
:max_bytes(150000):strip_icc():format(webp)/iPad-Mini-Splash-ef002ffe8db643d2a2b4de772ff46790.jpg)
New Create Realistic Fire Effects by Filmora for 2024
Create Realistic Fire Effects by Filmora
Do you know that many cinema films and big-budget companies use visual effects to create realistic fires? It saves them from potential danger in production and helps them manage the time required to create a project. In this article, you will get pro tips and easy ways to add Fire effects by Wondershare Filmora.
![]()
Note: let’s not count Michael Bay and Christopher Nolan productions because their movies have a higher budget, and creating fake fire is easy.
Part 1. What do you need to create fire effects?
Using simple tools such as Filmora and visual effects, you can create a realistic fire effect with an easy setup. For filming the effect, we will need
- A good camera
- A light source
- Video editing software - Wondershare Filmora
- Basic editing skills
However, the light source is key to the fire effects. It will be beneficial if you have a warmer color light or a light that can change its temperature. You can use tungsten light bulbs or small circular LEDs that are pretty famous with Vloggers and tick-tock users.
Part 2. How to make a realistic effect fire?
After getting prepared, it’s time to do the real things. Follow the steps below to create a realistic fire effect like a pro.
Step1 Record your footage
While recording the video, you can slightly shake your light source, which will give it the flickering effect of the flame. Here, you can do this in two ways.
Shaking the light manually
Just make sure when you are shaking the light, it is not shaken aggressively, or it will lose its realism to a real fire.

Shaking the light using a dimmer
You can also use some skills to create the flickering effect of the fire without literally shaking the LED light. Dimmers come to help. A dimmer is a device that enables you to change the temperature of the LED light. If you have a dimmer, your work will be more accessible.
A regulator on the dimmer will help you switch between low and high tones. It will flicker the light on the object like a flame and make it look like it was placed in front of a real fire.

Step2 Record the object
Our next step will be to record the object on which the effect is taking place. Ensure the camera is placed under a good light source so that the picture is not dim and the object is exposed. Make sure the camera is placed at the level of the eye so that it will help you record your video clearly and accurately.
Also, keep in mind to zoom out the camera lens, which will fix the frame of the video so that the object or the person is entirely on the screen. Another tip for creating a realistic fire effect would be the person acting as the object. The more natural the acting is, the more realistic would be the fire effect.
Step3 Edit the footage
We are being safe and saving time by not using actual fire. The goal of creating a fake fire would be the effect and reaction of the object or the actor.
1. Download a professional video editing software - Wondershare Filmora
Visit Wondershare Filmora official site if you haven’t already downloaded it.
![]()
Note: download the latest version of filmora. It will give you a pro version and help you to create more realistic fire effects.
2. Create a new project and import the recorded clips
Before adding the fire effects to your video, you must ensure that you are familiar with the editing software. Your first step would be to add your clips to the timeline. Drag the footage from the library and enter it into the timeline.

3. create the fire effect more realistic by adding smoke
The next step would be to add smoke to the fire. As it is only fair that the fire makes the smoke so. Adding the smoke will create the fire effect more realistic. Follow the below steps to get your cinematic video!
#Step1 Search for smoke effects
To add the smoke effect, click on the element’s icon on the bar above and search for smokescreen 2.
#Step2 Add a smoke effect
Once you have searched and found the smoke screen 2 effects, then import that effect onto your timeline so that you can begin editing.

Once you’ve added the fire effect, you will notice the change on the screen in the top right corner.
#Step3 Add duration
The next step would be to set the duration of the smokescreen effect so that it matches the length of the video. To do so,
- Click on the edge of the smoke screen effect.
- Drag it to the right if the effect appears smaller than the video clip.
- And drag it to the left if it is larger than the video clip.
- As soon as it matches the length of the video, leave the drag, and it will fit right into place.
#Step4 Make some changes to the smoke effect
Once you have matched the duration of the smoke screen effect to the video clip, our next step would be to make some changes. These changes will make the smokescreen appear more pleasing—double-click on the smokescreen effect, which will open the transform menu.
We would first focus on the transform panel. Here you would have many options, but our focus would be on rotation, scale, and position.
![]()
Note: make sure to rotate the smoke screen effect by simply sliding the slider or dragging the slider right or left to your desire.
- You would have created an angle of the smokescreen to make it more natural.
- Now, we would have to adjust the scale of the smokescreen effect.
- Drag the slider to the right to expand the smoke to spread on the screen. It will help the smoke screen do appear more natural.
- You can adjust how much the smoke screen is visible on the screen by decreasing the opacity.
Adjust the slider to the left so it blends in with the flickering of the light we created. Now playback the video from the big screen to get an idea of the effect you added. And here are our parameters for reference.

Cool, isn’t it? Now we have added smoke to our timeline. Combined with the flickering light effect, we are closer to our goal.
Step4 Add flames or sparks
To mimic a real fire, we also have one more element that is missing, And that will be the sparks and the flames. And if you want to bring the fire effect of your video to the pro level, we would have to use the film stock effects. Flames and sparks are also available in the Wondershare Filmora.
#Step1 Search for Fire Tab

- To do so, click on the bar above the element’s icon.
- Once you have opened the elements tab, look to your left window, where further options are available.
- From these options, click on the fire tab.
- A new window will pop up in the library panel.
#Step2 Add the flame to the timeline
Click on a large scale 14 and drag it into your timeline above the smoke effect and the clip. Doing so would have created two extra layers after the video tab.

#Step3 Adjust the flame effect
Now, we have to do steps similar to the ones above the first job. But first, you have to click on the edges of the effect. Then, match it to the length of your video.
Now, remember if the length of the effect is more than that of the video clip. You can adjust it by clicking on the edge and dragging it to the left. And if it appears to be smaller than the video clip, drag the edge to the right to match the length.
#Step4 Blend the video
When you look at the effect as you play the video from the start, you will notice that the effect is a little more intense than we want. To change it to your desires, you can follow the following steps.
- First of all, double-click and open the transform
- Experiment with the rotation and the scale and position; make your choice.
- Then move on to the compositing panel and focus on the blending mode.
- Here, you will notice a drop-down panel and select the screen option from all the other options.
- Doing so would help you blend the spark effect video much better.
If you focus on the spark effect that appears on the screen, you will notice that it seems to be much more intense than we require. If you want to blend it further, you can use the opacity adjuster and decrease the transparency. Then, adjust the slider till you feel it to be just right.
And the following are ideal parameters of our adjustment just for you to refer to.

Final results
Now can easily create a realistic-looking fire effect by Wondershare Filmora.

Best editing views
See how easy it was to create a fire effect without using real fire. A fire effect you can use:
- To make your car catch on fire.
- You are screaming at the top of your lungs in a yard where your garden is on fire.
- Act like your husband forgot to watch the stove on with the dish in the kitchen.
You can create all these scenarios by using camera tricks and lighting effects. And a few skills in video editing, easily! How cool is that?
If you are a beginner or a frequent user of Wondershare Filmora, following the steps explained above will help you quickly get the hang of how to add fire effects to your videos.
Also, if you have a YouTube channel or a content creator, adding these effects will add unique creativity to your videos and ultimately boost your approach.
Free Download For Win 7 or later(64-bit)
Free Download For macOS 10.14 or later
Part 1. What do you need to create fire effects?
Using simple tools such as Filmora and visual effects, you can create a realistic fire effect with an easy setup. For filming the effect, we will need
- A good camera
- A light source
- Video editing software - Wondershare Filmora
- Basic editing skills
However, the light source is key to the fire effects. It will be beneficial if you have a warmer color light or a light that can change its temperature. You can use tungsten light bulbs or small circular LEDs that are pretty famous with Vloggers and tick-tock users.
Part 2. How to make a realistic effect fire?
After getting prepared, it’s time to do the real things. Follow the steps below to create a realistic fire effect like a pro.
Step1 Record your footage
While recording the video, you can slightly shake your light source, which will give it the flickering effect of the flame. Here, you can do this in two ways.
Shaking the light manually
Just make sure when you are shaking the light, it is not shaken aggressively, or it will lose its realism to a real fire.
Shaking the light using a dimmer
You can also use some skills to create the flickering effect of the fire without literally shaking the LED light. Dimmers come to help. A dimmer is a device that enables you to change the temperature of the LED light. If you have a dimmer, your work will be more accessible.
A regulator on the dimmer will help you switch between low and high tones. It will flicker the light on the object like a flame and make it look like it was placed in front of a real fire.
Step2 Record the object
Our next step will be to record the object on which the effect is taking place. Ensure the camera is placed under a good light source so that the picture is not dim and the object is exposed. Make sure the camera is placed at the level of the eye so that it will help you record your video clearly and accurately.
Also, keep in mind to zoom out the camera lens, which will fix the frame of the video so that the object or the person is entirely on the screen. Another tip for creating a realistic fire effect would be the person acting as the object. The more natural the acting is, the more realistic would be the fire effect.
Step3 Edit the footage
We are being safe and saving time by not using actual fire. The goal of creating a fake fire would be the effect and reaction of the object or the actor.
1. Download a professional video editing software - Wondershare Filmora
Visit Wondershare Filmora official site if you haven’t already downloaded it.
![]()
Note: download the latest version of filmora. It will give you a pro version and help you to create more realistic fire effects.
2. Create a new project and import the recorded clips
Before adding the fire effects to your video, you must ensure that you are familiar with the editing software. Your first step would be to add your clips to the timeline. Drag the footage from the library and enter it into the timeline.
3. create the fire effect more realistic by adding smoke
The next step would be to add smoke to the fire. As it is only fair that the fire makes the smoke so. Adding the smoke will create the fire effect more realistic. Follow the below steps to get your cinematic video!
#Step1 Search for smoke effects
To add the smoke effect, click on the element’s icon on the bar above and search for smokescreen 2.
#Step2 Add a smoke effect
Once you have searched and found the smoke screen 2 effects, then import that effect onto your timeline so that you can begin editing.
Once you’ve added the fire effect, you will notice the change on the screen in the top right corner.
#Step3 Add duration
The next step would be to set the duration of the smokescreen effect so that it matches the length of the video. To do so,
- Click on the edge of the smoke screen effect.
- Drag it to the right if the effect appears smaller than the video clip.
- And drag it to the left if it is larger than the video clip.
- As soon as it matches the length of the video, leave the drag, and it will fit right into place.
#Step4 Make some changes to the smoke effect
Once you have matched the duration of the smoke screen effect to the video clip, our next step would be to make some changes. These changes will make the smokescreen appear more pleasing—double-click on the smokescreen effect, which will open the transform menu.
We would first focus on the transform panel. Here you would have many options, but our focus would be on rotation, scale, and position.
![]()
Note: make sure to rotate the smoke screen effect by simply sliding the slider or dragging the slider right or left to your desire.
- You would have created an angle of the smokescreen to make it more natural.
- Now, we would have to adjust the scale of the smokescreen effect.
- Drag the slider to the right to expand the smoke to spread on the screen. It will help the smoke screen do appear more natural.
- You can adjust how much the smoke screen is visible on the screen by decreasing the opacity.
Adjust the slider to the left so it blends in with the flickering of the light we created. Now playback the video from the big screen to get an idea of the effect you added. And here are our parameters for reference.
Cool, isn’t it? Now we have added smoke to our timeline. Combined with the flickering light effect, we are closer to our goal.
Step4 Add flames or sparks
To mimic a real fire, we also have one more element that is missing, And that will be the sparks and the flames. And if you want to bring the fire effect of your video to the pro level, we would have to use the film stock effects. Flames and sparks are also available in the Wondershare Filmora.
#Step1 Search for Fire Tab
- To do so, click on the bar above the element’s icon.
- Once you have opened the elements tab, look to your left window, where further options are available.
- From these options, click on the fire tab.
- A new window will pop up in the library panel.
#Step2 Add the flame to the timeline
Click on a large scale 14 and drag it into your timeline above the smoke effect and the clip. Doing so would have created two extra layers after the video tab.
#Step3 Adjust the flame effect
Now, we have to do steps similar to the ones above the first job. But first, you have to click on the edges of the effect. Then, match it to the length of your video.
Now, remember if the length of the effect is more than that of the video clip. You can adjust it by clicking on the edge and dragging it to the left. And if it appears to be smaller than the video clip, drag the edge to the right to match the length.
#Step4 Blend the video
When you look at the effect as you play the video from the start, you will notice that the effect is a little more intense than we want. To change it to your desires, you can follow the following steps.
- First of all, double-click and open the transform
- Experiment with the rotation and the scale and position; make your choice.
- Then move on to the compositing panel and focus on the blending mode.
- Here, you will notice a drop-down panel and select the screen option from all the other options.
- Doing so would help you blend the spark effect video much better.
If you focus on the spark effect that appears on the screen, you will notice that it seems to be much more intense than we require. If you want to blend it further, you can use the opacity adjuster and decrease the transparency. Then, adjust the slider till you feel it to be just right.
And the following are ideal parameters of our adjustment just for you to refer to.
Final results
Now can easily create a realistic-looking fire effect by Wondershare Filmora.
Best editing views
See how easy it was to create a fire effect without using real fire. A fire effect you can use:
- To make your car catch on fire.
- You are screaming at the top of your lungs in a yard where your garden is on fire.
- Act like your husband forgot to watch the stove on with the dish in the kitchen.
You can create all these scenarios by using camera tricks and lighting effects. And a few skills in video editing, easily! How cool is that?
If you are a beginner or a frequent user of Wondershare Filmora, following the steps explained above will help you quickly get the hang of how to add fire effects to your videos.
Also, if you have a YouTube channel or a content creator, adding these effects will add unique creativity to your videos and ultimately boost your approach.
Free Download For Win 7 or later(64-bit)
Free Download For macOS 10.14 or later
Best 15 Subtitle Apps
Every content creator wants professional subtitle generator apps to create subtitles flawlessly. There are tons of subtitle editors that you can find in the market, but not every tool produces quality results. It can be confusing and difficult to choose the best subtitle editor app among tons of options. By reading this article, you will come to know about professional subtitle apps for PC and all platforms.
- Jubler Subtitle Editor - The Best Free Subtitle Editor for Windows
- Wondershare Filmora - All-in-One Subtitle Solution
- Movavi Video Editor - Best for Adding Subtitles Manually
- VideoProc - Best Video Converter for macOS Devices
- Wondershare UniConverter - Complete Video Toolbox for Mac Users
- Adobe Premiere Pro - Video Editor for Professionals
- CapCut - Best App for TikTok Users
- MixCaptions - Specially Built for Adding Captions
- VLLO - Advanced Video and Subtitle Editor for Android Users
- iMovie - Free Video Editor for iOS Users
- Add Subtitles - Auto Captions - Enhanced Subtitle Creator for Apple Users
- InShot - Video Editor - Complete Subtitle and Video Editor
- Veed.io - Online Auto Subtitle Generator
- Happy Scribe - Subtitle Generator with Enhanced Features
- FlexClip - Manual Online Subtitle Editor
Part 1: Best 3 Subtitle Apps on Windows
Do you want to know about some reliable video subtitle apps for Windows? This section will shed light on the top 3 subtitle apps on Windows, along with their advantages and drawbacks.
| Name | Price | Support System | Supported Subtitle Files | Auto Caption | Video Editing |
|---|---|---|---|---|---|
| Jubler Subtitle Editor | Free | Linux, Windows, and Mac | ASS, SRT, SUB, Text, etc. | No | No |
| Wondershare Filmora | Month Plan: $19.99Annual Plan: $49.99Perpetual Plan: $79.99 | Windows, Mac, and iOS | SRT and Text | Yes | Yes |
| Movavi Video Editor | $69.95 | Windows and Mac | Text | No | Yes |
1. Jubler Subtitle Editor - The Best Free Subtitle Editor for Windows
Jubler is a classic example of a subtitle editor through which you can efficiently create and edit subtitles for your videos. You can also use this tool to convert, modify, transform, or correct the existing subtitles on a video file. The supported file formats are SubViewer, SubRip, SubStation, etc. Hence, it’s a compatible subtitle app for Windows users comprising all the necessary features for subtitle creation and editing.

Key Features
- This tool allows you to mark your subtitles with different colors while editing or playing the video file in real-time.
- This app can graphically display your subtitles and allows you to resize or move them.
- It provides the Undo and the Redo options to edit your subtitles without any complications.
Pros
- This tool offers a feature for spell-checking along with dictionary selection to prevent the chances of mistakes.
- You can check the current frame and waveform preview to graphically preview the subtitles using the FFMPEG library.
Cons
- You have to install a video player with this tool to preview your video to check the results.
2. Wondershare Filmora - All-in-One Subtitle Solution
Have you ever experienced using Wondershare Filmora? Filmora is a famous tool through which people can enhance and edit their video files using advanced features. You can utilize this platform with a famous video editor to create subtitles from scratch efficiently. It contains a Speech-to-Text option that can help you to generate subtitles without requiring your efforts. With a single click, this feature can automatically create subtitles by transcribing your voice with high accuracy.

Key Features
- Filmora offers more than 80 animation presets and styles that you can instantly apply to your created subtitles.
- The speech-to-text feature shows compatibility with up to 16 different languages. Thus, you can auto-create subtitles in popular languages.
- This tool contains stock footage in its library that you can easily add to your videos.
Pros
- This platform offers an AI Portrait feature that can remove the background from your videos. Moreover, it contains more than 70 AI portrait effects and stickers for further enhancement.
- This tool can act as a high-quality screen recorder to capture gameplays, online meetings, tutorials, and other screen activities.
Cons
- Filmora adds a watermark to your video in the free trial.
3. Movavi Video Editor - Best for Adding Subtitles Manually
Movavi is a popular tool that many professionals use to create and edit their videos in high quality. It contains various transition effects that you can apply to make your video look smooth and attractive. By using this tool, you can also create Softsubs and Hardsubs according to your desire. Afterward, you can select the font, color, and size of your added subtitles using this platform.

Key Features
- It contains a synchronization box that enables you to delay or advance the subtitles according to the specific time. This will make your subtitles synchronized effectively.
- You can also change the position of your subtitles with accuracy and precision using this tool.
- To make your video look customized, you can add a watermark to your video files according to your desire.
Pros
- If your video contains unnecessary noise, Movavi offers an AI Noise removal feature that allows you to eradicate the noise.
- If you have captured a shaky video, you can use its stabilization option to get rid of flaws.
Cons
- The video rendering process in this tool is slow and sluggish.
Part 2: 3 Subtitle Apps for Mac Worth Trying
Are you looking for special subtitle apps for your MacBook? In this section, we will shed light on the top 3 subtitle generator apps that can be ideal for MacBook users.
| Name | Price | Support System | Supported Subtitle Files | Auto Caption | Video Editing |
|---|---|---|---|---|---|
| VideoProc Converter | Lifetime License: $39.95 | Windows and Mac | ASS, SSA, SRT, Text | No | No |
| Wondershare UniConverter | Quarterly Plan: $29.99Annual Plan: $39.99Perpetual Plan: $55.99 | Windows and Mac | SRT. ASS, SSA, Text | Yes | Yes |
| Adobe Premier Pro | $20.99/Month | Windows and Mac | SCC, MCC, XML, STL, SRTDFXMP, Text | Yes | Yes |
1. VideoProc - Best Video Converter for macOS Devices
This app has a simple interface that enables you to manage subtitle files easily. Through this compatible tool, you can embed your subtitles into your videos without any hassle. It’s a lightweight tool as it won’t take up excessive storage space on your MacBook. Moreover, you can also use this tool to tackle video issues like noise, poor color, camera shake, etc.

Key Features
- This software can convert 4K and HD videos while maintaining their original quality.
- It offers batch conversion so that you can convert multiple video files at the same time easily.
- You can batch-download the video files in various formats and preferred resolutions. It also supports more than 1000 websites for media download.
Pros
- It offers two recording modes: Chroma key and Picture-in-picture. By utilizing these modes, you can capture live stream sessions and gameplays in high resolution.
- Using this tool instantly, you can rotate and flip your videos clockwise or counter-clockwise.
Cons
- The free trial of this tool is limited to 5 minutes video only.
2. Wondershare UniConverter - Complete Video Toolbox for Mac Users
UniConverter is one of the well-trusted platforms through which you can modify your videos by using advanced key features. It contains tons of options, such as a watermark editor, screen recorder, compressor, converter, etc. Furthermore, it provides a subtitle editor through which you can add subtitles to your videos in multiple ways. Thus, using this tool, you can add subtitles to your videos at a fast-processing speed.

Key Features
- This tool supports more than 1000 video file formats batch conversion. Thus, you can convert your multiple video files to other formats.
- You can use this tool as a downloader to download online videos of high quality.
- It contains an Auto Crop feature through which you can resize your videos according to social media channels.
Pros
- By using its AI Portrait feature, you can automatically separate the portrait and background from your video.
- To eradicate the unwanted parts from your video, you can use the trim feature of UniConverter effectively.
Cons
- It lacks advanced video editing features that are necessary for professional editing.
3. Adobe Premiere Pro - Video Editor for Professionals
Have you ever used Adobe Premiere Pro for video editing? Adobe Premiere Pro is undoubtedly the most famous software for MacBook users through which you can execute professional editing. It functions as a complete video toolbox and ensures great output results. Besides being a professional video editing software, you can also use this tool as a subtitle generator app. You can use its Speech-to-Text feature to produce subtitles automatically and with precision.

Key Features
- To increase the visual appeal of your video, you can use this tool for color grading and correction.
- You can create captivating intros and outros for your videos by using graphic templates and other elements.
- You can add different audio effects to transform the sound in your video professionally.
Pros
- Using this tool, you can convert your video to GIF within seconds.
- You can enhance or decrease the speed of your video accordingly from this professional tool.
Cons
- The interface of Adobe Premiere Pro can be intimidating for beginners.
Part 3: The Best 3 Subtitle Apps for Android
Being an Android user, you may feel to use auto caption apps to create subtitles for your videos without any hassle. By reading this section, you can come across some of the best subtitle generator apps for your Android devices.
1. CapCut - Best App for TikTok Users
CapCut is an easy-to-use Android and iOS app to add subtitles to videos professionally. It comprises different functions that can assist you in making your video look appealing and engaging. You can make adjustments such as changing the brightness, saturation, exposure, contrast, etc. To add subtitles, you can create auto captions through CapCut without manually adding them. Thus, it’s a complete tool for creating subtitles and editing videos effortlessly.

Price
- $0.99 - $74.99 Per Item
Key Features
- CapCut contains various trending text templates that you can apply while creating subtitles. It contains multiple text templates such as Titles, Outro, Spark, Chapter, Message, Tag, etc.
- You can extract audio from a video file using this app in its original quality with a single click.
- To enhance your visual appearance in a video, CapCut provides different filters such as Metal, Green Milk, Taro, Red Tea, and many more.
Pros
- You can retouch the facial features of your face by using different options such as White Teeth, Dark Circles, Smile Lines, etc.
- For more enhancements, you can modify the opacity of your video using this app.
Cons
- It does not offer impressive color grading options.
2. MixCaptions - Specially Built for Adding Captions
MixCaptions can be used as a video editor and subtitle editor app effectively. Apart from creating subtitles manually, you can utilize your SRT files to create subtitles. You can also use this app to create SRT files instantly. Moreover, you can also decide where to display your subtitles on your video. You can display your subtitles at the top, bottom, or middle using this tool.

Price
- $0.49 - $24.99 Per Item
Key Features
- Using MixCaptions, you can transcribe your voice in up to 23 languages, such as Turkish, English, French, German, Spanish, Chinese, etc.
- This tool supports common video aspect ratios that can be suitable for IGTV, TikTok, Twitter, Facebook, and Instagram posts.
- Once you have transcribed your voice to create subtitles, you can edit them by selecting the desired font, color, text style, etc.
Pros
- This tool does not add a watermark to your video files after you have bought its subscription plan.
- Using this tool, you can manually add subtitles to your videos according to the time frame.
Cons
- In a free trial, you can only transcribe the video for up to 3 minutes.
3. VLLO - Advanced Video and Subtitle Editor for Android Users
Have you ever used VLLO before? This video subtitle app offers an intuitive user interface through which you can perform different operations on your video files. You can trim, split, reverse, rotate, and crop your video quickly using this app. Moreover, you can add subtitles to your videos through this tool easily. The offered subtitle text styles are present in vector format so that you won’t lose the quality of your video.

Price
- $0.99 - $25.99 Per Item
Key Features
- VLLO provides more than 200 royalty-free background music tracks that can easily be added to your video files.
- You can also add a voice-over to your videos in high audio quality while editing in real-time.
- On this platform, you can craft your own customized text style by utilizing animation effects, shadows, and outline properties.
Pros
- To check the editing of your video, this tool provides a full-screen preview window. It also offers a grid so that you can analyze the ratio of your video easily.
- You can save all the edited videos in this app under the “My Project” folder.
Cons
- Many stickers, filters, text styles, and effects are only available for premium users.
Part 4: 3 Apps to Add Captions to Videos on iPhone
Are you ready to know about the best subtitle creators for iOS devices? Here are some of the top subtitle generators which you can use to add captions to videos on your iPhone.
1. iMovie - Free Video Editor for iOS Users
iMovie is an excellent app for iOS users through which they can try their creative editing skills easily. You can apply different styles and transitions to change the dimensions of your video clips completely. Moreover, you can also add text and subtitles to your videos using this tool. It offers various font styles and options that you can apply to create customized subtitles.

Price
- Free
Download: iOS
Key Features
- It offers 20 storyboards related to different categories that you can use to begin creating your videos effectively.
- In its timeline, you can easily rearrange and remove video clips.
- This tool offers up to 14 trailer templates through which you can produce your movie trailers.
Pros
- iMovie contains 8 distinct themes with added transitions, music tracks, and titles. You can apply these themes to create impressive videos effortlessly.
- You can share your projects created in iMovie between your iPhone and iPad using iCloud Drive.
Cons
- This tool does not include Multicam and motion tracking options.
2. Add Subtitles - Auto Captions - Enhanced Subtitle Creator for Apple Users
This video subtitle app is commonly used to add auto-captions on videos without any restrictions. The speech recognition feature in this tool works 3 times faster along with high precision. It does not restrict a user to a particular video length. Moreover, you would also receive text alternatives so that you can edit auto-generated subtitles.

Price
- Beginner: $3.99
- Expert: $9.99
- Business: $29.99
- Personal Use: $8.49
- Small Translations Pack: $2.99
- Big Translations Pack: $5.99
Download: iOS
Key Features
- The translation feature of this tool supports more than 100 languages. Moreover, you can translate up to 2 languages in one video file.
- It provides various export options such as M4V, MPEG4, 4K, HD, and QuickTime.
- You can create projects on this tool through your camera, photo library, and iCloud.
Pros
- You can filter videos to search for your project without any hassle.
- Using this tool, you can change the file name and thumbnail with a single tap.
Cons
- On this platform, you cannot edit or modify your video files.
3. InShot - Video Editor - Complete Subtitle and Video Editor
Have you ever used InShot before? InShot is a famous app that enables you to trim, cut, and merge video files instantly. Along with basic editing, you can also add music tracks, voice-overs, and effects. You can also add subtitles to your videos efficiently without any restrictions. Moreover, you can sync the added text to your videos on the timeline proficiently with a few clicks.

Price
- InShot Pro (1 Month): $3.99
- InShot Pro (1 Year): $14.99
- Remove Ads: $3.99
- InShot Pro (Permanently): $34.99
- Transition Pack - Power: $3.99
- Video Effect - FORM Pack: $1.99
- Filter Pack - CINEMA: $1.99
- Transition Pack - Glitch: $3.99
- Filter Pack - SKIN: $1.99
- Filter Pack - CREATE: $1.99
Key Features
- You can make blur borders on your video using this tool to upload them on social media platforms.
- This video subtitle app supports high video output resolution and allows you to save a video in 4K and 60FPS.
- This tool provides a wide variety of cinematic filters which you can add to make your videos more compelling.
Pros
- You can add music tracks to your video files to make your content more engaging.
- On this tool, you can add video and photo layers to display your creativity in a unique manner.
Cons
- This tool does not offer advanced features to create subtitles for video files automatically.
Part 5: 3 Online Tools to Add Subtitles to Videos
Many people don’t prefer to download apps or software on their devices. For such users, there are various online subtitle generator apps that can be accessed from any web browser. For your convenience, this part of the article will discuss the top 3 online auto caption apps.
1. Veed.io - Online Auto Subtitle Generator
When it comes to online subtitle generator apps, Veed.io is one of the most suitable choices. Through this app, you can add subtitles in three ways. To add subtitles briefly, you can use the manual option on this tool. Or, if you already have a subtitle file, you can upload it directly to this tool easily. To increase your work efficiency and productivity, you can use the auto transcription services to produce subtitles with 95% accuracy.

Pricing
- Basic: $12/Month
- Pro: $24/Month
Key Features
- To decrease the file size of your videos, this tool contains a video compressor to compress videos while preserving the original video quality.
- If you want to make your videos interesting and funny, Veed.io allows you to add emojis and stickers to video files instantly.
- It has a Subtitle Translator through which you can translate your subtitles into different languages.
Pros
- This tool can act as a video player that allows you to play videos of various file formats.
- io can function as a multi-streaming platform through which you can broadcast your live streams to multiple platforms like Twitter, YouTube, Facebook, etc.
Cons
- The video export length of the Veed.io free package is extremely low, which is 10 minutes.
2. Happy Scribe - Subtitle Generator with Enhanced Features
Happy Scribe is a famous online platform for adding subtitles to video apps impressively. It contains multiple export formats such as SRT, Word, PDF, Text, AVID, STL, VVT, etc. Without any limitations, such as creating a user account or uploading a particular file size, you can create subtitles for your videos. Furthermore, this app preserves the confidentiality and security of your files to keep personal data safe while editing it online.

Pricing
- Automatic: €0.20/minute
- Hand-made: €2.00/Minute
- Human Translation: €20.85/Minute
Key Features
- This app supports real-time collaboration so that you can modify and enhance your video files along with your friends and team members.
- In its transcription services, you can select either automatic transcription software or human-made transcription for more accurate results.
- You can customize your added subtitles with the help of CPL and CPS management.
Pros
- You can preview your subtitles in real-time and analyze their position with a soundwave.
- You can also share your subtitles by enabling the options like view-only and edit mode.
Cons
- Happy Scribe does not offer video editing features like other subtitle creators.
3. FlexClip - Manual Online Subtitle Editor
FlexClip is a classic and basic subtitle generator app through which you can produce subtitles in three simple steps. It supports popular video file formats such as MOV, MP4, M4V, etc. Without downloading any software or extension, you can quickly insert subtitles to your videos easily. This tool also provides more than 100 built-in text fonts for your ease. Hence, this online tool provides flexible subtitle editing in its clean and delightful user interface.

Pricing
- Basic: $9.99/Month
- Plus: $19.99/Month
- Business: $29.99/Month
Key Features
- To make your video look more appealing, you can enhance the video brightness through this online tool.
- You can also add text boxes to your videos to demonstrate or explain the content in an organized manner.
- To endorse your product or brand, you can easily add customized logos to your videos.
Pros
- You can use its merger feature to combine several video clips smoothly and effortlessly.
- This online tool does not charge any subscription fees from the users. Thus, you can create subtitles for your videos using this online platform free of cost.
Cons
- Using this tool, you cannot export videos in 4K and 8K.
Part 6: Three Top Picks
Do you want to know the top three picks of subtitle editors? Read this section to learn the best choices for video subtitle apps:
1. Best Easy-to-Use Subtitle Editor: Veed.io
Veed.io is an online tool that has the best clean and delightful user interface. As a beginner, you can easily navigate its interface and create subtitles without interruption or ads.
2. Most Advanced Subtitle Creator: Filmora
If you are looking for an advanced subtitle creator, Wondershare Filmora is the best choice. Its Speech-To-Text feature uses advanced algorithms through which you can auto-create subtitles for your videos.
Free Download For Win 7 or later(64-bit)
Free Download For macOS 10.14 or later
3. Most Cost-Effective Subtitle Generator: UniConverter
UniConverter is one of the most reliable and cost-effective software for subtitle editing. It provides multiple subscription plans within affordable ranges to assist students, beginners, and other individuals.
People May Also Ask
1. How can I merge subtitles and video permanently?
You can use Wondershare Filmora to edit your video files flawlessly. Once you are done editing your video, you can add subtitles to it by using your preferred option. Afterward, the tool will automatically merge subtitles and video once you have exported the video file.
2. How do I add subtitles to an already recorded or downloaded video?
Upload your video file to the interface of Filmora and head to its “Title” option. From there, select the option of “Subtitle” and choose your preferred subtitle style to add your subtitles. Using this tool, you can also choose its font style, color, size, and opacity.
Last Words
This article has shed light on the top 15 subtitle generator apps along with their descriptions, advantages, features, and drawbacks. For your help, we have provided a detailed list of subtitle apps for all platforms. However, if you want to choose the best video subtitle app, you can try Wondershare Filmora. This tool offers a Speech-to-Text feature that enables you to produce subtitles automatically and with high accuracy.
- VideoProc - Best Video Converter for macOS Devices
- Wondershare UniConverter - Complete Video Toolbox for Mac Users
- Adobe Premiere Pro - Video Editor for Professionals
- The Best 3 Subtitle Apps for Android
- CapCut - Best App for TikTok Users
- MixCaptions - Specially Built for Adding Captions
- VLLO - Advanced Video and Subtitle Editor for Android Users
- iMovie - Free Video Editor for iOS Users
- Add Subtitles - Auto Captions - Enhanced Subtitle Creator for Apple Users
- InShot - Video Editor - Complete Subtitle and Video Editor
- Veed.io - Online Auto Subtitle Generator
- Happy Scribe - Subtitle Generator with Enhanced Features
- FlexClip - Manual Online Subtitle Editor
Part 1: Best 3 Subtitle Apps on Windows
Do you want to know about some reliable video subtitle apps for Windows? This section will shed light on the top 3 subtitle apps on Windows, along with their advantages and drawbacks.
| Name | Price | Support System | Supported Subtitle Files | Auto Caption | Video Editing |
|---|---|---|---|---|---|
| Jubler Subtitle Editor | Free | Linux, Windows, and Mac | ASS, SRT, SUB, Text, etc. | No | No |
| Wondershare Filmora | Month Plan: $19.99Annual Plan: $49.99Perpetual Plan: $79.99 | Windows, Mac, and iOS | SRT and Text | Yes | Yes |
| Movavi Video Editor | $69.95 | Windows and Mac | Text | No | Yes |
1. Jubler Subtitle Editor - The Best Free Subtitle Editor for Windows
Jubler is a classic example of a subtitle editor through which you can efficiently create and edit subtitles for your videos. You can also use this tool to convert, modify, transform, or correct the existing subtitles on a video file. The supported file formats are SubViewer, SubRip, SubStation, etc. Hence, it’s a compatible subtitle app for Windows users comprising all the necessary features for subtitle creation and editing.
Key Features
- This tool allows you to mark your subtitles with different colors while editing or playing the video file in real-time.
- This app can graphically display your subtitles and allows you to resize or move them.
- It provides the Undo and the Redo options to edit your subtitles without any complications.
Pros
- This tool offers a feature for spell-checking along with dictionary selection to prevent the chances of mistakes.
- You can check the current frame and waveform preview to graphically preview the subtitles using the FFMPEG library.
Cons
- You have to install a video player with this tool to preview your video to check the results.
2. Wondershare Filmora - All-in-One Subtitle Solution
Have you ever experienced using Wondershare Filmora? Filmora is a famous tool through which people can enhance and edit their video files using advanced features. You can utilize this platform with a famous video editor to create subtitles from scratch efficiently. It contains a Speech-to-Text option that can help you to generate subtitles without requiring your efforts. With a single click, this feature can automatically create subtitles by transcribing your voice with high accuracy.
Key Features
- Filmora offers more than 80 animation presets and styles that you can instantly apply to your created subtitles.
- The speech-to-text feature shows compatibility with up to 16 different languages. Thus, you can auto-create subtitles in popular languages.
- This tool contains stock footage in its library that you can easily add to your videos.
Pros
- This platform offers an AI Portrait feature that can remove the background from your videos. Moreover, it contains more than 70 AI portrait effects and stickers for further enhancement.
- This tool can act as a high-quality screen recorder to capture gameplays, online meetings, tutorials, and other screen activities.
Cons
- Filmora adds a watermark to your video in the free trial.
3. Movavi Video Editor - Best for Adding Subtitles Manually
Movavi is a popular tool that many professionals use to create and edit their videos in high quality. It contains various transition effects that you can apply to make your video look smooth and attractive. By using this tool, you can also create Softsubs and Hardsubs according to your desire. Afterward, you can select the font, color, and size of your added subtitles using this platform.
Key Features
- It contains a synchronization box that enables you to delay or advance the subtitles according to the specific time. This will make your subtitles synchronized effectively.
- You can also change the position of your subtitles with accuracy and precision using this tool.
- To make your video look customized, you can add a watermark to your video files according to your desire.
Pros
- If your video contains unnecessary noise, Movavi offers an AI Noise removal feature that allows you to eradicate the noise.
- If you have captured a shaky video, you can use its stabilization option to get rid of flaws.
Cons
- The video rendering process in this tool is slow and sluggish.
Part 2: 3 Subtitle Apps for Mac Worth Trying
Are you looking for special subtitle apps for your MacBook? In this section, we will shed light on the top 3 subtitle generator apps that can be ideal for MacBook users.
| Name | Price | Support System | Supported Subtitle Files | Auto Caption | Video Editing |
|---|---|---|---|---|---|
| VideoProc Converter | Lifetime License: $39.95 | Windows and Mac | ASS, SSA, SRT, Text | No | No |
| Wondershare UniConverter | Quarterly Plan: $29.99Annual Plan: $39.99Perpetual Plan: $55.99 | Windows and Mac | SRT. ASS, SSA, Text | Yes | Yes |
| Adobe Premier Pro | $20.99/Month | Windows and Mac | SCC, MCC, XML, STL, SRTDFXMP, Text | Yes | Yes |
1. VideoProc - Best Video Converter for macOS Devices
This app has a simple interface that enables you to manage subtitle files easily. Through this compatible tool, you can embed your subtitles into your videos without any hassle. It’s a lightweight tool as it won’t take up excessive storage space on your MacBook. Moreover, you can also use this tool to tackle video issues like noise, poor color, camera shake, etc.
Key Features
- This software can convert 4K and HD videos while maintaining their original quality.
- It offers batch conversion so that you can convert multiple video files at the same time easily.
- You can batch-download the video files in various formats and preferred resolutions. It also supports more than 1000 websites for media download.
Pros
- It offers two recording modes: Chroma key and Picture-in-picture. By utilizing these modes, you can capture live stream sessions and gameplays in high resolution.
- Using this tool instantly, you can rotate and flip your videos clockwise or counter-clockwise.
Cons
- The free trial of this tool is limited to 5 minutes video only.
2. Wondershare UniConverter - Complete Video Toolbox for Mac Users
UniConverter is one of the well-trusted platforms through which you can modify your videos by using advanced key features. It contains tons of options, such as a watermark editor, screen recorder, compressor, converter, etc. Furthermore, it provides a subtitle editor through which you can add subtitles to your videos in multiple ways. Thus, using this tool, you can add subtitles to your videos at a fast-processing speed.
Key Features
- This tool supports more than 1000 video file formats batch conversion. Thus, you can convert your multiple video files to other formats.
- You can use this tool as a downloader to download online videos of high quality.
- It contains an Auto Crop feature through which you can resize your videos according to social media channels.
Pros
- By using its AI Portrait feature, you can automatically separate the portrait and background from your video.
- To eradicate the unwanted parts from your video, you can use the trim feature of UniConverter effectively.
Cons
- It lacks advanced video editing features that are necessary for professional editing.
3. Adobe Premiere Pro - Video Editor for Professionals
Have you ever used Adobe Premiere Pro for video editing? Adobe Premiere Pro is undoubtedly the most famous software for MacBook users through which you can execute professional editing. It functions as a complete video toolbox and ensures great output results. Besides being a professional video editing software, you can also use this tool as a subtitle generator app. You can use its Speech-to-Text feature to produce subtitles automatically and with precision.
Key Features
- To increase the visual appeal of your video, you can use this tool for color grading and correction.
- You can create captivating intros and outros for your videos by using graphic templates and other elements.
- You can add different audio effects to transform the sound in your video professionally.
Pros
- Using this tool, you can convert your video to GIF within seconds.
- You can enhance or decrease the speed of your video accordingly from this professional tool.
Cons
- The interface of Adobe Premiere Pro can be intimidating for beginners.
Part 3: The Best 3 Subtitle Apps for Android
Being an Android user, you may feel to use auto caption apps to create subtitles for your videos without any hassle. By reading this section, you can come across some of the best subtitle generator apps for your Android devices.
1. CapCut - Best App for TikTok Users
CapCut is an easy-to-use Android and iOS app to add subtitles to videos professionally. It comprises different functions that can assist you in making your video look appealing and engaging. You can make adjustments such as changing the brightness, saturation, exposure, contrast, etc. To add subtitles, you can create auto captions through CapCut without manually adding them. Thus, it’s a complete tool for creating subtitles and editing videos effortlessly.
Price
- $0.99 - $74.99 Per Item
Key Features
- CapCut contains various trending text templates that you can apply while creating subtitles. It contains multiple text templates such as Titles, Outro, Spark, Chapter, Message, Tag, etc.
- You can extract audio from a video file using this app in its original quality with a single click.
- To enhance your visual appearance in a video, CapCut provides different filters such as Metal, Green Milk, Taro, Red Tea, and many more.
Pros
- You can retouch the facial features of your face by using different options such as White Teeth, Dark Circles, Smile Lines, etc.
- For more enhancements, you can modify the opacity of your video using this app.
Cons
- It does not offer impressive color grading options.
2. MixCaptions - Specially Built for Adding Captions
MixCaptions can be used as a video editor and subtitle editor app effectively. Apart from creating subtitles manually, you can utilize your SRT files to create subtitles. You can also use this app to create SRT files instantly. Moreover, you can also decide where to display your subtitles on your video. You can display your subtitles at the top, bottom, or middle using this tool.
Price
- $0.49 - $24.99 Per Item
Key Features
- Using MixCaptions, you can transcribe your voice in up to 23 languages, such as Turkish, English, French, German, Spanish, Chinese, etc.
- This tool supports common video aspect ratios that can be suitable for IGTV, TikTok, Twitter, Facebook, and Instagram posts.
- Once you have transcribed your voice to create subtitles, you can edit them by selecting the desired font, color, text style, etc.
Pros
- This tool does not add a watermark to your video files after you have bought its subscription plan.
- Using this tool, you can manually add subtitles to your videos according to the time frame.
Cons
- In a free trial, you can only transcribe the video for up to 3 minutes.
3. VLLO - Advanced Video and Subtitle Editor for Android Users
Have you ever used VLLO before? This video subtitle app offers an intuitive user interface through which you can perform different operations on your video files. You can trim, split, reverse, rotate, and crop your video quickly using this app. Moreover, you can add subtitles to your videos through this tool easily. The offered subtitle text styles are present in vector format so that you won’t lose the quality of your video.
Price
- $0.99 - $25.99 Per Item
Key Features
- VLLO provides more than 200 royalty-free background music tracks that can easily be added to your video files.
- You can also add a voice-over to your videos in high audio quality while editing in real-time.
- On this platform, you can craft your own customized text style by utilizing animation effects, shadows, and outline properties.
Pros
- To check the editing of your video, this tool provides a full-screen preview window. It also offers a grid so that you can analyze the ratio of your video easily.
- You can save all the edited videos in this app under the “My Project” folder.
Cons
- Many stickers, filters, text styles, and effects are only available for premium users.
Part 4: 3 Apps to Add Captions to Videos on iPhone
Are you ready to know about the best subtitle creators for iOS devices? Here are some of the top subtitle generators which you can use to add captions to videos on your iPhone.
1. iMovie - Free Video Editor for iOS Users
iMovie is an excellent app for iOS users through which they can try their creative editing skills easily. You can apply different styles and transitions to change the dimensions of your video clips completely. Moreover, you can also add text and subtitles to your videos using this tool. It offers various font styles and options that you can apply to create customized subtitles.
Price
- Free
Download: iOS
Key Features
- It offers 20 storyboards related to different categories that you can use to begin creating your videos effectively.
- In its timeline, you can easily rearrange and remove video clips.
- This tool offers up to 14 trailer templates through which you can produce your movie trailers.
Pros
- iMovie contains 8 distinct themes with added transitions, music tracks, and titles. You can apply these themes to create impressive videos effortlessly.
- You can share your projects created in iMovie between your iPhone and iPad using iCloud Drive.
Cons
- This tool does not include Multicam and motion tracking options.
2. Add Subtitles - Auto Captions - Enhanced Subtitle Creator for Apple Users
This video subtitle app is commonly used to add auto-captions on videos without any restrictions. The speech recognition feature in this tool works 3 times faster along with high precision. It does not restrict a user to a particular video length. Moreover, you would also receive text alternatives so that you can edit auto-generated subtitles.
Price
- Beginner: $3.99
- Expert: $9.99
- Business: $29.99
- Personal Use: $8.49
- Small Translations Pack: $2.99
- Big Translations Pack: $5.99
Download: iOS
Key Features
- The translation feature of this tool supports more than 100 languages. Moreover, you can translate up to 2 languages in one video file.
- It provides various export options such as M4V, MPEG4, 4K, HD, and QuickTime.
- You can create projects on this tool through your camera, photo library, and iCloud.
Pros
- You can filter videos to search for your project without any hassle.
- Using this tool, you can change the file name and thumbnail with a single tap.
Cons
- On this platform, you cannot edit or modify your video files.
3. InShot - Video Editor - Complete Subtitle and Video Editor
Have you ever used InShot before? InShot is a famous app that enables you to trim, cut, and merge video files instantly. Along with basic editing, you can also add music tracks, voice-overs, and effects. You can also add subtitles to your videos efficiently without any restrictions. Moreover, you can sync the added text to your videos on the timeline proficiently with a few clicks.
Price
- InShot Pro (1 Month): $3.99
- InShot Pro (1 Year): $14.99
- Remove Ads: $3.99
- InShot Pro (Permanently): $34.99
- Transition Pack - Power: $3.99
- Video Effect - FORM Pack: $1.99
- Filter Pack - CINEMA: $1.99
- Transition Pack - Glitch: $3.99
- Filter Pack - SKIN: $1.99
- Filter Pack - CREATE: $1.99
Key Features
- You can make blur borders on your video using this tool to upload them on social media platforms.
- This video subtitle app supports high video output resolution and allows you to save a video in 4K and 60FPS.
- This tool provides a wide variety of cinematic filters which you can add to make your videos more compelling.
Pros
- You can add music tracks to your video files to make your content more engaging.
- On this tool, you can add video and photo layers to display your creativity in a unique manner.
Cons
- This tool does not offer advanced features to create subtitles for video files automatically.
Part 5: 3 Online Tools to Add Subtitles to Videos
Many people don’t prefer to download apps or software on their devices. For such users, there are various online subtitle generator apps that can be accessed from any web browser. For your convenience, this part of the article will discuss the top 3 online auto caption apps.
1. Veed.io - Online Auto Subtitle Generator
When it comes to online subtitle generator apps, Veed.io is one of the most suitable choices. Through this app, you can add subtitles in three ways. To add subtitles briefly, you can use the manual option on this tool. Or, if you already have a subtitle file, you can upload it directly to this tool easily. To increase your work efficiency and productivity, you can use the auto transcription services to produce subtitles with 95% accuracy.
Pricing
- Basic: $12/Month
- Pro: $24/Month
Key Features
- To decrease the file size of your videos, this tool contains a video compressor to compress videos while preserving the original video quality.
- If you want to make your videos interesting and funny, Veed.io allows you to add emojis and stickers to video files instantly.
- It has a Subtitle Translator through which you can translate your subtitles into different languages.
Pros
- This tool can act as a video player that allows you to play videos of various file formats.
- io can function as a multi-streaming platform through which you can broadcast your live streams to multiple platforms like Twitter, YouTube, Facebook, etc.
Cons
- The video export length of the Veed.io free package is extremely low, which is 10 minutes.
2. Happy Scribe - Subtitle Generator with Enhanced Features
Happy Scribe is a famous online platform for adding subtitles to video apps impressively. It contains multiple export formats such as SRT, Word, PDF, Text, AVID, STL, VVT, etc. Without any limitations, such as creating a user account or uploading a particular file size, you can create subtitles for your videos. Furthermore, this app preserves the confidentiality and security of your files to keep personal data safe while editing it online.
Pricing
- Automatic: €0.20/minute
- Hand-made: €2.00/Minute
- Human Translation: €20.85/Minute
Key Features
- This app supports real-time collaboration so that you can modify and enhance your video files along with your friends and team members.
- In its transcription services, you can select either automatic transcription software or human-made transcription for more accurate results.
- You can customize your added subtitles with the help of CPL and CPS management.
Pros
- You can preview your subtitles in real-time and analyze their position with a soundwave.
- You can also share your subtitles by enabling the options like view-only and edit mode.
Cons
- Happy Scribe does not offer video editing features like other subtitle creators.
3. FlexClip - Manual Online Subtitle Editor
FlexClip is a classic and basic subtitle generator app through which you can produce subtitles in three simple steps. It supports popular video file formats such as MOV, MP4, M4V, etc. Without downloading any software or extension, you can quickly insert subtitles to your videos easily. This tool also provides more than 100 built-in text fonts for your ease. Hence, this online tool provides flexible subtitle editing in its clean and delightful user interface.
Pricing
- Basic: $9.99/Month
- Plus: $19.99/Month
- Business: $29.99/Month
Key Features
- To make your video look more appealing, you can enhance the video brightness through this online tool.
- You can also add text boxes to your videos to demonstrate or explain the content in an organized manner.
- To endorse your product or brand, you can easily add customized logos to your videos.
Pros
- You can use its merger feature to combine several video clips smoothly and effortlessly.
- This online tool does not charge any subscription fees from the users. Thus, you can create subtitles for your videos using this online platform free of cost.
Cons
- Using this tool, you cannot export videos in 4K and 8K.
Part 6: Three Top Picks
Do you want to know the top three picks of subtitle editors? Read this section to learn the best choices for video subtitle apps:
1. Best Easy-to-Use Subtitle Editor: Veed.io
Veed.io is an online tool that has the best clean and delightful user interface. As a beginner, you can easily navigate its interface and create subtitles without interruption or ads.
2. Most Advanced Subtitle Creator: Filmora
If you are looking for an advanced subtitle creator, Wondershare Filmora is the best choice. Its Speech-To-Text feature uses advanced algorithms through which you can auto-create subtitles for your videos.
Free Download For Win 7 or later(64-bit)
Free Download For macOS 10.14 or later
3. Most Cost-Effective Subtitle Generator: UniConverter
UniConverter is one of the most reliable and cost-effective software for subtitle editing. It provides multiple subscription plans within affordable ranges to assist students, beginners, and other individuals.
People May Also Ask
1. How can I merge subtitles and video permanently?
You can use Wondershare Filmora to edit your video files flawlessly. Once you are done editing your video, you can add subtitles to it by using your preferred option. Afterward, the tool will automatically merge subtitles and video once you have exported the video file.
2. How do I add subtitles to an already recorded or downloaded video?
Upload your video file to the interface of Filmora and head to its “Title” option. From there, select the option of “Subtitle” and choose your preferred subtitle style to add your subtitles. Using this tool, you can also choose its font style, color, size, and opacity.
Last Words
This article has shed light on the top 15 subtitle generator apps along with their descriptions, advantages, features, and drawbacks. For your help, we have provided a detailed list of subtitle apps for all platforms. However, if you want to choose the best video subtitle app, you can try Wondershare Filmora. This tool offers a Speech-to-Text feature that enables you to produce subtitles automatically and with high accuracy.
How To Mirror a Video Clip in Premiere Pro
Video editing is a crucial part of filmmaking, and it can make or break the outcome of a project. Adobe Premiere Pro is a widely used video editing software that provides a vast range of tools for professional video editing. One of the features that Premiere Pro offers is the ability to mirror video clips, which can add an interesting visual element to your footage.
In this article, we will look at how to mirror a video clip in Premiere Pro in a few simple steps. Whether you’re a seasoned video editor or just starting, this guide will help you achieve the desired effect in your videos. From basic mirroring to advanced techniques, we will cover everything you need to know to create a symmetrical and visually appealing look in your projects.

What Is To “Mirror” a Video?
Mirroring a video in Adobe Premiere Pro refers to reflecting the footage along either the horizontal or vertical axis. This results in the composition being flipped and reversed, creating a reflection-like effect. Flipping a video is distinct from rotating it, as the orientation of the elements is changed, but their position remains the same.
Flipping can serve both creative and practical purposes. On the one hand, it can add a unique and visually interesting element to a project, creating a form of self-reflection or self-analysis. On the other hand, flipping can also be used to correct videos accidentally captured upside down. For example, flipping a video recorded with a selfie camera along the horizontal axis will correctly display the right side up.
It is important to note the distinction between flipping and rotating a video. A flipped video will look like a mirror image, whereas a video rotated 180 degrees will not. By understanding the differences between these techniques, you can effectively use mirroring to achieve the desired result in your projects.
How To Mirror a Video in Adobe Premiere Pro
Mirroring a video in Adobe Premiere Pro is a quick and simple process that can add a unique and visually appealing touch to your projects. Whether you want to create a symmetrical look or experiment with a new visual style, this guide will mirror a video clip in Premiere Pro. From basic to advanced techniques, you’ll be able to create stunning and reflective videos in no time. So, let’s get started!
Step1 Choose the “Effects“ option from the menu.

Step2 Look for the “Transform“ tab.

Step3 Pick the “Horizontal Flip“ or “Vertical Flip“ from the drop-down list.

Step4 Drag the desired flip onto the selected clip, which will immediately reverse the image displayed on the Program Monitor.

How To Create Mirror Video Effect in Premiere Pro
Creating a mirror video effect in Adobe Premiere Pro opens up a world of artistic possibilities for your projects. With the right techniques, you can create visually appealing and symmetrical videos that stand out from the crowd. This guide will show you how to master the art of mirror video effects in Premiere Pro, from the basics to more advanced techniques. Get ready to explore the creative side of video editing and elevate your projects to the next level.
Step1 Access the “Effects“ menu and select “Video Effects.”

Step2 Pick “Distort“, then the “Mirror“.

Step3 Apply the Mirror effect to your clip.

Step4 Adjust “Reflection Center“ for side-by-side effect or “Reflection Angle“ for up-and-down effect in the Effect Controls panel.

[Bonus] Wondershare Filmora – A Great Alternative to Premiere Pro Mirror Tool
Wondershare Filmora is a great alternative to Adobe Premiere Pro for video editing. Not only does it offer an intuitive interface for both beginners and professionals, but it also offers a range of video editing tools and features. One of those features is its ability to easily mirror a video. With Filmora, you can flip your videos vertically or horizontally with just a few clicks.
Free Download For Win 7 or later(64-bit)
Free Download For macOS 10.14 or later

Filmora also offers a variety of creative video effects and templates, making it easy to add a unique touch to your projects. In addition, its built-in audio editing tools allow you to create professional-sounding soundtracks for your videos. Filmora’s easy-to-use keyframe animation feature gives you precise control over the animation of your elements, allowing you to add movement and bring your videos to life.
Furthermore, Filmora’s advanced color correction tools help you achieve the perfect color balance in your videos. Whether you’re a beginner or a professional, Wondershare Filmora is a great option for anyone looking for a powerful and easy-to-use video editor.
How To Mirror a Video Clip With Wondershare Filmora
Mirroring a video clip is a simple process with Wondershare Filmora. This video editing software provides an intuitive and user-friendly interface, making it easy to achieve the desired result.
To mirror your video in Filmora, you can follow a few straightforward steps. Whether you want to flip your video horizontally or vertically, Filmora’s mirroring tool will help you achieve the perfect reflection with just a few clicks. So, if you’re looking for an alternative to Adobe Premiere Pro, Wondershare Filmora is a great option to consider for your video editing needs.
Step1 Within the “Flip“ section, there are four options available. To flip the clip from left to right, select the “Flip Horizontal“ icon, or if you want to turn the clip upside down, choose the “Flip “ option.

Step2 You can rotate the clip by clicking either the “Clockwise“ or “Counterclockwise“ icons under the Rotate section.

Step3 If you want to specify the rotation angle, you can either enter a value in the box under the Rotate tab or manipulate the dot in the circle to achieve the desired angle.

How To Create Mirror Video Effect in Wondershare Filmora
Wondershare Filmora is an excellent video editing software that offers a simple solution for creating a mirror video effect. Its intuitive interface and powerful features make it possible for amateur and professional video editors to achieve stunning results. Filmora provides users with an array of tools to create a mirror effect on their video clip effortlessly.
Whether you want to create a reversed image, flip the orientation vertically, or rotate the clip in a specific direction, Filmora has got you covered. Let’s see how to create a mirror video effect with Wondershare Filmora.
Step1 Add the video clip to a video track on the timeline

Step2 Click the “Filters“ icon and choose the “Distortion“ category

Step3 Locate the “Mirror“ effect, drag and drop it to the filter track, and adjust its duration to match the video clip

Step4 Preview the results in the Preview Window before exporting the video from Filmora.

Conclusion
Mirroring a video can add an interesting and unique visual effect to your videos. Adobe Premiere Pro and Wondershare Filmora provide easy-to-use tools to achieve this effect. While Premiere Pro offers more advanced features and customization options, Filmora provides a simpler and more user-friendly interface for those who want to achieve the same results without the hassle. Whichever option you choose, you can create stunning mirror videos in no time.
Free Download For macOS 10.14 or later
Filmora also offers a variety of creative video effects and templates, making it easy to add a unique touch to your projects. In addition, its built-in audio editing tools allow you to create professional-sounding soundtracks for your videos. Filmora’s easy-to-use keyframe animation feature gives you precise control over the animation of your elements, allowing you to add movement and bring your videos to life.
Furthermore, Filmora’s advanced color correction tools help you achieve the perfect color balance in your videos. Whether you’re a beginner or a professional, Wondershare Filmora is a great option for anyone looking for a powerful and easy-to-use video editor.
How To Mirror a Video Clip With Wondershare Filmora
Mirroring a video clip is a simple process with Wondershare Filmora. This video editing software provides an intuitive and user-friendly interface, making it easy to achieve the desired result.
To mirror your video in Filmora, you can follow a few straightforward steps. Whether you want to flip your video horizontally or vertically, Filmora’s mirroring tool will help you achieve the perfect reflection with just a few clicks. So, if you’re looking for an alternative to Adobe Premiere Pro, Wondershare Filmora is a great option to consider for your video editing needs.
Step1 Within the “Flip“ section, there are four options available. To flip the clip from left to right, select the “Flip Horizontal“ icon, or if you want to turn the clip upside down, choose the “Flip “ option.
Step2 You can rotate the clip by clicking either the “Clockwise“ or “Counterclockwise“ icons under the Rotate section.
Step3 If you want to specify the rotation angle, you can either enter a value in the box under the Rotate tab or manipulate the dot in the circle to achieve the desired angle.
How To Create Mirror Video Effect in Wondershare Filmora
Wondershare Filmora is an excellent video editing software that offers a simple solution for creating a mirror video effect. Its intuitive interface and powerful features make it possible for amateur and professional video editors to achieve stunning results. Filmora provides users with an array of tools to create a mirror effect on their video clip effortlessly.
Whether you want to create a reversed image, flip the orientation vertically, or rotate the clip in a specific direction, Filmora has got you covered. Let’s see how to create a mirror video effect with Wondershare Filmora.
Step1 Add the video clip to a video track on the timeline
Step2 Click the “Filters“ icon and choose the “Distortion“ category
Step3 Locate the “Mirror“ effect, drag and drop it to the filter track, and adjust its duration to match the video clip
Step4 Preview the results in the Preview Window before exporting the video from Filmora.
Conclusion
Mirroring a video can add an interesting and unique visual effect to your videos. Adobe Premiere Pro and Wondershare Filmora provide easy-to-use tools to achieve this effect. While Premiere Pro offers more advanced features and customization options, Filmora provides a simpler and more user-friendly interface for those who want to achieve the same results without the hassle. Whichever option you choose, you can create stunning mirror videos in no time.
3 Ways To Stream And Record At The Same Time
The popularity of live streaming has exploded recently. A live stream is simply a video broadcast in real-time over the internet. It’s a great way to connect with people directly, whether for a gaming session, a cooking show, or a Q&A.
Many reasons are there for which why you might want to live stream and record at the same time. For instance, keep a record of your gameplay or stream highlights for future editing or use your live stream to generate content for your YouTube channel.
Whatever your reasons, this article will show you how to do live streaming and recording at the same time using three different methods.
Way 1. Use OBS To Stream And Record Video At The Same Time
OBS, or Open Broadcaster Software, is a free and open-source tool that allows you to stream and record video at the same time, which can be useful if you want to live-stream your gameplay on Twitch or record a tutorial for YouTube.
Key Features of OBS
- Compatible with Mac OS X, Linux, and Windows operating systems.
- Requires at least 4 GB of storage space and an Intel i5 2000-series processor or higher DirectX 10 capable graphics card.
- High-performance video capturing and mixing in real-time.
- With Custom Transitions, you can set up an unlimited number of scenes you can switch between seamlessly.
- Intuitive audio mixer.
- Easy-to-use and simple configuration options.
Steps
Here’s an easy and quick guide on how to use OBS Studio to stream and record videos simultaneously:
Step1 Download OBS Studio from the official website and install it on your computer or laptop.
Step2 Launch OBS Studio and go to the Settings menu. Find the Recording section under the Output tab.
Step3 Click “Start Recording” to manually start the recording or head to the General Tab and checkmark the box before “Automatically Record When Streaming.”
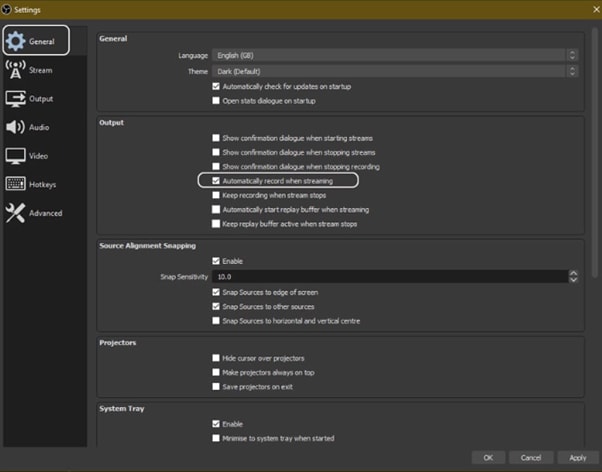
Step4 Finally, click “Apply” to save your settings. Now when you start your stream, the recording will also begin simultaneously.
Way 2. Use Twitch To Save Your Streams
Twitch is the most popular and best live streaming platform that allows gamers to broadcast their gameplay to a live audience and also gives them the ability to save their past broadcasts, or “streams.”
This feature can be useful to save your live stream for later viewing or share your stream with someone who missed it.
Features
Twitch offers a variety of features that make it a unique and powerful game streaming platform. Some of the most notable ones are:
- Live streaming: Twitch allows gamers to share their gameplay in real-time with other gamers around the world. This live aspect of the platform makes it unique and engaging.
- Social interaction: Twitch offers a variety of features that allow gamers to connect with each other, including chat rooms, forums, and user-generated content.
You can save your stream on Twitch in two ways:
- Use the “Highlights” feature, which allows you to save specific moments from your live stream.
- Download your stream’s entire VOD (video on demand) after it has ended.
Steps
Here are the quick steps to saving a stream on your PC from Twitch. But first, you need to enable Twitch VODs before starting your broadcast in the following way:
Step1 Visit Twitch and sign in to your account. Now, click the “Profile” icons and go to “Creator Dashboard.”
Step2 Head to Setting from the left-sidebar and click the “Stream” option. Scroll down and find the VOD Settings. Toggle the buttons next to “Store Past Broadcasts.”
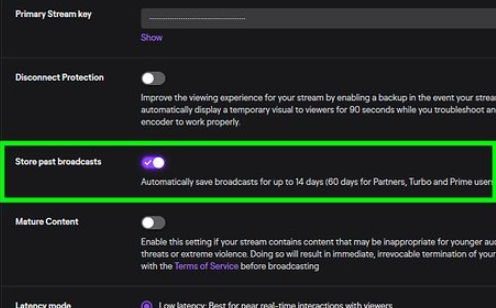
Step3 To publish your VODs instantly after broadcasting, toggle the button next to “Always Publish VODs.”
Now, to download the recordings of your broadcasts to your PC, do the following steps in sequence:
Step1 Head to the Creator Dashboard, find the “Content” section in the left sidebar, and click “Video Producer.”
Step2 Find the stream (VOD or Highlights) you want to download and on the right side, click the three dots.
Step3 Finally, click the “Download” option and let Twitch prepare your video. You will then get the stream’s recording in MP4 format.
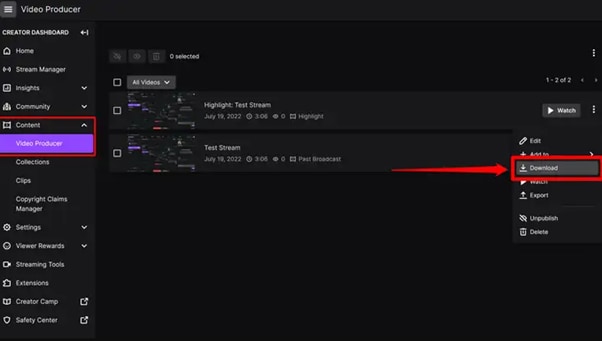
Way 3. Use Screen Recorder To Record Your Streams
Using a screen recorder is a great way to record your live stream because it lets you capture the full screen of your PC. Although there are many different screen recorders to choose from, we recommend using Filmora.
Wondershare Filmora is a powerful editor with easy-to-use screen recording capabilities, giving you everything you need to record and stream your video at the same time. The software is free to use and has an intuitive interface.
Features of Filmora
- Support for both Mac OS X and Windows operating systems.
- Ability to record your PC screen, audio, and webcam all at once
- A variety of video editing features
- An easy-to-use interface
Steps
Here’s how to use Filmora for recording while streaming:
Step1 Head to the official Filmora website, download the software and install it on your PC.
Step2 Launch Filmora 11 and click “New project” in the main interface. Click “File” from the top toolbar and scroll down to “Record media.” From the drop-down menu, select “Record PC Screen.”
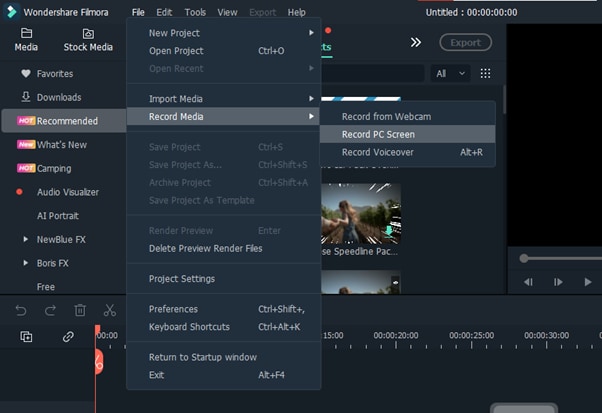
Step3 A new “Wondershare Screen Recorder” window will pop up. You can set up a full screen, custom or target screen recording, speaker, and microphone settings. If you want more Settings, click the drop-down icon.
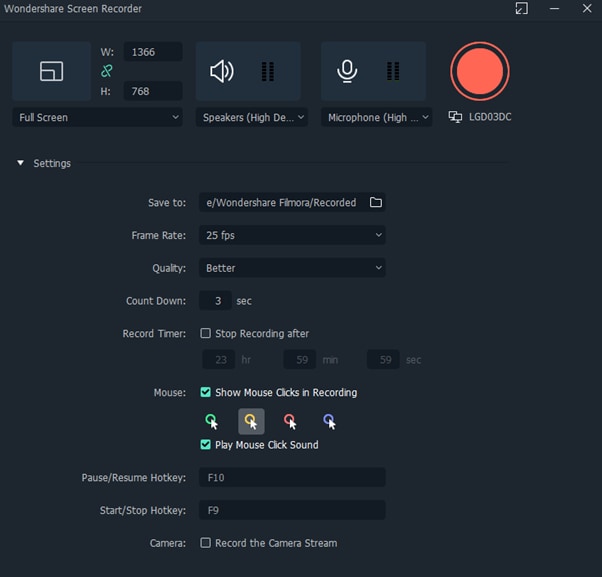
Step4 Click the Start icon to begin your recording. Afterward, click the Stop icon to stop the recording, and your stream will be saved in the selected destination.
Conclusion
In this article, we’ve discussed three step-by-step methods to help you do live streaming and recording at the same time. With these solutions at your disposal, you’ll be able to save your VODs with ease.
It is best to choose only one software to start with to avoid the time-consuming trial-and-error process. If you want to add another tool, do so later; otherwise, you will waste your precious time and resources.
Give these methods a shot, and eventually, you will find your groove—and become accustomed to just how easy it is to record and stream a video simultaneously.
Free Download For Win 7 or later(64-bit)
Free Download For macOS 10.14 or later
Free Download For macOS 10.14 or later
Also read:
- Updated 2024 Approved How to Rotate a Video in Windows 10
- How to Make a Super Easy Rotating Video Effect
- New In 2024, Steps to Denoise in Final Cut Pro – Reduce Video and Audio Noise
- New In 2024, Complete Tutorial on After Effects Countdown Timer Adding
- Updated In 2024, Want to Add an Exciting Countdown Timer to Your Wedding, Product Launch or Any Other Video Using After Effects or an Alternative Tool? This Article Will Help You Learn All About After Effects Countdown and the Procedure
- New Want to Convert MP4 Video To 60 FPS GIF? Read This
- Updated Best Movie Title Maker
- Updated In 2024, Do You Want to Watch Videos in QuickTime with Subtitles in Your Desired Language? Here Are Different Ways to Add Subtitles in QuickTime Player
- Updated How to Create Freeze Frame Clone Effect for 2024
- Updated How To Use Slow Zoom Effect in Your Video, In 2024
- New 2024 Approved A Comprehensive Review of LUTs Finding LUTs Made by Danny Gevirtz
- In This Article Ill Share to You some of the Skin Care Vlog Ideas for You to Start Doing a Skin Care Review on Your YouTube Channel. But Before that Ill Share with You How Important Is Skin Care, In 2024
- New Have You Tried Using a Craig Bot on Discord to Record Audio? Do You Have an Idea of Using a Discord Craig Bot Is Safe? Get Answers to These Questions and More From This Article as You Continue Reading
- New In 2024, 5 Tips for Faster Editing in Filmora
- New Step-By-Step Guide To Creating Halftone Effects In Photoshop
- New Step by Step to Rotate Video Using KMPlayer
- Updated How to Create Liquid Water Reveal Intro?
- SBV to SRT How to Convert YouTube SBV Subtitle to SRT Format
- In 2024, Doable Ways to Make Transparent Background in Procreate
- New How to Fade to Black Premiere Pro for 2024
- In 2024, This Article Will Show You How to Make a Tattoo Disappear on Your Body Magically
- 2024 Approved Adobe Photoshop Is the Best Photo Editor to Add Green Screen Effect to Your Photo While Wondershare Filmora Is the Best Video Editor to Add Green Screen Effect to Your Video
- In 2024, The Actual Discussion Is Regarding the Splitting of the Video by Using the VSDC. Also, Recommendation of Using Wondershare Filmora as the Better Substitute in Place of VSDC
- New The Ultimate Guide to Slideshow Maker with Music
- Updated 2024 Approved Looking for a Great Way to Make Your Own Anime Music Video? The Following Are the Top AMV Makers to Choose From
- New In 2024, Top 22 Free Video Editing Software
- Want to Add Life to Your Customary Business Presentations and Videos on a MacOs Device with Expressive Emojis? Dive in to Have an Insight Into the Credibility of Using Emojis on a Mac for 2024
- New Best 4 Love Video Maker with Music
- LumaFusion Offers Various Look Up Table Presets, or LUTs, Such as FiLMiC deLog and FiLMiC DeFlat, and Several Stylistic LUTs for Use with Neutral Use Video. You Can Also Manually Add the LUTs for 2024
- 2024 Approved If Youre Trying to Create a Countdown Effect, but Youre Not Sure Where to Start, Then This Post Is Going to Show You some Ways to Create a Countdown Animation for Your Videos
- Updated In 2024, All Things About Adding Effects In Kinemaster
- Repeated Text Animation Tutorial
- 2024 Approved 8 Websites to Find 3D Text PNG
- Updated How to Add Effects in Premiere Pro for 2024
- In 2024, How to Make Cool COD Warzone Thumbnail
- 10 BEST TEXT TO SPEECH VIDEO MAKERS
- Updated 2024 Approved Here Is a Step-by-Step Guide to Color Correct and Color Grade a Video Professionally with Wondershare Filmora. Lets Get Going
- There Are Many Aspects to Consider when It Comes to Publishing a Video. Safety and Privacy Aspects Are some of Them. If Youre Looking to Blur Out a Bystander or Cut Out Profanities From Your Video with Filmora, This Is the Right Article for You
- How to Make Coin Magic With Filmora
- New 2024 Approved Stunning Glitch Effect and Its Creation Steps for Premiere Pro
- New 2024 Approved Looking Forward to Try Hands at Using the Icecream Slideshow Maker Program to Create High End Slideshow Presentations? Stay Here for a Complete Insight Into the Process
- Updated Splitting Clips in Adobe After Effects Step by Step for 2024
- Thousands Already Know Ezgif and So Can You for 2024
- 2024 Approved How to Achieve GoPro Slow Motion With Quality
- In 2024, The Complete Guide to Samsung Galaxy Z Fold 5 FRP Bypass Everything You Need to Know
- How to Repair corrupt MP4 and AVI files of Honor 90 Pro with Video Repair Utility on Mac?
- In 2024, How I Transferred Messages from Realme 11 Pro+ to iPhone 12/XS (Max) in Seconds | Dr.fone
- How Can I Unlock My iPhone 14 After Forgetting my PIN Code?
- In 2024, Easiest Guide How to Clone Vivo Y27 5G Phone? | Dr.fone
- How to Cast Xiaomi Redmi Note 13 Pro 5G to Computer for iPhone and Android? | Dr.fone
- New In 2024, What Is Talking Avatar? | Wondershare Virbo Glossary
- How do i sign a .dotm file document electronically
- Resolve Your iPhone 13 Pro Keeps Asking for Outlook Password
- In 2024, The Most Useful Tips for Pokemon Go Ultra League On Lava Blaze Pro 5G | Dr.fone
- How to Unlock Samsung Galaxy M14 5G Phone Password Without Factory Reset?
- How to Bypass iCloud Lock on Apple iPhone SE
- In 2024, New Guide How To Check iCloud Activation Lock Status From Your Apple iPhone 12 mini
- 9 Mind-Blowing Tricks to Hatch Eggs in Pokemon Go Without Walking On Realme C55 | Dr.fone
- In 2024, Top 10 Best Spy Watches For your Apple iPhone 14 Pro Max | Dr.fone
- Reasons for OnePlus Open Stuck on Boot Screen and Ways To Fix Them | Dr.fone
- How to Update iPhone 6s without Losing Any Data? | Dr.fone
- In 2024, Best Ways on How to Unlock/Bypass/Swipe/Remove Samsung Galaxy F54 5G Fingerprint Lock
- Calls on Gionee F3 Pro Go Straight to Voicemail? 12 Fixes | Dr.fone
- In 2024, Why does the pokemon go battle league not available On Samsung Galaxy S24 | Dr.fone
- Useful ways that can help to effectively recover deleted files from Infinix Smart 7 HD
- In 2024, How To Stream Anything From Vivo Y27 5G to Apple TV | Dr.fone
- What To Do When Tecno Phantom V Fold Has Black Screen of Death? | Dr.fone
- 3 Ways of How to Get Someones Apple ID Off iPhone 8 without Password
- Updated In 2024, Best 12 AI Voice Cloning Tools Online & Offline
- Failed to play HEVC files on Xiaomi Mix Fold 3
- In 2024, iPhone 8 Asking for Passcode after iOS 17/14 Update, What to Do?
- 5 Hassle-Free Solutions to Fake Location on Find My Friends Of Xiaomi Redmi K70 | Dr.fone
- In 2024, How to Unlock SIM Card on Apple iPhone SE (2022) online without jailbreak
- Learn How To Lock Stolen Your Apple iPhone 7 Properly
- In 2024, Top 7 Phone Number Locators To Track Samsung Galaxy A25 5G Location | Dr.fone
- Title: New Create Realistic Fire Effects by Filmora for 2024
- Author: Morgan
- Created at : 2024-04-24 01:04:52
- Updated at : 2024-04-25 01:04:52
- Link: https://ai-video-editing.techidaily.com/new-create-realistic-fire-effects-by-filmora-for-2024/
- License: This work is licensed under CC BY-NC-SA 4.0.
