
New Detailed Tutorial to Crop a Video in KineMaster

Detailed Tutorial to Crop a Video in KineMaster
“Create. Edit. Share. Transform your videos with KineMaster! Powerful tools, easy to use.” – a few words we read when we come up with the official web-site of KineMaster, a mobile video editing application.

Scrolling down, we see a rich list of all the features KineMaster offers to its users, such as: Assets, Projects, Backup and Share, Blending Modes, Reverse, Chroma Key, High Resolution, Video Layers. Simply put, on KineMaster, you can download projects, add more than 2 500 effects, use powerful tools, add cinematic color, etc…
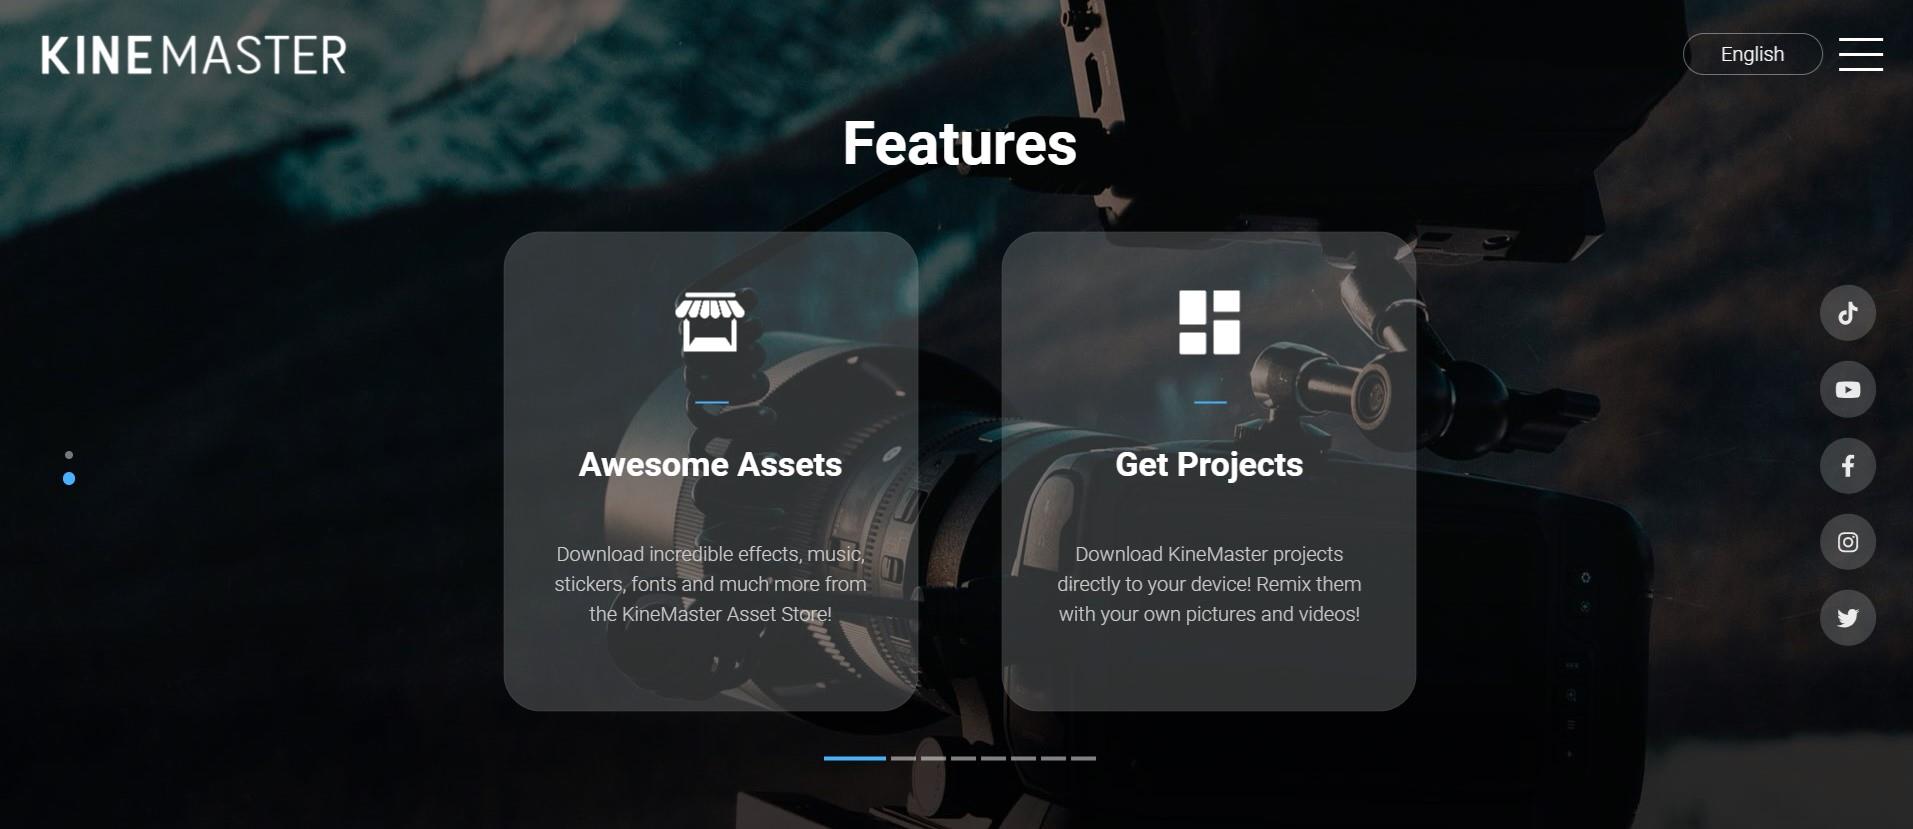
This many features make you think – how come it is possible to do all that on a mobile phone? How come Kinemaster is not only a software you can download, pay for, and use on your computer, which, on its behalf, should also be a powerful one? It would be a logical question, but remember, we are in 2022 already, so, no limits are put to the technology of today! On Google Play Store, in the description of the abovementioned app, it reads: “KineMaster makes video editing fun on your phone, tablet, or Chromebook!” – So, why not use this opportunity, to explore new ways of making our content better and as appealing as ever for our viewers?
Even though Kinemaster deserves a bigger article with more explanation of each tool, for now, we will only be focusing on cropping a video in this app. First off, why crop a video at all? – well, sometimes we have a wonderful footage but the aspect ratio just doesn’t work for us. It might be because we want to upload our clip on a platform needing a specific aspect ratio, or, we just need to crop and pan (which means to move around within a clip or an image) because we don’t like some things shown in the original video – we might as well need to zoom in and out, in order to get the best out of our footage. For whatever reason, when you need or just wish to crop a video, it should not be a big deal, and let’s see how KineMaster makes it a good and easy experience.
So, the first thing we do in almost every situation is to access the platform or an application itself! – you guessed it right, download KineMaster from Google Play Store! Once you have it on your phone, open it and enjoy the introduction of the app itself.
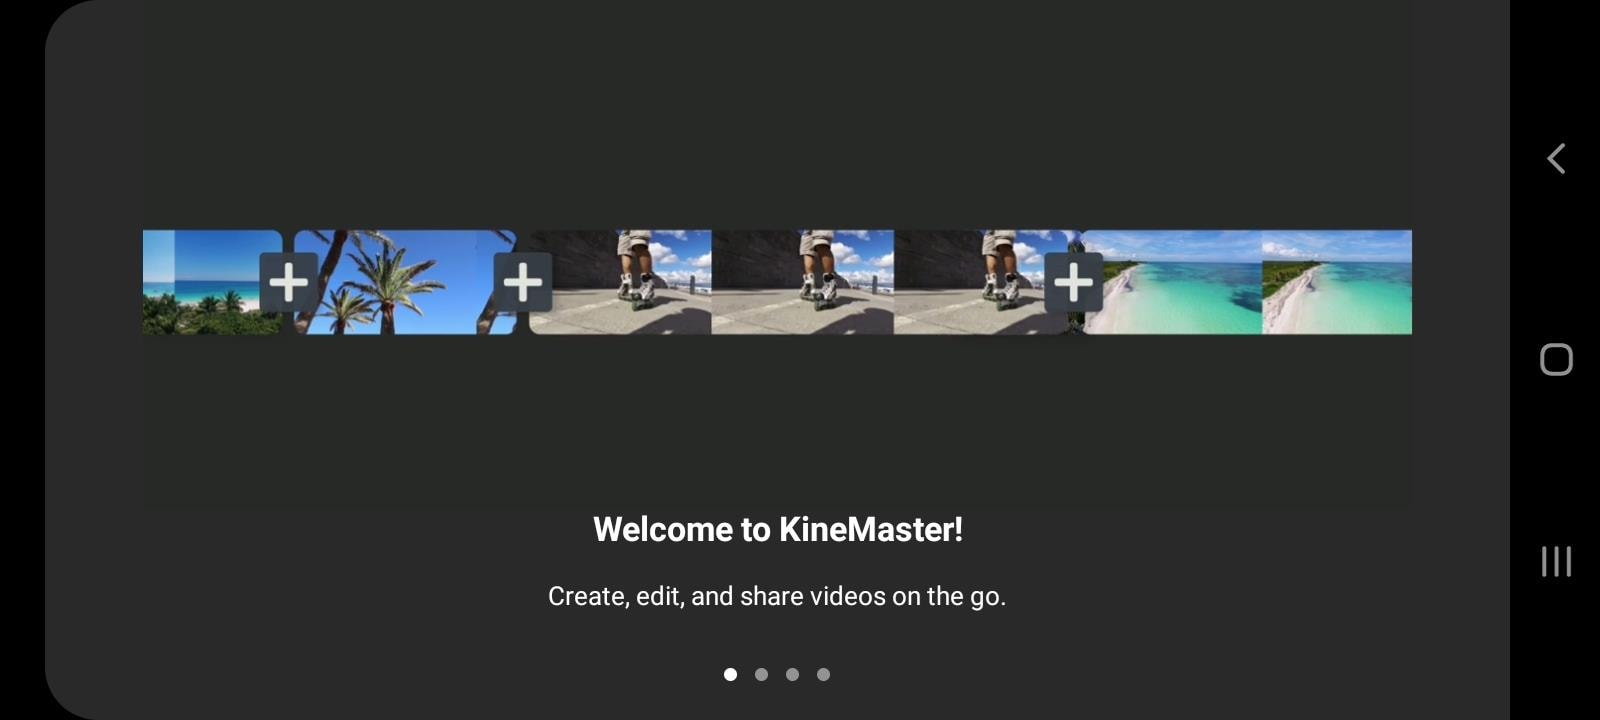
The interesting fact you will notice is that the layout of the app is horizontal, not vertical, unlike in most cases. So, it makes you feel like you are at least close to what video editors who work on their computers represent. The interface of the app is quite enjoyable for your eyes, as it is kind of fun, as well.
It is needless to say that, if you are going to do a specific “operation” to the video, such as cropping, you will already have figured out which one of your footage you want to crop and pan. So, it’s wise to jump on the button which says: Create New.
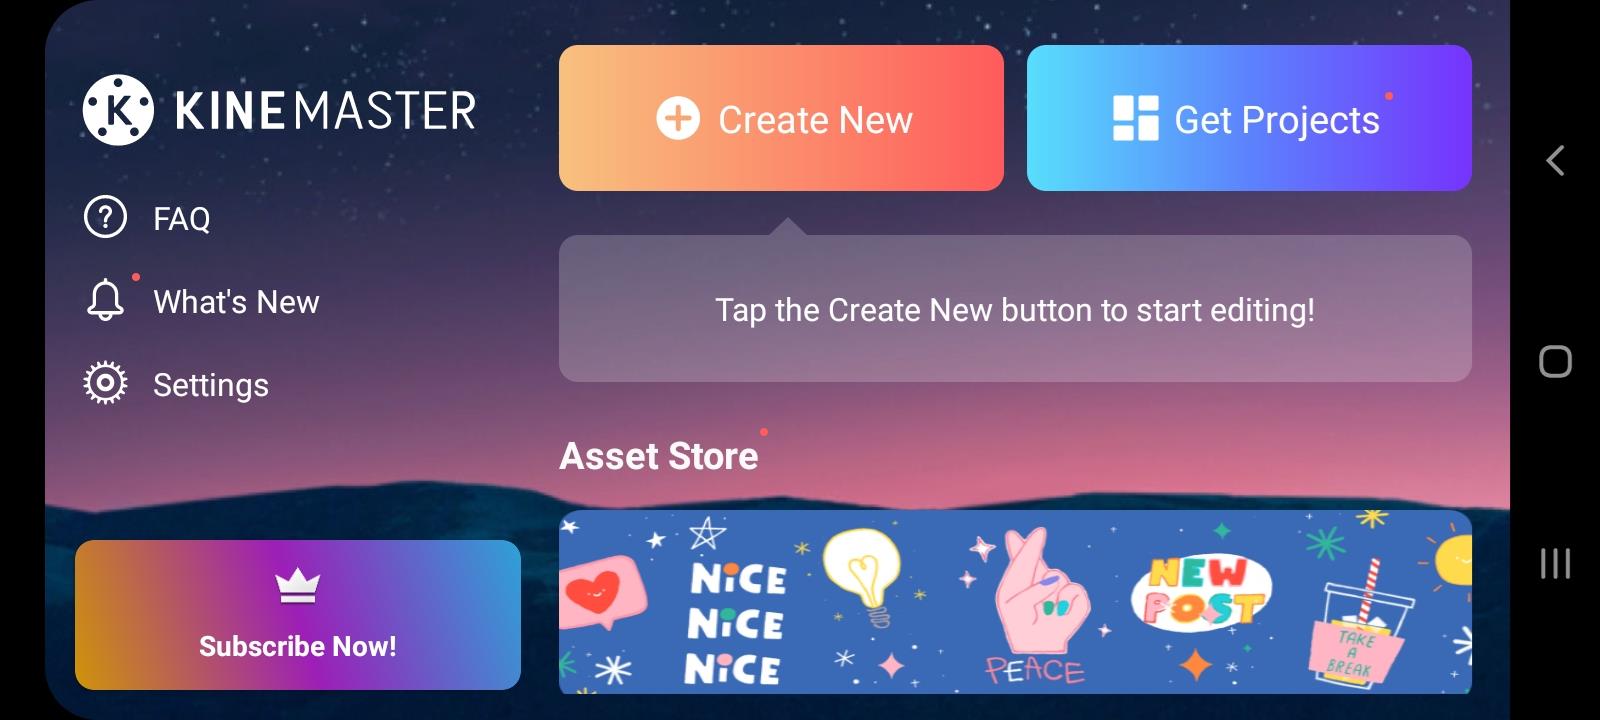
This will take you to the editor. Even though in the media section you will find the video you want to work on, but you might be struggling to notice a Crop button. It is because unfortunately, it’s not possible to crop your video right away in KineMaster – first, you will need to add a background, for example, a black one.
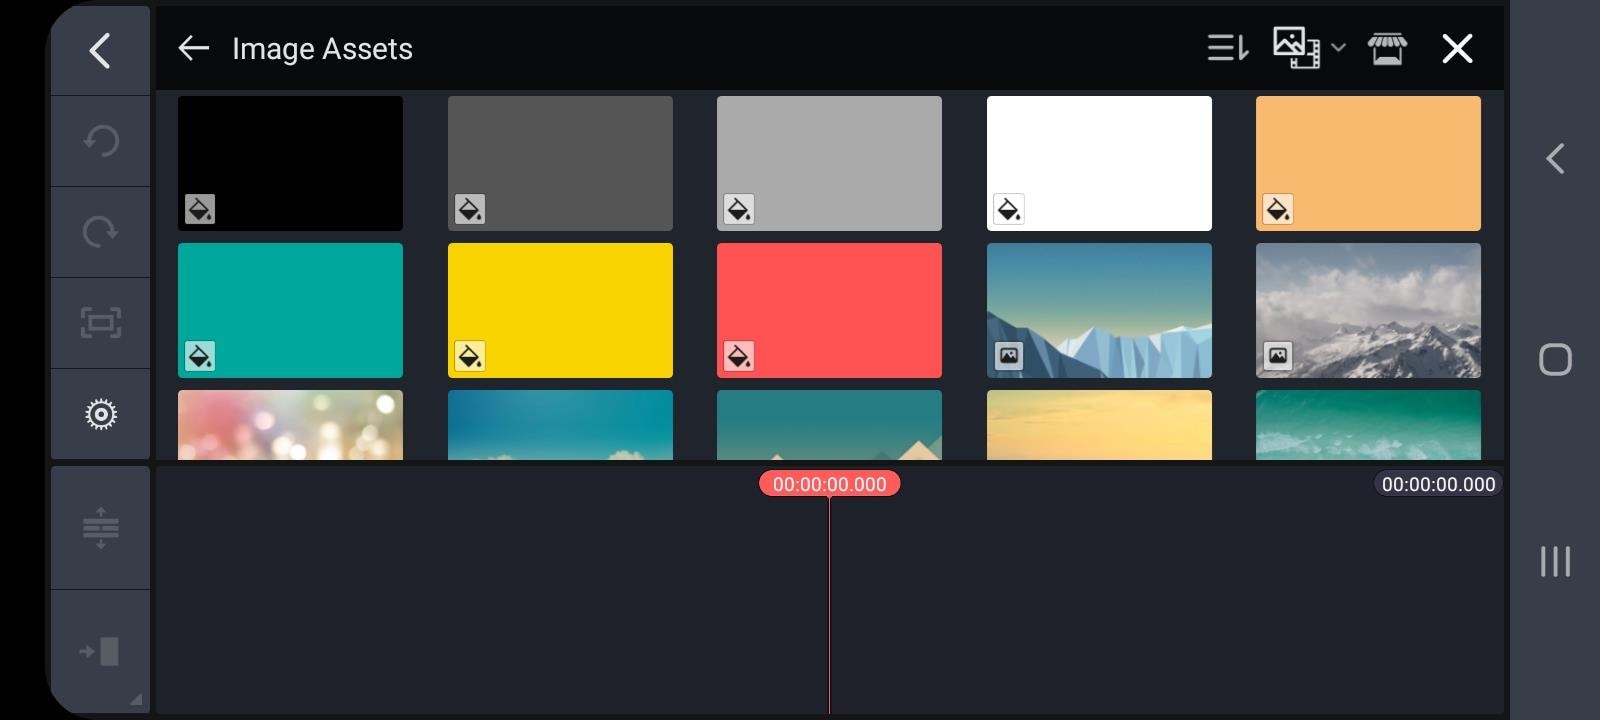
Then, you will go back to the menu and find Media section again to add the video clip you want to crop.
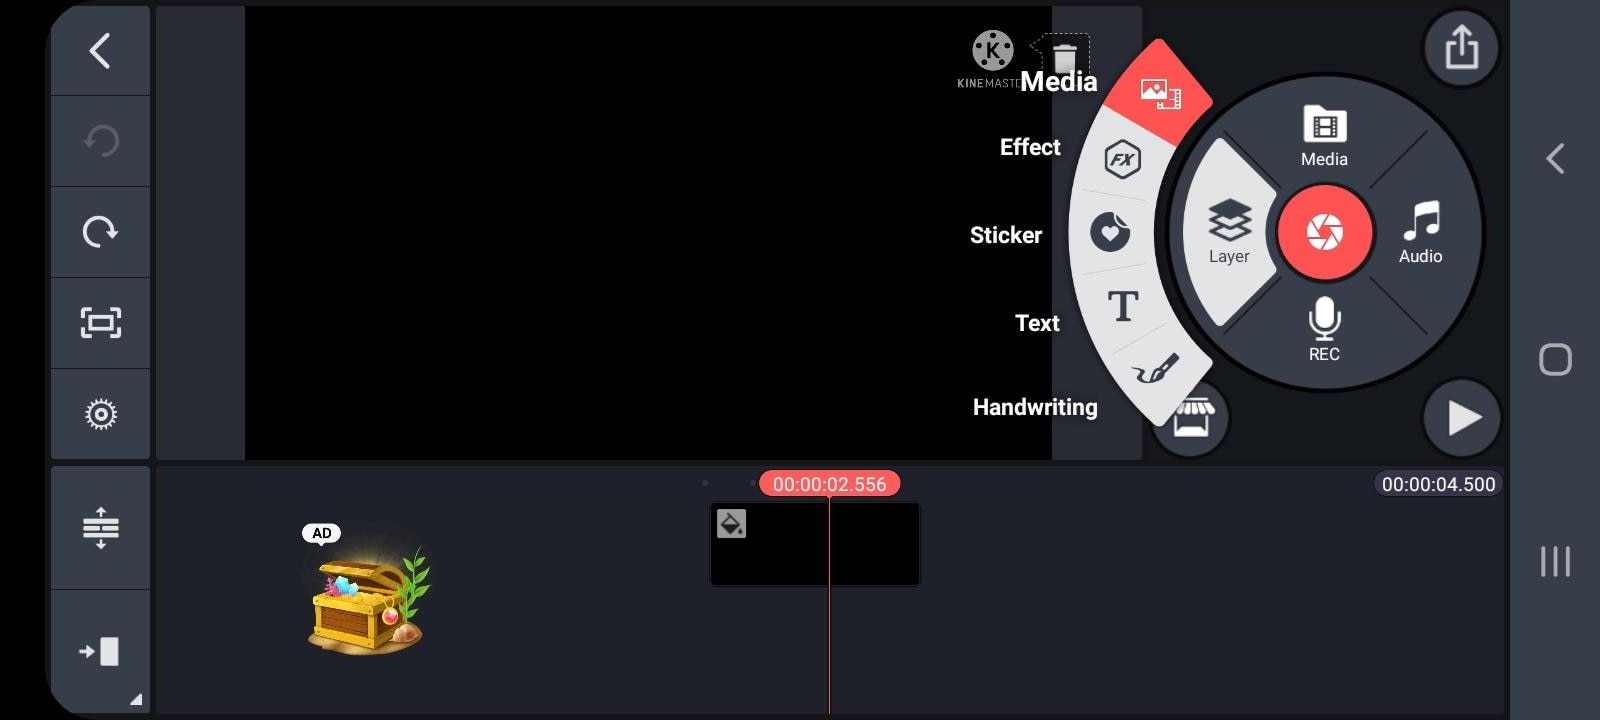
After adding it to the editor, you need to tap on the video file which has appeared in the sequence – this will show you different features you can use on the right. You have to scroll down a little and Voila! – here you find Cropping. After having clicked on that, a little cropping window will appear on the screen.
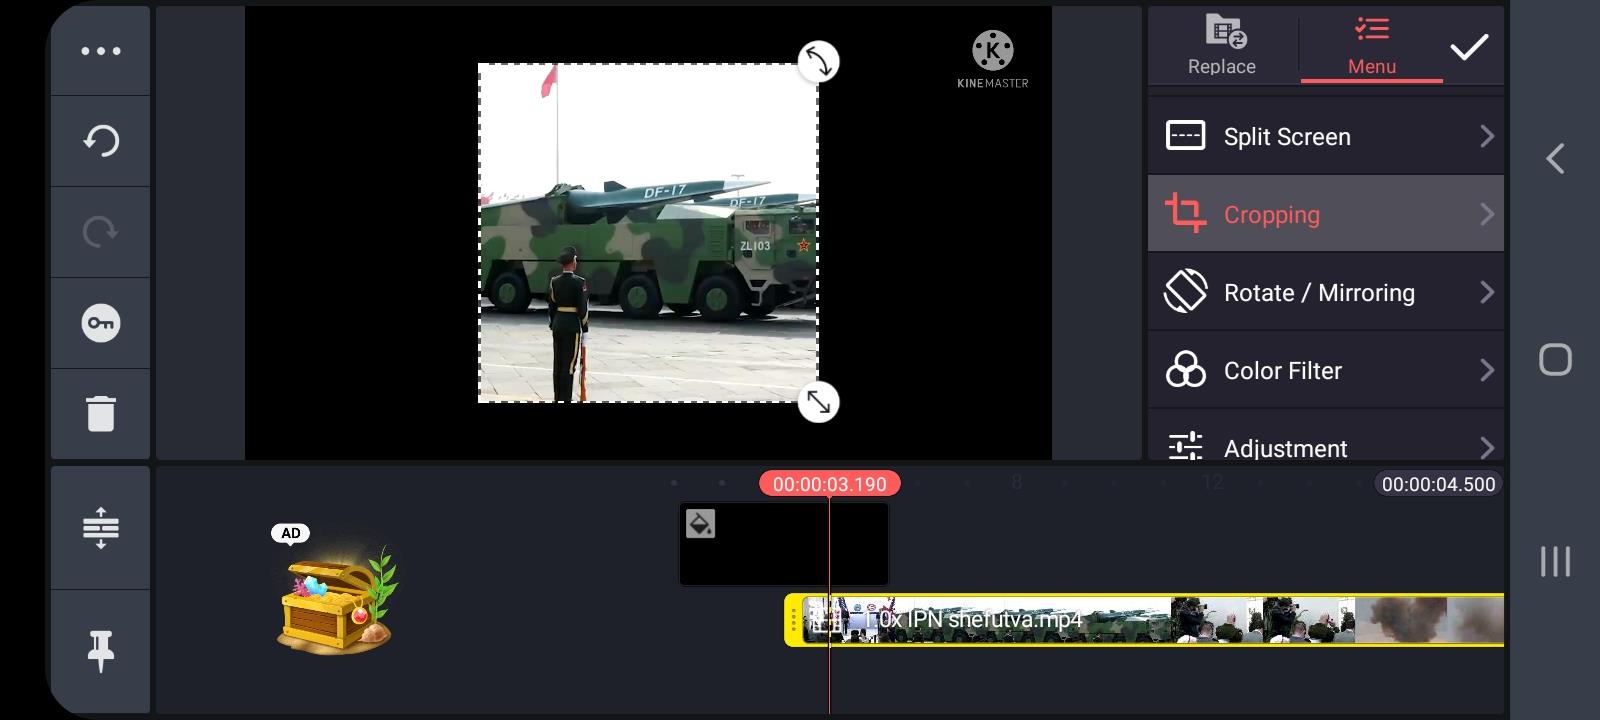
You can resize the clip, and in order to crop the video, turning on the mask option is needed.
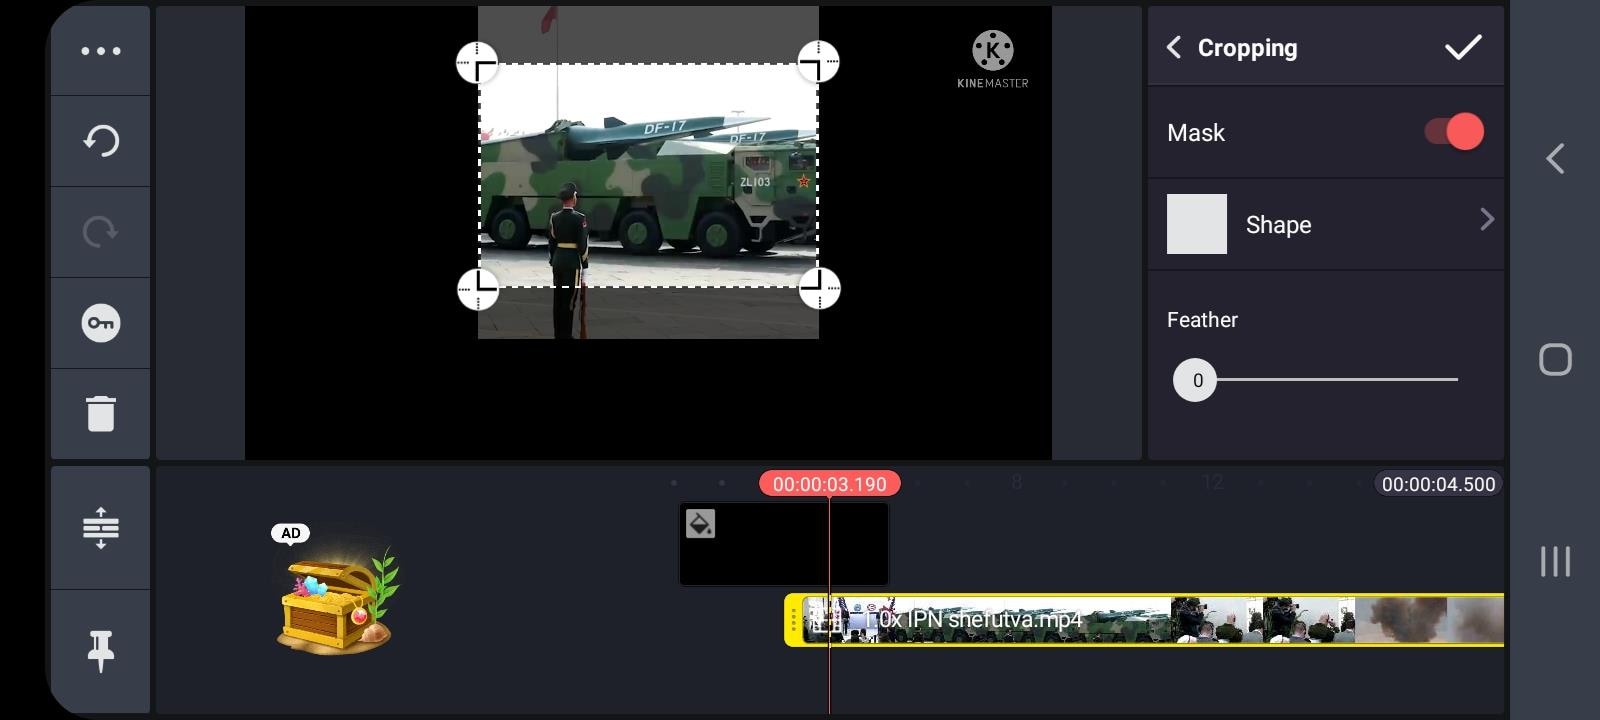
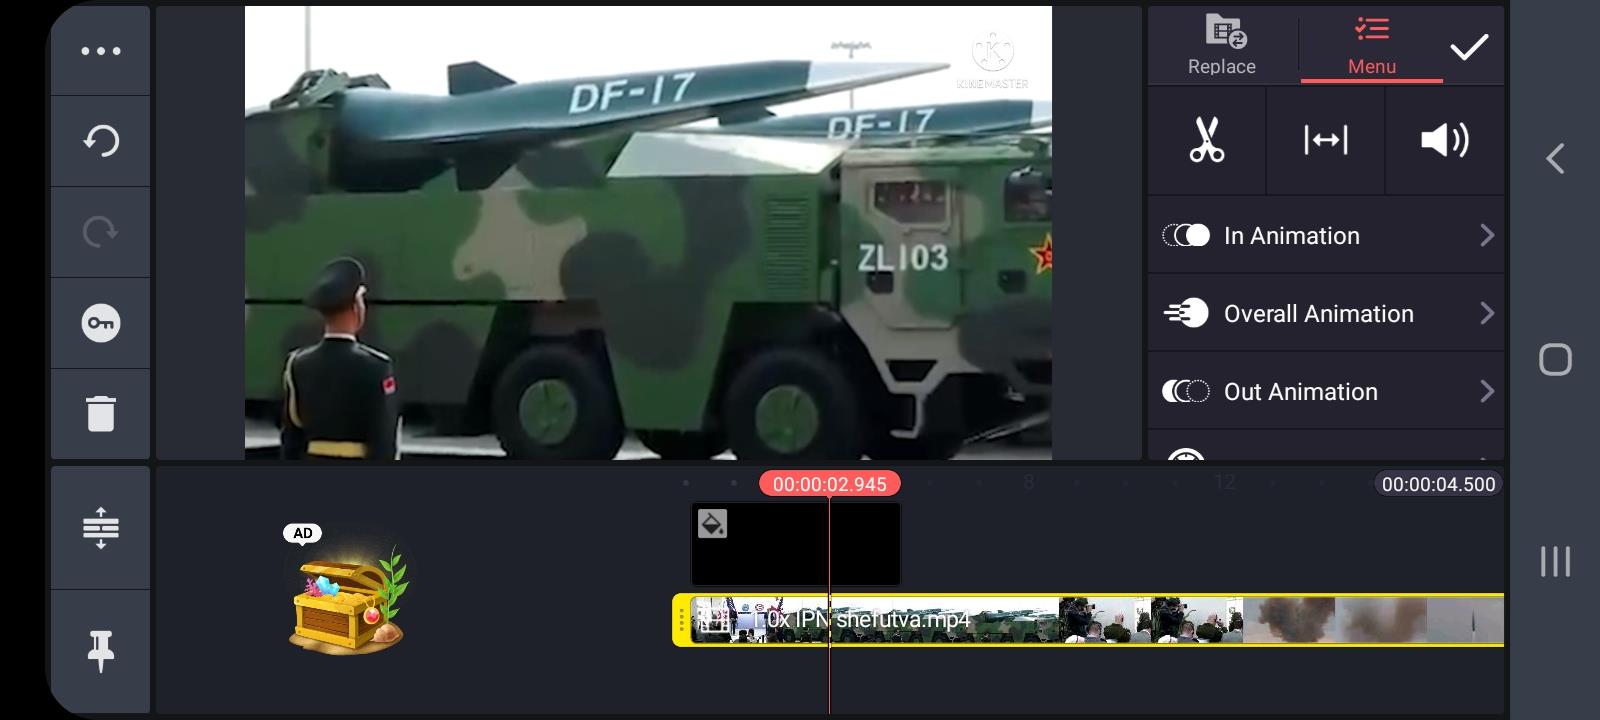
After you have finished cropping and resizing it to your liking, you need to click on the icon on the top right, and it will take you to the Save and Share page.
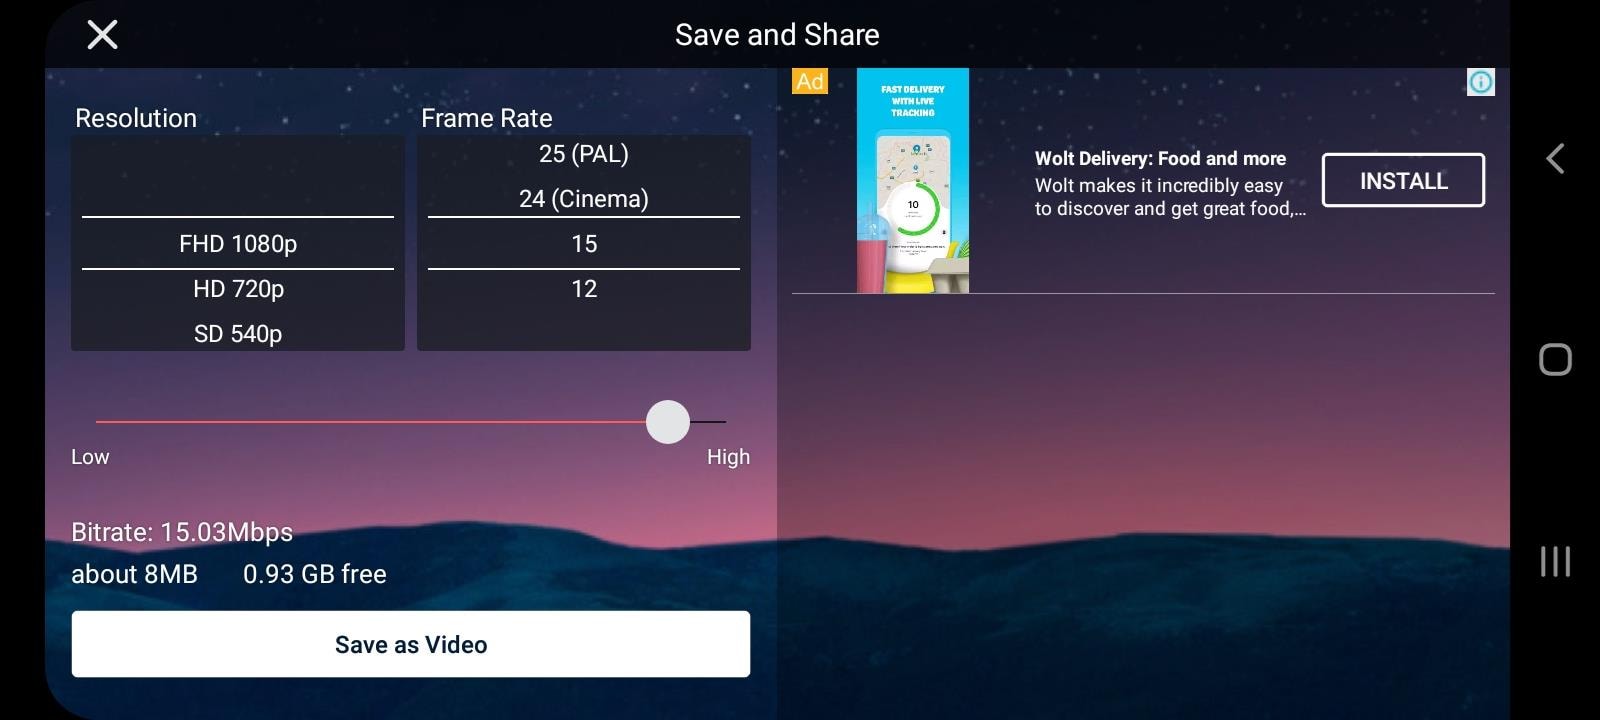
There, you will choose the Resolution and Frame rate, and Save as Video.
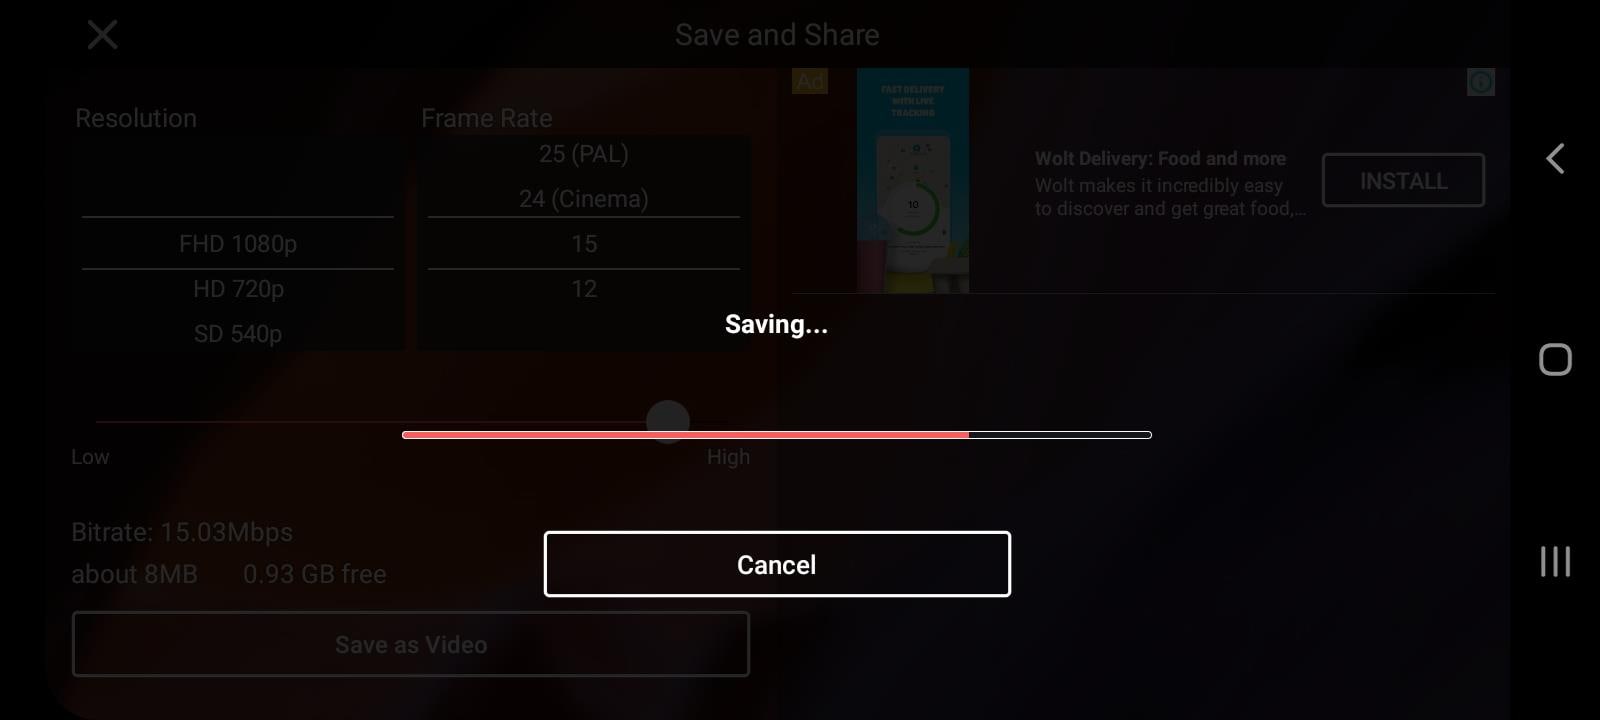
You can check your new cropped video on your gallery.
An easier way to crop video in Wondershare Filmora
An alternate way of cropping your video would be Filmora Video Editor , which is a software you can download and install on your computer and use its features only then. You can also try your hand at this very handy computer program which has an easy and user-friendly interface.
For Win 7 or later (64-bit)
For macOS 10.14 or later
Frist, as mentioned, you need to download and install Wondershare Filmora X. To add your files, you will need to click on Import Media Files Here.

You will choose your clip(s) you would like to crop and then drag and drop it in the sequence.

Above your video in the sequence you will see little icons and find a Crop one.

After clicking on it, a new window will open – it’s for Crop and Zoom, where you can choose a needed ratio or do it manually (for it, you have to select Custom first).

After clicking OK, your video will be cropped as you like. Then, you can proceed with Exporting it – click on Export, choose your preferred settings, and save the video at last.

So, in this article, you have learned how to crop a video using a mobile app KineMaster, as well as using a software – Wondershare Filmora X. of course, there are many other ways in which you can crop your video and make the best out of it. The technology and innovation gives us the opportunity to have great results with as little work as just a few minutes. You might need to crop your video for your channel on Youtube, or for your page on social media, or an official web-page of your company; last but not least is cropping and editing your video for your own pleasure, which is also a great way to interact with the virtual world around us.
Scrolling down, we see a rich list of all the features KineMaster offers to its users, such as: Assets, Projects, Backup and Share, Blending Modes, Reverse, Chroma Key, High Resolution, Video Layers. Simply put, on KineMaster, you can download projects, add more than 2 500 effects, use powerful tools, add cinematic color, etc…

This many features make you think – how come it is possible to do all that on a mobile phone? How come Kinemaster is not only a software you can download, pay for, and use on your computer, which, on its behalf, should also be a powerful one? It would be a logical question, but remember, we are in 2022 already, so, no limits are put to the technology of today! On Google Play Store, in the description of the abovementioned app, it reads: “KineMaster makes video editing fun on your phone, tablet, or Chromebook!” – So, why not use this opportunity, to explore new ways of making our content better and as appealing as ever for our viewers?
Even though Kinemaster deserves a bigger article with more explanation of each tool, for now, we will only be focusing on cropping a video in this app. First off, why crop a video at all? – well, sometimes we have a wonderful footage but the aspect ratio just doesn’t work for us. It might be because we want to upload our clip on a platform needing a specific aspect ratio, or, we just need to crop and pan (which means to move around within a clip or an image) because we don’t like some things shown in the original video – we might as well need to zoom in and out, in order to get the best out of our footage. For whatever reason, when you need or just wish to crop a video, it should not be a big deal, and let’s see how KineMaster makes it a good and easy experience.
So, the first thing we do in almost every situation is to access the platform or an application itself! – you guessed it right, download KineMaster from Google Play Store! Once you have it on your phone, open it and enjoy the introduction of the app itself.

The interesting fact you will notice is that the layout of the app is horizontal, not vertical, unlike in most cases. So, it makes you feel like you are at least close to what video editors who work on their computers represent. The interface of the app is quite enjoyable for your eyes, as it is kind of fun, as well.
It is needless to say that, if you are going to do a specific “operation” to the video, such as cropping, you will already have figured out which one of your footage you want to crop and pan. So, it’s wise to jump on the button which says: Create New.

This will take you to the editor. Even though in the media section you will find the video you want to work on, but you might be struggling to notice a Crop button. It is because unfortunately, it’s not possible to crop your video right away in KineMaster – first, you will need to add a background, for example, a black one.

Then, you will go back to the menu and find Media section again to add the video clip you want to crop.

After adding it to the editor, you need to tap on the video file which has appeared in the sequence – this will show you different features you can use on the right. You have to scroll down a little and Voila! – here you find Cropping. After having clicked on that, a little cropping window will appear on the screen.

You can resize the clip, and in order to crop the video, turning on the mask option is needed.


After you have finished cropping and resizing it to your liking, you need to click on the icon on the top right, and it will take you to the Save and Share page.

There, you will choose the Resolution and Frame rate, and Save as Video.

You can check your new cropped video on your gallery.
An easier way to crop video in Wondershare Filmora
An alternate way of cropping your video would be Filmora Video Editor , which is a software you can download and install on your computer and use its features only then. You can also try your hand at this very handy computer program which has an easy and user-friendly interface.
For Win 7 or later (64-bit)
For macOS 10.14 or later
Frist, as mentioned, you need to download and install Wondershare Filmora X. To add your files, you will need to click on Import Media Files Here.

You will choose your clip(s) you would like to crop and then drag and drop it in the sequence.

Above your video in the sequence you will see little icons and find a Crop one.

After clicking on it, a new window will open – it’s for Crop and Zoom, where you can choose a needed ratio or do it manually (for it, you have to select Custom first).

After clicking OK, your video will be cropped as you like. Then, you can proceed with Exporting it – click on Export, choose your preferred settings, and save the video at last.

So, in this article, you have learned how to crop a video using a mobile app KineMaster, as well as using a software – Wondershare Filmora X. of course, there are many other ways in which you can crop your video and make the best out of it. The technology and innovation gives us the opportunity to have great results with as little work as just a few minutes. You might need to crop your video for your channel on Youtube, or for your page on social media, or an official web-page of your company; last but not least is cropping and editing your video for your own pleasure, which is also a great way to interact with the virtual world around us.
Scrolling down, we see a rich list of all the features KineMaster offers to its users, such as: Assets, Projects, Backup and Share, Blending Modes, Reverse, Chroma Key, High Resolution, Video Layers. Simply put, on KineMaster, you can download projects, add more than 2 500 effects, use powerful tools, add cinematic color, etc…

This many features make you think – how come it is possible to do all that on a mobile phone? How come Kinemaster is not only a software you can download, pay for, and use on your computer, which, on its behalf, should also be a powerful one? It would be a logical question, but remember, we are in 2022 already, so, no limits are put to the technology of today! On Google Play Store, in the description of the abovementioned app, it reads: “KineMaster makes video editing fun on your phone, tablet, or Chromebook!” – So, why not use this opportunity, to explore new ways of making our content better and as appealing as ever for our viewers?
Even though Kinemaster deserves a bigger article with more explanation of each tool, for now, we will only be focusing on cropping a video in this app. First off, why crop a video at all? – well, sometimes we have a wonderful footage but the aspect ratio just doesn’t work for us. It might be because we want to upload our clip on a platform needing a specific aspect ratio, or, we just need to crop and pan (which means to move around within a clip or an image) because we don’t like some things shown in the original video – we might as well need to zoom in and out, in order to get the best out of our footage. For whatever reason, when you need or just wish to crop a video, it should not be a big deal, and let’s see how KineMaster makes it a good and easy experience.
So, the first thing we do in almost every situation is to access the platform or an application itself! – you guessed it right, download KineMaster from Google Play Store! Once you have it on your phone, open it and enjoy the introduction of the app itself.

The interesting fact you will notice is that the layout of the app is horizontal, not vertical, unlike in most cases. So, it makes you feel like you are at least close to what video editors who work on their computers represent. The interface of the app is quite enjoyable for your eyes, as it is kind of fun, as well.
It is needless to say that, if you are going to do a specific “operation” to the video, such as cropping, you will already have figured out which one of your footage you want to crop and pan. So, it’s wise to jump on the button which says: Create New.

This will take you to the editor. Even though in the media section you will find the video you want to work on, but you might be struggling to notice a Crop button. It is because unfortunately, it’s not possible to crop your video right away in KineMaster – first, you will need to add a background, for example, a black one.

Then, you will go back to the menu and find Media section again to add the video clip you want to crop.

After adding it to the editor, you need to tap on the video file which has appeared in the sequence – this will show you different features you can use on the right. You have to scroll down a little and Voila! – here you find Cropping. After having clicked on that, a little cropping window will appear on the screen.

You can resize the clip, and in order to crop the video, turning on the mask option is needed.


After you have finished cropping and resizing it to your liking, you need to click on the icon on the top right, and it will take you to the Save and Share page.

There, you will choose the Resolution and Frame rate, and Save as Video.

You can check your new cropped video on your gallery.
An easier way to crop video in Wondershare Filmora
An alternate way of cropping your video would be Filmora Video Editor , which is a software you can download and install on your computer and use its features only then. You can also try your hand at this very handy computer program which has an easy and user-friendly interface.
For Win 7 or later (64-bit)
For macOS 10.14 or later
Frist, as mentioned, you need to download and install Wondershare Filmora X. To add your files, you will need to click on Import Media Files Here.

You will choose your clip(s) you would like to crop and then drag and drop it in the sequence.

Above your video in the sequence you will see little icons and find a Crop one.

After clicking on it, a new window will open – it’s for Crop and Zoom, where you can choose a needed ratio or do it manually (for it, you have to select Custom first).

After clicking OK, your video will be cropped as you like. Then, you can proceed with Exporting it – click on Export, choose your preferred settings, and save the video at last.

So, in this article, you have learned how to crop a video using a mobile app KineMaster, as well as using a software – Wondershare Filmora X. of course, there are many other ways in which you can crop your video and make the best out of it. The technology and innovation gives us the opportunity to have great results with as little work as just a few minutes. You might need to crop your video for your channel on Youtube, or for your page on social media, or an official web-page of your company; last but not least is cropping and editing your video for your own pleasure, which is also a great way to interact with the virtual world around us.
Scrolling down, we see a rich list of all the features KineMaster offers to its users, such as: Assets, Projects, Backup and Share, Blending Modes, Reverse, Chroma Key, High Resolution, Video Layers. Simply put, on KineMaster, you can download projects, add more than 2 500 effects, use powerful tools, add cinematic color, etc…

This many features make you think – how come it is possible to do all that on a mobile phone? How come Kinemaster is not only a software you can download, pay for, and use on your computer, which, on its behalf, should also be a powerful one? It would be a logical question, but remember, we are in 2022 already, so, no limits are put to the technology of today! On Google Play Store, in the description of the abovementioned app, it reads: “KineMaster makes video editing fun on your phone, tablet, or Chromebook!” – So, why not use this opportunity, to explore new ways of making our content better and as appealing as ever for our viewers?
Even though Kinemaster deserves a bigger article with more explanation of each tool, for now, we will only be focusing on cropping a video in this app. First off, why crop a video at all? – well, sometimes we have a wonderful footage but the aspect ratio just doesn’t work for us. It might be because we want to upload our clip on a platform needing a specific aspect ratio, or, we just need to crop and pan (which means to move around within a clip or an image) because we don’t like some things shown in the original video – we might as well need to zoom in and out, in order to get the best out of our footage. For whatever reason, when you need or just wish to crop a video, it should not be a big deal, and let’s see how KineMaster makes it a good and easy experience.
So, the first thing we do in almost every situation is to access the platform or an application itself! – you guessed it right, download KineMaster from Google Play Store! Once you have it on your phone, open it and enjoy the introduction of the app itself.

The interesting fact you will notice is that the layout of the app is horizontal, not vertical, unlike in most cases. So, it makes you feel like you are at least close to what video editors who work on their computers represent. The interface of the app is quite enjoyable for your eyes, as it is kind of fun, as well.
It is needless to say that, if you are going to do a specific “operation” to the video, such as cropping, you will already have figured out which one of your footage you want to crop and pan. So, it’s wise to jump on the button which says: Create New.

This will take you to the editor. Even though in the media section you will find the video you want to work on, but you might be struggling to notice a Crop button. It is because unfortunately, it’s not possible to crop your video right away in KineMaster – first, you will need to add a background, for example, a black one.

Then, you will go back to the menu and find Media section again to add the video clip you want to crop.

After adding it to the editor, you need to tap on the video file which has appeared in the sequence – this will show you different features you can use on the right. You have to scroll down a little and Voila! – here you find Cropping. After having clicked on that, a little cropping window will appear on the screen.

You can resize the clip, and in order to crop the video, turning on the mask option is needed.


After you have finished cropping and resizing it to your liking, you need to click on the icon on the top right, and it will take you to the Save and Share page.

There, you will choose the Resolution and Frame rate, and Save as Video.

You can check your new cropped video on your gallery.
An easier way to crop video in Wondershare Filmora
An alternate way of cropping your video would be Filmora Video Editor , which is a software you can download and install on your computer and use its features only then. You can also try your hand at this very handy computer program which has an easy and user-friendly interface.
For Win 7 or later (64-bit)
For macOS 10.14 or later
Frist, as mentioned, you need to download and install Wondershare Filmora X. To add your files, you will need to click on Import Media Files Here.

You will choose your clip(s) you would like to crop and then drag and drop it in the sequence.

Above your video in the sequence you will see little icons and find a Crop one.

After clicking on it, a new window will open – it’s for Crop and Zoom, where you can choose a needed ratio or do it manually (for it, you have to select Custom first).

After clicking OK, your video will be cropped as you like. Then, you can proceed with Exporting it – click on Export, choose your preferred settings, and save the video at last.

So, in this article, you have learned how to crop a video using a mobile app KineMaster, as well as using a software – Wondershare Filmora X. of course, there are many other ways in which you can crop your video and make the best out of it. The technology and innovation gives us the opportunity to have great results with as little work as just a few minutes. You might need to crop your video for your channel on Youtube, or for your page on social media, or an official web-page of your company; last but not least is cropping and editing your video for your own pleasure, which is also a great way to interact with the virtual world around us.
How to Make Video Slow Motion?
Slow-motion videos are in trend now, especially when shooting for Instagram Reels , TikTok videos, or YouTube Shorts . While many users record the entire video in slow motion, there are others who need only a particular section of a clip to play at a reduced speed. Nevertheless, slowing down footage is no longer rocket science, thanks to the advancements in technology, and the availability and ease of access to relevant apps.
That said, here you will learn what is needed to record a video in slow motion, and how to get the job done in a simple way. In addition, you will also learn how to reduce the playback speed of an already existing video if it was recorded at a normal pace.
In this article
01 How to Make Slow Motion Videos via Recording?
02 How to Apply the Smooth Slow-Motion Effect in Post-Production?
Part 1: How to Make Slow Motion Videos via Recording?
The fact is, the playback speed of a video is inversely proportional to the frames per second (FPS) it has been recorded in. Usually, to have a video play at normal speed, it is recorded at 24 FPS or 30 FPS. On the other hand, if you increase the frame rate (FPS) to 120 or 240, the playback speed slows down. You can easily check this if you have access to a DSLR camera or an iPhone. These devices allow you to adjust the FPS so the videos can be recorded in slow motion.
For your convenience and learning, the step-by-step procedure on how to record a video in slow motion using an iPhone is explained below:
Step 1: Get to the SLO-MO Mode
Launch the Camera app on your iPhone (iPhone 13 Pro Max is used here for illustrations), and swipe the screen to the left to get to the SLO-MO mode.

Step 2: Adjust Recording Preferences
Tap the number at the top-right corner to switch between 120 FPS and 240 FPS as needed. Tap 1x from the lower-middle section of the screen, and use the rotator to adjust your preferred zoom level.

Step 3: Start and Stop Recording
Tap the Record button from the bottom-center of the screen to begin recording the video in slow motion. Tap Stop when you are done. You can access the recorded video from the Videos container of the Photos app in your iPhone.
If you are using Android phone, you can check this article to find out more details about How to Record Super Slow Motion Videos on Your Phone.
You may also like: Best Slo-mo Camera Apps for Android And iPhone
Part 2: How to Apply the Smooth Slow-Motion Effect in Post-Production?
If you don’t have access to a camera that can record videos in slow motion, or in case you want to capture the footage at normal playback speed and then slow it down later, you need a dedicated tool to get the job done. Even though several post-production applications are available in the market, the one that is most versatile, has an intuitive interface, and is quite easy to use is Filmora video editor from Wondershare .
The latest version of the app, i.e., Wondershare Filmora 11 has a new feature called Speed Ramping that enables you to graphically manage the speed of the clips. While using the feature, you can either slow down the entire video or certain parts of it according to your requirements. For your learning, both the methods are explained below:
Method 1: Add Slow Motion Effect to the Whole Clip
For Win 7 or later (64-bit)
For macOS 10.12 or later
Step 1: Import the Source Video and Add to Timeline
Launch Wondershare Filmora on your Windows or Mac computer (a Windows 11 PC is used here for illustrations), click New Project from the first screen that appears. Make sure that the Media tool is selected from the standard tool bar at the top, click anywhere inside the Media window, and select and import the source clip to the program.

Next, hover the mouse over the thumbnail of the imported video in the Media window, and click the + icon present at its bottom-right corner. When the confirmation box comes up, click the Match to Media or Keep Project Settings button to change the project settings to match the resolution of the video, or change the footage to meet the project settings respectively.
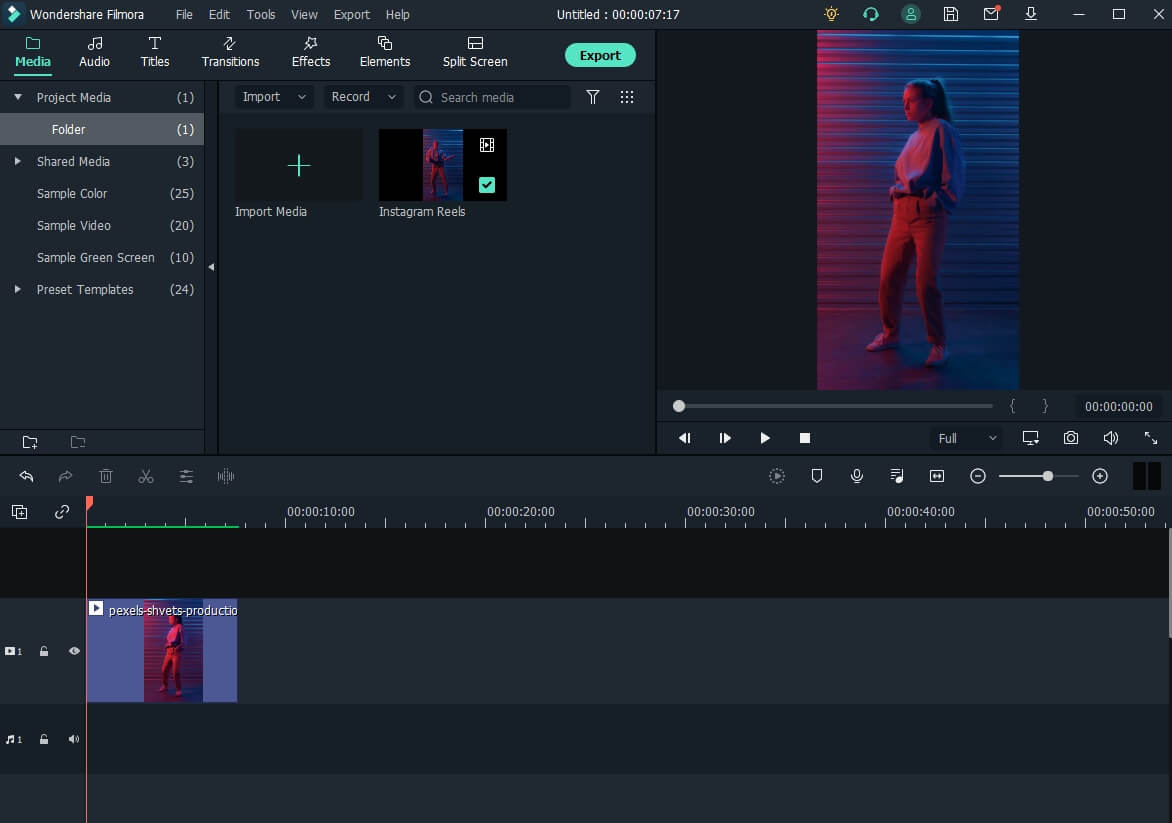
Step 2: Add Slow Motion Effect to the Whole Clip
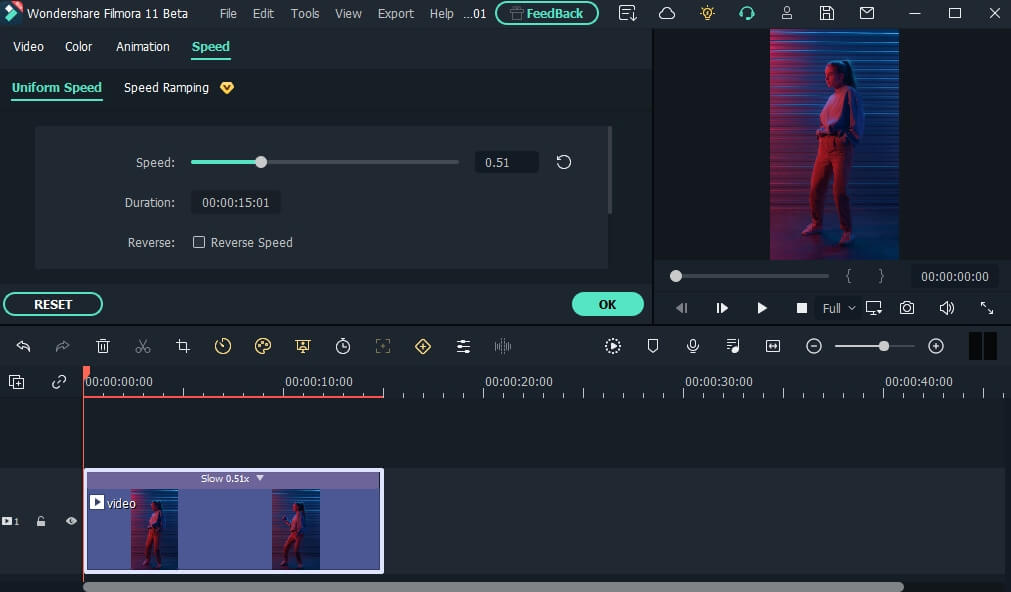
Once the media is added to the timeline, click on it and then click the Speed icon on the toolbar. Scroll down to the Slow menu and then you will see 0.5x, 0.25x, 0.1x, 0.05x and 0.01x presets. Select one to add slo-mo effects to the whole select clip. and click Speed Ramping from the menu that drops down.
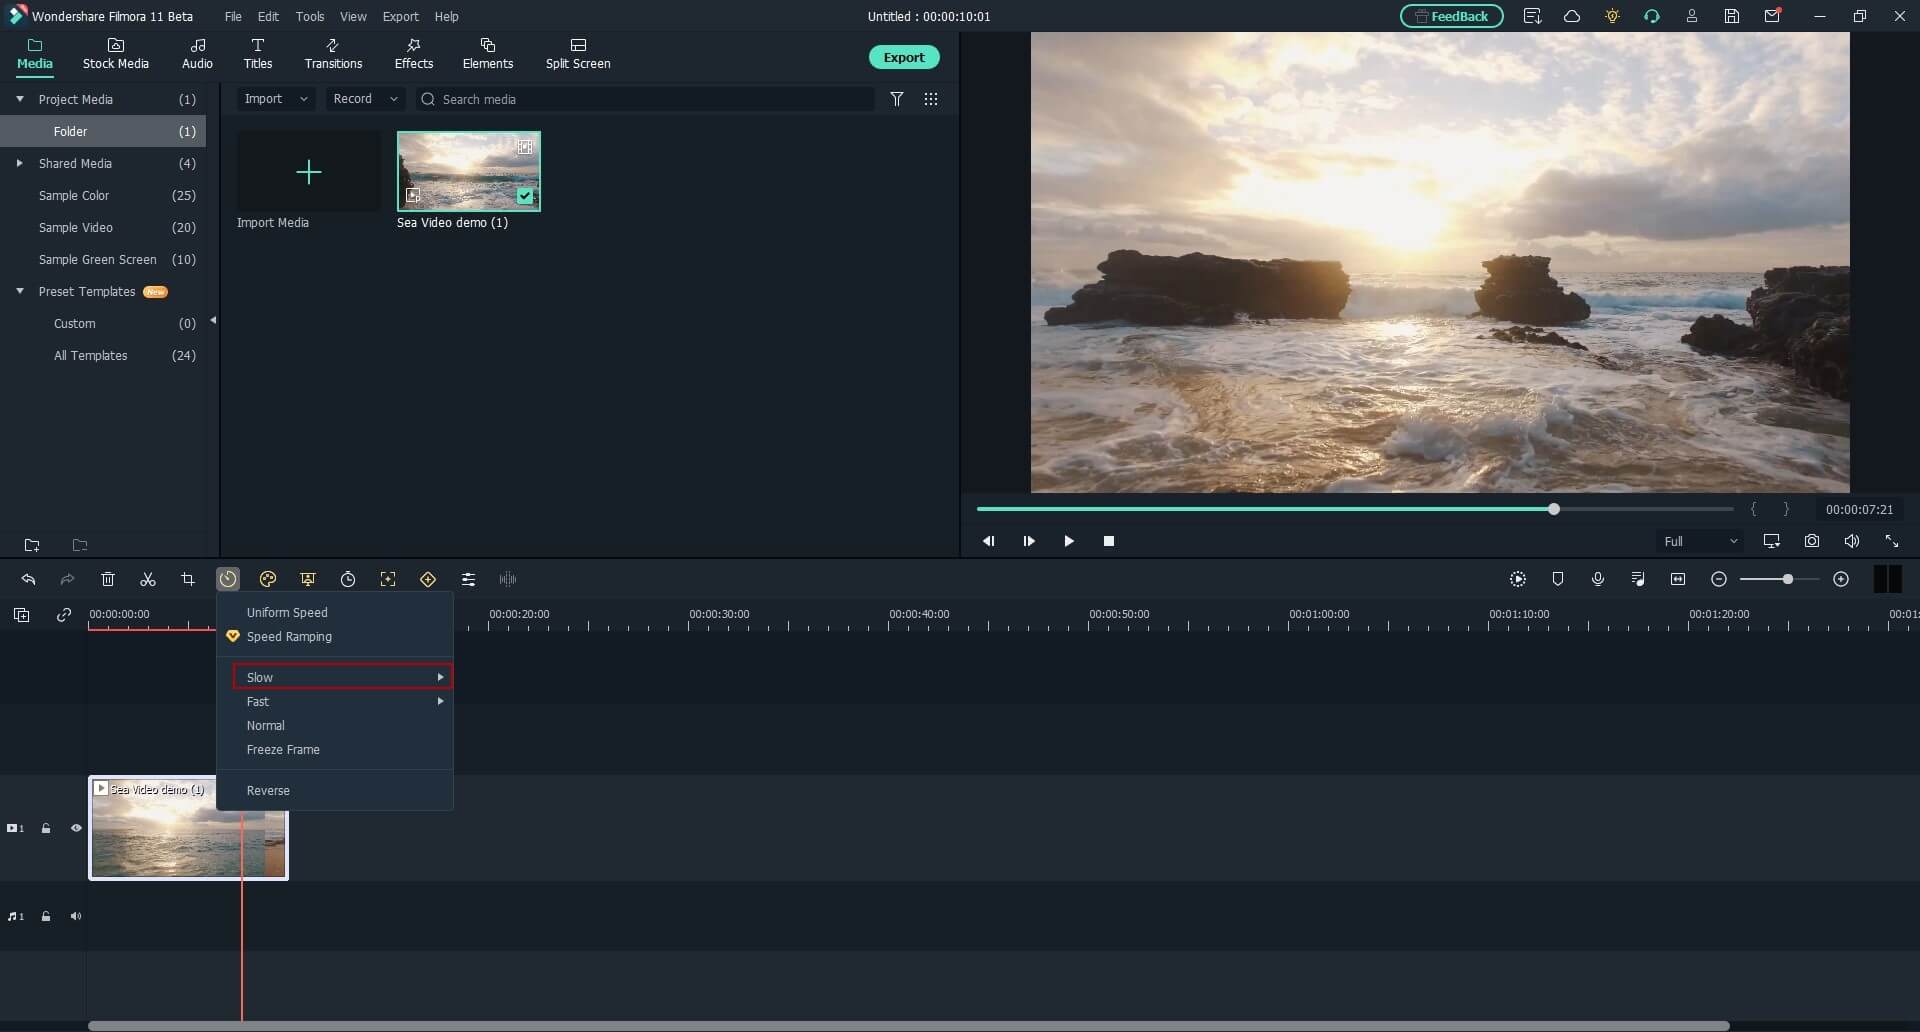
You can also right click the video in the timeline, and hover over to Speed option to select Uniform Speed to adjust the speed of the video to make a slo-mo effect video. Drag the speed slider to the left to slow down the video and you will see how many times it slowed down in the next field.
Method 2: Use Speed Ramping to Add Slow Motion Effect
For Win 7 or later (64-bit)
For macOS 10.12 or later
Speed Ramping enables you to add the slow-motion effect at different parts of a video and even freeze the screen for the duration that you specify. The processes to get these done are given below in detail:
Step 1: Add Source Video to Timeline and Get to the Speed Ramping Window
Use the process given in the previous method to import a source video to Wondershare Filmora 11 and add it to the Timeline. Then use the process given in the second step of the previous method to get to the Speed Ramping window.
Step 2: Add Slow Motion Effect to Different Parts of the Clip
Go to the Speed Ramping tab if it is not already selected, click Custom from the available options, and drag the adjustment points below the center line to reduce the playback speed for that particular section of the clip. Optionally, you can click any of the available presets to automatically add the slow-motion effect to the video.
Note: You can also drag the adjustment points above the line to increase the playback speed.
To add an adjustment point on the frame where it is not already present, place the playhead (skimmer) at the correct position, and click Add Adjust Point from the left of the Speed Ramping window itself. Once added, you can drag it downward to reduce the playback speed of that part of the clip.

Step 3: Freeze the Video
Place the skimmer on the frame where you want to freeze the video for a while, and click Add Freeze Frame from the left of the Speed Ramping window. When the time box appears, in the Freeze Time field, enter the duration in seconds you want to freeze the screen for, and click OK.
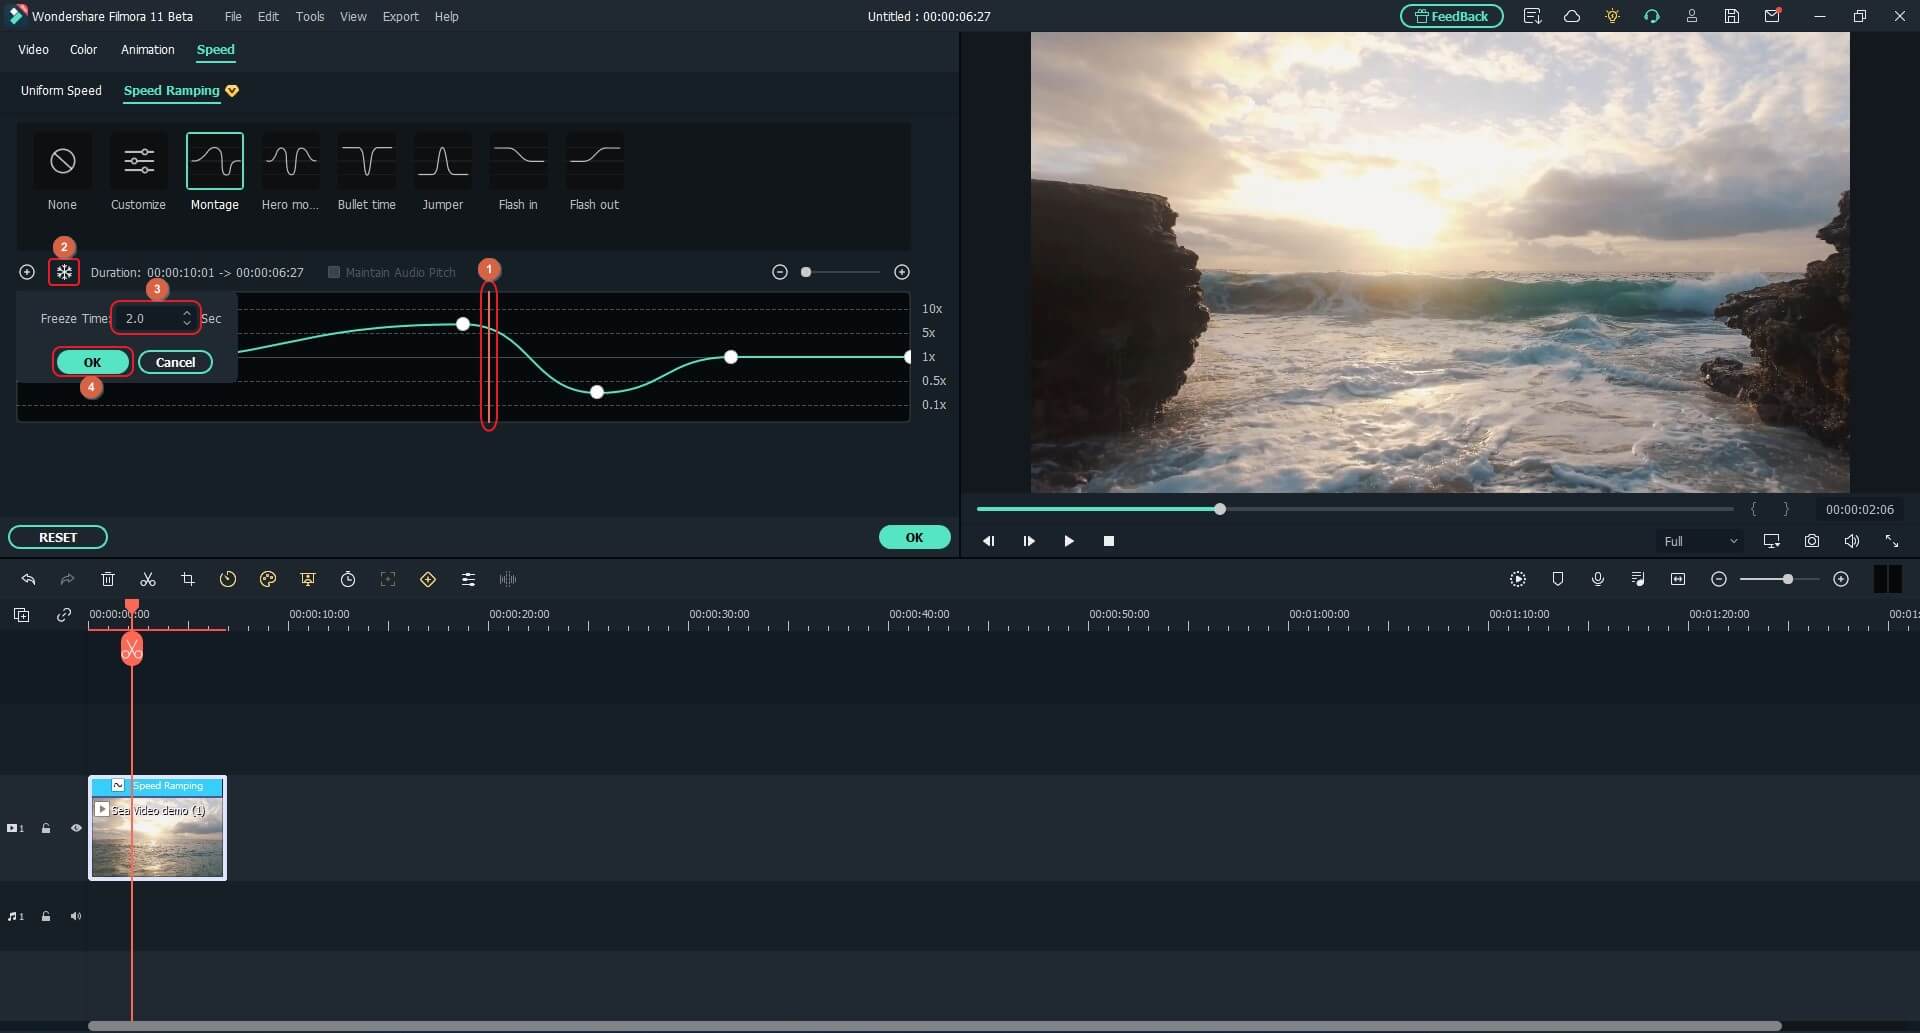
After adding a freeze point, optionally, you can drag and reposition it in the Speed Ramping timeline as needed. Finally, click OK from the bottom-right area to save the changes.
Part 3: When to Use Slow Motion?
There could be many instances when you want to add a slow-motion effect to your videos. Some of the most common ones include:
- Add Focus
If there is a particular scene in a clip that you want the audience to focus on, it would be a good idea to add the slow-motion effect right before that action appears on the screen, and bring the speed back to normal when the section is over.
- Skill or Style Demonstration
When a clip is playing at a normal speed, many times, the audience isn’t able to see the skills that you want to display. This is where you may want to add the slow-motion effect so that every detail can be noticed clearly and in detail.
- Replays
Mostly used for tournaments and matches where the actual action is to replayed so the audience, umpires, and other viewers can see the movements in detail before making the right decision.
- Observation
Some natural phenomena such as a deer running in the woods, a balloon full of water bursting, etc. occur quite quickly. If you want to witness such things clearly and in detail, it would be good to record them, and then reduce the playback speed for better viewing.
- Add Suspense
When you add the slow-motion effect to a scene, the impulse of the audience is automatically increased, and they take that particular section more seriously and with a thrill.
Conclusion
The slow-motion effect is inversely proportional to the framerate, i.e., frames per second or FPS. Almost all DSLR cameras that are available nowadays allow you to switch between different FPS values (typically 120 and 240) before recording. Also, if you have access to an iPhone, its Camera app has a built-in SLO-MO mode that can capture the footage in slow motion.
In addition, if you already have a video that has been recorded at a normal speed, you can use an efficient post-production software like Wondershare Filmora 11, and exploit its Speed Ramping feature to add the slow-motion effect at different scenes of a clip.
02 How to Apply the Smooth Slow-Motion Effect in Post-Production?
Part 1: How to Make Slow Motion Videos via Recording?
The fact is, the playback speed of a video is inversely proportional to the frames per second (FPS) it has been recorded in. Usually, to have a video play at normal speed, it is recorded at 24 FPS or 30 FPS. On the other hand, if you increase the frame rate (FPS) to 120 or 240, the playback speed slows down. You can easily check this if you have access to a DSLR camera or an iPhone. These devices allow you to adjust the FPS so the videos can be recorded in slow motion.
For your convenience and learning, the step-by-step procedure on how to record a video in slow motion using an iPhone is explained below:
Step 1: Get to the SLO-MO Mode
Launch the Camera app on your iPhone (iPhone 13 Pro Max is used here for illustrations), and swipe the screen to the left to get to the SLO-MO mode.

Step 2: Adjust Recording Preferences
Tap the number at the top-right corner to switch between 120 FPS and 240 FPS as needed. Tap 1x from the lower-middle section of the screen, and use the rotator to adjust your preferred zoom level.

Step 3: Start and Stop Recording
Tap the Record button from the bottom-center of the screen to begin recording the video in slow motion. Tap Stop when you are done. You can access the recorded video from the Videos container of the Photos app in your iPhone.
If you are using Android phone, you can check this article to find out more details about How to Record Super Slow Motion Videos on Your Phone.
You may also like: Best Slo-mo Camera Apps for Android And iPhone
Part 2: How to Apply the Smooth Slow-Motion Effect in Post-Production?
If you don’t have access to a camera that can record videos in slow motion, or in case you want to capture the footage at normal playback speed and then slow it down later, you need a dedicated tool to get the job done. Even though several post-production applications are available in the market, the one that is most versatile, has an intuitive interface, and is quite easy to use is Filmora video editor from Wondershare .
The latest version of the app, i.e., Wondershare Filmora 11 has a new feature called Speed Ramping that enables you to graphically manage the speed of the clips. While using the feature, you can either slow down the entire video or certain parts of it according to your requirements. For your learning, both the methods are explained below:
Method 1: Add Slow Motion Effect to the Whole Clip
For Win 7 or later (64-bit)
For macOS 10.12 or later
Step 1: Import the Source Video and Add to Timeline
Launch Wondershare Filmora on your Windows or Mac computer (a Windows 11 PC is used here for illustrations), click New Project from the first screen that appears. Make sure that the Media tool is selected from the standard tool bar at the top, click anywhere inside the Media window, and select and import the source clip to the program.

Next, hover the mouse over the thumbnail of the imported video in the Media window, and click the + icon present at its bottom-right corner. When the confirmation box comes up, click the Match to Media or Keep Project Settings button to change the project settings to match the resolution of the video, or change the footage to meet the project settings respectively.

Step 2: Add Slow Motion Effect to the Whole Clip
Once the media is added to the timeline, click on it and then click the Speed icon on the toolbar. Scroll down to the Slow menu and then you will see 0.5x, 0.25x, 0.1x, 0.05x and 0.01x presets. Select one to add slo-mo effects to the whole select clip. and click Speed Ramping from the menu that drops down.

You can also right click the video in the timeline, and hover over to Speed option to select Uniform Speed to adjust the speed of the video to make a slo-mo effect video. Drag the speed slider to the left to slow down the video and you will see how many times it slowed down in the next field.

Method 2: Use Speed Ramping to Add Slow Motion Effect
For Win 7 or later (64-bit)
For macOS 10.12 or later
Speed Ramping enables you to add the slow-motion effect at different parts of a video and even freeze the screen for the duration that you specify. The processes to get these done are given below in detail:
Step 1: Add Source Video to Timeline and Get to the Speed Ramping Window
Use the process given in the previous method to import a source video to Wondershare Filmora 11 and add it to the Timeline. Then use the process given in the second step of the previous method to get to the Speed Ramping window.
Step 2: Add Slow Motion Effect to Different Parts of the Clip
Go to the Speed Ramping tab if it is not already selected, click Custom from the available options, and drag the adjustment points below the center line to reduce the playback speed for that particular section of the clip. Optionally, you can click any of the available presets to automatically add the slow-motion effect to the video.
Note: You can also drag the adjustment points above the line to increase the playback speed.
To add an adjustment point on the frame where it is not already present, place the playhead (skimmer) at the correct position, and click Add Adjust Point from the left of the Speed Ramping window itself. Once added, you can drag it downward to reduce the playback speed of that part of the clip.

Step 3: Freeze the Video
Place the skimmer on the frame where you want to freeze the video for a while, and click Add Freeze Frame from the left of the Speed Ramping window. When the time box appears, in the Freeze Time field, enter the duration in seconds you want to freeze the screen for, and click OK.

After adding a freeze point, optionally, you can drag and reposition it in the Speed Ramping timeline as needed. Finally, click OK from the bottom-right area to save the changes.
Part 3: When to Use Slow Motion?
There could be many instances when you want to add a slow-motion effect to your videos. Some of the most common ones include:
- Add Focus
If there is a particular scene in a clip that you want the audience to focus on, it would be a good idea to add the slow-motion effect right before that action appears on the screen, and bring the speed back to normal when the section is over.
- Skill or Style Demonstration
When a clip is playing at a normal speed, many times, the audience isn’t able to see the skills that you want to display. This is where you may want to add the slow-motion effect so that every detail can be noticed clearly and in detail.
- Replays
Mostly used for tournaments and matches where the actual action is to replayed so the audience, umpires, and other viewers can see the movements in detail before making the right decision.
- Observation
Some natural phenomena such as a deer running in the woods, a balloon full of water bursting, etc. occur quite quickly. If you want to witness such things clearly and in detail, it would be good to record them, and then reduce the playback speed for better viewing.
- Add Suspense
When you add the slow-motion effect to a scene, the impulse of the audience is automatically increased, and they take that particular section more seriously and with a thrill.
Conclusion
The slow-motion effect is inversely proportional to the framerate, i.e., frames per second or FPS. Almost all DSLR cameras that are available nowadays allow you to switch between different FPS values (typically 120 and 240) before recording. Also, if you have access to an iPhone, its Camera app has a built-in SLO-MO mode that can capture the footage in slow motion.
In addition, if you already have a video that has been recorded at a normal speed, you can use an efficient post-production software like Wondershare Filmora 11, and exploit its Speed Ramping feature to add the slow-motion effect at different scenes of a clip.
02 How to Apply the Smooth Slow-Motion Effect in Post-Production?
Part 1: How to Make Slow Motion Videos via Recording?
The fact is, the playback speed of a video is inversely proportional to the frames per second (FPS) it has been recorded in. Usually, to have a video play at normal speed, it is recorded at 24 FPS or 30 FPS. On the other hand, if you increase the frame rate (FPS) to 120 or 240, the playback speed slows down. You can easily check this if you have access to a DSLR camera or an iPhone. These devices allow you to adjust the FPS so the videos can be recorded in slow motion.
For your convenience and learning, the step-by-step procedure on how to record a video in slow motion using an iPhone is explained below:
Step 1: Get to the SLO-MO Mode
Launch the Camera app on your iPhone (iPhone 13 Pro Max is used here for illustrations), and swipe the screen to the left to get to the SLO-MO mode.

Step 2: Adjust Recording Preferences
Tap the number at the top-right corner to switch between 120 FPS and 240 FPS as needed. Tap 1x from the lower-middle section of the screen, and use the rotator to adjust your preferred zoom level.

Step 3: Start and Stop Recording
Tap the Record button from the bottom-center of the screen to begin recording the video in slow motion. Tap Stop when you are done. You can access the recorded video from the Videos container of the Photos app in your iPhone.
If you are using Android phone, you can check this article to find out more details about How to Record Super Slow Motion Videos on Your Phone.
You may also like: Best Slo-mo Camera Apps for Android And iPhone
Part 2: How to Apply the Smooth Slow-Motion Effect in Post-Production?
If you don’t have access to a camera that can record videos in slow motion, or in case you want to capture the footage at normal playback speed and then slow it down later, you need a dedicated tool to get the job done. Even though several post-production applications are available in the market, the one that is most versatile, has an intuitive interface, and is quite easy to use is Filmora video editor from Wondershare .
The latest version of the app, i.e., Wondershare Filmora 11 has a new feature called Speed Ramping that enables you to graphically manage the speed of the clips. While using the feature, you can either slow down the entire video or certain parts of it according to your requirements. For your learning, both the methods are explained below:
Method 1: Add Slow Motion Effect to the Whole Clip
For Win 7 or later (64-bit)
For macOS 10.12 or later
Step 1: Import the Source Video and Add to Timeline
Launch Wondershare Filmora on your Windows or Mac computer (a Windows 11 PC is used here for illustrations), click New Project from the first screen that appears. Make sure that the Media tool is selected from the standard tool bar at the top, click anywhere inside the Media window, and select and import the source clip to the program.

Next, hover the mouse over the thumbnail of the imported video in the Media window, and click the + icon present at its bottom-right corner. When the confirmation box comes up, click the Match to Media or Keep Project Settings button to change the project settings to match the resolution of the video, or change the footage to meet the project settings respectively.

Step 2: Add Slow Motion Effect to the Whole Clip
Once the media is added to the timeline, click on it and then click the Speed icon on the toolbar. Scroll down to the Slow menu and then you will see 0.5x, 0.25x, 0.1x, 0.05x and 0.01x presets. Select one to add slo-mo effects to the whole select clip. and click Speed Ramping from the menu that drops down.

You can also right click the video in the timeline, and hover over to Speed option to select Uniform Speed to adjust the speed of the video to make a slo-mo effect video. Drag the speed slider to the left to slow down the video and you will see how many times it slowed down in the next field.

Method 2: Use Speed Ramping to Add Slow Motion Effect
For Win 7 or later (64-bit)
For macOS 10.12 or later
Speed Ramping enables you to add the slow-motion effect at different parts of a video and even freeze the screen for the duration that you specify. The processes to get these done are given below in detail:
Step 1: Add Source Video to Timeline and Get to the Speed Ramping Window
Use the process given in the previous method to import a source video to Wondershare Filmora 11 and add it to the Timeline. Then use the process given in the second step of the previous method to get to the Speed Ramping window.
Step 2: Add Slow Motion Effect to Different Parts of the Clip
Go to the Speed Ramping tab if it is not already selected, click Custom from the available options, and drag the adjustment points below the center line to reduce the playback speed for that particular section of the clip. Optionally, you can click any of the available presets to automatically add the slow-motion effect to the video.
Note: You can also drag the adjustment points above the line to increase the playback speed.
To add an adjustment point on the frame where it is not already present, place the playhead (skimmer) at the correct position, and click Add Adjust Point from the left of the Speed Ramping window itself. Once added, you can drag it downward to reduce the playback speed of that part of the clip.

Step 3: Freeze the Video
Place the skimmer on the frame where you want to freeze the video for a while, and click Add Freeze Frame from the left of the Speed Ramping window. When the time box appears, in the Freeze Time field, enter the duration in seconds you want to freeze the screen for, and click OK.

After adding a freeze point, optionally, you can drag and reposition it in the Speed Ramping timeline as needed. Finally, click OK from the bottom-right area to save the changes.
Part 3: When to Use Slow Motion?
There could be many instances when you want to add a slow-motion effect to your videos. Some of the most common ones include:
- Add Focus
If there is a particular scene in a clip that you want the audience to focus on, it would be a good idea to add the slow-motion effect right before that action appears on the screen, and bring the speed back to normal when the section is over.
- Skill or Style Demonstration
When a clip is playing at a normal speed, many times, the audience isn’t able to see the skills that you want to display. This is where you may want to add the slow-motion effect so that every detail can be noticed clearly and in detail.
- Replays
Mostly used for tournaments and matches where the actual action is to replayed so the audience, umpires, and other viewers can see the movements in detail before making the right decision.
- Observation
Some natural phenomena such as a deer running in the woods, a balloon full of water bursting, etc. occur quite quickly. If you want to witness such things clearly and in detail, it would be good to record them, and then reduce the playback speed for better viewing.
- Add Suspense
When you add the slow-motion effect to a scene, the impulse of the audience is automatically increased, and they take that particular section more seriously and with a thrill.
Conclusion
The slow-motion effect is inversely proportional to the framerate, i.e., frames per second or FPS. Almost all DSLR cameras that are available nowadays allow you to switch between different FPS values (typically 120 and 240) before recording. Also, if you have access to an iPhone, its Camera app has a built-in SLO-MO mode that can capture the footage in slow motion.
In addition, if you already have a video that has been recorded at a normal speed, you can use an efficient post-production software like Wondershare Filmora 11, and exploit its Speed Ramping feature to add the slow-motion effect at different scenes of a clip.
02 How to Apply the Smooth Slow-Motion Effect in Post-Production?
Part 1: How to Make Slow Motion Videos via Recording?
The fact is, the playback speed of a video is inversely proportional to the frames per second (FPS) it has been recorded in. Usually, to have a video play at normal speed, it is recorded at 24 FPS or 30 FPS. On the other hand, if you increase the frame rate (FPS) to 120 or 240, the playback speed slows down. You can easily check this if you have access to a DSLR camera or an iPhone. These devices allow you to adjust the FPS so the videos can be recorded in slow motion.
For your convenience and learning, the step-by-step procedure on how to record a video in slow motion using an iPhone is explained below:
Step 1: Get to the SLO-MO Mode
Launch the Camera app on your iPhone (iPhone 13 Pro Max is used here for illustrations), and swipe the screen to the left to get to the SLO-MO mode.

Step 2: Adjust Recording Preferences
Tap the number at the top-right corner to switch between 120 FPS and 240 FPS as needed. Tap 1x from the lower-middle section of the screen, and use the rotator to adjust your preferred zoom level.

Step 3: Start and Stop Recording
Tap the Record button from the bottom-center of the screen to begin recording the video in slow motion. Tap Stop when you are done. You can access the recorded video from the Videos container of the Photos app in your iPhone.
If you are using Android phone, you can check this article to find out more details about How to Record Super Slow Motion Videos on Your Phone.
You may also like: Best Slo-mo Camera Apps for Android And iPhone
Part 2: How to Apply the Smooth Slow-Motion Effect in Post-Production?
If you don’t have access to a camera that can record videos in slow motion, or in case you want to capture the footage at normal playback speed and then slow it down later, you need a dedicated tool to get the job done. Even though several post-production applications are available in the market, the one that is most versatile, has an intuitive interface, and is quite easy to use is Filmora video editor from Wondershare .
The latest version of the app, i.e., Wondershare Filmora 11 has a new feature called Speed Ramping that enables you to graphically manage the speed of the clips. While using the feature, you can either slow down the entire video or certain parts of it according to your requirements. For your learning, both the methods are explained below:
Method 1: Add Slow Motion Effect to the Whole Clip
For Win 7 or later (64-bit)
For macOS 10.12 or later
Step 1: Import the Source Video and Add to Timeline
Launch Wondershare Filmora on your Windows or Mac computer (a Windows 11 PC is used here for illustrations), click New Project from the first screen that appears. Make sure that the Media tool is selected from the standard tool bar at the top, click anywhere inside the Media window, and select and import the source clip to the program.

Next, hover the mouse over the thumbnail of the imported video in the Media window, and click the + icon present at its bottom-right corner. When the confirmation box comes up, click the Match to Media or Keep Project Settings button to change the project settings to match the resolution of the video, or change the footage to meet the project settings respectively.

Step 2: Add Slow Motion Effect to the Whole Clip
Once the media is added to the timeline, click on it and then click the Speed icon on the toolbar. Scroll down to the Slow menu and then you will see 0.5x, 0.25x, 0.1x, 0.05x and 0.01x presets. Select one to add slo-mo effects to the whole select clip. and click Speed Ramping from the menu that drops down.

You can also right click the video in the timeline, and hover over to Speed option to select Uniform Speed to adjust the speed of the video to make a slo-mo effect video. Drag the speed slider to the left to slow down the video and you will see how many times it slowed down in the next field.

Method 2: Use Speed Ramping to Add Slow Motion Effect
For Win 7 or later (64-bit)
For macOS 10.12 or later
Speed Ramping enables you to add the slow-motion effect at different parts of a video and even freeze the screen for the duration that you specify. The processes to get these done are given below in detail:
Step 1: Add Source Video to Timeline and Get to the Speed Ramping Window
Use the process given in the previous method to import a source video to Wondershare Filmora 11 and add it to the Timeline. Then use the process given in the second step of the previous method to get to the Speed Ramping window.
Step 2: Add Slow Motion Effect to Different Parts of the Clip
Go to the Speed Ramping tab if it is not already selected, click Custom from the available options, and drag the adjustment points below the center line to reduce the playback speed for that particular section of the clip. Optionally, you can click any of the available presets to automatically add the slow-motion effect to the video.
Note: You can also drag the adjustment points above the line to increase the playback speed.
To add an adjustment point on the frame where it is not already present, place the playhead (skimmer) at the correct position, and click Add Adjust Point from the left of the Speed Ramping window itself. Once added, you can drag it downward to reduce the playback speed of that part of the clip.

Step 3: Freeze the Video
Place the skimmer on the frame where you want to freeze the video for a while, and click Add Freeze Frame from the left of the Speed Ramping window. When the time box appears, in the Freeze Time field, enter the duration in seconds you want to freeze the screen for, and click OK.

After adding a freeze point, optionally, you can drag and reposition it in the Speed Ramping timeline as needed. Finally, click OK from the bottom-right area to save the changes.
Part 3: When to Use Slow Motion?
There could be many instances when you want to add a slow-motion effect to your videos. Some of the most common ones include:
- Add Focus
If there is a particular scene in a clip that you want the audience to focus on, it would be a good idea to add the slow-motion effect right before that action appears on the screen, and bring the speed back to normal when the section is over.
- Skill or Style Demonstration
When a clip is playing at a normal speed, many times, the audience isn’t able to see the skills that you want to display. This is where you may want to add the slow-motion effect so that every detail can be noticed clearly and in detail.
- Replays
Mostly used for tournaments and matches where the actual action is to replayed so the audience, umpires, and other viewers can see the movements in detail before making the right decision.
- Observation
Some natural phenomena such as a deer running in the woods, a balloon full of water bursting, etc. occur quite quickly. If you want to witness such things clearly and in detail, it would be good to record them, and then reduce the playback speed for better viewing.
- Add Suspense
When you add the slow-motion effect to a scene, the impulse of the audience is automatically increased, and they take that particular section more seriously and with a thrill.
Conclusion
The slow-motion effect is inversely proportional to the framerate, i.e., frames per second or FPS. Almost all DSLR cameras that are available nowadays allow you to switch between different FPS values (typically 120 and 240) before recording. Also, if you have access to an iPhone, its Camera app has a built-in SLO-MO mode that can capture the footage in slow motion.
In addition, if you already have a video that has been recorded at a normal speed, you can use an efficient post-production software like Wondershare Filmora 11, and exploit its Speed Ramping feature to add the slow-motion effect at different scenes of a clip.
Best Online GIF to Image (PNG/JPG) Converters
Great Video Converter - Wondershare Filmora
Provide abundant video effects - A creative video editor
Powerful color correction and grading
Detailed tutorials provided by the official channel
There are times you may need to convert GIFs into PNG or PNG and avoid losing image quality. Yet still, it can be tricky to carry this out without losing quality. This is the reason you need a powerful third-party image converter. So today, I will give you a list of the best GIF to image converters online. Let’s dive right in!
In addition, before jumping right into the conversion processes, it is paramount to know that many of these tools are free-to-all and offer exciting customization options. However, some might have specific requirements or conversion size limits. That aside, let’s now discuss how we can convert GIF into PNG online:
In this article
Part 1: Best Online GIF to PNG/JPG Converters
Part 2: How to Convert GIF to PNG?
Part 3: How to Convert GIF to JPG?
Part 1: Best Online GIF to PNG/JPG Converters
FileZigZag
This method can transfer GIF to JPG or PNG online, i.e., it does not require users to download any third-party software. In addition, it supports a wide range of formats, including PNG, WMA, SWF, image, documents, ZIP, MOV, etc.
This is a straightforward process: upload your image and choose the required format. Then input your email address, and the converter will send you a mail within minutes with the conversion.
Features
- Images, documents, audio and video files, ebooks, archival files, and webpages can all be converted with FileZigZag.
- Users will upload or drag a file to the platform.
- It supports a wide range of conversion formats.
- Convert files in minutes
Pros
It is convenient and free to use
The process is effortless, and the conversion speed is moderate
it provides users with sharing option
convert images in a real-time
Cons
You need to wait for a confirmation email, making it a little slow compared to other converters.
CoolUtils Online Image Converter
This is an online converter that gets rid of the need to download any software. In addition, you can get the conversion without wasting any time, and there is no need to wait for an email link.
Features
- To convert your files from GIF to JPG, PNG to JPG, and JPG to PNG, JPEG, or TIFF.
- Drag and drop your source file.
- Convert file online in a matter of seconds.
Pros
It allows users to rotate and resize the image before conversion.
It is compatible with nearly all operating system
It supports many file formats like JPEG, GIF, BMP, etc.
Cons
As of now, nothing in particular
ZAMZAR
This is a comprehensive GIF to PNG and JPG online converter that helps users convert GIF files to any photo format, including PNG and JPG format, for free.
Features
- Allows the addition of GIF files from your computer directly without downloading any programs to your PC.
- It requires only a few steps in converting GIF to JPG format
- It supports several video and photo formats in converting different formats easily
Pros
It is 100% simple to use
Support various input and output formats
No software installation is required
The software is free for conversions up to 100MB
Cons
Most users say the conversion process is a little too slow
The restriction of free conversion up to 100 MB makes it difficult in converting huge files
Ezgif
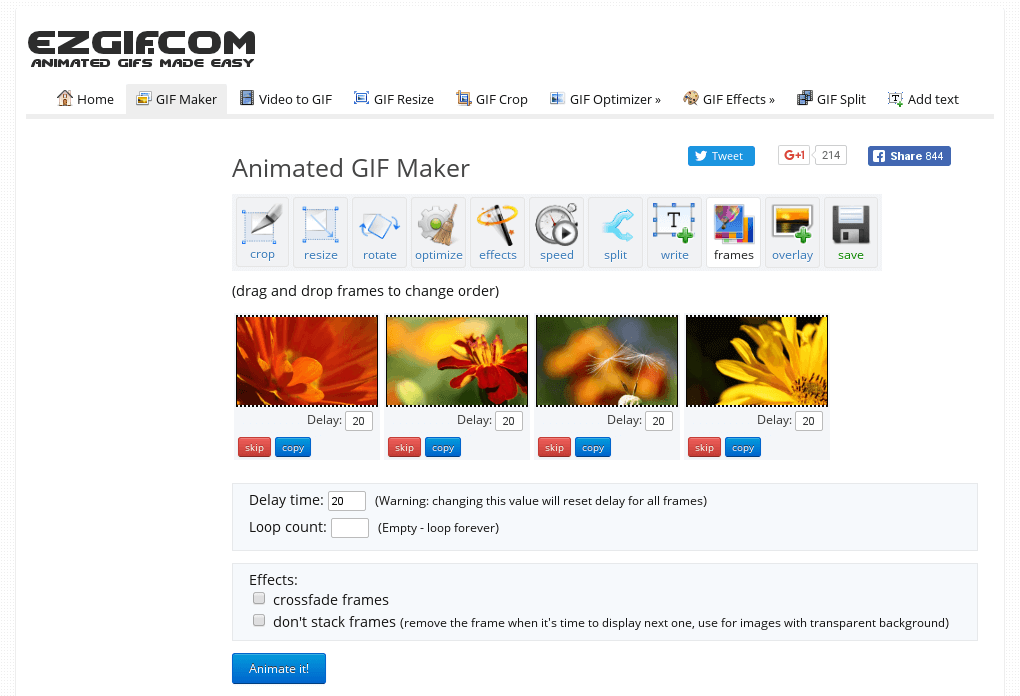
This is a free GIF to JPG converter that allows you to turn your GIF into an image with a single click leaving no watermark on the picture. In addition, the process is relatively easy to use as you need to upload a GIF file up to 35MB, then click the “Convert “ button, and your image will be ready.
Features:
- It performs most picture editing tasks, such as scaling, optimization, and cropping.
- Making, optimizing, trimming, and resizing animated GIFs with gifsicle and lossygif.
- For video conversions and editing, use FFmpeg.
Pros
Fast and free
No watermark
No Ads
No software downloads
Cons
It is sometimes slow
This online editing tool is a complete package that enables you to choose more than 80 different operations, which include the following:
Features:
- It allows Metadata Editing, i.e., editing the data before saving and converting it.
- Transform your pictures as well as resize, rotate, etc.
- Colors can adjust according to users’ preference
- Includes the addition of different filters, including emboss, sharpen, blur, etc.
- Users can do special effects like; vignetting, watermarking, etc.
Pros
Supports 500+ formats
Available on Mac, Windows, and Linux OS
Available in 20+ different languages
Advanced options available.
Cons
Some specific programs require constant updates.
Picresize
This is a free web-based GIF to JPG Converter that lets users add pictures for editing by uploading, linking, URL, etc. It is a customizable, lightweight tool for free editing images and photos online.
Features:
- Shrink and enlarge your photos
- It can crop your images for print or social media.
- Flip and rotate your pictures.
- Reduce the file size of your photos to the desired quality or disk size.
- Get web-ready image files by converting your photos or graphics into BMP, GIF. JPG or PNG format
Pros
It is an easy-to-use software
Support many formats
Compatible with a lot of Operating System
Allows changing the quality of the output file
Cons
There are limited settings compared to other editing software
This is a free Image Convert and Resize editor that is compact yet powerful for batch mode image processing. In addition, the program can easily convert separate images and file folders containing images into different renames, graphic formats, and reorders and changes their size following the set parameters. The supported image file formats for this software include; JPG, PNG, BMP, GIF, TGA, and PDF (export only).
Features:
- It is a compact program required for batch mode image processing.
- It allows the conversion of separate images and file folders to resize them accordingly
- The software is safe to run and use
- There is an option to install additional features according to your requirement
Pros
A secure option for beginners.
This small program is quite light on your system.
It is customizable.
Cons
Not all image format is supported compared to other converters
This software allows the conversion of all your digital pictures for sending email, on your website, posting on auction sites, etc. It provides a straight way to batch convert your digital images according to your need and add your watermark.
Features:
- Allows users to carry out batch conversion
- Enables users to import multiple photos from a folder
- Allows users to add their watermark
- Users can rotate, resize, and alter the images before and after conversion.
- Enables the creation of thumbnail pictures
- Users can upload their pictures to a dedicated server using the built-in FTP client.
Pros
The online help desk is highly responsive
Exceptional quality
Reasonable price
There are no prerequisites related to knowledge or experience.
Massive demands
Cons
Based on users’ preferences, nothing major.
Based on the above list, we have picked two excellent GIF to PNG and GIF to JPG converters that will serve you the best across the industry. Let us look at them one by one.
Part 2: How to Convert GIF to PNG?
Undeniably, Convertio is the clearest GIF to PNG online converter on this list. The numbered steps make it super-easy to use as users can convert GIF to PNG, TIFF, TGA, JPG, BMP, and many others.
Step 1: Access the Website and Add Files
Log in to Convertio and click the Add Files button to add your GIF file. You can besides directly drag and drop your GIF file to the timeline.

Step 2: Search and Choose the Format
Open the File drop-down list and select PNG open under the Image Formats.

Step 3: Convert and Download
Finally, click the Convert Now button to convert GIF to PNG.
Part 3: How to Convert GIF to JPG?
Ezgif is also a robust GIF converter that supports converting any image format to JPG without losing quality. It also supports the conversion of GIFs to other formats like PNG, WebP, or PDF formats.
Step 1: Import GIF
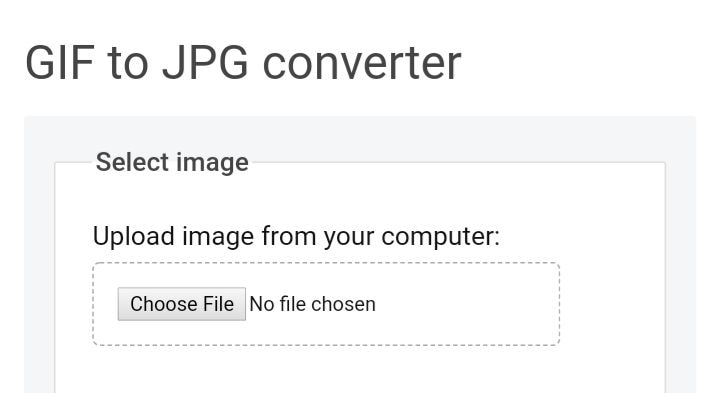
After logging in to the website and clicking the Choose file button to import your local GIF file, you can import multiple files having a total file size of less than 35MB.
Step 2: Start Editing GIF
Next is to click the Upload button to start editing your GIF file (cut, add text, resize, rotate) before converting it.
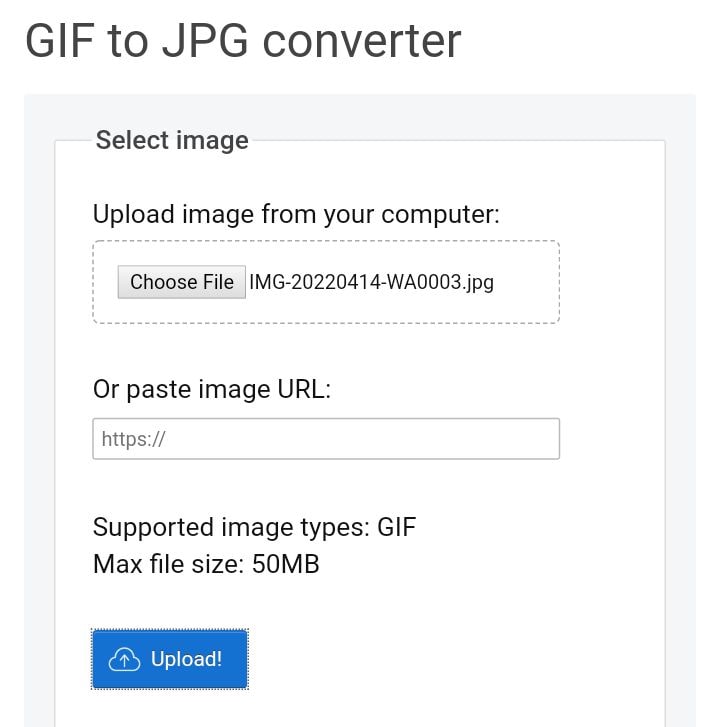
Step 3: Convert to APNG and Save
Finally, click the Convert to APNG! button to start converting, and your image is ready.
Conclusion
This article gave a detailed breakdown of GIF to PNG converter and explained how to convert GIF into JPG or PNG effectively.
Also, in the last two parts, you got details on how to use Convertio and Ezgif to convert GIF to PNG in a few simple steps.
There are times you may need to convert GIFs into PNG or PNG and avoid losing image quality. Yet still, it can be tricky to carry this out without losing quality. This is the reason you need a powerful third-party image converter. So today, I will give you a list of the best GIF to image converters online. Let’s dive right in!
In addition, before jumping right into the conversion processes, it is paramount to know that many of these tools are free-to-all and offer exciting customization options. However, some might have specific requirements or conversion size limits. That aside, let’s now discuss how we can convert GIF into PNG online:
In this article
Part 1: Best Online GIF to PNG/JPG Converters
Part 2: How to Convert GIF to PNG?
Part 3: How to Convert GIF to JPG?
Part 1: Best Online GIF to PNG/JPG Converters
FileZigZag
This method can transfer GIF to JPG or PNG online, i.e., it does not require users to download any third-party software. In addition, it supports a wide range of formats, including PNG, WMA, SWF, image, documents, ZIP, MOV, etc.
This is a straightforward process: upload your image and choose the required format. Then input your email address, and the converter will send you a mail within minutes with the conversion.
Features
- Images, documents, audio and video files, ebooks, archival files, and webpages can all be converted with FileZigZag.
- Users will upload or drag a file to the platform.
- It supports a wide range of conversion formats.
- Convert files in minutes
Pros
It is convenient and free to use
The process is effortless, and the conversion speed is moderate
it provides users with sharing option
convert images in a real-time
Cons
You need to wait for a confirmation email, making it a little slow compared to other converters.
CoolUtils Online Image Converter
This is an online converter that gets rid of the need to download any software. In addition, you can get the conversion without wasting any time, and there is no need to wait for an email link.
Features
- To convert your files from GIF to JPG, PNG to JPG, and JPG to PNG, JPEG, or TIFF.
- Drag and drop your source file.
- Convert file online in a matter of seconds.
Pros
It allows users to rotate and resize the image before conversion.
It is compatible with nearly all operating system
It supports many file formats like JPEG, GIF, BMP, etc.
Cons
As of now, nothing in particular
ZAMZAR
This is a comprehensive GIF to PNG and JPG online converter that helps users convert GIF files to any photo format, including PNG and JPG format, for free.
Features
- Allows the addition of GIF files from your computer directly without downloading any programs to your PC.
- It requires only a few steps in converting GIF to JPG format
- It supports several video and photo formats in converting different formats easily
Pros
It is 100% simple to use
Support various input and output formats
No software installation is required
The software is free for conversions up to 100MB
Cons
Most users say the conversion process is a little too slow
The restriction of free conversion up to 100 MB makes it difficult in converting huge files
Ezgif
This is a free GIF to JPG converter that allows you to turn your GIF into an image with a single click leaving no watermark on the picture. In addition, the process is relatively easy to use as you need to upload a GIF file up to 35MB, then click the “Convert “ button, and your image will be ready.

Features:
- It performs most picture editing tasks, such as scaling, optimization, and cropping.
- Making, optimizing, trimming, and resizing animated GIFs with gifsicle and lossygif.
- For video conversions and editing, use FFmpeg.
Pros
Fast and free
No watermark
No Ads
No software downloads
Cons
It is sometimes slow
This online editing tool is a complete package that enables you to choose more than 80 different operations, which include the following:
Features:
- It allows Metadata Editing, i.e., editing the data before saving and converting it.
- Transform your pictures as well as resize, rotate, etc.
- Colors can adjust according to users’ preference
- Includes the addition of different filters, including emboss, sharpen, blur, etc.
- Users can do special effects like; vignetting, watermarking, etc.
Pros
Supports 500+ formats
Available on Mac, Windows, and Linux OS
Available in 20+ different languages
Advanced options available.
Cons
Some specific programs require constant updates.
Picresize
This is a free web-based GIF to JPG Converter that lets users add pictures for editing by uploading, linking, URL, etc. It is a customizable, lightweight tool for free editing images and photos online.
Features:
- Shrink and enlarge your photos
- It can crop your images for print or social media.
- Flip and rotate your pictures.
- Reduce the file size of your photos to the desired quality or disk size.
- Get web-ready image files by converting your photos or graphics into BMP, GIF. JPG or PNG format
Pros
It is an easy-to-use software
Support many formats
Compatible with a lot of Operating System
Allows changing the quality of the output file
Cons
There are limited settings compared to other editing software
This is a free Image Convert and Resize editor that is compact yet powerful for batch mode image processing. In addition, the program can easily convert separate images and file folders containing images into different renames, graphic formats, and reorders and changes their size following the set parameters. The supported image file formats for this software include; JPG, PNG, BMP, GIF, TGA, and PDF (export only).
Features:
- It is a compact program required for batch mode image processing.
- It allows the conversion of separate images and file folders to resize them accordingly
- The software is safe to run and use
- There is an option to install additional features according to your requirement
Pros
A secure option for beginners.
This small program is quite light on your system.
It is customizable.
Cons
Not all image format is supported compared to other converters
This software allows the conversion of all your digital pictures for sending email, on your website, posting on auction sites, etc. It provides a straight way to batch convert your digital images according to your need and add your watermark.
Features:
- Allows users to carry out batch conversion
- Enables users to import multiple photos from a folder
- Allows users to add their watermark
- Users can rotate, resize, and alter the images before and after conversion.
- Enables the creation of thumbnail pictures
- Users can upload their pictures to a dedicated server using the built-in FTP client.
Pros
The online help desk is highly responsive
Exceptional quality
Reasonable price
There are no prerequisites related to knowledge or experience.
Massive demands
Cons
Based on users’ preferences, nothing major.
Based on the above list, we have picked two excellent GIF to PNG and GIF to JPG converters that will serve you the best across the industry. Let us look at them one by one.
Part 2: How to Convert GIF to PNG?
Undeniably, Convertio is the clearest GIF to PNG online converter on this list. The numbered steps make it super-easy to use as users can convert GIF to PNG, TIFF, TGA, JPG, BMP, and many others.
Step 1: Access the Website and Add Files
Log in to Convertio and click the Add Files button to add your GIF file. You can besides directly drag and drop your GIF file to the timeline.

Step 2: Search and Choose the Format
Open the File drop-down list and select PNG open under the Image Formats.

Step 3: Convert and Download
Finally, click the Convert Now button to convert GIF to PNG.
Part 3: How to Convert GIF to JPG?
Ezgif is also a robust GIF converter that supports converting any image format to JPG without losing quality. It also supports the conversion of GIFs to other formats like PNG, WebP, or PDF formats.
Step 1: Import GIF
After logging in to the website and clicking the Choose file button to import your local GIF file, you can import multiple files having a total file size of less than 35MB.

Step 2: Start Editing GIF
Next is to click the Upload button to start editing your GIF file (cut, add text, resize, rotate) before converting it.

Step 3: Convert to APNG and Save
Finally, click the Convert to APNG! button to start converting, and your image is ready.
Conclusion
This article gave a detailed breakdown of GIF to PNG converter and explained how to convert GIF into JPG or PNG effectively.
Also, in the last two parts, you got details on how to use Convertio and Ezgif to convert GIF to PNG in a few simple steps.
There are times you may need to convert GIFs into PNG or PNG and avoid losing image quality. Yet still, it can be tricky to carry this out without losing quality. This is the reason you need a powerful third-party image converter. So today, I will give you a list of the best GIF to image converters online. Let’s dive right in!
In addition, before jumping right into the conversion processes, it is paramount to know that many of these tools are free-to-all and offer exciting customization options. However, some might have specific requirements or conversion size limits. That aside, let’s now discuss how we can convert GIF into PNG online:
In this article
Part 1: Best Online GIF to PNG/JPG Converters
Part 2: How to Convert GIF to PNG?
Part 3: How to Convert GIF to JPG?
Part 1: Best Online GIF to PNG/JPG Converters
FileZigZag
This method can transfer GIF to JPG or PNG online, i.e., it does not require users to download any third-party software. In addition, it supports a wide range of formats, including PNG, WMA, SWF, image, documents, ZIP, MOV, etc.
This is a straightforward process: upload your image and choose the required format. Then input your email address, and the converter will send you a mail within minutes with the conversion.
Features
- Images, documents, audio and video files, ebooks, archival files, and webpages can all be converted with FileZigZag.
- Users will upload or drag a file to the platform.
- It supports a wide range of conversion formats.
- Convert files in minutes
Pros
It is convenient and free to use
The process is effortless, and the conversion speed is moderate
it provides users with sharing option
convert images in a real-time
Cons
You need to wait for a confirmation email, making it a little slow compared to other converters.
CoolUtils Online Image Converter
This is an online converter that gets rid of the need to download any software. In addition, you can get the conversion without wasting any time, and there is no need to wait for an email link.
Features
- To convert your files from GIF to JPG, PNG to JPG, and JPG to PNG, JPEG, or TIFF.
- Drag and drop your source file.
- Convert file online in a matter of seconds.
Pros
It allows users to rotate and resize the image before conversion.
It is compatible with nearly all operating system
It supports many file formats like JPEG, GIF, BMP, etc.
Cons
As of now, nothing in particular
ZAMZAR
This is a comprehensive GIF to PNG and JPG online converter that helps users convert GIF files to any photo format, including PNG and JPG format, for free.
Features
- Allows the addition of GIF files from your computer directly without downloading any programs to your PC.
- It requires only a few steps in converting GIF to JPG format
- It supports several video and photo formats in converting different formats easily
Pros
It is 100% simple to use
Support various input and output formats
No software installation is required
The software is free for conversions up to 100MB
Cons
Most users say the conversion process is a little too slow
The restriction of free conversion up to 100 MB makes it difficult in converting huge files
Ezgif
This is a free GIF to JPG converter that allows you to turn your GIF into an image with a single click leaving no watermark on the picture. In addition, the process is relatively easy to use as you need to upload a GIF file up to 35MB, then click the “Convert “ button, and your image will be ready.

Features:
- It performs most picture editing tasks, such as scaling, optimization, and cropping.
- Making, optimizing, trimming, and resizing animated GIFs with gifsicle and lossygif.
- For video conversions and editing, use FFmpeg.
Pros
Fast and free
No watermark
No Ads
No software downloads
Cons
It is sometimes slow
This online editing tool is a complete package that enables you to choose more than 80 different operations, which include the following:
Features:
- It allows Metadata Editing, i.e., editing the data before saving and converting it.
- Transform your pictures as well as resize, rotate, etc.
- Colors can adjust according to users’ preference
- Includes the addition of different filters, including emboss, sharpen, blur, etc.
- Users can do special effects like; vignetting, watermarking, etc.
Pros
Supports 500+ formats
Available on Mac, Windows, and Linux OS
Available in 20+ different languages
Advanced options available.
Cons
Some specific programs require constant updates.
Picresize
This is a free web-based GIF to JPG Converter that lets users add pictures for editing by uploading, linking, URL, etc. It is a customizable, lightweight tool for free editing images and photos online.
Features:
- Shrink and enlarge your photos
- It can crop your images for print or social media.
- Flip and rotate your pictures.
- Reduce the file size of your photos to the desired quality or disk size.
- Get web-ready image files by converting your photos or graphics into BMP, GIF. JPG or PNG format
Pros
It is an easy-to-use software
Support many formats
Compatible with a lot of Operating System
Allows changing the quality of the output file
Cons
There are limited settings compared to other editing software
This is a free Image Convert and Resize editor that is compact yet powerful for batch mode image processing. In addition, the program can easily convert separate images and file folders containing images into different renames, graphic formats, and reorders and changes their size following the set parameters. The supported image file formats for this software include; JPG, PNG, BMP, GIF, TGA, and PDF (export only).
Features:
- It is a compact program required for batch mode image processing.
- It allows the conversion of separate images and file folders to resize them accordingly
- The software is safe to run and use
- There is an option to install additional features according to your requirement
Pros
A secure option for beginners.
This small program is quite light on your system.
It is customizable.
Cons
Not all image format is supported compared to other converters
This software allows the conversion of all your digital pictures for sending email, on your website, posting on auction sites, etc. It provides a straight way to batch convert your digital images according to your need and add your watermark.
Features:
- Allows users to carry out batch conversion
- Enables users to import multiple photos from a folder
- Allows users to add their watermark
- Users can rotate, resize, and alter the images before and after conversion.
- Enables the creation of thumbnail pictures
- Users can upload their pictures to a dedicated server using the built-in FTP client.
Pros
The online help desk is highly responsive
Exceptional quality
Reasonable price
There are no prerequisites related to knowledge or experience.
Massive demands
Cons
Based on users’ preferences, nothing major.
Based on the above list, we have picked two excellent GIF to PNG and GIF to JPG converters that will serve you the best across the industry. Let us look at them one by one.
Part 2: How to Convert GIF to PNG?
Undeniably, Convertio is the clearest GIF to PNG online converter on this list. The numbered steps make it super-easy to use as users can convert GIF to PNG, TIFF, TGA, JPG, BMP, and many others.
Step 1: Access the Website and Add Files
Log in to Convertio and click the Add Files button to add your GIF file. You can besides directly drag and drop your GIF file to the timeline.

Step 2: Search and Choose the Format
Open the File drop-down list and select PNG open under the Image Formats.

Step 3: Convert and Download
Finally, click the Convert Now button to convert GIF to PNG.
Part 3: How to Convert GIF to JPG?
Ezgif is also a robust GIF converter that supports converting any image format to JPG without losing quality. It also supports the conversion of GIFs to other formats like PNG, WebP, or PDF formats.
Step 1: Import GIF
After logging in to the website and clicking the Choose file button to import your local GIF file, you can import multiple files having a total file size of less than 35MB.

Step 2: Start Editing GIF
Next is to click the Upload button to start editing your GIF file (cut, add text, resize, rotate) before converting it.

Step 3: Convert to APNG and Save
Finally, click the Convert to APNG! button to start converting, and your image is ready.
Conclusion
This article gave a detailed breakdown of GIF to PNG converter and explained how to convert GIF into JPG or PNG effectively.
Also, in the last two parts, you got details on how to use Convertio and Ezgif to convert GIF to PNG in a few simple steps.
There are times you may need to convert GIFs into PNG or PNG and avoid losing image quality. Yet still, it can be tricky to carry this out without losing quality. This is the reason you need a powerful third-party image converter. So today, I will give you a list of the best GIF to image converters online. Let’s dive right in!
In addition, before jumping right into the conversion processes, it is paramount to know that many of these tools are free-to-all and offer exciting customization options. However, some might have specific requirements or conversion size limits. That aside, let’s now discuss how we can convert GIF into PNG online:
In this article
Part 1: Best Online GIF to PNG/JPG Converters
Part 2: How to Convert GIF to PNG?
Part 3: How to Convert GIF to JPG?
Part 1: Best Online GIF to PNG/JPG Converters
FileZigZag
This method can transfer GIF to JPG or PNG online, i.e., it does not require users to download any third-party software. In addition, it supports a wide range of formats, including PNG, WMA, SWF, image, documents, ZIP, MOV, etc.
This is a straightforward process: upload your image and choose the required format. Then input your email address, and the converter will send you a mail within minutes with the conversion.
Features
- Images, documents, audio and video files, ebooks, archival files, and webpages can all be converted with FileZigZag.
- Users will upload or drag a file to the platform.
- It supports a wide range of conversion formats.
- Convert files in minutes
Pros
It is convenient and free to use
The process is effortless, and the conversion speed is moderate
it provides users with sharing option
convert images in a real-time
Cons
You need to wait for a confirmation email, making it a little slow compared to other converters.
CoolUtils Online Image Converter
This is an online converter that gets rid of the need to download any software. In addition, you can get the conversion without wasting any time, and there is no need to wait for an email link.
Features
- To convert your files from GIF to JPG, PNG to JPG, and JPG to PNG, JPEG, or TIFF.
- Drag and drop your source file.
- Convert file online in a matter of seconds.
Pros
It allows users to rotate and resize the image before conversion.
It is compatible with nearly all operating system
It supports many file formats like JPEG, GIF, BMP, etc.
Cons
As of now, nothing in particular
ZAMZAR
This is a comprehensive GIF to PNG and JPG online converter that helps users convert GIF files to any photo format, including PNG and JPG format, for free.
Features
- Allows the addition of GIF files from your computer directly without downloading any programs to your PC.
- It requires only a few steps in converting GIF to JPG format
- It supports several video and photo formats in converting different formats easily
Pros
It is 100% simple to use
Support various input and output formats
No software installation is required
The software is free for conversions up to 100MB
Cons
Most users say the conversion process is a little too slow
The restriction of free conversion up to 100 MB makes it difficult in converting huge files
Ezgif
This is a free GIF to JPG converter that allows you to turn your GIF into an image with a single click leaving no watermark on the picture. In addition, the process is relatively easy to use as you need to upload a GIF file up to 35MB, then click the “Convert “ button, and your image will be ready.

Features:
- It performs most picture editing tasks, such as scaling, optimization, and cropping.
- Making, optimizing, trimming, and resizing animated GIFs with gifsicle and lossygif.
- For video conversions and editing, use FFmpeg.
Pros
Fast and free
No watermark
No Ads
No software downloads
Cons
It is sometimes slow
This online editing tool is a complete package that enables you to choose more than 80 different operations, which include the following:
Features:
- It allows Metadata Editing, i.e., editing the data before saving and converting it.
- Transform your pictures as well as resize, rotate, etc.
- Colors can adjust according to users’ preference
- Includes the addition of different filters, including emboss, sharpen, blur, etc.
- Users can do special effects like; vignetting, watermarking, etc.
Pros
Supports 500+ formats
Available on Mac, Windows, and Linux OS
Available in 20+ different languages
Advanced options available.
Cons
Some specific programs require constant updates.
Picresize
This is a free web-based GIF to JPG Converter that lets users add pictures for editing by uploading, linking, URL, etc. It is a customizable, lightweight tool for free editing images and photos online.
Features:
- Shrink and enlarge your photos
- It can crop your images for print or social media.
- Flip and rotate your pictures.
- Reduce the file size of your photos to the desired quality or disk size.
- Get web-ready image files by converting your photos or graphics into BMP, GIF. JPG or PNG format
Pros
It is an easy-to-use software
Support many formats
Compatible with a lot of Operating System
Allows changing the quality of the output file
Cons
There are limited settings compared to other editing software
This is a free Image Convert and Resize editor that is compact yet powerful for batch mode image processing. In addition, the program can easily convert separate images and file folders containing images into different renames, graphic formats, and reorders and changes their size following the set parameters. The supported image file formats for this software include; JPG, PNG, BMP, GIF, TGA, and PDF (export only).
Features:
- It is a compact program required for batch mode image processing.
- It allows the conversion of separate images and file folders to resize them accordingly
- The software is safe to run and use
- There is an option to install additional features according to your requirement
Pros
A secure option for beginners.
This small program is quite light on your system.
It is customizable.
Cons
Not all image format is supported compared to other converters
This software allows the conversion of all your digital pictures for sending email, on your website, posting on auction sites, etc. It provides a straight way to batch convert your digital images according to your need and add your watermark.
Features:
- Allows users to carry out batch conversion
- Enables users to import multiple photos from a folder
- Allows users to add their watermark
- Users can rotate, resize, and alter the images before and after conversion.
- Enables the creation of thumbnail pictures
- Users can upload their pictures to a dedicated server using the built-in FTP client.
Pros
The online help desk is highly responsive
Exceptional quality
Reasonable price
There are no prerequisites related to knowledge or experience.
Massive demands
Cons
Based on users’ preferences, nothing major.
Based on the above list, we have picked two excellent GIF to PNG and GIF to JPG converters that will serve you the best across the industry. Let us look at them one by one.
Part 2: How to Convert GIF to PNG?
Undeniably, Convertio is the clearest GIF to PNG online converter on this list. The numbered steps make it super-easy to use as users can convert GIF to PNG, TIFF, TGA, JPG, BMP, and many others.
Step 1: Access the Website and Add Files
Log in to Convertio and click the Add Files button to add your GIF file. You can besides directly drag and drop your GIF file to the timeline.

Step 2: Search and Choose the Format
Open the File drop-down list and select PNG open under the Image Formats.

Step 3: Convert and Download
Finally, click the Convert Now button to convert GIF to PNG.
Part 3: How to Convert GIF to JPG?
Ezgif is also a robust GIF converter that supports converting any image format to JPG without losing quality. It also supports the conversion of GIFs to other formats like PNG, WebP, or PDF formats.
Step 1: Import GIF
After logging in to the website and clicking the Choose file button to import your local GIF file, you can import multiple files having a total file size of less than 35MB.

Step 2: Start Editing GIF
Next is to click the Upload button to start editing your GIF file (cut, add text, resize, rotate) before converting it.

Step 3: Convert to APNG and Save
Finally, click the Convert to APNG! button to start converting, and your image is ready.
Conclusion
This article gave a detailed breakdown of GIF to PNG converter and explained how to convert GIF into JPG or PNG effectively.
Also, in the last two parts, you got details on how to use Convertio and Ezgif to convert GIF to PNG in a few simple steps.
Beginner’s Guide About WMV Format and Best WMV Video Editor
WMV is the default file format for Windows Media Player. It was developed as an alternative to the RealVideo codec for web streaming purposes. WMV can be streamed on the internet and played by various media players. YouTube allows the users to upload WMV file format content.
Now that you know this about WMV format, there are some more details to share, so let’s start. The article understudy will discuss everything in detail; buckle up!
In this article
02 Advantage and Disadvantage of WMV Video Format
03 Best MMV Video Editor - Wondershare Filmora
04 How to Edit WMV Video File?
05 WMV VS. MP4: What’s the Difference?
Part 1. What Is WMV File?
WMV file format is from a sequence of video codecs, and it was developed by Microsoft. The full abbreviation of WMV is ‘Windows Media Video.’ WMV is a compressed file container that was made for the Windows Media Framework. It is mainly used for the video content that is to be sold either online or through HD DVDs and Blu-ray Discs.

WMV format files support the encryption for the use with Digital Rights Management (DRM) systems, protecting the content from copywriting and any unlawful production. The WMV file may contain animation, high-definition videos, TV episodes, or video clips.
WMV compresses large files for better data transmission over a network while maintaining quality standards. It is specifically designed to run on all Windows devices. After standardization by the Society of Motion Pictures and Television Engineering (SMPTE), WMV is now considered to be an open standard format.
Part 2. Advantage and Disadvantage of WMV Video Format
Like everything, the WMV file format has its benefits and drawbacks, but not everyone knows much about them. The following section of this article will talk about the benefits and drawbacks; let’s get started!
Advantages of WMV Format
- WMV format is excellent for web videos as it acquires little disc memory space and thus takes less time in loading.
- The files are compressed and have reduced size; hence it is easy to transfer WMV file format via emails etc.
- The format is widely used on Windows and is suitable for storing short animations as well as compressed videos.
- Do you know anything about the compression ratio? Well, if we compare WMV to MPEG-4, WMV format has a 2x compression ratio.
- The format also works on the Web through Google Drive. Also, the quality of the video is maintained with Windows video format.
Disadvantages of WMV Format
- Although the small size is better but not, every application works with the tiny file size as offered by WMV format.
- If you are a Mac user and wish to play WMV files on your Mac, you need plugins like Flip4Mac.
Part 3. Best MMV Video Editor -Wondershare Filmora
Wondershare Filmora has always been on the top of the list whenever we talk about video editing. The software is used worldwide by professionals and also newbies. This is because Filmora provides an endless range of features that can create captivating videos. Let’s share a few features:
- Stabilize Video: Your video might be shaky, or maybe single footage can be shaky. Do you know a way to fix this? Try Stabilize Video feature from Filmora. This feature helps you to smooth all the shaky scenes in your video.
- Motion Tracking: In the editing world, Motion Tracking is the most fun type of feature. With this feature, you can move objects like text, audio, video, elements, etc., by tracking the movements in your video.
- Auto Highlight: Do you know a feature that will save your time and effort? It’s Auto Highlight. The feature spontaneously extracts the highlight from the clip and saves your video trimming time.
For Win 7 or later (64-bit)
For macOS 10.12 or later
Part 4. How to Edit WMV Video File?
For editing, Wondershare Filmora is an ideal software to use. Now that you know about Filmora and its stunning features, do you have any knowledge about how to use it? Well, don’t worry. We are here to guide you about how you can edit WMV file format videos in Filmora. Just follow the simple steps shared below:
Step 1: Get the Media File
Start by launching the software on your respective device. Once Filmora opens, you can import the media file by drag and drop. Or else, tap on the ‘File’ tab and move to the ‘Import Media’ option. From the submenu, select the ‘Import Media Files’ option to add the WMV format file.

Step 2: Head to Editor Timeline
You should know that editing is only possible when your file is on the timeline. For that, after a successful file import, simply drag and drop the media file to the timeline and let the fun begins.

Step 3: Add Video Effects
Once the file is in the timeline, start editing. You can add various video effects to your WMV video file from this section. You can get effects like Canvas, Cool Film, Four Seasons, etc., and can also add overlays, filters, etc.

Step 4: Use Title Template
Filmora offers you so many different and cool title templates. You only have to select the best template from the options. You can go for School Pack, Channel Subscribe, Romantic Pack, etc. Moreover, add Lower Thirds, Subtitles, Openers, and a lot more.

Step 5: Export the WMV File
After all the editing is complete, get the WMV format file exported to your device. For that, hit the ‘Export’ button and from the ‘Locals’ section, select your preferred output file format.

Part 5. WMV VS. MP4: What’s the Difference?
MP4 is far more popular than the WMV file format. The world is shifting on the internet; MP4 is widely used and loved online. On the other hand, WMV is popular with Windows users, along with DVD and Blu-ray collectors.
If we talk about the supported software for MP4 and WMV, MP4 has bigger support. WMV is supported by fewer video players and online video editing tools. On the contrary, MP4 is supported by all the video players available for both Windows and Mac users; along with that, every online tool also supports MP4 format for video editing.
Now the world demands quality. In terms of quality, MP4 has better quality than WMV. WMV has lost the battle of quality provision against WMV. MP4 is a larger file than WMV in terms of file size. It is less compressed than WMV format, but the compression gives WMV an advantage over MP4.
Having a compressed file format produces files of smaller size, which can be easily stored. Easy storage of video files makes WMV a better option in places where the quality of the video can be compromised.
Bottom Line
After reading this article, we hope that you have increased your knowledge regarding the WMV file format. We talked about the pros and cons of the WMV format. Moreover, we also shared ways to edit a WMV video with the best video editor, Wondershare Filmora.
Let’s tell you more about the video editing software. Wondershare Filmora is not just a Video Editor; it’s also an Audio Editor with various diverse features like Audio Denoise, Silence Detection, etc. The software is easy to use with a drag and drop facility. You can create and edit stunning videos with the multi-track editor.
For Win 7 or later (64-bit)
For macOS 10.12 or later
02 Advantage and Disadvantage of WMV Video Format
03 Best MMV Video Editor - Wondershare Filmora
04 How to Edit WMV Video File?
05 WMV VS. MP4: What’s the Difference?
Part 1. What Is WMV File?
WMV file format is from a sequence of video codecs, and it was developed by Microsoft. The full abbreviation of WMV is ‘Windows Media Video.’ WMV is a compressed file container that was made for the Windows Media Framework. It is mainly used for the video content that is to be sold either online or through HD DVDs and Blu-ray Discs.

WMV format files support the encryption for the use with Digital Rights Management (DRM) systems, protecting the content from copywriting and any unlawful production. The WMV file may contain animation, high-definition videos, TV episodes, or video clips.
WMV compresses large files for better data transmission over a network while maintaining quality standards. It is specifically designed to run on all Windows devices. After standardization by the Society of Motion Pictures and Television Engineering (SMPTE), WMV is now considered to be an open standard format.
Part 2. Advantage and Disadvantage of WMV Video Format
Like everything, the WMV file format has its benefits and drawbacks, but not everyone knows much about them. The following section of this article will talk about the benefits and drawbacks; let’s get started!
Advantages of WMV Format
- WMV format is excellent for web videos as it acquires little disc memory space and thus takes less time in loading.
- The files are compressed and have reduced size; hence it is easy to transfer WMV file format via emails etc.
- The format is widely used on Windows and is suitable for storing short animations as well as compressed videos.
- Do you know anything about the compression ratio? Well, if we compare WMV to MPEG-4, WMV format has a 2x compression ratio.
- The format also works on the Web through Google Drive. Also, the quality of the video is maintained with Windows video format.
Disadvantages of WMV Format
- Although the small size is better but not, every application works with the tiny file size as offered by WMV format.
- If you are a Mac user and wish to play WMV files on your Mac, you need plugins like Flip4Mac.
Part 3. Best MMV Video Editor -Wondershare Filmora
Wondershare Filmora has always been on the top of the list whenever we talk about video editing. The software is used worldwide by professionals and also newbies. This is because Filmora provides an endless range of features that can create captivating videos. Let’s share a few features:
- Stabilize Video: Your video might be shaky, or maybe single footage can be shaky. Do you know a way to fix this? Try Stabilize Video feature from Filmora. This feature helps you to smooth all the shaky scenes in your video.
- Motion Tracking: In the editing world, Motion Tracking is the most fun type of feature. With this feature, you can move objects like text, audio, video, elements, etc., by tracking the movements in your video.
- Auto Highlight: Do you know a feature that will save your time and effort? It’s Auto Highlight. The feature spontaneously extracts the highlight from the clip and saves your video trimming time.
For Win 7 or later (64-bit)
For macOS 10.12 or later
Part 4. How to Edit WMV Video File?
For editing, Wondershare Filmora is an ideal software to use. Now that you know about Filmora and its stunning features, do you have any knowledge about how to use it? Well, don’t worry. We are here to guide you about how you can edit WMV file format videos in Filmora. Just follow the simple steps shared below:
Step 1: Get the Media File
Start by launching the software on your respective device. Once Filmora opens, you can import the media file by drag and drop. Or else, tap on the ‘File’ tab and move to the ‘Import Media’ option. From the submenu, select the ‘Import Media Files’ option to add the WMV format file.

Step 2: Head to Editor Timeline
You should know that editing is only possible when your file is on the timeline. For that, after a successful file import, simply drag and drop the media file to the timeline and let the fun begins.

Step 3: Add Video Effects
Once the file is in the timeline, start editing. You can add various video effects to your WMV video file from this section. You can get effects like Canvas, Cool Film, Four Seasons, etc., and can also add overlays, filters, etc.

Step 4: Use Title Template
Filmora offers you so many different and cool title templates. You only have to select the best template from the options. You can go for School Pack, Channel Subscribe, Romantic Pack, etc. Moreover, add Lower Thirds, Subtitles, Openers, and a lot more.

Step 5: Export the WMV File
After all the editing is complete, get the WMV format file exported to your device. For that, hit the ‘Export’ button and from the ‘Locals’ section, select your preferred output file format.

Part 5. WMV VS. MP4: What’s the Difference?
MP4 is far more popular than the WMV file format. The world is shifting on the internet; MP4 is widely used and loved online. On the other hand, WMV is popular with Windows users, along with DVD and Blu-ray collectors.
If we talk about the supported software for MP4 and WMV, MP4 has bigger support. WMV is supported by fewer video players and online video editing tools. On the contrary, MP4 is supported by all the video players available for both Windows and Mac users; along with that, every online tool also supports MP4 format for video editing.
Now the world demands quality. In terms of quality, MP4 has better quality than WMV. WMV has lost the battle of quality provision against WMV. MP4 is a larger file than WMV in terms of file size. It is less compressed than WMV format, but the compression gives WMV an advantage over MP4.
Having a compressed file format produces files of smaller size, which can be easily stored. Easy storage of video files makes WMV a better option in places where the quality of the video can be compromised.
Bottom Line
After reading this article, we hope that you have increased your knowledge regarding the WMV file format. We talked about the pros and cons of the WMV format. Moreover, we also shared ways to edit a WMV video with the best video editor, Wondershare Filmora.
Let’s tell you more about the video editing software. Wondershare Filmora is not just a Video Editor; it’s also an Audio Editor with various diverse features like Audio Denoise, Silence Detection, etc. The software is easy to use with a drag and drop facility. You can create and edit stunning videos with the multi-track editor.
For Win 7 or later (64-bit)
For macOS 10.12 or later
02 Advantage and Disadvantage of WMV Video Format
03 Best MMV Video Editor - Wondershare Filmora
04 How to Edit WMV Video File?
05 WMV VS. MP4: What’s the Difference?
Part 1. What Is WMV File?
WMV file format is from a sequence of video codecs, and it was developed by Microsoft. The full abbreviation of WMV is ‘Windows Media Video.’ WMV is a compressed file container that was made for the Windows Media Framework. It is mainly used for the video content that is to be sold either online or through HD DVDs and Blu-ray Discs.

WMV format files support the encryption for the use with Digital Rights Management (DRM) systems, protecting the content from copywriting and any unlawful production. The WMV file may contain animation, high-definition videos, TV episodes, or video clips.
WMV compresses large files for better data transmission over a network while maintaining quality standards. It is specifically designed to run on all Windows devices. After standardization by the Society of Motion Pictures and Television Engineering (SMPTE), WMV is now considered to be an open standard format.
Part 2. Advantage and Disadvantage of WMV Video Format
Like everything, the WMV file format has its benefits and drawbacks, but not everyone knows much about them. The following section of this article will talk about the benefits and drawbacks; let’s get started!
Advantages of WMV Format
- WMV format is excellent for web videos as it acquires little disc memory space and thus takes less time in loading.
- The files are compressed and have reduced size; hence it is easy to transfer WMV file format via emails etc.
- The format is widely used on Windows and is suitable for storing short animations as well as compressed videos.
- Do you know anything about the compression ratio? Well, if we compare WMV to MPEG-4, WMV format has a 2x compression ratio.
- The format also works on the Web through Google Drive. Also, the quality of the video is maintained with Windows video format.
Disadvantages of WMV Format
- Although the small size is better but not, every application works with the tiny file size as offered by WMV format.
- If you are a Mac user and wish to play WMV files on your Mac, you need plugins like Flip4Mac.
Part 3. Best MMV Video Editor -Wondershare Filmora
Wondershare Filmora has always been on the top of the list whenever we talk about video editing. The software is used worldwide by professionals and also newbies. This is because Filmora provides an endless range of features that can create captivating videos. Let’s share a few features:
- Stabilize Video: Your video might be shaky, or maybe single footage can be shaky. Do you know a way to fix this? Try Stabilize Video feature from Filmora. This feature helps you to smooth all the shaky scenes in your video.
- Motion Tracking: In the editing world, Motion Tracking is the most fun type of feature. With this feature, you can move objects like text, audio, video, elements, etc., by tracking the movements in your video.
- Auto Highlight: Do you know a feature that will save your time and effort? It’s Auto Highlight. The feature spontaneously extracts the highlight from the clip and saves your video trimming time.
For Win 7 or later (64-bit)
For macOS 10.12 or later
Part 4. How to Edit WMV Video File?
For editing, Wondershare Filmora is an ideal software to use. Now that you know about Filmora and its stunning features, do you have any knowledge about how to use it? Well, don’t worry. We are here to guide you about how you can edit WMV file format videos in Filmora. Just follow the simple steps shared below:
Step 1: Get the Media File
Start by launching the software on your respective device. Once Filmora opens, you can import the media file by drag and drop. Or else, tap on the ‘File’ tab and move to the ‘Import Media’ option. From the submenu, select the ‘Import Media Files’ option to add the WMV format file.

Step 2: Head to Editor Timeline
You should know that editing is only possible when your file is on the timeline. For that, after a successful file import, simply drag and drop the media file to the timeline and let the fun begins.

Step 3: Add Video Effects
Once the file is in the timeline, start editing. You can add various video effects to your WMV video file from this section. You can get effects like Canvas, Cool Film, Four Seasons, etc., and can also add overlays, filters, etc.

Step 4: Use Title Template
Filmora offers you so many different and cool title templates. You only have to select the best template from the options. You can go for School Pack, Channel Subscribe, Romantic Pack, etc. Moreover, add Lower Thirds, Subtitles, Openers, and a lot more.

Step 5: Export the WMV File
After all the editing is complete, get the WMV format file exported to your device. For that, hit the ‘Export’ button and from the ‘Locals’ section, select your preferred output file format.

Part 5. WMV VS. MP4: What’s the Difference?
MP4 is far more popular than the WMV file format. The world is shifting on the internet; MP4 is widely used and loved online. On the other hand, WMV is popular with Windows users, along with DVD and Blu-ray collectors.
If we talk about the supported software for MP4 and WMV, MP4 has bigger support. WMV is supported by fewer video players and online video editing tools. On the contrary, MP4 is supported by all the video players available for both Windows and Mac users; along with that, every online tool also supports MP4 format for video editing.
Now the world demands quality. In terms of quality, MP4 has better quality than WMV. WMV has lost the battle of quality provision against WMV. MP4 is a larger file than WMV in terms of file size. It is less compressed than WMV format, but the compression gives WMV an advantage over MP4.
Having a compressed file format produces files of smaller size, which can be easily stored. Easy storage of video files makes WMV a better option in places where the quality of the video can be compromised.
Bottom Line
After reading this article, we hope that you have increased your knowledge regarding the WMV file format. We talked about the pros and cons of the WMV format. Moreover, we also shared ways to edit a WMV video with the best video editor, Wondershare Filmora.
Let’s tell you more about the video editing software. Wondershare Filmora is not just a Video Editor; it’s also an Audio Editor with various diverse features like Audio Denoise, Silence Detection, etc. The software is easy to use with a drag and drop facility. You can create and edit stunning videos with the multi-track editor.
For Win 7 or later (64-bit)
For macOS 10.12 or later
02 Advantage and Disadvantage of WMV Video Format
03 Best MMV Video Editor - Wondershare Filmora
04 How to Edit WMV Video File?
05 WMV VS. MP4: What’s the Difference?
Part 1. What Is WMV File?
WMV file format is from a sequence of video codecs, and it was developed by Microsoft. The full abbreviation of WMV is ‘Windows Media Video.’ WMV is a compressed file container that was made for the Windows Media Framework. It is mainly used for the video content that is to be sold either online or through HD DVDs and Blu-ray Discs.

WMV format files support the encryption for the use with Digital Rights Management (DRM) systems, protecting the content from copywriting and any unlawful production. The WMV file may contain animation, high-definition videos, TV episodes, or video clips.
WMV compresses large files for better data transmission over a network while maintaining quality standards. It is specifically designed to run on all Windows devices. After standardization by the Society of Motion Pictures and Television Engineering (SMPTE), WMV is now considered to be an open standard format.
Part 2. Advantage and Disadvantage of WMV Video Format
Like everything, the WMV file format has its benefits and drawbacks, but not everyone knows much about them. The following section of this article will talk about the benefits and drawbacks; let’s get started!
Advantages of WMV Format
- WMV format is excellent for web videos as it acquires little disc memory space and thus takes less time in loading.
- The files are compressed and have reduced size; hence it is easy to transfer WMV file format via emails etc.
- The format is widely used on Windows and is suitable for storing short animations as well as compressed videos.
- Do you know anything about the compression ratio? Well, if we compare WMV to MPEG-4, WMV format has a 2x compression ratio.
- The format also works on the Web through Google Drive. Also, the quality of the video is maintained with Windows video format.
Disadvantages of WMV Format
- Although the small size is better but not, every application works with the tiny file size as offered by WMV format.
- If you are a Mac user and wish to play WMV files on your Mac, you need plugins like Flip4Mac.
Part 3. Best MMV Video Editor -Wondershare Filmora
Wondershare Filmora has always been on the top of the list whenever we talk about video editing. The software is used worldwide by professionals and also newbies. This is because Filmora provides an endless range of features that can create captivating videos. Let’s share a few features:
- Stabilize Video: Your video might be shaky, or maybe single footage can be shaky. Do you know a way to fix this? Try Stabilize Video feature from Filmora. This feature helps you to smooth all the shaky scenes in your video.
- Motion Tracking: In the editing world, Motion Tracking is the most fun type of feature. With this feature, you can move objects like text, audio, video, elements, etc., by tracking the movements in your video.
- Auto Highlight: Do you know a feature that will save your time and effort? It’s Auto Highlight. The feature spontaneously extracts the highlight from the clip and saves your video trimming time.
For Win 7 or later (64-bit)
For macOS 10.12 or later
Part 4. How to Edit WMV Video File?
For editing, Wondershare Filmora is an ideal software to use. Now that you know about Filmora and its stunning features, do you have any knowledge about how to use it? Well, don’t worry. We are here to guide you about how you can edit WMV file format videos in Filmora. Just follow the simple steps shared below:
Step 1: Get the Media File
Start by launching the software on your respective device. Once Filmora opens, you can import the media file by drag and drop. Or else, tap on the ‘File’ tab and move to the ‘Import Media’ option. From the submenu, select the ‘Import Media Files’ option to add the WMV format file.

Step 2: Head to Editor Timeline
You should know that editing is only possible when your file is on the timeline. For that, after a successful file import, simply drag and drop the media file to the timeline and let the fun begins.

Step 3: Add Video Effects
Once the file is in the timeline, start editing. You can add various video effects to your WMV video file from this section. You can get effects like Canvas, Cool Film, Four Seasons, etc., and can also add overlays, filters, etc.

Step 4: Use Title Template
Filmora offers you so many different and cool title templates. You only have to select the best template from the options. You can go for School Pack, Channel Subscribe, Romantic Pack, etc. Moreover, add Lower Thirds, Subtitles, Openers, and a lot more.

Step 5: Export the WMV File
After all the editing is complete, get the WMV format file exported to your device. For that, hit the ‘Export’ button and from the ‘Locals’ section, select your preferred output file format.

Part 5. WMV VS. MP4: What’s the Difference?
MP4 is far more popular than the WMV file format. The world is shifting on the internet; MP4 is widely used and loved online. On the other hand, WMV is popular with Windows users, along with DVD and Blu-ray collectors.
If we talk about the supported software for MP4 and WMV, MP4 has bigger support. WMV is supported by fewer video players and online video editing tools. On the contrary, MP4 is supported by all the video players available for both Windows and Mac users; along with that, every online tool also supports MP4 format for video editing.
Now the world demands quality. In terms of quality, MP4 has better quality than WMV. WMV has lost the battle of quality provision against WMV. MP4 is a larger file than WMV in terms of file size. It is less compressed than WMV format, but the compression gives WMV an advantage over MP4.
Having a compressed file format produces files of smaller size, which can be easily stored. Easy storage of video files makes WMV a better option in places where the quality of the video can be compromised.
Bottom Line
After reading this article, we hope that you have increased your knowledge regarding the WMV file format. We talked about the pros and cons of the WMV format. Moreover, we also shared ways to edit a WMV video with the best video editor, Wondershare Filmora.
Let’s tell you more about the video editing software. Wondershare Filmora is not just a Video Editor; it’s also an Audio Editor with various diverse features like Audio Denoise, Silence Detection, etc. The software is easy to use with a drag and drop facility. You can create and edit stunning videos with the multi-track editor.
For Win 7 or later (64-bit)
For macOS 10.12 or later
Also read:
- Updated Detailed Tutorial to Crop a Video in KineMaster for 2024
- What Are the Best Video Background Changers Online, In 2024
- Updated Do You Wish to Create the Best Video Collages ? No Problem, because Wondershare Filmora Will Help You Make the Best Video Collages
- Updated 2024 Approved Denoise a Video in Adobe Premiere Pro – Audio and Video Noise Removal
- New 2024 Approved Are You Looking to Create some Impressive Slow-Motion Video Content? Get This Done with some Impressive Android Slow Motion Video Apps
- Splice App for Android - How to Download & Use for 2024
- Updated In 2024, Are You Interested in the Best LUTs ? Do You Want to Enhance Your Photos and Images with High-End Quality? Then, Quickly Step Into This Article for Mind-Blowing Facts on It
- Updated Secret Tips & Tricks to Use in Filmora
- In 2024, Mastering FFmpeg How to Merge Audio and Video with Ease
- Getting Into The Details A Review of Kodak LUTs for 2024
- 2024 Approved Do You Wish to Learn About some Tools to Slow Down a Video? Discover How to Slow Down Time Lapse on iPhone Throughout This Article
- In 2024, How to Customize Your Loading Text Effect?
- 2024 Approved Kdenlive Review – Is It The Best Video Editor?
- In 2024, Want to Know How to Slow Down a Video on iPhone or Speed It Up? This Guide Provides Step by Step Method to Do so Using Simple Techniques. Find Out More About It
- 2024 Approved 8 Best Free Title Maker You Must Try and Put to Use
- New To Determine or Change the Video Aspect Ratio Online. Use a Ratio Calculator to Calculate Pixel Dimensions and Aspect Ratios of Images or Videos
- New How to Make a Super Easy Rotating Video Effect
- New Guide of 8 Photo Collage Apps for PC
- Updated Start Making Procreate GIFs and Take Your Editing Creativity to the Next Level
- Updated OpenCV Object Tracking The Complete Guide for 2024
- New In 2024, Top List Best Livestream Shopping Apps Of
- In 2024, How to Bypass FRP from Oppo Find X6?
- Wondering the Best Alternative to Hola On Samsung Galaxy M54 5G? Here Is the Answer | Dr.fone
- How to Change Netflix Location to Get More Country Version On Oppo Reno 11F 5G | Dr.fone
- How to Track Samsung Galaxy S23 Ultra Location by Number | Dr.fone
- How to Transfer Data from Motorola Moto G 5G (2023) to Any iOS Devices | Dr.fone
- In 2024, 3 Effective Methods to Fake GPS location on Android For your Nubia Red Magic 8S Pro | Dr.fone
- 2024 Approved Top 4 Elon Musk Voice Generator Programs to Make You Sound Like the Billionaire
- Best Ways on How to Unlock/Bypass/Swipe/Remove Nubia Red Magic 9 Pro+ Fingerprint Lock
- In 2024, The Best iSpoofer Alternative to Try On OnePlus 12R | Dr.fone
- In 2024, About Xiaomi Mix Fold 3 FRP Bypass
- FRP Hijacker by Hagard Download and Bypass your Vivo V29e FRP Locks
- Title: New Detailed Tutorial to Crop a Video in KineMaster
- Author: Morgan
- Created at : 2024-06-08 08:36:43
- Updated at : 2024-06-09 08:36:43
- Link: https://ai-video-editing.techidaily.com/new-detailed-tutorial-to-crop-a-video-in-kinemaster/
- License: This work is licensed under CC BY-NC-SA 4.0.

