:max_bytes(150000):strip_icc():format(webp)/GettyImages-454939687-56cac7b03df78cfb37988474.jpg)
New Discover How to Create Professional Foggy Text Reflection Effects in the Filmora Video Editor

Discover How to Create Professional Foggy Text Reflection Effects in the Filmora Video Editor
Preparation
What you need to prepare:
- A computer (Windows or macOS)
- Your video materials.
- Filmora video editor
Step 1
Download the Filmora video editor → run it → and click on “New Project”.
Step 2
Go to Titles → drag the Default Title to the Timeline below. Double-click on the clip to open its settings. Here, type in your text → change the font to Montserrat Light. Scroll down and increase Text Spacing to 5.0. Now, select only the first word in the box where you typed your text. Then, change its font to Montserrat Bold. Click OK.

Step 3
Take a Snapshot of the text you just created. Now, delete the Default Title clip from the Timeline and drag the Snapshot you took to the Timeline.

Step 4
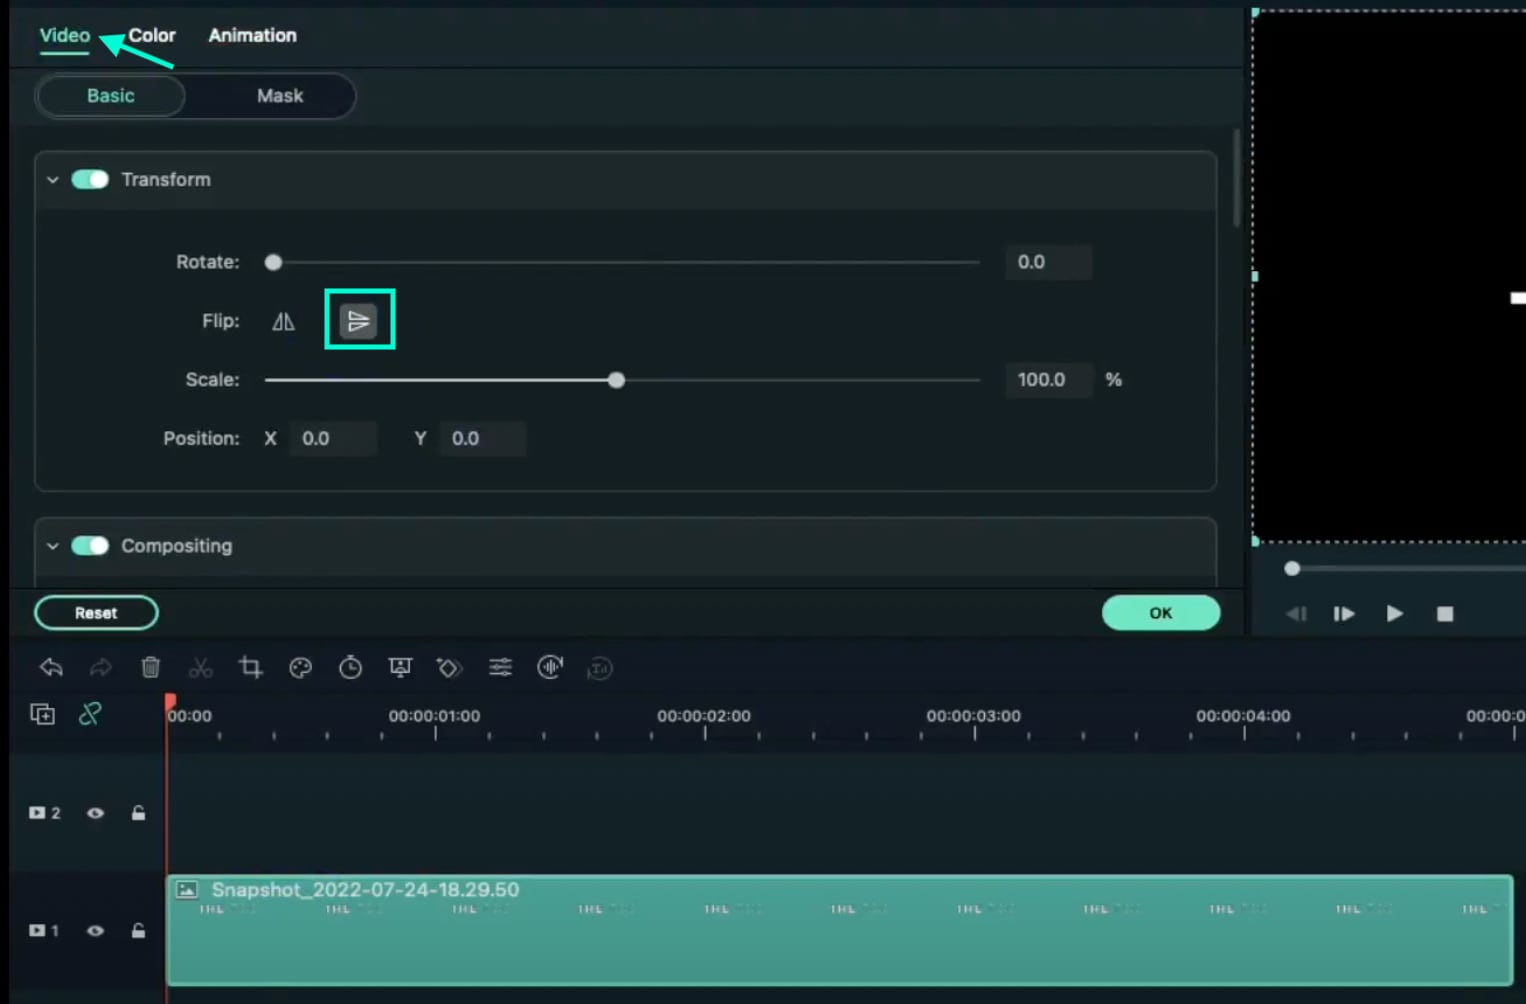
Double-click the Snapshot clip → go to the Video tab → click the highlighted button below to flip the text. Then, take a Snapshot of this flipped version of the text and delete the clip from the Timeline.
Step 5
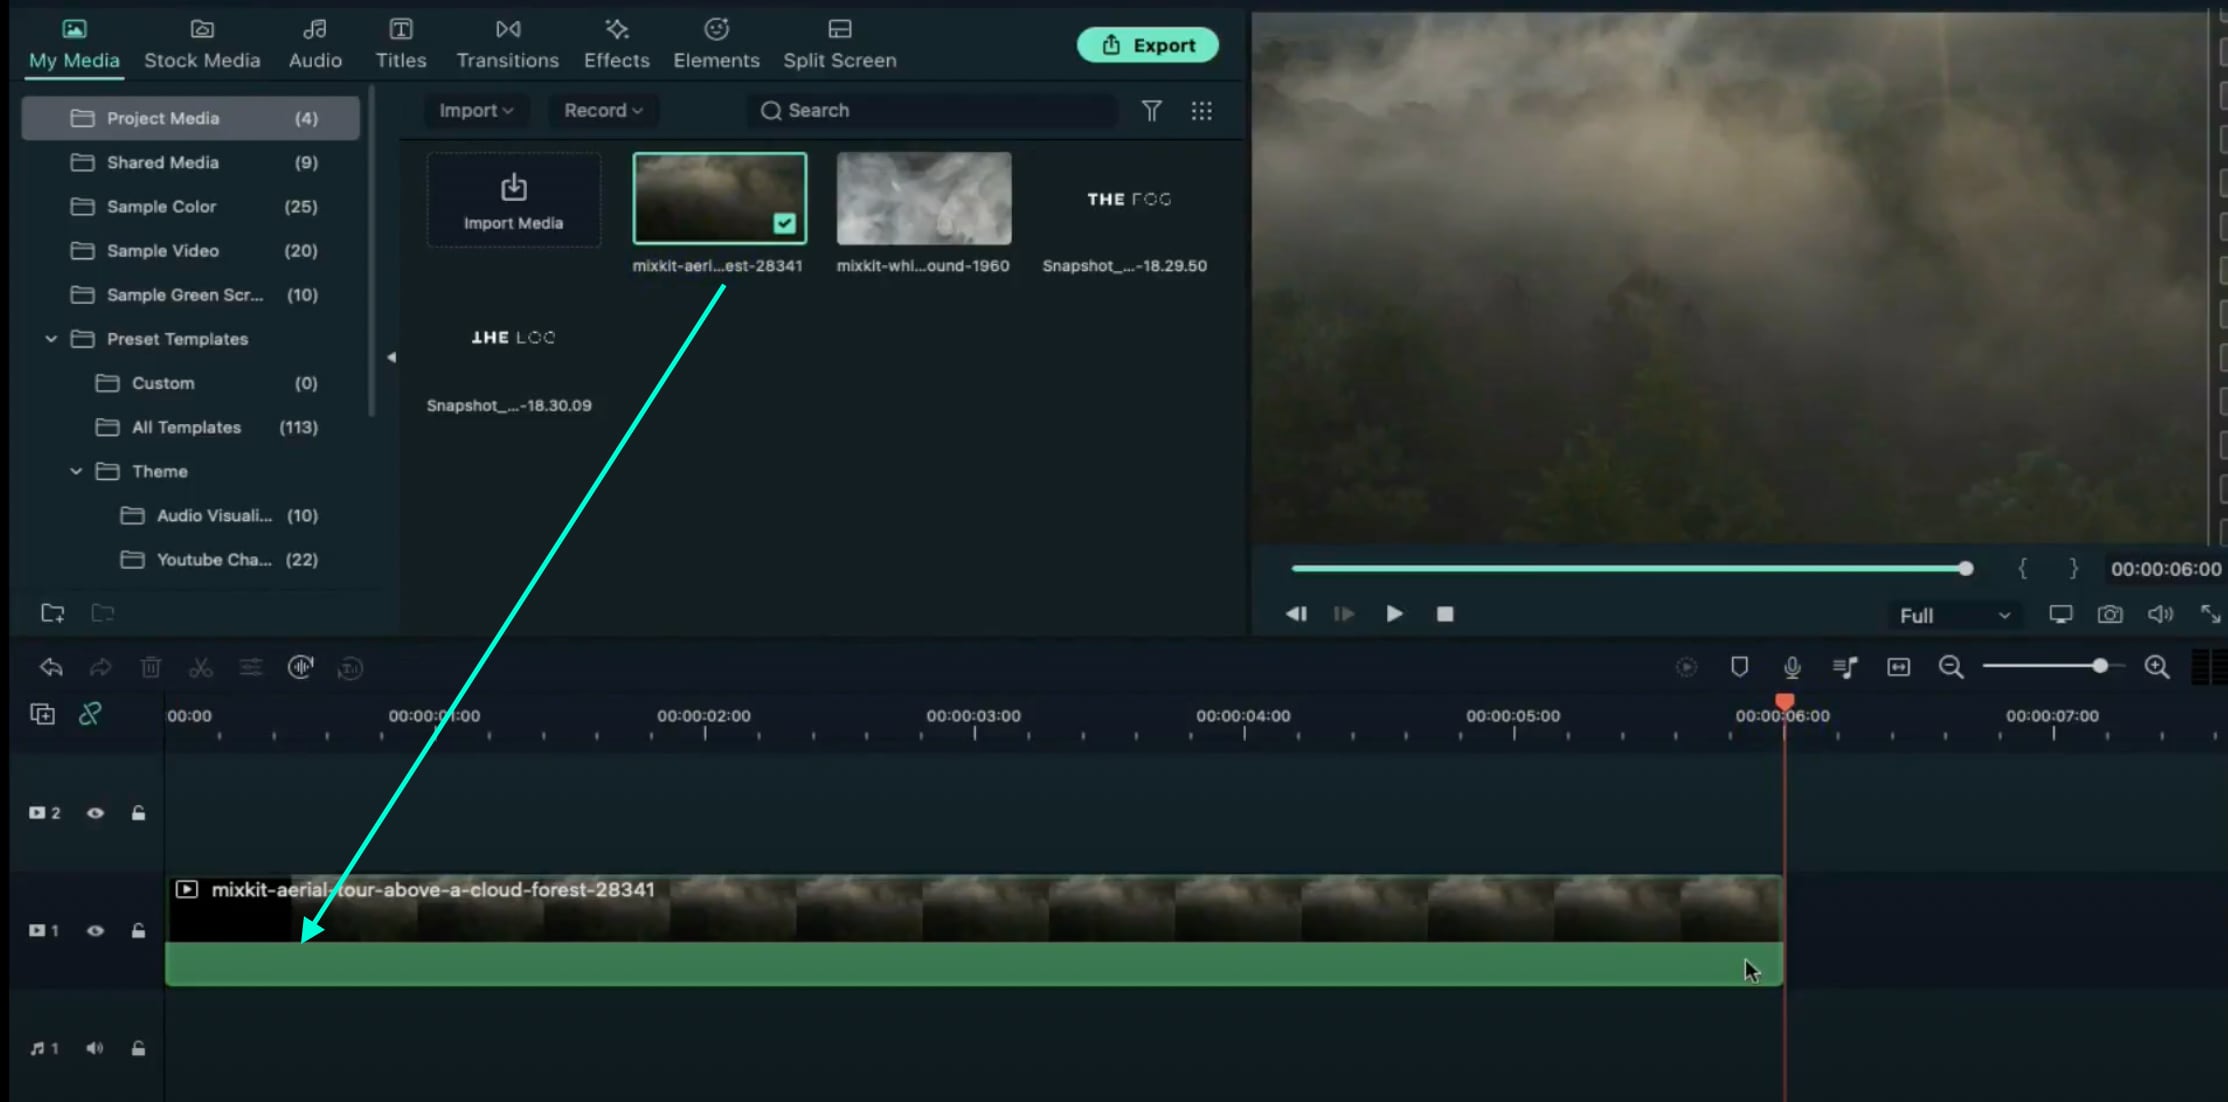
Visit the free stock footage site Mixkit and download any smoke or fog background video you like. Then, go to Filmora → My Media → Import Media → and select the footage you downloaded to import it into the video editor. Then, drag the Smoke clip to the Timeline and make it 6 seconds long.
Step 6
Double-click on the clip → go to Color. Now, change Contrast to “49”, Saturation to “100”, and Brightness to “18”. Below, set the 3D LUT option to “Game of Thrones”. Click OK.

Step 7
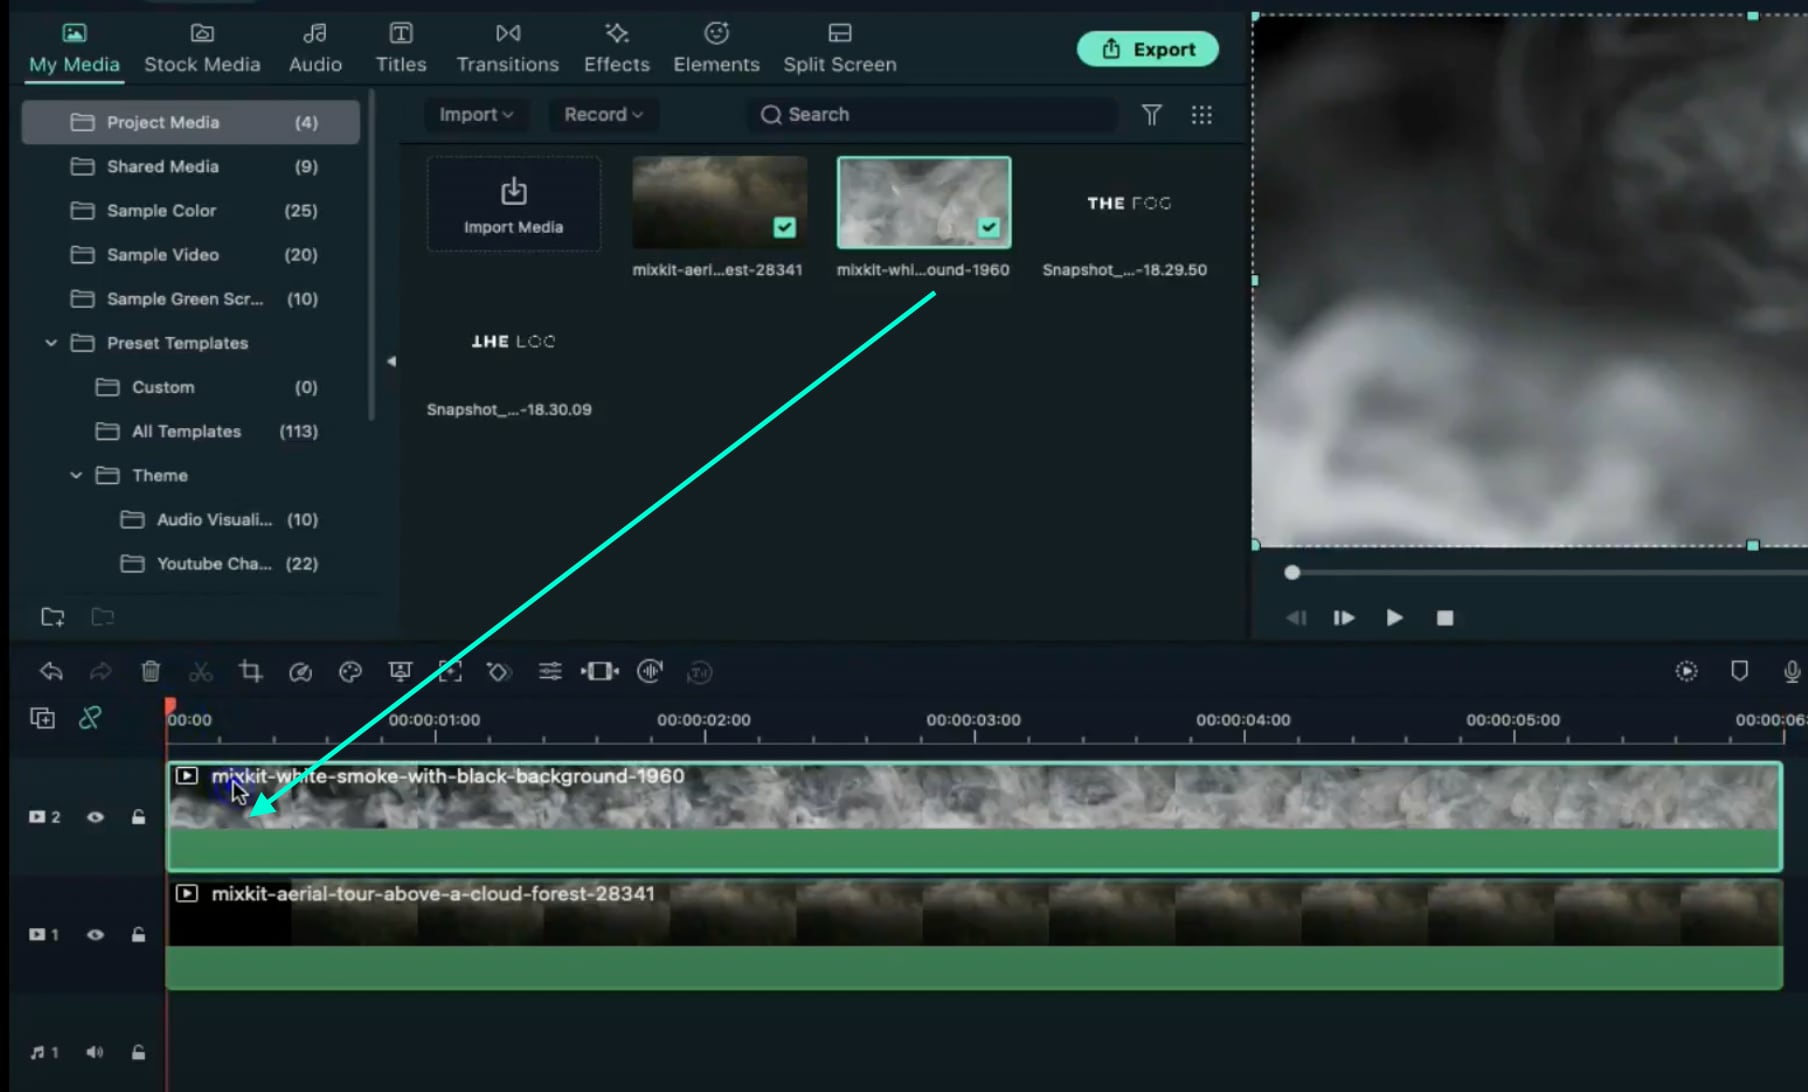
Drag the other Smoke clip to Track 2 of the Timeline. Make it 6 seconds long. Then, move the Playhead to the starting point of the video.
Step 8
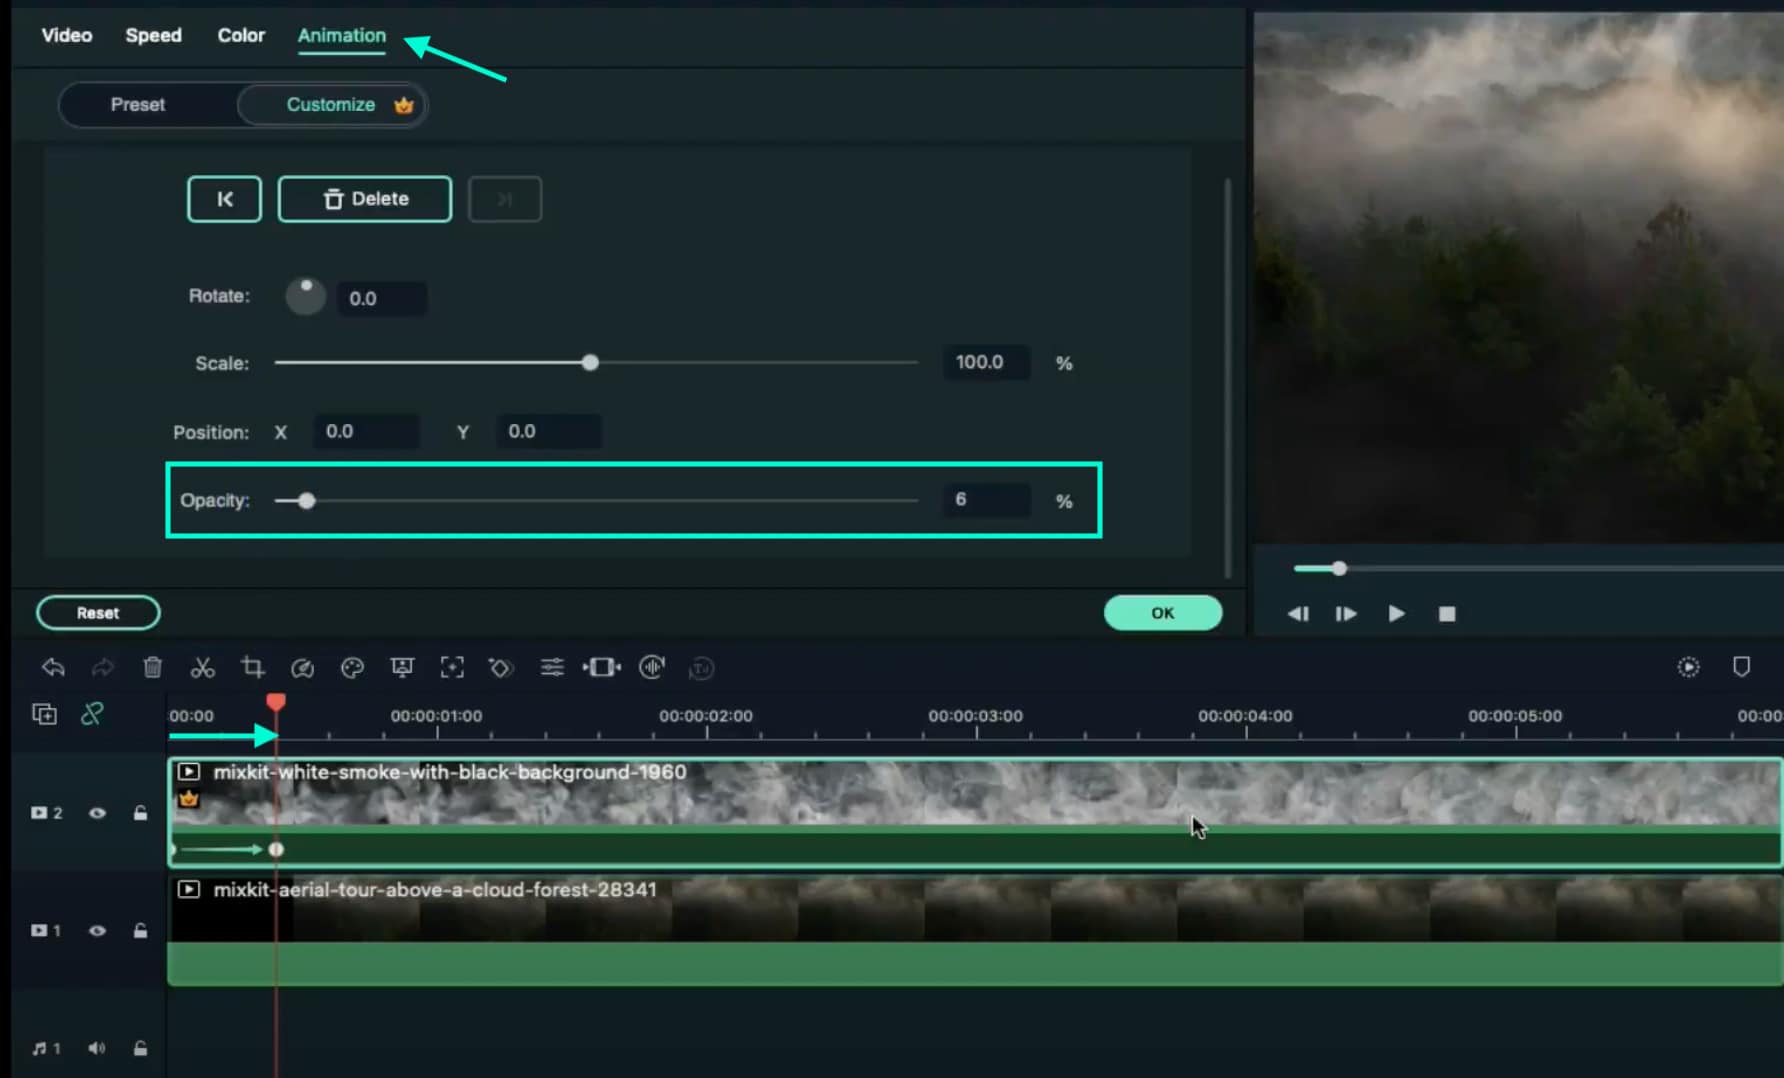
Double-click on the new smoke clip. Go to Animation. Decrease the Opacity to 0%. Move the Playhead 10 frames forward → increase the Opacity to 6%. Don’t click OK yet.
Step 9
Move the Playhead to 5 seconds. Click on “**+Add**” to add a keyframe to the clip. Then, move the Playhead to the next-to-last frame and increase the Opacity to 100%. Click OK.

Step 10
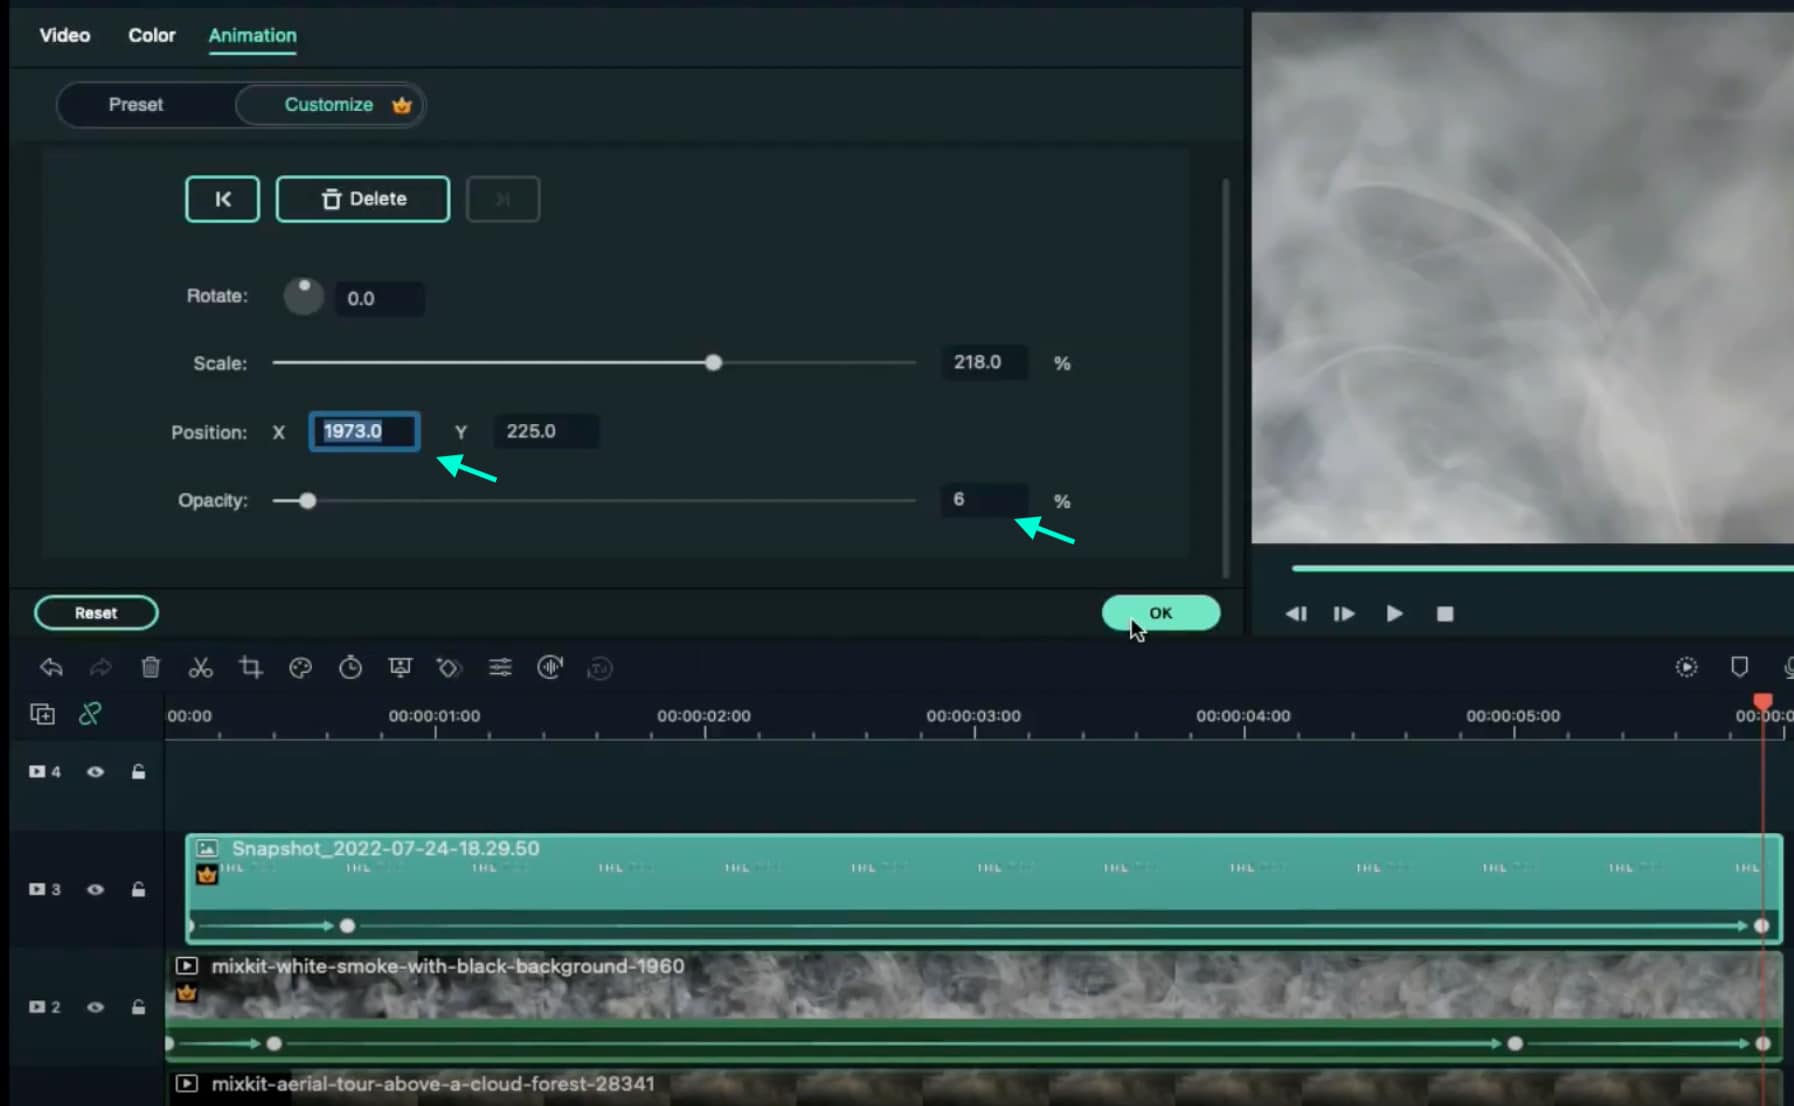
Set the Playhead to the second frame and drop the first Snapshot we took earlier at that starting point. Drag the clip to be 6 seconds long. Then, double-click on the clip and adjust the settings exactly as you see in this image here. Don’t click on OK yet.

Step 11
Move the Playhead at the 17th frame → increase the Opacity to 6%. Move the Playhead to 5 seconds and 23rd frame → change the X-axis value to “1973”. Click OK.
Step 12
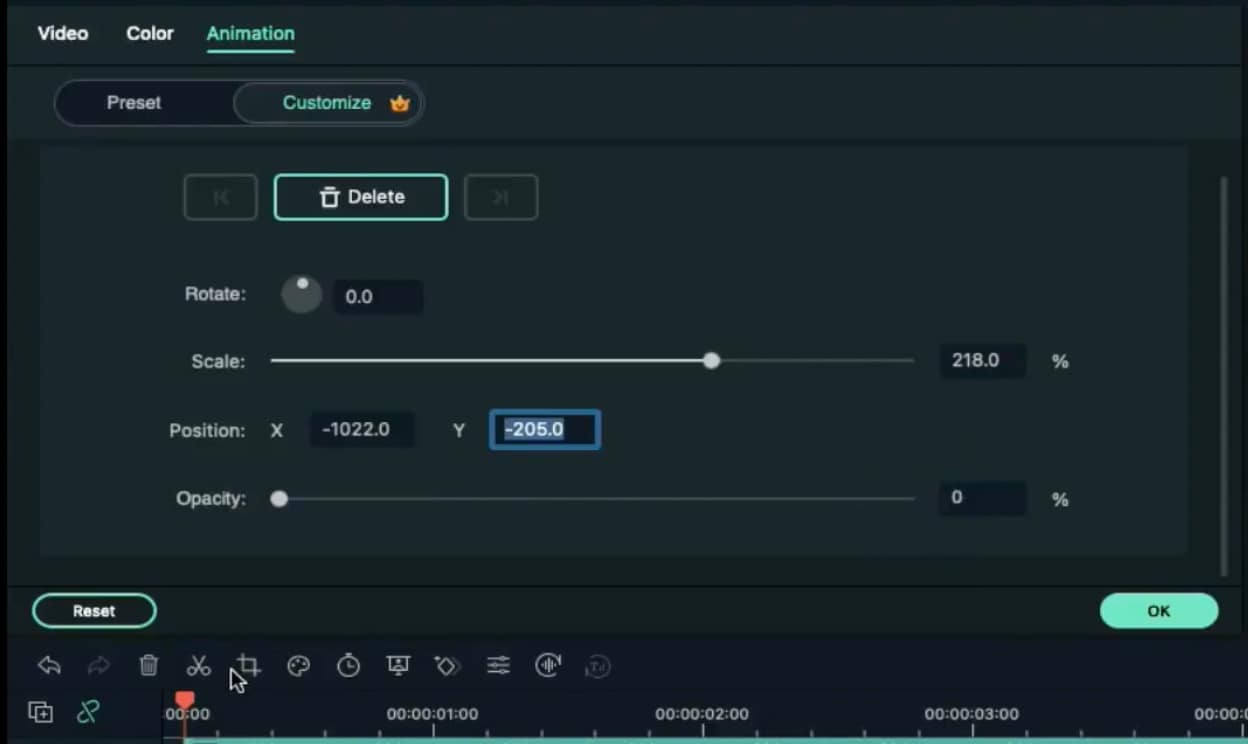
Drag the same Snapshot file to Track 4, directly on top of the clip in Track 3. Make its duration the same too. Now, double-click on this clip and apply the exact same settings as in the image here. Don’t click on OK yet.
Step 13
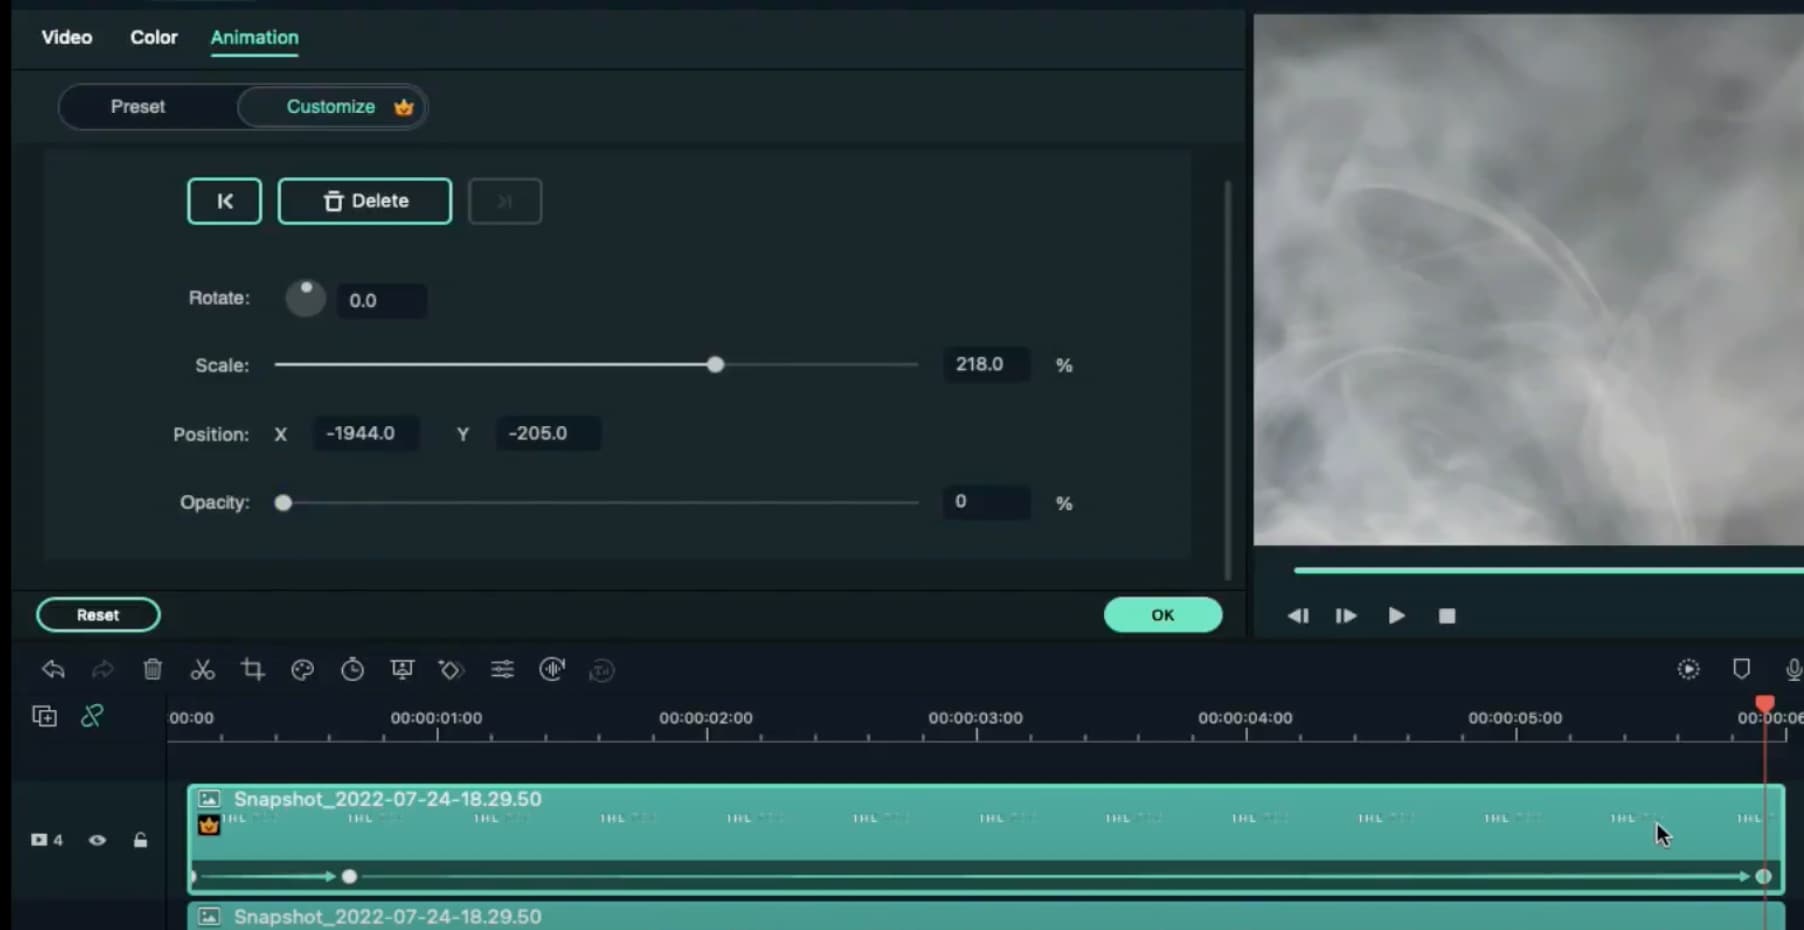
Move the Playhead to the 17th frame → increase the Opacity to 6%. Now, move the Playhead to 5 seconds and 23rd frame → change X-axis value to “-1944” and the Opacity to 0%. Click OK.
Step 14
Go to Sample Color and drag the White color on Track 6 in the Timeline. Place this clip at the same starting point as the snapshots below it. Set its duration the same as the clips below too. Then, move the Playhead at its starting point.

Step 15
Double-click on the Sample Color clip → go to Video → Mask → Import. Here, select the first Snapshot we created earlier in this tutorial.

Step 16
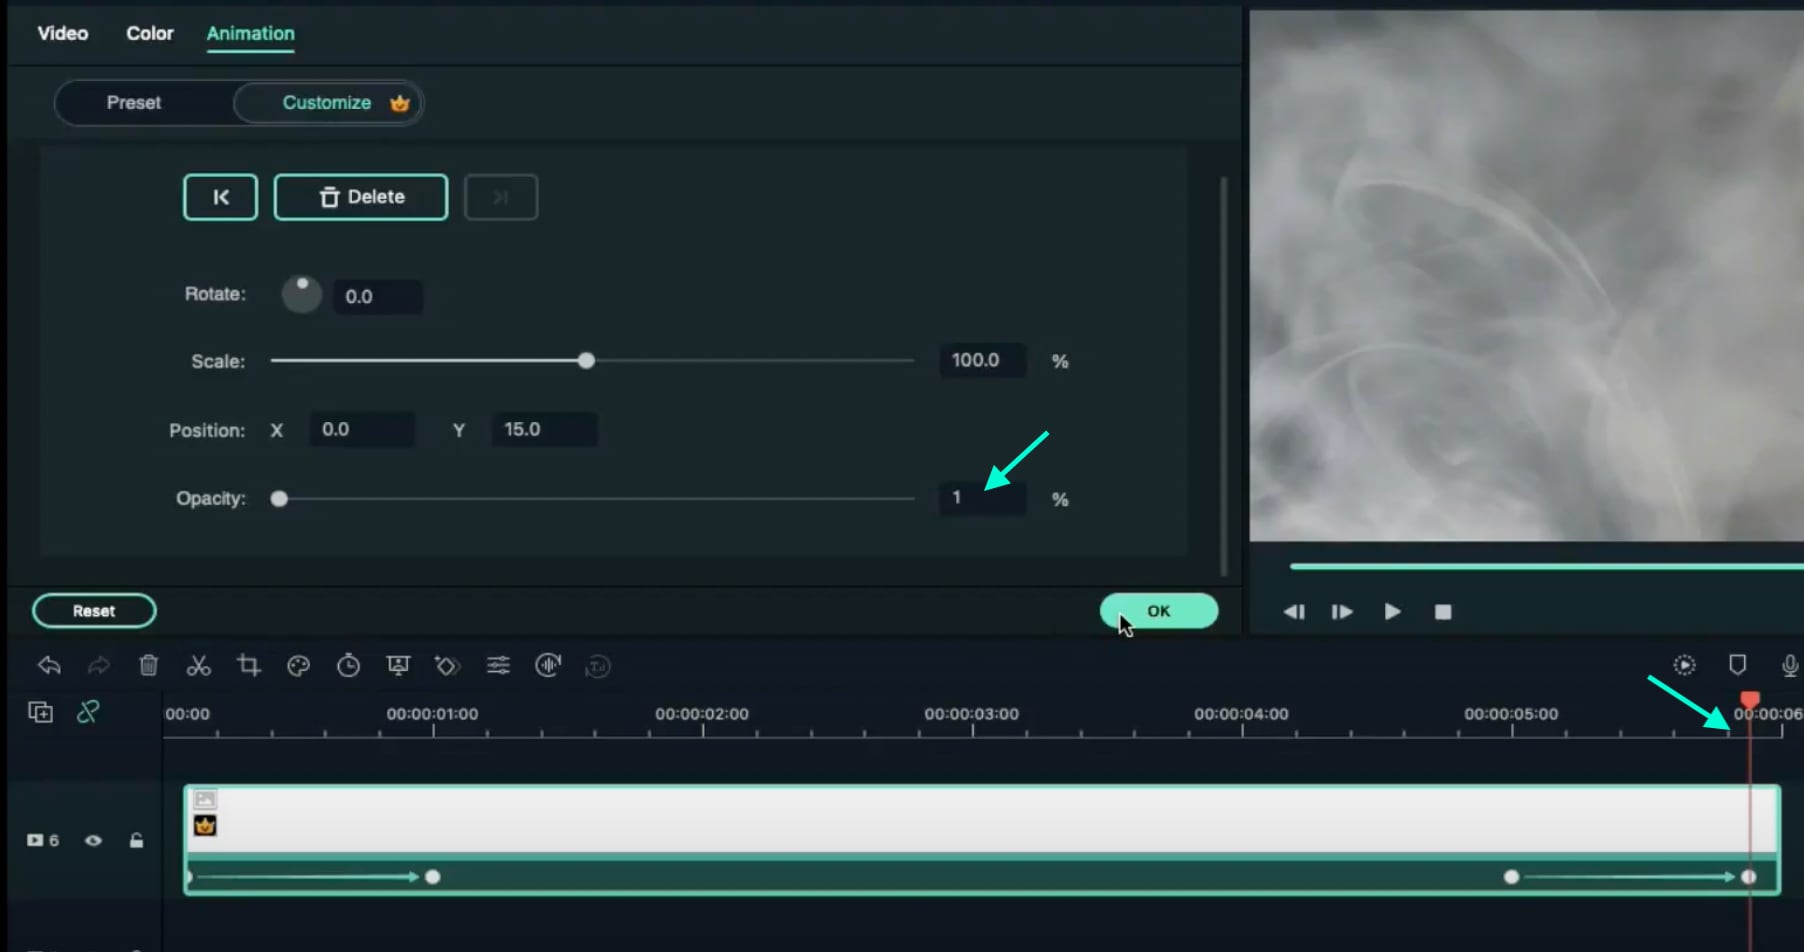
Now, go straight to the Animation tab and click the “**+Add**” button to add a keyframe. Then, compress the text in the preview screen until it’s not visible anymore on the screen.

Step 17
Add keyframes at the 1-second position and at the 5-second position. Then, move the Playhead once more to the 5-second and 22nd frame. Reduce the Opacity to 1%. Click OK.
Step 18
Drag another White Sample Color to Track 5 this time. Adjust its duration and starting point to be the same as the clip above it. Double-click on it → go to Video → Mask → Import. Here, select the flipped text Snapshot we created earlier.
Step 19
Now, go to Animation and add a keyframe at the starting point. Then, compress the text on the preview screen exactly as we did before with the other one. Then, add a keyframe at the 1-second position of the clip. Then, adjust the Y-axis position to create a reflection effect, just like this.

Step 20
Move the Playhead to the 5-second position and add a keyframe. Now, move the Playhead directly to 5-seconds and 22 frames. Here, reduce the Opacity to 0%.
Step 21
Go back to the Video tab from the upper-left corner of the panel. Now, move the Playhead to the clip’s starting point. Select the Mask tab. Add a keyframe. Move the Playhead to 1 second and set the Blur Strength to 6%.

Step 22
Move the Playhead to 3 seconds. Scroll down and set Vertical to 259%. Set Y-axis to “-157”. Then, increase Blur Strength to 25%. Click OK.

Step 23
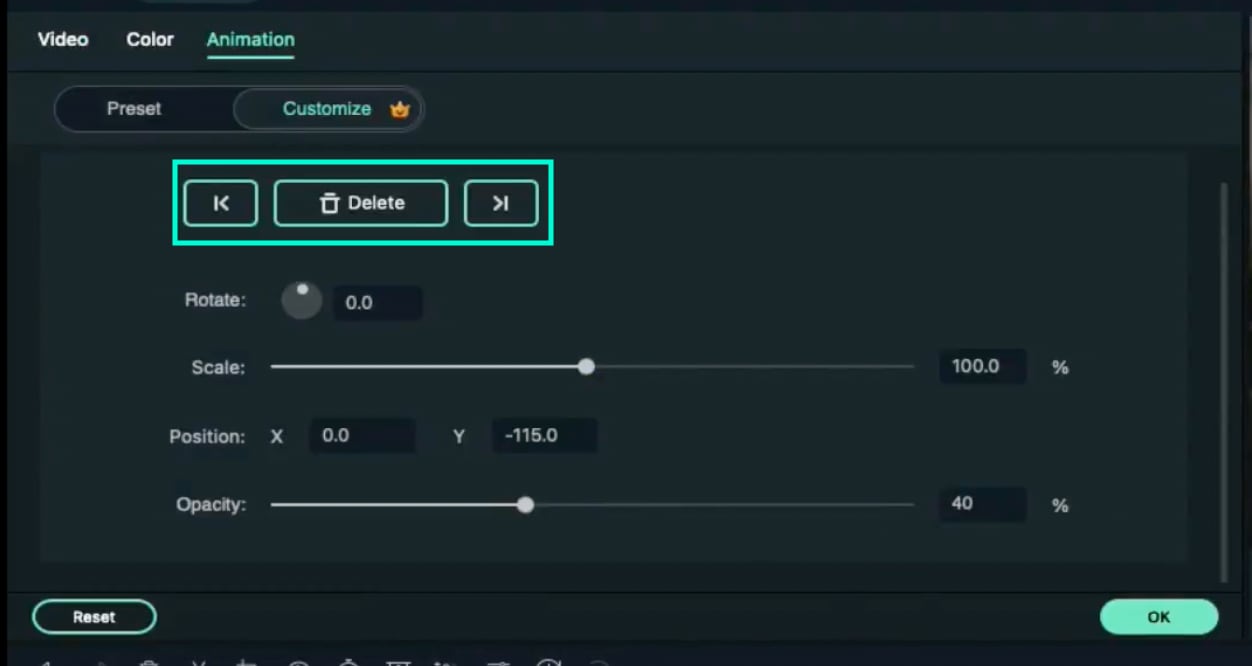
Click on the Sample Color in Track 5 and change the Opacity to 40% for the second and third keyframes. You can move between the keyframes on the arrows highlighted below. Click OK.
Step 24
Go to Sample Color and drag the “Gradient 4” color to Track 7 on the Timeline. Allow this clip to start from the very beginning and adjust its end time to be the same as all the other clips.
Step 25
Double-click on the Gradient 4 clip → go to Video → Basic. Change the Blending Mode to “Soft Light”. Reduce the Opacity to 42%. Click OK.

Step 26
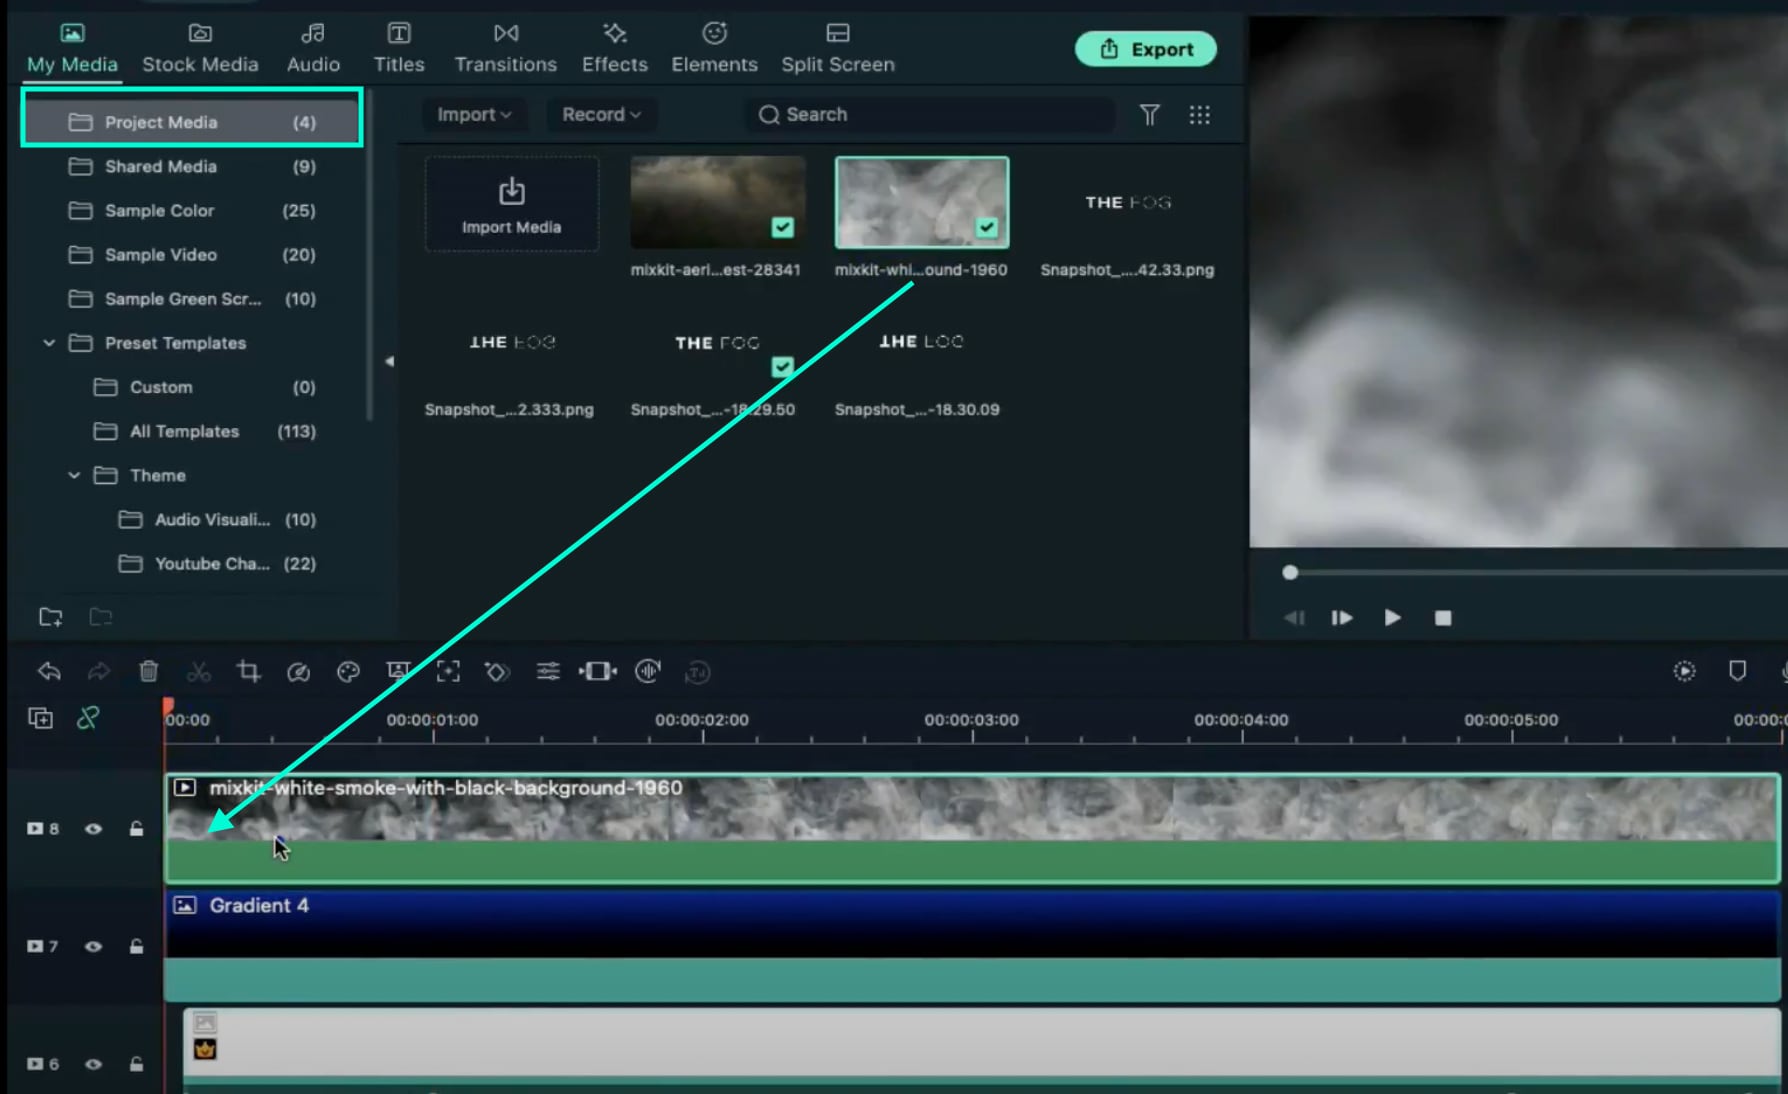
Go to Project Media and drag the white smoke clip on Track 8. Place the Playhead at the starting point and double-click on the clip.
Step 27
Change its Blending Mode to “Screen”. Go to the Animation tab and decrease the Opacity to 0%. Move the Playhead to frame 10 → increase Opacity to 12%. Move the Playhead to the 5-second position → add a keyframe. Then, move the Playhead at 5 seconds and 23rd frame → increase the Opacity back to 100%. Click OK.
Step 28
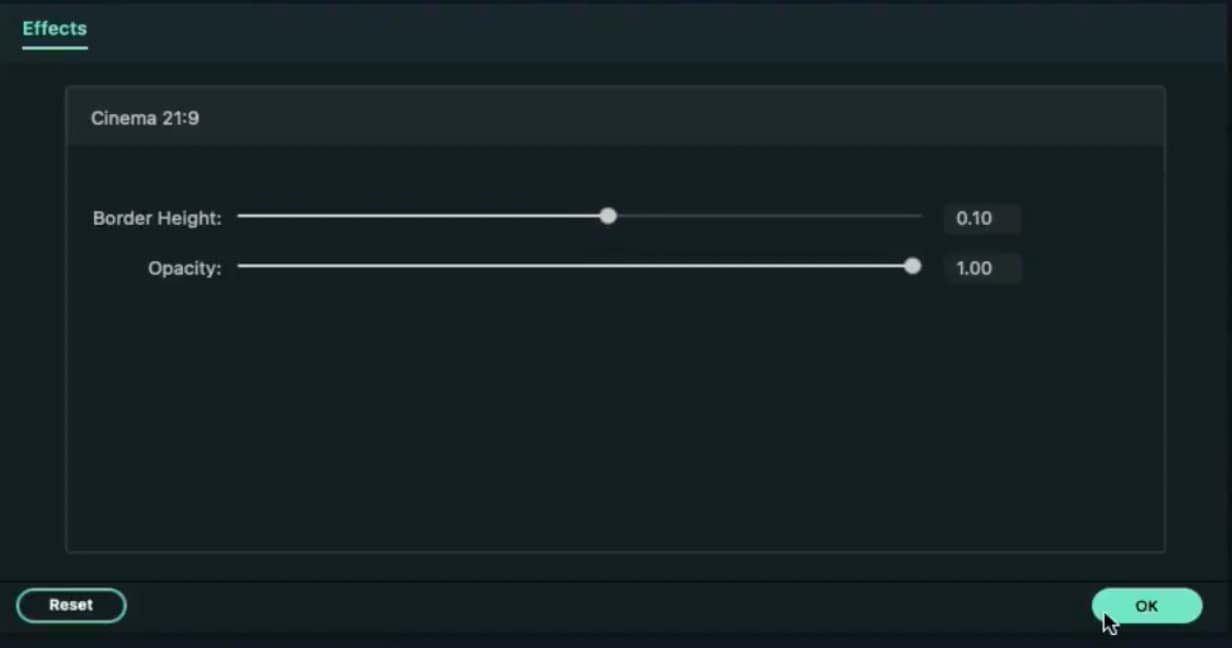
Go to Effects and drag the Cinema effect to Track 9. Adjust its duration to match all the other clips. Double-click on the clip and increase its Border Height to “0.10”. Click OK.
Step 29
Finally, Render the video and watch the final result. You’re done! Congratulations on resting a foggy text reflection effect in Filmora.

Summary
What you’ve learned:
- Create a foggy text reflection effect in the Filmora video editor
- Add and adjust keyframes to clips
- Edit and customize text
- Take and edit snapshots
What you need to prepare:
- A computer (Windows or macOS)
- Your video materials.
- Filmora video editor
Step 1
Download the Filmora video editor → run it → and click on “New Project”.
Step 2
Go to Titles → drag the Default Title to the Timeline below. Double-click on the clip to open its settings. Here, type in your text → change the font to Montserrat Light. Scroll down and increase Text Spacing to 5.0. Now, select only the first word in the box where you typed your text. Then, change its font to Montserrat Bold. Click OK.

Step 3
Take a Snapshot of the text you just created. Now, delete the Default Title clip from the Timeline and drag the Snapshot you took to the Timeline.

Step 4
Double-click the Snapshot clip → go to the Video tab → click the highlighted button below to flip the text. Then, take a Snapshot of this flipped version of the text and delete the clip from the Timeline.

Step 5
Visit the free stock footage site Mixkit and download any smoke or fog background video you like. Then, go to Filmora → My Media → Import Media → and select the footage you downloaded to import it into the video editor. Then, drag the Smoke clip to the Timeline and make it 6 seconds long.

Step 6
Double-click on the clip → go to Color. Now, change Contrast to “49”, Saturation to “100”, and Brightness to “18”. Below, set the 3D LUT option to “Game of Thrones”. Click OK.

Step 7
Drag the other Smoke clip to Track 2 of the Timeline. Make it 6 seconds long. Then, move the Playhead to the starting point of the video.

Step 8
Double-click on the new smoke clip. Go to Animation. Decrease the Opacity to 0%. Move the Playhead 10 frames forward → increase the Opacity to 6%. Don’t click OK yet.

Step 9
Move the Playhead to 5 seconds. Click on “**+Add**” to add a keyframe to the clip. Then, move the Playhead to the next-to-last frame and increase the Opacity to 100%. Click OK.

Step 10
Set the Playhead to the second frame and drop the first Snapshot we took earlier at that starting point. Drag the clip to be 6 seconds long. Then, double-click on the clip and adjust the settings exactly as you see in this image here. Don’t click on OK yet.

Step 11
Move the Playhead at the 17th frame → increase the Opacity to 6%. Move the Playhead to 5 seconds and 23rd frame → change the X-axis value to “1973”. Click OK.

Step 12
Drag the same Snapshot file to Track 4, directly on top of the clip in Track 3. Make its duration the same too. Now, double-click on this clip and apply the exact same settings as in the image here. Don’t click on OK yet.

Step 13
Move the Playhead to the 17th frame → increase the Opacity to 6%. Now, move the Playhead to 5 seconds and 23rd frame → change X-axis value to “-1944” and the Opacity to 0%. Click OK.

Step 14
Go to Sample Color and drag the White color on Track 6 in the Timeline. Place this clip at the same starting point as the snapshots below it. Set its duration the same as the clips below too. Then, move the Playhead at its starting point.

Step 15
Double-click on the Sample Color clip → go to Video → Mask → Import. Here, select the first Snapshot we created earlier in this tutorial.

Step 16
Now, go straight to the Animation tab and click the “**+Add**” button to add a keyframe. Then, compress the text in the preview screen until it’s not visible anymore on the screen.

Step 17
Add keyframes at the 1-second position and at the 5-second position. Then, move the Playhead once more to the 5-second and 22nd frame. Reduce the Opacity to 1%. Click OK.

Step 18
Drag another White Sample Color to Track 5 this time. Adjust its duration and starting point to be the same as the clip above it. Double-click on it → go to Video → Mask → Import. Here, select the flipped text Snapshot we created earlier.
Step 19
Now, go to Animation and add a keyframe at the starting point. Then, compress the text on the preview screen exactly as we did before with the other one. Then, add a keyframe at the 1-second position of the clip. Then, adjust the Y-axis position to create a reflection effect, just like this.

Step 20
Move the Playhead to the 5-second position and add a keyframe. Now, move the Playhead directly to 5-seconds and 22 frames. Here, reduce the Opacity to 0%.
Step 21
Go back to the Video tab from the upper-left corner of the panel. Now, move the Playhead to the clip’s starting point. Select the Mask tab. Add a keyframe. Move the Playhead to 1 second and set the Blur Strength to 6%.

Step 22
Move the Playhead to 3 seconds. Scroll down and set Vertical to 259%. Set Y-axis to “-157”. Then, increase Blur Strength to 25%. Click OK.

Step 23
Click on the Sample Color in Track 5 and change the Opacity to 40% for the second and third keyframes. You can move between the keyframes on the arrows highlighted below. Click OK.

Step 24
Go to Sample Color and drag the “Gradient 4” color to Track 7 on the Timeline. Allow this clip to start from the very beginning and adjust its end time to be the same as all the other clips.
Step 25
Double-click on the Gradient 4 clip → go to Video → Basic. Change the Blending Mode to “Soft Light”. Reduce the Opacity to 42%. Click OK.

Step 26
Go to Project Media and drag the white smoke clip on Track 8. Place the Playhead at the starting point and double-click on the clip.

Step 27
Change its Blending Mode to “Screen”. Go to the Animation tab and decrease the Opacity to 0%. Move the Playhead to frame 10 → increase Opacity to 12%. Move the Playhead to the 5-second position → add a keyframe. Then, move the Playhead at 5 seconds and 23rd frame → increase the Opacity back to 100%. Click OK.
Step 28
Go to Effects and drag the Cinema effect to Track 9. Adjust its duration to match all the other clips. Double-click on the clip and increase its Border Height to “0.10”. Click OK.

Step 29
Finally, Render the video and watch the final result. You’re done! Congratulations on resting a foggy text reflection effect in Filmora.

Summary
What you’ve learned:
- Create a foggy text reflection effect in the Filmora video editor
- Add and adjust keyframes to clips
- Edit and customize text
- Take and edit snapshots
What you need to prepare:
- A computer (Windows or macOS)
- Your video materials.
- Filmora video editor
Step 1
Download the Filmora video editor → run it → and click on “New Project”.
Step 2
Go to Titles → drag the Default Title to the Timeline below. Double-click on the clip to open its settings. Here, type in your text → change the font to Montserrat Light. Scroll down and increase Text Spacing to 5.0. Now, select only the first word in the box where you typed your text. Then, change its font to Montserrat Bold. Click OK.

Step 3
Take a Snapshot of the text you just created. Now, delete the Default Title clip from the Timeline and drag the Snapshot you took to the Timeline.

Step 4
Double-click the Snapshot clip → go to the Video tab → click the highlighted button below to flip the text. Then, take a Snapshot of this flipped version of the text and delete the clip from the Timeline.

Step 5
Visit the free stock footage site Mixkit and download any smoke or fog background video you like. Then, go to Filmora → My Media → Import Media → and select the footage you downloaded to import it into the video editor. Then, drag the Smoke clip to the Timeline and make it 6 seconds long.

Step 6
Double-click on the clip → go to Color. Now, change Contrast to “49”, Saturation to “100”, and Brightness to “18”. Below, set the 3D LUT option to “Game of Thrones”. Click OK.

Step 7
Drag the other Smoke clip to Track 2 of the Timeline. Make it 6 seconds long. Then, move the Playhead to the starting point of the video.

Step 8
Double-click on the new smoke clip. Go to Animation. Decrease the Opacity to 0%. Move the Playhead 10 frames forward → increase the Opacity to 6%. Don’t click OK yet.

Step 9
Move the Playhead to 5 seconds. Click on “**+Add**” to add a keyframe to the clip. Then, move the Playhead to the next-to-last frame and increase the Opacity to 100%. Click OK.

Step 10
Set the Playhead to the second frame and drop the first Snapshot we took earlier at that starting point. Drag the clip to be 6 seconds long. Then, double-click on the clip and adjust the settings exactly as you see in this image here. Don’t click on OK yet.

Step 11
Move the Playhead at the 17th frame → increase the Opacity to 6%. Move the Playhead to 5 seconds and 23rd frame → change the X-axis value to “1973”. Click OK.

Step 12
Drag the same Snapshot file to Track 4, directly on top of the clip in Track 3. Make its duration the same too. Now, double-click on this clip and apply the exact same settings as in the image here. Don’t click on OK yet.

Step 13
Move the Playhead to the 17th frame → increase the Opacity to 6%. Now, move the Playhead to 5 seconds and 23rd frame → change X-axis value to “-1944” and the Opacity to 0%. Click OK.

Step 14
Go to Sample Color and drag the White color on Track 6 in the Timeline. Place this clip at the same starting point as the snapshots below it. Set its duration the same as the clips below too. Then, move the Playhead at its starting point.

Step 15
Double-click on the Sample Color clip → go to Video → Mask → Import. Here, select the first Snapshot we created earlier in this tutorial.

Step 16
Now, go straight to the Animation tab and click the “**+Add**” button to add a keyframe. Then, compress the text in the preview screen until it’s not visible anymore on the screen.

Step 17
Add keyframes at the 1-second position and at the 5-second position. Then, move the Playhead once more to the 5-second and 22nd frame. Reduce the Opacity to 1%. Click OK.

Step 18
Drag another White Sample Color to Track 5 this time. Adjust its duration and starting point to be the same as the clip above it. Double-click on it → go to Video → Mask → Import. Here, select the flipped text Snapshot we created earlier.
Step 19
Now, go to Animation and add a keyframe at the starting point. Then, compress the text on the preview screen exactly as we did before with the other one. Then, add a keyframe at the 1-second position of the clip. Then, adjust the Y-axis position to create a reflection effect, just like this.

Step 20
Move the Playhead to the 5-second position and add a keyframe. Now, move the Playhead directly to 5-seconds and 22 frames. Here, reduce the Opacity to 0%.
Step 21
Go back to the Video tab from the upper-left corner of the panel. Now, move the Playhead to the clip’s starting point. Select the Mask tab. Add a keyframe. Move the Playhead to 1 second and set the Blur Strength to 6%.

Step 22
Move the Playhead to 3 seconds. Scroll down and set Vertical to 259%. Set Y-axis to “-157”. Then, increase Blur Strength to 25%. Click OK.

Step 23
Click on the Sample Color in Track 5 and change the Opacity to 40% for the second and third keyframes. You can move between the keyframes on the arrows highlighted below. Click OK.

Step 24
Go to Sample Color and drag the “Gradient 4” color to Track 7 on the Timeline. Allow this clip to start from the very beginning and adjust its end time to be the same as all the other clips.
Step 25
Double-click on the Gradient 4 clip → go to Video → Basic. Change the Blending Mode to “Soft Light”. Reduce the Opacity to 42%. Click OK.

Step 26
Go to Project Media and drag the white smoke clip on Track 8. Place the Playhead at the starting point and double-click on the clip.

Step 27
Change its Blending Mode to “Screen”. Go to the Animation tab and decrease the Opacity to 0%. Move the Playhead to frame 10 → increase Opacity to 12%. Move the Playhead to the 5-second position → add a keyframe. Then, move the Playhead at 5 seconds and 23rd frame → increase the Opacity back to 100%. Click OK.
Step 28
Go to Effects and drag the Cinema effect to Track 9. Adjust its duration to match all the other clips. Double-click on the clip and increase its Border Height to “0.10”. Click OK.

Step 29
Finally, Render the video and watch the final result. You’re done! Congratulations on resting a foggy text reflection effect in Filmora.

Summary
What you’ve learned:
- Create a foggy text reflection effect in the Filmora video editor
- Add and adjust keyframes to clips
- Edit and customize text
- Take and edit snapshots
What you need to prepare:
- A computer (Windows or macOS)
- Your video materials.
- Filmora video editor
Step 1
Download the Filmora video editor → run it → and click on “New Project”.
Step 2
Go to Titles → drag the Default Title to the Timeline below. Double-click on the clip to open its settings. Here, type in your text → change the font to Montserrat Light. Scroll down and increase Text Spacing to 5.0. Now, select only the first word in the box where you typed your text. Then, change its font to Montserrat Bold. Click OK.

Step 3
Take a Snapshot of the text you just created. Now, delete the Default Title clip from the Timeline and drag the Snapshot you took to the Timeline.

Step 4
Double-click the Snapshot clip → go to the Video tab → click the highlighted button below to flip the text. Then, take a Snapshot of this flipped version of the text and delete the clip from the Timeline.

Step 5
Visit the free stock footage site Mixkit and download any smoke or fog background video you like. Then, go to Filmora → My Media → Import Media → and select the footage you downloaded to import it into the video editor. Then, drag the Smoke clip to the Timeline and make it 6 seconds long.

Step 6
Double-click on the clip → go to Color. Now, change Contrast to “49”, Saturation to “100”, and Brightness to “18”. Below, set the 3D LUT option to “Game of Thrones”. Click OK.

Step 7
Drag the other Smoke clip to Track 2 of the Timeline. Make it 6 seconds long. Then, move the Playhead to the starting point of the video.

Step 8
Double-click on the new smoke clip. Go to Animation. Decrease the Opacity to 0%. Move the Playhead 10 frames forward → increase the Opacity to 6%. Don’t click OK yet.

Step 9
Move the Playhead to 5 seconds. Click on “**+Add**” to add a keyframe to the clip. Then, move the Playhead to the next-to-last frame and increase the Opacity to 100%. Click OK.

Step 10
Set the Playhead to the second frame and drop the first Snapshot we took earlier at that starting point. Drag the clip to be 6 seconds long. Then, double-click on the clip and adjust the settings exactly as you see in this image here. Don’t click on OK yet.

Step 11
Move the Playhead at the 17th frame → increase the Opacity to 6%. Move the Playhead to 5 seconds and 23rd frame → change the X-axis value to “1973”. Click OK.

Step 12
Drag the same Snapshot file to Track 4, directly on top of the clip in Track 3. Make its duration the same too. Now, double-click on this clip and apply the exact same settings as in the image here. Don’t click on OK yet.

Step 13
Move the Playhead to the 17th frame → increase the Opacity to 6%. Now, move the Playhead to 5 seconds and 23rd frame → change X-axis value to “-1944” and the Opacity to 0%. Click OK.

Step 14
Go to Sample Color and drag the White color on Track 6 in the Timeline. Place this clip at the same starting point as the snapshots below it. Set its duration the same as the clips below too. Then, move the Playhead at its starting point.

Step 15
Double-click on the Sample Color clip → go to Video → Mask → Import. Here, select the first Snapshot we created earlier in this tutorial.

Step 16
Now, go straight to the Animation tab and click the “**+Add**” button to add a keyframe. Then, compress the text in the preview screen until it’s not visible anymore on the screen.

Step 17
Add keyframes at the 1-second position and at the 5-second position. Then, move the Playhead once more to the 5-second and 22nd frame. Reduce the Opacity to 1%. Click OK.

Step 18
Drag another White Sample Color to Track 5 this time. Adjust its duration and starting point to be the same as the clip above it. Double-click on it → go to Video → Mask → Import. Here, select the flipped text Snapshot we created earlier.
Step 19
Now, go to Animation and add a keyframe at the starting point. Then, compress the text on the preview screen exactly as we did before with the other one. Then, add a keyframe at the 1-second position of the clip. Then, adjust the Y-axis position to create a reflection effect, just like this.

Step 20
Move the Playhead to the 5-second position and add a keyframe. Now, move the Playhead directly to 5-seconds and 22 frames. Here, reduce the Opacity to 0%.
Step 21
Go back to the Video tab from the upper-left corner of the panel. Now, move the Playhead to the clip’s starting point. Select the Mask tab. Add a keyframe. Move the Playhead to 1 second and set the Blur Strength to 6%.

Step 22
Move the Playhead to 3 seconds. Scroll down and set Vertical to 259%. Set Y-axis to “-157”. Then, increase Blur Strength to 25%. Click OK.

Step 23
Click on the Sample Color in Track 5 and change the Opacity to 40% for the second and third keyframes. You can move between the keyframes on the arrows highlighted below. Click OK.

Step 24
Go to Sample Color and drag the “Gradient 4” color to Track 7 on the Timeline. Allow this clip to start from the very beginning and adjust its end time to be the same as all the other clips.
Step 25
Double-click on the Gradient 4 clip → go to Video → Basic. Change the Blending Mode to “Soft Light”. Reduce the Opacity to 42%. Click OK.

Step 26
Go to Project Media and drag the white smoke clip on Track 8. Place the Playhead at the starting point and double-click on the clip.

Step 27
Change its Blending Mode to “Screen”. Go to the Animation tab and decrease the Opacity to 0%. Move the Playhead to frame 10 → increase Opacity to 12%. Move the Playhead to the 5-second position → add a keyframe. Then, move the Playhead at 5 seconds and 23rd frame → increase the Opacity back to 100%. Click OK.
Step 28
Go to Effects and drag the Cinema effect to Track 9. Adjust its duration to match all the other clips. Double-click on the clip and increase its Border Height to “0.10”. Click OK.

Step 29
Finally, Render the video and watch the final result. You’re done! Congratulations on resting a foggy text reflection effect in Filmora.

Summary
What you’ve learned:
- Create a foggy text reflection effect in the Filmora video editor
- Add and adjust keyframes to clips
- Edit and customize text
- Take and edit snapshots
Can You Enhance Your Drone Footage with Cinematic Drone LUTs? This Article Discusses Top Drone LUTs Recommendations to Simplify Video Editing
Drone footage is an aerial recording of an event, occasion, or entire town. The quality of these drone recordings may not be good enough. This is why users need to pursue video editing to enhance video quality. Meanwhile, editing videos from scratch can be time-consuming. Utilizing free drone LUTs is ideal for upscaling video quality to optimized standards. In this article, you will find top recommendations for using drone LUTs.
- Part 2: How Can LUTs be Used in Drone Footage Editing?
- Part 3: Best Drone LUTs To Discover In 2024
- Bonus Part: Learn More About Video Editing Through LUTs with Wondershare Filmora
Part 1: What Do You Know About LUTs?
LUTS, or Lookup Tables, do exist in small files. These files have sources to enhance color grading and optimize color correction within videos and images. The sources are special color presets that transform color schemas. The use cases of LUTs typically fall within the video and film industries. Individuals can also use these video-enhancing tools to better visualize their content.
Within LUTs, you will find a range of preset filters that can be applied. Meanwhile, the color grading is executed with more consistency. This way, the colors are accurately applied to all frames of visual content. The colors are mapped into the original footage using pre-determined color options. So, you don’t need to adjust or manually customize individual colors.
Part 2: How Can LUTs be Used in Drone Footage Editing?
Drone technology is a new revolution in this modern world. After all, it allows us to capture aerial photos and videos with greater proximity. While the quality of this footage may not be good, LUTs can help. Here is how you can use LUTs in drone footage editing and make your work easier:
- Color Grading: You can use LUTs for creative color grading solutions. After all, there are different filter presets with unique color styling. This provides new and interesting looks to your visual media.
- Match Colors: If you use different cameras to record drone footage, colors may differ. That’s where LUTs can be useful. They can match colors in all frames with dedicated filter presets.
- Color Correction: Drone footage often faces lighting issues that damage color gradients. When using drone LUTs pack-free, you can correct color schemas with consistency. The color imbalances will rectify.
- Saves Resources: With LUTs, you can save time and money. So, you don’t need to waste long hours on video editing. You don’t even have to spend money on good editing software. Color grading becomes more straightforward with LUTs.
Part 3: Best Drone LUTs To Discover In 2024
Aerial technology in this modern world is evolving, which includes drone usage. In contrast, you may need to upscale video colors using special drone LUTs. Here you’ll find the list of the best drone LUTs to make video upscaling smarter:
1.Moody DJI Drone LUTs
Provide moody styles to your recorded drone footage with this DJI drone LUTs pack free download. There are 15 LUTs preset filters that you can use to upscale video colors. All filters are unique, with different color gradients, contrast, and compositions. You have to import these filters to use them, and they require no extra plugin. The drone LUTs pack is compatible with both Windows and Mac.

2.DJI Drone LUTs Color Preset
Transfrom your aerial video shoot in wildlife, sports, or traveling with this LUTs pack. After all, this DJI Mavic 2 Pro LUTs works with drones, including the DJI Mavic Pro line. There are, in total, 120 color presets that are available in different gradients. The quality for these LUTs is 8K, and they work with LOG and Rec .709.

3.DB - Cinematic Drone LUTs
Enhance aerial videography using color grading using this cinematic drone LUTs-free pack. In this LUTs pack, you’ll find 10 premium LUTs to get started. Each LUTs possesses a special color preset to provide new looks within aerial videos. Meanwhile, this DJI drone LUTs pack free download is ideal for DJI drones. The LUTs work well on types of camera footage.

4. CINEMATIC DRONE LUTS
Apply professional color gradients to your all-important drone visual content. You can transform videos’ visual quality by using these free LUTs for drone footage. In total, you receive 25 color presets in different color schemas and textures. This way, you can blend cinematic touch into your aerial shoot. You can even set a reference point or increase the speed of color grading.

5. JHL Drone LUTs
Aerial videography can be upscaled in a simpler way using JHL drone LUTs. After all, this LUTs pack contains 18 distinctive LUTs preset filters. In general, you can use these LUTs on all software editing platforms. Meanwhile, the LUTs have been tested for DJI drone clips, so expect outstanding results. The LUTs are special because they provide solutions in all weather and light ranges.

6. Drone LUTs
Make your aerial project more enchanting with this drone LUTs pack free. You will get 20 diverse drone LUTs preset filters. In contrast, these filters suit all lighting, weather, and environment. The color gradients of your visual content are optimized with stunning color grading. These LUTs work with any resolution. You need to drag and drop these elements into your content.

7. B&W
Black and white color schemes are always special. Adding them to your aerial videos or photos can enlighten your content’s visualization. By using these B&W LUTs for drones, turn aerial shoots into appealing black-and-white contrasts. This will make your visual content more aesthetic with improved engagement. Using this LUTs pack is very convenient and straightforward.

Bonus Part: Learn More About Video Editing Through LUTs with Wondershare Filmora
Video editing is a way to optimize the quality of videos with perfection. Meanwhile, using LUTs can convincingly simplify video editing. For using cinematic drone LUTs free, you need a good and reliable tool. Wondershare Filmora is the trusted solution in this regard. This is a video editing software that allows video upscaling from broader perspectives.
There are more than 200 LUTs that you can use, and every LUTs is unique. The availability of titles, stickers, transitions, effects, and audio makes this tool special. Meanwhile, Filmora comes with a user-friendly interface to get started.

Key Features of Wondershare Filmora
Regarding video editing, Wondershare Filmora takes the lead over its competitors. There are several functions and various tools to learn about, which can be seen in the critical features of Filmora described below:
1. Instant Mode
Filmora’s instant mode allows you to create videos without requiring editing skills. You have to add your respective media items, and Filmora transforms them into videos. There are more than 115 templates that you can use. The AI algorithm works fast and efficiently.
2. Batch Text Editing
Using batch text editing, you can add subtitles to your video. There are three ways to batch edit the text. First, select all texts in the timeline to edit them at the same time. Second, multiple text styles in the Filmora player. Third, changing fonts in bulk quantity within advanced editing.
3. Screen Recorder
Record your screenplay using the Filmora screen recording facility. So, you can record videos from different areas of a webcam or PC screen. You can also customize the ratio and screen sizes of your videos. Meanwhile, audio is recorded by microphone and system.
4. Adjustment layer
Filmora can also help add general effects to your videos at once. Through the adjustment layer, the same effects could be applied across timeline videos. This improves video editing efficiency as a whole. In addition, the adjustment layer can hold unlimited effects.
Add LUTs on Video For Win 7 or later(64-bit)
Add LUTs on Video For macOS 10.14 or later
Conclusion
Drone technology is evolving modern videography and photography with aerial views. Meanwhile, using a camera may affect the quality of recorded videos. This is why using DJI mini 2 LUTs free is essential. This article discussed 7 drone LUTs pack free help get started with color upscaling. Moreover, you also learned about Wondershare Filmora, which is a best-in-class video editing software.
- Part 3: Best Drone LUTs To Discover In 2024
- Bonus Part: Learn More About Video Editing Through LUTs with Wondershare Filmora
Part 1: What Do You Know About LUTs?
LUTS, or Lookup Tables, do exist in small files. These files have sources to enhance color grading and optimize color correction within videos and images. The sources are special color presets that transform color schemas. The use cases of LUTs typically fall within the video and film industries. Individuals can also use these video-enhancing tools to better visualize their content.
Within LUTs, you will find a range of preset filters that can be applied. Meanwhile, the color grading is executed with more consistency. This way, the colors are accurately applied to all frames of visual content. The colors are mapped into the original footage using pre-determined color options. So, you don’t need to adjust or manually customize individual colors.
Part 2: How Can LUTs be Used in Drone Footage Editing?
Drone technology is a new revolution in this modern world. After all, it allows us to capture aerial photos and videos with greater proximity. While the quality of this footage may not be good, LUTs can help. Here is how you can use LUTs in drone footage editing and make your work easier:
- Color Grading: You can use LUTs for creative color grading solutions. After all, there are different filter presets with unique color styling. This provides new and interesting looks to your visual media.
- Match Colors: If you use different cameras to record drone footage, colors may differ. That’s where LUTs can be useful. They can match colors in all frames with dedicated filter presets.
- Color Correction: Drone footage often faces lighting issues that damage color gradients. When using drone LUTs pack-free, you can correct color schemas with consistency. The color imbalances will rectify.
- Saves Resources: With LUTs, you can save time and money. So, you don’t need to waste long hours on video editing. You don’t even have to spend money on good editing software. Color grading becomes more straightforward with LUTs.
Part 3: Best Drone LUTs To Discover In 2024
Aerial technology in this modern world is evolving, which includes drone usage. In contrast, you may need to upscale video colors using special drone LUTs. Here you’ll find the list of the best drone LUTs to make video upscaling smarter:
1.Moody DJI Drone LUTs
Provide moody styles to your recorded drone footage with this DJI drone LUTs pack free download. There are 15 LUTs preset filters that you can use to upscale video colors. All filters are unique, with different color gradients, contrast, and compositions. You have to import these filters to use them, and they require no extra plugin. The drone LUTs pack is compatible with both Windows and Mac.

2.DJI Drone LUTs Color Preset
Transfrom your aerial video shoot in wildlife, sports, or traveling with this LUTs pack. After all, this DJI Mavic 2 Pro LUTs works with drones, including the DJI Mavic Pro line. There are, in total, 120 color presets that are available in different gradients. The quality for these LUTs is 8K, and they work with LOG and Rec .709.

3.DB - Cinematic Drone LUTs
Enhance aerial videography using color grading using this cinematic drone LUTs-free pack. In this LUTs pack, you’ll find 10 premium LUTs to get started. Each LUTs possesses a special color preset to provide new looks within aerial videos. Meanwhile, this DJI drone LUTs pack free download is ideal for DJI drones. The LUTs work well on types of camera footage.

4. CINEMATIC DRONE LUTS
Apply professional color gradients to your all-important drone visual content. You can transform videos’ visual quality by using these free LUTs for drone footage. In total, you receive 25 color presets in different color schemas and textures. This way, you can blend cinematic touch into your aerial shoot. You can even set a reference point or increase the speed of color grading.

5. JHL Drone LUTs
Aerial videography can be upscaled in a simpler way using JHL drone LUTs. After all, this LUTs pack contains 18 distinctive LUTs preset filters. In general, you can use these LUTs on all software editing platforms. Meanwhile, the LUTs have been tested for DJI drone clips, so expect outstanding results. The LUTs are special because they provide solutions in all weather and light ranges.

6. Drone LUTs
Make your aerial project more enchanting with this drone LUTs pack free. You will get 20 diverse drone LUTs preset filters. In contrast, these filters suit all lighting, weather, and environment. The color gradients of your visual content are optimized with stunning color grading. These LUTs work with any resolution. You need to drag and drop these elements into your content.

7. B&W
Black and white color schemes are always special. Adding them to your aerial videos or photos can enlighten your content’s visualization. By using these B&W LUTs for drones, turn aerial shoots into appealing black-and-white contrasts. This will make your visual content more aesthetic with improved engagement. Using this LUTs pack is very convenient and straightforward.

Bonus Part: Learn More About Video Editing Through LUTs with Wondershare Filmora
Video editing is a way to optimize the quality of videos with perfection. Meanwhile, using LUTs can convincingly simplify video editing. For using cinematic drone LUTs free, you need a good and reliable tool. Wondershare Filmora is the trusted solution in this regard. This is a video editing software that allows video upscaling from broader perspectives.
There are more than 200 LUTs that you can use, and every LUTs is unique. The availability of titles, stickers, transitions, effects, and audio makes this tool special. Meanwhile, Filmora comes with a user-friendly interface to get started.

Key Features of Wondershare Filmora
Regarding video editing, Wondershare Filmora takes the lead over its competitors. There are several functions and various tools to learn about, which can be seen in the critical features of Filmora described below:
1. Instant Mode
Filmora’s instant mode allows you to create videos without requiring editing skills. You have to add your respective media items, and Filmora transforms them into videos. There are more than 115 templates that you can use. The AI algorithm works fast and efficiently.
2. Batch Text Editing
Using batch text editing, you can add subtitles to your video. There are three ways to batch edit the text. First, select all texts in the timeline to edit them at the same time. Second, multiple text styles in the Filmora player. Third, changing fonts in bulk quantity within advanced editing.
3. Screen Recorder
Record your screenplay using the Filmora screen recording facility. So, you can record videos from different areas of a webcam or PC screen. You can also customize the ratio and screen sizes of your videos. Meanwhile, audio is recorded by microphone and system.
4. Adjustment layer
Filmora can also help add general effects to your videos at once. Through the adjustment layer, the same effects could be applied across timeline videos. This improves video editing efficiency as a whole. In addition, the adjustment layer can hold unlimited effects.
Add LUTs on Video For Win 7 or later(64-bit)
Add LUTs on Video For macOS 10.14 or later
Conclusion
Drone technology is evolving modern videography and photography with aerial views. Meanwhile, using a camera may affect the quality of recorded videos. This is why using DJI mini 2 LUTs free is essential. This article discussed 7 drone LUTs pack free help get started with color upscaling. Moreover, you also learned about Wondershare Filmora, which is a best-in-class video editing software.
Top 7 Best GoPro Video Editors for Mac
Have you ever used or seen small box-type cameras for recording videos? Well, those are called action cameras. Action cameras are compact go. They were basically made to shoot sports or any other activities videos. They are mountable on many surfaces so you can record freely during any activity. Many of them provide 4K videos at 60 fps or higher to provide crisp video quality or low resolution at 120 or 240 fps to record smooth slow-mo videos. Most of them are waterproof and have good video stabilization so you can record any sports hassle-free.
There are many action camera companies out there in the market but the one ruling the market at the moment is GoPro. It has some best action camera models with dozens of amazing features. It can also record in RAW format and GoPro max can also shoot 360 videos.
GoPro gives amazing results but sometimes videos aren’t up to your expectations and need a little bit of refinement. From sharpening to speed ramping there are many ways to enhance your GoPro videos. And for this purpose, you need a good video editing software which has all these features plus it also supports RAW and 360 video files. Here we have mentioned some noteworthy video editing softwares for you.
Wondershare - Filmora :
It is available for both Windows and Mac.
If you are looking for professional and easy-to-use software to edit your GoPro videos then Filmora Video Editor can be the right choice for you. It has many cool features to enhance your action cam footage. From stabilization to color grading to fish eye effect all can be done in this software. It has a simple and attractive UI.
It has hundreds of effects and cool transitions. It is a paid video editor which also provides a free version to check and practice your skills on. But the main disadvantage of the free version is that it leaves a watermark on export. If you don’t want to invest money in the beginning, till then you can practice on the free version and once you are satisfied with your skills then you can upgrade to a pro version.
Pricing: Wondershare Filmora offers three different plans. Monthly one at $9.99/a month, Yearly one at $69.99, and perpetual license for $79.99 where you can own the software’s specific version for perpetual. It also provides an educational plan for students and teachers.
For Win 7 or later (64-bit)
For macOS 10.14 or later
~ Features:
- It supports 4K files and a wide range of file formats.
- It has a simple UI that is suitable for beginners.
- It Supports 360 video files (in equirectangular format).
- Supports industry-standard plugins like Boris fx.
- Have features like standard motion tracking, masking, chroma key, e.t.c.
- The paid version has more features like Speed ramping, Auto-sync, keyframing, and animation.
- Have vast stock library.
~ Cons:
- The free version leaves a watermark on export.
- Have playback issues with 4k videos.
- Lacks some standard editing features.
~ Steps:
Import: Open “Filmora” then select the desired aspect ratio and click “New Project’ to start editing. Click on the “Import panel” to import media files.

Edit: Drag and drop the clips to add them to the timeline. Drop the clips above or below to add them in layers. Click the top-left icon of the timeline to add layers. Select a clip and you will see a bunch of tools appear on the top bar of the timeline, use them to perform basic editing tasks like split, crop, speed ramping, keyframing, e.t.c.
Double-click on a clip to open its properties. . Click the blue “Ok” button to move back to the previous window.
Select the “Video” icon to transform the clip or to do motion tracking, stabilization, chroma-key, Masking, e.t.c.
Select the “Audio” icon to apply effects and enhance your audio.
Select the “Color” icon to do color correction and grading.
Select the “3D LUT” option to import a new customized lut.
Select the “Animation” icon to add preset animations or make custom animations by using keyframes.
Select the “Speed” icon to adjust the speed of the clip or to do speed ramping.

Click the blue “OK” button below to go back to the previous window.
Effects: On the horizontal bar at the top-left corner of the screen, all the effects, transitions, title present, and stock library are located. Drag and drop to apply them.

Export: Click the blue “Export” button to open export window, choose the desired settings than click “Export”. and don’t forget to save the project if you want to edit it again.
Free GoPro Video Editors for Mac:
If you are tight on budget but still want a professional video editor to edit your GoPro videos then here I have mentioned some free but powerful video editors. Whether you are a beginner or a professional content creator, these free softwares can get your job done.
Blackmagic - Davinchi Resolve:
It is available for both Windows and Mac.
Whether you are a freelance video editor or an industry-level filmmaker, if you want to step up your game and stand out from your competition then you need a powerful video editor to help you out and Davinchi Resolve can be the right choice for you. From sports vlogging using action cams to Hollywood filmmaking using Red cinema cameras, Davinchi Resolve can handle and edit all this footage easily and smoothly. It is even used in the making of several Hollywood projects including Marvels’s feature films.
It is one of the best color grading software available in the market. It has advanced color grading tools that can help color grade your GoPro raw videos easily as raw videos look dull but provide greater flexibility. It is a timeline-based editor but its Fusion and Color grading panel provides a Node-based editing system which is hard to use but provides great flexibility once mastered.
Resolve has 6 different pages to deal with different editing parts:
“Edit” and “Cut” pages to deal with simple editing tasks. Its “Fusion” page allows users to do VFX and 3D compositing. The “Color Grading” page has all the professional grading tools. While the “Fairlight” page is designed to edit and enhance audio. And the “Deliver” page to export your files.
All these features are available for free without even giving a watermark. Although it has a studio version that provides some additional features to get more out of this amazing software.

- Davinchi Resolve Studio:
The free version has almost everything a professional video editor needs. but you can purchase the Studio version to get some really juicy features to enhance your video editing experience. It includes the Davinci neural engine, stereoscopic 3D tools, Dolby atmos audio mastering,e.t.c.
Pricing: Studio version is available at $ 295 for a lifetime license and with free updates.
~ Features:
- It supports a 4K resolution at 60fps. (while the Studio version supports up to 32K resolution at 120 fps.)
- It is a multi-feature software that provides editing, color grading, VFX, 3D compositing, and audio editing all in one place.
- It has the most advanced and powerful Node-based color grading system, which is also used by Hollywood film studios.
- Supports Raw and 360 videos from GoPro or other action cameras.
- Supports multi-cam editing up to 16 camera angles.
- Can make Compound clips and add adjustment layers.
- Fairlight panel has professional audio production tools like waveform editing, audio ducking, and Channel mapping. (Dolby Vision mastering and 3D spatial Panning [audio editing in 3D space] are available in the Studio version.)
- Supports third-party plugins.
- Has a 3D workspace and provides a virtual set extension for 3D modeling and compositing.
~ Cons:
- Its node-based editing style is quite difficult for beginners.
- Requires a high-end workstation to run smoothly otherwise will often crash during editing.
- Its node-based editing system is hard to learn.
~ Steps:
Import: Open “Davinci Resolve’. Select a previously saved project or press “New project” to start a new one. Click “File” >> “Import” >> “Media” to import files or press “CTRL + I”.
Edit: Drag and drop files to add them to the timeline Use the tools present above the timeline to trim, cut or move your clips. Click the “Inspector” icon on the top-right corner of the window to open the Inspector tab. Here you will find the properties of all the clips, audio, transitions, effects, e.t.c. There are different editing tabs at the bottom of the window.
In the “Fusion” window, click “Nodes” to open the Node screen. Import a clip or use it from the editor timeline. Usually, a clip will have two nodes connected through a line. Above the nodes panel, different types of nodes are available. Drag any node in the panel and connect it through lines. or add a “merge” node to connect nodes.
Its color grading panel also has Node based editing system.

Effects: Click “Effects Library” then select any effect and drop it in the timeline to apply it. You can change its properties in the “Inspector” panel.
Click the diamond icon on the right side of the property to start keyframing then change the value of that property to add keyframes at desired time period.

Export: Open the “Deliver” window, choose the desired settings then click “Add to Render Queue” to start exporting.

FXhome - Hitfilm Express:
It is available on Windows, Mac and Linux also.
If you are looking for a free but powerful video editor to edit your GoPro clips then Hitfilm Express can be the right choice for you. It is a free timeline-based editing software with professional-grade VFX tools. It is a timeline-based editor where you can add dozens of audio, videos, and text layers.
It has a composite shot sequence where you can do complex editing like editing 3D videos and elements, lights e.t.c. It has physic-base behaviors and effects also to enhance 3D compositing. For professional-level editing almost most of the effects and properties have keyframing options. It has different workspace modes to suit your editing needs.
It can also edit 360 videos recorded from your GoPro max. It has a “GoPro Lens Reframe” effect to adjust your 360 clips, but some 360 toolkits can only be available when you purchase Hitfilm pro or buy a 360 toolkit add-on. Similarly, you can purchase more add-ons according to your editing needs or you can purchase Hitfilm Pro to gain access to all add-ons and features. But can use these pro features for free but without exporting as exporting with a paid effect can give a watermark.
Hitfilm Pro:
Although Hitfilm express doesn’t give a watermark on export, but to use more features like 3D composition, LUTs, e.t.c you need to purchase add-ons, there are over 30+ add-ons available to purchase which you can purchase depending on your needs, but if you want to get all the features than its better to get your hands on Hitfilm Pro.
Pricing: Available for purchase at £ 309 or $ 388 for a lifetime license. With 12 months of free updates. It has 3 seat license which means It can run on 3 PCs simultaneously.
~ Features:
- It is a free editing software with no watermark.
- It can edit 3D videos and it can also import and edit 3D models and tracking data.
- It can edit 360 videos also.
- You can add effects and color grades as layers in the timeline also.
- Can add adjustment layers and create nested clips within nested clips to make complex editing easier.
- It has a motion track and locked-on stabilization features.
- Can do smooth keyframing and animation with the help of value graphs.
- It supports multi-cam editing also.
- Keyboard shortcuts make workflow quite easy and quick.
~ Cons:
- It has some playback issues while using 4K videos.
- It crashes sometimes, so it’s better to save the project frequently during editing.
- Hitfilm express doesn’t have a dark mode.
- Some common features are only available on the Pro version or add-ons.
~ Steps:
Import: Open “Hitfilm”, Select “New Project” to open a blank project then click “open” to open an existing file or click “new” to create a new project. Then set project settings on pop-up then and click “ok”.
Then click the “Media” tab on the top-left corner of the screen. Then select the “Import” button to import videos, images, audio, or 3d models. You can also import previously made composite shots.
Edit: Drag and drop media files from the media tab to the timeline. or click the “New” tab to create a “Composite shot” or a solid plane layer. Right-click on the left side of the timeline to insert or delete layers. On the left side of the timeline, you will find some basic tools located on the vertical bar to do simple tasks.
In the “Viewer” tab, on the left side of the playback screen, you can find tools for masking and adding text.
In the “Controls” tab, you can adjust the properties of clips and other features related to the clip like masking, track, blend, transform, e.t.c.
Create a “Composite shot” to do complex editing like 3D compositing. Or select multiple layers then right-click and select “make Composite shot” to combine them for easy editing. Double-click the composite shot to open its contents.

Effects: From the “Effects” tab drag and drop effects on the clip to add them. Some effects can be added as layers which can affect all the layers beneath it. Properties of these effects can be adjusted in the “Control” tab.
To do keyframing, Click the circle icon on the left side of the property to start keyframing then change the values of that property to add keyframes at desired time period.
Export: Click the “Export” icon then “Export now” located at the top right side of the timeline to open the export window. The export will start automatically.
Shotcut:
It is available on Windows, Mac and Linux.
If you are making videos from your GoPro or mobile phone just for fun that doesn’t require much editing then you can look for a free and simple video editor and “Shotcut” can be the right choice for this purpose.
It is a free and open-source video editor with many cool features to get your hands on. It doesn’t have any pro version. It is simple and easy to use but takes some time to understand. It supports multi-track timeline editing. It has a basic timeline design but you can customize your timeline to meet your editing needs. It has some good color grading options, you can also import your color luts. It has many cool features and effects. It supports 360 video editing and also has a few 360 video filters. It has audio effects also.
~ Features:
- All its features are for free and it doesn’t leave any watermark.
- It supports 4K resolution and a wide range of file formats.
- It also supports 360 video files.
- Has keyframing and chroma kry features.
- It has advanced color grading features.
- It provides standard animation and keyframing features.
~ Cons:
- It is a basic video editor and lacks some professional editing features.
- Have playback issues with 4K videos.
- It does have proper text editing tools.
- It is difficult to understand as its UI is different from other familiar video editors.
~ Steps:
Import: Open “Shot Cut” then click the “Open Files” button on the top-left corner of the window to import files.
Edit: Drag and drop clips on an empty timeline panel to add tracks and drag the clip from corners to trim them. Right-click on the left side of the timeline to add a video or an audio track. You will find a bunch of tools above the timeline to do some basic tasks.
You can choose from 6 different workspace designs (available in the top-right corner of the window) to suit your editing styles.

On top of the window, you will see a bunch of icons like Timeline, filter, project, and properties. e.t.c. In the properties tab, you can change the aspect ratio and speed of the clip.
Effects: Click the “Filters” icon on top of the window to open the filters menu, Click “+” above it to add filters. Double click a filter to add it to the selected clip, then click the filter to open its properties menu. You can also add text from here.
Click the “Keyframes” icon on top of the window to open the Keyframes window. Select the “clock” icon on the filters to start keyframing then change the values at a specific time to add keyframes. Click the “Timeline” icon to go back to the previous window.

Export: Click the “Export” button on the top of the screen. Select a preset or click the “Advanced” button to change export settings then click “Export File”.

Paid GoPro Video Editor for Mac:
If you are a professional athlete or a vlogger using GoPro for all of your contents and want to invest some money on paid video editors to improve your content. Then here we have mentioned some paid video editors worthy of your investment.
Apple - Final Cut Pro:
It is available for Mac only.
If you are an Apple enthusiastic person and want everything Apple, then why look for any other video editor when you can have a powerful video editor “Final cut pro” made by Apple. It is a paid but professional software that can raise your GoPro videos to the next level. Whether it’s a 360 video or a RAW file recorded from your GoPro or from the RED cinema camera, all can be edited smoothly inside Final Cut Pro. It has dozens of useful features that a professional video editor looks for like 3D tracking, Motion Graphics, Color Grading, Audio Mixing, Multi-cam editing e.t.c.
Pricing: It is a one-time purchase software available at $ 299.9 for a lifetime license and all its future updates can be downloaded free of cost.
~ Features:
- It supports up to 8K resolution.
- Support 360 and RAW video files.
- Edit videos in complete 360 and 3D spaces.
- Supports third-party video and audio plugins.
- Supports Multi-cam editing.
- Have professional color grading tools with HDR support.
- Its UI is easy to use.
~ Cons:
- It is designed for Apple devices only.
- Requires a powerful PC.
- Its UI is a bit different from other common video editors in the market.
- ~ Steps:
Import: Open “Final Cut Pro” then click the “Files” button on the top-left corner of the screen, then select “Project” to create a new project. In the “Files” menu, click “import” then “media” to import your media files. Here most of the work is done with Keyboard commands.
Edit: Drag and Drop clips on the timeline. In the viewer panel, press “I” and “O” to add input and output points then drag the clip to add only a specific part of the clip. Press “Cmd + B” to split the clip at the desired location. Or add the clips above to add the layer.
Click the “Text” icon on the top-left corner of the screen to open the text page. Choose from presets or import your own Text presets and drag them to the timeline. Click the text to open “Text Editor” on the left side of the screen.
Select multiple clips then Right-click and select “New Compound Clip” to combine them. Double-click the compound clip to edit its components.
Effects: Click 2 icons on the top-right side of the timeline to open the effects and transition panel. Drag and drop on the clip to use them. You can change their properties in the “Effects editor” tab located in the same place as “Text Editor”.
In the editor tab, click the diamond icon beside any property to start keyframing, then change its property to add keyframes at the desired time.
Press “Cmd + 6” to open the Color Grading tab, here you can color grade your clips.
Export: To export the edited video. Click “File” >> “Share” >> “Master file” to open export window. Choose the desired settings then click “Next” then “Save” to export the video.
Adobe - Premiere Pro:
It is available for both Windows and Mac.
Whether you are a content creator or not, if you use a DSLR or an action camera for the first time, then maybe the output wouldn’t meet your expectations. In order to make it good, you need a video editor. And if you will ask your gathering about a good video editor, most of them will recommend you Adobe Premiere Pro, because it is such a versatile and well-known software available in the market. It is a subscription-based video editor.
It is an industry-level software with many professional and advanced features. From beginner video editing to film compositing, all can be done in this software. Whether you have a 360 video or a 4K video in Raw format recorded from your GoPro, just import it into premiere pro and start editing. It has a downloadable “GoPro FX Reframe” plugin to edit your 360 videos. It has different panels designed to deal with specific parts of post-production such as the Effects panel, Graphics panel, Sound panel, Colour Grading panel, e.t.c.
~ Features:
- It supports up to 8K resolution.
- Have different panels to enhance different segments of post-production.
- Have an essential Effects panel to create motion effects and animations using keyframes.
- Supports hundreds of third-party extensions.
- Have useful features like warp stabilizer and denoiser.
- You can import or create your color LUTs.
- Have a creative cloud with 100 Gb of storage.
- The bundle also includes a mobile video editor and a stock library.
~ Cons:
- Real-time rendering. It will take some time to render before exporting if you work on a mid-range PC.
- Freezes or crashes sometimes.
- Cache data fill-up quickly and eats a lot of storage. (It’s better to clear it after every project)
Pricing: It is cloud-based software, therefore it can’t be purchased one time. It has a monthly subscription starting at $ 20.99/month. It includes “premiere rush” mobile video editor and 100 GB of cloud storage within the plan. It also has a “Creative cloud All apps” plan that includes all 30+ Softwares + 100Gb cloud storage along with premiere pro for $ 54.99 only. All plans also include Behance (adobe creative community), Adobe Fonts, and Adobe stock assets for free. Adobe also provides educational access at a much discounted price.
~ Steps:
Import: Open “Premiere Pro”. Click “New Project” to start with then Click the “Files” button on the top-left corner of the window then select the “Import files” button to import files. Or press “CTRL + I” to import files or drag your files from their location to premiere pro.

Edit: Drag and Drop the files to add them to the timeline. Drop a file above a clip to add as a layer. or drop over a clip to overwrite it. On the right side of the timeline, you can find a bunch of tools to do basic edits like trimming, splitting, speed ramping, masking, or adding text.
In the “Effects Control” tab you can transform the selected clip or change its properties.
Select multiple clips then right-click and select “make Nested clip” to combine them into a single clip for easy editing.

Slide between 8 different workspace styles designed for specific post-production tasks by clicking the buttons available on the top of the window.
Effects: Go to the “Effects” panel on the bottom-left window to apply an effect or transitions. Here you can find all audio, video, 2D, and 3D effects. Drag and Drop on a clip to apply it. Change the properties of these effects in the “Effects Control” panel.
To color grade, your clips move to the “Color” workspace. Here you will find all the color grading features: correction, curves, color wheels, creative tab, e.t.c. To import a LUT click the “creative tab” then click “Browse” to import a LUT.
Export: To Export go to the “Files” tab on top of the screen then select the “Export” button to open the export tab. Select the desired settings then click “Export”.
Power Director 365 :
It is available for both Windows and Mac.
If you are looking for a budget-friendly video editor that is powerful enough to edit your GoPro videos like a content creator then Power director can be the right choice for you. It has many unique and useful features. It has different plugins and design centers to do specific post-production tasks like Ad designer, Multicam editor, AI style plugins, e.t.c.
It also has a separate action cam center to fix or enhance action cam videos. IT also has chapter and subtitle rooms to add subtitles and chapters for your Youtube videos or films. It also has a vast stock and preset library to speed up your project.
Pricing: It has a subscription plan which is available at $69/year. It is now available at 30% off till 22nd May,2022.
~ Features:
- It supports 4K videos and a wide range of import formats.
- Have many built-in plugins and design centers.
- Supports Multi-cam editing.
- Have an action cam center to deal with action cam footage.
- Have separate aspect ratio mode for 360 videos.
- Also, have a chapter and subtitle room. many recording aspects of the video.
- Have a content-aware editing feature that detects the recording aspects.
- Can import presets and color LUTs.
- Have a vast stock library.
~ Cons:
- Have some playback issues with 4K videos. (create shadow files to overcome this issue to an extent).
- Its UI is a little bit complicated for beginners.
- Not ideal for fast pace editing.
~ Steps:
Import: Open Power director and a pop-up will appear, select desired aspect ratio then click “Full mode” to open the software. Or select 360 aspect ratio if you want to edit 360 videos.

Click the “Import Media” icon below the Files tab in the top-left corner of the window to import files or press “CTRL + Q” to import files.
Edit: Drag and drop files to add them to any desired layer in the timeline. Click the icon on the top left corner of the timeline to add layers. When you select a clip in the timeline, some tools appear on the top timeline. Select any specific tool to edit your selected clip. Or click the “Plugins” button on the top-left of the window to open a specific designer tab.
Double-click on the clip to open ‘PIP designer”. Here you will find all the editing tools to edit or animate your clip.

After selecting a clip, in the “Plugins” menu click the “Action Camera Center” button to open an edit tab, Here you can fix your GoPro videos.

Effects: On the top-left corner of the window in a vertical bar you will find all the effects material lile Project library, titles, effects, transitions, overlays, e.t.c. Simply just drag and drop them on the timeline to use them. Here you can also do audio mixing and add subtitles and chapters.
Double click a clip or an overlay element to open the designer window. Here you can customize the clips and overlays to enhance your project.
Export: Click the blue “Produce” button on top of the screen to export your edited file. Select the desired mode and file format and add an export destination, then click “Start” to start exporting.
Which One Should I Choose Free or Paid GoPro Video Editor?
You can choose free or paid softwares depending on your requirements and budget. If a free software meets your requirements then stay on it otherwise move towards a paid alternative. If you have a GoPro and you make videos just for fun then use a free and simple video editor. Even if you are an experienced video editor, I would recommend you to go for free video editors which I have mentioned above as they are quite powerful and professional software but if you are harvesting a good amount of money from this field then you can upgrade to pro versions of these free softwares or get a paid software from start. As almost all of these softwares are professional and can get your job done, so it’s better to choose one, which is comfortable for you to work on.
FAQs about GoPro Video Editing:
- Q) Does GoPro has its own video editor?
Yes, GoPro has its own video editor “Quik”. It is available on mobile phones and desktops both. It is simple and easy to use. It provides basic features to edit your video. But the main disadvantage of this desktop software is that it supports only GoPro videos, you can’t import files from other devices. Although this isn’t the issue with Quik mobile app, here you can import videos from other devices also.
- Q) Can I make videos for social media with a GoPro?
It was basically made for recording sports and action videos. But as the market is revolutionized and new models are released it has covered a wide range of the video industry like vlogging, travel and cooking videos e.t.c. As new models of GoPros are waterproof, you can get some amazing underwater shots for your Instagram.
- Q) What is GoPro media format?
GoPro export files in popular file format MP4. MP4 is the most common file format and is supported by almost all the video editors. While it is efficient and takes less storage but isn’t supported in many devices.
- Q) How do I transfer files from my GoPro to Mac?
You can transfer your GoPro files through 3 methods:
- Eject the SD card from your GoPro and connect it to your Mac using a SD card adapter to transfer files.
- Connect your GoPro to Mac through USB connector and use “iphoto” or any other photo importer to import files.
For macOS 10.14 or later
~ Features:
- It supports 4K files and a wide range of file formats.
- It has a simple UI that is suitable for beginners.
- It Supports 360 video files (in equirectangular format).
- Supports industry-standard plugins like Boris fx.
- Have features like standard motion tracking, masking, chroma key, e.t.c.
- The paid version has more features like Speed ramping, Auto-sync, keyframing, and animation.
- Have vast stock library.
~ Cons:
- The free version leaves a watermark on export.
- Have playback issues with 4k videos.
- Lacks some standard editing features.
~ Steps:
Import: Open “Filmora” then select the desired aspect ratio and click “New Project’ to start editing. Click on the “Import panel” to import media files.

Edit: Drag and drop the clips to add them to the timeline. Drop the clips above or below to add them in layers. Click the top-left icon of the timeline to add layers. Select a clip and you will see a bunch of tools appear on the top bar of the timeline, use them to perform basic editing tasks like split, crop, speed ramping, keyframing, e.t.c.
Double-click on a clip to open its properties. . Click the blue “Ok” button to move back to the previous window.
Select the “Video” icon to transform the clip or to do motion tracking, stabilization, chroma-key, Masking, e.t.c.
Select the “Audio” icon to apply effects and enhance your audio.
Select the “Color” icon to do color correction and grading.
Select the “3D LUT” option to import a new customized lut.
Select the “Animation” icon to add preset animations or make custom animations by using keyframes.
Select the “Speed” icon to adjust the speed of the clip or to do speed ramping.

Click the blue “OK” button below to go back to the previous window.
Effects: On the horizontal bar at the top-left corner of the screen, all the effects, transitions, title present, and stock library are located. Drag and drop to apply them.

Export: Click the blue “Export” button to open export window, choose the desired settings than click “Export”. and don’t forget to save the project if you want to edit it again.
Free GoPro Video Editors for Mac:
If you are tight on budget but still want a professional video editor to edit your GoPro videos then here I have mentioned some free but powerful video editors. Whether you are a beginner or a professional content creator, these free softwares can get your job done.
Blackmagic - Davinchi Resolve:
It is available for both Windows and Mac.
Whether you are a freelance video editor or an industry-level filmmaker, if you want to step up your game and stand out from your competition then you need a powerful video editor to help you out and Davinchi Resolve can be the right choice for you. From sports vlogging using action cams to Hollywood filmmaking using Red cinema cameras, Davinchi Resolve can handle and edit all this footage easily and smoothly. It is even used in the making of several Hollywood projects including Marvels’s feature films.
It is one of the best color grading software available in the market. It has advanced color grading tools that can help color grade your GoPro raw videos easily as raw videos look dull but provide greater flexibility. It is a timeline-based editor but its Fusion and Color grading panel provides a Node-based editing system which is hard to use but provides great flexibility once mastered.
Resolve has 6 different pages to deal with different editing parts:
“Edit” and “Cut” pages to deal with simple editing tasks. Its “Fusion” page allows users to do VFX and 3D compositing. The “Color Grading” page has all the professional grading tools. While the “Fairlight” page is designed to edit and enhance audio. And the “Deliver” page to export your files.
All these features are available for free without even giving a watermark. Although it has a studio version that provides some additional features to get more out of this amazing software.

- Davinchi Resolve Studio:
The free version has almost everything a professional video editor needs. but you can purchase the Studio version to get some really juicy features to enhance your video editing experience. It includes the Davinci neural engine, stereoscopic 3D tools, Dolby atmos audio mastering,e.t.c.
Pricing: Studio version is available at $ 295 for a lifetime license and with free updates.
~ Features:
- It supports a 4K resolution at 60fps. (while the Studio version supports up to 32K resolution at 120 fps.)
- It is a multi-feature software that provides editing, color grading, VFX, 3D compositing, and audio editing all in one place.
- It has the most advanced and powerful Node-based color grading system, which is also used by Hollywood film studios.
- Supports Raw and 360 videos from GoPro or other action cameras.
- Supports multi-cam editing up to 16 camera angles.
- Can make Compound clips and add adjustment layers.
- Fairlight panel has professional audio production tools like waveform editing, audio ducking, and Channel mapping. (Dolby Vision mastering and 3D spatial Panning [audio editing in 3D space] are available in the Studio version.)
- Supports third-party plugins.
- Has a 3D workspace and provides a virtual set extension for 3D modeling and compositing.
~ Cons:
- Its node-based editing style is quite difficult for beginners.
- Requires a high-end workstation to run smoothly otherwise will often crash during editing.
- Its node-based editing system is hard to learn.
~ Steps:
Import: Open “Davinci Resolve’. Select a previously saved project or press “New project” to start a new one. Click “File” >> “Import” >> “Media” to import files or press “CTRL + I”.
Edit: Drag and drop files to add them to the timeline Use the tools present above the timeline to trim, cut or move your clips. Click the “Inspector” icon on the top-right corner of the window to open the Inspector tab. Here you will find the properties of all the clips, audio, transitions, effects, e.t.c. There are different editing tabs at the bottom of the window.
In the “Fusion” window, click “Nodes” to open the Node screen. Import a clip or use it from the editor timeline. Usually, a clip will have two nodes connected through a line. Above the nodes panel, different types of nodes are available. Drag any node in the panel and connect it through lines. or add a “merge” node to connect nodes.
Its color grading panel also has Node based editing system.

Effects: Click “Effects Library” then select any effect and drop it in the timeline to apply it. You can change its properties in the “Inspector” panel.
Click the diamond icon on the right side of the property to start keyframing then change the value of that property to add keyframes at desired time period.

Export: Open the “Deliver” window, choose the desired settings then click “Add to Render Queue” to start exporting.

FXhome - Hitfilm Express:
It is available on Windows, Mac and Linux also.
If you are looking for a free but powerful video editor to edit your GoPro clips then Hitfilm Express can be the right choice for you. It is a free timeline-based editing software with professional-grade VFX tools. It is a timeline-based editor where you can add dozens of audio, videos, and text layers.
It has a composite shot sequence where you can do complex editing like editing 3D videos and elements, lights e.t.c. It has physic-base behaviors and effects also to enhance 3D compositing. For professional-level editing almost most of the effects and properties have keyframing options. It has different workspace modes to suit your editing needs.
It can also edit 360 videos recorded from your GoPro max. It has a “GoPro Lens Reframe” effect to adjust your 360 clips, but some 360 toolkits can only be available when you purchase Hitfilm pro or buy a 360 toolkit add-on. Similarly, you can purchase more add-ons according to your editing needs or you can purchase Hitfilm Pro to gain access to all add-ons and features. But can use these pro features for free but without exporting as exporting with a paid effect can give a watermark.
Hitfilm Pro:
Although Hitfilm express doesn’t give a watermark on export, but to use more features like 3D composition, LUTs, e.t.c you need to purchase add-ons, there are over 30+ add-ons available to purchase which you can purchase depending on your needs, but if you want to get all the features than its better to get your hands on Hitfilm Pro.
Pricing: Available for purchase at £ 309 or $ 388 for a lifetime license. With 12 months of free updates. It has 3 seat license which means It can run on 3 PCs simultaneously.
~ Features:
- It is a free editing software with no watermark.
- It can edit 3D videos and it can also import and edit 3D models and tracking data.
- It can edit 360 videos also.
- You can add effects and color grades as layers in the timeline also.
- Can add adjustment layers and create nested clips within nested clips to make complex editing easier.
- It has a motion track and locked-on stabilization features.
- Can do smooth keyframing and animation with the help of value graphs.
- It supports multi-cam editing also.
- Keyboard shortcuts make workflow quite easy and quick.
~ Cons:
- It has some playback issues while using 4K videos.
- It crashes sometimes, so it’s better to save the project frequently during editing.
- Hitfilm express doesn’t have a dark mode.
- Some common features are only available on the Pro version or add-ons.
~ Steps:
Import: Open “Hitfilm”, Select “New Project” to open a blank project then click “open” to open an existing file or click “new” to create a new project. Then set project settings on pop-up then and click “ok”.
Then click the “Media” tab on the top-left corner of the screen. Then select the “Import” button to import videos, images, audio, or 3d models. You can also import previously made composite shots.
Edit: Drag and drop media files from the media tab to the timeline. or click the “New” tab to create a “Composite shot” or a solid plane layer. Right-click on the left side of the timeline to insert or delete layers. On the left side of the timeline, you will find some basic tools located on the vertical bar to do simple tasks.
In the “Viewer” tab, on the left side of the playback screen, you can find tools for masking and adding text.
In the “Controls” tab, you can adjust the properties of clips and other features related to the clip like masking, track, blend, transform, e.t.c.
Create a “Composite shot” to do complex editing like 3D compositing. Or select multiple layers then right-click and select “make Composite shot” to combine them for easy editing. Double-click the composite shot to open its contents.

Effects: From the “Effects” tab drag and drop effects on the clip to add them. Some effects can be added as layers which can affect all the layers beneath it. Properties of these effects can be adjusted in the “Control” tab.
To do keyframing, Click the circle icon on the left side of the property to start keyframing then change the values of that property to add keyframes at desired time period.
Export: Click the “Export” icon then “Export now” located at the top right side of the timeline to open the export window. The export will start automatically.
Shotcut:
It is available on Windows, Mac and Linux.
If you are making videos from your GoPro or mobile phone just for fun that doesn’t require much editing then you can look for a free and simple video editor and “Shotcut” can be the right choice for this purpose.
It is a free and open-source video editor with many cool features to get your hands on. It doesn’t have any pro version. It is simple and easy to use but takes some time to understand. It supports multi-track timeline editing. It has a basic timeline design but you can customize your timeline to meet your editing needs. It has some good color grading options, you can also import your color luts. It has many cool features and effects. It supports 360 video editing and also has a few 360 video filters. It has audio effects also.
~ Features:
- All its features are for free and it doesn’t leave any watermark.
- It supports 4K resolution and a wide range of file formats.
- It also supports 360 video files.
- Has keyframing and chroma kry features.
- It has advanced color grading features.
- It provides standard animation and keyframing features.
~ Cons:
- It is a basic video editor and lacks some professional editing features.
- Have playback issues with 4K videos.
- It does have proper text editing tools.
- It is difficult to understand as its UI is different from other familiar video editors.
~ Steps:
Import: Open “Shot Cut” then click the “Open Files” button on the top-left corner of the window to import files.
Edit: Drag and drop clips on an empty timeline panel to add tracks and drag the clip from corners to trim them. Right-click on the left side of the timeline to add a video or an audio track. You will find a bunch of tools above the timeline to do some basic tasks.
You can choose from 6 different workspace designs (available in the top-right corner of the window) to suit your editing styles.

On top of the window, you will see a bunch of icons like Timeline, filter, project, and properties. e.t.c. In the properties tab, you can change the aspect ratio and speed of the clip.
Effects: Click the “Filters” icon on top of the window to open the filters menu, Click “+” above it to add filters. Double click a filter to add it to the selected clip, then click the filter to open its properties menu. You can also add text from here.
Click the “Keyframes” icon on top of the window to open the Keyframes window. Select the “clock” icon on the filters to start keyframing then change the values at a specific time to add keyframes. Click the “Timeline” icon to go back to the previous window.

Export: Click the “Export” button on the top of the screen. Select a preset or click the “Advanced” button to change export settings then click “Export File”.

Paid GoPro Video Editor for Mac:
If you are a professional athlete or a vlogger using GoPro for all of your contents and want to invest some money on paid video editors to improve your content. Then here we have mentioned some paid video editors worthy of your investment.
Apple - Final Cut Pro:
It is available for Mac only.
If you are an Apple enthusiastic person and want everything Apple, then why look for any other video editor when you can have a powerful video editor “Final cut pro” made by Apple. It is a paid but professional software that can raise your GoPro videos to the next level. Whether it’s a 360 video or a RAW file recorded from your GoPro or from the RED cinema camera, all can be edited smoothly inside Final Cut Pro. It has dozens of useful features that a professional video editor looks for like 3D tracking, Motion Graphics, Color Grading, Audio Mixing, Multi-cam editing e.t.c.
Pricing: It is a one-time purchase software available at $ 299.9 for a lifetime license and all its future updates can be downloaded free of cost.
~ Features:
- It supports up to 8K resolution.
- Support 360 and RAW video files.
- Edit videos in complete 360 and 3D spaces.
- Supports third-party video and audio plugins.
- Supports Multi-cam editing.
- Have professional color grading tools with HDR support.
- Its UI is easy to use.
~ Cons:
- It is designed for Apple devices only.
- Requires a powerful PC.
- Its UI is a bit different from other common video editors in the market.
- ~ Steps:
Import: Open “Final Cut Pro” then click the “Files” button on the top-left corner of the screen, then select “Project” to create a new project. In the “Files” menu, click “import” then “media” to import your media files. Here most of the work is done with Keyboard commands.
Edit: Drag and Drop clips on the timeline. In the viewer panel, press “I” and “O” to add input and output points then drag the clip to add only a specific part of the clip. Press “Cmd + B” to split the clip at the desired location. Or add the clips above to add the layer.
Click the “Text” icon on the top-left corner of the screen to open the text page. Choose from presets or import your own Text presets and drag them to the timeline. Click the text to open “Text Editor” on the left side of the screen.
Select multiple clips then Right-click and select “New Compound Clip” to combine them. Double-click the compound clip to edit its components.
Effects: Click 2 icons on the top-right side of the timeline to open the effects and transition panel. Drag and drop on the clip to use them. You can change their properties in the “Effects editor” tab located in the same place as “Text Editor”.
In the editor tab, click the diamond icon beside any property to start keyframing, then change its property to add keyframes at the desired time.
Press “Cmd + 6” to open the Color Grading tab, here you can color grade your clips.
Export: To export the edited video. Click “File” >> “Share” >> “Master file” to open export window. Choose the desired settings then click “Next” then “Save” to export the video.
Adobe - Premiere Pro:
It is available for both Windows and Mac.
Whether you are a content creator or not, if you use a DSLR or an action camera for the first time, then maybe the output wouldn’t meet your expectations. In order to make it good, you need a video editor. And if you will ask your gathering about a good video editor, most of them will recommend you Adobe Premiere Pro, because it is such a versatile and well-known software available in the market. It is a subscription-based video editor.
It is an industry-level software with many professional and advanced features. From beginner video editing to film compositing, all can be done in this software. Whether you have a 360 video or a 4K video in Raw format recorded from your GoPro, just import it into premiere pro and start editing. It has a downloadable “GoPro FX Reframe” plugin to edit your 360 videos. It has different panels designed to deal with specific parts of post-production such as the Effects panel, Graphics panel, Sound panel, Colour Grading panel, e.t.c.
~ Features:
- It supports up to 8K resolution.
- Have different panels to enhance different segments of post-production.
- Have an essential Effects panel to create motion effects and animations using keyframes.
- Supports hundreds of third-party extensions.
- Have useful features like warp stabilizer and denoiser.
- You can import or create your color LUTs.
- Have a creative cloud with 100 Gb of storage.
- The bundle also includes a mobile video editor and a stock library.
~ Cons:
- Real-time rendering. It will take some time to render before exporting if you work on a mid-range PC.
- Freezes or crashes sometimes.
- Cache data fill-up quickly and eats a lot of storage. (It’s better to clear it after every project)
Pricing: It is cloud-based software, therefore it can’t be purchased one time. It has a monthly subscription starting at $ 20.99/month. It includes “premiere rush” mobile video editor and 100 GB of cloud storage within the plan. It also has a “Creative cloud All apps” plan that includes all 30+ Softwares + 100Gb cloud storage along with premiere pro for $ 54.99 only. All plans also include Behance (adobe creative community), Adobe Fonts, and Adobe stock assets for free. Adobe also provides educational access at a much discounted price.
~ Steps:
Import: Open “Premiere Pro”. Click “New Project” to start with then Click the “Files” button on the top-left corner of the window then select the “Import files” button to import files. Or press “CTRL + I” to import files or drag your files from their location to premiere pro.

Edit: Drag and Drop the files to add them to the timeline. Drop a file above a clip to add as a layer. or drop over a clip to overwrite it. On the right side of the timeline, you can find a bunch of tools to do basic edits like trimming, splitting, speed ramping, masking, or adding text.
In the “Effects Control” tab you can transform the selected clip or change its properties.
Select multiple clips then right-click and select “make Nested clip” to combine them into a single clip for easy editing.

Slide between 8 different workspace styles designed for specific post-production tasks by clicking the buttons available on the top of the window.
Effects: Go to the “Effects” panel on the bottom-left window to apply an effect or transitions. Here you can find all audio, video, 2D, and 3D effects. Drag and Drop on a clip to apply it. Change the properties of these effects in the “Effects Control” panel.
To color grade, your clips move to the “Color” workspace. Here you will find all the color grading features: correction, curves, color wheels, creative tab, e.t.c. To import a LUT click the “creative tab” then click “Browse” to import a LUT.
Export: To Export go to the “Files” tab on top of the screen then select the “Export” button to open the export tab. Select the desired settings then click “Export”.
Power Director 365 :
It is available for both Windows and Mac.
If you are looking for a budget-friendly video editor that is powerful enough to edit your GoPro videos like a content creator then Power director can be the right choice for you. It has many unique and useful features. It has different plugins and design centers to do specific post-production tasks like Ad designer, Multicam editor, AI style plugins, e.t.c.
It also has a separate action cam center to fix or enhance action cam videos. IT also has chapter and subtitle rooms to add subtitles and chapters for your Youtube videos or films. It also has a vast stock and preset library to speed up your project.
Pricing: It has a subscription plan which is available at $69/year. It is now available at 30% off till 22nd May,2022.
~ Features:
- It supports 4K videos and a wide range of import formats.
- Have many built-in plugins and design centers.
- Supports Multi-cam editing.
- Have an action cam center to deal with action cam footage.
- Have separate aspect ratio mode for 360 videos.
- Also, have a chapter and subtitle room. many recording aspects of the video.
- Have a content-aware editing feature that detects the recording aspects.
- Can import presets and color LUTs.
- Have a vast stock library.
~ Cons:
- Have some playback issues with 4K videos. (create shadow files to overcome this issue to an extent).
- Its UI is a little bit complicated for beginners.
- Not ideal for fast pace editing.
~ Steps:
Import: Open Power director and a pop-up will appear, select desired aspect ratio then click “Full mode” to open the software. Or select 360 aspect ratio if you want to edit 360 videos.

Click the “Import Media” icon below the Files tab in the top-left corner of the window to import files or press “CTRL + Q” to import files.
Edit: Drag and drop files to add them to any desired layer in the timeline. Click the icon on the top left corner of the timeline to add layers. When you select a clip in the timeline, some tools appear on the top timeline. Select any specific tool to edit your selected clip. Or click the “Plugins” button on the top-left of the window to open a specific designer tab.
Double-click on the clip to open ‘PIP designer”. Here you will find all the editing tools to edit or animate your clip.

After selecting a clip, in the “Plugins” menu click the “Action Camera Center” button to open an edit tab, Here you can fix your GoPro videos.

Effects: On the top-left corner of the window in a vertical bar you will find all the effects material lile Project library, titles, effects, transitions, overlays, e.t.c. Simply just drag and drop them on the timeline to use them. Here you can also do audio mixing and add subtitles and chapters.
Double click a clip or an overlay element to open the designer window. Here you can customize the clips and overlays to enhance your project.
Export: Click the blue “Produce” button on top of the screen to export your edited file. Select the desired mode and file format and add an export destination, then click “Start” to start exporting.
Which One Should I Choose Free or Paid GoPro Video Editor?
You can choose free or paid softwares depending on your requirements and budget. If a free software meets your requirements then stay on it otherwise move towards a paid alternative. If you have a GoPro and you make videos just for fun then use a free and simple video editor. Even if you are an experienced video editor, I would recommend you to go for free video editors which I have mentioned above as they are quite powerful and professional software but if you are harvesting a good amount of money from this field then you can upgrade to pro versions of these free softwares or get a paid software from start. As almost all of these softwares are professional and can get your job done, so it’s better to choose one, which is comfortable for you to work on.
FAQs about GoPro Video Editing:
- Q) Does GoPro has its own video editor?
Yes, GoPro has its own video editor “Quik”. It is available on mobile phones and desktops both. It is simple and easy to use. It provides basic features to edit your video. But the main disadvantage of this desktop software is that it supports only GoPro videos, you can’t import files from other devices. Although this isn’t the issue with Quik mobile app, here you can import videos from other devices also.
- Q) Can I make videos for social media with a GoPro?
It was basically made for recording sports and action videos. But as the market is revolutionized and new models are released it has covered a wide range of the video industry like vlogging, travel and cooking videos e.t.c. As new models of GoPros are waterproof, you can get some amazing underwater shots for your Instagram.
- Q) What is GoPro media format?
GoPro export files in popular file format MP4. MP4 is the most common file format and is supported by almost all the video editors. While it is efficient and takes less storage but isn’t supported in many devices.
- Q) How do I transfer files from my GoPro to Mac?
You can transfer your GoPro files through 3 methods:
- Eject the SD card from your GoPro and connect it to your Mac using a SD card adapter to transfer files.
- Connect your GoPro to Mac through USB connector and use “iphoto” or any other photo importer to import files.
For macOS 10.14 or later
~ Features:
- It supports 4K files and a wide range of file formats.
- It has a simple UI that is suitable for beginners.
- It Supports 360 video files (in equirectangular format).
- Supports industry-standard plugins like Boris fx.
- Have features like standard motion tracking, masking, chroma key, e.t.c.
- The paid version has more features like Speed ramping, Auto-sync, keyframing, and animation.
- Have vast stock library.
~ Cons:
- The free version leaves a watermark on export.
- Have playback issues with 4k videos.
- Lacks some standard editing features.
~ Steps:
Import: Open “Filmora” then select the desired aspect ratio and click “New Project’ to start editing. Click on the “Import panel” to import media files.

Edit: Drag and drop the clips to add them to the timeline. Drop the clips above or below to add them in layers. Click the top-left icon of the timeline to add layers. Select a clip and you will see a bunch of tools appear on the top bar of the timeline, use them to perform basic editing tasks like split, crop, speed ramping, keyframing, e.t.c.
Double-click on a clip to open its properties. . Click the blue “Ok” button to move back to the previous window.
Select the “Video” icon to transform the clip or to do motion tracking, stabilization, chroma-key, Masking, e.t.c.
Select the “Audio” icon to apply effects and enhance your audio.
Select the “Color” icon to do color correction and grading.
Select the “3D LUT” option to import a new customized lut.
Select the “Animation” icon to add preset animations or make custom animations by using keyframes.
Select the “Speed” icon to adjust the speed of the clip or to do speed ramping.

Click the blue “OK” button below to go back to the previous window.
Effects: On the horizontal bar at the top-left corner of the screen, all the effects, transitions, title present, and stock library are located. Drag and drop to apply them.

Export: Click the blue “Export” button to open export window, choose the desired settings than click “Export”. and don’t forget to save the project if you want to edit it again.
Free GoPro Video Editors for Mac:
If you are tight on budget but still want a professional video editor to edit your GoPro videos then here I have mentioned some free but powerful video editors. Whether you are a beginner or a professional content creator, these free softwares can get your job done.
Blackmagic - Davinchi Resolve:
It is available for both Windows and Mac.
Whether you are a freelance video editor or an industry-level filmmaker, if you want to step up your game and stand out from your competition then you need a powerful video editor to help you out and Davinchi Resolve can be the right choice for you. From sports vlogging using action cams to Hollywood filmmaking using Red cinema cameras, Davinchi Resolve can handle and edit all this footage easily and smoothly. It is even used in the making of several Hollywood projects including Marvels’s feature films.
It is one of the best color grading software available in the market. It has advanced color grading tools that can help color grade your GoPro raw videos easily as raw videos look dull but provide greater flexibility. It is a timeline-based editor but its Fusion and Color grading panel provides a Node-based editing system which is hard to use but provides great flexibility once mastered.
Resolve has 6 different pages to deal with different editing parts:
“Edit” and “Cut” pages to deal with simple editing tasks. Its “Fusion” page allows users to do VFX and 3D compositing. The “Color Grading” page has all the professional grading tools. While the “Fairlight” page is designed to edit and enhance audio. And the “Deliver” page to export your files.
All these features are available for free without even giving a watermark. Although it has a studio version that provides some additional features to get more out of this amazing software.

- Davinchi Resolve Studio:
The free version has almost everything a professional video editor needs. but you can purchase the Studio version to get some really juicy features to enhance your video editing experience. It includes the Davinci neural engine, stereoscopic 3D tools, Dolby atmos audio mastering,e.t.c.
Pricing: Studio version is available at $ 295 for a lifetime license and with free updates.
~ Features:
- It supports a 4K resolution at 60fps. (while the Studio version supports up to 32K resolution at 120 fps.)
- It is a multi-feature software that provides editing, color grading, VFX, 3D compositing, and audio editing all in one place.
- It has the most advanced and powerful Node-based color grading system, which is also used by Hollywood film studios.
- Supports Raw and 360 videos from GoPro or other action cameras.
- Supports multi-cam editing up to 16 camera angles.
- Can make Compound clips and add adjustment layers.
- Fairlight panel has professional audio production tools like waveform editing, audio ducking, and Channel mapping. (Dolby Vision mastering and 3D spatial Panning [audio editing in 3D space] are available in the Studio version.)
- Supports third-party plugins.
- Has a 3D workspace and provides a virtual set extension for 3D modeling and compositing.
~ Cons:
- Its node-based editing style is quite difficult for beginners.
- Requires a high-end workstation to run smoothly otherwise will often crash during editing.
- Its node-based editing system is hard to learn.
~ Steps:
Import: Open “Davinci Resolve’. Select a previously saved project or press “New project” to start a new one. Click “File” >> “Import” >> “Media” to import files or press “CTRL + I”.
Edit: Drag and drop files to add them to the timeline Use the tools present above the timeline to trim, cut or move your clips. Click the “Inspector” icon on the top-right corner of the window to open the Inspector tab. Here you will find the properties of all the clips, audio, transitions, effects, e.t.c. There are different editing tabs at the bottom of the window.
In the “Fusion” window, click “Nodes” to open the Node screen. Import a clip or use it from the editor timeline. Usually, a clip will have two nodes connected through a line. Above the nodes panel, different types of nodes are available. Drag any node in the panel and connect it through lines. or add a “merge” node to connect nodes.
Its color grading panel also has Node based editing system.

Effects: Click “Effects Library” then select any effect and drop it in the timeline to apply it. You can change its properties in the “Inspector” panel.
Click the diamond icon on the right side of the property to start keyframing then change the value of that property to add keyframes at desired time period.

Export: Open the “Deliver” window, choose the desired settings then click “Add to Render Queue” to start exporting.

FXhome - Hitfilm Express:
It is available on Windows, Mac and Linux also.
If you are looking for a free but powerful video editor to edit your GoPro clips then Hitfilm Express can be the right choice for you. It is a free timeline-based editing software with professional-grade VFX tools. It is a timeline-based editor where you can add dozens of audio, videos, and text layers.
It has a composite shot sequence where you can do complex editing like editing 3D videos and elements, lights e.t.c. It has physic-base behaviors and effects also to enhance 3D compositing. For professional-level editing almost most of the effects and properties have keyframing options. It has different workspace modes to suit your editing needs.
It can also edit 360 videos recorded from your GoPro max. It has a “GoPro Lens Reframe” effect to adjust your 360 clips, but some 360 toolkits can only be available when you purchase Hitfilm pro or buy a 360 toolkit add-on. Similarly, you can purchase more add-ons according to your editing needs or you can purchase Hitfilm Pro to gain access to all add-ons and features. But can use these pro features for free but without exporting as exporting with a paid effect can give a watermark.
Hitfilm Pro:
Although Hitfilm express doesn’t give a watermark on export, but to use more features like 3D composition, LUTs, e.t.c you need to purchase add-ons, there are over 30+ add-ons available to purchase which you can purchase depending on your needs, but if you want to get all the features than its better to get your hands on Hitfilm Pro.
Pricing: Available for purchase at £ 309 or $ 388 for a lifetime license. With 12 months of free updates. It has 3 seat license which means It can run on 3 PCs simultaneously.
~ Features:
- It is a free editing software with no watermark.
- It can edit 3D videos and it can also import and edit 3D models and tracking data.
- It can edit 360 videos also.
- You can add effects and color grades as layers in the timeline also.
- Can add adjustment layers and create nested clips within nested clips to make complex editing easier.
- It has a motion track and locked-on stabilization features.
- Can do smooth keyframing and animation with the help of value graphs.
- It supports multi-cam editing also.
- Keyboard shortcuts make workflow quite easy and quick.
~ Cons:
- It has some playback issues while using 4K videos.
- It crashes sometimes, so it’s better to save the project frequently during editing.
- Hitfilm express doesn’t have a dark mode.
- Some common features are only available on the Pro version or add-ons.
~ Steps:
Import: Open “Hitfilm”, Select “New Project” to open a blank project then click “open” to open an existing file or click “new” to create a new project. Then set project settings on pop-up then and click “ok”.
Then click the “Media” tab on the top-left corner of the screen. Then select the “Import” button to import videos, images, audio, or 3d models. You can also import previously made composite shots.
Edit: Drag and drop media files from the media tab to the timeline. or click the “New” tab to create a “Composite shot” or a solid plane layer. Right-click on the left side of the timeline to insert or delete layers. On the left side of the timeline, you will find some basic tools located on the vertical bar to do simple tasks.
In the “Viewer” tab, on the left side of the playback screen, you can find tools for masking and adding text.
In the “Controls” tab, you can adjust the properties of clips and other features related to the clip like masking, track, blend, transform, e.t.c.
Create a “Composite shot” to do complex editing like 3D compositing. Or select multiple layers then right-click and select “make Composite shot” to combine them for easy editing. Double-click the composite shot to open its contents.

Effects: From the “Effects” tab drag and drop effects on the clip to add them. Some effects can be added as layers which can affect all the layers beneath it. Properties of these effects can be adjusted in the “Control” tab.
To do keyframing, Click the circle icon on the left side of the property to start keyframing then change the values of that property to add keyframes at desired time period.
Export: Click the “Export” icon then “Export now” located at the top right side of the timeline to open the export window. The export will start automatically.
Shotcut:
It is available on Windows, Mac and Linux.
If you are making videos from your GoPro or mobile phone just for fun that doesn’t require much editing then you can look for a free and simple video editor and “Shotcut” can be the right choice for this purpose.
It is a free and open-source video editor with many cool features to get your hands on. It doesn’t have any pro version. It is simple and easy to use but takes some time to understand. It supports multi-track timeline editing. It has a basic timeline design but you can customize your timeline to meet your editing needs. It has some good color grading options, you can also import your color luts. It has many cool features and effects. It supports 360 video editing and also has a few 360 video filters. It has audio effects also.
~ Features:
- All its features are for free and it doesn’t leave any watermark.
- It supports 4K resolution and a wide range of file formats.
- It also supports 360 video files.
- Has keyframing and chroma kry features.
- It has advanced color grading features.
- It provides standard animation and keyframing features.
~ Cons:
- It is a basic video editor and lacks some professional editing features.
- Have playback issues with 4K videos.
- It does have proper text editing tools.
- It is difficult to understand as its UI is different from other familiar video editors.
~ Steps:
Import: Open “Shot Cut” then click the “Open Files” button on the top-left corner of the window to import files.
Edit: Drag and drop clips on an empty timeline panel to add tracks and drag the clip from corners to trim them. Right-click on the left side of the timeline to add a video or an audio track. You will find a bunch of tools above the timeline to do some basic tasks.
You can choose from 6 different workspace designs (available in the top-right corner of the window) to suit your editing styles.

On top of the window, you will see a bunch of icons like Timeline, filter, project, and properties. e.t.c. In the properties tab, you can change the aspect ratio and speed of the clip.
Effects: Click the “Filters” icon on top of the window to open the filters menu, Click “+” above it to add filters. Double click a filter to add it to the selected clip, then click the filter to open its properties menu. You can also add text from here.
Click the “Keyframes” icon on top of the window to open the Keyframes window. Select the “clock” icon on the filters to start keyframing then change the values at a specific time to add keyframes. Click the “Timeline” icon to go back to the previous window.

Export: Click the “Export” button on the top of the screen. Select a preset or click the “Advanced” button to change export settings then click “Export File”.

Paid GoPro Video Editor for Mac:
If you are a professional athlete or a vlogger using GoPro for all of your contents and want to invest some money on paid video editors to improve your content. Then here we have mentioned some paid video editors worthy of your investment.
Apple - Final Cut Pro:
It is available for Mac only.
If you are an Apple enthusiastic person and want everything Apple, then why look for any other video editor when you can have a powerful video editor “Final cut pro” made by Apple. It is a paid but professional software that can raise your GoPro videos to the next level. Whether it’s a 360 video or a RAW file recorded from your GoPro or from the RED cinema camera, all can be edited smoothly inside Final Cut Pro. It has dozens of useful features that a professional video editor looks for like 3D tracking, Motion Graphics, Color Grading, Audio Mixing, Multi-cam editing e.t.c.
Pricing: It is a one-time purchase software available at $ 299.9 for a lifetime license and all its future updates can be downloaded free of cost.
~ Features:
- It supports up to 8K resolution.
- Support 360 and RAW video files.
- Edit videos in complete 360 and 3D spaces.
- Supports third-party video and audio plugins.
- Supports Multi-cam editing.
- Have professional color grading tools with HDR support.
- Its UI is easy to use.
~ Cons:
- It is designed for Apple devices only.
- Requires a powerful PC.
- Its UI is a bit different from other common video editors in the market.
- ~ Steps:
Import: Open “Final Cut Pro” then click the “Files” button on the top-left corner of the screen, then select “Project” to create a new project. In the “Files” menu, click “import” then “media” to import your media files. Here most of the work is done with Keyboard commands.
Edit: Drag and Drop clips on the timeline. In the viewer panel, press “I” and “O” to add input and output points then drag the clip to add only a specific part of the clip. Press “Cmd + B” to split the clip at the desired location. Or add the clips above to add the layer.
Click the “Text” icon on the top-left corner of the screen to open the text page. Choose from presets or import your own Text presets and drag them to the timeline. Click the text to open “Text Editor” on the left side of the screen.
Select multiple clips then Right-click and select “New Compound Clip” to combine them. Double-click the compound clip to edit its components.
Effects: Click 2 icons on the top-right side of the timeline to open the effects and transition panel. Drag and drop on the clip to use them. You can change their properties in the “Effects editor” tab located in the same place as “Text Editor”.
In the editor tab, click the diamond icon beside any property to start keyframing, then change its property to add keyframes at the desired time.
Press “Cmd + 6” to open the Color Grading tab, here you can color grade your clips.
Export: To export the edited video. Click “File” >> “Share” >> “Master file” to open export window. Choose the desired settings then click “Next” then “Save” to export the video.
Adobe - Premiere Pro:
It is available for both Windows and Mac.
Whether you are a content creator or not, if you use a DSLR or an action camera for the first time, then maybe the output wouldn’t meet your expectations. In order to make it good, you need a video editor. And if you will ask your gathering about a good video editor, most of them will recommend you Adobe Premiere Pro, because it is such a versatile and well-known software available in the market. It is a subscription-based video editor.
It is an industry-level software with many professional and advanced features. From beginner video editing to film compositing, all can be done in this software. Whether you have a 360 video or a 4K video in Raw format recorded from your GoPro, just import it into premiere pro and start editing. It has a downloadable “GoPro FX Reframe” plugin to edit your 360 videos. It has different panels designed to deal with specific parts of post-production such as the Effects panel, Graphics panel, Sound panel, Colour Grading panel, e.t.c.
~ Features:
- It supports up to 8K resolution.
- Have different panels to enhance different segments of post-production.
- Have an essential Effects panel to create motion effects and animations using keyframes.
- Supports hundreds of third-party extensions.
- Have useful features like warp stabilizer and denoiser.
- You can import or create your color LUTs.
- Have a creative cloud with 100 Gb of storage.
- The bundle also includes a mobile video editor and a stock library.
~ Cons:
- Real-time rendering. It will take some time to render before exporting if you work on a mid-range PC.
- Freezes or crashes sometimes.
- Cache data fill-up quickly and eats a lot of storage. (It’s better to clear it after every project)
Pricing: It is cloud-based software, therefore it can’t be purchased one time. It has a monthly subscription starting at $ 20.99/month. It includes “premiere rush” mobile video editor and 100 GB of cloud storage within the plan. It also has a “Creative cloud All apps” plan that includes all 30+ Softwares + 100Gb cloud storage along with premiere pro for $ 54.99 only. All plans also include Behance (adobe creative community), Adobe Fonts, and Adobe stock assets for free. Adobe also provides educational access at a much discounted price.
~ Steps:
Import: Open “Premiere Pro”. Click “New Project” to start with then Click the “Files” button on the top-left corner of the window then select the “Import files” button to import files. Or press “CTRL + I” to import files or drag your files from their location to premiere pro.

Edit: Drag and Drop the files to add them to the timeline. Drop a file above a clip to add as a layer. or drop over a clip to overwrite it. On the right side of the timeline, you can find a bunch of tools to do basic edits like trimming, splitting, speed ramping, masking, or adding text.
In the “Effects Control” tab you can transform the selected clip or change its properties.
Select multiple clips then right-click and select “make Nested clip” to combine them into a single clip for easy editing.

Slide between 8 different workspace styles designed for specific post-production tasks by clicking the buttons available on the top of the window.
Effects: Go to the “Effects” panel on the bottom-left window to apply an effect or transitions. Here you can find all audio, video, 2D, and 3D effects. Drag and Drop on a clip to apply it. Change the properties of these effects in the “Effects Control” panel.
To color grade, your clips move to the “Color” workspace. Here you will find all the color grading features: correction, curves, color wheels, creative tab, e.t.c. To import a LUT click the “creative tab” then click “Browse” to import a LUT.
Export: To Export go to the “Files” tab on top of the screen then select the “Export” button to open the export tab. Select the desired settings then click “Export”.
Power Director 365 :
It is available for both Windows and Mac.
If you are looking for a budget-friendly video editor that is powerful enough to edit your GoPro videos like a content creator then Power director can be the right choice for you. It has many unique and useful features. It has different plugins and design centers to do specific post-production tasks like Ad designer, Multicam editor, AI style plugins, e.t.c.
It also has a separate action cam center to fix or enhance action cam videos. IT also has chapter and subtitle rooms to add subtitles and chapters for your Youtube videos or films. It also has a vast stock and preset library to speed up your project.
Pricing: It has a subscription plan which is available at $69/year. It is now available at 30% off till 22nd May,2022.
~ Features:
- It supports 4K videos and a wide range of import formats.
- Have many built-in plugins and design centers.
- Supports Multi-cam editing.
- Have an action cam center to deal with action cam footage.
- Have separate aspect ratio mode for 360 videos.
- Also, have a chapter and subtitle room. many recording aspects of the video.
- Have a content-aware editing feature that detects the recording aspects.
- Can import presets and color LUTs.
- Have a vast stock library.
~ Cons:
- Have some playback issues with 4K videos. (create shadow files to overcome this issue to an extent).
- Its UI is a little bit complicated for beginners.
- Not ideal for fast pace editing.
~ Steps:
Import: Open Power director and a pop-up will appear, select desired aspect ratio then click “Full mode” to open the software. Or select 360 aspect ratio if you want to edit 360 videos.

Click the “Import Media” icon below the Files tab in the top-left corner of the window to import files or press “CTRL + Q” to import files.
Edit: Drag and drop files to add them to any desired layer in the timeline. Click the icon on the top left corner of the timeline to add layers. When you select a clip in the timeline, some tools appear on the top timeline. Select any specific tool to edit your selected clip. Or click the “Plugins” button on the top-left of the window to open a specific designer tab.
Double-click on the clip to open ‘PIP designer”. Here you will find all the editing tools to edit or animate your clip.

After selecting a clip, in the “Plugins” menu click the “Action Camera Center” button to open an edit tab, Here you can fix your GoPro videos.

Effects: On the top-left corner of the window in a vertical bar you will find all the effects material lile Project library, titles, effects, transitions, overlays, e.t.c. Simply just drag and drop them on the timeline to use them. Here you can also do audio mixing and add subtitles and chapters.
Double click a clip or an overlay element to open the designer window. Here you can customize the clips and overlays to enhance your project.
Export: Click the blue “Produce” button on top of the screen to export your edited file. Select the desired mode and file format and add an export destination, then click “Start” to start exporting.
Which One Should I Choose Free or Paid GoPro Video Editor?
You can choose free or paid softwares depending on your requirements and budget. If a free software meets your requirements then stay on it otherwise move towards a paid alternative. If you have a GoPro and you make videos just for fun then use a free and simple video editor. Even if you are an experienced video editor, I would recommend you to go for free video editors which I have mentioned above as they are quite powerful and professional software but if you are harvesting a good amount of money from this field then you can upgrade to pro versions of these free softwares or get a paid software from start. As almost all of these softwares are professional and can get your job done, so it’s better to choose one, which is comfortable for you to work on.
FAQs about GoPro Video Editing:
- Q) Does GoPro has its own video editor?
Yes, GoPro has its own video editor “Quik”. It is available on mobile phones and desktops both. It is simple and easy to use. It provides basic features to edit your video. But the main disadvantage of this desktop software is that it supports only GoPro videos, you can’t import files from other devices. Although this isn’t the issue with Quik mobile app, here you can import videos from other devices also.
- Q) Can I make videos for social media with a GoPro?
It was basically made for recording sports and action videos. But as the market is revolutionized and new models are released it has covered a wide range of the video industry like vlogging, travel and cooking videos e.t.c. As new models of GoPros are waterproof, you can get some amazing underwater shots for your Instagram.
- Q) What is GoPro media format?
GoPro export files in popular file format MP4. MP4 is the most common file format and is supported by almost all the video editors. While it is efficient and takes less storage but isn’t supported in many devices.
- Q) How do I transfer files from my GoPro to Mac?
You can transfer your GoPro files through 3 methods:
- Eject the SD card from your GoPro and connect it to your Mac using a SD card adapter to transfer files.
- Connect your GoPro to Mac through USB connector and use “iphoto” or any other photo importer to import files.
For macOS 10.14 or later
~ Features:
- It supports 4K files and a wide range of file formats.
- It has a simple UI that is suitable for beginners.
- It Supports 360 video files (in equirectangular format).
- Supports industry-standard plugins like Boris fx.
- Have features like standard motion tracking, masking, chroma key, e.t.c.
- The paid version has more features like Speed ramping, Auto-sync, keyframing, and animation.
- Have vast stock library.
~ Cons:
- The free version leaves a watermark on export.
- Have playback issues with 4k videos.
- Lacks some standard editing features.
~ Steps:
Import: Open “Filmora” then select the desired aspect ratio and click “New Project’ to start editing. Click on the “Import panel” to import media files.

Edit: Drag and drop the clips to add them to the timeline. Drop the clips above or below to add them in layers. Click the top-left icon of the timeline to add layers. Select a clip and you will see a bunch of tools appear on the top bar of the timeline, use them to perform basic editing tasks like split, crop, speed ramping, keyframing, e.t.c.
Double-click on a clip to open its properties. . Click the blue “Ok” button to move back to the previous window.
Select the “Video” icon to transform the clip or to do motion tracking, stabilization, chroma-key, Masking, e.t.c.
Select the “Audio” icon to apply effects and enhance your audio.
Select the “Color” icon to do color correction and grading.
Select the “3D LUT” option to import a new customized lut.
Select the “Animation” icon to add preset animations or make custom animations by using keyframes.
Select the “Speed” icon to adjust the speed of the clip or to do speed ramping.

Click the blue “OK” button below to go back to the previous window.
Effects: On the horizontal bar at the top-left corner of the screen, all the effects, transitions, title present, and stock library are located. Drag and drop to apply them.

Export: Click the blue “Export” button to open export window, choose the desired settings than click “Export”. and don’t forget to save the project if you want to edit it again.
Free GoPro Video Editors for Mac:
If you are tight on budget but still want a professional video editor to edit your GoPro videos then here I have mentioned some free but powerful video editors. Whether you are a beginner or a professional content creator, these free softwares can get your job done.
Blackmagic - Davinchi Resolve:
It is available for both Windows and Mac.
Whether you are a freelance video editor or an industry-level filmmaker, if you want to step up your game and stand out from your competition then you need a powerful video editor to help you out and Davinchi Resolve can be the right choice for you. From sports vlogging using action cams to Hollywood filmmaking using Red cinema cameras, Davinchi Resolve can handle and edit all this footage easily and smoothly. It is even used in the making of several Hollywood projects including Marvels’s feature films.
It is one of the best color grading software available in the market. It has advanced color grading tools that can help color grade your GoPro raw videos easily as raw videos look dull but provide greater flexibility. It is a timeline-based editor but its Fusion and Color grading panel provides a Node-based editing system which is hard to use but provides great flexibility once mastered.
Resolve has 6 different pages to deal with different editing parts:
“Edit” and “Cut” pages to deal with simple editing tasks. Its “Fusion” page allows users to do VFX and 3D compositing. The “Color Grading” page has all the professional grading tools. While the “Fairlight” page is designed to edit and enhance audio. And the “Deliver” page to export your files.
All these features are available for free without even giving a watermark. Although it has a studio version that provides some additional features to get more out of this amazing software.

- Davinchi Resolve Studio:
The free version has almost everything a professional video editor needs. but you can purchase the Studio version to get some really juicy features to enhance your video editing experience. It includes the Davinci neural engine, stereoscopic 3D tools, Dolby atmos audio mastering,e.t.c.
Pricing: Studio version is available at $ 295 for a lifetime license and with free updates.
~ Features:
- It supports a 4K resolution at 60fps. (while the Studio version supports up to 32K resolution at 120 fps.)
- It is a multi-feature software that provides editing, color grading, VFX, 3D compositing, and audio editing all in one place.
- It has the most advanced and powerful Node-based color grading system, which is also used by Hollywood film studios.
- Supports Raw and 360 videos from GoPro or other action cameras.
- Supports multi-cam editing up to 16 camera angles.
- Can make Compound clips and add adjustment layers.
- Fairlight panel has professional audio production tools like waveform editing, audio ducking, and Channel mapping. (Dolby Vision mastering and 3D spatial Panning [audio editing in 3D space] are available in the Studio version.)
- Supports third-party plugins.
- Has a 3D workspace and provides a virtual set extension for 3D modeling and compositing.
~ Cons:
- Its node-based editing style is quite difficult for beginners.
- Requires a high-end workstation to run smoothly otherwise will often crash during editing.
- Its node-based editing system is hard to learn.
~ Steps:
Import: Open “Davinci Resolve’. Select a previously saved project or press “New project” to start a new one. Click “File” >> “Import” >> “Media” to import files or press “CTRL + I”.
Edit: Drag and drop files to add them to the timeline Use the tools present above the timeline to trim, cut or move your clips. Click the “Inspector” icon on the top-right corner of the window to open the Inspector tab. Here you will find the properties of all the clips, audio, transitions, effects, e.t.c. There are different editing tabs at the bottom of the window.
In the “Fusion” window, click “Nodes” to open the Node screen. Import a clip or use it from the editor timeline. Usually, a clip will have two nodes connected through a line. Above the nodes panel, different types of nodes are available. Drag any node in the panel and connect it through lines. or add a “merge” node to connect nodes.
Its color grading panel also has Node based editing system.

Effects: Click “Effects Library” then select any effect and drop it in the timeline to apply it. You can change its properties in the “Inspector” panel.
Click the diamond icon on the right side of the property to start keyframing then change the value of that property to add keyframes at desired time period.

Export: Open the “Deliver” window, choose the desired settings then click “Add to Render Queue” to start exporting.

FXhome - Hitfilm Express:
It is available on Windows, Mac and Linux also.
If you are looking for a free but powerful video editor to edit your GoPro clips then Hitfilm Express can be the right choice for you. It is a free timeline-based editing software with professional-grade VFX tools. It is a timeline-based editor where you can add dozens of audio, videos, and text layers.
It has a composite shot sequence where you can do complex editing like editing 3D videos and elements, lights e.t.c. It has physic-base behaviors and effects also to enhance 3D compositing. For professional-level editing almost most of the effects and properties have keyframing options. It has different workspace modes to suit your editing needs.
It can also edit 360 videos recorded from your GoPro max. It has a “GoPro Lens Reframe” effect to adjust your 360 clips, but some 360 toolkits can only be available when you purchase Hitfilm pro or buy a 360 toolkit add-on. Similarly, you can purchase more add-ons according to your editing needs or you can purchase Hitfilm Pro to gain access to all add-ons and features. But can use these pro features for free but without exporting as exporting with a paid effect can give a watermark.
Hitfilm Pro:
Although Hitfilm express doesn’t give a watermark on export, but to use more features like 3D composition, LUTs, e.t.c you need to purchase add-ons, there are over 30+ add-ons available to purchase which you can purchase depending on your needs, but if you want to get all the features than its better to get your hands on Hitfilm Pro.
Pricing: Available for purchase at £ 309 or $ 388 for a lifetime license. With 12 months of free updates. It has 3 seat license which means It can run on 3 PCs simultaneously.
~ Features:
- It is a free editing software with no watermark.
- It can edit 3D videos and it can also import and edit 3D models and tracking data.
- It can edit 360 videos also.
- You can add effects and color grades as layers in the timeline also.
- Can add adjustment layers and create nested clips within nested clips to make complex editing easier.
- It has a motion track and locked-on stabilization features.
- Can do smooth keyframing and animation with the help of value graphs.
- It supports multi-cam editing also.
- Keyboard shortcuts make workflow quite easy and quick.
~ Cons:
- It has some playback issues while using 4K videos.
- It crashes sometimes, so it’s better to save the project frequently during editing.
- Hitfilm express doesn’t have a dark mode.
- Some common features are only available on the Pro version or add-ons.
~ Steps:
Import: Open “Hitfilm”, Select “New Project” to open a blank project then click “open” to open an existing file or click “new” to create a new project. Then set project settings on pop-up then and click “ok”.
Then click the “Media” tab on the top-left corner of the screen. Then select the “Import” button to import videos, images, audio, or 3d models. You can also import previously made composite shots.
Edit: Drag and drop media files from the media tab to the timeline. or click the “New” tab to create a “Composite shot” or a solid plane layer. Right-click on the left side of the timeline to insert or delete layers. On the left side of the timeline, you will find some basic tools located on the vertical bar to do simple tasks.
In the “Viewer” tab, on the left side of the playback screen, you can find tools for masking and adding text.
In the “Controls” tab, you can adjust the properties of clips and other features related to the clip like masking, track, blend, transform, e.t.c.
Create a “Composite shot” to do complex editing like 3D compositing. Or select multiple layers then right-click and select “make Composite shot” to combine them for easy editing. Double-click the composite shot to open its contents.

Effects: From the “Effects” tab drag and drop effects on the clip to add them. Some effects can be added as layers which can affect all the layers beneath it. Properties of these effects can be adjusted in the “Control” tab.
To do keyframing, Click the circle icon on the left side of the property to start keyframing then change the values of that property to add keyframes at desired time period.
Export: Click the “Export” icon then “Export now” located at the top right side of the timeline to open the export window. The export will start automatically.
Shotcut:
It is available on Windows, Mac and Linux.
If you are making videos from your GoPro or mobile phone just for fun that doesn’t require much editing then you can look for a free and simple video editor and “Shotcut” can be the right choice for this purpose.
It is a free and open-source video editor with many cool features to get your hands on. It doesn’t have any pro version. It is simple and easy to use but takes some time to understand. It supports multi-track timeline editing. It has a basic timeline design but you can customize your timeline to meet your editing needs. It has some good color grading options, you can also import your color luts. It has many cool features and effects. It supports 360 video editing and also has a few 360 video filters. It has audio effects also.
~ Features:
- All its features are for free and it doesn’t leave any watermark.
- It supports 4K resolution and a wide range of file formats.
- It also supports 360 video files.
- Has keyframing and chroma kry features.
- It has advanced color grading features.
- It provides standard animation and keyframing features.
~ Cons:
- It is a basic video editor and lacks some professional editing features.
- Have playback issues with 4K videos.
- It does have proper text editing tools.
- It is difficult to understand as its UI is different from other familiar video editors.
~ Steps:
Import: Open “Shot Cut” then click the “Open Files” button on the top-left corner of the window to import files.
Edit: Drag and drop clips on an empty timeline panel to add tracks and drag the clip from corners to trim them. Right-click on the left side of the timeline to add a video or an audio track. You will find a bunch of tools above the timeline to do some basic tasks.
You can choose from 6 different workspace designs (available in the top-right corner of the window) to suit your editing styles.

On top of the window, you will see a bunch of icons like Timeline, filter, project, and properties. e.t.c. In the properties tab, you can change the aspect ratio and speed of the clip.
Effects: Click the “Filters” icon on top of the window to open the filters menu, Click “+” above it to add filters. Double click a filter to add it to the selected clip, then click the filter to open its properties menu. You can also add text from here.
Click the “Keyframes” icon on top of the window to open the Keyframes window. Select the “clock” icon on the filters to start keyframing then change the values at a specific time to add keyframes. Click the “Timeline” icon to go back to the previous window.

Export: Click the “Export” button on the top of the screen. Select a preset or click the “Advanced” button to change export settings then click “Export File”.

Paid GoPro Video Editor for Mac:
If you are a professional athlete or a vlogger using GoPro for all of your contents and want to invest some money on paid video editors to improve your content. Then here we have mentioned some paid video editors worthy of your investment.
Apple - Final Cut Pro:
It is available for Mac only.
If you are an Apple enthusiastic person and want everything Apple, then why look for any other video editor when you can have a powerful video editor “Final cut pro” made by Apple. It is a paid but professional software that can raise your GoPro videos to the next level. Whether it’s a 360 video or a RAW file recorded from your GoPro or from the RED cinema camera, all can be edited smoothly inside Final Cut Pro. It has dozens of useful features that a professional video editor looks for like 3D tracking, Motion Graphics, Color Grading, Audio Mixing, Multi-cam editing e.t.c.
Pricing: It is a one-time purchase software available at $ 299.9 for a lifetime license and all its future updates can be downloaded free of cost.
~ Features:
- It supports up to 8K resolution.
- Support 360 and RAW video files.
- Edit videos in complete 360 and 3D spaces.
- Supports third-party video and audio plugins.
- Supports Multi-cam editing.
- Have professional color grading tools with HDR support.
- Its UI is easy to use.
~ Cons:
- It is designed for Apple devices only.
- Requires a powerful PC.
- Its UI is a bit different from other common video editors in the market.
- ~ Steps:
Import: Open “Final Cut Pro” then click the “Files” button on the top-left corner of the screen, then select “Project” to create a new project. In the “Files” menu, click “import” then “media” to import your media files. Here most of the work is done with Keyboard commands.
Edit: Drag and Drop clips on the timeline. In the viewer panel, press “I” and “O” to add input and output points then drag the clip to add only a specific part of the clip. Press “Cmd + B” to split the clip at the desired location. Or add the clips above to add the layer.
Click the “Text” icon on the top-left corner of the screen to open the text page. Choose from presets or import your own Text presets and drag them to the timeline. Click the text to open “Text Editor” on the left side of the screen.
Select multiple clips then Right-click and select “New Compound Clip” to combine them. Double-click the compound clip to edit its components.
Effects: Click 2 icons on the top-right side of the timeline to open the effects and transition panel. Drag and drop on the clip to use them. You can change their properties in the “Effects editor” tab located in the same place as “Text Editor”.
In the editor tab, click the diamond icon beside any property to start keyframing, then change its property to add keyframes at the desired time.
Press “Cmd + 6” to open the Color Grading tab, here you can color grade your clips.
Export: To export the edited video. Click “File” >> “Share” >> “Master file” to open export window. Choose the desired settings then click “Next” then “Save” to export the video.
Adobe - Premiere Pro:
It is available for both Windows and Mac.
Whether you are a content creator or not, if you use a DSLR or an action camera for the first time, then maybe the output wouldn’t meet your expectations. In order to make it good, you need a video editor. And if you will ask your gathering about a good video editor, most of them will recommend you Adobe Premiere Pro, because it is such a versatile and well-known software available in the market. It is a subscription-based video editor.
It is an industry-level software with many professional and advanced features. From beginner video editing to film compositing, all can be done in this software. Whether you have a 360 video or a 4K video in Raw format recorded from your GoPro, just import it into premiere pro and start editing. It has a downloadable “GoPro FX Reframe” plugin to edit your 360 videos. It has different panels designed to deal with specific parts of post-production such as the Effects panel, Graphics panel, Sound panel, Colour Grading panel, e.t.c.
~ Features:
- It supports up to 8K resolution.
- Have different panels to enhance different segments of post-production.
- Have an essential Effects panel to create motion effects and animations using keyframes.
- Supports hundreds of third-party extensions.
- Have useful features like warp stabilizer and denoiser.
- You can import or create your color LUTs.
- Have a creative cloud with 100 Gb of storage.
- The bundle also includes a mobile video editor and a stock library.
~ Cons:
- Real-time rendering. It will take some time to render before exporting if you work on a mid-range PC.
- Freezes or crashes sometimes.
- Cache data fill-up quickly and eats a lot of storage. (It’s better to clear it after every project)
Pricing: It is cloud-based software, therefore it can’t be purchased one time. It has a monthly subscription starting at $ 20.99/month. It includes “premiere rush” mobile video editor and 100 GB of cloud storage within the plan. It also has a “Creative cloud All apps” plan that includes all 30+ Softwares + 100Gb cloud storage along with premiere pro for $ 54.99 only. All plans also include Behance (adobe creative community), Adobe Fonts, and Adobe stock assets for free. Adobe also provides educational access at a much discounted price.
~ Steps:
Import: Open “Premiere Pro”. Click “New Project” to start with then Click the “Files” button on the top-left corner of the window then select the “Import files” button to import files. Or press “CTRL + I” to import files or drag your files from their location to premiere pro.

Edit: Drag and Drop the files to add them to the timeline. Drop a file above a clip to add as a layer. or drop over a clip to overwrite it. On the right side of the timeline, you can find a bunch of tools to do basic edits like trimming, splitting, speed ramping, masking, or adding text.
In the “Effects Control” tab you can transform the selected clip or change its properties.
Select multiple clips then right-click and select “make Nested clip” to combine them into a single clip for easy editing.

Slide between 8 different workspace styles designed for specific post-production tasks by clicking the buttons available on the top of the window.
Effects: Go to the “Effects” panel on the bottom-left window to apply an effect or transitions. Here you can find all audio, video, 2D, and 3D effects. Drag and Drop on a clip to apply it. Change the properties of these effects in the “Effects Control” panel.
To color grade, your clips move to the “Color” workspace. Here you will find all the color grading features: correction, curves, color wheels, creative tab, e.t.c. To import a LUT click the “creative tab” then click “Browse” to import a LUT.
Export: To Export go to the “Files” tab on top of the screen then select the “Export” button to open the export tab. Select the desired settings then click “Export”.
Power Director 365 :
It is available for both Windows and Mac.
If you are looking for a budget-friendly video editor that is powerful enough to edit your GoPro videos like a content creator then Power director can be the right choice for you. It has many unique and useful features. It has different plugins and design centers to do specific post-production tasks like Ad designer, Multicam editor, AI style plugins, e.t.c.
It also has a separate action cam center to fix or enhance action cam videos. IT also has chapter and subtitle rooms to add subtitles and chapters for your Youtube videos or films. It also has a vast stock and preset library to speed up your project.
Pricing: It has a subscription plan which is available at $69/year. It is now available at 30% off till 22nd May,2022.
~ Features:
- It supports 4K videos and a wide range of import formats.
- Have many built-in plugins and design centers.
- Supports Multi-cam editing.
- Have an action cam center to deal with action cam footage.
- Have separate aspect ratio mode for 360 videos.
- Also, have a chapter and subtitle room. many recording aspects of the video.
- Have a content-aware editing feature that detects the recording aspects.
- Can import presets and color LUTs.
- Have a vast stock library.
~ Cons:
- Have some playback issues with 4K videos. (create shadow files to overcome this issue to an extent).
- Its UI is a little bit complicated for beginners.
- Not ideal for fast pace editing.
~ Steps:
Import: Open Power director and a pop-up will appear, select desired aspect ratio then click “Full mode” to open the software. Or select 360 aspect ratio if you want to edit 360 videos.

Click the “Import Media” icon below the Files tab in the top-left corner of the window to import files or press “CTRL + Q” to import files.
Edit: Drag and drop files to add them to any desired layer in the timeline. Click the icon on the top left corner of the timeline to add layers. When you select a clip in the timeline, some tools appear on the top timeline. Select any specific tool to edit your selected clip. Or click the “Plugins” button on the top-left of the window to open a specific designer tab.
Double-click on the clip to open ‘PIP designer”. Here you will find all the editing tools to edit or animate your clip.

After selecting a clip, in the “Plugins” menu click the “Action Camera Center” button to open an edit tab, Here you can fix your GoPro videos.

Effects: On the top-left corner of the window in a vertical bar you will find all the effects material lile Project library, titles, effects, transitions, overlays, e.t.c. Simply just drag and drop them on the timeline to use them. Here you can also do audio mixing and add subtitles and chapters.
Double click a clip or an overlay element to open the designer window. Here you can customize the clips and overlays to enhance your project.
Export: Click the blue “Produce” button on top of the screen to export your edited file. Select the desired mode and file format and add an export destination, then click “Start” to start exporting.
Which One Should I Choose Free or Paid GoPro Video Editor?
You can choose free or paid softwares depending on your requirements and budget. If a free software meets your requirements then stay on it otherwise move towards a paid alternative. If you have a GoPro and you make videos just for fun then use a free and simple video editor. Even if you are an experienced video editor, I would recommend you to go for free video editors which I have mentioned above as they are quite powerful and professional software but if you are harvesting a good amount of money from this field then you can upgrade to pro versions of these free softwares or get a paid software from start. As almost all of these softwares are professional and can get your job done, so it’s better to choose one, which is comfortable for you to work on.
FAQs about GoPro Video Editing:
- Q) Does GoPro has its own video editor?
Yes, GoPro has its own video editor “Quik”. It is available on mobile phones and desktops both. It is simple and easy to use. It provides basic features to edit your video. But the main disadvantage of this desktop software is that it supports only GoPro videos, you can’t import files from other devices. Although this isn’t the issue with Quik mobile app, here you can import videos from other devices also.
- Q) Can I make videos for social media with a GoPro?
It was basically made for recording sports and action videos. But as the market is revolutionized and new models are released it has covered a wide range of the video industry like vlogging, travel and cooking videos e.t.c. As new models of GoPros are waterproof, you can get some amazing underwater shots for your Instagram.
- Q) What is GoPro media format?
GoPro export files in popular file format MP4. MP4 is the most common file format and is supported by almost all the video editors. While it is efficient and takes less storage but isn’t supported in many devices.
- Q) How do I transfer files from my GoPro to Mac?
You can transfer your GoPro files through 3 methods:
- Eject the SD card from your GoPro and connect it to your Mac using a SD card adapter to transfer files.
- Connect your GoPro to Mac through USB connector and use “iphoto” or any other photo importer to import files.
What’re the Best Alternatives to Pexels?
Sites like Pexels provide you with royalty-free images to include in your messages to further their impact. Although Pexels is a great resource for royalty-free photos and animations, it is not without its limitations. Here is a list of Pexels alternatives for you to consider when creating content. It includes reasons why the sites are suitable alternatives and brief guides on how to get started on them.
Part1: What are the best alternatives to Pexels?
There are several factors to consider when selecting a suitable image resource for your messaging. For example, you may consider a site favorable to another because of its intuitive user interface, or you may consider another because it has no pesky advertisements. Taking this into consideration, here is a list of the three best Pexels alternatives worth checking out for your next project.
No.1 Unsplash

Unsplash is a stock photo-sharing website run by Getty Images. According to recent reports, the site hosts over 265,000 photographers contributing to a library of over 3.5 million photos. Initially, all photos were under a creative commons license zero, meaning you could distribute the photos without restriction. However, following lobbying from some creators, all photos are now under the Unsplash license.
This means you can still copy, modify, share, and download images for free. However, under the new licensing terms, you cannot use unedited copies of the images for commercial purposes such as T-Shirt printing or branding and using the photos on a similar or competing service.
Most Unsplash users praise it for the following features:
- The library contains tons of high-resolution photos.
- You can access the site through your web browser or the app available on Android and iOS devices.
- There are no download limits to the photos, and everything is free.
- Unsplash is a plugin for various content editing software such as Filmora 11, Adobe XD, and Figma.
Despite all the positives, here are a few improvements to make Unsplash even better.
- The website lacks a free HD video library, which would be a great addition for aspiring content creators.
- In addition, the search algorithm is not as accurate, and you may struggle to find suitable images for your subject matter.
No.2 Shutterstock
Another Pexels alternative to consider is Shutterstock. It is an online resource where individuals and businesses can access high-quality, licensed photos, videos, illustrations, vectors, and music for their content creation.

Unlike Unsplash above, you need to create an account to access Shutterstock services. In addition, the website offers different pricing models for each user, depending on your unique requirements. For example, you can subscribe to an image-only subscription that allows you ten image downloads monthly for $29. Alternatively, you can purchase the Mix and Match subscription that offers you 25 credits monthly to download different media from the site.
Currently, the website boasts a collection of over 200 million royalty-free images and over 10 million video clips. In addition, the company also offers a percentage-based compensation model to contributors, with first-timers earning up to 15% of content sales. Furthermore, the site continues to populate its library through the acquisition of different companies in a similar space. Some of its notable acquisitions include Turbosquid, Bigstock, Rex Features, and BEImages.
No.3 Filmstock [Editor’s Choices]
Filmstock is an online library of different editing resources for filmmakers. Some of the resources you can obtain are effects, elements, titles, and audio. In addition, Filmstock is the most recent version of the formerly known Filmora Effects Store. Regardless of the close association with Filmora Video Editing Software, you can still use these resources in your creations on other programs.
Filmstock currently offers its services in three categories. They are:
- A Free package that allows you unlimited downloads of media effects and resources under a royalty-free license. However, any resource you download from the site comes with a Filmora tag.
- The Standard subscription will cost you $9.99 per month and includes free technical support as an additional feature to those available in the free package.
- Finally, the Premium subscription gives you access to the premium library that contains an exclusive selection of the contributors’ commercial work. The package will cost you $32.99 monthly and also includes all the features in the previous subscription models.
Kindly note that you must register for a Filmstock or Wondershare account to use the service. In addition, you will need to purchase a separate license to use the service with Filmora Video Editing software.
No.4 Getty Images
Getty Images is an online supplier of media resources for media, creative, and corporate clients. It boasts a resource library of over 477 million entries. Access to the site requires you to create a user account. In addition, some of the prints you will find on the site will require you to make a purchase, depending on the size and quality.
No.5 iStock

iStock is an online library of creative resources, including music, videos, illustrations, and images. In addition, the site offers access to its exclusive stock-image library through different subscription models. Some of the platforms appealing features include the following:
- An AI-powered search engine that provides more accurate results than Pexels.
- Preset templates for easier creation of videos and social media posts.
No.6 Flickr
Flickr is another alternative to Pexels worth considering. This is because it offers you free and paid access to one of the internet’s largest creative libraries. In addition, you can select from several licenses, including creative commons and U.S. Government works licenses for your assets, something other similar sites lack in their offering.
No.7 Pixabay

Pixabay gives you access to over 1 million creative assets in different categories, including videos, music, and sound effects. In addition, the site offers its content under the creative commons zero licenses, meaning you can use all stock photos without fear of backlash. Although the site’s search function requires work on its accuracy, the numerous categories make it easier to pinpoint your desired image.
No.8 Adobe Stock

Another site like Pexels is Adobe Stock, where you can access millions of creative assets for your content. Depending on your licensing options, the site offers free and paid access to its services. For example, you can increase your creativity by subscribing to the different Adobe design assets, including Adobe Stock Vector and Adobe Stock Illustrations.
No.9 Vista Create
Vista Create is an online free photo and image website like Pexels that also includes design tools to alter the images to your liking. In addition, you have plenty of templates to suit different platform requirements, including social media sites such as Facebook and Instagram. Furthermore, Vista Creare also boasts a wide collection of vectors, which you can customize in three easy steps.
No.10 LibreStock

Unlike the ones above, LIbreStock is an aggregator site that combines stock photo databases in a single platform. As such, it is arguably the largest provider of royalty-free images on the web. In addition, it automatically filters out poor-quality images, guaranteeing you excellence each time.
Most LibreStock users name the website’s search function as its best feature. This is because it also utilizes search tags when scanning through different databases. As such, you can easily find unique stock photos for your creation, regardless of how outrageous the search tag is. Finally, LibreStock provides its content under the creative commons zero licenses, meaning you can use the assets for personal and commercial work.
No.11 StockSnap

StockSnap operates similarly to Pexels, as it also offers a variety of free stock photos and images. However, a few tweaks to how you receive these creative assets make it slightly better. For example, StockSnap allows you to download ten free images from Shutterstock if what you need is unavailable in their library.
In addition, the platform also displays the most recent additions to their library in the top search results. As such, you are guaranteed to receive unique pictures without significant overuse.
Part2: FAQs
What is better than Pexels?
From the above information, Unsplash ranks as the best alternative to Pexels. This is because of its user-friendly interface, availability across web-based and smartphones, and compatibility with different video editing software such as Adobe XD and Filmora . As such, its versatility allows you to always create on the go.
Can I use Pexels on YouTube?
Yes, you can use Pexels on YouTube, provided you apply the creative assets to your material. In addition, you will need to make alterations to Pexels images and videos before using them to avoid violating your license agreement.
Free Download For Win 7 or later(64-bit)
Free Download For macOS 10.14 or later
Free Download For macOS 10.14 or later
Also read:
- Best 12 Sony Vegas Slideshow Templates for Free Download for 2024
- New In 2024, Detailed Steps to Rotate Videos in Davinci Resolve
- New 2024 Approved How to Remove Background Noise From Video Sony Vegas
- Updated 2024 Approved The Ultimate Guide to Using AR Emoji Stickers in Your Videos
- In 2024, Add some Sci-Fi Touch to Your Next Video Content Using Wondershare Filmora Editing Tools to Create an Alternate Reality Effect
- Updated In 2024, Discover the Top 5 Online Tools for Merging MP4 Files Easily and Quickly. Streamline Your Video Editing Process and Create Seamless Videos with These User-Friendly Tools
- Updated Best 10 Anime Movies for All Time
- In 2024, Discover How You Can Use Vectorscope to Adjust Luminance, Color Grading, and More in Your Video Editing Projects
- New How to Use Rules of Thirds for 2024
- 2024 Approved Create the Stranger Things Upside Down Effect Video
- Updated In 2024, This Article Provides Helpful Tips for Creating Better Film Footage in Public Places. Learn How to Choose the Right Angle and Re-Record the Audio with Filmora
- Updated Top 10 Picks for Flawless Slow Motion Video Generation for 2024
- Updated In 2024, Mask Tracking Is Believed to Be a Helpful Procedure for Marking Proper Areas in Videos. Learn How to Perform Premiere Pro Mask Tracking in This Guide
- Updated Guide To Creating the Best Video Collages for 2024
- Updated In 2024, Find a Video Background Change Online that Works for You. This Article Contains Tools that Can Edit Video Backgrounds Online with Little Effort
- Updated 2024 Approved 6 Instant Ways to Create Windows 10 Slideshow
- How To Simulate GPS Movement With Location Spoofer On Vivo V29 Pro? | Dr.fone
- In 2024, How Can I Use a Fake GPS Without Mock Location On Realme Note 50? | Dr.fone
- How to recover old messages from your Xiaomi Redmi Note 13 5G
- Is your Itel P40 working too slow? Heres how you can hard reset it | Dr.fone
- In 2024, Techniques on Making After Effects 2D Animation
- How to Get and Use Pokemon Go Promo Codes On Samsung Galaxy M14 4G | Dr.fone
- How to Transfer Data from Vivo Y36 to BlackBerry | Dr.fone
- Some MP4 won't play on my Samsung Galaxy F34 5G
- Unlock Your Vivo T2x 5Gs Potential The Top 20 Lock Screen Apps You Need to Try
- How Do You Remove Restricted Mode on Apple iPhone XS Max
- Ready To Dive Into Photo Talking Videos? Heres What You Need To Know
- Title: New Discover How to Create Professional Foggy Text Reflection Effects in the Filmora Video Editor
- Author: Morgan
- Created at : 2024-05-19 05:12:31
- Updated at : 2024-05-20 05:12:31
- Link: https://ai-video-editing.techidaily.com/new-discover-how-to-create-professional-foggy-text-reflection-effects-in-the-filmora-video-editor/
- License: This work is licensed under CC BY-NC-SA 4.0.


