:max_bytes(150000):strip_icc():format(webp)/dualsenseedge-749ef030e3c84376926d817913be924b.jpg)
New Do You Use Premiere Pro and Want to Learn How to Change a Videos Frame Rate Using the Tool? Here Are the Steps that You Need to Follow

Do You Use Premiere Pro and Want to Learn How to Change a Video’s Frame Rate Using the Tool? Here Are the Steps that You Need to Follow
The video’s frame rate is an important aspect of it. Too high of a frame rate makes the video seem unnatural. On the other hand, too low can make some videos choppy. You can fix that by changing the frame rate using a video editor. And we are here to help you learn how to do that. Here’s how to change the frame rate in Premiere Pro.
The frame rate sometimes makes or breaks the video. So it is important to get this setting right. Suppose you made a mistake and recorded your video in the wrong setting. You can follow this guide to solve your problem.
How To Check Video Frame Rate in Premiere Pro
Before we teach you how to change a video’s frame rate in Premiere Pro, let’s first make sure you know how to check. Maybe you don’t need to modify the video because it is already in the correct setting.
So how do you do that in Premiere Pro?
- Import the video to Adobe Premiere Pro.
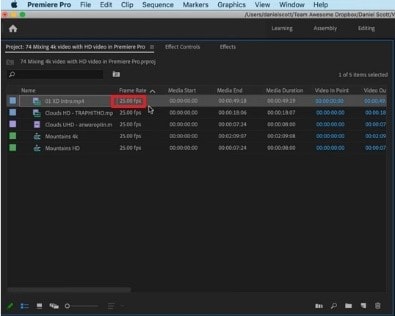
- Check the “Media” window. Next to the video file name is its frame rate. It is written in the format x.00 fps. FPS stands for “frames per second,” which is used interchangeably with the term frame rate.
Reasons for Changing Frame Rate
Suppose you have an action-packed video. It would not look great at 30 fps - it will look too choppy. That will give your audience a rotten viewing experience. By increasing the frames, you can make the motion more fluid and smoother.
Increasing the frames per second also results in better slow-motion videos. A 30 fps one would not look good with this effect because it does not show smooth motion. Thus, we recommend making the video at least 60 fps.
However, a higher frame rate does not always mean better videos. It can result in what they call the “soap opera effect.” It means the video shows too many details. That makes the videos seem “unnatural” or less cinematic.
High frame rates make videos look more realistic since there is less stuttering and motion blur between frames. That’s great. But for older audiences - the ones used to watching videos at 24 fps, it can be off-putting. So it’s also important to consider your target audience when deciding the right frame rate for your video.
With these reasons in mind, you may want to change your video’s frame rate.
How To Change FPS in Premiere Pro
Let’s dilly-dally no more. Here’s a quick guide on how to change fps in Adobe Premiere Pro. This program gives you two different ways to change fps. One is changing the frame rate of a sequence; the other is changing the frame rate of the video clip. We will teach you how to do both.
l Change the Frame Rate of a Sequence
Suppose you want to keep the frame rate of most of the video the same. Only some parts need adjusting. You can change the frame rate of the sequences that need changing instead. Here are the steps to follow to achieve this:
- Open your project in Adobe Premiere Pro.
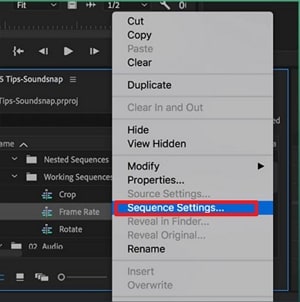
- In the Project panel, select the sequence whose frame rate you want to change. Right-click on that sequence.
- Choose “Sequence Settings” from the menu that appears.
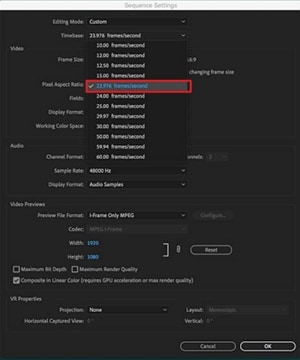
- Click the drop-down menu for “Timebase.”
- Select the frame rate you want the sequence to be in.
- Click “OK.”
l Change the Frame Rate of a Video Clip
Here are the steps you should follow if you want to change the frame rate of an entire video clip.
- Import your video clip to Premiere Pro and drag it to the timeline.
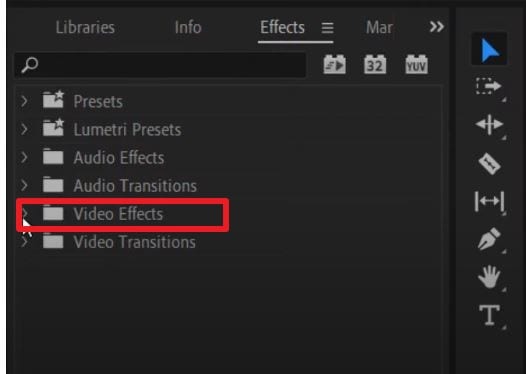
- Go to the “Effects” tab. It’s in the options at the bottom left of the screen.
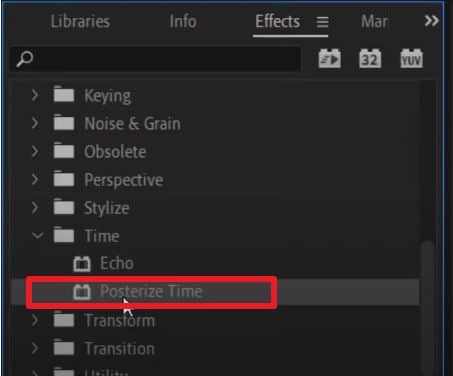
- Select “Video Effects” > “Time” > “Posterize Time.”
- Drag and drop the Posterize Time effect to the clip whose frame rate you want to change.
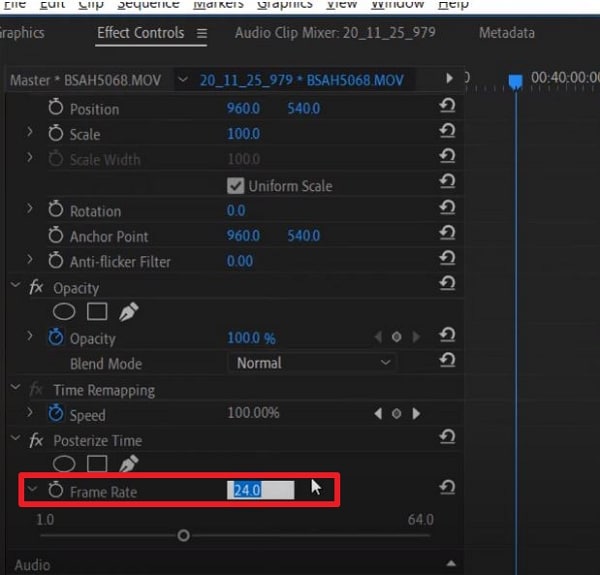
- Click “Effect Controls” at the top left of the screen.
- Select the small “arrow” button next to the “Frame Rate” text under “Posterize Time.”
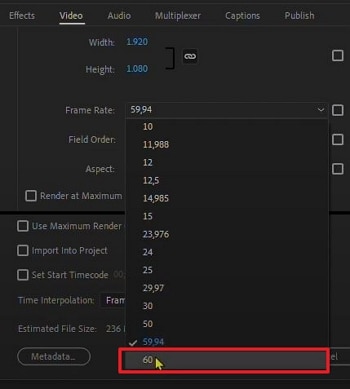
- Change the frame rate to your preferred setting. For example, type “60” to make the video 60 fps.
- Click “Sequence” > “Render Selection.”
And that’s it! That is how you change a video clip’s frame rate in Adobe Premiere Pro.
How To Make 120 FPS Videos With Premiere Pro
Videos that are 120 fps are very popular now. If you are a gaming content creator on YouTube, you probably record videos at this frame rate. You’d want to edit that footage and export it at the same frame rate.
Adobe Premiere Pro allows you to do that. But it’s a little bit of a hidden feature. When creating a sequence, you may notice that the highest the frame rate can go is 60 frames per second. That’s obviously not the number that we want. Don’t worry. There is a workaround. The best thing is that it’s super easy.
Follow these steps to change your video to 120 fps:
- Import your 120 fps video to Adobe Premiere Pro.
- Select your footage. Drag it to your timeline or the tab where the text says, “Drop media here to create sequence.”
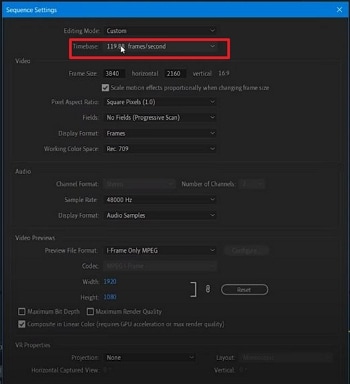
- Select the timeline panel. Click “Sequence” > “Sequence Settings.”
- Check the “Timebase” section. It should say “119.88 frames/second,” 120 fps when rounded off.
- Edit the video as needed and render it. The output should stay at 120 fps.
How To Change Video From 30 FPS to 60 FPS in Premiere Pro
Do you have a video recorded at 30 frames per second, and do you want it at 60? Here’s a simple solution to that. Follow these steps in Adobe Premiere Pro to double the video’s frame rate.
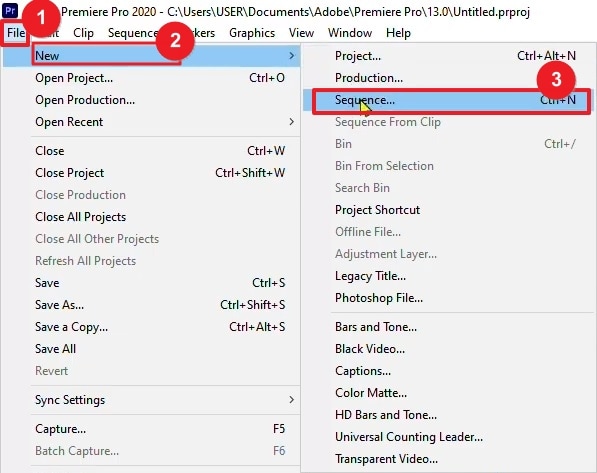
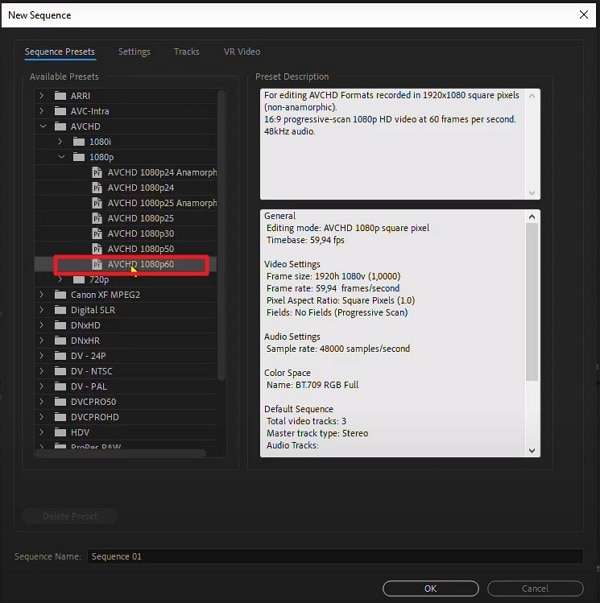
- Open Adobe Premiere Pro. Click “File” > “New” > “Sequence.”
- Click “AVCHD” > “1080p” > “AVCHD 1080p60” > “OK.”
- Import your 30 fps video into Adobe Premiere Pro.
- Drag the video into the timeline.
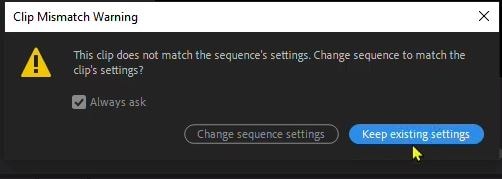
- Click “Keep existing settings.”
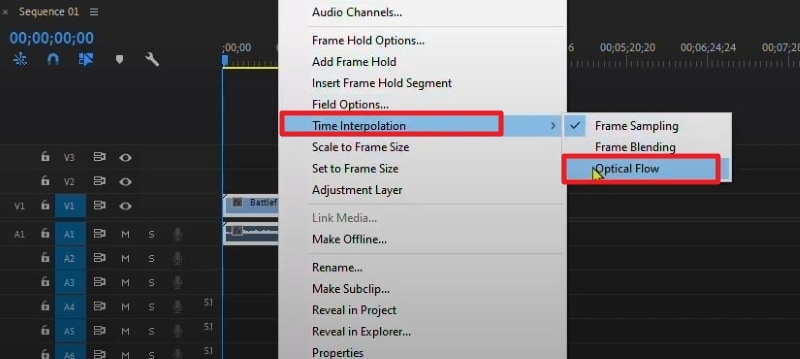
- Right-click the video in the timeline. Select “Time interpolation” > “Optical Flow.”
- Press the “Enter” key. Wait for the processing to finish. This can take hours.
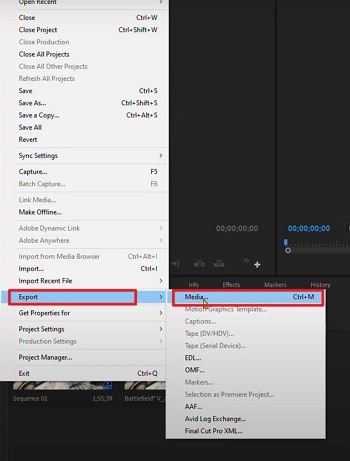
- Click “File” > “Export” > “Media.”
- Select a preset.
- Scroll down to the “Effects” section to check if the frame rate is at 60 fps. If not, change it to 60 fps.
- Click “Export.”
[Bonus] Wondershare Filmora - Premiere Pro’s Alternative
Free Download For Win 7 or later(64-bit)
Free Download For macOS 10.14 or later
What if you don’t have Adobe Premiere Pro or don’t like this tool? What’s a good alternative? That would be Wondershare Filmora.

Why use Filmora as a substitute for Premiere Pro? This video editor offers lots of great features, basic or advanced. With these at your fingertips, you can bring your videos to the next level and wow your audiences.
Among Filmora’s handy features is the ability to quickly change a video’s frame rate. You don’t even need to be a video editing expert to do it with this software! That’s how straightforward the process is.
How To Change the Frame Rate in Wondershare Filmora
Changing a video’s frame rate in Wondershare Filmora is super easy. Even a child can do it due to how simple the steps are. Here, read this 5-step guide to change a video’s frame rate using this amazing video editor.
- Launch Wondershare Filmora and create a new project.

- Import the video whose frame rate you want to change.
- Drag the video into the timeline.
![]()
- Click “Export.”
- Select the format you want the output file to be in. Find the “Frame Rate” in the options, click the drop-down menu, and select the frame rate that you want. Click “Export.”

Conclusion
Getting the frame rate of a video right is important, so you should not neglect it. It greatly affects your audience’s viewing experience. Thankfully, if you make mistakes, you can correct them with video editors like Premiere Pro. If it’s not to your liking, you can use Wondershare Filmora instead - it’s the best alternative.
Filmora lets you change a video’s frame rate very easily. Also, it gives you a bunch of other features you might enjoy using. And here’s some good news: this software app is affordable! You can also download the free trial to give it a shot.
Free Download For macOS 10.14 or later
What if you don’t have Adobe Premiere Pro or don’t like this tool? What’s a good alternative? That would be Wondershare Filmora.

Why use Filmora as a substitute for Premiere Pro? This video editor offers lots of great features, basic or advanced. With these at your fingertips, you can bring your videos to the next level and wow your audiences.
Among Filmora’s handy features is the ability to quickly change a video’s frame rate. You don’t even need to be a video editing expert to do it with this software! That’s how straightforward the process is.
How To Change the Frame Rate in Wondershare Filmora
Changing a video’s frame rate in Wondershare Filmora is super easy. Even a child can do it due to how simple the steps are. Here, read this 5-step guide to change a video’s frame rate using this amazing video editor.
- Launch Wondershare Filmora and create a new project.

- Import the video whose frame rate you want to change.
- Drag the video into the timeline.
![]()
- Click “Export.”
- Select the format you want the output file to be in. Find the “Frame Rate” in the options, click the drop-down menu, and select the frame rate that you want. Click “Export.”

Conclusion
Getting the frame rate of a video right is important, so you should not neglect it. It greatly affects your audience’s viewing experience. Thankfully, if you make mistakes, you can correct them with video editors like Premiere Pro. If it’s not to your liking, you can use Wondershare Filmora instead - it’s the best alternative.
Filmora lets you change a video’s frame rate very easily. Also, it gives you a bunch of other features you might enjoy using. And here’s some good news: this software app is affordable! You can also download the free trial to give it a shot.
Blender - A Video Editor for All Professor
Video editing has become one of the most necessary steps in designing quality content because of the rise in popularity of video streaming platforms. There are nearly hundreds of video editing applications available in the market that facilitate video enhancement tools. And one such application is the Blender, which is available on both macOS and Windows. However, what makes this application stand out from others is its feature-loaded interface that can modify any ordinary video into cinematic clips.
Blender editor is a professional software used even by filmmakers to create stunning visual content as well as animated videos that can attract the attention of a larger audience. Its interface is very simple and easy to use which enables the new users to interact and learn with the different tools available in the application.
1. How to download and install Blender?
Blender is believed to be one of the most advanced and very capable video editors that have been used for over a decade now by content creators. The variety of options for import and export quality of any video content is what attracts most users. The tools are also very useful to all kinds of video content creators no matter the scale of their project. And if you want Blender download and installation on your device, then here is how you can do it:
First, go to the search bar of your web browser and type “Download Blender for Windows” or “Download Blender for macOS” depending on your PC operating system.
Then from the search results, click on the first result and navigate to the official website of Blender where you will see “Download Blender to Windows device” for Windows users.

For the macOS users, they will find the option to “Download Blender to Mac device”.
Click on that and the file will be downloaded to your PC over a short time. Then click on it and with the help of the installation wizard, allow the permissions for installation.

The installation will take some time and when it is finished, you will be able to edit videos using Blender without any difficulty.

2. Key Features of Blender
Some of the key features of Blender are as follows:
- Blender is an open-source application ready for your customization
- Easy-to-use interface with tutorial videos for different tools
- Real-time viewport availability with luma waveform
- Blender video editing provides the availability of both CPU & GPU rendering
- Multiple format support for both imports and export
- VR video editing support for 360° video contents
- Syncing, scrubbing, and easy audio mixing
- Powerful color grading tools for a cinematic look
3. How to edit videos with Blender?
Blender has an intuitive user interface that allows its users to interact with the different video editing tools to edit videos. It also provides tutorials for beginners who don’t know how to edit the videos. But sometimes all these varieties of tools may seem overwhelming. And if you are looking for a guide to editing videos using Blender, then you can follow these steps:
**Stepwise process

First, open the Blender application and when the interface opens, you will see the video preview mode on the top. At the bottom, you will find the video sequencing tool.

Now, drag and drop any media file that you want to edit and the cyan color will appear as an audio strip and the video strip will have a blue color.

Here, you can play the clip to view it, and then you are available with tools to cut, split, trim, and crop the video clips according to your preference. The green bar at the start and end of video clips is the intro and outro and dragging it you will be able to adjust the duration of your clips.
After you are done with the individual clips, you can sequence them as per your needs on the sequence bar available at the bottom of your screen.
You can change the default audio of your media files by clicking on the “Audio” option given in the menu bar and then selecting any audio track according to your preference.
After you are done with all the necessary modifications to your clips, you will need to click on the “Output” option on the left. Here you can change the path for your saved projects.
From the output menu, click on the “Animation’ option and then save your video. This will export your video to the desired location on your device.
4. Blender Alternative to Edit Videos
Blender is one of the most amazing video editors of all time and most video creators use it daily to edit their content. But for some reason, if you are looking at alternatives to Blender video editor, then Filmora can be a great replacement for this application. Filmora features some of the best video editing tools that are easy yet effective to use. And Filmora also comes with a free trial for you to test run the application and its several features.

Here is how you can download and install Filmora on your device:
For Win 7 or later (64-bit)
For macOS 10.12 or later
**Stepwise process
- First, go to your web browser and then search “Download Filmora for Windows” if you are using a Windows device. And if you are using an Apple device, then you will need to search for “Download Filmora for macOS”.
- Then you need to click on the first search result which will take you to the official website of Filmora. There you will see “Filmora for Windows” or “Filmora for macOS” depending on your device. Then click on that and you will be asked to choose between “Free trial” or “Buy Filmora” fordownloading the application.
- Choose the version you want to download for your device and after the application is downloaded to your PC. After that install the application and open it.
- Inside the Filmora interface, you will need to first click on “Create project” where you can import any media file to edit.
- The video clips will be shown on a timeline as thumbnails at the bottom of your screen. You can trim or crop the video clips from there. You are also available with the option to rearrange the clips according to your preference.
- After you are done with the sequence of the clips, you can add transitions, effects, and presets to the video clips to make them more attractive.
- Now you can add a music track or voice-over to the video and select the span of timeline for which you want the audio to be played.
- Before exporting you will have the option to change the video quality and framerate and when done, the changes will be saved. When you are done with all the changes, you need to click on the “Export” project to save it to your device.
5. FAQs about Blender
1.Is Blender video editor free to use?
Yes, Blender video editor is completely free to use and it doesn’t need any special payment for accessing any of its tools. You can search for the official Blender installation package and download it for free to edit your videos.
2.Can Blender edit 4K quality videos?
There are multiple quality and framerate support to import media files to Blender video editor and export them. And you can edit your 4K video contents by changing the settings inside the Blender application.
3.Is Blender good for beginners?
Yes, Blender video editor is very good for beginners since it features an easy-to-use intuitive user interface that can be used by almost anyone. And it also features tutorials that can help beginners understand the different tools of the Blender video editor.
Conclusion
The popularity of video streaming platforms has made the quality of content in videos very demanding. And this rise in demand for high-quality videos needs an appropriate video editor. The article discussed the downloading and installation process of Blender and the complete procedure of how you can use it to edit videos. Also, if you are looking for alternatives to Blender, then we have discussed the Filmora application and a complete stepwise guide about how you can use it.
3. How to edit videos with Blender?
Blender has an intuitive user interface that allows its users to interact with the different video editing tools to edit videos. It also provides tutorials for beginners who don’t know how to edit the videos. But sometimes all these varieties of tools may seem overwhelming. And if you are looking for a guide to editing videos using Blender, then you can follow these steps:
**Stepwise process

First, open the Blender application and when the interface opens, you will see the video preview mode on the top. At the bottom, you will find the video sequencing tool.

Now, drag and drop any media file that you want to edit and the cyan color will appear as an audio strip and the video strip will have a blue color.

Here, you can play the clip to view it, and then you are available with tools to cut, split, trim, and crop the video clips according to your preference. The green bar at the start and end of video clips is the intro and outro and dragging it you will be able to adjust the duration of your clips.
After you are done with the individual clips, you can sequence them as per your needs on the sequence bar available at the bottom of your screen.
You can change the default audio of your media files by clicking on the “Audio” option given in the menu bar and then selecting any audio track according to your preference.
After you are done with all the necessary modifications to your clips, you will need to click on the “Output” option on the left. Here you can change the path for your saved projects.
From the output menu, click on the “Animation’ option and then save your video. This will export your video to the desired location on your device.
4. Blender Alternative to Edit Videos
Blender is one of the most amazing video editors of all time and most video creators use it daily to edit their content. But for some reason, if you are looking at alternatives to Blender video editor, then Filmora can be a great replacement for this application. Filmora features some of the best video editing tools that are easy yet effective to use. And Filmora also comes with a free trial for you to test run the application and its several features.

Here is how you can download and install Filmora on your device:
For Win 7 or later (64-bit)
For macOS 10.12 or later
**Stepwise process
- First, go to your web browser and then search “Download Filmora for Windows” if you are using a Windows device. And if you are using an Apple device, then you will need to search for “Download Filmora for macOS”.
- Then you need to click on the first search result which will take you to the official website of Filmora. There you will see “Filmora for Windows” or “Filmora for macOS” depending on your device. Then click on that and you will be asked to choose between “Free trial” or “Buy Filmora” fordownloading the application.
- Choose the version you want to download for your device and after the application is downloaded to your PC. After that install the application and open it.
- Inside the Filmora interface, you will need to first click on “Create project” where you can import any media file to edit.
- The video clips will be shown on a timeline as thumbnails at the bottom of your screen. You can trim or crop the video clips from there. You are also available with the option to rearrange the clips according to your preference.
- After you are done with the sequence of the clips, you can add transitions, effects, and presets to the video clips to make them more attractive.
- Now you can add a music track or voice-over to the video and select the span of timeline for which you want the audio to be played.
- Before exporting you will have the option to change the video quality and framerate and when done, the changes will be saved. When you are done with all the changes, you need to click on the “Export” project to save it to your device.
5. FAQs about Blender
1.Is Blender video editor free to use?
Yes, Blender video editor is completely free to use and it doesn’t need any special payment for accessing any of its tools. You can search for the official Blender installation package and download it for free to edit your videos.
2.Can Blender edit 4K quality videos?
There are multiple quality and framerate support to import media files to Blender video editor and export them. And you can edit your 4K video contents by changing the settings inside the Blender application.
3.Is Blender good for beginners?
Yes, Blender video editor is very good for beginners since it features an easy-to-use intuitive user interface that can be used by almost anyone. And it also features tutorials that can help beginners understand the different tools of the Blender video editor.
Conclusion
The popularity of video streaming platforms has made the quality of content in videos very demanding. And this rise in demand for high-quality videos needs an appropriate video editor. The article discussed the downloading and installation process of Blender and the complete procedure of how you can use it to edit videos. Also, if you are looking for alternatives to Blender, then we have discussed the Filmora application and a complete stepwise guide about how you can use it.
3. How to edit videos with Blender?
Blender has an intuitive user interface that allows its users to interact with the different video editing tools to edit videos. It also provides tutorials for beginners who don’t know how to edit the videos. But sometimes all these varieties of tools may seem overwhelming. And if you are looking for a guide to editing videos using Blender, then you can follow these steps:
**Stepwise process

First, open the Blender application and when the interface opens, you will see the video preview mode on the top. At the bottom, you will find the video sequencing tool.

Now, drag and drop any media file that you want to edit and the cyan color will appear as an audio strip and the video strip will have a blue color.

Here, you can play the clip to view it, and then you are available with tools to cut, split, trim, and crop the video clips according to your preference. The green bar at the start and end of video clips is the intro and outro and dragging it you will be able to adjust the duration of your clips.
After you are done with the individual clips, you can sequence them as per your needs on the sequence bar available at the bottom of your screen.
You can change the default audio of your media files by clicking on the “Audio” option given in the menu bar and then selecting any audio track according to your preference.
After you are done with all the necessary modifications to your clips, you will need to click on the “Output” option on the left. Here you can change the path for your saved projects.
From the output menu, click on the “Animation’ option and then save your video. This will export your video to the desired location on your device.
4. Blender Alternative to Edit Videos
Blender is one of the most amazing video editors of all time and most video creators use it daily to edit their content. But for some reason, if you are looking at alternatives to Blender video editor, then Filmora can be a great replacement for this application. Filmora features some of the best video editing tools that are easy yet effective to use. And Filmora also comes with a free trial for you to test run the application and its several features.

Here is how you can download and install Filmora on your device:
For Win 7 or later (64-bit)
For macOS 10.12 or later
**Stepwise process
- First, go to your web browser and then search “Download Filmora for Windows” if you are using a Windows device. And if you are using an Apple device, then you will need to search for “Download Filmora for macOS”.
- Then you need to click on the first search result which will take you to the official website of Filmora. There you will see “Filmora for Windows” or “Filmora for macOS” depending on your device. Then click on that and you will be asked to choose between “Free trial” or “Buy Filmora” fordownloading the application.
- Choose the version you want to download for your device and after the application is downloaded to your PC. After that install the application and open it.
- Inside the Filmora interface, you will need to first click on “Create project” where you can import any media file to edit.
- The video clips will be shown on a timeline as thumbnails at the bottom of your screen. You can trim or crop the video clips from there. You are also available with the option to rearrange the clips according to your preference.
- After you are done with the sequence of the clips, you can add transitions, effects, and presets to the video clips to make them more attractive.
- Now you can add a music track or voice-over to the video and select the span of timeline for which you want the audio to be played.
- Before exporting you will have the option to change the video quality and framerate and when done, the changes will be saved. When you are done with all the changes, you need to click on the “Export” project to save it to your device.
5. FAQs about Blender
1.Is Blender video editor free to use?
Yes, Blender video editor is completely free to use and it doesn’t need any special payment for accessing any of its tools. You can search for the official Blender installation package and download it for free to edit your videos.
2.Can Blender edit 4K quality videos?
There are multiple quality and framerate support to import media files to Blender video editor and export them. And you can edit your 4K video contents by changing the settings inside the Blender application.
3.Is Blender good for beginners?
Yes, Blender video editor is very good for beginners since it features an easy-to-use intuitive user interface that can be used by almost anyone. And it also features tutorials that can help beginners understand the different tools of the Blender video editor.
Conclusion
The popularity of video streaming platforms has made the quality of content in videos very demanding. And this rise in demand for high-quality videos needs an appropriate video editor. The article discussed the downloading and installation process of Blender and the complete procedure of how you can use it to edit videos. Also, if you are looking for alternatives to Blender, then we have discussed the Filmora application and a complete stepwise guide about how you can use it.
3. How to edit videos with Blender?
Blender has an intuitive user interface that allows its users to interact with the different video editing tools to edit videos. It also provides tutorials for beginners who don’t know how to edit the videos. But sometimes all these varieties of tools may seem overwhelming. And if you are looking for a guide to editing videos using Blender, then you can follow these steps:
**Stepwise process

First, open the Blender application and when the interface opens, you will see the video preview mode on the top. At the bottom, you will find the video sequencing tool.

Now, drag and drop any media file that you want to edit and the cyan color will appear as an audio strip and the video strip will have a blue color.

Here, you can play the clip to view it, and then you are available with tools to cut, split, trim, and crop the video clips according to your preference. The green bar at the start and end of video clips is the intro and outro and dragging it you will be able to adjust the duration of your clips.
After you are done with the individual clips, you can sequence them as per your needs on the sequence bar available at the bottom of your screen.
You can change the default audio of your media files by clicking on the “Audio” option given in the menu bar and then selecting any audio track according to your preference.
After you are done with all the necessary modifications to your clips, you will need to click on the “Output” option on the left. Here you can change the path for your saved projects.
From the output menu, click on the “Animation’ option and then save your video. This will export your video to the desired location on your device.
4. Blender Alternative to Edit Videos
Blender is one of the most amazing video editors of all time and most video creators use it daily to edit their content. But for some reason, if you are looking at alternatives to Blender video editor, then Filmora can be a great replacement for this application. Filmora features some of the best video editing tools that are easy yet effective to use. And Filmora also comes with a free trial for you to test run the application and its several features.

Here is how you can download and install Filmora on your device:
For Win 7 or later (64-bit)
For macOS 10.12 or later
**Stepwise process
- First, go to your web browser and then search “Download Filmora for Windows” if you are using a Windows device. And if you are using an Apple device, then you will need to search for “Download Filmora for macOS”.
- Then you need to click on the first search result which will take you to the official website of Filmora. There you will see “Filmora for Windows” or “Filmora for macOS” depending on your device. Then click on that and you will be asked to choose between “Free trial” or “Buy Filmora” fordownloading the application.
- Choose the version you want to download for your device and after the application is downloaded to your PC. After that install the application and open it.
- Inside the Filmora interface, you will need to first click on “Create project” where you can import any media file to edit.
- The video clips will be shown on a timeline as thumbnails at the bottom of your screen. You can trim or crop the video clips from there. You are also available with the option to rearrange the clips according to your preference.
- After you are done with the sequence of the clips, you can add transitions, effects, and presets to the video clips to make them more attractive.
- Now you can add a music track or voice-over to the video and select the span of timeline for which you want the audio to be played.
- Before exporting you will have the option to change the video quality and framerate and when done, the changes will be saved. When you are done with all the changes, you need to click on the “Export” project to save it to your device.
5. FAQs about Blender
1.Is Blender video editor free to use?
Yes, Blender video editor is completely free to use and it doesn’t need any special payment for accessing any of its tools. You can search for the official Blender installation package and download it for free to edit your videos.
2.Can Blender edit 4K quality videos?
There are multiple quality and framerate support to import media files to Blender video editor and export them. And you can edit your 4K video contents by changing the settings inside the Blender application.
3.Is Blender good for beginners?
Yes, Blender video editor is very good for beginners since it features an easy-to-use intuitive user interface that can be used by almost anyone. And it also features tutorials that can help beginners understand the different tools of the Blender video editor.
Conclusion
The popularity of video streaming platforms has made the quality of content in videos very demanding. And this rise in demand for high-quality videos needs an appropriate video editor. The article discussed the downloading and installation process of Blender and the complete procedure of how you can use it to edit videos. Also, if you are looking for alternatives to Blender, then we have discussed the Filmora application and a complete stepwise guide about how you can use it.
How to Make Your CSGO Montage Impressive
CSGO (Counter-Strike: Global Offensive) is a popular objective-based multiplayer FPS (first-person shooter) released in 2012. The developers of this game are Hidden Path Entertainment and Valve. It’s one of the world’s most popular global eSports video games remains one of the most popular global esports, with millions of people playing it. Many people also love watching other skilled gamers play CSGO as montage videos.
With that in mind, we’ll explain how you can make CSGO montage videos and add effects to make them stand out and engaging.
How to Make Your CSGO Montage
If you are wondering: How can I create a CSGO montage video? Follow these steps:
Step1Record Your CSGO Gameplay
CSGO is compatible with Linux, PlayStation 3, Xbox 360, macOS, and Windows. You can record the CSGO demo by going to the top menu. The application will ask you to select the Capture option. Here, you can define the area you want to record and the audio settings. Specify a location where you want to save your recorded file.
You can also use a screen capture tool, such as Wondershare DemoCreator, to record your CSGO gameplay. The software saves the video clips you have captured on your PC’s hard drive.
To record your CSGO gameplay using DemoCreator, follow the steps below:
- Open the software and click “Capture.” You can set various specifications, including the audio settings for your recording and the recorded area.

Record Screen with Democreator
- Specify the location where you would like to save your recorded file.
- Press F10 or click the start capturing option to start the recording. By indicating you’re recording a game, you’ll be able to increase the frame rate.
- Click on F10 to stop the recording. The program will save the file on your PC.
Step2Choose Background Music that Fits Your CSGO Montage
The capability of music conveying emotions, authentic interactions, and a sense of realism is crucial to the viewers’ watching experience. It holds the attention of viewers and makes them want to continue watching your gaming montage.
Make sure the music you choose fits the theme of your CSGO montage video. The right music will provide a constant through-line that ties numerous CSGO gameplay clips together. What’s more? It can lend your montage a level of professionalism while giving it a polish.
Only use royalty-free music in your montage video, as this means you won’t pay any ongoing royalties when you use the music track. There are loads of royalty-free music libraries online, where you can find non-copyrighted montage music. These include StoryBlocks, FreeSound, and SoundCloud.
Once you’ve found the music you like, download it and use it in your CSGO montage video.
Step3Download Video Editing Software
You’ll need video editing software to put your series of CSGO gameplay clips together and make a montage video. While you’ll find numerous desktop-based video editing programs available, choose the best one.
A reliable video editing software should be user-friendly. The last thing you want is to get a video editing program that will make you spend months trying to learn how to edit your first montage video.
Pick a program with video editing templates; this will allow you to create CSGO montage videos swiftly because you only have to substitute the existing placeholder media with the content you are making. It should also have special effects and music.
If you’re tired of the plain and common video editing effects, check out Filmora. This video editing software has tons of cool effects that you can add to your CSGO montage videos.
Why We Need to Add Effects to Our CSGO Montage
Adding effects to your CSGO montage is crucial because of various reasons. They produce powerful entertainment for viewers. Special effects provide a creative way to spice up your gaming montage views. You can use them to captivate your audience and make them feel like your video is realistic.
Effects also help you add emotions and personality to your CSGO montage videos. You can also use them to set the tone and ensure your audience enjoys an exhilarating viewing experience.
Additionally, effects help you set the stage for your next scene, convey a mood, and move the story along. You can use them to emphasize the action occurring in the video and make viewers focus on it.
Useful Effects in Filmora that Can Make Your CSGO Video Impressive
We’ll now explore some of the effects Filmora offers on their video editing software. You can use them to make epic CSGO montage videos. Let’s dive in.
1. Split Screen Effect
Also known as video overlaying or picture-in-picture effect, Filmora’s split-screen effect allows you to display two or more video clips simultaneously in up-down style or side by side. You can use it to tell your story creatively by showing multiple viewpoints.
Filmora offers a range of animated split-screen layouts that you can use in your gaming montage video. You can also add multiple split screens.

Split Screen
2. Pan and Zoom
Also known as the Ken Burns effect, Fimora’s Pan and Zoom effect allows users to focus on specific parts of their CSGO montage video. You can use this feature to zoom in on an object or scenery to create movement or evoke emotional storytelling experiences in the video.
3. Fast Motion
Filmora’s time-lapse or fast motion effect makes your video clip play faster. The software allows you to increase the speed of your montage video by dragging the speed slider or the duration you need.
4. Transitions
Transitions improve the flow of your montage video and help you capture the viewers’ attention, as they make it look professional and cinematic. Filmora has loads of transitions that you can add between video clips to add interest and improve the flow of your montage video.
5. Overlays
Filmora has tons of overlays that you can apply to your CSGO montage videos. You can overlay a video clip on a video and an image or photo on your video. You can also size and mask the video overlay, adjust the position of the overlay, and add elements and animation to your video overlay.
6. Filters
The software allows you to add as many filters as you want to your montage video. These filters can dramatically change the feel and look of your gaming montage in a couple of clicks. You can add glitch effects, make your video shake or black and white, and much more.
Wondershare Filmora11 Express Better
Achieve More
Grow Together
Free Download Free Download Learn More

Step-By-Step Guide to Adding Effects to Your CSGO Montage Using Filmora
Applying transitions, overlays, filters, and transitions is a breeze. Just follow the steps below.
- Launch Filmora and import your video file. You can do this by pressing Ctrl+I. A window will then pop up and allow you to find your video.
- Select the video and click on the Open button to import it to Filmora’s media library.
- Drag your CSGO montage and drop it to the timeline.

Import Media
- To add transitions, head to the Transition tab. Here, you will find tons of transitions that you can use.

Add Transition
- Choose the transition you want, then drag it to the beginning or end of the gaming montage in your timeline.
- To add an overlay to your montage video, go to Effects>Overlay. You’ll find several categories here; click on one subcategory to check the available overlays. To add the effect, drag the overlay you like to your timeline. You can also take your mouse on the overlay effect, then click the plus icon to add the effect to your video.

Add Overlays
- To add a filter effect to your montage, go to Effects and select the Filters option on your left side menu. Here, you’ll find several categories of filters. Choose the one you like and drag it to the video on your timeline. Double-click on the effect if you want to make changes to the filter.

Add Filters
- To pan and zoom your video, right-click on your video in the timeline, then select the Video option and click on Crop and Zoom. Now select the Pan & Zoom option. You’ll see frames marked blue and orange over the video clip viewer. Click the Start frame, then modify the pan and zoom with the resizer and dragger to get the desired results before clicking the End frame.

Pan & Zoom
- To add the Fast Motion effect, right-click on your montage video on the timeline and select Speed. Click on the Uniform Speed option. Now, drag the speed slider to the right side to increase the speed of your video.

Fast Motion
Once you have made all the changes in your CSGO montage, click Export. This option allows you to export and save your video on your computer.
Closing Thoughts:
You can make an impressive CSGO montage video that will capture the attention of viewers and get lots of views. Use Filmora to add effects that will make your gaming montage stand out and keep viewers watching until the end of the video.
Free Download Free Download Learn More

Step-By-Step Guide to Adding Effects to Your CSGO Montage Using Filmora
Applying transitions, overlays, filters, and transitions is a breeze. Just follow the steps below.
- Launch Filmora and import your video file. You can do this by pressing Ctrl+I. A window will then pop up and allow you to find your video.
- Select the video and click on the Open button to import it to Filmora’s media library.
- Drag your CSGO montage and drop it to the timeline.

Import Media
- To add transitions, head to the Transition tab. Here, you will find tons of transitions that you can use.

Add Transition
- Choose the transition you want, then drag it to the beginning or end of the gaming montage in your timeline.
- To add an overlay to your montage video, go to Effects>Overlay. You’ll find several categories here; click on one subcategory to check the available overlays. To add the effect, drag the overlay you like to your timeline. You can also take your mouse on the overlay effect, then click the plus icon to add the effect to your video.

Add Overlays
- To add a filter effect to your montage, go to Effects and select the Filters option on your left side menu. Here, you’ll find several categories of filters. Choose the one you like and drag it to the video on your timeline. Double-click on the effect if you want to make changes to the filter.

Add Filters
- To pan and zoom your video, right-click on your video in the timeline, then select the Video option and click on Crop and Zoom. Now select the Pan & Zoom option. You’ll see frames marked blue and orange over the video clip viewer. Click the Start frame, then modify the pan and zoom with the resizer and dragger to get the desired results before clicking the End frame.

Pan & Zoom
- To add the Fast Motion effect, right-click on your montage video on the timeline and select Speed. Click on the Uniform Speed option. Now, drag the speed slider to the right side to increase the speed of your video.

Fast Motion
Once you have made all the changes in your CSGO montage, click Export. This option allows you to export and save your video on your computer.
Closing Thoughts:
You can make an impressive CSGO montage video that will capture the attention of viewers and get lots of views. Use Filmora to add effects that will make your gaming montage stand out and keep viewers watching until the end of the video.
Step By Step Guide on Using Media Player Classic To Rotate A Video
The Internet and social media have become a staple in our daily lives. Internet users post thousands of videos every day that you can watch online or download and rewatch in your free time. Suppose you encounter a video that is upside down or shot at an angle that makes it difficult for you to enjoy it fully.
It would be nice to find a way to rotate the video to portrait mode so you can watch it without any distractions. Fortunately, this article will discuss using Media Player Classic to rotate any video. We also discuss an excellent alternative to the aforementioned media player.
What Is Media Player Classic?
In a nutshell, Media Player Classic is an open-source media player suitable for 32-bit and 64-bit Microsoft Windows. If you have used the original interface, you might notice that it resembles Windows Media Player 6.4. The only key difference is that the former is more feature-rich and provides more options. In addition, Media Player Classic is very compact and lightweight.

A programmer named “Gabest’’ created and designed this platform as a closed-source application. Things changed, and he later relicensed the media player as free under the terms of the GLP-2.0 license. He released the final version, MPC 6.4.9.0, on 20th March 2006.
Unfortunately, development stalled in 2006, much to the disappointment of many users who had grown to love it. Gabest made a public statement in 2007 saying that Media Player Classic was not dead, just that he couldn’t work on it anymore.
How To Rotate Video in Media Player Classic?
Media Player Classic allows you to rotate your video around three axes, X, Y, and Z. Once you are done, you can fix a video that was initially upside down or in landscape mode for a better viewing experience. Another perk of using Media Player Classic to rotate a video is that you can use shortcuts to make your work easier.
Before we teach you how to rotate video in windows Media Player Classic, there are a few things you should know. Unfortunately, this platform doesn’t allow you to rotate a video in its graphical user interface. You can’t also use it to edit a video. Suppose you want to add text or overwrite the original video clip. Media Player Classic can only allow you to playback a video or rotate it.
Here is a simple guide on how to rotate videos in Media Player Classic.
Step1 Launch Media Player Classic and click on the “View” tab. Select “Options” or click “O” to display the “Options” window.

Step2 Navigate to the left pane to the Player Group and click on “Keys.” If the Player Group is not expanded by the time, you launch the platform, double-click it and wait a few seconds. You can then navigate to the “PnS Rotate” command on the Keys list.

Step3 Go to the “PnS Rotate+” command and double-click the “Key” field. You can then click on any key to rotate your video around the x-axis. Once you are satisfied with the results, click “…” to apply the changes you have made.

Step4 You can now assign shortcuts to “PnS Rotate” commands. For instance, you could assign PnS Rotate Y for rotation along the Y axis and PnS Z for rotation along the Z axis. After each axis has a shortcut, select “Apply” then “OK” to save your changes and close the Options window respectively.

Step5 Select “Output” on the Options window and navigate to the DirectShow Video section to confirm whether the Media Classic Player supports rotation for the rendered video. Ascertain the Rotation feature has a green check mark, which indicates that the platform promotes rotation for the video. If the video has a red X, select “Apply” and click “OK.”

Step6 Use the shortcuts you assigned to the keys in Step 4 to rotate your video as you see fit. Since the rotation occurs gradually, you might need to press the keys numerous times or press and hold to see a visible change.
For instance, you can rotate your video from landscape to portrait by clicking “Alt-Num 1” and “Alt-Num 3,” respectively. To revert your video to its original state, press “Alt-Num 5.”
Need an alternative to Media Player Classic? Try Wondershare Filmora To Rotate a Video
Free Download For Win 7 or later(64-bit)
Free Download For macOS 10.14 or later
You might need a better alternative to Media Classic Player to help rotate your videos. As we mentioned, Media Classic Player doesn’t allow you to change the video. The scope of this platform only extends to playing and rotating videos along three axes. In our opinion, Wondershare Filmora is an excellent alternative.

This feature-rich platform is your one-stop solution for any creator who wants to make a mark with their videos. You can download it free on your desktop, laptop, or smartphone and use it anytime. The cloud storage allows you to snap a photo and upload it for editing at a later time.
In addition, the platform has a co-creation space where you can share your work with other users and compare notes. Here is a list of other nifty features we guarantee you will enjoy.
- Motion tracking
- Auto beat sync
- Split screen
- Title Editing
- Preset templates
- AI Portrait
- Mask and blend
- Text to speech
- Silence detection
- Audio visualizer
How To Rotate a Video 90 Degrees With Wondershare Filmora?
Now that you have seen how different this platform is from Media Classic Player, you might be curious about how effectively it rotates your videos. Perhaps our detailed guide will help you decide whether you want to give Wondershare Filmora a shot.
Stick around to learn how to rotate a video 90 degrees with Wondershare Filmora.
Step1 Import the video you want to rotate to Wondershare Filmora and drag and drop it to the timeline as shown below.

Step2 Click on the monitor icon and select “Change Project Aspect Ratio” in the drop-down menu.

Step3 In the “Project Settings” window, you can change your video’s Aspect Ratio, Resolution, Frame Rate, and Color space.

Step4 Once you are happy with your changes, click “OK” and close the window.

Step5 Double-click the video track and navigate to the Rotate option in the window. Hover your mouse over the dot in the Rotate tab until you get to 90 degrees. You could also adjust the rotation of the video by clicking on the pivot in the media player till the video is at 90 degrees.

Step6 Click “Export” to save a copy of the rotated video to your device.

Which Is Better To Rotate a Video? Media Player Classic or Wondershare Filmora?
Having seen both sides of the coin, you might wonder which option is better to help you rotate a video. In this section of the article, we pit Wondershare Filmora against Media Player Classic to help you determine which option will work best for you.
Take a look at the table below.
| Media Player Classic | Wondershare Filmora | |
|---|---|---|
| Operating System | Microsoft Windows | Windows & Mac |
| Ratings from G2 | N/A | 4.4/5 stars |
| Pricing | Free | Annual Plan – US$49.99/yearCross Platform Plan - US$59.99/YearPerpetual Plan - US$79.99 |
| Features | ● Enhanced video rendering● Removal of tearing● Supports SVCD, VCD, and DVD playback● AVI subtitles● Customizable toolbar | ● AI Portrait● Mask and blend● Text to speech● Silence detection● Audio visualizer● Motion tracking● Auto beat sync● Split screen● Title Editing● Preset templates |
As you have seen, Media player Classic doesn’t have the Rotate feature per se. However, you can assign shortcuts to the keys to rotate a video along three axes as you see fit. You can also use a combination of keys like Alt and Num to change how your video sits so you can enjoy it as you like.
On the other hand, Wondershare Filmora has a more comprehensive Rotate feature that allows you to drag your pointer along a bar till the video sits at the correct number of degrees.
This platform also provides additional features, like allowing you to scale the video to fit the screen and adjusting project settings like the resolution and frame rate. If you don’t want to use the sliding bar, you can use your pointer to manually adjust the rotation by clicking on the pivot with your pointer.
In a nutshell, Windows Media Player is the ideal choice if you want to rotate your video and leave it at that. However, if you are looking for more advanced features, you are better off choosing Wondershare Filmora. The latter option also makes your videos look more polished like they were edited by a professional.
Conclusion
Videos might be trickier to edit than photos, especially when you want to rotate them. Fortunately, developers have been working tirelessly to ensure you have many tools at your disposal to edit your videos from any device at any time.
If you don’t fancy editing videos on your laptop, you could download the software to your smartphone and rotate videos on the move. Technology is truly a blessing that has come to make our work easier. Hopefully, after reading this article, you can effortlessly rotate any video you encounter.
Free Download For macOS 10.14 or later
You might need a better alternative to Media Classic Player to help rotate your videos. As we mentioned, Media Classic Player doesn’t allow you to change the video. The scope of this platform only extends to playing and rotating videos along three axes. In our opinion, Wondershare Filmora is an excellent alternative.

This feature-rich platform is your one-stop solution for any creator who wants to make a mark with their videos. You can download it free on your desktop, laptop, or smartphone and use it anytime. The cloud storage allows you to snap a photo and upload it for editing at a later time.
In addition, the platform has a co-creation space where you can share your work with other users and compare notes. Here is a list of other nifty features we guarantee you will enjoy.
- Motion tracking
- Auto beat sync
- Split screen
- Title Editing
- Preset templates
- AI Portrait
- Mask and blend
- Text to speech
- Silence detection
- Audio visualizer
How To Rotate a Video 90 Degrees With Wondershare Filmora?
Now that you have seen how different this platform is from Media Classic Player, you might be curious about how effectively it rotates your videos. Perhaps our detailed guide will help you decide whether you want to give Wondershare Filmora a shot.
Stick around to learn how to rotate a video 90 degrees with Wondershare Filmora.
Step1 Import the video you want to rotate to Wondershare Filmora and drag and drop it to the timeline as shown below.

Step2 Click on the monitor icon and select “Change Project Aspect Ratio” in the drop-down menu.

Step3 In the “Project Settings” window, you can change your video’s Aspect Ratio, Resolution, Frame Rate, and Color space.

Step4 Once you are happy with your changes, click “OK” and close the window.

Step5 Double-click the video track and navigate to the Rotate option in the window. Hover your mouse over the dot in the Rotate tab until you get to 90 degrees. You could also adjust the rotation of the video by clicking on the pivot in the media player till the video is at 90 degrees.

Step6 Click “Export” to save a copy of the rotated video to your device.

Which Is Better To Rotate a Video? Media Player Classic or Wondershare Filmora?
Having seen both sides of the coin, you might wonder which option is better to help you rotate a video. In this section of the article, we pit Wondershare Filmora against Media Player Classic to help you determine which option will work best for you.
Take a look at the table below.
| Media Player Classic | Wondershare Filmora | |
|---|---|---|
| Operating System | Microsoft Windows | Windows & Mac |
| Ratings from G2 | N/A | 4.4/5 stars |
| Pricing | Free | Annual Plan – US$49.99/yearCross Platform Plan - US$59.99/YearPerpetual Plan - US$79.99 |
| Features | ● Enhanced video rendering● Removal of tearing● Supports SVCD, VCD, and DVD playback● AVI subtitles● Customizable toolbar | ● AI Portrait● Mask and blend● Text to speech● Silence detection● Audio visualizer● Motion tracking● Auto beat sync● Split screen● Title Editing● Preset templates |
As you have seen, Media player Classic doesn’t have the Rotate feature per se. However, you can assign shortcuts to the keys to rotate a video along three axes as you see fit. You can also use a combination of keys like Alt and Num to change how your video sits so you can enjoy it as you like.
On the other hand, Wondershare Filmora has a more comprehensive Rotate feature that allows you to drag your pointer along a bar till the video sits at the correct number of degrees.
This platform also provides additional features, like allowing you to scale the video to fit the screen and adjusting project settings like the resolution and frame rate. If you don’t want to use the sliding bar, you can use your pointer to manually adjust the rotation by clicking on the pivot with your pointer.
In a nutshell, Windows Media Player is the ideal choice if you want to rotate your video and leave it at that. However, if you are looking for more advanced features, you are better off choosing Wondershare Filmora. The latter option also makes your videos look more polished like they were edited by a professional.
Conclusion
Videos might be trickier to edit than photos, especially when you want to rotate them. Fortunately, developers have been working tirelessly to ensure you have many tools at your disposal to edit your videos from any device at any time.
If you don’t fancy editing videos on your laptop, you could download the software to your smartphone and rotate videos on the move. Technology is truly a blessing that has come to make our work easier. Hopefully, after reading this article, you can effortlessly rotate any video you encounter.
Also read:
- New In 2024, The Best Wedding LUTs for Premiere Pro
- Updated IMovie Review – Is It The Best Video Editor for Mac Users?
- In 2024, How to Make A Slideshow Video (+Filmora Techniques)
- New In 2024, How To Fade Audio With Movavi Editor
- Guide to Create Intro Video with KineMaster for 2024
- New In 2024, Denoise a Video in Adobe Premiere Pro – Audio and Video Noise Removal
- Google Meet Green Screen Is the Latest Addition to the Virtual Meeting App. It Is a Crucial Feature as It Allows Users to Maintain a Semblance of Privacy Through Virtual Backgrounds
- Best 22 Video Editing Tips to Know for 2024
- New 2024 Approved You Might Have Difficulty Rotating a Video without an Efficient Media Player or Editing Tool. Below Is a Detailed Guide on Rotating a Video on Any Axes
- Updated In 2024, Best Green Screen Software for Beginner on Mac
- Detailed Steps to Rotate Videos Using Kdenlive for 2024
- Are You Stuck with How to Use Discord GIF Ideally? Check that Out in This Article, as We Will Guide You on All You Need to Know About GIFs for Discord
- Updated The Glitch Filter Is Similar to an Error or a Distorted Effect in the Video. The Article Enables the Users to Get the VHS Filter in One of Their Travel Videos and Instagram Accounts
- New DVD Slideshow Builder 2024 Review and Tutorial
- Updated In 2024, How To Speed Up Video With Lightworks Video Editor
- 2024 Approved Top 10 Secret Tips & Tricks to Use in Wondershare Filmora
- In 2024, Detailed guide of ispoofer for pogo installation On Oppo Find N3 Flip | Dr.fone
- How to Unlock Nubia Phone Pattern Lock without Factory Reset
- Itel A60s ADB Format Tool for PC vs. Other Unlocking Tools Which One is the Best?
- The Ultimate Guide to Bypassing iCloud Activation Lock from iPhone 6s Plus
- How to Watch Hulu Outside US On Apple iPhone 12 mini | Dr.fone
- New Best Live Chat Apps To Try With Shopify for 2024
- In 2024, A How-To Guide on Bypassing Apple iPhone 11 Pro Max iCloud Activation Lock
- In 2024, How to Use Google Assistant on Your Lock Screen Of Itel A60 Phone
- In 2024, How To Enable USB Debugging on a Locked Samsung Galaxy S23 Phone
- How to retrieve erased music from Oppo Find X6
- How to Unlock Find N3 Without Password?
- In 2024, How To Get the Apple ID Verification Code From iPhone X in the Best Ways
- In 2024, How to See Someones Location on Apple iPhone 7 Plus | Dr.fone
- How to Reset Oppo A38 without Losing Data | Dr.fone
- How to restore wiped videos on Vivo V29
- In 2024, Additional Tips About Sinnoh Stone For Motorola Moto G34 5G | Dr.fone
- Title: New Do You Use Premiere Pro and Want to Learn How to Change a Videos Frame Rate Using the Tool? Here Are the Steps that You Need to Follow
- Author: Morgan
- Created at : 2024-05-19 05:12:32
- Updated at : 2024-05-20 05:12:32
- Link: https://ai-video-editing.techidaily.com/new-do-you-use-premiere-pro-and-want-to-learn-how-to-change-a-videos-frame-rate-using-the-tool-here-are-the-steps-that-you-need-to-follow/
- License: This work is licensed under CC BY-NC-SA 4.0.

