
:max_bytes(150000):strip_icc():format(webp)/GettyImages-597071115-37c5865742de421eafc8b7da4cc5a618.jpg)
New Do You Want to Add Subtitles to Your MKV Files Easily? This Article Will Introduce 7 Simple Ways Through Which You Can Add Subtitles to MKV on Different Devices
Do You Want to Add Subtitles to Your MKV Files Easily? This Article Will Introduce 7 Simple Ways Through Which You Can Add Subtitles to MKV on Different Devices
Many people use MKV files as it’s an open-source format and does not require licenses. This file format functions as a multimedia file container that can help you in storing audio and video tracks. However, there are some key disadvantages of using MKV files, as this format is not supported by various platforms or devices. So, the most suitable video file formats that you can use are FLV and MP4. These two formats offer high-quality results and are supported by multiple platforms.
If you still want to use MKV files and want to add subtitles, this article can assist you. By reading this article, you can learn how to add subtitles to MKV with different methods.
Part 1: How to Add Subtitles to MKV on Windows?
Are you a Windows user and want to add subtitles to MKV? Read this section to find out compatible tools that can add subtitles to your MKV videos efficiently.
1. Wondershare Filmora
Free Download For Win 7 or later(64-bit)
Free Download For macOS 10.14 or later
Wondershare Filmora is a popular tool that provides you with multiple options to edit video files. If you are interested in adding subtitles to your MKV files, you can navigate to its “Speech-to-Text” feature. This feature automatically transcribes the voice used in the video into subtitles. It supports 16 different languages for creating subtitles through this feature.
This feature can also enhance your editing efficiency as you don’t have to write the subtitles on your own. Moreover, the STT feature utilizes advanced algorithms that help the tool create subtitles with high precision. Furthermore, you can also manually add the subtitles to your MKV file using this MKV subtitle editor.
Key Features
- Filmora offers various effects, such as a green screen that can help you to change your background dramatically.
- If you want to resize your videos efficiently, this tool provides the Auto Reframe feature.
- Filmora also offers various preset templates that can help you to craft captivating videos easily.
Step-by-Step Guide to Add Subtitles Using Filmora
Step1 Create a New Filmora Project
Download and install Filmora on your PC and click “Create Project.” Afterward, import the MKV video from your PC to this tool by clicking on the “Arrow” icon.

Step2 Go to Titles Tab
After importing the video, drag it to the timeline. Once done, click on the “Titles” section given on top. Afterward, click on “Subtitles” from the left section. Now you will be able to see different types of subtitles on your screen. Select your favorite style of subtitles and tap on its “Download” icon.

Step3 Choose the Preferred Subtitle Style
After that, tap on the “Plus” icon to add your selected subtitle style to the timeline. Double-click on the added subtitles, which will open the settings. You can manually add the subtitles on the “Input Text” box easily. Moreover, you can easily change the text font, color, opacity, and alignment.

Step4 Export and Save Video
Once you have created subtitles for your imported video, click the “Export” button on top. Using this option, you can save the video file to your device or share it on other platforms.

2. Cisdem Video Converter
Cisdem is an efficient tool that can be used by content creators for various purposes. Along with editing the videos, this tool can help you add subtitles to your video files in any format. It supports various formats for adding subtitles, such as MKV, MP4, AVI, etc. This tool also offers a built-in editor to modify the MKV videos flawlessly. Hence, it’s a basic tool that generates quality results instantly.
Key Features
- Cisdem can function as a video converter that supports more than 300 file formats. You can convert to and from MKV files using this platform easily.
- Through this software, you can professionally add watermarks to your MKV files. It provides various options to add a customized watermark to your desired video files.
- It offers a built-in media player that allows you to play and watch MKV files without interruption.
Steps to Add Subtitles to MKV Using Cisdem Video Converter
Step1 Launch the Cisdem tool on your system and navigate to its “Converter”. Afterward, import the MKV file instantly. Now tap on the “Pencil” icon given on top to open the editing window.

Step2 From the editing window, go to “Subtitle and Audio” and click on “No subtitles.” From the drop-down box, click on “Load Subtitles” to upload your SRT or ASS subtitle file from your system.

Step3 Now press the “Save” button to proceed. As the default output format in this tool is MP4, navigate to the “General Video” section to change it. From this option, select “MKV Video” as the output format. Afterward, hit the “Convert” button to embed the added subtitles easily.

3. VLC Media Player
The VLC Media Player is a commonly used platform that offers various functions. It can be easily accessed and shows compatibility with tons of platforms. It has a simple interface that allows you to operate it easily. Through this tool, you can also add subtitles to MKV proficiently. This MKV subtitle editor supports various caption formats such as VobSub, SubRip, SubViewer, etc.
Key Features
- While watching a video on the VLC media player, you can take instant snapshots of your favorite moments in high resolution.
- This tool offers a screen recorder through which you can capture your activities on a desktop. You can also choose the frame rate and output format for your screen recording.
- You can enhance your video files by adding effects from this tool. Along with applying attractive video effects, you can also change the brightness and hue of your video.
Step-by-Step Guide to Add Subtitles Using VLC
Step1 Open your VLC media player and click on the “Media” tab given on top. From there, tap on the “Convert/Save” option.

Step2 A new dialogue box will open regarding “Open Media.” Now you can instantly upload your MKV file on this tool. By staying on the same window, check the box saying, “Use a subtitle file.” Afterward, browse the SRT file from your computer.

Step3 Now tap on the “Convert/Save” arrowhead and choose the “Convert” option from the drop-down menu. A new window will open from where you have to tap on the “Wretch” icon. On the “Encapsulation” section, select “MKV.”

Step4 By going to the “Audio codec” and “Video codec” sections, check the box “keep original video or audio track.” Now go to the “Subtitle” section and enable the option of “Overlay subtitles on the video.” Once done, hit the “Create” button.

Part 2: How to Add Subtitles to MKV on Mac?
Are you looking for MKV subtitle editors that are compatible with Mac? In this section, you can learn how to add subtitles to MKV on your Mac devices easily.
1. HD Video Converter Deluxe
This tool is highly compatible with Mac users and provides tons of advanced features. Besides being a great video editor, this tool can help you add subtitles to your MKV video files. It supports popular subtitle formats such as ASS, SSA, and SRT. If you want to embed hardcode subtitles into your MKV files, this is the most compatible tool.
Key Features
- If you want to decrease the video file size without harming its high quality, you can use this platform. This tool offers a video compressor through which you can reduce file sizes effectively.
- To combine your various video chunks or clips, this software offers a reliable video merger.
- If you are facing audio problems in your video, this tool can permanently adjust the volume according to your preference.
Step-by-Step Guide to Add Subtitles Using HD Video Converter Deluxe
Step1 Start by launching HD Video Converter Deluxe on your MacBook. Afterward, tap on the “+Video” button to import your MKV file.

Step2 On the Output Profile window, choose “MKV” as your output format. Click on the “OK” button to proceed. Now navigate to the “Edit” tab and select “Subtitle.” From there, check “Enable Subtitle.” Also, check “Extra” and then click on the “Add” button. Now you can import the subtitle file to this tool.

Step3 Click the “Done” button and then hit the “RUN” button to embed the subtitles.

2. Wondershare UniConverter
UniConverter is one of the famous tools that many people prefer due to its high reliability. Among its various advanced features, you can use its “Subtitle Editor” to add subtitles to MKV videos. You can create subtitles manually in your preferred font. Moreover, it provides an auto generator to create subtitles by extracting audio from the video file. This feature supports more than 100 languages to offer more diversity.
Key Features
- The MKV subtitle editor of UniConverter is also capable of converting text into subtitle lines through its TXT to SRT feature.
- You can remove backgrounds from your video and add a new one with a few clicks. This can make your video more captivating.
- It offers a vocal remover that can separate instrumental sounds and vocals from an audio or video file easily.
Step-by-Step Guide to Use the Subtitle Editor of UniConverter
Step1 Run UniConverter on your PC and click on “Subtitle Editor” from its homepage. A new window will open in which you have to import the MKV video file.

Step2 You can click on the “Manual Subtitles” button to add your subtitles with respect to the time duration. Or, you can tap on ‘Import Subtitles’ to upload the subtitles file from your MacBook. Other options are also available such as Text to Subtitles and Auto Subtitles.

Step3 You can edit the added subtitles by going to the “Styles” section. Here, you can change the font, color, and style of your subtitles. Once done, click on the “Save” button.

Part 3: How to Add Subtitles to MKV Online?
If you want to use online platforms to merge subtitles with MKV, here are the top two online tools.
1. Veed
Veed is an easy-to-use online tool that allows you to edit your video clips with high accuracy. Through this online tool, you can add subtitles to your MKV files in 3 different ways. You can upload subtitle files in formats like VVT, TXT, SSA, SRT, and ASS. Otherwise, you can enter the subtitles manually by selecting their color, font, size, and time duration. Moreover, you can use its voice recognition software to auto-create subtitles instantly.
Key Features
- To make your video clips funny and engaging, this tool enables you to add various emojis and stickers to your video files.
- You can explain the content in your video by adding annotations such as text boxes using this tool.
- To remove unwanted objects from your video, you can use the crop feature of Veed.
Step-by-Step Guide to Add Subtitles Using Veed
Step1 Access the official website of Veed and click on “Add Subtitles To video” from its tools. Afterward, click the “Choose Files” button and import your MKV file.

Step2 Once done with uploading, click on “Upload Subtitle File.” You can upload any of its supported subtitle files. Also, choose the language from the given box.

Step3 After importing the subtitles, you can modify them by altering their text color, color effect, style, and alignment. Once done, hit the “Export” button.

2. Flixier
Do you want an interesting tool to create subtitles? Flixier is an efficient online tool that can edit your video and audio files. Without making a user account, you can use this tool to add subtitles to MKV video files. You can upload MKV files from different platforms, such as your device, Google Drive, Zoom, Dropbox, etc. This tool also provides different ways to flawlessly create subtitles for your video files.
Key Features
- The subtitle editor of this tool offers more than 1000 fonts. Thus, you can make your subtitles look stylish by choosing a preferred font.
- To edit your videos, this tool allows you to collaborate with your friends in real-time.
- It offers more than 50 transitions that you can apply to your videos easily.
Step-by-Step Guide to Add Subtitles Using Flixier
Step1 Visit the website of Flixier and click on “Add subtitles to your videos” from its tools. Afterward, tap on “Get Started” to proceed. The tool will ask you to upload your video file.

Step2 Once you have uploaded the MKV video, click on “Text” given on the left side. Afterward, tap “Add Subtitle” to create subtitles for your video. You can add text to the given space to create subtitles. You can also tap on the “Import Subtitle” button to upload the subtitle file. To change the properties of your subtitles, you can edit them from the provided options on your screen.

Step3 Once done with creating and adjusting subtitles, click on the “Export” button.

Conclusion
Subtitles are shown at the bottom of a video and help make the video content comprehensive. If you are dealing with MKV files and want to add subtitles in an instant way, this article has provided all the details. By reading this guide, you can learn how to add subtitles to MKV files on different platforms.
To attain the best results and utilize advanced features, we will highly recommend you use Wondershare Filmora. This tool creates a comfortable environment and gives an intuitive interface to create subtitles.
Part 1: How to Add Subtitles to MKV on Windows?
Are you a Windows user and want to add subtitles to MKV? Read this section to find out compatible tools that can add subtitles to your MKV videos efficiently.
1. Wondershare Filmora
Free Download For Win 7 or later(64-bit)
Free Download For macOS 10.14 or later
Wondershare Filmora is a popular tool that provides you with multiple options to edit video files. If you are interested in adding subtitles to your MKV files, you can navigate to its “Speech-to-Text” feature. This feature automatically transcribes the voice used in the video into subtitles. It supports 16 different languages for creating subtitles through this feature.
This feature can also enhance your editing efficiency as you don’t have to write the subtitles on your own. Moreover, the STT feature utilizes advanced algorithms that help the tool create subtitles with high precision. Furthermore, you can also manually add the subtitles to your MKV file using this MKV subtitle editor.
Key Features
- Filmora offers various effects, such as a green screen that can help you to change your background dramatically.
- If you want to resize your videos efficiently, this tool provides the Auto Reframe feature.
- Filmora also offers various preset templates that can help you to craft captivating videos easily.
Step-by-Step Guide to Add Subtitles Using Filmora
Step1 Create a New Filmora Project
Download and install Filmora on your PC and click “Create Project.” Afterward, import the MKV video from your PC to this tool by clicking on the “Arrow” icon.
Step2 Go to Titles Tab
After importing the video, drag it to the timeline. Once done, click on the “Titles” section given on top. Afterward, click on “Subtitles” from the left section. Now you will be able to see different types of subtitles on your screen. Select your favorite style of subtitles and tap on its “Download” icon.
Step3 Choose the Preferred Subtitle Style
After that, tap on the “Plus” icon to add your selected subtitle style to the timeline. Double-click on the added subtitles, which will open the settings. You can manually add the subtitles on the “Input Text” box easily. Moreover, you can easily change the text font, color, opacity, and alignment.
Step4 Export and Save Video
Once you have created subtitles for your imported video, click the “Export” button on top. Using this option, you can save the video file to your device or share it on other platforms.
2. Cisdem Video Converter
Cisdem is an efficient tool that can be used by content creators for various purposes. Along with editing the videos, this tool can help you add subtitles to your video files in any format. It supports various formats for adding subtitles, such as MKV, MP4, AVI, etc. This tool also offers a built-in editor to modify the MKV videos flawlessly. Hence, it’s a basic tool that generates quality results instantly.
Key Features
- Cisdem can function as a video converter that supports more than 300 file formats. You can convert to and from MKV files using this platform easily.
- Through this software, you can professionally add watermarks to your MKV files. It provides various options to add a customized watermark to your desired video files.
- It offers a built-in media player that allows you to play and watch MKV files without interruption.
Steps to Add Subtitles to MKV Using Cisdem Video Converter
Step1 Launch the Cisdem tool on your system and navigate to its “Converter”. Afterward, import the MKV file instantly. Now tap on the “Pencil” icon given on top to open the editing window.
Step2 From the editing window, go to “Subtitle and Audio” and click on “No subtitles.” From the drop-down box, click on “Load Subtitles” to upload your SRT or ASS subtitle file from your system.
Step3 Now press the “Save” button to proceed. As the default output format in this tool is MP4, navigate to the “General Video” section to change it. From this option, select “MKV Video” as the output format. Afterward, hit the “Convert” button to embed the added subtitles easily.
3. VLC Media Player
The VLC Media Player is a commonly used platform that offers various functions. It can be easily accessed and shows compatibility with tons of platforms. It has a simple interface that allows you to operate it easily. Through this tool, you can also add subtitles to MKV proficiently. This MKV subtitle editor supports various caption formats such as VobSub, SubRip, SubViewer, etc.
Key Features
- While watching a video on the VLC media player, you can take instant snapshots of your favorite moments in high resolution.
- This tool offers a screen recorder through which you can capture your activities on a desktop. You can also choose the frame rate and output format for your screen recording.
- You can enhance your video files by adding effects from this tool. Along with applying attractive video effects, you can also change the brightness and hue of your video.
Step-by-Step Guide to Add Subtitles Using VLC
Step1 Open your VLC media player and click on the “Media” tab given on top. From there, tap on the “Convert/Save” option.
Step2 A new dialogue box will open regarding “Open Media.” Now you can instantly upload your MKV file on this tool. By staying on the same window, check the box saying, “Use a subtitle file.” Afterward, browse the SRT file from your computer.
Step3 Now tap on the “Convert/Save” arrowhead and choose the “Convert” option from the drop-down menu. A new window will open from where you have to tap on the “Wretch” icon. On the “Encapsulation” section, select “MKV.”
Step4 By going to the “Audio codec” and “Video codec” sections, check the box “keep original video or audio track.” Now go to the “Subtitle” section and enable the option of “Overlay subtitles on the video.” Once done, hit the “Create” button.
Part 2: How to Add Subtitles to MKV on Mac?
Are you looking for MKV subtitle editors that are compatible with Mac? In this section, you can learn how to add subtitles to MKV on your Mac devices easily.
1. HD Video Converter Deluxe
This tool is highly compatible with Mac users and provides tons of advanced features. Besides being a great video editor, this tool can help you add subtitles to your MKV video files. It supports popular subtitle formats such as ASS, SSA, and SRT. If you want to embed hardcode subtitles into your MKV files, this is the most compatible tool.
Key Features
- If you want to decrease the video file size without harming its high quality, you can use this platform. This tool offers a video compressor through which you can reduce file sizes effectively.
- To combine your various video chunks or clips, this software offers a reliable video merger.
- If you are facing audio problems in your video, this tool can permanently adjust the volume according to your preference.
Step-by-Step Guide to Add Subtitles Using HD Video Converter Deluxe
Step1 Start by launching HD Video Converter Deluxe on your MacBook. Afterward, tap on the “+Video” button to import your MKV file.
Step2 On the Output Profile window, choose “MKV” as your output format. Click on the “OK” button to proceed. Now navigate to the “Edit” tab and select “Subtitle.” From there, check “Enable Subtitle.” Also, check “Extra” and then click on the “Add” button. Now you can import the subtitle file to this tool.
Step3 Click the “Done” button and then hit the “RUN” button to embed the subtitles.
2. Wondershare UniConverter
UniConverter is one of the famous tools that many people prefer due to its high reliability. Among its various advanced features, you can use its “Subtitle Editor” to add subtitles to MKV videos. You can create subtitles manually in your preferred font. Moreover, it provides an auto generator to create subtitles by extracting audio from the video file. This feature supports more than 100 languages to offer more diversity.
Key Features
- The MKV subtitle editor of UniConverter is also capable of converting text into subtitle lines through its TXT to SRT feature.
- You can remove backgrounds from your video and add a new one with a few clicks. This can make your video more captivating.
- It offers a vocal remover that can separate instrumental sounds and vocals from an audio or video file easily.
Step-by-Step Guide to Use the Subtitle Editor of UniConverter
Step1 Run UniConverter on your PC and click on “Subtitle Editor” from its homepage. A new window will open in which you have to import the MKV video file.
Step2 You can click on the “Manual Subtitles” button to add your subtitles with respect to the time duration. Or, you can tap on ‘Import Subtitles’ to upload the subtitles file from your MacBook. Other options are also available such as Text to Subtitles and Auto Subtitles.
Step3 You can edit the added subtitles by going to the “Styles” section. Here, you can change the font, color, and style of your subtitles. Once done, click on the “Save” button.
Part 3: How to Add Subtitles to MKV Online?
If you want to use online platforms to merge subtitles with MKV, here are the top two online tools.
1. Veed
Veed is an easy-to-use online tool that allows you to edit your video clips with high accuracy. Through this online tool, you can add subtitles to your MKV files in 3 different ways. You can upload subtitle files in formats like VVT, TXT, SSA, SRT, and ASS. Otherwise, you can enter the subtitles manually by selecting their color, font, size, and time duration. Moreover, you can use its voice recognition software to auto-create subtitles instantly.
Key Features
- To make your video clips funny and engaging, this tool enables you to add various emojis and stickers to your video files.
- You can explain the content in your video by adding annotations such as text boxes using this tool.
- To remove unwanted objects from your video, you can use the crop feature of Veed.
Step-by-Step Guide to Add Subtitles Using Veed
Step1 Access the official website of Veed and click on “Add Subtitles To video” from its tools. Afterward, click the “Choose Files” button and import your MKV file.
Step2 Once done with uploading, click on “Upload Subtitle File.” You can upload any of its supported subtitle files. Also, choose the language from the given box.
Step3 After importing the subtitles, you can modify them by altering their text color, color effect, style, and alignment. Once done, hit the “Export” button.
2. Flixier
Do you want an interesting tool to create subtitles? Flixier is an efficient online tool that can edit your video and audio files. Without making a user account, you can use this tool to add subtitles to MKV video files. You can upload MKV files from different platforms, such as your device, Google Drive, Zoom, Dropbox, etc. This tool also provides different ways to flawlessly create subtitles for your video files.
Key Features
- The subtitle editor of this tool offers more than 1000 fonts. Thus, you can make your subtitles look stylish by choosing a preferred font.
- To edit your videos, this tool allows you to collaborate with your friends in real-time.
- It offers more than 50 transitions that you can apply to your videos easily.
Step-by-Step Guide to Add Subtitles Using Flixier
Step1 Visit the website of Flixier and click on “Add subtitles to your videos” from its tools. Afterward, tap on “Get Started” to proceed. The tool will ask you to upload your video file.
Step2 Once you have uploaded the MKV video, click on “Text” given on the left side. Afterward, tap “Add Subtitle” to create subtitles for your video. You can add text to the given space to create subtitles. You can also tap on the “Import Subtitle” button to upload the subtitle file. To change the properties of your subtitles, you can edit them from the provided options on your screen.
Step3 Once done with creating and adjusting subtitles, click on the “Export” button.
Conclusion
Subtitles are shown at the bottom of a video and help make the video content comprehensive. If you are dealing with MKV files and want to add subtitles in an instant way, this article has provided all the details. By reading this guide, you can learn how to add subtitles to MKV files on different platforms.
To attain the best results and utilize advanced features, we will highly recommend you use Wondershare Filmora. This tool creates a comfortable environment and gives an intuitive interface to create subtitles.
What Are the 10 Best GIF Creator?
What are the 10 Best GIF Creator?
An easy yet powerful editor
Numerous effects to choose from
Detailed tutorials provided by the official channel
Stay tuned to find the most affordable GIF creator solutions.
In this article
01 [Why Gifs Are Essential for Every Marketer?](#Part 1)
02 [How to Make Your Own GIF?](#Part 2)
03 [What Are 10 Best GIF Creator to Find Brilliant Pre-made Gifs?](#Part 3)
Part 1 Why Gifs Are Essential for Every Marketer?
Everyone around you today is accustomed with the fact that GIFs are an interesting and impactful means of content sharing. These 3-5 second snippets are highly preferred and convenient ways to deliver information that is precise, clear and to the point. When it comes to time frames, short and quick GIFs are obvious choices over lengthy videos. Additionally, GIFs are eye-catchy and keep you captivated to see though the entire content within seconds, contradictory to those monotonous and often dull videos that sound more like a long, boring lecture.
These are an effective media tool that is not limited to sharing information that is chiefly entertainment based or fun centered. You can use them to deliver important content that addresses a specific purpose or audience. Owing to this, GIFs have become an essential marketing utility, here’s why:
● Improve Product Branding:
GIFs can serve as impressive branding tools for your products in the market. Markets today are considerably impacted by the ‘What You See is What You Buy’ concept, which puts forward the need to lay added stress on effective branding.
GIFs are ready to sort this out with their exciting range of features. From video editing choices to sound and color customization, GIFs are loaded with everything you need to improvise your product branding. All you have to do is explore your creativity to make the most of the GIF branding choices.
● Explain it Better
On a preference poll, most of us would shift to ‘watch’ over ‘read’ for a comprehensive understanding. An attractive motion visual is an even better treat. GIFs are pivotal in making viewers relate to the concept and message behind your product in a more enhanced manner.
Additionally, these are a continent means to introduce emotional mobility among your target audience with depictive emojis. You can use GIFs to develop effective content approaches to make the audience connect with your product viability, both practically band emotionally.
● Increase Visitor Attraction
Today’s changing times have brought about a rapid outlook towards everything. All of us are bounded by time constraints and when browsing the web, the prime need is to look for quick and accurate solutions to everything concerned.
Short and exact information delivery of GIFs is something that would keep visitors glued to your site because they will be assured of getting exactly what they search for and that too in an interesting and entertaining way.
Part 2 How to Make Your Own GIF?
Now that you are familiar with the creative marketing credibility of GIFs, you might naturally feel motivated towards creating a GIF of your own. In case you are, see through the following section of this article to find out interesting ways of creating interesting and catchy GIFs, either for impressive product marketing or just to make your social media posts leave your community peers in awe!
Looking for the best GIF creator solutions on the web, you can rely on GIPHY, one of the most preferred and convenient databases to create GIFs quickly. This is a smartphone compatible tool and works well with almost any device. Follow the steps given below to make GIFs with this tool:
Step 1:
Download and install the GIPHY app in your device.
Step 2:
Click on ‘Create’ in the app’s welcome screen. This will change (+) icon at the top-right corner to the ‘Camera’ symbol. You can also navigate to the ‘Profile’ at the bottom-right and tap the (+) or ‘Camera’ icon in the app’s account page.
Step 3:
Click on ‘Allow Camera Access’. You will receive two successive prompt messages from the app. Click on ‘Allow’ to grant access permissions to your device media. When you are done, click on ‘I Agree’.
Step 4:
GIFHY uses your device’s front camera for GIF creation. However, if you need to go for a camera switch, click on the ‘Camera’ sign at the bottom-right.
Step 5:
Choose a desired filter and effect for your GIF with a left or right swipe on the live feed toolbar. The app has 11 amazing and realistic effects, including VHS Static, 3D Glasses, etc.
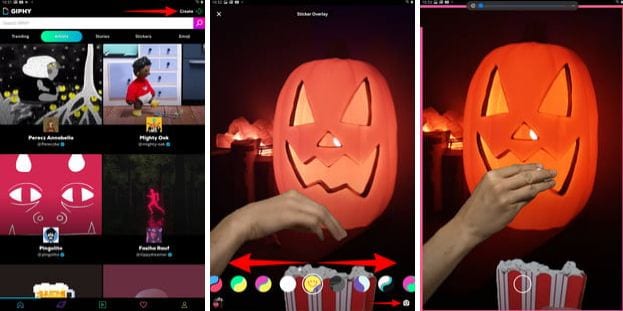
Step 6:
You can take up either of the following:
Press either of the ‘Filter’ or ‘Effect’ buttons to take static shots to create GIF from images, or press and hold the same to create animated GIF. For simply using effects, tap the white button.
In case you choose to create a motion GIF, the app forms a ‘visual timer’ around the editor screen. The motion recording stops once the line is in sync with the screen edges.
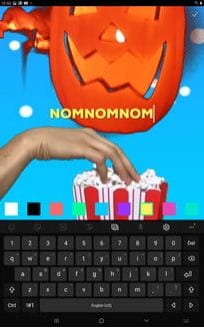
Step 7:
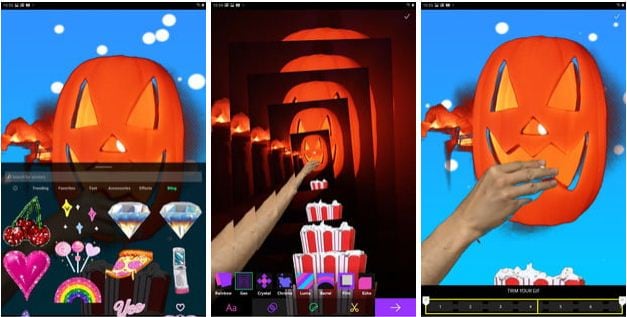
Having captured your perfect shot, you have the liberty to merge it with an image or video. However, do consider the following options to add some more elements to your capture: You can add relatable text in 9 color choices.
● Enhance your graphic presentation with 8 amazing effects like, ‘rainbow overlays’, BW film grains, etc.
● Choose from a never ending list of suitable stickers to add the feel through connect to your GIFs.
● Trim your animated GIFs to the ‘just perfect’ portion by adjusting the editing markers.
Relax; that’s no rocket science. Just tap on the respective buttons and there you go!
Step 8:
Set your GIF in a desired size frame by choosing the ‘Crop’ tool from the top-right corner of the editing screen. You are given a size flexibility of 1:1, 3:2, 16:9, 4:5 and 9:16.

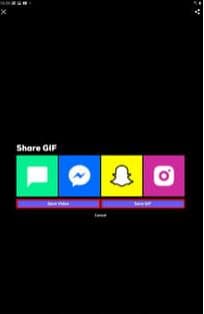
Step 9:
Once you are satisfied with your creation, tap the ‘Right Arrow’ icon. In the interface that follows, add suitable share tags to the GIF.
Step 10:
Tap ‘Share GIF’ to post your creation on social media platforms or share it through popular IM apps. To save your initially captured clip, click on ‘Save Video’ or tap ‘Save GIF’ to save your creation in your smartphone’s memory.
Part 1 What Are 10 Best GIF Creator to Find Brilliant Pre-made Gifs?
Having talked about GIF creation on the go, let’s take a dive into the best GIF creator solutions that are a storehouse of exciting pre-made GIFs. When browsing the web for an affordable GIF maker tool, you land across a pool of choices. Read through the further sections of this article to find out what’s best for you.
Described below are 10 best alternatives to get amazing pre-made GIFs:
● Wondershare Filmora Video Editor
This one is a popular, preferred and top rated application where you get to choose from an exciting range of pre-made GIFs under a variety of specific categories. All you need to do is, visit the app’s official site, browse to your favorite GIF category and select a desired GIF. Follow a few app instructions to save your selection and that’s it! Your selected GIF reaches your device memory within seconds.

Wondershare Filmora - Best Video Editor for Mac/Windows
5,481,435 people have downloaded it.
Build unique custom animations without breaking a sweat.
Focus on creating epic stories and leave the details to Filmora’s auto features.
Start a creative adventure with drag & drop effects and endless possibilities.
Filmora simplifies advanced features to save you time and effort.
Filmora cuts out repetition so you can move on to your next creative breakthrough.
Key Features
● This app is available to you absolutely free of cost.
● Has an intelligent and user cohesive interface.
● Loaded with tons of brilliant GIFs to choose from.
● The app supports GIF customization.
● GIFHY
Launched in 2013, this one is probably the best GIF maker and downloader tool available on the web today. It is a free tool, packed with enormous varieties of GIFs to choose from. What’s more interesting about the app is that you are free to play with your editing creativity to enhance your downloaded GIFs in the GIPHY editor.
Key Features
● It comes with an easy to use, convenient interface.
● You can edit downloaded GIFs with hundreds of effects and filters.
● The app provides you a direct sharing platform, allowing you to post GIFs to various social media platforms and also go for sharing via Instant Messaging applications.
● This is a fast processing tool that allows you to escape the notch of annoying and delayed download processes.
● Tenor
You can conveniently regard this one as the closest competitor to the GIPHY GIF creator and downloader tool. Needless to say, both are quite similar to each other in interface and usage respects. However, focusing on search results for a common keyword, you find diverse variations to your obvious surprise.
Key Features
● This is a free to use, interactive interface tool.
● It introduces a GIF Keyboard that allows you to search the most specific and relatable GIFs.
● It ensures a speedy and high quality GIF download.
● You can explore your editing skills to your heart’s content to improvise the downloaded GIFs with this tool.
● This tool gives you the liberty to directly share GIFs across different platforms.
If you like to spend ample time on choosing what’s perfect for you, refer this online tool for your GIF download solutions. It caters to your love of diversity with the most deep rooted and broad GIF range. However, this one comes with a little messy interface, demanding some patience from you to get to the right thing.
Key Features
● This tool provides you with almost all possible choices for a GIF category.
● It is available to you free of cost
● The tool site is loaded with rich and quality GIF content.
● This one is a direct save and export tool for your downloaded GIFs.
● Gfycat
You can prefer this one as a GIF hosting tool. Developed with a view to launch a common medium for GIF and HTML contents, this app ensures in-time and hassle free downloads and delivery. Though lacking a refined search bar, this tool promises you of excellence in content quality.
Key Features
● This comes to you as one of the most reliable GIF hosting tools.
● It is a free and quick content delivery tool.
● You are allowed to select the most suitable one from a variety of playback choices.
● This tool also gives you the flexibility of direct media sharing.
● GIFbin
If you are hung-over decade old nostalgia and the fever doesn’t seem to go away, you can check this site for some really satisfying retro and other similar content. This would definitely make you take a toll back to the times when MSN and Limewire were unparalleled market leaders in content sharing.
Key Features
● GIFbin is a storehouse of the best animated GIFs, that is on a continuous update to facilitate fresh and quality based content, every time you visit the site.
● It has an advanced, API enabled search mechanism.
● It boasts of having the handiest and convenient user interface.
● If you prefer GIFs of the comic genre, this tool is heaven for you.
● Imgflip
This is another GIF download site, commonly preferred for comedy and fun oriented content. Using this site, you can download and create a variety of GIF based memes that have the potential to flood your social media posts with likes and comments. This one is a complete GIF basket, suited to vast content varieties and user preferences. You will find the site’s official watermark on all its contents.
Key Features
● The site stands among the most preferred GIF-meme creation and sharing platforms.
● The tool is packed with loads of quality content under specific categories
● You can improvise the dimensions of your editing skills to modify downloaded GIFs.
● This site has a default media export feature that you can use to share your GIFs on social media.
● Imgur
Launched in 2009, this is among the most visited GIF sites, originally created for sharing meme based contents on social media. Its extensive search filters are dedicated to fetch the exact GIFs and memes you are looking for. If you are tired of browsing sites for particular content requirements, your search spree will definitely end here.
Key Features
● The site is known for its extensive and diversified content quality.
● It is a free, convenient and dependable GIF download tool.
● Imgur is highly preferred for content export across various media platforms.
● It is equipped with an advanced and updated search filter that assures you of getting fresh and top quality GIFs on almost every possible keyword.
● Tumblr
Claiming a launch date of 13 years back, this is quite a good GIF download option. You can find excellent quality GIF content on the site, particularly in the comic genre. Though not as popular as its online counterparts today, the site definitely enjoyed commendable visitor preferences at the time of its launch. You can certainly visit this site for a filling entertainment dose.
Key Features
● Tumblr is a free download site with a user friendly interface.
● The site is loaded with notable content varieties.
● You can go for direct media sharing through this site.
● Its comic GIFs are quite hilarious.
● Know Your Meme
This site uses the Wiki software to stock an inventory of classic GIFs and memes. Using this database for GIF downloads means that you don’t need to compromise on content and image quality. The site contents are periodically updated to ensure that visitors are not exposed to stale and outdated content.
Key Features
● The site offers fresh content having catchy and latest GIFs.
● This is a complete storehouse of GIFs and memes that can definitely keep you rolling.
● The site comes as a free tool and gas a user cohesive interface
● It hast the most efficient search filters that are regularly improvised to ensure quality content delivery.
● Key Takeaways from This Episode →
● GIFs are an effective and captivating means of quality content sharing and message delivery. Take them as a hilarious entertainment source or use them to enhance your marketing policies, GIFs can do it all.
● Influenced by the user credibility of GIFs, there are loads of GIF creator and download tools available online; among which Filmora by Wondershare is the current market leader. You can use this app to explore your GIF editing skills or download and share latest GIFs across media sharing platforms.
Stay tuned to find the most affordable GIF creator solutions.
In this article
01 [Why Gifs Are Essential for Every Marketer?](#Part 1)
02 [How to Make Your Own GIF?](#Part 2)
03 [What Are 10 Best GIF Creator to Find Brilliant Pre-made Gifs?](#Part 3)
Part 1 Why Gifs Are Essential for Every Marketer?
Everyone around you today is accustomed with the fact that GIFs are an interesting and impactful means of content sharing. These 3-5 second snippets are highly preferred and convenient ways to deliver information that is precise, clear and to the point. When it comes to time frames, short and quick GIFs are obvious choices over lengthy videos. Additionally, GIFs are eye-catchy and keep you captivated to see though the entire content within seconds, contradictory to those monotonous and often dull videos that sound more like a long, boring lecture.
These are an effective media tool that is not limited to sharing information that is chiefly entertainment based or fun centered. You can use them to deliver important content that addresses a specific purpose or audience. Owing to this, GIFs have become an essential marketing utility, here’s why:
● Improve Product Branding:
GIFs can serve as impressive branding tools for your products in the market. Markets today are considerably impacted by the ‘What You See is What You Buy’ concept, which puts forward the need to lay added stress on effective branding.
GIFs are ready to sort this out with their exciting range of features. From video editing choices to sound and color customization, GIFs are loaded with everything you need to improvise your product branding. All you have to do is explore your creativity to make the most of the GIF branding choices.
● Explain it Better
On a preference poll, most of us would shift to ‘watch’ over ‘read’ for a comprehensive understanding. An attractive motion visual is an even better treat. GIFs are pivotal in making viewers relate to the concept and message behind your product in a more enhanced manner.
Additionally, these are a continent means to introduce emotional mobility among your target audience with depictive emojis. You can use GIFs to develop effective content approaches to make the audience connect with your product viability, both practically band emotionally.
● Increase Visitor Attraction
Today’s changing times have brought about a rapid outlook towards everything. All of us are bounded by time constraints and when browsing the web, the prime need is to look for quick and accurate solutions to everything concerned.
Short and exact information delivery of GIFs is something that would keep visitors glued to your site because they will be assured of getting exactly what they search for and that too in an interesting and entertaining way.
Part 2 How to Make Your Own GIF?
Now that you are familiar with the creative marketing credibility of GIFs, you might naturally feel motivated towards creating a GIF of your own. In case you are, see through the following section of this article to find out interesting ways of creating interesting and catchy GIFs, either for impressive product marketing or just to make your social media posts leave your community peers in awe!
Looking for the best GIF creator solutions on the web, you can rely on GIPHY, one of the most preferred and convenient databases to create GIFs quickly. This is a smartphone compatible tool and works well with almost any device. Follow the steps given below to make GIFs with this tool:
Step 1:
Download and install the GIPHY app in your device.
Step 2:
Click on ‘Create’ in the app’s welcome screen. This will change (+) icon at the top-right corner to the ‘Camera’ symbol. You can also navigate to the ‘Profile’ at the bottom-right and tap the (+) or ‘Camera’ icon in the app’s account page.
Step 3:
Click on ‘Allow Camera Access’. You will receive two successive prompt messages from the app. Click on ‘Allow’ to grant access permissions to your device media. When you are done, click on ‘I Agree’.
Step 4:
GIFHY uses your device’s front camera for GIF creation. However, if you need to go for a camera switch, click on the ‘Camera’ sign at the bottom-right.
Step 5:
Choose a desired filter and effect for your GIF with a left or right swipe on the live feed toolbar. The app has 11 amazing and realistic effects, including VHS Static, 3D Glasses, etc.
Step 6:
You can take up either of the following:
Press either of the ‘Filter’ or ‘Effect’ buttons to take static shots to create GIF from images, or press and hold the same to create animated GIF. For simply using effects, tap the white button.
In case you choose to create a motion GIF, the app forms a ‘visual timer’ around the editor screen. The motion recording stops once the line is in sync with the screen edges.
Step 7:
Having captured your perfect shot, you have the liberty to merge it with an image or video. However, do consider the following options to add some more elements to your capture: You can add relatable text in 9 color choices.
● Enhance your graphic presentation with 8 amazing effects like, ‘rainbow overlays’, BW film grains, etc.
● Choose from a never ending list of suitable stickers to add the feel through connect to your GIFs.
● Trim your animated GIFs to the ‘just perfect’ portion by adjusting the editing markers.
Relax; that’s no rocket science. Just tap on the respective buttons and there you go!
Step 8:
Set your GIF in a desired size frame by choosing the ‘Crop’ tool from the top-right corner of the editing screen. You are given a size flexibility of 1:1, 3:2, 16:9, 4:5 and 9:16.
Step 9:
Once you are satisfied with your creation, tap the ‘Right Arrow’ icon. In the interface that follows, add suitable share tags to the GIF.
Step 10:
Tap ‘Share GIF’ to post your creation on social media platforms or share it through popular IM apps. To save your initially captured clip, click on ‘Save Video’ or tap ‘Save GIF’ to save your creation in your smartphone’s memory.
Part 1 What Are 10 Best GIF Creator to Find Brilliant Pre-made Gifs?
Having talked about GIF creation on the go, let’s take a dive into the best GIF creator solutions that are a storehouse of exciting pre-made GIFs. When browsing the web for an affordable GIF maker tool, you land across a pool of choices. Read through the further sections of this article to find out what’s best for you.
Described below are 10 best alternatives to get amazing pre-made GIFs:
● Wondershare Filmora Video Editor
This one is a popular, preferred and top rated application where you get to choose from an exciting range of pre-made GIFs under a variety of specific categories. All you need to do is, visit the app’s official site, browse to your favorite GIF category and select a desired GIF. Follow a few app instructions to save your selection and that’s it! Your selected GIF reaches your device memory within seconds.
Wondershare Filmora - Best Video Editor for Mac/Windows
5,481,435 people have downloaded it.
Build unique custom animations without breaking a sweat.
Focus on creating epic stories and leave the details to Filmora’s auto features.
Start a creative adventure with drag & drop effects and endless possibilities.
Filmora simplifies advanced features to save you time and effort.
Filmora cuts out repetition so you can move on to your next creative breakthrough.
Key Features
● This app is available to you absolutely free of cost.
● Has an intelligent and user cohesive interface.
● Loaded with tons of brilliant GIFs to choose from.
● The app supports GIF customization.
● GIFHY
Launched in 2013, this one is probably the best GIF maker and downloader tool available on the web today. It is a free tool, packed with enormous varieties of GIFs to choose from. What’s more interesting about the app is that you are free to play with your editing creativity to enhance your downloaded GIFs in the GIPHY editor.
Key Features
● It comes with an easy to use, convenient interface.
● You can edit downloaded GIFs with hundreds of effects and filters.
● The app provides you a direct sharing platform, allowing you to post GIFs to various social media platforms and also go for sharing via Instant Messaging applications.
● This is a fast processing tool that allows you to escape the notch of annoying and delayed download processes.
● Tenor
You can conveniently regard this one as the closest competitor to the GIPHY GIF creator and downloader tool. Needless to say, both are quite similar to each other in interface and usage respects. However, focusing on search results for a common keyword, you find diverse variations to your obvious surprise.
Key Features
● This is a free to use, interactive interface tool.
● It introduces a GIF Keyboard that allows you to search the most specific and relatable GIFs.
● It ensures a speedy and high quality GIF download.
● You can explore your editing skills to your heart’s content to improvise the downloaded GIFs with this tool.
● This tool gives you the liberty to directly share GIFs across different platforms.
If you like to spend ample time on choosing what’s perfect for you, refer this online tool for your GIF download solutions. It caters to your love of diversity with the most deep rooted and broad GIF range. However, this one comes with a little messy interface, demanding some patience from you to get to the right thing.
Key Features
● This tool provides you with almost all possible choices for a GIF category.
● It is available to you free of cost
● The tool site is loaded with rich and quality GIF content.
● This one is a direct save and export tool for your downloaded GIFs.
● Gfycat
You can prefer this one as a GIF hosting tool. Developed with a view to launch a common medium for GIF and HTML contents, this app ensures in-time and hassle free downloads and delivery. Though lacking a refined search bar, this tool promises you of excellence in content quality.
Key Features
● This comes to you as one of the most reliable GIF hosting tools.
● It is a free and quick content delivery tool.
● You are allowed to select the most suitable one from a variety of playback choices.
● This tool also gives you the flexibility of direct media sharing.
● GIFbin
If you are hung-over decade old nostalgia and the fever doesn’t seem to go away, you can check this site for some really satisfying retro and other similar content. This would definitely make you take a toll back to the times when MSN and Limewire were unparalleled market leaders in content sharing.
Key Features
● GIFbin is a storehouse of the best animated GIFs, that is on a continuous update to facilitate fresh and quality based content, every time you visit the site.
● It has an advanced, API enabled search mechanism.
● It boasts of having the handiest and convenient user interface.
● If you prefer GIFs of the comic genre, this tool is heaven for you.
● Imgflip
This is another GIF download site, commonly preferred for comedy and fun oriented content. Using this site, you can download and create a variety of GIF based memes that have the potential to flood your social media posts with likes and comments. This one is a complete GIF basket, suited to vast content varieties and user preferences. You will find the site’s official watermark on all its contents.
Key Features
● The site stands among the most preferred GIF-meme creation and sharing platforms.
● The tool is packed with loads of quality content under specific categories
● You can improvise the dimensions of your editing skills to modify downloaded GIFs.
● This site has a default media export feature that you can use to share your GIFs on social media.
● Imgur
Launched in 2009, this is among the most visited GIF sites, originally created for sharing meme based contents on social media. Its extensive search filters are dedicated to fetch the exact GIFs and memes you are looking for. If you are tired of browsing sites for particular content requirements, your search spree will definitely end here.
Key Features
● The site is known for its extensive and diversified content quality.
● It is a free, convenient and dependable GIF download tool.
● Imgur is highly preferred for content export across various media platforms.
● It is equipped with an advanced and updated search filter that assures you of getting fresh and top quality GIFs on almost every possible keyword.
● Tumblr
Claiming a launch date of 13 years back, this is quite a good GIF download option. You can find excellent quality GIF content on the site, particularly in the comic genre. Though not as popular as its online counterparts today, the site definitely enjoyed commendable visitor preferences at the time of its launch. You can certainly visit this site for a filling entertainment dose.
Key Features
● Tumblr is a free download site with a user friendly interface.
● The site is loaded with notable content varieties.
● You can go for direct media sharing through this site.
● Its comic GIFs are quite hilarious.
● Know Your Meme
This site uses the Wiki software to stock an inventory of classic GIFs and memes. Using this database for GIF downloads means that you don’t need to compromise on content and image quality. The site contents are periodically updated to ensure that visitors are not exposed to stale and outdated content.
Key Features
● The site offers fresh content having catchy and latest GIFs.
● This is a complete storehouse of GIFs and memes that can definitely keep you rolling.
● The site comes as a free tool and gas a user cohesive interface
● It hast the most efficient search filters that are regularly improvised to ensure quality content delivery.
● Key Takeaways from This Episode →
● GIFs are an effective and captivating means of quality content sharing and message delivery. Take them as a hilarious entertainment source or use them to enhance your marketing policies, GIFs can do it all.
● Influenced by the user credibility of GIFs, there are loads of GIF creator and download tools available online; among which Filmora by Wondershare is the current market leader. You can use this app to explore your GIF editing skills or download and share latest GIFs across media sharing platforms.
Montage Makes It Easy to Create and Share Videos. This Article Will Explain What It Can Do and Show You Examples of Movies that Use Montage
As with many new things in life, Montage isn’t your best friend right off the bat. So, if you want to learn to use montages with movies, they need to be the right ones. If you don’t know what Montage is, it is a way of compressing an action or series of actions into a short amount of time. We look at movies because they are a common type of entertainment everyone has seen before, which makes them easier to understand as a concept.
Using Montage is a great way to create engaging video content. There are many people interested in the topic of Montage, so if you get that video out there, you can easily find an audience. When used in conjunction with YouTube advertising, creating videos about Montage could be an excellent business idea for you.
Learning how to use Montage properly can be challenging. The process isn’t intuitive, and using it can feel like hiding random pieces around your page. But, when you watch the right movies, they can help you understand how to use this tool effectively. So, take some time, check out these movies, and learn how to get the most out of Montage!
What Is A Montage?
The definition of a montage is a “series of short scenes or episodes forming a unified whole.” That definition can lead to different interpretations of a montage and can be applied to any art medium. A “montage” isn’t just for movies. Music artists use montages to tell stories that often describe their emotions and experiences; writers create poetry and prose contained in such an artistic form, and painters often use this art form. However, many people are most familiar with the term associated with movies: a montage is essentially a collection of images or scenes that populate a movie with music.
If you’ve seen any blockbuster Hollywood films in the last ten years, you’ve probably seen some Montage. The Montage is a sequence that takes place over a set period and shows us how the lead character goes from being an ordinary person to an extraordinary one. The difference between these two states is dramatic, so we see so many montages in movies. They are meant to grab your attention and excitingly introduce a character.
Purpose of Montage
Montage movies are made up of a compilation of short yet powerful scenes put together to make one movie or project. Even though these types of movies have become a common genre, there’s a list of reasons why this is popular in movies today.
- Montage has several uses in movies. Of course, Montage can be used to show events such as battles or dancing. It can also describe emotions, including sadness, happiness, and sarcasm. These different uses of Montage do come with their styles, but they all share a few common traits.
- They’re often used to condense periods of storytime into much smaller but more entertaining segments. The word montage is French for “to construct from many parts .”Montages can now be seen everywhere in film and television, from silent films to blockbuster action movies.
- This is frequently used in narratives when the story needs to advance quickly. The characters are going somewhere or doing something else not within the context of the moment in time that represents them. A great example of a montage was used in Rocky when Rocky was training for his fight with Apollo Creed.
- A montage allows filmmakers to explore a theme using several sequential shots that can’t be covered in a single shot.
Learn To Use Montage With These Movies
1. Rocky (1976)
The training montage is popular in cinema. A montage like this helps us follow how the protagonist prepares himself for a life-threatening fight and claims honor in society. Sylvester Stallone plays Robert “Rocky” Balboa, going through the rigorous preparations for his fight. A song by Bill Conti called “Gonna Fly Now” is playing in the background, contributing to the scene’s energy.
Rocky (1976)
2. Scarface (1983)
A fictional Cuban Tony (Al Pacino) becomes a gangster in Brian De Palma’s 1983 film Scarface against the backdrop of the cocaine boom of the 1980s. He is portrayed as a criminal rising to the echelons of the underworld and slowly falling. In this montage sequence, Tony becomes the biggest drug lord in Miami and controls nearly all the cocaine that comes through the city.
Scarface (1983)
3. Goodfellas (1990)
Martin Scorsese’s Goodfellas is a gangster film set in 1950s New York City, one of the best. In it, Irish-Italian Henry Hill (Ray Liotta) is portrayed as he rises through the ranks of the crime branch of his Brooklyn neighborhood. As we watch this Montage, we see Henry and his gang members viciously murdering anyone who stands in their path. This edit is beautifully complemented by Eric Clapton’s “Layla.” voice-over.
Goodfellas (1990)
4. Trainspotting (1996)
Ewan McGregor stars in Danny Boyle’s black comedy, which tells the tale of drug addict Mark Renton (Danny Boyle). Mark tries to get clean and get back on his feet. Despite this, drug enticements and friend influence are major deterrents. Through this introductory Montage, we are introduced to the protagonist’s lifestyle. In addition, the film explores the themes of drug abuse, addiction, and nihilism.
Trainspotting (1996)
5. Run Lola Run (1998)
In his movie Run Lola Run (1998), Tom Tykwer tells the story of Lola (Franka Potente) and Mani (Moritz Bleibtreu) as they face the different possibilities that arise from a single event in their lives. This Montage shows Lola bumping into various people as she begins to sprint. Her encounter has a profound impact on their lives. Through Montage, the film is given a sense of exhilarating pace and multi-layered visual design.
Run Lola Run (1998)
6. Requiem for a Dream (2000)
Hubert Selby Jr.’s titular novel is the source material for Darren Aronofsky’s psychological drama. Four people trapped by their addictions are the focus of the narrative. By watching this Montage, a viewer can get a better sense of the world or the film’s characters. As a result of their drug addictions, four ambitious people will eventually have their dreams dashed. As a result, we gain insight into how addiction takes hold of the characters’ minds and bodies.
Requiem for a Dream (2000)
7. Swades (2004)
Songs have played an integral role in bringing the story of the film to life in the hands of some of India’s most thoughtful filmmakers. Among them is Ashutosh Gowariker. Montage techniques are used to create the title song sequence of his film Swades. The fictional Indian village of Charanpur, where the protagonist Mohan Bhargava (Shahrukh Khan) has lived, is a source of great trauma for the protagonist. As he ends up returning to India, the song signifies his development psychologically.
Swades (2004)
8. Whiplash (2014)
Miles Teller plays Andrew Neiman, a promising young drummer who enrolls in a tough music conservatory. Damien Chazelle directs the film. Terence Fletcher (J. K. Simmons) mentors him, and he is determined to see his students’ dreams come true. Neiman pushes himself to his limits in this Montage, suffering a breakdown as a result. Edited shots and tempo match the visual images to accentuate the protagonist’s mental state.
Whiplash (2014)
9. Gone Girl (2014)
Gillian Flynn’s eponymous novel is the basis for David Fincher’s psychological crime drama. On their fifth wedding anniversary, Amy Elliott Dunne (Rosamund Pike) disappears, and Nicholas Dunne (Ben Affleck) becomes the prime suspect. Amy carefully crafts her new identity in this Montage as we learn she is alive. The Montage ends as Amy sets up her cabin and begins purchasing supplies. After hitting herself with a hammer, the sequence ends.
Whiplash (2014)
10. Parasite (2019)
In Bong Joon-ho’s Oscar-winning dark comedy thriller, the Kim family lives on the edge of poverty. They are suddenly thrown into a world of affluence when a family member gets a job at an affluent family. Moon-Gwang (Lee Jung-Eun) is a long-time housekeeper for the Kim family. The family comes up with a cunning plan to exploit her allergy to peaches. In the closing montage, they convince Mrs. Park (Cho Yeo-Jeong) that Moon-Gwang has tuberculosis.
Whiplash (2014)
Wondershare Filmora11 Express Better
Achieve More
Grow Together
Free Download Free Download Learn More

![]()
Summarize:
If you’re thinking about using Montage, check out movies and trailers in the Action and Comedy genres. Keep in mind that finding material that works well with montages is no accident. They are filled with some of the best soundtracks, action scenes, and comedy routines that can help guide your project through its rough spots. Montage can do amazing things for any movie, so it’s important to learn when and where it should be used.
Rocky (1976)
2. Scarface (1983)
A fictional Cuban Tony (Al Pacino) becomes a gangster in Brian De Palma’s 1983 film Scarface against the backdrop of the cocaine boom of the 1980s. He is portrayed as a criminal rising to the echelons of the underworld and slowly falling. In this montage sequence, Tony becomes the biggest drug lord in Miami and controls nearly all the cocaine that comes through the city.
Scarface (1983)
3. Goodfellas (1990)
Martin Scorsese’s Goodfellas is a gangster film set in 1950s New York City, one of the best. In it, Irish-Italian Henry Hill (Ray Liotta) is portrayed as he rises through the ranks of the crime branch of his Brooklyn neighborhood. As we watch this Montage, we see Henry and his gang members viciously murdering anyone who stands in their path. This edit is beautifully complemented by Eric Clapton’s “Layla.” voice-over.
Goodfellas (1990)
4. Trainspotting (1996)
Ewan McGregor stars in Danny Boyle’s black comedy, which tells the tale of drug addict Mark Renton (Danny Boyle). Mark tries to get clean and get back on his feet. Despite this, drug enticements and friend influence are major deterrents. Through this introductory Montage, we are introduced to the protagonist’s lifestyle. In addition, the film explores the themes of drug abuse, addiction, and nihilism.
Trainspotting (1996)
5. Run Lola Run (1998)
In his movie Run Lola Run (1998), Tom Tykwer tells the story of Lola (Franka Potente) and Mani (Moritz Bleibtreu) as they face the different possibilities that arise from a single event in their lives. This Montage shows Lola bumping into various people as she begins to sprint. Her encounter has a profound impact on their lives. Through Montage, the film is given a sense of exhilarating pace and multi-layered visual design.
Run Lola Run (1998)
6. Requiem for a Dream (2000)
Hubert Selby Jr.’s titular novel is the source material for Darren Aronofsky’s psychological drama. Four people trapped by their addictions are the focus of the narrative. By watching this Montage, a viewer can get a better sense of the world or the film’s characters. As a result of their drug addictions, four ambitious people will eventually have their dreams dashed. As a result, we gain insight into how addiction takes hold of the characters’ minds and bodies.
Requiem for a Dream (2000)
7. Swades (2004)
Songs have played an integral role in bringing the story of the film to life in the hands of some of India’s most thoughtful filmmakers. Among them is Ashutosh Gowariker. Montage techniques are used to create the title song sequence of his film Swades. The fictional Indian village of Charanpur, where the protagonist Mohan Bhargava (Shahrukh Khan) has lived, is a source of great trauma for the protagonist. As he ends up returning to India, the song signifies his development psychologically.
Swades (2004)
8. Whiplash (2014)
Miles Teller plays Andrew Neiman, a promising young drummer who enrolls in a tough music conservatory. Damien Chazelle directs the film. Terence Fletcher (J. K. Simmons) mentors him, and he is determined to see his students’ dreams come true. Neiman pushes himself to his limits in this Montage, suffering a breakdown as a result. Edited shots and tempo match the visual images to accentuate the protagonist’s mental state.
Whiplash (2014)
9. Gone Girl (2014)
Gillian Flynn’s eponymous novel is the basis for David Fincher’s psychological crime drama. On their fifth wedding anniversary, Amy Elliott Dunne (Rosamund Pike) disappears, and Nicholas Dunne (Ben Affleck) becomes the prime suspect. Amy carefully crafts her new identity in this Montage as we learn she is alive. The Montage ends as Amy sets up her cabin and begins purchasing supplies. After hitting herself with a hammer, the sequence ends.
Whiplash (2014)
10. Parasite (2019)
In Bong Joon-ho’s Oscar-winning dark comedy thriller, the Kim family lives on the edge of poverty. They are suddenly thrown into a world of affluence when a family member gets a job at an affluent family. Moon-Gwang (Lee Jung-Eun) is a long-time housekeeper for the Kim family. The family comes up with a cunning plan to exploit her allergy to peaches. In the closing montage, they convince Mrs. Park (Cho Yeo-Jeong) that Moon-Gwang has tuberculosis.
Whiplash (2014)
Wondershare Filmora11 Express Better
Achieve More
Grow Together
Free Download Free Download Learn More
![]()
Summarize:
If you’re thinking about using Montage, check out movies and trailers in the Action and Comedy genres. Keep in mind that finding material that works well with montages is no accident. They are filled with some of the best soundtracks, action scenes, and comedy routines that can help guide your project through its rough spots. Montage can do amazing things for any movie, so it’s important to learn when and where it should be used.
As Video Editing Has Become a Pillar Stone in Post-Production Work, You Might Need to Upgrade Your Knowledge About It. In This Article, You Will Learn How to Rotate the Video
The first video editing machine in 1924 (Moviola) left an indelible print on the minds of the media industry. It was a maiden attempt to make edits while simultaneously viewing the film. Over time, editing videos followed the trajectory of various transitions letting the imagination run wild. According to a survey, the video editing software market will grow to 932.7 million U.S. dollars by 2025.
As video editing has become a pillar stone in post-production work, you might need to upgrade your knowledge about it. In this article, you will learn how to rotate the video.
Whether your video has an issue in the aspect ratio or you want the desired output in the mirror or flipped version, you need not panic. By exploring different options of Davinci Resolve and Filmora, you can easily change the orientation of your video.
You’ll see a complete picture guide of the above-mentioned softwares.
Changing the orientation of video by Davinci Resolve
Davinci Resolve is a comprehensive video editing software. It performs functions from colour grading to auto-enhancement for the post-production work. Though, professionals usually use this and pitch it as comparatively complex. But even novices need not worry. It comes with features that can change the entire output of the video. One of such functions is the rotation of the videos. You can give a professional and top-notch touch to your post-production work by changing the orientation of the videos. That will bring a new dimension to your project. The flipped version of videos can make the output more prompt and subtle as they stitch different videos scenes together.
Here is the step by step guide for rotating the video
Step 1: Entering the Edit Mode
Set DaVinci Resolve to Edit mode and in the upper-right corner of your workspace, select the Inspector tab.

The drop-down menu with different options will appear. Search for the Transform section. There you have to select the **Rotation Angle.**You can also enter the value of rotation.After entering the value, you will notice that your vidoe is rotated.

Tip: By pressing Ctrl + R, you can rotate the video 90 degrees clockwise.
Editing a portrait video in DaVinci Resolve
The Transform Panel has the XY Zoom fields. You can use this to scale your video to fit the vertical frame by increasing the size to ~1.750.
Voilà, you now have a vertical video you can edit and export.
Horizontal and Vertical Flip in DaVinci Resolve
You want to create a mirror effect for your video. Flipp it. You would love the results.
You can edit it by going to the same Inspector drop-down menu.

Select the kind of flip you want at the bottom of the Transform section. It can be horizontal or vertical.

How to change the direction of animation in the DaVinci Resolve?
Keyframes are an essential part of video animations. Davinci Resolve facilitates you to play a little with its keyframes parameters.
The keyframe system is not that complex.
All you need to do is select a region on your Timeline. Choose the parameters that need animation by clicking the small diamond. You can see the small diamond next to each parameter’s value.
Apart from Davinci Resolve, there is also an alternate software which has this versatility.You can also use Filmora Wonder for rotation of your vidoes
Changing the direction of video using Filmora Wondershare
If you have mistakenly taken a video at the wrong angle and don’t want to lose it. Filmora Video Editor is there to keep you out of trouble. It comes with the option of changing the orientation of your videos in your desired way. You can even zoom in or crop the unwanted parts in the videos. Adding more to it, it offers you preset ratios (16:9, 9:16; 4:5, 1:1) to find the perfect aspect ratio for YuoTube, Instagram, etc.
For Win 7 or later (64-bit)
For macOS 10.14 or later
Here is the step-by-step guide to rotating the direction of the video by using it.
Step 1: Drag and Drop
It starts with importing the desired file you wish to edit. Afterwards, you have to drag-drop it to the timeline.

Step 2: Enter the video-editing Panel
To start editing, you need to double-click on the video clip in the timeline. You’ll see various tabs above the timeline header from transformation to auto-enhance.

Step 3: Explore your options
Click on the Transform menu. It will display various options from rotation to scaling. You’ll find the “Rotate” option.

Either you can drag the slider or enter the specific value to adjust to the desired rotation.
For example, if you want to rotate this clip 170 degrees, enter the value in the box.

Moreover, you can adjust the scale. You have to drag the Scale slider to have a full-screen image. You can also edit the shape, size and position in the Viewer Panel.

Step 4:Ready to Export
Now, you have achieved the desired rotation for your video. You can export it and select the option that you want.

You can flip the direction of your video in a jiff by following these simple steps.
Conclusion
Stitching different scenes by video rotation has brought video editing to a new dimension altogether. Creating transitions in the videos has become easy more than ever. By adding effects in video editing, you can achieve your editing goals. Hence, you can have that “wow part of editing” without breaking a sweat. When the scenes with different directions are combined, they help in creating the subtle mood prompts for creating the desired flow. You can even adjust the angle of your video if you captured it at the wrong angle.
There are a variety of softwares in the digital world for this purpose. Davinci Resolve and Filmora Wondershare come with dynamic options for your post-production work. Owing to their versatility, these also have the feature of rotating your videos. Their user-friendly interface has made the entire experience of post-production work enjoyable.
The drop-down menu with different options will appear. Search for the Transform section. There you have to select the **Rotation Angle.**You can also enter the value of rotation.After entering the value, you will notice that your vidoe is rotated.
Tip: By pressing Ctrl + R, you can rotate the video 90 degrees clockwise.
Editing a portrait video in DaVinci Resolve
The Transform Panel has the XY Zoom fields. You can use this to scale your video to fit the vertical frame by increasing the size to ~1.750.
Voilà, you now have a vertical video you can edit and export.
Horizontal and Vertical Flip in DaVinci Resolve
You want to create a mirror effect for your video. Flipp it. You would love the results.
You can edit it by going to the same Inspector drop-down menu.
Select the kind of flip you want at the bottom of the Transform section. It can be horizontal or vertical.
How to change the direction of animation in the DaVinci Resolve?
Keyframes are an essential part of video animations. Davinci Resolve facilitates you to play a little with its keyframes parameters.
The keyframe system is not that complex.
All you need to do is select a region on your Timeline. Choose the parameters that need animation by clicking the small diamond. You can see the small diamond next to each parameter’s value.
Apart from Davinci Resolve, there is also an alternate software which has this versatility.You can also use Filmora Wonder for rotation of your vidoes
Changing the direction of video using Filmora Wondershare
If you have mistakenly taken a video at the wrong angle and don’t want to lose it. Filmora Video Editor is there to keep you out of trouble. It comes with the option of changing the orientation of your videos in your desired way. You can even zoom in or crop the unwanted parts in the videos. Adding more to it, it offers you preset ratios (16:9, 9:16; 4:5, 1:1) to find the perfect aspect ratio for YuoTube, Instagram, etc.
For Win 7 or later (64-bit)
For macOS 10.14 or later
Here is the step-by-step guide to rotating the direction of the video by using it.
Step 1: Drag and Drop
It starts with importing the desired file you wish to edit. Afterwards, you have to drag-drop it to the timeline.
Step 2: Enter the video-editing Panel
To start editing, you need to double-click on the video clip in the timeline. You’ll see various tabs above the timeline header from transformation to auto-enhance.
Step 3: Explore your options
Click on the Transform menu. It will display various options from rotation to scaling. You’ll find the “Rotate” option.
Either you can drag the slider or enter the specific value to adjust to the desired rotation.
For example, if you want to rotate this clip 170 degrees, enter the value in the box.
Moreover, you can adjust the scale. You have to drag the Scale slider to have a full-screen image. You can also edit the shape, size and position in the Viewer Panel.
Step 4:Ready to Export
Now, you have achieved the desired rotation for your video. You can export it and select the option that you want.
You can flip the direction of your video in a jiff by following these simple steps.
Conclusion
Stitching different scenes by video rotation has brought video editing to a new dimension altogether. Creating transitions in the videos has become easy more than ever. By adding effects in video editing, you can achieve your editing goals. Hence, you can have that “wow part of editing” without breaking a sweat. When the scenes with different directions are combined, they help in creating the subtle mood prompts for creating the desired flow. You can even adjust the angle of your video if you captured it at the wrong angle.
There are a variety of softwares in the digital world for this purpose. Davinci Resolve and Filmora Wondershare come with dynamic options for your post-production work. Owing to their versatility, these also have the feature of rotating your videos. Their user-friendly interface has made the entire experience of post-production work enjoyable.
Also read:
- Updated Do You Want to Add Subtitles to Your MKV Files Easily? This Article Will Introduce 7 Simple Ways Through Which You Can Add Subtitles to MKV on Different Devices
- Updated If You Dont Know How to Blur a Part of a Video, Youre in the Right Place. We Have Provided All the Details You Need to Help You Blur a Still or Moving Portion of Your Video
- Updated How to Use Motion Tracking in Video Editing for 2024
- Some Facts That Few People Know on How to Make Transparent Background in Canva
- Updated In 2024, Through Speed Ramping, Create a Smooth Transition in Slow-Motion Videos. Follow This Guide and Learn About Premiere Pro Slow Motion and a Better Alternative
- New 15 Camera Shake Preset for Premiere Pro for 2024
- Discover the Ultimate LUTs for Wondershare Filmora Uncover the Answer
- Updated How to Make Blender Render Transparent Background
- Updated How to Convert SRT to DOCX
- Create a Movie with Windows Movie Maker for 2024
- How to Do Censor Effects with Filmora for 2024
- Updated 4 Simple Methods for Making a High-Quality Recap Video for 2024
- New In 2024, Final Cut Pro for iPad- Is It Available?
- Updated In 2024, How to Rotate AVI in Vertical/Portrait Orientation Windows, Mac,Android, iPhone & Online
- Step by Step to Rotate Video in Google Photos for 2024
- If You Want to Prompt Your eCommerce Business in Facebook, Then Using Facebook Video Ads Is One of the Effective Methods. This Post Will Show You How to Edit Videos for Facebook Advertisement for 2024
- Updated 2024 Approved What Is MOV Format and How To Edit MOV Video Creatively?
- New Five Thoughts on Discord Create Accounts How-To Questions for 2024
- New 2024 Approved How To Be A Successful YouTuber
- AI Features of Wondershare Filmora - Silence Detection in Videos
- Updated Methods to Make Sure Your Recording Slideshow in Powerpoint Is Not Wro
- Best Free LUTs to Use
- How to Create Text Animation for Videos
- In 2024, How to Set Up Twitch Green Screen
- New Best 8 Animated Video Makers for 2024
- Do You Want to Create Slow-Motion Videos? This Article Shows Methods to Create Slow-Mo Videos without Changing the Medias Quality
- In 2024, Learning How to Create LUTs with LUTs Generator
- New 2024 Approved Best Animated Video Makers
- Updated This Article Introduces How Sheila Become a Youtuber and How She Started Video Editing
- New 2024 Approved 10 Top Vloggers on YouTube
- Updated 2024 Approved Do You Need to Create a Video for Your Business Online but Feel You Do Not Have the Skill and Time to Do That? Try Out These AI Video Generators that Will Work for You to Carry Out Tasks Effectively
- New Guide to Create Freeze Frame Clone Effect Video
- A Step-by-Step Guide on Using ADB and Fastboot to Remove FRP Lock from your Xiaomi Redmi Note 12 Pro+ 5G
- In 2024, 3 Solutions to Find Your Oppo Reno 8T 5G Current Location of a Mobile Number | Dr.fone
- 8 Solutions to Fix Find My Friends Location Not Available On Lava Yuva 2 Pro | Dr.fone
- In 2024, A Guide Vivo V29 Wireless and Wired Screen Mirroring | Dr.fone
- Top 10 Telegram Spy Tools On Xiaomi 13 Ultra for Parents | Dr.fone
- In 2024, A Guide Honor 100 Wireless and Wired Screen Mirroring | Dr.fone
- Failed to play HEVC files on Redmi 12 5G
- Top 4 Android System Repair Software for Huawei P60 Bricked Devices | Dr.fone
- How to Reset Honor X50i without Losing Data | Dr.fone
- Reasons why Pokémon GPS does not Work On Apple iPhone 14 Plus? | Dr.fone
- In 2024, How to Reset Apple ID and Apple Password On Apple iPhone 7 Plus
- Process of Screen Sharing Realme 12+ 5G to PC- Detailed Steps | Dr.fone
- Troubleshooting Guide How to Fix an Unresponsive Poco F5 Pro 5G Screen | Dr.fone
- How to Reset Nokia C210 Without the Home Button | Dr.fone
- Ways To Find Unlocking Codes For Samsung Galaxy Z Flip 5 Phones
- The way to get back lost call history from Infinix Smart 7 HD
- How to use Pokemon Go Joystick on Xiaomi Redmi Note 12 Pro 5G? | Dr.fone
- Nokia 130 Music Bootloop Problem, How to Fix it Without Data Loss | Dr.fone
- How to share/fake gps on Uber for Samsung Galaxy F34 5G | Dr.fone
- In 2024, How to Unlock iPhone SE (2020) Passcode without iTunes without Knowing Passcode? | Dr.fone
- How to Transfer Data After Switching From Honor Magic Vs 2 to Latest Samsung | Dr.fone
- Apple iPhone 15 Pro Backup Password Never Set But Still Asking? Heres the Fix | Dr.fone
- Title: New Do You Want to Add Subtitles to Your MKV Files Easily? This Article Will Introduce 7 Simple Ways Through Which You Can Add Subtitles to MKV on Different Devices
- Author: Morgan
- Created at : 2024-05-19 05:12:33
- Updated at : 2024-05-20 05:12:33
- Link: https://ai-video-editing.techidaily.com/new-do-you-want-to-add-subtitles-to-your-mkv-files-easily-this-article-will-introduce-7-simple-ways-through-which-you-can-add-subtitles-to-mkv-on-different-/
- License: This work is licensed under CC BY-NC-SA 4.0.
