
:max_bytes(150000):strip_icc():format(webp)/windows_search-56aa11bd3df78cf772ac3ea5.jpg)
New Find a Solution for Effortless Sky Replacement Photoshop in This Comprehensive Guide. Also, Use the Easiest Video Editing Tool to Make Your Media Stunning
Find a Solution for Effortless Sky Replacement Photoshop in This Comprehensive Guide. Also, Use the Easiest Video Editing Tool to Make Your Media Stunning
Editing images is an essential point for photographers to make their work stand out. Creators use certain editing tools to polish their captured media. Suppose having an image with low sunlight that dims the natural beauty of the surroundings. In this situation, replacing sky backgrounds seems the only way to set a stunning landscape.
Photographers mostly rely on Adobe Photoshop sky replacement packs for this purpose. Using this option, users put life in their dull media with skies. Without further delay, learn everything about sky replacement Photoshop in this guide.
Sky Replacement A cross-platform works like magic for background removal or sky replacement photos!
Free Download Free Download Learn More

Part 1: How Good Has Photoshop Been in Helping Users Make Crisp Pictures and Media?
Adobe Photoshop is a graphics editor tool designed for professional digital art. It is widely used to grow business through designing virtual backgrounds and graphics. You can adjust the subject’s features and poses to make perfect portraits. To transform letters into artistic expressions, it offers Photoshop brushes and paints. Users can collaborate with their teammates and share work for approvals with this tool.
Key Features To Look Out In Adobe Photoshop
This tool can accelerate workflow with its latest features. It allows you to expand, add, and remove content from images with high-quality results. The following are some key features of Photoshop for your better understanding of this tool:
- It offers a sky replacement Photoshop feature that can change the sky from captured images.
- You can remove and replace your background in Photoshop and refine it as required.
- With the remove object feature, users can erase unwanted objects from images.
- Use the “Colorize” feature and make your black-and-white images colorful.
- Enhance workflow by using “Layer” masking that hides part of images without erasing them.
Part 2: A Detailed Guide on How to Replace Sky Background in Photoshop?
With AI integration in Adobe Photoshop, you can change skies with simple clicks. It provides a collection of skies from the Blue Skies, Spectacular, and sunset categories. Also, users can import any sky from their gallery or download one from presets. To do so, let us show you how to change the sky in Photoshop in given steps:
Step 1: Bring your desired image to the Adobe Photoshop. Head to the top toolbar and click the “Edit” option next to the “File.” Look for the “Sky Replacement” option from the list.

Step 2: After tapping “Sky Replacement,” you will get a respective screen on your front. Press the downward symbol next to the “Sky” and pick one sky from available options.

Step 3: Alternatively, you can hit the “+” icon and browse the sky image from your system. When you choose one, it gets added to the existing sky list. Select that and tap the “OK” button to apply changes in your media.

Part 3: An Alternative Solution: Wondershare Filmora Providing Workability with Easy Background Replacement
Changing sky in Photoshop is difficult for beginners and requires a basic skill set. It may take a lot of your time to understand its functionalities. That’s why choosing a tool with simple operation and high-quality output is important. In this regard, you should use Wondershare Filmora as a better option for everyone. It is a video editor that offers a variety of powerful features.
Using this tool, you can remove and change the background from your images or videos. With the integration of AI, it can automatically detect the object and foreground.
Other Prominent Video Editing Features
Apart from changing background, Filmora can perform A to Z video editing tasks. Let’s explore some of the key features to overview its fruitful functionalities:
Free Download For Win 7 or later(64-bit)
Free Download For macOS 10.14 or later
1. AI Text-to-Video
Who needs a camera and crew when you can effortlessly generate video from text? Filmora can transform your text into an engaging storytelling video with just text prompts. After getting the video, you can customize the video’s appearance with fonts, styles, and colors. Users can add smooth transitions between text elements for a cohesive flow.

2. AI Music Generator
Sometimes, we get tired of searching for music that perfectly aligns with our video content. In such cases, AI music generator saves us by providing the music we want. It offers you many options to choose from different genres and styles. You can set the music duration and number of tracks you want to generate. Then, you can make manual adjustments like balancing sound and auto normalization.

3. AI Image
Similar to text-to-video, Filmora can generate images from text. To do so, just describe your imagination in simple words. Then, you are asked to pick one resolution from given options. You can use the generated images in your projects directly. It allows you to generate an image from your chosen style. A few of the styles include Freestyle, Cyberpunk, and Futuristic.

4. AI Copilot Editing
While editing projects, humans often require suggestions or assistance. For this purpose, Filmora provides you with AI Copilot as your personal AI assistant. It will prevent errors in your editing by sending error messages. You can get the best editing solution as per your needs. This way, the quality of your project gets increased.

5. AI Vocal Remover
With advanced algorithms, it is an exceptional feature of Filmora. It relieves your breath by removing unwanted vocals from your audio or video. You can now completely remove vocal sounds from the video and add your recorded ones. It’s an automated process that separates voice and background in the media panel.

Steps To Remove Background Using Two Unique Ways with Wondershare Filmora
Filmora is one of the easiest tools to operate that anyone can use to get desired results. It allows users to approach the same features in different ways. Similarly, there are two unique ways to remove or change the sky Photoshop background, which are given below.
Free Download For Win 7 or later(64-bit)
Free Download For macOS 10.14 or later
Method 1: Using Chroma Key
Step 1: Start your project in Filmora and import two files in the timeline. Bring the background clip first in the timeline, then the original file. Cut the unnecessary portion of background-clip.

Step 2: Keep them selected and come to the “AI Tools” option in the right-side panel. Enable the “Chroma Key” toggle, and AI will automatically replace the background. You can use the “Tolerance,” “Edge Thickness,” and “Edge Feather” sliders for manual changes.

Method 2: Through AI Portrait
Step 1: Import your background clip and main video in Filmora 13. Place the background clip on track 1 and the main clip on the 2nd track in the timeline.

Step 2: Hold both of them and head to the right-side panel. Press the “AI Tools” option and scroll to access the “AI Portrait.” Enable that option, and your background will automatically change with AI. Now, you can make manual changes by moving the “Edge Thickness” and “Feather” sliders.

Conclusion
To wrap up, let’s say that Sky Photoshop sets the right tone for your media with landscapes. On the other hand, this feature might prove difficult for some users to handle. Thus, they can rely on Wondershare Filmora for convenience. Beginners and professionals can benefit from its extraordinary features in video editing.
Free Download Free Download Learn More
Part 1: How Good Has Photoshop Been in Helping Users Make Crisp Pictures and Media?
Adobe Photoshop is a graphics editor tool designed for professional digital art. It is widely used to grow business through designing virtual backgrounds and graphics. You can adjust the subject’s features and poses to make perfect portraits. To transform letters into artistic expressions, it offers Photoshop brushes and paints. Users can collaborate with their teammates and share work for approvals with this tool.
Key Features To Look Out In Adobe Photoshop
This tool can accelerate workflow with its latest features. It allows you to expand, add, and remove content from images with high-quality results. The following are some key features of Photoshop for your better understanding of this tool:
- It offers a sky replacement Photoshop feature that can change the sky from captured images.
- You can remove and replace your background in Photoshop and refine it as required.
- With the remove object feature, users can erase unwanted objects from images.
- Use the “Colorize” feature and make your black-and-white images colorful.
- Enhance workflow by using “Layer” masking that hides part of images without erasing them.
Part 2: A Detailed Guide on How to Replace Sky Background in Photoshop?
With AI integration in Adobe Photoshop, you can change skies with simple clicks. It provides a collection of skies from the Blue Skies, Spectacular, and sunset categories. Also, users can import any sky from their gallery or download one from presets. To do so, let us show you how to change the sky in Photoshop in given steps:
Step 1: Bring your desired image to the Adobe Photoshop. Head to the top toolbar and click the “Edit” option next to the “File.” Look for the “Sky Replacement” option from the list.
Step 2: After tapping “Sky Replacement,” you will get a respective screen on your front. Press the downward symbol next to the “Sky” and pick one sky from available options.
Step 3: Alternatively, you can hit the “+” icon and browse the sky image from your system. When you choose one, it gets added to the existing sky list. Select that and tap the “OK” button to apply changes in your media.
Part 3: An Alternative Solution: Wondershare Filmora Providing Workability with Easy Background Replacement
Changing sky in Photoshop is difficult for beginners and requires a basic skill set. It may take a lot of your time to understand its functionalities. That’s why choosing a tool with simple operation and high-quality output is important. In this regard, you should use Wondershare Filmora as a better option for everyone. It is a video editor that offers a variety of powerful features.
Using this tool, you can remove and change the background from your images or videos. With the integration of AI, it can automatically detect the object and foreground.
Other Prominent Video Editing Features
Apart from changing background, Filmora can perform A to Z video editing tasks. Let’s explore some of the key features to overview its fruitful functionalities:
Free Download For Win 7 or later(64-bit)
Free Download For macOS 10.14 or later
1. AI Text-to-Video
Who needs a camera and crew when you can effortlessly generate video from text? Filmora can transform your text into an engaging storytelling video with just text prompts. After getting the video, you can customize the video’s appearance with fonts, styles, and colors. Users can add smooth transitions between text elements for a cohesive flow.
2. AI Music Generator
Sometimes, we get tired of searching for music that perfectly aligns with our video content. In such cases, AI music generator saves us by providing the music we want. It offers you many options to choose from different genres and styles. You can set the music duration and number of tracks you want to generate. Then, you can make manual adjustments like balancing sound and auto normalization.
3. AI Image
Similar to text-to-video, Filmora can generate images from text. To do so, just describe your imagination in simple words. Then, you are asked to pick one resolution from given options. You can use the generated images in your projects directly. It allows you to generate an image from your chosen style. A few of the styles include Freestyle, Cyberpunk, and Futuristic.
4. AI Copilot Editing
While editing projects, humans often require suggestions or assistance. For this purpose, Filmora provides you with AI Copilot as your personal AI assistant. It will prevent errors in your editing by sending error messages. You can get the best editing solution as per your needs. This way, the quality of your project gets increased.
5. AI Vocal Remover
With advanced algorithms, it is an exceptional feature of Filmora. It relieves your breath by removing unwanted vocals from your audio or video. You can now completely remove vocal sounds from the video and add your recorded ones. It’s an automated process that separates voice and background in the media panel.
Steps To Remove Background Using Two Unique Ways with Wondershare Filmora
Filmora is one of the easiest tools to operate that anyone can use to get desired results. It allows users to approach the same features in different ways. Similarly, there are two unique ways to remove or change the sky Photoshop background, which are given below.
Free Download For Win 7 or later(64-bit)
Free Download For macOS 10.14 or later
Method 1: Using Chroma Key
Step 1: Start your project in Filmora and import two files in the timeline. Bring the background clip first in the timeline, then the original file. Cut the unnecessary portion of background-clip.
Step 2: Keep them selected and come to the “AI Tools” option in the right-side panel. Enable the “Chroma Key” toggle, and AI will automatically replace the background. You can use the “Tolerance,” “Edge Thickness,” and “Edge Feather” sliders for manual changes.
Method 2: Through AI Portrait
Step 1: Import your background clip and main video in Filmora 13. Place the background clip on track 1 and the main clip on the 2nd track in the timeline.
Step 2: Hold both of them and head to the right-side panel. Press the “AI Tools” option and scroll to access the “AI Portrait.” Enable that option, and your background will automatically change with AI. Now, you can make manual changes by moving the “Edge Thickness” and “Feather” sliders.
Conclusion
To wrap up, let’s say that Sky Photoshop sets the right tone for your media with landscapes. On the other hand, this feature might prove difficult for some users to handle. Thus, they can rely on Wondershare Filmora for convenience. Beginners and professionals can benefit from its extraordinary features in video editing.
Add Background to Video With/Without a Green Screen
Versatile Video Editor - Wondershare Filmora
An easy yet powerful editor
Numerous effects to choose from
Detailed tutorials provided by the official channel
Video’s background is the most crucial part of video editing. When filming, the backgrounds cannot be more attractive with the natural background, so editors use background effects to change the background of the video and make it more appealing. Wondershare Filmora is a fantastic software to add background to a video without a green screen. The good news is that Filmora offers various tools to remove background from a video, add a background, add transition effects, and all these by using virtual reality to complete the task. It has several effects and themes and has tools to remove background effectively. Many editors are available in the market for background effects but with limitations. Filmora offers an effective way to add background without a green screen and with a green screen. You will also be able to add a background to the green screen photo online.
Let us discuss the finest tools available in Filmora to change the background easily and quickly. This article will concentrate on two methods to edit background.
● How to put a background on a video without a green screen.
● How to add background to video with green screen.
If you wonder how to add a background to a green screen in after effects, it involves a very long step and quality footage to remove the background.
In this article
01 [Add background to green screen video](#Part 1)
02 [Add background to video without a green screen.](#Part 2)
Part 1 Add background to green screen video
The green screen effect is the advanced feature in overlays. It makes the background of the clips transparent. If you want to add background to green screen video online, there are many websites available but always with some limitations in resolutions and quality while exporting the video. Filmora is a useful tool in video editing to create animatic and superimpose backgrounds like any jet craft or a bird flying. You can easily make these changes to the video using Filmora by using a green screen footage clip or a plain green screen in the background while creating the footage. We will focus on putting a background on a green screen in this part.
Let us discuss how to add background to green screen are pretty simple using Filmora.
Step1 Add Overlay clip to timeline
Select “Create New Project” to start the editing. At first, you have to choose both the overlay clip and background clip and add them to the timeline. You can either import from the library or drag the files to the timeline in the positions shown in the picture.
You can edit the overlay clip individually by adding animation, effects, filterers, mask frame, and blending modes (multiply, darken, or color burn). Let us move to the next step, how to put the background on the green screen.
Step2 Make a Green Screen
Let’s get into the first step to add background to the green screen video. In this part, you will be using a green screen to remove the background. So, import the green screen clips to the media library. Now, add the background green screen to the timeline above the video track as shown in the picture.

● Move the cursor to the green screen on the timeline and double-click on it.
● The settings box will appear on the left.
● You have to tick the Chroma key there.
The green screen effects will be applied automatically.

The video can be refined with many additional tools like Tolerance, Offset, and Alpha channel to make the video background clear. Once satisfied with the results, click on OK. Now that we have discussed how to add background to green screen video with the help of Filmora let’s now discuss how to add a background to a video without a green screen.
Part 2 Add background to video without a green screen
Let us learn how to add a background to a video without a green screen. In Filmora, there is a special effect called the Human segmentation effect to isolate people from the backgrounds without a green screen. All it takes is a few clicks. Once you remove the surround, you can add an image or a video clip to go well with your original video. Another unique feature is that after removing the background from the video clip, you can add it to the overlay of another video clip. It works well when it has a natural and single person in front of the camera.
Let’s discuss how to add background without a green screen.
Wondershare Filmora
Get started easily with Filmora’s powerful performance, intuitive interface, and countless effects!
Try It Free Try It Free Try It Free Learn More about Filmora>

Step1 Import Media to Timeline
Import the video clip from the device. You can also drag the video clip from the timeline. You can use other effects from Filmora to make necessary changes like editing, cutting, trimming, filter and transition.

Step2 Adding Human Segmentation Effect
To see the options to add background to video without a green screen, go to Effects – AI Portrait, and you can see a list of all AI portrait effects here. You can see the human segmentation effect, drag and place it on the top of your video clip in the timeline.

Step3 Preview and Adjust
After the human segmentation effect, the people will be isolated separately from the background, shown in the picture. Double click on the effects in the timeline where you can edit, adjust, thickness, feather, and preview.

Step4 Replace and change video background
If you wish to change the background, import an image or video below your main track. Now, that is how to add a background without a green screen.

Thus, you learned to create your green screen backgrounds and add a background to a green screen video using the favorite video effect software, Filmora.
Conclusion
Thus, in this guide, you learned how to add a background to a video without a green screen, and we hope this will be useful. You can find multiple software online for adding a background to a green screen with additional background effects. However, the Human segmentation available in Filmora is the easiest way to change scenes and clone people. With support to over 100 video tracks, Filmora is by far the best tool that allows you to change the setting with and without a green screen.
Video’s background is the most crucial part of video editing. When filming, the backgrounds cannot be more attractive with the natural background, so editors use background effects to change the background of the video and make it more appealing. Wondershare Filmora is a fantastic software to add background to a video without a green screen. The good news is that Filmora offers various tools to remove background from a video, add a background, add transition effects, and all these by using virtual reality to complete the task. It has several effects and themes and has tools to remove background effectively. Many editors are available in the market for background effects but with limitations. Filmora offers an effective way to add background without a green screen and with a green screen. You will also be able to add a background to the green screen photo online.
Let us discuss the finest tools available in Filmora to change the background easily and quickly. This article will concentrate on two methods to edit background.
● How to put a background on a video without a green screen.
● How to add background to video with green screen.
If you wonder how to add a background to a green screen in after effects, it involves a very long step and quality footage to remove the background.
In this article
01 [Add background to green screen video](#Part 1)
02 [Add background to video without a green screen.](#Part 2)
Part 1 Add background to green screen video
The green screen effect is the advanced feature in overlays. It makes the background of the clips transparent. If you want to add background to green screen video online, there are many websites available but always with some limitations in resolutions and quality while exporting the video. Filmora is a useful tool in video editing to create animatic and superimpose backgrounds like any jet craft or a bird flying. You can easily make these changes to the video using Filmora by using a green screen footage clip or a plain green screen in the background while creating the footage. We will focus on putting a background on a green screen in this part.
Let us discuss how to add background to green screen are pretty simple using Filmora.
Step1 Add Overlay clip to timeline
Select “Create New Project” to start the editing. At first, you have to choose both the overlay clip and background clip and add them to the timeline. You can either import from the library or drag the files to the timeline in the positions shown in the picture.
You can edit the overlay clip individually by adding animation, effects, filterers, mask frame, and blending modes (multiply, darken, or color burn). Let us move to the next step, how to put the background on the green screen.
Step2 Make a Green Screen
Let’s get into the first step to add background to the green screen video. In this part, you will be using a green screen to remove the background. So, import the green screen clips to the media library. Now, add the background green screen to the timeline above the video track as shown in the picture.
● Move the cursor to the green screen on the timeline and double-click on it.
● The settings box will appear on the left.
● You have to tick the Chroma key there.
The green screen effects will be applied automatically.
The video can be refined with many additional tools like Tolerance, Offset, and Alpha channel to make the video background clear. Once satisfied with the results, click on OK. Now that we have discussed how to add background to green screen video with the help of Filmora let’s now discuss how to add a background to a video without a green screen.
Part 2 Add background to video without a green screen
Let us learn how to add a background to a video without a green screen. In Filmora, there is a special effect called the Human segmentation effect to isolate people from the backgrounds without a green screen. All it takes is a few clicks. Once you remove the surround, you can add an image or a video clip to go well with your original video. Another unique feature is that after removing the background from the video clip, you can add it to the overlay of another video clip. It works well when it has a natural and single person in front of the camera.
Let’s discuss how to add background without a green screen.
Wondershare Filmora
Get started easily with Filmora’s powerful performance, intuitive interface, and countless effects!
Try It Free Try It Free Try It Free Learn More about Filmora>
Step1 Import Media to Timeline
Import the video clip from the device. You can also drag the video clip from the timeline. You can use other effects from Filmora to make necessary changes like editing, cutting, trimming, filter and transition.
Step2 Adding Human Segmentation Effect
To see the options to add background to video without a green screen, go to Effects – AI Portrait, and you can see a list of all AI portrait effects here. You can see the human segmentation effect, drag and place it on the top of your video clip in the timeline.
Step3 Preview and Adjust
After the human segmentation effect, the people will be isolated separately from the background, shown in the picture. Double click on the effects in the timeline where you can edit, adjust, thickness, feather, and preview.
Step4 Replace and change video background
If you wish to change the background, import an image or video below your main track. Now, that is how to add a background without a green screen.
Thus, you learned to create your green screen backgrounds and add a background to a green screen video using the favorite video effect software, Filmora.
Conclusion
Thus, in this guide, you learned how to add a background to a video without a green screen, and we hope this will be useful. You can find multiple software online for adding a background to a green screen with additional background effects. However, the Human segmentation available in Filmora is the easiest way to change scenes and clone people. With support to over 100 video tracks, Filmora is by far the best tool that allows you to change the setting with and without a green screen.
Your Search for the Best GIF Creator Tools Ends Here
What are the 10 Best GIF Creator?
An easy yet powerful editor
Numerous effects to choose from
Detailed tutorials provided by the official channel
Stay tuned to find the most affordable GIF creator solutions.
In this article
01 [Why Gifs Are Essential for Every Marketer?](#Part 1)
02 [How to Make Your Own GIF?](#Part 2)
03 [What Are 10 Best GIF Creator to Find Brilliant Pre-made Gifs?](#Part 3)
Part 1 Why Gifs Are Essential for Every Marketer?
Everyone around you today is accustomed with the fact that GIFs are an interesting and impactful means of content sharing. These 3-5 second snippets are highly preferred and convenient ways to deliver information that is precise, clear and to the point. When it comes to time frames, short and quick GIFs are obvious choices over lengthy videos. Additionally, GIFs are eye-catchy and keep you captivated to see though the entire content within seconds, contradictory to those monotonous and often dull videos that sound more like a long, boring lecture.
These are an effective media tool that is not limited to sharing information that is chiefly entertainment based or fun centered. You can use them to deliver important content that addresses a specific purpose or audience. Owing to this, GIFs have become an essential marketing utility, here’s why:
● Improve Product Branding:
GIFs can serve as impressive branding tools for your products in the market. Markets today are considerably impacted by the ‘What You See is What You Buy’ concept, which puts forward the need to lay added stress on effective branding.
GIFs are ready to sort this out with their exciting range of features. From video editing choices to sound and color customization, GIFs are loaded with everything you need to improvise your product branding. All you have to do is explore your creativity to make the most of the GIF branding choices.
● Explain it Better
On a preference poll, most of us would shift to ‘watch’ over ‘read’ for a comprehensive understanding. An attractive motion visual is an even better treat. GIFs are pivotal in making viewers relate to the concept and message behind your product in a more enhanced manner.
Additionally, these are a continent means to introduce emotional mobility among your target audience with depictive emojis. You can use GIFs to develop effective content approaches to make the audience connect with your product viability, both practically band emotionally.
● Increase Visitor Attraction
Today’s changing times have brought about a rapid outlook towards everything. All of us are bounded by time constraints and when browsing the web, the prime need is to look for quick and accurate solutions to everything concerned.
Short and exact information delivery of GIFs is something that would keep visitors glued to your site because they will be assured of getting exactly what they search for and that too in an interesting and entertaining way.
Part 2 How to Make Your Own GIF?
Now that you are familiar with the creative marketing credibility of GIFs, you might naturally feel motivated towards creating a GIF of your own. In case you are, see through the following section of this article to find out interesting ways of creating interesting and catchy GIFs, either for impressive product marketing or just to make your social media posts leave your community peers in awe!
Looking for the best GIF creator solutions on the web, you can rely on GIPHY, one of the most preferred and convenient databases to create GIFs quickly. This is a smartphone compatible tool and works well with almost any device. Follow the steps given below to make GIFs with this tool:
Step 1:
Download and install the GIPHY app in your device.
Step 2:
Click on ‘Create’ in the app’s welcome screen. This will change (+) icon at the top-right corner to the ‘Camera’ symbol. You can also navigate to the ‘Profile’ at the bottom-right and tap the (+) or ‘Camera’ icon in the app’s account page.
Step 3:
Click on ‘Allow Camera Access’. You will receive two successive prompt messages from the app. Click on ‘Allow’ to grant access permissions to your device media. When you are done, click on ‘I Agree’.
Step 4:
GIFHY uses your device’s front camera for GIF creation. However, if you need to go for a camera switch, click on the ‘Camera’ sign at the bottom-right.
Step 5:
Choose a desired filter and effect for your GIF with a left or right swipe on the live feed toolbar. The app has 11 amazing and realistic effects, including VHS Static, 3D Glasses, etc.
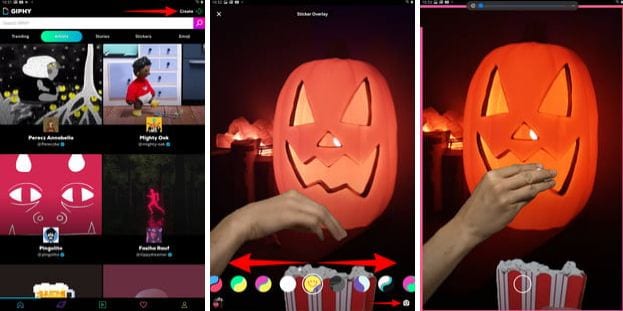
Step 6:
You can take up either of the following:
Press either of the ‘Filter’ or ‘Effect’ buttons to take static shots to create GIF from images, or press and hold the same to create animated GIF. For simply using effects, tap the white button.
In case you choose to create a motion GIF, the app forms a ‘visual timer’ around the editor screen. The motion recording stops once the line is in sync with the screen edges.
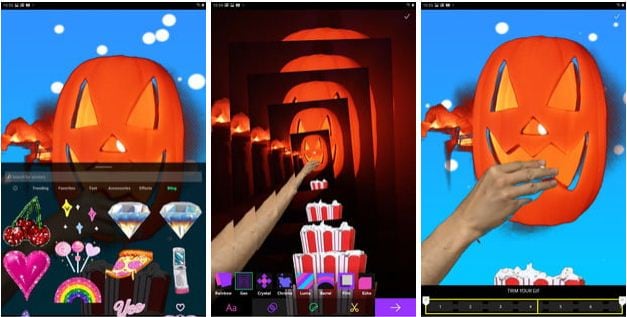
Step 7:
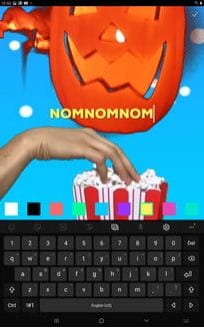
Having captured your perfect shot, you have the liberty to merge it with an image or video. However, do consider the following options to add some more elements to your capture: You can add relatable text in 9 color choices.
● Enhance your graphic presentation with 8 amazing effects like, ‘rainbow overlays’, BW film grains, etc.
● Choose from a never ending list of suitable stickers to add the feel through connect to your GIFs.
● Trim your animated GIFs to the ‘just perfect’ portion by adjusting the editing markers.
Relax; that’s no rocket science. Just tap on the respective buttons and there you go!
Step 8:
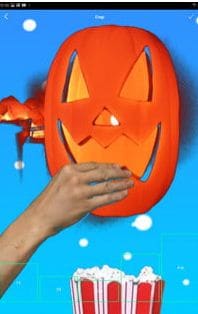
Set your GIF in a desired size frame by choosing the ‘Crop’ tool from the top-right corner of the editing screen. You are given a size flexibility of 1:1, 3:2, 16:9, 4:5 and 9:16.
Step 9:
Once you are satisfied with your creation, tap the ‘Right Arrow’ icon. In the interface that follows, add suitable share tags to the GIF.
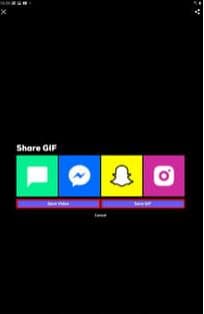
Step 10:
Tap ‘Share GIF’ to post your creation on social media platforms or share it through popular IM apps. To save your initially captured clip, click on ‘Save Video’ or tap ‘Save GIF’ to save your creation in your smartphone’s memory.
Part 1 What Are 10 Best GIF Creator to Find Brilliant Pre-made Gifs?
Having talked about GIF creation on the go, let’s take a dive into the best GIF creator solutions that are a storehouse of exciting pre-made GIFs. When browsing the web for an affordable GIF maker tool, you land across a pool of choices. Read through the further sections of this article to find out what’s best for you.
Described below are 10 best alternatives to get amazing pre-made GIFs:
● Wondershare Filmora Video Editor
This one is a popular, preferred and top rated application where you get to choose from an exciting range of pre-made GIFs under a variety of specific categories. All you need to do is, visit the app’s official site, browse to your favorite GIF category and select a desired GIF. Follow a few app instructions to save your selection and that’s it! Your selected GIF reaches your device memory within seconds.

Wondershare Filmora - Best Video Editor for Mac/Windows
5,481,435 people have downloaded it.
Build unique custom animations without breaking a sweat.
Focus on creating epic stories and leave the details to Filmora’s auto features.
Start a creative adventure with drag & drop effects and endless possibilities.
Filmora simplifies advanced features to save you time and effort.
Filmora cuts out repetition so you can move on to your next creative breakthrough.
Key Features
● This app is available to you absolutely free of cost.
● Has an intelligent and user cohesive interface.
● Loaded with tons of brilliant GIFs to choose from.
● The app supports GIF customization.
● GIFHY
Launched in 2013, this one is probably the best GIF maker and downloader tool available on the web today. It is a free tool, packed with enormous varieties of GIFs to choose from. What’s more interesting about the app is that you are free to play with your editing creativity to enhance your downloaded GIFs in the GIPHY editor.
Key Features
● It comes with an easy to use, convenient interface.
● You can edit downloaded GIFs with hundreds of effects and filters.
● The app provides you a direct sharing platform, allowing you to post GIFs to various social media platforms and also go for sharing via Instant Messaging applications.
● This is a fast processing tool that allows you to escape the notch of annoying and delayed download processes.
● Tenor
You can conveniently regard this one as the closest competitor to the GIPHY GIF creator and downloader tool. Needless to say, both are quite similar to each other in interface and usage respects. However, focusing on search results for a common keyword, you find diverse variations to your obvious surprise.
Key Features
● This is a free to use, interactive interface tool.
● It introduces a GIF Keyboard that allows you to search the most specific and relatable GIFs.
● It ensures a speedy and high quality GIF download.
● You can explore your editing skills to your heart’s content to improvise the downloaded GIFs with this tool.
● This tool gives you the liberty to directly share GIFs across different platforms.
If you like to spend ample time on choosing what’s perfect for you, refer this online tool for your GIF download solutions. It caters to your love of diversity with the most deep rooted and broad GIF range. However, this one comes with a little messy interface, demanding some patience from you to get to the right thing.
Key Features
● This tool provides you with almost all possible choices for a GIF category.
● It is available to you free of cost
● The tool site is loaded with rich and quality GIF content.
● This one is a direct save and export tool for your downloaded GIFs.
● Gfycat
You can prefer this one as a GIF hosting tool. Developed with a view to launch a common medium for GIF and HTML contents, this app ensures in-time and hassle free downloads and delivery. Though lacking a refined search bar, this tool promises you of excellence in content quality.
Key Features
● This comes to you as one of the most reliable GIF hosting tools.
● It is a free and quick content delivery tool.
● You are allowed to select the most suitable one from a variety of playback choices.
● This tool also gives you the flexibility of direct media sharing.
● GIFbin
If you are hung-over decade old nostalgia and the fever doesn’t seem to go away, you can check this site for some really satisfying retro and other similar content. This would definitely make you take a toll back to the times when MSN and Limewire were unparalleled market leaders in content sharing.
Key Features
● GIFbin is a storehouse of the best animated GIFs, that is on a continuous update to facilitate fresh and quality based content, every time you visit the site.
● It has an advanced, API enabled search mechanism.
● It boasts of having the handiest and convenient user interface.
● If you prefer GIFs of the comic genre, this tool is heaven for you.
● Imgflip
This is another GIF download site, commonly preferred for comedy and fun oriented content. Using this site, you can download and create a variety of GIF based memes that have the potential to flood your social media posts with likes and comments. This one is a complete GIF basket, suited to vast content varieties and user preferences. You will find the site’s official watermark on all its contents.
Key Features
● The site stands among the most preferred GIF-meme creation and sharing platforms.
● The tool is packed with loads of quality content under specific categories
● You can improvise the dimensions of your editing skills to modify downloaded GIFs.
● This site has a default media export feature that you can use to share your GIFs on social media.
● Imgur
Launched in 2009, this is among the most visited GIF sites, originally created for sharing meme based contents on social media. Its extensive search filters are dedicated to fetch the exact GIFs and memes you are looking for. If you are tired of browsing sites for particular content requirements, your search spree will definitely end here.
Key Features
● The site is known for its extensive and diversified content quality.
● It is a free, convenient and dependable GIF download tool.
● Imgur is highly preferred for content export across various media platforms.
● It is equipped with an advanced and updated search filter that assures you of getting fresh and top quality GIFs on almost every possible keyword.
● Tumblr
Claiming a launch date of 13 years back, this is quite a good GIF download option. You can find excellent quality GIF content on the site, particularly in the comic genre. Though not as popular as its online counterparts today, the site definitely enjoyed commendable visitor preferences at the time of its launch. You can certainly visit this site for a filling entertainment dose.
Key Features
● Tumblr is a free download site with a user friendly interface.
● The site is loaded with notable content varieties.
● You can go for direct media sharing through this site.
● Its comic GIFs are quite hilarious.
● Know Your Meme
This site uses the Wiki software to stock an inventory of classic GIFs and memes. Using this database for GIF downloads means that you don’t need to compromise on content and image quality. The site contents are periodically updated to ensure that visitors are not exposed to stale and outdated content.
Key Features
● The site offers fresh content having catchy and latest GIFs.
● This is a complete storehouse of GIFs and memes that can definitely keep you rolling.
● The site comes as a free tool and gas a user cohesive interface
● It hast the most efficient search filters that are regularly improvised to ensure quality content delivery.
● Key Takeaways from This Episode →
● GIFs are an effective and captivating means of quality content sharing and message delivery. Take them as a hilarious entertainment source or use them to enhance your marketing policies, GIFs can do it all.
● Influenced by the user credibility of GIFs, there are loads of GIF creator and download tools available online; among which Filmora by Wondershare is the current market leader. You can use this app to explore your GIF editing skills or download and share latest GIFs across media sharing platforms.
Stay tuned to find the most affordable GIF creator solutions.
In this article
01 [Why Gifs Are Essential for Every Marketer?](#Part 1)
02 [How to Make Your Own GIF?](#Part 2)
03 [What Are 10 Best GIF Creator to Find Brilliant Pre-made Gifs?](#Part 3)
Part 1 Why Gifs Are Essential for Every Marketer?
Everyone around you today is accustomed with the fact that GIFs are an interesting and impactful means of content sharing. These 3-5 second snippets are highly preferred and convenient ways to deliver information that is precise, clear and to the point. When it comes to time frames, short and quick GIFs are obvious choices over lengthy videos. Additionally, GIFs are eye-catchy and keep you captivated to see though the entire content within seconds, contradictory to those monotonous and often dull videos that sound more like a long, boring lecture.
These are an effective media tool that is not limited to sharing information that is chiefly entertainment based or fun centered. You can use them to deliver important content that addresses a specific purpose or audience. Owing to this, GIFs have become an essential marketing utility, here’s why:
● Improve Product Branding:
GIFs can serve as impressive branding tools for your products in the market. Markets today are considerably impacted by the ‘What You See is What You Buy’ concept, which puts forward the need to lay added stress on effective branding.
GIFs are ready to sort this out with their exciting range of features. From video editing choices to sound and color customization, GIFs are loaded with everything you need to improvise your product branding. All you have to do is explore your creativity to make the most of the GIF branding choices.
● Explain it Better
On a preference poll, most of us would shift to ‘watch’ over ‘read’ for a comprehensive understanding. An attractive motion visual is an even better treat. GIFs are pivotal in making viewers relate to the concept and message behind your product in a more enhanced manner.
Additionally, these are a continent means to introduce emotional mobility among your target audience with depictive emojis. You can use GIFs to develop effective content approaches to make the audience connect with your product viability, both practically band emotionally.
● Increase Visitor Attraction
Today’s changing times have brought about a rapid outlook towards everything. All of us are bounded by time constraints and when browsing the web, the prime need is to look for quick and accurate solutions to everything concerned.
Short and exact information delivery of GIFs is something that would keep visitors glued to your site because they will be assured of getting exactly what they search for and that too in an interesting and entertaining way.
Part 2 How to Make Your Own GIF?
Now that you are familiar with the creative marketing credibility of GIFs, you might naturally feel motivated towards creating a GIF of your own. In case you are, see through the following section of this article to find out interesting ways of creating interesting and catchy GIFs, either for impressive product marketing or just to make your social media posts leave your community peers in awe!
Looking for the best GIF creator solutions on the web, you can rely on GIPHY, one of the most preferred and convenient databases to create GIFs quickly. This is a smartphone compatible tool and works well with almost any device. Follow the steps given below to make GIFs with this tool:
Step 1:
Download and install the GIPHY app in your device.
Step 2:
Click on ‘Create’ in the app’s welcome screen. This will change (+) icon at the top-right corner to the ‘Camera’ symbol. You can also navigate to the ‘Profile’ at the bottom-right and tap the (+) or ‘Camera’ icon in the app’s account page.
Step 3:
Click on ‘Allow Camera Access’. You will receive two successive prompt messages from the app. Click on ‘Allow’ to grant access permissions to your device media. When you are done, click on ‘I Agree’.
Step 4:
GIFHY uses your device’s front camera for GIF creation. However, if you need to go for a camera switch, click on the ‘Camera’ sign at the bottom-right.
Step 5:
Choose a desired filter and effect for your GIF with a left or right swipe on the live feed toolbar. The app has 11 amazing and realistic effects, including VHS Static, 3D Glasses, etc.
Step 6:
You can take up either of the following:
Press either of the ‘Filter’ or ‘Effect’ buttons to take static shots to create GIF from images, or press and hold the same to create animated GIF. For simply using effects, tap the white button.
In case you choose to create a motion GIF, the app forms a ‘visual timer’ around the editor screen. The motion recording stops once the line is in sync with the screen edges.
Step 7:
Having captured your perfect shot, you have the liberty to merge it with an image or video. However, do consider the following options to add some more elements to your capture: You can add relatable text in 9 color choices.
● Enhance your graphic presentation with 8 amazing effects like, ‘rainbow overlays’, BW film grains, etc.
● Choose from a never ending list of suitable stickers to add the feel through connect to your GIFs.
● Trim your animated GIFs to the ‘just perfect’ portion by adjusting the editing markers.
Relax; that’s no rocket science. Just tap on the respective buttons and there you go!
Step 8:
Set your GIF in a desired size frame by choosing the ‘Crop’ tool from the top-right corner of the editing screen. You are given a size flexibility of 1:1, 3:2, 16:9, 4:5 and 9:16.
Step 9:
Once you are satisfied with your creation, tap the ‘Right Arrow’ icon. In the interface that follows, add suitable share tags to the GIF.
Step 10:
Tap ‘Share GIF’ to post your creation on social media platforms or share it through popular IM apps. To save your initially captured clip, click on ‘Save Video’ or tap ‘Save GIF’ to save your creation in your smartphone’s memory.
Part 1 What Are 10 Best GIF Creator to Find Brilliant Pre-made Gifs?
Having talked about GIF creation on the go, let’s take a dive into the best GIF creator solutions that are a storehouse of exciting pre-made GIFs. When browsing the web for an affordable GIF maker tool, you land across a pool of choices. Read through the further sections of this article to find out what’s best for you.
Described below are 10 best alternatives to get amazing pre-made GIFs:
● Wondershare Filmora Video Editor
This one is a popular, preferred and top rated application where you get to choose from an exciting range of pre-made GIFs under a variety of specific categories. All you need to do is, visit the app’s official site, browse to your favorite GIF category and select a desired GIF. Follow a few app instructions to save your selection and that’s it! Your selected GIF reaches your device memory within seconds.
Wondershare Filmora - Best Video Editor for Mac/Windows
5,481,435 people have downloaded it.
Build unique custom animations without breaking a sweat.
Focus on creating epic stories and leave the details to Filmora’s auto features.
Start a creative adventure with drag & drop effects and endless possibilities.
Filmora simplifies advanced features to save you time and effort.
Filmora cuts out repetition so you can move on to your next creative breakthrough.
Key Features
● This app is available to you absolutely free of cost.
● Has an intelligent and user cohesive interface.
● Loaded with tons of brilliant GIFs to choose from.
● The app supports GIF customization.
● GIFHY
Launched in 2013, this one is probably the best GIF maker and downloader tool available on the web today. It is a free tool, packed with enormous varieties of GIFs to choose from. What’s more interesting about the app is that you are free to play with your editing creativity to enhance your downloaded GIFs in the GIPHY editor.
Key Features
● It comes with an easy to use, convenient interface.
● You can edit downloaded GIFs with hundreds of effects and filters.
● The app provides you a direct sharing platform, allowing you to post GIFs to various social media platforms and also go for sharing via Instant Messaging applications.
● This is a fast processing tool that allows you to escape the notch of annoying and delayed download processes.
● Tenor
You can conveniently regard this one as the closest competitor to the GIPHY GIF creator and downloader tool. Needless to say, both are quite similar to each other in interface and usage respects. However, focusing on search results for a common keyword, you find diverse variations to your obvious surprise.
Key Features
● This is a free to use, interactive interface tool.
● It introduces a GIF Keyboard that allows you to search the most specific and relatable GIFs.
● It ensures a speedy and high quality GIF download.
● You can explore your editing skills to your heart’s content to improvise the downloaded GIFs with this tool.
● This tool gives you the liberty to directly share GIFs across different platforms.
If you like to spend ample time on choosing what’s perfect for you, refer this online tool for your GIF download solutions. It caters to your love of diversity with the most deep rooted and broad GIF range. However, this one comes with a little messy interface, demanding some patience from you to get to the right thing.
Key Features
● This tool provides you with almost all possible choices for a GIF category.
● It is available to you free of cost
● The tool site is loaded with rich and quality GIF content.
● This one is a direct save and export tool for your downloaded GIFs.
● Gfycat
You can prefer this one as a GIF hosting tool. Developed with a view to launch a common medium for GIF and HTML contents, this app ensures in-time and hassle free downloads and delivery. Though lacking a refined search bar, this tool promises you of excellence in content quality.
Key Features
● This comes to you as one of the most reliable GIF hosting tools.
● It is a free and quick content delivery tool.
● You are allowed to select the most suitable one from a variety of playback choices.
● This tool also gives you the flexibility of direct media sharing.
● GIFbin
If you are hung-over decade old nostalgia and the fever doesn’t seem to go away, you can check this site for some really satisfying retro and other similar content. This would definitely make you take a toll back to the times when MSN and Limewire were unparalleled market leaders in content sharing.
Key Features
● GIFbin is a storehouse of the best animated GIFs, that is on a continuous update to facilitate fresh and quality based content, every time you visit the site.
● It has an advanced, API enabled search mechanism.
● It boasts of having the handiest and convenient user interface.
● If you prefer GIFs of the comic genre, this tool is heaven for you.
● Imgflip
This is another GIF download site, commonly preferred for comedy and fun oriented content. Using this site, you can download and create a variety of GIF based memes that have the potential to flood your social media posts with likes and comments. This one is a complete GIF basket, suited to vast content varieties and user preferences. You will find the site’s official watermark on all its contents.
Key Features
● The site stands among the most preferred GIF-meme creation and sharing platforms.
● The tool is packed with loads of quality content under specific categories
● You can improvise the dimensions of your editing skills to modify downloaded GIFs.
● This site has a default media export feature that you can use to share your GIFs on social media.
● Imgur
Launched in 2009, this is among the most visited GIF sites, originally created for sharing meme based contents on social media. Its extensive search filters are dedicated to fetch the exact GIFs and memes you are looking for. If you are tired of browsing sites for particular content requirements, your search spree will definitely end here.
Key Features
● The site is known for its extensive and diversified content quality.
● It is a free, convenient and dependable GIF download tool.
● Imgur is highly preferred for content export across various media platforms.
● It is equipped with an advanced and updated search filter that assures you of getting fresh and top quality GIFs on almost every possible keyword.
● Tumblr
Claiming a launch date of 13 years back, this is quite a good GIF download option. You can find excellent quality GIF content on the site, particularly in the comic genre. Though not as popular as its online counterparts today, the site definitely enjoyed commendable visitor preferences at the time of its launch. You can certainly visit this site for a filling entertainment dose.
Key Features
● Tumblr is a free download site with a user friendly interface.
● The site is loaded with notable content varieties.
● You can go for direct media sharing through this site.
● Its comic GIFs are quite hilarious.
● Know Your Meme
This site uses the Wiki software to stock an inventory of classic GIFs and memes. Using this database for GIF downloads means that you don’t need to compromise on content and image quality. The site contents are periodically updated to ensure that visitors are not exposed to stale and outdated content.
Key Features
● The site offers fresh content having catchy and latest GIFs.
● This is a complete storehouse of GIFs and memes that can definitely keep you rolling.
● The site comes as a free tool and gas a user cohesive interface
● It hast the most efficient search filters that are regularly improvised to ensure quality content delivery.
● Key Takeaways from This Episode →
● GIFs are an effective and captivating means of quality content sharing and message delivery. Take them as a hilarious entertainment source or use them to enhance your marketing policies, GIFs can do it all.
● Influenced by the user credibility of GIFs, there are loads of GIF creator and download tools available online; among which Filmora by Wondershare is the current market leader. You can use this app to explore your GIF editing skills or download and share latest GIFs across media sharing platforms.
Competitive Guide To Use Slow Motion in After Effects
A slow-motion effect in the videos can enhance the viewing experience. It can highlight a certain action by providing closer details. Moreover, it also evokes an emotional impact in any video scene. Along with creating a dramatic effect, a slow-mo effect also brings aesthetic appeal. Thus, the slow-motion effect can grasp the attention of the audience in an effortless manner.
This article will discuss how to create a slow-motion effect with Adobe After Effects. It’s a well-recognized tool for modifying videos with its powerful features. Hence, keep reading this guide to learn about After Effects slow motion.
Slow Motion Video Maker Slow your video’s speed with better control of your keyframes to create unique cinematic effects!
Make A Slow Motion Video Make A Slow Motion Video More Features
Part 1: What Does A Perfect Slow Motion Video Contains?
To create a perfect slow-motion video, you must consider several factors. In this section, you can come across some elements through which you can generate an accurate slow-motion effect.
- Resolution: Make sure to record your video in high resolution. By doing so, the slow-motion effect will add more visual clarity. Thus, the minimum resolution should be 1080p or 4K.
- Accurate Lighting: Perfect lighting can make a video look impactful. You can either use natural or artificial lighting to make a well-exposed slow-mo effect.
- Choosing Subject: To grasp the attention, choose the subject carefully. A slow-motion effect in sports activities or water droplets can look eye-catching. Thus, you should choose a subject that looks appealing in a slow-mo effect.
- Sound Selection: A slow-mo effect will look more convincing with a relevant sound design. You should search for slow-mo sound effects to generate attractive results. Also, ensure that the speed of sound effects with the video is managed smartly.
- Frame Rate: A frame rate plays a vital role in creating slow-motion effect. Higher frame rates influence a smooth, slow-motion effect. Thus, use 240fps or higher to create a seamless slow-mo effect.
Part 2: Creating Slow Motion Effect in Adobe After Effects
Adobe After Effects is a famous program used in post-production of video making. It contains many motion graphics effects to enhance a video. You can add animated shapes and text to the video with this tool. Many people use this platform to create VFX in their videos to create stunning videos. It also supports 2D and 3D elements to produce realistic effects.
Furthermore, it offers many tools for compositing and keying. Users can change the color patterns in their videos with this robust software. Moreover, it can create After Effects slow motion with perfect accuracy. You can manually adjust the timing and speed of the slow-motion effect with this tool. Thus, Adobe After Effects is a comprehensive tool for video editing.
Here are the instructions that can guide you to produce slow-motion effects After Effects. Thus, let’s dig into the details:
Step 1
Start by uploading a video on After Effects. Drag it to the timeline and edit it in a desired manner. Now, place the cursor in the timeline to begin the process. Right-click on the timeline layer and select “Time” from the pop-up menu. From there, select “Time Stretch.” It will open a Time Stretch window on the screen.

Step 2
On the Time Stretch window, make the “Stretch Factor” value to 250. Once done, press the “OK” button.

Step 3
For high-quality results, enable the “Frame Blending” option. Right-click on the layer and select “Frame Blending” from the pop-up menu. Here, you can select two options: Frame Mix and Pixel Motion. After the frame blending, you can render the final output. Select a suitable format and then export the video.

Part 3: Quick and Unique Alternative: Making Slow Motion Effect with Wondershare Filmora
An excellent alternative to After Effects is Wondershare Filmora . With the release of its Volume 13, you can enjoy many premium features. To boost your productivity, the tool offers many AI features. You can use its AI copywriting feature to produce video outlines. By doing so, you can have AI-generated content for video production. Furthermore, it provides a smooth performance with its robust interface.
It contains a wide range of filters and overlays. It also allows you to apply transitions in the video clip from various options. To replace backgrounds in the video, try its Green Screen feature. This advanced feature can add realistic backgrounds to the videos easily. Moreover, you can color-correct the video to add perfect exposure properties. You can modify brightness, saturation, and other elements in the color-correct options.
Free Download For Win 7 or later(64-bit)
Free Download For macOS 10.14 or later
How to Add Slow-Motion Effect With Filmora
Are you ready to create a slow-mo effect in Filmora? Read the following section to learn how to create a slow-motion effect using this tool.
Step 1: Select New Project
Begin by launching this desktop tool on your PC. Choose the “Profile” icon from the top and sign into the tool. Continue to select the “New Project” button on the main screen to open a new editing window.

Step 2: Import Video to Filmora
On the main interface, press “Ctrl + I” from your keyboard. By doing so, you can import the video clip from your PC. Once done, drag and drop the imported video to the timeline.

Step 3: Choose Optical Flow
Now, select the video you have dragged to the timeline. Go to the right panel and choose the “Speed” tab. Look through the “Uniform Speed” tab and look for the “AI Frame Interpolation” option. By expanding this option, choose “Optical Flow.”

Step 4: Render and Export the Video
Now, head to the toolbar of the timeline. From there, tap on “Render Preview,” through which you can see the final results. Once done, you can export the video to the desired platform.

With the new upgrade, you can add an accurate slow-mo effect from Filmora. It uses AI technology to achieve the best results. Hence, this editing tool is a game-changer in the video production industry.
Exceptional Features of Filmora
AI Music Generator: This tool allows you to create custom music sounds. To do so, select your music style and genre from the given options. Afterward, you can edit the music by adjusting its volume and other parameters.
Screen Recorder: Do you want to capture the on-screen activities of your PC? The screen recorder of this software can capture any area of the screen. It also allows webcam and microphone recording. Afterward, you can edit the screen recording with its basic tools.
Silence Detection: To add more clarity to your videos, try the Silence Detection feature. This option removes the silent parts from your video. The process is automatic and does not need your manual efforts. Thus, with a single tap, you can eradicate unwanted parts from the video.
Speech-to-Text: The STT feature transcribes the video in the selected language. You can add subtitles to the videos in up to 26 languages. This feature increases your editing efficiency and offers great accuracy.
Conclusion
A slow-motion effect can highlight an action in a video clip. It can engage the viewers by generating a cinematic impact. The After Effects is a common program to add a slow-mo effect in videos. However, to create a more captivating slow-motion effect, we suggest Filmora. Its latest version has introduced many premium features for video editing. With AI algorithms, you can add a smooth, slow-motion effect to your videos. The process is automatic, which saves you from manual work.
Make A Slow Motion Video Make A Slow Motion Video More Features
Part 1: What Does A Perfect Slow Motion Video Contains?
To create a perfect slow-motion video, you must consider several factors. In this section, you can come across some elements through which you can generate an accurate slow-motion effect.
- Resolution: Make sure to record your video in high resolution. By doing so, the slow-motion effect will add more visual clarity. Thus, the minimum resolution should be 1080p or 4K.
- Accurate Lighting: Perfect lighting can make a video look impactful. You can either use natural or artificial lighting to make a well-exposed slow-mo effect.
- Choosing Subject: To grasp the attention, choose the subject carefully. A slow-motion effect in sports activities or water droplets can look eye-catching. Thus, you should choose a subject that looks appealing in a slow-mo effect.
- Sound Selection: A slow-mo effect will look more convincing with a relevant sound design. You should search for slow-mo sound effects to generate attractive results. Also, ensure that the speed of sound effects with the video is managed smartly.
- Frame Rate: A frame rate plays a vital role in creating slow-motion effect. Higher frame rates influence a smooth, slow-motion effect. Thus, use 240fps or higher to create a seamless slow-mo effect.
Part 2: Creating Slow Motion Effect in Adobe After Effects
Adobe After Effects is a famous program used in post-production of video making. It contains many motion graphics effects to enhance a video. You can add animated shapes and text to the video with this tool. Many people use this platform to create VFX in their videos to create stunning videos. It also supports 2D and 3D elements to produce realistic effects.
Furthermore, it offers many tools for compositing and keying. Users can change the color patterns in their videos with this robust software. Moreover, it can create After Effects slow motion with perfect accuracy. You can manually adjust the timing and speed of the slow-motion effect with this tool. Thus, Adobe After Effects is a comprehensive tool for video editing.
Here are the instructions that can guide you to produce slow-motion effects After Effects. Thus, let’s dig into the details:
Step 1
Start by uploading a video on After Effects. Drag it to the timeline and edit it in a desired manner. Now, place the cursor in the timeline to begin the process. Right-click on the timeline layer and select “Time” from the pop-up menu. From there, select “Time Stretch.” It will open a Time Stretch window on the screen.
Step 2
On the Time Stretch window, make the “Stretch Factor” value to 250. Once done, press the “OK” button.
Step 3
For high-quality results, enable the “Frame Blending” option. Right-click on the layer and select “Frame Blending” from the pop-up menu. Here, you can select two options: Frame Mix and Pixel Motion. After the frame blending, you can render the final output. Select a suitable format and then export the video.
Part 3: Quick and Unique Alternative: Making Slow Motion Effect with Wondershare Filmora
An excellent alternative to After Effects is Wondershare Filmora . With the release of its Volume 13, you can enjoy many premium features. To boost your productivity, the tool offers many AI features. You can use its AI copywriting feature to produce video outlines. By doing so, you can have AI-generated content for video production. Furthermore, it provides a smooth performance with its robust interface.
It contains a wide range of filters and overlays. It also allows you to apply transitions in the video clip from various options. To replace backgrounds in the video, try its Green Screen feature. This advanced feature can add realistic backgrounds to the videos easily. Moreover, you can color-correct the video to add perfect exposure properties. You can modify brightness, saturation, and other elements in the color-correct options.
Free Download For Win 7 or later(64-bit)
Free Download For macOS 10.14 or later
How to Add Slow-Motion Effect With Filmora
Are you ready to create a slow-mo effect in Filmora? Read the following section to learn how to create a slow-motion effect using this tool.
Step 1: Select New Project
Begin by launching this desktop tool on your PC. Choose the “Profile” icon from the top and sign into the tool. Continue to select the “New Project” button on the main screen to open a new editing window.
Step 2: Import Video to Filmora
On the main interface, press “Ctrl + I” from your keyboard. By doing so, you can import the video clip from your PC. Once done, drag and drop the imported video to the timeline.
Step 3: Choose Optical Flow
Now, select the video you have dragged to the timeline. Go to the right panel and choose the “Speed” tab. Look through the “Uniform Speed” tab and look for the “AI Frame Interpolation” option. By expanding this option, choose “Optical Flow.”
Step 4: Render and Export the Video
Now, head to the toolbar of the timeline. From there, tap on “Render Preview,” through which you can see the final results. Once done, you can export the video to the desired platform.
With the new upgrade, you can add an accurate slow-mo effect from Filmora. It uses AI technology to achieve the best results. Hence, this editing tool is a game-changer in the video production industry.
Exceptional Features of Filmora
AI Music Generator: This tool allows you to create custom music sounds. To do so, select your music style and genre from the given options. Afterward, you can edit the music by adjusting its volume and other parameters.
Screen Recorder: Do you want to capture the on-screen activities of your PC? The screen recorder of this software can capture any area of the screen. It also allows webcam and microphone recording. Afterward, you can edit the screen recording with its basic tools.
Silence Detection: To add more clarity to your videos, try the Silence Detection feature. This option removes the silent parts from your video. The process is automatic and does not need your manual efforts. Thus, with a single tap, you can eradicate unwanted parts from the video.
Speech-to-Text: The STT feature transcribes the video in the selected language. You can add subtitles to the videos in up to 26 languages. This feature increases your editing efficiency and offers great accuracy.
Conclusion
A slow-motion effect can highlight an action in a video clip. It can engage the viewers by generating a cinematic impact. The After Effects is a common program to add a slow-mo effect in videos. However, to create a more captivating slow-motion effect, we suggest Filmora. Its latest version has introduced many premium features for video editing. With AI algorithms, you can add a smooth, slow-motion effect to your videos. The process is automatic, which saves you from manual work.
Also read:
- Land Into the Thrill of Creating Stunning GIFs with Ezgif
- New You Must Be Wondering Which the Best Online Transparent Image-Maker Is! Well, There Is No Need to Get Confused as Here; You Will Get a Curated List for the Same
- Featuring The Use of Camera Shake in Creating the Best Videos for 2024
- Updated In 2024, A Wedding Is One of the Exciting Parts that Will Happen in Your Life. Its Not that Easy to Plan a Wedding, Theres a Lot to Be Consider Like Wedding Dress, Food, Venue, Videographer Etc
- New In 2024, In This Guidepost, Youll Learn What an HDRI Photo Is and How to Use the Best Free HDRI Program to Edit Photos. Youll Also Know the Difference Between HDR and HDRI
- Updated 2024 Approved Blender Tips - How to Make Blender Render Transparent Background
- Top 10 Text to Robot Voice Generators Windows, Mac, Android, iPhone for 2024
- Updated 2024 Approved How to Easily Add VHS Green Screen to Your Video
- Updated How to Create a Light Sweep (Shine) Effect
- New In 2024, Using Track Matte and Tracking in Adobe After Effects Reviewing All Possibilities
- Updated In 2024, Would You Like to Know How to Change the Ratio of the Video or Which Is the Correct Aspect Ratio for Uploading to the Online Platform? Then, Go Through the Article to Get Complete Details About the Video Aspect Ratio
- 2024 Approved 5 Excellent Tools To Convert Video to 60 FPS
- New In 2024, 2 Methods to Crop a Video Using After Effects
- Updated How to Create a Custom Sequence Preset in Premiere Pro for 2024
- Updated Do You Know You Can Trim and Cut Your Video Into the Desired Portions Using a Reliable Video Splitter? Get an Easy Video Splitter Now to Simplify Your Work. Here Are 33 Carefully Chosen Apps to Help You in This
- Updated Here We Will Investigate AI-Based Video Interview, How It Is Being Used, and How to Master an Artificial Intelligence Video Interview Act for 2024
- Updated 10 Best Meme Text to Speech Tools Windows, Mac, Android, iPhone&Online
- New In 2024, How to Add Subtitles to Videos With Kapwing
- New In 2024, In This Article, Youll Find Four Solutions for Rotating Your Go-Pro Videos. The Following Tools Will Be Used for This Purpose
- Updated Have You Ever Used an Adjustment Layer in Photoshop? Read This Article to Find Out How to Add, Resize, Change, and Use an Adjustment Layer in Photoshop Efficiently
- New 2024 Approved 10 Matching Color Combination That Works Together
- New 2024 Approved TOP 6 Online Video Speed Controller for Chrome, Safari, Firefox
- In 2024, How to Unlock iPhone XS With an Apple Watch & What to Do if It Doesnt Work
- In 2024, Guide to Mirror Your Nokia C110 to Other Android devices | Dr.fone
- In 2024, Top 15 Augmented Reality Games Like Pokémon GO To Play On Sony Xperia 1 V | Dr.fone
- 3 Things You Must Know about Fake Snapchat Location On Vivo S18 Pro | Dr.fone
- How To Unbrick a Dead Motorola G54 5G | Dr.fone
- Three Solutions to Hard Reset Tecno Camon 20 Premier 5G? | Dr.fone
- Overview of the Best Motorola Edge 40 Neo Screen Mirroring App | Dr.fone
- How to Hard Reset Vivo Y17s Without Password | Dr.fone
- In 2024, Top 7 Skype Hacker to Hack Any Skype Account On your Vivo V27e | Dr.fone
- In 2024, Best Anti Tracker Software For Oppo A58 4G | Dr.fone
- 9 Quick Fixes to Unfortunately TouchWiz has stopped Of Lava Blaze Pro 5G | Dr.fone
- Fixing Persistent Pandora Crashes on Vivo Y78t | Dr.fone
- Tips and Tricks for Apple ID Locked Issue On Apple iPhone 6
- Title: New Find a Solution for Effortless Sky Replacement Photoshop in This Comprehensive Guide. Also, Use the Easiest Video Editing Tool to Make Your Media Stunning
- Author: Morgan
- Created at : 2024-05-19 05:12:34
- Updated at : 2024-05-20 05:12:34
- Link: https://ai-video-editing.techidaily.com/new-find-a-solution-for-effortless-sky-replacement-photoshop-in-this-comprehensive-guide-also-use-the-easiest-video-editing-tool-to-make-your-media-stunning/
- License: This work is licensed under CC BY-NC-SA 4.0.
