:max_bytes(150000):strip_icc():format(webp)/cq5dam.web.1280.1280-3-5c2a5dc746e0fb0001d115f0.jpeg)
New How to Add a Green Screen to Zoom

How to Add a Green Screen to Zoom
If you are a regular user of Zoom app because you have to attend meetings and video conferences every now and then, you should know how to create a green screen for Zoom calls. There are going to be times when you would not want to show what is in your background because it might look distracting. Besides, changing the background from time to time breaks the monotony of your Zoom calls.
Zoom app allows you to change your background and set any available virtual background. However, the effect of virtual background may not be accurate and smooth unless you have a uniform background color. If you use green screen background for Zoom, you can replace it with any virtual background that will look very realistic to your audiences. We will illustrate how to create a green screen background for Zoom.
Part 1. How to add green screen to Zoom on computer?
Regular Zoom users prefer arranging and attending video conferences from their computers. Zoom desktop app makes it more convenient to attend Zoom conference with a wider screen and better visibility. Make sure you have a uniform green screen in your background before attending Zoom call so that you can replace it with any available virtual background on Zoom. Here are the steps on how to create a green screen for Zoom app on your computer.
Step1Open Zoom app and make sure you are logged into your account. Adjust the webcam so that only you and your green screen should be visible in the frame.
Step2Click on Settings (gear icon) located in the top-right corner.
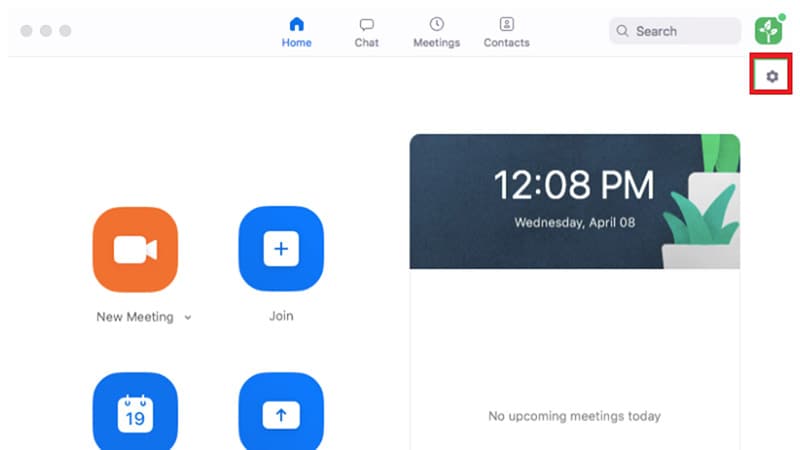
Step3Once Settings window opens, click on Virtual background option on the left panel.
Step4Turn on the option “I have a green screen” located at the bottom. Thereafter, choose a virtual background with which you want to replace the green screen in your video.
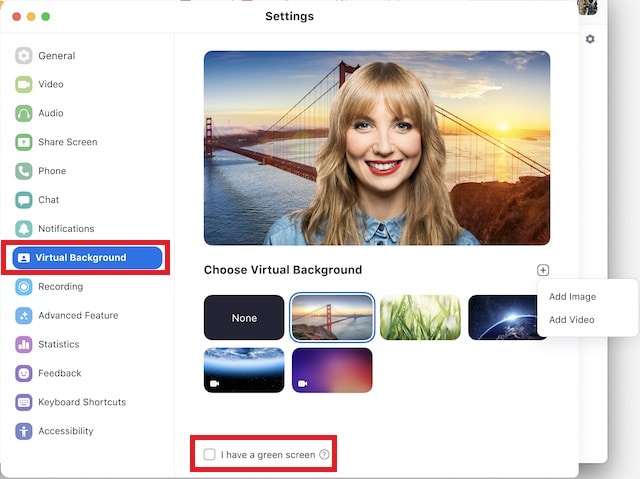
Step5Apart from the present virtual background, you can add photo or video to replace green screen background.
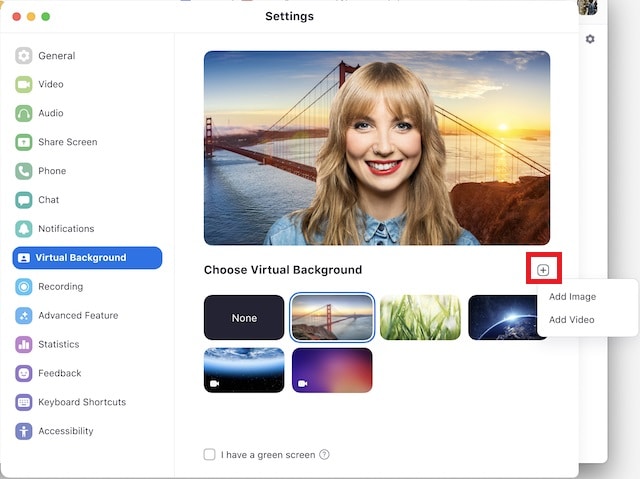
Step6Close Settings window and you will see that your green screen is replaced by your selected virtual background.
Part 2. How to add green screen to Zoom on mobile?
If you are an occasional Zoom user, you are more likely to use your smartphone to attend Zoom conferences. If you want green screen effect on your Zoom call, make sure you have a sizeable green screen in your background. This is because even if you happen to move your phone during the meeting, green screen background should come in the video frame all the time.
It is recommended to use a tripod to keep your smartphone fixed in one spot for better and consistent green screen effect. Here are the steps to answer your question how do you add a green screen to Zoom app on your mobile phone. The steps are the same for Android and iOS users.
Step1Open Zoom app on your smartphone and make sure you are signed into your account.
Step2Start a Zoom meeting and tap on More option located in the bottom-right corner.

Step3Tap on Virtual background and you can select any preset virtual background.
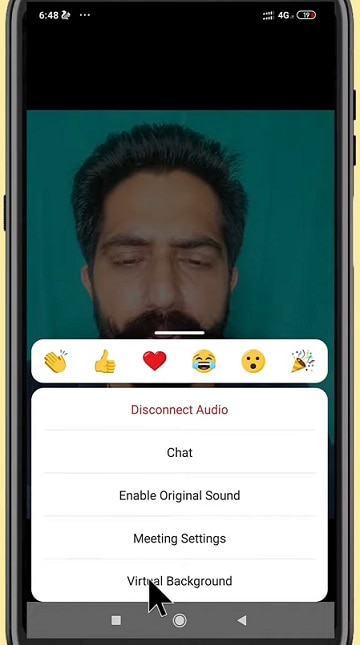
Step4If you want to replace green screen with a customized background, tap on “+” icon and select any photo or video from your phone.
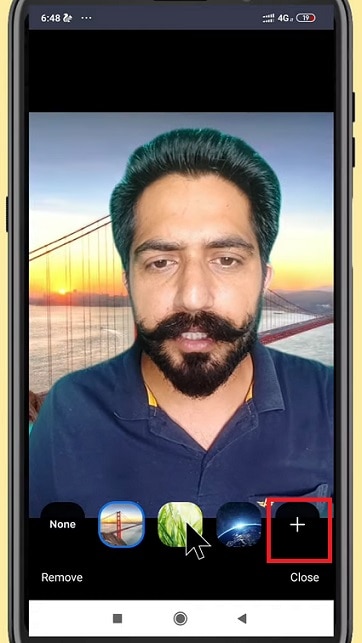
Step5Tap on Close option and the selected virtual background will be applied to your Zoom video.
Part 3. Tips to use green screen on Zoom video
Here are some important tips to use green screen on Zoom video for a better outcome.
Buy Large Green Screen - Since you are going to invest in buying green screen, you should buy a large green screen instead of buying two. Firstly, when you have one large green screen, you can set it up without any wrinkles or overlaps.
Secondly, a large green screen means greater surface area, and even when you slightly change the angle of your camera, your background will still have green screen instead of the exterior wall showing up and ruining virtual background effect.
Buy Green Screen Stand - Along with green screen, you should buy a sizeable green screen stand. A regular green screen stand contains two vertical supports at both ends and one horizontal support where you hand the green screen.
You can buy it according to the size of green screen you have bought. And you need to buy stand because you cannot fix the green screen on the wall properly. If you use any other means, there are going to be wrinkles and uneven virtual background effect.
Green Screen Quality - You can purchase any shade of green screen, but we recommend you opt for vibrant green color for a better outcome. Most importantly, the color should be even across the surface, and there should not be light and dark patches to dampen the virtual background effect and make it look unrealistic. That is why you should not compromise with quality.
Avoid Green Objects - You should not wear anything green. If your green screen has a lighter shade, you can wear deep color dresses and vice versa. Most importantly, you should not keep anything that is green while attending Zoom attending as it will disturb the green screen effect and it will look embarrassing. If you need to keep any green objects in your Zoom meetings, you should have blue screen instead of green screen.
Focus On Lighting - Lighting is extremely important when you want to use green screen. You should place the light so that it spreads evenly across the green screen. Otherwise, there are going to be light and dark patches, and the effect can get disturbed. Make sure you do not cast any shadow on the green screen by positioning the green screen accordingly.
Select A Proper Background - Last but not least, when you change your green screen to any virtual background photo or video, make sure you keep your audiences in mind. If you are attending a meeting, you should keep a professional-looking background. The background should not be distracting and match the theme of your meeting.
Conclusion
We have answered your question, “How do you add a green screen to zoom?” You can use green screen on your Zoom desktop app as well as smartphone app. This will help you to make your usual background cover up with green screen and replace green screen with any virtual background. Keep in mind all the tips we have provided you so that the green screen effect is perfect.
Free Download For Win 7 or later(64-bit)
Free Download For macOS 10.14 or later
How to Do Censor Effects with Filmora
There are many aspects to consider when it comes to publishing a video. Safety and privacy aspects are some of them. If you’re looking to blur out a bystander or cut out profanities from your video with Filmora, this is the right article for you.
Part 1. How to add a beep sound to a video with Filmora
Filmora’s powerful video editing menu includes easy tweaking on audio. You can censor any part of speech you want to exclude from your video with just these simple steps.
Step1 Create a new project and import the video to Filmora.

Step2 Separate the audio component from the video by right-clicking on the video and selecting the Detach Audio option. You can now edit each of them individually.

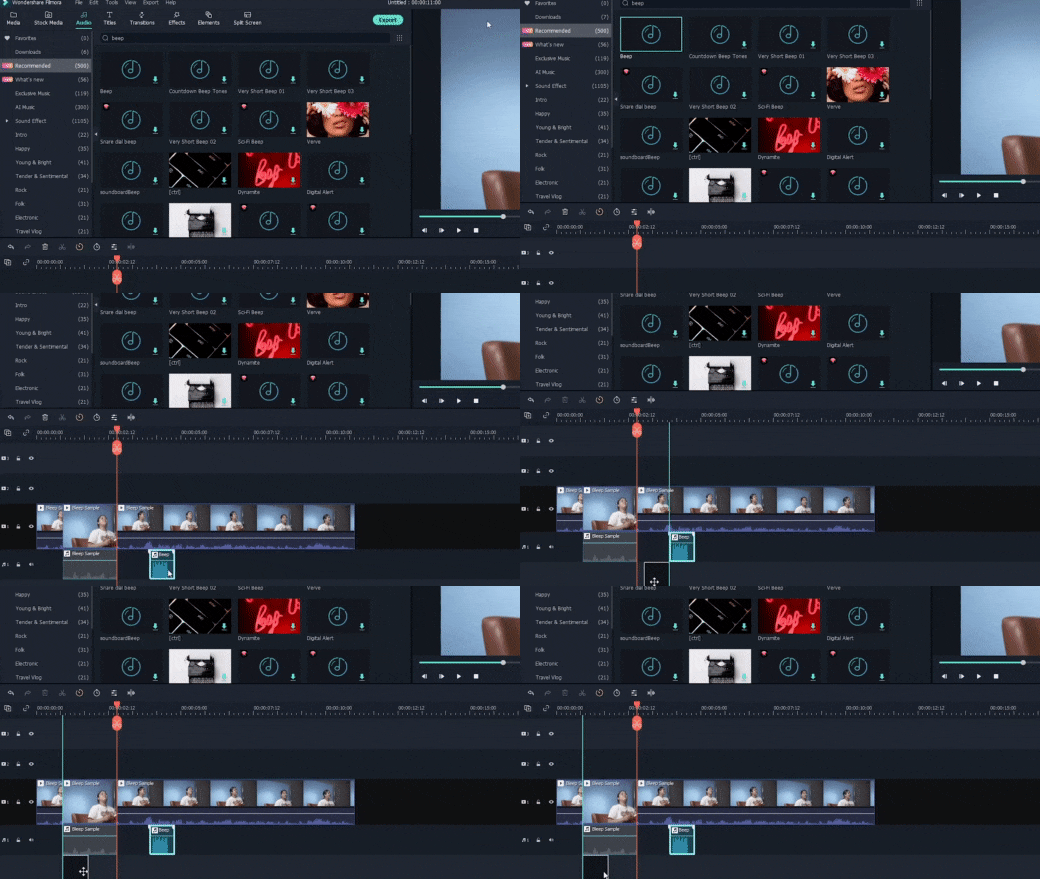
Step3 Mark the part to place the start of the beep using the playhead and click the Split icon on the editor’s toolbar.

Step4 Place the playhead at the end of the censored segment and click Split. Double-click on the segment to open the audio editing menu, then you can remove that part of the audio or lower the volume.

Step5 Click the Audio>Audio Effects menu on the upper left corner of the screen. After you find the Beep effect, drag the track to the audio timeline and place it in between the split section. Adjust trimming and volume until the censor is placed correctly.
Part 2. How to add mosaic to video with Filmora
Whether you want to hide a passerby’s face or your own, or even other types of objects, Wondershare Filmora is ready to take on the task. While its nifty face-off function automatically follows the movement of a marked face, the mosaic effect is the fast and perfect solution for a static object in the video.
Step1 After importing a video to Filmora, tap on the Effects tab and find the Mosaic filter from the gallery.

Step2 Drag the Mosaic filter to the timeline just above the main video track.

Step3 A yellow box will appear in the viewer. You can drag and adjust its size to hide the targetted object. You can also adjust the opacity and intensity of the effect using the adjustment menu, accessible when you double-click the yellow box.

If the targetted object moves, you can set the automatic tracking before adding the mosaic filter by clicking on the Motion Tracking>Start Tracking located above the timeline. Before you place the filter, preview and adjust the tracking frame to ensure tight proof censor.

Conclusion
Wondershare Filmora offers a large array of special effects that goes beyond simply trimming, cropping, splitting, or adding transitions to your video. You can add some special effects to your video as well, such as Blur, Face-Off, Mosaic, Tilt Shift and Jump Cut at Beat. On top of completing it with audio effects, you can also add subtitles or typography easily.
With Filmora, you can always enhance your video within minutes with excellent quality.
Free Download For Win 7 or later(64-bit)
Free Download For macOS 10.14 or later
Free Download For macOS 10.14 or later
Top Ways to Make Fast Motion Video on iPhone [Solved]
Fast motion has always been a time saver since it covers the unnecessary details in seconds. Acquiring this skill is important if you are a content creator or videographer. You might already be aware of how to make fast-motion videos on iPhone.
However, if this is unheard of or you are new to video editing, we’ve got you covered. This article covers the ins and outs of how to make a video fast-motion iPhone. In addition, users can gain insights into some applications and their guides. Moreover, we’ll discuss an AI alternative to those applications.
Slow Motion Video Maker Slow your video’s speed with better control of your keyframes to create unique cinematic effects!
Make A Slow Motion Video Make A Slow Motion Video More Features

Part 1: What are the Different Use Cases of Fast-Motion Videos?
The fast motion effect covers multiple creative ways of speed increase that you can incorporate. All these ways apply to different genres of videos. This section diverts your focus on different use cases of fast-motion videos. Here is how to make video fast motion on iPhone for different purposes:
1. Construction and Development Videos
Fast-motion videos help in video creation where development is happening. Such videos show the before and after results of an area, location, or building. The construction or manufacturing process is shown in fast motion in engineering videos. It also helps in showing the transformation of a non-populated or undeveloped city.
2. Nature Photography or Documentaries
Natural phenomenon like the blooming of a flower usually occurs at a slower rate. Capturing them takes a long time, but the audience may not like such a long duration. Hence, editors can increase the speed of such videos to speed up the phenomenon. In addition, if you watch wildlife or nature documentaries, they also use this effect.
3. Aesthetic Expression
Fast-paced videos bring a sense of creativity to your videos as they are an artistic expression of time. To indicate the passing of time in movies or to show a scene at a railway station or airport. It also indicates that the filmmakers and editors have put in an effort.
Part 2: Different Tools to Help You Make Fast Motion Video on iPhone
Fast-motion tools are important in video editing since they offer a chance at creativity. They have a wide range of applications in the filmmaking and media industry. Do you know how to make a video fast-motion iPhone using a third-party application? If not, here is a detailed guide on some of them:
1. iMovie
If you are looking for an accessible application with an easy-to-use interface, this is for you. The process of speed manipulation consists of a slider for control. After editing, you can integrate multiple soundtracks from 130 pre-assembled tracks. The application is compatible with iPhone X and newer versions.
Steps to Create a Fast Motion Video Using iMovie
Do you want to learn how to make fast-motion videos on your iPhone with this application? Given Below is your perfect guide to crafting a fast-paced video:
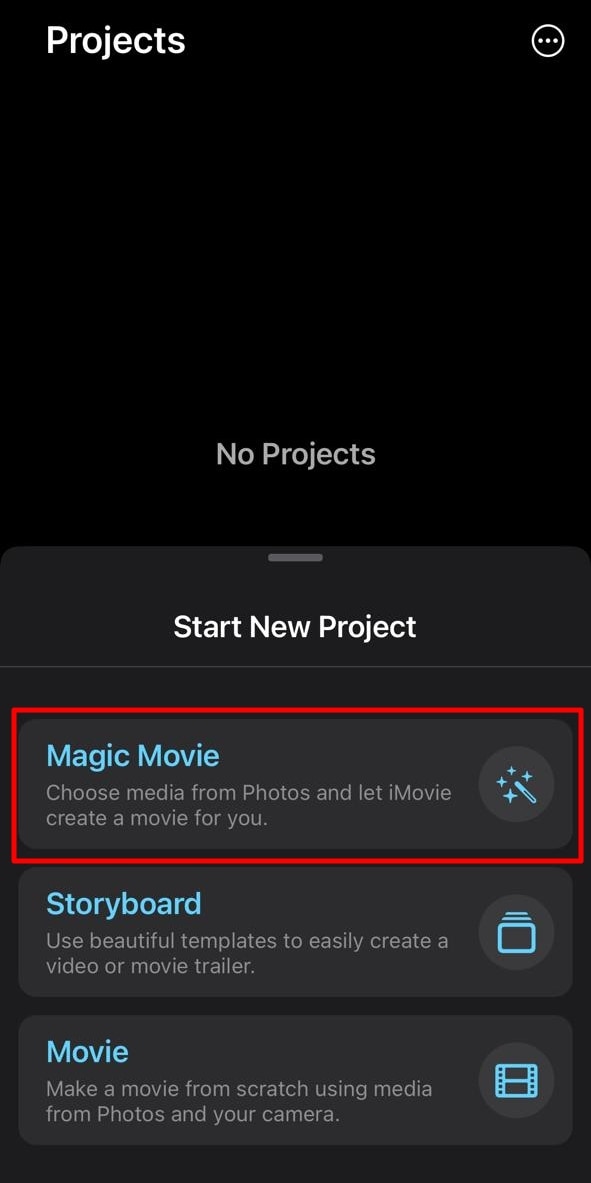
Step 1: After downloading the application on your iPhone, access it and “Start New Project.” Then, select a video from your media library to edit.
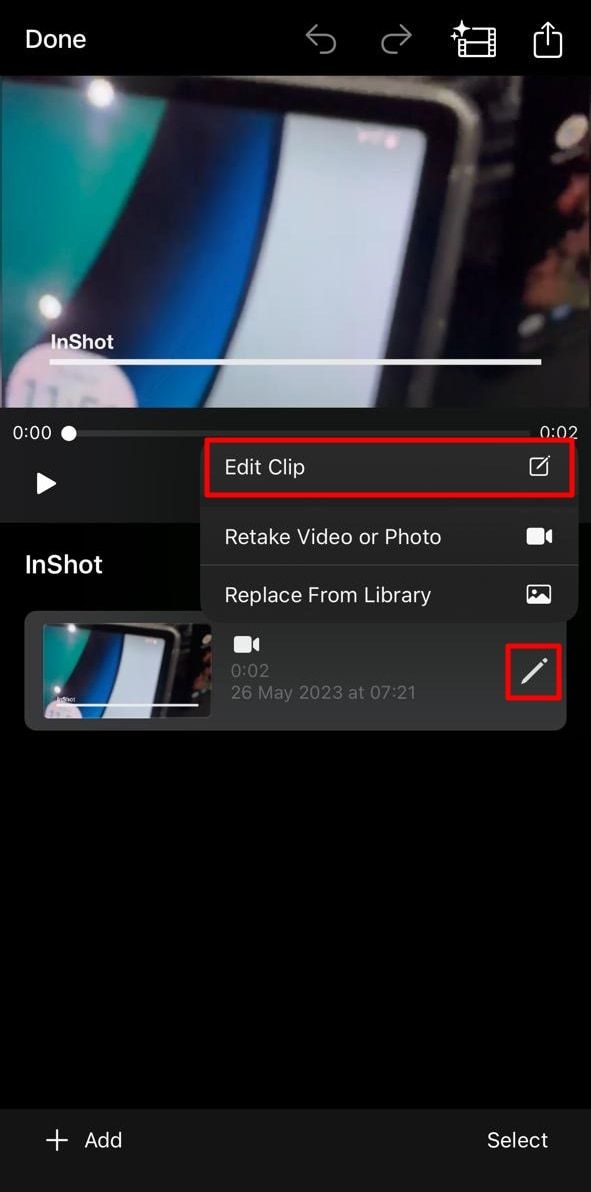
Step 2: After importing the video, click the “Pen” icon to access editing options. Then, click the “Edit Clip” option to do so.
Step 3: Move to the bottom of the screen and slide the given option to access “Speed.” Click it and drag the speed slider towards the right side to increase the speed of the video.
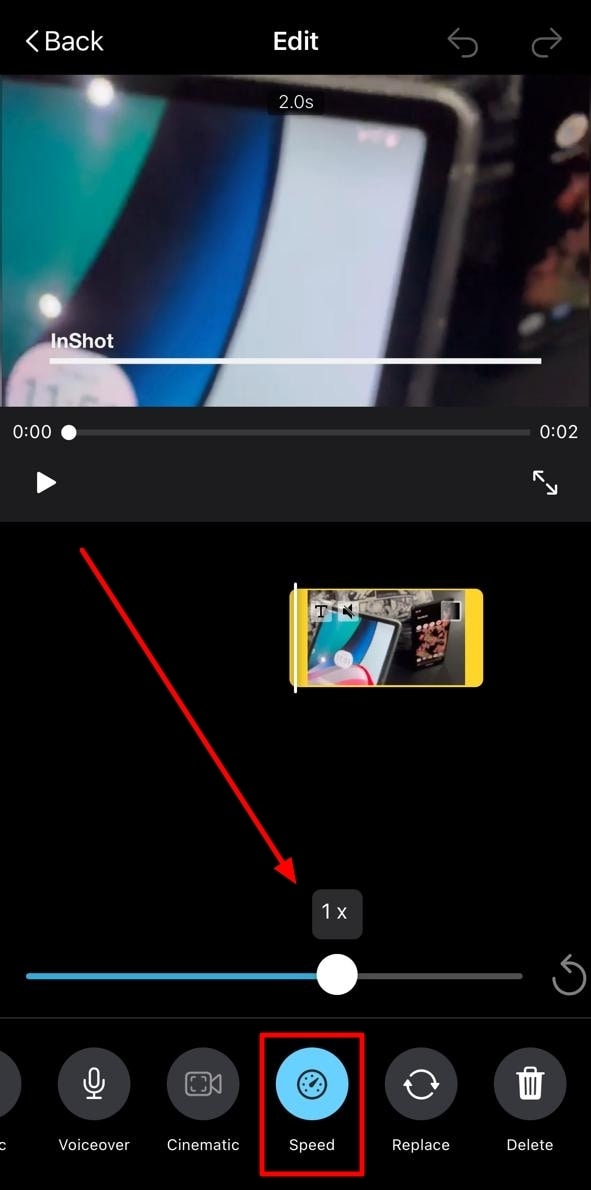
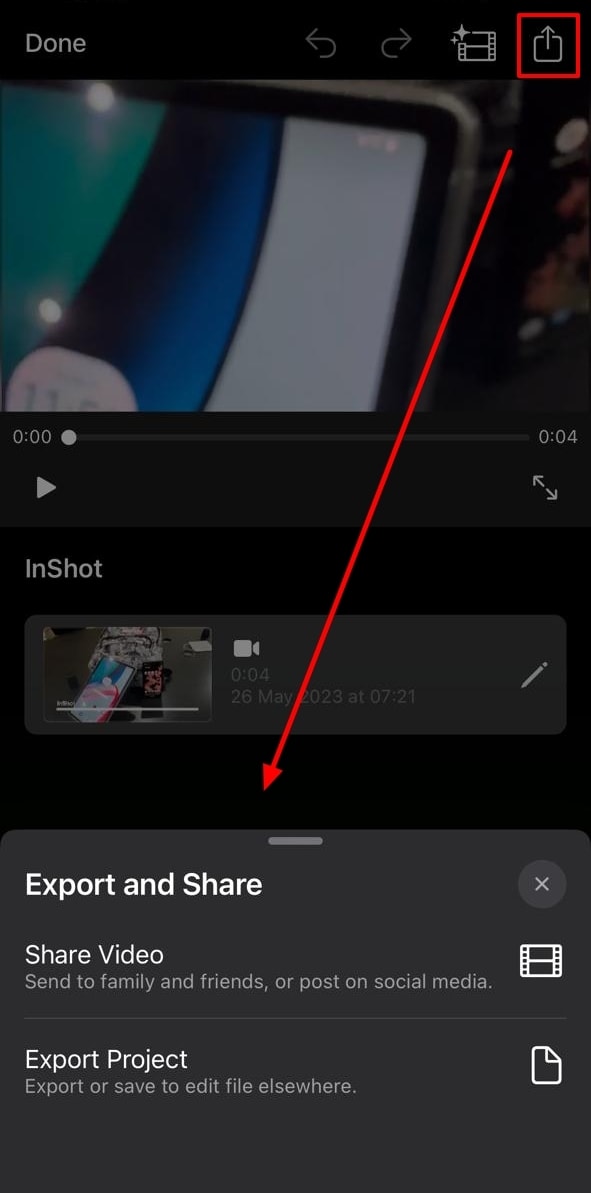
Step 4: Hit the “Play” button to see the speed of the video and re-adjust if required. Go to the top right corner of the screen, locate the “Export” icon, and click it.
2. Video Speed Changer – Editor
Want to learn how to make video fast motion on iPhone without additional technicalities? This application ensures a comprehensive narrative just for speed change. Users can formulate 3 fast motion effects with it at specific frames. For pre-recorded or new videos, it offers Time Wrap, Time Lapse, and Hyper-lapse. The application has been found to support iOS 12.3 and later versions.
Steps to Create a Fast Motion Video Using Video Speed Changer
Multiple applications provide similar services, but none can compare to its UI. Here is how to make a video fast motion iPhone using this
Step 1: Access this application from the App Store and launch it after installation. Click on the “Select Video” button and import a clip.

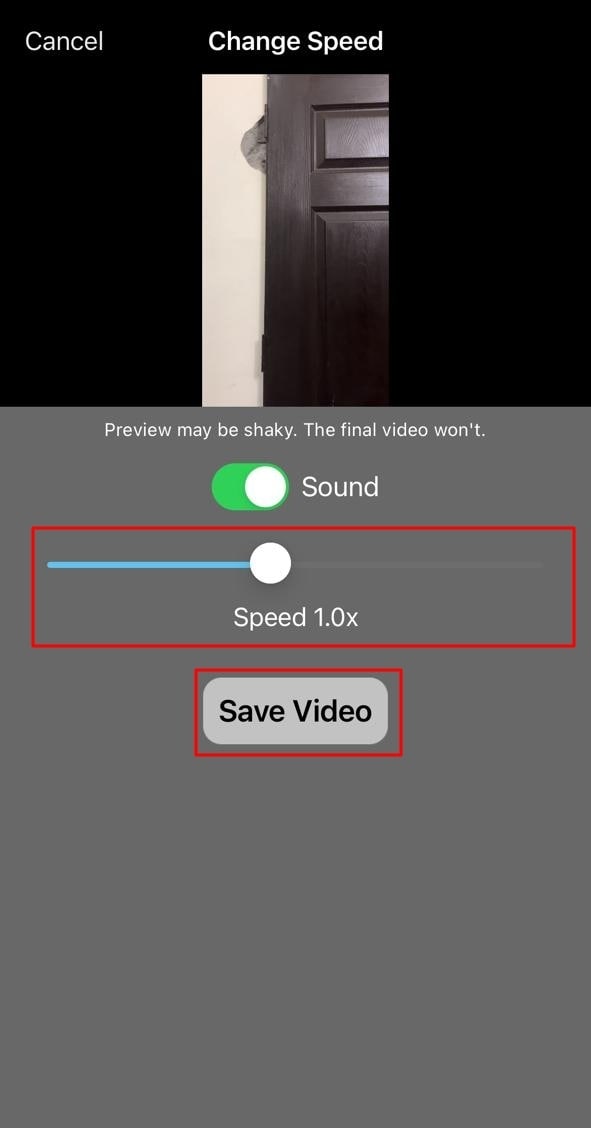
Step 2: Once you have selected a video, it will take you straight to the speed change option. Change the position of the given slider. Finally, preview the video and click the “Save Video” button to save it on your device.
3. Slow Motion Video FX Edit
Although the name indicates otherwise, this video editor is capable of high-speed change. It comes with an intuitive user interface and is easy for anyone to employ. In addition to speed alteration, you can insert 40 different filters into your video. You can also commence its freeze frame action to add an extra layer of creativity. The tool is compatible with iOS 13.0 and higher versions.
Steps to Create Fast Motion Using Slow Motion Video FX
This is another editor to gain insights on how to make fast-motion videos on an iPhone. We have given the verified step-by-step guide to using this app:
Step 1: After launching this application, click the “Choose From Library” option. Then, select a clip from your device’s gallery.
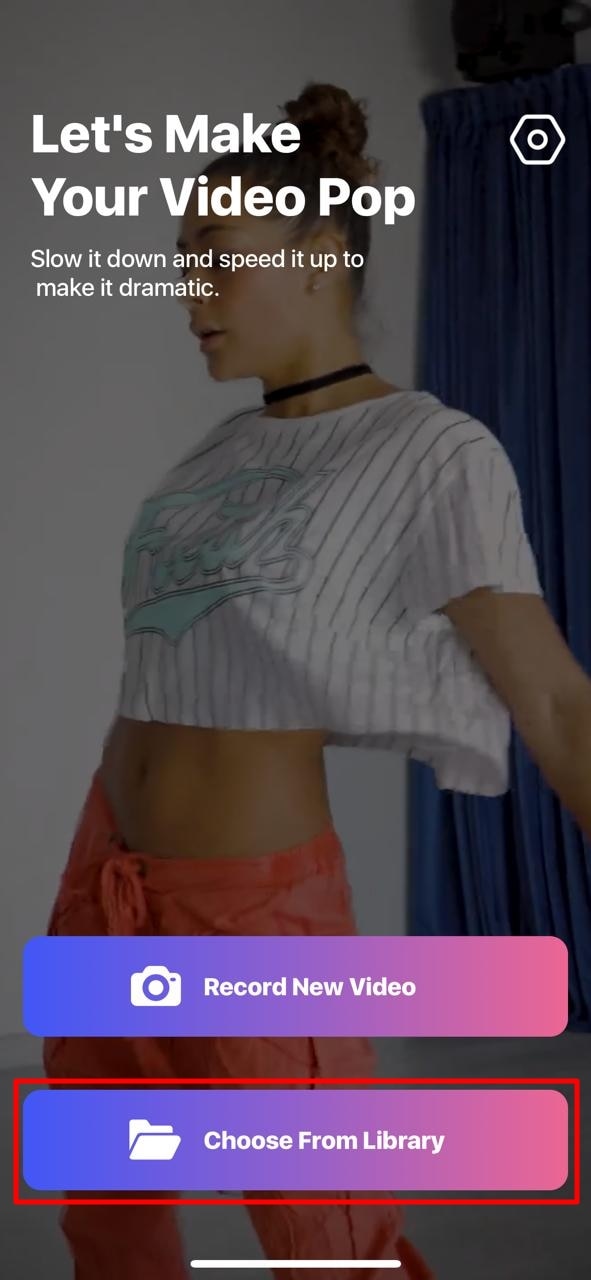
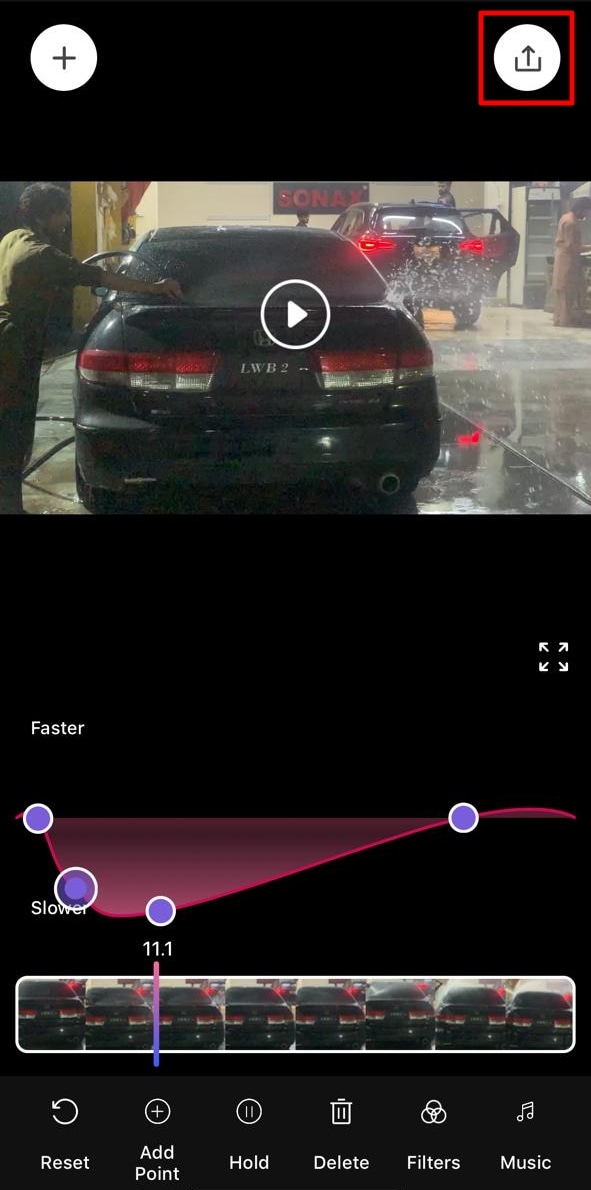
Step 2: Once the video is compressed, you’ll be taken to the speed change screen. From there, you can alter the speed of different clip sections. Move the slider of the relevant section upward to increase the speed.
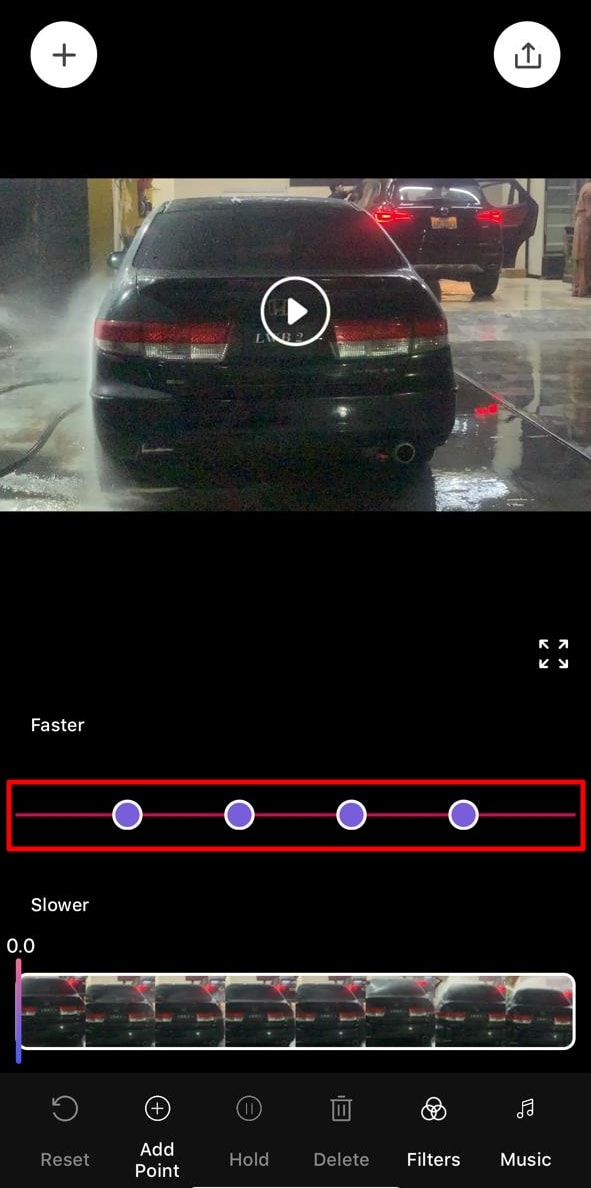
Step 3: Once you have altered the speed, navigate towards the top right corner and click the “Export” icon.
Part 3: Desktop Solution: Remedy for Those Who Want to Speed Up Video on Their Computer
If you have gone through the above applications, you know the fast-motion effect. Do you want to know how to make a video fast motion on an iPhone using a computer? Wondershare Filmora is the best alternative to the above applications for creating this effect. The software is compatible with all the macOS and iOS devices and allows seamless editing.
With this editor, you get multiple options to create a fast-motion video. In this article, we will use the Uniform Speed feature. The operating process is very accessible and designed to assist both professionals and beginners. You can also apply the AI Frame Interpolation option to apply “Frame Bending.”
Free Download For Win 7 or later(64-bit)
Free Download For macOS 10.14 or later
Step-by-Step Guide to Speed Up Video with Filmora
After reading the article till now, you have gained knowledge of Filmora’s speeding options. How to make fast motion video on iPhone now seems like an easy option. Even though the process is easy, we want you to stay ahead. Hence, here is a step-by-step procedure for creating fast motion in Filmora:
Step 1Create a New Project and Import Media
First, connect your iOS device to your Wondershare Filmora device. After that, launch Filmora to access the main menu. From there, click on the “New Project” tab fashioned in the center. Expand the “Import” option in the Project Media section and select the suitable option. In this case, choose the “Import from Phone or Camera” option.

Step 2Access the Uniform Speed Section
After bringing the imported media to the timeline, select it to access the settings panel. Select the “Speed > Uniform Speed” tab from the appeared panel. Then, drag the Speed slider on the right side to increase speed. Afterward, click the “Play” button on the preview screen to see the results.
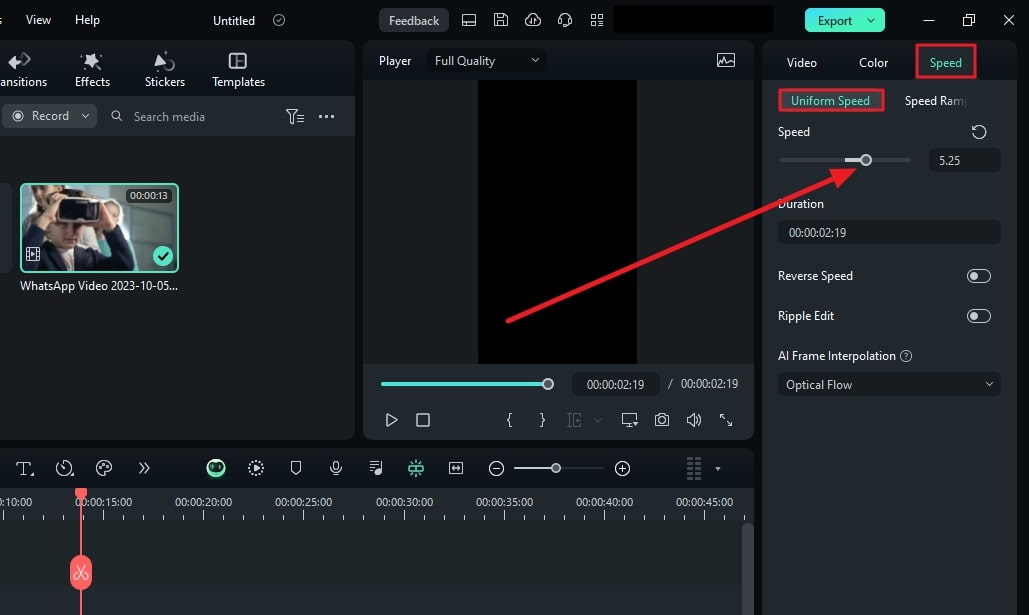
Step 3Apply Frame Bending and Export
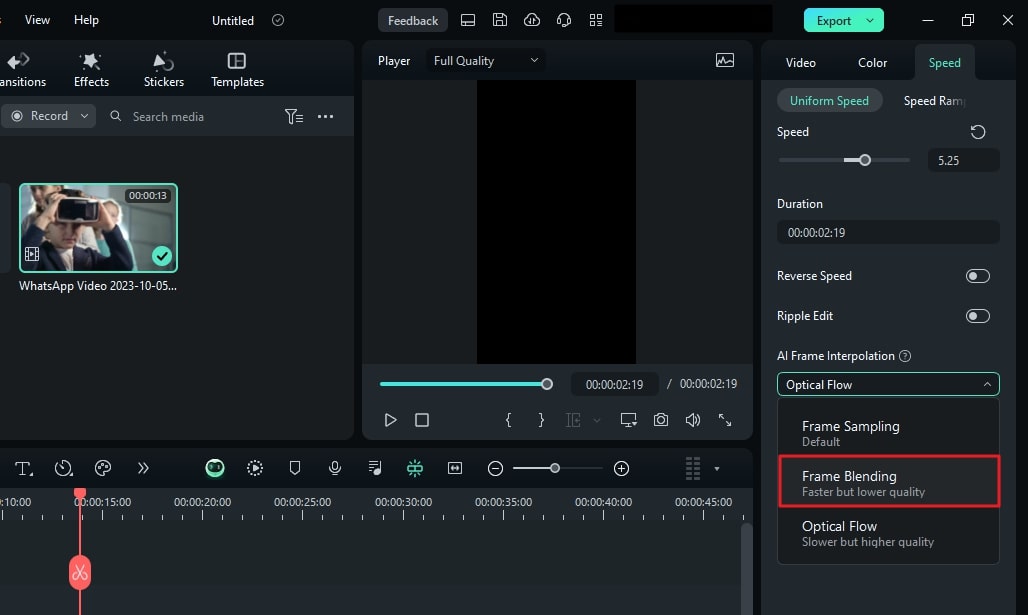
This part is optional, but if you find an irregularity or roughness to the video, apply this. Go to the “AI Frame Interpolation” section at the bottom and expand the options. From the dropdown menu, select the “Frame Bending” option and do the rendering from the timeline. After everything is set, select the “Export” button at the top right corner.
Trending Video Editing Features of Wondershare Filmora
Filmora is a versatile tool that is not confined to speed manipulation or fast motion only. This editor offers audio, text, AI editing options, and video. Here are some prominent key features of Wondershare Filmora to help you in editing:
1. Speed Ramping
The other option for speed modification mentioned previously is speed ramping. This option comes with 6 editable speed change presets for automated editing. However, you can also employ the custom preset to create your own way. Moreover, it allows the audio pitch option to enable automated maintenance of audio.
2. AI Smart Cutout
There is more than one way of removing and replacing a background in Filmora. Smart Cutout offers an AI-integrated masking option to cut out the selected parts. You can also set preferences for Edge Thickness or Edge Feather for accuracy. Afterward, you can introduce three background options: color, grid, or more.
3. AI Text-to-Video
Bring your imagination to visuals with this amazing generative AI video creator. It creates videos from text and covers the voice and graphical elements. Users can customize the AI voice and ratio before generating a video. The prompt section offers up to 1000 characters for adding a script or giving directions.
4. AI Smart Masking
Are there any effects or filters you want to introduce to only a specific part of the video? Use Filmora’s AI mask for automated masking of an object or background. The mask brush selects the relevant area on its own. Besides AI masks, there is a manual masking option or mask shapes to apply. You can also customize the Brush size according to the video.
Conclusion
The article highlighted the importance of increasing video speed in many industries. In addition, we discussed some tools that make fast motion with ease. We also provided step-by-step guides on how to make fast motion video on iPhone. Wondershare Filmora stands amongst all those applications to create fast motion. We recommend this software due to its multiple functionalities and detailed editing abilities.
Make A Slow Motion Video Make A Slow Motion Video More Features

Part 1: What are the Different Use Cases of Fast-Motion Videos?
The fast motion effect covers multiple creative ways of speed increase that you can incorporate. All these ways apply to different genres of videos. This section diverts your focus on different use cases of fast-motion videos. Here is how to make video fast motion on iPhone for different purposes:
1. Construction and Development Videos
Fast-motion videos help in video creation where development is happening. Such videos show the before and after results of an area, location, or building. The construction or manufacturing process is shown in fast motion in engineering videos. It also helps in showing the transformation of a non-populated or undeveloped city.
2. Nature Photography or Documentaries
Natural phenomenon like the blooming of a flower usually occurs at a slower rate. Capturing them takes a long time, but the audience may not like such a long duration. Hence, editors can increase the speed of such videos to speed up the phenomenon. In addition, if you watch wildlife or nature documentaries, they also use this effect.
3. Aesthetic Expression
Fast-paced videos bring a sense of creativity to your videos as they are an artistic expression of time. To indicate the passing of time in movies or to show a scene at a railway station or airport. It also indicates that the filmmakers and editors have put in an effort.
Part 2: Different Tools to Help You Make Fast Motion Video on iPhone
Fast-motion tools are important in video editing since they offer a chance at creativity. They have a wide range of applications in the filmmaking and media industry. Do you know how to make a video fast-motion iPhone using a third-party application? If not, here is a detailed guide on some of them:
1. iMovie
If you are looking for an accessible application with an easy-to-use interface, this is for you. The process of speed manipulation consists of a slider for control. After editing, you can integrate multiple soundtracks from 130 pre-assembled tracks. The application is compatible with iPhone X and newer versions.
Steps to Create a Fast Motion Video Using iMovie
Do you want to learn how to make fast-motion videos on your iPhone with this application? Given Below is your perfect guide to crafting a fast-paced video:
Step 1: After downloading the application on your iPhone, access it and “Start New Project.” Then, select a video from your media library to edit.

Step 2: After importing the video, click the “Pen” icon to access editing options. Then, click the “Edit Clip” option to do so.

Step 3: Move to the bottom of the screen and slide the given option to access “Speed.” Click it and drag the speed slider towards the right side to increase the speed of the video.

Step 4: Hit the “Play” button to see the speed of the video and re-adjust if required. Go to the top right corner of the screen, locate the “Export” icon, and click it.

2. Video Speed Changer – Editor
Want to learn how to make video fast motion on iPhone without additional technicalities? This application ensures a comprehensive narrative just for speed change. Users can formulate 3 fast motion effects with it at specific frames. For pre-recorded or new videos, it offers Time Wrap, Time Lapse, and Hyper-lapse. The application has been found to support iOS 12.3 and later versions.
Steps to Create a Fast Motion Video Using Video Speed Changer
Multiple applications provide similar services, but none can compare to its UI. Here is how to make a video fast motion iPhone using this
Step 1: Access this application from the App Store and launch it after installation. Click on the “Select Video” button and import a clip.

Step 2: Once you have selected a video, it will take you straight to the speed change option. Change the position of the given slider. Finally, preview the video and click the “Save Video” button to save it on your device.

3. Slow Motion Video FX Edit
Although the name indicates otherwise, this video editor is capable of high-speed change. It comes with an intuitive user interface and is easy for anyone to employ. In addition to speed alteration, you can insert 40 different filters into your video. You can also commence its freeze frame action to add an extra layer of creativity. The tool is compatible with iOS 13.0 and higher versions.
Steps to Create Fast Motion Using Slow Motion Video FX
This is another editor to gain insights on how to make fast-motion videos on an iPhone. We have given the verified step-by-step guide to using this app:
Step 1: After launching this application, click the “Choose From Library” option. Then, select a clip from your device’s gallery.

Step 2: Once the video is compressed, you’ll be taken to the speed change screen. From there, you can alter the speed of different clip sections. Move the slider of the relevant section upward to increase the speed.

Step 3: Once you have altered the speed, navigate towards the top right corner and click the “Export” icon.

Part 3: Desktop Solution: Remedy for Those Who Want to Speed Up Video on Their Computer
If you have gone through the above applications, you know the fast-motion effect. Do you want to know how to make a video fast motion on an iPhone using a computer? Wondershare Filmora is the best alternative to the above applications for creating this effect. The software is compatible with all the macOS and iOS devices and allows seamless editing.
With this editor, you get multiple options to create a fast-motion video. In this article, we will use the Uniform Speed feature. The operating process is very accessible and designed to assist both professionals and beginners. You can also apply the AI Frame Interpolation option to apply “Frame Bending.”
Free Download For Win 7 or later(64-bit)
Free Download For macOS 10.14 or later
Step-by-Step Guide to Speed Up Video with Filmora
After reading the article till now, you have gained knowledge of Filmora’s speeding options. How to make fast motion video on iPhone now seems like an easy option. Even though the process is easy, we want you to stay ahead. Hence, here is a step-by-step procedure for creating fast motion in Filmora:
Step 1Create a New Project and Import Media
First, connect your iOS device to your Wondershare Filmora device. After that, launch Filmora to access the main menu. From there, click on the “New Project” tab fashioned in the center. Expand the “Import” option in the Project Media section and select the suitable option. In this case, choose the “Import from Phone or Camera” option.

Step 2Access the Uniform Speed Section
After bringing the imported media to the timeline, select it to access the settings panel. Select the “Speed > Uniform Speed” tab from the appeared panel. Then, drag the Speed slider on the right side to increase speed. Afterward, click the “Play” button on the preview screen to see the results.

Step 3Apply Frame Bending and Export
This part is optional, but if you find an irregularity or roughness to the video, apply this. Go to the “AI Frame Interpolation” section at the bottom and expand the options. From the dropdown menu, select the “Frame Bending” option and do the rendering from the timeline. After everything is set, select the “Export” button at the top right corner.

Trending Video Editing Features of Wondershare Filmora
Filmora is a versatile tool that is not confined to speed manipulation or fast motion only. This editor offers audio, text, AI editing options, and video. Here are some prominent key features of Wondershare Filmora to help you in editing:
1. Speed Ramping
The other option for speed modification mentioned previously is speed ramping. This option comes with 6 editable speed change presets for automated editing. However, you can also employ the custom preset to create your own way. Moreover, it allows the audio pitch option to enable automated maintenance of audio.
2. AI Smart Cutout
There is more than one way of removing and replacing a background in Filmora. Smart Cutout offers an AI-integrated masking option to cut out the selected parts. You can also set preferences for Edge Thickness or Edge Feather for accuracy. Afterward, you can introduce three background options: color, grid, or more.
3. AI Text-to-Video
Bring your imagination to visuals with this amazing generative AI video creator. It creates videos from text and covers the voice and graphical elements. Users can customize the AI voice and ratio before generating a video. The prompt section offers up to 1000 characters for adding a script or giving directions.
4. AI Smart Masking
Are there any effects or filters you want to introduce to only a specific part of the video? Use Filmora’s AI mask for automated masking of an object or background. The mask brush selects the relevant area on its own. Besides AI masks, there is a manual masking option or mask shapes to apply. You can also customize the Brush size according to the video.
Conclusion
The article highlighted the importance of increasing video speed in many industries. In addition, we discussed some tools that make fast motion with ease. We also provided step-by-step guides on how to make fast motion video on iPhone. Wondershare Filmora stands amongst all those applications to create fast motion. We recommend this software due to its multiple functionalities and detailed editing abilities.
3 Methods to Combine 2 or 3 Videos Into 1
You’ll need to combine the video segments you just recorded to create a beautiful video most of the time. You may mix and merge multiple video clips using a variety of desktop applications, smartphone apps, and web resources. You don’t have to try each one to see which one is the best for merging video clips in multiple formats, frame rates, or even aspect ratios.
This guide is to help you select the ways that meet your needs, and it is easy for you to combine 2 or more videos into one video. Therefore, the four ways to combine 2 or 3 videos or more into one include the following with a step-by-step guide:
Combining 2 or 3 Videos into 1 Using Filmora
Filmora Video Editor is a video editing software which allows you to merge multiple videos and edit them in the best way you can. Filmora Video Merger makes adding videos, audio files, and images simple. You can effortlessly combine numerous films into one with Filmora video editing software and apply transitions, overlays, filters, and many other features.
For Win 7 or later (64-bit)
For macOS 10.14 or later
Follow the step-by-step guide to merge videos using filmora:
Step 1: Import Video Files
You must load the video clips into Filmora after it has been installed. Then, to upload your video files, click Import or drag them directly to the media library. They’ll appear as thumbnails in the left pane when you’ve imported all of them.

Step 2: Drag and Drop
Drag & drop the files you wish to merge from the media library to the timeline, and the merged video will appear in real-time. The Preview window can be viewed by pressing the Play button. You can export it immediately if you’re happy with it, but you can also improve it by adding transitions, filters, or overlays.

Step 3: Trim or Add Transition (Optional)
Please click the video clip in the timeline to cut your videos. To cut, first, move the play head to the desired location, then click the slipt icon in the toolbar. After that, shift the play to a different frame. Then, finally, click the split icon again.

Select Transition from the top menu and drag your preferred transition effect between two clips. You can also Apply to Favourite any transition by right-clicking on it.

Step 4: Export Combined Video File
After making all the adjustments, click the EXPORT tab to export your videos. You may export or convert your original video formats to iPhone, iPad, HTC, Samsung Galaxy, and other portable devices. On your devices, they’ll run without a hitch.

Combining 2 or 3 Videos into 1 Using Photos App on Windows 10
Photos App on Windows 10 empowers you to experiment with the photos and videos to make them look better. It allows you to merge multiple videos and edit the video content, compare videos, and create films. It is easy to use and offers all basic viewing and fixing options.
Follow the step-by-step guide to merge videos using Photos App on Windows 10:
Step 1: Lauch the Photos App
You might wish to put all of the films or photographs you want to merge into one folder on your computer before going to the Photos app. It will aid in the speeding up of the entire procedure.
Type ‘Photos’ into your computer’s search bar, then click on the program that appears.

Step 2: Start a New Video Project
You want to start your video production after launching the Photos app. To do so, go to the top right corner of your screen and select New Video Project, which will take you to the editor mode.
The second part of this procedure is known by several titles in different versions of Windows 10’s Photos app, such as creating a video with music, creating a film with text, and a new video project.
Launching the editor mode directly from the photo if you’re using photos in your video project is also possible. In that case, consider the following:
- Open your file in the Photos app
- Select Edit & Create
- Select Create a movie with text from the drop-down menu.

You can name the project by typing it in the name tab in the top left corner of your screen. Then, by clicking the pencil icon next to your project’s name, you can alter your title at any moment.
The video editor in the Photos app won’t allow you to upload files until you’ve given your project a title. When you try to add a file, a pop-up choice will display, and you may write in the project’s name and then click OK or Create a Video to continue.
Step 3: Import Files
To add files to your video project, go to the Project Library portion of your screen and click the + icon that you see in the top left corner.
If you have all of the files you wish to merge into one video in one folder, you can select them all and add them to your project using the ‘This PC’ option. Alternatively, you can add the files one by one.
The tool will automatically combine all of your files into a single video. Then, you can alter the video order in the Storyboard and edit them.
Go to your Project Library and drag all of the files you added to the video editor into the Storyboard section to get started on your project.

Step 4: Trim Video Clips
You can also trim your clip in the Photos app if necessary. Here’s how to do it:
- On your Storyboard, select the Trim icon.
- Using the handlebar, shorten or prolong the duration of your clip as desired.
- Select “Done” from the drop-down menu.

Step 5: Remove/Add Sound
You can now select numerous music options from the Windows library or upload your own.
Select the Background Music option in the top-right corner of the screen. Then, mute or adjust the volume of your video.
Or select Add an audio file from the Custom Audio menu in the top-right corner of your screen, select the file you want to Import, click Open, make any necessary changes to the audio file, and select Done.

Step 6: Add Text
You can add text to your video project using the Windows video editor, but there aren’t many font styles to choose from. You’ll also have to add and optimize your text for each clip separately, which isn’t the most time-efficient approach.
To add text to your clips, follow these steps:
- Choose Text
- Select the small box icon on the clip you want to add text to
- In the empty box, type the text you wish to add.
- Select the font style you want to use.
- Choose where your text should show in the video.

Step 7: Export/Save Merged File
You can save your video project to your computer after being happy with it. To do so, follow these steps:
- Click the Export, Share, or Finish movie option in the top right corner of your screen.
- Select the video resolution in which you want your video to be saved.
Combining 2 or 3 Videos into 1 Using VLC
VLC is a widely used media player that is free to download and use on various platforms, including Linux, Mac OS X, Windows, and others. In addition, this open-source utility includes a wide range of editing tools, including converting, combining, and others, in addition to video playing. As a result, VLC is an excellent program to use if you’re seeking a cheap way to merge videos quickly and efficiently.
Step 1: Import files
VLC Media Player is a free media player that you can download, install, and use on your computer. First, click the Media tab on the main screen, then pick Open Multiple Files from the drop-down menu.

Step 2: Open Video Files
Select the File tab from the pop-up box, then click the +Add button to browse and load the videos to be merged. Here you can upload multiple files.
You can upload as many videos as you want. There are no such limitations to merge video files.

Step 3: Convert
Go to the Play menu and select the Convert option from the drop-down menu.

Step 4: Save Merged Video Files
You’ll be taken to a new Convert window, where you can save the merged file to your desktop. Finally, Click on the Play button to begin the VLC video merge process.
Once the process is completed, you can export your merged video files to any platform you like.

FAQs
Q1. How to merge two MP4 videos into 1?
Whether you have two MP4 clips or videos with different extensions, you can easily merge them into one with Filmora. To do that, position both videos on the same track without space. Then, export the project in your desired output format, such as MP4.
Q2. What is the best app for combining videos?
For fast video joining, you can choose Filmora or Adobe Premiere Pro. Both apps are available on Windows and Mac operating systems. Moreover, the combining process is also trouble-free.
Q3. How to merge two videos without losing quality?
Professionals with years of video editing experience choose Premiere Pro to maintain the quality of the merged videos. But remember, any mistakes in the export settings can reduce the calibre. Contrarily, Filmora offers user-friendly and uncomplicated export options so you can save combined videos in the highest quality possible.
The Bottom Line
Different methods of merging videos depend primarily on the type of program you intend to use. The step-by-step guide is to help beginners move ahead in their careers and choose the best method that they find easy. Each method is easy-to-use and accessible by all users. Also, it doesn’t require you to invest money to purchase premium versions of video merging softwares.
However, there are some other softwares that can also be used to merge videos. But they are complex and makes it challenging for a beginner to merge videos easily.
For macOS 10.14 or later
Follow the step-by-step guide to merge videos using filmora:
Step 1: Import Video Files
You must load the video clips into Filmora after it has been installed. Then, to upload your video files, click Import or drag them directly to the media library. They’ll appear as thumbnails in the left pane when you’ve imported all of them.

Step 2: Drag and Drop
Drag & drop the files you wish to merge from the media library to the timeline, and the merged video will appear in real-time. The Preview window can be viewed by pressing the Play button. You can export it immediately if you’re happy with it, but you can also improve it by adding transitions, filters, or overlays.

Step 3: Trim or Add Transition (Optional)
Please click the video clip in the timeline to cut your videos. To cut, first, move the play head to the desired location, then click the slipt icon in the toolbar. After that, shift the play to a different frame. Then, finally, click the split icon again.

Select Transition from the top menu and drag your preferred transition effect between two clips. You can also Apply to Favourite any transition by right-clicking on it.

Step 4: Export Combined Video File
After making all the adjustments, click the EXPORT tab to export your videos. You may export or convert your original video formats to iPhone, iPad, HTC, Samsung Galaxy, and other portable devices. On your devices, they’ll run without a hitch.

Combining 2 or 3 Videos into 1 Using Photos App on Windows 10
Photos App on Windows 10 empowers you to experiment with the photos and videos to make them look better. It allows you to merge multiple videos and edit the video content, compare videos, and create films. It is easy to use and offers all basic viewing and fixing options.
Follow the step-by-step guide to merge videos using Photos App on Windows 10:
Step 1: Lauch the Photos App
You might wish to put all of the films or photographs you want to merge into one folder on your computer before going to the Photos app. It will aid in the speeding up of the entire procedure.
Type ‘Photos’ into your computer’s search bar, then click on the program that appears.

Step 2: Start a New Video Project
You want to start your video production after launching the Photos app. To do so, go to the top right corner of your screen and select New Video Project, which will take you to the editor mode.
The second part of this procedure is known by several titles in different versions of Windows 10’s Photos app, such as creating a video with music, creating a film with text, and a new video project.
Launching the editor mode directly from the photo if you’re using photos in your video project is also possible. In that case, consider the following:
- Open your file in the Photos app
- Select Edit & Create
- Select Create a movie with text from the drop-down menu.

You can name the project by typing it in the name tab in the top left corner of your screen. Then, by clicking the pencil icon next to your project’s name, you can alter your title at any moment.
The video editor in the Photos app won’t allow you to upload files until you’ve given your project a title. When you try to add a file, a pop-up choice will display, and you may write in the project’s name and then click OK or Create a Video to continue.
Step 3: Import Files
To add files to your video project, go to the Project Library portion of your screen and click the + icon that you see in the top left corner.
If you have all of the files you wish to merge into one video in one folder, you can select them all and add them to your project using the ‘This PC’ option. Alternatively, you can add the files one by one.
The tool will automatically combine all of your files into a single video. Then, you can alter the video order in the Storyboard and edit them.
Go to your Project Library and drag all of the files you added to the video editor into the Storyboard section to get started on your project.

Step 4: Trim Video Clips
You can also trim your clip in the Photos app if necessary. Here’s how to do it:
- On your Storyboard, select the Trim icon.
- Using the handlebar, shorten or prolong the duration of your clip as desired.
- Select “Done” from the drop-down menu.

Step 5: Remove/Add Sound
You can now select numerous music options from the Windows library or upload your own.
Select the Background Music option in the top-right corner of the screen. Then, mute or adjust the volume of your video.
Or select Add an audio file from the Custom Audio menu in the top-right corner of your screen, select the file you want to Import, click Open, make any necessary changes to the audio file, and select Done.

Step 6: Add Text
You can add text to your video project using the Windows video editor, but there aren’t many font styles to choose from. You’ll also have to add and optimize your text for each clip separately, which isn’t the most time-efficient approach.
To add text to your clips, follow these steps:
- Choose Text
- Select the small box icon on the clip you want to add text to
- In the empty box, type the text you wish to add.
- Select the font style you want to use.
- Choose where your text should show in the video.

Step 7: Export/Save Merged File
You can save your video project to your computer after being happy with it. To do so, follow these steps:
- Click the Export, Share, or Finish movie option in the top right corner of your screen.
- Select the video resolution in which you want your video to be saved.
Combining 2 or 3 Videos into 1 Using VLC
VLC is a widely used media player that is free to download and use on various platforms, including Linux, Mac OS X, Windows, and others. In addition, this open-source utility includes a wide range of editing tools, including converting, combining, and others, in addition to video playing. As a result, VLC is an excellent program to use if you’re seeking a cheap way to merge videos quickly and efficiently.
Step 1: Import files
VLC Media Player is a free media player that you can download, install, and use on your computer. First, click the Media tab on the main screen, then pick Open Multiple Files from the drop-down menu.

Step 2: Open Video Files
Select the File tab from the pop-up box, then click the +Add button to browse and load the videos to be merged. Here you can upload multiple files.
You can upload as many videos as you want. There are no such limitations to merge video files.

Step 3: Convert
Go to the Play menu and select the Convert option from the drop-down menu.

Step 4: Save Merged Video Files
You’ll be taken to a new Convert window, where you can save the merged file to your desktop. Finally, Click on the Play button to begin the VLC video merge process.
Once the process is completed, you can export your merged video files to any platform you like.

FAQs
Q1. How to merge two MP4 videos into 1?
Whether you have two MP4 clips or videos with different extensions, you can easily merge them into one with Filmora. To do that, position both videos on the same track without space. Then, export the project in your desired output format, such as MP4.
Q2. What is the best app for combining videos?
For fast video joining, you can choose Filmora or Adobe Premiere Pro. Both apps are available on Windows and Mac operating systems. Moreover, the combining process is also trouble-free.
Q3. How to merge two videos without losing quality?
Professionals with years of video editing experience choose Premiere Pro to maintain the quality of the merged videos. But remember, any mistakes in the export settings can reduce the calibre. Contrarily, Filmora offers user-friendly and uncomplicated export options so you can save combined videos in the highest quality possible.
The Bottom Line
Different methods of merging videos depend primarily on the type of program you intend to use. The step-by-step guide is to help beginners move ahead in their careers and choose the best method that they find easy. Each method is easy-to-use and accessible by all users. Also, it doesn’t require you to invest money to purchase premium versions of video merging softwares.
However, there are some other softwares that can also be used to merge videos. But they are complex and makes it challenging for a beginner to merge videos easily.
For macOS 10.14 or later
Follow the step-by-step guide to merge videos using filmora:
Step 1: Import Video Files
You must load the video clips into Filmora after it has been installed. Then, to upload your video files, click Import or drag them directly to the media library. They’ll appear as thumbnails in the left pane when you’ve imported all of them.

Step 2: Drag and Drop
Drag & drop the files you wish to merge from the media library to the timeline, and the merged video will appear in real-time. The Preview window can be viewed by pressing the Play button. You can export it immediately if you’re happy with it, but you can also improve it by adding transitions, filters, or overlays.

Step 3: Trim or Add Transition (Optional)
Please click the video clip in the timeline to cut your videos. To cut, first, move the play head to the desired location, then click the slipt icon in the toolbar. After that, shift the play to a different frame. Then, finally, click the split icon again.

Select Transition from the top menu and drag your preferred transition effect between two clips. You can also Apply to Favourite any transition by right-clicking on it.

Step 4: Export Combined Video File
After making all the adjustments, click the EXPORT tab to export your videos. You may export or convert your original video formats to iPhone, iPad, HTC, Samsung Galaxy, and other portable devices. On your devices, they’ll run without a hitch.

Combining 2 or 3 Videos into 1 Using Photos App on Windows 10
Photos App on Windows 10 empowers you to experiment with the photos and videos to make them look better. It allows you to merge multiple videos and edit the video content, compare videos, and create films. It is easy to use and offers all basic viewing and fixing options.
Follow the step-by-step guide to merge videos using Photos App on Windows 10:
Step 1: Lauch the Photos App
You might wish to put all of the films or photographs you want to merge into one folder on your computer before going to the Photos app. It will aid in the speeding up of the entire procedure.
Type ‘Photos’ into your computer’s search bar, then click on the program that appears.

Step 2: Start a New Video Project
You want to start your video production after launching the Photos app. To do so, go to the top right corner of your screen and select New Video Project, which will take you to the editor mode.
The second part of this procedure is known by several titles in different versions of Windows 10’s Photos app, such as creating a video with music, creating a film with text, and a new video project.
Launching the editor mode directly from the photo if you’re using photos in your video project is also possible. In that case, consider the following:
- Open your file in the Photos app
- Select Edit & Create
- Select Create a movie with text from the drop-down menu.

You can name the project by typing it in the name tab in the top left corner of your screen. Then, by clicking the pencil icon next to your project’s name, you can alter your title at any moment.
The video editor in the Photos app won’t allow you to upload files until you’ve given your project a title. When you try to add a file, a pop-up choice will display, and you may write in the project’s name and then click OK or Create a Video to continue.
Step 3: Import Files
To add files to your video project, go to the Project Library portion of your screen and click the + icon that you see in the top left corner.
If you have all of the files you wish to merge into one video in one folder, you can select them all and add them to your project using the ‘This PC’ option. Alternatively, you can add the files one by one.
The tool will automatically combine all of your files into a single video. Then, you can alter the video order in the Storyboard and edit them.
Go to your Project Library and drag all of the files you added to the video editor into the Storyboard section to get started on your project.

Step 4: Trim Video Clips
You can also trim your clip in the Photos app if necessary. Here’s how to do it:
- On your Storyboard, select the Trim icon.
- Using the handlebar, shorten or prolong the duration of your clip as desired.
- Select “Done” from the drop-down menu.

Step 5: Remove/Add Sound
You can now select numerous music options from the Windows library or upload your own.
Select the Background Music option in the top-right corner of the screen. Then, mute or adjust the volume of your video.
Or select Add an audio file from the Custom Audio menu in the top-right corner of your screen, select the file you want to Import, click Open, make any necessary changes to the audio file, and select Done.

Step 6: Add Text
You can add text to your video project using the Windows video editor, but there aren’t many font styles to choose from. You’ll also have to add and optimize your text for each clip separately, which isn’t the most time-efficient approach.
To add text to your clips, follow these steps:
- Choose Text
- Select the small box icon on the clip you want to add text to
- In the empty box, type the text you wish to add.
- Select the font style you want to use.
- Choose where your text should show in the video.

Step 7: Export/Save Merged File
You can save your video project to your computer after being happy with it. To do so, follow these steps:
- Click the Export, Share, or Finish movie option in the top right corner of your screen.
- Select the video resolution in which you want your video to be saved.
Combining 2 or 3 Videos into 1 Using VLC
VLC is a widely used media player that is free to download and use on various platforms, including Linux, Mac OS X, Windows, and others. In addition, this open-source utility includes a wide range of editing tools, including converting, combining, and others, in addition to video playing. As a result, VLC is an excellent program to use if you’re seeking a cheap way to merge videos quickly and efficiently.
Step 1: Import files
VLC Media Player is a free media player that you can download, install, and use on your computer. First, click the Media tab on the main screen, then pick Open Multiple Files from the drop-down menu.

Step 2: Open Video Files
Select the File tab from the pop-up box, then click the +Add button to browse and load the videos to be merged. Here you can upload multiple files.
You can upload as many videos as you want. There are no such limitations to merge video files.

Step 3: Convert
Go to the Play menu and select the Convert option from the drop-down menu.

Step 4: Save Merged Video Files
You’ll be taken to a new Convert window, where you can save the merged file to your desktop. Finally, Click on the Play button to begin the VLC video merge process.
Once the process is completed, you can export your merged video files to any platform you like.

FAQs
Q1. How to merge two MP4 videos into 1?
Whether you have two MP4 clips or videos with different extensions, you can easily merge them into one with Filmora. To do that, position both videos on the same track without space. Then, export the project in your desired output format, such as MP4.
Q2. What is the best app for combining videos?
For fast video joining, you can choose Filmora or Adobe Premiere Pro. Both apps are available on Windows and Mac operating systems. Moreover, the combining process is also trouble-free.
Q3. How to merge two videos without losing quality?
Professionals with years of video editing experience choose Premiere Pro to maintain the quality of the merged videos. But remember, any mistakes in the export settings can reduce the calibre. Contrarily, Filmora offers user-friendly and uncomplicated export options so you can save combined videos in the highest quality possible.
The Bottom Line
Different methods of merging videos depend primarily on the type of program you intend to use. The step-by-step guide is to help beginners move ahead in their careers and choose the best method that they find easy. Each method is easy-to-use and accessible by all users. Also, it doesn’t require you to invest money to purchase premium versions of video merging softwares.
However, there are some other softwares that can also be used to merge videos. But they are complex and makes it challenging for a beginner to merge videos easily.
For macOS 10.14 or later
Follow the step-by-step guide to merge videos using filmora:
Step 1: Import Video Files
You must load the video clips into Filmora after it has been installed. Then, to upload your video files, click Import or drag them directly to the media library. They’ll appear as thumbnails in the left pane when you’ve imported all of them.

Step 2: Drag and Drop
Drag & drop the files you wish to merge from the media library to the timeline, and the merged video will appear in real-time. The Preview window can be viewed by pressing the Play button. You can export it immediately if you’re happy with it, but you can also improve it by adding transitions, filters, or overlays.

Step 3: Trim or Add Transition (Optional)
Please click the video clip in the timeline to cut your videos. To cut, first, move the play head to the desired location, then click the slipt icon in the toolbar. After that, shift the play to a different frame. Then, finally, click the split icon again.

Select Transition from the top menu and drag your preferred transition effect between two clips. You can also Apply to Favourite any transition by right-clicking on it.

Step 4: Export Combined Video File
After making all the adjustments, click the EXPORT tab to export your videos. You may export or convert your original video formats to iPhone, iPad, HTC, Samsung Galaxy, and other portable devices. On your devices, they’ll run without a hitch.

Combining 2 or 3 Videos into 1 Using Photos App on Windows 10
Photos App on Windows 10 empowers you to experiment with the photos and videos to make them look better. It allows you to merge multiple videos and edit the video content, compare videos, and create films. It is easy to use and offers all basic viewing and fixing options.
Follow the step-by-step guide to merge videos using Photos App on Windows 10:
Step 1: Lauch the Photos App
You might wish to put all of the films or photographs you want to merge into one folder on your computer before going to the Photos app. It will aid in the speeding up of the entire procedure.
Type ‘Photos’ into your computer’s search bar, then click on the program that appears.

Step 2: Start a New Video Project
You want to start your video production after launching the Photos app. To do so, go to the top right corner of your screen and select New Video Project, which will take you to the editor mode.
The second part of this procedure is known by several titles in different versions of Windows 10’s Photos app, such as creating a video with music, creating a film with text, and a new video project.
Launching the editor mode directly from the photo if you’re using photos in your video project is also possible. In that case, consider the following:
- Open your file in the Photos app
- Select Edit & Create
- Select Create a movie with text from the drop-down menu.

You can name the project by typing it in the name tab in the top left corner of your screen. Then, by clicking the pencil icon next to your project’s name, you can alter your title at any moment.
The video editor in the Photos app won’t allow you to upload files until you’ve given your project a title. When you try to add a file, a pop-up choice will display, and you may write in the project’s name and then click OK or Create a Video to continue.
Step 3: Import Files
To add files to your video project, go to the Project Library portion of your screen and click the + icon that you see in the top left corner.
If you have all of the files you wish to merge into one video in one folder, you can select them all and add them to your project using the ‘This PC’ option. Alternatively, you can add the files one by one.
The tool will automatically combine all of your files into a single video. Then, you can alter the video order in the Storyboard and edit them.
Go to your Project Library and drag all of the files you added to the video editor into the Storyboard section to get started on your project.

Step 4: Trim Video Clips
You can also trim your clip in the Photos app if necessary. Here’s how to do it:
- On your Storyboard, select the Trim icon.
- Using the handlebar, shorten or prolong the duration of your clip as desired.
- Select “Done” from the drop-down menu.

Step 5: Remove/Add Sound
You can now select numerous music options from the Windows library or upload your own.
Select the Background Music option in the top-right corner of the screen. Then, mute or adjust the volume of your video.
Or select Add an audio file from the Custom Audio menu in the top-right corner of your screen, select the file you want to Import, click Open, make any necessary changes to the audio file, and select Done.

Step 6: Add Text
You can add text to your video project using the Windows video editor, but there aren’t many font styles to choose from. You’ll also have to add and optimize your text for each clip separately, which isn’t the most time-efficient approach.
To add text to your clips, follow these steps:
- Choose Text
- Select the small box icon on the clip you want to add text to
- In the empty box, type the text you wish to add.
- Select the font style you want to use.
- Choose where your text should show in the video.

Step 7: Export/Save Merged File
You can save your video project to your computer after being happy with it. To do so, follow these steps:
- Click the Export, Share, or Finish movie option in the top right corner of your screen.
- Select the video resolution in which you want your video to be saved.
Combining 2 or 3 Videos into 1 Using VLC
VLC is a widely used media player that is free to download and use on various platforms, including Linux, Mac OS X, Windows, and others. In addition, this open-source utility includes a wide range of editing tools, including converting, combining, and others, in addition to video playing. As a result, VLC is an excellent program to use if you’re seeking a cheap way to merge videos quickly and efficiently.
Step 1: Import files
VLC Media Player is a free media player that you can download, install, and use on your computer. First, click the Media tab on the main screen, then pick Open Multiple Files from the drop-down menu.

Step 2: Open Video Files
Select the File tab from the pop-up box, then click the +Add button to browse and load the videos to be merged. Here you can upload multiple files.
You can upload as many videos as you want. There are no such limitations to merge video files.

Step 3: Convert
Go to the Play menu and select the Convert option from the drop-down menu.

Step 4: Save Merged Video Files
You’ll be taken to a new Convert window, where you can save the merged file to your desktop. Finally, Click on the Play button to begin the VLC video merge process.
Once the process is completed, you can export your merged video files to any platform you like.

FAQs
Q1. How to merge two MP4 videos into 1?
Whether you have two MP4 clips or videos with different extensions, you can easily merge them into one with Filmora. To do that, position both videos on the same track without space. Then, export the project in your desired output format, such as MP4.
Q2. What is the best app for combining videos?
For fast video joining, you can choose Filmora or Adobe Premiere Pro. Both apps are available on Windows and Mac operating systems. Moreover, the combining process is also trouble-free.
Q3. How to merge two videos without losing quality?
Professionals with years of video editing experience choose Premiere Pro to maintain the quality of the merged videos. But remember, any mistakes in the export settings can reduce the calibre. Contrarily, Filmora offers user-friendly and uncomplicated export options so you can save combined videos in the highest quality possible.
The Bottom Line
Different methods of merging videos depend primarily on the type of program you intend to use. The step-by-step guide is to help beginners move ahead in their careers and choose the best method that they find easy. Each method is easy-to-use and accessible by all users. Also, it doesn’t require you to invest money to purchase premium versions of video merging softwares.
However, there are some other softwares that can also be used to merge videos. But they are complex and makes it challenging for a beginner to merge videos easily.
Also read:
- Lets Learn How to Convert a Normal Video Into a Film Shot in the 1920S with Wondershare Filmora
- New In 2024, Steps to Create One Click Video Reverse Effect in Filmora
- Updated Do You Want to Make Your Photos and Videos Look Different From Others? There Are Many Lightroom LUTs Free, and They Make Your Media Content Stand Out From Others
- Updated Learn How to Make Interactive and Fun Video Collages Using Kapwing Collage Maker, an Easy-to-Use Tool for All Your Collage-Making Needs for 2024
- Easy Way to Create an Alternate Reality Effect
- Updated In 2024, Using Slow Motion in Adobe After Effects A Step-by-Step Procession
- New How To Zoom In On TikTok Videos, In 2024
- How to Convert Videos to Slow Motion? Complete Guide
- New Video Editors Use Transitions to Tie Their Shots and Clips Together Into a Cohesive, Polished Program. Learn the Best Method to Create a Smooth Cut Transition Effect
- New In 2024, Best Method to Split the Video Into Parts Online
- New How to Make OBS Slideshow for 2024
- 2024 Approved TikTok Velocity Dance Tutorial| Filmora
- New How to Time-Lapse a Video on iMovie for 2024
- 2024 Approved How to Change Frame Rate in Premiere Pro
- Updated Based on Preferences, You Can Adjust the Speed of YouTube Videos. Learn How to Produce a YouTube Slow-Motion Video in This Article
- Are You Trying to Make Your Video Pause on a Specific Frame? Learn How to Do so Quickly and with Ease by Adding a Freeze-Frame Effect in These Freeze-Frame Video Editing Apps for 2024
- Updated 2024 Approved 6 Free Tools To Radial Blur Photos Online
- Updated 2024 Approved Camera Shake Effects in Videos Helps to Showcase Aesthetics and Vibes. Do You Wish to Add a Camera Shake in Videos? Consider Using the Video Editor Discussed Here for This
- New 2024 Approved Unleash the Power of Video Slow Motion with Wondershare Filmora. Find Out How to Create Slow Motion Video with the Effective Speed Ramping Feature on Filmora
- How to Make a Smooth Speed Ramping in Premiere Pro for 2024
- Updated Do You Want to Know About Efficient Motion Blur Plugins for Adobe Effects? Read This Article to Find Out How to Use Motion Blur Plugins for Enhanced Results for 2024
- In 2024, How to Animate Text in A Video
- Updated | Top GIF to MP4 Converters
- Updated How to Use LUTs in Lumafusion & Free Resource for 2024
- Multi Object Tracking The Ultimate Guide for 2024
- 2024 Approved How to Create Your Own LOL Montage Video
- Discover the Top Slow Motion Camera App to Use
- New 2024 Approved Top Online Video Background Changers Transform Your Videos with Ease
- TEXT REVEAL Animation | Easy Masking Filmora for 2024
- In 2024, Google Meet Green Screen Is the Latest Addition to the Virtual Meeting App. It Is a Crucial Feature as It Allows Users to Maintain a Semblance of Privacy Through Virtual Backgrounds
- New In 2024, Do You Use Premiere Pro and Want to Learn How to Change a Videos Frame Rate Using the Tool? Here Are the Steps that You Need to Follow
- Updated 2024 Approved Know How You Can Get some Cool Discord Animated Icons Through some Simple Steps. Presenting the Latest Tool to Get Animated PFP and Logos Instantly for Discord
- Updated Want to Convert MP4 Video To 60 FPS GIF? Read This
- New In 2024, Looking for the Simple Steps to Add a Filter to Your Video in Premiere Pro? Here Are the Complete Steps Along with the List of Free Premiere Filter Presets to Use
- If You Want an App to Make Videos with Pictures and Music for Social Media Posts, We Are with the Best Apps to Make Videos with Music and Pictures for 2024
- Updated 2024 Approved Best 7 Color Match Paint Apps
- New In 2024, Top 22 Free Video Editing Software
- 2024 Approved How to Record Video Streams With FFmpeg on Windows and Mac?
- Prank Your Friends! Easy Ways to Fake and Share Google Maps Location On Honor Magic 6 | Dr.fone
- In 2024, The Complete Guide to Honor Play 7T FRP Bypass Everything You Need to Know
- In 2024, How to Make the Most of Your Apple iPhone 12 Pro Lock Screen with Notifications? | Dr.fone
- In 2024, 5 Ways to Move Contacts From Vivo V29 Pro to iPhone (13/14/15) | Dr.fone
- Apple iPhone X Mirror to PC? Top Apps You Must Know | Dr.fone
- How to Bypass Google FRP Lock on Oppo Devices
- In 2024, A Comprehensive Guide to Mastering iPogo for Pokémon GO On Apple iPhone 13 | Dr.fone
- How PGSharp Save You from Ban While Spoofing Pokemon Go On Lava Agni 2 5G? | Dr.fone
- In 2024, AddROM Bypass An Android Tool to Unlock FRP Lock Screen For your Samsung Galaxy S23 Tactical Edition
- Updated How to Create Marketing Videos for 2024
- Updated In 2024, How to Create an Adobe Collage?
- How To Transfer Data From iPhone 15 Plus To Other iPhone 14 Pro devices? | Dr.fone
- How to Fix Android.Process.Media Has Stopped on Oppo Reno 8T 5G | Dr.fone
- In 2024, How to Bypass Activation Lock from iPhone 6s or iPad?
- Best 3 Samsung Galaxy M14 5G Emulator for Mac to Run Your Wanted Android Apps | Dr.fone
- In 2024, How to Watch Hulu Outside US On Motorola Defy 2 | Dr.fone
- 4 Easy Ways for Your Honor 90 Hard Reset | Dr.fone
- Easy steps to recover deleted videos from Vivo X100
- 10 Free Location Spoofers to Fake GPS Location on your Itel A60 | Dr.fone
- The Best 8 VPN Hardware Devices Reviewed On Vivo S17 | Dr.fone
- How to get the dragon scale and evolution-enabled pokemon On Honor Magic 5? | Dr.fone
- 11 Best Location Changers for Realme Narzo N53 | Dr.fone
- In 2024, How To Fix Apple ID Verification Code Not Working On Apple iPhone 14 Pro
- How To Transfer Data From iPhone X To Other iPhone 13 Pro Max devices? | Dr.fone
- What is the best Pokemon for pokemon pvp ranking On Tecno Spark Go (2024)? | Dr.fone
- Title: New How to Add a Green Screen to Zoom
- Author: Morgan
- Created at : 2024-05-19 05:11:49
- Updated at : 2024-05-20 05:11:49
- Link: https://ai-video-editing.techidaily.com/new-how-to-add-a-green-screen-to-zoom/
- License: This work is licensed under CC BY-NC-SA 4.0.

