

New How to Add Effects in Premiere Pro for 2024
How to Add Effects in Premiere Pro
In order to provide video editors a simple method to combine unprocessed material into a finished product, Adobe Premiere Pro was created. Add effects in premiere pro shines at this job if you’re trying to take the raw video of a video that was taken and remove all of the less fascinating bits while retaining all of the better pieces. You may utilize how to add video effects in premiere pro by importing your material into the application, adding it all to a sequence, and then starting to rearrange the individual clips and add effects.
In Adobe Premiere Pro, you can significantly speed up the editing process, including a large number of common effects that can be applied to your video and configurable parameters that can change the clip size, opacity, rotation, and position. Knowing how to add after effects to premiere pro can be learned with the upcoming steps as it also offers a variety of editing tools that lets you clip, split a structured sequence of tracks and is designed for playback. Additionally, Premiere Pro templates may be used to jumpstart your procedure.
Part 1. Types of Video Effects on Adobe Premiere Pro
A video editing program called Adobe Premiere Pro can be used to create everything from TV programs and movies to advertisements and family videos. These effects include Transitions, VFX, Audio, Videos as well as Advanced level effects like Green Screen. In addition, to know how to add shake effect in premiere pro, we’ve explained in the upcoming steps.
For editors who don’t want to utilize the other motion graphic packages, Premiere provides a ton of built-in effects. Here are a few effects that you may not be aware are available to you. Any filmmaker or content producer must understand how to apply effects since they are necessary for a top-notch video. We’ve compiled easy steps on applying effects in Premiere Pro to be of assistance.
Part 2. How to Add Effects in Premier Pro
Add Transition Effects
There are several transition effects in Adobe Premiere Pro, and there are countless ways to customize them to fit your film. It is quite easy to locate transitions and add them. The Effects panel, which is accessible from the very top options bar, contains all the transition options. A panel will show up on the right when you choose this. To include a transition, adhere to these procedures.
- Navigate to the Video Transitions area of the Effects panel.

- Select the desired transition type from any of the available ones When you wish to employ a transition, press and hold it before dragging it to the start or finish of the clip. Alternately, insert it in between two clips to serve as a transition between the start and finish of each.

- In Premiere, there are several possible transitions, and some can be more suitable for your project than others.
Add Visual Effects
The Essential Graphics panel was added by Adobe to Premiere Pro. Users now have a much different workflow than they had with the few prior title panels. Now that everything is in one panel, you can easily create, animate, and use VFX. Some of the VFX shots were just building miniature towns and adding pieces, while others involved the standard green screen removal and backdrop replacement.
- Simply importing and uploading your video and audio files into Premiere Pro is the first step. The procedure of clicking through is fairly simple. Choose “New Project.” Press the Media Browser panel button and find the Ultra Key tool by opening the Effects panel.

- The film clip with the green screen should have the Ultra Key added. Utilizing the matte creation and matte cleaning tools, remove the green screen using the ultra key effect. When softening, be cautious to eliminate any sharp edges. All of this can be adjusted under the Effects Control panel.

- Put your backdrop material behind your green screen clip after you have a clear key. You should now be able to view your backdrop behind the keyed layer.

Add Text Effects
There are many justifications for include text in your video. It has the ability to reach a bigger audience and is a fantastic example of cross-media integration. We must be able to write text since it is such a crucial component of video production. Learning how to add text in Adobe Premiere is quite simple; here’s an example:
- Select the type tool from the tool window. To add text, click the backdrop and then type. The segment includes a music titled visuals.

- choosing the Type Tool (T) Drag a text box onto your movie using the Graphic Type Tool, then type in it. You may need to go to Windows > Tools and click and hold on Type Tool if it isn’t already selected.

- Head over to the Effect controls panel. under the Text Tab. The text’s font and color can be changed. Decide on a place. Use the Effect Controls panel if you want to add some simple motion to your text. Motion may be added here. You can make rolling credits at the conclusion of your movie or add a rotating effect to your titles using the Properties window as shown below.

- To Fine-Tune the Text Effects, go to Window > Effect Controls You can see all of the effects I changed in the Essential Graphics panel using this panel. A graphic layer will instantly reflect and be highlighted in the Effect Controls panel when clicked on in the Essential Graphics panel, and vice versa.
Add Audio Effects
It’s simple to work with audio with Premiere Pro. By selecting Clip > Audio Options > Audio Gain (or by hitting “G” on your keyboard), you may fast change audio levels. By adding keyframes to the audio clips in your sequence, you can also get greater audio control.
- First, equalize the audio. You have thus eliminated your stutters and the buzz from the audio track of your speaker. You may use the Parametric Equalizer effect under Effects > Audio Effects to give your voices a last boost of clarity and flow.

- Click on your clip and choose Effect Controls > Custom Setup > Edit to make more customizations.

- Make use of the vocal enhancer. In the dropdown menu of your parametric equalizer, choose vocal enhancement. Next, adjust your frequencies upward and downward until everything sounds good.

- In Adobe Premiere Pro, a crossfade is used as the audio transition by default. Use them to join audio files together, provide a smooth transition from opening to closing credits, or add and remove sounds as required. Select Audio Transitions > Crossfade from the Effects menu.

- For fine-tuning your audio, go to Preferences > Timeline > Audio Transition Default to finish. To polish your audio, use duration.
Presets Effects
Presets for Adobe Premiere Pro CC can be a useful tool while editing videos. They eliminate the need for constant manual adjustment by enabling the user to rapidly and simply apply effects, transitions, and other intricate settings. You may utilize effect presets to give your video clips effects. This is a fantastic way to give your project some flare and originality!
- After adjusting the effect to your liking, right-click the name and choose Save Preset. Your own effects are kept by default by Premiere Pro CC in the Presets folder of your Effects Window.

- Right-click the effect preset and choose “Preset Properties…” to alter the Name, Type, or Description of the preset. This option can also be found in the pop-up menu for the Effects panel.

- Editors using Premiere Pro may export and share effect presets. This includes changes to the speed, opacity, and motion! Select “Export Presets” from the Effects panel pop-up menu after selecting the effect preset or presets you want to export. The names of the specific preset included in this file remain unchanged.
Part 3. Alternative Way to Add Effects to Videos [Use Filmora]
Making films can be a wonderful way to save your priceless memories, and several internet influencers have made it their full-time profession and artistic endeavor. Due to how easy it is to locate and utilize its many functions, Filmora is simpler to use than a tool like Adobe Premiere. Simply locate the effect you want to use and drag it onto your timeline. You can quickly find and use any feature you choose.
The most recent edition of a video editing tool regarded for being the most user-friendly and intuitive in its industry is called Wondershare Filmora . The magnetic timeline in Wondershare Filmora enables effects to locate and quickly snap to the boundaries of clips and other effects when they are dropped into different tracks. You may disable this function. Advanced color tuning is available, allowing you to modify the white balance, light, color, and HSL settings as well as add 3D LUTs and custom vignetting. Follow the steps below to Add effects to videos using Filmora:
Free Download For Win 7 or later(64-bit)
Free Download For macOS 10.14 or later
Steps to Use Filmora to Add Effects to Videos:
Step1Import Files
The first step is to import files. You may accomplish this by downloading videos, music, and photographs from social networking websites as well as from your computer. You can quickly arrange the Filmora Media Library to make it simple to locate your clips. To add an element to the timeline, drag it there or click the “Import Files” button.

Step2Use Sound Effects
To enter the sound editing window, double-click on the soundtrack in the timeline. Drag your movie to the timeline, pick the “Music” tab, click on the sound effect, and then drag it to the timeline’s soundtrack. You may also change the sound’s tempo, fade-in and fade-out effects, loudness, and other settings. Additionally, background noise can be eliminated.

Step3Apply Effects
Simply locate the effect you want to use and drag it onto your timeline. You may employ sophisticated tools like green screen, picture-in-picture (PIP), split-screen, stabilization, and speed adjustments to elevate your films to a new level.

Step4Export the Masterpiece
Wondershare There are many export possibilities available with Filmora9. You can instantly publish your films to Facebook, Vimeo, YouTube, and other social networking platforms. You may pick from a variety of video file types when exporting your movie, including WMV, MP4, AVI, MOV, FLV, MKV, TS, 3GP, MPEG-2, WEBM, MP3, and GIF. A DVD might also be created.

Conclusion
Adobe Premiere Pro enables video editors to import their material and add it to sequences that can be put together anyway the editor sees fit. This involves cutting out extraneous material, combining brief portions that make a narrative, and adding sound effects, music, or effects. You now know how to add after effects to premiere pro. However, Filmora , a reliable video editor with an amazing feature set, particularly for its affordable price, is what we suggest for the best performance. The editing process is simplified, allowing users to concentrate on being creative.
A video editing program called Adobe Premiere Pro can be used to create everything from TV programs and movies to advertisements and family videos. These effects include Transitions, VFX, Audio, Videos as well as Advanced level effects like Green Screen. In addition, to know how to add shake effect in premiere pro, we’ve explained in the upcoming steps.For editors who don’t want to utilize the other motion graphic packages, Premiere provides a ton of built-in effects. Here are a few effects that you may not be aware are available to you. Any filmmaker or content producer must understand how to apply effects since they are necessary for a top-notch video. We’ve compiled easy steps on applying effects in Premiere Pro to be of assistance.
Part 2. How to Add Effects in Premier Pro
Add Transition Effects
There are several transition effects in Adobe Premiere Pro, and there are countless ways to customize them to fit your film. It is quite easy to locate transitions and add them. The Effects panel, which is accessible from the very top options bar, contains all the transition options. A panel will show up on the right when you choose this. To include a transition, adhere to these procedures.
- Navigate to the Video Transitions area of the Effects panel.
- Select the desired transition type from any of the available ones When you wish to employ a transition, press and hold it before dragging it to the start or finish of the clip. Alternately, insert it in between two clips to serve as a transition between the start and finish of each.
- In Premiere, there are several possible transitions, and some can be more suitable for your project than others.
Add Visual Effects
The Essential Graphics panel was added by Adobe to Premiere Pro. Users now have a much different workflow than they had with the few prior title panels. Now that everything is in one panel, you can easily create, animate, and use VFX. Some of the VFX shots were just building miniature towns and adding pieces, while others involved the standard green screen removal and backdrop replacement.
- Simply importing and uploading your video and audio files into Premiere Pro is the first step. The procedure of clicking through is fairly simple. Choose “New Project.” Press the Media Browser panel button and find the Ultra Key tool by opening the Effects panel.
- The film clip with the green screen should have the Ultra Key added. Utilizing the matte creation and matte cleaning tools, remove the green screen using the ultra key effect. When softening, be cautious to eliminate any sharp edges. All of this can be adjusted under the Effects Control panel.
- Put your backdrop material behind your green screen clip after you have a clear key. You should now be able to view your backdrop behind the keyed layer.
Add Text Effects
There are many justifications for include text in your video. It has the ability to reach a bigger audience and is a fantastic example of cross-media integration. We must be able to write text since it is such a crucial component of video production. Learning how to add text in Adobe Premiere is quite simple; here’s an example:
- Select the type tool from the tool window. To add text, click the backdrop and then type. The segment includes a music titled visuals.
- choosing the Type Tool (T) Drag a text box onto your movie using the Graphic Type Tool, then type in it. You may need to go to Windows > Tools and click and hold on Type Tool if it isn’t already selected.
- Head over to the Effect controls panel. under the Text Tab. The text’s font and color can be changed. Decide on a place. Use the Effect Controls panel if you want to add some simple motion to your text. Motion may be added here. You can make rolling credits at the conclusion of your movie or add a rotating effect to your titles using the Properties window as shown below.
- To Fine-Tune the Text Effects, go to Window > Effect Controls You can see all of the effects I changed in the Essential Graphics panel using this panel. A graphic layer will instantly reflect and be highlighted in the Effect Controls panel when clicked on in the Essential Graphics panel, and vice versa.
Add Audio Effects
It’s simple to work with audio with Premiere Pro. By selecting Clip > Audio Options > Audio Gain (or by hitting “G” on your keyboard), you may fast change audio levels. By adding keyframes to the audio clips in your sequence, you can also get greater audio control.
- First, equalize the audio. You have thus eliminated your stutters and the buzz from the audio track of your speaker. You may use the Parametric Equalizer effect under Effects > Audio Effects to give your voices a last boost of clarity and flow.
- Click on your clip and choose Effect Controls > Custom Setup > Edit to make more customizations.
- Make use of the vocal enhancer. In the dropdown menu of your parametric equalizer, choose vocal enhancement. Next, adjust your frequencies upward and downward until everything sounds good.
- In Adobe Premiere Pro, a crossfade is used as the audio transition by default. Use them to join audio files together, provide a smooth transition from opening to closing credits, or add and remove sounds as required. Select Audio Transitions > Crossfade from the Effects menu.
- For fine-tuning your audio, go to Preferences > Timeline > Audio Transition Default to finish. To polish your audio, use duration.
Presets Effects
Presets for Adobe Premiere Pro CC can be a useful tool while editing videos. They eliminate the need for constant manual adjustment by enabling the user to rapidly and simply apply effects, transitions, and other intricate settings. You may utilize effect presets to give your video clips effects. This is a fantastic way to give your project some flare and originality!
- After adjusting the effect to your liking, right-click the name and choose Save Preset. Your own effects are kept by default by Premiere Pro CC in the Presets folder of your Effects Window.
- Right-click the effect preset and choose “Preset Properties…” to alter the Name, Type, or Description of the preset. This option can also be found in the pop-up menu for the Effects panel.
- Editors using Premiere Pro may export and share effect presets. This includes changes to the speed, opacity, and motion! Select “Export Presets” from the Effects panel pop-up menu after selecting the effect preset or presets you want to export. The names of the specific preset included in this file remain unchanged.
Part 3. Alternative Way to Add Effects to Videos [Use Filmora]
Making films can be a wonderful way to save your priceless memories, and several internet influencers have made it their full-time profession and artistic endeavor. Due to how easy it is to locate and utilize its many functions, Filmora is simpler to use than a tool like Adobe Premiere. Simply locate the effect you want to use and drag it onto your timeline. You can quickly find and use any feature you choose.
The most recent edition of a video editing tool regarded for being the most user-friendly and intuitive in its industry is called Wondershare Filmora . The magnetic timeline in Wondershare Filmora enables effects to locate and quickly snap to the boundaries of clips and other effects when they are dropped into different tracks. You may disable this function. Advanced color tuning is available, allowing you to modify the white balance, light, color, and HSL settings as well as add 3D LUTs and custom vignetting. Follow the steps below to Add effects to videos using Filmora:
Free Download For Win 7 or later(64-bit)
Free Download For macOS 10.14 or later
Steps to Use Filmora to Add Effects to Videos:
Step1Import Files
The first step is to import files. You may accomplish this by downloading videos, music, and photographs from social networking websites as well as from your computer. You can quickly arrange the Filmora Media Library to make it simple to locate your clips. To add an element to the timeline, drag it there or click the “Import Files” button.
Step2Use Sound Effects
To enter the sound editing window, double-click on the soundtrack in the timeline. Drag your movie to the timeline, pick the “Music” tab, click on the sound effect, and then drag it to the timeline’s soundtrack. You may also change the sound’s tempo, fade-in and fade-out effects, loudness, and other settings. Additionally, background noise can be eliminated.
Step3Apply Effects
Simply locate the effect you want to use and drag it onto your timeline. You may employ sophisticated tools like green screen, picture-in-picture (PIP), split-screen, stabilization, and speed adjustments to elevate your films to a new level.
Step4Export the Masterpiece
Wondershare There are many export possibilities available with Filmora9. You can instantly publish your films to Facebook, Vimeo, YouTube, and other social networking platforms. You may pick from a variety of video file types when exporting your movie, including WMV, MP4, AVI, MOV, FLV, MKV, TS, 3GP, MPEG-2, WEBM, MP3, and GIF. A DVD might also be created.
Conclusion
Adobe Premiere Pro enables video editors to import their material and add it to sequences that can be put together anyway the editor sees fit. This involves cutting out extraneous material, combining brief portions that make a narrative, and adding sound effects, music, or effects. You now know how to add after effects to premiere pro. However, Filmora , a reliable video editor with an amazing feature set, particularly for its affordable price, is what we suggest for the best performance. The editing process is simplified, allowing users to concentrate on being creative.
Benefits of Live Streaming on YouTube
Maybe you already heard of the word live streaming people use in different social media platforms. Whether it is about something that you want your audiences to participate in, or whether you want to sell something, to discuss something or even to showcase something to the virtual world. If you’re a YouTuber like me, you can definitely go on live streaming on your YouTube Channel. But before we go ahead and broadcast ourselves on YouTube, let’s first discuss what is live streaming for you to have an idea beforehand.
Live streaming is a streaming media simultaneously recorded and broadcast in real-time over the internet. It is often referred to simply as streaming. Non-live media such as video-on-demand, vlogs and YouTube videos are technically are streamed, but not live streamed. Live stream services encompass a wide variety of topics, from social media to video games (e.g., overwatch) to professional sports. Platform such as YouTube, Facebook, Twitch, and Instagram can be one of your biggest choices to showcase any of your talent.
How to go on Live on YouTube?
- Go to your YouTube Channel.
- On the upper left corner of your Channel, click the video icon and you’ll see the word “Create”. Click it.

- Next is you’ll see a drop-down box, choose Go Live.

- And since I’m not using the live streaming a very long time ago, I was amazed that it has now options that you can choose from. Whether you want to go on live right away, or you can pick up the time where you’re most comfortable with.

- I chose the second one since we’re not going on live at this very moment. As you can see in the image below. There you have options to choose from. Whether to use the built-in webcam of your laptop or the computer you’re using or you can use a personal computer screen recorder like OBS Studio (Open Broadcaster Software). I already break down the whereabouts of this particular screen recorder on my previous article. But, let me just discuss you a little bit, maybe it’ll be helpful if you want to go on live with a more powerful and engaging live streaming.

What is OBS Studio?
Open Broadcaster Software or OBS Studio is s free, open-source and cross-platform screencasting and streaming app. It is available for windows, macOS, Linux distributions, and BSD. OBS Studio provides real-time capture, encoding and broadcasting for YouTube, Twitch, Facebook, Instagram and many other social media platforms. You can download the application itself for FREE.

- If you’re a rookie and you want to go on live for the very first time, YouTube provides the step-by-step process. But if you’re already a pro when it comes to live streaming, then you can always choose the use of a screen recorder software because it has many useful tools for you to offer. You just need to learn it firsthand.
Next step, you just need to click the “Allow” button and you’re ready to the next step.

- You just need to simplify what is your live stream all about. Make a catchy title so that your audiences will be curious and will wait for you to be on live. Be specific with your description and find a topic that will be helpful to others. You know, everyone’s time is gold. We need to make the most out of it.

- I changed the Title and the Description as an example and the thumbnail as well. You can edit it when you continue to scroll down. You’ll choose what kind of category it fits in. If you want, you can also add it to your Playlist and you’ll choose your audience, if it’s suitable for kids or not.

- And since my YouTube Channel was already monetized, I have the options to monetize the live streaming too.

- As what it says, you need to customize the live stream according to your preference.

- And the final step before you can actually go on live, you will choose the visibility of your live broadcast. Usually, most of the people choose Public located at the bottom area of the options listed in the image below.

- The image below shows how it looks like after you click the “DONE” button. And the only thing that you need is to click the “GO LIVE” button and everyone can participate on your live streaming.

And here’s an actual example of a Live streaming that I’ve already done before on my YouTube Channel. I used OBS Studio in presenting the information that I needed, to convey the message to the audiences that are interested in learning Hebrew language to be exact.

During the live streaming, you can see people interacting with you on live and that’s totally awesome!
Live streaming is essential for your YouTube Channel success for two main reasons:
- You can minimize the part of editing a raw vlog and that is time consuming, you can just click the “Go Live” button and follow all the required steps and you can share all your ideas through everyone who will watch your live streaming. You can exchange thoughts, interact with them right away. You can also enhance your speaking skills in front of the camera. A very much needed ability if you want to be a YouTuber like us.
- If you’re a newbie in vlogging, YouTube set its requirements for you to be their YouTube Partner; which includes 1000 subscribers and 4000 watch hours (240,000 minutes). So, if you want to get pass above it as fast as you could, YouTube livestreaming could be the best key to achieve it. Imagine you’re going to be on live for about 3 hours in a row, so that’s 180 minutes already.
To sum it up, if you’re someone who wants to share your ability to the virtual world out there; then YouTube platform can be one of your go-to-stage. You can also choose Facebook if you want to target large audiences. Although YouTube is the second largest search engine next to Google, I think Facebook are a way ahead when it comes to reaching potential viewers or audiences because Facebook statistics show that more than two billion users have an account, 65 million businesses have Facebook pages and advertisers are crazy about it. Most of our friends and relatives are on Facebook. And that’s freaking insane. So, what are you waiting for, choose your social platform and GO ON LIVE For Win 7 or later(64-bit)
Free Download For macOS 10.14 or later
Free Download For macOS 10.14 or later
4 Ways for Rotating Your GoPro Videos Professionally
Video editing has secured a prominent position among other post-production works with innovation in cameras. Now, you do not need to hold the reins of your imagination tight.
With its advanced technology, Go-Pro has grabbed the attention of technology lovers. It offers video stabilization, making it the best gadget for capturing sports activities and other outdoor events.
If you have recorded your video in an odd direction? Also, you don’t want to lose that precious memory? There is no need to worry.
Rotating your video horizontally or vertically can change the entire perspective of your project.
The process of changing the orientation of the video is convenient. There are different tools for rotating your Go-Pro videos simply and easily.
In this article, you’ll find four solutions for rotating your Go-Pro Videos. The following tools will be used for this purpose.
- Wondershare Filmora
- GoPro Quik
- VLC Media Player
- Online Converter (Ezgif)
Filmora Wondershare-A companion to rotate your GoPro Videos
If you want to experience new dimensions of video editing by changing the orientation of your videos, then Filmora Video Editor is there for you. If you have made a video with your Go-pro at the wrong angle, video rotation can solve your problem.
Filmora is there to keep you out of trouble. It comes with the option of changing the direction of your videos. Apart from that, you can crop the unwanted parts or even zoom in on videos.
For Win 7 or later (64-bit)
For macOS 10.14 or later
Here is the step-by-step guide for rotating your go-pro video.
Step 1: Drag and Drop
The interface of Filmora is user-friendly and convenient. The video rotation process starts with importing the video file and then adding the drag and drop feature to the timeline.


Step 2: Video Rotation
- In the timeline, double-click on the video clip.
- The video tab will appear with several options like transformation and lens correction.

Step 3: Exploring the Transform Tab
- Expand the Transform tab.
- You will see the options like rotation, flip, scale, and position.
- You can now rotate your Go-pro video by either rotating the slider or entering a specific value for the degree of rotation.

- You can also use the scale slider to adjust the image size.

Step 4:Exporting the rotated Go-pro Video
- After changing the orientation of your video, now is the time to export your project.
- Click on the Export tab.

The Export tab shows a list of options whether you want to export the rotated video directly to your computer or share it with your friends via social media.

Exploring the Rotation of Video through GoPro Quik
GoPro Quik provides an alternative for changing the direction of videos. It comes with built-in tools specifically meant to deal with GoPro videos. Irrespective of the quality of your videos or format, it can rotate GoPro videos with ease.
You can rotate GoPro Video with GoPro Quik by following these steps
- Download and install the software and launch it afterward.
- You can connect your GoPro device to your computer or choose a folder to add media.

- Upload the media folder into the GoPro Quik program.

- Go to the video you want to rotate and double click on it.

- A new window will open. Select the circle-shaped icon.

- The video is rotated at 90 degrees with each click.

- Apart from that, on the far right side is a three-dotted button. Click on it to enter Create Mode.

- Afterward, select Open.
- Click on the Save button to save all the editing.
Pros:
- User-friendly and convenient
- It connects to the GoPro camera easily.
- Background tracks can be imported to audio libraries.
- Supports importing of background tracks to music libraries.
Cons:
- It is slow when dealing with 4K and files.
Changing the orientation of a Go-pro video using a VLC player
The majority consider VLC as only a media player. But, it also performs the functions of a video editor. The software is user-friendly and supports every existing operating system, including Windows and Linux. The cherry on top is that it supports all audio and video formats. Unlike other tools, there is no need to download add-ons.
- After downloading the VLC media player, launch the software.

- Now, you need to import the video file you want to rotate. This is done by dragging the media file to the timeline or selecting a media source from the left.

- In the VLC menu, go to Tools and then select Effects and Filters.

Tip: You can use the shortcut CTRL+E for the same purpose.
- The effects and filter tab will open a dialogue box with different options. Select the Video Effects tab.

- The video effect tab has many sub-tabs. You need to select the Geometry tab.

- Select the Transform option. A drop-down menu will appear with different options for rotating your video at different angles.

- Tick the checkbox that says Rotate to flip your video at a certain angle. Then, move the angle dialer. This will rotate your video to the angle you have specified.

- Click on the save option to complete the rotation process.

Note: The rotation settings are saved. Thus, you need to uncheck the option if you don’t want to rotate your next video.
Permanent Rotation of Video
The above steps rotated the video for only playing once. If you want to make the orientation of the video permanently to be flipped, then follow these instructions after the above steps.
Go to Media and select Convert/Save on the menu bar or use the shortcut CTRL+R.

A pop-up window will appear. Click on the Add button. Your video will be added.
Afterward, select the option Convert/Save.

A pop-up window will appear in which you have to select the settings logo, located next to Profile

- A pop-up window will appear; click on the Video codec tab.
- Select the Filters tab and click on the Video transformation filter

In the Audio Codec tab, under the encoding parameters, select MP3 in the codec option.
Select the save option.

Note: Make sure to add the destination file in the convert dialogue box.

Click on the start button to begin the transformation.
Using the Online Converter
The Online Converter is a tool that assists you in rotating the direction of your GoPro. It is an online resource and does not require downloading and installing the cumbersome trouble. It is user-friendly and compatible with different video formats like MP4, MKV,3GP, and more.
Pros:
It is free for users. Therefore, there is no need for installation.
Cons:
- If it takes longer to upload a file, you may have to re-submit it. Hence, it can be time-consuming.
- It does not support encrypted files.
Fixing the Orientation of Go-pro video by Ezgif
If you have no time to download different tools for rotating your Go-Pro videos, then the Internet has got a solution to your problem. There are various resources available on the web that facilitate the online rotation of your videos.
The Ezgif online video rotation is a handy tool. With it, you can flip your Go-pro video both horizontally and vertically. Not only that, but it also gives you the option of rotating your video at different angles. It supports various video formats like MP4, MOV, and many others.
You need to follow these simple steps to fix the orientation of your Go-Pro video.
- Upload your desired video file.
- You can also paste an URL.

- Select the rotation options and then click the Rotate video button.

Viola! Your new rotated video is there in no time.
- You will also see several options ranging from cropping the video to changing the speed of the video.

Pros:
- There would be no watermarks in the rotated version.
- The output of the created file is mostly similar to the pre-rotated video.
Cons:
- If you have poor internet connectivity, the conversion process may take a little longer than usual.
Conclusion
With the rising trend in the development of video editing tools, Go-pro Quik is not the only app for editing its videos. Whether you are a beginner or an intermediate, editing multimedia files has added spark to the creativity of the artists. You can add the desired rotation effects to yours.
Changing the rotation of your Go-Pro videos has been made easier due to the availability of user-friendly tools. These are available for all types of operating systems. Their interface is not complicated. Hence, it makes it easy for beginners to polish their video-editing skills.
By changing the orientation of your video, you can turn an ordinary video into a mesmerizing and cherishable lifelong memory. So be it an indoor or outdoor activity, enhance your video editing skills by playing with different orientations of your videos.
For macOS 10.14 or later
Here is the step-by-step guide for rotating your go-pro video.
Step 1: Drag and Drop
The interface of Filmora is user-friendly and convenient. The video rotation process starts with importing the video file and then adding the drag and drop feature to the timeline.
Step 2: Video Rotation
- In the timeline, double-click on the video clip.
- The video tab will appear with several options like transformation and lens correction.
Step 3: Exploring the Transform Tab
- Expand the Transform tab.
- You will see the options like rotation, flip, scale, and position.
- You can now rotate your Go-pro video by either rotating the slider or entering a specific value for the degree of rotation.
- You can also use the scale slider to adjust the image size.
Step 4:Exporting the rotated Go-pro Video
- After changing the orientation of your video, now is the time to export your project.
- Click on the Export tab.
The Export tab shows a list of options whether you want to export the rotated video directly to your computer or share it with your friends via social media.
Exploring the Rotation of Video through GoPro Quik
GoPro Quik provides an alternative for changing the direction of videos. It comes with built-in tools specifically meant to deal with GoPro videos. Irrespective of the quality of your videos or format, it can rotate GoPro videos with ease.
You can rotate GoPro Video with GoPro Quik by following these steps
- Download and install the software and launch it afterward.
- You can connect your GoPro device to your computer or choose a folder to add media.
- Upload the media folder into the GoPro Quik program.
- Go to the video you want to rotate and double click on it.
- A new window will open. Select the circle-shaped icon.
- The video is rotated at 90 degrees with each click.
- Apart from that, on the far right side is a three-dotted button. Click on it to enter Create Mode.
- Afterward, select Open.
- Click on the Save button to save all the editing.
Pros:
- User-friendly and convenient
- It connects to the GoPro camera easily.
- Background tracks can be imported to audio libraries.
- Supports importing of background tracks to music libraries.
Cons:
- It is slow when dealing with 4K and files.
Changing the orientation of a Go-pro video using a VLC player
The majority consider VLC as only a media player. But, it also performs the functions of a video editor. The software is user-friendly and supports every existing operating system, including Windows and Linux. The cherry on top is that it supports all audio and video formats. Unlike other tools, there is no need to download add-ons.
- After downloading the VLC media player, launch the software.
- Now, you need to import the video file you want to rotate. This is done by dragging the media file to the timeline or selecting a media source from the left.
- In the VLC menu, go to Tools and then select Effects and Filters.
Tip: You can use the shortcut CTRL+E for the same purpose.
- The effects and filter tab will open a dialogue box with different options. Select the Video Effects tab.
- The video effect tab has many sub-tabs. You need to select the Geometry tab.
- Select the Transform option. A drop-down menu will appear with different options for rotating your video at different angles.
- Tick the checkbox that says Rotate to flip your video at a certain angle. Then, move the angle dialer. This will rotate your video to the angle you have specified.
- Click on the save option to complete the rotation process.
Note: The rotation settings are saved. Thus, you need to uncheck the option if you don’t want to rotate your next video.
Permanent Rotation of Video
The above steps rotated the video for only playing once. If you want to make the orientation of the video permanently to be flipped, then follow these instructions after the above steps.
Go to Media and select Convert/Save on the menu bar or use the shortcut CTRL+R.
A pop-up window will appear. Click on the Add button. Your video will be added.
Afterward, select the option Convert/Save.
A pop-up window will appear in which you have to select the settings logo, located next to Profile
- A pop-up window will appear; click on the Video codec tab.
- Select the Filters tab and click on the Video transformation filter
In the Audio Codec tab, under the encoding parameters, select MP3 in the codec option.
Select the save option.
Note: Make sure to add the destination file in the convert dialogue box.
Click on the start button to begin the transformation.
Using the Online Converter
The Online Converter is a tool that assists you in rotating the direction of your GoPro. It is an online resource and does not require downloading and installing the cumbersome trouble. It is user-friendly and compatible with different video formats like MP4, MKV,3GP, and more.
Pros:
It is free for users. Therefore, there is no need for installation.
Cons:
- If it takes longer to upload a file, you may have to re-submit it. Hence, it can be time-consuming.
- It does not support encrypted files.
Fixing the Orientation of Go-pro video by Ezgif
If you have no time to download different tools for rotating your Go-Pro videos, then the Internet has got a solution to your problem. There are various resources available on the web that facilitate the online rotation of your videos.
The Ezgif online video rotation is a handy tool. With it, you can flip your Go-pro video both horizontally and vertically. Not only that, but it also gives you the option of rotating your video at different angles. It supports various video formats like MP4, MOV, and many others.
You need to follow these simple steps to fix the orientation of your Go-Pro video.
- Upload your desired video file.
- You can also paste an URL.
- Select the rotation options and then click the Rotate video button.
Viola! Your new rotated video is there in no time.
- You will also see several options ranging from cropping the video to changing the speed of the video.
Pros:
- There would be no watermarks in the rotated version.
- The output of the created file is mostly similar to the pre-rotated video.
Cons:
- If you have poor internet connectivity, the conversion process may take a little longer than usual.
Conclusion
With the rising trend in the development of video editing tools, Go-pro Quik is not the only app for editing its videos. Whether you are a beginner or an intermediate, editing multimedia files has added spark to the creativity of the artists. You can add the desired rotation effects to yours.
Changing the rotation of your Go-Pro videos has been made easier due to the availability of user-friendly tools. These are available for all types of operating systems. Their interface is not complicated. Hence, it makes it easy for beginners to polish their video-editing skills.
By changing the orientation of your video, you can turn an ordinary video into a mesmerizing and cherishable lifelong memory. So be it an indoor or outdoor activity, enhance your video editing skills by playing with different orientations of your videos.
3 Ways To Stream And Record At The Same Time
The popularity of live streaming has exploded recently. A live stream is simply a video broadcast in real-time over the internet. It’s a great way to connect with people directly, whether for a gaming session, a cooking show, or a Q&A.
Many reasons are there for which why you might want to live stream and record at the same time. For instance, keep a record of your gameplay or stream highlights for future editing or use your live stream to generate content for your YouTube channel.
Whatever your reasons, this article will show you how to do live streaming and recording at the same time using three different methods.
Way 1. Use OBS To Stream And Record Video At The Same Time
OBS, or Open Broadcaster Software, is a free and open-source tool that allows you to stream and record video at the same time, which can be useful if you want to live-stream your gameplay on Twitch or record a tutorial for YouTube.
Key Features of OBS
- Compatible with Mac OS X, Linux, and Windows operating systems.
- Requires at least 4 GB of storage space and an Intel i5 2000-series processor or higher DirectX 10 capable graphics card.
- High-performance video capturing and mixing in real-time.
- With Custom Transitions, you can set up an unlimited number of scenes you can switch between seamlessly.
- Intuitive audio mixer.
- Easy-to-use and simple configuration options.
Steps
Here’s an easy and quick guide on how to use OBS Studio to stream and record videos simultaneously:
Step1 Download OBS Studio from the official website and install it on your computer or laptop.
Step2 Launch OBS Studio and go to the Settings menu. Find the Recording section under the Output tab.
Step3 Click “Start Recording” to manually start the recording or head to the General Tab and checkmark the box before “Automatically Record When Streaming.”
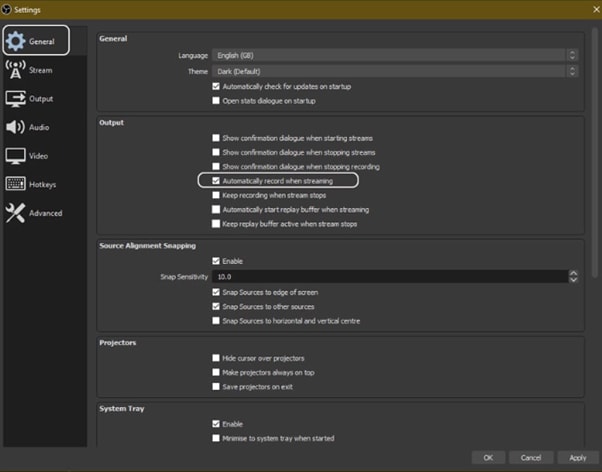
Step4 Finally, click “Apply” to save your settings. Now when you start your stream, the recording will also begin simultaneously.
Way 2. Use Twitch To Save Your Streams
Twitch is the most popular and best live streaming platform that allows gamers to broadcast their gameplay to a live audience and also gives them the ability to save their past broadcasts, or “streams.”
This feature can be useful to save your live stream for later viewing or share your stream with someone who missed it.
Features
Twitch offers a variety of features that make it a unique and powerful game streaming platform. Some of the most notable ones are:
- Live streaming: Twitch allows gamers to share their gameplay in real-time with other gamers around the world. This live aspect of the platform makes it unique and engaging.
- Social interaction: Twitch offers a variety of features that allow gamers to connect with each other, including chat rooms, forums, and user-generated content.
You can save your stream on Twitch in two ways:
- Use the “Highlights” feature, which allows you to save specific moments from your live stream.
- Download your stream’s entire VOD (video on demand) after it has ended.
Steps
Here are the quick steps to saving a stream on your PC from Twitch. But first, you need to enable Twitch VODs before starting your broadcast in the following way:
Step1 Visit Twitch and sign in to your account. Now, click the “Profile” icons and go to “Creator Dashboard.”
Step2 Head to Setting from the left-sidebar and click the “Stream” option. Scroll down and find the VOD Settings. Toggle the buttons next to “Store Past Broadcasts.”
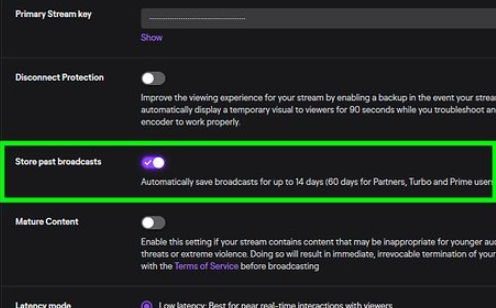
Step3 To publish your VODs instantly after broadcasting, toggle the button next to “Always Publish VODs.”
Now, to download the recordings of your broadcasts to your PC, do the following steps in sequence:
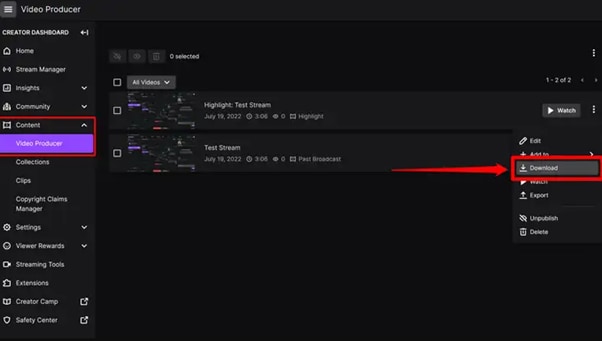
Step1 Head to the Creator Dashboard, find the “Content” section in the left sidebar, and click “Video Producer.”
Step2 Find the stream (VOD or Highlights) you want to download and on the right side, click the three dots.
Step3 Finally, click the “Download” option and let Twitch prepare your video. You will then get the stream’s recording in MP4 format.
Way 3. Use Screen Recorder To Record Your Streams
Using a screen recorder is a great way to record your live stream because it lets you capture the full screen of your PC. Although there are many different screen recorders to choose from, we recommend using Filmora.
Wondershare Filmora is a powerful editor with easy-to-use screen recording capabilities, giving you everything you need to record and stream your video at the same time. The software is free to use and has an intuitive interface.
Features of Filmora
- Support for both Mac OS X and Windows operating systems.
- Ability to record your PC screen, audio, and webcam all at once
- A variety of video editing features
- An easy-to-use interface
Steps
Here’s how to use Filmora for recording while streaming:
Step1 Head to the official Filmora website, download the software and install it on your PC.
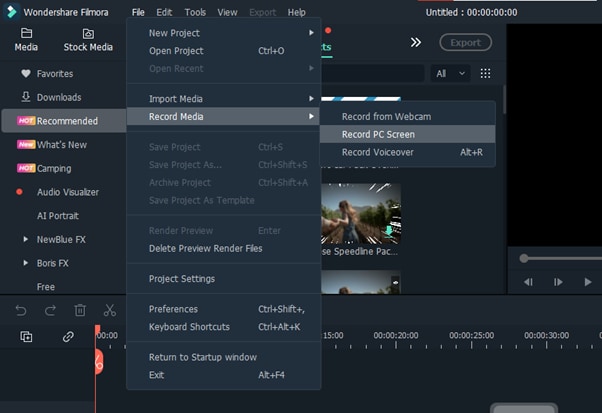
Step2 Launch Filmora 11 and click “New project” in the main interface. Click “File” from the top toolbar and scroll down to “Record media.” From the drop-down menu, select “Record PC Screen.”
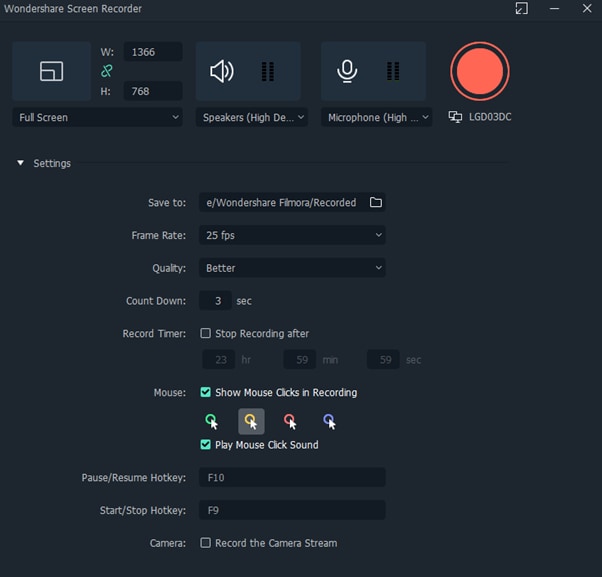
Step3 A new “Wondershare Screen Recorder” window will pop up. You can set up a full screen, custom or target screen recording, speaker, and microphone settings. If you want more Settings, click the drop-down icon.
Step4 Click the Start icon to begin your recording. Afterward, click the Stop icon to stop the recording, and your stream will be saved in the selected destination.
Conclusion
In this article, we’ve discussed three step-by-step methods to help you do live streaming and recording at the same time. With these solutions at your disposal, you’ll be able to save your VODs with ease.
It is best to choose only one software to start with to avoid the time-consuming trial-and-error process. If you want to add another tool, do so later; otherwise, you will waste your precious time and resources.
Give these methods a shot, and eventually, you will find your groove—and become accustomed to just how easy it is to record and stream a video simultaneously.
Free Download For Win 7 or later(64-bit)
Free Download For macOS 10.14 or later
Free Download For macOS 10.14 or later
Also read:
- New 2024 Approved 10 BEST TEXT TO SPEECH VIDEO MAKERS
- New 2024 Approved Easy Step by Step Tutorial on Creating a Lightroom Collage
- Have You Ever Created a Slow Motion Video on Your Phonr or Camera? This Article Will Show You some Knowledge About Slow Motion Photography
- Free Ways to Download Mobile Phone Green Screen Videos and Pictures No Copyright for 2024
- Updated 2024 Approved Easy Ways to Change Aspect Ratio in iMovie?
- Updated Looking Into How Slow Mo Guys Have Changed the Dynamics of Slow-Motion
- In 2024, How Long Does It Take To Edit Videos
- Updated 11 Ways To Radial Blur To Images (iPhone/Android/Mac/Windows)
- New Have You Ever Tried to Remove Motion Blur From Photos? This Article Will Address How to Remove the Motion Blur Effect Using Photoshop and Its Alternatives for 2024
- New You Must Be Wondering Which the Best Online Transparent Image-Maker Is! Well, There Is No Need to Get Confused as Here; You Will Get a Curated List for the Same
- In 2024, Looking Forward to Complement Your Weekend Evenings with a Fantasy Tour to the Anime World? Stay Here to Pick the Most Appealing Alternative From the Best and Timeless Anime Creations
- Updated This Article Provides Helpful Tips for Creating Better Film Footage in Public Places. Learn How to Choose the Right Angle and Re-Record the Audio with Filmora for 2024
- New TikTok Slow Zoom | Create Your Slow Zoom TikTok in Minutes for 2024
- New 2024 Approved MP3 Cutter Download for Computer and Mobile
- Guide to Add Transition Effects in Premiere Pro for 2024
- Tips to Make Cinematic Color Grading for 2024
- In 2024, Detailed Tutorial to Rotate a Video in Cyberlink PowerDirector
- 2024 Approved Create Realistic Fire Effects by Filmora
- In 2024, How to Brighten Video in Premiere Pro
- A Guide To Adopting Lumetri Color Presets in Effective Color Grading
- New 10 Best Vloggers on YouTube for 2024
- Updated 2024 Approved Discord Is the Future of Networking. After All, It Is Here to Stay. Have You Heard of the Discord Animated Avatar? If Yes, You Understand Its Power and if Not, Ensure You Study This Article for More Information
- Updated Adobe After Effects Review for 2024
- How to recover old music from your Sony Xperia 1 V
- How to Remove iPhone SE Device from iCloud
- In 2024, AddROM Bypass An Android Tool to Unlock FRP Lock Screen For your Samsung Galaxy S23 Tactical Edition
- Android Unlock Code Sim Unlock Your Oppo Find N3 Flip Phone and Remove Locked Screen
- What Legendaries Are In Pokemon Platinum On Honor X50 GT? | Dr.fone
- Fix Oppo A58 4G Android System Webview Crash 2024 Issue | Dr.fone
- In 2024, The Easy Way to Remove an Apple ID from Your MacBook For your iPhone SE (2022)
- In 2024, Full Guide to Fix iToolab AnyGO Not Working On Apple iPhone 14 Pro Max | Dr.fone
- In 2024, Latest way to get Shiny Meltan Box in Pokémon Go Mystery Box On Vivo Y17s | Dr.fone
- FRP Hijacker by Hagard Download and Bypass your Oppo Reno 8T 5G FRP Locks
- 4 Solutions to Fix Unfortunately Your App Has Stopped Error on Itel P55T | Dr.fone
- In 2024, Ways to trade pokemon go from far away On Realme C67 5G? | Dr.fone
- How to Track a Lost Xiaomi Redmi 12 5G for Free? | Dr.fone
- In 2024, Hassle-Free Ways to Remove FRP Lock on Oppo F23 5G Phones with/without a PC
- In 2024, Fixing Foneazy MockGo Not Working On Infinix Note 30 5G | Dr.fone
- In 2024, How to Change GPS Location on Oppo Find N3 Easily & Safely | Dr.fone
- Title: New How to Add Effects in Premiere Pro for 2024
- Author: Morgan
- Created at : 2024-06-24 01:30:31
- Updated at : 2024-06-25 01:30:31
- Link: https://ai-video-editing.techidaily.com/new-how-to-add-effects-in-premiere-pro-for-2024/
- License: This work is licensed under CC BY-NC-SA 4.0.
