:max_bytes(150000):strip_icc():format(webp)/snork-fa65ca350e2243e1a2deaf6bb7b209b1.jpg)
New How to Add Subtitles to MKV Videos on All Platforms

How to Add Subtitles to MKV Videos on All Platforms
Many people use MKV files as it’s an open-source format and does not require licenses. This file format functions as a multimedia file container that can help you in storing audio and video tracks. However, there are some key disadvantages of using MKV files, as this format is not supported by various platforms or devices. So, the most suitable video file formats that you can use are FLV and MP4. These two formats offer high-quality results and are supported by multiple platforms.
If you still want to use MKV files and want to add subtitles, this article can assist you. By reading this article, you can learn how to add subtitles to MKV with different methods.
Part 1: How to Add Subtitles to MKV on Windows?
Are you a Windows user and want to add subtitles to MKV? Read this section to find out compatible tools that can add subtitles to your MKV videos efficiently.
1. Wondershare Filmora
Free Download For Win 7 or later(64-bit)
Free Download For macOS 10.14 or later
Wondershare Filmora is a popular tool that provides you with multiple options to edit video files. If you are interested in adding subtitles to your MKV files, you can navigate to its “Speech-to-Text” feature. This feature automatically transcribes the voice used in the video into subtitles. It supports 16 different languages for creating subtitles through this feature.
This feature can also enhance your editing efficiency as you don’t have to write the subtitles on your own. Moreover, the STT feature utilizes advanced algorithms that help the tool create subtitles with high precision. Furthermore, you can also manually add the subtitles to your MKV file using this MKV subtitle editor.
Key Features
- Filmora offers various effects, such as a green screen that can help you to change your background dramatically.
- If you want to resize your videos efficiently, this tool provides the Auto Reframe feature.
- Filmora also offers various preset templates that can help you to craft captivating videos easily.
Step-by-Step Guide to Add Subtitles Using Filmora
Step1 Create a New Filmora Project
Download and install Filmora on your PC and click “Create Project.” Afterward, import the MKV video from your PC to this tool by clicking on the “Arrow” icon.

Step2 Go to Titles Tab
After importing the video, drag it to the timeline. Once done, click on the “Titles” section given on top. Afterward, click on “Subtitles” from the left section. Now you will be able to see different types of subtitles on your screen. Select your favorite style of subtitles and tap on its “Download” icon.

Step3 Choose the Preferred Subtitle Style
After that, tap on the “Plus” icon to add your selected subtitle style to the timeline. Double-click on the added subtitles, which will open the settings. You can manually add the subtitles on the “Input Text” box easily. Moreover, you can easily change the text font, color, opacity, and alignment.

Step4 Export and Save Video
Once you have created subtitles for your imported video, click the “Export” button on top. Using this option, you can save the video file to your device or share it on other platforms.

2. Cisdem Video Converter
Cisdem is an efficient tool that can be used by content creators for various purposes. Along with editing the videos, this tool can help you add subtitles to your video files in any format. It supports various formats for adding subtitles, such as MKV, MP4, AVI, etc. This tool also offers a built-in editor to modify the MKV videos flawlessly. Hence, it’s a basic tool that generates quality results instantly.
Key Features
- Cisdem can function as a video converter that supports more than 300 file formats. You can convert to and from MKV files using this platform easily.
- Through this software, you can professionally add watermarks to your MKV files. It provides various options to add a customized watermark to your desired video files.
- It offers a built-in media player that allows you to play and watch MKV files without interruption.
Steps to Add Subtitles to MKV Using Cisdem Video Converter
Step1 Launch the Cisdem tool on your system and navigate to its “Converter”. Afterward, import the MKV file instantly. Now tap on the “Pencil” icon given on top to open the editing window.

Step2 From the editing window, go to “Subtitle and Audio” and click on “No subtitles.” From the drop-down box, click on “Load Subtitles” to upload your SRT or ASS subtitle file from your system.

Step3 Now press the “Save” button to proceed. As the default output format in this tool is MP4, navigate to the “General Video” section to change it. From this option, select “MKV Video” as the output format. Afterward, hit the “Convert” button to embed the added subtitles easily.

3. VLC Media Player
The VLC Media Player is a commonly used platform that offers various functions. It can be easily accessed and shows compatibility with tons of platforms. It has a simple interface that allows you to operate it easily. Through this tool, you can also add subtitles to MKV proficiently. This MKV subtitle editor supports various caption formats such as VobSub, SubRip, SubViewer, etc.
Key Features
- While watching a video on the VLC media player, you can take instant snapshots of your favorite moments in high resolution.
- This tool offers a screen recorder through which you can capture your activities on a desktop. You can also choose the frame rate and output format for your screen recording.
- You can enhance your video files by adding effects from this tool. Along with applying attractive video effects, you can also change the brightness and hue of your video.
Step-by-Step Guide to Add Subtitles Using VLC
Step1 Open your VLC media player and click on the “Media” tab given on top. From there, tap on the “Convert/Save” option.

Step2 A new dialogue box will open regarding “Open Media.” Now you can instantly upload your MKV file on this tool. By staying on the same window, check the box saying, “Use a subtitle file.” Afterward, browse the SRT file from your computer.

Step3 Now tap on the “Convert/Save” arrowhead and choose the “Convert” option from the drop-down menu. A new window will open from where you have to tap on the “Wretch” icon. On the “Encapsulation” section, select “MKV.”

Step4 By going to the “Audio codec” and “Video codec” sections, check the box “keep original video or audio track.” Now go to the “Subtitle” section and enable the option of “Overlay subtitles on the video.” Once done, hit the “Create” button.

Part 2: How to Add Subtitles to MKV on Mac?
Are you looking for MKV subtitle editors that are compatible with Mac? In this section, you can learn how to add subtitles to MKV on your Mac devices easily.
1. HD Video Converter Deluxe
This tool is highly compatible with Mac users and provides tons of advanced features. Besides being a great video editor, this tool can help you add subtitles to your MKV video files. It supports popular subtitle formats such as ASS, SSA, and SRT. If you want to embed hardcode subtitles into your MKV files, this is the most compatible tool.
Key Features
- If you want to decrease the video file size without harming its high quality, you can use this platform. This tool offers a video compressor through which you can reduce file sizes effectively.
- To combine your various video chunks or clips, this software offers a reliable video merger.
- If you are facing audio problems in your video, this tool can permanently adjust the volume according to your preference.
Step-by-Step Guide to Add Subtitles Using HD Video Converter Deluxe
Step1 Start by launching HD Video Converter Deluxe on your MacBook. Afterward, tap on the “+Video” button to import your MKV file.

Step2 On the Output Profile window, choose “MKV” as your output format. Click on the “OK” button to proceed. Now navigate to the “Edit” tab and select “Subtitle.” From there, check “Enable Subtitle.” Also, check “Extra” and then click on the “Add” button. Now you can import the subtitle file to this tool.

Step3 Click the “Done” button and then hit the “RUN” button to embed the subtitles.

2. Wondershare UniConverter
UniConverter is one of the famous tools that many people prefer due to its high reliability. Among its various advanced features, you can use its “Subtitle Editor” to add subtitles to MKV videos. You can create subtitles manually in your preferred font. Moreover, it provides an auto generator to create subtitles by extracting audio from the video file. This feature supports more than 100 languages to offer more diversity.
Key Features
- The MKV subtitle editor of UniConverter is also capable of converting text into subtitle lines through its TXT to SRT feature.
- You can remove backgrounds from your video and add a new one with a few clicks. This can make your video more captivating.
- It offers a vocal remover that can separate instrumental sounds and vocals from an audio or video file easily.
Step-by-Step Guide to Use the Subtitle Editor of UniConverter
Step1 Run UniConverter on your PC and click on “Subtitle Editor” from its homepage. A new window will open in which you have to import the MKV video file.

Step2 You can click on the “Manual Subtitles” button to add your subtitles with respect to the time duration. Or, you can tap on ‘Import Subtitles’ to upload the subtitles file from your MacBook. Other options are also available such as Text to Subtitles and Auto Subtitles.

Step3 You can edit the added subtitles by going to the “Styles” section. Here, you can change the font, color, and style of your subtitles. Once done, click on the “Save” button.

Part 3: How to Add Subtitles to MKV Online?
If you want to use online platforms to merge subtitles with MKV, here are the top two online tools.
1. Veed
Veed is an easy-to-use online tool that allows you to edit your video clips with high accuracy. Through this online tool, you can add subtitles to your MKV files in 3 different ways. You can upload subtitle files in formats like VVT, TXT, SSA, SRT, and ASS. Otherwise, you can enter the subtitles manually by selecting their color, font, size, and time duration. Moreover, you can use its voice recognition software to auto-create subtitles instantly.
Key Features
- To make your video clips funny and engaging, this tool enables you to add various emojis and stickers to your video files.
- You can explain the content in your video by adding annotations such as text boxes using this tool.
- To remove unwanted objects from your video, you can use the crop feature of Veed.
Step-by-Step Guide to Add Subtitles Using Veed
Step1 Access the official website of Veed and click on “Add Subtitles To video” from its tools. Afterward, click the “Choose Files” button and import your MKV file.

Step2 Once done with uploading, click on “Upload Subtitle File.” You can upload any of its supported subtitle files. Also, choose the language from the given box.

Step3 After importing the subtitles, you can modify them by altering their text color, color effect, style, and alignment. Once done, hit the “Export” button.

2. Flixier
Do you want an interesting tool to create subtitles? Flixier is an efficient online tool that can edit your video and audio files. Without making a user account, you can use this tool to add subtitles to MKV video files. You can upload MKV files from different platforms, such as your device, Google Drive, Zoom, Dropbox, etc. This tool also provides different ways to flawlessly create subtitles for your video files.
Key Features
- The subtitle editor of this tool offers more than 1000 fonts. Thus, you can make your subtitles look stylish by choosing a preferred font.
- To edit your videos, this tool allows you to collaborate with your friends in real-time.
- It offers more than 50 transitions that you can apply to your videos easily.
Step-by-Step Guide to Add Subtitles Using Flixier
Step1 Visit the website of Flixier and click on “Add subtitles to your videos” from its tools. Afterward, tap on “Get Started” to proceed. The tool will ask you to upload your video file.

Step2 Once you have uploaded the MKV video, click on “Text” given on the left side. Afterward, tap “Add Subtitle” to create subtitles for your video. You can add text to the given space to create subtitles. You can also tap on the “Import Subtitle” button to upload the subtitle file. To change the properties of your subtitles, you can edit them from the provided options on your screen.

Step3 Once done with creating and adjusting subtitles, click on the “Export” button.

Conclusion
Subtitles are shown at the bottom of a video and help make the video content comprehensive. If you are dealing with MKV files and want to add subtitles in an instant way, this article has provided all the details. By reading this guide, you can learn how to add subtitles to MKV files on different platforms.
To attain the best results and utilize advanced features, we will highly recommend you use Wondershare Filmora. This tool creates a comfortable environment and gives an intuitive interface to create subtitles.
Part 1: How to Add Subtitles to MKV on Windows?
Are you a Windows user and want to add subtitles to MKV? Read this section to find out compatible tools that can add subtitles to your MKV videos efficiently.
1. Wondershare Filmora
Free Download For Win 7 or later(64-bit)
Free Download For macOS 10.14 or later
Wondershare Filmora is a popular tool that provides you with multiple options to edit video files. If you are interested in adding subtitles to your MKV files, you can navigate to its “Speech-to-Text” feature. This feature automatically transcribes the voice used in the video into subtitles. It supports 16 different languages for creating subtitles through this feature.
This feature can also enhance your editing efficiency as you don’t have to write the subtitles on your own. Moreover, the STT feature utilizes advanced algorithms that help the tool create subtitles with high precision. Furthermore, you can also manually add the subtitles to your MKV file using this MKV subtitle editor.
Key Features
- Filmora offers various effects, such as a green screen that can help you to change your background dramatically.
- If you want to resize your videos efficiently, this tool provides the Auto Reframe feature.
- Filmora also offers various preset templates that can help you to craft captivating videos easily.
Step-by-Step Guide to Add Subtitles Using Filmora
Step1 Create a New Filmora Project
Download and install Filmora on your PC and click “Create Project.” Afterward, import the MKV video from your PC to this tool by clicking on the “Arrow” icon.

Step2 Go to Titles Tab
After importing the video, drag it to the timeline. Once done, click on the “Titles” section given on top. Afterward, click on “Subtitles” from the left section. Now you will be able to see different types of subtitles on your screen. Select your favorite style of subtitles and tap on its “Download” icon.

Step3 Choose the Preferred Subtitle Style
After that, tap on the “Plus” icon to add your selected subtitle style to the timeline. Double-click on the added subtitles, which will open the settings. You can manually add the subtitles on the “Input Text” box easily. Moreover, you can easily change the text font, color, opacity, and alignment.

Step4 Export and Save Video
Once you have created subtitles for your imported video, click the “Export” button on top. Using this option, you can save the video file to your device or share it on other platforms.

2. Cisdem Video Converter
Cisdem is an efficient tool that can be used by content creators for various purposes. Along with editing the videos, this tool can help you add subtitles to your video files in any format. It supports various formats for adding subtitles, such as MKV, MP4, AVI, etc. This tool also offers a built-in editor to modify the MKV videos flawlessly. Hence, it’s a basic tool that generates quality results instantly.
Key Features
- Cisdem can function as a video converter that supports more than 300 file formats. You can convert to and from MKV files using this platform easily.
- Through this software, you can professionally add watermarks to your MKV files. It provides various options to add a customized watermark to your desired video files.
- It offers a built-in media player that allows you to play and watch MKV files without interruption.
Steps to Add Subtitles to MKV Using Cisdem Video Converter
Step1 Launch the Cisdem tool on your system and navigate to its “Converter”. Afterward, import the MKV file instantly. Now tap on the “Pencil” icon given on top to open the editing window.

Step2 From the editing window, go to “Subtitle and Audio” and click on “No subtitles.” From the drop-down box, click on “Load Subtitles” to upload your SRT or ASS subtitle file from your system.

Step3 Now press the “Save” button to proceed. As the default output format in this tool is MP4, navigate to the “General Video” section to change it. From this option, select “MKV Video” as the output format. Afterward, hit the “Convert” button to embed the added subtitles easily.

3. VLC Media Player
The VLC Media Player is a commonly used platform that offers various functions. It can be easily accessed and shows compatibility with tons of platforms. It has a simple interface that allows you to operate it easily. Through this tool, you can also add subtitles to MKV proficiently. This MKV subtitle editor supports various caption formats such as VobSub, SubRip, SubViewer, etc.
Key Features
- While watching a video on the VLC media player, you can take instant snapshots of your favorite moments in high resolution.
- This tool offers a screen recorder through which you can capture your activities on a desktop. You can also choose the frame rate and output format for your screen recording.
- You can enhance your video files by adding effects from this tool. Along with applying attractive video effects, you can also change the brightness and hue of your video.
Step-by-Step Guide to Add Subtitles Using VLC
Step1 Open your VLC media player and click on the “Media” tab given on top. From there, tap on the “Convert/Save” option.

Step2 A new dialogue box will open regarding “Open Media.” Now you can instantly upload your MKV file on this tool. By staying on the same window, check the box saying, “Use a subtitle file.” Afterward, browse the SRT file from your computer.

Step3 Now tap on the “Convert/Save” arrowhead and choose the “Convert” option from the drop-down menu. A new window will open from where you have to tap on the “Wretch” icon. On the “Encapsulation” section, select “MKV.”

Step4 By going to the “Audio codec” and “Video codec” sections, check the box “keep original video or audio track.” Now go to the “Subtitle” section and enable the option of “Overlay subtitles on the video.” Once done, hit the “Create” button.

Part 2: How to Add Subtitles to MKV on Mac?
Are you looking for MKV subtitle editors that are compatible with Mac? In this section, you can learn how to add subtitles to MKV on your Mac devices easily.
1. HD Video Converter Deluxe
This tool is highly compatible with Mac users and provides tons of advanced features. Besides being a great video editor, this tool can help you add subtitles to your MKV video files. It supports popular subtitle formats such as ASS, SSA, and SRT. If you want to embed hardcode subtitles into your MKV files, this is the most compatible tool.
Key Features
- If you want to decrease the video file size without harming its high quality, you can use this platform. This tool offers a video compressor through which you can reduce file sizes effectively.
- To combine your various video chunks or clips, this software offers a reliable video merger.
- If you are facing audio problems in your video, this tool can permanently adjust the volume according to your preference.
Step-by-Step Guide to Add Subtitles Using HD Video Converter Deluxe
Step1 Start by launching HD Video Converter Deluxe on your MacBook. Afterward, tap on the “+Video” button to import your MKV file.

Step2 On the Output Profile window, choose “MKV” as your output format. Click on the “OK” button to proceed. Now navigate to the “Edit” tab and select “Subtitle.” From there, check “Enable Subtitle.” Also, check “Extra” and then click on the “Add” button. Now you can import the subtitle file to this tool.

Step3 Click the “Done” button and then hit the “RUN” button to embed the subtitles.

2. Wondershare UniConverter
UniConverter is one of the famous tools that many people prefer due to its high reliability. Among its various advanced features, you can use its “Subtitle Editor” to add subtitles to MKV videos. You can create subtitles manually in your preferred font. Moreover, it provides an auto generator to create subtitles by extracting audio from the video file. This feature supports more than 100 languages to offer more diversity.
Key Features
- The MKV subtitle editor of UniConverter is also capable of converting text into subtitle lines through its TXT to SRT feature.
- You can remove backgrounds from your video and add a new one with a few clicks. This can make your video more captivating.
- It offers a vocal remover that can separate instrumental sounds and vocals from an audio or video file easily.
Step-by-Step Guide to Use the Subtitle Editor of UniConverter
Step1 Run UniConverter on your PC and click on “Subtitle Editor” from its homepage. A new window will open in which you have to import the MKV video file.

Step2 You can click on the “Manual Subtitles” button to add your subtitles with respect to the time duration. Or, you can tap on ‘Import Subtitles’ to upload the subtitles file from your MacBook. Other options are also available such as Text to Subtitles and Auto Subtitles.

Step3 You can edit the added subtitles by going to the “Styles” section. Here, you can change the font, color, and style of your subtitles. Once done, click on the “Save” button.

Part 3: How to Add Subtitles to MKV Online?
If you want to use online platforms to merge subtitles with MKV, here are the top two online tools.
1. Veed
Veed is an easy-to-use online tool that allows you to edit your video clips with high accuracy. Through this online tool, you can add subtitles to your MKV files in 3 different ways. You can upload subtitle files in formats like VVT, TXT, SSA, SRT, and ASS. Otherwise, you can enter the subtitles manually by selecting their color, font, size, and time duration. Moreover, you can use its voice recognition software to auto-create subtitles instantly.
Key Features
- To make your video clips funny and engaging, this tool enables you to add various emojis and stickers to your video files.
- You can explain the content in your video by adding annotations such as text boxes using this tool.
- To remove unwanted objects from your video, you can use the crop feature of Veed.
Step-by-Step Guide to Add Subtitles Using Veed
Step1 Access the official website of Veed and click on “Add Subtitles To video” from its tools. Afterward, click the “Choose Files” button and import your MKV file.

Step2 Once done with uploading, click on “Upload Subtitle File.” You can upload any of its supported subtitle files. Also, choose the language from the given box.

Step3 After importing the subtitles, you can modify them by altering their text color, color effect, style, and alignment. Once done, hit the “Export” button.

2. Flixier
Do you want an interesting tool to create subtitles? Flixier is an efficient online tool that can edit your video and audio files. Without making a user account, you can use this tool to add subtitles to MKV video files. You can upload MKV files from different platforms, such as your device, Google Drive, Zoom, Dropbox, etc. This tool also provides different ways to flawlessly create subtitles for your video files.
Key Features
- The subtitle editor of this tool offers more than 1000 fonts. Thus, you can make your subtitles look stylish by choosing a preferred font.
- To edit your videos, this tool allows you to collaborate with your friends in real-time.
- It offers more than 50 transitions that you can apply to your videos easily.
Step-by-Step Guide to Add Subtitles Using Flixier
Step1 Visit the website of Flixier and click on “Add subtitles to your videos” from its tools. Afterward, tap on “Get Started” to proceed. The tool will ask you to upload your video file.

Step2 Once you have uploaded the MKV video, click on “Text” given on the left side. Afterward, tap “Add Subtitle” to create subtitles for your video. You can add text to the given space to create subtitles. You can also tap on the “Import Subtitle” button to upload the subtitle file. To change the properties of your subtitles, you can edit them from the provided options on your screen.

Step3 Once done with creating and adjusting subtitles, click on the “Export” button.

Conclusion
Subtitles are shown at the bottom of a video and help make the video content comprehensive. If you are dealing with MKV files and want to add subtitles in an instant way, this article has provided all the details. By reading this guide, you can learn how to add subtitles to MKV files on different platforms.
To attain the best results and utilize advanced features, we will highly recommend you use Wondershare Filmora. This tool creates a comfortable environment and gives an intuitive interface to create subtitles.
How To Polish Your Music Video Edits Using Filmora
A common understanding in cinematography circles is that editing makes the seventy percent of the total job. It is editing that makes a significant difference, and Filmora, a professional video editor, comes in handy when you want to edit your photos.
Filmora has multiple features that allow you to shine your videos in countless ways. This article will clarify everything you need to improve your music video. Also, it is just the tip of the iceberg. The more you try to be creative, the more options Filmora will provide you. The following points highlight how you can polish your music video editing skills.
Part 1. Duplicate your project before editing
Before you begin unleashing your inner creativity, you must make a duplicate copy of your project file. Of course, it would help if you did so to keep a backup file.
It will help you get back to the pre-edit file if you want to start from the beginning or if you want to save the file for use in the future. You can make a duplicate file of your project by following the subsequent steps.
Step1Download and install Filmora
You can download Filmora from its official website.
Free Download For Win 7 or later(64-bit)
Free Download For macOS 10.14 or later
Step2Create or import your project
- Create a project if you are using Filmora for the first time.
- Import the project from your computer directory. Then, go to file in the menu bar, and click on the open project.
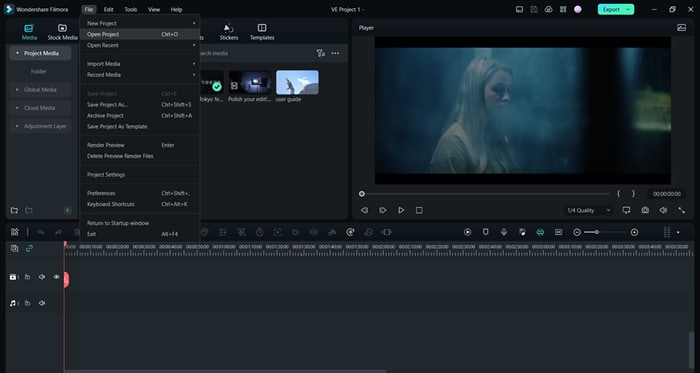
- Select the project you want to open.
Step3Duplicate the project file and rename it
- When you open Filmora, a start-up window will appear.
- Right-click on the project you want to duplicate.

Step4Rename the duplicate file
- Rename the file to keep a record of new editions.
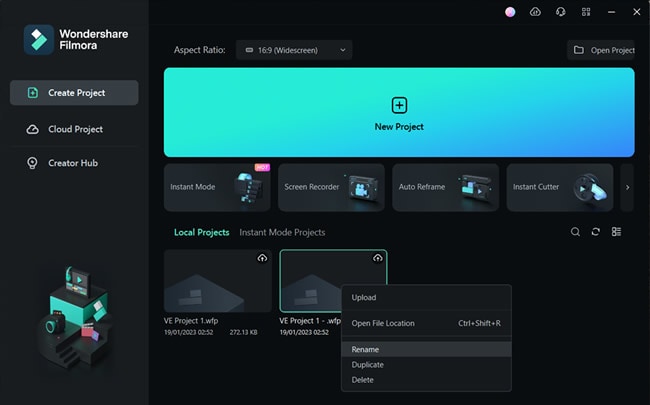
The file is renamed. It will help you remember which file is original. If your files become corrupted, you can easily access the original ones. Once you are done duplicating your project file, it is time to do our primary job: Polishing our video edits with Filmora .
Free Download For Win 7 or later(64-bit)
Free Download For macOS 10.14 or later
Part 2. Polishing Your Music Video
Just like ladies apply polish to their nails to make them more attractive, you can use editing to your music video to get the same result. Ladies can go to the beautician if they want. You can go to a professional editor if you like it.
However, these options are pretty expensive. The best way is to do it yourself. It is fun. Also, you can let loose your hidden artist for a while. Stick to the following points to understand how to begin polishing your music video.
How to put cuts on beats?
Adding beat cuts to a music video is imperative. Randomly placing beats yield an inferior-quality video. It also gives the impression that video editing is not done by a professional. The beats must be adjusted to synchronize with the storyline of the video.
Moreover, the video will lose its charm if you put cuts on every beat. People will not be able to enjoy, let alone understand, what is happening in the film.
What are the beats?
Beats are pieces of music that recur in a pattern. They are essential for music videos. It adds attraction for the viewers. Also, without beats, no music video can go viral. In the digital age, beats boost your music video.
![]()
Note: Cuts are recommended on every 2nd and 4th beat. In that way, a smooth transition of music beats takes place, making it more ear-pleasing. It also gives a professional outlook to the whole music.
Let’s learn how you can put cuts on your beats.
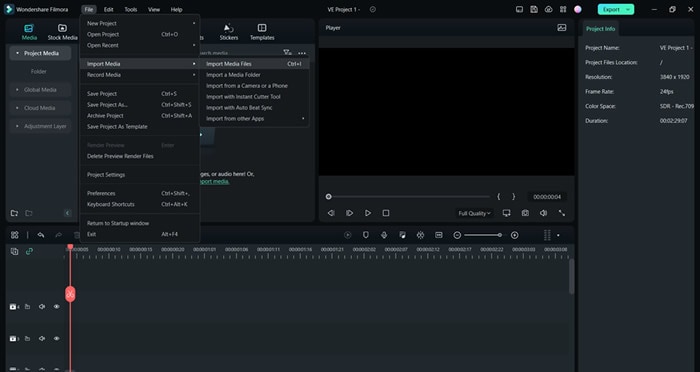
Step1Import the music video
- Import the Music video to which you would like to add any beat.
- You can also use the one given in Filmora.
- Drag and Drop the music video in the timeline panel.
Step2Detach its audio
- Right-click on the video.
- Select the option “Detach Audio.” It will separate the attached audio from the music. You will be able to add cuts where you deem necessary.
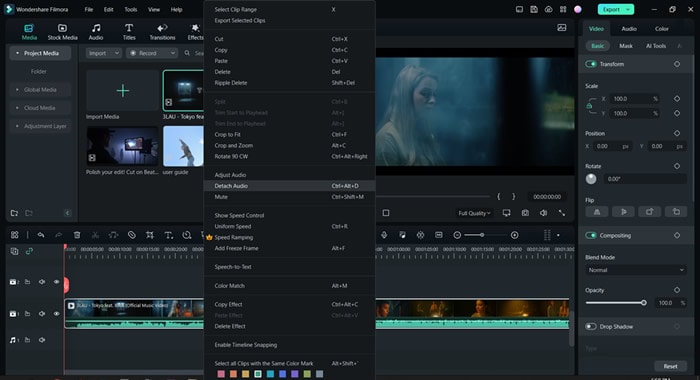
You can also import audio from your drive. After that, drag and drop the imported file into the timeline panel.
- Right, Click on the audio file in the audio panel.
- Select the option “Beat Detection.” It will show beats (with red markers) on the audio timeline, making adding cuts to the beat easy.
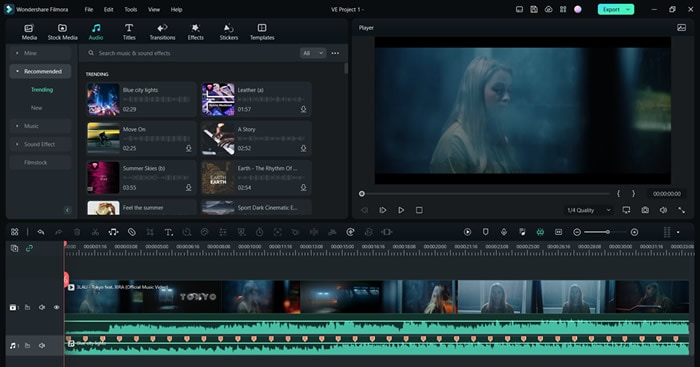
Step3Cut the beats where you find necessary
- Listen carefully to the audio file and plan where you want to add a cut to your beat.
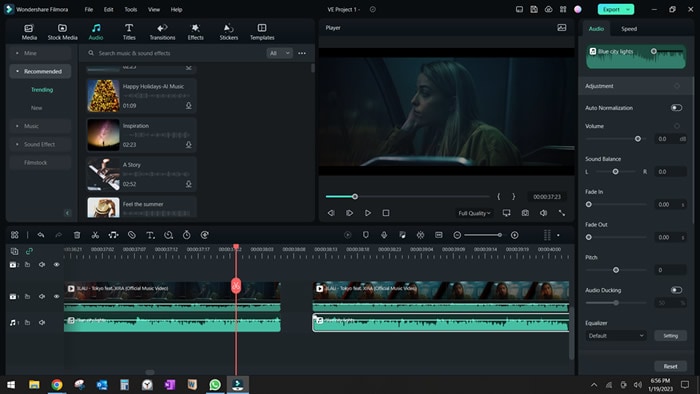
- Adjust the beat according to your music video.
- Join the trimmed video segments to maintain continuity. The final product should look like the one given below.
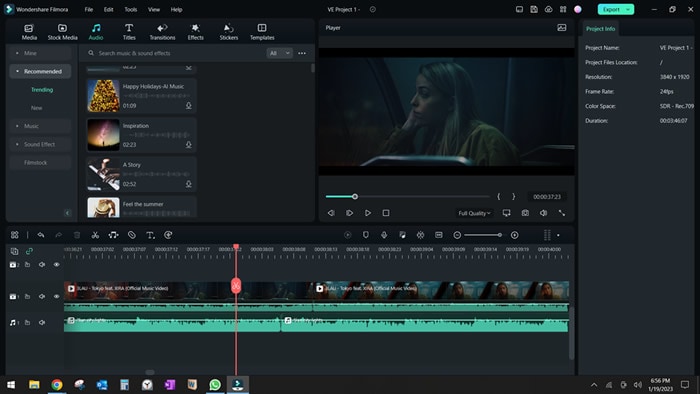
Resultantly, it will readjust the beat to a different spot on the video. You can make multiple cuts in the beats. However, it is not recommended. It makes the whole experience of listening quite jarring.
Once you’ve added cuts to the beats, it is time to make them smooth. For that, keep reading the instructions given below.
Free Download For Win 7 or later(64-bit)
Free Download For macOS 10.14 or later
How to smooth out cuts
Adding cuts in the beats is one part of the job, not the whole job. After adding these cuts, you have to smoothen them. With it, the point of interest for the audience becomes clear.
To maintain the audience’s attention on our video, we have to smoothen the cuts so that our audience quickly understands the ongoing story in our video. If sudden changes occur on the screen, watching it gets disconcerting.
Indeed, you would not want your audience to have this experience. Head to the following techniques to understand how to smooth out video cuts
Technique 1: Showing multiple perspectives
The focal person in the video must occupy the same spot in the previous shot as it maintains in the current shot.
Let us understand from the example given below.
- Shot 1: The actress in the music video is occupying the left seat on the bus while looking outside.
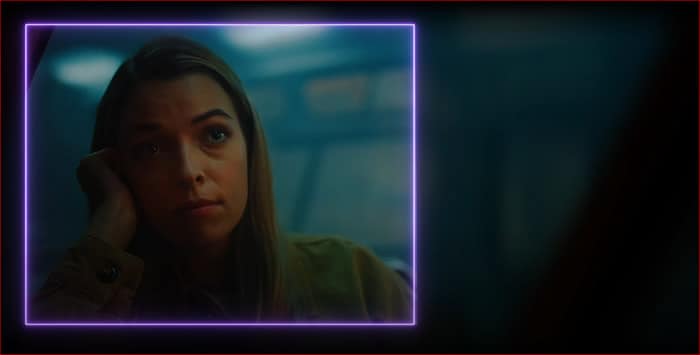
- Shot 2: The actress occupies the same spot in the subsequent shot.
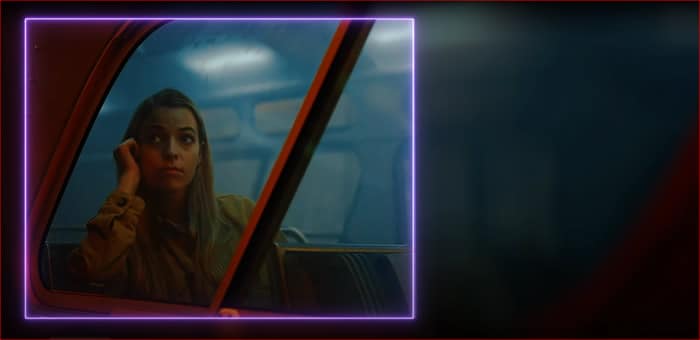
- Third Shot: The shot shows the wide angle of the bus from the inside. The actress is still sitting in the same position and the same place.
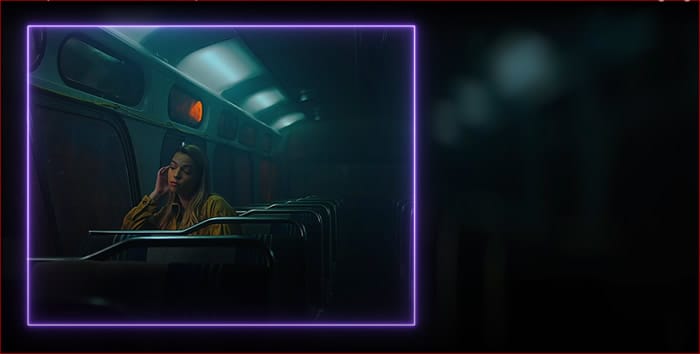
This technique keeps the audience focused on the point of interest while giving them a different perspective of the scene.
Technique 2: Using light leaks
The technique is quite helpful for the transition between two cuts. It uses different levels of colors to shine between cuts, adding smoothness and providing coherence.
What are light leaks?
Light leaks are great effects in Filmora. These effects fill the screen with light. It seems that light is leaking in a disorderly fashion. For the time being, the whole screen is filled with that effect. Thus, it explains the name of this effect as a light leak.
Filmora provides a plethora of features for adding Light Leak for transitioning cuts. With the use of Filmora, one can quickly bring a level of flow to the music video. Keep reading to understand how to use this remarkable feature of Filmora.
Free Download For Win 7 or later(64-bit)
Free Download For macOS 10.14 or later
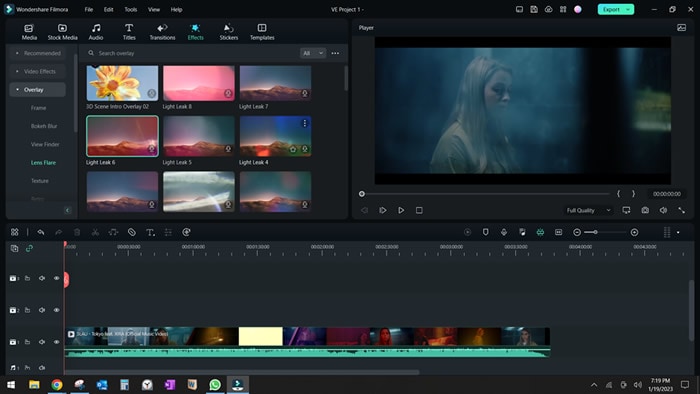
Step1Access the light leak effects on Filmora
- Go to Effects on the Interface.
- Go to Overlay and choose the light Leak feature.
- You can also use any other light Leak stock in your capacity.
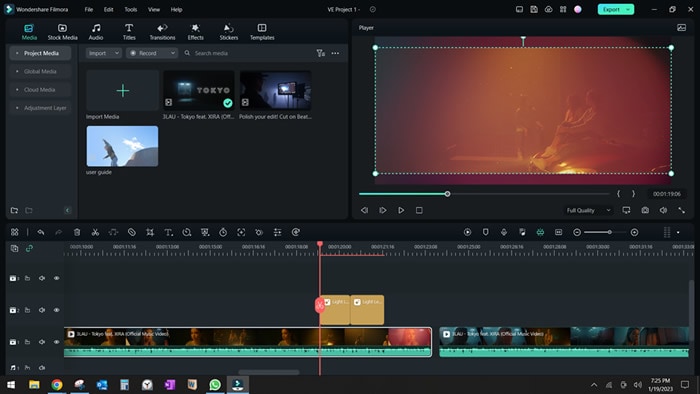
Step2Drag and drop the effects in the video editing
- Drag and drop the effect between any two cuts where you want to add this feature for a smooth transition.
- The effects should be placed above the video, in the timeline over the clip.
Step3Setting the color and blend of the light leak effect
- Right-click on the clip, and go to “Edit Properties.”
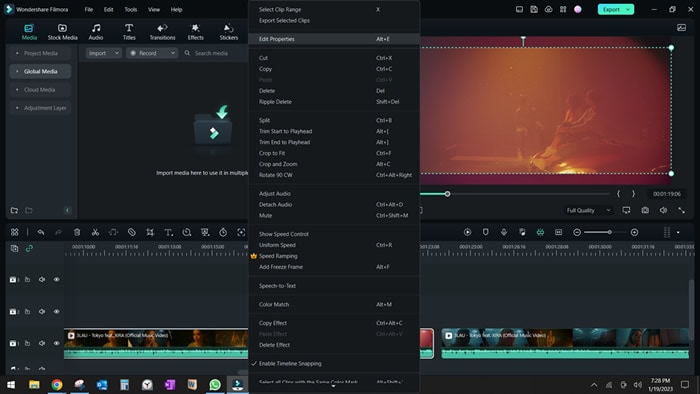
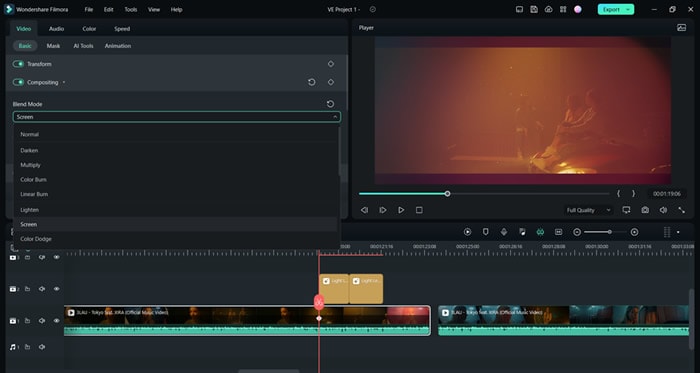
- Go to the Composing menu. Then, go to “Blend Mode” and choose “Screen.”
- It will adjust the light Leak feature to your entire screen.
Step4Fit the effect to the width of the screen
- Go to the Transform option in the clip properties.
- Click on both circles in front of the Scale option. It will adjust the effect to the entire frame width, giving it a pleasing outlook.
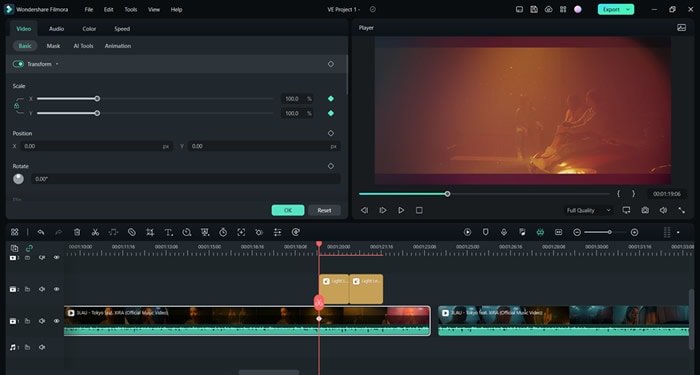
There you go! Your light Leak filter is ready. Give attention to how the light floods the screen and the scene transitions from one part to the next.

Now, you are done with adding some additional color and light to your cuts. Your cuts are now smooth and trouble-free. Moving onto our next tip that will further polish your music video. It is called Reframing and Zooming.
Reframe and zoom to polish your video
Another significant feature of Filmora is that it allows you to readjust the frame and zoom of the video. Any zooming option left undone in the shooting phase can be addressed in the editing phase.
For example, a director did an excellent job shooting a video. He considered every angle and yielded the best video shoot he could achieve. However, he missed a few zooming-out techniques while shooting. Now, what should one do? Use Filmora.
It is where the reframing and zooming feature of Filmora comes into play and saves the day.
Free Download For Win 7 or later(64-bit)
Free Download For macOS 10.14 or later
What are the reframing and zooming features?
This feature allows you to adjust the zoom on the point of interest in the music video. If you want to add extra focus on a certain point, the feature in Filmora can do that for you. You can run zoom in or zoom out on any particular object or actor. Follow the given steps to understand how you can do that.
Step1Plan your video
- Where you want to reframe and zoom. Trim that part of the video.
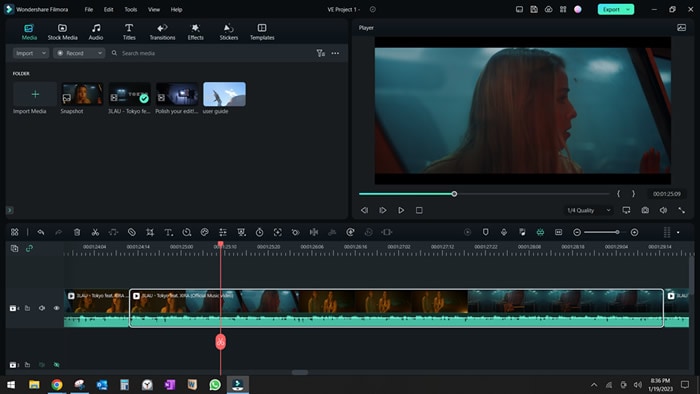
Step2Choose any two points on the clip for reframing
- Choose any two points on the clip. These points are reference points. When the clip moves from one point to the next point, the reframing takes place.
Step3Adjust the scale and position of the clip
- Go to the Transform option in Clip properties.
- Go to the clip’s end (2nd point), and turn on the Scale and Position circles.
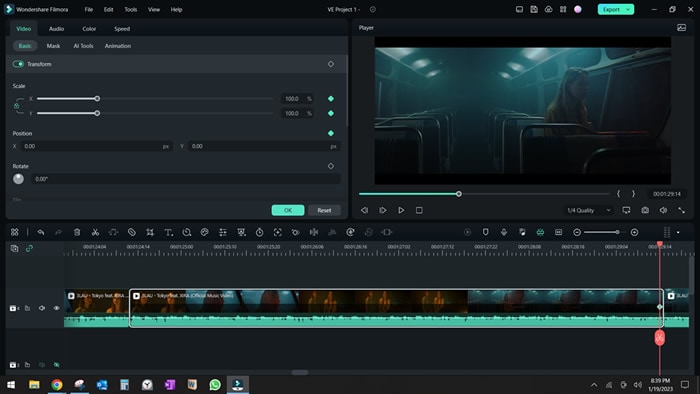
- Go to the start of the clip
- And adjust the value of scale and position.
Atl Text: Setting new value to Scale and Position.
Step4Replay the clip
- Once the scale readings and position in the initial point are set, replay the clip to observe the reframing.

You can use it on the static shots if you want. The procedure is the same. You have to adjust the scale and position of the screen to adjust reframing. Thus, Filmora fills gaps in your music video without the need to reshoot.
Final words
Video editing requires patience, creativity, and efficient tools. Filmora provides the most effective means to run various effects on your video. You can add cuts to your, smoothen your cuts, and readjust the frame of your video. These are merely a few features to mention.
In a nutshell, Filmora assists you in polishing your music video. You will not need a professional editor. You will become one in no time.
Free Download For Win 7 or later(64-bit)
Free Download For macOS 10.14 or later
Free Download For macOS 10.14 or later
Step2Create or import your project
- Create a project if you are using Filmora for the first time.
- Import the project from your computer directory. Then, go to file in the menu bar, and click on the open project.

- Select the project you want to open.
Step3Duplicate the project file and rename it
- When you open Filmora, a start-up window will appear.
- Right-click on the project you want to duplicate.

Step4Rename the duplicate file
- Rename the file to keep a record of new editions.

The file is renamed. It will help you remember which file is original. If your files become corrupted, you can easily access the original ones. Once you are done duplicating your project file, it is time to do our primary job: Polishing our video edits with Filmora .
Free Download For Win 7 or later(64-bit)
Free Download For macOS 10.14 or later
Part 2. Polishing Your Music Video
Just like ladies apply polish to their nails to make them more attractive, you can use editing to your music video to get the same result. Ladies can go to the beautician if they want. You can go to a professional editor if you like it.
However, these options are pretty expensive. The best way is to do it yourself. It is fun. Also, you can let loose your hidden artist for a while. Stick to the following points to understand how to begin polishing your music video.
How to put cuts on beats?
Adding beat cuts to a music video is imperative. Randomly placing beats yield an inferior-quality video. It also gives the impression that video editing is not done by a professional. The beats must be adjusted to synchronize with the storyline of the video.
Moreover, the video will lose its charm if you put cuts on every beat. People will not be able to enjoy, let alone understand, what is happening in the film.
What are the beats?
Beats are pieces of music that recur in a pattern. They are essential for music videos. It adds attraction for the viewers. Also, without beats, no music video can go viral. In the digital age, beats boost your music video.
![]()
Note: Cuts are recommended on every 2nd and 4th beat. In that way, a smooth transition of music beats takes place, making it more ear-pleasing. It also gives a professional outlook to the whole music.
Let’s learn how you can put cuts on your beats.
Step1Import the music video
- Import the Music video to which you would like to add any beat.
- You can also use the one given in Filmora.
- Drag and Drop the music video in the timeline panel.

Step2Detach its audio
- Right-click on the video.
- Select the option “Detach Audio.” It will separate the attached audio from the music. You will be able to add cuts where you deem necessary.

You can also import audio from your drive. After that, drag and drop the imported file into the timeline panel.
- Right, Click on the audio file in the audio panel.
- Select the option “Beat Detection.” It will show beats (with red markers) on the audio timeline, making adding cuts to the beat easy.

Step3Cut the beats where you find necessary
- Listen carefully to the audio file and plan where you want to add a cut to your beat.

- Adjust the beat according to your music video.
- Join the trimmed video segments to maintain continuity. The final product should look like the one given below.

Resultantly, it will readjust the beat to a different spot on the video. You can make multiple cuts in the beats. However, it is not recommended. It makes the whole experience of listening quite jarring.
Once you’ve added cuts to the beats, it is time to make them smooth. For that, keep reading the instructions given below.
Free Download For Win 7 or later(64-bit)
Free Download For macOS 10.14 or later
How to smooth out cuts
Adding cuts in the beats is one part of the job, not the whole job. After adding these cuts, you have to smoothen them. With it, the point of interest for the audience becomes clear.
To maintain the audience’s attention on our video, we have to smoothen the cuts so that our audience quickly understands the ongoing story in our video. If sudden changes occur on the screen, watching it gets disconcerting.
Indeed, you would not want your audience to have this experience. Head to the following techniques to understand how to smooth out video cuts
Technique 1: Showing multiple perspectives
The focal person in the video must occupy the same spot in the previous shot as it maintains in the current shot.
Let us understand from the example given below.
- Shot 1: The actress in the music video is occupying the left seat on the bus while looking outside.

- Shot 2: The actress occupies the same spot in the subsequent shot.

- Third Shot: The shot shows the wide angle of the bus from the inside. The actress is still sitting in the same position and the same place.

This technique keeps the audience focused on the point of interest while giving them a different perspective of the scene.
Technique 2: Using light leaks
The technique is quite helpful for the transition between two cuts. It uses different levels of colors to shine between cuts, adding smoothness and providing coherence.
What are light leaks?
Light leaks are great effects in Filmora. These effects fill the screen with light. It seems that light is leaking in a disorderly fashion. For the time being, the whole screen is filled with that effect. Thus, it explains the name of this effect as a light leak.
Filmora provides a plethora of features for adding Light Leak for transitioning cuts. With the use of Filmora, one can quickly bring a level of flow to the music video. Keep reading to understand how to use this remarkable feature of Filmora.
Free Download For Win 7 or later(64-bit)
Free Download For macOS 10.14 or later
Step1Access the light leak effects on Filmora
- Go to Effects on the Interface.
- Go to Overlay and choose the light Leak feature.
- You can also use any other light Leak stock in your capacity.

Step2Drag and drop the effects in the video editing
- Drag and drop the effect between any two cuts where you want to add this feature for a smooth transition.
- The effects should be placed above the video, in the timeline over the clip.

Step3Setting the color and blend of the light leak effect
- Right-click on the clip, and go to “Edit Properties.”

- Go to the Composing menu. Then, go to “Blend Mode” and choose “Screen.”
- It will adjust the light Leak feature to your entire screen.

Step4Fit the effect to the width of the screen
- Go to the Transform option in the clip properties.
- Click on both circles in front of the Scale option. It will adjust the effect to the entire frame width, giving it a pleasing outlook.

There you go! Your light Leak filter is ready. Give attention to how the light floods the screen and the scene transitions from one part to the next.

Now, you are done with adding some additional color and light to your cuts. Your cuts are now smooth and trouble-free. Moving onto our next tip that will further polish your music video. It is called Reframing and Zooming.
Reframe and zoom to polish your video
Another significant feature of Filmora is that it allows you to readjust the frame and zoom of the video. Any zooming option left undone in the shooting phase can be addressed in the editing phase.
For example, a director did an excellent job shooting a video. He considered every angle and yielded the best video shoot he could achieve. However, he missed a few zooming-out techniques while shooting. Now, what should one do? Use Filmora.
It is where the reframing and zooming feature of Filmora comes into play and saves the day.
Free Download For Win 7 or later(64-bit)
Free Download For macOS 10.14 or later
What are the reframing and zooming features?
This feature allows you to adjust the zoom on the point of interest in the music video. If you want to add extra focus on a certain point, the feature in Filmora can do that for you. You can run zoom in or zoom out on any particular object or actor. Follow the given steps to understand how you can do that.
Step1Plan your video
- Where you want to reframe and zoom. Trim that part of the video.

Step2Choose any two points on the clip for reframing
- Choose any two points on the clip. These points are reference points. When the clip moves from one point to the next point, the reframing takes place.
Step3Adjust the scale and position of the clip
- Go to the Transform option in Clip properties.
- Go to the clip’s end (2nd point), and turn on the Scale and Position circles.

- Go to the start of the clip
- And adjust the value of scale and position.
Atl Text: Setting new value to Scale and Position.
Step4Replay the clip
- Once the scale readings and position in the initial point are set, replay the clip to observe the reframing.

You can use it on the static shots if you want. The procedure is the same. You have to adjust the scale and position of the screen to adjust reframing. Thus, Filmora fills gaps in your music video without the need to reshoot.
Final words
Video editing requires patience, creativity, and efficient tools. Filmora provides the most effective means to run various effects on your video. You can add cuts to your, smoothen your cuts, and readjust the frame of your video. These are merely a few features to mention.
In a nutshell, Filmora assists you in polishing your music video. You will not need a professional editor. You will become one in no time.
Free Download For Win 7 or later(64-bit)
Free Download For macOS 10.14 or later
You Must Be Wondering Which the Best Online Transparent Image-Maker Is! Well, There Is No Need to Get Confused as Here; You Will Get a Curated List for the Same
[Top 10] Transparent Image Online Tools That Give You an Advantage
An easy yet powerful editor
Numerous effects to choose from
Detailed tutorials provided by the official channel
If you are a photoholic person and you love to share your images on social media then at some point in time you might have felt the need of removing the background of the image and add something cool to the background. This process of removing the background of the image is called making your image transparent. Professional photo artists make the most use of this feature to create the best of photos. Creating transparent images and changing their background could be used in many ways like designing the logo of the brands, professional photography, or simply fun purpose.
If you have not made use of transparent images yet and you want to learn to create transparent images online and edit transparent images online then this article is for you.
In this article
01 [Best 10 Transparent Image Editors You Deserve to Own](#Part 1)
02 [Can You Find Assets of Transparent Image in the Video Editor?](#Part 2)
Part 1 Best 10 Transparent Image Editors You Deserve to Own
You might be afraid that editing a picture online and making it a transparent image would need technical knowledge in photo editing. Then you are wrong. Making transparent images online and then editing them is very easy. We, here in this article, have come up with the 10 best online transparent image makers using which you can create transparent images in a very fun way, and then you can use them for whatever purpose you want. And don’t worry, we have provided the steps on how to use online transparent image makers to make your work easy.
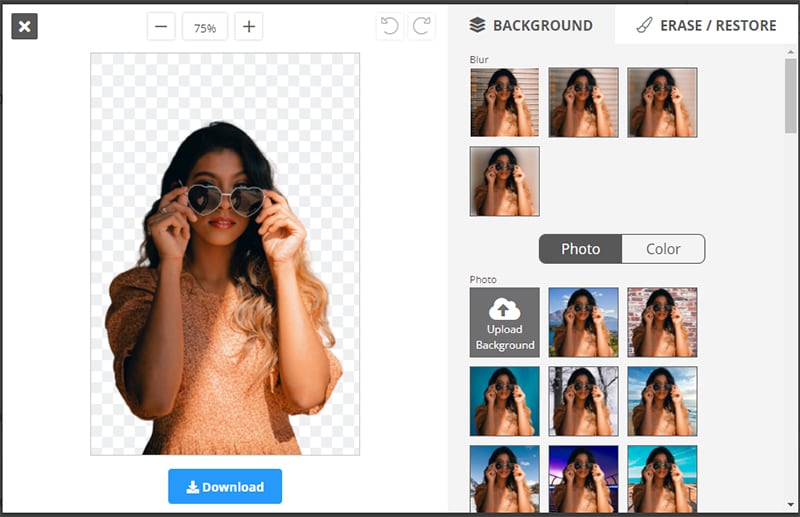
01Removebg
If you are looking for a free online transparent image maker then Removbg should be the first one you give a try. This online tool is powered by Al technology which enables you to remove the background of your image precisely. Removebg has “Erase” and “Restore” tools which provides for manual adjustment of the details so you can give your image a realistic touch. Apart from these features, the other highlights of this online tool are solid color backgrounds, well-designed templates, and custom templates. Using this online free tool you can also upload your image in batches. Images created by you will have a professional finishing.
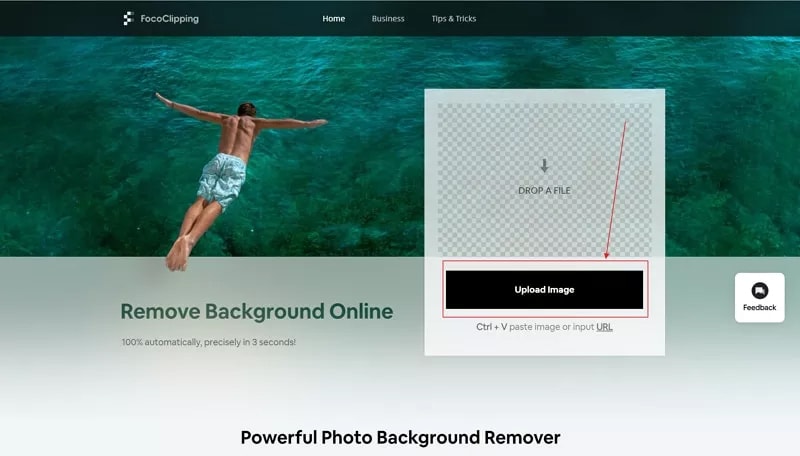
02FocoClipping
The next great online transparent image maker on our list is FocoClipping. While most of the image makers and editors have a free version and paid version but all the features in the FocoClipping are free. This image editor enables you to remove background from your photos and make them transparent with only a single click. FocoClipping also uses AI tech to remove the background of your image precisely. The other features of this tool include no limit of download and upload, an easy-to-use interface, casting shadows into images, and many more.
03Image online.co
Image online.co is a trusted name in the field of transparent image makers online. This amazing website is also completely free to use. This website is powered packed by a bundle of image editing tools. To make your transparent image all you need to do is to select the background using the mouse and you are done. No technical photo editing knowledge is required to use this tool. Apart from this Image online.co offers you features like resizing the image, image color picker, merging the images, pencil sketching the photo, adding text to the image, adding a logo to the photo, etc.

04AirMore
If you are the one who needs a simple and easy-to-use tool without much sophistication to make a transparent image, then AirMore could be a good choice for you. All you need is a single click on the background to remove it. This tool provides the “Keep” and “Remove” options so in case you don’t like your editing then you can reverse the whole process. The best thing about using AirMore is that you will not have to compromise with the quality of your image and you can add any cool background to your image like a pro.

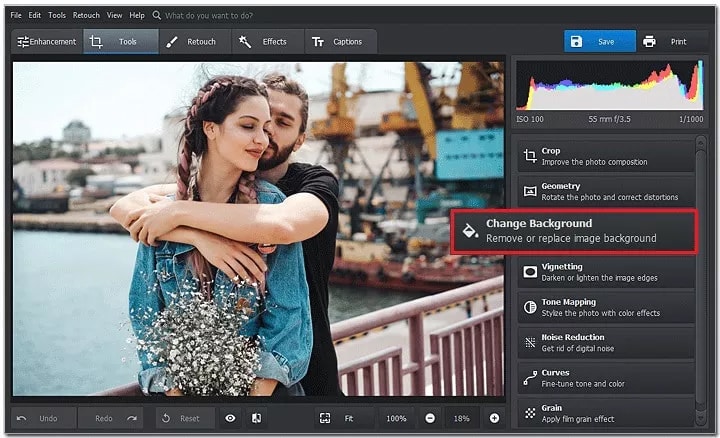
05PhotoWorks
If you find photoshop software on your pc too complicated to use then try PhotoWorks. This easy-to-use tool can help you in making transparent images online in a few seconds. PhotoWorks has a very user-friendly interface packed with many manual settings which users can adjust according to their needs. The biggest highlight of this tool is once you access it online you need no further internet connection to edit your images. It is a wonderful transparent background generator with effective results.
06Publisher
This tool comes is created by Microsoft and comes in your laptops and computers with the Microsoft office package. Publisher provides features using which you can generate transparent images in a very quick and easy manner. Other features of this tool include making designs, calendars, posters, greeting cards, and many more. However, this tool is only compatible with computers only and not smartphones. The results generated by Publisher are accurate to a high level and the interface of this software is very user-friendly.

07Online PNG Tools
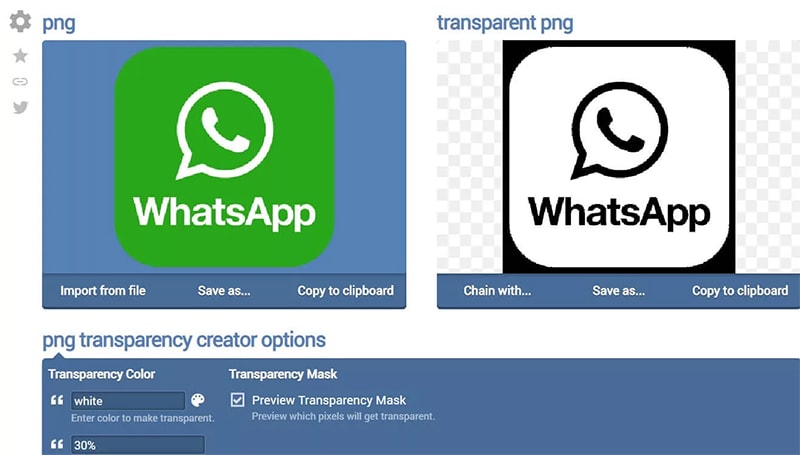
Another website on our list is Online PNG Tools. This website offers you all the means to create a hassle-free transparent image online in a few seconds and that too at no cost. The algorithm of this website is powered by artificial intelligence which lets you make transparent images without any trouble. All you need to do is open the site and upload your image and click on the background you want to make transparent. The most attractive feature offered by this website is that it does not ask you to download anything. You will get very quick results while using Online PNG Tools.
08Photoshop
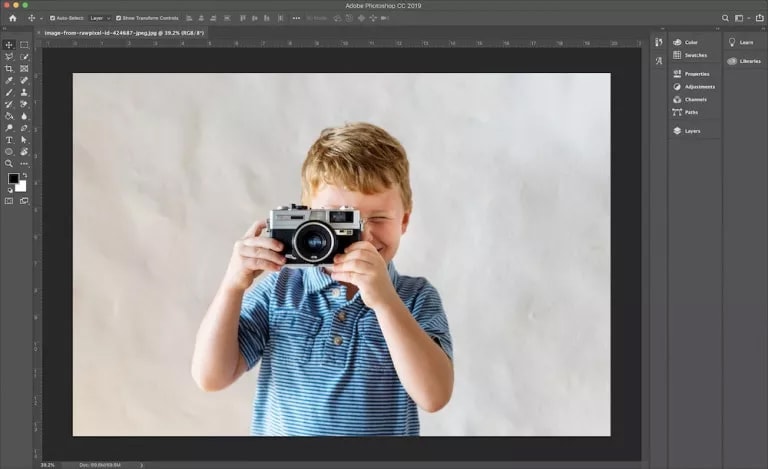
After reading the name Photoshop on our list, many readers might be surprised. Many people find Photoshop a bit tough to use but that is not true. This is one of the best online transparent image makers which you can use to remove the background from your images. Photoshop is a one-stop solution for the entire photo editing-related works. Here you can use features like resizing the image, image color picker, merging the images, pencil sketching the photo, adding text to the image, adding a logo to the photo, etc. Photoshop is the most reliable transparent image maker.
09LunaPic
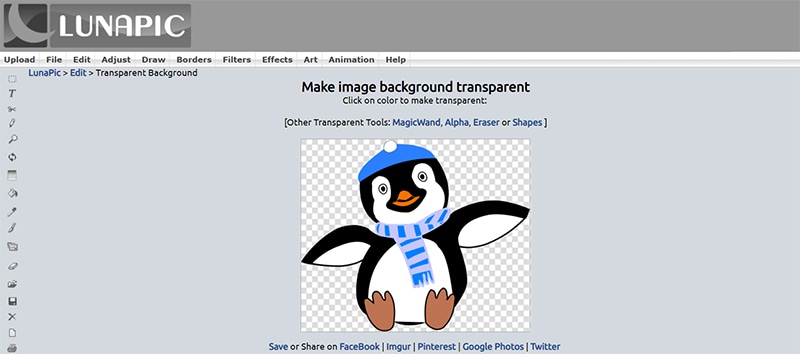
Next on our list of online transparent image makers is LunaPic. This online platform is completely free to use and you don’t even need to sign in to use it. The best feature is can upload your image from your computer, social media, the Cloud, or any other website you want. LunaPic is power-packed with numerous tools for editing the images which will make your online transparent image-making experience a good one. It provides various Borders, Filters, Effects, etc using which you can be master in image editing. Also, you can share your photos directly to social media from the LunaPic.
10Fotor
No discussion of online transparent image maker is complete without Fotor. If you consider yourself a complete beginner, in photo editing, you should try Fotor. Creating transparent images through this tool is very easy. Along with this, you can make use of various Effects, Beauty, Frames, Stickers, etc to make the image picture-perfect. This tool’s photo background remover lets you clear the background in just a few steps. Be it about beautifying life by sharing moments or the purpose is simply the business advertisement, when you have Fotor in hand, the background removal experience is incredible and the process gets easy with its easy interface.

So, now you know the best online transparent image maker. But if you are not a professional and worried about using these online tools then we are here. Here we will guide you on making a transparent picture online, and we have usedFocoClipping for explaining, but you can use any of the above-mentioned tools and the steps are almost similar for all.
Step 1: Go to the browser of your computer and type “FocoClipping” in your search box. Click on the FocoClipping link on your screen.
Step 2: Now select the image you want to make transparent and click on “Upload”. FocoClipping user interface is auto-adjusted to remove the background from your image. As soon as you open the image in FocoClipping the background of your image will be removed.
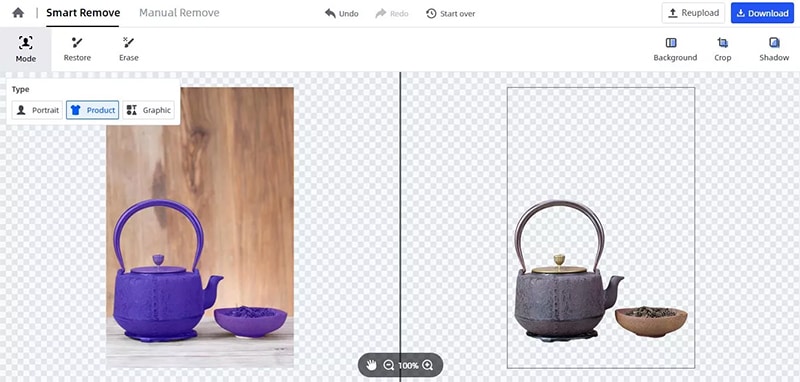
Step 3: Now if you want to experiment more with your image then you a new background, crop, or resize the transparent image. On the right corner of your screen, you will see options “Background, Crop, and Shadow” select them according to your requirements.
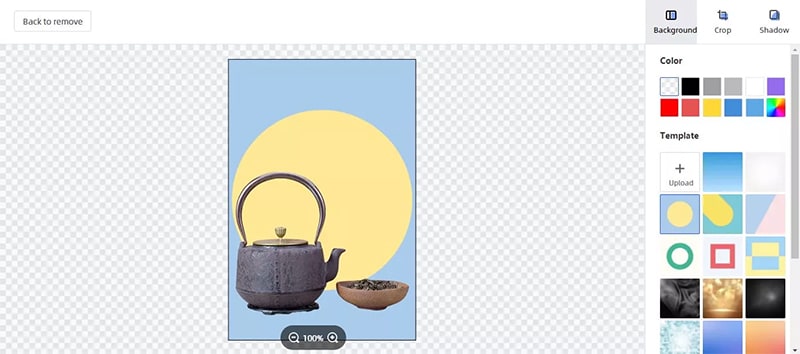
Step 4: If you feel like restoring any part or whole of the real image then select the “Recover” option. Drag the recover brush over the parts you want to recover. You can make use of the “Erase” tool to delete any stuff.
Step 5: After the completion of the whole editing process click on the “Download” button”. FocoClipping will download your image without any sign-in process. The tool will ask you to choose between PNG and JPG format to save your edited image, go for your preferred format. Hit the “Download” option again and your edited image will get saved to your preferred location on your pc.
Part 2 Can You Find Assets of Transparent Image in the Video Editor?
Till now we were keeping our discussion limited to online photo editors that can create transparent images, but what is a video editing platform that provides all such features? If you find all the assets of the transparent image in a video editor then your life is going to be very easy.
Here we are talking about Wondershare Filmora Video Editor . This online video editing platform enables its users to find all the assets of transparent images. All the online video content creators find this feature of Filmora very handy in making their videos awesome and cool.
For Win 7 or later (64-bit)
For macOS 10.12 or later
Apart from this Filmora is power-packed with a big list of features some of these features are mentioned below.
● Editing features like split screen, motion tracker, screen recorder, keyframing, Auto Beat Sync, etc.
● Various kinds of effects like green screen, mask and blend, AI portraits, video effects, etc.
● Audio editing features like audio ducking and silence detection.
● Color match and color combination.
Using Filmora you can create transparent images online and along with it, this platform offers a whole bunch of editing features. If you are new to photo editing then you don’t have to worry, the UI of Filmora has been designed in such a way that anyone without any technical expertise can edit their images and videos like a pro.
● Ending Thoughts →
● So dear readers, with this article we have tried to bring you the best online transparent image maker.
● All the 10 image editors mentioned in his article are top class and you can use them to create and edit all kinds of images including transparent images.
● With the tutorial provided in the article, you can learn to create transparent images. All you need to do is to follow the steps explained in the article and you will master the art of creating transparent images online.
● If you are looking for a video editing platform through which you can access all the assets of transparent images then try Filmora.
● This platform enables you to create and video including transparent images in a very quick and easy manner.
If you are a photoholic person and you love to share your images on social media then at some point in time you might have felt the need of removing the background of the image and add something cool to the background. This process of removing the background of the image is called making your image transparent. Professional photo artists make the most use of this feature to create the best of photos. Creating transparent images and changing their background could be used in many ways like designing the logo of the brands, professional photography, or simply fun purpose.
If you have not made use of transparent images yet and you want to learn to create transparent images online and edit transparent images online then this article is for you.
In this article
01 [Best 10 Transparent Image Editors You Deserve to Own](#Part 1)
02 [Can You Find Assets of Transparent Image in the Video Editor?](#Part 2)
Part 1 Best 10 Transparent Image Editors You Deserve to Own
You might be afraid that editing a picture online and making it a transparent image would need technical knowledge in photo editing. Then you are wrong. Making transparent images online and then editing them is very easy. We, here in this article, have come up with the 10 best online transparent image makers using which you can create transparent images in a very fun way, and then you can use them for whatever purpose you want. And don’t worry, we have provided the steps on how to use online transparent image makers to make your work easy.
01Removebg
If you are looking for a free online transparent image maker then Removbg should be the first one you give a try. This online tool is powered by Al technology which enables you to remove the background of your image precisely. Removebg has “Erase” and “Restore” tools which provides for manual adjustment of the details so you can give your image a realistic touch. Apart from these features, the other highlights of this online tool are solid color backgrounds, well-designed templates, and custom templates. Using this online free tool you can also upload your image in batches. Images created by you will have a professional finishing.

02FocoClipping
The next great online transparent image maker on our list is FocoClipping. While most of the image makers and editors have a free version and paid version but all the features in the FocoClipping are free. This image editor enables you to remove background from your photos and make them transparent with only a single click. FocoClipping also uses AI tech to remove the background of your image precisely. The other features of this tool include no limit of download and upload, an easy-to-use interface, casting shadows into images, and many more.

03Image online.co
Image online.co is a trusted name in the field of transparent image makers online. This amazing website is also completely free to use. This website is powered packed by a bundle of image editing tools. To make your transparent image all you need to do is to select the background using the mouse and you are done. No technical photo editing knowledge is required to use this tool. Apart from this Image online.co offers you features like resizing the image, image color picker, merging the images, pencil sketching the photo, adding text to the image, adding a logo to the photo, etc.

04AirMore
If you are the one who needs a simple and easy-to-use tool without much sophistication to make a transparent image, then AirMore could be a good choice for you. All you need is a single click on the background to remove it. This tool provides the “Keep” and “Remove” options so in case you don’t like your editing then you can reverse the whole process. The best thing about using AirMore is that you will not have to compromise with the quality of your image and you can add any cool background to your image like a pro.

05PhotoWorks
If you find photoshop software on your pc too complicated to use then try PhotoWorks. This easy-to-use tool can help you in making transparent images online in a few seconds. PhotoWorks has a very user-friendly interface packed with many manual settings which users can adjust according to their needs. The biggest highlight of this tool is once you access it online you need no further internet connection to edit your images. It is a wonderful transparent background generator with effective results.

06Publisher
This tool comes is created by Microsoft and comes in your laptops and computers with the Microsoft office package. Publisher provides features using which you can generate transparent images in a very quick and easy manner. Other features of this tool include making designs, calendars, posters, greeting cards, and many more. However, this tool is only compatible with computers only and not smartphones. The results generated by Publisher are accurate to a high level and the interface of this software is very user-friendly.

07Online PNG Tools
Another website on our list is Online PNG Tools. This website offers you all the means to create a hassle-free transparent image online in a few seconds and that too at no cost. The algorithm of this website is powered by artificial intelligence which lets you make transparent images without any trouble. All you need to do is open the site and upload your image and click on the background you want to make transparent. The most attractive feature offered by this website is that it does not ask you to download anything. You will get very quick results while using Online PNG Tools.

08Photoshop
After reading the name Photoshop on our list, many readers might be surprised. Many people find Photoshop a bit tough to use but that is not true. This is one of the best online transparent image makers which you can use to remove the background from your images. Photoshop is a one-stop solution for the entire photo editing-related works. Here you can use features like resizing the image, image color picker, merging the images, pencil sketching the photo, adding text to the image, adding a logo to the photo, etc. Photoshop is the most reliable transparent image maker.

09LunaPic
Next on our list of online transparent image makers is LunaPic. This online platform is completely free to use and you don’t even need to sign in to use it. The best feature is can upload your image from your computer, social media, the Cloud, or any other website you want. LunaPic is power-packed with numerous tools for editing the images which will make your online transparent image-making experience a good one. It provides various Borders, Filters, Effects, etc using which you can be master in image editing. Also, you can share your photos directly to social media from the LunaPic.

10Fotor
No discussion of online transparent image maker is complete without Fotor. If you consider yourself a complete beginner, in photo editing, you should try Fotor. Creating transparent images through this tool is very easy. Along with this, you can make use of various Effects, Beauty, Frames, Stickers, etc to make the image picture-perfect. This tool’s photo background remover lets you clear the background in just a few steps. Be it about beautifying life by sharing moments or the purpose is simply the business advertisement, when you have Fotor in hand, the background removal experience is incredible and the process gets easy with its easy interface.

So, now you know the best online transparent image maker. But if you are not a professional and worried about using these online tools then we are here. Here we will guide you on making a transparent picture online, and we have usedFocoClipping for explaining, but you can use any of the above-mentioned tools and the steps are almost similar for all.
Step 1: Go to the browser of your computer and type “FocoClipping” in your search box. Click on the FocoClipping link on your screen.
Step 2: Now select the image you want to make transparent and click on “Upload”. FocoClipping user interface is auto-adjusted to remove the background from your image. As soon as you open the image in FocoClipping the background of your image will be removed.

Step 3: Now if you want to experiment more with your image then you a new background, crop, or resize the transparent image. On the right corner of your screen, you will see options “Background, Crop, and Shadow” select them according to your requirements.

Step 4: If you feel like restoring any part or whole of the real image then select the “Recover” option. Drag the recover brush over the parts you want to recover. You can make use of the “Erase” tool to delete any stuff.
Step 5: After the completion of the whole editing process click on the “Download” button”. FocoClipping will download your image without any sign-in process. The tool will ask you to choose between PNG and JPG format to save your edited image, go for your preferred format. Hit the “Download” option again and your edited image will get saved to your preferred location on your pc.
Part 2 Can You Find Assets of Transparent Image in the Video Editor?
Till now we were keeping our discussion limited to online photo editors that can create transparent images, but what is a video editing platform that provides all such features? If you find all the assets of the transparent image in a video editor then your life is going to be very easy.
Here we are talking about Wondershare Filmora Video Editor . This online video editing platform enables its users to find all the assets of transparent images. All the online video content creators find this feature of Filmora very handy in making their videos awesome and cool.
For Win 7 or later (64-bit)
For macOS 10.12 or later
Apart from this Filmora is power-packed with a big list of features some of these features are mentioned below.
● Editing features like split screen, motion tracker, screen recorder, keyframing, Auto Beat Sync, etc.
● Various kinds of effects like green screen, mask and blend, AI portraits, video effects, etc.
● Audio editing features like audio ducking and silence detection.
● Color match and color combination.
Using Filmora you can create transparent images online and along with it, this platform offers a whole bunch of editing features. If you are new to photo editing then you don’t have to worry, the UI of Filmora has been designed in such a way that anyone without any technical expertise can edit their images and videos like a pro.
● Ending Thoughts →
● So dear readers, with this article we have tried to bring you the best online transparent image maker.
● All the 10 image editors mentioned in his article are top class and you can use them to create and edit all kinds of images including transparent images.
● With the tutorial provided in the article, you can learn to create transparent images. All you need to do is to follow the steps explained in the article and you will master the art of creating transparent images online.
● If you are looking for a video editing platform through which you can access all the assets of transparent images then try Filmora.
● This platform enables you to create and video including transparent images in a very quick and easy manner.
If you are a photoholic person and you love to share your images on social media then at some point in time you might have felt the need of removing the background of the image and add something cool to the background. This process of removing the background of the image is called making your image transparent. Professional photo artists make the most use of this feature to create the best of photos. Creating transparent images and changing their background could be used in many ways like designing the logo of the brands, professional photography, or simply fun purpose.
If you have not made use of transparent images yet and you want to learn to create transparent images online and edit transparent images online then this article is for you.
In this article
01 [Best 10 Transparent Image Editors You Deserve to Own](#Part 1)
02 [Can You Find Assets of Transparent Image in the Video Editor?](#Part 2)
Part 1 Best 10 Transparent Image Editors You Deserve to Own
You might be afraid that editing a picture online and making it a transparent image would need technical knowledge in photo editing. Then you are wrong. Making transparent images online and then editing them is very easy. We, here in this article, have come up with the 10 best online transparent image makers using which you can create transparent images in a very fun way, and then you can use them for whatever purpose you want. And don’t worry, we have provided the steps on how to use online transparent image makers to make your work easy.
01Removebg
If you are looking for a free online transparent image maker then Removbg should be the first one you give a try. This online tool is powered by Al technology which enables you to remove the background of your image precisely. Removebg has “Erase” and “Restore” tools which provides for manual adjustment of the details so you can give your image a realistic touch. Apart from these features, the other highlights of this online tool are solid color backgrounds, well-designed templates, and custom templates. Using this online free tool you can also upload your image in batches. Images created by you will have a professional finishing.

02FocoClipping
The next great online transparent image maker on our list is FocoClipping. While most of the image makers and editors have a free version and paid version but all the features in the FocoClipping are free. This image editor enables you to remove background from your photos and make them transparent with only a single click. FocoClipping also uses AI tech to remove the background of your image precisely. The other features of this tool include no limit of download and upload, an easy-to-use interface, casting shadows into images, and many more.

03Image online.co
Image online.co is a trusted name in the field of transparent image makers online. This amazing website is also completely free to use. This website is powered packed by a bundle of image editing tools. To make your transparent image all you need to do is to select the background using the mouse and you are done. No technical photo editing knowledge is required to use this tool. Apart from this Image online.co offers you features like resizing the image, image color picker, merging the images, pencil sketching the photo, adding text to the image, adding a logo to the photo, etc.

04AirMore
If you are the one who needs a simple and easy-to-use tool without much sophistication to make a transparent image, then AirMore could be a good choice for you. All you need is a single click on the background to remove it. This tool provides the “Keep” and “Remove” options so in case you don’t like your editing then you can reverse the whole process. The best thing about using AirMore is that you will not have to compromise with the quality of your image and you can add any cool background to your image like a pro.

05PhotoWorks
If you find photoshop software on your pc too complicated to use then try PhotoWorks. This easy-to-use tool can help you in making transparent images online in a few seconds. PhotoWorks has a very user-friendly interface packed with many manual settings which users can adjust according to their needs. The biggest highlight of this tool is once you access it online you need no further internet connection to edit your images. It is a wonderful transparent background generator with effective results.

06Publisher
This tool comes is created by Microsoft and comes in your laptops and computers with the Microsoft office package. Publisher provides features using which you can generate transparent images in a very quick and easy manner. Other features of this tool include making designs, calendars, posters, greeting cards, and many more. However, this tool is only compatible with computers only and not smartphones. The results generated by Publisher are accurate to a high level and the interface of this software is very user-friendly.

07Online PNG Tools
Another website on our list is Online PNG Tools. This website offers you all the means to create a hassle-free transparent image online in a few seconds and that too at no cost. The algorithm of this website is powered by artificial intelligence which lets you make transparent images without any trouble. All you need to do is open the site and upload your image and click on the background you want to make transparent. The most attractive feature offered by this website is that it does not ask you to download anything. You will get very quick results while using Online PNG Tools.

08Photoshop
After reading the name Photoshop on our list, many readers might be surprised. Many people find Photoshop a bit tough to use but that is not true. This is one of the best online transparent image makers which you can use to remove the background from your images. Photoshop is a one-stop solution for the entire photo editing-related works. Here you can use features like resizing the image, image color picker, merging the images, pencil sketching the photo, adding text to the image, adding a logo to the photo, etc. Photoshop is the most reliable transparent image maker.

09LunaPic
Next on our list of online transparent image makers is LunaPic. This online platform is completely free to use and you don’t even need to sign in to use it. The best feature is can upload your image from your computer, social media, the Cloud, or any other website you want. LunaPic is power-packed with numerous tools for editing the images which will make your online transparent image-making experience a good one. It provides various Borders, Filters, Effects, etc using which you can be master in image editing. Also, you can share your photos directly to social media from the LunaPic.

10Fotor
No discussion of online transparent image maker is complete without Fotor. If you consider yourself a complete beginner, in photo editing, you should try Fotor. Creating transparent images through this tool is very easy. Along with this, you can make use of various Effects, Beauty, Frames, Stickers, etc to make the image picture-perfect. This tool’s photo background remover lets you clear the background in just a few steps. Be it about beautifying life by sharing moments or the purpose is simply the business advertisement, when you have Fotor in hand, the background removal experience is incredible and the process gets easy with its easy interface.

So, now you know the best online transparent image maker. But if you are not a professional and worried about using these online tools then we are here. Here we will guide you on making a transparent picture online, and we have usedFocoClipping for explaining, but you can use any of the above-mentioned tools and the steps are almost similar for all.
Step 1: Go to the browser of your computer and type “FocoClipping” in your search box. Click on the FocoClipping link on your screen.
Step 2: Now select the image you want to make transparent and click on “Upload”. FocoClipping user interface is auto-adjusted to remove the background from your image. As soon as you open the image in FocoClipping the background of your image will be removed.

Step 3: Now if you want to experiment more with your image then you a new background, crop, or resize the transparent image. On the right corner of your screen, you will see options “Background, Crop, and Shadow” select them according to your requirements.

Step 4: If you feel like restoring any part or whole of the real image then select the “Recover” option. Drag the recover brush over the parts you want to recover. You can make use of the “Erase” tool to delete any stuff.
Step 5: After the completion of the whole editing process click on the “Download” button”. FocoClipping will download your image without any sign-in process. The tool will ask you to choose between PNG and JPG format to save your edited image, go for your preferred format. Hit the “Download” option again and your edited image will get saved to your preferred location on your pc.
Part 2 Can You Find Assets of Transparent Image in the Video Editor?
Till now we were keeping our discussion limited to online photo editors that can create transparent images, but what is a video editing platform that provides all such features? If you find all the assets of the transparent image in a video editor then your life is going to be very easy.
Here we are talking about Wondershare Filmora Video Editor . This online video editing platform enables its users to find all the assets of transparent images. All the online video content creators find this feature of Filmora very handy in making their videos awesome and cool.
For Win 7 or later (64-bit)
For macOS 10.12 or later
Apart from this Filmora is power-packed with a big list of features some of these features are mentioned below.
● Editing features like split screen, motion tracker, screen recorder, keyframing, Auto Beat Sync, etc.
● Various kinds of effects like green screen, mask and blend, AI portraits, video effects, etc.
● Audio editing features like audio ducking and silence detection.
● Color match and color combination.
Using Filmora you can create transparent images online and along with it, this platform offers a whole bunch of editing features. If you are new to photo editing then you don’t have to worry, the UI of Filmora has been designed in such a way that anyone without any technical expertise can edit their images and videos like a pro.
● Ending Thoughts →
● So dear readers, with this article we have tried to bring you the best online transparent image maker.
● All the 10 image editors mentioned in his article are top class and you can use them to create and edit all kinds of images including transparent images.
● With the tutorial provided in the article, you can learn to create transparent images. All you need to do is to follow the steps explained in the article and you will master the art of creating transparent images online.
● If you are looking for a video editing platform through which you can access all the assets of transparent images then try Filmora.
● This platform enables you to create and video including transparent images in a very quick and easy manner.
If you are a photoholic person and you love to share your images on social media then at some point in time you might have felt the need of removing the background of the image and add something cool to the background. This process of removing the background of the image is called making your image transparent. Professional photo artists make the most use of this feature to create the best of photos. Creating transparent images and changing their background could be used in many ways like designing the logo of the brands, professional photography, or simply fun purpose.
If you have not made use of transparent images yet and you want to learn to create transparent images online and edit transparent images online then this article is for you.
In this article
01 [Best 10 Transparent Image Editors You Deserve to Own](#Part 1)
02 [Can You Find Assets of Transparent Image in the Video Editor?](#Part 2)
Part 1 Best 10 Transparent Image Editors You Deserve to Own
You might be afraid that editing a picture online and making it a transparent image would need technical knowledge in photo editing. Then you are wrong. Making transparent images online and then editing them is very easy. We, here in this article, have come up with the 10 best online transparent image makers using which you can create transparent images in a very fun way, and then you can use them for whatever purpose you want. And don’t worry, we have provided the steps on how to use online transparent image makers to make your work easy.
01Removebg
If you are looking for a free online transparent image maker then Removbg should be the first one you give a try. This online tool is powered by Al technology which enables you to remove the background of your image precisely. Removebg has “Erase” and “Restore” tools which provides for manual adjustment of the details so you can give your image a realistic touch. Apart from these features, the other highlights of this online tool are solid color backgrounds, well-designed templates, and custom templates. Using this online free tool you can also upload your image in batches. Images created by you will have a professional finishing.

02FocoClipping
The next great online transparent image maker on our list is FocoClipping. While most of the image makers and editors have a free version and paid version but all the features in the FocoClipping are free. This image editor enables you to remove background from your photos and make them transparent with only a single click. FocoClipping also uses AI tech to remove the background of your image precisely. The other features of this tool include no limit of download and upload, an easy-to-use interface, casting shadows into images, and many more.

03Image online.co
Image online.co is a trusted name in the field of transparent image makers online. This amazing website is also completely free to use. This website is powered packed by a bundle of image editing tools. To make your transparent image all you need to do is to select the background using the mouse and you are done. No technical photo editing knowledge is required to use this tool. Apart from this Image online.co offers you features like resizing the image, image color picker, merging the images, pencil sketching the photo, adding text to the image, adding a logo to the photo, etc.

04AirMore
If you are the one who needs a simple and easy-to-use tool without much sophistication to make a transparent image, then AirMore could be a good choice for you. All you need is a single click on the background to remove it. This tool provides the “Keep” and “Remove” options so in case you don’t like your editing then you can reverse the whole process. The best thing about using AirMore is that you will not have to compromise with the quality of your image and you can add any cool background to your image like a pro.

05PhotoWorks
If you find photoshop software on your pc too complicated to use then try PhotoWorks. This easy-to-use tool can help you in making transparent images online in a few seconds. PhotoWorks has a very user-friendly interface packed with many manual settings which users can adjust according to their needs. The biggest highlight of this tool is once you access it online you need no further internet connection to edit your images. It is a wonderful transparent background generator with effective results.

06Publisher
This tool comes is created by Microsoft and comes in your laptops and computers with the Microsoft office package. Publisher provides features using which you can generate transparent images in a very quick and easy manner. Other features of this tool include making designs, calendars, posters, greeting cards, and many more. However, this tool is only compatible with computers only and not smartphones. The results generated by Publisher are accurate to a high level and the interface of this software is very user-friendly.

07Online PNG Tools
Another website on our list is Online PNG Tools. This website offers you all the means to create a hassle-free transparent image online in a few seconds and that too at no cost. The algorithm of this website is powered by artificial intelligence which lets you make transparent images without any trouble. All you need to do is open the site and upload your image and click on the background you want to make transparent. The most attractive feature offered by this website is that it does not ask you to download anything. You will get very quick results while using Online PNG Tools.

08Photoshop
After reading the name Photoshop on our list, many readers might be surprised. Many people find Photoshop a bit tough to use but that is not true. This is one of the best online transparent image makers which you can use to remove the background from your images. Photoshop is a one-stop solution for the entire photo editing-related works. Here you can use features like resizing the image, image color picker, merging the images, pencil sketching the photo, adding text to the image, adding a logo to the photo, etc. Photoshop is the most reliable transparent image maker.

09LunaPic
Next on our list of online transparent image makers is LunaPic. This online platform is completely free to use and you don’t even need to sign in to use it. The best feature is can upload your image from your computer, social media, the Cloud, or any other website you want. LunaPic is power-packed with numerous tools for editing the images which will make your online transparent image-making experience a good one. It provides various Borders, Filters, Effects, etc using which you can be master in image editing. Also, you can share your photos directly to social media from the LunaPic.

10Fotor
No discussion of online transparent image maker is complete without Fotor. If you consider yourself a complete beginner, in photo editing, you should try Fotor. Creating transparent images through this tool is very easy. Along with this, you can make use of various Effects, Beauty, Frames, Stickers, etc to make the image picture-perfect. This tool’s photo background remover lets you clear the background in just a few steps. Be it about beautifying life by sharing moments or the purpose is simply the business advertisement, when you have Fotor in hand, the background removal experience is incredible and the process gets easy with its easy interface.

So, now you know the best online transparent image maker. But if you are not a professional and worried about using these online tools then we are here. Here we will guide you on making a transparent picture online, and we have usedFocoClipping for explaining, but you can use any of the above-mentioned tools and the steps are almost similar for all.
Step 1: Go to the browser of your computer and type “FocoClipping” in your search box. Click on the FocoClipping link on your screen.
Step 2: Now select the image you want to make transparent and click on “Upload”. FocoClipping user interface is auto-adjusted to remove the background from your image. As soon as you open the image in FocoClipping the background of your image will be removed.

Step 3: Now if you want to experiment more with your image then you a new background, crop, or resize the transparent image. On the right corner of your screen, you will see options “Background, Crop, and Shadow” select them according to your requirements.

Step 4: If you feel like restoring any part or whole of the real image then select the “Recover” option. Drag the recover brush over the parts you want to recover. You can make use of the “Erase” tool to delete any stuff.
Step 5: After the completion of the whole editing process click on the “Download” button”. FocoClipping will download your image without any sign-in process. The tool will ask you to choose between PNG and JPG format to save your edited image, go for your preferred format. Hit the “Download” option again and your edited image will get saved to your preferred location on your pc.
Part 2 Can You Find Assets of Transparent Image in the Video Editor?
Till now we were keeping our discussion limited to online photo editors that can create transparent images, but what is a video editing platform that provides all such features? If you find all the assets of the transparent image in a video editor then your life is going to be very easy.
Here we are talking about Wondershare Filmora Video Editor . This online video editing platform enables its users to find all the assets of transparent images. All the online video content creators find this feature of Filmora very handy in making their videos awesome and cool.
For Win 7 or later (64-bit)
For macOS 10.12 or later
Apart from this Filmora is power-packed with a big list of features some of these features are mentioned below.
● Editing features like split screen, motion tracker, screen recorder, keyframing, Auto Beat Sync, etc.
● Various kinds of effects like green screen, mask and blend, AI portraits, video effects, etc.
● Audio editing features like audio ducking and silence detection.
● Color match and color combination.
Using Filmora you can create transparent images online and along with it, this platform offers a whole bunch of editing features. If you are new to photo editing then you don’t have to worry, the UI of Filmora has been designed in such a way that anyone without any technical expertise can edit their images and videos like a pro.
● Ending Thoughts →
● So dear readers, with this article we have tried to bring you the best online transparent image maker.
● All the 10 image editors mentioned in his article are top class and you can use them to create and edit all kinds of images including transparent images.
● With the tutorial provided in the article, you can learn to create transparent images. All you need to do is to follow the steps explained in the article and you will master the art of creating transparent images online.
● If you are looking for a video editing platform through which you can access all the assets of transparent images then try Filmora.
● This platform enables you to create and video including transparent images in a very quick and easy manner.
Color Lut in Video -How to Color Grade Your Video
Create High-Quality Video - Wondershare Filmora
An easy and powerful YouTube video editor
Numerous video and audio effects to choose from
Detailed tutorials provided by the official channel
Do you want to improve the quality of your videos? With so many people providing online video content. Other than the subject of your video, its quality is also important. One way to make your content pop is to create a lut video. Below is information on how to color grade your video using lut resources. Keep reading to discover why lut video editing is important and where to get the best resources.

In this article
01 What is LUT?
02 Why do we need to use LUTs?
03 How to add luts to your video using Filmora
So, what is LUT?
LUT refers to Look Up Tables, which a custom color templates you use when creating videos. These help you create content for different devices, including television and mobile devices. For example, you can create custom LUTs for easy conversion from standard definition to more modern cinematic formats such as 4K and UHD.
What are the different types of LUTs?
Here are the colour lut categories for filmmakers:
- Transform
- Calibration
- Viewing
- 1D: 1D lut offers customization on one value of your colors. These are available as .lut file types.
- 3D: These award you more control over your luts video editing since they offer saturation, hues, and brightness levels on different axis. You will find these as .cube file types.

These allow you to make your content vibrant and mimic the color schemes of famous filmmakers such as David Fincher. He is famous for using greens and blues in his films to arrest your attention. He does this by employing a darker than usual color scheme, which leaves you staring at the screen for the entire film. You can see this color lut in the movie Fight Club or The Social Network.
Keep reading to discover the effects of each in luts video editing.
Why do we need to use LUTs?
You use LUTs for different reasons, as you can see from David Fincher’s example. However, here are a few more:
• To add emphasis to a particular scene
Sometimes, it can be challenging to communicate the importance of your message using standard color schemes. As such, filmmakers use dramatic color schemes in their content. For example, the colour scheme in the above photo emphasizes the tranquillity of the sea between contrasting landscapes.

• To ensure uniformity across different devices
You will use a calibration color lut to ensure a similar video quality across different TV monitors whether it is HD, UHD, or 4K. Similarly, you can use a transformation colour lut to add a cinematic effect to your film to make it appear as if your audience is viewing it in a theatre.
Camera manufacturers use different color luts to diversify their products according to their target markets. For example, you get a different lut color grading from a Sony camera as you would in a Canon.

How to add luts to your video using Filmora
Filmora is a great video editing tool for all filmmaker experience levels. It includes tons of features and a user-friendly interface to ensure professional results each time. It is available for both macOS and Windows devices. Filmora allows you to install custom Luts and apply it to your videos.
Guide to use Filmora
1. Launch the video editor
Once you complete the download, launch it to start making magical videos for your audience.
2. Import Your Film
The lut editing video software allows you to import your videos directly from your device.
3. Select Advanced Color Tuning
You will find this on the Tools drop-down menu. It is located on the top menu options of Filmora. Then, drag and drop your video to the timeline. The tool also offers an A/B comparison, allowing you to check the result of your lut video editing before you apply the effect.
You can use the preset luts Filmora offers or upload your custom luts from any of the sites in the next section.
4. Save & Export
Click OK to finalize the correction and export the video to your preferred device. You will see the available options from the software’s export menu.
A few things to consider before using Filmora’s Advanced Color correction tool include:
- Your film white balance needs to be correct to get better results.
- Your camera’s exposure during filming also needs to be optimal to get ideal results when using Filmora for lut video editing. However, the Advanced Color Correction tool will tell you if everything is optimal.
- Finally, the original video needs to be of ideal quality for optimal color lut results. Different shooting conditions may not work with certain color luts. Therefore, opt for luts that match your filmmaking style to get the best results.
For Win 7 or later (64-bit)
For macOS 10.12 or later
Bonus! Free Lut Resources
Do you want more diversity in your lut video editing? Here are some free lut resources to check out.
1. Vision color luts
Vision color luts is another lut video editing software that you can use to hone your skills. They also offer free luts you can upload on their favorite software. Additionally, they have luts for even the latest display resolutions such as 2K and 3D. Check out the full list here.
2. Sam Kolder
Sam Kolder is a Vlogger who is famous for his stunning creations that feature his travels. His work also inspires many creators thanks to his editing and use of color luts. He also shares free lut packs and his creative process across his official channels, including YouTube and Instagram.
He mainly works on Adobe Premiere pro. However, his luts still work with other video editing software.
3. Shutterstock.com
Shutterstock also offers tons of free stuff relating to lut video editing. You will also find free luts that are compatible with Filmora on the website. Here are a few of them you can sample. Please check before you download other packs, as some of the stuff may not match your current versions.
4. Giggster.com
Giggster.com is an LA-based company that caters to aspiring filmmakers. They too offer the occasional lut files you can use to make your videos more stunning. However, they mostly feature those that work with Photoshop CC. So, you may wanna check your software’s compatibility beforehand. Here is one of the freebies you can download.
5. Premiumbeat.com
You may also want to check out some of Premiumbeat’s free offerings if you are an AfterEffects user. They offer stylistic luts and other free tools you can use to edit your films. Additionally, they do this regularly. Therefore, they are worth a look to see what is new.
Conclusion
● Color luts are incredible tools to add flair to your videos. Additionally, you can use them with incredible ease on software like Filmora. Here are some of the creations you can sample from some of the free ones that come with the tool.
Do you want to improve the quality of your videos? With so many people providing online video content. Other than the subject of your video, its quality is also important. One way to make your content pop is to create a lut video. Below is information on how to color grade your video using lut resources. Keep reading to discover why lut video editing is important and where to get the best resources.

In this article
01 What is LUT?
02 Why do we need to use LUTs?
03 How to add luts to your video using Filmora
So, what is LUT?
LUT refers to Look Up Tables, which a custom color templates you use when creating videos. These help you create content for different devices, including television and mobile devices. For example, you can create custom LUTs for easy conversion from standard definition to more modern cinematic formats such as 4K and UHD.
What are the different types of LUTs?
Here are the colour lut categories for filmmakers:
- Transform
- Calibration
- Viewing
- 1D: 1D lut offers customization on one value of your colors. These are available as .lut file types.
- 3D: These award you more control over your luts video editing since they offer saturation, hues, and brightness levels on different axis. You will find these as .cube file types.

These allow you to make your content vibrant and mimic the color schemes of famous filmmakers such as David Fincher. He is famous for using greens and blues in his films to arrest your attention. He does this by employing a darker than usual color scheme, which leaves you staring at the screen for the entire film. You can see this color lut in the movie Fight Club or The Social Network.
Keep reading to discover the effects of each in luts video editing.
Why do we need to use LUTs?
You use LUTs for different reasons, as you can see from David Fincher’s example. However, here are a few more:
• To add emphasis to a particular scene
Sometimes, it can be challenging to communicate the importance of your message using standard color schemes. As such, filmmakers use dramatic color schemes in their content. For example, the colour scheme in the above photo emphasizes the tranquillity of the sea between contrasting landscapes.

• To ensure uniformity across different devices
You will use a calibration color lut to ensure a similar video quality across different TV monitors whether it is HD, UHD, or 4K. Similarly, you can use a transformation colour lut to add a cinematic effect to your film to make it appear as if your audience is viewing it in a theatre.
Camera manufacturers use different color luts to diversify their products according to their target markets. For example, you get a different lut color grading from a Sony camera as you would in a Canon.

How to add luts to your video using Filmora
Filmora is a great video editing tool for all filmmaker experience levels. It includes tons of features and a user-friendly interface to ensure professional results each time. It is available for both macOS and Windows devices. Filmora allows you to install custom Luts and apply it to your videos.
Guide to use Filmora
1. Launch the video editor
Once you complete the download, launch it to start making magical videos for your audience.
2. Import Your Film
The lut editing video software allows you to import your videos directly from your device.
3. Select Advanced Color Tuning
You will find this on the Tools drop-down menu. It is located on the top menu options of Filmora. Then, drag and drop your video to the timeline. The tool also offers an A/B comparison, allowing you to check the result of your lut video editing before you apply the effect.
You can use the preset luts Filmora offers or upload your custom luts from any of the sites in the next section.
4. Save & Export
Click OK to finalize the correction and export the video to your preferred device. You will see the available options from the software’s export menu.
A few things to consider before using Filmora’s Advanced Color correction tool include:
- Your film white balance needs to be correct to get better results.
- Your camera’s exposure during filming also needs to be optimal to get ideal results when using Filmora for lut video editing. However, the Advanced Color Correction tool will tell you if everything is optimal.
- Finally, the original video needs to be of ideal quality for optimal color lut results. Different shooting conditions may not work with certain color luts. Therefore, opt for luts that match your filmmaking style to get the best results.
For Win 7 or later (64-bit)
For macOS 10.12 or later
Bonus! Free Lut Resources
Do you want more diversity in your lut video editing? Here are some free lut resources to check out.
1. Vision color luts
Vision color luts is another lut video editing software that you can use to hone your skills. They also offer free luts you can upload on their favorite software. Additionally, they have luts for even the latest display resolutions such as 2K and 3D. Check out the full list here.
2. Sam Kolder
Sam Kolder is a Vlogger who is famous for his stunning creations that feature his travels. His work also inspires many creators thanks to his editing and use of color luts. He also shares free lut packs and his creative process across his official channels, including YouTube and Instagram.
He mainly works on Adobe Premiere pro. However, his luts still work with other video editing software.
3. Shutterstock.com
Shutterstock also offers tons of free stuff relating to lut video editing. You will also find free luts that are compatible with Filmora on the website. Here are a few of them you can sample. Please check before you download other packs, as some of the stuff may not match your current versions.
4. Giggster.com
Giggster.com is an LA-based company that caters to aspiring filmmakers. They too offer the occasional lut files you can use to make your videos more stunning. However, they mostly feature those that work with Photoshop CC. So, you may wanna check your software’s compatibility beforehand. Here is one of the freebies you can download.
5. Premiumbeat.com
You may also want to check out some of Premiumbeat’s free offerings if you are an AfterEffects user. They offer stylistic luts and other free tools you can use to edit your films. Additionally, they do this regularly. Therefore, they are worth a look to see what is new.
Conclusion
● Color luts are incredible tools to add flair to your videos. Additionally, you can use them with incredible ease on software like Filmora. Here are some of the creations you can sample from some of the free ones that come with the tool.
Do you want to improve the quality of your videos? With so many people providing online video content. Other than the subject of your video, its quality is also important. One way to make your content pop is to create a lut video. Below is information on how to color grade your video using lut resources. Keep reading to discover why lut video editing is important and where to get the best resources.

In this article
01 What is LUT?
02 Why do we need to use LUTs?
03 How to add luts to your video using Filmora
So, what is LUT?
LUT refers to Look Up Tables, which a custom color templates you use when creating videos. These help you create content for different devices, including television and mobile devices. For example, you can create custom LUTs for easy conversion from standard definition to more modern cinematic formats such as 4K and UHD.
What are the different types of LUTs?
Here are the colour lut categories for filmmakers:
- Transform
- Calibration
- Viewing
- 1D: 1D lut offers customization on one value of your colors. These are available as .lut file types.
- 3D: These award you more control over your luts video editing since they offer saturation, hues, and brightness levels on different axis. You will find these as .cube file types.

These allow you to make your content vibrant and mimic the color schemes of famous filmmakers such as David Fincher. He is famous for using greens and blues in his films to arrest your attention. He does this by employing a darker than usual color scheme, which leaves you staring at the screen for the entire film. You can see this color lut in the movie Fight Club or The Social Network.
Keep reading to discover the effects of each in luts video editing.
Why do we need to use LUTs?
You use LUTs for different reasons, as you can see from David Fincher’s example. However, here are a few more:
• To add emphasis to a particular scene
Sometimes, it can be challenging to communicate the importance of your message using standard color schemes. As such, filmmakers use dramatic color schemes in their content. For example, the colour scheme in the above photo emphasizes the tranquillity of the sea between contrasting landscapes.

• To ensure uniformity across different devices
You will use a calibration color lut to ensure a similar video quality across different TV monitors whether it is HD, UHD, or 4K. Similarly, you can use a transformation colour lut to add a cinematic effect to your film to make it appear as if your audience is viewing it in a theatre.
Camera manufacturers use different color luts to diversify their products according to their target markets. For example, you get a different lut color grading from a Sony camera as you would in a Canon.

How to add luts to your video using Filmora
Filmora is a great video editing tool for all filmmaker experience levels. It includes tons of features and a user-friendly interface to ensure professional results each time. It is available for both macOS and Windows devices. Filmora allows you to install custom Luts and apply it to your videos.
Guide to use Filmora
1. Launch the video editor
Once you complete the download, launch it to start making magical videos for your audience.
2. Import Your Film
The lut editing video software allows you to import your videos directly from your device.
3. Select Advanced Color Tuning
You will find this on the Tools drop-down menu. It is located on the top menu options of Filmora. Then, drag and drop your video to the timeline. The tool also offers an A/B comparison, allowing you to check the result of your lut video editing before you apply the effect.
You can use the preset luts Filmora offers or upload your custom luts from any of the sites in the next section.
4. Save & Export
Click OK to finalize the correction and export the video to your preferred device. You will see the available options from the software’s export menu.
A few things to consider before using Filmora’s Advanced Color correction tool include:
- Your film white balance needs to be correct to get better results.
- Your camera’s exposure during filming also needs to be optimal to get ideal results when using Filmora for lut video editing. However, the Advanced Color Correction tool will tell you if everything is optimal.
- Finally, the original video needs to be of ideal quality for optimal color lut results. Different shooting conditions may not work with certain color luts. Therefore, opt for luts that match your filmmaking style to get the best results.
For Win 7 or later (64-bit)
For macOS 10.12 or later
Bonus! Free Lut Resources
Do you want more diversity in your lut video editing? Here are some free lut resources to check out.
1. Vision color luts
Vision color luts is another lut video editing software that you can use to hone your skills. They also offer free luts you can upload on their favorite software. Additionally, they have luts for even the latest display resolutions such as 2K and 3D. Check out the full list here.
2. Sam Kolder
Sam Kolder is a Vlogger who is famous for his stunning creations that feature his travels. His work also inspires many creators thanks to his editing and use of color luts. He also shares free lut packs and his creative process across his official channels, including YouTube and Instagram.
He mainly works on Adobe Premiere pro. However, his luts still work with other video editing software.
3. Shutterstock.com
Shutterstock also offers tons of free stuff relating to lut video editing. You will also find free luts that are compatible with Filmora on the website. Here are a few of them you can sample. Please check before you download other packs, as some of the stuff may not match your current versions.
4. Giggster.com
Giggster.com is an LA-based company that caters to aspiring filmmakers. They too offer the occasional lut files you can use to make your videos more stunning. However, they mostly feature those that work with Photoshop CC. So, you may wanna check your software’s compatibility beforehand. Here is one of the freebies you can download.
5. Premiumbeat.com
You may also want to check out some of Premiumbeat’s free offerings if you are an AfterEffects user. They offer stylistic luts and other free tools you can use to edit your films. Additionally, they do this regularly. Therefore, they are worth a look to see what is new.
Conclusion
● Color luts are incredible tools to add flair to your videos. Additionally, you can use them with incredible ease on software like Filmora. Here are some of the creations you can sample from some of the free ones that come with the tool.
Do you want to improve the quality of your videos? With so many people providing online video content. Other than the subject of your video, its quality is also important. One way to make your content pop is to create a lut video. Below is information on how to color grade your video using lut resources. Keep reading to discover why lut video editing is important and where to get the best resources.

In this article
01 What is LUT?
02 Why do we need to use LUTs?
03 How to add luts to your video using Filmora
So, what is LUT?
LUT refers to Look Up Tables, which a custom color templates you use when creating videos. These help you create content for different devices, including television and mobile devices. For example, you can create custom LUTs for easy conversion from standard definition to more modern cinematic formats such as 4K and UHD.
What are the different types of LUTs?
Here are the colour lut categories for filmmakers:
- Transform
- Calibration
- Viewing
- 1D: 1D lut offers customization on one value of your colors. These are available as .lut file types.
- 3D: These award you more control over your luts video editing since they offer saturation, hues, and brightness levels on different axis. You will find these as .cube file types.

These allow you to make your content vibrant and mimic the color schemes of famous filmmakers such as David Fincher. He is famous for using greens and blues in his films to arrest your attention. He does this by employing a darker than usual color scheme, which leaves you staring at the screen for the entire film. You can see this color lut in the movie Fight Club or The Social Network.
Keep reading to discover the effects of each in luts video editing.
Why do we need to use LUTs?
You use LUTs for different reasons, as you can see from David Fincher’s example. However, here are a few more:
• To add emphasis to a particular scene
Sometimes, it can be challenging to communicate the importance of your message using standard color schemes. As such, filmmakers use dramatic color schemes in their content. For example, the colour scheme in the above photo emphasizes the tranquillity of the sea between contrasting landscapes.

• To ensure uniformity across different devices
You will use a calibration color lut to ensure a similar video quality across different TV monitors whether it is HD, UHD, or 4K. Similarly, you can use a transformation colour lut to add a cinematic effect to your film to make it appear as if your audience is viewing it in a theatre.
Camera manufacturers use different color luts to diversify their products according to their target markets. For example, you get a different lut color grading from a Sony camera as you would in a Canon.

How to add luts to your video using Filmora
Filmora is a great video editing tool for all filmmaker experience levels. It includes tons of features and a user-friendly interface to ensure professional results each time. It is available for both macOS and Windows devices. Filmora allows you to install custom Luts and apply it to your videos.
Guide to use Filmora
1. Launch the video editor
Once you complete the download, launch it to start making magical videos for your audience.
2. Import Your Film
The lut editing video software allows you to import your videos directly from your device.
3. Select Advanced Color Tuning
You will find this on the Tools drop-down menu. It is located on the top menu options of Filmora. Then, drag and drop your video to the timeline. The tool also offers an A/B comparison, allowing you to check the result of your lut video editing before you apply the effect.
You can use the preset luts Filmora offers or upload your custom luts from any of the sites in the next section.
4. Save & Export
Click OK to finalize the correction and export the video to your preferred device. You will see the available options from the software’s export menu.
A few things to consider before using Filmora’s Advanced Color correction tool include:
- Your film white balance needs to be correct to get better results.
- Your camera’s exposure during filming also needs to be optimal to get ideal results when using Filmora for lut video editing. However, the Advanced Color Correction tool will tell you if everything is optimal.
- Finally, the original video needs to be of ideal quality for optimal color lut results. Different shooting conditions may not work with certain color luts. Therefore, opt for luts that match your filmmaking style to get the best results.
For Win 7 or later (64-bit)
For macOS 10.12 or later
Bonus! Free Lut Resources
Do you want more diversity in your lut video editing? Here are some free lut resources to check out.
1. Vision color luts
Vision color luts is another lut video editing software that you can use to hone your skills. They also offer free luts you can upload on their favorite software. Additionally, they have luts for even the latest display resolutions such as 2K and 3D. Check out the full list here.
2. Sam Kolder
Sam Kolder is a Vlogger who is famous for his stunning creations that feature his travels. His work also inspires many creators thanks to his editing and use of color luts. He also shares free lut packs and his creative process across his official channels, including YouTube and Instagram.
He mainly works on Adobe Premiere pro. However, his luts still work with other video editing software.
3. Shutterstock.com
Shutterstock also offers tons of free stuff relating to lut video editing. You will also find free luts that are compatible with Filmora on the website. Here are a few of them you can sample. Please check before you download other packs, as some of the stuff may not match your current versions.
4. Giggster.com
Giggster.com is an LA-based company that caters to aspiring filmmakers. They too offer the occasional lut files you can use to make your videos more stunning. However, they mostly feature those that work with Photoshop CC. So, you may wanna check your software’s compatibility beforehand. Here is one of the freebies you can download.
5. Premiumbeat.com
You may also want to check out some of Premiumbeat’s free offerings if you are an AfterEffects user. They offer stylistic luts and other free tools you can use to edit your films. Additionally, they do this regularly. Therefore, they are worth a look to see what is new.
Conclusion
● Color luts are incredible tools to add flair to your videos. Additionally, you can use them with incredible ease on software like Filmora. Here are some of the creations you can sample from some of the free ones that come with the tool.
Also read:
- Updated This Article Talks in Detail About How to Export iMovie Video From iPhone, Mac, Etc. It Also Covers the Process of Using iMovie Alternative to Edit Videos on Mac. Check Out Now
- Updated Add Text Animation to A Video Online
- New 2024 Approved Ever Wondered About the Similarity You Bear with an Anime Character? If You Have Not yet Looked Into This Exciting Aspect of Motion Graphic Design, You Can Very Well Break the Ice Here
- New In 2024, Want to Learn How to Crop or Trim Video in PowerPoint? We Have Got You Covered; We Have Given a Step-by-Step Guide that Will Allow You to Trim and Crop Videos Using This Presentation Program
- Updated In 2024, Ultimate Guide on How To Plan and Storyboard a Music Video
- New 2024 Approved Detailed Steps to Rotate Videos Using OBS
- New As an Online Marketer, It Is Important to Know the Algorithm of YouTube Platform. Ill Share You the History of Algorithm of YouTube and the New Changes in This Year for 2024
- Updated In 2024, Create an Awesome Logo Reveal with Logo Intro Templates
- Free Ways to Download Mobile Phone Green Screen Videos and Pictures No Copyright for 2024
- New 2024 Approved Top GIF to MP4 Converters
- New How to Make Foggy Text Reflection Effect for 2024
- Dubbing Videos With Voiceovers | Using Wondershare Filmora
- End Screen Makers for 2024
- New In 2024, Ways to Make Sure Your Recording Slideshow in Powerpoint Is Not Wrong
- 2024 Approved Learn How to Create a Unique Repeated Text Animation in the Filmora Video Editor. Follow the Simple Step-by-Step Instructions
- New How to Remove Audio From Videos with FFmpeg for 2024
- Updated 2 Methods to Crop a Video Using After Effects for 2024
- New In 2024, Split Audio From a Video in Adobe Premiere Pro Step by Step
- If You Want an App to Make Videos with Pictures and Music for Social Media Posts, We Are with the Best Apps to Make Videos with Music and Pictures for 2024
- Want to Sync Separate Audio with Video? Check Out This Guide to Do It in the Simplest Way Using the Video Editor - Wondershare Filmora
- Steps to Create One Click Video Reverse Effect in Filmora for 2024
- In 2024, Detailed Steps to Resize Video in Davinci Resolve
- Updated 5 Ways to Denoise a Video for 2024
- How to Shoot Cinematic Footage with Phone for 2024
- Updated 2024 Approved Leveraging the Vectorscope for Better Color Correction in Premiere Pro
- Do You Wish to Make Your Discord PFP an Attention-Seeker? If Yes, Try the Animated Discord PFP. Lets Go over Essential Facts on the Topic, Including How to Get an Animated Discord PFP for 2024
- Splitting Audio From a Video in Sony Vegas Step by Step
- In 2024, GIF to JPG Is as Simple as a Blink of an Eye
- New How to Be a Good Podcast Host for 2024
- Updated In 2024, How to Record Shots and Edit Them Using Wonderware Filmora to Create the Super Jump Effect? A Complete Guide for Beginners
- New Best Guide of 8 Photo Collage Apps for PC
- In 2024, Guide To Creating the Best Video Collages
- Updated Looking for the Simple Steps to Add a Filter to Your Video in Premiere Pro? Here Are the Complete Steps Along with the List of Free Premiere Filter Presets to Use for 2024
- A Complete Guide to the Best Brand Story Videos |2023| for 2024
- 2024 Approved How to Create Glowing Edge Effect in TikTok Dancing Video
- New 2024 Approved A Detailed Guid to Remove Background From a Video in Premier Pro
- New How to Edit A Time Lapse Video on iPhone, In 2024
- How to Fix Error 495 While Download/Updating Android Apps On Nokia C12 Plus | Dr.fone
- In 2024, Pokemon Go No GPS Signal? Heres Every Possible Solution On Realme 11 Pro+ | Dr.fone
- 11 Proven Solutions to Fix Google Play Store Not Working Issue on Oppo A38 | Dr.fone
- In 2024, 3 Facts You Need to Know about Screen Mirroring Vivo V30 Pro | Dr.fone
- Delete Gmail Account With/Without Password On Vivo Y02T
- In 2024, Top-Notch Solutions for Disabled Apple ID On iPhone 11 Pro Max Making It Possible
- How to bypass Tecno Spark 10 Pro’s lock screen pattern, PIN or password
- How to use Device Manager to reinstall your hardware drivers on Windows 10 & 7
- How to Transfer Data from Honor 80 Pro Straight Screen Edition to Any iOS Devices | Dr.fone
- In 2024, How to Screen Mirroring Nubia Z50S Pro to PC? | Dr.fone
- In 2024, Step-by-Step Tutorial How To Bypass Tecno Spark 10 5G FRP
- How to Transfer Data from Nokia C12 Pro to Any iOS Devices | Dr.fone
- In 2024, Forgot Locked iPhone 6 Plus Password? Learn the Best Methods To Unlock | Dr.fone
- Prevent Cross-Site Tracking on Poco M6 Pro 4G and Browser | Dr.fone
- Planning to Use a Pokemon Go Joystick on Motorola G24 Power? | Dr.fone
- In 2024, 5 Quick Methods to Bypass Samsung Galaxy M14 4G FRP
- Bypass iCloud Activation Lock with IMEI Code From iPhone 15
- Overview of the Best Honor Magic 6 Screen Mirroring App | Dr.fone
- Full Guide to Catch 100 IV Pokémon Using a Map On Poco M6 Pro 5G | Dr.fone
- Overview of the Best Vivo V29e Screen Mirroring App | Dr.fone
- What Pokémon Evolve with A Dawn Stone For Tecno Spark 10 4G? | Dr.fone
- Easy Ways to Manage Your Xiaomi Redmi 12 Location Settings | Dr.fone
- Read This Guide to Find a Reliable Alternative to Fake GPS On Infinix Note 30 VIP | Dr.fone
- How To Fix Auto Lock Greyed Out on iPhone SE
- In 2024, CatchEmAll Celebrate National Pokémon Day with Virtual Location On Poco C51 | Dr.fone
- How To Transfer Data From Apple iPhone 15 Pro To Other iPhone 12 Pro devices? | Dr.fone
- In 2024, How To Use Allshare Cast To Turn On Screen Mirroring On Motorola Defy 2 | Dr.fone
- 9 Solutions to Fix Process System Isnt Responding Error on Tecno Camon 20 Pro 5G | Dr.fone
- How to Fix Honor X8b Find My Friends No Location Found? | Dr.fone
- Infinix Zero 30 5G Unlock Tool - Remove android phone password, PIN, Pattern and fingerprint
- In 2024, Process of Screen Sharing Vivo X100 to PC- Detailed Steps | Dr.fone
- In 2024, How Can You Transfer Files From Vivo Y100i To iPhone 15/14/13? | Dr.fone
- In 2024, How to Unlock iPhone 8 Plus With an Apple Watch & What to Do if It Doesnt Work
- In 2024, Is Your Apple iPhone 13 Pro Max in Security Lockout? Proper Ways To Unlock | Dr.fone
- Title: New How to Add Subtitles to MKV Videos on All Platforms
- Author: Morgan
- Created at : 2024-05-19 05:12:01
- Updated at : 2024-05-20 05:12:01
- Link: https://ai-video-editing.techidaily.com/new-how-to-add-subtitles-to-mkv-videos-on-all-platforms/
- License: This work is licensed under CC BY-NC-SA 4.0.

