:max_bytes(150000):strip_icc():format(webp)/removerokuchannel-c354faa0f712495384a4d5888017e30c.png)
New How to Add Text in Adobe Rush

How to Add Text in Adobe Rush
Adobe Premiere Rush is a tool designed to make it easier to make simple video edits on desktop and mobile devices. But most users who are used to video editing using Adobe Premiere may find Adobe Rush a little complicated. This includes simple tasks like adding text to your video , which can be difficult unless you know how to do it.
In this article, we will share with you how you can add text to a video using Adobe Rush. We will also share with you an Adobe Rush alternative solution that is much simpler to use.
How to Add Text in Adobe Rush
To easily add text to your Adobe Premiere Rush project, follow these very simple steps. These steps apply to both desktop and mobile versions of Adobe Rush.
Step 1Open Adobe Premiere Rush on your computer and then open the video project you are working on.
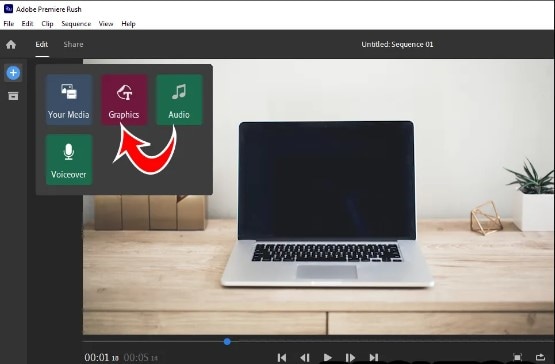
Step 2With the project open, click on the blue “Plus” icon under the main menu. On mobile devices, the icon would be at the bottom of the main page.
![]()
Step 3Select “Graphics” from the options that appear
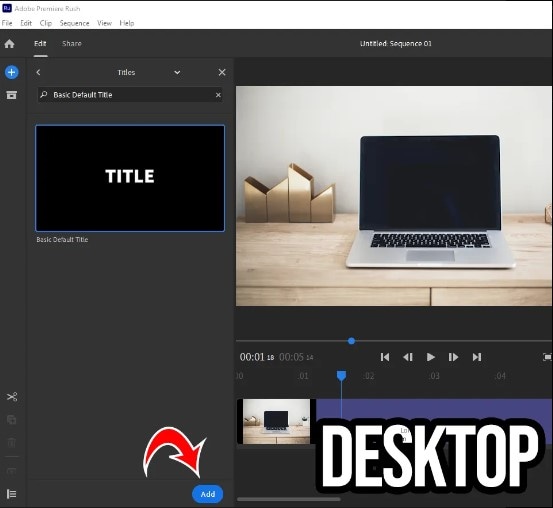
Step 4Click on “More” under “Titles” and then search for “Basic Default Title.” Tap “Add” to add a title to the video’s sequence.
Step 5Once the title is in the sequence, you will be able to make changes to it any way you want. To do that, just drag the title in the preview and tap on it. You should then be able to see options to change the color, size, font, and more in the submenu.
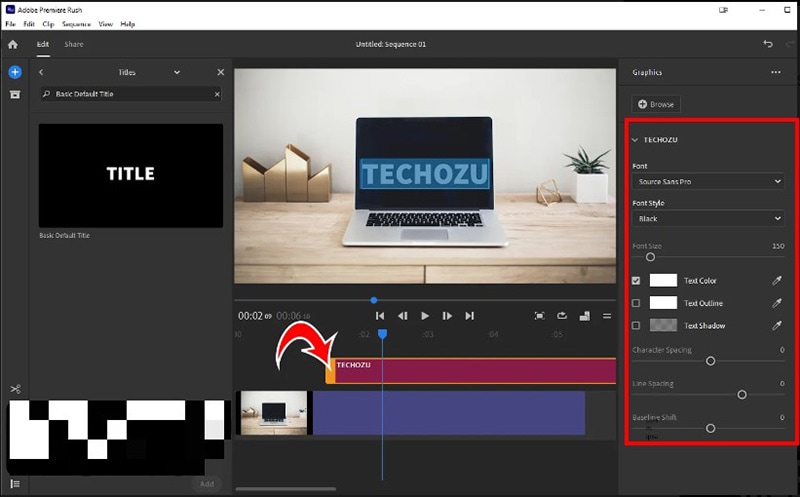
For the purpose of this tutorial, we chose to use the basic title, but Adobe Premiere Rush allows you to choose from a wide range of titles and styling effects to suit your project’s requirements. You also have the choice to add numerous graphics and effects to the title.
You can also very easily duplicate the formatted text as many times as you need to. Just right-click on the formatted text and select “duplicate” to create a copy.
Alternative Way to Add Text Effects to a Video
If Adobe Rush is not a viable solution for you, perhaps because of the cost of the program or even its complexity, we have a video editing platform that is easy to use and has all the features you would find on Adobe Rush and so much more.
This video editing suite is Wondershare Filmora , an easy-to-use and highly effective solution that offers numerous ways to edit videos. The following simple steps show you how you can use Filmora to add text effects to your video project;
Free Download For Win 7 or later(64-bit)
Free Download For macOS 10.14 or later
Step 1Install Wondershare Filmora
Start by installing Wondershare Filmora on your computer. You can download the setup file from the main website and then follow the instructions on the installation Wizard to install the program on your computer.
When the installation is complete, open Filmora on your computer.
Step 2Import the Video Files
On the main screen, click on “New Project” to start editing your video.
At this point, you may want to adjust several settings such as the aspect ratio and frame rates. You can do that in the “Project Settings” window.
Once you have all the settings as needed depending on your project, click “Import” to select the video that you would like to edit.
You can also just drag and drop the video into the main window to open it.

Step 3Add the Video/Videos to the Timeline
To edit the video and any of its components, you will need to add the video to the timeline. You can do that by simply dragging and dropping the video clips from the media library to the timeline below.
This will allow you to see the locations within the video that you can add and effects to.
Step 4Select Text Presets and Add Your Text
With the video in the timeline, you are now ready to add your text. To do that, click on the “Titles” tab and then open the “Text & Title” presets.
Filmora offers more than 200+ text effects that apply to various types of videos. Find the title preset that you would like to use and double-click on it and you should be able to see the effect in the “Preview” window.

If you like what you see, place your Playhead icon where you want the add the text and title in the timeline, and then drag and drop the track above the video.
Step 5Select the Duration of the Text
The default duration of any text overlay that you add to the project is 5 seconds. But you can extend this timeline to fit your needs.
To change the duration of the text overlay, select the text in the timeline and click on the “Timer” icon.

Step 6Edit and Customize Your Text
You also have the option to customize your text in various ways including changing the text font, color, and size.
To edit the text, double-click on the “Title” frame in the timeline, and in the window that appears, make as many changes as you want. There are more than 20 text effects to choose from. Just select one and then double-click on any style to apply it to the text.

You can also use the “Animation” icon if you want to change the animation of the text overlay.
You can also click on the “Advanced” tab to get more advanced editing options for the text that you add to the video. In the advanced options window, you can apply a preset and animation or even customize the Text Fill, Border, and Shadow elements of your text.
Step 7Export Your Video
Once you’ve made all the changes you wanted to make to the video, you can click on the “Play” icon to see a preview of the video to make sure it is just the way you want it to be.
If you are happy with everything and you don’t need to make any more changes, click on the “Export” button. In the window that appears, select the output format for the video and if you need to, you can also select other parameters including the Bit Rate, Encoder, Resolution, and more.
Once all your settings are just how you want them to be, click on “Export” to name the video and save all the changes that you just made.
Filmora also gives you the option to upload the video directly to YouTube and you can also choose to burn the video to DVD. If you will be playing the video on mobile devices, click on the “Devices” tab and select the device you will be using from the options listed here including iPhone, iPad, Samsung Galaxy, and more.
Related FAQs
1. Can I Add Captions in Adobe Rush?
Yes. Adobe Premiere Rush does allow you to add captions and subtitles to any video project. The process is very easy, just open the video in Adobe Rush and add an unformatted “Title” as we did in part 1 above. You can then move the title to any section of the screen and format it any way you want. Ensure that you extend the text to cover the full length of the video. Then simply copy and paste the subtitles from the video’s SRT file to the Title. Set the timing of the text to correspond to the video’s duration and you’re all set.
2. Can You Move Text in Adobe Rush?
Yes, you can easily move text in Adobe Rush. Add the text to the video as described in the first part of this article and once it is on the timeline, you can simply drag the text clip to any desired area on the timeline to change its location.
3. How Do I Add a Title in Adobe Rush Mobile?
One of the greatest advantages of choosing Adobe Rush over other video editors is that it can be very easy to use on mobile devices. The steps to add a title using Adobe Rush for mobile are just as simple as the steps to do it on a desktop. Just open Adobe Rush on your mobile device and then open the video you want to edit, tap on the blue “+” icon at the bottom and select “Graphics > More > Basic Default Title” and then tap “Add” to add your title. You also get the same options to edit the text in various ways including the font size, color, and effects.
Free Download For Win 7 or later(64-bit)
Free Download For macOS 10.14 or later
Free Download For macOS 10.14 or later
Step 1Install Wondershare Filmora
Start by installing Wondershare Filmora on your computer. You can download the setup file from the main website and then follow the instructions on the installation Wizard to install the program on your computer.
When the installation is complete, open Filmora on your computer.
Step 2Import the Video Files
On the main screen, click on “New Project” to start editing your video.
At this point, you may want to adjust several settings such as the aspect ratio and frame rates. You can do that in the “Project Settings” window.
Once you have all the settings as needed depending on your project, click “Import” to select the video that you would like to edit.
You can also just drag and drop the video into the main window to open it.

Step 3Add the Video/Videos to the Timeline
To edit the video and any of its components, you will need to add the video to the timeline. You can do that by simply dragging and dropping the video clips from the media library to the timeline below.
This will allow you to see the locations within the video that you can add and effects to.
Step 4Select Text Presets and Add Your Text
With the video in the timeline, you are now ready to add your text. To do that, click on the “Titles” tab and then open the “Text & Title” presets.
Filmora offers more than 200+ text effects that apply to various types of videos. Find the title preset that you would like to use and double-click on it and you should be able to see the effect in the “Preview” window.

If you like what you see, place your Playhead icon where you want the add the text and title in the timeline, and then drag and drop the track above the video.
Step 5Select the Duration of the Text
The default duration of any text overlay that you add to the project is 5 seconds. But you can extend this timeline to fit your needs.
To change the duration of the text overlay, select the text in the timeline and click on the “Timer” icon.

Step 6Edit and Customize Your Text
You also have the option to customize your text in various ways including changing the text font, color, and size.
To edit the text, double-click on the “Title” frame in the timeline, and in the window that appears, make as many changes as you want. There are more than 20 text effects to choose from. Just select one and then double-click on any style to apply it to the text.

You can also use the “Animation” icon if you want to change the animation of the text overlay.
You can also click on the “Advanced” tab to get more advanced editing options for the text that you add to the video. In the advanced options window, you can apply a preset and animation or even customize the Text Fill, Border, and Shadow elements of your text.
Step 7Export Your Video
Once you’ve made all the changes you wanted to make to the video, you can click on the “Play” icon to see a preview of the video to make sure it is just the way you want it to be.
If you are happy with everything and you don’t need to make any more changes, click on the “Export” button. In the window that appears, select the output format for the video and if you need to, you can also select other parameters including the Bit Rate, Encoder, Resolution, and more.
Once all your settings are just how you want them to be, click on “Export” to name the video and save all the changes that you just made.
Filmora also gives you the option to upload the video directly to YouTube and you can also choose to burn the video to DVD. If you will be playing the video on mobile devices, click on the “Devices” tab and select the device you will be using from the options listed here including iPhone, iPad, Samsung Galaxy, and more.
Related FAQs
1. Can I Add Captions in Adobe Rush?
Yes. Adobe Premiere Rush does allow you to add captions and subtitles to any video project. The process is very easy, just open the video in Adobe Rush and add an unformatted “Title” as we did in part 1 above. You can then move the title to any section of the screen and format it any way you want. Ensure that you extend the text to cover the full length of the video. Then simply copy and paste the subtitles from the video’s SRT file to the Title. Set the timing of the text to correspond to the video’s duration and you’re all set.
2. Can You Move Text in Adobe Rush?
Yes, you can easily move text in Adobe Rush. Add the text to the video as described in the first part of this article and once it is on the timeline, you can simply drag the text clip to any desired area on the timeline to change its location.
3. How Do I Add a Title in Adobe Rush Mobile?
One of the greatest advantages of choosing Adobe Rush over other video editors is that it can be very easy to use on mobile devices. The steps to add a title using Adobe Rush for mobile are just as simple as the steps to do it on a desktop. Just open Adobe Rush on your mobile device and then open the video you want to edit, tap on the blue “+” icon at the bottom and select “Graphics > More > Basic Default Title” and then tap “Add” to add your title. You also get the same options to edit the text in various ways including the font size, color, and effects.
Free Download For Win 7 or later(64-bit)
Free Download For macOS 10.14 or later
10 Mind-Blowing Video Collage Maker for PC
10 Mind-Blowing Video Collage Maker for PC
An easy yet powerful editor
Numerous effects to choose from
Detailed tutorials provided by the official channel
Video collages are a great way to play multiple short videos at the same time. These collages can be used for different purposes and platforms like social media platforms, online video sharing sites, brand promotion, announcing an event or a service, and similar others.

Whatever may be the situation, you would need a good and feature-packed tool for creating such a collage so that videos look perfect in a frame, background audio can be added, and other customizations can be done. Keep reading below to learn about the best video collage maker for PC.
In this article
01 [Top 10 Video Collage Makers for Pc](#Part 1)
02 [Alternatives to Video Collage Maker for Pc](#Part 2)
Part 1 Top 10 video collage makers for PC
Among the long list of tools available, below we have shortlisted the top 10 PC tools that can be used for creating a video collage.
01**Wondershare Filmora Video Editor **
This Windows and Mac-based software is the best choice when it comes to creating a simple video collage in an effortless manner.
Key features
● Create a video collage using the split-screen feature of the software.
● Excellent video editing tool supporting advanced features for creating professional-looking videos.
● Support customizable animation options along with precise editing functions.
● Support to multiple audio-related features like automatic audio sync, audio compression, audio transitions, and more.
● Offers of stock collection of images, and other media files.
● Windows and Mac support.
For Win 7 or later (64-bit)
For macOS 10.12 or later
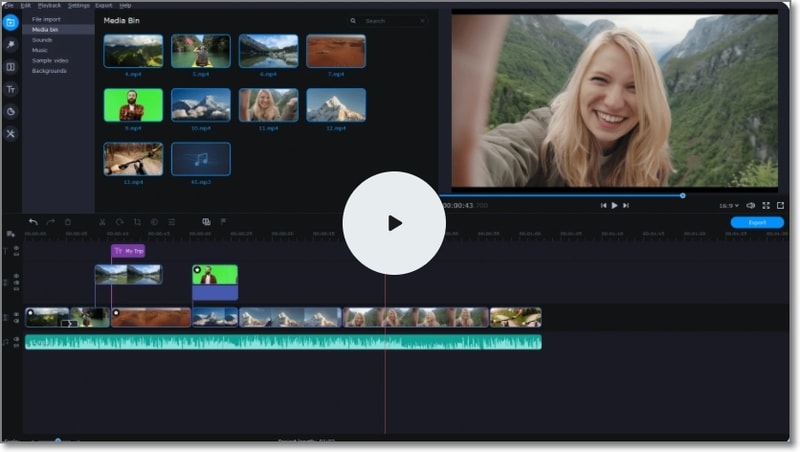
04Movavi Video Editor Plus
Unleash your creativity and make stunning videos including video collages using this excellent software.
Key features:
● Create stunning video collages with multiple video customization options.
● Allows adding titles, transitions, stickers, and filters.
● Option to apply chroma-key for changing the background.
● Option for creating automatic video collages.
● User-friendly interface.
● Windows and Mac support.
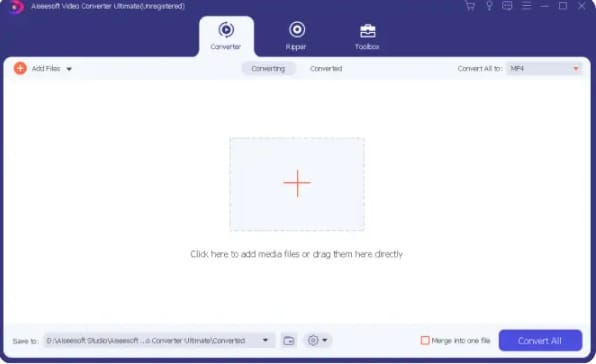
05Aiseesoft Video Converter Ultimate
Though the name suggests the software to be a video conversion tool, it is a multi-tasking software that can perform a variety of functions including video collage making and thus can be considered as a decent video collage app for PC.
Key features
● A feature-rich program that can also be used for creating a video collage.
● Allows performing a variety of features like video conversion, editing, compression, and more.
● Option for editing the video effects and also editing ID3 info.
● Create interesting GIF animations.
● Simple and easy-to-understand layout.
● Windows and Mac support.
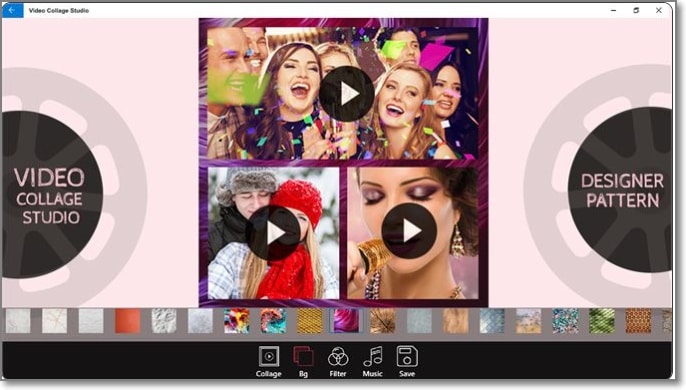
06Cidade Video Collage Studio
Using this intuitive tool, you can quickly create a video collage by combining all your favorite videos in one place.
Key features
● Create a video collage by combining multiple videos or creating a video grid.
● Intuitive and user-friendly interface.
● Multiple-grid options to choose from.
● Allows applying effects like Sepia, Lomo, and others.
● Background audio or music files can be added.
● Option to change the background color and also preview the video.
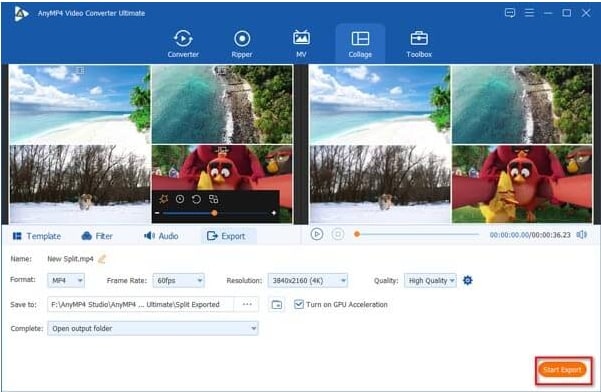
07Blu-ray Master Video Converter Ultimate
This is a video toolbox supporting multiple functions that also include creating a video collage.
Key feature
● Create a video collage using high-quality videos.
● Support customizing and editing videos using several built-in tools.
● Video conversion to over 500 formats supported.
● Multiple layouts and templates for video collage are available.
● Almost all video, image, and audio formats are supported.
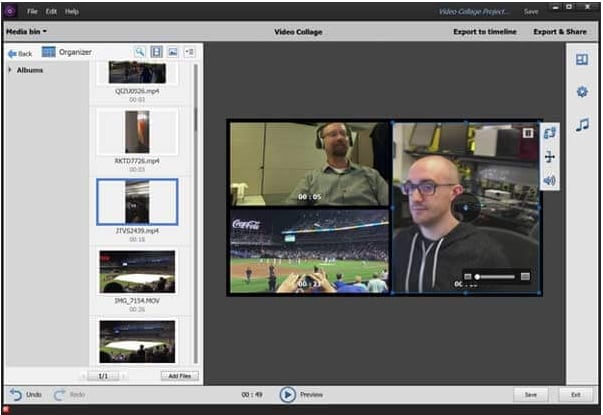
08Adobe Premiere Elements
If you are looking for an advanced and professional tool for creating a video collage and for other video editing needs, this is the right choice.
Key features:
● Create professional-looking collages using high-quality video files.
● The interface is clean with support for advanced functions.
● Option for adding multiple video effects.
● Comes with help documents and guides to help you with the software functions.
● Windows and Mac support.
09Collage Maker
For creating a simple video collage on your Windows system this is a good tool to consider.
Key features
● Simple and basic collage-making tool.
● Comes with customizable and adjustable layout options.
● Option to add stickers ad text to the collage.
● Allows mixing videos, and images along with the music file.

1010. iMovie
For Mac users, iMovie is the default video editing tool that is pre-installed on the system. Besides editing functions, the tool can also perform other tasks like creating a video collage.
Key features:
● Allows to quickly create a video collage.
● Intuitive interface.
● Comes pre-installed with Mac systems.
● Transitions and other effects can be added.
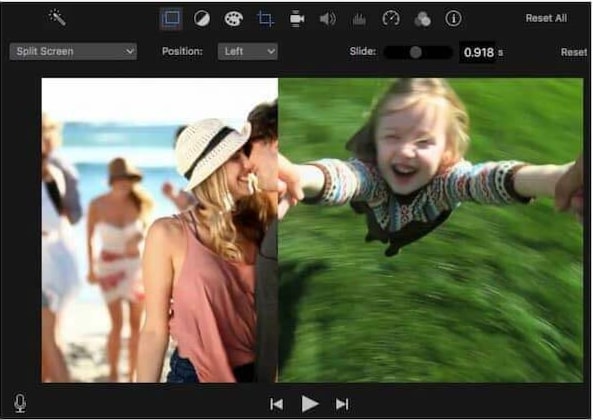
Part 2 Alternatives to video collage maker for PC
If you do not want to download any additional software on your PC for creating a video collage, there are alternatives available in form of online tools and phone-based apps. The online tools are free and simple to use supporting all basic and needed functions. Some of the popular names in the category include FastReels, Typito, Kapwing, and more.
Apps are a great option when you want to create a collage on your mobile phone. Multiple apps for the task are available on the Google play store and Apple Store. Some of the widely used ones are PicStich, PicPlayPost Movie Video Editor, Mojo, and others.
● Ending Thoughts →
● Video collages are an interesting way to combine and play short multiple videos or play them in a grid.
● There are several PC-based video collage maker tools available like Wondershare Filmora, and others.
● As alternatives, you can use online tools or phone-based apps for creating a video collage.
Video collages are a great way to play multiple short videos at the same time. These collages can be used for different purposes and platforms like social media platforms, online video sharing sites, brand promotion, announcing an event or a service, and similar others.

Whatever may be the situation, you would need a good and feature-packed tool for creating such a collage so that videos look perfect in a frame, background audio can be added, and other customizations can be done. Keep reading below to learn about the best video collage maker for PC.
In this article
01 [Top 10 Video Collage Makers for Pc](#Part 1)
02 [Alternatives to Video Collage Maker for Pc](#Part 2)
Part 1 Top 10 video collage makers for PC
Among the long list of tools available, below we have shortlisted the top 10 PC tools that can be used for creating a video collage.
01**Wondershare Filmora Video Editor **
This Windows and Mac-based software is the best choice when it comes to creating a simple video collage in an effortless manner.
Key features
● Create a video collage using the split-screen feature of the software.
● Excellent video editing tool supporting advanced features for creating professional-looking videos.
● Support customizable animation options along with precise editing functions.
● Support to multiple audio-related features like automatic audio sync, audio compression, audio transitions, and more.
● Offers of stock collection of images, and other media files.
● Windows and Mac support.
For Win 7 or later (64-bit)
For macOS 10.12 or later
04Movavi Video Editor Plus
Unleash your creativity and make stunning videos including video collages using this excellent software.
Key features:
● Create stunning video collages with multiple video customization options.
● Allows adding titles, transitions, stickers, and filters.
● Option to apply chroma-key for changing the background.
● Option for creating automatic video collages.
● User-friendly interface.
● Windows and Mac support.

05Aiseesoft Video Converter Ultimate
Though the name suggests the software to be a video conversion tool, it is a multi-tasking software that can perform a variety of functions including video collage making and thus can be considered as a decent video collage app for PC.
Key features
● A feature-rich program that can also be used for creating a video collage.
● Allows performing a variety of features like video conversion, editing, compression, and more.
● Option for editing the video effects and also editing ID3 info.
● Create interesting GIF animations.
● Simple and easy-to-understand layout.
● Windows and Mac support.

06Cidade Video Collage Studio
Using this intuitive tool, you can quickly create a video collage by combining all your favorite videos in one place.
Key features
● Create a video collage by combining multiple videos or creating a video grid.
● Intuitive and user-friendly interface.
● Multiple-grid options to choose from.
● Allows applying effects like Sepia, Lomo, and others.
● Background audio or music files can be added.
● Option to change the background color and also preview the video.

07Blu-ray Master Video Converter Ultimate
This is a video toolbox supporting multiple functions that also include creating a video collage.
Key feature
● Create a video collage using high-quality videos.
● Support customizing and editing videos using several built-in tools.
● Video conversion to over 500 formats supported.
● Multiple layouts and templates for video collage are available.
● Almost all video, image, and audio formats are supported.

08Adobe Premiere Elements
If you are looking for an advanced and professional tool for creating a video collage and for other video editing needs, this is the right choice.
Key features:
● Create professional-looking collages using high-quality video files.
● The interface is clean with support for advanced functions.
● Option for adding multiple video effects.
● Comes with help documents and guides to help you with the software functions.
● Windows and Mac support.

09Collage Maker
For creating a simple video collage on your Windows system this is a good tool to consider.
Key features
● Simple and basic collage-making tool.
● Comes with customizable and adjustable layout options.
● Option to add stickers ad text to the collage.
● Allows mixing videos, and images along with the music file.

1010. iMovie
For Mac users, iMovie is the default video editing tool that is pre-installed on the system. Besides editing functions, the tool can also perform other tasks like creating a video collage.
Key features:
● Allows to quickly create a video collage.
● Intuitive interface.
● Comes pre-installed with Mac systems.
● Transitions and other effects can be added.

Part 2 Alternatives to video collage maker for PC
If you do not want to download any additional software on your PC for creating a video collage, there are alternatives available in form of online tools and phone-based apps. The online tools are free and simple to use supporting all basic and needed functions. Some of the popular names in the category include FastReels, Typito, Kapwing, and more.
Apps are a great option when you want to create a collage on your mobile phone. Multiple apps for the task are available on the Google play store and Apple Store. Some of the widely used ones are PicStich, PicPlayPost Movie Video Editor, Mojo, and others.
● Ending Thoughts →
● Video collages are an interesting way to combine and play short multiple videos or play them in a grid.
● There are several PC-based video collage maker tools available like Wondershare Filmora, and others.
● As alternatives, you can use online tools or phone-based apps for creating a video collage.
Video collages are a great way to play multiple short videos at the same time. These collages can be used for different purposes and platforms like social media platforms, online video sharing sites, brand promotion, announcing an event or a service, and similar others.

Whatever may be the situation, you would need a good and feature-packed tool for creating such a collage so that videos look perfect in a frame, background audio can be added, and other customizations can be done. Keep reading below to learn about the best video collage maker for PC.
In this article
01 [Top 10 Video Collage Makers for Pc](#Part 1)
02 [Alternatives to Video Collage Maker for Pc](#Part 2)
Part 1 Top 10 video collage makers for PC
Among the long list of tools available, below we have shortlisted the top 10 PC tools that can be used for creating a video collage.
01**Wondershare Filmora Video Editor **
This Windows and Mac-based software is the best choice when it comes to creating a simple video collage in an effortless manner.
Key features
● Create a video collage using the split-screen feature of the software.
● Excellent video editing tool supporting advanced features for creating professional-looking videos.
● Support customizable animation options along with precise editing functions.
● Support to multiple audio-related features like automatic audio sync, audio compression, audio transitions, and more.
● Offers of stock collection of images, and other media files.
● Windows and Mac support.
For Win 7 or later (64-bit)
For macOS 10.12 or later
04Movavi Video Editor Plus
Unleash your creativity and make stunning videos including video collages using this excellent software.
Key features:
● Create stunning video collages with multiple video customization options.
● Allows adding titles, transitions, stickers, and filters.
● Option to apply chroma-key for changing the background.
● Option for creating automatic video collages.
● User-friendly interface.
● Windows and Mac support.

05Aiseesoft Video Converter Ultimate
Though the name suggests the software to be a video conversion tool, it is a multi-tasking software that can perform a variety of functions including video collage making and thus can be considered as a decent video collage app for PC.
Key features
● A feature-rich program that can also be used for creating a video collage.
● Allows performing a variety of features like video conversion, editing, compression, and more.
● Option for editing the video effects and also editing ID3 info.
● Create interesting GIF animations.
● Simple and easy-to-understand layout.
● Windows and Mac support.

06Cidade Video Collage Studio
Using this intuitive tool, you can quickly create a video collage by combining all your favorite videos in one place.
Key features
● Create a video collage by combining multiple videos or creating a video grid.
● Intuitive and user-friendly interface.
● Multiple-grid options to choose from.
● Allows applying effects like Sepia, Lomo, and others.
● Background audio or music files can be added.
● Option to change the background color and also preview the video.

07Blu-ray Master Video Converter Ultimate
This is a video toolbox supporting multiple functions that also include creating a video collage.
Key feature
● Create a video collage using high-quality videos.
● Support customizing and editing videos using several built-in tools.
● Video conversion to over 500 formats supported.
● Multiple layouts and templates for video collage are available.
● Almost all video, image, and audio formats are supported.

08Adobe Premiere Elements
If you are looking for an advanced and professional tool for creating a video collage and for other video editing needs, this is the right choice.
Key features:
● Create professional-looking collages using high-quality video files.
● The interface is clean with support for advanced functions.
● Option for adding multiple video effects.
● Comes with help documents and guides to help you with the software functions.
● Windows and Mac support.

09Collage Maker
For creating a simple video collage on your Windows system this is a good tool to consider.
Key features
● Simple and basic collage-making tool.
● Comes with customizable and adjustable layout options.
● Option to add stickers ad text to the collage.
● Allows mixing videos, and images along with the music file.

1010. iMovie
For Mac users, iMovie is the default video editing tool that is pre-installed on the system. Besides editing functions, the tool can also perform other tasks like creating a video collage.
Key features:
● Allows to quickly create a video collage.
● Intuitive interface.
● Comes pre-installed with Mac systems.
● Transitions and other effects can be added.

Part 2 Alternatives to video collage maker for PC
If you do not want to download any additional software on your PC for creating a video collage, there are alternatives available in form of online tools and phone-based apps. The online tools are free and simple to use supporting all basic and needed functions. Some of the popular names in the category include FastReels, Typito, Kapwing, and more.
Apps are a great option when you want to create a collage on your mobile phone. Multiple apps for the task are available on the Google play store and Apple Store. Some of the widely used ones are PicStich, PicPlayPost Movie Video Editor, Mojo, and others.
● Ending Thoughts →
● Video collages are an interesting way to combine and play short multiple videos or play them in a grid.
● There are several PC-based video collage maker tools available like Wondershare Filmora, and others.
● As alternatives, you can use online tools or phone-based apps for creating a video collage.
Video collages are a great way to play multiple short videos at the same time. These collages can be used for different purposes and platforms like social media platforms, online video sharing sites, brand promotion, announcing an event or a service, and similar others.

Whatever may be the situation, you would need a good and feature-packed tool for creating such a collage so that videos look perfect in a frame, background audio can be added, and other customizations can be done. Keep reading below to learn about the best video collage maker for PC.
In this article
01 [Top 10 Video Collage Makers for Pc](#Part 1)
02 [Alternatives to Video Collage Maker for Pc](#Part 2)
Part 1 Top 10 video collage makers for PC
Among the long list of tools available, below we have shortlisted the top 10 PC tools that can be used for creating a video collage.
01**Wondershare Filmora Video Editor **
This Windows and Mac-based software is the best choice when it comes to creating a simple video collage in an effortless manner.
Key features
● Create a video collage using the split-screen feature of the software.
● Excellent video editing tool supporting advanced features for creating professional-looking videos.
● Support customizable animation options along with precise editing functions.
● Support to multiple audio-related features like automatic audio sync, audio compression, audio transitions, and more.
● Offers of stock collection of images, and other media files.
● Windows and Mac support.
For Win 7 or later (64-bit)
For macOS 10.12 or later
04Movavi Video Editor Plus
Unleash your creativity and make stunning videos including video collages using this excellent software.
Key features:
● Create stunning video collages with multiple video customization options.
● Allows adding titles, transitions, stickers, and filters.
● Option to apply chroma-key for changing the background.
● Option for creating automatic video collages.
● User-friendly interface.
● Windows and Mac support.

05Aiseesoft Video Converter Ultimate
Though the name suggests the software to be a video conversion tool, it is a multi-tasking software that can perform a variety of functions including video collage making and thus can be considered as a decent video collage app for PC.
Key features
● A feature-rich program that can also be used for creating a video collage.
● Allows performing a variety of features like video conversion, editing, compression, and more.
● Option for editing the video effects and also editing ID3 info.
● Create interesting GIF animations.
● Simple and easy-to-understand layout.
● Windows and Mac support.

06Cidade Video Collage Studio
Using this intuitive tool, you can quickly create a video collage by combining all your favorite videos in one place.
Key features
● Create a video collage by combining multiple videos or creating a video grid.
● Intuitive and user-friendly interface.
● Multiple-grid options to choose from.
● Allows applying effects like Sepia, Lomo, and others.
● Background audio or music files can be added.
● Option to change the background color and also preview the video.

07Blu-ray Master Video Converter Ultimate
This is a video toolbox supporting multiple functions that also include creating a video collage.
Key feature
● Create a video collage using high-quality videos.
● Support customizing and editing videos using several built-in tools.
● Video conversion to over 500 formats supported.
● Multiple layouts and templates for video collage are available.
● Almost all video, image, and audio formats are supported.

08Adobe Premiere Elements
If you are looking for an advanced and professional tool for creating a video collage and for other video editing needs, this is the right choice.
Key features:
● Create professional-looking collages using high-quality video files.
● The interface is clean with support for advanced functions.
● Option for adding multiple video effects.
● Comes with help documents and guides to help you with the software functions.
● Windows and Mac support.

09Collage Maker
For creating a simple video collage on your Windows system this is a good tool to consider.
Key features
● Simple and basic collage-making tool.
● Comes with customizable and adjustable layout options.
● Option to add stickers ad text to the collage.
● Allows mixing videos, and images along with the music file.

1010. iMovie
For Mac users, iMovie is the default video editing tool that is pre-installed on the system. Besides editing functions, the tool can also perform other tasks like creating a video collage.
Key features:
● Allows to quickly create a video collage.
● Intuitive interface.
● Comes pre-installed with Mac systems.
● Transitions and other effects can be added.

Part 2 Alternatives to video collage maker for PC
If you do not want to download any additional software on your PC for creating a video collage, there are alternatives available in form of online tools and phone-based apps. The online tools are free and simple to use supporting all basic and needed functions. Some of the popular names in the category include FastReels, Typito, Kapwing, and more.
Apps are a great option when you want to create a collage on your mobile phone. Multiple apps for the task are available on the Google play store and Apple Store. Some of the widely used ones are PicStich, PicPlayPost Movie Video Editor, Mojo, and others.
● Ending Thoughts →
● Video collages are an interesting way to combine and play short multiple videos or play them in a grid.
● There are several PC-based video collage maker tools available like Wondershare Filmora, and others.
● As alternatives, you can use online tools or phone-based apps for creating a video collage.
Top 5 Tools to Help You Know More Freeze-Frame Video Editing Skills
Best 5 Tools to Help You Know More Freeze Frame Video Editing Skills
An easy yet powerful editor
Numerous effects to choose from
Detailed tutorials provided by the official channel
The freeze-frame video editing effect is a technique used to stop the moving image of a video and hold it still onscreen. This effect aims to pause the world the video is living in and allow the audience to process the scene and gain more context fully. Note that the world around us keeps ongoing, and time never stops. But luckily for us, we can pause film and video with a simple but powerful video effect known as the freeze-frame.
In addition, a freeze-frame can be carried out in a video to showcase a specific frame in your clip by extending the length of Time that frame is displayed. For example, you can decide to freeze a frame to show the video frame where a goal is being scored in a sporting event or use it to showcase a captured reaction or a smile. When a freeze-frame applies to a video clip, the clip automatically splits at the freezing point, and the chosen frame is inserted as an image file (BMP) and displayed on screen for the duration you set. This article will teach how to use the freeze-frame editing service ideally.
In this article
01 [How to Add a Freeze-frame to Video Clips in all Tools](#Part 1)
02 [SUPER COOL Freeze-frame Effect with Filmora 11](#Part 2)
Part 1 How to Add a Freeze-frame to Video Clips in all Tools
Do you want to draw your audience’s attention to a point or for dramatic flair by stopping your video and holding on to a single frame? This section will give you the best tools for freeze-frame editing via a step-by-step guide on how to do it.
01After Effects
Here is a step-by-step guide on how to Freeze-frame in After Effects:
Step 1: Download After Effects
Download and install Adobe After Effects and open it on your desktop. This software works with both macOS and Windows.
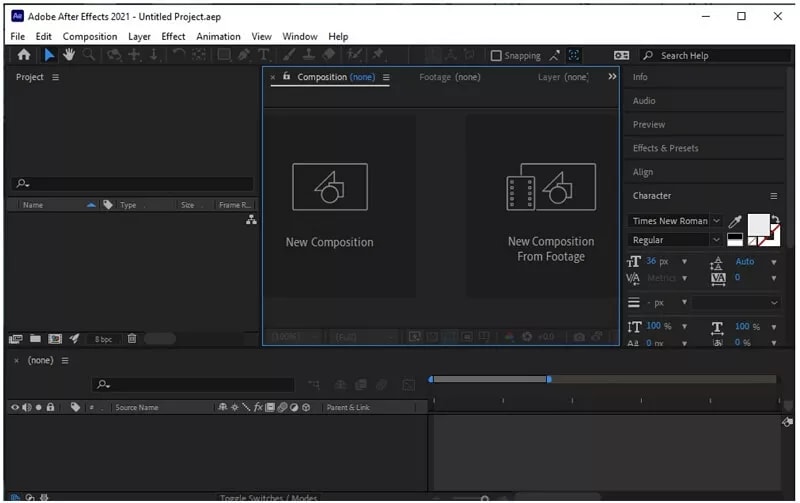
Step 2: New Composition
Next is to open a new project or drag and drop your video and add it to the timeline. Another way is to click on “New Composition from Footage” and then browse the video you want to edit.
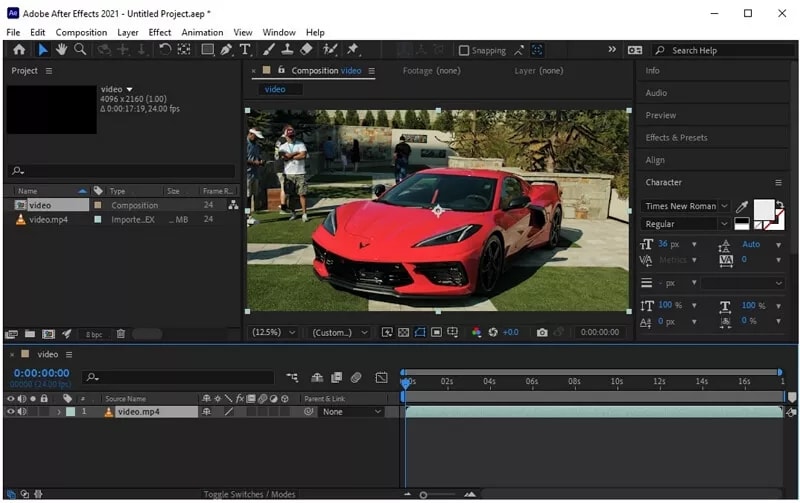
Step 3: Select the Frame
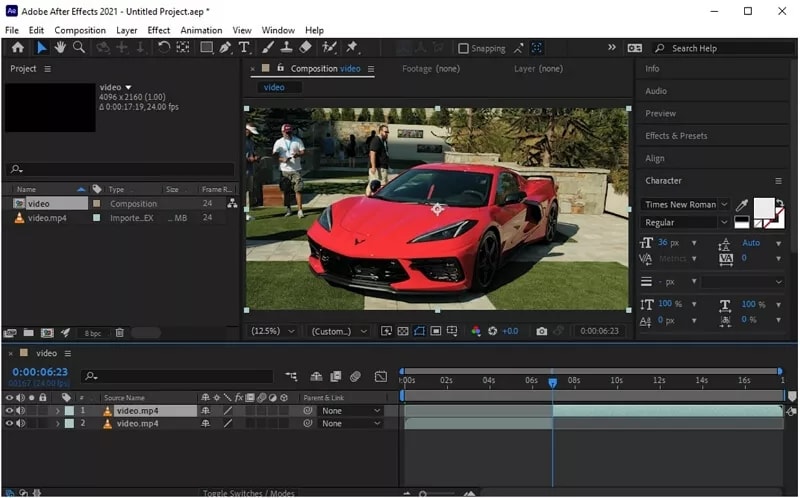
There is a Playhead or slider above the slide, which will help you to select the frame needed to be frozen. Press the “Space bar” to play and pause the video. Then, with the help of the slider, select the frame and pause the video at that instant.
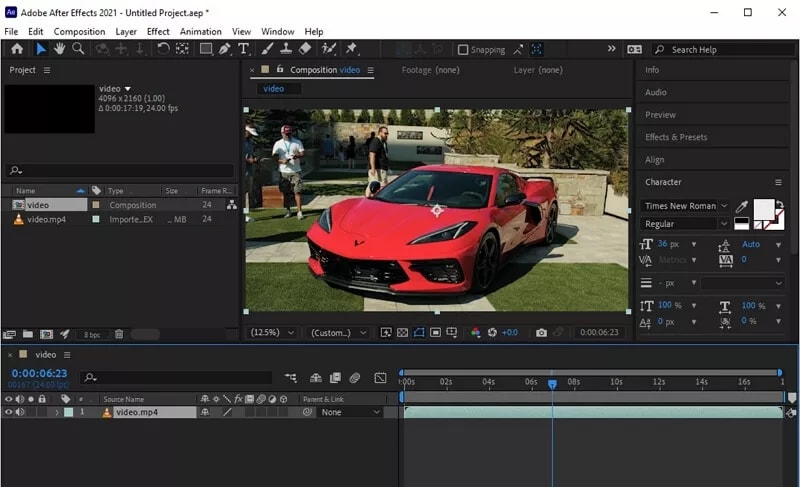
Step 4: Create a New Layer
After you pause the video at the place you want to freeze, Press “Ctrl + Shift + D” to cut the video at that instant, then another layer of the video will add just after the moment.
Step 5: Freeze the Frame
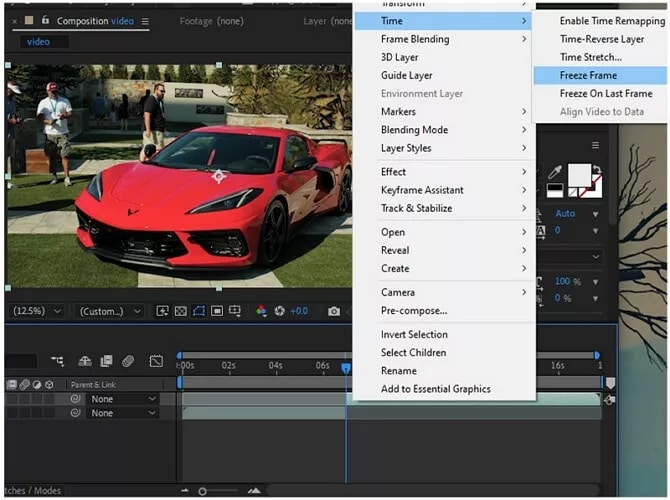
Next is to right-click on the layer, and the settings will pop up. Go to Time> Freeze-frame, and your selected frame will get frozen.
Step 6: Save the Video
Finally, go to File > Export to save the video per your PC requirement.
02**Wondershare Filmora Video Editor **
For Win 7 or later (64-bit)
For macOS 10.12 or later
Here is a step-by-step guide on how to Freeze-frame in Wondershare Filmora:
Step 1: Import your media files
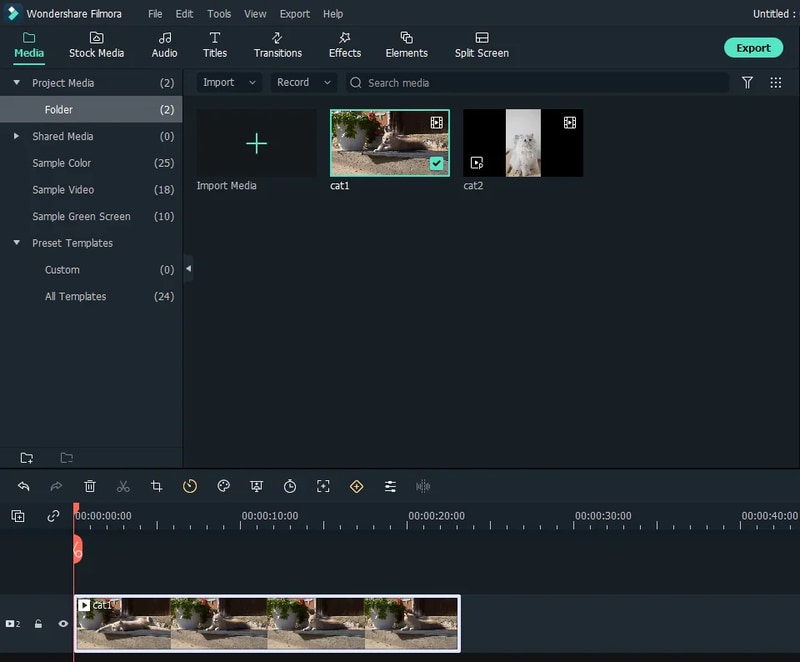
After installing the software on your PC, drag and drop all files into the primary window or click on “Import” to browse your file folder. Also, this program supports a variety of media files, including MP4, MKV, WMV, MOV, DV, AVI, MTS, TS, 3GP, M4V, etc. After uploading the video, drag them to the Video Timeline.
Step 2: Freeze video with ease
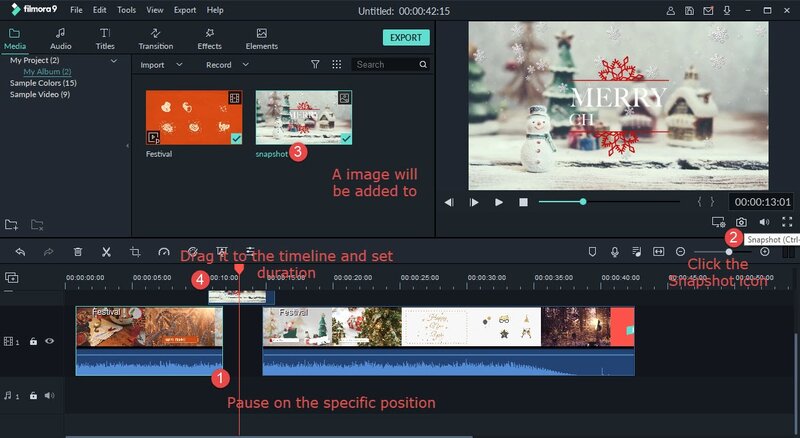
Now play the video clip you want to add freeze-frame and pause it when it comes to the correct position. Then click the “Snapshot” icon under the Viewer panel. Immediately, a picture will add to the media library. Drag and drop the Picture to the PIP track over the main video track, and set the duration of the still image.
Step 3: Save your video
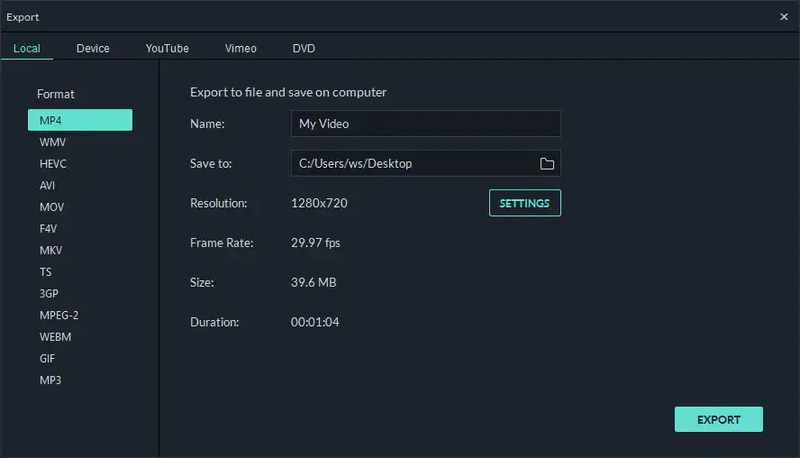
When satisfied with your result, click “Export” to export your video. In the pop-up window that appears, please select the file format options to save onto your computer, or you can directly upload it to Twitter, YouTube, or Facebook, to share with your family and friends.
03Premiere Pro
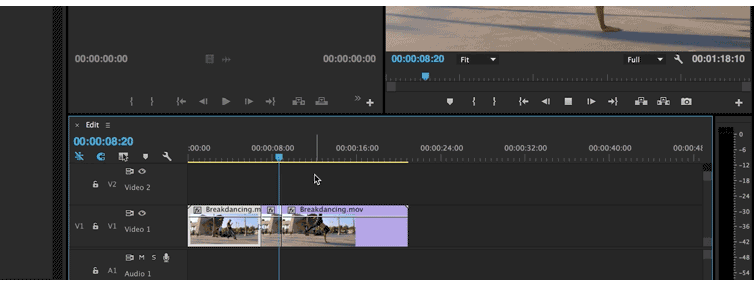
Here is a step-by-step guide on how to Freeze-frame in Premiere Pro using a video frame for the duration of a clip:
Step 1: Download Premiere Pro
Download and install Adobe Premiere Pro on your PC and open it to start editing your video. Import video to Premiere Pro and drag and drop to the timeline.
Step 2: Select a clip in a Timeline panel.
To freeze a frame using other methods than the In or Out point, open the video portion in the Source Monitor, and set the Marker 0 (zero) to the frame you wish to pause in the video.
Step 3: Choose Clip > Video Options > Frame Hold.
Next is to tap Hold On and select the frame you want to hold from the menu. However, you can choose the frame based on Source Timecode, In Point, Out Point, Sequence Timecode, or Playhead position.
Step 4: Finally, specify “Hold Filters” and click OK.
Effect settings use the values at the holding frame to prevent keyframed effect settings (if any are present) from animating during the clip’s duration.
04Kapwing
Step 1: Upload and edit your video with Kapwing.
Choose to “Get Started,” upload a file from your device, or paste a video link from a third-party site like YouTube, Vimeo, or TikTok. In any case, you’ll be whisked away to your very own video editing studio.

Step 2: Give your video a freeze-frame effect.
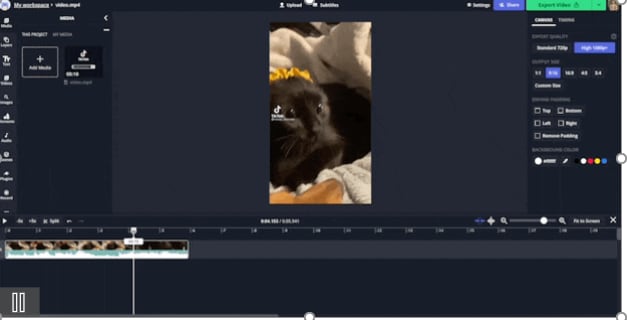
Select the “Timing” tab in the right navigation bar and click “Freeze Frame” after uploading your video to Kapwing.
In Kapwing, you may add a freeze-frame to a video.
As you can see, clicking “Freeze Frame” instantly creates an image layer for the frame your timeline slider was on. Click on the image layer and choose from the “Duration” dropdown option under the “Edit” tab in the right navigation bar to change the length of the freeze-frame. Alternatively, you may drag the image layer onto your timeline by clicking and dragging it.
That’s all there is to it!
05Animotica
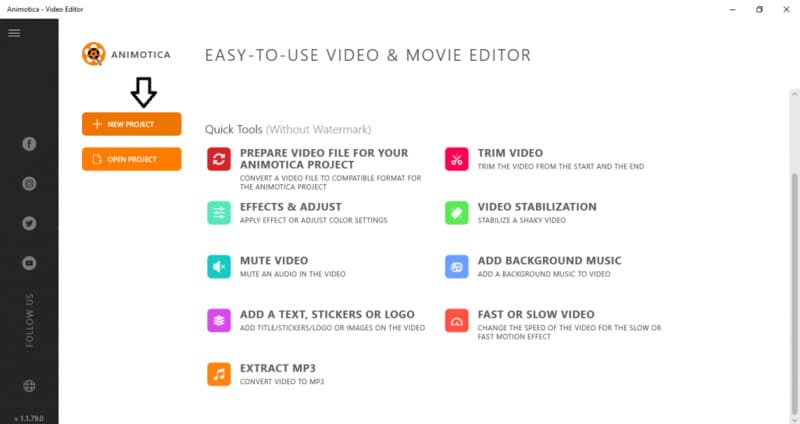
Step 1: Creating a New Project
To begin, open your video editor and select Create a New Project. Choose Empty Project, give your project a name, and click the Create a New Project button.
Step 2: Selecting the Video to Freeze
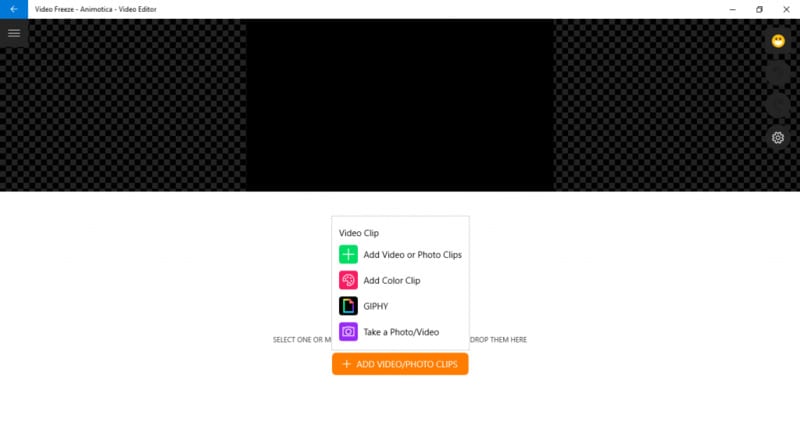
Select Add Video/Photo Clips from the drop-down menu.
You can add video clips to Animotica by navigating to where you saved your video clip, selecting it, and opening it. You’ll now return to the project window, where your video will display. You can enable a wide range of enhancing options by tapping on the video clip with your mouse.
Step 3: The Freeze Effect
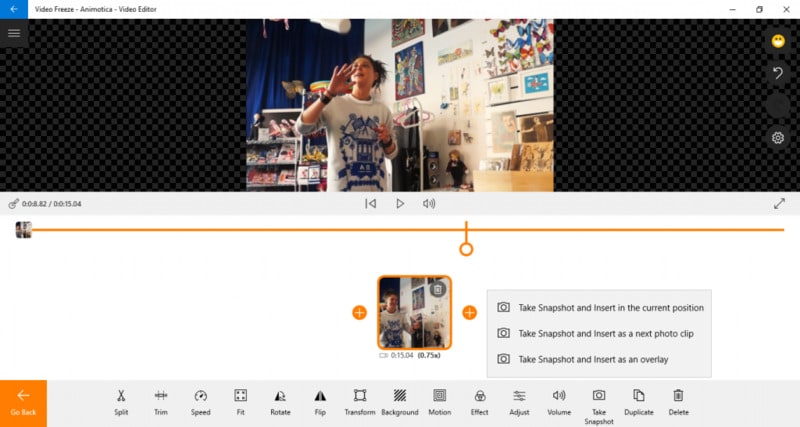
To activate your options, tap on the video clip. You must now decide which segment of the video you want to freeze. To make things easy for you, press the play and pause buttons when you reach the part you want to freeze.
Take a picture of the video by dragging your pointer down to the camera icon and pressing it to take a photo while keeping the clip paused, where you want it to be frozen. When you do that, a menu of three options will appear; select Take Snapshots and Insert in Current Position. This choice will split the movie in half and insert the scene you just recorded in the middle, resulting in a freeze.
Part 2 SUPER COOL Freeze-frame Effect with Filmora 11
With no prior experience in video editing, you may get started right away.
Filmora 11 is a scalable experience built for new and seasoned content creators who want freeze-frame editing. You may start cutting and editing your videos like an expert, even if you’re a beginner, and access anything you need from the toolbar once the software launches on your computer, including media, audio, titles, effects, split-screen formatting, elements, and transitions.
Hundreds of extra alternatives are available for each of these elements, which you can drag and drop over your chosen film. You can also use the scissors symbol to cut the movie by pausing on a specific frame within your shot and clicking it. Filmora 11 also comes with pre-set aspect ratios and resolutions for your chosen media to get started right away.
● Ending Thoughts →
● This article provided users with a guide to using Mac and Windows video editor freeze-frame for your video effects. Aside from the editor listed here, Movavi video editor freeze-frame and other editors are available on the Internet.
● However, the ones listed in this blog are our top picks for the best you can use. In addition, Filmora is the best freeze-frame effect editor with a lot of effects you can use in your video editing
The freeze-frame video editing effect is a technique used to stop the moving image of a video and hold it still onscreen. This effect aims to pause the world the video is living in and allow the audience to process the scene and gain more context fully. Note that the world around us keeps ongoing, and time never stops. But luckily for us, we can pause film and video with a simple but powerful video effect known as the freeze-frame.
In addition, a freeze-frame can be carried out in a video to showcase a specific frame in your clip by extending the length of Time that frame is displayed. For example, you can decide to freeze a frame to show the video frame where a goal is being scored in a sporting event or use it to showcase a captured reaction or a smile. When a freeze-frame applies to a video clip, the clip automatically splits at the freezing point, and the chosen frame is inserted as an image file (BMP) and displayed on screen for the duration you set. This article will teach how to use the freeze-frame editing service ideally.
In this article
01 [How to Add a Freeze-frame to Video Clips in all Tools](#Part 1)
02 [SUPER COOL Freeze-frame Effect with Filmora 11](#Part 2)
Part 1 How to Add a Freeze-frame to Video Clips in all Tools
Do you want to draw your audience’s attention to a point or for dramatic flair by stopping your video and holding on to a single frame? This section will give you the best tools for freeze-frame editing via a step-by-step guide on how to do it.
01After Effects
Here is a step-by-step guide on how to Freeze-frame in After Effects:
Step 1: Download After Effects
Download and install Adobe After Effects and open it on your desktop. This software works with both macOS and Windows.

Step 2: New Composition
Next is to open a new project or drag and drop your video and add it to the timeline. Another way is to click on “New Composition from Footage” and then browse the video you want to edit.

Step 3: Select the Frame
There is a Playhead or slider above the slide, which will help you to select the frame needed to be frozen. Press the “Space bar” to play and pause the video. Then, with the help of the slider, select the frame and pause the video at that instant.

Step 4: Create a New Layer
After you pause the video at the place you want to freeze, Press “Ctrl + Shift + D” to cut the video at that instant, then another layer of the video will add just after the moment.

Step 5: Freeze the Frame
Next is to right-click on the layer, and the settings will pop up. Go to Time> Freeze-frame, and your selected frame will get frozen.

Step 6: Save the Video
Finally, go to File > Export to save the video per your PC requirement.
02**Wondershare Filmora Video Editor **
For Win 7 or later (64-bit)
For macOS 10.12 or later
Here is a step-by-step guide on how to Freeze-frame in Wondershare Filmora:
Step 1: Import your media files
After installing the software on your PC, drag and drop all files into the primary window or click on “Import” to browse your file folder. Also, this program supports a variety of media files, including MP4, MKV, WMV, MOV, DV, AVI, MTS, TS, 3GP, M4V, etc. After uploading the video, drag them to the Video Timeline.

Step 2: Freeze video with ease
Now play the video clip you want to add freeze-frame and pause it when it comes to the correct position. Then click the “Snapshot” icon under the Viewer panel. Immediately, a picture will add to the media library. Drag and drop the Picture to the PIP track over the main video track, and set the duration of the still image.

Step 3: Save your video
When satisfied with your result, click “Export” to export your video. In the pop-up window that appears, please select the file format options to save onto your computer, or you can directly upload it to Twitter, YouTube, or Facebook, to share with your family and friends.

03Premiere Pro
Here is a step-by-step guide on how to Freeze-frame in Premiere Pro using a video frame for the duration of a clip:
Step 1: Download Premiere Pro
Download and install Adobe Premiere Pro on your PC and open it to start editing your video. Import video to Premiere Pro and drag and drop to the timeline.
Step 2: Select a clip in a Timeline panel.
To freeze a frame using other methods than the In or Out point, open the video portion in the Source Monitor, and set the Marker 0 (zero) to the frame you wish to pause in the video.
Step 3: Choose Clip > Video Options > Frame Hold.
Next is to tap Hold On and select the frame you want to hold from the menu. However, you can choose the frame based on Source Timecode, In Point, Out Point, Sequence Timecode, or Playhead position.
Step 4: Finally, specify “Hold Filters” and click OK.
Effect settings use the values at the holding frame to prevent keyframed effect settings (if any are present) from animating during the clip’s duration.

04Kapwing
Step 1: Upload and edit your video with Kapwing.
Choose to “Get Started,” upload a file from your device, or paste a video link from a third-party site like YouTube, Vimeo, or TikTok. In any case, you’ll be whisked away to your very own video editing studio.

Step 2: Give your video a freeze-frame effect.
Select the “Timing” tab in the right navigation bar and click “Freeze Frame” after uploading your video to Kapwing.
In Kapwing, you may add a freeze-frame to a video.
As you can see, clicking “Freeze Frame” instantly creates an image layer for the frame your timeline slider was on. Click on the image layer and choose from the “Duration” dropdown option under the “Edit” tab in the right navigation bar to change the length of the freeze-frame. Alternatively, you may drag the image layer onto your timeline by clicking and dragging it.
That’s all there is to it!

05Animotica
Step 1: Creating a New Project
To begin, open your video editor and select Create a New Project. Choose Empty Project, give your project a name, and click the Create a New Project button.

Step 2: Selecting the Video to Freeze
Select Add Video/Photo Clips from the drop-down menu.
You can add video clips to Animotica by navigating to where you saved your video clip, selecting it, and opening it. You’ll now return to the project window, where your video will display. You can enable a wide range of enhancing options by tapping on the video clip with your mouse.

Step 3: The Freeze Effect
To activate your options, tap on the video clip. You must now decide which segment of the video you want to freeze. To make things easy for you, press the play and pause buttons when you reach the part you want to freeze.
Take a picture of the video by dragging your pointer down to the camera icon and pressing it to take a photo while keeping the clip paused, where you want it to be frozen. When you do that, a menu of three options will appear; select Take Snapshots and Insert in Current Position. This choice will split the movie in half and insert the scene you just recorded in the middle, resulting in a freeze.

Part 2 SUPER COOL Freeze-frame Effect with Filmora 11
With no prior experience in video editing, you may get started right away.
Filmora 11 is a scalable experience built for new and seasoned content creators who want freeze-frame editing. You may start cutting and editing your videos like an expert, even if you’re a beginner, and access anything you need from the toolbar once the software launches on your computer, including media, audio, titles, effects, split-screen formatting, elements, and transitions.
Hundreds of extra alternatives are available for each of these elements, which you can drag and drop over your chosen film. You can also use the scissors symbol to cut the movie by pausing on a specific frame within your shot and clicking it. Filmora 11 also comes with pre-set aspect ratios and resolutions for your chosen media to get started right away.
● Ending Thoughts →
● This article provided users with a guide to using Mac and Windows video editor freeze-frame for your video effects. Aside from the editor listed here, Movavi video editor freeze-frame and other editors are available on the Internet.
● However, the ones listed in this blog are our top picks for the best you can use. In addition, Filmora is the best freeze-frame effect editor with a lot of effects you can use in your video editing
The freeze-frame video editing effect is a technique used to stop the moving image of a video and hold it still onscreen. This effect aims to pause the world the video is living in and allow the audience to process the scene and gain more context fully. Note that the world around us keeps ongoing, and time never stops. But luckily for us, we can pause film and video with a simple but powerful video effect known as the freeze-frame.
In addition, a freeze-frame can be carried out in a video to showcase a specific frame in your clip by extending the length of Time that frame is displayed. For example, you can decide to freeze a frame to show the video frame where a goal is being scored in a sporting event or use it to showcase a captured reaction or a smile. When a freeze-frame applies to a video clip, the clip automatically splits at the freezing point, and the chosen frame is inserted as an image file (BMP) and displayed on screen for the duration you set. This article will teach how to use the freeze-frame editing service ideally.
In this article
01 [How to Add a Freeze-frame to Video Clips in all Tools](#Part 1)
02 [SUPER COOL Freeze-frame Effect with Filmora 11](#Part 2)
Part 1 How to Add a Freeze-frame to Video Clips in all Tools
Do you want to draw your audience’s attention to a point or for dramatic flair by stopping your video and holding on to a single frame? This section will give you the best tools for freeze-frame editing via a step-by-step guide on how to do it.
01After Effects
Here is a step-by-step guide on how to Freeze-frame in After Effects:
Step 1: Download After Effects
Download and install Adobe After Effects and open it on your desktop. This software works with both macOS and Windows.

Step 2: New Composition
Next is to open a new project or drag and drop your video and add it to the timeline. Another way is to click on “New Composition from Footage” and then browse the video you want to edit.

Step 3: Select the Frame
There is a Playhead or slider above the slide, which will help you to select the frame needed to be frozen. Press the “Space bar” to play and pause the video. Then, with the help of the slider, select the frame and pause the video at that instant.

Step 4: Create a New Layer
After you pause the video at the place you want to freeze, Press “Ctrl + Shift + D” to cut the video at that instant, then another layer of the video will add just after the moment.

Step 5: Freeze the Frame
Next is to right-click on the layer, and the settings will pop up. Go to Time> Freeze-frame, and your selected frame will get frozen.

Step 6: Save the Video
Finally, go to File > Export to save the video per your PC requirement.
02**Wondershare Filmora Video Editor **
For Win 7 or later (64-bit)
For macOS 10.12 or later
Here is a step-by-step guide on how to Freeze-frame in Wondershare Filmora:
Step 1: Import your media files
After installing the software on your PC, drag and drop all files into the primary window or click on “Import” to browse your file folder. Also, this program supports a variety of media files, including MP4, MKV, WMV, MOV, DV, AVI, MTS, TS, 3GP, M4V, etc. After uploading the video, drag them to the Video Timeline.

Step 2: Freeze video with ease
Now play the video clip you want to add freeze-frame and pause it when it comes to the correct position. Then click the “Snapshot” icon under the Viewer panel. Immediately, a picture will add to the media library. Drag and drop the Picture to the PIP track over the main video track, and set the duration of the still image.

Step 3: Save your video
When satisfied with your result, click “Export” to export your video. In the pop-up window that appears, please select the file format options to save onto your computer, or you can directly upload it to Twitter, YouTube, or Facebook, to share with your family and friends.

03Premiere Pro
Here is a step-by-step guide on how to Freeze-frame in Premiere Pro using a video frame for the duration of a clip:
Step 1: Download Premiere Pro
Download and install Adobe Premiere Pro on your PC and open it to start editing your video. Import video to Premiere Pro and drag and drop to the timeline.
Step 2: Select a clip in a Timeline panel.
To freeze a frame using other methods than the In or Out point, open the video portion in the Source Monitor, and set the Marker 0 (zero) to the frame you wish to pause in the video.
Step 3: Choose Clip > Video Options > Frame Hold.
Next is to tap Hold On and select the frame you want to hold from the menu. However, you can choose the frame based on Source Timecode, In Point, Out Point, Sequence Timecode, or Playhead position.
Step 4: Finally, specify “Hold Filters” and click OK.
Effect settings use the values at the holding frame to prevent keyframed effect settings (if any are present) from animating during the clip’s duration.

04Kapwing
Step 1: Upload and edit your video with Kapwing.
Choose to “Get Started,” upload a file from your device, or paste a video link from a third-party site like YouTube, Vimeo, or TikTok. In any case, you’ll be whisked away to your very own video editing studio.

Step 2: Give your video a freeze-frame effect.
Select the “Timing” tab in the right navigation bar and click “Freeze Frame” after uploading your video to Kapwing.
In Kapwing, you may add a freeze-frame to a video.
As you can see, clicking “Freeze Frame” instantly creates an image layer for the frame your timeline slider was on. Click on the image layer and choose from the “Duration” dropdown option under the “Edit” tab in the right navigation bar to change the length of the freeze-frame. Alternatively, you may drag the image layer onto your timeline by clicking and dragging it.
That’s all there is to it!

05Animotica
Step 1: Creating a New Project
To begin, open your video editor and select Create a New Project. Choose Empty Project, give your project a name, and click the Create a New Project button.

Step 2: Selecting the Video to Freeze
Select Add Video/Photo Clips from the drop-down menu.
You can add video clips to Animotica by navigating to where you saved your video clip, selecting it, and opening it. You’ll now return to the project window, where your video will display. You can enable a wide range of enhancing options by tapping on the video clip with your mouse.

Step 3: The Freeze Effect
To activate your options, tap on the video clip. You must now decide which segment of the video you want to freeze. To make things easy for you, press the play and pause buttons when you reach the part you want to freeze.
Take a picture of the video by dragging your pointer down to the camera icon and pressing it to take a photo while keeping the clip paused, where you want it to be frozen. When you do that, a menu of three options will appear; select Take Snapshots and Insert in Current Position. This choice will split the movie in half and insert the scene you just recorded in the middle, resulting in a freeze.

Part 2 SUPER COOL Freeze-frame Effect with Filmora 11
With no prior experience in video editing, you may get started right away.
Filmora 11 is a scalable experience built for new and seasoned content creators who want freeze-frame editing. You may start cutting and editing your videos like an expert, even if you’re a beginner, and access anything you need from the toolbar once the software launches on your computer, including media, audio, titles, effects, split-screen formatting, elements, and transitions.
Hundreds of extra alternatives are available for each of these elements, which you can drag and drop over your chosen film. You can also use the scissors symbol to cut the movie by pausing on a specific frame within your shot and clicking it. Filmora 11 also comes with pre-set aspect ratios and resolutions for your chosen media to get started right away.
● Ending Thoughts →
● This article provided users with a guide to using Mac and Windows video editor freeze-frame for your video effects. Aside from the editor listed here, Movavi video editor freeze-frame and other editors are available on the Internet.
● However, the ones listed in this blog are our top picks for the best you can use. In addition, Filmora is the best freeze-frame effect editor with a lot of effects you can use in your video editing
The freeze-frame video editing effect is a technique used to stop the moving image of a video and hold it still onscreen. This effect aims to pause the world the video is living in and allow the audience to process the scene and gain more context fully. Note that the world around us keeps ongoing, and time never stops. But luckily for us, we can pause film and video with a simple but powerful video effect known as the freeze-frame.
In addition, a freeze-frame can be carried out in a video to showcase a specific frame in your clip by extending the length of Time that frame is displayed. For example, you can decide to freeze a frame to show the video frame where a goal is being scored in a sporting event or use it to showcase a captured reaction or a smile. When a freeze-frame applies to a video clip, the clip automatically splits at the freezing point, and the chosen frame is inserted as an image file (BMP) and displayed on screen for the duration you set. This article will teach how to use the freeze-frame editing service ideally.
In this article
01 [How to Add a Freeze-frame to Video Clips in all Tools](#Part 1)
02 [SUPER COOL Freeze-frame Effect with Filmora 11](#Part 2)
Part 1 How to Add a Freeze-frame to Video Clips in all Tools
Do you want to draw your audience’s attention to a point or for dramatic flair by stopping your video and holding on to a single frame? This section will give you the best tools for freeze-frame editing via a step-by-step guide on how to do it.
01After Effects
Here is a step-by-step guide on how to Freeze-frame in After Effects:
Step 1: Download After Effects
Download and install Adobe After Effects and open it on your desktop. This software works with both macOS and Windows.

Step 2: New Composition
Next is to open a new project or drag and drop your video and add it to the timeline. Another way is to click on “New Composition from Footage” and then browse the video you want to edit.

Step 3: Select the Frame
There is a Playhead or slider above the slide, which will help you to select the frame needed to be frozen. Press the “Space bar” to play and pause the video. Then, with the help of the slider, select the frame and pause the video at that instant.

Step 4: Create a New Layer
After you pause the video at the place you want to freeze, Press “Ctrl + Shift + D” to cut the video at that instant, then another layer of the video will add just after the moment.

Step 5: Freeze the Frame
Next is to right-click on the layer, and the settings will pop up. Go to Time> Freeze-frame, and your selected frame will get frozen.

Step 6: Save the Video
Finally, go to File > Export to save the video per your PC requirement.
02**Wondershare Filmora Video Editor **
For Win 7 or later (64-bit)
For macOS 10.12 or later
Here is a step-by-step guide on how to Freeze-frame in Wondershare Filmora:
Step 1: Import your media files
After installing the software on your PC, drag and drop all files into the primary window or click on “Import” to browse your file folder. Also, this program supports a variety of media files, including MP4, MKV, WMV, MOV, DV, AVI, MTS, TS, 3GP, M4V, etc. After uploading the video, drag them to the Video Timeline.

Step 2: Freeze video with ease
Now play the video clip you want to add freeze-frame and pause it when it comes to the correct position. Then click the “Snapshot” icon under the Viewer panel. Immediately, a picture will add to the media library. Drag and drop the Picture to the PIP track over the main video track, and set the duration of the still image.

Step 3: Save your video
When satisfied with your result, click “Export” to export your video. In the pop-up window that appears, please select the file format options to save onto your computer, or you can directly upload it to Twitter, YouTube, or Facebook, to share with your family and friends.

03Premiere Pro
Here is a step-by-step guide on how to Freeze-frame in Premiere Pro using a video frame for the duration of a clip:
Step 1: Download Premiere Pro
Download and install Adobe Premiere Pro on your PC and open it to start editing your video. Import video to Premiere Pro and drag and drop to the timeline.
Step 2: Select a clip in a Timeline panel.
To freeze a frame using other methods than the In or Out point, open the video portion in the Source Monitor, and set the Marker 0 (zero) to the frame you wish to pause in the video.
Step 3: Choose Clip > Video Options > Frame Hold.
Next is to tap Hold On and select the frame you want to hold from the menu. However, you can choose the frame based on Source Timecode, In Point, Out Point, Sequence Timecode, or Playhead position.
Step 4: Finally, specify “Hold Filters” and click OK.
Effect settings use the values at the holding frame to prevent keyframed effect settings (if any are present) from animating during the clip’s duration.

04Kapwing
Step 1: Upload and edit your video with Kapwing.
Choose to “Get Started,” upload a file from your device, or paste a video link from a third-party site like YouTube, Vimeo, or TikTok. In any case, you’ll be whisked away to your very own video editing studio.

Step 2: Give your video a freeze-frame effect.
Select the “Timing” tab in the right navigation bar and click “Freeze Frame” after uploading your video to Kapwing.
In Kapwing, you may add a freeze-frame to a video.
As you can see, clicking “Freeze Frame” instantly creates an image layer for the frame your timeline slider was on. Click on the image layer and choose from the “Duration” dropdown option under the “Edit” tab in the right navigation bar to change the length of the freeze-frame. Alternatively, you may drag the image layer onto your timeline by clicking and dragging it.
That’s all there is to it!

05Animotica
Step 1: Creating a New Project
To begin, open your video editor and select Create a New Project. Choose Empty Project, give your project a name, and click the Create a New Project button.

Step 2: Selecting the Video to Freeze
Select Add Video/Photo Clips from the drop-down menu.
You can add video clips to Animotica by navigating to where you saved your video clip, selecting it, and opening it. You’ll now return to the project window, where your video will display. You can enable a wide range of enhancing options by tapping on the video clip with your mouse.

Step 3: The Freeze Effect
To activate your options, tap on the video clip. You must now decide which segment of the video you want to freeze. To make things easy for you, press the play and pause buttons when you reach the part you want to freeze.
Take a picture of the video by dragging your pointer down to the camera icon and pressing it to take a photo while keeping the clip paused, where you want it to be frozen. When you do that, a menu of three options will appear; select Take Snapshots and Insert in Current Position. This choice will split the movie in half and insert the scene you just recorded in the middle, resulting in a freeze.

Part 2 SUPER COOL Freeze-frame Effect with Filmora 11
With no prior experience in video editing, you may get started right away.
Filmora 11 is a scalable experience built for new and seasoned content creators who want freeze-frame editing. You may start cutting and editing your videos like an expert, even if you’re a beginner, and access anything you need from the toolbar once the software launches on your computer, including media, audio, titles, effects, split-screen formatting, elements, and transitions.
Hundreds of extra alternatives are available for each of these elements, which you can drag and drop over your chosen film. You can also use the scissors symbol to cut the movie by pausing on a specific frame within your shot and clicking it. Filmora 11 also comes with pre-set aspect ratios and resolutions for your chosen media to get started right away.
● Ending Thoughts →
● This article provided users with a guide to using Mac and Windows video editor freeze-frame for your video effects. Aside from the editor listed here, Movavi video editor freeze-frame and other editors are available on the Internet.
● However, the ones listed in this blog are our top picks for the best you can use. In addition, Filmora is the best freeze-frame effect editor with a lot of effects you can use in your video editing
TOP 6 Online Video Speed Controller for Chrome, Safari, Firefox
Social media and video streaming apps like Facebook, Instagram and YouTube let the user control the video speed, but the speed controls are not smart enough. What if you want to watch the YouTube video at more than 2x speed? That’s where the video speed controller comes in.
AI speed control For Win 7 or later(64-bit)
AI speed control For macOS 10.14 or later
These speed controllers let you speed control video at your liking. If you want to take control of video playback speeds, you can go for the video speed controller download options. Let’s discuss some of the best speed controllers apps and extensions.
- Video Speed Controller
- YouTube Playback Speed Control
- Accelerate for Safari
- Playback Speed
- SpeedUp
- PlayerFab All-in-One
TOP 6 Online Video Speed Controller
01 Video Speed Controller
Video speed controller Chrome extension is one of the best speed control video extensions. You can adjust the playback speed, navigate forward or backward, and control HTML5 audio/video using keyboard shortcuts. The best thing about this speed controller extension is its ability to rewind video for a few seconds without changing playback speeds.
Customizable speed control video adjustments.
Easy shortcuts using a keyboard.
Simple user interface to control the video speed.
Sometime forget settings
02 YouTube Playback Speed Control
If you are looking for the video speed controller download, YouTube Playback Speed Control comes with plenty of speed control video options. The simple pressing of ‘+’ key to increase and ‘-’ to decrease playback speed makes it a favorite extension of every browser user. It is one of the best speed controller extension without any annoying popups on your streaming screen.
Control YouTube video playback speed using keyboard shortcuts.
Customize the keyboard buttons used for controlling playback speed.
Functional with HTML5 YouTube players embedded in other websites.
Doesn’t work with other video streaming options.
03 Accelerate for Safari
If you are a Mac, iPhone or iPad user, you can also download the video speed controller Safari. Accelate for Safari also supports Picture-in-Picture and AirPlay, which means you are not bound to stay in Safari browser to stream the video at your preferred pace. You can play the video in the background and continue browsing. The great thing about this video speed controller Safari extension is that it works with all the streaming and video platforms.
Customize video playback speed and controls in Safari.
Supports keyboard shortcuts for various video controls including play/pause and speed adjustment.
Compatible with major video platforms like YouTube, Netflix, Hulu, and more.
First time setup could be a hassle if you are not techie enough. 04 Playback Speed
04 Playback Speed
If you use Firefox like millions of others but feel sad that we haven’t mentioned video speed controller Firefox extension, well, you shouldn’t be. Playback Speed is one of the best speed controller extension on Firefox that lets you customize the playback controls. Another great thing, you won’t see annoying pop ups as its control center is next to the video link search bar. The setup is easier and the settings user interface is pleasing on the eyes with slider controls.
Play HTML5 videos on YouTube at customizable speeds.
Simple and one touch user interface to control settings
Slow playback speed options are limited.
Limited function availability across other streaming platforms.
05 SpeedUp
SpeedUp is a popular video speed controller Firefox extension with hundreds of downloads. There are many extensions that ask for tracking permission across all websites but SpeedUp doesn’t track any activity even on the video platform. Another great thing is that you can enable in-video buttons to control the video as per your preference. If you use a Firefox browser, you use go for the video speed controller download.
Control speed of all the video streaming platforms and websites.
Support for HTML5 videos on any website.
simple user interface provided by Speedify. Disadvantages
The speed playback buttons could be clumsy sometimes.
06 PlayerFab All-in-One
PlayerFab lets you play back local videos, DVD/Blu-ray/UHD discs, and videos from Amazon and Netflix, and other streaming platforms. As a streaming playback platform, it lets you watch and play videos in one place. All you have to do is type the name of the movie/show, and it will play the video while giving you access to video playback controls.
You can watch videos in FHD, and it supports EAC3 5.1 audio quality.
All in one solution for all the streaming platforms.
Lets you adjust the playback speed.
Hi-Res Audio and Video support.
Lifetime license for premium features needs one time purchase.
Conclusion
If you are looking for a video speed controller that lets you speed control video, we have discussed some of the best video speed controller download options. We have chosen some of the best speed controller extensions for Google Chrome, Mozilla Firefox and Safari.
If you are looking for a speed controller extension, you can download any of the extensions mentioned. However, all these free chrome extensions have some compromises. If you don’t want to compromise on features and control access, you can purchase PlayerFab All-in-One.
Also read:
- Updated How to Concatenate Videos Using FFmpeg for 2024
- Updated Get 15 Absolutely-Free LUTs From This Article as Well as Get an Insight on How Cinematic LUTs Affect Your Film
- Updated How to Change Video Resolution in Filmora
- Updated Cropping Video in VLC Step by Step
- In 2024, Discover the Various Techniques of Video Framing, Which Involve Capturing the Essence of a Subject While Eliminating Distractions in the Background, Andlearn How to Apply Them Skillfully to Achieve Desired Results
- Updated In 2024, Guide to Create Intro Video with KineMaster
- 2024 Approved Best 10 Fun Discord Bots You Need
- Updated 2024 Approved Separating Audio From Video in DaVinci Resolve Step by Step
- In 2024, Perfect Guide for Beginners to Make a TikTok with Multiple Clips
- New In 2024, How to Make Random Letter Reveal Intro?
- Vlogs and Travel Content Are Incomplete without a Fast-Motion Effect. Learn Step-by-Step How to Make Fast Motion Video on an iPhone in This Article
- Updated What Anime Character Are You Look Like, In 2024
- Updated Do You Like Clouds or Sky and Want to Use Them as a Video Background? Explore This Article to Learn About the Sky Change Video in Filmora for 2024
- New If Youre Considering Starting a Podcast Video Recording, You Need to Read This Article and Learn All You Need to Know About Making a Successful Podcast
- 4 Solutions to Resize a WebM File for 2024
- New Finding the Best Game Recorder for PC
- New In 2024, How to Make a Video Loop in QuickTime
- In 2024, Add Fade in Windows Video Editor
- 2024 Approved An Ultimate Guide to Edit a Music Video Aspect Ratio and First Cut
- Updated Are You Surfing for some Way to Make Your Animated Emoji Discord Using Videos, GIFs, Images, or Text? Read Through This Article as Well Guide You Through the Process for 2024
- Updated Adding a Spooky Shadow Effect with Filmora
- How to Loop a Video on Vimeo for 2024
- In 2024, How Long Does It Take To Edit Videos
- 11 Ways To Speed Up A Video On iPhone for 2024
- 2024 Approved Best 5 GIF to Video Converters You Cant-Miss
- Updated 2024 Approved Learn How to Extract Sound From Video Using the Different Online and Software Tools. Details About Their Features, Pros/Cons, and More Are Given
- In 2024, Finding The Best Ways To Replace Sky in Lightroom
- New | Change Speed of a Video on iPhone for 2024
- New How to Overlay Video in Premiere Pro for 2024
- How to Track Motorola Moto G23 by Phone Number | Dr.fone
- How to Change/Fake Your Asus ROG Phone 7 Ultimate Location on Viber | Dr.fone
- Vivo Y56 5G Stuck on Screen – Finding Solutions For Stuck on Boot | Dr.fone
- In 2024, How Do You Get Sun Stone Evolutions in Pokémon For Vivo Y200e 5G? | Dr.fone
- How to Bypass iPhone 14 Pro Passcode Easily Video Inside
- How To Unlock iPhone 14 Pro 3 Ways To Unlock
- What are Location Permissions Life360 On Xiaomi Redmi Note 12 Pro 5G? | Dr.fone
- In 2024, Additional Tips About Sinnoh Stone For Samsung Galaxy S23 Ultra | Dr.fone
- How to Unlock Razr 40 Ultra Phone Forgot Password
- In 2024, Forgot Locked Apple iPhone SE Password? Learn the Best Methods To Unlock
- In 2024, How to Track WhatsApp Messages on Xiaomi Redmi Note 12R Without Them Knowing? | Dr.fone
- In 2024, Hacks to do pokemon go trainer battles For Samsung Galaxy A34 5G | Dr.fone
- The Updated Method to Bypass Motorola Edge 40 Neo FRP
- How To Fake GPS On Samsung Galaxy Z Fold 5 For Mobile Legends? | Dr.fone
- In 2024, Ultimate Guide on Itel S23 FRP Bypass
- Things You Dont Know About Nokia C12 Reset Code | Dr.fone
- The Ultimate Guide to Xiaomi Civi 3 Disney 100th Anniversary Edition Pattern Lock Screen Everything You Need to Know
- In 2024, How Many Attempts To Unlock Apple iPhone 12 Pro | Dr.fone
- How To Bypass Tecno Spark 20 Pro+ FRP In 3 Different Ways
- Is your Samsung Galaxy S23 Ultra working too slow? Heres how you can hard reset it | Dr.fone
- Is pgsharp legal when you are playing pokemon On OnePlus Nord CE 3 Lite 5G? | Dr.fone
- In 2024, Does find my friends work on Oppo A56s 5G | Dr.fone
- How to Fix Android.Process.Media Has Stopped on Vivo V30 Lite 5G | Dr.fone
- Updated 2024 Approved Christmas Is Coming! How to Find & Make Animated Christmas GIFs?
- In 2024, Edit and Send Fake Location on Telegram For your Realme C55 in 3 Ways | Dr.fone
- 7 Fixes for Unfortunately, Phone Has Stopped on HTC U23 Pro | Dr.fone
- 7 Solutions to Fix Chrome Crashes or Wont Open on Vivo T2 Pro 5G | Dr.fone
- Title: New How to Add Text in Adobe Rush
- Author: Morgan
- Created at : 2024-05-19 05:11:51
- Updated at : 2024-05-20 05:11:51
- Link: https://ai-video-editing.techidaily.com/new-how-to-add-text-in-adobe-rush/
- License: This work is licensed under CC BY-NC-SA 4.0.

