:max_bytes(150000):strip_icc():format(webp)/GettyImages-1353420724-65161751b9924195880d3273e327cb54.jpg)
New How to Change Frame Rate in Premiere Pro

How to Change Frame Rate in Premiere Pro
The video’s frame rate is an important aspect of it. Too high of a frame rate makes the video seem unnatural. On the other hand, too low can make some videos choppy. You can fix that by changing the frame rate using a video editor. And we are here to help you learn how to do that. Here’s how to change the frame rate in Premiere Pro.
The frame rate sometimes makes or breaks the video. So it is important to get this setting right. Suppose you made a mistake and recorded your video in the wrong setting. You can follow this guide to solve your problem.
How To Check Video Frame Rate in Premiere Pro
Before we teach you how to change a video’s frame rate in Premiere Pro, let’s first make sure you know how to check. Maybe you don’t need to modify the video because it is already in the correct setting.
So how do you do that in Premiere Pro?
- Import the video to Adobe Premiere Pro.
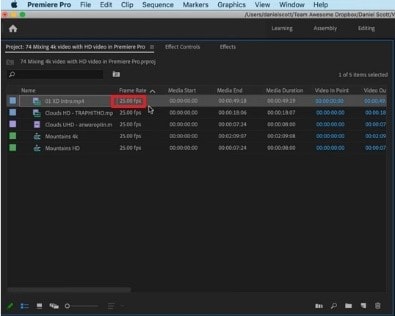
- Check the “Media” window. Next to the video file name is its frame rate. It is written in the format x.00 fps. FPS stands for “frames per second,” which is used interchangeably with the term frame rate.
Reasons for Changing Frame Rate
Suppose you have an action-packed video. It would not look great at 30 fps - it will look too choppy. That will give your audience a rotten viewing experience. By increasing the frames, you can make the motion more fluid and smoother.
Increasing the frames per second also results in better slow-motion videos. A 30 fps one would not look good with this effect because it does not show smooth motion. Thus, we recommend making the video at least 60 fps.
However, a higher frame rate does not always mean better videos. It can result in what they call the “soap opera effect.” It means the video shows too many details. That makes the videos seem “unnatural” or less cinematic.
High frame rates make videos look more realistic since there is less stuttering and motion blur between frames. That’s great. But for older audiences - the ones used to watching videos at 24 fps, it can be off-putting. So it’s also important to consider your target audience when deciding the right frame rate for your video.
With these reasons in mind, you may want to change your video’s frame rate.
How To Change FPS in Premiere Pro
Let’s dilly-dally no more. Here’s a quick guide on how to change fps in Adobe Premiere Pro. This program gives you two different ways to change fps. One is changing the frame rate of a sequence; the other is changing the frame rate of the video clip. We will teach you how to do both.
l Change the Frame Rate of a Sequence
Suppose you want to keep the frame rate of most of the video the same. Only some parts need adjusting. You can change the frame rate of the sequences that need changing instead. Here are the steps to follow to achieve this:
- Open your project in Adobe Premiere Pro.
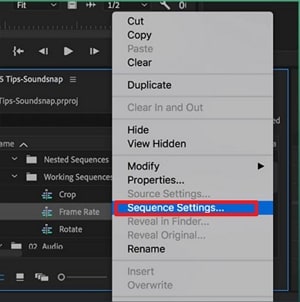
- In the Project panel, select the sequence whose frame rate you want to change. Right-click on that sequence.
- Choose “Sequence Settings” from the menu that appears.
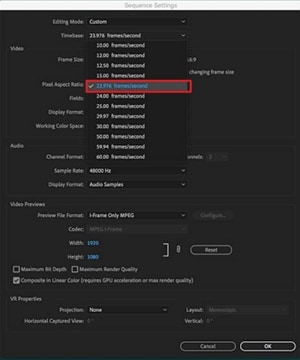
- Click the drop-down menu for “Timebase.”
- Select the frame rate you want the sequence to be in.
- Click “OK.”
l Change the Frame Rate of a Video Clip
Here are the steps you should follow if you want to change the frame rate of an entire video clip.
- Import your video clip to Premiere Pro and drag it to the timeline.
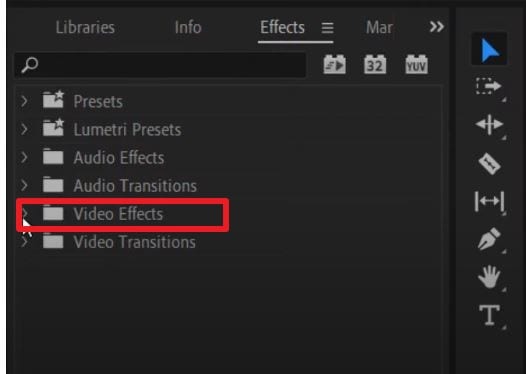
- Go to the “Effects” tab. It’s in the options at the bottom left of the screen.
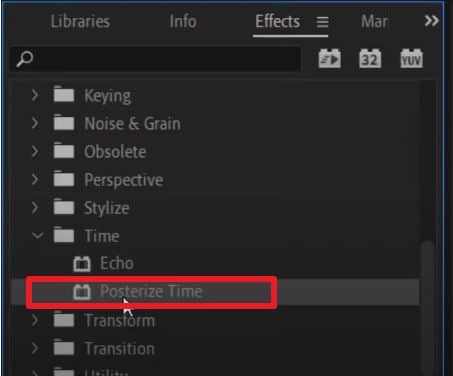
- Select “Video Effects” > “Time” > “Posterize Time.”
- Drag and drop the Posterize Time effect to the clip whose frame rate you want to change.
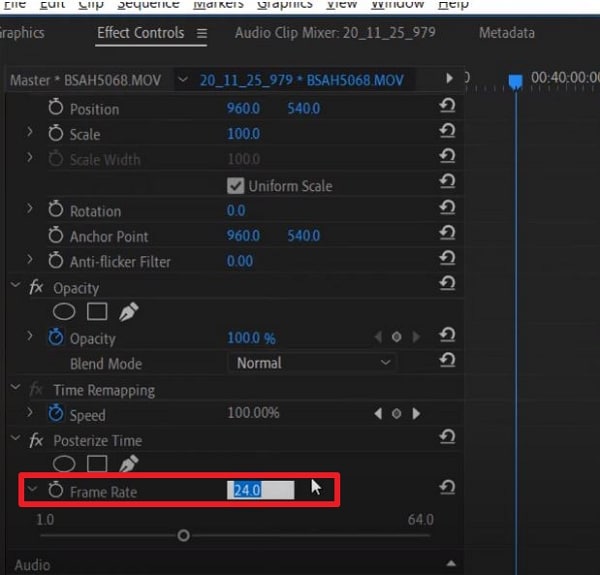
- Click “Effect Controls” at the top left of the screen.
- Select the small “arrow” button next to the “Frame Rate” text under “Posterize Time.”
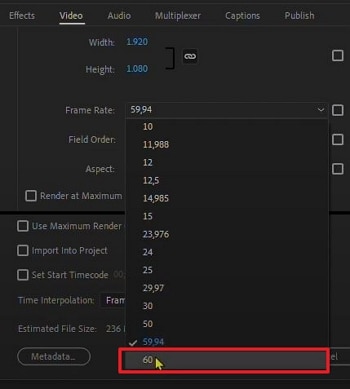
- Change the frame rate to your preferred setting. For example, type “60” to make the video 60 fps.
- Click “Sequence” > “Render Selection.”
And that’s it! That is how you change a video clip’s frame rate in Adobe Premiere Pro.
How To Make 120 FPS Videos With Premiere Pro
Videos that are 120 fps are very popular now. If you are a gaming content creator on YouTube, you probably record videos at this frame rate. You’d want to edit that footage and export it at the same frame rate.
Adobe Premiere Pro allows you to do that. But it’s a little bit of a hidden feature. When creating a sequence, you may notice that the highest the frame rate can go is 60 frames per second. That’s obviously not the number that we want. Don’t worry. There is a workaround. The best thing is that it’s super easy.
Follow these steps to change your video to 120 fps:
- Import your 120 fps video to Adobe Premiere Pro.
- Select your footage. Drag it to your timeline or the tab where the text says, “Drop media here to create sequence.”
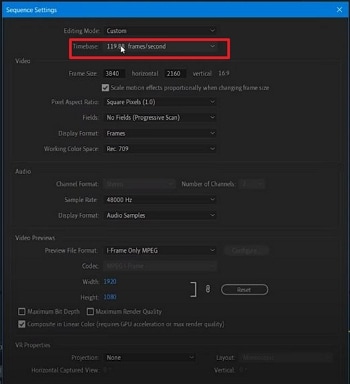
- Select the timeline panel. Click “Sequence” > “Sequence Settings.”
- Check the “Timebase” section. It should say “119.88 frames/second,” 120 fps when rounded off.
- Edit the video as needed and render it. The output should stay at 120 fps.
How To Change Video From 30 FPS to 60 FPS in Premiere Pro
Do you have a video recorded at 30 frames per second, and do you want it at 60? Here’s a simple solution to that. Follow these steps in Adobe Premiere Pro to double the video’s frame rate.
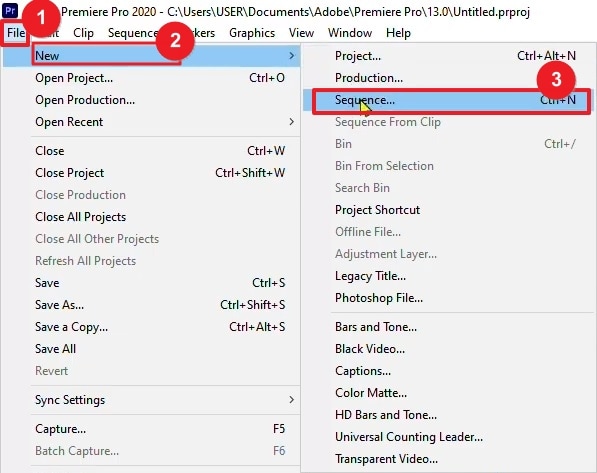
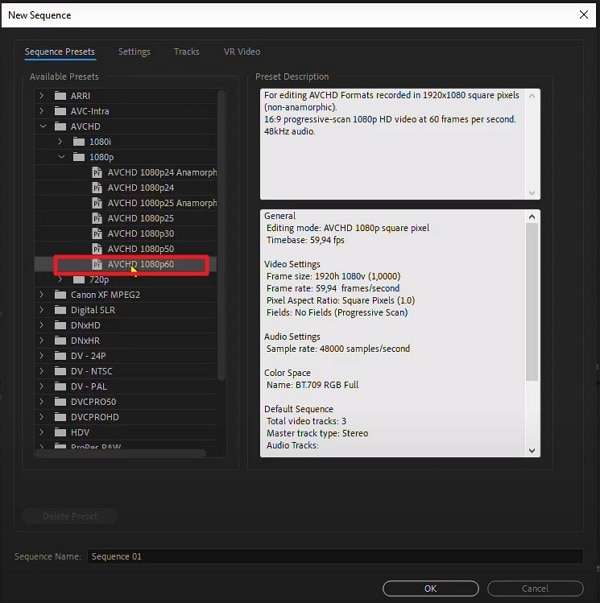
- Open Adobe Premiere Pro. Click “File” > “New” > “Sequence.”
- Click “AVCHD” > “1080p” > “AVCHD 1080p60” > “OK.”
- Import your 30 fps video into Adobe Premiere Pro.
- Drag the video into the timeline.
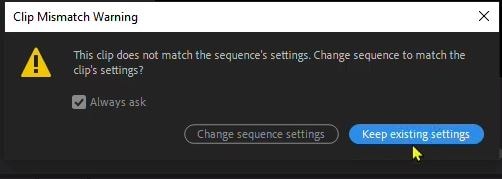
- Click “Keep existing settings.”
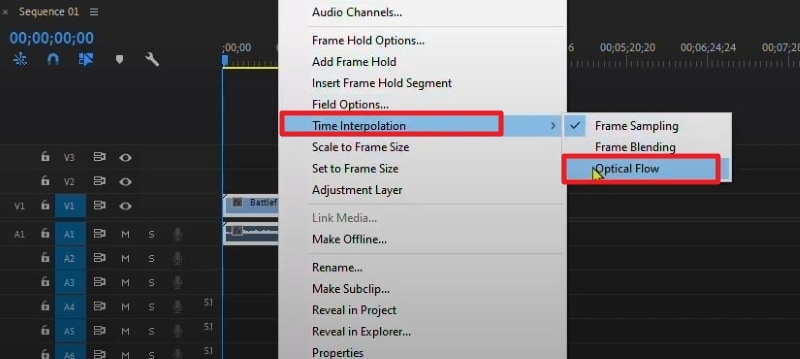
- Right-click the video in the timeline. Select “Time interpolation” > “Optical Flow.”
- Press the “Enter” key. Wait for the processing to finish. This can take hours.
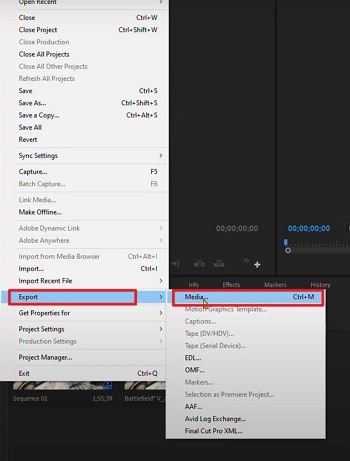
- Click “File” > “Export” > “Media.”
- Select a preset.
- Scroll down to the “Effects” section to check if the frame rate is at 60 fps. If not, change it to 60 fps.
- Click “Export.”
[Bonus] Wondershare Filmora - Premiere Pro’s Alternative
Free Download For Win 7 or later(64-bit)
Free Download For macOS 10.14 or later
What if you don’t have Adobe Premiere Pro or don’t like this tool? What’s a good alternative? That would be Wondershare Filmora.

Why use Filmora as a substitute for Premiere Pro? This video editor offers lots of great features, basic or advanced. With these at your fingertips, you can bring your videos to the next level and wow your audiences.
Among Filmora’s handy features is the ability to quickly change a video’s frame rate. You don’t even need to be a video editing expert to do it with this software! That’s how straightforward the process is.
How To Change the Frame Rate in Wondershare Filmora
Changing a video’s frame rate in Wondershare Filmora is super easy. Even a child can do it due to how simple the steps are. Here, read this 5-step guide to change a video’s frame rate using this amazing video editor.
- Launch Wondershare Filmora and create a new project.

- Import the video whose frame rate you want to change.
- Drag the video into the timeline.
![]()
- Click “Export.”
- Select the format you want the output file to be in. Find the “Frame Rate” in the options, click the drop-down menu, and select the frame rate that you want. Click “Export.”

Conclusion
Getting the frame rate of a video right is important, so you should not neglect it. It greatly affects your audience’s viewing experience. Thankfully, if you make mistakes, you can correct them with video editors like Premiere Pro. If it’s not to your liking, you can use Wondershare Filmora instead - it’s the best alternative.
Filmora lets you change a video’s frame rate very easily. Also, it gives you a bunch of other features you might enjoy using. And here’s some good news: this software app is affordable! You can also download the free trial to give it a shot.
Free Download For macOS 10.14 or later
What if you don’t have Adobe Premiere Pro or don’t like this tool? What’s a good alternative? That would be Wondershare Filmora.

Why use Filmora as a substitute for Premiere Pro? This video editor offers lots of great features, basic or advanced. With these at your fingertips, you can bring your videos to the next level and wow your audiences.
Among Filmora’s handy features is the ability to quickly change a video’s frame rate. You don’t even need to be a video editing expert to do it with this software! That’s how straightforward the process is.
How To Change the Frame Rate in Wondershare Filmora
Changing a video’s frame rate in Wondershare Filmora is super easy. Even a child can do it due to how simple the steps are. Here, read this 5-step guide to change a video’s frame rate using this amazing video editor.
- Launch Wondershare Filmora and create a new project.

- Import the video whose frame rate you want to change.
- Drag the video into the timeline.
![]()
- Click “Export.”
- Select the format you want the output file to be in. Find the “Frame Rate” in the options, click the drop-down menu, and select the frame rate that you want. Click “Export.”

Conclusion
Getting the frame rate of a video right is important, so you should not neglect it. It greatly affects your audience’s viewing experience. Thankfully, if you make mistakes, you can correct them with video editors like Premiere Pro. If it’s not to your liking, you can use Wondershare Filmora instead - it’s the best alternative.
Filmora lets you change a video’s frame rate very easily. Also, it gives you a bunch of other features you might enjoy using. And here’s some good news: this software app is affordable! You can also download the free trial to give it a shot.
How Have Game Recording Software Improved Their Stature in the Market? An Overview
Recording gameplay on PC has been an essential part of operations for many streamers. This has led to developing several recording software dedicated to this specific purpose. With the market flooding with these tools, it is important to look at the quality instead of the quantity.
Let’s dive into the world of top game recorders for PC featuring services for the finest content creation. Take a look at their benefits, along with a simple and cost-effective alternative to make screen recording much easier on your PC.
Screen Recording Now For Win 7 or later(64-bit)
Screen Recording Now For macOS 10.14 or later
Part 1. Finding a Good Gameplay Recorder on PC? Get One Instantly
Now that you are aware of some top benefits that game recorders provide, it is time to learn how to reap these benefits. There are currently several apps to help you capture gameplay on PC. The following list provides an insight into the top 10 apps to record gameplay on your computer:
Top Gameplay Recorder Tools on PC:
1.Bandicam
2. OBS Studio
3.Xbox Game Bar
4.Action! – Game Recorder
5.XSplit Broadcaster
6.FBX
7.D3DGear
8.Geceta by Movavi
9.Radeon ReLive
10.ScreenPal
1.Bandicam
Bandicam stands amongst the top gameplay recorders available for PC today. It is an easy-to-use and free screen recording software that can capture anything you want on your screen.
Bandicam offers several useful features when it comes to screen recording. You can record audio, choose webcam overlay, draw real-time on the screen, and more. Bandicam also offers long-term screen recording, stretching as long as 24 hours. Besides recording gameplay, it is also suitable for recording lectures, webinars, video calls, and more.

2.OBS Studio
OBS Studio offers open-source software for recording and live-streaming videos. The game recorder for PC is available for download on Windows, Mac, and Linux. OBS allows real-time audio and video capturing abilities without compromising on performance. You can capture multiple sources simultaneously, including windows, text, images, webcams, and more.
The tool allows users to set unlimited scenes and seamlessly switch between them. You can easily choose custom transitions, duplicate screens, and tweak other aspects.

3.Xbox Game Bar
Your Windows PC will likely have an in-built Game Bar offered by Xbox. It is a customizable gaming overlay that makes gaming easier. Among other useful features, the Game Bar allows for real-time recording of any gameplay on the PC.
The Xbox Game Bar offers easy keyboard shortcuts that can be customized for various functions. The start and end of the recording are also narrated by the tool, so you can hear when changes are made. Game Bar can also help find new teammates with LFG (Looking For Group) and chat with other Xbox users.

4.Action! – Game Recorder
Action! – Game Recorder is one of the best software currently available for recording gameplay on PC. With smooth recordings and high-quality streaming, it is a reliable option for novice and expert gamers.
It can record HD gameplay at up to 120fps with low CPU usage. Users can easily get around its easy-to-use interface. You can export your videos directly to Facebook and YouTube. Action! also supports live streaming to Twitch, YouTube, and Upstream. You can even control the video recording on your PC via your smartphone.

5.XSplit Broadcaster
Another remarkable tool that offers simple yet powerful gameplay recording is XSplit. You can use tools to create content for popular platforms like Twitch, YouTube, and TikTok. XSplit Broadcaster comes as a feature-packed production studio for content creation.
XSplit offers unlimited customization options when it comes to recording gameplay. It offers flawless video and audio quality without putting additional load on the system. XSplit ensures lag-free gameplay, so your efficiency is not affected while recording.

6.FBX
If you want high-performance HD recordings without interruptions in your gameplay, FBX is a reliable option. It is a dedicated game recorder offering many useful features to users. FBX can save highlights of the best parts of your gameplay. You can customize hotkeys that instantly save short videos of your best action.
It can also capture high-quality screenshots for easy sharing. FBX also allows live streaming options with rapid setups. The tool can automatically adjust to your bandwidth to help eliminate jerky streams.

7.D3DGear
For fast and efficient recordings, you can opt for D3DGear. It is a high-quality game screen recorder for PC containing all the essentials for smooth recordings. The tool is available on Windows computers as a plugin and add-on software.
D3DGear can record gameplay smoothly without causing the game to drop much in the frame rate. It also allows users to live stream their gameplay to Twitch. D3DGear can also record Oculus Rift VR gameplay with HD SBS stereoscopic videos. Furthermore, it can produce Constant Frame Rate (CFR) movies, often required with Adobe software.

8.Gecata by Movavi
Movavi offers its state-of-the-art game recorder for PC in the form of Gecata. The tool is a lightweight and solid program for recording and streaming gameplay. You can use it to grab the best moments of your gaming experience and share them with your peers across the globe.
Gecata enables users to record and stream their games at the same time without any lag. You can also record webcam and microphone, in-game sound effects, music, and dialogues all in one click. Gecata provides full control, allowing you to customize overlays to monitor frame rate, bit count, and other metrics.

9.Radeon ReLive
Radeon ReLive by AMD certainly deserves a spot on this list of game recorder software for PCs. It is a user-friendly game recorder that helps users capture and share gameplay videos and screenshots. Radeon ReLive is configuring-friendly and has a minimal impact on the FPS rate.
The tool works on systems with AMD graphics cards. It allows users to tweak their game and display settings, allowing for seamless gameplay. Radeon also contains a switch for saving power and preventing the system from overheating.

10.ScreenPal
Formerly known as Screencast-o-Matic, ScreenPal is a user-friendly tool designed to capture and share screen recordings. You can record and edit your content on the same platform using this versatile tool. ScreenPal is available on Windows, Mac, iOS, Android, and Chromebook devices.
Besides recording gameplay on a PC, you can also use it for education, work, and other personal purposes. ScreenPal comes with a built-in editor that helps you tweak your videos after recording them. You can also host and share content on its easily accessible cloud.

[Cost-Effective] Screen Recording in Wondershare Filmora
The tools mentioned above are great for recording gameplay on PC. However, you might have noticed that many of these tools offer pricing plans that can prove heavy on the wallet. If you are looking for a cost-effective solution for recording gameplay, Wondershare Filmora is a stellar choice.
Filmora by Wondershare is an all-in-one solution when it comes to content creation. While other game recorders for PC often offer specific tools, Filmora offers a 360-degree approach. Besides recording the screen, Filmora also allows users to compile and edit their recorded gameplay without ever exiting the platform.
Anyone Can Create a Tutorial With These Easy Steps
Free Download For Win 7 or later(64-bit)
Free Download For macOS 10.14 or later
How to Record Gameplay Using Wondershare Filmora
The Screen Record feature on Filmora is a simple yet powerful function that can help you capture your computer’s screen and webcam. You can record audio using the microphone and the system at the same time.
Filmora also lets users customize the area of the screen they wish to capture. This makes it arguably the best game screen recorder for PC. To capture gameplay on PC using Filmora, follow the steps below:
Step1Open Screen Recorder on Filmora
Install and launch Wondershare Filmora on your PC. You can select the “Screen Recorder” feature from the startup window on Filmora.

Alternatively, you can also go to the “File” tab and select “Record Media” from the dropdown list, then choose to record the webcam, PC screen, or voiceover.

Step2Adjust Screen Recording Settings
Once the Screen Recorder panel opens, you can choose the recording ratio from the menu under the “Square” icon. The available options are to record the full screen, a target window, or any custom size. You can then toggle the switches next to the “Microphone,” “System Audio,” and “Camera” options to turn them on or off. Filmora also lets users adjust the frame rate, quality, and other parameters.

Step3 Adjust Screen Recording Settings
Once the Screen Recorder panel opens, you can choose the recording ratio from the menu under the “Square” icon. The available options are to record the full screen, a target window, or any custom size. You can then toggle the switches next to the “Microphone,” “System Audio,” and “Camera” options to turn them on or off. Filmora also lets users adjust the frame rate, quality, and other parameters.
Step4Record Through Filmora and Conclude
After specifying the settings, tap the “Record” button to start recording your gameplay. Filmora will ensure your gameplay is not affected by the recording. Hit the “Stop” button once you are done and edit the file in Filmora. Finally, export the recorded gameplay to a location of your choice.

Conclusion
Many dedicated software are available to help you capture gameplay on PC. The top game recording software for PC and their pricing plans are mentioned above for your convenience. However, our advice is to switch to Wondershare Filmora. Not only does Filmora offer a cost-effective solution, but it is also much easier to use and provides high-quality recordings without lag.
Screen Recording Now For Win 7 or later(64-bit)
Screen Recording Now For macOS 10.14 or later
Part 1. Finding a Good Gameplay Recorder on PC? Get One Instantly
Now that you are aware of some top benefits that game recorders provide, it is time to learn how to reap these benefits. There are currently several apps to help you capture gameplay on PC. The following list provides an insight into the top 10 apps to record gameplay on your computer:
Top Gameplay Recorder Tools on PC:
1.Bandicam
2. OBS Studio
3.Xbox Game Bar
4.Action! – Game Recorder
5.XSplit Broadcaster
6.FBX
7.D3DGear
8.Geceta by Movavi
9.Radeon ReLive
10.ScreenPal
1.Bandicam
Bandicam stands amongst the top gameplay recorders available for PC today. It is an easy-to-use and free screen recording software that can capture anything you want on your screen.
Bandicam offers several useful features when it comes to screen recording. You can record audio, choose webcam overlay, draw real-time on the screen, and more. Bandicam also offers long-term screen recording, stretching as long as 24 hours. Besides recording gameplay, it is also suitable for recording lectures, webinars, video calls, and more.

2.OBS Studio
OBS Studio offers open-source software for recording and live-streaming videos. The game recorder for PC is available for download on Windows, Mac, and Linux. OBS allows real-time audio and video capturing abilities without compromising on performance. You can capture multiple sources simultaneously, including windows, text, images, webcams, and more.
The tool allows users to set unlimited scenes and seamlessly switch between them. You can easily choose custom transitions, duplicate screens, and tweak other aspects.

3.Xbox Game Bar
Your Windows PC will likely have an in-built Game Bar offered by Xbox. It is a customizable gaming overlay that makes gaming easier. Among other useful features, the Game Bar allows for real-time recording of any gameplay on the PC.
The Xbox Game Bar offers easy keyboard shortcuts that can be customized for various functions. The start and end of the recording are also narrated by the tool, so you can hear when changes are made. Game Bar can also help find new teammates with LFG (Looking For Group) and chat with other Xbox users.

4.Action! – Game Recorder
Action! – Game Recorder is one of the best software currently available for recording gameplay on PC. With smooth recordings and high-quality streaming, it is a reliable option for novice and expert gamers.
It can record HD gameplay at up to 120fps with low CPU usage. Users can easily get around its easy-to-use interface. You can export your videos directly to Facebook and YouTube. Action! also supports live streaming to Twitch, YouTube, and Upstream. You can even control the video recording on your PC via your smartphone.

5.XSplit Broadcaster
Another remarkable tool that offers simple yet powerful gameplay recording is XSplit. You can use tools to create content for popular platforms like Twitch, YouTube, and TikTok. XSplit Broadcaster comes as a feature-packed production studio for content creation.
XSplit offers unlimited customization options when it comes to recording gameplay. It offers flawless video and audio quality without putting additional load on the system. XSplit ensures lag-free gameplay, so your efficiency is not affected while recording.

6.FBX
If you want high-performance HD recordings without interruptions in your gameplay, FBX is a reliable option. It is a dedicated game recorder offering many useful features to users. FBX can save highlights of the best parts of your gameplay. You can customize hotkeys that instantly save short videos of your best action.
It can also capture high-quality screenshots for easy sharing. FBX also allows live streaming options with rapid setups. The tool can automatically adjust to your bandwidth to help eliminate jerky streams.

7.D3DGear
For fast and efficient recordings, you can opt for D3DGear. It is a high-quality game screen recorder for PC containing all the essentials for smooth recordings. The tool is available on Windows computers as a plugin and add-on software.
D3DGear can record gameplay smoothly without causing the game to drop much in the frame rate. It also allows users to live stream their gameplay to Twitch. D3DGear can also record Oculus Rift VR gameplay with HD SBS stereoscopic videos. Furthermore, it can produce Constant Frame Rate (CFR) movies, often required with Adobe software.

8.Gecata by Movavi
Movavi offers its state-of-the-art game recorder for PC in the form of Gecata. The tool is a lightweight and solid program for recording and streaming gameplay. You can use it to grab the best moments of your gaming experience and share them with your peers across the globe.
Gecata enables users to record and stream their games at the same time without any lag. You can also record webcam and microphone, in-game sound effects, music, and dialogues all in one click. Gecata provides full control, allowing you to customize overlays to monitor frame rate, bit count, and other metrics.

9.Radeon ReLive
Radeon ReLive by AMD certainly deserves a spot on this list of game recorder software for PCs. It is a user-friendly game recorder that helps users capture and share gameplay videos and screenshots. Radeon ReLive is configuring-friendly and has a minimal impact on the FPS rate.
The tool works on systems with AMD graphics cards. It allows users to tweak their game and display settings, allowing for seamless gameplay. Radeon also contains a switch for saving power and preventing the system from overheating.

10.ScreenPal
Formerly known as Screencast-o-Matic, ScreenPal is a user-friendly tool designed to capture and share screen recordings. You can record and edit your content on the same platform using this versatile tool. ScreenPal is available on Windows, Mac, iOS, Android, and Chromebook devices.
Besides recording gameplay on a PC, you can also use it for education, work, and other personal purposes. ScreenPal comes with a built-in editor that helps you tweak your videos after recording them. You can also host and share content on its easily accessible cloud.

[Cost-Effective] Screen Recording in Wondershare Filmora
The tools mentioned above are great for recording gameplay on PC. However, you might have noticed that many of these tools offer pricing plans that can prove heavy on the wallet. If you are looking for a cost-effective solution for recording gameplay, Wondershare Filmora is a stellar choice.
Filmora by Wondershare is an all-in-one solution when it comes to content creation. While other game recorders for PC often offer specific tools, Filmora offers a 360-degree approach. Besides recording the screen, Filmora also allows users to compile and edit their recorded gameplay without ever exiting the platform.
Anyone Can Create a Tutorial With These Easy Steps
Free Download For Win 7 or later(64-bit)
Free Download For macOS 10.14 or later
How to Record Gameplay Using Wondershare Filmora
The Screen Record feature on Filmora is a simple yet powerful function that can help you capture your computer’s screen and webcam. You can record audio using the microphone and the system at the same time.
Filmora also lets users customize the area of the screen they wish to capture. This makes it arguably the best game screen recorder for PC. To capture gameplay on PC using Filmora, follow the steps below:
Step1Open Screen Recorder on Filmora
Install and launch Wondershare Filmora on your PC. You can select the “Screen Recorder” feature from the startup window on Filmora.

Alternatively, you can also go to the “File” tab and select “Record Media” from the dropdown list, then choose to record the webcam, PC screen, or voiceover.

Step2Adjust Screen Recording Settings
Once the Screen Recorder panel opens, you can choose the recording ratio from the menu under the “Square” icon. The available options are to record the full screen, a target window, or any custom size. You can then toggle the switches next to the “Microphone,” “System Audio,” and “Camera” options to turn them on or off. Filmora also lets users adjust the frame rate, quality, and other parameters.

Step3 Adjust Screen Recording Settings
Once the Screen Recorder panel opens, you can choose the recording ratio from the menu under the “Square” icon. The available options are to record the full screen, a target window, or any custom size. You can then toggle the switches next to the “Microphone,” “System Audio,” and “Camera” options to turn them on or off. Filmora also lets users adjust the frame rate, quality, and other parameters.
Step4Record Through Filmora and Conclude
After specifying the settings, tap the “Record” button to start recording your gameplay. Filmora will ensure your gameplay is not affected by the recording. Hit the “Stop” button once you are done and edit the file in Filmora. Finally, export the recorded gameplay to a location of your choice.

Conclusion
Many dedicated software are available to help you capture gameplay on PC. The top game recording software for PC and their pricing plans are mentioned above for your convenience. However, our advice is to switch to Wondershare Filmora. Not only does Filmora offer a cost-effective solution, but it is also much easier to use and provides high-quality recordings without lag.
Confused About Which GoPro Should You Use? This Article Introduces and Provides a Detailed Overview of the Best GoPro for YouTubers You Can Find in the Market for Vlogging
Vlogging has developed into quite an industry in a short period. We have seen many people building up their image as professional vloggers who have entertained millions of users with their unique content. However, while understanding the dynamics of vlogging, it is particularly important to set up the equipment that would help the user in their vlogging.
This article discusses very proficient equipment, GoPro for YouTubers, which has been considered across various scales for professional vlogging. We shall be providing our readers with an idea of the best GoPro they can be used to cover their vlogs.
In this article
01 What Need to Be Considered Before Choosing a GoPro for Vlogging?
02 8 Best GoPro for Vlogging in 2022
Part 1: What Need to Be Considered Before Choosing a GoPro for Vlogging?
GoPro cameras are known for their versatility. While being simply the best tool for vlogging, they are known for offering several impressive features. This, however, needs to be considered before choosing a GoPro for vlogging. Get ready as we are about to figure them out.
1. Portable and Easy to Carry
Isn’t it great that you are not required to carry heavy equipment everywhere? GoPro cameras offer convenience to their users by providing small sizes and rugged designs. This can prove to be extremely good for vloggers who have rough uses.
2. Multiple Video Features
Are you tired of capturing a simple video? GoPro offers you multiple options while capturing videos, which come in the form of time-lapses. Get creative with the videos that you shoot across your vlogs. Isn’t it great?
3. Affordability
GoPro should never be judged by its size. These tools are considered the most high-end cameras that can be used for vlogging. As they compete for professional cameras, they are considered relatively affordable in their comparison, which makes them a suitable choice in vlogging.
4. Shooting Modes
Have you ever heard about shooting modes? GoPro for vlogging comes up with different modes that can help you manage impressive visuals for your videos. GoPro helps you design content that is visually appealing to the viewers.
5. Quality of Video
Have you ever thought to have video resolutions up to 6K in a small camera? GoPro provides you the opportunity of witnessing history across the cameras with its stunning video resolution features. This is truly exceptional in the video-making industry.
Part 2: 8 Best GoPro for Vlogging in 2022
Once you are aware of what should be kept in mind for selecting a GoPro for vlogging, it is time to come up with some of the best-recommended models according to the use case of the vlogger. Let’s get started on this exceptional journey of finding the best GoPro for yourselves. Come right away!
1. GoPro Hero10 Black
Price: $499.99
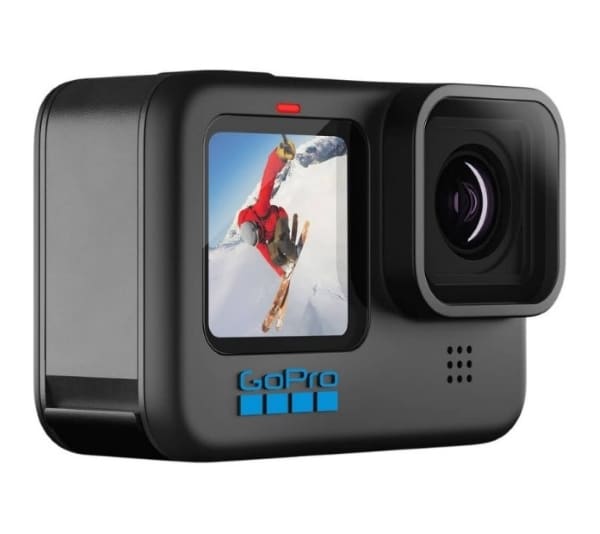
The first and foremost model that may come into our mind is the GoPro Hero10 Black, which is, without any discussion, the most advanced model in GoPro cameras. Taking the features to the next level, GoPro Hero10 Black is available with a 5.3K resolution, which is the smoothest resolution in videos you can ask for. It provides faster processors than its predecessors, with features that make it the top-of-the-line choice.
You can find improved stabilization across Hero10; however, the price tag across the camera is as much as a mirrorless camera. Absolutely stunning, it is!
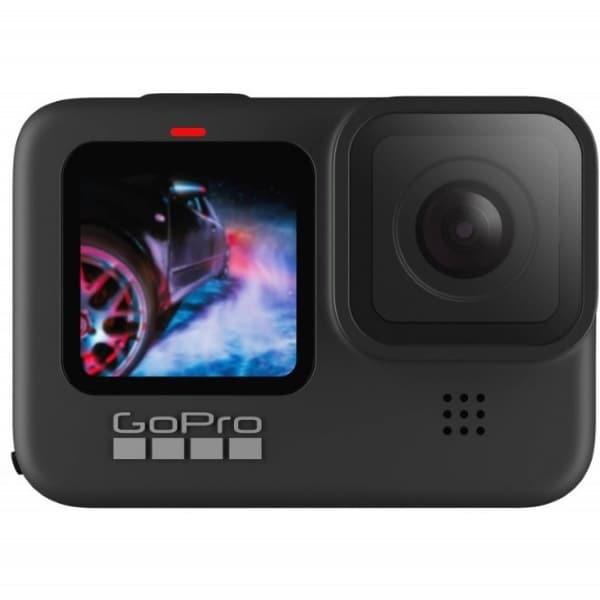
2. GoPro Hero9 Black
Price: $399.99
Another impressive model in the GoPro products is the Hero9 Black model, referred to as the previous iteration of the Hero10. Although it is not as remarkable as the Hero10, it takes up videos with 5K Ultra HD resolution, with a 1080p live streaming facility. Talking about the stabilization of this camera, it isn’t as proficient as the Hero10; however, it still performs better than the previous iterations.
A heavier camera’s multifunctional characteristics are a few major points that need to be considered for Hero9 Black. Do you wish to buy this?
3. GoPro Hero8 Black
Price: $349.98
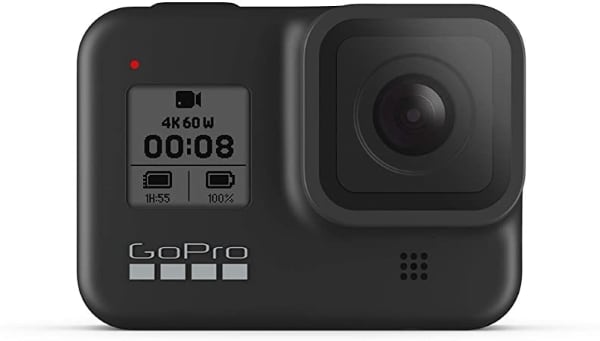
GoPro cameras are known for their effective sizes and high-performance results. GoPro Hero8 Black is recognized among the most versatile GoPro for YouTubers, accompanied by the small size. Being the first GoPro camera that provides a microphone to its users, GoPro Hero8 changed the dynamics of video making with its effective features. Users can cover 4K Ultra HD video across the device with a 12MP resolution for photos.
The Media Mode offered across the device makes video enhancement possible across GoPro for vlogging, which is commendable.
4. GoPro Hero7 Silver
Price: $299.99
Are you confused about the GoPro that fits your needs? GoPro Hero7 Silver is the most budget-friendly vlogging camera that can be found across the market. GoPro Hero7 Silver can be your perfect companion in tough vlogs with a rugged outlook and waterproofing. It provides voice control, two-mic, slo-mo, time-lapse across a 4K Ultra HD resolution, which broadens the possibility for the users.
This GoPro for YouTubers is still among the people’s favorites, which makes it a consistent choice among newbies. Isn’t it great?

5. GoPro Max
Price: $549.98
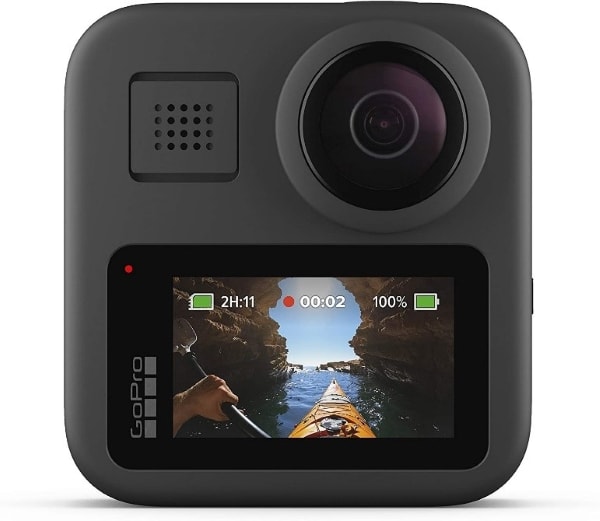
Want a camera that captures 360-degree shots? GoPro Max is the camera that you should look for in the market. GoPro Max is a very impressive up-gradation across GoPro cameras, which came to offer more features to it than before. The two 180-degree cameras provide better stabilization, thus crossing cameras like Hero8 quite easily. The details are extremely proficient in this design with improved mic facilities and other characteristics.
If you wish to shift yourselves from a single-camera device, this GoPro for vlogging is the perfect choice you can come by.
6. GoPro Hero7 Black
Price: $319.99
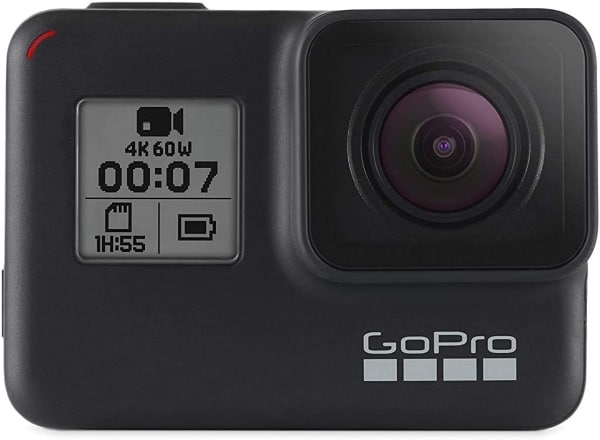
GoPro Hero7 Black, though introduced in 2018, came out to be a quite advanced version of the previous GoPro cameras. This camera allows 4K video resolution shooting under 60fps, stabilizing for smoothing out shakes and vibrations. The video quality from a GoPro is different from the rest, which makes it basic equipment in vlogging.
This GoPro for YouTubers offered excessive controls to its user base, with commands that were able to neutralize and optimize video enhancement. What a great choice!
7. GoPro Fusion
Price: $279.99
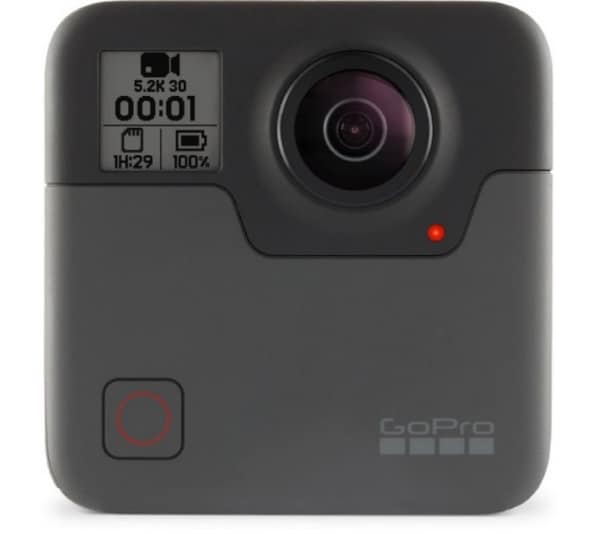
This is a hugely different camera across the complete GoPro series. Fusion is known for many things, out of which the size comes out to be the main reason for its popularity. This iteration in GoPro cameras provides 5.2K video resolution quality under a pocket-sized model. Although it is quite durable compared to the other cameras in the market for vlogging, the price tag across this device is usually not much acceptable for users.
It is a bold choice to have Fusion as your GoPro for vlogging, which also allows adding audio across the 360-degree feature. This is sensational.
8. GoPro Hero7 White
Price: $274.49
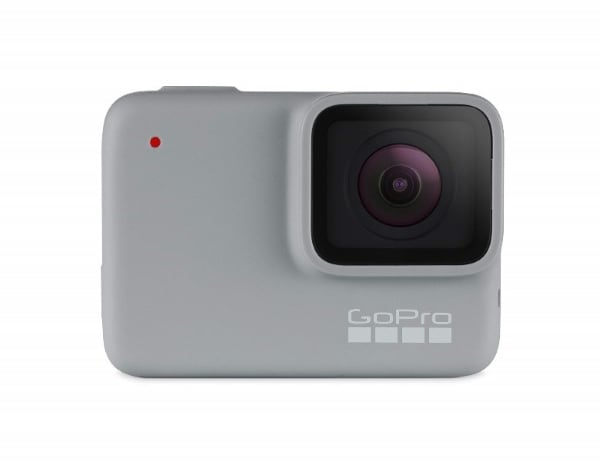
GoPro Hero7 White is a perfect option to start vlogging. Designed for beginners, it provides Full HD video resolution with a touch screen for better functioning. Although the camera is quite downgraded in terms of the features it offers, it is basically offered for catering to user-friendliness.
It also offers video stabilization for introducing users to a certain environment in video editing. With an affordable price tag, this camera can be the perfect start as your GoPro for vlogging. Do you wish to get started?
Closing Words
Got to know about the best GoPro cameras? Are you ready to select your GoPro for vlogging? We hope that this article has featured the most optimal options. Go through this article to get the perfect start for your vlogging journey. However, if you wish to have a good experience with video editing, you should consider working on Wondershare Filmora .
The tool manages all GoPro videos to perfection. It is truly an exceptional platform to work with. Along with that, Filmora provides a list of impressive video editing functions which can be adopted for making the video look professional. That is why this platform is recommended across multiple stages. Surely the best editor you can use!
Wondershare Filmora
Get started easily with Filmora’s powerful performance, intuitive interface, and countless effects!
Try It Free Try It Free Try It Free Learn More >

02 8 Best GoPro for Vlogging in 2022
Part 1: What Need to Be Considered Before Choosing a GoPro for Vlogging?
GoPro cameras are known for their versatility. While being simply the best tool for vlogging, they are known for offering several impressive features. This, however, needs to be considered before choosing a GoPro for vlogging. Get ready as we are about to figure them out.

1. Portable and Easy to Carry
Isn’t it great that you are not required to carry heavy equipment everywhere? GoPro cameras offer convenience to their users by providing small sizes and rugged designs. This can prove to be extremely good for vloggers who have rough uses.
2. Multiple Video Features
Are you tired of capturing a simple video? GoPro offers you multiple options while capturing videos, which come in the form of time-lapses. Get creative with the videos that you shoot across your vlogs. Isn’t it great?
3. Affordability
GoPro should never be judged by its size. These tools are considered the most high-end cameras that can be used for vlogging. As they compete for professional cameras, they are considered relatively affordable in their comparison, which makes them a suitable choice in vlogging.
4. Shooting Modes
Have you ever heard about shooting modes? GoPro for vlogging comes up with different modes that can help you manage impressive visuals for your videos. GoPro helps you design content that is visually appealing to the viewers.
5. Quality of Video
Have you ever thought to have video resolutions up to 6K in a small camera? GoPro provides you the opportunity of witnessing history across the cameras with its stunning video resolution features. This is truly exceptional in the video-making industry.
Part 2: 8 Best GoPro for Vlogging in 2022
Once you are aware of what should be kept in mind for selecting a GoPro for vlogging, it is time to come up with some of the best-recommended models according to the use case of the vlogger. Let’s get started on this exceptional journey of finding the best GoPro for yourselves. Come right away!
1. GoPro Hero10 Black
Price: $499.99
The first and foremost model that may come into our mind is the GoPro Hero10 Black, which is, without any discussion, the most advanced model in GoPro cameras. Taking the features to the next level, GoPro Hero10 Black is available with a 5.3K resolution, which is the smoothest resolution in videos you can ask for. It provides faster processors than its predecessors, with features that make it the top-of-the-line choice.
You can find improved stabilization across Hero10; however, the price tag across the camera is as much as a mirrorless camera. Absolutely stunning, it is!

2. GoPro Hero9 Black
Price: $399.99
Another impressive model in the GoPro products is the Hero9 Black model, referred to as the previous iteration of the Hero10. Although it is not as remarkable as the Hero10, it takes up videos with 5K Ultra HD resolution, with a 1080p live streaming facility. Talking about the stabilization of this camera, it isn’t as proficient as the Hero10; however, it still performs better than the previous iterations.
A heavier camera’s multifunctional characteristics are a few major points that need to be considered for Hero9 Black. Do you wish to buy this?

3. GoPro Hero8 Black
Price: $349.98
GoPro cameras are known for their effective sizes and high-performance results. GoPro Hero8 Black is recognized among the most versatile GoPro for YouTubers, accompanied by the small size. Being the first GoPro camera that provides a microphone to its users, GoPro Hero8 changed the dynamics of video making with its effective features. Users can cover 4K Ultra HD video across the device with a 12MP resolution for photos.
The Media Mode offered across the device makes video enhancement possible across GoPro for vlogging, which is commendable.

4. GoPro Hero7 Silver
Price: $299.99
Are you confused about the GoPro that fits your needs? GoPro Hero7 Silver is the most budget-friendly vlogging camera that can be found across the market. GoPro Hero7 Silver can be your perfect companion in tough vlogs with a rugged outlook and waterproofing. It provides voice control, two-mic, slo-mo, time-lapse across a 4K Ultra HD resolution, which broadens the possibility for the users.
This GoPro for YouTubers is still among the people’s favorites, which makes it a consistent choice among newbies. Isn’t it great?

5. GoPro Max
Price: $549.98
Want a camera that captures 360-degree shots? GoPro Max is the camera that you should look for in the market. GoPro Max is a very impressive up-gradation across GoPro cameras, which came to offer more features to it than before. The two 180-degree cameras provide better stabilization, thus crossing cameras like Hero8 quite easily. The details are extremely proficient in this design with improved mic facilities and other characteristics.
If you wish to shift yourselves from a single-camera device, this GoPro for vlogging is the perfect choice you can come by.

6. GoPro Hero7 Black
Price: $319.99
GoPro Hero7 Black, though introduced in 2018, came out to be a quite advanced version of the previous GoPro cameras. This camera allows 4K video resolution shooting under 60fps, stabilizing for smoothing out shakes and vibrations. The video quality from a GoPro is different from the rest, which makes it basic equipment in vlogging.
This GoPro for YouTubers offered excessive controls to its user base, with commands that were able to neutralize and optimize video enhancement. What a great choice!

7. GoPro Fusion
Price: $279.99
This is a hugely different camera across the complete GoPro series. Fusion is known for many things, out of which the size comes out to be the main reason for its popularity. This iteration in GoPro cameras provides 5.2K video resolution quality under a pocket-sized model. Although it is quite durable compared to the other cameras in the market for vlogging, the price tag across this device is usually not much acceptable for users.
It is a bold choice to have Fusion as your GoPro for vlogging, which also allows adding audio across the 360-degree feature. This is sensational.

8. GoPro Hero7 White
Price: $274.49
GoPro Hero7 White is a perfect option to start vlogging. Designed for beginners, it provides Full HD video resolution with a touch screen for better functioning. Although the camera is quite downgraded in terms of the features it offers, it is basically offered for catering to user-friendliness.
It also offers video stabilization for introducing users to a certain environment in video editing. With an affordable price tag, this camera can be the perfect start as your GoPro for vlogging. Do you wish to get started?

Closing Words
Got to know about the best GoPro cameras? Are you ready to select your GoPro for vlogging? We hope that this article has featured the most optimal options. Go through this article to get the perfect start for your vlogging journey. However, if you wish to have a good experience with video editing, you should consider working on Wondershare Filmora .
The tool manages all GoPro videos to perfection. It is truly an exceptional platform to work with. Along with that, Filmora provides a list of impressive video editing functions which can be adopted for making the video look professional. That is why this platform is recommended across multiple stages. Surely the best editor you can use!
Wondershare Filmora
Get started easily with Filmora’s powerful performance, intuitive interface, and countless effects!
Try It Free Try It Free Try It Free Learn More >

02 8 Best GoPro for Vlogging in 2022
Part 1: What Need to Be Considered Before Choosing a GoPro for Vlogging?
GoPro cameras are known for their versatility. While being simply the best tool for vlogging, they are known for offering several impressive features. This, however, needs to be considered before choosing a GoPro for vlogging. Get ready as we are about to figure them out.

1. Portable and Easy to Carry
Isn’t it great that you are not required to carry heavy equipment everywhere? GoPro cameras offer convenience to their users by providing small sizes and rugged designs. This can prove to be extremely good for vloggers who have rough uses.
2. Multiple Video Features
Are you tired of capturing a simple video? GoPro offers you multiple options while capturing videos, which come in the form of time-lapses. Get creative with the videos that you shoot across your vlogs. Isn’t it great?
3. Affordability
GoPro should never be judged by its size. These tools are considered the most high-end cameras that can be used for vlogging. As they compete for professional cameras, they are considered relatively affordable in their comparison, which makes them a suitable choice in vlogging.
4. Shooting Modes
Have you ever heard about shooting modes? GoPro for vlogging comes up with different modes that can help you manage impressive visuals for your videos. GoPro helps you design content that is visually appealing to the viewers.
5. Quality of Video
Have you ever thought to have video resolutions up to 6K in a small camera? GoPro provides you the opportunity of witnessing history across the cameras with its stunning video resolution features. This is truly exceptional in the video-making industry.
Part 2: 8 Best GoPro for Vlogging in 2022
Once you are aware of what should be kept in mind for selecting a GoPro for vlogging, it is time to come up with some of the best-recommended models according to the use case of the vlogger. Let’s get started on this exceptional journey of finding the best GoPro for yourselves. Come right away!
1. GoPro Hero10 Black
Price: $499.99
The first and foremost model that may come into our mind is the GoPro Hero10 Black, which is, without any discussion, the most advanced model in GoPro cameras. Taking the features to the next level, GoPro Hero10 Black is available with a 5.3K resolution, which is the smoothest resolution in videos you can ask for. It provides faster processors than its predecessors, with features that make it the top-of-the-line choice.
You can find improved stabilization across Hero10; however, the price tag across the camera is as much as a mirrorless camera. Absolutely stunning, it is!

2. GoPro Hero9 Black
Price: $399.99
Another impressive model in the GoPro products is the Hero9 Black model, referred to as the previous iteration of the Hero10. Although it is not as remarkable as the Hero10, it takes up videos with 5K Ultra HD resolution, with a 1080p live streaming facility. Talking about the stabilization of this camera, it isn’t as proficient as the Hero10; however, it still performs better than the previous iterations.
A heavier camera’s multifunctional characteristics are a few major points that need to be considered for Hero9 Black. Do you wish to buy this?

3. GoPro Hero8 Black
Price: $349.98
GoPro cameras are known for their effective sizes and high-performance results. GoPro Hero8 Black is recognized among the most versatile GoPro for YouTubers, accompanied by the small size. Being the first GoPro camera that provides a microphone to its users, GoPro Hero8 changed the dynamics of video making with its effective features. Users can cover 4K Ultra HD video across the device with a 12MP resolution for photos.
The Media Mode offered across the device makes video enhancement possible across GoPro for vlogging, which is commendable.

4. GoPro Hero7 Silver
Price: $299.99
Are you confused about the GoPro that fits your needs? GoPro Hero7 Silver is the most budget-friendly vlogging camera that can be found across the market. GoPro Hero7 Silver can be your perfect companion in tough vlogs with a rugged outlook and waterproofing. It provides voice control, two-mic, slo-mo, time-lapse across a 4K Ultra HD resolution, which broadens the possibility for the users.
This GoPro for YouTubers is still among the people’s favorites, which makes it a consistent choice among newbies. Isn’t it great?

5. GoPro Max
Price: $549.98
Want a camera that captures 360-degree shots? GoPro Max is the camera that you should look for in the market. GoPro Max is a very impressive up-gradation across GoPro cameras, which came to offer more features to it than before. The two 180-degree cameras provide better stabilization, thus crossing cameras like Hero8 quite easily. The details are extremely proficient in this design with improved mic facilities and other characteristics.
If you wish to shift yourselves from a single-camera device, this GoPro for vlogging is the perfect choice you can come by.

6. GoPro Hero7 Black
Price: $319.99
GoPro Hero7 Black, though introduced in 2018, came out to be a quite advanced version of the previous GoPro cameras. This camera allows 4K video resolution shooting under 60fps, stabilizing for smoothing out shakes and vibrations. The video quality from a GoPro is different from the rest, which makes it basic equipment in vlogging.
This GoPro for YouTubers offered excessive controls to its user base, with commands that were able to neutralize and optimize video enhancement. What a great choice!

7. GoPro Fusion
Price: $279.99
This is a hugely different camera across the complete GoPro series. Fusion is known for many things, out of which the size comes out to be the main reason for its popularity. This iteration in GoPro cameras provides 5.2K video resolution quality under a pocket-sized model. Although it is quite durable compared to the other cameras in the market for vlogging, the price tag across this device is usually not much acceptable for users.
It is a bold choice to have Fusion as your GoPro for vlogging, which also allows adding audio across the 360-degree feature. This is sensational.

8. GoPro Hero7 White
Price: $274.49
GoPro Hero7 White is a perfect option to start vlogging. Designed for beginners, it provides Full HD video resolution with a touch screen for better functioning. Although the camera is quite downgraded in terms of the features it offers, it is basically offered for catering to user-friendliness.
It also offers video stabilization for introducing users to a certain environment in video editing. With an affordable price tag, this camera can be the perfect start as your GoPro for vlogging. Do you wish to get started?

Closing Words
Got to know about the best GoPro cameras? Are you ready to select your GoPro for vlogging? We hope that this article has featured the most optimal options. Go through this article to get the perfect start for your vlogging journey. However, if you wish to have a good experience with video editing, you should consider working on Wondershare Filmora .
The tool manages all GoPro videos to perfection. It is truly an exceptional platform to work with. Along with that, Filmora provides a list of impressive video editing functions which can be adopted for making the video look professional. That is why this platform is recommended across multiple stages. Surely the best editor you can use!
Wondershare Filmora
Get started easily with Filmora’s powerful performance, intuitive interface, and countless effects!
Try It Free Try It Free Try It Free Learn More >

02 8 Best GoPro for Vlogging in 2022
Part 1: What Need to Be Considered Before Choosing a GoPro for Vlogging?
GoPro cameras are known for their versatility. While being simply the best tool for vlogging, they are known for offering several impressive features. This, however, needs to be considered before choosing a GoPro for vlogging. Get ready as we are about to figure them out.

1. Portable and Easy to Carry
Isn’t it great that you are not required to carry heavy equipment everywhere? GoPro cameras offer convenience to their users by providing small sizes and rugged designs. This can prove to be extremely good for vloggers who have rough uses.
2. Multiple Video Features
Are you tired of capturing a simple video? GoPro offers you multiple options while capturing videos, which come in the form of time-lapses. Get creative with the videos that you shoot across your vlogs. Isn’t it great?
3. Affordability
GoPro should never be judged by its size. These tools are considered the most high-end cameras that can be used for vlogging. As they compete for professional cameras, they are considered relatively affordable in their comparison, which makes them a suitable choice in vlogging.
4. Shooting Modes
Have you ever heard about shooting modes? GoPro for vlogging comes up with different modes that can help you manage impressive visuals for your videos. GoPro helps you design content that is visually appealing to the viewers.
5. Quality of Video
Have you ever thought to have video resolutions up to 6K in a small camera? GoPro provides you the opportunity of witnessing history across the cameras with its stunning video resolution features. This is truly exceptional in the video-making industry.
Part 2: 8 Best GoPro for Vlogging in 2022
Once you are aware of what should be kept in mind for selecting a GoPro for vlogging, it is time to come up with some of the best-recommended models according to the use case of the vlogger. Let’s get started on this exceptional journey of finding the best GoPro for yourselves. Come right away!
1. GoPro Hero10 Black
Price: $499.99
The first and foremost model that may come into our mind is the GoPro Hero10 Black, which is, without any discussion, the most advanced model in GoPro cameras. Taking the features to the next level, GoPro Hero10 Black is available with a 5.3K resolution, which is the smoothest resolution in videos you can ask for. It provides faster processors than its predecessors, with features that make it the top-of-the-line choice.
You can find improved stabilization across Hero10; however, the price tag across the camera is as much as a mirrorless camera. Absolutely stunning, it is!

2. GoPro Hero9 Black
Price: $399.99
Another impressive model in the GoPro products is the Hero9 Black model, referred to as the previous iteration of the Hero10. Although it is not as remarkable as the Hero10, it takes up videos with 5K Ultra HD resolution, with a 1080p live streaming facility. Talking about the stabilization of this camera, it isn’t as proficient as the Hero10; however, it still performs better than the previous iterations.
A heavier camera’s multifunctional characteristics are a few major points that need to be considered for Hero9 Black. Do you wish to buy this?

3. GoPro Hero8 Black
Price: $349.98
GoPro cameras are known for their effective sizes and high-performance results. GoPro Hero8 Black is recognized among the most versatile GoPro for YouTubers, accompanied by the small size. Being the first GoPro camera that provides a microphone to its users, GoPro Hero8 changed the dynamics of video making with its effective features. Users can cover 4K Ultra HD video across the device with a 12MP resolution for photos.
The Media Mode offered across the device makes video enhancement possible across GoPro for vlogging, which is commendable.

4. GoPro Hero7 Silver
Price: $299.99
Are you confused about the GoPro that fits your needs? GoPro Hero7 Silver is the most budget-friendly vlogging camera that can be found across the market. GoPro Hero7 Silver can be your perfect companion in tough vlogs with a rugged outlook and waterproofing. It provides voice control, two-mic, slo-mo, time-lapse across a 4K Ultra HD resolution, which broadens the possibility for the users.
This GoPro for YouTubers is still among the people’s favorites, which makes it a consistent choice among newbies. Isn’t it great?

5. GoPro Max
Price: $549.98
Want a camera that captures 360-degree shots? GoPro Max is the camera that you should look for in the market. GoPro Max is a very impressive up-gradation across GoPro cameras, which came to offer more features to it than before. The two 180-degree cameras provide better stabilization, thus crossing cameras like Hero8 quite easily. The details are extremely proficient in this design with improved mic facilities and other characteristics.
If you wish to shift yourselves from a single-camera device, this GoPro for vlogging is the perfect choice you can come by.

6. GoPro Hero7 Black
Price: $319.99
GoPro Hero7 Black, though introduced in 2018, came out to be a quite advanced version of the previous GoPro cameras. This camera allows 4K video resolution shooting under 60fps, stabilizing for smoothing out shakes and vibrations. The video quality from a GoPro is different from the rest, which makes it basic equipment in vlogging.
This GoPro for YouTubers offered excessive controls to its user base, with commands that were able to neutralize and optimize video enhancement. What a great choice!

7. GoPro Fusion
Price: $279.99
This is a hugely different camera across the complete GoPro series. Fusion is known for many things, out of which the size comes out to be the main reason for its popularity. This iteration in GoPro cameras provides 5.2K video resolution quality under a pocket-sized model. Although it is quite durable compared to the other cameras in the market for vlogging, the price tag across this device is usually not much acceptable for users.
It is a bold choice to have Fusion as your GoPro for vlogging, which also allows adding audio across the 360-degree feature. This is sensational.

8. GoPro Hero7 White
Price: $274.49
GoPro Hero7 White is a perfect option to start vlogging. Designed for beginners, it provides Full HD video resolution with a touch screen for better functioning. Although the camera is quite downgraded in terms of the features it offers, it is basically offered for catering to user-friendliness.
It also offers video stabilization for introducing users to a certain environment in video editing. With an affordable price tag, this camera can be the perfect start as your GoPro for vlogging. Do you wish to get started?

Closing Words
Got to know about the best GoPro cameras? Are you ready to select your GoPro for vlogging? We hope that this article has featured the most optimal options. Go through this article to get the perfect start for your vlogging journey. However, if you wish to have a good experience with video editing, you should consider working on Wondershare Filmora .
The tool manages all GoPro videos to perfection. It is truly an exceptional platform to work with. Along with that, Filmora provides a list of impressive video editing functions which can be adopted for making the video look professional. That is why this platform is recommended across multiple stages. Surely the best editor you can use!
Wondershare Filmora
Get started easily with Filmora’s powerful performance, intuitive interface, and countless effects!
Try It Free Try It Free Try It Free Learn More >

How to to Mimic Professional Filming Gears
The professional and expensive gears are primarily out of budget for starters. But there is no need to stop filming because household things will give good output.
In this article, you will learn 6 pro tips to make professional filming gear using cardboard, container, and tape. It will turn out into POV and barrel roll shots. Scroll more to learn the top ways, and then enjoy the rest with your audience.
Part 1. Things to Remember Before Making Gears
Before using tools for professional videos, you should remember some side effects and cautions to make everything reliable and simple. Read the below outlines!
Not Professional Results
You should remember that homemade tools will give you different results than professional gear because they are expensive for a purpose. But you can experiment and get fun during filming with these products.
Safety Measures
If you use any heavy or temperature-sensitive equipment, you should take safety before operating them.
Handle Carefully
Before experimenting, make sure that you are holding everything tightly. Ensure that no accident occurs during filming!
After taking precautions and understanding the output, it’s time to make tools and film!
Part 2. Smooth Camera Movement with A Door
With a simple mobile camera, you can make smooth shots of any action, like walking, running, and playing. There is no need to get any professional gear.
It easy to achieve by attaching a camera to the door. You can use duct or any other tape which is easily available in the home. Fasten the mobile phone to the side of the door with tape, as shown below!

Moving the door while performing any action will result in smooth shots. Check out the final results below.

Part 3. Film Shots of Underwater
Filming underwater is always a dream of any videographer, but we were limited to get shots from the water’s surface. So now it’s time to add more creativity to your video.
First, you need to take a transparent container or any glass container. Pour water according to your need in it.
![]()
Note: Ensure the container is light enough to put on the phone.
Then, place the container on the lens of the phone to make a video. Then, take care of the phone from the water.

Pro Tip: You can also shine light source in water and add glitter or colors to get more astonishing shots.
Part 4. Make Colourful Shots Without Coloured Lights
All filmmakers love party lights and want to add colors like that in the video. Different colored lights in videos usually represent different mood swings and enhance the creativity of storytellers.
Professional videographers use expensive lights to give these effects. But you don’t need to purchase any expensive gear. Because you can make colorful shots easily with colored plastic binder dividers, or you can also use cellophane wraps.
First, wrap the colored divider around the LED light or any light you use to shoot video.
![]()
Note: Check the light temperature after short intervals because it melts or burns the dividers when the light source gets hot.

Now make the video and try with different colors to add suspense, horror, and happy effects to the video.

The video still needs more creative effects and designs; scroll more to read exciting tips.
Part 5. Different Shapes of Light with Cardboard
To add a fantasy location in the video and make light effects in the form of shapes, try out easily available cardboard. Most of the time, aesthetic videos are made by these hacks, giving viewers different vibes.
Only a professional photographer and videographer know how to attract the audience to the shots by doing these simple hacks.
The interesting thing is that if light has more shape, it will precisely describe more about the scene’s backstory, location, and context. Give it a try!
Step1 Cutting of cardboards
Cut the cardboard in any shape, whatever you want. We will experiment by cutting cardboard in window blinds shape.
![]()
Note: There is no specific recommendation for the cardboard, you can use any size or shape which suits you the best.

Step2 Make shots in different shapes of light
After giving shape, now move the cardboard around the light source and make a video. It seems like the subject is sitting near the window and has aesthetic vibes.
![]()
Note: The more precise the cutting of cardboard, the more professional it looks.

Become more creative and make more shapes with cardboard because the audience always prefers new content in the market.
Part 6. Create Point of View Shots
After adding colors and shapes, now it’s time to get some Point of View (POV) shots. Most of the time, viewers become bored by watching framing and filming coverages.
POV shots are mostly captured from a specific angle to show an object’s characters. They are mostly seen in food commercials, and videographers of snacks just love to make these shots.
To make POV shots, there is nothing specific required. You just have to make a suitable position for the lens. Follow the below guidelines and capture it!
Step1 Cut ends of packet
To create POV shots of your favorite snack, first of all, cut down both ends of the packets.
Step2 Attach packet on a camera
After cutting, attach the packet of snacks to the camera lens or phone with the help of old-fashioned tape.
Ensure the camera is turned on, and then make a POV shot. Now, it’s time to enjoy the rest part with the audience. Check out the final results, as shown below!

Due to this, the food seems good, and you can notice the number of spices too. This one actually looks amazing!
What if we add the rotatory shots, too, in the video? For this, check out the last tip and try that!
Part 7. Create a Barrel Roll Shot
Barrel roll shots are the full axial shot by spinning the camera lens. Epic shots that formerly required costly gimbals and sophisticated techniques are now as simple as strolling.
It’s pretty easy to make a rotatory shot at 360° by using equipment easily available at home. Rolling may feel anxiety and disorientation. Filmmakers utilize it to confuse or unnerve audiences in movies.
There is no need to purchase expensive gambles to make barrel roll clips. Instead, try this hack by utilizing a power drill present at your home. Then, follow the below steps to give it a professional look!
Step1 Take equipment
First, take a camera lens or smartphone, whatever you are using to make a video, and a power drill as a gimbal.
Step2 Camera with drill
Attach the camera to the power drill with the help of old-fashioned tape.
![]()
Note: You should have a piece of square foam or soft block placed between the camera and drill to assist.

Now, it’s time to turn on the drill and ensure that the video option is “Turn On” in the camera. Then, enjoy the shots of 360° with your audience!

Conclusion
Finally, you get a filmy video after performing above mentioned 6 DIY hacks without expensive gear. More creativity in a video attracts more audience, which makes you more prior in the videography industry.
You can also try more tools at home and share your ideas with others to get reviews on them and make better changes. Make sure that you are taking all safety measures and precautions.
Then, place the container on the lens of the phone to make a video. Then, take care of the phone from the water.

Pro Tip: You can also shine light source in water and add glitter or colors to get more astonishing shots.
Part 4. Make Colourful Shots Without Coloured Lights
All filmmakers love party lights and want to add colors like that in the video. Different colored lights in videos usually represent different mood swings and enhance the creativity of storytellers.
Professional videographers use expensive lights to give these effects. But you don’t need to purchase any expensive gear. Because you can make colorful shots easily with colored plastic binder dividers, or you can also use cellophane wraps.
First, wrap the colored divider around the LED light or any light you use to shoot video.
![]()
Note: Check the light temperature after short intervals because it melts or burns the dividers when the light source gets hot.

Now make the video and try with different colors to add suspense, horror, and happy effects to the video.

The video still needs more creative effects and designs; scroll more to read exciting tips.
Part 5. Different Shapes of Light with Cardboard
To add a fantasy location in the video and make light effects in the form of shapes, try out easily available cardboard. Most of the time, aesthetic videos are made by these hacks, giving viewers different vibes.
Only a professional photographer and videographer know how to attract the audience to the shots by doing these simple hacks.
The interesting thing is that if light has more shape, it will precisely describe more about the scene’s backstory, location, and context. Give it a try!
Step1 Cutting of cardboards
Cut the cardboard in any shape, whatever you want. We will experiment by cutting cardboard in window blinds shape.
![]()
Note: There is no specific recommendation for the cardboard, you can use any size or shape which suits you the best.

Step2 Make shots in different shapes of light
After giving shape, now move the cardboard around the light source and make a video. It seems like the subject is sitting near the window and has aesthetic vibes.
![]()
Note: The more precise the cutting of cardboard, the more professional it looks.

Become more creative and make more shapes with cardboard because the audience always prefers new content in the market.
Part 6. Create Point of View Shots
After adding colors and shapes, now it’s time to get some Point of View (POV) shots. Most of the time, viewers become bored by watching framing and filming coverages.
POV shots are mostly captured from a specific angle to show an object’s characters. They are mostly seen in food commercials, and videographers of snacks just love to make these shots.
To make POV shots, there is nothing specific required. You just have to make a suitable position for the lens. Follow the below guidelines and capture it!
Step1 Cut ends of packet
To create POV shots of your favorite snack, first of all, cut down both ends of the packets.
Step2 Attach packet on a camera
After cutting, attach the packet of snacks to the camera lens or phone with the help of old-fashioned tape.
Ensure the camera is turned on, and then make a POV shot. Now, it’s time to enjoy the rest part with the audience. Check out the final results, as shown below!

Due to this, the food seems good, and you can notice the number of spices too. This one actually looks amazing!
What if we add the rotatory shots, too, in the video? For this, check out the last tip and try that!
Part 7. Create a Barrel Roll Shot
Barrel roll shots are the full axial shot by spinning the camera lens. Epic shots that formerly required costly gimbals and sophisticated techniques are now as simple as strolling.
It’s pretty easy to make a rotatory shot at 360° by using equipment easily available at home. Rolling may feel anxiety and disorientation. Filmmakers utilize it to confuse or unnerve audiences in movies.
There is no need to purchase expensive gambles to make barrel roll clips. Instead, try this hack by utilizing a power drill present at your home. Then, follow the below steps to give it a professional look!
Step1 Take equipment
First, take a camera lens or smartphone, whatever you are using to make a video, and a power drill as a gimbal.
Step2 Camera with drill
Attach the camera to the power drill with the help of old-fashioned tape.
![]()
Note: You should have a piece of square foam or soft block placed between the camera and drill to assist.

Now, it’s time to turn on the drill and ensure that the video option is “Turn On” in the camera. Then, enjoy the shots of 360° with your audience!

Conclusion
Finally, you get a filmy video after performing above mentioned 6 DIY hacks without expensive gear. More creativity in a video attracts more audience, which makes you more prior in the videography industry.
You can also try more tools at home and share your ideas with others to get reviews on them and make better changes. Make sure that you are taking all safety measures and precautions.
Also read:
- Updated In 2024, Split Audio From Video in Adobe Premiere Pro Step by Step
- Updated 2024 Approved Advancements in Game Recording Software A Comprehensive Overview
- Updated 2024 Approved You Will Also Be Guided on How to Use This Software to Crop Your Videos. Dont Worry and Just Take It One Step at a Time
- Updated Have You Ever Created a Slow Motion Video on Your Phonr or Camera? This Article Will Show You some Knowledge About Slow Motion Photography
- New In 2024, A Vacation Slideshow Is a Great Way to Relive the Vacation Memories and Also Share Them with Your Loved Ones. If You Are Looking for Ways to Create a Slideshow in Just a Few Minutes, We Will Help You with the Best Tool
- Are You Finding It Challenging to Convert GIFs Into JPG or PNG Images? Do Not Worry! The Best Free Online Tool and Software to Change Your GIF Into PNG or JPG Images Are Below for 2024
- In 2024, How to Create Intro Video with KineMaster
- New Learning How to Slow Down a Video on iPhone Properly
- New Adding a Spooky Shadow Effect with Filmora
- New 2024 Approved Find Out How to Create Your Own Custom Motion Graphics in Filmora. Add Unique Objects, Manipulate Text, and Animate Anything You Want
- How To Achieve LumaFusion Color Grading Through LUTs
- New 2024 Approved Splitting a Video Into Frames with the FFmpeg Step by Step
- Updated How to Use OBS Chroma Key With/Without Green Screen Easy Solutions
- New Guide to Making Cinematography for Music Video for 2024
- Updated In 2024, Do You Seek to Blur Out Your Video and Photo to Display some Motion Blur? This Article Provides a List of the Best Motion Blur Apps for Videos and Photos
- Updated In 2024, How to Create a Freeze Frame Sequence Effect
- Some Effective Slow Motion Video Editors You Can Try for 2024
- Best 10 Anime Movies for All Time
- New How to Add Text in Adobe Rush for 2024
- In 2024, An Ultimate Guide to Flexclip Online Trimmer
- 2024 Approved Kdenlive Is a Free, Open-Source Video Editing Software Application. Kdenlive Is a Powerful Video Editor that Can Be Used to Create Professional-Quality Videos
- Updated In 2024, Create an Awesome Logo Reveal with Logo Intro Templates
- Looking for a Great Way to Make Your Own Anime Music Video? The Following Are the Top AMV Makers to Choose From
- In 2024, How to Track WhatsApp Messages on Oppo Find X6 Without Them Knowing? | Dr.fone
- How To Bypass Google FRP on Sony Xperia 1 V
- Solved Warning Camera Failed on Nokia C300 | Dr.fone
- In 2024, How to Get and Use Pokemon Go Promo Codes On Google Pixel 8 | Dr.fone
- In 2024, What Legendaries Are In Pokemon Platinum On Lava Yuva 3 Pro? | Dr.fone
- How does the stardust trade cost In pokemon go On Nokia 150 (2023)? | Dr.fone
- In 2024, How to Mirror PC to Apple iPhone 14 Pro? | Dr.fone
- 5 Most Effective Methods to Unlock iPhone 15 in Lost Mode
- 3 Methods to Mirror Vivo X100 to Roku | Dr.fone
- How To Bypass Lava Blaze 2 5G FRP In 3 Different Ways
- How To Repair iOS System Issues of iPhone 7? | Dr.fone
- In 2024, Easy Guide to Xiaomi Redmi K70 FRP Bypass With Best Methods
- In 2024, Full Guide to Unlock Your Nokia C12 Pro
- 7 Ways to Lock Apps on iPhone XS Max and iPad Securely
- How to Transfer Data from Infinix Hot 30i to Any iOS Devices | Dr.fone
- Title: New How to Change Frame Rate in Premiere Pro
- Author: Morgan
- Created at : 2024-05-19 05:12:01
- Updated at : 2024-05-20 05:12:01
- Link: https://ai-video-editing.techidaily.com/new-how-to-change-frame-rate-in-premiere-pro/
- License: This work is licensed under CC BY-NC-SA 4.0.

