
:max_bytes(150000):strip_icc():format(webp)/F8conferencelogo-7ec4475dc6624114aea076c2611df199.jpg)
New How to Create a DIY Green Screen Video Effect for 2024
How to Create a DIY Green Screen Video Effect?
No matter how big the budget of a Hollywood movie is, at the end of the day, it has to rely on the humble green screens for special video effects. The stunning studios from where your favorite YouTubers and gamers stream their videos are graphical video effects created through green screens. Even the studios that you see on TV channels are a graphical creation of green screens. You must be wondering how they could achieve such awesome graphics with a simple green screen.
All you need is a good-quality green fabric, a professional video editing software, and a camera. You may not believe it, but that is all you need for creating DIY green screen video effect. You do not have to be a professional video editor to edit the green screen on your videos and add any special video effect. In this article, you will learn how to create your own DIY green backdrop.
What Is Green Screen Technique?
A green screen is nothing but a green fabric. In a video, a green screen is placed in the background behind the subject. In the editing phase of the video, the green screen is replaced with any background image or video effect that stays intact in the video as long as possible. In short, the green screen technique involves superimposing photos and videos on the green screen in a video.
Starting from the video game industry, movie industry to video streaming and TV channels, the green screen technique is used everywhere. The stunning graphical component of these industries is totally dependent on the green screen technique. In fact, DIY green screen for zoom meetings and video conferencing is widely used. Along with that, YouTubers and Twitch streamers use DIY green screen for streaming live.
Technically speaking, instead of a green screen, you can use any other color of screen. However, green screens are widely used, and it has become a norm. The main point to remember when using a green screen is that nothing else should have green color such as the dresses the subject is wearing. Therefore, in technical terms, the green screen is referred to as Chroma Key, and you will find Chroma Key option instead of green screen in most video editors.
Why Use Green Screen Technique?
The main reason why the green screen technique is used in movie and video making is that the video editor can replace the entire background at once instead of replacing the background frame by frame. Once you replace a green screen with an image or video effect, it stays the same throughout the video as long as required.
Therefore, the video editor can save a lot of time in editing and the editing stays uniform throughout which gives a realistic effect. If the green screen technique is not used and editing is done frame by frame of a video, there could be a manual error, inconsistent, and graphical glitches.
You can replace green screens with anything you want. It could be a still image of a beautiful studio with 3D effect like you see in case of YouTubers and gamers. It could be a moving, real-life landscape on any place in the world instead of a beautiful background picture. Similarly, it could be replaced by video effects such as explosions, stadiums full of people, battlefields, and likewise. At times, it could be live animations as you see on TV channels.
How To Create DIY Green Screen Stand Setup and Add Green Screen Effect?
If you want to have a green screen setup for your video, you need to have the following things ready.
- A green cloth that is large enough to cover the entire background.
- A video editing software to replace green screen in your video with anything.
- External light for more video clarity and a good camera with mic.
Step 1: Setup DIY Green Backdrop
Your green fabric should be soft and bright. If you are going to be the subject of the video, make sure you are not wearing anything green. Moreover, do not keep any object within the video frame that is green in color. If there are too many green objects, you can use a blue screen.
When it comes to hanging the green cloth in the background, people find it very difficult. If your video frame is going to be a close-up to the subject, you can use a green screen panel to hang green cloth. A green screen panel generally has a collapsible structure for easy storage and transportation.
Otherwise, you need to install hooks in the wall if you are planning to replace the green screen with a studio-like scene so that the entire background of the video frame stays covered with green screen. You should opt for multiple green screens and stitch them together to cover the background completely.
Step 2: Setup Camera and Light
Whether you are shooting with a DSLR camera or smartphone camera or webcam, make sure you are shooting at least HD video quality so that the editing could be great. Lights are important when you are using green screen though they are not a necessity. The video quality and brightness get enhanced with lights. Diffused lights work the best and the background should be well-lit.
Most importantly, you have to place the lights in such a way that your body arms should not be casting any shadow on the green screen. You can either stand very close to the green screen or away from the green screen so that your shadow does not go till the green screen. Instead of starting to shoot the video from the very beginning, you should capture for a few seconds and make sure everything is perfect including the camera angle.
Step 3: Get The Best Video Editor For Green Screen Effect
There are various video editors available, but not all of them are suitable for green screen effect. We recommend Wondershare Filmora as the best video editor to apply green screen effects on your video while editing. The reason behind the recommendation is that the steps to replace the green screen with any image or video are super simple and anyone can do it. There is no need to be a professional video editor.
Wondershare Filmora also lets you capture video through webcam and you can also capture your screen. It is perfect for recording gameplay as well as your reaction and commentary. Similarly, you can record demonstrations, tutorial videos, as well as video conferences. You can apply green screen effects to your recorded video instantly and publish on different platforms. In fact, you can adjust all the parameters such as color scheme, audio ducking, keyframing, motion tracking and much more to enhance the video output quality.
Conclusion
Making videos with DIY green screen stand is no more an esoteric concept. You can set it up anywhere and start shooting video. The magic begins in the post-production stage where you can use Wondershare Filmora to replace the green screen with video effects that will blow the mind of your viewers and followers. Filmora has intuitive options and controls through which you can apply green screen effect in simple steps.
Phone Aspect Ratio Vertical Definition, Types & Tips
Versatile Video Editor - Wondershare Filmora
If you are a professional video or image creator, you know what aspect ratio is and why aspect ratio is important. Even people passionate about their cameras and visual art enthusiasts know it. If you are a newbie, Let us make it easy for you. This article will talk about the vertical phone aspect ratio ratio, its definition, types, iPhone vertical video dimensions, etc. We’ll also provide you solid tips on mobile vertical video size and how to create phone vertical videos easily. Let’s jump into the topic and see what you can learn.
In this article
01 [What is Phone Aspect Ratio Vertical?](#Part 1)
02 [Types of Phone Aspect Ratio Vertical](#Part 2)
03 [Tips to Create Phone Vertical Videos](#Part 3)
Part 1 What is Phone Aspect Ratio Vertical?
The vertical phone aspect ratio is the “proportional” relationship between the screen’s width and height. For example, if your image or video has an aspect ratio of 4:5, it simply means the width of the screen (photo or video) is four times the height of the image.
The vertical phone aspect ratio is the “proportional” relationship between the screen’s width and height. For example, if your image or video has an aspect ratio of 4:5, it simply means the width of the screen (photo or video) is four times the height of the image.
Back in the television days, you might have seen certain old pictures with black padding on either side of the screen. It was just that they were shot in different aspect ratios and your television screen had different aspect ratios.
Aspect Ratio Vs Resolution
Remember that aspect ratio does not refer to the physical size of an image or its dimensions in pixels (resolution). So aspect ratio 3:1 does not refer to the actual width and height of the image or video; it just describes their relationship.
You are wrong if you think aspect ratio is just another fancy name for resolution. Think again. Check out how it is calculated.
“
| | Aspect Ratio | Resolution | |
| ————— | ————————————————————– | ———————————————————————————- |
| Definition | The Ratio of the width of an image to the height of the image. | Total number of pixels displayed on your screen (computer, cell phone, television) |
| Commonly Used | ● 1:1 ● 3:1 ● 3:2 ● 4:3 ● 5:4 ● 9:1 ● 16:9 | ● 640x480 ● 800x600 ● 1024x768 |
Aspect Ratio Calculator
To get the resolution, you need to multiply width times the height. To get aspect ratio, the formula is: Divide the width by the height or simply divide the long side by the short side.
There are multiple online aspect ratio calculators available. Check out the value for both the images and the videos generated through the photo ratio calculator for your ease.
| Common Aspect Ratio | AR Width | AR Height | Image Width | Image Height |
|---|---|---|---|---|
| 1:1(square) | 1 | 1 | 1920 | 1920 |
| 5:4 (large and medium format cameras) | 5 | 4 | 1920 | 1536 |
| 4:3 Standard | 4 | 3 | 1920 | 1440 |
| 3:2 (35mm camera) | 3 | 2 | 1920 | 1280 |
| 16:9 | 16 | 9 | 1920 | 1080 |
| 3:1 Panoramic | 3 | 1 | 1920 | 640 |
| 9:16 | 9 | 16 | 1080 | 1920 |
For example, the aspect ratio of 3:1 may be an image of 3m wide and 1m high. At the same time it can be 3 feet wide and 1 foot high. For further simplification, consider dimensions in pixels: a 6000×4000 image has 3:2 aspect ratios.
Always remember this small but crucial point. The aspect ratio refers to the image or video you captured or recorded and the display (or screen) in which your video or image would be displayed.
Why is the aspect ratio important?
In the age of web content, asking why aspect ratio is important? Some may consider it naïve. Images need to be uploaded at different aspect ratios for different uses (desktop vs. mobile or blog vs. social media). Incorrect aspect ratio affects your final image and end-user experience.
Choice of the wrong aspect ratio can eliminate the potential for editing (cropping and resizing). In addition, using the correct aspect ratios saves you from facing the trouble of distortion or clipping.
Part 2 Types of Phone Aspect Ratio Vertical
Image Aspect Ratios
The aspect ratio decides and changes the entire composition and how the audience perceives the image. First, let us see some common image aspect ratios.

● 1:1 Ratio

If you have seen a square-shaped image, it had probably a 1:1 aspect ratio. It simply means both sides (width and height of the image) are equal. It was initially the aspect ratio of square television sets. However, this is commonly used for print photos, mobile screens, and social platforms.
● 3:2 Ratio

Initially used for classic 35 mm film and still photography, aspect ratio 3:5 is still used on some laptops, tablets, and handheld game consoles. The famous example of this aspect ratio Images framed at 1080×720 pixels or 6″x4″.
● 5:4 Ratio

It was commonly used for photography and art prints. For Images having dimensions, 8″x10″ and 16x20 have the 5:4 aspect ratios.
Video Aspect Ratios

Like the image aspect ratios, video aspect ratios would also profoundly affect its composition and thus how your directed viewers perceive it. Some common mobile vertical video size or video aspect ratios are given below.
● 16:9 Ratio

If you have seen presentation slides, computer monitors, or widescreee seen this slimmer and more elongated rectangular-shaped 16:9 Ratio. This is the standardized widescreen aspect ratio that you see everywhere on the web. In terms of pixel common dimension for 16:9 is 1920×1080 pixels and 1280×720 pixels.
● 9:16 Ratio (Vertical)

When smartphones started coming with video capabilities, this Ratio became popular. Likewise, today this Ratio is trendy for social media platforms with video story capabilities.
The Instagram story typically consists of 1080x1920 pixels, which in terms of aspect ratio is 9:16. Most phones, such as iPhone, have a feature that allows you to record footage in both (16:9 as well as 9:16).
Phone aspect ratio vertical
Back in the day, taking aspect ratio vertical (portrait mode) footage was considered unprofessional and a sign of an amateur. But the digital revolution has changed that. Now from unforgivable sin, the vewayal mode has practically become a mainstream media sensation. Vertical style has now become the dominant format.

Phone aspect ratio vertical simply means taller screen than wider. The most common type is 9:16 (1080x1920 pixels), a typical vertical videos aspect ratio. Although this phone aspect ratio vertical comes in a few more shapes and sizes such as 4:5, 2:3.
Part 3 Tips to Create Phone Vertical Videos
Creating vertical videos is crucial for getting engagements and growing your brand. It is easy with a phone because most smartphones, by default, record in 9:16, which is the standard vertical aspect ratio. But with a camera, you have to manually edit to the correct aspect ratio before you shoot it.
You can also shoot horizontally and then change it to vertical, but it needs professional videographer expertise.
Who wants to rotate their phones watching videos? Well, as far as the trend, Let us see some tiny but handy tips for creating vertical phone videos.
1. Choose the correct aspect ratio
Video taller than the 1:1 aspect ratio is commonly considered Vertical video. Types of these vertical aspects ratio include 4:5 (social), 2:3 and 9:16. They are all taller than they are wide, thus vertical.
Choosing the correct aspect ratio for your vertical video, always think about why and where you intend to use the video. The second important thing you should consider is your plans for editing that video.
Cropping horizontal can be irritating and sometimes disappointing at the same time. Producing a 9:16 vertical frame at HD resolution from a horizontal HD frame may result in very pixelated and low-quality footage.
If, for some reason, you still want first to shoot it horizontal and then change it back to mobile vertical video size. You may need to shoot in 4K horizontally to get extra pixels to work with. It can later be cropped in the sides to 9:16 (Vertical phone aspect ratio). Plus, you won’t need to scale it anymore.
2. Direct your viewer’s eyes
For hooking social media viewers, you need to put your most interesting visual upfront. These include GIFs, colourful stop-motion or looping animation. Always try to match your first couple of shots with your overall brand personality.
3. Screen splitting into two or more

A tall vertical screen can be styled with multiple horizontal clips on top of each other. These clips must relate to your relevant content and overall look. Natural lines or patterns can help display them in the most creative ways.
4. Be close to your subject
For producing an intimate experience with the vertical frame, you should get closer to the subject. Most of the action will be positioned to the centre as your viewers scroll. Do not let cut off or cover up your main subject by any text and make sure you leave enough room for text, emojis and stickers.
5. Filling the vertical space
First, make sure that your subject is vertical-friendly. Then get closer and fill the space within the vertical frame. The vertical frame can be filled through the following:
● Up-close shot (if the subject is personal).
● Raising the camera high and tilting it down (to film things like a long, empty road).
● Bird’s-eye view from above.
5. Rule of Third

This photography rule says not to place the main subject directly in the center of the frame. Create more dynamic composition by creating imaginary (Horizontal & Vertical) lines that divide your frame into thirds.
You have to place your subject either on the lines or where the lines meet up. And guess what? You don’t need to draw imaginary nowadays. Most cameras and smartphones provide you with this option.
6. Avoid Shaking
You do not want to distract your viewers with shaky camera moments. Normal pan and 360-degree rotation are acceptable or maybe even essential. But moving side to side too quickly will make it difficult for the camera to process that information. You better use a selfie stick or gimbal.
Now, check out the best vertical video ratios for various social platforms.
Best video aspect ratios for Facebook

● 1:1 or 4:5 (Feed)
● 9:16 (Stories) Full portrait/Vertical
● 1:1 (Video Carousel)
● 16:9 (In streams, ads) -> Full landscape
● 9:16 (Audience Network)
● 2:3 (Vertical)
Best video aspect ratios for Instagram
● 1:1 (Feed)
● 4:5 (Feed ads)
● 9:16 (Stories)
● 9:16 (Reels)
● 9:16 (ICTV)
Best video aspect ratios for Twitter

● 1:1 (Promoted Videos)
● 1:1 or 9:16 (Sponsorship)
● 16:9 (Live Videos)
● 1:11 or 16:9 (Video Posts)
Best video aspect ratios for TikTok
● 9:16, 1:1, or 16:9 (For ads)
● 9:16 (For organic videos)
Wondershare Filmora
Being a newbie and producing perfect and professional vertical video content can be challenging, especially for the social platform. And then perfection requires delicate skills. If you want to change the aspect ratio after capturing an image or shooting a video, you need post-processing software.
There are tons of post-processing software available that have aspect ratio tools. As a tech geek, I even want essential tools that can serve all my needs and are also simple to use. Wondershare Filmora (iOS and Android) and Wondershare Filmora (Windows) is just that platform where you simply record, edit and share right away. It is loaded with easy-to-use editing features, special effects, social media integration options, and your desired music.
The best thing about Filmora Go is that it is for every skill level, unlike the other video editing software. Moreover, it lets you build unique custom build animation without breaking a sweat. So if you have a horizontal video, Filmora Go makes it easy to edit it into a Vertical one.
Features:
● Allows users to make videos anywhere using your iOS or Android device.
● The powerful editing tools of Filmora and Filmora help you create excellent iPhone vertical video dimensions.
● A dynamic music library helps users to add great background music in the videos.
● Both Filmora and Filmora (Desktop) have a user-friendly and intuitive user interface.
● The new Video Beautification feature helps you modify the shape of your face, lips, or nose in the picture.
Wondershare Filmora
Get started easily with Filmora’s powerful performance, intuitive interface, and countless effects!
Try It Free Try It Free Try It Free Learn More >

Conclusion
The vertical phone aspect ratio may seem avoidable, but you need a near-perfect influence on your desired audience to engage and grow. Thus, the Aspect ratio is not something to avoid if you want to compete in the business. Smartphone digital evolution has shifted the balance towards the phone aspect ratio vertical. In this article, we also talked about iPhone video dimensions vertical, hope it will help you. Platforms like Filmora provides comprehensive and easy editing solutions to edit aspect ratio as desired.
If you are a professional video or image creator, you know what aspect ratio is and why aspect ratio is important. Even people passionate about their cameras and visual art enthusiasts know it. If you are a newbie, Let us make it easy for you. This article will talk about the vertical phone aspect ratio ratio, its definition, types, iPhone vertical video dimensions, etc. We’ll also provide you solid tips on mobile vertical video size and how to create phone vertical videos easily. Let’s jump into the topic and see what you can learn.
In this article
01 [What is Phone Aspect Ratio Vertical?](#Part 1)
02 [Types of Phone Aspect Ratio Vertical](#Part 2)
03 [Tips to Create Phone Vertical Videos](#Part 3)
Part 1 What is Phone Aspect Ratio Vertical?
The vertical phone aspect ratio is the “proportional” relationship between the screen’s width and height. For example, if your image or video has an aspect ratio of 4:5, it simply means the width of the screen (photo or video) is four times the height of the image.
The vertical phone aspect ratio is the “proportional” relationship between the screen’s width and height. For example, if your image or video has an aspect ratio of 4:5, it simply means the width of the screen (photo or video) is four times the height of the image.
Back in the television days, you might have seen certain old pictures with black padding on either side of the screen. It was just that they were shot in different aspect ratios and your television screen had different aspect ratios.
Aspect Ratio Vs Resolution
Remember that aspect ratio does not refer to the physical size of an image or its dimensions in pixels (resolution). So aspect ratio 3:1 does not refer to the actual width and height of the image or video; it just describes their relationship.
You are wrong if you think aspect ratio is just another fancy name for resolution. Think again. Check out how it is calculated.
“
| | Aspect Ratio | Resolution | |
| ————— | ————————————————————– | ———————————————————————————- |
| Definition | The Ratio of the width of an image to the height of the image. | Total number of pixels displayed on your screen (computer, cell phone, television) |
| Commonly Used | ● 1:1 ● 3:1 ● 3:2 ● 4:3 ● 5:4 ● 9:1 ● 16:9 | ● 640x480 ● 800x600 ● 1024x768 |
Aspect Ratio Calculator
To get the resolution, you need to multiply width times the height. To get aspect ratio, the formula is: Divide the width by the height or simply divide the long side by the short side.
There are multiple online aspect ratio calculators available. Check out the value for both the images and the videos generated through the photo ratio calculator for your ease.
| Common Aspect Ratio | AR Width | AR Height | Image Width | Image Height |
|---|---|---|---|---|
| 1:1(square) | 1 | 1 | 1920 | 1920 |
| 5:4 (large and medium format cameras) | 5 | 4 | 1920 | 1536 |
| 4:3 Standard | 4 | 3 | 1920 | 1440 |
| 3:2 (35mm camera) | 3 | 2 | 1920 | 1280 |
| 16:9 | 16 | 9 | 1920 | 1080 |
| 3:1 Panoramic | 3 | 1 | 1920 | 640 |
| 9:16 | 9 | 16 | 1080 | 1920 |
For example, the aspect ratio of 3:1 may be an image of 3m wide and 1m high. At the same time it can be 3 feet wide and 1 foot high. For further simplification, consider dimensions in pixels: a 6000×4000 image has 3:2 aspect ratios.
Always remember this small but crucial point. The aspect ratio refers to the image or video you captured or recorded and the display (or screen) in which your video or image would be displayed.
Why is the aspect ratio important?
In the age of web content, asking why aspect ratio is important? Some may consider it naïve. Images need to be uploaded at different aspect ratios for different uses (desktop vs. mobile or blog vs. social media). Incorrect aspect ratio affects your final image and end-user experience.
Choice of the wrong aspect ratio can eliminate the potential for editing (cropping and resizing). In addition, using the correct aspect ratios saves you from facing the trouble of distortion or clipping.
Part 2 Types of Phone Aspect Ratio Vertical
Image Aspect Ratios
The aspect ratio decides and changes the entire composition and how the audience perceives the image. First, let us see some common image aspect ratios.
● 1:1 Ratio
If you have seen a square-shaped image, it had probably a 1:1 aspect ratio. It simply means both sides (width and height of the image) are equal. It was initially the aspect ratio of square television sets. However, this is commonly used for print photos, mobile screens, and social platforms.
● 3:2 Ratio
Initially used for classic 35 mm film and still photography, aspect ratio 3:5 is still used on some laptops, tablets, and handheld game consoles. The famous example of this aspect ratio Images framed at 1080×720 pixels or 6″x4″.
● 5:4 Ratio
It was commonly used for photography and art prints. For Images having dimensions, 8″x10″ and 16x20 have the 5:4 aspect ratios.
Video Aspect Ratios
Like the image aspect ratios, video aspect ratios would also profoundly affect its composition and thus how your directed viewers perceive it. Some common mobile vertical video size or video aspect ratios are given below.
● 16:9 Ratio
If you have seen presentation slides, computer monitors, or widescreee seen this slimmer and more elongated rectangular-shaped 16:9 Ratio. This is the standardized widescreen aspect ratio that you see everywhere on the web. In terms of pixel common dimension for 16:9 is 1920×1080 pixels and 1280×720 pixels.
● 9:16 Ratio (Vertical)
When smartphones started coming with video capabilities, this Ratio became popular. Likewise, today this Ratio is trendy for social media platforms with video story capabilities.
The Instagram story typically consists of 1080x1920 pixels, which in terms of aspect ratio is 9:16. Most phones, such as iPhone, have a feature that allows you to record footage in both (16:9 as well as 9:16).
Phone aspect ratio vertical
Back in the day, taking aspect ratio vertical (portrait mode) footage was considered unprofessional and a sign of an amateur. But the digital revolution has changed that. Now from unforgivable sin, the vewayal mode has practically become a mainstream media sensation. Vertical style has now become the dominant format.
Phone aspect ratio vertical simply means taller screen than wider. The most common type is 9:16 (1080x1920 pixels), a typical vertical videos aspect ratio. Although this phone aspect ratio vertical comes in a few more shapes and sizes such as 4:5, 2:3.
Part 3 Tips to Create Phone Vertical Videos
Creating vertical videos is crucial for getting engagements and growing your brand. It is easy with a phone because most smartphones, by default, record in 9:16, which is the standard vertical aspect ratio. But with a camera, you have to manually edit to the correct aspect ratio before you shoot it.
You can also shoot horizontally and then change it to vertical, but it needs professional videographer expertise.
Who wants to rotate their phones watching videos? Well, as far as the trend, Let us see some tiny but handy tips for creating vertical phone videos.
1. Choose the correct aspect ratio
Video taller than the 1:1 aspect ratio is commonly considered Vertical video. Types of these vertical aspects ratio include 4:5 (social), 2:3 and 9:16. They are all taller than they are wide, thus vertical.
Choosing the correct aspect ratio for your vertical video, always think about why and where you intend to use the video. The second important thing you should consider is your plans for editing that video.
Cropping horizontal can be irritating and sometimes disappointing at the same time. Producing a 9:16 vertical frame at HD resolution from a horizontal HD frame may result in very pixelated and low-quality footage.
If, for some reason, you still want first to shoot it horizontal and then change it back to mobile vertical video size. You may need to shoot in 4K horizontally to get extra pixels to work with. It can later be cropped in the sides to 9:16 (Vertical phone aspect ratio). Plus, you won’t need to scale it anymore.
2. Direct your viewer’s eyes
For hooking social media viewers, you need to put your most interesting visual upfront. These include GIFs, colourful stop-motion or looping animation. Always try to match your first couple of shots with your overall brand personality.
3. Screen splitting into two or more
A tall vertical screen can be styled with multiple horizontal clips on top of each other. These clips must relate to your relevant content and overall look. Natural lines or patterns can help display them in the most creative ways.
4. Be close to your subject
For producing an intimate experience with the vertical frame, you should get closer to the subject. Most of the action will be positioned to the centre as your viewers scroll. Do not let cut off or cover up your main subject by any text and make sure you leave enough room for text, emojis and stickers.
5. Filling the vertical space
First, make sure that your subject is vertical-friendly. Then get closer and fill the space within the vertical frame. The vertical frame can be filled through the following:
● Up-close shot (if the subject is personal).
● Raising the camera high and tilting it down (to film things like a long, empty road).
● Bird’s-eye view from above.
5. Rule of Third
This photography rule says not to place the main subject directly in the center of the frame. Create more dynamic composition by creating imaginary (Horizontal & Vertical) lines that divide your frame into thirds.
You have to place your subject either on the lines or where the lines meet up. And guess what? You don’t need to draw imaginary nowadays. Most cameras and smartphones provide you with this option.
6. Avoid Shaking
You do not want to distract your viewers with shaky camera moments. Normal pan and 360-degree rotation are acceptable or maybe even essential. But moving side to side too quickly will make it difficult for the camera to process that information. You better use a selfie stick or gimbal.
Now, check out the best vertical video ratios for various social platforms.
Best video aspect ratios for Facebook
● 1:1 or 4:5 (Feed)
● 9:16 (Stories) Full portrait/Vertical
● 1:1 (Video Carousel)
● 16:9 (In streams, ads) -> Full landscape
● 9:16 (Audience Network)
● 2:3 (Vertical)
Best video aspect ratios for Instagram
● 1:1 (Feed)
● 4:5 (Feed ads)
● 9:16 (Stories)
● 9:16 (Reels)
● 9:16 (ICTV)
Best video aspect ratios for Twitter
● 1:1 (Promoted Videos)
● 1:1 or 9:16 (Sponsorship)
● 16:9 (Live Videos)
● 1:11 or 16:9 (Video Posts)
Best video aspect ratios for TikTok
● 9:16, 1:1, or 16:9 (For ads)
● 9:16 (For organic videos)
Wondershare Filmora
Being a newbie and producing perfect and professional vertical video content can be challenging, especially for the social platform. And then perfection requires delicate skills. If you want to change the aspect ratio after capturing an image or shooting a video, you need post-processing software.
There are tons of post-processing software available that have aspect ratio tools. As a tech geek, I even want essential tools that can serve all my needs and are also simple to use. Wondershare Filmora (iOS and Android) and Wondershare Filmora (Windows) is just that platform where you simply record, edit and share right away. It is loaded with easy-to-use editing features, special effects, social media integration options, and your desired music.
The best thing about Filmora Go is that it is for every skill level, unlike the other video editing software. Moreover, it lets you build unique custom build animation without breaking a sweat. So if you have a horizontal video, Filmora Go makes it easy to edit it into a Vertical one.
Features:
● Allows users to make videos anywhere using your iOS or Android device.
● The powerful editing tools of Filmora and Filmora help you create excellent iPhone vertical video dimensions.
● A dynamic music library helps users to add great background music in the videos.
● Both Filmora and Filmora (Desktop) have a user-friendly and intuitive user interface.
● The new Video Beautification feature helps you modify the shape of your face, lips, or nose in the picture.
Wondershare Filmora
Get started easily with Filmora’s powerful performance, intuitive interface, and countless effects!
Try It Free Try It Free Try It Free Learn More >
Conclusion
The vertical phone aspect ratio may seem avoidable, but you need a near-perfect influence on your desired audience to engage and grow. Thus, the Aspect ratio is not something to avoid if you want to compete in the business. Smartphone digital evolution has shifted the balance towards the phone aspect ratio vertical. In this article, we also talked about iPhone video dimensions vertical, hope it will help you. Platforms like Filmora provides comprehensive and easy editing solutions to edit aspect ratio as desired.
Do You Want to Stream and Record at the Same Time but Can’t Find an Easy Solution? This Guide Will Help You Get This Done Using Three Easy-to-Follow Methods
The popularity of live streaming has exploded recently. A live stream is simply a video broadcast in real-time over the internet. It’s a great way to connect with people directly, whether for a gaming session, a cooking show, or a Q&A.
Many reasons are there for which why you might want to live stream and record at the same time. For instance, keep a record of your gameplay or stream highlights for future editing or use your live stream to generate content for your YouTube channel.
Whatever your reasons, this article will show you how to do live streaming and recording at the same time using three different methods.
Way 1. Use OBS To Stream And Record Video At The Same Time
OBS, or Open Broadcaster Software, is a free and open-source tool that allows you to stream and record video at the same time, which can be useful if you want to live-stream your gameplay on Twitch or record a tutorial for YouTube.
Key Features of OBS
- Compatible with Mac OS X, Linux, and Windows operating systems.
- Requires at least 4 GB of storage space and an Intel i5 2000-series processor or higher DirectX 10 capable graphics card.
- High-performance video capturing and mixing in real-time.
- With Custom Transitions, you can set up an unlimited number of scenes you can switch between seamlessly.
- Intuitive audio mixer.
- Easy-to-use and simple configuration options.
Steps
Here’s an easy and quick guide on how to use OBS Studio to stream and record videos simultaneously:
Step1 Download OBS Studio from the official website and install it on your computer or laptop.
Step2 Launch OBS Studio and go to the Settings menu. Find the Recording section under the Output tab.
Step3 Click “Start Recording” to manually start the recording or head to the General Tab and checkmark the box before “Automatically Record When Streaming.”
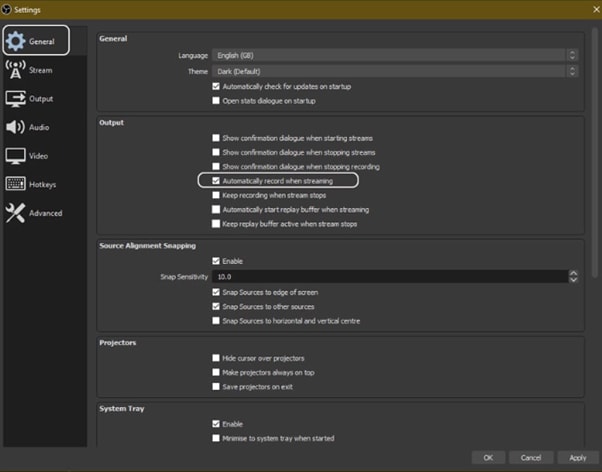
Step4 Finally, click “Apply” to save your settings. Now when you start your stream, the recording will also begin simultaneously.
Way 2. Use Twitch To Save Your Streams
Twitch is the most popular and best live streaming platform that allows gamers to broadcast their gameplay to a live audience and also gives them the ability to save their past broadcasts, or “streams.”
This feature can be useful to save your live stream for later viewing or share your stream with someone who missed it.
Features
Twitch offers a variety of features that make it a unique and powerful game streaming platform. Some of the most notable ones are:
- Live streaming: Twitch allows gamers to share their gameplay in real-time with other gamers around the world. This live aspect of the platform makes it unique and engaging.
- Social interaction: Twitch offers a variety of features that allow gamers to connect with each other, including chat rooms, forums, and user-generated content.
You can save your stream on Twitch in two ways:
- Use the “Highlights” feature, which allows you to save specific moments from your live stream.
- Download your stream’s entire VOD (video on demand) after it has ended.
Steps
Here are the quick steps to saving a stream on your PC from Twitch. But first, you need to enable Twitch VODs before starting your broadcast in the following way:
Step1 Visit Twitch and sign in to your account. Now, click the “Profile” icons and go to “Creator Dashboard.”
Step2 Head to Setting from the left-sidebar and click the “Stream” option. Scroll down and find the VOD Settings. Toggle the buttons next to “Store Past Broadcasts.”
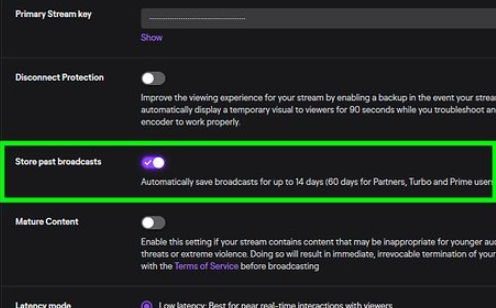
Step3 To publish your VODs instantly after broadcasting, toggle the button next to “Always Publish VODs.”
Now, to download the recordings of your broadcasts to your PC, do the following steps in sequence:
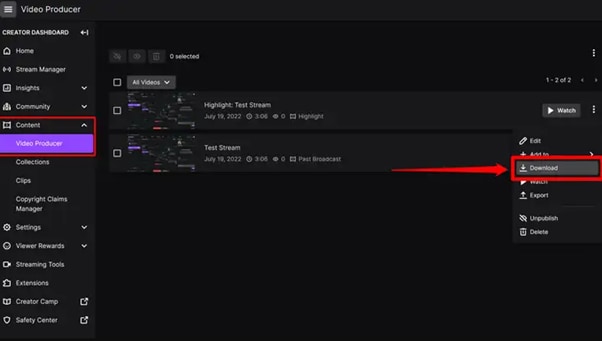
Step1 Head to the Creator Dashboard, find the “Content” section in the left sidebar, and click “Video Producer.”
Step2 Find the stream (VOD or Highlights) you want to download and on the right side, click the three dots.
Step3 Finally, click the “Download” option and let Twitch prepare your video. You will then get the stream’s recording in MP4 format.
Way 3. Use Screen Recorder To Record Your Streams
Using a screen recorder is a great way to record your live stream because it lets you capture the full screen of your PC. Although there are many different screen recorders to choose from, we recommend using Filmora.
Wondershare Filmora is a powerful editor with easy-to-use screen recording capabilities, giving you everything you need to record and stream your video at the same time. The software is free to use and has an intuitive interface.
Features of Filmora
- Support for both Mac OS X and Windows operating systems.
- Ability to record your PC screen, audio, and webcam all at once
- A variety of video editing features
- An easy-to-use interface
Steps
Here’s how to use Filmora for recording while streaming:
Step1 Head to the official Filmora website, download the software and install it on your PC.
Step2 Launch Filmora 11 and click “New project” in the main interface. Click “File” from the top toolbar and scroll down to “Record media.” From the drop-down menu, select “Record PC Screen.”
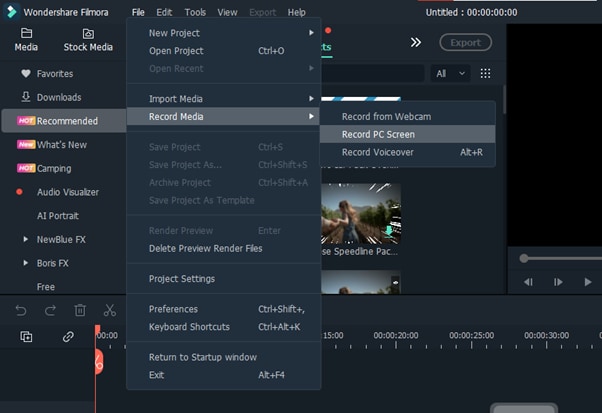
Step3 A new “Wondershare Screen Recorder” window will pop up. You can set up a full screen, custom or target screen recording, speaker, and microphone settings. If you want more Settings, click the drop-down icon.
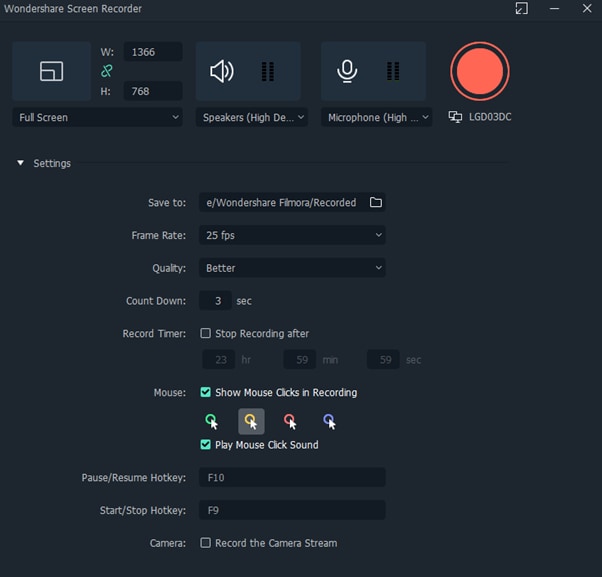
Step4 Click the Start icon to begin your recording. Afterward, click the Stop icon to stop the recording, and your stream will be saved in the selected destination.
Conclusion
In this article, we’ve discussed three step-by-step methods to help you do live streaming and recording at the same time. With these solutions at your disposal, you’ll be able to save your VODs with ease.
It is best to choose only one software to start with to avoid the time-consuming trial-and-error process. If you want to add another tool, do so later; otherwise, you will waste your precious time and resources.
Give these methods a shot, and eventually, you will find your groove—and become accustomed to just how easy it is to record and stream a video simultaneously.
Free Download For Win 7 or later(64-bit)
Free Download For macOS 10.14 or later
Free Download For macOS 10.14 or later
How To Add Fade In Windows Video Editor
A recent development in the media business is the fading into and out of videos, which significantly improves and cools down a scene. It causes the movie to twist and gives it a photorealistic appearance, giving the sense of depth. Too much or too little fading might ruin the whole impact of the video that has been generated, which is why we’re providing instructions on how to apply fade in Windows video editors.
People often search for How to Add Fade in after effects but in such tools, backgrounds are used to achieve fading, so what should you do if you want your movie on your Windows 10 desktop to fade to black, white, or another color? We suggest the solution in this article that would be of assistance. It is suggested that you apply the video fades using a backdrop clip which is either black or white. Video fades come in two varieties: fade in and fade out. A video or picture may gradually appear from a black, white, or colored backdrop using a technique called a “fade-in.” On the other hand, a video or picture may gradually blend into a white, black, or multicolored backdrop using the fade-out technique.
Part 1: How to Add Fade in Windows Video Editor
To begin with, you’ll need top-notch editing software for your movies. We advise you to try Windows Video Editor if you use Windows. It is slick, simple, and enjoyable to use. The Microsoft Store’s most downloaded video editing app is also this one. To test how it works, you may install it for free. The Windows video editor is a strong tool that makes it simple for users to utilize the fundamentals of video editing. It has the ability to move, concatenate, cut, and add the Fading effects to videos. However, it lacks the transitions needed to insert them into videos or in between them.
Steps to Add Fade in Windows Video Editor
Step1Open Windows Video Editor and choose the video clip you wish to apply a fade to.

Step2To display further effects, click the down arrow in the corner of the effects tray after selecting the Visual Effects tab. The effects are divided into a group named Motions and Fades. To get an explanation and a sample of what the effects do, hover your mouse cursor over the thumbnails of the effects.

The available effects include pixelate, ripple, and a simple fade in or fade out to black or white. Apply No Effect, the first thumbnail in the list of visual effects, after choosing the clip and the visual effect you wish to remove.
Step3Select the desired video portion, then click the Edit tab under Video Tools to fade the video sound. The ribbon’s initial part is devoted to audio controls. One drop-down choice is for fade in, and the other is for fade out. You may choose none, slow, medium, or quick for each of them.

Step4Select the Options option beneath Motion and Fades to fade your videos and the soundtrack. The first ribbon area is devoted to audio controls, much to what we saw for video sound. One drop-down choice is for fade in, and the other is for fade out. You may choose none, slow, medium, or quick for each of them.

It is pertinent to mention here that the windows video editor does not support the fading feature that is included in the transitions. It can be used for various things, however the editor lacks fading options. We thus provide an alternative technique for fading the movies and words on Windows or iOS platforms in the upcoming part.
Part 2: Alternative Way to Fade Your Video - Filmora
Almost every video editor has fade in and fade out effects but the features that Filmora provides are out of the box. It creates smooth scene changes, assists in making some components stand out on the screen, and in general, are highly pleasing to the eye. These can be considered as wonderful magic tricks however, not with Filmora. A popular and futuristic video editor with which, fades can be made easily and handy. The layout is straight forward, and the commands are easy to understand and changeable. The best thing about this software is that it is free and works on both Mac and Windows.
With the applications that Windows provide, the fade-in effect is frequently used to gradually bring a shot to the viewer’s attention, but it can also be used to pacify the transition between two shots. Especially when it is combined with the fade-out effect, frequently used to wrap up a shot, end a sequence, or the entire video clip. However, with Filmora, you can upload a picture, a GIF, or a video from your computer or paste in a link in the Filmora opening window including the Fading effects on both Audio and Video clips.
Free Download For Win 7 or later(64-bit)
Free Download For macOS 10.14 or later
Steps to How to Fade in Filmora Video Editor
Your meme video, GIF, or picture may include text. It is simple to change the font color, size, and placement of the text. Your meme may be downloaded as a GIF, MP4, PNG, or JPG image. As a result, the operations may be carried out simply and easily, and no prior understanding of the program is necessary since it has a highly user-friendly interface.
Step1Download and Install Filmora Video Editor
the simple platform to begin modifying your audio and music files. To use this program hassle-free, you must first download and install it on your windows computer. Start by downloading the most recent version of this program. Once you’ve done that, it’s time to install it on your computer. To do it quickly, simply follow the usual setup instructions and install this software on your computer.
Step2In Filmora Start Importing Files
We’ll walk you through the process of utilizing this platform for audio fade-in/fade-out in the following step. You need to quickly open Filmora from your desktop or the search bar in order to get started. Now, all you have to do to import your music and video files is click the Import button on the software’s main screen as seen below:

Step3Use Fade-in/Fade-out Effects
The first step in this process is to learn how to use Filmora to begin fading your audio files in and out. The nicest feature of the Filmora is how easy you can use these methods from the timeline. To do so, center your attention on your audio file inside the timeline; after you’ve chosen it, the two icons will appear above the audio file. Drag the first one to the length you want to conduct the audio fade-in option, as shown:

![]()
Note: Playing the file inside the timeline to the Filmora preview layout will also allow you to listen to the audio and video respectively.
Step4Edit the whole project
Wondershare Filmora, which includes an audio and video editor, is an all-in-one solution for all your video editing needs, as we’ve already said. Filmora features a built-in video editing toolbox in addition to an audio editor. Within the app, you may use editing methods ranging from simple to advanced. Simply click on the video file inside the timeline as shown below to choose the basic editor:

Step5Share and export
We’ll give you a quick overview of exporting and sharing your audio-edited files and projects with a few clicks in the last section of this tutorial. To continue, it’s important to note that Wondershare Filmora also enables you to share your content and quickly export it from the software’s user interface. for the export to your PC to continue. On your software’s screen, click the Export button in the top-right corner as shown:
Part 3: FAQs Regarding Video Fade
1. What is the fade panel in Windows video editor?
In the windows video editor, there is a panel for basic video editing tools. But for fading in/out of a video or text, there is no option available. The built-in windows tool does not have any option of ‘transition’. It straight forwardly moves from one video clip to the other without any sort of transition because Microsoft believe these transitions to be lame and unnecessary. Hence, they are not available. In case of Filmora, and other such tools, there is a straight up option for transitions where you can fade in and out with a lot of other cool stuff. For fading you can follow the method mentioned above in the article.
2. How do I fade text in Windows video editor?
As stated earlier, there is no option for fading in windows video editor, hence, even the text cannot be faded in or out. There is a panel for basic video editing tools in the Windows video editor. However, there is no ability for a video or text to fade in and out. There is no “transition” option in the built-in Windows programme. Microsoft considers these transitions to be unnecessary, so it simply switches from one video clip to the next without making any other effects.
3. How do I fade out music in Windows video editor?
There is no direct command for making the music or sound fade out but you can do it manually, that is, in the video where ever you want the music or sound to fade out is that you can trim that clip out and then divide into two more clips. You can take the first of the two clips and lower its sound and in the next clip, you can mute the clip, note: the clips must be kept small, otherwise it will sound quite weird. If the respective lengths of the clips are kept quite small, only then will the fade feel natural. Due to unavailability of a direct command, fading the music out can be a very taxing job.
The Bottom Line
The built-in video editor for Windows does not have a direct option, therefore fading procedures cannot be utilized without downloading and installing other software, such as Filmora, which may assist with such problems. Filmora comes with built-in tools for text, video, and audio fading. In Filmora, there are at least four different ways to fade media. As a consequence, the conclusion we reach is that although the Windows video editor is strong and useful in a professional setting, it cannot be utilized to create effects that are often employed in the current world to draw in viewers.
Free Download For Win 7 or later(64-bit)
Free Download For macOS 10.14 or later
Free Download For macOS 10.14 or later
Steps to How to Fade in Filmora Video Editor
Your meme video, GIF, or picture may include text. It is simple to change the font color, size, and placement of the text. Your meme may be downloaded as a GIF, MP4, PNG, or JPG image. As a result, the operations may be carried out simply and easily, and no prior understanding of the program is necessary since it has a highly user-friendly interface.
Step1Download and Install Filmora Video Editor
the simple platform to begin modifying your audio and music files. To use this program hassle-free, you must first download and install it on your windows computer. Start by downloading the most recent version of this program. Once you’ve done that, it’s time to install it on your computer. To do it quickly, simply follow the usual setup instructions and install this software on your computer.
Step2In Filmora Start Importing Files
We’ll walk you through the process of utilizing this platform for audio fade-in/fade-out in the following step. You need to quickly open Filmora from your desktop or the search bar in order to get started. Now, all you have to do to import your music and video files is click the Import button on the software’s main screen as seen below:
Step3Use Fade-in/Fade-out Effects
The first step in this process is to learn how to use Filmora to begin fading your audio files in and out. The nicest feature of the Filmora is how easy you can use these methods from the timeline. To do so, center your attention on your audio file inside the timeline; after you’ve chosen it, the two icons will appear above the audio file. Drag the first one to the length you want to conduct the audio fade-in option, as shown:
![]()
Note: Playing the file inside the timeline to the Filmora preview layout will also allow you to listen to the audio and video respectively.
Step4Edit the whole project
Wondershare Filmora, which includes an audio and video editor, is an all-in-one solution for all your video editing needs, as we’ve already said. Filmora features a built-in video editing toolbox in addition to an audio editor. Within the app, you may use editing methods ranging from simple to advanced. Simply click on the video file inside the timeline as shown below to choose the basic editor:
Step5Share and export
We’ll give you a quick overview of exporting and sharing your audio-edited files and projects with a few clicks in the last section of this tutorial. To continue, it’s important to note that Wondershare Filmora also enables you to share your content and quickly export it from the software’s user interface. for the export to your PC to continue. On your software’s screen, click the Export button in the top-right corner as shown:
Part 3: FAQs Regarding Video Fade
1. What is the fade panel in Windows video editor?
In the windows video editor, there is a panel for basic video editing tools. But for fading in/out of a video or text, there is no option available. The built-in windows tool does not have any option of ‘transition’. It straight forwardly moves from one video clip to the other without any sort of transition because Microsoft believe these transitions to be lame and unnecessary. Hence, they are not available. In case of Filmora, and other such tools, there is a straight up option for transitions where you can fade in and out with a lot of other cool stuff. For fading you can follow the method mentioned above in the article.
2. How do I fade text in Windows video editor?
As stated earlier, there is no option for fading in windows video editor, hence, even the text cannot be faded in or out. There is a panel for basic video editing tools in the Windows video editor. However, there is no ability for a video or text to fade in and out. There is no “transition” option in the built-in Windows programme. Microsoft considers these transitions to be unnecessary, so it simply switches from one video clip to the next without making any other effects.
3. How do I fade out music in Windows video editor?
There is no direct command for making the music or sound fade out but you can do it manually, that is, in the video where ever you want the music or sound to fade out is that you can trim that clip out and then divide into two more clips. You can take the first of the two clips and lower its sound and in the next clip, you can mute the clip, note: the clips must be kept small, otherwise it will sound quite weird. If the respective lengths of the clips are kept quite small, only then will the fade feel natural. Due to unavailability of a direct command, fading the music out can be a very taxing job.
The Bottom Line
The built-in video editor for Windows does not have a direct option, therefore fading procedures cannot be utilized without downloading and installing other software, such as Filmora, which may assist with such problems. Filmora comes with built-in tools for text, video, and audio fading. In Filmora, there are at least four different ways to fade media. As a consequence, the conclusion we reach is that although the Windows video editor is strong and useful in a professional setting, it cannot be utilized to create effects that are often employed in the current world to draw in viewers.
Free Download For Win 7 or later(64-bit)
Free Download For macOS 10.14 or later
Also read:
- Updated In 2024, Do You Want to Stream and Record at the Same Time but Cant Find an Easy Solution? This Guide Will Help You Get This Done Using Three Easy-to-Follow Methods
- Updated 2024 Approved You Can Create Interaction Videos with Friends and Family by Sitting Far Away, Which Seems Innovative. In This Article, Youll Get a Guide to Edit a Split-Screen Video on Filmora
- In 2024, What Slideshow Templates Teach You About Aesthetic
- Updated In 2024, AI Features of Wondershare Filmora - Silence Detection in Videos
- Updated In 2024, How to Make Vintage Film Effect 1980S
- In 2024, 8 Best Video Editor with Useful Masking
- New Separate Audio From Video in DaVinci Resolve Step by Step for 2024
- Updated Gifs Can Convey Your Emotions in a Way that Words Cannot, so They Are Becoming a Popular Way to Express Yourself, and You Must Know How to Make a Gif and You Wont Believe that Its Not Difficult to Do for 2024
- Updated Easy Way to Create a DIY Green Screen Video Effect for 2024
- Updated 2024 Approved How to Create an URL for Your Video?
- New 2024 Approved Progressive Solutions to Adding VHS Effects to Video with Ease
- New 2024 Approved Detailed Steps to Rotate Videos in Blender
- 2024 Approved Creating Collages on Canva Is Simple and Quick. The Tool Lets You Create some Amazing Customized Collages as Needed. So, Get Ready to Explore the World of Canva Collages
- Updated Are You Looking for the Best Premiere Pro Slideshow Template Online for Free? If Yes, You Can Find a Few Exciting Slideshow Templates Here. They Are Worth Using for 2024
- Updated Here We Will Investigate AI-Based Video Interview, How It Is Being Used, and How to Master an Artificial Intelligence Video Interview Act for 2024
- Updated 2024 Approved Detailed Guide to Rotate Videos in Blender
- 2024 Approved You Need to Follow Certain Steps to Complete Your Project. In the Section Below, We Will Discuss in Detail the Steps to Make a Movie From Windows Movie Maker
- New 2024 Approved 6 Instant Ways to Create Windows 10 Slideshow
- Updated In 2024, In This Article, Youll Find Four Solutions for Rotating Your Go-Pro Videos. The Following Tools Will Be Used for This Purpose
- Updated Kdenlive Video Editor Review
- 2024 Approved How to Create Video Contents That Convert Sales
- Adobe Premiere Pro Download and Use Guide In Depth
- Updated Whatre the Best Alternatives to Pexels, In 2024
- Updated 2024 Approved 4 Solutions to Crop a Video on Android Easily
- New How to Create a Light Sweep (Shine) Effect with Filmora
- Updated How to Make Vintage Film Effect 1980S for 2024
- Updated Are You Finding It Difficult to Freeze-Frame in After Effects? Note that Freeze-Frame Takes only a Few Seconds, and, in This Tutorial, We Will Guide You on How to Create and Add Frame Hold in After Effects
- In 2024, How to Make Double Exposure Effect in Filmora
- Updated With This Article, We Will Be Looking at Steps to Rotate a Video in Cyberlink PowerDirector to Help You when Required. We Have Also Mentioned the Steps You Will Need to Follow in Wondershare Filmora
- Updated Best Ways to Add Meme Text to Videos for 2024
- 2024 Approved 5 Tried-And-True Methods to GIF Making
- How to Easily Convert SRT to VTT
- New 2024 Approved Top 10 iPad Slideshow Apps to Create a Slideshow
- Updated 2024 Approved Best Video Editors to Add Text to a Video
- Updated Step by Step to Rotate Videos Using Kdenlive
- New Top Free Video Editing Software Enhance Your Content with These Essential Tools for 2024
- New Top VHS Sound Effect That You Can Use in Video Making for 2024
- New | Best 8 Online GIF to APNG Converters
- How to Make a Super Easy Rotating Video Effect
- Updated 2024 Approved Gif to Svg, Svg to Gif, Convert Gif to Svg, Animated Svg to Gif, Convert Svg to Gif, Svg to Gif Converter, Svg to Gif Animation, Svg Animation to Gif, Gif to Svg Converter
- 3uTools Virtual Location Not Working On Motorola Moto G 5G (2023)? Fix Now | Dr.fone
- How to Unlock Apple ID Activation Lock From iPhone 11?
- Cellular Network Not Available for Voice Calls On Vivo Y200 | Dr.fone
- Which Pokémon can Evolve with a Moon Stone For Honor Magic V2? | Dr.fone
- Complete Review & Guide to Techeligible FRP Bypass and More For Vivo X Flip
- In 2024, Hassle-Free Ways to Remove FRP Lock from Vivo Y200 Phones with/without a PC
- Why Apple Account Disabled On your iPhone 6s Plus? How to Fix
- Full Guide to Unlock iPhone 14 Plus with iTunes | Dr.fone
- How To Enable USB Debugging on a Locked Samsung Galaxy A15 5G Phone
- Calls on Vivo V29 Pro Go Straight to Voicemail? 12 Fixes | Dr.fone
- In 2024, How to Track Lava Yuva 3 Location by Number | Dr.fone
- Title: New How to Create a DIY Green Screen Video Effect for 2024
- Author: Morgan
- Created at : 2024-04-24 01:02:22
- Updated at : 2024-04-25 01:02:22
- Link: https://ai-video-editing.techidaily.com/new-how-to-create-a-diy-green-screen-video-effect-for-2024/
- License: This work is licensed under CC BY-NC-SA 4.0.
