
:max_bytes(150000):strip_icc():format(webp)/preaknessstakes-5c804f1b46e0fb00019b8ee0.jpg)
New How to Create Cooking Video Intro and Outro for YouTube Channel for 2024
How to Create Cooking Video Intro and Outro for YouTube Channel?
With the number of YouTube content creators increasing every minute, the competition will be strong and unmatched. If you are a chef owning a YouTube cooking channel, this article might be your calling.
The revolutionary cooking video intros and promising outro for the channels are the need of the hour. It has become crucial to give your competitors a powerful match via robust content, incredible cooking background music, and a great end. The article covers creating a café meal intro and cooking channel YouTube end screen. So, time to begin? Shall we?
In this article
01 How to Create a Cafe Meal Intro?
02 How to Create a Cooking Channel YouTube End Screen?
03 3 Recommended Sites to Download Cooking Background Music
Part 1: How to Create a Cafe Meal Intro?
Are you a chef in a restaurant in Paris? Do you need to create a café meal intro that grabs the attention of all food fanatics worldwide? Worry no more, as this section has got you covered.
Wondershare Filmora is a one of its kind software to create an astonishing café meal intro in seconds. Let us initiate the step-by-step!
For Win 7 or later (64-bit)
For macOS 10.12 or later
Step 1: Double click on Wondershare Filmora to open the software. Head to the “Audio” tab and tap “Young and Bright.” The process will launch interesting music from there.

Step 2: Pick one and drag it to the timeline. Navigate to the “Media” tab to drag the cooking video to the first track. You can also import the video from your system.

Step 3: It is time to use the “Split Screen” to show more scenes in one video. Pick one and drag it to the timeline. It will create three vertical divisions on the preview window. Drop three different videos in each division and adjust the height using the Zoom settings.

Step 4: Import another cooking video and import it to the first track. Navigate to the “Elements” section and drag one of it as a background to the end of the first track. Look for another “café” related element to drag it to the end of the second track.

Step 5: Moving on, scroll to the “Titles” panel to pick a “restaurant” related idea and drag it to the timeline. The position of the title can be adjusted, and the name of the title can be altered by placing it in the preview window.

Step 6: Use the big titles for the beginning of the video and drag them to the second track. The title can be adjusted and renamed effortlessly. Pick another title for the middle of the video and perform the same procedure. The process is completed, and you can export the video.

Part 2: How to Create a Cooking Channel YouTube End Screen?
Are you an impeccable chef? Do you own a YouTube channel with limited subscribers?
The background music for cooking videos is essential to capture the attention of food addicts in the world. Your cooking channel’s stunning YouTube end screen is your perfect shot at improving subscribers’ range. The subsection shall reflect upon the procedure to effortlessly use Wondershare Filmora. So, let us have a look!
For Win 7 or later (64-bit)
For macOS 10.12 or later
Step 1: Open Wondershare Filmora from your computer and import the video that you need for the YouTube outro. Drag the video to the first track of your timeline. Head to the “Titles” tab and find the ideal title related to the restaurant idea. Now, drag it on to the second track.

Step 2: Now, it is time to use the “Transitions” tab to pick one and drag it to the end of the second track. First, import another video and drag it to the first track. After that, select the “Titles” and search YouTube pack lower-thirds. Hit one and drag it to the second track. Make required alterations related to the position, allocation, title name, size, and color.

Step 3: Navigate to the “Transitions” and click on one. Drag it and drop between the two clips. Screenshot the picture from the preview window and drag it from the “Media” tab to the first track. Pick the “YouTube end screen template” from titles and drag it to the second track.

Step 4: Modify your text from the “Advanced Settings.” Now, it is time to pick another media from your system to be used as a YouTube channel avatar. Place it on to the third track. It is time to adjust the photo on the end screen.

Step 5: To do so, go to the “Effects” and pick an image mask from it. Drag it to the photo avatar in the preview window. After that, double click on the track, and settings will appear. Select “Image Mask” options to adjust the size of the circle as needed.

Step 6: Adjust the position of the avatar on your preview window. Moving on, pick the keyframe to animate the position of the avatar. Change the rotation, escalation, and opacity as needed.

Step 7: It is time to add another image to the fourth track and perform the same procedure as the profile image. It will be displayed as the recent video on the end screen. Animate the imagery as done previously. You have created a creative end screen for your cooking YouTube channel.

Part 3: 3 Recommended Sites to Download Cooking Background Music
The background music for cooking videos is an important part of a cooking video intro and outro. Therefore, we can introduce three sites that offer great cooking background music free of copyright infringement issues. So, are you with us? Let us start!
Envato Elements
The first one of the lot is Envato Elements. There are different genres of music linked with cooking videos. The website filters can be tailored according to the theme of one’s cooking YouTube channel. Additionally, there are cooking moods music as well.

MobCup
MobCup has made it easy to browse the related cooking background music. The cooking music soup, monster hunt, cooking instrumental, and cooking effects are famous music options. The user can download them by hitting the “Download” button effortlessly.

SoundCloud
SoundCloud is another remarkable source for cooking videos to get hands-on background music. The royalty-free music for food, cooking music, and uplifting background music can be incorporated in the videos to give an essence of the cooking tutorials. The link can be copied, and the track can be downloaded in seconds.

Concluding Remarks
The marketing industry is getting more fame than the actual brand services due to multiple reasons. The animations and transitions are used to attract the attention of potential users and clients. If you own a restaurant with a YouTube cooking channel, the exciting cooking background music will work best for you.
The article discussed creating a café meal intro and cooking channel YouTube end screen through Filmora. The three recommended sites to download the music were also this write-up’s crux.
Wondershare Filmora
Get started easily with Filmora’s powerful performance, intuitive interface, and countless effects!
Try It Free Try It Free Try It Free Learn More >

02 How to Create a Cooking Channel YouTube End Screen?
03 3 Recommended Sites to Download Cooking Background Music
Part 1: How to Create a Cafe Meal Intro?
Are you a chef in a restaurant in Paris? Do you need to create a café meal intro that grabs the attention of all food fanatics worldwide? Worry no more, as this section has got you covered.
Wondershare Filmora is a one of its kind software to create an astonishing café meal intro in seconds. Let us initiate the step-by-step!
For Win 7 or later (64-bit)
For macOS 10.12 or later
Step 1: Double click on Wondershare Filmora to open the software. Head to the “Audio” tab and tap “Young and Bright.” The process will launch interesting music from there.
Step 2: Pick one and drag it to the timeline. Navigate to the “Media” tab to drag the cooking video to the first track. You can also import the video from your system.
Step 3: It is time to use the “Split Screen” to show more scenes in one video. Pick one and drag it to the timeline. It will create three vertical divisions on the preview window. Drop three different videos in each division and adjust the height using the Zoom settings.
Step 4: Import another cooking video and import it to the first track. Navigate to the “Elements” section and drag one of it as a background to the end of the first track. Look for another “café” related element to drag it to the end of the second track.
Step 5: Moving on, scroll to the “Titles” panel to pick a “restaurant” related idea and drag it to the timeline. The position of the title can be adjusted, and the name of the title can be altered by placing it in the preview window.
Step 6: Use the big titles for the beginning of the video and drag them to the second track. The title can be adjusted and renamed effortlessly. Pick another title for the middle of the video and perform the same procedure. The process is completed, and you can export the video.
Part 2: How to Create a Cooking Channel YouTube End Screen?
Are you an impeccable chef? Do you own a YouTube channel with limited subscribers?
The background music for cooking videos is essential to capture the attention of food addicts in the world. Your cooking channel’s stunning YouTube end screen is your perfect shot at improving subscribers’ range. The subsection shall reflect upon the procedure to effortlessly use Wondershare Filmora. So, let us have a look!
For Win 7 or later (64-bit)
For macOS 10.12 or later
Step 1: Open Wondershare Filmora from your computer and import the video that you need for the YouTube outro. Drag the video to the first track of your timeline. Head to the “Titles” tab and find the ideal title related to the restaurant idea. Now, drag it on to the second track.
Step 2: Now, it is time to use the “Transitions” tab to pick one and drag it to the end of the second track. First, import another video and drag it to the first track. After that, select the “Titles” and search YouTube pack lower-thirds. Hit one and drag it to the second track. Make required alterations related to the position, allocation, title name, size, and color.
Step 3: Navigate to the “Transitions” and click on one. Drag it and drop between the two clips. Screenshot the picture from the preview window and drag it from the “Media” tab to the first track. Pick the “YouTube end screen template” from titles and drag it to the second track.
Step 4: Modify your text from the “Advanced Settings.” Now, it is time to pick another media from your system to be used as a YouTube channel avatar. Place it on to the third track. It is time to adjust the photo on the end screen.
Step 5: To do so, go to the “Effects” and pick an image mask from it. Drag it to the photo avatar in the preview window. After that, double click on the track, and settings will appear. Select “Image Mask” options to adjust the size of the circle as needed.
Step 6: Adjust the position of the avatar on your preview window. Moving on, pick the keyframe to animate the position of the avatar. Change the rotation, escalation, and opacity as needed.
Step 7: It is time to add another image to the fourth track and perform the same procedure as the profile image. It will be displayed as the recent video on the end screen. Animate the imagery as done previously. You have created a creative end screen for your cooking YouTube channel.
Part 3: 3 Recommended Sites to Download Cooking Background Music
The background music for cooking videos is an important part of a cooking video intro and outro. Therefore, we can introduce three sites that offer great cooking background music free of copyright infringement issues. So, are you with us? Let us start!
Envato Elements
The first one of the lot is Envato Elements. There are different genres of music linked with cooking videos. The website filters can be tailored according to the theme of one’s cooking YouTube channel. Additionally, there are cooking moods music as well.
MobCup
MobCup has made it easy to browse the related cooking background music. The cooking music soup, monster hunt, cooking instrumental, and cooking effects are famous music options. The user can download them by hitting the “Download” button effortlessly.
SoundCloud
SoundCloud is another remarkable source for cooking videos to get hands-on background music. The royalty-free music for food, cooking music, and uplifting background music can be incorporated in the videos to give an essence of the cooking tutorials. The link can be copied, and the track can be downloaded in seconds.
Concluding Remarks
The marketing industry is getting more fame than the actual brand services due to multiple reasons. The animations and transitions are used to attract the attention of potential users and clients. If you own a restaurant with a YouTube cooking channel, the exciting cooking background music will work best for you.
The article discussed creating a café meal intro and cooking channel YouTube end screen through Filmora. The three recommended sites to download the music were also this write-up’s crux.
Wondershare Filmora
Get started easily with Filmora’s powerful performance, intuitive interface, and countless effects!
Try It Free Try It Free Try It Free Learn More >
Spooky Halloween with the Best 15+ Halloween Countdown Video Clips
Halloween is fast approaching, and as a content creator, you’re looking to take advantage of the season and give your viewers unique Halloween vibes in your videos, but you don’t know how to go about it. Don’t panic, we got just the right idea for you. Some might ask; What idea? Well, it’s none other than a Halloween countdown video clip.
Adding a Halloween countdown clip to your video is a great way to spice it up. However, it can be quite difficult to find a perfect clip that will suit the theme of your video. To help you out, we’ve curated a list of the best 15 Halloween countdown video clips that you can use in your videos to make them fancier.
- Fog Stones Halloween Dead
- Scary Sadako ghost
- Transferring Halloween Cupcakes From The Tray To The Table Moments
- Skeleton breaking screen
- Dark Monster Halloween Horror
- Face Portrait Halloween Clown
- A Family Wearing Handmade Halloween Mask At Home
- Halloween Buckets Stacked Together
- Carving Of Pumpkin For Halloween
- Dough Halloween Cookies Bakery Products
- Woman Decorating for Halloween [TikTok]
- Girl Blonde Portrait Halloween
- An Outdoor Table With Halloween Theme Settings
- A Kid In A Mummy Costume Holding A Halloween Bucket
- Stop Motion Of Halloween Candy
Halloween Countdown Clips Editor The best editor helps you add a Halloween countdown clip to your video.
Free Download Free Download Learn More

Part 1: Top 10 Halloween-Themed Footage for Halloween Countdown Clock Video
Here we provide footage exclusively for horizontal videos, so that you can use them for your videos for YouTube, Vimeo, Twitch, etc. If you just want some clips for TikTok, Ins story, or anything else, go ahead Halloween footage for vertical videos.
1. Fog Stones Halloween Dead
Spooky graveyard with scary tombstones is another good way to go about it when you are looking for vacation countdown clock videos. The mixture of the turbulent and serene environment is enough to set the Halloween mood and even scare some folks.
Remember the scene from the movie “The Fog” and its famous dialogues: When the fog rolls in the terror begin! If you do not, take a look at a scene and judge for yourself if scary enough or not.

2. Scary Sadako ghost
What’s better than the Sadako ghost 7-day video call threat on Halloween? Well, nothing! So, why not create a prank video for your friends and family, especially those afraid of Sadako? Plus, Sadako creates a perfect backdrop for the countdown. Look at this Philippines creator who went to great lengths to scare his friends via a Sadako video call.
But you do not have to go through all that costume and scenery setup. Instead, you can use the video footage on any premium video and apply Sadako ghost via Green Screen.

3. Transferring Halloween Cupcakes From The Tray To The Table Moments
Halloween is adored for its trick-or-treat, but what about the party? What will you serve? Cupcakes sound like a good idea. But how will you entice your guest with your Halloween cupcakes? Well, you can include the cupcakes in the invitation video. While you can find many Halloween creative and savory cupcake recipes on YouTube, you can use stock footage to have them in the video.

4. Skeleton breaking screen
The broken screen is the classic prank suitable for any event and day. But simply using apps or replacing the wallpaper on your friend’s or spouse’s mobile doesn’t cut in this age and day. With new technology coming in, you have to get creative. Plus, it’s for Halloween, meaning dead skulls are a must.

5. Dark Monster Halloween Horror
Halloween house horror is another great backdrop for scaring your friends after a vacation countdown clock. You will find tons of videos on Halloween Horror houses on the internet. Look at how Jackie from Super Enthused (YouTube channel) gets scared while touring the 10 Halloween horror houses at the theme park. That was really scary, and this Halloween countdown effect can also help you do the same to your viewers.

6. Face Portrait Halloween Clown
Scary clowns against a kid’s window have been the long norm of scaring the small ones. No doubt, such pranks can scare anyone, not just kids. If you do not believe me, look at the reaction video from Infinite featuring scaring clowns’ pranks.
But how about dropping such a scary face bomb in a vacation countdown clock video? You can easily get your hands on creepy clowns’ portraits for videos via premium stock libraries like Filmora’s Filmstock.

7. A Family Wearing Handmade Halloween Mask At Home
Another not-so-fancy, subtle, and understated appeal for the Halloween vacation countdown clock video is a family together with Halloween masks. Given everyone will be in their costumes, you can also consider distributing self-made masks for everyone. You can take ideas from any of the numerous videos about Halloween mask design ideas.

8. Halloween Buckets Stacked Together
What’s the simplest and most fitting footage for the Halloween vacation countdown clock? Well, it is the scary pumpkins. Carving out Jack-o’-lantern has long been the Halloween “tradition,” and featuring it in your countdown timer at the party is the most classic way to go about it. The vibe from simple Halloween buckets stacked together is on the next level; if you do not believe me, look at Angie Bellemare’s Halloween Bucket ideas and creativity:

9. Carving Of Pumpkin For Halloween
Another Jack-o’-lantern idea for the vacation countdown clock video is the DIY Pumpin projects in the video. It doesn’t sound like much, but it really is enough to give the best feeling about Halloween without really indulging in the scary stuff. Take a look at how Jenn designs her Pumpkin Stack Fall Planter:

10. Dough Halloween Cookies Bakery Products
If Halloween is more about spending time with friends and family, a bunch of laughter, fun, and creating memories, then it cannot get better than focusing on the sweet stuff, like the dough used to cook the Halloween cookies. When you imagine the scenario of dough mixing for the Halloween countdown timer video, it does not sound like much! But they are cool-looking and set the perfect backdrop for a countdown timer video:
You can use such clips individually or mix them with other stock video footage mentioned here to create a perfect Halloween vacation countdown clock video clip.

Halloween Footage for Vertical Videos [TikTok/Instagram Story]:
The above list discusses the panoramic footage suitable for big screens. If your screen is rather a vertical one, then you might be looking for vertical stock footage for the Halloween vacation countdown clock clip. Here are some vertical footage ideas and links to stock footage to create the perfect vertical vacation countdown clock video for Halloween:
1. Woman Decorating for Halloween [TikTok]
Another simple backdrop for the Halloween countdown timer video is the decorations process to transform your indoors or outdoors for Halloween. And while you can use your own footage of decorating the house, chances are you may have missed filming yourself while decorating the house, given not everyone films themselves decorating the house and use it for their TikTok video. Here’s a video from Spooky Bones featuring the indoor decoration process for Halloween.

2. Girl Blonde Portrait Halloween
Another simple idea for a vertical countdown timer for Halloween is a scary face. In fact, if you are looking for the users to focus on the timer instead of footage is to use a slo-mo video, like this one from Tay. Tay tells a story about a real haunted house in her neighborhood while wearing scary Halloween makeup.
Of course, you can replace the story; and instead, use a clock with a girl wearing Halloween makeup.

3. An Outdoor Table With Halloween Theme Settings
If you are looking to feature the vacation countdown clock outdoors in a vertical setup, then a table with a Halloween theme might create the perfect setting. After all, Halloween is all about setting the perfect theme, and featuring a non-relevant indoor or scary video outdoors spoils the theme. Take a look at how Stephanie Cunningham on TikTok showcases her outdoor table decoration setup for Halloween.

4. A Kid In A Mummy Costume Holding A Halloween Bucket
If you are going for the classic mummy theme on Halloween, then how can you include any other footage than an actual mummy in the vertical countdown timer video? There are many ways to go about when looking to feature a mummy in the countdown clock; one idea is to show you made the mummy costumes, like Vina’s getup video on TikTok.

5. Stop Motion Of Halloween Candy
Hosting a Halloween party for kids and in search of the perfect vertical footage for a Halloween vacation countdown clock video? It cannot get better than simply featuring a bunch of candy to lure the kids toward the countdown clock. When you look at this video and imagine using a clock for the countdown clock.

Part 2: How to Apply a Halloween Countdown Clock to Your Video?
To make a unique Halloween Countdown Clock that ticks boxes around, you need software like Wondershare Filmora to implement the right element seamlessly.
Filmora library is filled with numerous such videos that will create the perfect backdrop for Halloween vacation countdown clock clips.
Coming to using the footage in your videos and making the Halloween countdown clock; well, you can do that easily using the Filmora Video editor (the video editor includes the Filmstock plug-in for easy navigation).
- Aside from Halloween-themed video footage, Filmora’s Filmstock also includes numerous audio, image, and other such elements.
- Filmora, primarily, is a video editor. You can combine all the elements like the stock footage videos discussed above and scary soundtracks and create a clock-down timer video easily.
- From trimming to splitting, to cool effects, there are several editing tools in Filmora.
- Transitions**, filters, text animations, and other editing features** are all supported.
Here’s how to use Filmora to Create a Halloween Countdown Clock Video
Free Download For Win 7 or later(64-bit)
Free Download For macOS 10.14 or later
Step1 Download and install Filmora on your Mac or PC.
Step2 Start the installed software and click Import from the main interface to upload the Halloween countdown clip. Alternatively, you can just drag-n-drop the video.

Step3 Drag-n-drop the uploaded video to the timeline.

Step4 Next, click on Stock Media and select the countdown effect that you want to use in the Halloween video. Then, drag-n-drop it to the timeline.

Step5 double click on the countdown effect and adjust it according to your requirement. You can adjust the time length too.

After that, play the video to preview it.
Step6 If you’re satisfied with the editing, scroll to the top of the screen and click Export, then, select ‘Burn DVD’.

Step7 Enter a name for your file in the Label box of the pop-up that appears on your screen, then in the Folder Path, choose the location where you want the file to be saved. Click the ‘Export’ button to finish.

Conclusion
There you have it - the top 15 Halloween countdown videos that can be used to spice up videos. Not to mention, you can find the stock footage on this page via Filmstock’s vast library containing tons of such videos. Also, is better to use subtle and not-so-horrifying clips if you want everything to be serene in the Halloween vacation countdown clock video.
Free Download For Win 7 or later(64-bit)
Free Download For macOS 10.14 or later
Halloween Countdown Clips Editor The best editor helps you add a Halloween countdown clip to your video.
Free Download Free Download Learn More
Part 1: Top 10 Halloween-Themed Footage for Halloween Countdown Clock Video
Here we provide footage exclusively for horizontal videos, so that you can use them for your videos for YouTube, Vimeo, Twitch, etc. If you just want some clips for TikTok, Ins story, or anything else, go ahead Halloween footage for vertical videos.
1. Fog Stones Halloween Dead
Spooky graveyard with scary tombstones is another good way to go about it when you are looking for vacation countdown clock videos. The mixture of the turbulent and serene environment is enough to set the Halloween mood and even scare some folks.
Remember the scene from the movie “The Fog” and its famous dialogues: When the fog rolls in the terror begin! If you do not, take a look at a scene and judge for yourself if scary enough or not.
2. Scary Sadako ghost
What’s better than the Sadako ghost 7-day video call threat on Halloween? Well, nothing! So, why not create a prank video for your friends and family, especially those afraid of Sadako? Plus, Sadako creates a perfect backdrop for the countdown. Look at this Philippines creator who went to great lengths to scare his friends via a Sadako video call.
But you do not have to go through all that costume and scenery setup. Instead, you can use the video footage on any premium video and apply Sadako ghost via Green Screen.
3. Transferring Halloween Cupcakes From The Tray To The Table Moments
Halloween is adored for its trick-or-treat, but what about the party? What will you serve? Cupcakes sound like a good idea. But how will you entice your guest with your Halloween cupcakes? Well, you can include the cupcakes in the invitation video. While you can find many Halloween creative and savory cupcake recipes on YouTube, you can use stock footage to have them in the video.
4. Skeleton breaking screen
The broken screen is the classic prank suitable for any event and day. But simply using apps or replacing the wallpaper on your friend’s or spouse’s mobile doesn’t cut in this age and day. With new technology coming in, you have to get creative. Plus, it’s for Halloween, meaning dead skulls are a must.
5. Dark Monster Halloween Horror
Halloween house horror is another great backdrop for scaring your friends after a vacation countdown clock. You will find tons of videos on Halloween Horror houses on the internet. Look at how Jackie from Super Enthused (YouTube channel) gets scared while touring the 10 Halloween horror houses at the theme park. That was really scary, and this Halloween countdown effect can also help you do the same to your viewers.
6. Face Portrait Halloween Clown
Scary clowns against a kid’s window have been the long norm of scaring the small ones. No doubt, such pranks can scare anyone, not just kids. If you do not believe me, look at the reaction video from Infinite featuring scaring clowns’ pranks.
But how about dropping such a scary face bomb in a vacation countdown clock video? You can easily get your hands on creepy clowns’ portraits for videos via premium stock libraries like Filmora’s Filmstock.
7. A Family Wearing Handmade Halloween Mask At Home
Another not-so-fancy, subtle, and understated appeal for the Halloween vacation countdown clock video is a family together with Halloween masks. Given everyone will be in their costumes, you can also consider distributing self-made masks for everyone. You can take ideas from any of the numerous videos about Halloween mask design ideas.
8. Halloween Buckets Stacked Together
What’s the simplest and most fitting footage for the Halloween vacation countdown clock? Well, it is the scary pumpkins. Carving out Jack-o’-lantern has long been the Halloween “tradition,” and featuring it in your countdown timer at the party is the most classic way to go about it. The vibe from simple Halloween buckets stacked together is on the next level; if you do not believe me, look at Angie Bellemare’s Halloween Bucket ideas and creativity:
9. Carving Of Pumpkin For Halloween
Another Jack-o’-lantern idea for the vacation countdown clock video is the DIY Pumpin projects in the video. It doesn’t sound like much, but it really is enough to give the best feeling about Halloween without really indulging in the scary stuff. Take a look at how Jenn designs her Pumpkin Stack Fall Planter:
10. Dough Halloween Cookies Bakery Products
If Halloween is more about spending time with friends and family, a bunch of laughter, fun, and creating memories, then it cannot get better than focusing on the sweet stuff, like the dough used to cook the Halloween cookies. When you imagine the scenario of dough mixing for the Halloween countdown timer video, it does not sound like much! But they are cool-looking and set the perfect backdrop for a countdown timer video:
You can use such clips individually or mix them with other stock video footage mentioned here to create a perfect Halloween vacation countdown clock video clip.
Halloween Footage for Vertical Videos [TikTok/Instagram Story]:
The above list discusses the panoramic footage suitable for big screens. If your screen is rather a vertical one, then you might be looking for vertical stock footage for the Halloween vacation countdown clock clip. Here are some vertical footage ideas and links to stock footage to create the perfect vertical vacation countdown clock video for Halloween:
1. Woman Decorating for Halloween [TikTok]
Another simple backdrop for the Halloween countdown timer video is the decorations process to transform your indoors or outdoors for Halloween. And while you can use your own footage of decorating the house, chances are you may have missed filming yourself while decorating the house, given not everyone films themselves decorating the house and use it for their TikTok video. Here’s a video from Spooky Bones featuring the indoor decoration process for Halloween.
2. Girl Blonde Portrait Halloween
Another simple idea for a vertical countdown timer for Halloween is a scary face. In fact, if you are looking for the users to focus on the timer instead of footage is to use a slo-mo video, like this one from Tay. Tay tells a story about a real haunted house in her neighborhood while wearing scary Halloween makeup.
Of course, you can replace the story; and instead, use a clock with a girl wearing Halloween makeup.
3. An Outdoor Table With Halloween Theme Settings
If you are looking to feature the vacation countdown clock outdoors in a vertical setup, then a table with a Halloween theme might create the perfect setting. After all, Halloween is all about setting the perfect theme, and featuring a non-relevant indoor or scary video outdoors spoils the theme. Take a look at how Stephanie Cunningham on TikTok showcases her outdoor table decoration setup for Halloween.
4. A Kid In A Mummy Costume Holding A Halloween Bucket
If you are going for the classic mummy theme on Halloween, then how can you include any other footage than an actual mummy in the vertical countdown timer video? There are many ways to go about when looking to feature a mummy in the countdown clock; one idea is to show you made the mummy costumes, like Vina’s getup video on TikTok.
5. Stop Motion Of Halloween Candy
Hosting a Halloween party for kids and in search of the perfect vertical footage for a Halloween vacation countdown clock video? It cannot get better than simply featuring a bunch of candy to lure the kids toward the countdown clock. When you look at this video and imagine using a clock for the countdown clock.
Part 2: How to Apply a Halloween Countdown Clock to Your Video?
To make a unique Halloween Countdown Clock that ticks boxes around, you need software like Wondershare Filmora to implement the right element seamlessly.
Filmora library is filled with numerous such videos that will create the perfect backdrop for Halloween vacation countdown clock clips.
Coming to using the footage in your videos and making the Halloween countdown clock; well, you can do that easily using the Filmora Video editor (the video editor includes the Filmstock plug-in for easy navigation).
- Aside from Halloween-themed video footage, Filmora’s Filmstock also includes numerous audio, image, and other such elements.
- Filmora, primarily, is a video editor. You can combine all the elements like the stock footage videos discussed above and scary soundtracks and create a clock-down timer video easily.
- From trimming to splitting, to cool effects, there are several editing tools in Filmora.
- Transitions**, filters, text animations, and other editing features** are all supported.
Here’s how to use Filmora to Create a Halloween Countdown Clock Video
Free Download For Win 7 or later(64-bit)
Free Download For macOS 10.14 or later
Step1 Download and install Filmora on your Mac or PC.
Step2 Start the installed software and click Import from the main interface to upload the Halloween countdown clip. Alternatively, you can just drag-n-drop the video.
Step3 Drag-n-drop the uploaded video to the timeline.
Step4 Next, click on Stock Media and select the countdown effect that you want to use in the Halloween video. Then, drag-n-drop it to the timeline.
Step5 double click on the countdown effect and adjust it according to your requirement. You can adjust the time length too.
After that, play the video to preview it.
Step6 If you’re satisfied with the editing, scroll to the top of the screen and click Export, then, select ‘Burn DVD’.
Step7 Enter a name for your file in the Label box of the pop-up that appears on your screen, then in the Folder Path, choose the location where you want the file to be saved. Click the ‘Export’ button to finish.
Conclusion
There you have it - the top 15 Halloween countdown videos that can be used to spice up videos. Not to mention, you can find the stock footage on this page via Filmstock’s vast library containing tons of such videos. Also, is better to use subtle and not-so-horrifying clips if you want everything to be serene in the Halloween vacation countdown clock video.
Free Download For Win 7 or later(64-bit)
Free Download For macOS 10.14 or later
Splice Video Editor Online - Get Your Videos Splice
Create High-Quality Video - Wondershare Filmora
An easy and powerful YouTube video editor
Numerous video and audio effects to choose from
Detailed tutorials are provided by the official channel
We are in the digital era, and any online activity gives us a high exposure level. Making digital content and posting it online is not enough. You have to be creative and adopt an advanced mode of communication. The best place to begin is with online platforms. This is because most people find it easy to source information online instead of any other place.
The availability of video editors makes it possible to splice videos online and post them instantly, reaching thousands of viewers through social media platforms in a short time.
Recent research has shown that online videos are more effective and can help brands connect with their audience compared to other data types like images, audio, GIFs, and text, among others. Check out how to merge videos online and the advantages of going online on your video editing journey.

In this article
01 The Meaning of Splice Video
02 Top 6 Online Video Splice Editors
The Meaning of Splice Video
To splice a video means combining two or more video clips to form one. You can use the available editing apps to merge several videos. You need to select each video to splice and put them together in the timeline. Several apps enable you to edit your footage by trimming, cropping, adding music, and transitions, among other adjustments.
Reasons to splice video
You could be wondering why it is necessary to splice your videos. Well, people love to be creative, and working on several videos may not bring out the creativity they need. Here are some reasons that come in handy as far as splicing video is concerned.
- It isn’t easy to share many videos at once. Splicing your videos is a quick way to get your videos to move as one piece and express your message as direct as possible.
- You can also splice videos for easy management. Remember, you can edit it as one, making you finish the editing process quickly and easily.
- Merged videos make it easy to share on other platforms. It would be very hectic to promote several videos separately on media sites.
- Another reason for splicing videos is to compress them. It will take up less space compared to dealing with several videos at once.
- Spliced video is organized, indicating the starting point and endpoint of the video.
The Benefits of Online Video Editing
Since its backbone reason is to share videos online, several pros come with it. The Splice video editor online enables anyone to create engaging videos without software installation. Let’s peruse the advantages of using online video editing compared to the conventional options.
• Automatic updates
Updates are important for the normal operation of an application. It may be hectic to keep remembering when you should update your drivers on your device. However, online apps need no manual configuration as they do this automatically. You’ll always get the latest version anytime you log in. Besides, new templates and features are instantly available to you after every update.
• Easy collaboration
This comes when several people work on a project. It could be difficult to share files manually, given the rise of computer crashes and data loss. Online mechanisms come to the rescue as all files are kept in the cloud. This lets anyone working on the project access it on any device, anywhere, thereby minimizing the risks of data loss. Furthermore, multiple collaborators can log in to the same project to input their views and other additions. Anyone can upload the file from their end and make the necessary adjustments.
• Convenient
You don’t require any tools while manage Splice video editor online. You can easily make edits from anywhere as long as you have an internet connection. It also promotes easy accessibility of your files from any device. More so, making edits and polishing your video is accomplished faster than ever.
• Time-saving
You’ll get improved productivity when you work online on your video. You won’t waste time running up and down the stairs to install your app or get updates. All you need are a few clicks of a button to make quick moves as far as video editing is concerned. Instead, you can easily polish and post your clip while you figure out what works best for your audience at each step.
• Multi-OS compatible
An online video editor runs in a web browser and, therefore, can run on several operating systems. It doesn’t matter which device you use to compose your video. You can easily share it and be accessible on other platforms by several people. Likewise, the speed will not be affected no matter which operating system you use.
Top 6 Online Video Splice Editors
Now that we have seen what online video editing is best at, we need to explore the suitable Splice video editor online that will quickly bring out the creativity in you and elevate your editing ability to the next level.
1) MiniTool MovieMaker
The app comes free with no ads and is watermark-free as well. It is rich in features that help you to maneuver as you edit your video to perfection. The MiniTool lets you create continuous videos based on your vision. It also encompasses video templates that make it easy to settle on a theme.

Pros
Customize videos with video transitions and animated text.
This app contains no advertisements.
It leaves no watermark on the finished video.
It has an intuitive and clean interface that enables easy editing of videos.
The app is highly compatible with popular video and audio formats.
Cons
It lacks some advanced features, like a green screen and motion speed control.
2) Filmora Video Editor
Filmora is another powerful tool with splice video templates. It has an intuitive interface that enables any level of user to easily edit videos. You can add filters and other video effects to create an engaging video. Also, make use of advanced features like keyframe animation, color matching, split screen, etc.
For Win 7 or later (64-bit)
For macOS 10.12 or later
Pros
It comes with advanced features to help you create compelling videos.
You can add music and other sound effects directly.
An intuitive interface that suits beginners.
Produce high-density videos.
Cons
It doesn’t support newer formats like HEIC photos..
3) Clipchamp
This online splice video editor offers you two modes of video creation online. You can either use the video templates or the blank project option. For templates, get customized ones right from the app’s gallery. However, you may also opt to start your video creation from scratch and make progress toward completion.

Pros
This app offers you two modes for video creation.
Preview your video clips before posting them.
Easily organize your music tracks in the timeline.
Splice your videos without quality loss.
Use styled text templates with animations.
Cons
It has no keyframe features for animation creation.
4) Kapwing
This is a video converter and splice video editor that freely edits your videos to any file format. You can use the screen-by-screen editing option for advanced editing ability. You can also bring on more creativity by using multiple scenes. Furthermore, you can’t run out of editing tools, which include rotating, splitting, and trimming, among others. Also, spice up your project by adding some background music and customizing text to the desired font and color.

Pros
It includes free music from the internet.
It comes with a large library of photos, stickers, etc.
It’s easy to use and allows editing of videos without signing in.
Cons
It lacks advanced features like speech ramping.
5) Video Editor by EaseUS
This is another reliable splice editor that comes with quality editing features. You can splice, merge, trim, and rotate your video, among other functionalities. Furthermore, the advanced features allow you to easily apply transitions and elements.

Pros
Splice your videos instantly using your mouse.
Easily detach the audio from the spliced video.
It supports various video formats.
Cons
It has limited templates.
6) WeVideo
This online editor lets you splice your videos anywhere. It supports several formats, and you can finally export your video in any format. Besides, it allows you access to free stock media like music tracks, videos, and images, among others.

Pros
WeVideo is free to use. However, you can upgrade to the premium version for advanced features.
Directly export videos to YouTube, Instagram, etc.
Cons
The free version leaves a watermark on your videos.
Conclusion
● Are you looking forward to promoting your brand online? Then splice the video online at the best resolution for your editing purposes. You’ll quickly edit your videos and reach your target audience with just a few clicks of a button. Likewise, it is effective to monitor your viewers’ reactions through various comments and feedback. This article has brought you several editing apps for online use. You can easily pinpoint what works best for you concerning their features.
We are in the digital era, and any online activity gives us a high exposure level. Making digital content and posting it online is not enough. You have to be creative and adopt an advanced mode of communication. The best place to begin is with online platforms. This is because most people find it easy to source information online instead of any other place.
The availability of video editors makes it possible to splice videos online and post them instantly, reaching thousands of viewers through social media platforms in a short time.
Recent research has shown that online videos are more effective and can help brands connect with their audience compared to other data types like images, audio, GIFs, and text, among others. Check out how to merge videos online and the advantages of going online on your video editing journey.
In this article
01 The Meaning of Splice Video
02 Top 6 Online Video Splice Editors
The Meaning of Splice Video
To splice a video means combining two or more video clips to form one. You can use the available editing apps to merge several videos. You need to select each video to splice and put them together in the timeline. Several apps enable you to edit your footage by trimming, cropping, adding music, and transitions, among other adjustments.
Reasons to splice video
You could be wondering why it is necessary to splice your videos. Well, people love to be creative, and working on several videos may not bring out the creativity they need. Here are some reasons that come in handy as far as splicing video is concerned.
- It isn’t easy to share many videos at once. Splicing your videos is a quick way to get your videos to move as one piece and express your message as direct as possible.
- You can also splice videos for easy management. Remember, you can edit it as one, making you finish the editing process quickly and easily.
- Merged videos make it easy to share on other platforms. It would be very hectic to promote several videos separately on media sites.
- Another reason for splicing videos is to compress them. It will take up less space compared to dealing with several videos at once.
- Spliced video is organized, indicating the starting point and endpoint of the video.
The Benefits of Online Video Editing
Since its backbone reason is to share videos online, several pros come with it. The Splice video editor online enables anyone to create engaging videos without software installation. Let’s peruse the advantages of using online video editing compared to the conventional options.
• Automatic updates
Updates are important for the normal operation of an application. It may be hectic to keep remembering when you should update your drivers on your device. However, online apps need no manual configuration as they do this automatically. You’ll always get the latest version anytime you log in. Besides, new templates and features are instantly available to you after every update.
• Easy collaboration
This comes when several people work on a project. It could be difficult to share files manually, given the rise of computer crashes and data loss. Online mechanisms come to the rescue as all files are kept in the cloud. This lets anyone working on the project access it on any device, anywhere, thereby minimizing the risks of data loss. Furthermore, multiple collaborators can log in to the same project to input their views and other additions. Anyone can upload the file from their end and make the necessary adjustments.
• Convenient
You don’t require any tools while manage Splice video editor online. You can easily make edits from anywhere as long as you have an internet connection. It also promotes easy accessibility of your files from any device. More so, making edits and polishing your video is accomplished faster than ever.
• Time-saving
You’ll get improved productivity when you work online on your video. You won’t waste time running up and down the stairs to install your app or get updates. All you need are a few clicks of a button to make quick moves as far as video editing is concerned. Instead, you can easily polish and post your clip while you figure out what works best for your audience at each step.
• Multi-OS compatible
An online video editor runs in a web browser and, therefore, can run on several operating systems. It doesn’t matter which device you use to compose your video. You can easily share it and be accessible on other platforms by several people. Likewise, the speed will not be affected no matter which operating system you use.
Top 6 Online Video Splice Editors
Now that we have seen what online video editing is best at, we need to explore the suitable Splice video editor online that will quickly bring out the creativity in you and elevate your editing ability to the next level.
1) MiniTool MovieMaker
The app comes free with no ads and is watermark-free as well. It is rich in features that help you to maneuver as you edit your video to perfection. The MiniTool lets you create continuous videos based on your vision. It also encompasses video templates that make it easy to settle on a theme.
Pros
Customize videos with video transitions and animated text.
This app contains no advertisements.
It leaves no watermark on the finished video.
It has an intuitive and clean interface that enables easy editing of videos.
The app is highly compatible with popular video and audio formats.
Cons
It lacks some advanced features, like a green screen and motion speed control.
2) Filmora Video Editor
Filmora is another powerful tool with splice video templates. It has an intuitive interface that enables any level of user to easily edit videos. You can add filters and other video effects to create an engaging video. Also, make use of advanced features like keyframe animation, color matching, split screen, etc.
For Win 7 or later (64-bit)
For macOS 10.12 or later
Pros
It comes with advanced features to help you create compelling videos.
You can add music and other sound effects directly.
An intuitive interface that suits beginners.
Produce high-density videos.
Cons
It doesn’t support newer formats like HEIC photos..
3) Clipchamp
This online splice video editor offers you two modes of video creation online. You can either use the video templates or the blank project option. For templates, get customized ones right from the app’s gallery. However, you may also opt to start your video creation from scratch and make progress toward completion.
Pros
This app offers you two modes for video creation.
Preview your video clips before posting them.
Easily organize your music tracks in the timeline.
Splice your videos without quality loss.
Use styled text templates with animations.
Cons
It has no keyframe features for animation creation.
4) Kapwing
This is a video converter and splice video editor that freely edits your videos to any file format. You can use the screen-by-screen editing option for advanced editing ability. You can also bring on more creativity by using multiple scenes. Furthermore, you can’t run out of editing tools, which include rotating, splitting, and trimming, among others. Also, spice up your project by adding some background music and customizing text to the desired font and color.
Pros
It includes free music from the internet.
It comes with a large library of photos, stickers, etc.
It’s easy to use and allows editing of videos without signing in.
Cons
It lacks advanced features like speech ramping.
5) Video Editor by EaseUS
This is another reliable splice editor that comes with quality editing features. You can splice, merge, trim, and rotate your video, among other functionalities. Furthermore, the advanced features allow you to easily apply transitions and elements.
Pros
Splice your videos instantly using your mouse.
Easily detach the audio from the spliced video.
It supports various video formats.
Cons
It has limited templates.
6) WeVideo
This online editor lets you splice your videos anywhere. It supports several formats, and you can finally export your video in any format. Besides, it allows you access to free stock media like music tracks, videos, and images, among others.
Pros
WeVideo is free to use. However, you can upgrade to the premium version for advanced features.
Directly export videos to YouTube, Instagram, etc.
Cons
The free version leaves a watermark on your videos.
Conclusion
● Are you looking forward to promoting your brand online? Then splice the video online at the best resolution for your editing purposes. You’ll quickly edit your videos and reach your target audience with just a few clicks of a button. Likewise, it is effective to monitor your viewers’ reactions through various comments and feedback. This article has brought you several editing apps for online use. You can easily pinpoint what works best for you concerning their features.
Add Green Screen Video on TikTok
TikTok is the most popular platform for making short videos. You can create creative short videos and upload to TikTok so that they can entertain your followers and make your videos go viral. To add variety to your video content, the use of green screen in short videos is a great idea. You can replace the green screen with any background in your TikTok video. You need to know how to add green screen video on TikTok.
Adding green screen on TikTok videos has become a trend now as there are several green screen TikTok videos that have gone viral. In fact, creative green screen videos are extremely popular on social media platforms. Instead of replacing the green screen in your video with a single photo, you can replace it with multiple pictures on TikTok. We will illustrate how to add multiple pictures on TikTok green screen.
Part 1. How to Add Green Screen on TikTok?
To add green screen on TikTok video, you need to have a background of uniform color. It does not necessarily have to be a green screen. For example, if you are shooting a video of your legs and the floor tiles have uniform color, you can use green screen on TikTok to replace the tiles with any picture. Instead of using one picture on TikTok short video, you can use multiple pictures in the background to create stunning TikTok videos. Here are the steps on how to add multiple pictures to TikTok green screen.
Step1 Open TikTok app on your phone. Tap on Plus icon located at the bottom of the app screen to make a new video.
Step2 Choose the duration of the video as per your preference. Thereafter, tap on Effects option located at the bottom-left corner to see the different effects available on TikTok.
![]()
Step3 Go to Trending tab and you will see Green Screen and Green Screen Video icons. If you want your video to have green screen photo, tap on Green Screen icon. If you want your video to have green screen video, tap on Green Screen Video icon.
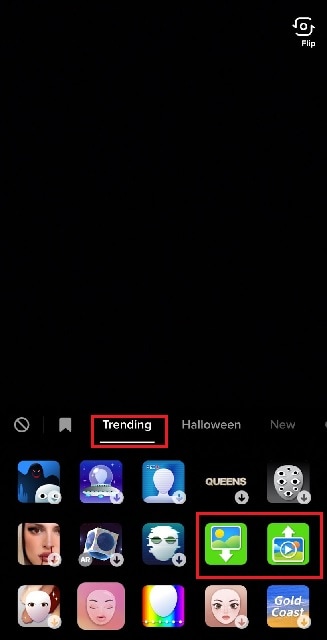
Step4 You will get a generic background and you can choose any preset background or select photo or video from your phone gallery by tapping on Plus icon. Once you are done, tap on Record button.
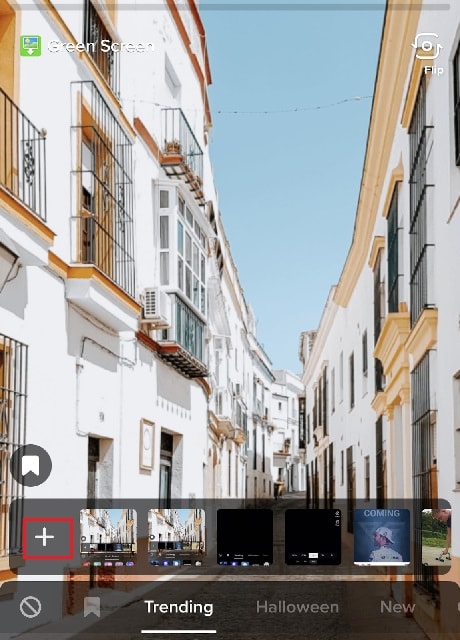
Step5 In order to use multiple pictures, you should stop recording in between and change your green screen image to anything you desire. Then tap on Record button again. TikTok will string your clips and it would appear that you have been changing multiple pictures of your background for your video.
If you want to experiment with green scree effects, you can scroll down after tapping on Green Screen icon under Effects. You will see different types of green screen videos possible on TikTok to choose from.
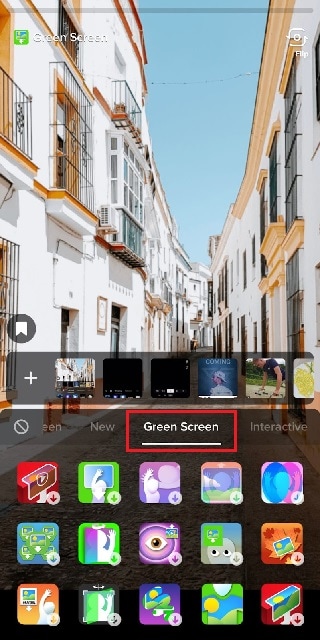
Part 2. Creative Ideas to Make TikTok Green Screen Video
Now that you know how to add a video on TikTok green screen, you have to make the most out of it. If you are wondering how you can use green screen in your TikTok videos, here are some creative ideas for you.
Walking Out Videos – You can use green screen effect to show that you are walking out of plane, walking vertically on the wall like inception, walking on the roof of a building. In fact, you can show that you are walking out of popular monuments and palaces and trick your viewers into thinking that you were actually there.
Photoshoot Location – Create a TikTok video showing your favorite locations across the world where you dream of doing photoshoot. You can pose differently and place the location in your background through green screen effect.
How-To Video – If your TikTok channel is about tutorial and learning videos, you can explain things better by putting screenshots and multiple relevant pictures in the background so that viewers can get a pictorial representation of what you are speaking to them.
Mystery Story – You can a create short video describing unknowing facts and mysteries around certain places in the world. You can put photos or video clips of those mysterious places in your background to keep your viewers hooked and related to your narration.
Rate Them Video – You can use green screen effect to showcase your old Instagram photos or videos and rate them. This is an extremely popular trend in TikTok where people show their old photos, display work from the past, and rate them today.
Reveal Your Creation – Share your secrets or interesting stories behind some of the photos or videos you took in the past. You can talk about how creatively you took certain photos and put those photos in the background while discussing them.
Part 3. How to Make Green Screen Video on Computer?
If you have a computer and a webcam, you can record a green screen video on your computer. You can place the green screen in the background perfectly and place the webcam so that the background stays within the green screen. You will need a video recorder and a video editor to make green screen video as well as replace the green screen with any photo or video. We recommend Wondershare Filmora where you can record as well as edit green screen video.
Filmora is a professional video editor where you can record your computer screen as well as your webcam video with green screen background in Picture-in-Picture mode. After recording the video, you can replace the green screen with any video clip or photo instantly in a few steps. You can also fine-tune green screen effect for perfection. Therefore, you can save the video in any resolution and file format as per your preference.

Free Download For Win 7 or later(64-bit)
Free Download For macOS 10.14 or later
Conclusion
Adding green screen effect on TikTok videos can make your videos stand out. We have illustrated how to add multiple green screen videos on TikTok and your videos will have a better chance of getting viral. Keep the green screen ideas in mind while making TikTok green screen videos. If you want to make and edit green screen videos on computer, Wondershare Filmora is the best application available for Windows and Mac users.
Also read:
- Updated In 2024, Would You Like to Know How to Change the Ratio of the Video or Which Is the Correct Aspect Ratio for Uploading to the Online Platform? Then, Go Through the Article to Get Complete Details About the Video Aspect Ratio
- New Frame Rates, Speed, and Wondershare Filmora An Overview for 2024
- Updated How to Apply Video Filters
- Updated How to Make Blender Render Transparent Background
- How to Add Text in Adobe Rush for 2024
- Updated Do You Want to Know About the Best Filmic Pro LUTs for Video Editing? This Article Provides Details on the Best Recommendations for 2024
- New In 2024, Want to Know the Simplest Way to Match the Colors of Your Photos in Photoshop? The Following Discussion Will Help Match Color in Photoshop, Almost Effortlessly
- New 2024 Approved The Best Peter McKinnon LUTs Recommendation
- 10 BEST TEXT TO SPEECH VIDEO MAKERS for 2024
- New This Article Will Help You Make Cinematic Shots with Simple DIY Hacks Using Stuff From Your Nearest Dollar Store. You Can Edit Your Video to Get Pro Results by Wondershare Filmora for 2024
- New How To Unlink Audio and Video in DaVinci Resolve for 2024
- New Expolring Top 6 Best Alternatives to Clownfish Voice Changer
- Updated How to Loop a Video on Vimeo, In 2024
- 2024 Approved Elevate Your Designs with Feather Shapes in After Effects
- 2024 Approved TEXT REVEAL Animation | Easy Masking Filmora
- Updated Create the Stranger Things Upside Down Effect Video
- A Guide to Understanding Efectum App and Some Top Alternatives for 2024
- How to Create a Bokeh Effect
- New In 2024, Create a Transparent Image in Minimal Steps with Right Tools. Try Out Best Transparent Maker and Know How to Use Them. In No Time, the Desired Image Will Be Right There with You
- Updated Boost the Pace of Your Instagram Reels Videos with These Simple Tricks
- Updated 7 Best Green Screen Software for Beginners on Mac for 2024
- Tactics to Make Transparent Image in Minimal Steps
- New In 2024, Best Free LUTs to Use
- New 2024 Approved Start Your Creative Journey Now. Follow This Step-by-Step Guide on How to Add Double Exposure Effects to Your Personal Videos by Using the Filmora Video Editor
- 2024 Approved Color Match Game Top Tips for You
- New 2024 Approved How to Make Video Slow Motion?
- 2024 Approved In This Guidepost, Youll Learn What an HDRI Photo Is and How to Use the Best Free HDRI Program to Edit Photos. Youll Also Know the Difference Between HDR and HDRI
- Updated In 2024, CapCut Lenta Template How It Benefits Slow Motion Video
- Updated In This Article, We Will Show You How to Rotate Videos Using Obs
- New In 2024, How to Speed Up Video with Canva Online Tool?
- Updated Merge MP4 Online? Its Easy With These 5 Tools
- Updated Convert Your Videos to 60 FPS Using These Excellent Tools for 2024
- New In 2024, How to Control the Speed of Video
- Updated This Article Will Show You How to Make a Tattoo Disappear on Your Body Magically for 2024
- Updated In 2024, Discover the Best Video Filter Software . Elevate Your Video Editing with Top Contenders Like Filmora, DaVinci Resolve, HitFilm Express, and More
- Updated In 2024, Ultimate Guide on How to Film Better in Public
- New How to Use Motion Tracking in Video Editing for 2024
- Updated Adobe Premiere Pro Rec 709 LUTs Finding The Best Choices for 2024
- New Do You Know that You Can Apply Different LUTs and Create Your Own? There Are Many LUT Online and Offline Generators that You Can Use to Create Your LUT
- Updated How To Use Motion Blur On Video Star?
- New In 2024, How to Make Discord Emoji GIF
- Best Free LUTs to Use for 2024
- New How to Make Video Slow Motion? Complete Guide
- The Ultimate Guide to Countdown Animation in Videos for 2024
- Updated How to Record Clips Using Your Camera and Edit Them Using Wondershare Filmora to Make a Loop Video? A Complete Guide for Beginners for 2024
- Updated Splitting Clips in Adobe After Effects Step by Step for 2024
- Updated Learn to Merge Clips in DaVinci Resolve with Simple Steps for 2024
- Updated 2024 Approved How to Add a Green Screen to Zoom
- 5 Best Route Generator Apps You Should Try On Oppo K11 5G | Dr.fone
- In 2024, 8 Ways to Transfer Photos from Lava Yuva 3 to iPhone Easily | Dr.fone
- How to Easily Hard reset my Motorola Edge 40 Pro | Dr.fone
- In 2024, Downloading SamFw FRP Tool 3.0 for Xiaomi Redmi Note 12T Pro
- In 2024, Reasons why Pokémon GPS does not Work On Vivo V27 Pro? | Dr.fone
- In 2024, How to use iSpoofer on Realme GT Neo 5 SE? | Dr.fone
- In 2024, How to Track Vivo Y78t Location by Number | Dr.fone
- Updated In 2024, How to Create Picsart Cartoon
- In 2024, How PGSharp Save You from Ban While Spoofing Pokemon Go On Samsung Galaxy M14 5G? | Dr.fone
- How To Transfer Data From iPhone 7 To Other iPhone 15 Pro devices? | Dr.fone
- In 2024, 9 Best Phone Monitoring Apps for Realme Narzo 60 Pro 5G | Dr.fone
- Samsung Galaxy A15 5G Not Connecting to Wi-Fi? 12 Quick Ways to Fix | Dr.fone
- In 2024, How to Unlock Vivo Y27 4G Bootloader Easily
- In 2024, Forgot iPhone Passcode Again? Unlock iPhone 15 Pro Without Passcode Now | Dr.fone
- In 2024, Chrome Video Translators Top 5 Video Translation Chrome Extensions
- 4 solution to get rid of pokemon fail to detect location On Realme GT Neo 5 SE | Dr.fone
- In 2024, Ways to trade pokemon go from far away On Apple iPhone SE? | Dr.fone
- In 2024, What Legendaries Are In Pokemon Platinum On Samsung Galaxy A54 5G? | Dr.fone
- 5 Quick Methods to Bypass Infinix Note 30 Pro FRP
- Various Methods to Transfer Pictures from Apple iPhone 15 to PC | Dr.fone
- Reasons for Tecno Spark Go (2023) Stuck on Boot Screen and Ways To Fix Them | Dr.fone
- Updated 15 Types of Cartoon Drawing Styles with Examples
- How to get back lost photos from Oppo A1x 5G.
- In 2024, How to Intercept Text Messages on OnePlus Nord N30 5G | Dr.fone
- How to fix iCloud lock from your Apple iPhone 14 and iPad
- How to Reset a Nokia Phone that is Locked?
- In 2024, Easiest Guide How to Clone Infinix Smart 7 HD Phone? | Dr.fone
- In 2024, 6 Ways To Transfer Contacts From Honor X7b to iPhone | Dr.fone
- In 2024, How to Make the Most of Your Apple iPhone 15 Pro Max Lock Screen with Notifications?
- 5 Easy Ways to Change Location on YouTube TV On Xiaomi Redmi Note 13 5G | Dr.fone
- Unlocking iPhone 11 Pro Passcode without a Computer
- In 2024, Top 10 AirPlay Apps in Motorola Edge 40 Pro for Streaming | Dr.fone
- How to Come up With the Best Pokemon Team On Nokia G22? | Dr.fone
- In 2024, How to Access Your Apple iPhone 8 When You Forget the Passcode? | Dr.fone
- Simple ways to get lost music back from Vivo Y78+
- How Can Motorola G24 PowerMirror Share to PC? | Dr.fone
- In 2024, How Google Pixel Fold Mirror Screen to PC? | Dr.fone
- How to Bypass iPhone 8 Passcode Easily Video Inside | Dr.fone
- Solved Warning Camera Failed on Motorola Moto G84 5G | Dr.fone
- Authentication Error Occurred on Lenovo ThinkPhone? Here Are 10 Proven Fixes | Dr.fone
- In 2024, How to Hide/Fake Snapchat Location on Your Vivo Y78t | Dr.fone
- Title: New How to Create Cooking Video Intro and Outro for YouTube Channel for 2024
- Author: Morgan
- Created at : 2024-04-24 01:02:25
- Updated at : 2024-04-25 01:02:25
- Link: https://ai-video-editing.techidaily.com/new-how-to-create-cooking-video-intro-and-outro-for-youtube-channel-for-2024/
- License: This work is licensed under CC BY-NC-SA 4.0.
