:max_bytes(150000):strip_icc():format(webp)/F8conferencelogo-7ec4475dc6624114aea076c2611df199.jpg)
New How to Create the Stranger Things Upside Down Effect

How to Create the Stranger Things Upside Down Effect
With stranger things season 4 ending, it seems like great timing to make a stranger things style transition to the Upside Down. In the Netflix series Stranger Things, there is an opposite version of our world called the Upside Down. The Upside Down is dark, creepy, and possibly filled with aliens, monsters, creatures, and other things.
Now, you can also apply the Stranger Things Upside Down Effect to your video! This effect combines camera tricks and video editing within Filmora to transition from the normal world into the Upside Down.
How-to Guide
1) Preparation
To make this effect, you will need two footage shots: one with the camera moving down and one with the camera coming back up.
When shooting for the footage, follow the steps below:
First shot
- Find any item close enough to the ground that we can block our frame with.

- Once you have your talent lined up, rotate your camera while lowering it below the foreground item at a constant speed and leaving the camera there. The key is making sure when you go behind the object, the frame is nothing but black.

For the next scene, have your actor change positions, or you can change the set around to look like the Upside Down. For instance, adding fake plants and flickering lights.
Second shot
Start bringing your camera back up at the same speed and rotate it again in the direction it was moving.

2) Steps
After you have all the footage, you can start editing it on Filmora. If you haven’t installed it yet, you can download Filmora at their official website at https://filmora.wondershare.com .
Free Download For Win 7 or later(64-bit)
Free Download For macOS 10.14 or later
Now, launch Filmora on your PC and follow the steps below:
Step1 Take your first clip in the “normal” world and drag it down to a video track on the timeline. Trim the edge of the clip, so it ends on pure black and in a downward motion.

Step2 Drag the second clip (in the Upside Down) onto the video track on the timeline after the first clip. Trim this video, so it begins in pure black and an upward motion.

Cut the clips to get the timing right since it should be a very fast transition. You can cut in the black frames so they won’t be too apparent.
If you don’t have a perfectly smooth transition, you can add a dissolve by going to Transitions > Basic > Dissolve.

Color Grading and Effects
After the transition, you can make the clip look a lot more like the Upside Down from the show with a color grade and Filmora effects. Follow the steps below:
Step1 Double-click on your second clip, then go to Color > Advanced. For a quick edit, you can try one of the presets available, such as “cool film.” It will give you the colder blue tones that Stranger Things used for the Upside Down.

Step2 You can further edit the color grading in the white balance menu. Drag the slider to the left to get a blue, cold vibe for the Upside Down.
The “cool” or “warm” color grading technically talks about color temperature. A “warmer” look will be more orange, and a “colder” look will be bluer. You can also use the tint slider to fine-tune the look.

Step3 Next, move down to the color, lower the brightness and increase contrast. It makes the scene darker and more sinister than the normal world.

Step4 Finally, go down to the vignette and drag the amount slider a tiny bit to give a Vinnette around your clip.

3) Pro Tips
You can still make your clip look even more like Upside Down with some Filmora elements.
Go to Elements > Smoke > Smokescreen 2. Drag this element on top of your Upside Down clip and trim it, so it starts at the same time the clip leaves the black frame.

You can adjust the opacity by double-clicking the smoke effect to open the setting.
Finally, go to the Transition > Basic > Dissolve to the start of the smoke and adjust it when the smoke gradually appears.

Resources from Filmostock
You can also use filmstock effects to bring our video to the next level. Go to Elements > Fire > Large Scale 12 and drag it down on top of your clip and the smoke.

Double-click the clip and change the scale of the effect to your needs. Then, go to compositing to change the blending mode to the screen to help the effect blend in more.

Now, go to color and open the white balance menu. Drag the two sliders to change the color of the particles to match your clip.

Summary
That is all you need to make a Stranger Things Upside Down effects to your video. Let us know if there are any other effects from tv shows you want to learn how to make.
Free Download For macOS 10.14 or later
Now, launch Filmora on your PC and follow the steps below:
Step1 Take your first clip in the “normal” world and drag it down to a video track on the timeline. Trim the edge of the clip, so it ends on pure black and in a downward motion.

Step2 Drag the second clip (in the Upside Down) onto the video track on the timeline after the first clip. Trim this video, so it begins in pure black and an upward motion.

Cut the clips to get the timing right since it should be a very fast transition. You can cut in the black frames so they won’t be too apparent.
If you don’t have a perfectly smooth transition, you can add a dissolve by going to Transitions > Basic > Dissolve.

Color Grading and Effects
After the transition, you can make the clip look a lot more like the Upside Down from the show with a color grade and Filmora effects. Follow the steps below:
Step1 Double-click on your second clip, then go to Color > Advanced. For a quick edit, you can try one of the presets available, such as “cool film.” It will give you the colder blue tones that Stranger Things used for the Upside Down.

Step2 You can further edit the color grading in the white balance menu. Drag the slider to the left to get a blue, cold vibe for the Upside Down.
The “cool” or “warm” color grading technically talks about color temperature. A “warmer” look will be more orange, and a “colder” look will be bluer. You can also use the tint slider to fine-tune the look.

Step3 Next, move down to the color, lower the brightness and increase contrast. It makes the scene darker and more sinister than the normal world.

Step4 Finally, go down to the vignette and drag the amount slider a tiny bit to give a Vinnette around your clip.

3) Pro Tips
You can still make your clip look even more like Upside Down with some Filmora elements.
Go to Elements > Smoke > Smokescreen 2. Drag this element on top of your Upside Down clip and trim it, so it starts at the same time the clip leaves the black frame.

You can adjust the opacity by double-clicking the smoke effect to open the setting.
Finally, go to the Transition > Basic > Dissolve to the start of the smoke and adjust it when the smoke gradually appears.

Resources from Filmostock
You can also use filmstock effects to bring our video to the next level. Go to Elements > Fire > Large Scale 12 and drag it down on top of your clip and the smoke.

Double-click the clip and change the scale of the effect to your needs. Then, go to compositing to change the blending mode to the screen to help the effect blend in more.

Now, go to color and open the white balance menu. Drag the two sliders to change the color of the particles to match your clip.

Summary
That is all you need to make a Stranger Things Upside Down effects to your video. Let us know if there are any other effects from tv shows you want to learn how to make.
10 Recommended Websites to Discover Awesome Premiere Pro Video Templates
The Premiere Pro templates are a great help to start working on the video right away. You don’t need to create your video from scratch thus, saving time. Moreover, there are fully adaptable features that make your video eye-catching. The article provides knowledge about 10 free Premiere Pro templates. So, let us commence this! Are you with us?
Part 1: 10 Popular Websites to Find Premiere Pro Templates
There is an extensive range of websites to access the free Adobe Premiere templates. It is important to know the workability of such websites and what they bring to the house. Therefore, the sub-section of this write-up would shed light on 10 of such websites where you can download Adobe Premiere templates and find them compatible with the software.
So, what are we waiting for? Let us begin the process!
1. Envato Elements
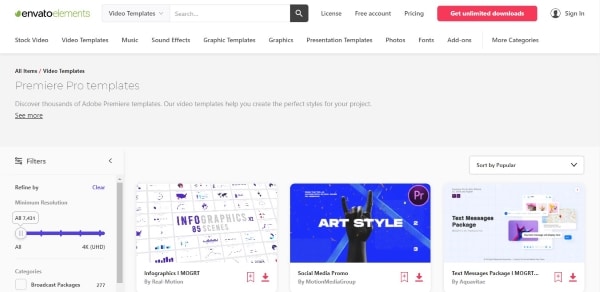
The first website offering Adobe Premiere templates is known as Envato Elements. One can count on this webpage to access millions of creative assets. Envato Elements comes up with Adobe Premiere Pro templates free, stock videos, graphic templates, photos, and website templates.
Moreover, if you are into print and website design, you will find Envato Elements beside you. The search bar makes the search effective as you can choose between categories or applications. The search filter has made life easy for designers and creators.
2. Storyblocks
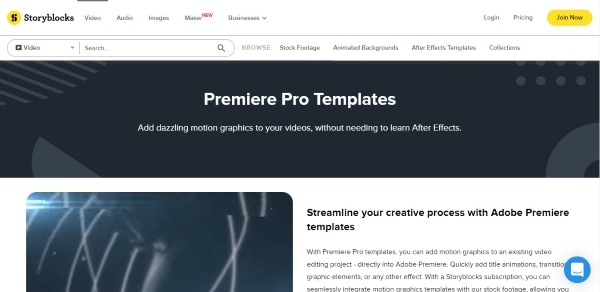
Storyblocks are the next big thing if you need to download Premiere templates without much effort. This website presents an awful load of green screen footage, music and sound effects, animated backgrounds, royalty stock footage, and templates for Premiere Pro. It also has a Maker, enabling the user to make the professional video in seconds.
The filtering option of Storyblocks is to die for. Style or software can filter the templates and effects to have what we need without wasting much time.
3. MotionElements
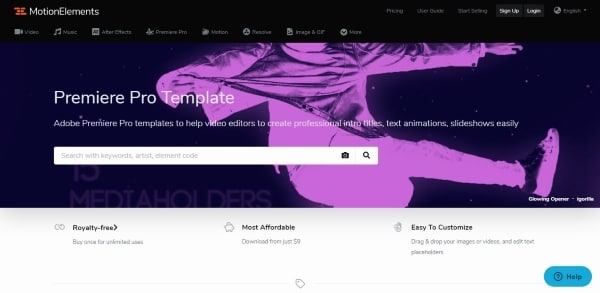
The third royalty-free marketplace making a brand name for itself is MotionElements. The website offers more than 3 million assets for its users in different industry sectors. You can access Premiere Pro templates free download with other stock videos and audio files.
From images, music, templates, effects to transitions, logos, and animations, MotionElements has covered its basis. The search filter gives multiple categories, including software, category, and style.
4. Motion Array
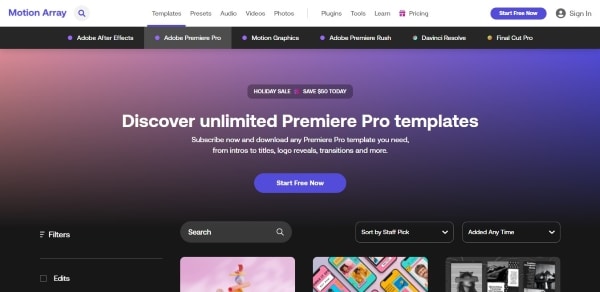
Claiming to be an all-in-one video and filmmaker’s platform, Motion Array takes complete responsibility for making your projects successful. The website takes the raw concept of your project and turns it into completion. Adobe Premiere Pro templates can be downloaded via Motion Array with other effects.
You can have Adobe Premiere Pro, Final Cut, DaVinci, and After Effects templates. The stock motion graphics, sound effects, videos, and photos are some of the strengths of Motion Array. The unlimited downloads save you from emptying your wallet.
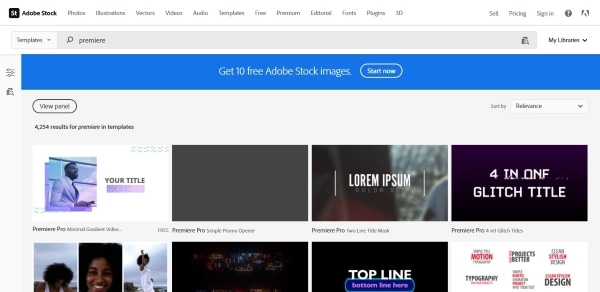
5. Adobe Stock
While we are on the subject of template Adobe Premiere free, how can we forget about Adobe Stock? Adobe Stock is a serious archive for templates, especially for Adobe Creative Suite applications. Moreover, getting hands-on an impeccable library of stock photos, audio, and videos, is one of the strongest traits of Adobe Stock.
The search filter has different options to make the search easier, for instance, application, categories, transitions, and whatnot. If you type free in the search bar, you will find Premiere Pro video templates so that downloading them wouldn’t cost a penny.
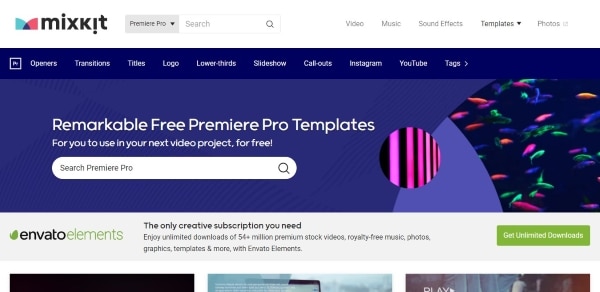
6. Mixkit
Mixkit is the top choice for getting Premiere Pro split-screen template among other royalty-free assets. Mixkit offers free Premiere Pro templates with After Effects, Final Cut Pro, DaVinci Resolve, and much more.
Moreover, Mixkit can be used for stock videos, music, sound effects, and music tracks. The quality is always high, so you don’t need to worry about that.
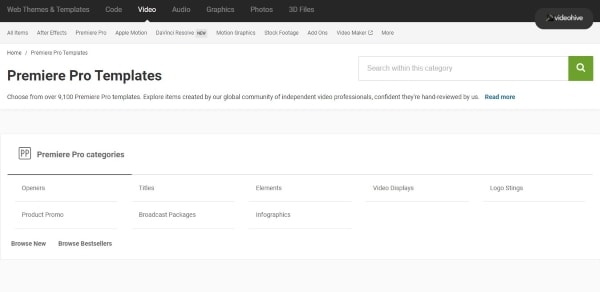
7. VideoHive
VideoHive offers the best quality and fast researched Premiere Pro templates. With more than 9,100 free Adobe Premiere templates, VideoHive helps add motion graphics and effects to your videos. Most filmmakers prefer the usage of motion graphics as it improves time and cost-effectiveness and enhances ease in adding animations to the projects.
If you are interested in making a slideshow, animated title, transition, or logo stings, you will find VideoHive there for you.
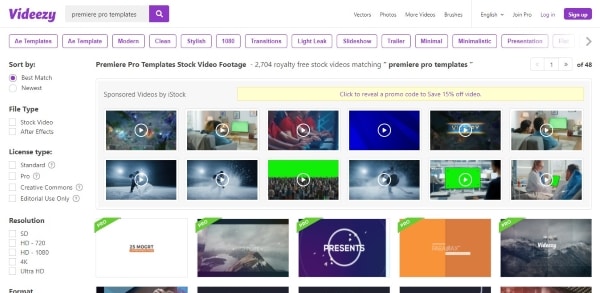
8. Videezy
Videezy is a fair choice if you need to access Premiere templates free in the most effortless fashion. The search bar of Videezy stock marketplace has interactive filter options. The user is free to navigate by sorting the results based on their presence on the website. Moreover, you can choose between the file type and bring productivity to the media industry.
The resolution can also be decided as Videezy offers SD, HD 720, HD 1080, 4K, and Ultra HD. Doesn’t it feel like a dream come true?
9. Videvo
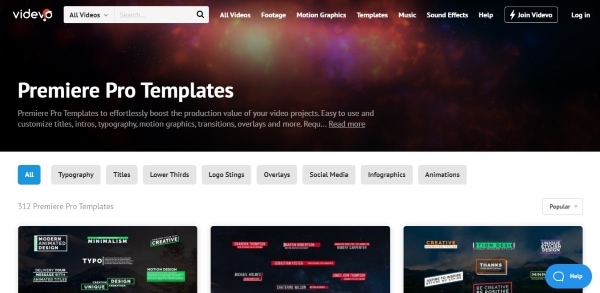
Videvo is the right shop for you if you prefer the ease-of-use over-complicated workability. Offering an interactive interface and progressive search results, Videvo boosts the production value of your projects multifold. Furthermore, this free Premiere Pro templates provider is an allrounder from the video footage, motion graphics, templates, music, and sound effects.
The user is free to customize titles, intros, typographs, overlays, and transitions. Launch the website, download the template, and get into the process.
10. Monsterone
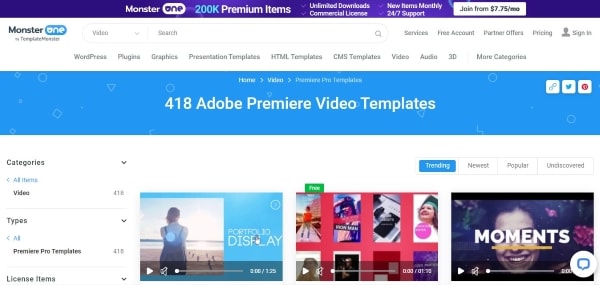
Offering Trending, Newest, Popular, and Undiscovered filtering options and choosing the right tags, Monsterone has made it to the bucket list of professionals in the field. More than 400 Premiere Pro templates can be downloaded to start working on the deadline right away.
The templates can be effortlessly previewed and launched before accessing them. It helps the user make a conscious choice. The resolution can also be set as the user deems necessary.
The Bottom Line
We are surrounded by videos 24/7. It is true for most creative professionals in the industry who are expected to edit the video to make it more captivating and attractive. One needs to have access to free Premiere Pro templates to obtain a sense of originality as we save money and time on making videos from scratch.
For this very reason, the article discussed 10 compatible and popular websites where Premiere templates free are found. We expect the user to make the right choice based on their niche in the industry. The video editing process can be accelerated by using a phenomenal tool which is Wondershare Filmora.
Filmora has the right toolbox set to make video editing easier and flawless. From cropping to flipping and motion tracking to adding keyframes, Filmora knows it all. One can also count on this tool to add backgrounds in Hollywood effect to gain innovation at all costs.
Wondershare Filmstock is your one-stop shop for royalty-free effects, video footage, clips, video effects, and audio tracks. Do not forget to review Filmora and Filmstock about their workability in the flesh.
Click here to find 10 Free After Effects Logo Templates .
Wondershare Filmora
Get started easily with Filmora’s powerful performance, intuitive interface, and countless effects!
Try It Free Try It Free Try It Free Learn More >


A Guide to Adding Audio in Wondershare Filmora
Audios are the most important part of videos in today’s world. Even if your video quality is not cinematic, audio lets you engage multiple users, even on low-quality video. To ensure the maximum number of customers on your videos, you need to add optimized quality audio to them. And it’s okay if you don’t know how to add audio to videos because you are about to.
Wondershare Filmora will let you accomplish your task in a matter of seconds. Along with providing details on adding and adjusting audio, we will also introduce the premium quality features of Filmora to present it as a powerful tool. By the end of this discussion, you will get familiar with the procedure of how to adjust TikTok audio through this video editing tool.
Part 1: Discussing The Audio Features of Wondershare Filmora in Detail
The key features of Wondershare Filmora are itself a full fledge example of innovation and modernization. You can maximize the productivity of your videos by adding soothing and studio-quality audio. Not only does it serve as a good audio adjustor, but it also makes processing easier.
Filmora is not only used for adding audio to videos, but also for modifications of audio. The AI audio-related key features of Wondershare Filmora through which you can boost your audio quality and overall video quality are presented here:
1. Audio Ducking
Integrating two soundtracks into the videos means you have to dominate one of them. With the Audio Ducking feature of Filmora, you can lower the sound of one of the two tracks presented in the videos. This is very helpful when working on YouTube videos, podcasts, and Vlogs. This tool also automatically detects soundtracks, so you don’t have to face hassles.
2. Text-to-Speech (TTS)
In this busy world, everyone looks for reliable shortcuts and ways to accomplish their task in a limited time. Filmora offers you the ability to convert text files into realistic and outclass voiceovers. You can also write lengthy blogs, share them with the site and make voiceover videos with state of art accuracy
3. Silence Detection
Do you wish to detect the silent moments in the videos and remove them without impacting the video quality? No need to worry because the Silence Detection feature of Filmora will assist you with this problem. You can also customize the Volume Threshold, Minimum Duration, and Softening Butter. Moreover, you can remove the silenced parts with a few taps.
4. Audio Visualizer
The Audio Visualizer of Filmora can add new life to your lifeless videos and match them with your videos. In addition to this, it can also add dynamic effects to videos. Not only simple, but you also have the option to add podcasts and cinematic music videos. Filmora comprises more than 25 visualizer effects for the ease of the users.
5. Audio Synchronization
Matching audio with the length of the videos without any complication is like a dream to some users. However, it can be true if you are utilizing assistive tools such as Filmora. It supports the feature of Auto Sync, through which you can synchronize the audio with video irrespective of length and format. You can also select royalty-free music from Filmora, add it to the video and sync it automatically .
6. AI Audio Stretch
To fit the duration of your audio with audio, you can retime the audio in real-time with Filmora. This feature encompasses AI powers, so you don’t have to adjust everything manually. There is no need to add fading effects or cut unnecessary parts. Along with this, you can also preview the music track to match it with the length of the videos.
7. AI Audio Denoise
Background noises in videos cause a distraction for the users and impact the engagement of users in a bad way. From removing electrical noises to the removal of pet noises, this tool can help you with everything. As it supports a wide array of audio file formats, you will not face restrictions in this part.
8. Speech-to-Text (STT)
Transcribing long videos without errors and mistakes is one of the specialties in Filmora. It also integrates several plug-ins through which you can optimize the speech-to-text in a limited time. One of the best things is it can also work on SRT files.
Part 2: How to Add and Detach Audio in Wondershare Filmora?
Integrating audio in the video somehow depends upon the user’s preferences. Yet, a reliable video editor will let you add or detach the audio from videos without any issue. The best tool through which you can accomplish this task is Wondershare Filmora. You can also discover the procedure of addition and detaching videos in the below-given information:
How to Add Audio to Video with Wondershare Filmora?
As stated above, Filmora is an industry-standard tool that offers a straightforward procedure for modifying multimedia content. The procedure for adding audio in videos with Wondershare Filmora free audio editor is listed here:
Add Audio to Video For Win 7 or later(64-bit)
Add Audio to Video For macOS 10.14 or later
Step 1Import Video and Select Audio
Initially, import the video in Filmora and drag it to “Timeline.” Next, go to the “Audio” section and select the audio of your choice. You can also click the “Learn More” icon to get more information about the audio. You can also import the customized audio from your device.

Step 2Add Audio to Video
Following this, drag your selected audio in the video in “Timeline” and “Double Click” on the audio. Next, manage the “Volume,” “Sound Balance,” “Pitch,” “Audio Ducking,” and other parameters of audio from the right panel. After this, click the “Export” button, change settings, and again hit the “Export” button to save the video on the device.

How to Detach Audio From Video with Wondershare Filmora
The procedure of audio detaching is also very smooth. Feel free to follow the steps instructed here to accomplish this task:
Detach Audio From Video For Win 7 or later(64-bit)
Detach Audio From Video For macOS 10.14 or later
Step 1Drag Video to Timeline
To get started, launch Filmora and import the video by clicking on the “Click here to import media” button. To continue, drag the imported video to the “Timeline.”

Step 2Detach Audio from Video
Once done, right-click on the video in the timeline and locate the “Detach Audio” button. Following this, hit “Detach Audio” to separate the audio from the video and continue to save it on the device.

Part 3: How to Adjust the Parameters of Audios in Filmora?
Every person wishes to customize the audio in the video so they can share their creativity with the world without any complications. To adjust the audio parameters, you need to use a reliable tool that offers versatile audio editing features.
Adjust Audio Now For Win 7 or later(64-bit)
Adjust Audio Now For macOS 10.14 or later
Luckily, Wondershare Filmora can help you a lot in modifying and customizing the audio parameters. To change the audio parameters in this audio adjuster, follow the instructions listed here:
Step 1Access Filmora and Import Video
To change the audio parameters, access Wondershare Filmora on your device and click “New Project.” Following this, hit the “Click here to import media” button to import a video and drag it to the “Timeline.”

Step 2 Change Audio Parameters in the Video
Once the video is in the timeline, double-click on the audio in the timeline. After this, the audio parameter window will be opened in the right section. From here, you can change “Sound Balance,” “Fade In,” and “Fade Out” in a customized way. Moreover, you can also toggle the “Auto-Normalization” option and optimize “Volume.”

Step 3Saving the Adjusted Video to the Device
Saving the Adjusted Video to the Device

Conclusion
In a nutshell, this discussion has guided you about the addition and adjustment of Wondershare Filmora. With Filmora, you can optimize the quality of audio in videos in no time. Moreover, it also integrates several useful features such as Audio Ducking, AI Audio Denoise, Audio Visualizer, and more.
You can discover more information about its features from the above-given discussion. This article also discusses the steps to add and detach audio from video. In addition to this, you can also adjust multiple audio parameters with Filmora’s explicit toolkit.
How to Add Audio to Video with Wondershare Filmora?
As stated above, Filmora is an industry-standard tool that offers a straightforward procedure for modifying multimedia content. The procedure for adding audio in videos with Wondershare Filmora free audio editor is listed here:
Add Audio to Video For Win 7 or later(64-bit)
Add Audio to Video For macOS 10.14 or later
Step 1Import Video and Select Audio
Initially, import the video in Filmora and drag it to “Timeline.” Next, go to the “Audio” section and select the audio of your choice. You can also click the “Learn More” icon to get more information about the audio. You can also import the customized audio from your device.

Step 2Add Audio to Video
Following this, drag your selected audio in the video in “Timeline” and “Double Click” on the audio. Next, manage the “Volume,” “Sound Balance,” “Pitch,” “Audio Ducking,” and other parameters of audio from the right panel. After this, click the “Export” button, change settings, and again hit the “Export” button to save the video on the device.

How to Detach Audio From Video with Wondershare Filmora
The procedure of audio detaching is also very smooth. Feel free to follow the steps instructed here to accomplish this task:
Detach Audio From Video For Win 7 or later(64-bit)
Detach Audio From Video For macOS 10.14 or later
Step 1Drag Video to Timeline
To get started, launch Filmora and import the video by clicking on the “Click here to import media” button. To continue, drag the imported video to the “Timeline.”

Step 2Detach Audio from Video
Once done, right-click on the video in the timeline and locate the “Detach Audio” button. Following this, hit “Detach Audio” to separate the audio from the video and continue to save it on the device.

Part 3: How to Adjust the Parameters of Audios in Filmora?
Every person wishes to customize the audio in the video so they can share their creativity with the world without any complications. To adjust the audio parameters, you need to use a reliable tool that offers versatile audio editing features.
Adjust Audio Now For Win 7 or later(64-bit)
Adjust Audio Now For macOS 10.14 or later
Luckily, Wondershare Filmora can help you a lot in modifying and customizing the audio parameters. To change the audio parameters in this audio adjuster, follow the instructions listed here:
Step 1Access Filmora and Import Video
To change the audio parameters, access Wondershare Filmora on your device and click “New Project.” Following this, hit the “Click here to import media” button to import a video and drag it to the “Timeline.”

Step 2 Change Audio Parameters in the Video
Once the video is in the timeline, double-click on the audio in the timeline. After this, the audio parameter window will be opened in the right section. From here, you can change “Sound Balance,” “Fade In,” and “Fade Out” in a customized way. Moreover, you can also toggle the “Auto-Normalization” option and optimize “Volume.”

Step 3Saving the Adjusted Video to the Device
Saving the Adjusted Video to the Device

Conclusion
In a nutshell, this discussion has guided you about the addition and adjustment of Wondershare Filmora. With Filmora, you can optimize the quality of audio in videos in no time. Moreover, it also integrates several useful features such as Audio Ducking, AI Audio Denoise, Audio Visualizer, and more.
You can discover more information about its features from the above-given discussion. This article also discusses the steps to add and detach audio from video. In addition to this, you can also adjust multiple audio parameters with Filmora’s explicit toolkit.
How to Change Video Thumbnail in Google Drive
What is a Google drive?
“Google drive is a self-hosted cloud-based site that provides free space to store your files and pictures to share them with your friends and family”.
Google Drive is also used to promote businesses or websites. You can upload a video to Google Drive and embed the file in your blog or any other website.
What is a Thumbnail?
“A Thumbnail is a still image that acts as
a preview image of your video.”
A thumbnail is the first thing seen by the viewers while watching videos. It is the only thing that forces the viewer either to watch the video or not because it previews the video content. It is also shown in the search results. A thumbnail is just like the cover or title of a book. You will read a book by its cover. In the same way, a video is viewed by its thumbnail.
Google drive is also used for the promotion of websites and businesses. It does not offer to add a thumbnail or cover image like YouTube has the option to set and can change the thumbnail of the video. As we all know Google drive is not a streaming platform and has its own boundaries.
Normally, the google drive can generate a thumbnail from the video and uses the generated thumbnail ignoring the one you have uploaded. But on the other hand, if it cannot generate a thumbnail the uploaded thumbnail will be displayed. Usually, the default thumbnail may have weird facial expressions or may not be attractive for the viewers to open the video.
Here we are discussing a few alternatives to change the thumbnail of the video in Google drive.
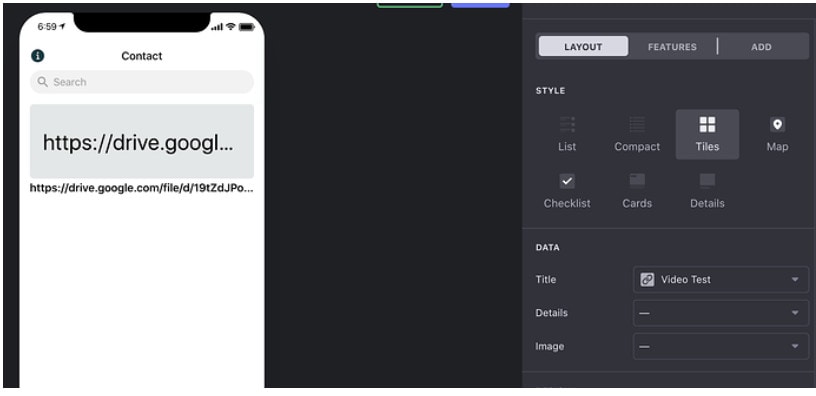
Select a separate image to be housed in a separate column to set as a thumbnail image and then go into the details, title, and Image settings.
How to Add Thumbnails to the Video Using Wonder Share Filmora 11
Wonder Share Filmora 11 is an all-in-one video editing platform that provides powerful, creative, and simple interphase to edit videos and images in a few clicks. It has a ton of amazing features that make your videos, images, and audio stands out. You can edit your videos and images in a great cinematic form using its effects, transitions, overlays, text, and a lot more. Do not wait, go and download Filmora 11 and there are more tools for you to discover.
I am going to show you how to create a thumbnail of the video in Filmora11.
Let us get started!
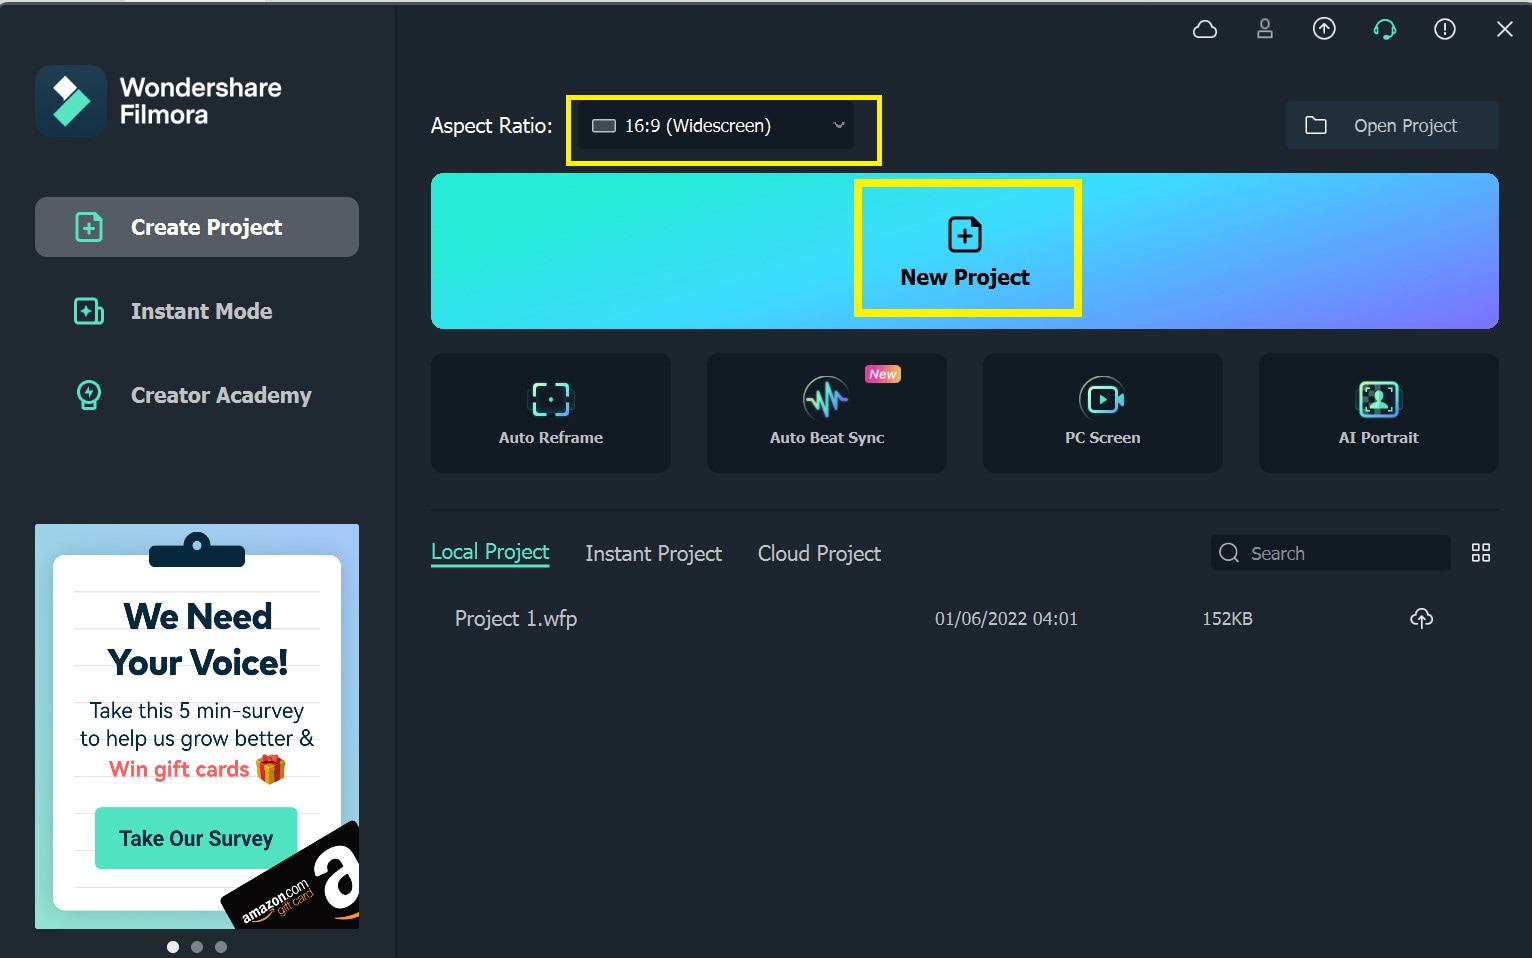
- Open Wonder Share Filmora 11 and click on New Project.
- Drag the image of your choice into the timeline.
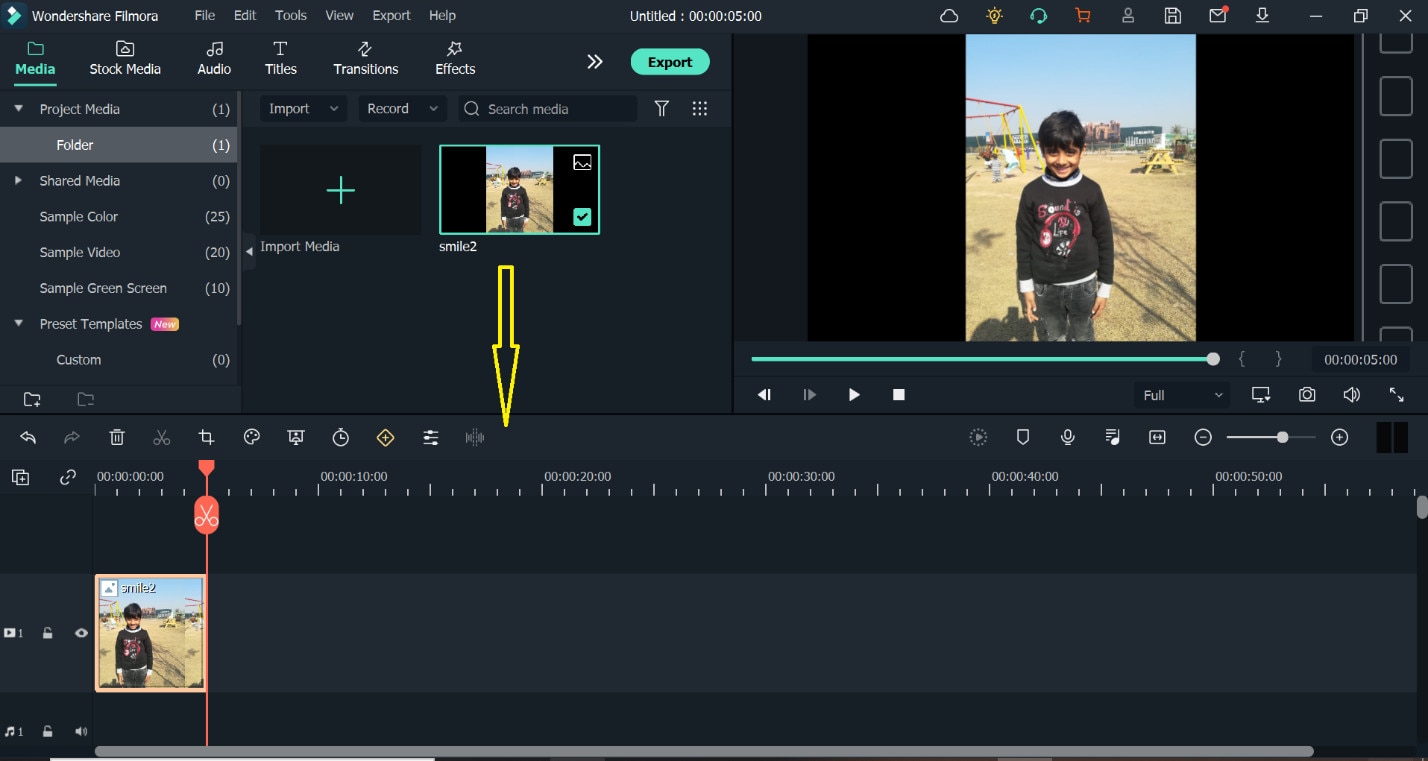
- Drag the image of your choice into the timeline.
- Click on the AI-Portrait option from the Effects
- Drag the Human Segmentation effect over the clip into the timeline.
Now you see that the subject of the video thumbnail is selected and the background has been removed.
The AI-Portrait is a very useful effect, it allows you to quickly remove the background through artificial intelligence.
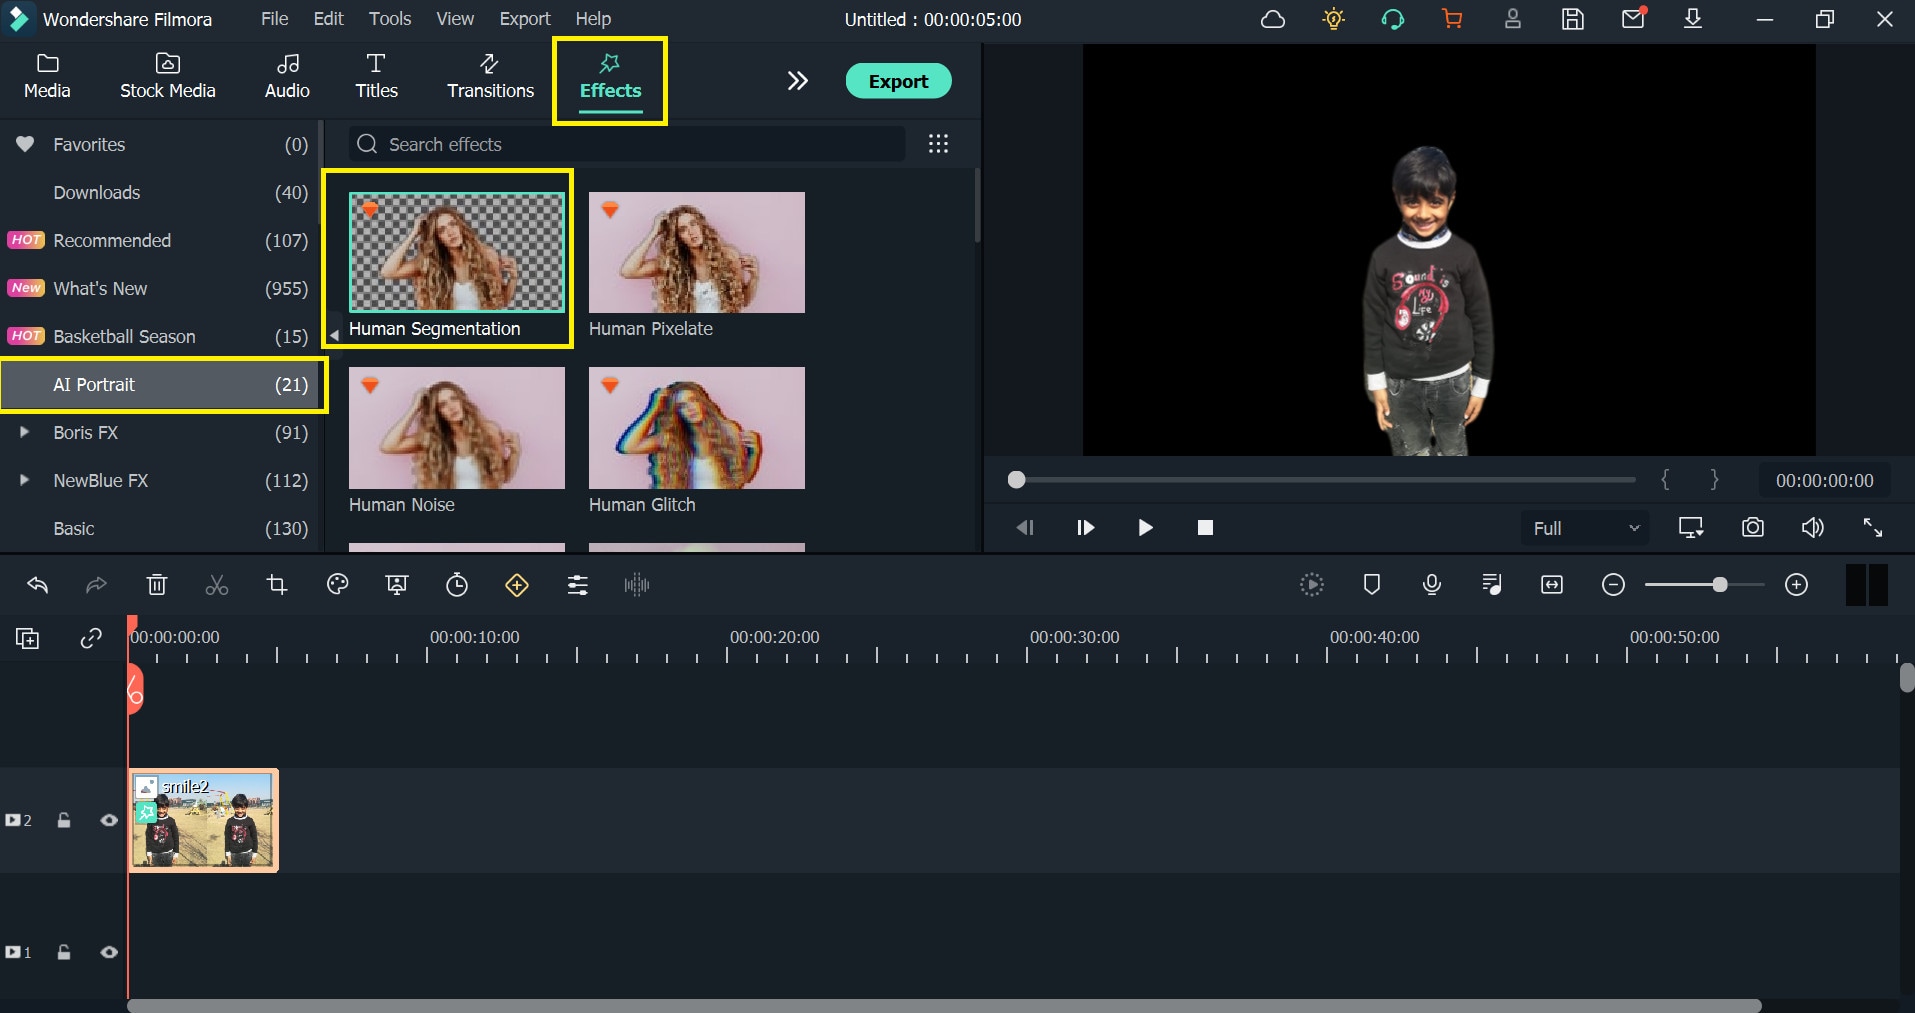
Now you can see the subject has been selected and the background has been removed.
- Now Scale up the photo to be visible on the screen.
- You can set the border settings here to make it more smooth and attractive.
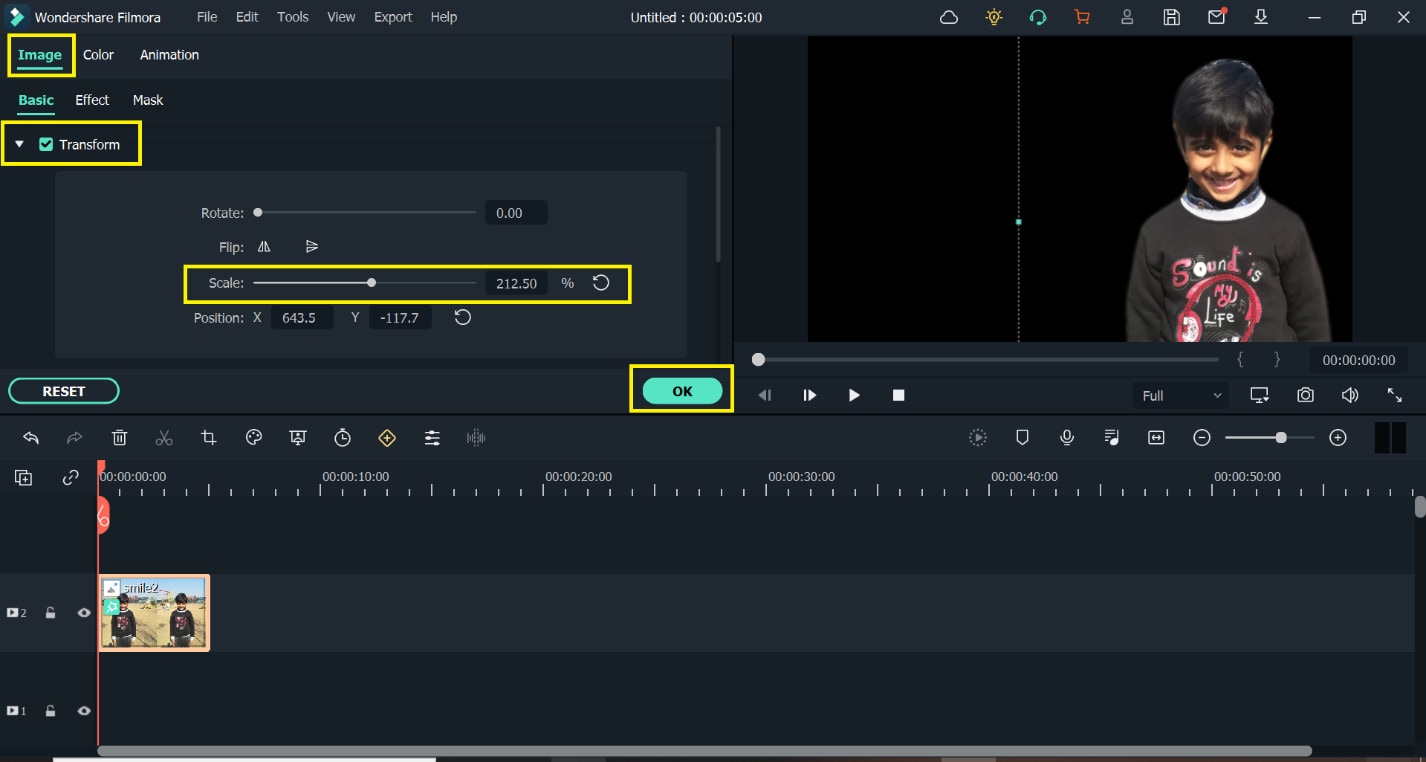
I have dragged my image to the left as I want my text to the right side.
- Let’s drag the desired background into the timeline. ( I got this background from Pexel.com)
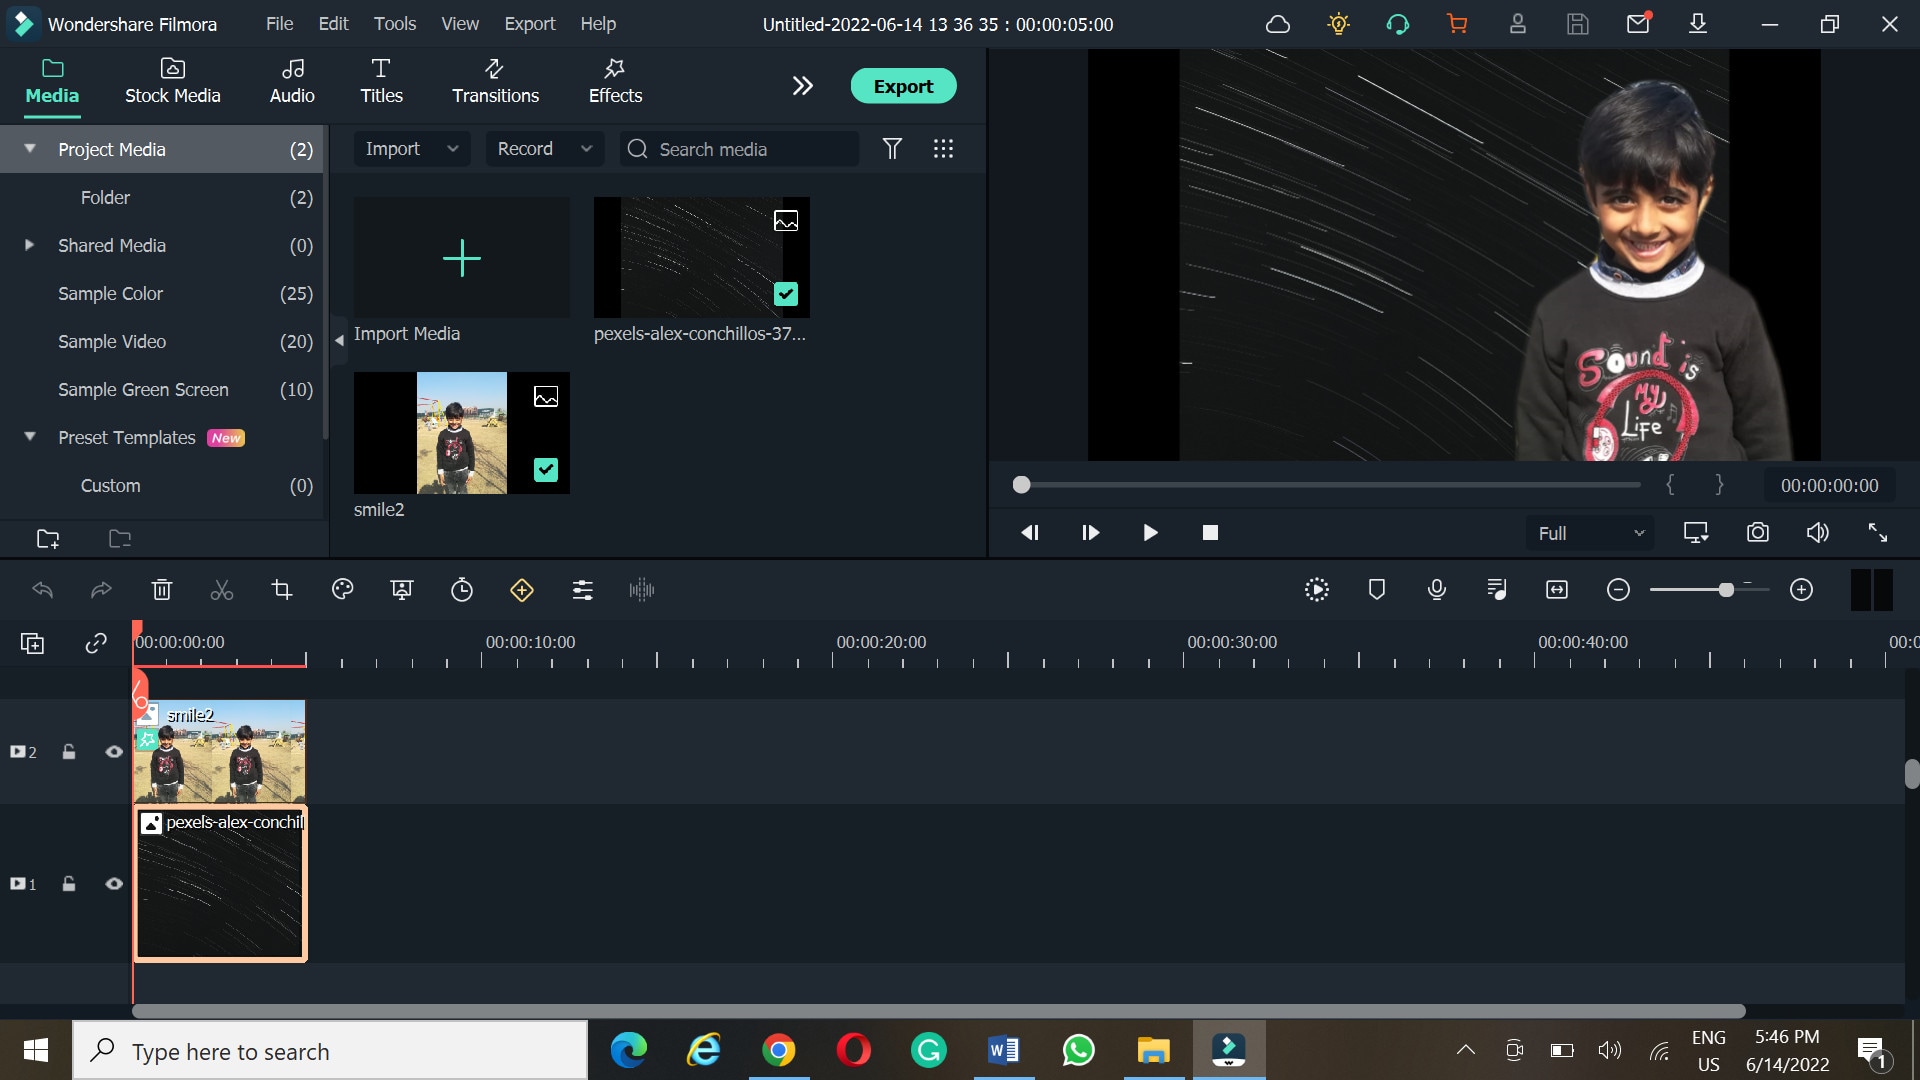
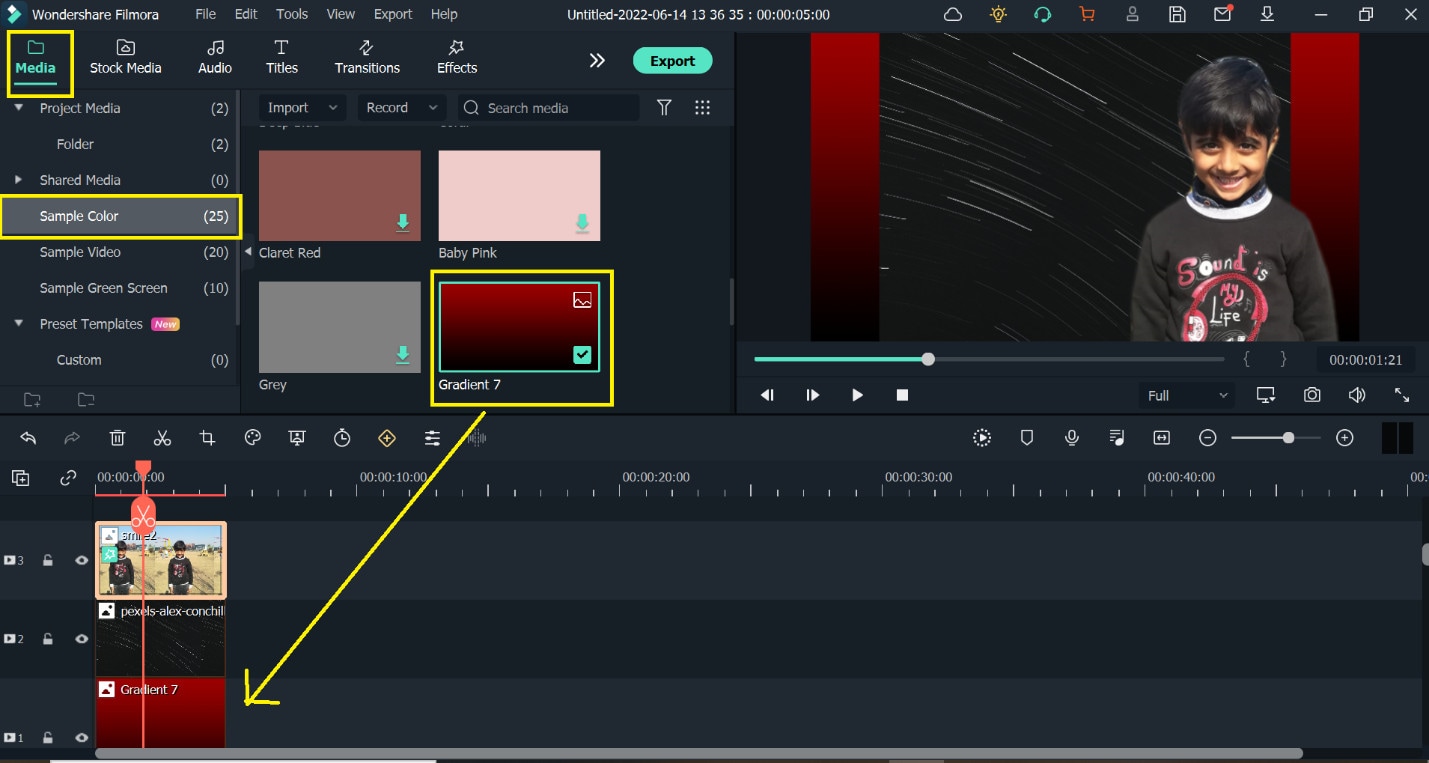
- Click on sample colors under the media option to add the gradient overlay.
- Drag your favorite Gradient and drop it below the background layer.
- Now select the Overlay option under the Effects tab and then Hit Frames.
- Add your desired frame between a photo layer and a background layer to show depth in your thumbnail.
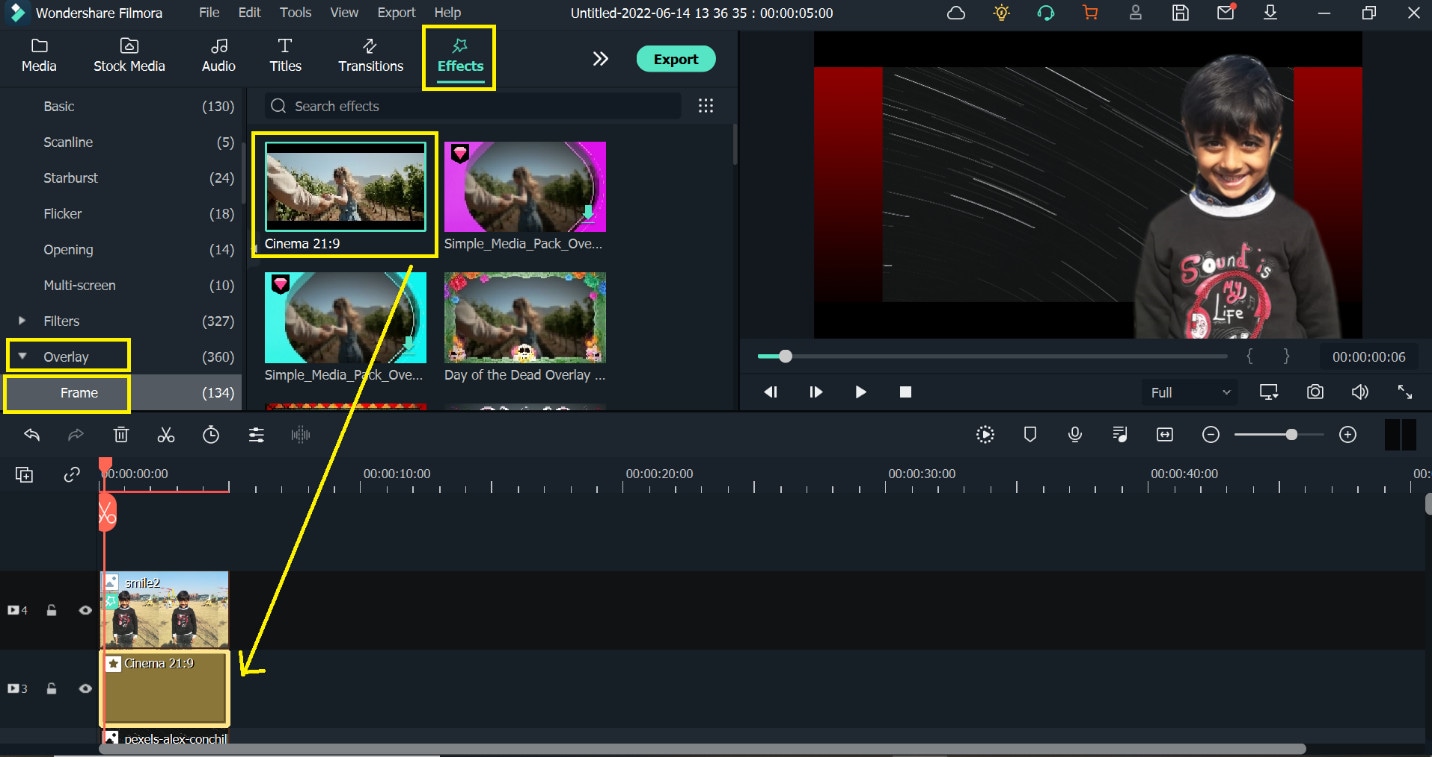
So, I choose cinema 21.9 frames to add two black bars behind our subject.
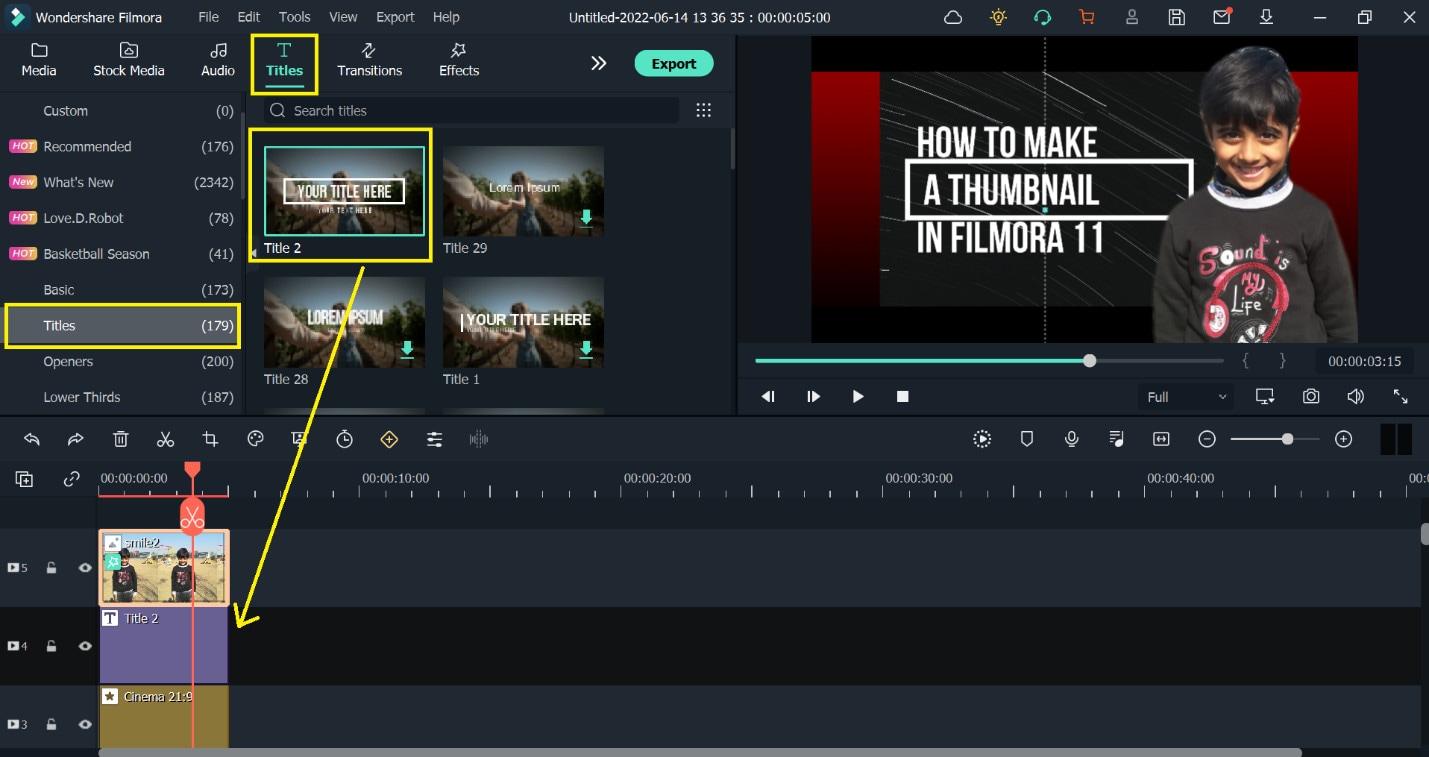
Let’s choose your desired Title from the Library. Here are tons of title packs, you can choose from.
- Select the Titles option under the Titles tab then select your desired Title.
- Drag and locate the title in the place of your taste and then write the text you want.
- Adjust your text accordingly, you can change the font size, color, style, and much more
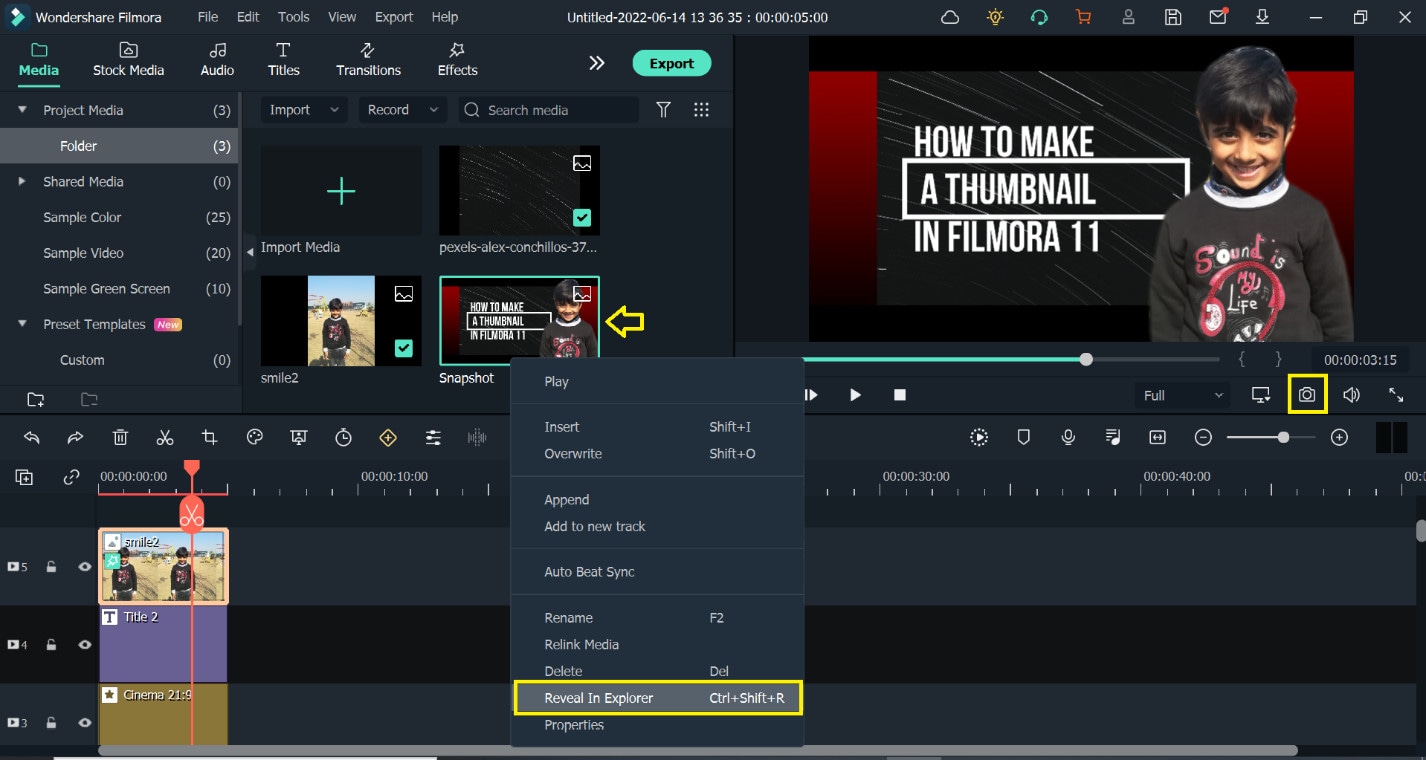
- Now simply click the snapshot button below the preview screen and the snapshot will be saved in default directory and automatically imported to the medium room.
- Right-click on the snapshot in the media pool and click on Reveal in explorer.
- Your thumbnail will be saved in the folder, you can upload it on the Google drive.
Unfortunately, there is no way to change the thumbnail of the video on Google drive. But we can take help from other websites to customize the thumbnail image and then upload it to Google drive. Let us discuss a few free websites used for the thumbnail of a video on Google drive.
Here are the best possible ways to change the thumbnail of the video stored in the Google drive.
1. Change the Thumbnails of Google drive using the Wix.
The Wix editor is a platform that is used to edit and make your own website. It provides easy interphase to customize the site using its amazing features. There are hundreds of features to build your own site or image by adding customizing elements and choosing color and text theme.
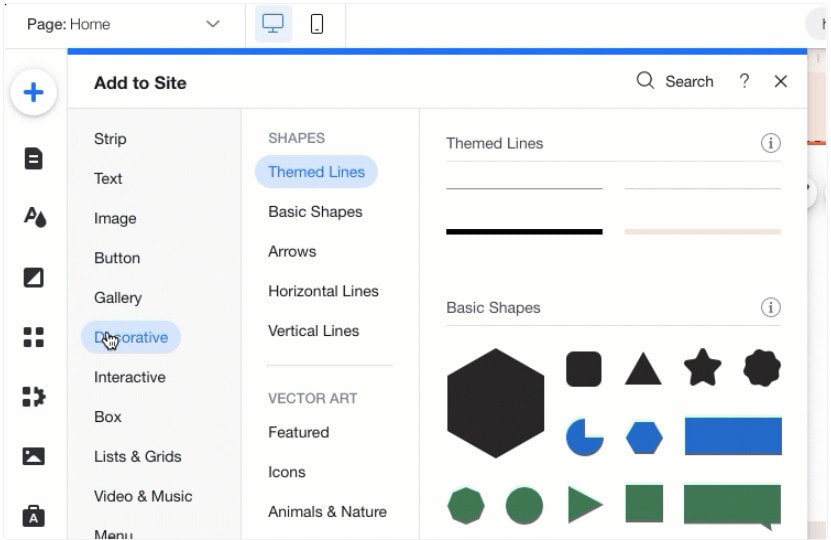
You can use the Wix to set or change your thumbnail to make your video attractive and eye-catching. The cover image can be by uploading and a frame can be selected from the video.
Let’s get started!
- Open the Wix editor from the browser.
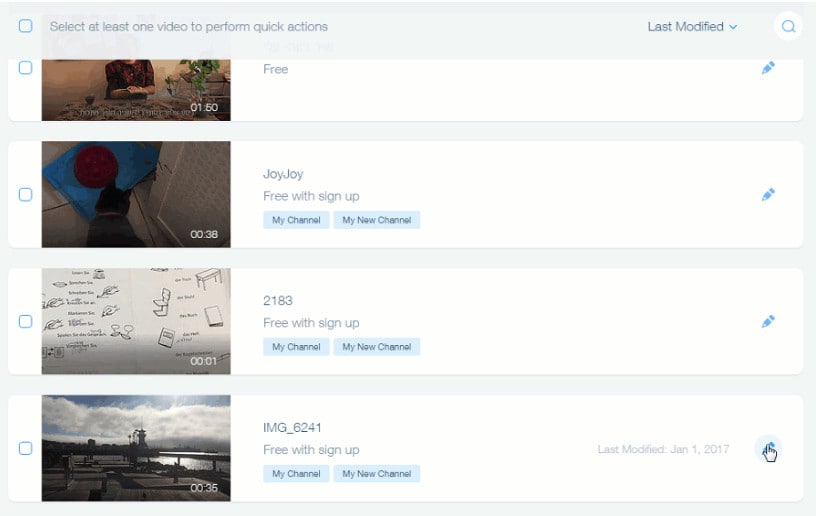
- Select a video from your video library.
- Hit the Edit icon at the video
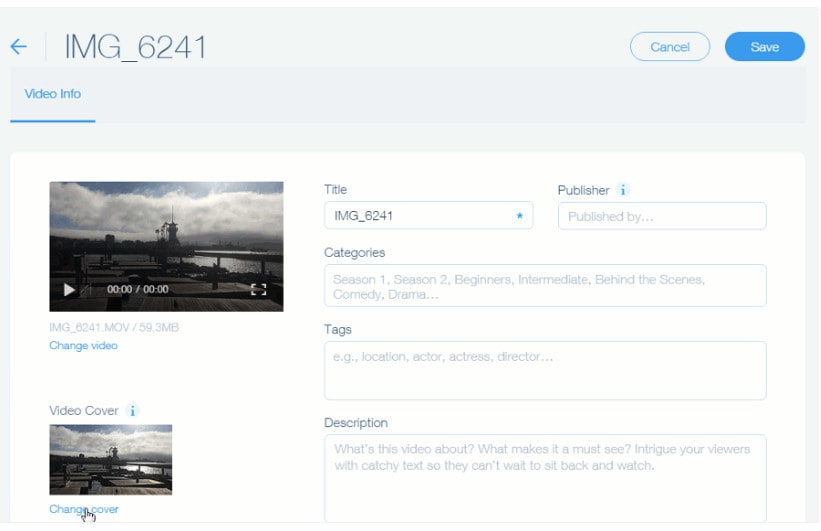
- Click on change cover under the cover image.
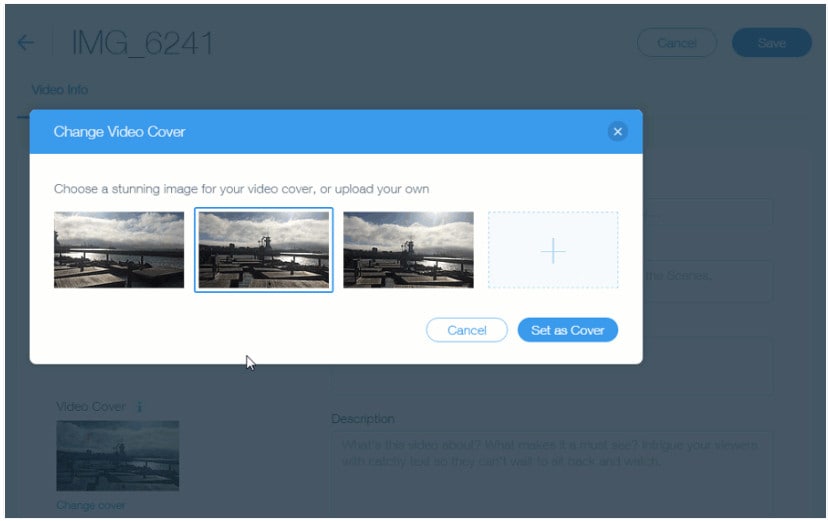
- Select the desired frame from the list, or you can upload your own by clicking the “+”
- Click on the Set as Cover
- Now upload the video on Google drive.
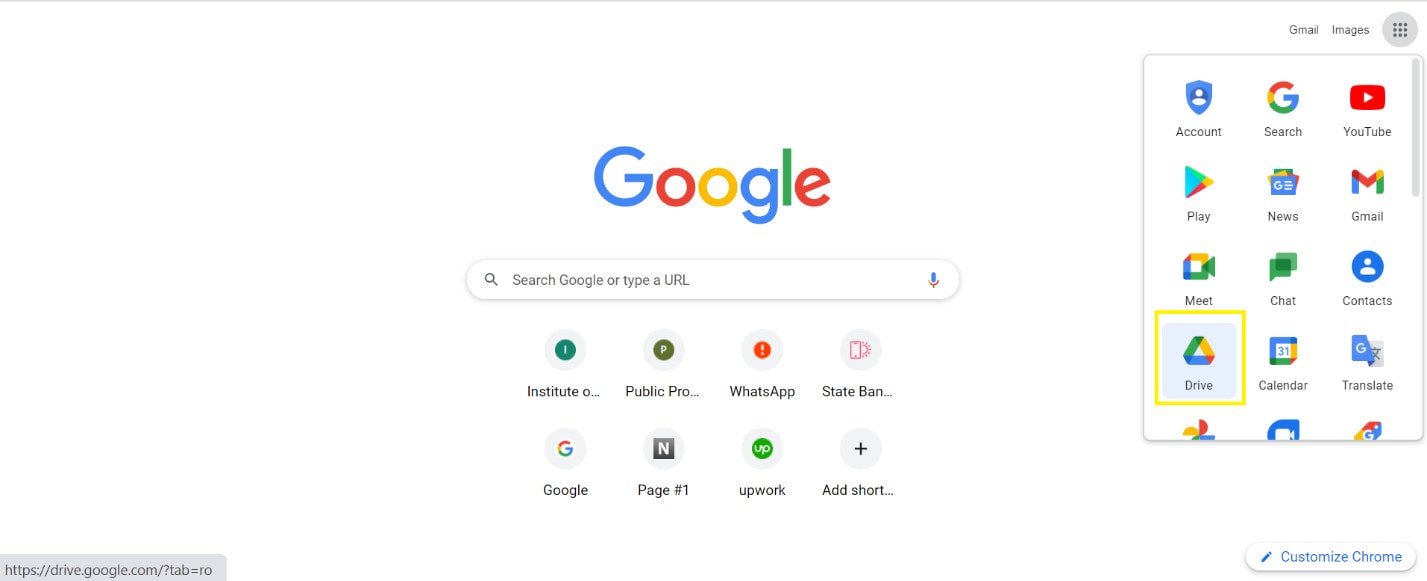
- If the file fails to upload, clear your cache and cookies and check your internet connection.
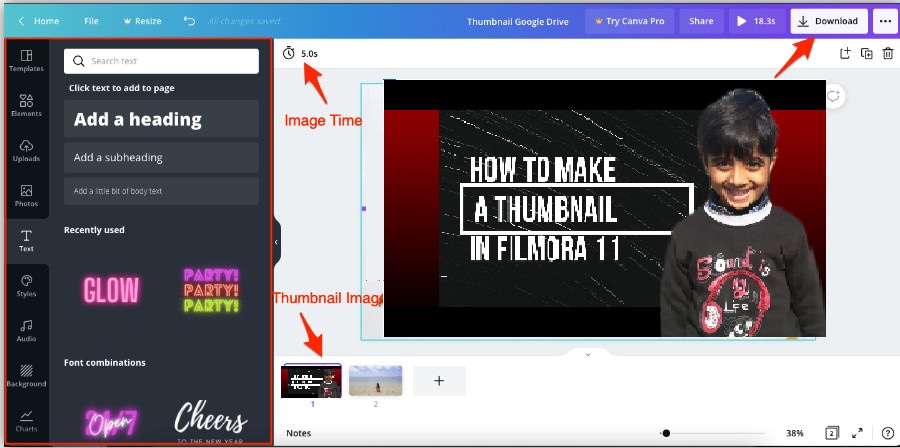
2. Change the Thumbnails of Google drive using Canvas.
Canvas is an online graphic design platform that allows and provides you with user-friendly interphase to make eye-catching logos, thumbnails, posters, and a ton of other visual content. You need not download any application and moreover, it is free to use. It saves your previous tasks and has hundreds of frames, and designs to select according to your taste or you can make your own design by editing.
So let’s start!
- Select a template of your choice from the library.
- Canvas provides you with more than 2 million images in the library but you can also upload your own image for Thumbnail.
- Click on the placeholder text to write your own text.
- You can change your image fonts, color, size, and
- You can easily customize your video thumbnail and upload it on Google drive.
- Download the video thumbnail.
- Now upload the Thumbnail on Google Drive.
3. Change the Thumbnails of Google drive using VLC Media Player.
VLC Media Player is a free and open-source media player that plays wide range of media files like images, video files as well as audio and DVDs. It is 100% free software and safe from viruses.

Here are the steps used to change the cover photo of your video using the VLC Media Player.
Let’s dive in…
- Go to the tools and select information from the drop-down list.
- The Current Media Information tab will be shown.
- There will be a picture or VLC icon at the bottom-right corner.
- Right-click on that picture or icon and select the download cover art or add cover art from file.
- Download cover art; if you want to add pictures from the album from the internet.
- Add cover art from file; if you want to put your own thumbnail image and browse from the storage.
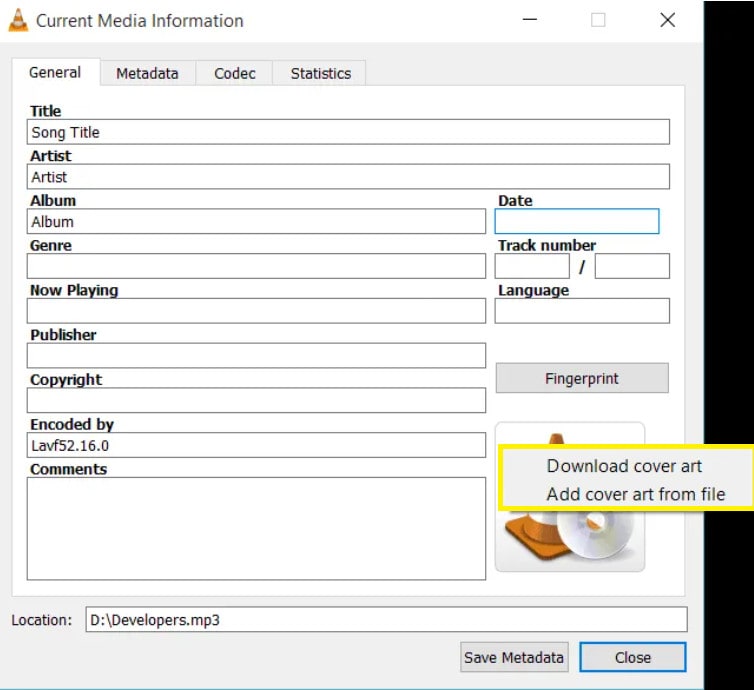
The information will be saved automatically and the thumbnail will be changed when you open the file.
Important points.
You can use any other video editor to change the thumbnail of the video but keep a few points in mind.
- Thumbnails should be added at the start of the video.
- The Thumbnail should be a few seconds long so that google drive considers it as a cover image.
- It works for short videos but it can be applied for long videos.
- Use a high-quality HD image for the thumbnail so that Google Drive can accept it as valuable for the thumbnail image.
- Thumbnails should be uploaded in PNG, GIF, or JPG
- The image ratio should be 16:9 and resolution of 1920x1080 pixels for PNG and JPG and 960x480 pixels for GIFs.
- The maximum file size should be
- The minimum width should be 220 pixels.
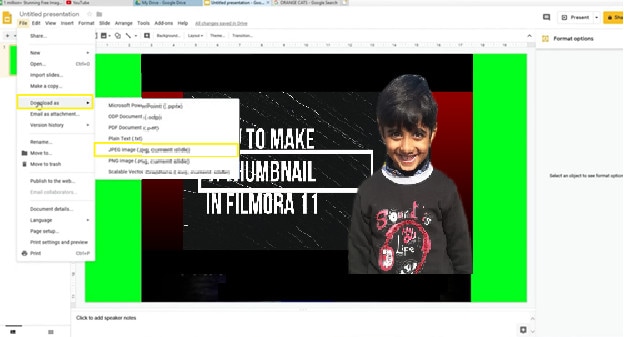
Even after keeping an eye on these important points, google drive sometimes does not show the thumbnail as a cover photo.
Conclusion.
In the above article, I have discussed a couple of different ways to add a thumbnail of the video and upload it on Google drive. I personally recommend Wonder Share Filmora 11 to make and change thumbnail image of the video as it is a very powerful as well as simple tool.
How to Add Thumbnails to the Video Using Wonder Share Filmora 11
Wonder Share Filmora 11 is an all-in-one video editing platform that provides powerful, creative, and simple interphase to edit videos and images in a few clicks. It has a ton of amazing features that make your videos, images, and audio stands out. You can edit your videos and images in a great cinematic form using its effects, transitions, overlays, text, and a lot more. Do not wait, go and download Filmora 11 and there are more tools for you to discover.
I am going to show you how to create a thumbnail of the video in Filmora11.
Let us get started!
- Open Wonder Share Filmora 11 and click on New Project.

- Drag the image of your choice into the timeline.

- Drag the image of your choice into the timeline.
- Click on the AI-Portrait option from the Effects
- Drag the Human Segmentation effect over the clip into the timeline.
Now you see that the subject of the video thumbnail is selected and the background has been removed.
The AI-Portrait is a very useful effect, it allows you to quickly remove the background through artificial intelligence.

Now you can see the subject has been selected and the background has been removed.
- Now Scale up the photo to be visible on the screen.
- You can set the border settings here to make it more smooth and attractive.

I have dragged my image to the left as I want my text to the right side.
- Let’s drag the desired background into the timeline. ( I got this background from Pexel.com)

- Click on sample colors under the media option to add the gradient overlay.
- Drag your favorite Gradient and drop it below the background layer.

- Now select the Overlay option under the Effects tab and then Hit Frames.
- Add your desired frame between a photo layer and a background layer to show depth in your thumbnail.

So, I choose cinema 21.9 frames to add two black bars behind our subject.
Let’s choose your desired Title from the Library. Here are tons of title packs, you can choose from.
- Select the Titles option under the Titles tab then select your desired Title.
- Drag and locate the title in the place of your taste and then write the text you want.
- Adjust your text accordingly, you can change the font size, color, style, and much more

- Now simply click the snapshot button below the preview screen and the snapshot will be saved in default directory and automatically imported to the medium room.
- Right-click on the snapshot in the media pool and click on Reveal in explorer.
- Your thumbnail will be saved in the folder, you can upload it on the Google drive.

Unfortunately, there is no way to change the thumbnail of the video on Google drive. But we can take help from other websites to customize the thumbnail image and then upload it to Google drive. Let us discuss a few free websites used for the thumbnail of a video on Google drive.
Here are the best possible ways to change the thumbnail of the video stored in the Google drive.
1. Change the Thumbnails of Google drive using the Wix.
The Wix editor is a platform that is used to edit and make your own website. It provides easy interphase to customize the site using its amazing features. There are hundreds of features to build your own site or image by adding customizing elements and choosing color and text theme.

You can use the Wix to set or change your thumbnail to make your video attractive and eye-catching. The cover image can be by uploading and a frame can be selected from the video.
Let’s get started!
- Open the Wix editor from the browser.
- Select a video from your video library.
- Hit the Edit icon at the video

- Click on change cover under the cover image.

- Select the desired frame from the list, or you can upload your own by clicking the “+”
- Click on the Set as Cover

- Now upload the video on Google drive.

- If the file fails to upload, clear your cache and cookies and check your internet connection.
2. Change the Thumbnails of Google drive using Canvas.
Canvas is an online graphic design platform that allows and provides you with user-friendly interphase to make eye-catching logos, thumbnails, posters, and a ton of other visual content. You need not download any application and moreover, it is free to use. It saves your previous tasks and has hundreds of frames, and designs to select according to your taste or you can make your own design by editing.
So let’s start!
- Select a template of your choice from the library.
- Canvas provides you with more than 2 million images in the library but you can also upload your own image for Thumbnail.
- Click on the placeholder text to write your own text.
- You can change your image fonts, color, size, and
- You can easily customize your video thumbnail and upload it on Google drive.
- Download the video thumbnail.
- Now upload the Thumbnail on Google Drive.

3. Change the Thumbnails of Google drive using VLC Media Player.
VLC Media Player is a free and open-source media player that plays wide range of media files like images, video files as well as audio and DVDs. It is 100% free software and safe from viruses.

Here are the steps used to change the cover photo of your video using the VLC Media Player.
Let’s dive in…
- Go to the tools and select information from the drop-down list.
- The Current Media Information tab will be shown.
- There will be a picture or VLC icon at the bottom-right corner.
- Right-click on that picture or icon and select the download cover art or add cover art from file.
- Download cover art; if you want to add pictures from the album from the internet.
- Add cover art from file; if you want to put your own thumbnail image and browse from the storage.

The information will be saved automatically and the thumbnail will be changed when you open the file.
Important points.
You can use any other video editor to change the thumbnail of the video but keep a few points in mind.
- Thumbnails should be added at the start of the video.
- The Thumbnail should be a few seconds long so that google drive considers it as a cover image.
- It works for short videos but it can be applied for long videos.
- Use a high-quality HD image for the thumbnail so that Google Drive can accept it as valuable for the thumbnail image.
- Thumbnails should be uploaded in PNG, GIF, or JPG
- The image ratio should be 16:9 and resolution of 1920x1080 pixels for PNG and JPG and 960x480 pixels for GIFs.
- The maximum file size should be
- The minimum width should be 220 pixels.

Even after keeping an eye on these important points, google drive sometimes does not show the thumbnail as a cover photo.
Conclusion.
In the above article, I have discussed a couple of different ways to add a thumbnail of the video and upload it on Google drive. I personally recommend Wonder Share Filmora 11 to make and change thumbnail image of the video as it is a very powerful as well as simple tool.
How to Add Thumbnails to the Video Using Wonder Share Filmora 11
Wonder Share Filmora 11 is an all-in-one video editing platform that provides powerful, creative, and simple interphase to edit videos and images in a few clicks. It has a ton of amazing features that make your videos, images, and audio stands out. You can edit your videos and images in a great cinematic form using its effects, transitions, overlays, text, and a lot more. Do not wait, go and download Filmora 11 and there are more tools for you to discover.
I am going to show you how to create a thumbnail of the video in Filmora11.
Let us get started!
- Open Wonder Share Filmora 11 and click on New Project.

- Drag the image of your choice into the timeline.

- Drag the image of your choice into the timeline.
- Click on the AI-Portrait option from the Effects
- Drag the Human Segmentation effect over the clip into the timeline.
Now you see that the subject of the video thumbnail is selected and the background has been removed.
The AI-Portrait is a very useful effect, it allows you to quickly remove the background through artificial intelligence.

Now you can see the subject has been selected and the background has been removed.
- Now Scale up the photo to be visible on the screen.
- You can set the border settings here to make it more smooth and attractive.

I have dragged my image to the left as I want my text to the right side.
- Let’s drag the desired background into the timeline. ( I got this background from Pexel.com)

- Click on sample colors under the media option to add the gradient overlay.
- Drag your favorite Gradient and drop it below the background layer.

- Now select the Overlay option under the Effects tab and then Hit Frames.
- Add your desired frame between a photo layer and a background layer to show depth in your thumbnail.

So, I choose cinema 21.9 frames to add two black bars behind our subject.
Let’s choose your desired Title from the Library. Here are tons of title packs, you can choose from.
- Select the Titles option under the Titles tab then select your desired Title.
- Drag and locate the title in the place of your taste and then write the text you want.
- Adjust your text accordingly, you can change the font size, color, style, and much more

- Now simply click the snapshot button below the preview screen and the snapshot will be saved in default directory and automatically imported to the medium room.
- Right-click on the snapshot in the media pool and click on Reveal in explorer.
- Your thumbnail will be saved in the folder, you can upload it on the Google drive.

Unfortunately, there is no way to change the thumbnail of the video on Google drive. But we can take help from other websites to customize the thumbnail image and then upload it to Google drive. Let us discuss a few free websites used for the thumbnail of a video on Google drive.
Here are the best possible ways to change the thumbnail of the video stored in the Google drive.
1. Change the Thumbnails of Google drive using the Wix.
The Wix editor is a platform that is used to edit and make your own website. It provides easy interphase to customize the site using its amazing features. There are hundreds of features to build your own site or image by adding customizing elements and choosing color and text theme.

You can use the Wix to set or change your thumbnail to make your video attractive and eye-catching. The cover image can be by uploading and a frame can be selected from the video.
Let’s get started!
- Open the Wix editor from the browser.
- Select a video from your video library.
- Hit the Edit icon at the video

- Click on change cover under the cover image.

- Select the desired frame from the list, or you can upload your own by clicking the “+”
- Click on the Set as Cover

- Now upload the video on Google drive.

- If the file fails to upload, clear your cache and cookies and check your internet connection.
2. Change the Thumbnails of Google drive using Canvas.
Canvas is an online graphic design platform that allows and provides you with user-friendly interphase to make eye-catching logos, thumbnails, posters, and a ton of other visual content. You need not download any application and moreover, it is free to use. It saves your previous tasks and has hundreds of frames, and designs to select according to your taste or you can make your own design by editing.
So let’s start!
- Select a template of your choice from the library.
- Canvas provides you with more than 2 million images in the library but you can also upload your own image for Thumbnail.
- Click on the placeholder text to write your own text.
- You can change your image fonts, color, size, and
- You can easily customize your video thumbnail and upload it on Google drive.
- Download the video thumbnail.
- Now upload the Thumbnail on Google Drive.

3. Change the Thumbnails of Google drive using VLC Media Player.
VLC Media Player is a free and open-source media player that plays wide range of media files like images, video files as well as audio and DVDs. It is 100% free software and safe from viruses.

Here are the steps used to change the cover photo of your video using the VLC Media Player.
Let’s dive in…
- Go to the tools and select information from the drop-down list.
- The Current Media Information tab will be shown.
- There will be a picture or VLC icon at the bottom-right corner.
- Right-click on that picture or icon and select the download cover art or add cover art from file.
- Download cover art; if you want to add pictures from the album from the internet.
- Add cover art from file; if you want to put your own thumbnail image and browse from the storage.

The information will be saved automatically and the thumbnail will be changed when you open the file.
Important points.
You can use any other video editor to change the thumbnail of the video but keep a few points in mind.
- Thumbnails should be added at the start of the video.
- The Thumbnail should be a few seconds long so that google drive considers it as a cover image.
- It works for short videos but it can be applied for long videos.
- Use a high-quality HD image for the thumbnail so that Google Drive can accept it as valuable for the thumbnail image.
- Thumbnails should be uploaded in PNG, GIF, or JPG
- The image ratio should be 16:9 and resolution of 1920x1080 pixels for PNG and JPG and 960x480 pixels for GIFs.
- The maximum file size should be
- The minimum width should be 220 pixels.

Even after keeping an eye on these important points, google drive sometimes does not show the thumbnail as a cover photo.
Conclusion.
In the above article, I have discussed a couple of different ways to add a thumbnail of the video and upload it on Google drive. I personally recommend Wonder Share Filmora 11 to make and change thumbnail image of the video as it is a very powerful as well as simple tool.
How to Add Thumbnails to the Video Using Wonder Share Filmora 11
Wonder Share Filmora 11 is an all-in-one video editing platform that provides powerful, creative, and simple interphase to edit videos and images in a few clicks. It has a ton of amazing features that make your videos, images, and audio stands out. You can edit your videos and images in a great cinematic form using its effects, transitions, overlays, text, and a lot more. Do not wait, go and download Filmora 11 and there are more tools for you to discover.
I am going to show you how to create a thumbnail of the video in Filmora11.
Let us get started!
- Open Wonder Share Filmora 11 and click on New Project.

- Drag the image of your choice into the timeline.

- Drag the image of your choice into the timeline.
- Click on the AI-Portrait option from the Effects
- Drag the Human Segmentation effect over the clip into the timeline.
Now you see that the subject of the video thumbnail is selected and the background has been removed.
The AI-Portrait is a very useful effect, it allows you to quickly remove the background through artificial intelligence.

Now you can see the subject has been selected and the background has been removed.
- Now Scale up the photo to be visible on the screen.
- You can set the border settings here to make it more smooth and attractive.

I have dragged my image to the left as I want my text to the right side.
- Let’s drag the desired background into the timeline. ( I got this background from Pexel.com)

- Click on sample colors under the media option to add the gradient overlay.
- Drag your favorite Gradient and drop it below the background layer.

- Now select the Overlay option under the Effects tab and then Hit Frames.
- Add your desired frame between a photo layer and a background layer to show depth in your thumbnail.

So, I choose cinema 21.9 frames to add two black bars behind our subject.
Let’s choose your desired Title from the Library. Here are tons of title packs, you can choose from.
- Select the Titles option under the Titles tab then select your desired Title.
- Drag and locate the title in the place of your taste and then write the text you want.
- Adjust your text accordingly, you can change the font size, color, style, and much more

- Now simply click the snapshot button below the preview screen and the snapshot will be saved in default directory and automatically imported to the medium room.
- Right-click on the snapshot in the media pool and click on Reveal in explorer.
- Your thumbnail will be saved in the folder, you can upload it on the Google drive.

Unfortunately, there is no way to change the thumbnail of the video on Google drive. But we can take help from other websites to customize the thumbnail image and then upload it to Google drive. Let us discuss a few free websites used for the thumbnail of a video on Google drive.
Here are the best possible ways to change the thumbnail of the video stored in the Google drive.
1. Change the Thumbnails of Google drive using the Wix.
The Wix editor is a platform that is used to edit and make your own website. It provides easy interphase to customize the site using its amazing features. There are hundreds of features to build your own site or image by adding customizing elements and choosing color and text theme.

You can use the Wix to set or change your thumbnail to make your video attractive and eye-catching. The cover image can be by uploading and a frame can be selected from the video.
Let’s get started!
- Open the Wix editor from the browser.
- Select a video from your video library.
- Hit the Edit icon at the video

- Click on change cover under the cover image.

- Select the desired frame from the list, or you can upload your own by clicking the “+”
- Click on the Set as Cover

- Now upload the video on Google drive.

- If the file fails to upload, clear your cache and cookies and check your internet connection.
2. Change the Thumbnails of Google drive using Canvas.
Canvas is an online graphic design platform that allows and provides you with user-friendly interphase to make eye-catching logos, thumbnails, posters, and a ton of other visual content. You need not download any application and moreover, it is free to use. It saves your previous tasks and has hundreds of frames, and designs to select according to your taste or you can make your own design by editing.
So let’s start!
- Select a template of your choice from the library.
- Canvas provides you with more than 2 million images in the library but you can also upload your own image for Thumbnail.
- Click on the placeholder text to write your own text.
- You can change your image fonts, color, size, and
- You can easily customize your video thumbnail and upload it on Google drive.
- Download the video thumbnail.
- Now upload the Thumbnail on Google Drive.

3. Change the Thumbnails of Google drive using VLC Media Player.
VLC Media Player is a free and open-source media player that plays wide range of media files like images, video files as well as audio and DVDs. It is 100% free software and safe from viruses.

Here are the steps used to change the cover photo of your video using the VLC Media Player.
Let’s dive in…
- Go to the tools and select information from the drop-down list.
- The Current Media Information tab will be shown.
- There will be a picture or VLC icon at the bottom-right corner.
- Right-click on that picture or icon and select the download cover art or add cover art from file.
- Download cover art; if you want to add pictures from the album from the internet.
- Add cover art from file; if you want to put your own thumbnail image and browse from the storage.

The information will be saved automatically and the thumbnail will be changed when you open the file.
Important points.
You can use any other video editor to change the thumbnail of the video but keep a few points in mind.
- Thumbnails should be added at the start of the video.
- The Thumbnail should be a few seconds long so that google drive considers it as a cover image.
- It works for short videos but it can be applied for long videos.
- Use a high-quality HD image for the thumbnail so that Google Drive can accept it as valuable for the thumbnail image.
- Thumbnails should be uploaded in PNG, GIF, or JPG
- The image ratio should be 16:9 and resolution of 1920x1080 pixels for PNG and JPG and 960x480 pixels for GIFs.
- The maximum file size should be
- The minimum width should be 220 pixels.

Even after keeping an eye on these important points, google drive sometimes does not show the thumbnail as a cover photo.
Conclusion.
In the above article, I have discussed a couple of different ways to add a thumbnail of the video and upload it on Google drive. I personally recommend Wonder Share Filmora 11 to make and change thumbnail image of the video as it is a very powerful as well as simple tool.
Also read:
- Updated 2024 Approved Unraveling How the Slow Motion Guys Have Revolutionized The Slow Motion Game
- Updated Need to Learn About Halftone Effects? Learn How to Quickly Create a Halftone Effect in Adobe Photoshop with Simple, Easy-to-Follow Instructions
- Updated In 2024, List of Supported iPhone Video Formats and Best iPhone Video Editor
- New Quick Answer What Is a Transparent Logo and Why Do You Need It for 2024
- New GIF Splitting Into Frames Is an Interesting Activity to Do with the Right Tools. Convert GIFs Into Frames Easily with Tools and Use Them as Needed
- In 2024, How to Remove Motion Blur In Photoshop
- Updated 2024 Approved How to Remove Echo From Videos with Adobe Audition
- Updated 2024 Approved Progressive Solutions to Adding VHS Effects to Video with Ease
- Your Recorded Video Footage Has some Visible Grains Making Your Video Noisy and Thus Hampering the Overall Viewing Experience. No Worries, as There AI Video Denoiser and Other Software Available to Correct the Issue for 2024
- New Are You Trying to Make Slow-Mo Videos on Instagram? In This Article, We Will Discuss Top-Rated Ways to Produce Perfect Slow-Motion Videos for Instagram
- New In 2024, Do You Want to Add an Adjustment Layer to Your Video for Easier Editing? Read This Article to Find Out How to Efficiently Add an Adjustment Layer in After Effects
- Reviewing Efectum App For Smartphone Users Create Slow Motion Videos
- Updated In 2024, The Quicktime Software with Its Latest Version Gives You an Option to Change the Speed of an Audio or Video File. It Makes It Easy to Watch the Slow-Motion Video or Fast-Forward the Audio
- In 2024, How to Create An Eye-Catching Intro Videos with InVideo
- Ultimate Guide To Make A Political Video for 2024
- 2024 Approved Top Tools To Create Blend Image Collage
- Updated Best Method to Split Video Into Parts Online
- New In 2024, How to Create an Aesthetic Slideshow Presentation
- Updated 2024 Approved Wondering How to Create a Stunning Intro Video with KineMaster? Here Are the Simple Steps to Use KineMaster to Design Your Intro Video in Simple Steps
- New Are You Looking to Enhance Your Video or Photo Colors Using Premiere LUTs? Get to Know About the Best Free LUT Effects to Get Started for 2024
- Updated How D AI Video Games Act More Human Than Human for 2024
- In 2024, Easy Steps to Make Glitch Effect with Filmora
- Updated In 2024, Lets Look at Four Different Ways of Merging Audios and Videos. The Tools Will Help You Craft High-End Videos without Involving Any Complex Steps. You Can Make Your Videos Beautiful by Using the Following Easy to Use Tools
- New Best 10 3D Slideshow Software Review
- Updated Learn How to Merge Audio and Video Like a Pro with This Step-by-Step Guide to Using FFmpeg. Create Seamless Videos and Improve Your Video Production Skills for 2024
- Updated Some Facts About GIF Background You Didnt Know for 2024
- Updated In 2024, Dubbing Videos With Voiceovers | Using Wondershare Filmora
- Updated Top Way to Freeze-Frame in Final Cut Pro
- Updated Want to Make Use of a Lovely Background for Your Image by Removing the Background or Making It Transparent? Here Is Something You Need to Cover for 2024
- Updated How to Combine Videos Into One on Instagram
- Updated Best 5 AI Music Video Examples and Makers to Make Them
- New 2024 Approved How to Make Text Reveal Effect for Your Video
- New 2024 Approved Hard to Remove Black Background in After Effects? Heres the Best Way to Deal With It
- 2024 Approved The Complete Guide to Zoho Slides with Ease
- Updated OBS Studio Is a Free and Open-Source App for Screen-Casting and Live Streaming
- New 2024 Approved List of Supported Whatsapp Video Format You May Want to Know
- Updated Everything You Need to Know About Color Grading in Photography for 2024
- Updated How Much Wedding Videographer Cost
- New 2024 Approved If You Are a Marketer Who Want to Create Facebook Ads to Boost Your Business, You Are Coming to the Right Place. Well Share You some Useful Tips to Start Your First FB Ads Campaign
- New Speed Control Is Frequently Used in Video Editing. By Speed up or Slow Down the Video Speed, You Can Achieve Different Visual Results. This Article Will Show You How to Control the Speed of a Video for 2024
- In 2024, While Emojis Have High End Credibility Towards Different Media Utilities, People Also Ask About Ways and Methods to Add Emoji to iPhone. Be Here to Get the Easiest Solutions to the Query
- Updated In 2024, How to Got Free After Effects Templates Slideshow with Simple Trick
- 2024 Approved 4 Methods to Merge MP4 and MP3
- Updated 2024 Approved DVD Slideshow Builder Review and Tutorial
- New In 2024, This Article Talks in Detail About How to Edit Videos with Windows Movie Maker 10, How to Download or Install It, and so On. It Further Involves the Use of an Alternative to This Tool. Check Out Now
- Preparation to Beat Giovani in Pokemon Go For Tecno Pop 8 | Dr.fone
- How to Change Location On Facebook Dating for your Oppo Find N3 | Dr.fone
- In 2024, How to Delete iCloud Account with or without Password from your Apple iPhone SE (2022)/Windows/Mac
- In 2024, How To Change Your Apple ID Password On your iPhone 8 | Dr.fone
- The Best Android SIM Unlock Code Generators Unlock Your Vivo X Flip Phone Hassle-Free
- Full Guide on Mirroring Your Realme GT Neo 5 SE to Your PC/Mac | Dr.fone
- Updated Top 7 Video Language Converter Online Free
- For People Wanting to Mock GPS on Vivo V27e Devices | Dr.fone
- Bricked Your OnePlus 11 5G? Heres A Full Solution | Dr.fone
- 5 Quick Methods to Bypass Xiaomi Redmi K70 Pro FRP
- How to Unlock Apple ID On your Apple iPhone 11 without Security Questions?
- Why Your WhatsApp Live Location is Not Updating and How to Fix on your Honor X9b | Dr.fone
- How to recover old call logs from your Zero 5G 2023 Turbo?
- Why Your WhatsApp Location is Not Updating and How to Fix On Motorola Edge 2023 | Dr.fone
- In 2024, iPhone 13 Asking for Passcode after iOS 17/14 Update, What to Do? | Dr.fone
- The Best 8 VPN Hardware Devices Reviewed On Honor Magic Vs 2 | Dr.fone
- 5 Easy Ways to Change Location on YouTube TV On Oppo Reno 10 Pro 5G | Dr.fone
- In 2024, iPhone SE (2020) Asking for Passcode after iOS 17/14 Update, What to Do? | Dr.fone
- In 2024, Top 7 Skype Hacker to Hack Any Skype Account On your Nokia C12 | Dr.fone
- Can I recover permanently deleted photos from Realme Narzo N53
- In 2024, Is GSM Flasher ADB Legit? Full Review To Bypass Your Xiaomi Redmi 13C 5G Phone FRP Lock
- Removing Device From Apple ID For your iPhone 7
- In 2024, Universal Unlock Pattern for Itel P55
- Troubleshooting Guide How to Fix an Unresponsive OnePlus 11R Screen | Dr.fone
- In 2024, Fake the Location to Get Around the MLB Blackouts on Motorola Edge 40 | Dr.fone
- In 2024, A Step-by-Step Guide on Using ADB and Fastboot to Remove FRP Lock from your Xiaomi Redmi K70E
- In 2024, A Detailed Guide To Stream to Instagram With an RTMP
- In 2024, How to Turn Off Google Location to Stop Tracking You on Xiaomi Mix Fold 3 | Dr.fone
- A Complete Guide To OEM Unlocking on Xiaomi Redmi Note 13 Pro 5G
- In 2024, Things You Should Know When Unlocking Total Wireless Of iPhone SE (2020) | Dr.fone
- In 2024, How to Watch Hulu Outside US On Google Pixel 8 Pro | Dr.fone
- 7 Solutions to Fix Error Code 963 on Google Play Of Infinix Zero 30 5G | Dr.fone
- In 2024, Unlocking iPhone XR Passcode without a Computer | Dr.fone
- In 2024, 4 Ways to Sync Contacts from Apple iPhone 12 to iPad Easily | Dr.fone
- 3uTools Virtual Location Not Working On Nubia Red Magic 9 Pro? Fix Now | Dr.fone
- 8 Solutions to Solve YouTube App Crashing on Realme 11 Pro | Dr.fone
- In 2024, Does Airplane Mode Turn off GPS Location On Tecno Phantom V Flip? | Dr.fone
- 6 Proven Ways to Unlock Motorola Moto G04 Phone When You Forget the Password
- Process of Screen Sharing Sony Xperia 5 V to PC- Detailed Steps | Dr.fone
- 3 Facts You Need to Know about Screen Mirroring Vivo T2x 5G | Dr.fone
- 7 Solutions to Fix Chrome Crashes or Wont Open on Vivo X100 Pro | Dr.fone
- 5 Ways to Track Samsung Galaxy Z Fold 5 without App | Dr.fone
- In 2024, How to Bypass FRP from Oppo K11 5G?
- Title: New How to Create the Stranger Things Upside Down Effect
- Author: Morgan
- Created at : 2024-05-19 05:12:17
- Updated at : 2024-05-20 05:12:17
- Link: https://ai-video-editing.techidaily.com/new-how-to-create-the-stranger-things-upside-down-effect/
- License: This work is licensed under CC BY-NC-SA 4.0.


