
New How to Do Motion Graphics in Filmora

How to Do Motion Graphics in Filmora
Preparation
What you need to prepare:
- A computer (Windows or macOS)
- Your video materials.
- Filmora video editor
Step 1
Visit the filmora.wondershare.com website and download Filmora . Install the program and wait for it to Run. Then, click on New Project.
Step 2
Go to File → Project Settings and set the FPS to 60. Also, ensure that the project is in Full Resolution (1920x1080). Click OK.

Step 3
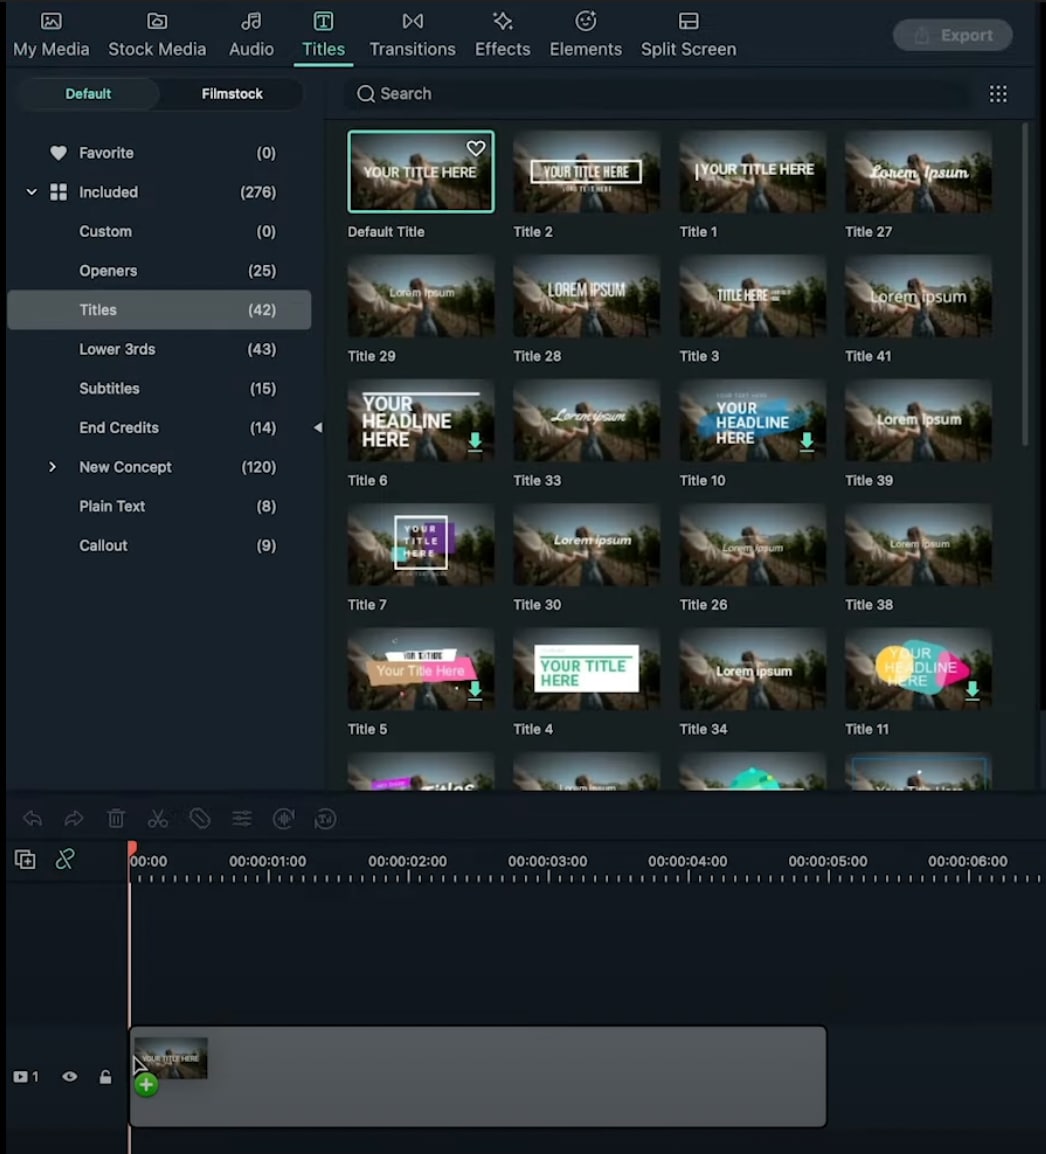
Open the Titles tab and drag the Default Title to the Timeline. Then, double-click on the Default Title and click on ADVANCED.
Step 4
From the Advanced settings panel, delete the existing text and add a Rectangle shape.

Step 5
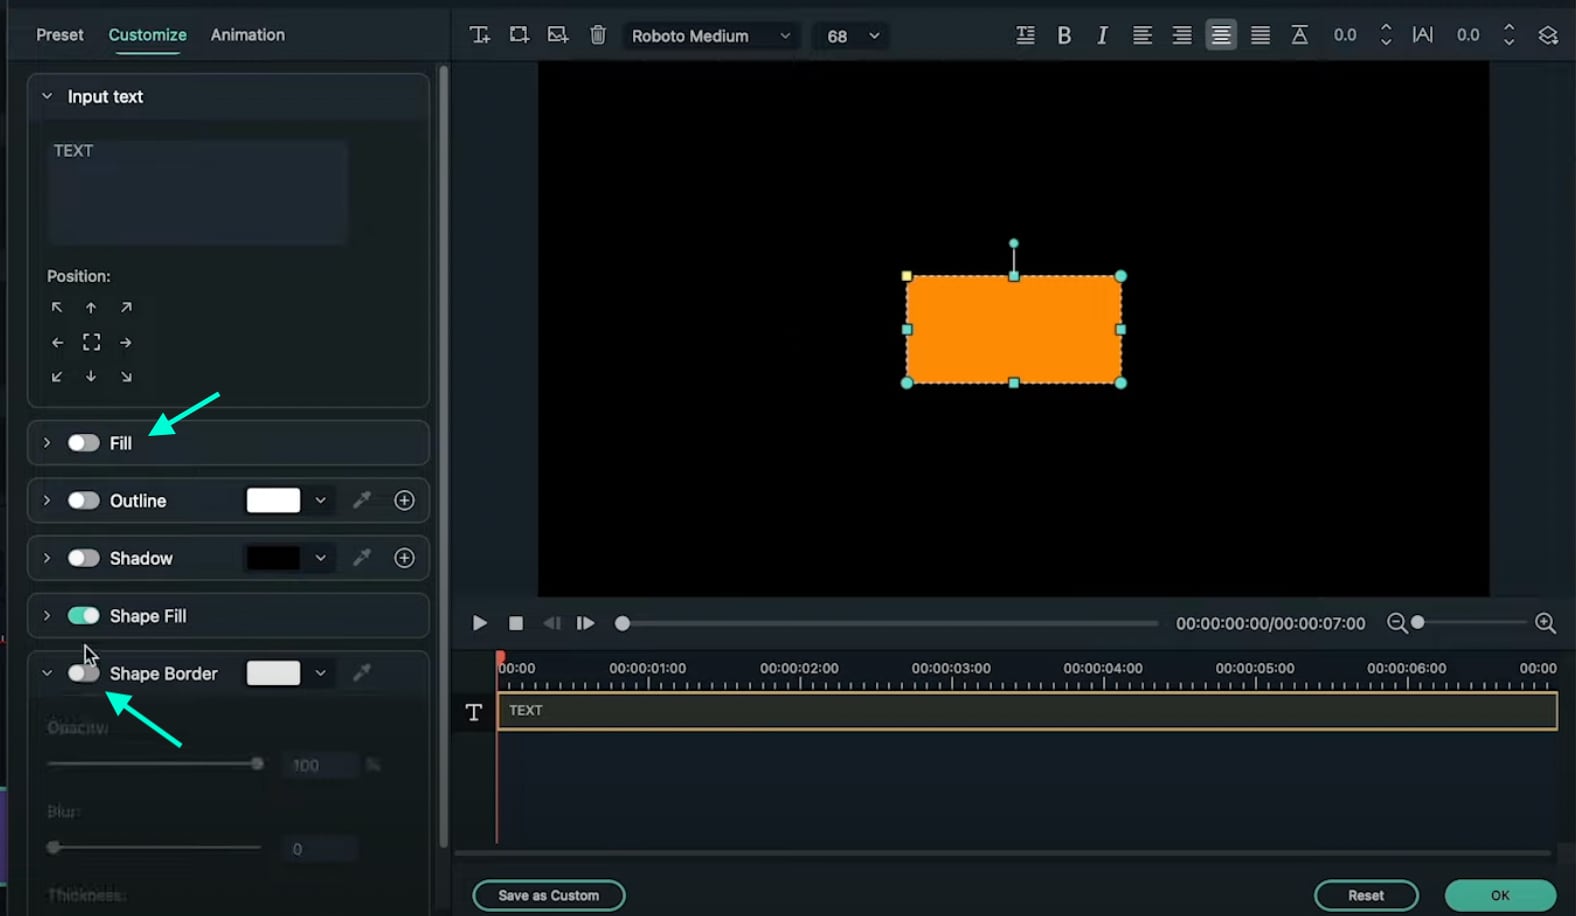
Disable the Text Fill and the Shape Border options from the panel on the left side.
Step 6
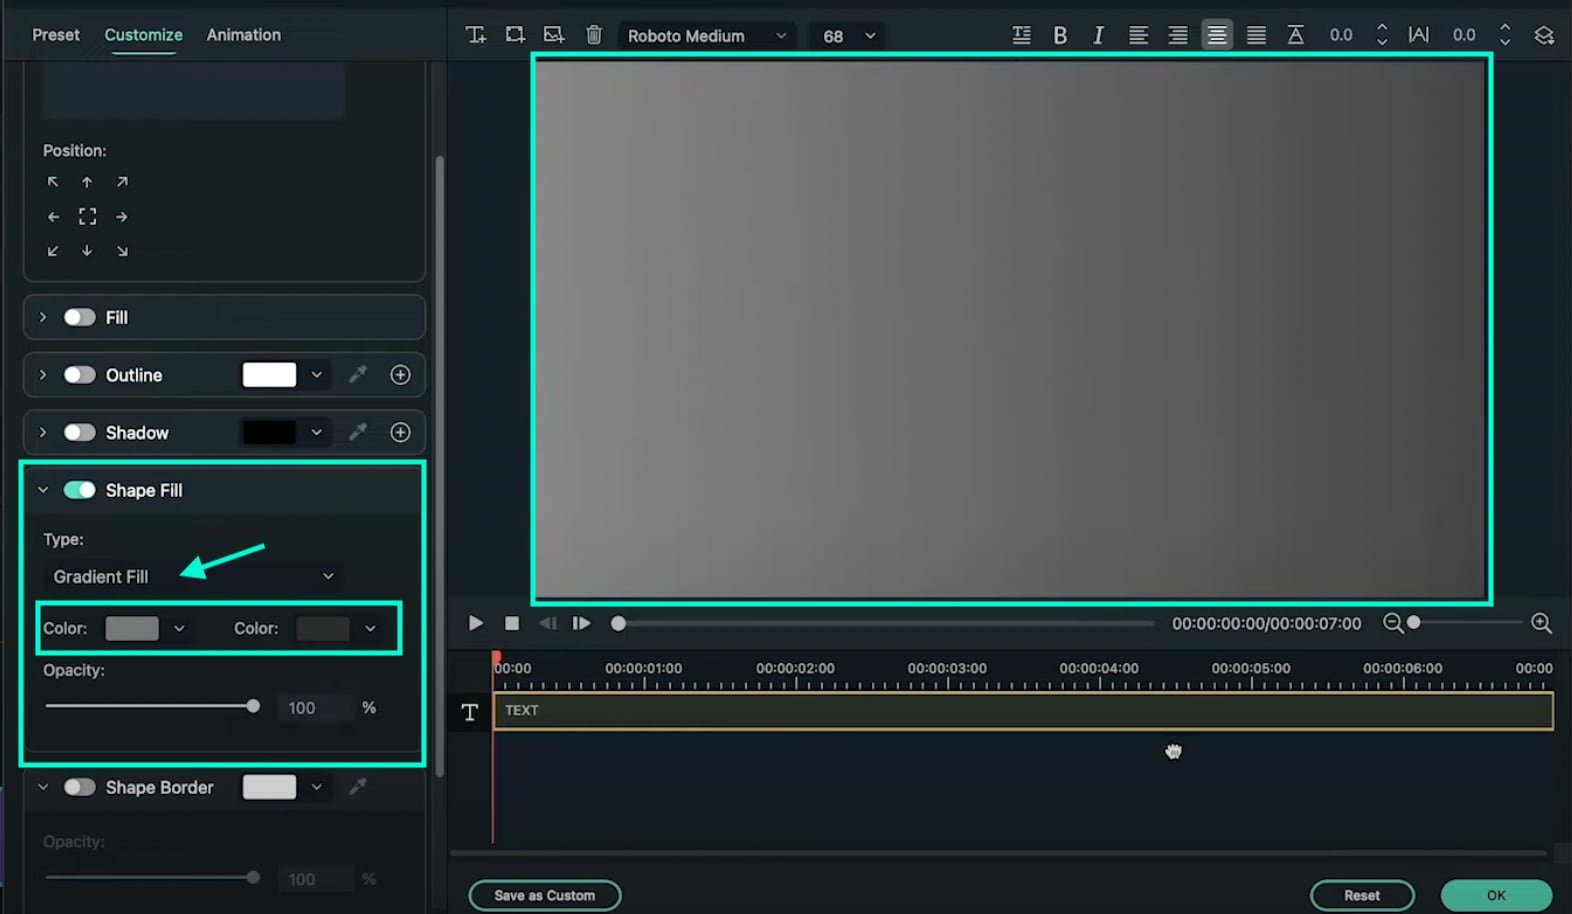
Click the drop-down arrow on the Shape Fill option and change the Type to Gradient Fill. Then, adjust the two color pallets from lighter to darker to create a gradient effect. Finally, adjust the rectangle to fit the entire screen. Click OK.
Step 7
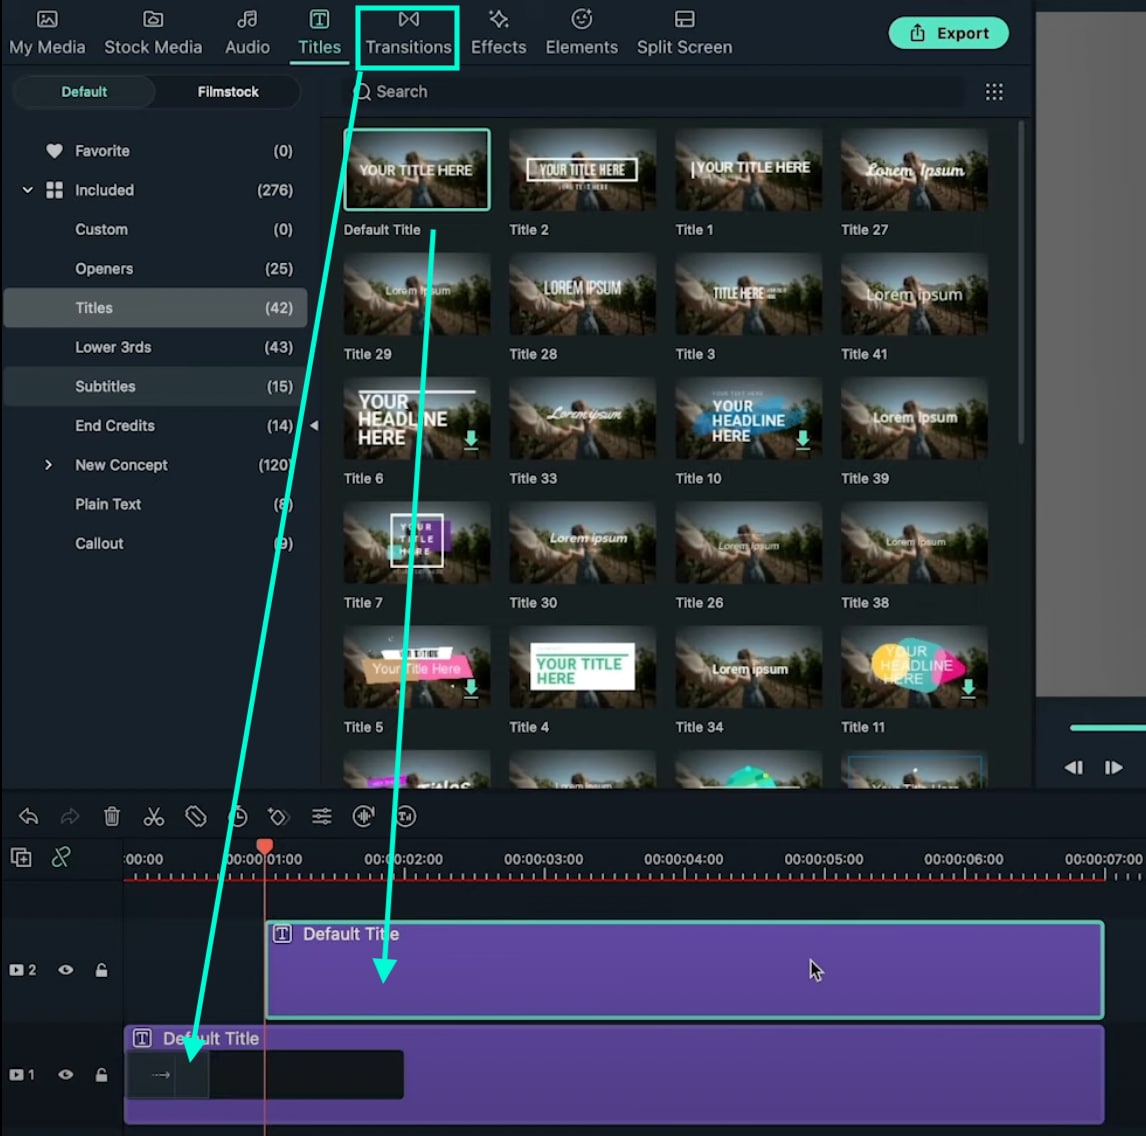
Go to the Transitions tab → search for “Push” → drag the Push transition to the Default Title in the Timeline. Then, move the Playhead to the 1-second marker and drag another Default Title to that point from the Titles tab.
Step 8
Double-click on the new Default Title → go to Advanced. Delete the default text and add a Circle shape this time instead of a Rectangle. Disable the Text Fill and Shape Fill options this time.
Step 9
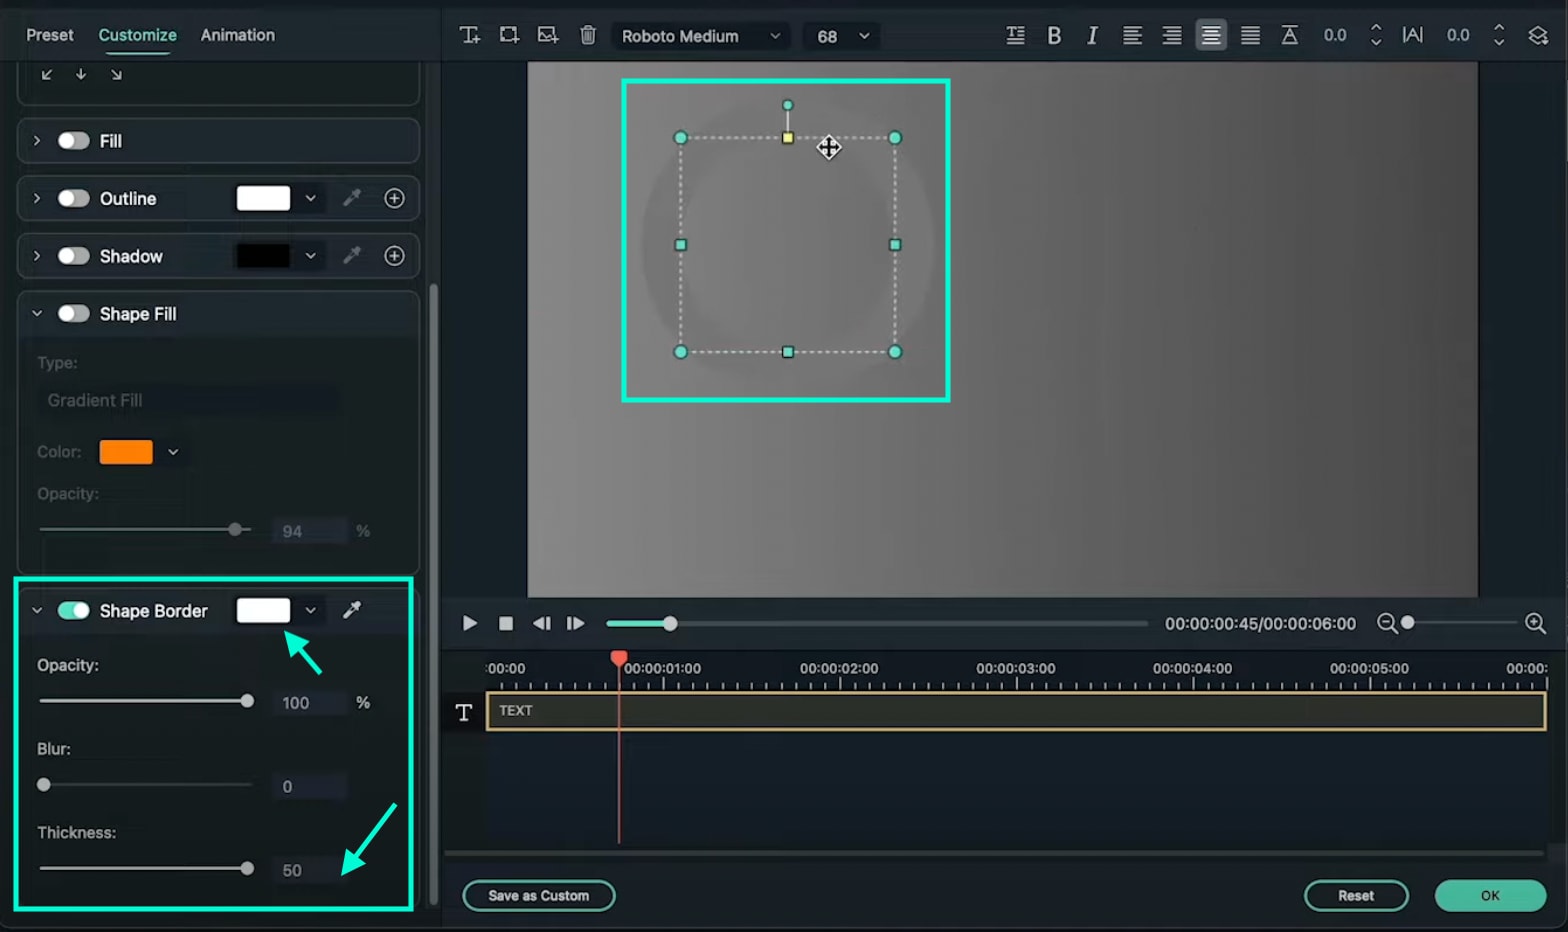
Scroll down to Shape Border and increase the Thickness bar all the way up. Then, change the circle’s color to match your background as closely as possible. Click OK.
Step 10
Copy the Title you just edited and paste it into the above layer. Then, double-click on the copied Title and go to its Advanced settings panel.

Step 11
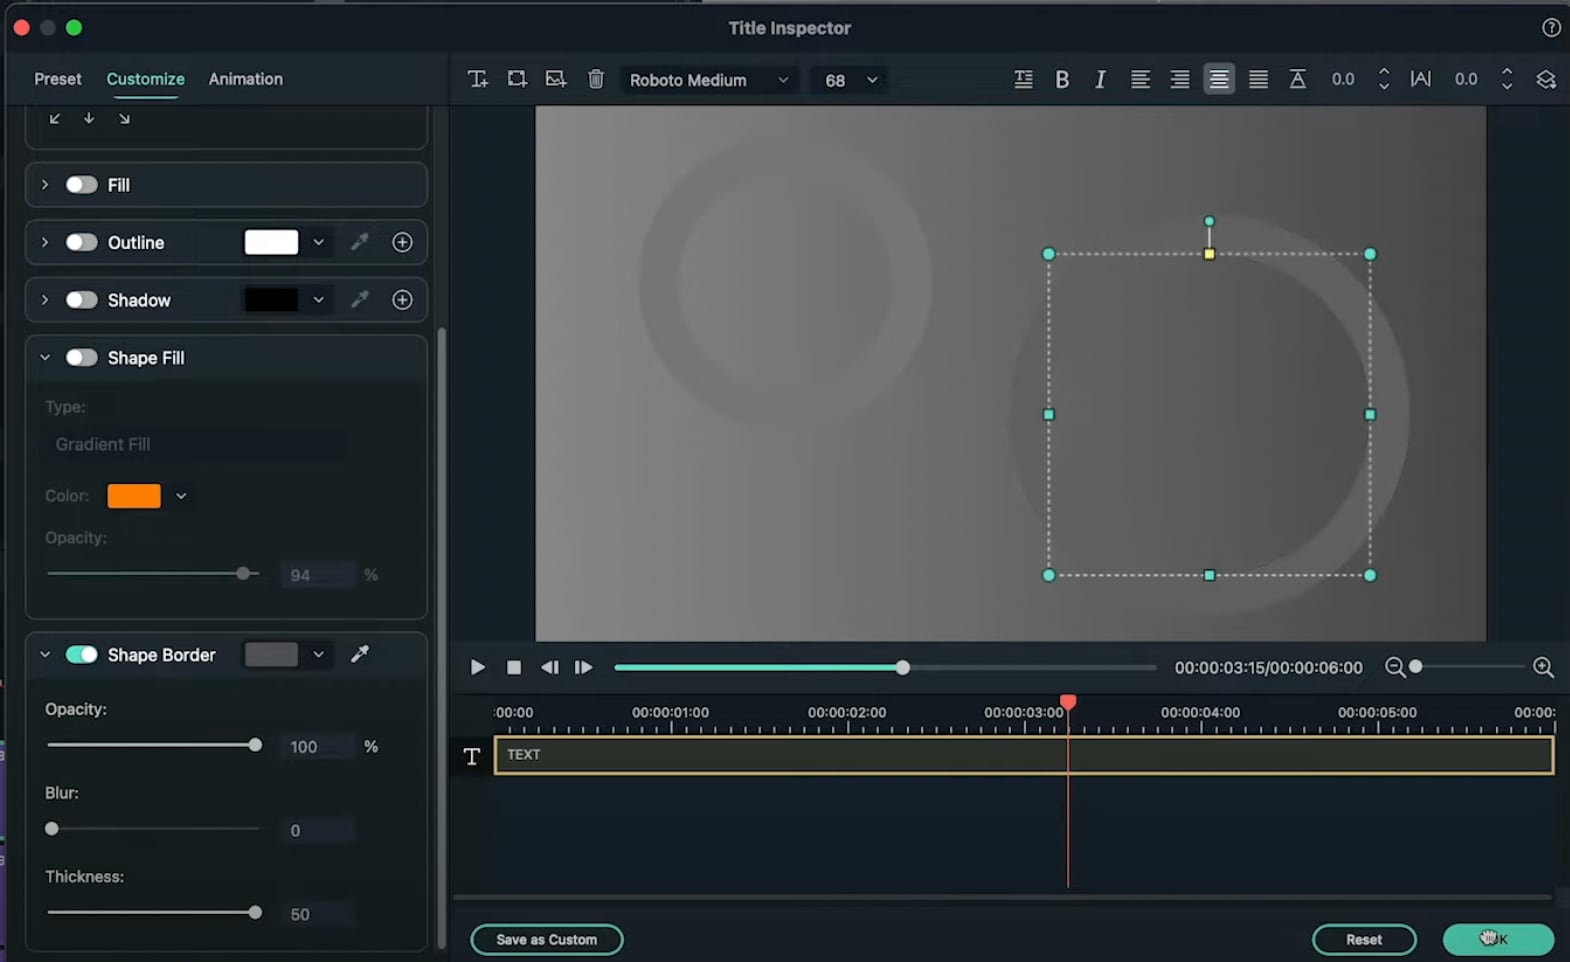
In the Advanced panel, copy the circle and paste it somewhere else on the screen. Change its size if you want, and change the shade of its color to match the background once more. You can add as many new copies of the Default Titles and copy as many circles as you want. Click OK.
Step 12
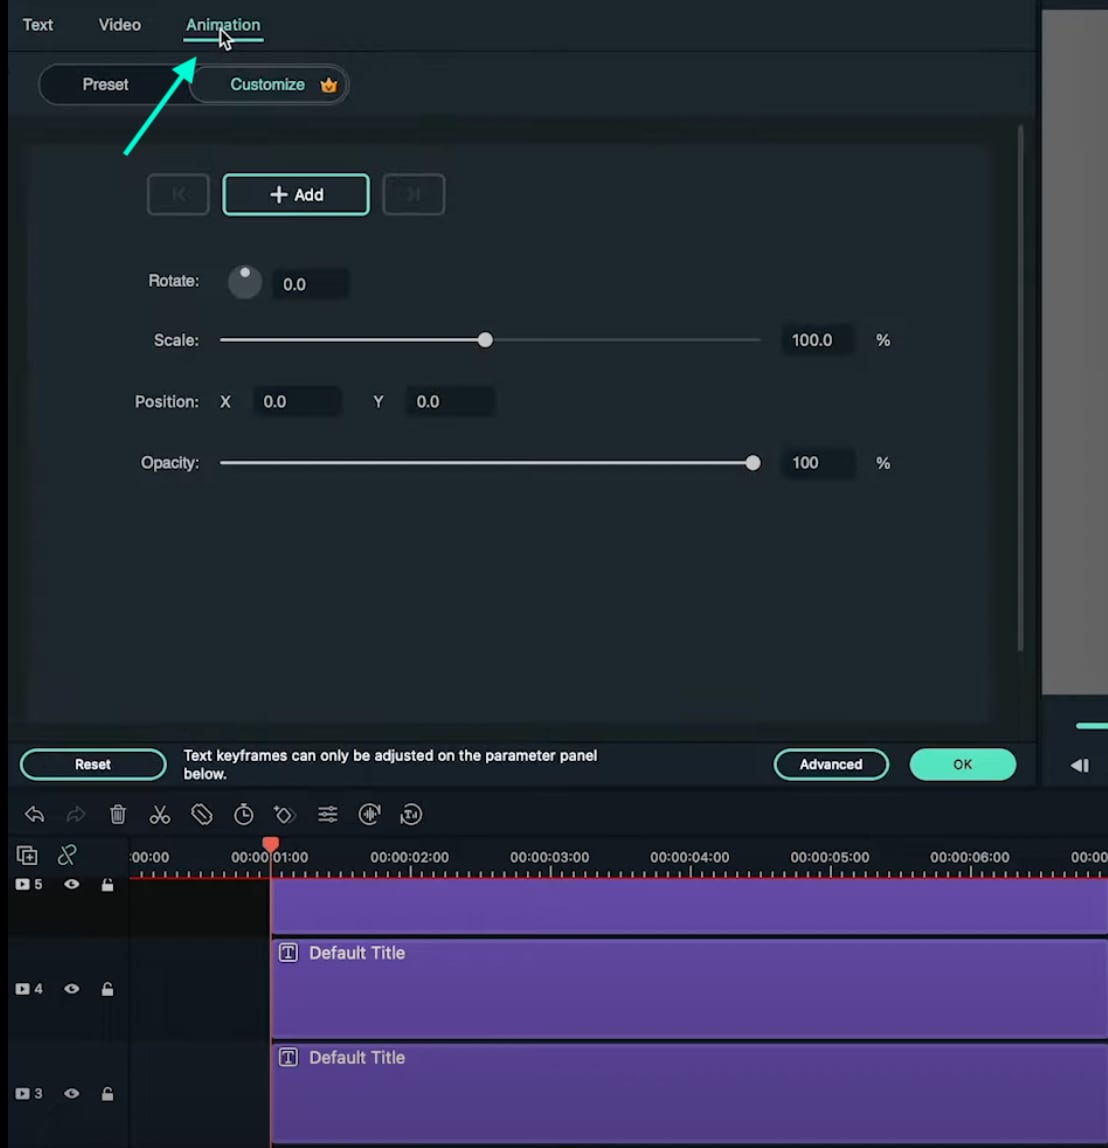
After you’re done copying and pasting more Default Titles with more Circles inside, you can start animating them. Start with the first one. Double-click on the first Default Title with the Circle inside. Make sure you place the Playhead at the beginning of that clip. Then, go to the Animation tab.
Step 13
You need to add 3 keyframes. Add the first one right now. Just click on the “**+Add” button. Then, move the Playhead somewhere in the middle and click “+Add” again. Last, move the Playhead at the end of the clip, and click “+Add**” again to add the third keyframe.

Step 14
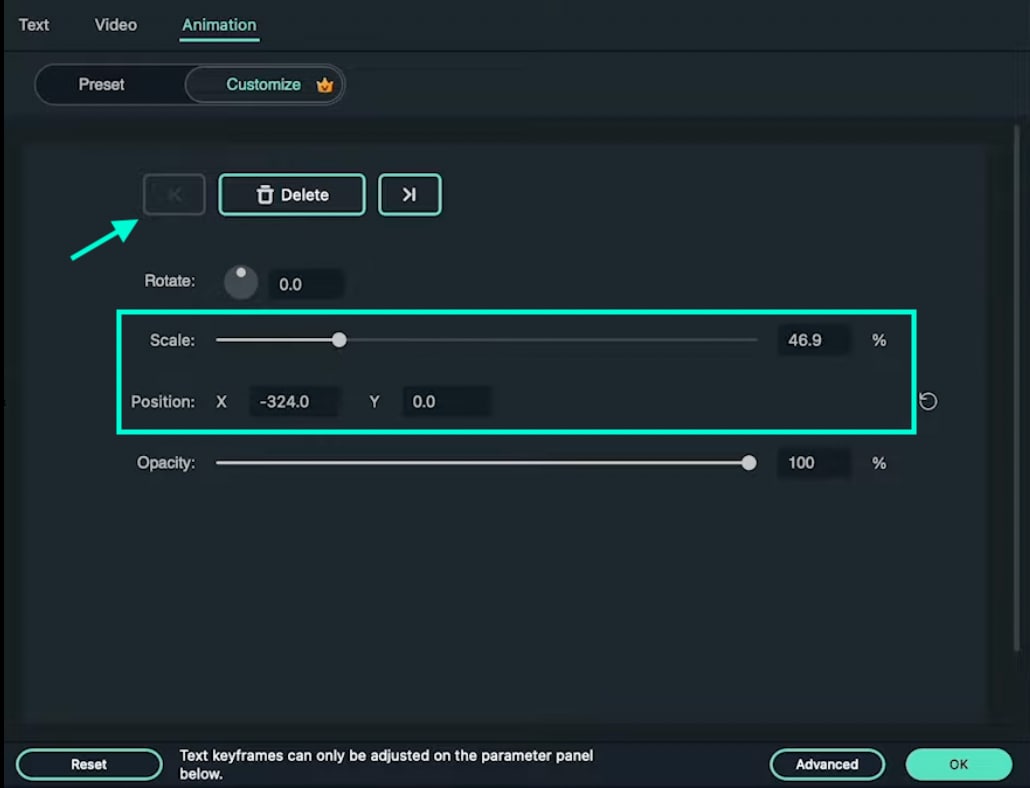
Now, go back to the first keyframe to edit its settings. Click the arrows to move between keyframes. Once you’re at the first one, start decreasing the Scale and the Position values as you move the Playhead toward the second keyframe. There are no rules here. Move each value based on how it looks best to you.
For the second keyframe, just increase the Scale and adjust the Position value based on how it looks on the screen.
Step 15
Now, apply the same method as in Step 14 to all the other circles in your video. Then, adjust the keyframe positions for all layers to create more unique movement throughout the video.
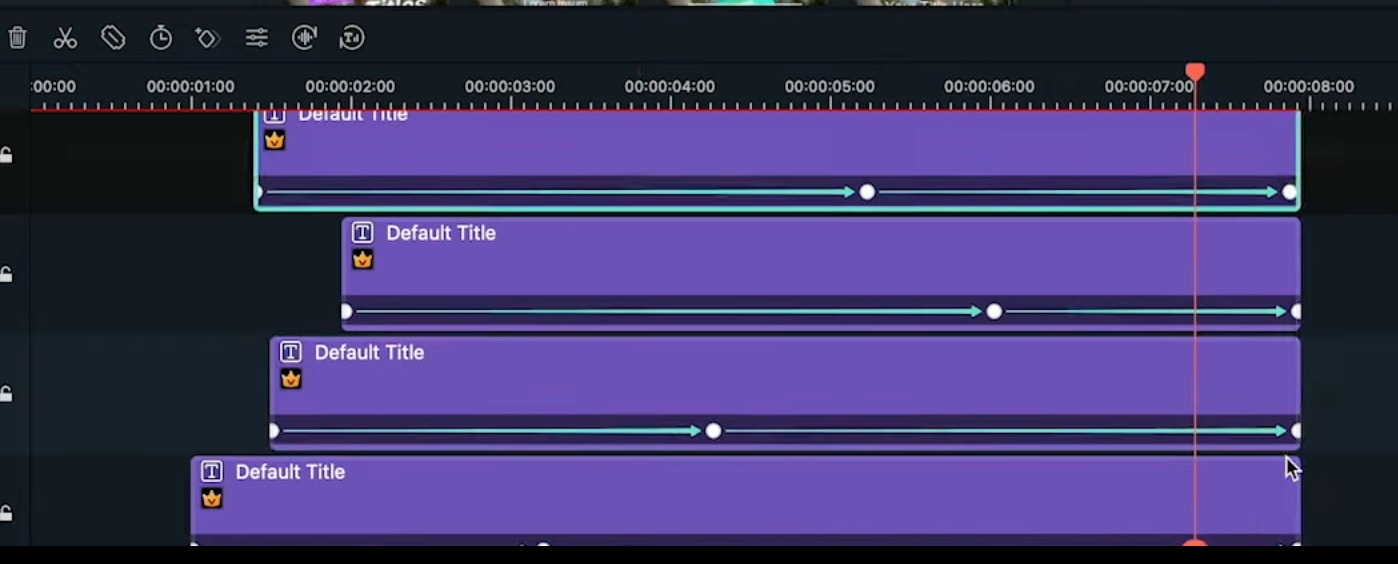
Step 16
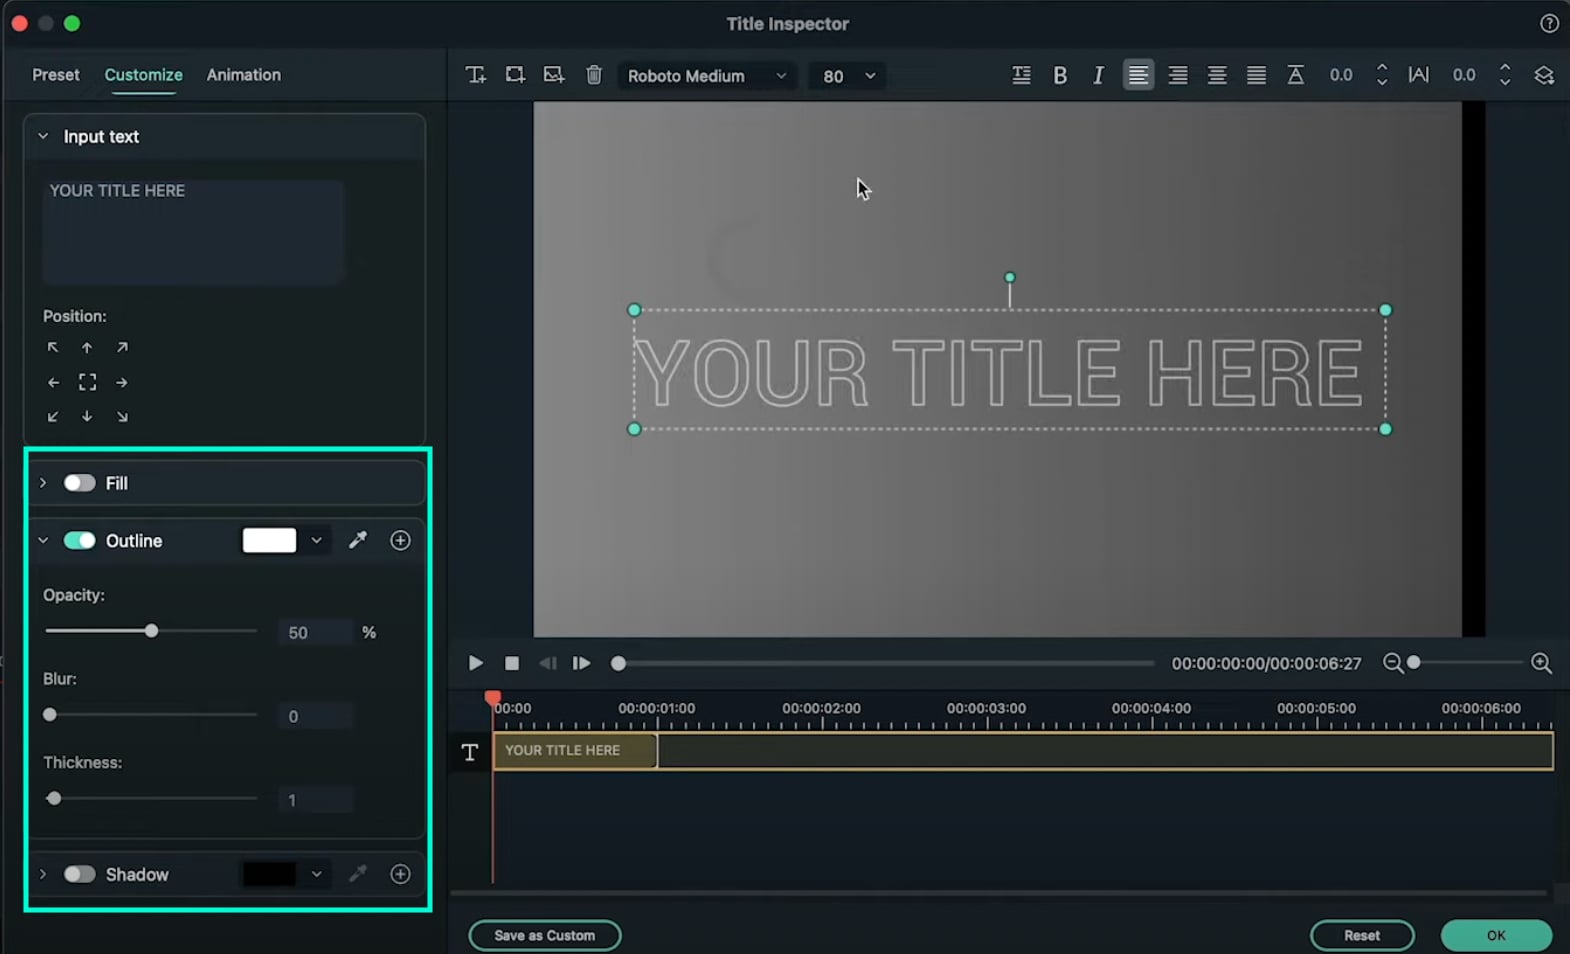
Move the Playhead to 1 second and 30 frames. Then, add a new Default Title in the Timeline and go to its Advanced settings panel. From there, Enable the Outline option and Disable the Fill option. In the Outline option, change the color to White, set Opacity to 50%, and decrease Thickness to 1.
Step 17
Next, choose your favorite font and type in your text inside the textbox. Then, change the value you see highlighted in this image to “-20”. Finally, increase the text size to almost fit the entire screen. Don’t worry about the fact that you can’t see all of it on the screen.

Step 18
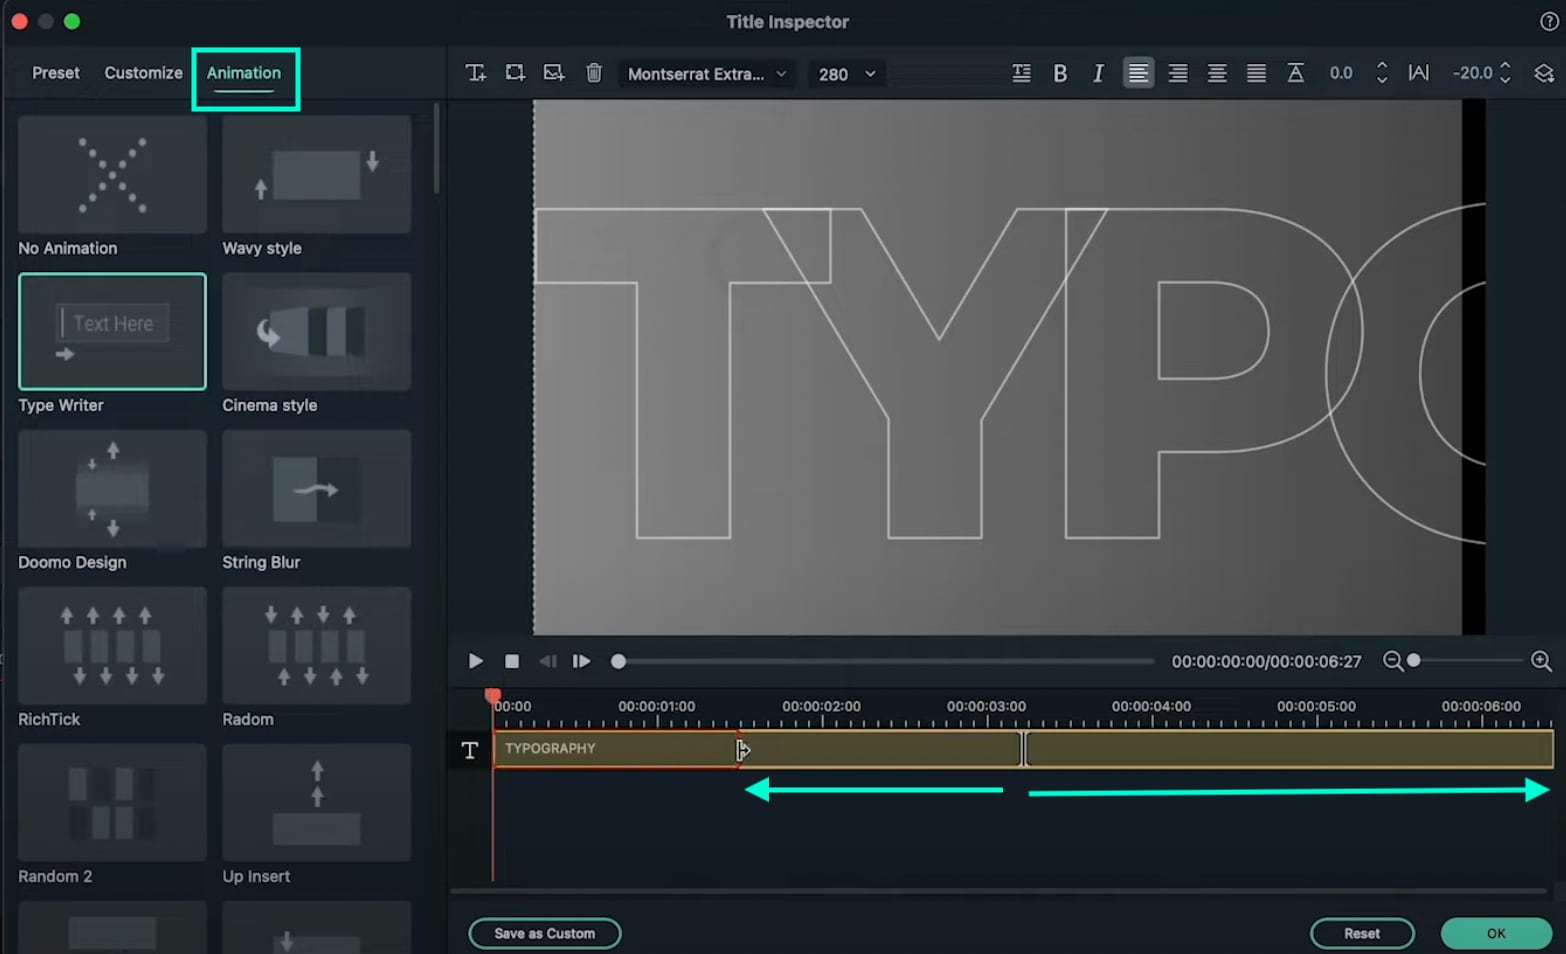
Go to the Animation tab and apply the “Type Writer” animation. Then, drag the yellow lines below just like you see in the image here. The arrows show you the length to which you need to drag these lines. Click OK.
Step 19
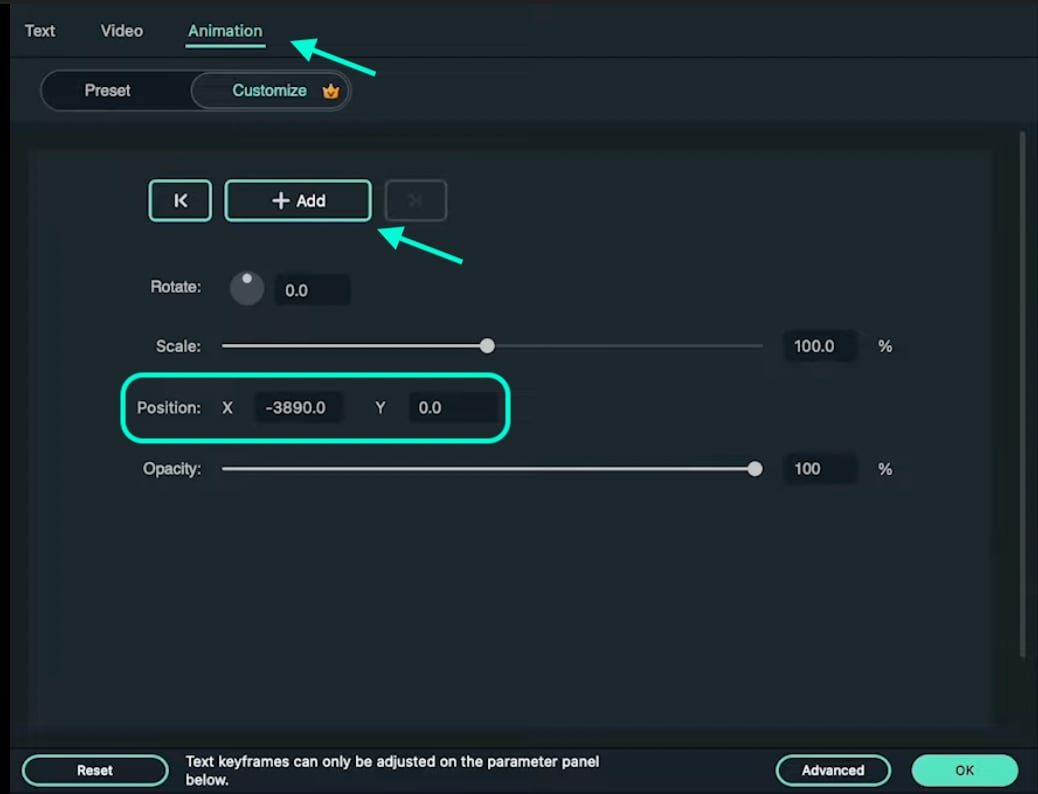
Set the Playhead to 1 second and 40 frames. Now, double-click on the last Default Title we just created and go to its Animation settings. NOTE: Don’t open its Advanced settings this time. Next, add a keyframe. Then, move the Playhead near the end of this clip in the Timeline. Now, drag the X position to the left until you see the last letter of your text appear on the screen. Click OK.
Step 20
Now, add another Default Title to the Timeline. Open its Advanced settings and type in your main text. Then, go to its Animation tab and apply the “Random 2” animation. Change its starting and end times according to your preference. Click OK.

Step 21
That’s it. You’re done! Feel free to preview the video and Render it. Congratulations on creating unique motion graphics in Filmora.
Summary
What you’ve learned:
- How to create custom motion graphics in Filmora
- How to edit and add animations to titles in Filmora
- Customize text and shapes in Filmora
What you need to prepare:
- A computer (Windows or macOS)
- Your video materials.
- Filmora video editor
Step 1
Visit the filmora.wondershare.com website and download Filmora . Install the program and wait for it to Run. Then, click on New Project.
Step 2
Go to File → Project Settings and set the FPS to 60. Also, ensure that the project is in Full Resolution (1920x1080). Click OK.

Step 3
Open the Titles tab and drag the Default Title to the Timeline. Then, double-click on the Default Title and click on ADVANCED.

Step 4
From the Advanced settings panel, delete the existing text and add a Rectangle shape.

Step 5
Disable the Text Fill and the Shape Border options from the panel on the left side.

Step 6
Click the drop-down arrow on the Shape Fill option and change the Type to Gradient Fill. Then, adjust the two color pallets from lighter to darker to create a gradient effect. Finally, adjust the rectangle to fit the entire screen. Click OK.

Step 7
Go to the Transitions tab → search for “Push” → drag the Push transition to the Default Title in the Timeline. Then, move the Playhead to the 1-second marker and drag another Default Title to that point from the Titles tab.

Step 8
Double-click on the new Default Title → go to Advanced. Delete the default text and add a Circle shape this time instead of a Rectangle. Disable the Text Fill and Shape Fill options this time.
Step 9
Scroll down to Shape Border and increase the Thickness bar all the way up. Then, change the circle’s color to match your background as closely as possible. Click OK.

Step 10
Copy the Title you just edited and paste it into the above layer. Then, double-click on the copied Title and go to its Advanced settings panel.

Step 11
In the Advanced panel, copy the circle and paste it somewhere else on the screen. Change its size if you want, and change the shade of its color to match the background once more. You can add as many new copies of the Default Titles and copy as many circles as you want. Click OK.

Step 12
After you’re done copying and pasting more Default Titles with more Circles inside, you can start animating them. Start with the first one. Double-click on the first Default Title with the Circle inside. Make sure you place the Playhead at the beginning of that clip. Then, go to the Animation tab.

Step 13
You need to add 3 keyframes. Add the first one right now. Just click on the “**+Add” button. Then, move the Playhead somewhere in the middle and click “+Add” again. Last, move the Playhead at the end of the clip, and click “+Add**” again to add the third keyframe.

Step 14
Now, go back to the first keyframe to edit its settings. Click the arrows to move between keyframes. Once you’re at the first one, start decreasing the Scale and the Position values as you move the Playhead toward the second keyframe. There are no rules here. Move each value based on how it looks best to you.
For the second keyframe, just increase the Scale and adjust the Position value based on how it looks on the screen.

Step 15
Now, apply the same method as in Step 14 to all the other circles in your video. Then, adjust the keyframe positions for all layers to create more unique movement throughout the video.

Step 16
Move the Playhead to 1 second and 30 frames. Then, add a new Default Title in the Timeline and go to its Advanced settings panel. From there, Enable the Outline option and Disable the Fill option. In the Outline option, change the color to White, set Opacity to 50%, and decrease Thickness to 1.

Step 17
Next, choose your favorite font and type in your text inside the textbox. Then, change the value you see highlighted in this image to “-20”. Finally, increase the text size to almost fit the entire screen. Don’t worry about the fact that you can’t see all of it on the screen.

Step 18
Go to the Animation tab and apply the “Type Writer” animation. Then, drag the yellow lines below just like you see in the image here. The arrows show you the length to which you need to drag these lines. Click OK.

Step 19
Set the Playhead to 1 second and 40 frames. Now, double-click on the last Default Title we just created and go to its Animation settings. NOTE: Don’t open its Advanced settings this time. Next, add a keyframe. Then, move the Playhead near the end of this clip in the Timeline. Now, drag the X position to the left until you see the last letter of your text appear on the screen. Click OK.

Step 20
Now, add another Default Title to the Timeline. Open its Advanced settings and type in your main text. Then, go to its Animation tab and apply the “Random 2” animation. Change its starting and end times according to your preference. Click OK.

Step 21
That’s it. You’re done! Feel free to preview the video and Render it. Congratulations on creating unique motion graphics in Filmora.
Summary
What you’ve learned:
- How to create custom motion graphics in Filmora
- How to edit and add animations to titles in Filmora
- Customize text and shapes in Filmora
What you need to prepare:
- A computer (Windows or macOS)
- Your video materials.
- Filmora video editor
Step 1
Visit the filmora.wondershare.com website and download Filmora . Install the program and wait for it to Run. Then, click on New Project.
Step 2
Go to File → Project Settings and set the FPS to 60. Also, ensure that the project is in Full Resolution (1920x1080). Click OK.

Step 3
Open the Titles tab and drag the Default Title to the Timeline. Then, double-click on the Default Title and click on ADVANCED.

Step 4
From the Advanced settings panel, delete the existing text and add a Rectangle shape.

Step 5
Disable the Text Fill and the Shape Border options from the panel on the left side.

Step 6
Click the drop-down arrow on the Shape Fill option and change the Type to Gradient Fill. Then, adjust the two color pallets from lighter to darker to create a gradient effect. Finally, adjust the rectangle to fit the entire screen. Click OK.

Step 7
Go to the Transitions tab → search for “Push” → drag the Push transition to the Default Title in the Timeline. Then, move the Playhead to the 1-second marker and drag another Default Title to that point from the Titles tab.

Step 8
Double-click on the new Default Title → go to Advanced. Delete the default text and add a Circle shape this time instead of a Rectangle. Disable the Text Fill and Shape Fill options this time.
Step 9
Scroll down to Shape Border and increase the Thickness bar all the way up. Then, change the circle’s color to match your background as closely as possible. Click OK.

Step 10
Copy the Title you just edited and paste it into the above layer. Then, double-click on the copied Title and go to its Advanced settings panel.

Step 11
In the Advanced panel, copy the circle and paste it somewhere else on the screen. Change its size if you want, and change the shade of its color to match the background once more. You can add as many new copies of the Default Titles and copy as many circles as you want. Click OK.

Step 12
After you’re done copying and pasting more Default Titles with more Circles inside, you can start animating them. Start with the first one. Double-click on the first Default Title with the Circle inside. Make sure you place the Playhead at the beginning of that clip. Then, go to the Animation tab.

Step 13
You need to add 3 keyframes. Add the first one right now. Just click on the “**+Add” button. Then, move the Playhead somewhere in the middle and click “+Add” again. Last, move the Playhead at the end of the clip, and click “+Add**” again to add the third keyframe.

Step 14
Now, go back to the first keyframe to edit its settings. Click the arrows to move between keyframes. Once you’re at the first one, start decreasing the Scale and the Position values as you move the Playhead toward the second keyframe. There are no rules here. Move each value based on how it looks best to you.
For the second keyframe, just increase the Scale and adjust the Position value based on how it looks on the screen.

Step 15
Now, apply the same method as in Step 14 to all the other circles in your video. Then, adjust the keyframe positions for all layers to create more unique movement throughout the video.

Step 16
Move the Playhead to 1 second and 30 frames. Then, add a new Default Title in the Timeline and go to its Advanced settings panel. From there, Enable the Outline option and Disable the Fill option. In the Outline option, change the color to White, set Opacity to 50%, and decrease Thickness to 1.

Step 17
Next, choose your favorite font and type in your text inside the textbox. Then, change the value you see highlighted in this image to “-20”. Finally, increase the text size to almost fit the entire screen. Don’t worry about the fact that you can’t see all of it on the screen.

Step 18
Go to the Animation tab and apply the “Type Writer” animation. Then, drag the yellow lines below just like you see in the image here. The arrows show you the length to which you need to drag these lines. Click OK.

Step 19
Set the Playhead to 1 second and 40 frames. Now, double-click on the last Default Title we just created and go to its Animation settings. NOTE: Don’t open its Advanced settings this time. Next, add a keyframe. Then, move the Playhead near the end of this clip in the Timeline. Now, drag the X position to the left until you see the last letter of your text appear on the screen. Click OK.

Step 20
Now, add another Default Title to the Timeline. Open its Advanced settings and type in your main text. Then, go to its Animation tab and apply the “Random 2” animation. Change its starting and end times according to your preference. Click OK.

Step 21
That’s it. You’re done! Feel free to preview the video and Render it. Congratulations on creating unique motion graphics in Filmora.
Summary
What you’ve learned:
- How to create custom motion graphics in Filmora
- How to edit and add animations to titles in Filmora
- Customize text and shapes in Filmora
What you need to prepare:
- A computer (Windows or macOS)
- Your video materials.
- Filmora video editor
Step 1
Visit the filmora.wondershare.com website and download Filmora . Install the program and wait for it to Run. Then, click on New Project.
Step 2
Go to File → Project Settings and set the FPS to 60. Also, ensure that the project is in Full Resolution (1920x1080). Click OK.

Step 3
Open the Titles tab and drag the Default Title to the Timeline. Then, double-click on the Default Title and click on ADVANCED.

Step 4
From the Advanced settings panel, delete the existing text and add a Rectangle shape.

Step 5
Disable the Text Fill and the Shape Border options from the panel on the left side.

Step 6
Click the drop-down arrow on the Shape Fill option and change the Type to Gradient Fill. Then, adjust the two color pallets from lighter to darker to create a gradient effect. Finally, adjust the rectangle to fit the entire screen. Click OK.

Step 7
Go to the Transitions tab → search for “Push” → drag the Push transition to the Default Title in the Timeline. Then, move the Playhead to the 1-second marker and drag another Default Title to that point from the Titles tab.

Step 8
Double-click on the new Default Title → go to Advanced. Delete the default text and add a Circle shape this time instead of a Rectangle. Disable the Text Fill and Shape Fill options this time.
Step 9
Scroll down to Shape Border and increase the Thickness bar all the way up. Then, change the circle’s color to match your background as closely as possible. Click OK.

Step 10
Copy the Title you just edited and paste it into the above layer. Then, double-click on the copied Title and go to its Advanced settings panel.

Step 11
In the Advanced panel, copy the circle and paste it somewhere else on the screen. Change its size if you want, and change the shade of its color to match the background once more. You can add as many new copies of the Default Titles and copy as many circles as you want. Click OK.

Step 12
After you’re done copying and pasting more Default Titles with more Circles inside, you can start animating them. Start with the first one. Double-click on the first Default Title with the Circle inside. Make sure you place the Playhead at the beginning of that clip. Then, go to the Animation tab.

Step 13
You need to add 3 keyframes. Add the first one right now. Just click on the “**+Add” button. Then, move the Playhead somewhere in the middle and click “+Add” again. Last, move the Playhead at the end of the clip, and click “+Add**” again to add the third keyframe.

Step 14
Now, go back to the first keyframe to edit its settings. Click the arrows to move between keyframes. Once you’re at the first one, start decreasing the Scale and the Position values as you move the Playhead toward the second keyframe. There are no rules here. Move each value based on how it looks best to you.
For the second keyframe, just increase the Scale and adjust the Position value based on how it looks on the screen.

Step 15
Now, apply the same method as in Step 14 to all the other circles in your video. Then, adjust the keyframe positions for all layers to create more unique movement throughout the video.

Step 16
Move the Playhead to 1 second and 30 frames. Then, add a new Default Title in the Timeline and go to its Advanced settings panel. From there, Enable the Outline option and Disable the Fill option. In the Outline option, change the color to White, set Opacity to 50%, and decrease Thickness to 1.

Step 17
Next, choose your favorite font and type in your text inside the textbox. Then, change the value you see highlighted in this image to “-20”. Finally, increase the text size to almost fit the entire screen. Don’t worry about the fact that you can’t see all of it on the screen.

Step 18
Go to the Animation tab and apply the “Type Writer” animation. Then, drag the yellow lines below just like you see in the image here. The arrows show you the length to which you need to drag these lines. Click OK.

Step 19
Set the Playhead to 1 second and 40 frames. Now, double-click on the last Default Title we just created and go to its Animation settings. NOTE: Don’t open its Advanced settings this time. Next, add a keyframe. Then, move the Playhead near the end of this clip in the Timeline. Now, drag the X position to the left until you see the last letter of your text appear on the screen. Click OK.

Step 20
Now, add another Default Title to the Timeline. Open its Advanced settings and type in your main text. Then, go to its Animation tab and apply the “Random 2” animation. Change its starting and end times according to your preference. Click OK.

Step 21
That’s it. You’re done! Feel free to preview the video and Render it. Congratulations on creating unique motion graphics in Filmora.
Summary
What you’ve learned:
- How to create custom motion graphics in Filmora
- How to edit and add animations to titles in Filmora
- Customize text and shapes in Filmora
How to Merge Audio and Video in VLC Media Player
Merging audio and video is a common task for many content creators, whether you’re making a YouTube video, a podcast, or a movie. One of the most popular ways to do this is using VLC Media Player. It is a powerful media player with a built-in feature that allows you to merge audio and video files. This guide will show you how to easily use VLC Media Player to merge audio and video files.
VLC Media Player is a free, open-source program that can play various media formats. It’s available for Windows, Mac, and Linux and is widely used by content creators, media enthusiasts, and casual users. In addition to playing media files, VLC Media Player has several advanced features, including the ability to convert, record, and merge files. This guide will focus on how to merge audio and video in VLC Media Player.
How To Merge Audio and Video in VLC (VideoLan Media Player)
In addition to playing media files, VLC has a built-in feature that allows you to merge audio and video files into a single file. This guide will walk you through merging audio and video files in VLC, making it easy to create your videos, podcasts, or movies with a professional touch.
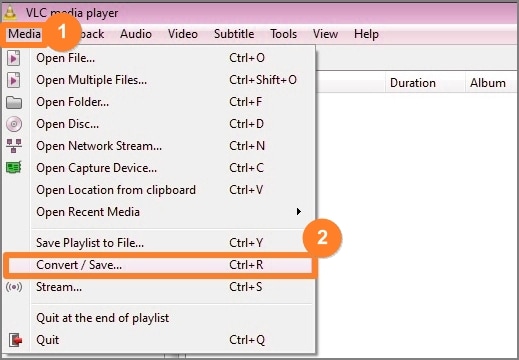
- Open VLC. Click on “Media” > “Convert / Save” from the dropdown menu.
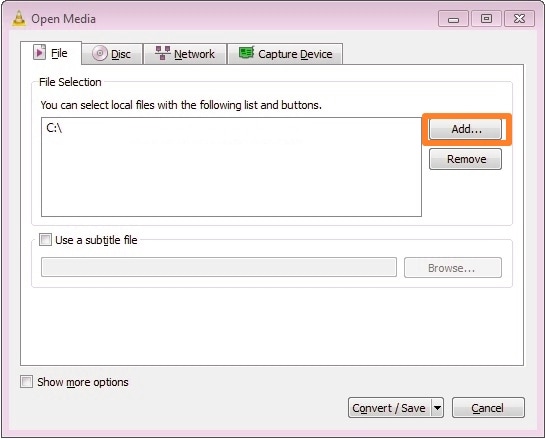
- Under the “File” tab, click on the “Add…” button to import the videos you want to merge.
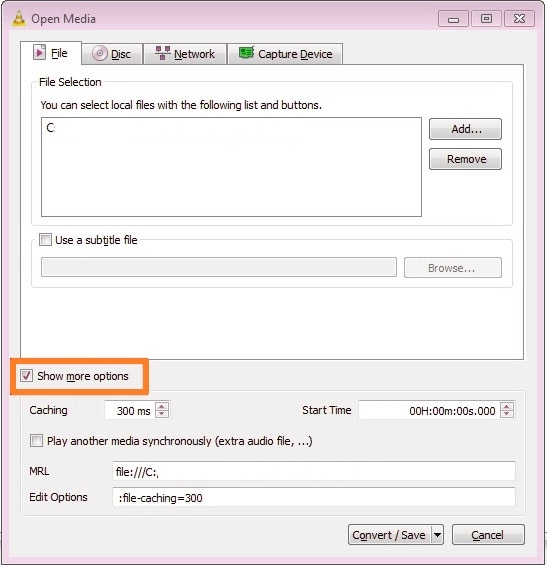
- Tick the “Show more options” checkbox at the bottom.
- Tick the “Play another media synchronously” to add the audio file.
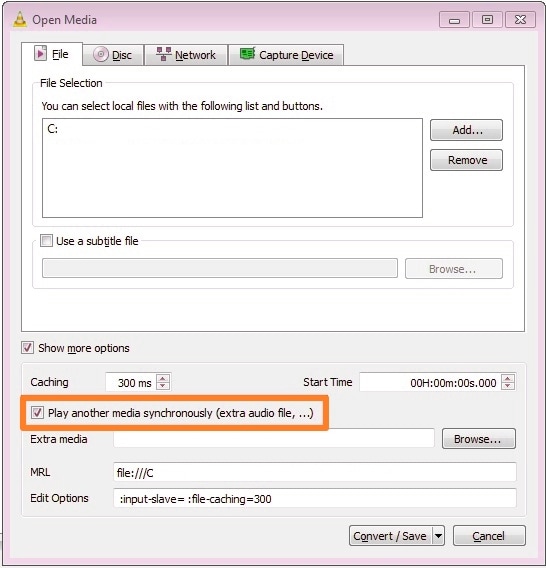
- Click on the “Browse” button and select the audio on your computer.

- Select the “Convert” radio button.
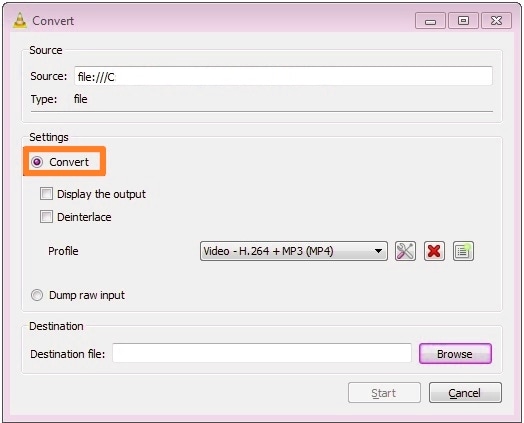
- Click on the “Browse” button and select a location on your computer to save the video.
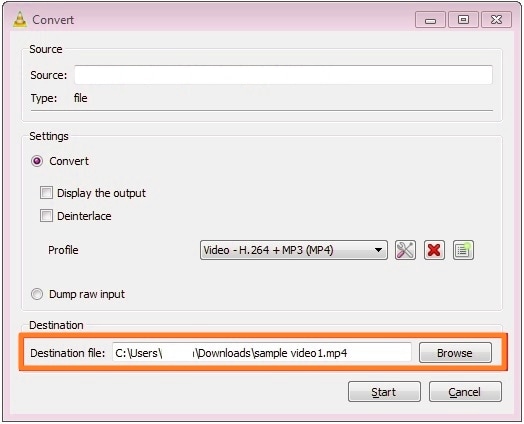
- Click on the “Start” button to save the video.

[Bonus] Filmora – Best Alternative to VLC to Combine Audio and Video
VLC is a great tool. But other tools may be better for people serious about making videos. VLC is more of an entry-level video editing software. It is good. But if it’s no longer enough for you, you should try its alternatives. Among the best ones is Wondershare Filmora . It has more advanced tools that answer the needs of video editing experts.
Free Download For Win 7 or later(64-bit)
Free Download For macOS 10.14 or later
Wondershare Filmore Features
Wondershare Filmora is a good alternative to VLC. To paint a picture, let’s look at its features. Filmora has:
- A library of carefully curated music.
- Speed controls that let you match your timing to a beat.
- Filters and effects to help you enhance the video.
- Transition effects to add more flare to the video.
- Integration with Instagram, YouTube, TikTok, or Vimeo, which allows you to publish with one tap.
Step-By-Step Guide To Merging Audio and Video With Filmora
So how to merge audio and video with Wondershare Filmora? Follow these steps to do so.
- Import the audio and videos that you want to merge into Filmora. You can do this through drag-and-drop or by clicking the link that says, “Click here to import media.”

- Drag the media files into the timeline. Adjust the video to align with the audio.

- Optionally, if you want to replace the video’s original audio, do this. Right-click on the video file. Select “Detach Audio.” The original audio will be separated from the video and put in the audio track. Delete it and replace it with the new audio.
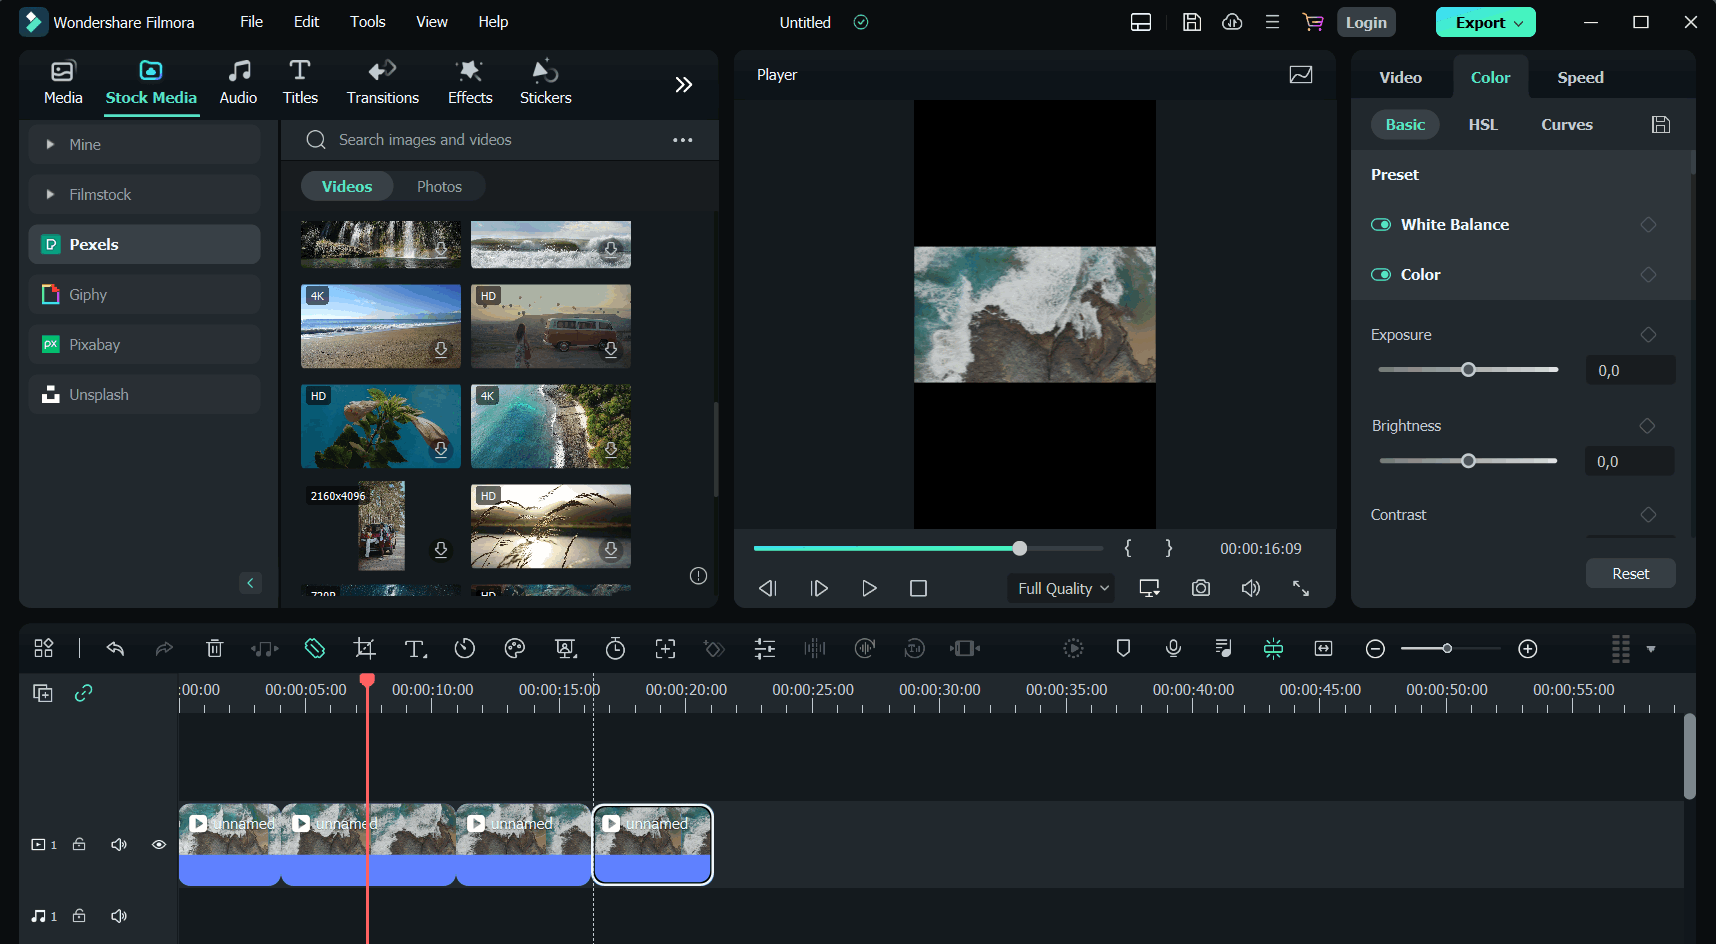
- Click “Export.” Select the format that you like, and click “Export” again. Alternatively, you can publish directly to YouTube or burn the video into a DVD.

You can watch this video to learn more about how to add audio to a video:
Combine Audio & Video? VLC or Filmora
Do you find it difficult to choose between VLC and Filmora for merging audio and video? Here’s a direct comparison between the two. It should help you decide.
| | VLC | Filmora | |
| —————————- | ———————————————————————————————————————————————————————————————————————————————————————————————————————— | ———————————————————————————————————————————————————————————————————————————————————————————————————————————————- |
| Customer Reviews from G2 | One G2 Validated Reviewer wrote that VideoLan is an “awesome all-in-one media player” that fulfills all their needs. It helps them play all audio and video media files without installing an external codec pack. The reviewer gave VLC 5 stars out of 5 stars. | A Validated Reviewer on G2 commented about Filmora’s audio editing. They said the most helpful feature is the ability to detach or mute the video. With that, you can add your own recordings or music to the video. This reviewer gave Wondershare Filmora 5 stars out of 5 stars. |
| Operating Systems | Windows; macOS; Linux; Android; iOS | Windows; macOS; Android; iOS |
| Pricing | ● VLC is an open-source program. Meaning it is completely free. | ● Wondershare Filmora’s annual plan for individual users costs $49.99.● The cross-platform plan costs $59.99 per year.● The perpetual plan costs $79.99. |
| Features | ● Plays all video and audio formats● Subtitle synchronization● Audio and video filters● Screen record without watermark | ● Split-screen● Speed ramping● Keyframing● Templates● Auto beat sync● Audio ducking● Silence detection● Audio synchronization● Video effects, filters, and transitions |
The main difference is that VLC is more of a media player. People use it to watch movies or play songs. Yes, it also lets you merge audio and video, convert videos, and screen record. But that’s about it; it does not give you features that challenge your creativity.
On the other hand, Wondershare Filmora is a video editor. It gives you tools that enable you to create original videos and enhance them. Therefore, it is the better option if you want to be a YouTuber or renowned video maker.
That said, the best use case for VLC is using it to play videos and music. It’s also a great free media converter. Meanwhile, Wondershare Filmora is better suited for video content creation. The tools it provides you with allow the creation of videos that are sure to captivate your audience.
Conclusion
Merging audio and video is easy. VLC and Wondershare Filmora are fantastic tools that can help you with that task. Suppose you want to do more than just merge audio and video. The latter is the better option. It includes powerful video editing tools that help you create amazing videos. Aside from merging, Filmora also offers audio synchronization, auto beat sync, audio detaching, and more. These features ensure the output file will be of high quality.
Free Download For macOS 10.14 or later
Wondershare Filmore Features
Wondershare Filmora is a good alternative to VLC. To paint a picture, let’s look at its features. Filmora has:
- A library of carefully curated music.
- Speed controls that let you match your timing to a beat.
- Filters and effects to help you enhance the video.
- Transition effects to add more flare to the video.
- Integration with Instagram, YouTube, TikTok, or Vimeo, which allows you to publish with one tap.
Step-By-Step Guide To Merging Audio and Video With Filmora
So how to merge audio and video with Wondershare Filmora? Follow these steps to do so.
- Import the audio and videos that you want to merge into Filmora. You can do this through drag-and-drop or by clicking the link that says, “Click here to import media.”

- Drag the media files into the timeline. Adjust the video to align with the audio.

- Optionally, if you want to replace the video’s original audio, do this. Right-click on the video file. Select “Detach Audio.” The original audio will be separated from the video and put in the audio track. Delete it and replace it with the new audio.

- Click “Export.” Select the format that you like, and click “Export” again. Alternatively, you can publish directly to YouTube or burn the video into a DVD.

You can watch this video to learn more about how to add audio to a video:
Combine Audio & Video? VLC or Filmora
Do you find it difficult to choose between VLC and Filmora for merging audio and video? Here’s a direct comparison between the two. It should help you decide.
| | VLC | Filmora | |
| —————————- | ———————————————————————————————————————————————————————————————————————————————————————————————————————— | ———————————————————————————————————————————————————————————————————————————————————————————————————————————————- |
| Customer Reviews from G2 | One G2 Validated Reviewer wrote that VideoLan is an “awesome all-in-one media player” that fulfills all their needs. It helps them play all audio and video media files without installing an external codec pack. The reviewer gave VLC 5 stars out of 5 stars. | A Validated Reviewer on G2 commented about Filmora’s audio editing. They said the most helpful feature is the ability to detach or mute the video. With that, you can add your own recordings or music to the video. This reviewer gave Wondershare Filmora 5 stars out of 5 stars. |
| Operating Systems | Windows; macOS; Linux; Android; iOS | Windows; macOS; Android; iOS |
| Pricing | ● VLC is an open-source program. Meaning it is completely free. | ● Wondershare Filmora’s annual plan for individual users costs $49.99.● The cross-platform plan costs $59.99 per year.● The perpetual plan costs $79.99. |
| Features | ● Plays all video and audio formats● Subtitle synchronization● Audio and video filters● Screen record without watermark | ● Split-screen● Speed ramping● Keyframing● Templates● Auto beat sync● Audio ducking● Silence detection● Audio synchronization● Video effects, filters, and transitions |
The main difference is that VLC is more of a media player. People use it to watch movies or play songs. Yes, it also lets you merge audio and video, convert videos, and screen record. But that’s about it; it does not give you features that challenge your creativity.
On the other hand, Wondershare Filmora is a video editor. It gives you tools that enable you to create original videos and enhance them. Therefore, it is the better option if you want to be a YouTuber or renowned video maker.
That said, the best use case for VLC is using it to play videos and music. It’s also a great free media converter. Meanwhile, Wondershare Filmora is better suited for video content creation. The tools it provides you with allow the creation of videos that are sure to captivate your audience.
Conclusion
Merging audio and video is easy. VLC and Wondershare Filmora are fantastic tools that can help you with that task. Suppose you want to do more than just merge audio and video. The latter is the better option. It includes powerful video editing tools that help you create amazing videos. Aside from merging, Filmora also offers audio synchronization, auto beat sync, audio detaching, and more. These features ensure the output file will be of high quality.
How to Edit Text in Premiere Pro
Premier Pro is a popular video editing software developed by Adobe Inc. It is one of the best creative platforms if you want to build editing skills. Whether you’re editing a video for social media or a big box office film, Premiere Pro can help you create your story with the tools available there. Import and edit clip, apply effects, and export to any destination. It has everything that you need to make anything you want to. When it comes to its features, there are so many features of using Premiere Pro; one of them is text editing. But how to edit text in premiere pro?
Well, text effects can make your project look more professional and attractive. It includes various activities such as creating a title graphic, adding animation to the text, changing fonts, colors, text, and many more. Before getting into the editing work, you should be familiar with Adobe Premiere Pro software, so it will be really helpful for you to get the most out of it. So, the first and foremost task is the installation of the Adobe Premier Pro app and then learning some basic skills in that.
There are several techniques on how to edit text on premiere pro. But here we will focus on two main approaches.
Part 1. Edit Text in Premiere Using the Type Tool
Firstly, go to the Adobe Premier Pro software in your window or mac. From there, choose the Type Tool option and drag the box to your video to write some text. In some cases, we may need to go to the window followed by Tools and click and hold the Type Tool. Now, coming to edit your text, you need to access Essential Graphics Workspace.
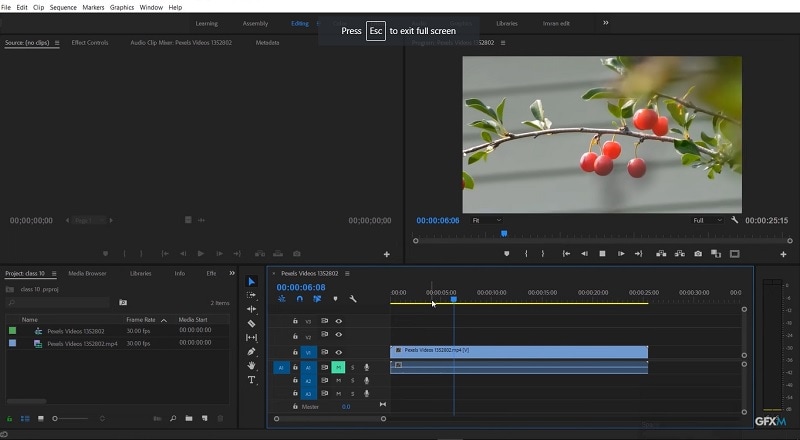
The further steps on how to edit text premiere pro using Type Tool are noted below:
- Go to the Window
- Click on the Workspaces
- Choose Graphics from the menu. Now, you will be able to see the Essential Graphic Panel.
- Then, go to the Edit option and select Text from the dropdown options available there.
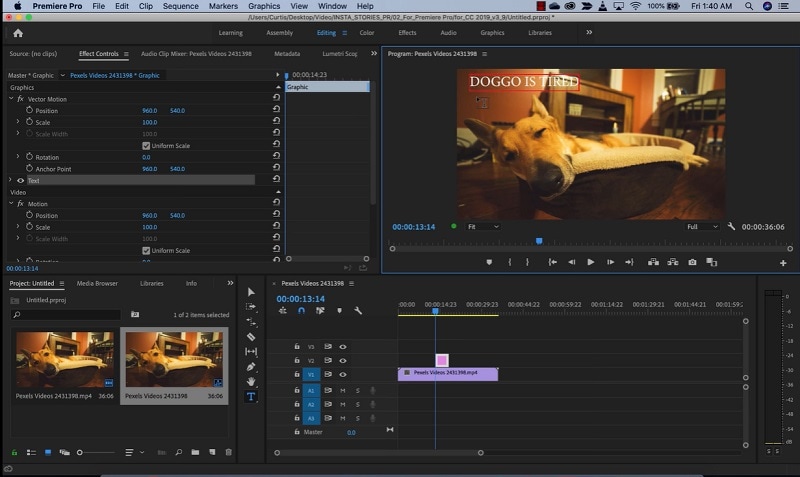
- After finishing all these steps, you now have a text layer overlaid on top of your video. From here, you can precisely personalize your text layer. You can edit the text, change the color, and so on in the new window.
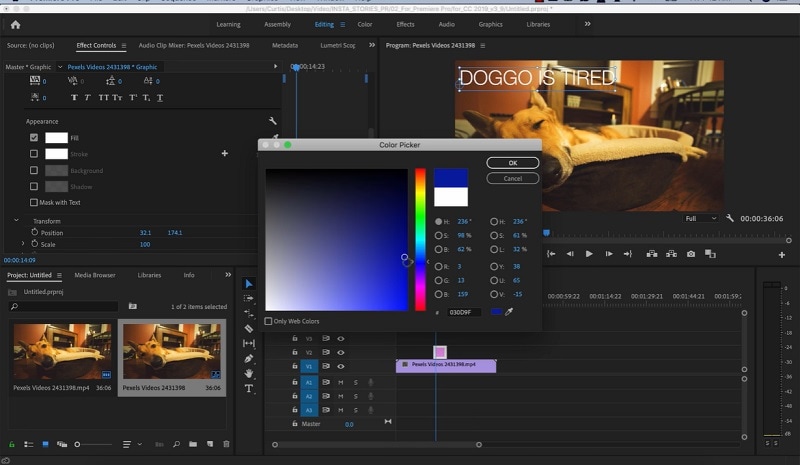
- Text can be bolded, italicized, or underlined here. Text can also be aligned to the left, right, or center of the text frame and the entire window.
- If you want to create a Title Graphic, Go to the Essential Graphic Workspace. First open the Window, followed by Workspaces, followed by Graphics from the main menu. Now, if you wish to add animation to your text, you can use the Effect controls Panel where you can apply motion to the texts.
So, following all these steps on how to edit text in adobe premiere with this tool, we can work in less time and create professional videos.
Part 2. Use Text Templates in Premiere Pro
While learning video editing in Premiere Pro, you will choose a suitable template, right? So, to make your title look more professional, you need to replace the text variant and adjust the color. In the Adobe Premiere pro, you can choose your preferred template as dozens of templates are available there. You can find the one and opt for which you want to select by simply dragging it to the timeline. Here’s a complete process on how to edit text in adobe premiere pro using text templates:
- Open the Adobe Premier pro and select browse on the right-hand “Essential panel”. Then activate it. It will help you with the quick export of your templates that are in the library.
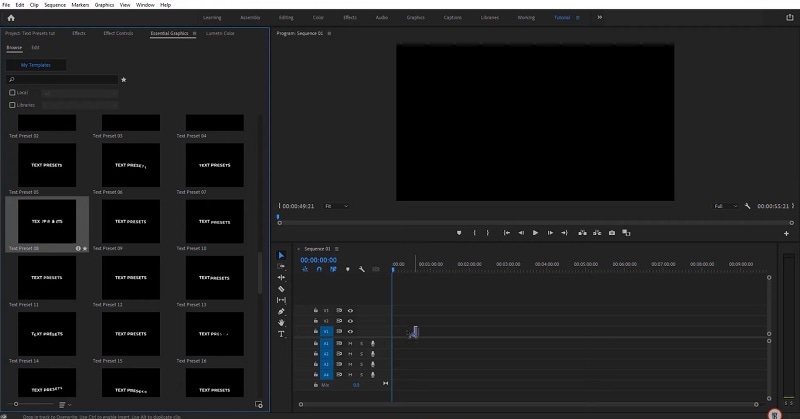
- Now, opt for “edit tab” from where you can opt for the text alignment and addition of the transparency. Further, you may manually tilt or rotate text here.
- Then, you have to choose the font and its size. If you have to opt for resizing a video, do so by the selection of the required font. You can then go for the adjustment of the size of the text that’s there on the “Edit tab”. The icons will be disabled in the case if there is no support for bold and/or italic options. Furthermore, if you wish to underline any object, you can easily add it to a font.
- At this point, opt for the addition of color/effects to the text. You will see options like fill and stroke. (An outline around the shape of a text), shadow, and many more.
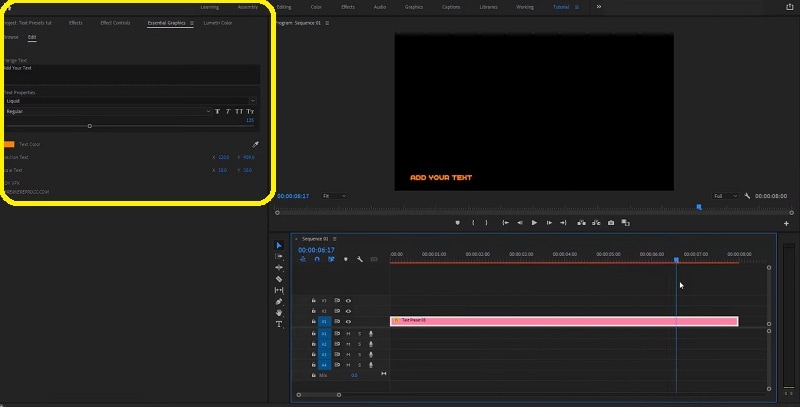
- Select the reqd. color to the text. Then opt for the addition of a stroke and then opt to shadow the same. Just in the case of a window having multiple text frames, opt for double-clicking on it so you can change the same as per the chosen tools.
Part 3. Alternative Way to Edit Text in Videos
Like Premiere Pro, there is another best video editing app called “Filmora” . If you are a beginner then also you will be able to learn editing skills and show your creativity. You don’t need to be a professional or an experienced editor to run the software. You can easily create high-quality and impressive videos using Filmora. The major reason why beginners should go for this video editor is that it requires only a few simple steps to create a video with a lot of features available. That’s why it is the best alternative for Premiere Pro users.
Free Download For Win 7 or later(64-bit)
Free Download For macOS 10.14 or later

Here we have listed below some features so that you will have no reason to get Filmora .
- It is free to download for windows and mac.
- You can edit and personalize your videos with less time and effort with lots of visual effects and transitions.
- You can easily capture your screen recording.
- There are over 800+ effects available and it supports 80+ video formats.
Now you will definitely think of getting Filmora and expanding your creativity to a greater level for sure.
How to edit text in videos in Filmora?
- Before starting a new project, you have to first do the installation of Filmora.
- After this, select a new project. Then allow your media files and start the editing procedure.
- While editing, drag and drop video, audio, photos, and titles into the timeline and create your video. Do trim/crop/cut/rotate/split if necessary.
- Now, go through your entire video and do the final changes.
- Then, export your video and post it on your social media platform to show your creativity.
The Bottom Line
There are millions of platforms available to enhance your innovative ideas. Find the suitable one for you that will consume your time with a great learning outcome. If you prefer Adobe Premiere pro, then be familiar with this software. Because there are certain options available like Layers, Responsive Design, Master styles, Text, Align and Transform, and Appearance in the Essential graphic panel.
Learn the functions of all the various buttons shown there. So, these minute things will help you a lot to make a perfect video. If you are a beginner and confused about where to start, you can go for a free premier pro basic course that provides a set of 7 lessons so that you don’t have to put a lot of effort and time.
Free Download For macOS 10.14 or later

Here we have listed below some features so that you will have no reason to get Filmora .
- It is free to download for windows and mac.
- You can edit and personalize your videos with less time and effort with lots of visual effects and transitions.
- You can easily capture your screen recording.
- There are over 800+ effects available and it supports 80+ video formats.
Now you will definitely think of getting Filmora and expanding your creativity to a greater level for sure.
How to edit text in videos in Filmora?
- Before starting a new project, you have to first do the installation of Filmora.
- After this, select a new project. Then allow your media files and start the editing procedure.
- While editing, drag and drop video, audio, photos, and titles into the timeline and create your video. Do trim/crop/cut/rotate/split if necessary.
- Now, go through your entire video and do the final changes.
- Then, export your video and post it on your social media platform to show your creativity.
The Bottom Line
There are millions of platforms available to enhance your innovative ideas. Find the suitable one for you that will consume your time with a great learning outcome. If you prefer Adobe Premiere pro, then be familiar with this software. Because there are certain options available like Layers, Responsive Design, Master styles, Text, Align and Transform, and Appearance in the Essential graphic panel.
Learn the functions of all the various buttons shown there. So, these minute things will help you a lot to make a perfect video. If you are a beginner and confused about where to start, you can go for a free premier pro basic course that provides a set of 7 lessons so that you don’t have to put a lot of effort and time.
15 Amazing GIF Splitter Examples You Need to Bookmark
15 Amazing GIF Splitter Examples You Need to Bookmark in 2024
An easy yet powerful editor
Numerous effects to choose from
Detailed tutorials provided by the official channel
GIF has been in consideration for a very long time, and right now, it is used for various purposes. From sending animated messages to friends to advertising a business, GIF is playing a great role. But sometimes, it happens that we are in need of getting a particular frame from the file and have no clue how to do it.
If you are stuck in this confusion that how will you be able to split GIFs into frames, use the GIF Splitters available.
The GIF Splitters are the tools available to help users to create frames from the GIF. There will be no problem in using these tools because all of them have an innovative interface. The best part is if a user is looking forward to doing any particular editing considering the frame, they can do it too. Well, for better understanding, keep reading. Here we are discussing GIF split into Frames and some splitters too. Let’s get started!
In this article
01 [15 Free Animated GIF Splitters - Split GIF into Frames Efficiently](#Part 1)
02 [5 Rules You Need to Follow When Splitting GIF into Frames](#Part 2)
03 [How to Split GIF into Frames into 3 Steps](#Part 3)
Part 1 Free Animated GIF Splitters - Split GIF into Frames Efficiently
In this section, you will find out some free gif splitter online available. This list has some interesting tools available that will help you to complete the task easily. Let’s have a look:-
01GIF Viewer
A GIF viewer is a tool that allows people to view GIFs in an easier and faster way. It splits up the GIF into frames so that it can be played at any speed, paused, or reversed. This tool also allows you to add text captions and stickers to your GIFs. This is useful when you want to add some context or commentary about what is happening in the GIF. Furthermore, after splitting the GIF into the frame, the quality of it is also retained.

02Animated GIF Frame Extractor by Softpedia
Animated GIF Frame Extractor is a free online tool to extract frames from a gif. It can extract the first frame, last frame, or any number of frames in between. This GIF tool is useful for those who need to create animated graphics for presentations or other purposes. It can also be used by web developers who need to create animations on their websites.
This also extracts frames from a gif file and saves them as separate images. Furthermore, it is also useful for creating animated graphics and animations with different frame rates, resolutions, or sizes.

03IrfanView
The IrfanView’s GIF Splitter into Frames tool splits the GIF into individual frames. In general, users can extract individual frames from an animation or change the order of frames in it. It is right to conclude that this tool provides an easy way to edit animated GIFs by extracting individual frames or creating new animations from scratch with images imported from other sources.
04 EZGIF.com
EZGIF.com is a GIF tool that lets you create animated GIFs from start to finish. It also lets you edit the GIFs, adds text and stickers, save them, and share them on social media sites like Facebook or Twitter. Furthermore, it lets you split the video into frames, and then it allows you to edit the frames as per your need.

05ImageMagick
ImageMagick is a GIF splitter tool that allows you to extract frames from a GIF animation. It’s easy to use, simple, and intuitive interface that lets you extract individual frames from your GIF animation. It’s also possible to extract all frames or just one frame at a time.
It is available for free download on their website, and it’s compatible with Windows and macOS X operating systems.

067GIF
7GIF is a tool that can be used to split an animation into individual frames, which can then be exported as individual GIF files. This GIF Splitter is a tool that allows you to break a GIF into individual frames.
It does this by analyzing the GIF and then breaking it up into its component parts, which are the frames. It then saves these frames as individual images and produces links to each of them.

07AniView
AniView is a free online animation maker that allows you to create animated videos with your own photos or videos, text, and music. You can upload your own media or use their library of public domain content for free. Furthermore, if you are thinking of splitting GIFs into frames, this tool has the option for it.

08GifSplitter
GifSplitter is a free online tool that splits an animated GIF into individual frames. This tool is very useful for people who want to extract a single frame from the GIF or convert it to a video file. The interface of the portal is quite easy to understand, and users will be able to do the editing as they need.
09 GIFGIFs.com
GIFGIFs.com is an online website that allows users to upload GIFs and split them into frames, which can be easily shared on social media or other websites. This tool helps people make their own GIF animations, which are very popular nowadays.

10FFmpeg
FFmpeg is an open-source software used for video and audio processing. This tool has many different features, but its most popular use is to split a GIF into a series of frames. This makes it easier to edit the individual frames of a GIF in Photoshop or another photo editing software.

11GIF Image Tools
The GIF Image tools act as a Splitter to split GIFs into Frames. This tool can be found in many different types of programs, including Adobe Photoshop, GIMP, and Windows Movie Maker. It is usually listed under the “Tools” tab in these programs. The tool is very easy to use, and it does not require any installation. All you need to do is upload the GIF file and then click on “Split.” It will automatically generate a folder with all the frames of your GIF image.

12Picasion
Picasion is a free online GIF maker. It allows you to create GIFs from your video files and then split them into frames in order to make them more engaging. Users can upload their video files or use the video from YouTube and then crop the frame they want to animate. They can also edit the duration of each frame and add text over their GIFs for a personalized touch.

13GIFMaker Pro
GIFMaker Pro is a free and easy-to-use GIF animation tool. It has a simple interface, and it doesn’t require any installation or sign-in. You can easily create animated GIFs with this tool.
It is a free, easy-to-use, and powerful GIF animation creator that allows you to create high-quality animated GIF splits into frames quickly. The best thing about this tool is that it does not require any installation or sign-in, so you can start using it right away!

14ImgFlip
ImgFlip is a GIF animation tool that is used to create and edit animated GIFs. It has the ability to convert videos into GIFs, as well as allow users to edit the frames and export them.
To use ImgFlip, all you need to do is open the app and select a video from your gallery or record one with your device’s camera. Once you have selected the video, ImgFlip will automatically convert it into an animated GIF that can be shared on social media platforms like Twitter and Facebook.

15GIFPAL
GIFPAL is a free GIF animation maker that splits GIF animations into frames. It is a great tool for creating cool animated GIFs from videos, images, and clips. It gives you the option to customize the frame rate, repeat playback, play order, and looping of your animation. It also lets you add text captions and change the colors of your frames.

Part 2 Rules You Need to Follow When Splitting GIF into Frames
Rules are important to follow when one is splitting GIFs into Frames. These are as follows:
● When you are splitting a GIF into frames, it is important to keep the size of each frame as close as possible to the original size of the GIF.
● The first frame should be the same size or slightly bigger than the original frame, and subsequent frames should be smaller than this.
● You can use tools to crop and resize your frames for your GIFs if needed.
● If you want to keep your GIF on its original aspect ratio, you need to make sure that all of your frames are in the same aspect ratio as well.
● Make sure you are splitting the subject in a way that makes sense for the GIF and for the viewer.
Part 3 How to Split GIF into Frames into 3 Steps
There is a possibility that you might be looking forward to splitting GIFs into frames and wish to know the best steps too. Well, there are only 3 steps that you need to follow. This includes:
Step 1: First of all, choose a GIF Splitter and browse through the frames options available in it to see whether the options you want are there or not.
Step 2: Upload the GIF from your system and choose the frame you wish to apply in order to split it. After choosing it, you need to hit on the “Split button.”
Step 3: Wait until the splitting is done, and on the top of the tool, there is a “downloading button” available click on it to download the GIF Splitted file you have created!
Note: So many options are available when you look for GIF Splitting tools. It is not important that every time you are going for some fancy options. There are some tools like “Filmora” available at reasonable prices and catering to your GIF Splitting needs too.)
Part 4 Other Frequently Asked Questions on GIF Splitter
01How Long Does It Take to Split GIF?
It can be done in a few seconds. Yes, with the help of splitter tools, the task can be done easily. If you are in search of a tool to split GIF, consider “Filmora.”
“Wondershare Filmora Video Editor is one of the best tools available for users out there to fulfill their image or video editing needs. So many options are there in it making it the best tool to have. Also, this tool has a simple to understand interface and even a layman can use this. If you are searching for a tool to split GIF, go for it right away!”

Wondershare Filmora - Best Video Editor for Mac/Windows
5,481,435 people have downloaded it.
Build unique custom animations without breaking a sweat.
Focus on creating epic stories and leave the details to Filmora’s auto features.
Start a creative adventure with drag & drop effects and endless possibilities.
Filmora simplifies advanced features to save you time and effort.
Filmora cuts out repetition so you can move on to your next creative breakthrough.
02Is It Safe to Split GIF Using Free Splitter App?
Somewhere the free splitter App is safe, and sometimes not. First of all, it is important to check whether the particular app is safe to use or not. Some free GIF Splitters are there that claim to be safe, but in reality, these are not. It is recommended to go for paid files because these are safe to use.
03Can I Split GIF on Mac OS, Android, or Linux?
If you have a GIF Splitter tool compatible with the operating system you are using, then you can split the GIFs on your system easily. For instance, do know if you are using Linux, the GIF Splitter you are choosing must be compatible with it.
● Ending Thoughts →
● GIF splitting is fun and easy to do. We made every possible effort to bring the best to you. The detailed discussion on GIF splitters will help you serve the purpose when you need it.
● Filmora is the best GIF Splitter to date. You should give a try on it if you want a great editing experience.
● GIF splitting can be done in 3 simple steps. We hope you can now do it on your own.
GIF has been in consideration for a very long time, and right now, it is used for various purposes. From sending animated messages to friends to advertising a business, GIF is playing a great role. But sometimes, it happens that we are in need of getting a particular frame from the file and have no clue how to do it.
If you are stuck in this confusion that how will you be able to split GIFs into frames, use the GIF Splitters available.
The GIF Splitters are the tools available to help users to create frames from the GIF. There will be no problem in using these tools because all of them have an innovative interface. The best part is if a user is looking forward to doing any particular editing considering the frame, they can do it too. Well, for better understanding, keep reading. Here we are discussing GIF split into Frames and some splitters too. Let’s get started!
In this article
01 [15 Free Animated GIF Splitters - Split GIF into Frames Efficiently](#Part 1)
02 [5 Rules You Need to Follow When Splitting GIF into Frames](#Part 2)
03 [How to Split GIF into Frames into 3 Steps](#Part 3)
Part 1 Free Animated GIF Splitters - Split GIF into Frames Efficiently
In this section, you will find out some free gif splitter online available. This list has some interesting tools available that will help you to complete the task easily. Let’s have a look:-
01GIF Viewer
A GIF viewer is a tool that allows people to view GIFs in an easier and faster way. It splits up the GIF into frames so that it can be played at any speed, paused, or reversed. This tool also allows you to add text captions and stickers to your GIFs. This is useful when you want to add some context or commentary about what is happening in the GIF. Furthermore, after splitting the GIF into the frame, the quality of it is also retained.

02Animated GIF Frame Extractor by Softpedia
Animated GIF Frame Extractor is a free online tool to extract frames from a gif. It can extract the first frame, last frame, or any number of frames in between. This GIF tool is useful for those who need to create animated graphics for presentations or other purposes. It can also be used by web developers who need to create animations on their websites.
This also extracts frames from a gif file and saves them as separate images. Furthermore, it is also useful for creating animated graphics and animations with different frame rates, resolutions, or sizes.

03IrfanView
The IrfanView’s GIF Splitter into Frames tool splits the GIF into individual frames. In general, users can extract individual frames from an animation or change the order of frames in it. It is right to conclude that this tool provides an easy way to edit animated GIFs by extracting individual frames or creating new animations from scratch with images imported from other sources.

04 EZGIF.com
EZGIF.com is a GIF tool that lets you create animated GIFs from start to finish. It also lets you edit the GIFs, adds text and stickers, save them, and share them on social media sites like Facebook or Twitter. Furthermore, it lets you split the video into frames, and then it allows you to edit the frames as per your need.

05ImageMagick
ImageMagick is a GIF splitter tool that allows you to extract frames from a GIF animation. It’s easy to use, simple, and intuitive interface that lets you extract individual frames from your GIF animation. It’s also possible to extract all frames or just one frame at a time.
It is available for free download on their website, and it’s compatible with Windows and macOS X operating systems.

067GIF
7GIF is a tool that can be used to split an animation into individual frames, which can then be exported as individual GIF files. This GIF Splitter is a tool that allows you to break a GIF into individual frames.
It does this by analyzing the GIF and then breaking it up into its component parts, which are the frames. It then saves these frames as individual images and produces links to each of them.

07AniView
AniView is a free online animation maker that allows you to create animated videos with your own photos or videos, text, and music. You can upload your own media or use their library of public domain content for free. Furthermore, if you are thinking of splitting GIFs into frames, this tool has the option for it.

08GifSplitter
GifSplitter is a free online tool that splits an animated GIF into individual frames. This tool is very useful for people who want to extract a single frame from the GIF or convert it to a video file. The interface of the portal is quite easy to understand, and users will be able to do the editing as they need.

09 GIFGIFs.com
GIFGIFs.com is an online website that allows users to upload GIFs and split them into frames, which can be easily shared on social media or other websites. This tool helps people make their own GIF animations, which are very popular nowadays.

10FFmpeg
FFmpeg is an open-source software used for video and audio processing. This tool has many different features, but its most popular use is to split a GIF into a series of frames. This makes it easier to edit the individual frames of a GIF in Photoshop or another photo editing software.

11GIF Image Tools
The GIF Image tools act as a Splitter to split GIFs into Frames. This tool can be found in many different types of programs, including Adobe Photoshop, GIMP, and Windows Movie Maker. It is usually listed under the “Tools” tab in these programs. The tool is very easy to use, and it does not require any installation. All you need to do is upload the GIF file and then click on “Split.” It will automatically generate a folder with all the frames of your GIF image.

12Picasion
Picasion is a free online GIF maker. It allows you to create GIFs from your video files and then split them into frames in order to make them more engaging. Users can upload their video files or use the video from YouTube and then crop the frame they want to animate. They can also edit the duration of each frame and add text over their GIFs for a personalized touch.

13GIFMaker Pro
GIFMaker Pro is a free and easy-to-use GIF animation tool. It has a simple interface, and it doesn’t require any installation or sign-in. You can easily create animated GIFs with this tool.
It is a free, easy-to-use, and powerful GIF animation creator that allows you to create high-quality animated GIF splits into frames quickly. The best thing about this tool is that it does not require any installation or sign-in, so you can start using it right away!

14ImgFlip
ImgFlip is a GIF animation tool that is used to create and edit animated GIFs. It has the ability to convert videos into GIFs, as well as allow users to edit the frames and export them.
To use ImgFlip, all you need to do is open the app and select a video from your gallery or record one with your device’s camera. Once you have selected the video, ImgFlip will automatically convert it into an animated GIF that can be shared on social media platforms like Twitter and Facebook.

15GIFPAL
GIFPAL is a free GIF animation maker that splits GIF animations into frames. It is a great tool for creating cool animated GIFs from videos, images, and clips. It gives you the option to customize the frame rate, repeat playback, play order, and looping of your animation. It also lets you add text captions and change the colors of your frames.

Part 2 Rules You Need to Follow When Splitting GIF into Frames
Rules are important to follow when one is splitting GIFs into Frames. These are as follows:
● When you are splitting a GIF into frames, it is important to keep the size of each frame as close as possible to the original size of the GIF.
● The first frame should be the same size or slightly bigger than the original frame, and subsequent frames should be smaller than this.
● You can use tools to crop and resize your frames for your GIFs if needed.
● If you want to keep your GIF on its original aspect ratio, you need to make sure that all of your frames are in the same aspect ratio as well.
● Make sure you are splitting the subject in a way that makes sense for the GIF and for the viewer.
Part 3 How to Split GIF into Frames into 3 Steps
There is a possibility that you might be looking forward to splitting GIFs into frames and wish to know the best steps too. Well, there are only 3 steps that you need to follow. This includes:
Step 1: First of all, choose a GIF Splitter and browse through the frames options available in it to see whether the options you want are there or not.
Step 2: Upload the GIF from your system and choose the frame you wish to apply in order to split it. After choosing it, you need to hit on the “Split button.”
Step 3: Wait until the splitting is done, and on the top of the tool, there is a “downloading button” available click on it to download the GIF Splitted file you have created!
Note: So many options are available when you look for GIF Splitting tools. It is not important that every time you are going for some fancy options. There are some tools like “Filmora” available at reasonable prices and catering to your GIF Splitting needs too.)
Part 4 Other Frequently Asked Questions on GIF Splitter
01How Long Does It Take to Split GIF?
It can be done in a few seconds. Yes, with the help of splitter tools, the task can be done easily. If you are in search of a tool to split GIF, consider “Filmora.”
“Wondershare Filmora Video Editor is one of the best tools available for users out there to fulfill their image or video editing needs. So many options are there in it making it the best tool to have. Also, this tool has a simple to understand interface and even a layman can use this. If you are searching for a tool to split GIF, go for it right away!”

Wondershare Filmora - Best Video Editor for Mac/Windows
5,481,435 people have downloaded it.
Build unique custom animations without breaking a sweat.
Focus on creating epic stories and leave the details to Filmora’s auto features.
Start a creative adventure with drag & drop effects and endless possibilities.
Filmora simplifies advanced features to save you time and effort.
Filmora cuts out repetition so you can move on to your next creative breakthrough.
02Is It Safe to Split GIF Using Free Splitter App?
Somewhere the free splitter App is safe, and sometimes not. First of all, it is important to check whether the particular app is safe to use or not. Some free GIF Splitters are there that claim to be safe, but in reality, these are not. It is recommended to go for paid files because these are safe to use.
03Can I Split GIF on Mac OS, Android, or Linux?
If you have a GIF Splitter tool compatible with the operating system you are using, then you can split the GIFs on your system easily. For instance, do know if you are using Linux, the GIF Splitter you are choosing must be compatible with it.
● Ending Thoughts →
● GIF splitting is fun and easy to do. We made every possible effort to bring the best to you. The detailed discussion on GIF splitters will help you serve the purpose when you need it.
● Filmora is the best GIF Splitter to date. You should give a try on it if you want a great editing experience.
● GIF splitting can be done in 3 simple steps. We hope you can now do it on your own.
GIF has been in consideration for a very long time, and right now, it is used for various purposes. From sending animated messages to friends to advertising a business, GIF is playing a great role. But sometimes, it happens that we are in need of getting a particular frame from the file and have no clue how to do it.
If you are stuck in this confusion that how will you be able to split GIFs into frames, use the GIF Splitters available.
The GIF Splitters are the tools available to help users to create frames from the GIF. There will be no problem in using these tools because all of them have an innovative interface. The best part is if a user is looking forward to doing any particular editing considering the frame, they can do it too. Well, for better understanding, keep reading. Here we are discussing GIF split into Frames and some splitters too. Let’s get started!
In this article
01 [15 Free Animated GIF Splitters - Split GIF into Frames Efficiently](#Part 1)
02 [5 Rules You Need to Follow When Splitting GIF into Frames](#Part 2)
03 [How to Split GIF into Frames into 3 Steps](#Part 3)
Part 1 Free Animated GIF Splitters - Split GIF into Frames Efficiently
In this section, you will find out some free gif splitter online available. This list has some interesting tools available that will help you to complete the task easily. Let’s have a look:-
01GIF Viewer
A GIF viewer is a tool that allows people to view GIFs in an easier and faster way. It splits up the GIF into frames so that it can be played at any speed, paused, or reversed. This tool also allows you to add text captions and stickers to your GIFs. This is useful when you want to add some context or commentary about what is happening in the GIF. Furthermore, after splitting the GIF into the frame, the quality of it is also retained.

02Animated GIF Frame Extractor by Softpedia
Animated GIF Frame Extractor is a free online tool to extract frames from a gif. It can extract the first frame, last frame, or any number of frames in between. This GIF tool is useful for those who need to create animated graphics for presentations or other purposes. It can also be used by web developers who need to create animations on their websites.
This also extracts frames from a gif file and saves them as separate images. Furthermore, it is also useful for creating animated graphics and animations with different frame rates, resolutions, or sizes.

03IrfanView
The IrfanView’s GIF Splitter into Frames tool splits the GIF into individual frames. In general, users can extract individual frames from an animation or change the order of frames in it. It is right to conclude that this tool provides an easy way to edit animated GIFs by extracting individual frames or creating new animations from scratch with images imported from other sources.

04 EZGIF.com
EZGIF.com is a GIF tool that lets you create animated GIFs from start to finish. It also lets you edit the GIFs, adds text and stickers, save them, and share them on social media sites like Facebook or Twitter. Furthermore, it lets you split the video into frames, and then it allows you to edit the frames as per your need.

05ImageMagick
ImageMagick is a GIF splitter tool that allows you to extract frames from a GIF animation. It’s easy to use, simple, and intuitive interface that lets you extract individual frames from your GIF animation. It’s also possible to extract all frames or just one frame at a time.
It is available for free download on their website, and it’s compatible with Windows and macOS X operating systems.

067GIF
7GIF is a tool that can be used to split an animation into individual frames, which can then be exported as individual GIF files. This GIF Splitter is a tool that allows you to break a GIF into individual frames.
It does this by analyzing the GIF and then breaking it up into its component parts, which are the frames. It then saves these frames as individual images and produces links to each of them.

07AniView
AniView is a free online animation maker that allows you to create animated videos with your own photos or videos, text, and music. You can upload your own media or use their library of public domain content for free. Furthermore, if you are thinking of splitting GIFs into frames, this tool has the option for it.

08GifSplitter
GifSplitter is a free online tool that splits an animated GIF into individual frames. This tool is very useful for people who want to extract a single frame from the GIF or convert it to a video file. The interface of the portal is quite easy to understand, and users will be able to do the editing as they need.

09 GIFGIFs.com
GIFGIFs.com is an online website that allows users to upload GIFs and split them into frames, which can be easily shared on social media or other websites. This tool helps people make their own GIF animations, which are very popular nowadays.

10FFmpeg
FFmpeg is an open-source software used for video and audio processing. This tool has many different features, but its most popular use is to split a GIF into a series of frames. This makes it easier to edit the individual frames of a GIF in Photoshop or another photo editing software.

11GIF Image Tools
The GIF Image tools act as a Splitter to split GIFs into Frames. This tool can be found in many different types of programs, including Adobe Photoshop, GIMP, and Windows Movie Maker. It is usually listed under the “Tools” tab in these programs. The tool is very easy to use, and it does not require any installation. All you need to do is upload the GIF file and then click on “Split.” It will automatically generate a folder with all the frames of your GIF image.

12Picasion
Picasion is a free online GIF maker. It allows you to create GIFs from your video files and then split them into frames in order to make them more engaging. Users can upload their video files or use the video from YouTube and then crop the frame they want to animate. They can also edit the duration of each frame and add text over their GIFs for a personalized touch.

13GIFMaker Pro
GIFMaker Pro is a free and easy-to-use GIF animation tool. It has a simple interface, and it doesn’t require any installation or sign-in. You can easily create animated GIFs with this tool.
It is a free, easy-to-use, and powerful GIF animation creator that allows you to create high-quality animated GIF splits into frames quickly. The best thing about this tool is that it does not require any installation or sign-in, so you can start using it right away!

14ImgFlip
ImgFlip is a GIF animation tool that is used to create and edit animated GIFs. It has the ability to convert videos into GIFs, as well as allow users to edit the frames and export them.
To use ImgFlip, all you need to do is open the app and select a video from your gallery or record one with your device’s camera. Once you have selected the video, ImgFlip will automatically convert it into an animated GIF that can be shared on social media platforms like Twitter and Facebook.

15GIFPAL
GIFPAL is a free GIF animation maker that splits GIF animations into frames. It is a great tool for creating cool animated GIFs from videos, images, and clips. It gives you the option to customize the frame rate, repeat playback, play order, and looping of your animation. It also lets you add text captions and change the colors of your frames.

Part 2 Rules You Need to Follow When Splitting GIF into Frames
Rules are important to follow when one is splitting GIFs into Frames. These are as follows:
● When you are splitting a GIF into frames, it is important to keep the size of each frame as close as possible to the original size of the GIF.
● The first frame should be the same size or slightly bigger than the original frame, and subsequent frames should be smaller than this.
● You can use tools to crop and resize your frames for your GIFs if needed.
● If you want to keep your GIF on its original aspect ratio, you need to make sure that all of your frames are in the same aspect ratio as well.
● Make sure you are splitting the subject in a way that makes sense for the GIF and for the viewer.
Part 3 How to Split GIF into Frames into 3 Steps
There is a possibility that you might be looking forward to splitting GIFs into frames and wish to know the best steps too. Well, there are only 3 steps that you need to follow. This includes:
Step 1: First of all, choose a GIF Splitter and browse through the frames options available in it to see whether the options you want are there or not.
Step 2: Upload the GIF from your system and choose the frame you wish to apply in order to split it. After choosing it, you need to hit on the “Split button.”
Step 3: Wait until the splitting is done, and on the top of the tool, there is a “downloading button” available click on it to download the GIF Splitted file you have created!
Note: So many options are available when you look for GIF Splitting tools. It is not important that every time you are going for some fancy options. There are some tools like “Filmora” available at reasonable prices and catering to your GIF Splitting needs too.)
Part 4 Other Frequently Asked Questions on GIF Splitter
01How Long Does It Take to Split GIF?
It can be done in a few seconds. Yes, with the help of splitter tools, the task can be done easily. If you are in search of a tool to split GIF, consider “Filmora.”
“Wondershare Filmora Video Editor is one of the best tools available for users out there to fulfill their image or video editing needs. So many options are there in it making it the best tool to have. Also, this tool has a simple to understand interface and even a layman can use this. If you are searching for a tool to split GIF, go for it right away!”

Wondershare Filmora - Best Video Editor for Mac/Windows
5,481,435 people have downloaded it.
Build unique custom animations without breaking a sweat.
Focus on creating epic stories and leave the details to Filmora’s auto features.
Start a creative adventure with drag & drop effects and endless possibilities.
Filmora simplifies advanced features to save you time and effort.
Filmora cuts out repetition so you can move on to your next creative breakthrough.
02Is It Safe to Split GIF Using Free Splitter App?
Somewhere the free splitter App is safe, and sometimes not. First of all, it is important to check whether the particular app is safe to use or not. Some free GIF Splitters are there that claim to be safe, but in reality, these are not. It is recommended to go for paid files because these are safe to use.
03Can I Split GIF on Mac OS, Android, or Linux?
If you have a GIF Splitter tool compatible with the operating system you are using, then you can split the GIFs on your system easily. For instance, do know if you are using Linux, the GIF Splitter you are choosing must be compatible with it.
● Ending Thoughts →
● GIF splitting is fun and easy to do. We made every possible effort to bring the best to you. The detailed discussion on GIF splitters will help you serve the purpose when you need it.
● Filmora is the best GIF Splitter to date. You should give a try on it if you want a great editing experience.
● GIF splitting can be done in 3 simple steps. We hope you can now do it on your own.
GIF has been in consideration for a very long time, and right now, it is used for various purposes. From sending animated messages to friends to advertising a business, GIF is playing a great role. But sometimes, it happens that we are in need of getting a particular frame from the file and have no clue how to do it.
If you are stuck in this confusion that how will you be able to split GIFs into frames, use the GIF Splitters available.
The GIF Splitters are the tools available to help users to create frames from the GIF. There will be no problem in using these tools because all of them have an innovative interface. The best part is if a user is looking forward to doing any particular editing considering the frame, they can do it too. Well, for better understanding, keep reading. Here we are discussing GIF split into Frames and some splitters too. Let’s get started!
In this article
01 [15 Free Animated GIF Splitters - Split GIF into Frames Efficiently](#Part 1)
02 [5 Rules You Need to Follow When Splitting GIF into Frames](#Part 2)
03 [How to Split GIF into Frames into 3 Steps](#Part 3)
Part 1 Free Animated GIF Splitters - Split GIF into Frames Efficiently
In this section, you will find out some free gif splitter online available. This list has some interesting tools available that will help you to complete the task easily. Let’s have a look:-
01GIF Viewer
A GIF viewer is a tool that allows people to view GIFs in an easier and faster way. It splits up the GIF into frames so that it can be played at any speed, paused, or reversed. This tool also allows you to add text captions and stickers to your GIFs. This is useful when you want to add some context or commentary about what is happening in the GIF. Furthermore, after splitting the GIF into the frame, the quality of it is also retained.

02Animated GIF Frame Extractor by Softpedia
Animated GIF Frame Extractor is a free online tool to extract frames from a gif. It can extract the first frame, last frame, or any number of frames in between. This GIF tool is useful for those who need to create animated graphics for presentations or other purposes. It can also be used by web developers who need to create animations on their websites.
This also extracts frames from a gif file and saves them as separate images. Furthermore, it is also useful for creating animated graphics and animations with different frame rates, resolutions, or sizes.

03IrfanView
The IrfanView’s GIF Splitter into Frames tool splits the GIF into individual frames. In general, users can extract individual frames from an animation or change the order of frames in it. It is right to conclude that this tool provides an easy way to edit animated GIFs by extracting individual frames or creating new animations from scratch with images imported from other sources.

04 EZGIF.com
EZGIF.com is a GIF tool that lets you create animated GIFs from start to finish. It also lets you edit the GIFs, adds text and stickers, save them, and share them on social media sites like Facebook or Twitter. Furthermore, it lets you split the video into frames, and then it allows you to edit the frames as per your need.

05ImageMagick
ImageMagick is a GIF splitter tool that allows you to extract frames from a GIF animation. It’s easy to use, simple, and intuitive interface that lets you extract individual frames from your GIF animation. It’s also possible to extract all frames or just one frame at a time.
It is available for free download on their website, and it’s compatible with Windows and macOS X operating systems.

067GIF
7GIF is a tool that can be used to split an animation into individual frames, which can then be exported as individual GIF files. This GIF Splitter is a tool that allows you to break a GIF into individual frames.
It does this by analyzing the GIF and then breaking it up into its component parts, which are the frames. It then saves these frames as individual images and produces links to each of them.

07AniView
AniView is a free online animation maker that allows you to create animated videos with your own photos or videos, text, and music. You can upload your own media or use their library of public domain content for free. Furthermore, if you are thinking of splitting GIFs into frames, this tool has the option for it.

08GifSplitter
GifSplitter is a free online tool that splits an animated GIF into individual frames. This tool is very useful for people who want to extract a single frame from the GIF or convert it to a video file. The interface of the portal is quite easy to understand, and users will be able to do the editing as they need.

09 GIFGIFs.com
GIFGIFs.com is an online website that allows users to upload GIFs and split them into frames, which can be easily shared on social media or other websites. This tool helps people make their own GIF animations, which are very popular nowadays.

10FFmpeg
FFmpeg is an open-source software used for video and audio processing. This tool has many different features, but its most popular use is to split a GIF into a series of frames. This makes it easier to edit the individual frames of a GIF in Photoshop or another photo editing software.

11GIF Image Tools
The GIF Image tools act as a Splitter to split GIFs into Frames. This tool can be found in many different types of programs, including Adobe Photoshop, GIMP, and Windows Movie Maker. It is usually listed under the “Tools” tab in these programs. The tool is very easy to use, and it does not require any installation. All you need to do is upload the GIF file and then click on “Split.” It will automatically generate a folder with all the frames of your GIF image.

12Picasion
Picasion is a free online GIF maker. It allows you to create GIFs from your video files and then split them into frames in order to make them more engaging. Users can upload their video files or use the video from YouTube and then crop the frame they want to animate. They can also edit the duration of each frame and add text over their GIFs for a personalized touch.

13GIFMaker Pro
GIFMaker Pro is a free and easy-to-use GIF animation tool. It has a simple interface, and it doesn’t require any installation or sign-in. You can easily create animated GIFs with this tool.
It is a free, easy-to-use, and powerful GIF animation creator that allows you to create high-quality animated GIF splits into frames quickly. The best thing about this tool is that it does not require any installation or sign-in, so you can start using it right away!

14ImgFlip
ImgFlip is a GIF animation tool that is used to create and edit animated GIFs. It has the ability to convert videos into GIFs, as well as allow users to edit the frames and export them.
To use ImgFlip, all you need to do is open the app and select a video from your gallery or record one with your device’s camera. Once you have selected the video, ImgFlip will automatically convert it into an animated GIF that can be shared on social media platforms like Twitter and Facebook.

15GIFPAL
GIFPAL is a free GIF animation maker that splits GIF animations into frames. It is a great tool for creating cool animated GIFs from videos, images, and clips. It gives you the option to customize the frame rate, repeat playback, play order, and looping of your animation. It also lets you add text captions and change the colors of your frames.

Part 2 Rules You Need to Follow When Splitting GIF into Frames
Rules are important to follow when one is splitting GIFs into Frames. These are as follows:
● When you are splitting a GIF into frames, it is important to keep the size of each frame as close as possible to the original size of the GIF.
● The first frame should be the same size or slightly bigger than the original frame, and subsequent frames should be smaller than this.
● You can use tools to crop and resize your frames for your GIFs if needed.
● If you want to keep your GIF on its original aspect ratio, you need to make sure that all of your frames are in the same aspect ratio as well.
● Make sure you are splitting the subject in a way that makes sense for the GIF and for the viewer.
Part 3 How to Split GIF into Frames into 3 Steps
There is a possibility that you might be looking forward to splitting GIFs into frames and wish to know the best steps too. Well, there are only 3 steps that you need to follow. This includes:
Step 1: First of all, choose a GIF Splitter and browse through the frames options available in it to see whether the options you want are there or not.
Step 2: Upload the GIF from your system and choose the frame you wish to apply in order to split it. After choosing it, you need to hit on the “Split button.”
Step 3: Wait until the splitting is done, and on the top of the tool, there is a “downloading button” available click on it to download the GIF Splitted file you have created!
Note: So many options are available when you look for GIF Splitting tools. It is not important that every time you are going for some fancy options. There are some tools like “Filmora” available at reasonable prices and catering to your GIF Splitting needs too.)
Part 4 Other Frequently Asked Questions on GIF Splitter
01How Long Does It Take to Split GIF?
It can be done in a few seconds. Yes, with the help of splitter tools, the task can be done easily. If you are in search of a tool to split GIF, consider “Filmora.”
“Wondershare Filmora Video Editor is one of the best tools available for users out there to fulfill their image or video editing needs. So many options are there in it making it the best tool to have. Also, this tool has a simple to understand interface and even a layman can use this. If you are searching for a tool to split GIF, go for it right away!”

Wondershare Filmora - Best Video Editor for Mac/Windows
5,481,435 people have downloaded it.
Build unique custom animations without breaking a sweat.
Focus on creating epic stories and leave the details to Filmora’s auto features.
Start a creative adventure with drag & drop effects and endless possibilities.
Filmora simplifies advanced features to save you time and effort.
Filmora cuts out repetition so you can move on to your next creative breakthrough.
02Is It Safe to Split GIF Using Free Splitter App?
Somewhere the free splitter App is safe, and sometimes not. First of all, it is important to check whether the particular app is safe to use or not. Some free GIF Splitters are there that claim to be safe, but in reality, these are not. It is recommended to go for paid files because these are safe to use.
03Can I Split GIF on Mac OS, Android, or Linux?
If you have a GIF Splitter tool compatible with the operating system you are using, then you can split the GIFs on your system easily. For instance, do know if you are using Linux, the GIF Splitter you are choosing must be compatible with it.
● Ending Thoughts →
● GIF splitting is fun and easy to do. We made every possible effort to bring the best to you. The detailed discussion on GIF splitters will help you serve the purpose when you need it.
● Filmora is the best GIF Splitter to date. You should give a try on it if you want a great editing experience.
● GIF splitting can be done in 3 simple steps. We hope you can now do it on your own.
Also read:
- New There Are Several Video Players that You Can Use to Watch Videos on Your PC. To Have a Better Experience Viewing Videos and Enhancing Them Across a Similar Platform, You Can Try Out VLC Media Player for PC for 2024
- New 2024 Approved Applying and Creating Gif Background on Your Devices and Presentations Is Not Hard. Read Below to Learn How to Apply a GIF Background on All Devices
- New Adobe After Effects Review
- Updated 2024 Approved Do You Want to Know How to Add LUTs to Premiere Pro? In This Guide, You Will Find Details and Easy Steps to Proceed with Using LUTs in Premiere Pro
- 2024 Approved Wondershare Filmora Tutorial | Using The AI Auto Reframe Feature
- Updated 2024 Approved Do You Want to Remove the Video Background in Premier Pro Using the Ultra Key but Dont Know About the Whole Process? Please Read Our Complete Step-by-Step Tutorial and Learn From Scratch as a Beginner
- New Video Editing Tips to Know Before Editing First Draft for 2024
- In 2024, Finding the Best GIF Websites Was Never Easier
- New Want to Speed up Your Video to Create Short-Duration Instagram Reels? Here Is How You Can Change the Speed of Pre-Recorded and Live Videos on Instagram Reels
- Updated 2024 Approved Add Flesh to Your Video Content Before Posting Them for Your Audience to See Using Meme Texts. Use the Tutorial Guide Shared in This Post
- New Applying and Creating Gif Background on Your Devices and Presentations Is Not Hard. Read Below to Learn How to Apply a GIF Background on All Devices for 2024
- New A Complete Overview of VSCO Video Editor for 2024
- Updated 2024 Approved One of the Latest Tools for Editing Video and Images Is AI Composite Video App Which Is Popular Among Users. Learn All About This Tool and Its Functioning
- Updated How to Create Custom Lower Thirds in Filmora for 2024
- New Replacing the Sky in Adobe After Effects An Extensive Guide
- New In 2024, Quick Solved How to Add Subtitles to a Video on iPhones
- Learning Unique Ways to Slow Down Time Lapse on iPhone
- Find Out What the Flexclip Trimmer Is, Its Key Features, and How to Use It to Trim Your Videos to Remove Unwanted Parts with Just a Few Clicks for 2024
- 2024 Approved Effective 10 Ways to Convert YouTube to MOV at Ease PC & Online
- Easily Cut Large Videos Faster on Mac 7 Solutions Included
- In 2024, Want to Make a Slide Show Video? Heres How
- Updated Top 8 Memoji Makers to Make a Memoji on PC, Android & iPhone
- Updated 2024 Approved How to Brighten a Video in Windows 10 | Step-By-Step Guide
- Updated Learn to Merge Clips in DaVinci Resolve with Simple Steps for 2024
- Art of Time Manipulation A Guide to After Effects Slow Motion Mastery
- How to Get Motion Blur in Valorant, In 2024
- Updated In 2024, 5 Ways to Denoise a Video
- 2024 Approved TikTok Velocity Dance Tutorial| Filmora
- Updated Quickest Guide | Zoom In and Out on Snapchat
- New In 2024, Quick Answer Why Did Filmora AI Portrait Attract People?
- New 2024 Approved Have You Ever Wondered How to Add Camera Shake to Video in Adobe After Effects? Let Us Share with You some Tips and Tricks on How to Do Just That
- New 2024 Approved Detailed Guide to Crop Video in Sony Vegas Pro
- Updated Learn Color Correction in After Effects with These YouTube Videos
- New 2024 Approved If You Want to Know What to Prepare and How to Make the Wedding Video Perfect for Videographers, Check Out This Menu Here
- Are You Searching the Internet for Top Wedding LUTs Premiere Pro? This Article Provides Suggestions on the Best LUT Color Presets
- Top 22 Free Video Editing Software for 2024
- New Are You Finding It Difficult to Freeze-Frame in After Effects? Note that Freeze-Frame Takes only a Few Seconds, and, in This Tutorial, We Will Guide You on How to Create and Add Frame Hold in After Effects for 2024
- Updated 10+ Best Unlimited FCPX Slideshow Templates for 2024
- New Replacing the Sky in Adobe After Effects An Extensive Guide for 2024
- Updated In 2024, You May Want to Change the Speed of Certain Portions of Your Video. This Article Enlightens You on How to Splice and Speed up the Video in Simple Ways
- Updated In 2024, Trailer Guide for Creators and Developers
- Hassle-Free Ways to Remove FRP Lock on Tecno Camon 20 Phones with/without a PC
- Use Device Manager to identify malfunctioning your drivers with Windows Device Manager in Windows 7
- How to Track Realme 10T 5G Location without Installing Software? | Dr.fone
- 8 Solutions to Fix Find My Friends Location Not Available On Nokia 130 Music | Dr.fone
- In 2024, Downloading SamFw FRP Tool 3.0 for Xiaomi Redmi 12 5G
- In 2024, Launching Your Live Room
- In 2024, 3 Facts You Need to Know about Screen Mirroring Samsung Galaxy M54 5G | Dr.fone
- How to Fix the Soft Bricked Samsung Galaxy A54 5G? | Dr.fone
- In 2024, The Ultimate Guide to Unlocking Your Apple iPhone XR on MetroPCS
- Simple and Effective Ways to Change Your Country on YouTube App Of your Apple iPhone 11 Pro | Dr.fone
- For People Wanting to Mock GPS on Vivo Y27 4G Devices | Dr.fone
- How to Change Oppo F23 5G Location on Skout | Dr.fone
- Updated 2024 Approved Best 10 Chinese Video to English Translators
- In 2024, How PGSharp Save You from Ban While Spoofing Pokemon Go On Motorola Moto G23? | Dr.fone
- In 2024, How To Create an Apple Developer Account From Apple iPhone SE (2022)
- What You Need To Know To Improve Your Samsung Galaxy M34 5G Hard Reset | Dr.fone
- Xiaomi won't play MOV videos, how to fix ?
- How to Unlock iPhone X? | Dr.fone
- Can I Bypass a Forgotten Phone Password Of OnePlus Nord N30 5G?
- How To Transfer Data From iPhone 14 To Others Android Devices? | Dr.fone
- In 2024, Change Location on Yik Yak For your Nokia C12 to Enjoy More Fun | Dr.fone
- Recover your music after Lava Yuva 3 has been deleted
- How to Rescue Lost Pictures from Huawei Nova Y91?
- What is Geo-Blocking and How to Bypass it On Poco M6 5G? | Dr.fone
- In 2024, Rootjunky APK To Bypass Google FRP Lock For Xiaomi Redmi Note 12 Pro 5G
- Repair Video Tool - Repair all your damaged video files of Huawei on Windows
- How Can We Bypass OnePlus Nord CE 3 Lite 5G FRP?
- How To Unlock A Found iPhone 11 Pro Max? | Dr.fone
- In 2024, 3 Solutions to Find Your Apple iPhone 13 Pro Current Location of a Mobile Number | Dr.fone
- In 2024, Easy Ways to Manage Your Nubia Red Magic 9 Pro Location Settings | Dr.fone
- In 2024, How to Fake Snapchat Location without Jailbreak On Apple iPhone 6s | Dr.fone
- What are Location Permissions Life360 On Vivo Y27 5G? | Dr.fone
- In 2024, 5 Quick Methods to Bypass Nokia G22 FRP
- How To Fix Auto Lock Greyed Out on Apple iPhone XR
- Pokemon Go Error 12 Failed to Detect Location On Oppo A18? | Dr.fone
- In 2024, Is GSM Flasher ADB Legit? Full Review To Bypass Your Vivo X Flip Phone FRP Lock
- Top 7 Skype Hacker to Hack Any Skype Account On your Oppo Reno 11 5G | Dr.fone
- In 2024, 5 Ways to Transfer Music from Samsung Galaxy M34 5G to Other Android Devices Easily | Dr.fone
- Title: New How to Do Motion Graphics in Filmora
- Author: Morgan
- Created at : 2024-06-24 01:30:06
- Updated at : 2024-06-25 01:30:06
- Link: https://ai-video-editing.techidaily.com/new-how-to-do-motion-graphics-in-filmora/
- License: This work is licensed under CC BY-NC-SA 4.0.


