
:max_bytes(150000):strip_icc():format(webp)/preaknessstakes-5c804f1b46e0fb00019b8ee0.jpg)
New How to Export iMovie for 2024
How to Export iMovie?
We live in a digital technology world where various applications do everything, and it has made our lives simpler and hassle-free to a certain extent. One of the path-breaking digital technologies is sharing your ideas and thoughts in a video format. You can now create your videos in any format and export them to your friends, colleagues, and family members. Moreover, you can also export your videos to any secondary device so that your hard drive does not get congested with heavy files.
So, if you want to know how to export iMovie, we will give you a step-by-step guideline to satisfy your requirements. One of the most significant aspects of iMovie is that you can edit your videos at your convenience. You can create professional videos, enhance your creativity, and showcase your talent to the world. You can add videos and photos and edit them according to your story.
Part 1. How to Export iMovie Video from iPhone?
Once you design the shape of your story, it is time you make the world know about your creativity. Since iMovie has loads of exciting tools and features, you can create videos with a professional touch. With the help of your iPhone, you can easily export iMovie videos in various ways. Following are the ways how to export iMovie:
1. Send video via email or text message
You can easily send video via email or text message from your iPhone. Following are the steps:
- Tap on the movie that you want to send.
- It would be best if you tap on the share option, which will redirect you to your email page.
- Complete the steps of the email by filling in the required details.
- Once your file is attached, tap on the send button.
2. Export video to another device
With the help of the iPhone, you can easily export iMovie videos to other devices. It saves the hard disk space of your iPhone and, simultaneously, gives you the advantage of restoring your videos if your video gets deleted from your iPhone. Following are the steps to export your iMovie videos from iPhone to other devices. One of the best options is to export your videos to other devices using the AirDrop option.
- Tap the video you want to export from the Project browser of your iPhone.
- Tap the share button after selecting the video that you want to export.
- Choose the resolution of the video that you want to share.
- Tap on the frame rate
- Turn on the HDR output for the particular video.
- Tap on Done
- Select the AirDrop option and tap on the device you want to transfer.

- You must ensure that the AirDrop option is turned on for both devices.
3. Export video to the web
Since iMovie is versatile video editing software, you can quickly transfer them anywhere, including any social networking site. It is an excellent way of showcasing your masterpiece to the world. However, if you plan to upload your video to any social networking site, you must ensure that you have an account with it. The following steps will help you export your iMovie videos to the web.
- Select any of your favorite social networking sites.
- Click on create and select Upload Video.
- Select the video that you want to upload.
- Click on Next to upload your iMovie video.
Part 2. How to Export iMovie Video from Mac?
1. Send video via email
Mac offers you the comfort to send your videos to your friends, colleagues, and loved ones via email. You can create professional videos and send them instantly. However, you must make sure that the videos do not have a high resolution, otherwise it will take some time to transfer the files.
Following are the steps for exporting the iMovie video via email.
- Download the Google Drive app to your iPhone
- Choose the video that you want to transfer to Google drive.
- Tap on the arrow following the name of the video.
- Slide the bar from offline to online
- Tap on the Export icon.
- Tap on Share
- You need to type the email address of the recipient you want to share your iMovie video.
- Tap on the Add option.
- The recipient will get your video instantly.
2. Add the movie to your Photos library
You can add your creative iMovie videos to the Photos library on your Mac, giving you the freedom to store your videos for later use. Following are the steps to add iMovie videos to your Photos library.
- From the Project Browser, select the iMovie video that you want to add to your Photos Library.
- Click on the ‘More’ option and choose the Share Project.
- Click on File.
- Choose a Resolution from the Resolution pop-up menu to define the size of your video. If you select a resolution video, the file size will be less and load onto your photos library fast. However, you need to choose a higher resolution video for excellent viewing.
- Choose a location to save your iMovie video.
- Drag the file that you want to transfer to the photos library.
3. Share video to web
iMovie allows you to share your videos on the web using any social networking platform. Following are the steps to share your videos on the web.
- Click on the iMovie video that you want to export.
- Click on the share button.
- Open your choice of any social networking site.

- Choose a location to save your file by clicking on ‘save’
- Upload the file that you want to share on the social networking site.
Part 3. iMovie Alternative to Edit Videos on Mac
If you find that iMovie export video is not your cup of tea, one of the best alternatives to edit your videos is to use Filmora . The advantage of using Filmora is that you can easily edit your videos. Moreover, you do not have to have previous experience in video editing as the application is easy to use. You can easily download Windows Filmora from the net and use it like a professional. It has some of the most exciting tools that will help you to make videos according to your convenience.
Free Download For Win 7 or later(64-bit)
Free Download For macOS 10.14 or later

With the help of Filmora, you can easily create and transfer your videos in any format. You can even edit any particular area of the videos and add subtitles and music to give it a professional look. One of the most exciting features of Filmora is that the application has one of the best special effects that will enhance the pro touch of your video. You can even make tutorials and other educational videos for your students. It is because you can add your audio and use it best for educational purposes. It is the best application for professionals as well as beginners.
Moreover, you can export the videos in any of the formats of your choice for better viewing, as it works on any given platform. Filmora is great at creating and editing Youtube videos, professional videos, and other videos on social networks. It is one of the best applications for editing your videos.
Conclusion
Apple’s iMovie is one of the most exciting video editing applications that will enhance your creativity. It offers a wide range of tools to create and edit videos according to your choice. Therefore, with the help of iMovie export, you can explore your creativity and showcase the world of your talent. Moreover, it allows you to export files in any video format so you can play them on any device.
Therefore, it is time to empower your imagination and give it a professional look with Apple’s iMovie application. Overall, iMovie is excellent software that is apt for any business or educational institution to enhance its growth. It is the best way to share your ideas and thoughts visually.
Free Download For Win 7 or later(64-bit)
Free Download For macOS 10.14 or later
Free Download For macOS 10.14 or later
With the help of Filmora, you can easily create and transfer your videos in any format. You can even edit any particular area of the videos and add subtitles and music to give it a professional look. One of the most exciting features of Filmora is that the application has one of the best special effects that will enhance the pro touch of your video. You can even make tutorials and other educational videos for your students. It is because you can add your audio and use it best for educational purposes. It is the best application for professionals as well as beginners.
Moreover, you can export the videos in any of the formats of your choice for better viewing, as it works on any given platform. Filmora is great at creating and editing Youtube videos, professional videos, and other videos on social networks. It is one of the best applications for editing your videos.
Conclusion
Apple’s iMovie is one of the most exciting video editing applications that will enhance your creativity. It offers a wide range of tools to create and edit videos according to your choice. Therefore, with the help of iMovie export, you can explore your creativity and showcase the world of your talent. Moreover, it allows you to export files in any video format so you can play them on any device.
Therefore, it is time to empower your imagination and give it a professional look with Apple’s iMovie application. Overall, iMovie is excellent software that is apt for any business or educational institution to enhance its growth. It is the best way to share your ideas and thoughts visually.
Free Download For Win 7 or later(64-bit)
Free Download For macOS 10.14 or later
Top List of Best VHS Video Effect Makers
VHS effects are the trendiest and most highly usable effects for videos through which you can add retro qualities in simple videos. You must have noticed the classical yet smooth distortion in the famous music videos. This smoother distortion that gives a retro vibe in the video is possible with the VHS effects. You don’t have to spend millions on this as many VHS effect online tools are at your disposal.
This discussion aims to familiarize you with the most known and reliable VHS filter online tools. You will also discover much-needed and significant knowledge of VHS effects. The offline tool through which you can add VHS effects in videos like never before will also be discussed here.
Part 1: What Do You Know About VHS Effects?
The VHS effects are the visual and auditory artifacts, along with smoother playback video distortion. The term VHS indicates the technology “Video Home System tapes.” From the 1980s-1990s, these effects were well-known and readily used in digital content. Moreover, in recent years, the vintage appeal of the videos has been achieved with these VHS effects. You can learn more about this from the provided information:
- Lines of VHS: The lines in VHS are tracking lines, and it is used to implement distortion effects in the videos. You can notice that these lines often run vertically in the video effects.
- Vintage Frames: You may have seen the darkening and faded effects on the edges in the VHS-integrated videos. The playback equipment limitation initially caused it; however, many videographers apply these effects in videos to give them a vintage look.
- Glitching Effects: VHS effects are not completed without comprehension of glitching effects. This includes rolling bars and sudden statics. This also gives the look of tape damage and signal interface and is perfect for flashbacks.
- Nostalgic Provocation: With this effect, you can add nostalgic feelings. If you are going to make movies regarding history, it can also help you by adding retro effects. It also replicates imperfections to give a unique look to videos.
Add VHS Effect to Video
Simply add video effects on Video with Filmora Video Effect Editor ! Experience the magic of cool yet outstanding video effects, where your videos come to life in beautiful visuals.
Apply VHS Effect Apply VHS Effect Learn More >


Part 2: Top VHS Video Effect Online Tools to Use in 2024
A substantial inventory of tools can confuse you and make it harder to select the best tool. We wish to bring peace and harmony to your videography career and wish you to get familiar with the VHS effect online video tools without getting confused. You can find the industry-grade tool for making videos visually appealing here:
| 1. Veed.io | 2. Kapwing |
|---|---|
| 3. Clideo | 4. FlexClip |
| 5. Fastreel | 6. CreatorKit |
1. Veed.io
Veed.io lets you transform simple-looking videos into a masterpiece of aesthetics and retros with its VHS overlays. With this online VHS effect tool, you can also add perfect flashbacks along with VHS to engage users. Creating the loops of videos and adding VHS overlays is also possible with this. It also helps to add customized subtitles to the videos to make it more understandable.
Some Prominent Characteristics of Veed.io
- It is an all-in-one video editor through which you can add modern modifications to create stunning and powerful videos. This tool can help in creating marketing, training, TikTok, and demos.
- You can also optimize the videos by trimming, cropping, rotating, and splitting them. Other than this, you can add customized audio in simple videos.
- Removing unnecessary background noises and awkward pauses is also possible with Veed.io. You can also upgrade your productivity by using its pre-built templates.

2. Kapwing
To add VHS effects to video online for free, you can get assistance from this premium grade tool - Kapwing . It also supports timeline-based nondestructive editing, which gives you a free hand in customization. Other than this, you can also create the layers in the videos and add VHS effects where needed. If you have some unique idea in mind, don’t hesitate to choose a blank canvas.
Some Prominent Characteristics of Kapwing
- Kapwing lets you import videos from different sources. You can use Google Drive, Google Photos, or your device’s gallery to add a video.
- Using its preset templates, you can create high-quality videos without investing extra time. It also supports diversified plugins to boost your productivity.
- There are versatile shapes, emojis, and elements in it that you can use as per your need. This also lets you add customized text and subtitles to videos.

3. Clideo
This fast and secure VHS effect online video tool helps you add realistic VHS effects to videos. You can not only add the effects but can also change the format of videos without any issues. Other than this, you also apply several intuitive filters to make videos more studio friendly. Clideo can edit diversified metrics of the videos and work as a reputable video editor.
Some Prominent Characteristics of Clideo
- With this tool, you can add text to a video, change its fonts and colors, or make a picture in a picture split screen.
- It also assists you in merging lengthy videos into smaller ones. You can also compress the large-sized videos to make them more shareable.
- Creating memes, managing the speed of videos, resizing their dimensions, or cropping unrequired parts is also possible with this.

4. FlexClip
Distorted video quality is much adored in today’s world, and you can also add these effects to your videos. You can deploy this effect to represent something in the past, and it can boost your engagement in the entertainment industry. If you are worried that the quality of the video will be compromised with FlexClip , you can use its duplicating feature so the original video is preserved.
Some Prominent Characteristics of FlexClip
- It supports the text-to-speech feature through which you can not only add voiceover but can also customize the voice style.
- If you want to make videos more engaging, you can use the previously existing soundtracks of FlexClip. You can also search for the required soundtrack through specific genres.
- There are versatile effects, logos, shapes, cooperative, decorative, and title overlays, so you can make videos more illustrative.

5. Fastreel
This online-based platform can escalate your user experience by adding VHS effects to the videos. You can add high-quality VHS effects in videos and create perfect slideshows. Not only personally, but you can also use the capabilities of this tool to expand your professional life. Fastreel also lets you merge multiple videos and then apply the VHS effects.
Some Prominent Characteristics of Fastreel
- This tool works like an all-in-one video editor, as you can reverse, crop, resize, flip, and loop videos.
- If you are a slow-motion video lover, you can also make slow and stop-motion videos with built-in features.
- Fastreel can also convert images into videos or make video collages for you. Other than this, you are also free to add music to videos.

6. CreatorKit
Along with hundreds of promotional templates for high-quality VHS effects, this VHS filter online tool never fails to amaze users with its higher functionality. CreatorKit can create engaging product videos with intuitive text styles. You can use its background removal if you want to create transparent-grade videos.
Some Prominent Characteristics of CreatorKit
- To create optimized videos, you can use its Shopify integrations to access more elements and other things.
- It can add animated price tags along with showcasing product features. You can also create intros and outros with this.
- There are several colors generated and gradient-generating bases that can assist you in showcasing the brand colors without any issues.

Part 3: Software Alternative: Insert Best VHS Effects Using Wondershare Filmora
It will not be inappropriate to say that Wondershare Filmora is the top-ranked video editor in the market. With Filmora, you can add several types of VHS effects in videos, such as horror filters, distortion bad, static, lines, vintage, and more. You can also search for customized effects by adding keywords and their subscription status.
Add VHS Video Effect For Win 7 or later(64-bit)
Add VHS Video Effect For macOS 10.14 or later
Wondershare Filmora is also a better option than other VHS effect online tools because you can also access versatile stock media files in it. There are tons of pre-built templates in Filmora, and you can also access all your previous projects from Filmora Cloud. Adding high-quality audio to videos is also possible with this tool.
Instructions to Add VHS Effects in Videos with Filmora
The instructions through which you can add the VHS effects in videos with any complications are given here:
Step 1Launch Filmora and Add a Video
To get started, install and launch Wondershare Filmora on your device. Make sure you use the updated version of Filmora. Next, click the “New Project” button and select “Click here to import media.” Next, add the video of your choice on which you wish to apply the VHS effect.

Step 2Add Video to Timeline and Apply Effect
Following this, drag the video to the “Timeline,” click on “Effects” from the above panel and go to “Search Bar.” From there, search for “VHS Effects” and select the effect from the available options. After selecting it, drag it on the video present in the timeline.

Step 3Download the VHS Effect Integrated Video
To continue, you can also modify it to a further extent by clicking on the added effect. There are several features that can help you with modification, such as Transitions, Stickers, and more. Afterward, click the “Export” button, customize the “Name,” “Save To,” “Format,” Quality,” and other metrics of videos. Finally, hit the “Export” button and save the video on your device.

Conclusion
To summarize, it can be said that you can use the VHS effect online video tools to create cinematic-level videos. VHS effects are smooth distortion effects that are used in several videos. You can learn more about this from the above information. Besides this, several online tools such as Veed.io, Clideo, FlexClip, and more can help you add VHS effects to videos.
To learn more about these tools, look at the information provided above. In case you wish to add the VHS effects to videos without facing any complications, don’t refrain from using the top-class tool named Wondershare Filmora. The steps to accomplish this task in a flawless manner are also discussed above for you.
Apply VHS Effect Apply VHS Effect Learn More >
Part 2: Top VHS Video Effect Online Tools to Use in 2024
A substantial inventory of tools can confuse you and make it harder to select the best tool. We wish to bring peace and harmony to your videography career and wish you to get familiar with the VHS effect online video tools without getting confused. You can find the industry-grade tool for making videos visually appealing here:
| 1. Veed.io | 2. Kapwing |
|---|---|
| 3. Clideo | 4. FlexClip |
| 5. Fastreel | 6. CreatorKit |
1. Veed.io
Veed.io lets you transform simple-looking videos into a masterpiece of aesthetics and retros with its VHS overlays. With this online VHS effect tool, you can also add perfect flashbacks along with VHS to engage users. Creating the loops of videos and adding VHS overlays is also possible with this. It also helps to add customized subtitles to the videos to make it more understandable.
Some Prominent Characteristics of Veed.io
- It is an all-in-one video editor through which you can add modern modifications to create stunning and powerful videos. This tool can help in creating marketing, training, TikTok, and demos.
- You can also optimize the videos by trimming, cropping, rotating, and splitting them. Other than this, you can add customized audio in simple videos.
- Removing unnecessary background noises and awkward pauses is also possible with Veed.io. You can also upgrade your productivity by using its pre-built templates.
2. Kapwing
To add VHS effects to video online for free, you can get assistance from this premium grade tool - Kapwing . It also supports timeline-based nondestructive editing, which gives you a free hand in customization. Other than this, you can also create the layers in the videos and add VHS effects where needed. If you have some unique idea in mind, don’t hesitate to choose a blank canvas.
Some Prominent Characteristics of Kapwing
- Kapwing lets you import videos from different sources. You can use Google Drive, Google Photos, or your device’s gallery to add a video.
- Using its preset templates, you can create high-quality videos without investing extra time. It also supports diversified plugins to boost your productivity.
- There are versatile shapes, emojis, and elements in it that you can use as per your need. This also lets you add customized text and subtitles to videos.
3. Clideo
This fast and secure VHS effect online video tool helps you add realistic VHS effects to videos. You can not only add the effects but can also change the format of videos without any issues. Other than this, you also apply several intuitive filters to make videos more studio friendly. Clideo can edit diversified metrics of the videos and work as a reputable video editor.
Some Prominent Characteristics of Clideo
- With this tool, you can add text to a video, change its fonts and colors, or make a picture in a picture split screen.
- It also assists you in merging lengthy videos into smaller ones. You can also compress the large-sized videos to make them more shareable.
- Creating memes, managing the speed of videos, resizing their dimensions, or cropping unrequired parts is also possible with this.
4. FlexClip
Distorted video quality is much adored in today’s world, and you can also add these effects to your videos. You can deploy this effect to represent something in the past, and it can boost your engagement in the entertainment industry. If you are worried that the quality of the video will be compromised with FlexClip , you can use its duplicating feature so the original video is preserved.
Some Prominent Characteristics of FlexClip
- It supports the text-to-speech feature through which you can not only add voiceover but can also customize the voice style.
- If you want to make videos more engaging, you can use the previously existing soundtracks of FlexClip. You can also search for the required soundtrack through specific genres.
- There are versatile effects, logos, shapes, cooperative, decorative, and title overlays, so you can make videos more illustrative.
5. Fastreel
This online-based platform can escalate your user experience by adding VHS effects to the videos. You can add high-quality VHS effects in videos and create perfect slideshows. Not only personally, but you can also use the capabilities of this tool to expand your professional life. Fastreel also lets you merge multiple videos and then apply the VHS effects.
Some Prominent Characteristics of Fastreel
- This tool works like an all-in-one video editor, as you can reverse, crop, resize, flip, and loop videos.
- If you are a slow-motion video lover, you can also make slow and stop-motion videos with built-in features.
- Fastreel can also convert images into videos or make video collages for you. Other than this, you are also free to add music to videos.
6. CreatorKit
Along with hundreds of promotional templates for high-quality VHS effects, this VHS filter online tool never fails to amaze users with its higher functionality. CreatorKit can create engaging product videos with intuitive text styles. You can use its background removal if you want to create transparent-grade videos.
Some Prominent Characteristics of CreatorKit
- To create optimized videos, you can use its Shopify integrations to access more elements and other things.
- It can add animated price tags along with showcasing product features. You can also create intros and outros with this.
- There are several colors generated and gradient-generating bases that can assist you in showcasing the brand colors without any issues.
Part 3: Software Alternative: Insert Best VHS Effects Using Wondershare Filmora
It will not be inappropriate to say that Wondershare Filmora is the top-ranked video editor in the market. With Filmora, you can add several types of VHS effects in videos, such as horror filters, distortion bad, static, lines, vintage, and more. You can also search for customized effects by adding keywords and their subscription status.
Add VHS Video Effect For Win 7 or later(64-bit)
Add VHS Video Effect For macOS 10.14 or later
Wondershare Filmora is also a better option than other VHS effect online tools because you can also access versatile stock media files in it. There are tons of pre-built templates in Filmora, and you can also access all your previous projects from Filmora Cloud. Adding high-quality audio to videos is also possible with this tool.
Instructions to Add VHS Effects in Videos with Filmora
The instructions through which you can add the VHS effects in videos with any complications are given here:
Step 1Launch Filmora and Add a Video
To get started, install and launch Wondershare Filmora on your device. Make sure you use the updated version of Filmora. Next, click the “New Project” button and select “Click here to import media.” Next, add the video of your choice on which you wish to apply the VHS effect.
Step 2Add Video to Timeline and Apply Effect
Following this, drag the video to the “Timeline,” click on “Effects” from the above panel and go to “Search Bar.” From there, search for “VHS Effects” and select the effect from the available options. After selecting it, drag it on the video present in the timeline.
Step 3Download the VHS Effect Integrated Video
To continue, you can also modify it to a further extent by clicking on the added effect. There are several features that can help you with modification, such as Transitions, Stickers, and more. Afterward, click the “Export” button, customize the “Name,” “Save To,” “Format,” Quality,” and other metrics of videos. Finally, hit the “Export” button and save the video on your device.
Conclusion
To summarize, it can be said that you can use the VHS effect online video tools to create cinematic-level videos. VHS effects are smooth distortion effects that are used in several videos. You can learn more about this from the above information. Besides this, several online tools such as Veed.io, Clideo, FlexClip, and more can help you add VHS effects to videos.
To learn more about these tools, look at the information provided above. In case you wish to add the VHS effects to videos without facing any complications, don’t refrain from using the top-class tool named Wondershare Filmora. The steps to accomplish this task in a flawless manner are also discussed above for you.
How To Fade Audio In Kinemaster
If you have been looking for video and audio editing tools then you have probably heard of Kinemaster. It is a great video editing app that allows users to edit all aspects of the video including any audio or music that may accompany the video. It has a lot of very useful features and the user interface is fairly easy to use.
One of the things that you can do with Kinemaster is to fade out audio, a useful feature that can help the ending of any video appear more authentic. In this article, we will be looking at how you can use Kinemaster to fade audio.
Kinemaster Fade Audio Steps
The following steps show you how you can easily fade audio in Kinemaster;
Step1If you don’t have Kinemaster already, start by downloading and installing the video editor on your computer.
Step2Open Kinemaster on your computer and then click on the “New Project” icon to start. Select the aspect ratio that you would like to use. If you are not sure, we recommend choosing the “16:9” aspect ratio.
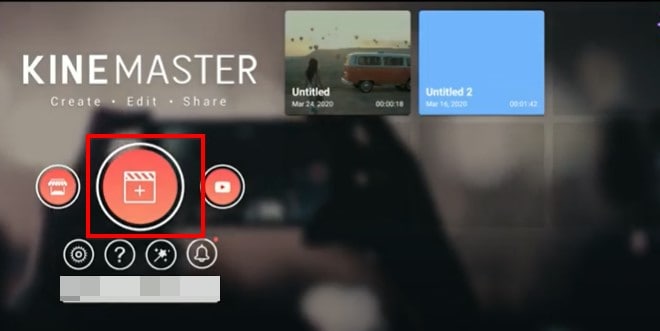
Step3In the next window, click on “Media” to select the clip you would like to add to the Kinemaster project that you have just created.
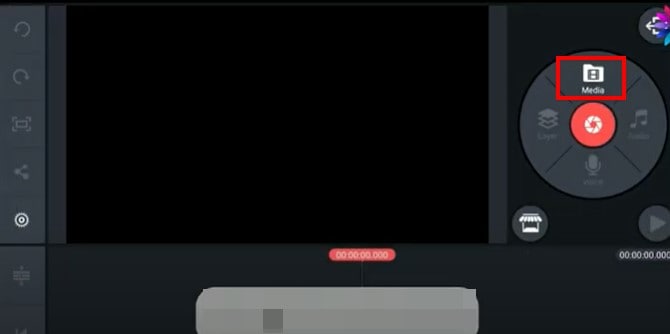
Step4To fade in and fade out the audio in the project, click on the gear icon from the options to the left of the screen.
![]()
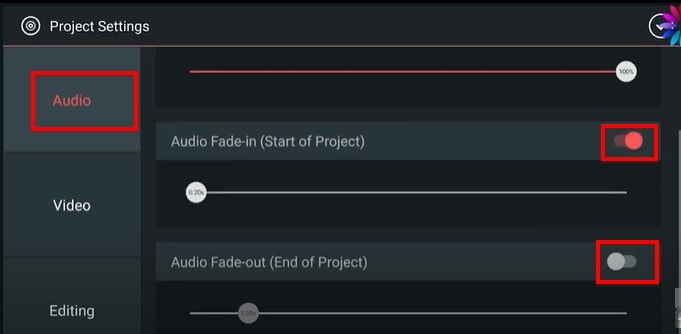
Step5Select the “Audio” tab on the next screen and then turn on the switch next to “Audio Fade-in (Start of Project)” and “Audio Fade-out (End of Project).” This will add a fade-in and fade-out effect at the beginning of the audio and at the end of it.
Step6You can then easily set the duration of the “Audio fade-in” and “Audio fade-out” by dragging the slider below each option. We recommend setting the duration to just a few seconds.
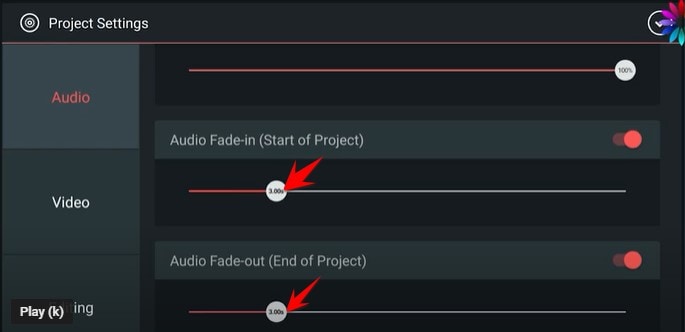
Don’t forget to save the project when you’re done.
Kinemaster Alternative to Edit Audio
Kinemaster is a good way to edit both audio and video on your computer, but the following options are just as good;
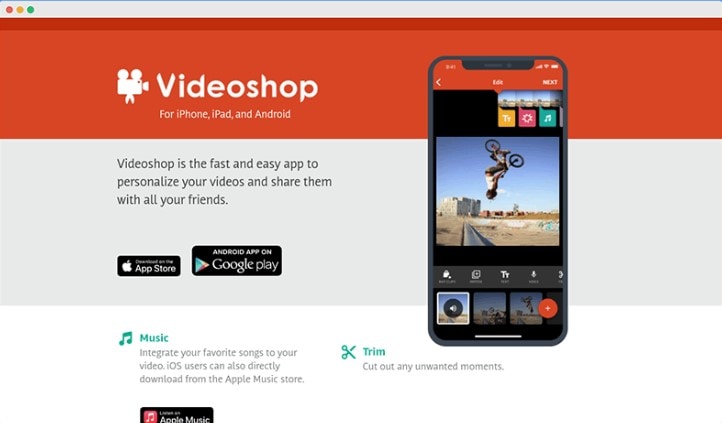
1. VideoShop
VideoShop is a simple to use and highly effective program that you can use to create and edit videos on your computer. The interface makes it easy to import any video project that you have into the program and the wealth of very useful features can help you edit the video in various ways.
For example, you can change the speed of the video, add transitions at various points in the video, add and remove text, add and remove music and so much more. Although there is a free trial version, you will only be able to access some of the more useful features when you purchase the premium version.
The Pro version of VideoShop goes for $3.99 a month, but you can get lifetime access to the program for only $39.99. One thing that VideoShop has over Kinemaster is that it is very easy to use, even beginner users find video editing a breeze with this tool.
2. Filmora
If you are looking for a simple way to edit videos on Android or iOS devices, Filmora is one of the best options in the market. This mobile version of the very popular Filmora video editor is just as easy to use as its parent program. You can use it to create video projects from scratch or upload a video and make changes to it.
It offers you a lot of choices when it comes to editing features including trimming sections of the video, adding filters, adding music, adding or removing text, and even changing the canvas or the background of the video. Advanced options such as changing the speed of the video are also available.
One of the things that we love about Filmora is that you don’t even have to create an account to use it or remove the watermark added to the completed video project, watching a video ad can be enough. But this option is only available once every 24 hours, meaning that you can only remove a watermark on the free version once a day. Filmora is available for both iOS and Android and the yearly premium plan will cost you just $19.90.
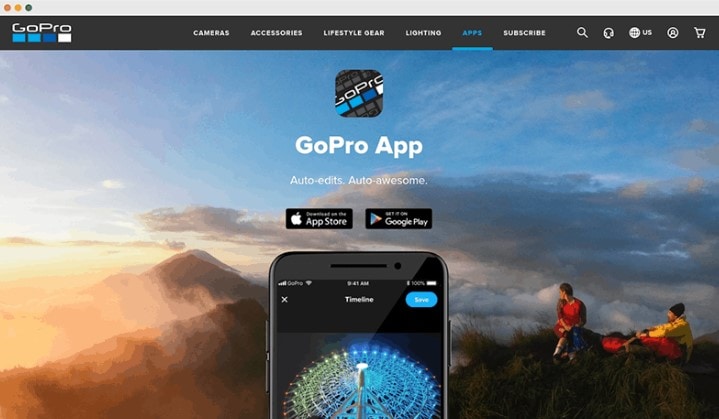
3. Quik
Quik is a video editing program created by GoPro for the purpose of editing GoPro videos, but that doesn’t mean that you will not be able to use it to edit other types of videos. You can use Quik to create a new project or edit an existing video and gives users a lot of different options when it comes to video editing.
One of the main benefits of using Quik is that you can easily add music, audio, and special effects to a video as well as change the length of the video, fade audio in and out and even change when the music starts. It is also one of the best ways to use images to create collages and slideshows very easily. There are a lot of slideshow and collage templates to choose from, and you can edit them easily by adding your music and images. Quik is completely free to use and you can upload your creation to the cloud ad share the link with others.
Conclusion
Kinemaster is one of the most popular video editing tools, especially since it simplifies the video editing process to make it very easy. All the alternative tools we have outlined here in this article are selected because they can make video editing quite simple.
Free Download For Win 7 or later(64-bit)
Free Download For macOS 10.14 or later
Create a Kickass COD Warzone Thumbnail for Free
Gaming is a popular video category. And COD: Warzone is one of the most popular games nowadays. That said, many gamers flock to video streaming websites to watch Warzone gameplays. And there are so many of them, and the competition for views is tough. So you must use all you can to win that battle. Your Warzone thumbnails, titles, and videos themselves must be on point.
With kickass thumbnails, the eyes of users searching for Call of Duty: Warzone videos will be attracted to your content. If your content is good, that will convert to an increase in views and subscribers.

How To Make an Impressive Warzone Thumbnail for Free
We have clarified how important a Warzone thumbnail that pop is. But how to make one? That’s what this article is for. Here, you will learn how to create impressive Warzone thumbnails for free. That’s right - FOR FREE.
Without further ado, here are the steps that you should follow:
Step1 Download & Install an Excellent Warzone Thumbnail Maker
Of course, the first step is to find good software for making thumbnails. But there is no thumbnail maker specifically made for Warzone. So, the best choice is a thumbnail maker that is also a video editor - like Wondershare Filmora .
Free Download For Win 7 or later(64-bit)
Free Download For macOS 10.14 or later
Admittedly, Wondershare Filmora has premium plans. But you can download it for free. Additionally, you can use the free trial version to create video thumbnails without upgrading to the paid version. So essentially, Wondershare Filmora is a free Warzone thumbnail maker. The best part is that you can use some of Filmora’s other features to make the thumbnail as cool as possible.
Step2 Take a Snapshot of Your Call of Duty Warzone Game
Using in-game screenshots is recommended. That way, the image is personalized and can’t be found anywhere else. Unfortunately, COD: Warzone does not have an in-game functionality for screenshots. So, you have to get the image using other means. You can use the following keyboard shortcuts to grab a screenshot:
- Using Windows’ Game Bar - Windows key + ALT + PrintScreen
- NVIDIA’s Shadow Play - ALT + Z
- Windows Screenshot - Windows + PrintScreen
Step3 Create a Project, Set Project Ratio & Import the Snapshot
- Download and launch Wondershare Filmora.
- Click “New Project.”

- Click “File” button. In the drop-down menu, select “Project Settings.”

- In the pop-up window, set the resolution to 1280*720, which is the recommended resolution of YouTube Thumbnail.
- Drag and drop the screenshot you took into the Filmora window. Alternatively, click the “Click here to import media” link to locate and import it.

Step4 Drag the Media to the Timeline, Add Effects, Stickers & Texts
- Drag the image from the Project Media section into the timeline.

- Click “Effects.” Select an effect to use and drag it into the timeline.
- Click “Stickers.” Select stickers to use and drag them into the timeline.

- Add Text overlays to the video. To do so, click “Titles.” Select the text style and drag it into the timeline. Double-click it to edit the written text.
Step5 Find a Desired Frame and Take a Screenshot
- Play the video preview.
- Pause the video when you see the best frame to use as the thumbnail.
- Click the “Camera” icon below the video preview to take a snapshot.

- Select a file format and a target destination folder for the image.

- Click “Ok.”
Step6 Use the Screenshot as Your New COD Warzone Thumbnail
- The screenshot will appear in the Project Media section in Filmora. Right-click the image.
- Click “Reveal in Explorer.” It will open the folder where the screenshot is saved.

- Use the screenshot as your video thumbnail.

![]()
Note: The free version of Wondershare Filmora will add a watermark to saved videos. But it will not add a watermark to a snapshot. Indeed, it is a free Warzone thumbnail creator.
If you want to know more tricks about creating a nice Warzone thumbnail, please check the video below:
Tips for a Superb Call of Duty: Warzone Thumbnail
A thumbnail is useless if it does not look good on YouTube. But how can you ensure it looks good on YouTube? That’s a good question. Actually, the YouTube help center gave pointers on how your video thumbnail should be. These are the five important things you should know about:
- The Warzone thumbnail size should be at least 640 pixels wide.
- YouTube thumbnail dimensions use an aspect ratio of 16:9.
- Your Warzone thumbnail should not exceed 2MB.
- The best size for YouTube video thumbnails is 1280 pixels by 720 pixels.
- The supported image formats are JPG, PNG, and GIF.
The next question is how the actual thumbnail image should look. There’s only one rule for that. Make it as cool as possible. Call of Duty: Warzone is a first-person shooter/battle royale game. People who are into these games are drawn to this aesthetic.
5 Best Call of Duty: Warzone Thumbnails on YouTube That May Inspire You
Research is always key to accomplishing something. If you want to create kickass COD: Warzone video thumbnails, you should look at the ones that worked. Visit YouTube and find videos that have great success. That will help you get some ideas for your thumbnails.
Let us help you with that. Here are 5 Call of Duty: Warzone thumbnails you should check out.
1. Call of Duty Warzone: THE BATTLE OF VERDANSK GAMEPLAY! (No Commentary)

This video from the channel NoAnnoyingCommentary has 3.3 million views. It shows the player pointing their gun upwards. Flying in the sky are many fighter planes (obviously edited.) Then, a sepia filter is applied to make it look like a shot from past real-world wars. It is cool and sure to attract the attention of the COD: Warzone demographics.
2. TOP 300 FUNNIEST FAILS IN WARZONE

This video is made by Red Arcade . It has attracted more than 12 million views. Admittedly, the title and the video concept are already enough to attract many viewers. But we can’t say that the thumbnail did not help. It’s actually really good.
The thumbnail shows a screenshot from Warzone. A player’s character is in the middle, with his back facing the camera. The words “AFK. Don’t shoot!” are written on the wall he is facing. The character is viewed through a sniper scope. It’s more “funny” than cool. But for what the video is about, it works fantastic.
3. Clean House [PS5 UHD 4K] Next-Gen Ultra Realistic Graphics PlayStation 5 Call of Duty Gameplay

This video from HEDGEHOG ヅ has a whopping 12 million views. Again, the title likely is the main reason why it got that many views. But for sure, people did not read that long title at first. They were drawn to it by the thumbnail.
The thumbnail shows a clear-as-crystal screenshot of a team of 4 players on the battlefield. At the top left corner is the PS5 logo. Then, at the bottom left is an icon that says the video is in 4K UHD. If you’re also uploading 4K Warzone videos, you can try doing this. Users are attracted to videos that are eye-pleasing.
4. Call of Duty: Warzone Battle Royale | RTX 3080 10GB ( 4K Maximum Settings Ray Tracing OFF )

The thumbnail for this video (made by GTX 1050 Ti ), with 5.2 million views, is just an in-game screenshot. At the top-right is a large logo of GEFORCE RTX 3080 and at the bottom left is an Intel logo. Like the previous one, it attracts viewers by stating the visual appeal of the video.
5. NEW RECORD! 64 KILL GAME in CoD WARZONE! (Best Classes / Loadouts)

Like most Warzone thumbnails, this thumbnail from a Vikkstar123 video features a gun. At the top right is the victory banner, and at the bottom is the logo for kills with the number 64 next to it. The top right shows the logo of COD Warzone.
Players are attracted to amazing gameplay. Unsurprisingly, the player who got 64 kills got 3.1 million views in his video. The gist is that if you have achieved something amazing, try to incorporate it into the thumbnail.
Conclusion
Using in-game screenshots is recommended for making amazing COD Warzone thumbnails. But you should not use raw photos. You must edit them to ensure they have visual appeal. Of course, that means you need a good thumbnail maker.
Your best option is Wondershare Filmora. Why? Because it is a thumbnail maker and video editing software in one. Also, it allows you to make thumbnails for free! What could be better than that?
Free Download For macOS 10.14 or later
Admittedly, Wondershare Filmora has premium plans. But you can download it for free. Additionally, you can use the free trial version to create video thumbnails without upgrading to the paid version. So essentially, Wondershare Filmora is a free Warzone thumbnail maker. The best part is that you can use some of Filmora’s other features to make the thumbnail as cool as possible.
Step2 Take a Snapshot of Your Call of Duty Warzone Game
Using in-game screenshots is recommended. That way, the image is personalized and can’t be found anywhere else. Unfortunately, COD: Warzone does not have an in-game functionality for screenshots. So, you have to get the image using other means. You can use the following keyboard shortcuts to grab a screenshot:
- Using Windows’ Game Bar - Windows key + ALT + PrintScreen
- NVIDIA’s Shadow Play - ALT + Z
- Windows Screenshot - Windows + PrintScreen
Step3 Create a Project, Set Project Ratio & Import the Snapshot
- Download and launch Wondershare Filmora.
- Click “New Project.”
- Click “File” button. In the drop-down menu, select “Project Settings.”
- In the pop-up window, set the resolution to 1280*720, which is the recommended resolution of YouTube Thumbnail.
- Drag and drop the screenshot you took into the Filmora window. Alternatively, click the “Click here to import media” link to locate and import it.
Step4 Drag the Media to the Timeline, Add Effects, Stickers & Texts
- Drag the image from the Project Media section into the timeline.
- Click “Effects.” Select an effect to use and drag it into the timeline.
- Click “Stickers.” Select stickers to use and drag them into the timeline.
- Add Text overlays to the video. To do so, click “Titles.” Select the text style and drag it into the timeline. Double-click it to edit the written text.
Step5 Find a Desired Frame and Take a Screenshot
- Play the video preview.
- Pause the video when you see the best frame to use as the thumbnail.
- Click the “Camera” icon below the video preview to take a snapshot.
- Select a file format and a target destination folder for the image.
- Click “Ok.”
Step6 Use the Screenshot as Your New COD Warzone Thumbnail
- The screenshot will appear in the Project Media section in Filmora. Right-click the image.
- Click “Reveal in Explorer.” It will open the folder where the screenshot is saved.
- Use the screenshot as your video thumbnail.
![]()
Note: The free version of Wondershare Filmora will add a watermark to saved videos. But it will not add a watermark to a snapshot. Indeed, it is a free Warzone thumbnail creator.
If you want to know more tricks about creating a nice Warzone thumbnail, please check the video below:
Tips for a Superb Call of Duty: Warzone Thumbnail
A thumbnail is useless if it does not look good on YouTube. But how can you ensure it looks good on YouTube? That’s a good question. Actually, the YouTube help center gave pointers on how your video thumbnail should be. These are the five important things you should know about:
- The Warzone thumbnail size should be at least 640 pixels wide.
- YouTube thumbnail dimensions use an aspect ratio of 16:9.
- Your Warzone thumbnail should not exceed 2MB.
- The best size for YouTube video thumbnails is 1280 pixels by 720 pixels.
- The supported image formats are JPG, PNG, and GIF.
The next question is how the actual thumbnail image should look. There’s only one rule for that. Make it as cool as possible. Call of Duty: Warzone is a first-person shooter/battle royale game. People who are into these games are drawn to this aesthetic.
5 Best Call of Duty: Warzone Thumbnails on YouTube That May Inspire You
Research is always key to accomplishing something. If you want to create kickass COD: Warzone video thumbnails, you should look at the ones that worked. Visit YouTube and find videos that have great success. That will help you get some ideas for your thumbnails.
Let us help you with that. Here are 5 Call of Duty: Warzone thumbnails you should check out.
1. Call of Duty Warzone: THE BATTLE OF VERDANSK GAMEPLAY! (No Commentary)
This video from the channel NoAnnoyingCommentary has 3.3 million views. It shows the player pointing their gun upwards. Flying in the sky are many fighter planes (obviously edited.) Then, a sepia filter is applied to make it look like a shot from past real-world wars. It is cool and sure to attract the attention of the COD: Warzone demographics.
2. TOP 300 FUNNIEST FAILS IN WARZONE
This video is made by Red Arcade . It has attracted more than 12 million views. Admittedly, the title and the video concept are already enough to attract many viewers. But we can’t say that the thumbnail did not help. It’s actually really good.
The thumbnail shows a screenshot from Warzone. A player’s character is in the middle, with his back facing the camera. The words “AFK. Don’t shoot!” are written on the wall he is facing. The character is viewed through a sniper scope. It’s more “funny” than cool. But for what the video is about, it works fantastic.
3. Clean House [PS5 UHD 4K] Next-Gen Ultra Realistic Graphics PlayStation 5 Call of Duty Gameplay
This video from HEDGEHOG ヅ has a whopping 12 million views. Again, the title likely is the main reason why it got that many views. But for sure, people did not read that long title at first. They were drawn to it by the thumbnail.
The thumbnail shows a clear-as-crystal screenshot of a team of 4 players on the battlefield. At the top left corner is the PS5 logo. Then, at the bottom left is an icon that says the video is in 4K UHD. If you’re also uploading 4K Warzone videos, you can try doing this. Users are attracted to videos that are eye-pleasing.
4. Call of Duty: Warzone Battle Royale | RTX 3080 10GB ( 4K Maximum Settings Ray Tracing OFF )
The thumbnail for this video (made by GTX 1050 Ti ), with 5.2 million views, is just an in-game screenshot. At the top-right is a large logo of GEFORCE RTX 3080 and at the bottom left is an Intel logo. Like the previous one, it attracts viewers by stating the visual appeal of the video.
5. NEW RECORD! 64 KILL GAME in CoD WARZONE! (Best Classes / Loadouts)
Like most Warzone thumbnails, this thumbnail from a Vikkstar123 video features a gun. At the top right is the victory banner, and at the bottom is the logo for kills with the number 64 next to it. The top right shows the logo of COD Warzone.
Players are attracted to amazing gameplay. Unsurprisingly, the player who got 64 kills got 3.1 million views in his video. The gist is that if you have achieved something amazing, try to incorporate it into the thumbnail.
Conclusion
Using in-game screenshots is recommended for making amazing COD Warzone thumbnails. But you should not use raw photos. You must edit them to ensure they have visual appeal. Of course, that means you need a good thumbnail maker.
Your best option is Wondershare Filmora. Why? Because it is a thumbnail maker and video editing software in one. Also, it allows you to make thumbnails for free! What could be better than that?
Also read:
- Updated 2024 Approved How to Loop Videos on Android Phones
- 2024 Approved Are You in Search for a Step-by-Step Guide to How to Add Effects in TikTok? Here It Is. To Add some Flavor to Your TikTok Videos. Use These How to Add Effect to TikTok Recommendations
- In 2024, How to Create and Add an Adjustment Layer in Final Cut Pro
- New Adding Shake Effects to Your Video With Alight Motion for 2024
- How To Quickly Create A Screen Print Effect In Photoshop Detailed Gui
- Updated Want to Make Your Slideshows More Fun and Exciting? Follow the Given Discussion to Know How to Make a Slideshow Gif, Thereby Making Your Slideshow More Enjoyable than Ever for 2024
- Updated Online Calculate and Change Video Aspect Ratio
- New In 2024, Top 10 Movie Trailer Voice Generators Windows, Mac, Android, iPhone
- Adobe After Effects Review
- New Learning How to Create LUTs with LUTs Generator for 2024
- Updated How To Change Text In Premiere Pro for 2024
- In 2024, What Is MOV Format and How To Edit MOV Video Creatively?
- New Easy Steps to Add Miniature Effect to Videos for 2024
- 2024 Approved Detailed Steps to Resize Video in Davinci Resolve
- Updated In 2024, Easy Steps to Loop YouTube Videos on iPhone
- Updated In 2024, Learn How to Blur Faces in Your Video on iPhone
- Updated There Are Many Vlogging Cameras You Can Find in the Market. However, to Get a Good Start in Vlogging, some Sony Vlogging Cameras and Canon Vlog Cameras Are to Consider. This Article Introduces You to the Respective List
- New In 2024, Guide To Scaling and Setting Videos in Filmora | Tutorial
- New In 2024, Cropping Videos in VLC Step by Step
- Learn How to Trim/Crop Video in Microsoft PowerPoint for 2024
- Updated In 2024, Best Video Grabbers for Chrome
- New AI Features of Wondershare Filmora - Silence Detection in Videos for 2024
- New 2024 Approved This Blog Post Shows How to Create an Eye-Catching Paper Rip Effect for Your Videos Using Wondershare Filmora with These Easy-to-Follow Steps
- 2024 Approved 5 Methods to Make a Fake Facetime Call Video
- How to Perform Mask Tracking Discovering the Best Methods
- Updated In 2024, Are You Eager to Discover All About Dynamic Videos? You Are in the Right Place because This Article Provides Insight Into Dynamic Video Collages
- New 2024 Approved How to Create Emoji on Mac That Take Less Than 10 Mins
- Top Free LUTs To Use in Shotcut An Overview for 2024
- New In 2024, Efficient Ways to Manage Your Timeline
- New A Wedding Is One of the Exciting Parts that Will Happen in Your Life. Its Not that Easy to Plan a Wedding, Theres a Lot to Be Consider Like Wedding Dress, Food, Venue, Videographer Etc
- Updated In 2024, So, in This Short Tutorial, Well Learn How to Create a Vintage 1980-Style Video with a Retro Effect that Will Leave Your Audience Yearning for More
- Updated In 2024, How to Add Video Effects with Movavi Slideshow Maker
- New Are You Finding It Difficult to Freeze-Frame in After Effects? Note that Freeze-Frame Takes only a Few Seconds, and, in This Tutorial, We Will Guide You on How to Create and Add Frame Hold in After Effects for 2024
- A Perfect Guide To Remove or Disable Google Smart Lock On Oppo Reno 9A
- In 2024, Top 11 Free Apps to Check IMEI on Sony Xperia 10 V Phones
- In 2024, Is GSM Flasher ADB Legit? Full Review To Bypass Your Tecno Camon 20 Premier 5GFRP Lock
- Detailed guide of ispoofer for pogo installation On OnePlus Nord CE 3 5G | Dr.fone
- Reliable User Guide to Fix Vivo Y56 5G Running Slow and Freezing | Dr.fone
- How to Cast Lenovo ThinkPhone to Computer for iPhone and Android? | Dr.fone
- In 2024, Top 6 Apps/Services to Trace Any Vivo X90S Location By Mobile Number | Dr.fone
- How Can We Unlock Our Vivo Y78 5G Phone Screen?
- The Ultimate Guide How to Bypass Swipe Screen to Unlock on Vivo V27e Device
- Updated 2024 Approved Best 10 Video to GIF Converters Top Picks
- The way to recover deleted photos on Oppo Reno 10 5G without backup.
- In 2024, Top 9 Oppo Find X6 Pro Monitoring Apps for Parental Controls | Dr.fone
- Top 10 Fixes for Phone Keep Disconnecting from Wi-Fi On Tecno Spark Go (2023) | Dr.fone
- 4 Feasible Ways to Fake Location on Facebook For your Infinix Note 30 5G | Dr.fone
- How To Check if Your Huawei Nova Y91 Is Unlocked
- 3 Solutions to Hard Reset Xiaomi Redmi Note 12 Pro 5G Phone Using PC | Dr.fone
- In 2024, How to Use Pokémon Emerald Master Ball Cheat On Honor Magic Vs 2 | Dr.fone
- How to Mirror PC Screen to Vivo Y28 5G Phones? | Dr.fone
- Change Location on Yik Yak For your Infinix Note 30i to Enjoy More Fun | Dr.fone
- Can I recover permanently deleted photos from S17
- Title: New How to Export iMovie for 2024
- Author: Morgan
- Created at : 2024-04-24 01:05:59
- Updated at : 2024-04-25 01:05:59
- Link: https://ai-video-editing.techidaily.com/new-how-to-export-imovie-for-2024/
- License: This work is licensed under CC BY-NC-SA 4.0.
