
:max_bytes(150000):strip_icc():format(webp)/GettyImages-151812569-ff7311e1de18461da9f8698205953384.jpg)
New How to Make A Funny Vlog for TikTok, In 2024
How to Make A Funny Vlog for TikTok?
TikTok has been among the few social media platforms that have gained an exponential following in a truly short time. Regardless of this stunted digital environment, the platform made its statement of becoming part of the all-time greats.
TikTok became known as a short-video platform that influenced the making of funny vlogs. If you are interested in making a funny vlog, you are at the right place.
In this article
01 Ideas for Creating A Funny Vlog for TikTok
02 5 Popular Funny Vloggers on TikTok
Part 1: Ideas for Creating A Funny Vlog for TikTok
When creating a funny vlog across TikTok, there are numerous ideas that one can think of. However, since TikTok videos are of small lengths, achieving diversity is difficult yet possible. You’ll surely get your break if you understand the following ideas for creating a funny vlog.

React to Other Videos
While it may seem the most mainstream style of creating funny content across TikTok, it is also the most effective way of making people laugh while watching your video. This will also bring recurring viewers across your channel.
Display Failure Videos
It is always great to see people trying and doing something funny across the video. Failure videos are believed to be the other way of creating content for a funny vlog on your TikTok, which shall make people laugh hard.
Use Goofy and Peculiar Voices
Unrealistic and weird voices can make your short video seem funny. If you consider talking about something in a silly voice, it will make people burst out of laughter.
Trolling Family Members
One of the best ways to make something good out of TikTok is creating candid moments. This can always be done if you troll or prank your family members out of nowhere. Just keep reminding that you have to ensure no one gets injured due to it.
Impersonations
Making impersonated videos of major celebrities is another way of showing funny content to the viewers on TikTok. If you consider some funny examples for this, it will surely bring you effective results.
Make Puns and Funny Statements
Another great way to create a funny vlog for your TikTok is to be good at making puns. This is purely hilarious content and needs someone to be highly great in it.
Physical Challenges
This can be a bit risky, but it can become quite fun to make and show to the world if executed with care. However, this can be conducted individually or in a group of people, as you find it appropriate.
Use Effects of TikTok
TikTok makes sure to provide something funny in effects to its users. The use of effects for TikTok is an excellent technique to make funny vlogs; however, it can get funny if the elements used across it have a dubious meaning.
Run Everything in Reverse
One of the most straightforward techniques to make a funny vlog is to run everything in reverse order. The simplest thing of a video becomes the funniest to watch.
Part 2: 5 Popular Funny Vloggers on TikTok
This part will provide some popular examples of TikTokers who have made a considerate performance in providing funny content to people across the platform.
Khaby Lame
This is, without a doubt, the first-choice in TikTok accounts that would always come while relating to funny content. Khaby started his journey as a TikToker with a remarkably simple motive of pointing out the simplicity in different tasks, which were displayed to be difficult. Although it sounds pretty basic, the technique taken by Khaby has been so considerate it brought him millions of followers for creating funny content.

Sarah Cooper
Want to see a great impersonation of Donald Trump? It is undoubtedly great to see every time. With Sarah Cooper, it just becomes an entirely different story. Her impersonation has been so perfect that she has been referred to as one of the best funny vloggers on TikTok. Her likes across the platform may not be that great, but she has shown some stature in presenting funny content in a great way.

Dobre Twins
This twin duo is known across many social media platforms for its funny content. As the twins started using TikTok, they started creating good funny vlogs, which gained quite the traction for them. Their unique ideas to present different things have presented the following worth 23 million likes across TikTok, which is quite commendable. However, Lucas and Marcus are only known to operate this TikTok account.

Image alt: dobre twins funny tiktoker
Brittany Broski
Quite a few TikTokers actually make funny videos with impressive comedy. Brittany Broski is a celebrity in this genre, where she has taken great use of her comedy skills to present great vlogs with different and unique topics. Her take on comedy is entirely different, which makes her funny vlog unique and better than others.

Cole LeBrant
This TikToker makes a good collection of funny vlogs across his account with his family. The variety and variability in his videos make him a different version of fun compared to other TikTokers. He has built a great reach across the account, which makes him an impressive choice.

Part 3: How to Make a Funny Vlog?
Funny vlogs are a fabulous way to interact with people of different tastes. It can be something that cherishes the moods of the viewers, regardless of their current emotions. To make this happen, you need a good platform that helps you create a video for your viewers to watch. Wondershare Filmora fulfills the needs of a video editor by providing you with the perfect options while editing the video for TikTok.
For Win 7 or later (64-bit)
For macOS 10.12 or later
If you are looking forward to understanding how to create a funny vlog for your TikTok using Filmora, you need to follow a set of simple steps. These are shown as follows:
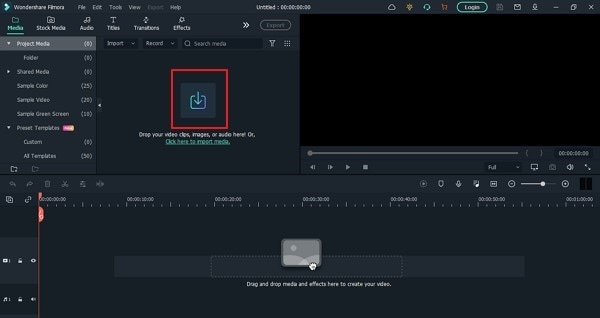
Step 1: Launch and Import Video
To start, you need to have Wondershare Filmora installed across your device. Launch the tool and click on “New Project” to start from scratch. Once the screen opens up, you need to click on the “Arrow Head” icon across the ‘Media’ Tab to import the audio you wish to amend for TikTok.
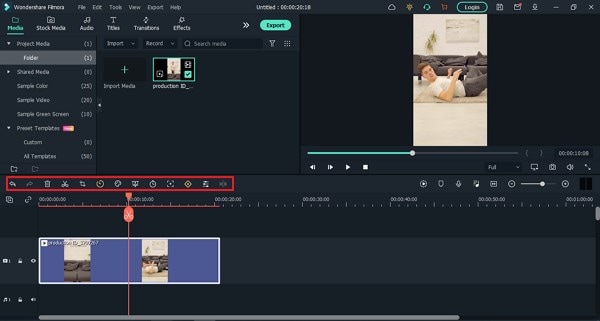
Step 2: Perform Basic Editing
Wondershare Filmora provides users with multiple options for editing their files. At first, drag the file onto the timeline. Following this, you can merge different videos or enhance the video by trimming it. Along with that, you can also consider splitting the image or changing its playback speed for different results.
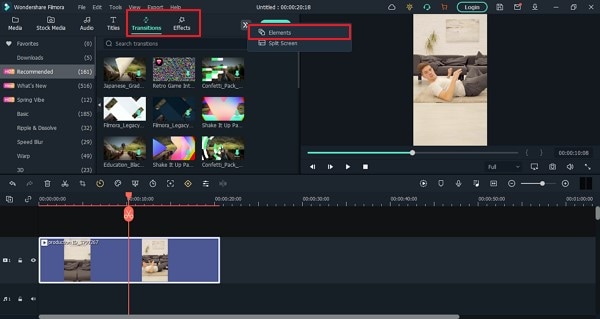
Step 3: Add Effects and Transitions
After you are done with some basic editing, you can add different effects from the “Effects” section. To make the video look exclusive, you can also include “Transitions” across it. Use the “Elements” tab to include stickers and emojis to enhance your TikTok video.
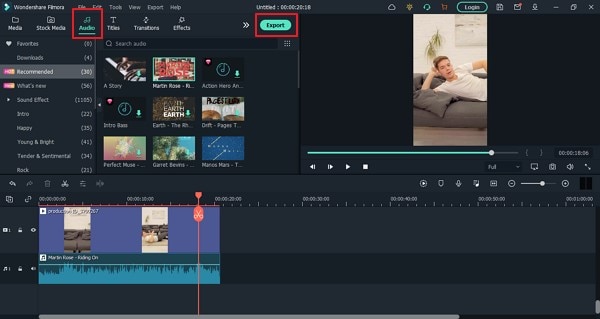
Step 4: Manage the Audio
For managing the audio of your video, you can make several changes across it. You can detach audio and change the audio with another soundtrack. Filmora also allows you to add audio from the “Audio” section, which contains royalty-free music to add. Once you are done, click on the “Export” button to set the settings of the video before exporting it back onto the device.
Closing Words
This article has presented some of the finest tips that can be utilized for creating funny vlogs on your TikTok. If you coherently use these tips, you can get significant results across your account in the name of the followers. Along with that, you can also use Filmora for making the best funny vlog with different editing tools.
Wondershare Filmora
Get started easily with Filmora’s powerful performance, intuitive interface, and countless effects!
Try It Free Try It Free Try It Free Learn More >

02 5 Popular Funny Vloggers on TikTok
Part 1: Ideas for Creating A Funny Vlog for TikTok
When creating a funny vlog across TikTok, there are numerous ideas that one can think of. However, since TikTok videos are of small lengths, achieving diversity is difficult yet possible. You’ll surely get your break if you understand the following ideas for creating a funny vlog.
React to Other Videos
While it may seem the most mainstream style of creating funny content across TikTok, it is also the most effective way of making people laugh while watching your video. This will also bring recurring viewers across your channel.
Display Failure Videos
It is always great to see people trying and doing something funny across the video. Failure videos are believed to be the other way of creating content for a funny vlog on your TikTok, which shall make people laugh hard.
Use Goofy and Peculiar Voices
Unrealistic and weird voices can make your short video seem funny. If you consider talking about something in a silly voice, it will make people burst out of laughter.
Trolling Family Members
One of the best ways to make something good out of TikTok is creating candid moments. This can always be done if you troll or prank your family members out of nowhere. Just keep reminding that you have to ensure no one gets injured due to it.
Impersonations
Making impersonated videos of major celebrities is another way of showing funny content to the viewers on TikTok. If you consider some funny examples for this, it will surely bring you effective results.
Make Puns and Funny Statements
Another great way to create a funny vlog for your TikTok is to be good at making puns. This is purely hilarious content and needs someone to be highly great in it.
Physical Challenges
This can be a bit risky, but it can become quite fun to make and show to the world if executed with care. However, this can be conducted individually or in a group of people, as you find it appropriate.
Use Effects of TikTok
TikTok makes sure to provide something funny in effects to its users. The use of effects for TikTok is an excellent technique to make funny vlogs; however, it can get funny if the elements used across it have a dubious meaning.
Run Everything in Reverse
One of the most straightforward techniques to make a funny vlog is to run everything in reverse order. The simplest thing of a video becomes the funniest to watch.
Part 2: 5 Popular Funny Vloggers on TikTok
This part will provide some popular examples of TikTokers who have made a considerate performance in providing funny content to people across the platform.
Khaby Lame
This is, without a doubt, the first-choice in TikTok accounts that would always come while relating to funny content. Khaby started his journey as a TikToker with a remarkably simple motive of pointing out the simplicity in different tasks, which were displayed to be difficult. Although it sounds pretty basic, the technique taken by Khaby has been so considerate it brought him millions of followers for creating funny content.
Sarah Cooper
Want to see a great impersonation of Donald Trump? It is undoubtedly great to see every time. With Sarah Cooper, it just becomes an entirely different story. Her impersonation has been so perfect that she has been referred to as one of the best funny vloggers on TikTok. Her likes across the platform may not be that great, but she has shown some stature in presenting funny content in a great way.
Dobre Twins
This twin duo is known across many social media platforms for its funny content. As the twins started using TikTok, they started creating good funny vlogs, which gained quite the traction for them. Their unique ideas to present different things have presented the following worth 23 million likes across TikTok, which is quite commendable. However, Lucas and Marcus are only known to operate this TikTok account.
Image alt: dobre twins funny tiktoker
Brittany Broski
Quite a few TikTokers actually make funny videos with impressive comedy. Brittany Broski is a celebrity in this genre, where she has taken great use of her comedy skills to present great vlogs with different and unique topics. Her take on comedy is entirely different, which makes her funny vlog unique and better than others.
Cole LeBrant
This TikToker makes a good collection of funny vlogs across his account with his family. The variety and variability in his videos make him a different version of fun compared to other TikTokers. He has built a great reach across the account, which makes him an impressive choice.
Part 3: How to Make a Funny Vlog?
Funny vlogs are a fabulous way to interact with people of different tastes. It can be something that cherishes the moods of the viewers, regardless of their current emotions. To make this happen, you need a good platform that helps you create a video for your viewers to watch. Wondershare Filmora fulfills the needs of a video editor by providing you with the perfect options while editing the video for TikTok.
For Win 7 or later (64-bit)
For macOS 10.12 or later
If you are looking forward to understanding how to create a funny vlog for your TikTok using Filmora, you need to follow a set of simple steps. These are shown as follows:
Step 1: Launch and Import Video
To start, you need to have Wondershare Filmora installed across your device. Launch the tool and click on “New Project” to start from scratch. Once the screen opens up, you need to click on the “Arrow Head” icon across the ‘Media’ Tab to import the audio you wish to amend for TikTok.
Step 2: Perform Basic Editing
Wondershare Filmora provides users with multiple options for editing their files. At first, drag the file onto the timeline. Following this, you can merge different videos or enhance the video by trimming it. Along with that, you can also consider splitting the image or changing its playback speed for different results.
Step 3: Add Effects and Transitions
After you are done with some basic editing, you can add different effects from the “Effects” section. To make the video look exclusive, you can also include “Transitions” across it. Use the “Elements” tab to include stickers and emojis to enhance your TikTok video.
Step 4: Manage the Audio
For managing the audio of your video, you can make several changes across it. You can detach audio and change the audio with another soundtrack. Filmora also allows you to add audio from the “Audio” section, which contains royalty-free music to add. Once you are done, click on the “Export” button to set the settings of the video before exporting it back onto the device.
Closing Words
This article has presented some of the finest tips that can be utilized for creating funny vlogs on your TikTok. If you coherently use these tips, you can get significant results across your account in the name of the followers. Along with that, you can also use Filmora for making the best funny vlog with different editing tools.
Wondershare Filmora
Get started easily with Filmora’s powerful performance, intuitive interface, and countless effects!
Try It Free Try It Free Try It Free Learn More >
How to Create an Instant Slideshow on Mac
How to Create an Instant Slideshow on Mac
An easy yet powerful editor
Numerous effects to choose from
Detailed tutorials provided by the official channel
Instant slideshows on Mac devices are elusive graphic elements to creatively convey your information to the target audience. Stay here to have a complete knowhow of the design process!
In this article
01 [How to Create a Slideshow in Photos on Mac](#Part 1)
02 [How to Create a Slideshow in Video on Mac](#Part 2)
03 [How to Make a Slideshow on Mac in Preview](#Part 3)
04 [How to Create Slideshows Online](#Part 4)
05 [FAQs About Slideshows on Mac](#Part 5)
Part 1 How to Create a Slideshow in Photos on Mac
Creating a slideshow is an intuitive exploration of your graphic design skills, either just for a fun-filled entertainment, or catering to some specific information delivery on the professional front. When aiming to create Mac photos slideshow presentations, you can affordably pick any of your preferred devices and a suitable slideshow creator tool.
Speaking in the light of the fact, it is an equally amazing experience to design exemplary movies and presentations for a slide show MacBook, thanks to the high end technical abilities of such devices that work together to facilitate a remarkable and classic slideshow output. Having said that, let us proceed with discussing about the process of creating slideshow Mac presentations in the ‘Photos’ app of a Mac supported device in the following section:
User’s Guide to Create a Slideshow in the Photos App of a Mac Device
Step 1: Launch the App
Open the apps gallery of your Mac device and navigate to the ‘Photos’ app. Launch the same to be greeted by the latter’s welcome screen. Next, head to the sidebar in the left and hit the ‘Library’ option under the ‘Photos’ tab.

Step 2: Select Your Images
Within the ‘Library’ tab, hit the ‘Days’ or ‘All Photos’ subcategory to choose the desired images and videos that you wish to include in your presentation to create slideshow on Mac.

Step 3: View the Presentation
The ‘Photos’ app has a feature to automatically transform your selections in the previous step into an impressive slideshow. You can take a look at the created Mac photo slideshow by navigating to the ‘Menu Bar’ at the top of the app screen and hitting the ‘File’ tab, followed by selecting the ‘Play Slideshow’ option from the dropdown menu that appears next.

Step 4: Customize Your Slideshow
Completion of Step 3 causes a customization window to pop up, where you can select a vibrant theme and background music for your presentation. Once you have made your choices, you can visualize their appearance in the ‘Preview’ window at the right side of the screen.
About the selection of background music, you can either choose an audio track from the in-built music app of your iPad, or go with the inline complementary music of the presentation theme that you have already selected.

Step 5: It’s Time to Play!
When everything seems fine and you are satisfied with your efforts, head to the ‘File’ tab again and select the ‘Play Slideshow’ from the list of options that drops down to start your MacBook Photos slideshow. Once the slideshow begins to run, you can use the ‘Arrow Keys’ on your device to navigate forward and backward within the presentation, or press the ‘Spacebar’ to pause/resume the slideshow. If you want to stop playing the slideshow, press either of the ‘Escape’ or ‘X’ keys on your system’s keyboard.

Part 2 How to Create a Slideshow in Video on Mac
While image centered slideshows add life to still photos, video editions of the same are highly effective in integrating motion with visual excellence. Creating a slideshow on Mac is easy enough. However, if you wish to design elusive video presentations on the device, it is no difficult either. Having understood the credibility and design process of still presentations, let us move ahead with getting an insight into crafting classic masterpieces of video slideshows on a Mac device in what follows next:
User’s Guide to Create a Video Slideshow in a Mac Device
Step 1: Download and Install a Suitable Video Editor Application
Browsing the IT market, you can easily pick your preferred Mac compatible video editing software to address the concern of how to make a slideshow on Mac. As of now, let us try hands at understanding the creation process through the Movavi Slideshow Maker application.
Start with navigating to and downloading the Movavi Slideshow Maker software from the latter’s official website. Having done that, proceed to install the program in your Mac device by following the on screen instructions to run the installation files.
Step 2: Select a Working Mode
After a successful installation of the program, proceed to launch it in your Mac device and wait for the app’s welcome screen to appear. Choosing the Movavi Slideshow Maker program for creating Mac slideshow presentations, you are allowed to work in 2 different creation modes.
If you wish to explicitly convert still images into stunning slideshows, select the ‘Slideshow Wizard’ mode. On the contrary, if you have a task of designing a high end, professional presentation with a series of elements, prefer choosing the ‘Create a Movie in Manual Mode’ option.
Having talked enough about how to create slideshow presentations with images on a Mac device in the previous section, let us now dive into making a classic video presentation on the same, in what follows next. As already stated; select ‘Create a Movie in Manual Mode’ from the software’s main interface to begin with the creation process.

Step 3: Import Media Files
Browse through the local media gallery on your Mac device to select the required image and video files that you wish to create the slideshow presentation from. To do this, navigate to the ‘Elements Panel’ at the left and hit the ‘Import’ tab, followed by clicking on the ‘Add Files’ option in the software’s editor timeline and navigate through your locally saved media files.
When you have selected everything, your choices will automatically appear in the app’s editing workspace. You can alternatively, prefer dragging and dropping the associated files directly to the software timeline.

Step 4: Include Transitions
Adding a suitable transition effect gives the perfect flow to your presentation, while eliminating distortions in between successive slides. To supplement your slideshow with the same, navigate to the ‘Elements Panel’ at the left of the editor timeline and hit the ‘Transitions’ tab. You can choose any preferred transition style from the variety of available options in line with the theme of your presentation.
When you have made your choice, drag the same in between the desired pair of consecutive slides within the editor workspace. If you require supplementing all the presentation slides with a particular transition effect, click on the icon beside the ‘Transitions’ tab to automatically add a selected transition effect to all the slides together.

Step 5: Add an Upbeat Background Music
To add a preferred background audio, head to the ‘Import’ tab in the left side ‘Elements Panel’ and click on the same to see the ‘Add Files’ option. Here, you can traverse through your device’s media gallery and select a desired soundtrack. Click on the track’s thumbnail to automatically include it within the ‘Audio Track’ of the software timeline.

Step 6: Include Titles and Captions
To add text customizations within your presentations, head to the ‘Elements Panel’ at the left and hit the ‘Titles’ tab to open the program’s preset title options. You can select any suitable annotation for your slideshow, followed by dragging and dropping the same to the editor workspace to include it in the presentation.

You can customize the added title by double clicking on the same, either in the ‘Preview’ window above the editor timeline, or within the timeline itself. Next, double click within the text box in the ‘Preview’ window to type the desired text for including it into the slideshow.
To adjust text parameters like, size, font, color of the added title, double click on the same within the program’s timeline to open the title customization interface in the ‘Preview’ window, where you get the liberty to make desired modifications in the preset parameter values. When you have made the required changes, hit ‘Apply’ to confirm them.

Step 7: Export Your Slideshow
When you are satisfied with your efforts till here, proceed to save the presentation by navigating to and hitting the ‘Export’ tab at the right side of the editor workspace. This will direct you to the slideshow export interface, where you can choose from a variety of file saving options according to your specific needs.

Click on ‘Save Video File’ to add the presentation to your device’s local media gallery, or hit the ‘Save for Devices’ option to preserve your creation for an external device export. For a direct export of the slideshow to your ‘YouTube’ channel, click on ‘Upload to YouTube’, or choose to save the presentation in any of the MP4, OGV and WebM media file formats for an online sharing purpose. Once you are done with making all the selections and adjustments, head to and tap the ‘Start’ button.

Part 3 How to Make a Slideshow on Mac in Preview
When the question is how to create a slideshow on Mac devices, the answer can have a diverse range of aspects. You can work with the ‘Photos’ app, create a video slideshow, and much more. Exploring the domain, let us proceed with learning to create a Mac slideshow in the Preview feature of the device in the following section:
User’s Guide to Create a Slideshow in the Preview App of a Mac Device
Step 1: Launch the Application
In the launchpad of your Mac device, head to and tap the ‘Preview’ app icon frame to open the same.
Step 2: Choose Your Photos
Browse through the local media gallery of your device and select the desired images that you wish to include within the presentation. Click the ‘Open’ button, once you have made your choices.
Step 3: Play the Presentation
Navigate to the ‘Functions Toolbar’ at the top of the app’s main interface and hit the ‘View’ tab, followed by clicking on the ‘Slideshow’ option from the dropdown list that appears next.
Step 4: That’s It!
You can now watch and control the automatically created slideshow through the respective buttons that appear on the screen.

Part 4 How to Create Slideshows Online
As is evident by now that MacBook slideshow presentations have a diversity of creation processes and platforms, you can conveniently pick the one that suits your specific design concerns and portability requirements. After discussing about the ways to make Mac compatible slideshow presentations on external software platforms, as well as on the device itself, let us now have an insight into the process of creating slideshows on online utilities in the following section:
User’s Guide to Create Online Slideshow Presentations
Step 1: Launch a Preferred Online Tool
In any of your favorite web browsers, navigate to and launch any desired online slideshow creator tool from its official website. As of now, let us proceed with using the Kapwing video slideshow maker.
Step 2: Upload Media Files
Browse through the media gallery of your device to select and upload the desired set of images, GIFs and videos to the Kapwing video slideshow maker online tool. You can also ‘Drag and Drop’ the media directly to the tool’s editor workspace.

In addition to choosing media files from your device, you can directly import the same from online sources, like, YouTube, Twitter, etc., by copying the media link and pasting it within the tool’s media URL box. The Kapwing slideshow maker allows you to work with a series of media file formats, such as, MOV, JPG, GIF, MP4, PNG, among others.
Step 3: Sort and Edit Your Presentation
Once all the media files are imported to the workspace, you can use the ‘Slideshow Preview’ to sort the Images and videos within the presentation in a desired sequence of appearance. As far as editing the slideshow is concerned, you can set the orientation of the slides to landscape, square or a 9:16 aspect ratio.
There are options to crop the images and videos to include specific sections, while simultaneously adjusting their screen time. You can further, complement the presentation with a cohesive soundtrack in the background and include different graphic elements, like, stickers, titles and text annotations to craft the perfect slideshow.

Step 4: Time to Share!
When you are happy with your work, proceed to the top right corner of the editor workspace and click on the ‘Export’ tab. The Kapwing video maker will now transform your media into an MP4 slideshow presentation, which you are free to either save locally in your device, or share with your social media peers.
Part 5 FAQs About Slideshows on Mac
● How to delete a slideshow?
To delete a saved slideshow for MacBook, navigate to the latter’s destination folder in your device and browse for the particular presentation you wish to remove. Once found, right click on the same, followed by selecting the ‘Delete’ option from the dropdown menu that appears next. A ‘Delete Slideshow’ conformation box pops up, where you need to click on the ‘Yes’ button to move the presentation to your device’s ‘Trash Can’.
● How to include animations within a slideshow presentation?
If you are working on the concern of how to create a slideshow on Mac in the Photo apps of a Mac device, there is no provision for including animations within the slideshow. If at all you choose to add live images and animation files, they will appear as still images when you run the presentation.
● How to export a slideshow in the video format?
For exporting a created slideshow in the video format, all you need to do is, open the slideshow and navigate to the ‘Export’ button at the top right corner. As you hit the tab, the slideshow export interface pops up, where you can select the desired video format and destination of your slideshow. When you have made your choice, click ‘Save’ at the bottom right corner.
● How to create slideshows for Facebook?
To create a slideshow on Facebook, launch the app to login to your Facebook account in your device and head to the ‘Status Update’ tab. From the list of options that follows next, choose ‘Photo/Video’, succeeded by ‘Create a Slideshow’. You can now add the desired media files and adjust the different slideshow parameters to create a presentation.
● How to upload slideshow presentations on Instagram?
To create and upload a slideshow on Instagram, launch the app in your device and click on the ‘+’ icon in the latter’s welcome screen. You now need to hit the ‘Select Multiple’ button and choose the desired images and videos up to a maximum of 10 files from your device to add to the presentation. You can sort the order and add filter customizations before posting your creation. When you are done, click ‘Upload’ and follow the upcoming instructions.
Creating Slideshow Presentations on a Mac Device With Wondershare Filmora Video Editor
For Win 7 or later (64-bit)
For macOS 10.12 or later
The credibility of the Filmora video editor package does not need an introduction in the graphic design world. When the talk is about how to do a slideshow on Mac, the franchise presents its exclusive, Mac compatible slideshow creator program for designing professional quality slideshow movies. The software is handy enough to be easily worked upon by amateurs, casual creators and experienced professionals.
When it comes to the editing flexibility, the program’s inbuilt library is there to deliver a hoard of upgraded and high tech audio-visual and design effects, filters, elements at your disposal. Whether create a presentation from scratch or customize a premade slideshow template, Filmora lets you do everything to generate a slideshow output that is no less than a visual masterpiece. Talking of the output quality, you can safely leave everything to this high resolution program.
● Ending Thoughts →
● Mac devices have a diversity of utilities and in-built apps to automatically create beautiful and stunning slideshow presentations within just a few clicks.
● When addressing the concern of how to make slides on MacBook, you can choose from working with a range of media files to design and customize a classic piece o0f graphic artwork.
● If the talk is about choosing the most reliable Mac slideshow creator alternative, you can pick the Wondershare Filmora slideshow maker application without a second thought.
Instant slideshows on Mac devices are elusive graphic elements to creatively convey your information to the target audience. Stay here to have a complete knowhow of the design process!
In this article
01 [How to Create a Slideshow in Photos on Mac](#Part 1)
02 [How to Create a Slideshow in Video on Mac](#Part 2)
03 [How to Make a Slideshow on Mac in Preview](#Part 3)
04 [How to Create Slideshows Online](#Part 4)
05 [FAQs About Slideshows on Mac](#Part 5)
Part 1 How to Create a Slideshow in Photos on Mac
Creating a slideshow is an intuitive exploration of your graphic design skills, either just for a fun-filled entertainment, or catering to some specific information delivery on the professional front. When aiming to create Mac photos slideshow presentations, you can affordably pick any of your preferred devices and a suitable slideshow creator tool.
Speaking in the light of the fact, it is an equally amazing experience to design exemplary movies and presentations for a slide show MacBook, thanks to the high end technical abilities of such devices that work together to facilitate a remarkable and classic slideshow output. Having said that, let us proceed with discussing about the process of creating slideshow Mac presentations in the ‘Photos’ app of a Mac supported device in the following section:
User’s Guide to Create a Slideshow in the Photos App of a Mac Device
Step 1: Launch the App
Open the apps gallery of your Mac device and navigate to the ‘Photos’ app. Launch the same to be greeted by the latter’s welcome screen. Next, head to the sidebar in the left and hit the ‘Library’ option under the ‘Photos’ tab.
Step 2: Select Your Images
Within the ‘Library’ tab, hit the ‘Days’ or ‘All Photos’ subcategory to choose the desired images and videos that you wish to include in your presentation to create slideshow on Mac.
Step 3: View the Presentation
The ‘Photos’ app has a feature to automatically transform your selections in the previous step into an impressive slideshow. You can take a look at the created Mac photo slideshow by navigating to the ‘Menu Bar’ at the top of the app screen and hitting the ‘File’ tab, followed by selecting the ‘Play Slideshow’ option from the dropdown menu that appears next.
Step 4: Customize Your Slideshow
Completion of Step 3 causes a customization window to pop up, where you can select a vibrant theme and background music for your presentation. Once you have made your choices, you can visualize their appearance in the ‘Preview’ window at the right side of the screen.
About the selection of background music, you can either choose an audio track from the in-built music app of your iPad, or go with the inline complementary music of the presentation theme that you have already selected.
Step 5: It’s Time to Play!
When everything seems fine and you are satisfied with your efforts, head to the ‘File’ tab again and select the ‘Play Slideshow’ from the list of options that drops down to start your MacBook Photos slideshow. Once the slideshow begins to run, you can use the ‘Arrow Keys’ on your device to navigate forward and backward within the presentation, or press the ‘Spacebar’ to pause/resume the slideshow. If you want to stop playing the slideshow, press either of the ‘Escape’ or ‘X’ keys on your system’s keyboard.
Part 2 How to Create a Slideshow in Video on Mac
While image centered slideshows add life to still photos, video editions of the same are highly effective in integrating motion with visual excellence. Creating a slideshow on Mac is easy enough. However, if you wish to design elusive video presentations on the device, it is no difficult either. Having understood the credibility and design process of still presentations, let us move ahead with getting an insight into crafting classic masterpieces of video slideshows on a Mac device in what follows next:
User’s Guide to Create a Video Slideshow in a Mac Device
Step 1: Download and Install a Suitable Video Editor Application
Browsing the IT market, you can easily pick your preferred Mac compatible video editing software to address the concern of how to make a slideshow on Mac. As of now, let us try hands at understanding the creation process through the Movavi Slideshow Maker application.
Start with navigating to and downloading the Movavi Slideshow Maker software from the latter’s official website. Having done that, proceed to install the program in your Mac device by following the on screen instructions to run the installation files.
Step 2: Select a Working Mode
After a successful installation of the program, proceed to launch it in your Mac device and wait for the app’s welcome screen to appear. Choosing the Movavi Slideshow Maker program for creating Mac slideshow presentations, you are allowed to work in 2 different creation modes.
If you wish to explicitly convert still images into stunning slideshows, select the ‘Slideshow Wizard’ mode. On the contrary, if you have a task of designing a high end, professional presentation with a series of elements, prefer choosing the ‘Create a Movie in Manual Mode’ option.
Having talked enough about how to create slideshow presentations with images on a Mac device in the previous section, let us now dive into making a classic video presentation on the same, in what follows next. As already stated; select ‘Create a Movie in Manual Mode’ from the software’s main interface to begin with the creation process.
Step 3: Import Media Files
Browse through the local media gallery on your Mac device to select the required image and video files that you wish to create the slideshow presentation from. To do this, navigate to the ‘Elements Panel’ at the left and hit the ‘Import’ tab, followed by clicking on the ‘Add Files’ option in the software’s editor timeline and navigate through your locally saved media files.
When you have selected everything, your choices will automatically appear in the app’s editing workspace. You can alternatively, prefer dragging and dropping the associated files directly to the software timeline.
Step 4: Include Transitions
Adding a suitable transition effect gives the perfect flow to your presentation, while eliminating distortions in between successive slides. To supplement your slideshow with the same, navigate to the ‘Elements Panel’ at the left of the editor timeline and hit the ‘Transitions’ tab. You can choose any preferred transition style from the variety of available options in line with the theme of your presentation.
When you have made your choice, drag the same in between the desired pair of consecutive slides within the editor workspace. If you require supplementing all the presentation slides with a particular transition effect, click on the icon beside the ‘Transitions’ tab to automatically add a selected transition effect to all the slides together.
Step 5: Add an Upbeat Background Music
To add a preferred background audio, head to the ‘Import’ tab in the left side ‘Elements Panel’ and click on the same to see the ‘Add Files’ option. Here, you can traverse through your device’s media gallery and select a desired soundtrack. Click on the track’s thumbnail to automatically include it within the ‘Audio Track’ of the software timeline.
Step 6: Include Titles and Captions
To add text customizations within your presentations, head to the ‘Elements Panel’ at the left and hit the ‘Titles’ tab to open the program’s preset title options. You can select any suitable annotation for your slideshow, followed by dragging and dropping the same to the editor workspace to include it in the presentation.
You can customize the added title by double clicking on the same, either in the ‘Preview’ window above the editor timeline, or within the timeline itself. Next, double click within the text box in the ‘Preview’ window to type the desired text for including it into the slideshow.
To adjust text parameters like, size, font, color of the added title, double click on the same within the program’s timeline to open the title customization interface in the ‘Preview’ window, where you get the liberty to make desired modifications in the preset parameter values. When you have made the required changes, hit ‘Apply’ to confirm them.
Step 7: Export Your Slideshow
When you are satisfied with your efforts till here, proceed to save the presentation by navigating to and hitting the ‘Export’ tab at the right side of the editor workspace. This will direct you to the slideshow export interface, where you can choose from a variety of file saving options according to your specific needs.
Click on ‘Save Video File’ to add the presentation to your device’s local media gallery, or hit the ‘Save for Devices’ option to preserve your creation for an external device export. For a direct export of the slideshow to your ‘YouTube’ channel, click on ‘Upload to YouTube’, or choose to save the presentation in any of the MP4, OGV and WebM media file formats for an online sharing purpose. Once you are done with making all the selections and adjustments, head to and tap the ‘Start’ button.
Part 3 How to Make a Slideshow on Mac in Preview
When the question is how to create a slideshow on Mac devices, the answer can have a diverse range of aspects. You can work with the ‘Photos’ app, create a video slideshow, and much more. Exploring the domain, let us proceed with learning to create a Mac slideshow in the Preview feature of the device in the following section:
User’s Guide to Create a Slideshow in the Preview App of a Mac Device
Step 1: Launch the Application
In the launchpad of your Mac device, head to and tap the ‘Preview’ app icon frame to open the same.
Step 2: Choose Your Photos
Browse through the local media gallery of your device and select the desired images that you wish to include within the presentation. Click the ‘Open’ button, once you have made your choices.
Step 3: Play the Presentation
Navigate to the ‘Functions Toolbar’ at the top of the app’s main interface and hit the ‘View’ tab, followed by clicking on the ‘Slideshow’ option from the dropdown list that appears next.
Step 4: That’s It!
You can now watch and control the automatically created slideshow through the respective buttons that appear on the screen.
Part 4 How to Create Slideshows Online
As is evident by now that MacBook slideshow presentations have a diversity of creation processes and platforms, you can conveniently pick the one that suits your specific design concerns and portability requirements. After discussing about the ways to make Mac compatible slideshow presentations on external software platforms, as well as on the device itself, let us now have an insight into the process of creating slideshows on online utilities in the following section:
User’s Guide to Create Online Slideshow Presentations
Step 1: Launch a Preferred Online Tool
In any of your favorite web browsers, navigate to and launch any desired online slideshow creator tool from its official website. As of now, let us proceed with using the Kapwing video slideshow maker.
Step 2: Upload Media Files
Browse through the media gallery of your device to select and upload the desired set of images, GIFs and videos to the Kapwing video slideshow maker online tool. You can also ‘Drag and Drop’ the media directly to the tool’s editor workspace.
In addition to choosing media files from your device, you can directly import the same from online sources, like, YouTube, Twitter, etc., by copying the media link and pasting it within the tool’s media URL box. The Kapwing slideshow maker allows you to work with a series of media file formats, such as, MOV, JPG, GIF, MP4, PNG, among others.
Step 3: Sort and Edit Your Presentation
Once all the media files are imported to the workspace, you can use the ‘Slideshow Preview’ to sort the Images and videos within the presentation in a desired sequence of appearance. As far as editing the slideshow is concerned, you can set the orientation of the slides to landscape, square or a 9:16 aspect ratio.
There are options to crop the images and videos to include specific sections, while simultaneously adjusting their screen time. You can further, complement the presentation with a cohesive soundtrack in the background and include different graphic elements, like, stickers, titles and text annotations to craft the perfect slideshow.
Step 4: Time to Share!
When you are happy with your work, proceed to the top right corner of the editor workspace and click on the ‘Export’ tab. The Kapwing video maker will now transform your media into an MP4 slideshow presentation, which you are free to either save locally in your device, or share with your social media peers.
Part 5 FAQs About Slideshows on Mac
● How to delete a slideshow?
To delete a saved slideshow for MacBook, navigate to the latter’s destination folder in your device and browse for the particular presentation you wish to remove. Once found, right click on the same, followed by selecting the ‘Delete’ option from the dropdown menu that appears next. A ‘Delete Slideshow’ conformation box pops up, where you need to click on the ‘Yes’ button to move the presentation to your device’s ‘Trash Can’.
● How to include animations within a slideshow presentation?
If you are working on the concern of how to create a slideshow on Mac in the Photo apps of a Mac device, there is no provision for including animations within the slideshow. If at all you choose to add live images and animation files, they will appear as still images when you run the presentation.
● How to export a slideshow in the video format?
For exporting a created slideshow in the video format, all you need to do is, open the slideshow and navigate to the ‘Export’ button at the top right corner. As you hit the tab, the slideshow export interface pops up, where you can select the desired video format and destination of your slideshow. When you have made your choice, click ‘Save’ at the bottom right corner.
● How to create slideshows for Facebook?
To create a slideshow on Facebook, launch the app to login to your Facebook account in your device and head to the ‘Status Update’ tab. From the list of options that follows next, choose ‘Photo/Video’, succeeded by ‘Create a Slideshow’. You can now add the desired media files and adjust the different slideshow parameters to create a presentation.
● How to upload slideshow presentations on Instagram?
To create and upload a slideshow on Instagram, launch the app in your device and click on the ‘+’ icon in the latter’s welcome screen. You now need to hit the ‘Select Multiple’ button and choose the desired images and videos up to a maximum of 10 files from your device to add to the presentation. You can sort the order and add filter customizations before posting your creation. When you are done, click ‘Upload’ and follow the upcoming instructions.
Creating Slideshow Presentations on a Mac Device With Wondershare Filmora Video Editor
For Win 7 or later (64-bit)
For macOS 10.12 or later
The credibility of the Filmora video editor package does not need an introduction in the graphic design world. When the talk is about how to do a slideshow on Mac, the franchise presents its exclusive, Mac compatible slideshow creator program for designing professional quality slideshow movies. The software is handy enough to be easily worked upon by amateurs, casual creators and experienced professionals.
When it comes to the editing flexibility, the program’s inbuilt library is there to deliver a hoard of upgraded and high tech audio-visual and design effects, filters, elements at your disposal. Whether create a presentation from scratch or customize a premade slideshow template, Filmora lets you do everything to generate a slideshow output that is no less than a visual masterpiece. Talking of the output quality, you can safely leave everything to this high resolution program.
● Ending Thoughts →
● Mac devices have a diversity of utilities and in-built apps to automatically create beautiful and stunning slideshow presentations within just a few clicks.
● When addressing the concern of how to make slides on MacBook, you can choose from working with a range of media files to design and customize a classic piece o0f graphic artwork.
● If the talk is about choosing the most reliable Mac slideshow creator alternative, you can pick the Wondershare Filmora slideshow maker application without a second thought.
A Full Review of Leeming LUT Pro
Create High-Quality Video - Wondershare Filmora
An easy and powerful YouTube video editor
Numerous video and audio effects to choose from
Detailed tutorials are provided by the official channel
Color grading can be a tedious process, especially if you don’t have the technical skills required to achieve the desired result. That’s where a LUT can come in handy. So, what is a LUT?
LUT stands for “look up table.” Simply put, a LUT is a color preset that you can apply to your video footage to speed up the color grading process. While LUTs are commonly used to speed up the color grading process, they can also be used for other tasks, such as color transfer between software, monitor calibration, and more.
In this article, we’ll explore a particular LUT – Leeming LUT Pro™ and how you can use it in various video editors.

In this article
02 Supported Cameras of Leeming LUT Pro™
03 How to Import and Use Leeming LUT Pro™ in Different Video Editors
What is Leeming LUT Pro™?
Leeming LUT Pro™ is the world’s first unified, corrective Look Up Table (LUT) system for supported cameras. It’s designed to maximize dynamic range, fix skin tones, remove unwanted color casts and provide an accurate Rec709 starting point for further creative color grading.
The Pro LUTs are designed for perfect Rec709 colorimetry and have a linear luma curve, with an average measured dE(2000) of less than 1. As a result, they are visually indistinguishable from reality to the human eye.
Athena LUTs are a brighter version of Pro. They are designed around how the eye sees while retaining the same perfect colorimetry as Pro.
Supported Cameras of Leeming LUT Pro™
- Panasonic G Series: All G series cameras with Cine-D, V-LogL, and HLG for Rec709
- Panasonic S Series: All S series cameras with V-Log, V-Log BRAW, V-Log ProRes RAW, Cine-D, Cine-D2, and HLG for Rec709
- Fujifilm X Series: All X Series cameras with F-Log, Eterna Cinema, Pro Neg Std, and HLG for Rec709
- Canon R Series: All R series cameras with the Faithful Picture Style, C-Log, C-Log3, and CanonRAW
- Canon C Series: All C series cameras with BT.709, C-Log2, C-Log3, HDR-PQ for Rec709, and HLG for Rec709
- Blackmagic Pocket 4K/6K/6K Pro: All cameras with Gen 4 or Gen5 Film
- Blackmagic Pocket/Micro: Older cameras with Gen1 Film
- Nikon Z Series: All cameras with N-Log, Flat
- Sony A Series: All cameras with Picture profile menus, like the A7, with Cine2, S-Log2, S-Log3, HLG/3 for Rec709, and S-Cinetone
- JVC: GY-LS300 with J-Log1
- RunCam: 5 Orange Normal, Flat
- GoPro: 6,7 8, 9 & 10 ProTune, 4 & 5 ProTune, Session ProTune
- DJI: Mavic3, Phantom 4 Pro, Air 2S, Mavic 2 Pro, Mavic Air 2, Mini Series, Mavic Air, Mavic Pro, Pocket 2, Osmo Pocket, Osmo Action, X5 Series
How to Import and Use Leeming LUT Pro™ in Different Video Editors
Leeming LUT Pro™ is supported by various video editors, coloring software, and motion graphics programs, such as:
- Final Cut Pro X
- Avid Media Composer
- DaVinci Resolve
- Adobe Premiere Pro
- Adobe After Effects
- Magix Vegas
- Grass Valley Edius
- Lightworks
- Cyberlink PowerDirector
- LumaFusion
Next, we’ll explore how you can use Leeming LUT in some popular video editors.
1. How to Use Leeming LUT in FCPX
Follow these steps to use Leeming LUT in Final Cut Pro:
Step 1. Import Footage
Launch Final Cut Pro and import your footage. To import your footage, navigate to the top left corner and click on the import icon (the arrow pointing downwards).
In the window that opens, your camera or device name should appear in the left column under devices.
Click on your camera or device to display the media you want to import. Then select the media you want to import and click on the import selected button in the bottom right corner to import your footage.

Step 2. Highlight the Footage
Highlight all the footage by clicking and dragging your pointer over the footage or press Command + A to select all the footage.

Step 3. Open the Inspector
After highlighting all the footage, open the Inspector menu and click the little i icon. Then go down to the bottom of the Inspector and switch from Basic to General.
Step 4. Select the Camera LUT Option
Select Camera LUT from the options under General and click on the Add Custom Camera LUT option.
Step 5. Import Leeming LUTs into FCPX
Find the folder where your Leeming LUTs are stored and import them into Final Cut Pro by clicking on Open.
Step 6. Select the LUT
Once imported, go back to the Camera LUT option under General and click on it. Then scroll down the available options and select your Leeming LUT under the Custom Camera options.
Finally, click the profile you used to apply it to your footage.
2. How to Use Leeming LUT in PowerDirector
Follow these steps to use a LUT in PowerDirector:
Step 1. Launch PowerDirector
Open PowerDirector and select Full Mode.
Step 2. Import Media
Click the import button and then select Import Media Folder to import the video footage you want to apply the Leeming LUT to.
Step 3. Add Footage to Timeline
Drag and drop the imported video footage into your project’s timeline.
Step 4. Select the Fix/Enhance Option
Click on the video clip on the timeline and choose the Fix/Enhance option.
Step 5. Select the Color Presets & CLUTs Option
In the top left window that opens above the timeline, select the Color Presets & CLUTs option under Enhance.
Step 6. Apply the Leeming LUT to the Footage
Click on the import button in the panel to import the Leeming LUT file. Once imported, apply it to give your video a more vibrant look.
Part 5: Bonus! Use Filmora – Easy to Use Video Editor for Color LUTs
Besides Final Cut Pro and PowerDirector, Filmora is another excellent video editing software that you can use to apply LUTs to your video.
Designed for beginners and intermediate users, Filmora is an intuitive yet powerful video editing software.
For instance, you can apply 3D LUTs to your video using Filmora. Unlike 1D LUTs, which can only control one value setting, 3D LUTs can allow you to control various value settings. As a result, 3D LUTs can give you more control over specific color values in your video.
Here’s how you can apply LUTs using Filmora:
Step 1. Import the Footage
Launch Filmora and choose New Project. In the New Project window that opens, import the video you want to apply the LUT to by clicking on Import and selecting one of the drop-down options.
Step 2. Add the Video to the Timeline
Drag and drop the video into your project’s timeline.
Step 3. Open the Color Tab
Double click the video on the timeline to select it. Once it’s selected, go to the top left panel and click on the color tab.

Step 4. Apply a LUT to the Video
Under the color tab, navigate to the 3D LUT option and select one of the available options in the 3D LUT drop-down menu to apply a LUT.
Many LUTs are named after popular TV shows and series whose visual styles they mimic, such as Batman, House of Cards, Game of Thrones, Mission Impossible, Harry Potter, Star Wars, and more.
Once you apply a LUT, you can see your changes in the Preview Window. Besides using the preset LUTs, Filmora also allows you to use custom LUTs. Instead of choosing one of the presets, click on the Load New LUT option to import your custom LUT into Filmora.
Step 5. Make Fine Adjustments
Once you apply a LUT, Filmora can allow you to make further modifications to the video. Click on the Advanced button at the bottom of the color tab to view advanced color correction options.
In the new window that opens, you can adjust several things, such as color, light, HSL, and more. You can also choose from a variety of other available presets.

Step 6. Save the Changes
Once you’re satisfied with the changes you’ve applied, click on the OK button in the lower right corner to save the changes.
For Win 7 or later (64-bit)
For macOS 10.12 or later
Conclusion
LUTs are a fast way to color grade your footage after color correction. However, to ensure your LUTs work effectively, here are some important guidelines you should observe when using LUTs:
- Ensure your footage matches from shot to shot, especially if you’re applying LUTs to multiple clips.
- Ensure your exposure is correct before using LUTs. You can use a histogram to help you set the exposure.
- Ensure you apply LUTs to a video that’s been properly color corrected.
- Make small adjustments to things, such as brightness, saturation, contrast, exposure, color temperature, and tint for best results.
- Test out various LUTs before settling for one because shooting conditions can drastically affect how different LUTs look.
Ultimately, LUTs are an excellent way to make your video more cinematic. If you don’t have advanced video editing skills or prior experience working with LUTs, don’t worry. Filmora is a user-friendly video editing software that allows you to quickly apply LUTs with no video editing experience. Just download Filmora for free to get started.
Color grading can be a tedious process, especially if you don’t have the technical skills required to achieve the desired result. That’s where a LUT can come in handy. So, what is a LUT?
LUT stands for “look up table.” Simply put, a LUT is a color preset that you can apply to your video footage to speed up the color grading process. While LUTs are commonly used to speed up the color grading process, they can also be used for other tasks, such as color transfer between software, monitor calibration, and more.
In this article, we’ll explore a particular LUT – Leeming LUT Pro™ and how you can use it in various video editors.
In this article
02 Supported Cameras of Leeming LUT Pro™
03 How to Import and Use Leeming LUT Pro™ in Different Video Editors
What is Leeming LUT Pro™?
Leeming LUT Pro™ is the world’s first unified, corrective Look Up Table (LUT) system for supported cameras. It’s designed to maximize dynamic range, fix skin tones, remove unwanted color casts and provide an accurate Rec709 starting point for further creative color grading.
The Pro LUTs are designed for perfect Rec709 colorimetry and have a linear luma curve, with an average measured dE(2000) of less than 1. As a result, they are visually indistinguishable from reality to the human eye.
Athena LUTs are a brighter version of Pro. They are designed around how the eye sees while retaining the same perfect colorimetry as Pro.
Supported Cameras of Leeming LUT Pro™
- Panasonic G Series: All G series cameras with Cine-D, V-LogL, and HLG for Rec709
- Panasonic S Series: All S series cameras with V-Log, V-Log BRAW, V-Log ProRes RAW, Cine-D, Cine-D2, and HLG for Rec709
- Fujifilm X Series: All X Series cameras with F-Log, Eterna Cinema, Pro Neg Std, and HLG for Rec709
- Canon R Series: All R series cameras with the Faithful Picture Style, C-Log, C-Log3, and CanonRAW
- Canon C Series: All C series cameras with BT.709, C-Log2, C-Log3, HDR-PQ for Rec709, and HLG for Rec709
- Blackmagic Pocket 4K/6K/6K Pro: All cameras with Gen 4 or Gen5 Film
- Blackmagic Pocket/Micro: Older cameras with Gen1 Film
- Nikon Z Series: All cameras with N-Log, Flat
- Sony A Series: All cameras with Picture profile menus, like the A7, with Cine2, S-Log2, S-Log3, HLG/3 for Rec709, and S-Cinetone
- JVC: GY-LS300 with J-Log1
- RunCam: 5 Orange Normal, Flat
- GoPro: 6,7 8, 9 & 10 ProTune, 4 & 5 ProTune, Session ProTune
- DJI: Mavic3, Phantom 4 Pro, Air 2S, Mavic 2 Pro, Mavic Air 2, Mini Series, Mavic Air, Mavic Pro, Pocket 2, Osmo Pocket, Osmo Action, X5 Series
How to Import and Use Leeming LUT Pro™ in Different Video Editors
Leeming LUT Pro™ is supported by various video editors, coloring software, and motion graphics programs, such as:
- Final Cut Pro X
- Avid Media Composer
- DaVinci Resolve
- Adobe Premiere Pro
- Adobe After Effects
- Magix Vegas
- Grass Valley Edius
- Lightworks
- Cyberlink PowerDirector
- LumaFusion
Next, we’ll explore how you can use Leeming LUT in some popular video editors.
1. How to Use Leeming LUT in FCPX
Follow these steps to use Leeming LUT in Final Cut Pro:
Step 1. Import Footage
Launch Final Cut Pro and import your footage. To import your footage, navigate to the top left corner and click on the import icon (the arrow pointing downwards).
In the window that opens, your camera or device name should appear in the left column under devices.
Click on your camera or device to display the media you want to import. Then select the media you want to import and click on the import selected button in the bottom right corner to import your footage.
Step 2. Highlight the Footage
Highlight all the footage by clicking and dragging your pointer over the footage or press Command + A to select all the footage.
Step 3. Open the Inspector
After highlighting all the footage, open the Inspector menu and click the little i icon. Then go down to the bottom of the Inspector and switch from Basic to General.
Step 4. Select the Camera LUT Option
Select Camera LUT from the options under General and click on the Add Custom Camera LUT option.
Step 5. Import Leeming LUTs into FCPX
Find the folder where your Leeming LUTs are stored and import them into Final Cut Pro by clicking on Open.
Step 6. Select the LUT
Once imported, go back to the Camera LUT option under General and click on it. Then scroll down the available options and select your Leeming LUT under the Custom Camera options.
Finally, click the profile you used to apply it to your footage.
2. How to Use Leeming LUT in PowerDirector
Follow these steps to use a LUT in PowerDirector:
Step 1. Launch PowerDirector
Open PowerDirector and select Full Mode.
Step 2. Import Media
Click the import button and then select Import Media Folder to import the video footage you want to apply the Leeming LUT to.
Step 3. Add Footage to Timeline
Drag and drop the imported video footage into your project’s timeline.
Step 4. Select the Fix/Enhance Option
Click on the video clip on the timeline and choose the Fix/Enhance option.
Step 5. Select the Color Presets & CLUTs Option
In the top left window that opens above the timeline, select the Color Presets & CLUTs option under Enhance.
Step 6. Apply the Leeming LUT to the Footage
Click on the import button in the panel to import the Leeming LUT file. Once imported, apply it to give your video a more vibrant look.
Part 5: Bonus! Use Filmora – Easy to Use Video Editor for Color LUTs
Besides Final Cut Pro and PowerDirector, Filmora is another excellent video editing software that you can use to apply LUTs to your video.
Designed for beginners and intermediate users, Filmora is an intuitive yet powerful video editing software.
For instance, you can apply 3D LUTs to your video using Filmora. Unlike 1D LUTs, which can only control one value setting, 3D LUTs can allow you to control various value settings. As a result, 3D LUTs can give you more control over specific color values in your video.
Here’s how you can apply LUTs using Filmora:
Step 1. Import the Footage
Launch Filmora and choose New Project. In the New Project window that opens, import the video you want to apply the LUT to by clicking on Import and selecting one of the drop-down options.
Step 2. Add the Video to the Timeline
Drag and drop the video into your project’s timeline.
Step 3. Open the Color Tab
Double click the video on the timeline to select it. Once it’s selected, go to the top left panel and click on the color tab.
Step 4. Apply a LUT to the Video
Under the color tab, navigate to the 3D LUT option and select one of the available options in the 3D LUT drop-down menu to apply a LUT.
Many LUTs are named after popular TV shows and series whose visual styles they mimic, such as Batman, House of Cards, Game of Thrones, Mission Impossible, Harry Potter, Star Wars, and more.
Once you apply a LUT, you can see your changes in the Preview Window. Besides using the preset LUTs, Filmora also allows you to use custom LUTs. Instead of choosing one of the presets, click on the Load New LUT option to import your custom LUT into Filmora.
Step 5. Make Fine Adjustments
Once you apply a LUT, Filmora can allow you to make further modifications to the video. Click on the Advanced button at the bottom of the color tab to view advanced color correction options.
In the new window that opens, you can adjust several things, such as color, light, HSL, and more. You can also choose from a variety of other available presets.
Step 6. Save the Changes
Once you’re satisfied with the changes you’ve applied, click on the OK button in the lower right corner to save the changes.
For Win 7 or later (64-bit)
For macOS 10.12 or later
Conclusion
LUTs are a fast way to color grade your footage after color correction. However, to ensure your LUTs work effectively, here are some important guidelines you should observe when using LUTs:
- Ensure your footage matches from shot to shot, especially if you’re applying LUTs to multiple clips.
- Ensure your exposure is correct before using LUTs. You can use a histogram to help you set the exposure.
- Ensure you apply LUTs to a video that’s been properly color corrected.
- Make small adjustments to things, such as brightness, saturation, contrast, exposure, color temperature, and tint for best results.
- Test out various LUTs before settling for one because shooting conditions can drastically affect how different LUTs look.
Ultimately, LUTs are an excellent way to make your video more cinematic. If you don’t have advanced video editing skills or prior experience working with LUTs, don’t worry. Filmora is a user-friendly video editing software that allows you to quickly apply LUTs with no video editing experience. Just download Filmora for free to get started.
Do You Want to Learn How to Film a TikTok with Multiple Clips? Worry No More because You Can Do This by Following the Methods Instructed in This Article
A “day-in-life” short vlog is insanely increasing on TikTok. People love to create small clips throughout the day and then merge it together as a short vlog. With the right tools and methods, you can also create a perfect TikTok with many clips. Moreover, if you don’t know how to film a TikTok with multiple clips, this article is for you.
Here, we will discuss recording multiple clips on TikTok and editing it. If you do not like the editing with TikTok, consider using a third-party video editor. A tool named Wondershare Filmora can help you a lot with this process.

Part 1: How to Make a TikTok Video with Multiple Clips
With more than 1 billion downloads on Play Store and No.1 in the entertainment charts on App Store, TikTok is loved by many users. The community present worldwide has accepted the addition of TikTok to social media. Generally, TikTok is discovered as a source of small videos.
It is widely used for creating and posting entertaining and interactive videos. Making TikTok videos with multiple clips is not as complicated as it sounds. You don’t have to master any videography skills to complete this task.
Moreover, you don’t have to be concerned about private videos as it allows you to make your TikTok account private or public. Managing followers and the following list is also very easy with TikTok. By using the simplified and easy-to-implement methods, you can record multiple TikTok clips with ease:
Method 1: How to Record Multiple Clips on One TikTok Video
The built-in camera recorder of TikTok holds very astonishing metrics. With it, you can switch the flash on and off and swipe the camera from front and back. Moreover, you can also add filters to make videos more complimentary. Enabling beautify feature will help you in looking more beautiful in the videos. By following the steps listed below, you can record multiple TikTok clips:
Step 1: To start the process, locate TikTok on your device and launch it. From the app’s interface, tap the “+” icon from the bottom center of the screen.

Step 2: From the recording interface, select the time limit from the options of “15s”, “60s,” “3m,” and “10m.” Then, hold onto the “Record” button and capture the scenes you want. You can resume and pause the recording to shoot multiple clips. In case you’ve recorded anything unwanted, select “Back Arrow.” Afterward, select the “Tick” icon from the left side of the record button.

Step 3: Following this, you can customize your videos with the options of editing, text, stickers, effects, filters, and more. Once done with editing the video, tap “Next” and add captions and hashtags of your liking. Then hit “Post,” and you upload a TikTok with multiple clips.

Method 2: Uploading Multiple Videos on Create Page
TikTok is a widely used feature-rich application that gives users a full hand to edit videos. You can not only record multiple clips with TikTok but can also add clips in it from the camera roll. Furthermore, TikTok allows you to edit videos by personalizing their speed and length. Adding and deleting clips is also a very smooth process with this app.
You can also use TikTok’s built-in stickers, effects, and filters to give a video a more creative look. They are the perfect elements to enhance the quality of a video. The steps below help you in editing TikTok with more than one clip:
Step 1: To upload several videos on create page, launch TikTok on your device and tap the “Plus” button. Following this, select “Upload” from the bottom right and hit “Select Multiple.” Keep in mind that you cannot select more than 35 clips. After selecting the clips, choose the “Next” button.

Step 2: Once the clips are uploaded as one video, you can enhance them by accessing the TikTok editor. For sound synchronization, select the “Sound Sync” icon from the bottom screen. Edit, text, overlays, and effects can also be customized here.
Once the video is edited, tap on “Save” and select “Next.” Following this add captions of your choice on the next screen and tap “Post.”

Method 3: How to Add Multiple Clips to a TikTok Video Using a Video Editor App
Although TikTok has diversified editing parameters, some users cannot be satisfied with it. That is why they need to take assistance from a third-party video editor. If you are a person who wants to edit TikTok with multiple clips with a third-party tool, the recommendation lies in Wondershare Filmora . Both Android and iPhone users can use this video editor to make prolific TikTok videos.
Filmora has a smooth and sleek interface, making it the best video editing app. It generally provides a variety of editing features to manage videos. Other than this, the processing speed of this tool is ultra-fast, so you can edit TikTok videos in the least time.
download filmora app for ios ](https://app.adjust.com/b0k9hf2%5F4bsu85t ) download filmora app for android ](https://app.adjust.com/b0k9hf2%5F4bsu85t )
Outstanding Key Features of Wondershare Filmora
- Powerful Video Editing Tools: In this app, you can find all the powerful and innovative video editing tools. It can help you with splitting screens, speed ramping, title editing, and more.
- Magnificent Effects: All the video effects in Wondershare Filmora are beyond expectations. It supports all the latest and exclusive video effects. The use of video effects can make your videos eye-catching. AI Portrait and HumanClone are also some special effects in it.
- Edit Videos with Green Screen: Everyone has their own preferences for video editing. If you are working with a green screen and want to change the video’s background, Filmora can help you. It also helps in trimming and adding subtitles and logos in a video.
- Customize Colors: If your video has no illustrative colors, viewers will not like it. That is why Filmora allows you to add a colorful background without complications. You can also blur your background or add an image as your video background.
Steps to Make TikTok Video with Multiple Clips by Using Filmora
To create and enhance the TikTok video with multiple clips in an appealing way, follow the instructions guided below:
Step 1: Launch Filmora and Import Clips
Access Wondershare Filmora on your mobile and launch it. From the main interface, tap “New Project” and select the clips of your choice. Tap the “Import” button and wait a few seconds.

Step 2: Edit the Video with Multiple Clips
Once the clips are imported to Filmora, you will see that they are in the form of one video. From here, you can edit the video by using several editing tools like trim, music, text stickers, and more. You can also tap “Adjust” to customize metrics like exposure and contrast.

Step 3: Export TikTok Video with Multiple Clips
After editing the video to its full extent, tap the “Resolution” dropdown menu from the above panel. From the given options, select the resolution and frames per second for your video. Select the “Export” button to save the edited TikTok video with various clips.

Conclusion
TikTok is an innovative platform for creating and uploading videos. This article has taught you how to film a TikTok with multiple clips with ease. It also offers numerous editing options to its users for creating effective videos. If you don’t like them, you can use a third-party video editor.
A video editor by which you can create and edit TikTok videos with two or more clips is Wondershare Filmora. It never fails to amaze its users with its intuitive and modern tools.
Outstanding Key Features of Wondershare Filmora
- Powerful Video Editing Tools: In this app, you can find all the powerful and innovative video editing tools. It can help you with splitting screens, speed ramping, title editing, and more.
- Magnificent Effects: All the video effects in Wondershare Filmora are beyond expectations. It supports all the latest and exclusive video effects. The use of video effects can make your videos eye-catching. AI Portrait and HumanClone are also some special effects in it.
- Edit Videos with Green Screen: Everyone has their own preferences for video editing. If you are working with a green screen and want to change the video’s background, Filmora can help you. It also helps in trimming and adding subtitles and logos in a video.
- Customize Colors: If your video has no illustrative colors, viewers will not like it. That is why Filmora allows you to add a colorful background without complications. You can also blur your background or add an image as your video background.
Steps to Make TikTok Video with Multiple Clips by Using Filmora
To create and enhance the TikTok video with multiple clips in an appealing way, follow the instructions guided below:
Step 1: Launch Filmora and Import Clips
Access Wondershare Filmora on your mobile and launch it. From the main interface, tap “New Project” and select the clips of your choice. Tap the “Import” button and wait a few seconds.
Step 2: Edit the Video with Multiple Clips
Once the clips are imported to Filmora, you will see that they are in the form of one video. From here, you can edit the video by using several editing tools like trim, music, text stickers, and more. You can also tap “Adjust” to customize metrics like exposure and contrast.
Step 3: Export TikTok Video with Multiple Clips
After editing the video to its full extent, tap the “Resolution” dropdown menu from the above panel. From the given options, select the resolution and frames per second for your video. Select the “Export” button to save the edited TikTok video with various clips.
Conclusion
TikTok is an innovative platform for creating and uploading videos. This article has taught you how to film a TikTok with multiple clips with ease. It also offers numerous editing options to its users for creating effective videos. If you don’t like them, you can use a third-party video editor.
A video editor by which you can create and edit TikTok videos with two or more clips is Wondershare Filmora. It never fails to amaze its users with its intuitive and modern tools.
Also read:
- 2024 Approved How to Trim Video in QuickTime Player on Your Mac
- Updated Looking Forward to Try Hands at Using the Icecream Slideshow Maker Program to Create High End Slideshow Presentations? Stay Here for a Complete Insight Into the Process for 2024
- In 2024, Through Speed Ramping, Create a Smooth Transition in Slow-Motion Videos. Follow This Guide and Learn About Premiere Pro Slow Motion and a Better Alternative
- New Create Promotional Video
- New 2024 Approved Learn More About the Video Editing Interface of Wondershare Filmora
- In 2024, Step by Step to Cut Videos in Lightworks
- New Adobe After Effects Review
- New Guide to Create a Timelapse Video in After Effects for 2024
- In 2024, If You Are a Marketer Who Want to Create Facebook Ads to Boost Your Business, You Are Coming to the Right Place. Well Share You some Useful Tips to Start Your First FB Ads Campaign
- Unlock the Power of Shotcut The Ultimate Guide to Rotating Videos for 2024
- Updated 2024 Approved How to Edit GoPro Videos on Mac
- In 2024, Add Amazing Filters and Effects for Fun to Watch GIFs Using Adobe After Effects. Read on to Discover an Easy-to-Learn After Effects Alternative
- New 2024 Approved 12 Best GIF Editors to Use
- Do You Need to Create a Video for Your Business Online but Feel You Do Not Have the Skill and Time to Do That? Try Out These AI Video Generators that Will Work for You to Carry Out Tasks Effectively for 2024
- 2024 Approved Top 10 Secret Tips & Tricks to Use in Wondershare Filmora
- Updated In 2024, How to Delete White Background in Photoshop. How to Create a Transparent Background in Photoshop? Steps to Get Rid of White Background in Photoshop
- 2024 Approved If You Have a Low Budget but Want to Create a Filmy Appearance of the Video, Then Read 6 Ways to Get Professional Filming Equipment by Using Household Objects
- 2024 Approved Finding The Finest Way to Add Subtitles to Videos | Filmora
- Updated In 2024, Hey! Are You Looking for Video Reverse Effects in Your Videos? Then, You Are at the Right Place. This Article Will Guide You in Creating a Video Reverse Effect
- Updated In 2024, Let Us Help You with Something that You Might Not Know. Have You Ever Worked with MOV File Format Before? Or Do You Know What that Is? Lets Talk About It
- Updated How to Make First Impression Review Video
- Updated 2024 Approved Learn Color Correction in After Effects with These YouTube Videos
- New Step by Step to Rotate Video in Google Photos for 2024
- Updated 2024 Approved Top 10 Sound Extractors to Extract Sound From Video
- New In 2024, Guide to Add Transition Effects in Premiere Pro
- New In 2024, Are You Looking to Remove Echo in Premiere Pro? Please Look at Our Guide for Advice and Suggestions on Getting the Best Possible Outcomes
- Updated 22 Free Video Editing Software to Save Your Money and Time for 2024
- Updated 2024 Approved Convert Time-Lapse to Normal Video
- New In 2024, How To Create 3D Text In Video
- In 2024, Videos Look Better when Edited Professionally. If Youre Looking to Edit Recorded Video with a Pro-Level Editing Then Weve Got You Covered. Learn About Editing Recorded Videos with the Best Toolkit Here
- Updated 2024 Approved Quickest Guide | Zoom In and Out on Snapchat
- Do You Also Use Android to Create and Edit Videos? Read About the Efectum Video Effects Editor, Which Is Available in Your App Stores for Seamless Editing for 2024
- New Premiere Pro Is a Powerful Video Editing Software. In This Article, You Will Learn About How to Use, Save and Export LUTs in Adobe Premiere Pro for 2024
- New 2024 Approved Wondershare Filmora Has Introduced a New Feature - AI Portrait Effect that You Can Use to Remove Background From Various Videos and Images. Explore the Uses, Benefits, and Real-Life Scenarios of This Feature in a Comprehensive Guide
- Updated In 2024, Learning How to Create LUTs with LUTs Generator
- New 2024 Approved A Review of 3D LUT Mobile App - A Composite Application for Editing Media
- Updated 2024 Approved How to to Mimic Professional Filming Gears
- Updated In 2024, How Windows Movie Maker Save MP4 File
- New 2024 Approved Easy Steps to Loop YouTube Videos on iPhone
- Updated Do You Want to Use a Video Editor for Your iOS Device? This Article Introduces LumaFusion, a Perfect Multi-Track Video Editor Designed to Cater to Your Needs
- How to Make Video Slow Motion?
- Top 9 Best Solutions To Go For When Creating an AI Thumbnail for 2024
- New The Craziest 10 AI Editors Youve Ever Seen
- Updated How To Change Text In Premiere Pro
- Updated Achieving GoPro Slow Motion with Quality An In-Depth Overview for 2024
- Updated In 2024, Adding a Spooky Shadow Effect with Filmora
- This Article Will Help You Understand How to Create Video Contents that Convert Sales
- Updated Discover How to Create Professional Foggy Text Reflection Effects in the Filmora Video Editor
- How to Upgrade Apple iPhone 15 Pro to the Latest iOS Version? | Dr.fone
- Life360 Learn How Everything Works On Samsung Galaxy A54 5G | Dr.fone
- Resolve Your Apple iPhone XS Keeps Asking for Outlook Password
- Full Guide on Mirroring Your Samsung Galaxy S23 Ultra to Your PC/Mac | Dr.fone
- Life360 Circle Everything You Need to Know On Apple iPhone 15 Pro Max | Dr.fone
- In 2024, How to Change your Motorola Moto E13 Location on Twitter | Dr.fone
- 3 Facts You Need to Know about Screen Mirroring Lava Blaze 2 | Dr.fone
- Best software to Fix and Repair Corrupt MP4,MOV,AVI video files of Infinix Note 30 VIP Racing Edition
- What You Need To Know To Improve Your Meizu 21 Pro Hard Reset | Dr.fone
- 2024 Approved Auto Translate YouTube Videos Into Different Languages
- Does find my friends work on Samsung Galaxy F34 5G | Dr.fone
- Can Life360 Track You When Your Google Pixel 7a is off? | Dr.fone
- 9 Mind-Blowing Tricks to Hatch Eggs in Pokemon Go Without Walking On Motorola Edge 2023 | Dr.fone
- How Can I Catch the Regional Pokémon without Traveling On Vivo Y28 5G | Dr.fone
- In 2024, Can I use iTools gpx file to catch the rare Pokemon On Samsung Galaxy M14 5G | Dr.fone
- How to Google Pixel 8 Get Deleted Phone Number Back with Ease and Safety
- Identify malfunctioning hardware drivers with Windows Device Manager in Windows 11/10
- 3 Ways to Track Samsung Galaxy F04 without Them Knowing | Dr.fone
- Ultimate Guide from Xiaomi Redmi K70 Pro FRP Bypass
- Honor 90 Pro Screen Unresponsive? Heres How to Fix It | Dr.fone
- In 2024, How to Use Google Assistant on Your Lock Screen Of Poco C65 Phone
- In 2024, How To Change Country on App Store for iPhone 6 Plus With 7 Methods | Dr.fone
- How To Restore Missing Contacts Files from Huawei P60.
- New In 2024, The Best 10 Sketch Animation Video Makers
- In 2024, For People Wanting to Mock GPS on Vivo Y27s Devices | Dr.fone
- Use Device Manager to identify malfunctioning your drivers with Windows Device Manager in Windows 11/10
- Undelete lost contacts from Galaxy M54 5G.
- 4 Methods to Turn off Life 360 On Nokia G310 without Anyone Knowing | Dr.fone
- How to Unlock Apple iPhone 6 Online? Here are 6 Easy Ways
- How to Unlock Samsung Galaxy A25 5G Phone with Broken Screen
- Best Asus FRP Bypass Guide
- How to Rescue Lost Photos from Honor Magic Vs 2?
- In 2024, How to Delete iCloud Account with or without Password from your Apple iPhone 14 Plus/Windows/Mac
- How to Recover Apple iPhone 11 Pro Data From iOS iTunes Backup? | Dr.fone
- Title: New How to Make A Funny Vlog for TikTok, In 2024
- Author: Morgan
- Created at : 2024-04-24 01:06:05
- Updated at : 2024-04-25 01:06:05
- Link: https://ai-video-editing.techidaily.com/new-how-to-make-a-funny-vlog-for-tiktok-in-2024/
- License: This work is licensed under CC BY-NC-SA 4.0.
