:max_bytes(150000):strip_icc():format(webp)/full-frame-shot-of-speakers-1138109687-33289baddc314b44ae87abc2fc8060cd-e7bccad6d81244509ed97ddf557f89e4.jpg)
New How to Make Custom Lower Thirds with Filmora for 2024

How to Make Custom Lower Thirds with Filmora
As a video creator, there are times when you need to use Lower Thirds. Although many lower-third presets are available, making unique and personalized ones can ensure your video stands out.
So, to empower your inner video creator, this article will show you how to make your own Lower Thirds in Filmora.
Part 1: What is Lower Third
A Lower Third is a mix of motion graphic design and texts that are placed in the lower area of the screen. It provides additional information, such as a person’s name or other relevant information, without distracting the audience from the main content.
Lower Thirds can be used in various settings, such as news broadcasts or interviews, to help provide viewers with additional context.
Part 2: How to Make Your Own Lower Thirds in Filmora
Free Download For Win 7 or later(64-bit)
Free Download For macOS 10.14 or later
(1) A simple line and texts

Step1 Create a simple line
Go to the Media library > Sample Media folder > choose a color sample. For this tutorial, we will select the white color. Then, drag and drop this sample color onto the upper video track.

Double-click the white sample clip to open the settings and scale it to 30%. Then, reposition the white bar to your desired place.

Step2 Mask the white sample
Since we want to create a thin horizontal shape, you need to make some adjustments to the white sample by using an image mask. So, go to the Effect window > Utility > Image Mask. Then, drag and drop the “Image Mask” onto the white color sample.

After that, double-click the white sample on the timeline and find the Image Mask setting. Choose the shape that works best for your needs. For this tutorial, we are going to use this one. Then, adjust the X and Y-axis scale numbers until it becomes a thin white line. Click OK.

Step3 Add a text for your lower thirds
Go to Titles > Plain Text > Basic 6 and drop it onto the second video track above the white line clip. Don’t worry about the exact position yet. We can adjust it later.

Double-click on the text clip to open the settings, then type some text there and adjust the size and font.

Step4 Add animation to the text
Click Advanced > Animation > Up Down 1 animation. Adjust the animation length by dragging the two brackets on the timeline on the right side. Click Ok.

Step5 Add keyframes to the white line clip when entering
Double-click on the white line clip on the timeline to show the animation keyframe setting window. Then, playback the animation of the text, find a position before the text animation starts and move the play head there. Make sure it is close enough to when the texts show up so the white line enters the keyframe right before the text enters.

Click to add a keyframe, double-check to make sure it is the final position you want, and the opacity should be 100 at this point.
After that, move the play head to the left for a few frames and click add again. To make sure the white line is out of the frame before entering, you need to change the Y-axis number. Change the opacity to 0 as the white line starts in transparent color.

These two keyframes will create an effect of the line entering the frame while turning from transparent to white. Playback the animation and adjust the keyframes marks by dragging them to the left or right until you feel the timing looks good.
Step6 Add keyframes to the white line clip when exiting
Playback again to find where the texts disappear, then move the play head to a position after it. Also, make sure it’s close enough to where the texts disappear so you can ensure the white line exits right after the texts disappear. Then, add the keyframe.

You don’t need to change the setting this time because this keyframe is used to keep the position and opacity unchanged.
Instead, move the play head again to the right for a few frames and add another keyframe. Move the texts out of the frame by changing the y-axis number, then change the opacity to 0. This keyframe is used to create the white line animation exiting the frame and turning back to transparent in the meantime.

Playback the video and see how it looks.
(2) A name card with a solid background

Sometimes you might want to create a name card with a solid background like the sample above. To create it, we can use the same method. Here’s how to do it:
Step1 Make the lower third background
Select the white color sample from the sample color folder and drop it onto the upper video track of the video.

Change the scale to 30%, then reposition the white sample to your desired place. Click OK.

Step2 Create an image mask for the lower third background
Drag and drop the Image Mask onto the white sample clip on the timeline.

Double-click on the white sample clip to activate the video setting window and find the Image Mask settings. Then, choose the mask shape you need. You can also adjust its size by changing the X or Y-axis.

Step3 Add some text
Once the background card is in place, go to Titles > Plain Text > ‘Basic 6’ and drop it onto the third video track.

Now, type in the texts as needed. Reposition and scale the texts to make sure they are on top of the background shape.

Step4 Add animation to the text
Click Advanced > Animation > Push. Then, adjust the animation length accordingly. Click Ok.

Double-click on the background clip to show the animation tab setting. Then, playback the text animation and find a position earlier than the start and add a keyframe.

Similar to the tutorial before, move the play head again a few frames earlier to the left and add another keyframe. If you want to have the name card flying in from the left while expanding, you can change the X-axis and scale of the background card to 0. Change the opacity to 0 to create a color change from transparent to white.

To let the background card exit the frame, add two more keyframes to the background card. Add a keyframe with no changes to settings. Move the play head to the right for a few frames and add another keyframe.

If you want the name card to exit to the bottom, change the Y-axis number until it exits. Change the scale and opacity to 0. Then, playback and adjust the keyframes.
Finally, you can add a Subscribe button from the new default Filmora element pack “Social Media.”

Wrapping up
These are two ways you can create your own Lower Thirds in FIlmora. You can also change the keyframe settings to customize your lower thirds even more. Now, it’s time to try it yourself, and let us know what you think!
Free Download For macOS 10.14 or later
(1) A simple line and texts

Step1 Create a simple line
Go to the Media library > Sample Media folder > choose a color sample. For this tutorial, we will select the white color. Then, drag and drop this sample color onto the upper video track.

Double-click the white sample clip to open the settings and scale it to 30%. Then, reposition the white bar to your desired place.

Step2 Mask the white sample
Since we want to create a thin horizontal shape, you need to make some adjustments to the white sample by using an image mask. So, go to the Effect window > Utility > Image Mask. Then, drag and drop the “Image Mask” onto the white color sample.

After that, double-click the white sample on the timeline and find the Image Mask setting. Choose the shape that works best for your needs. For this tutorial, we are going to use this one. Then, adjust the X and Y-axis scale numbers until it becomes a thin white line. Click OK.

Step3 Add a text for your lower thirds
Go to Titles > Plain Text > Basic 6 and drop it onto the second video track above the white line clip. Don’t worry about the exact position yet. We can adjust it later.

Double-click on the text clip to open the settings, then type some text there and adjust the size and font.

Step4 Add animation to the text
Click Advanced > Animation > Up Down 1 animation. Adjust the animation length by dragging the two brackets on the timeline on the right side. Click Ok.

Step5 Add keyframes to the white line clip when entering
Double-click on the white line clip on the timeline to show the animation keyframe setting window. Then, playback the animation of the text, find a position before the text animation starts and move the play head there. Make sure it is close enough to when the texts show up so the white line enters the keyframe right before the text enters.

Click to add a keyframe, double-check to make sure it is the final position you want, and the opacity should be 100 at this point.
After that, move the play head to the left for a few frames and click add again. To make sure the white line is out of the frame before entering, you need to change the Y-axis number. Change the opacity to 0 as the white line starts in transparent color.

These two keyframes will create an effect of the line entering the frame while turning from transparent to white. Playback the animation and adjust the keyframes marks by dragging them to the left or right until you feel the timing looks good.
Step6 Add keyframes to the white line clip when exiting
Playback again to find where the texts disappear, then move the play head to a position after it. Also, make sure it’s close enough to where the texts disappear so you can ensure the white line exits right after the texts disappear. Then, add the keyframe.

You don’t need to change the setting this time because this keyframe is used to keep the position and opacity unchanged.
Instead, move the play head again to the right for a few frames and add another keyframe. Move the texts out of the frame by changing the y-axis number, then change the opacity to 0. This keyframe is used to create the white line animation exiting the frame and turning back to transparent in the meantime.

Playback the video and see how it looks.
(2) A name card with a solid background

Sometimes you might want to create a name card with a solid background like the sample above. To create it, we can use the same method. Here’s how to do it:
Step1 Make the lower third background
Select the white color sample from the sample color folder and drop it onto the upper video track of the video.

Change the scale to 30%, then reposition the white sample to your desired place. Click OK.

Step2 Create an image mask for the lower third background
Drag and drop the Image Mask onto the white sample clip on the timeline.

Double-click on the white sample clip to activate the video setting window and find the Image Mask settings. Then, choose the mask shape you need. You can also adjust its size by changing the X or Y-axis.

Step3 Add some text
Once the background card is in place, go to Titles > Plain Text > ‘Basic 6’ and drop it onto the third video track.

Now, type in the texts as needed. Reposition and scale the texts to make sure they are on top of the background shape.

Step4 Add animation to the text
Click Advanced > Animation > Push. Then, adjust the animation length accordingly. Click Ok.

Double-click on the background clip to show the animation tab setting. Then, playback the text animation and find a position earlier than the start and add a keyframe.

Similar to the tutorial before, move the play head again a few frames earlier to the left and add another keyframe. If you want to have the name card flying in from the left while expanding, you can change the X-axis and scale of the background card to 0. Change the opacity to 0 to create a color change from transparent to white.

To let the background card exit the frame, add two more keyframes to the background card. Add a keyframe with no changes to settings. Move the play head to the right for a few frames and add another keyframe.

If you want the name card to exit to the bottom, change the Y-axis number until it exits. Change the scale and opacity to 0. Then, playback and adjust the keyframes.
Finally, you can add a Subscribe button from the new default Filmora element pack “Social Media.”

Wrapping up
These are two ways you can create your own Lower Thirds in FIlmora. You can also change the keyframe settings to customize your lower thirds even more. Now, it’s time to try it yourself, and let us know what you think!
Some Effective Slow Motion Video Editors You Can Try
Slow-motion videos help in sports analysis to gain insights into the performance. Slow motion is beneficial for observing precise movements in instructional videos. Moreover, such videos are crucial for product showcasing in advertising and marketing. Due to the various uses of slow-motion videos, you may need to create one with an edit video slow motion online free.
Thus, this article will focus on some top-notch slow-motion video editors online for free. With these tools, you can produce slow-motion videos at the desired pace. Moreover, we will introduce a desktop tool that leaves behind all online video editors slow motion free.
Slow Motion Video Maker Slow your video’s speed with better control of your keyframes to create unique cinematic effects!
Make A Slow Motion Video Make A Slow Motion Video More Features

Part 1: [Top List] Best Slow Motion Video Editors To Work Within 2024
Have you ever worked with slow-motion video editors? In this section, we will shed light on some of the best online video editors that are slow-motion free. By using them, you can produce professional quality slow-motion videos with ease:
1. VEED.io
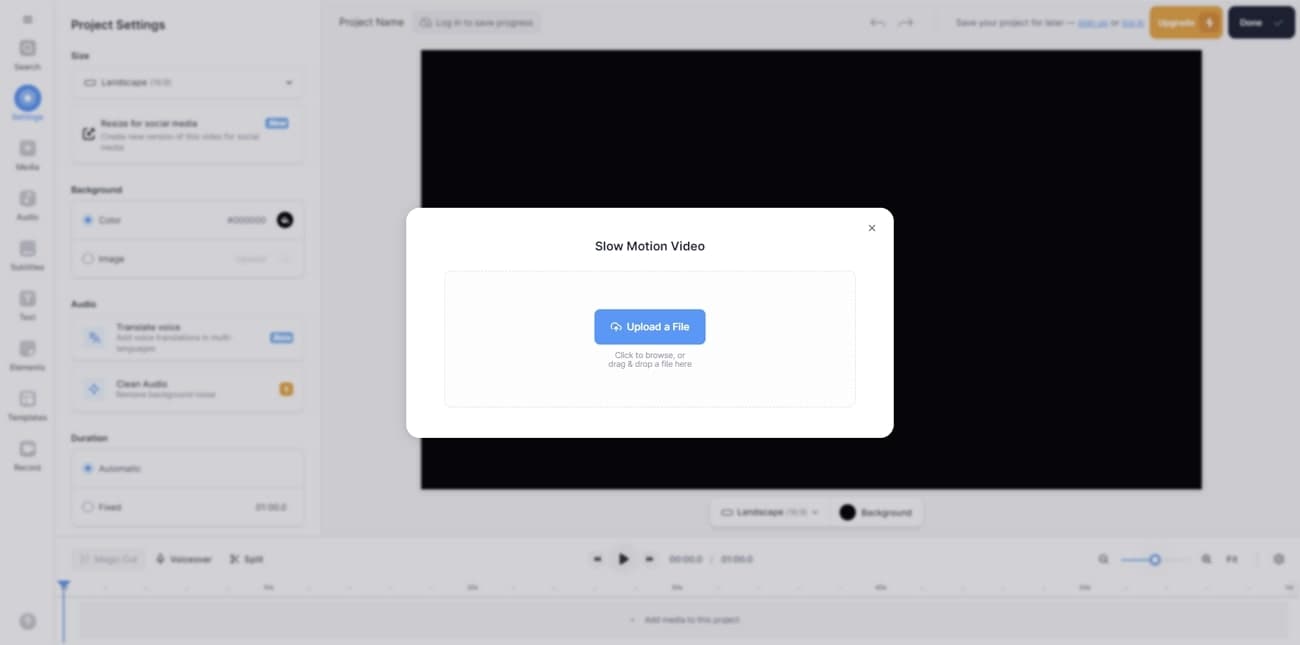
VEED.io is a prominent tool that you can access through a web browser. Along with its many features, this tool lets you slow down a video with proficiency. It lets you change the video speed to up to 0.5x. Moreover, you can enter the custom speed for more modification. For precision, you can slow down certain parts by splitting the clips. Hence, this tool gives you complete control for making slow-motion videos.
Pros
- This tool shows compatibility with many file formats. For example, you can import videos in MOV, MP3, AVI, and other formats.
- After slowing down a video, this tool lets you perform basic video editing. You can cut, crop, trim, and annotate the slow-motion video.
Cons
- This tool freezes and lacks fast processing speed.
2. Canva
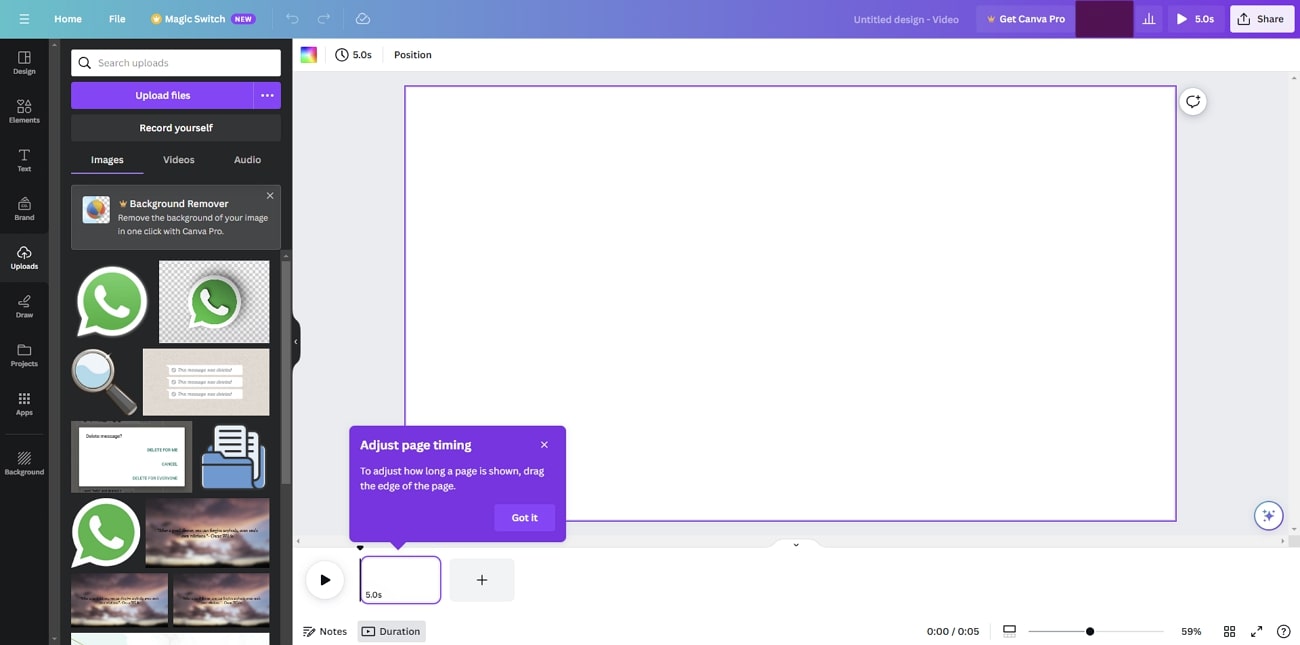
Have you ever edited a video through Canva? This famous edit video slow motion online free tool offers many tools to execute basic and advanced editing. Among them, it contains the feature to add a slow-motion effect to a video. After uploading the video, you can reduce the speed to 0.1x. While adding a slow-motion effect, you can add comments to the video for more modification.
Pros
- This tool provides many options for uploading a video. For instance, you can upload videos from Facebook, Google Drive, Google Photos, or Dropbox.
- It includes a collaboration link to help your teammates access the video. You can also enter groups, people, and tags for collaboration.
Cons
- The options for template designs and export are limited.
3. Typito
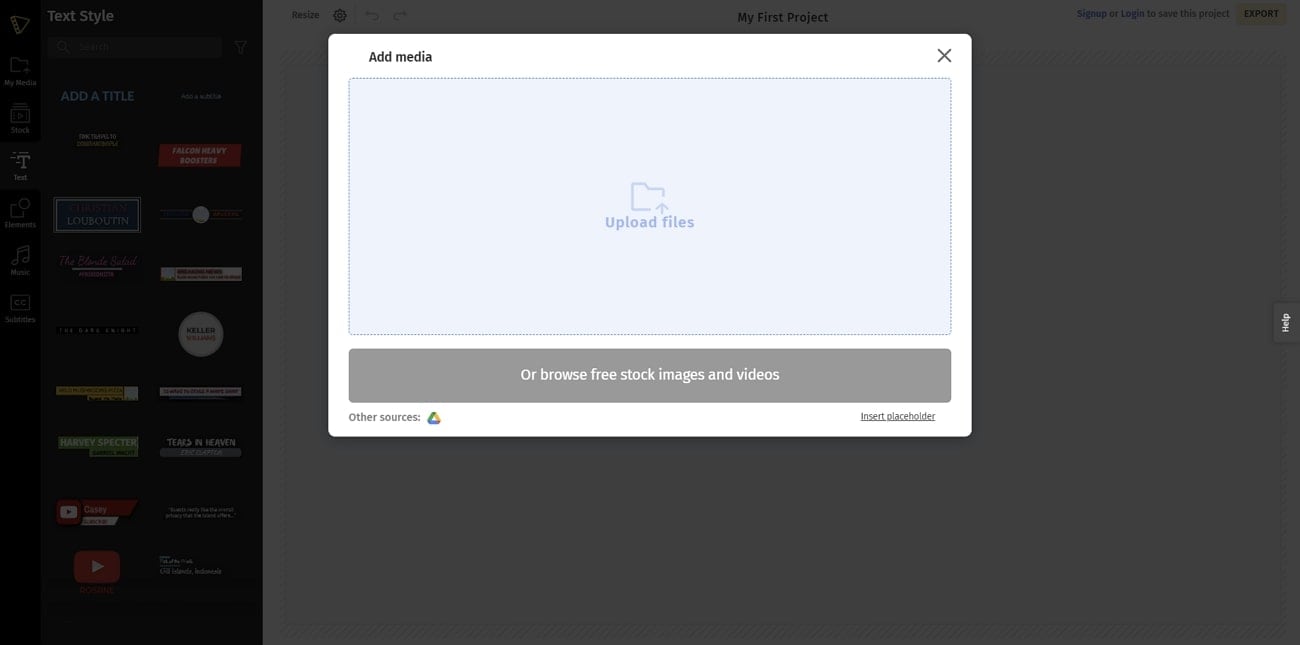
Typito is a reliable tool that supports over 20 video file formats. With its video speed modifier, you can speed up or slow down a video file without hassle. Furthermore, it supports many aspect ratios, like a square letterbox, vertical, etc. Moreover, it contains a stock media library containing royalty-free videos and images. Thus, it’s a competent online tool featuring a reliable option to make slow-motion videos.
Pros
- You can display your own brand video with this tool. It allows you to upload your brand colors, designs, and fonts for brand marketing.
- It offers a real-time video preview to analyze the final result. By doing so, you can download satisfactory slow-motion videos.
Cons
- Sometimes, the tool encounters glitches, which can disrupt its overall performance.
4. Media.io
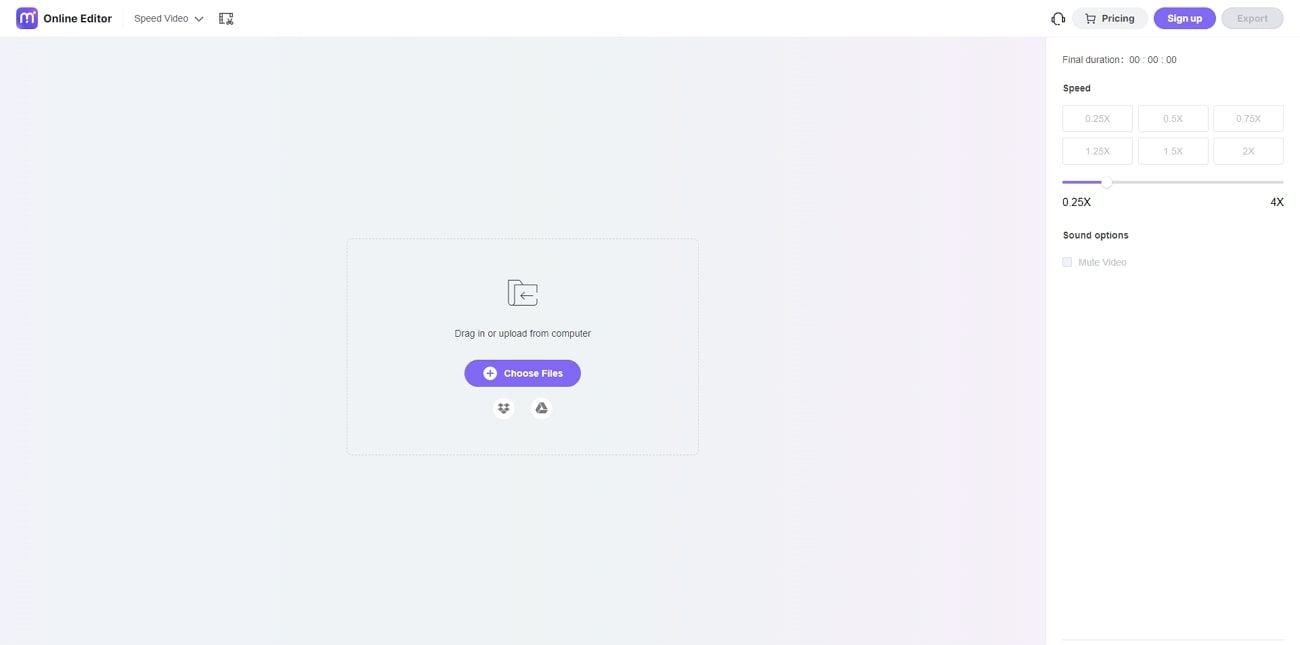
Media.io is a capable online tool famous for its flawless results. After importing the video, you can reduce it to the lowest speed, which is 0.25x. Meanwhile, you can also increase the video speed to 4x efficiently. One of the best things about this tool is that it can edit the motion effect to YouTube URLs directly. Hence, this slow down video online free can benefit you in making slow-motion videos.
Pros
- This tool contains many free additional features. For instance, it contains a video converter, letting you convert the file format into another one.
- To remove unwanted audio from a video, you can mute the video. Thus, with a single click, you can mute the video instantly.
Cons
- You cannot upload large file sizes on this tool. Thus, you can face file size restrictions on Media.io.
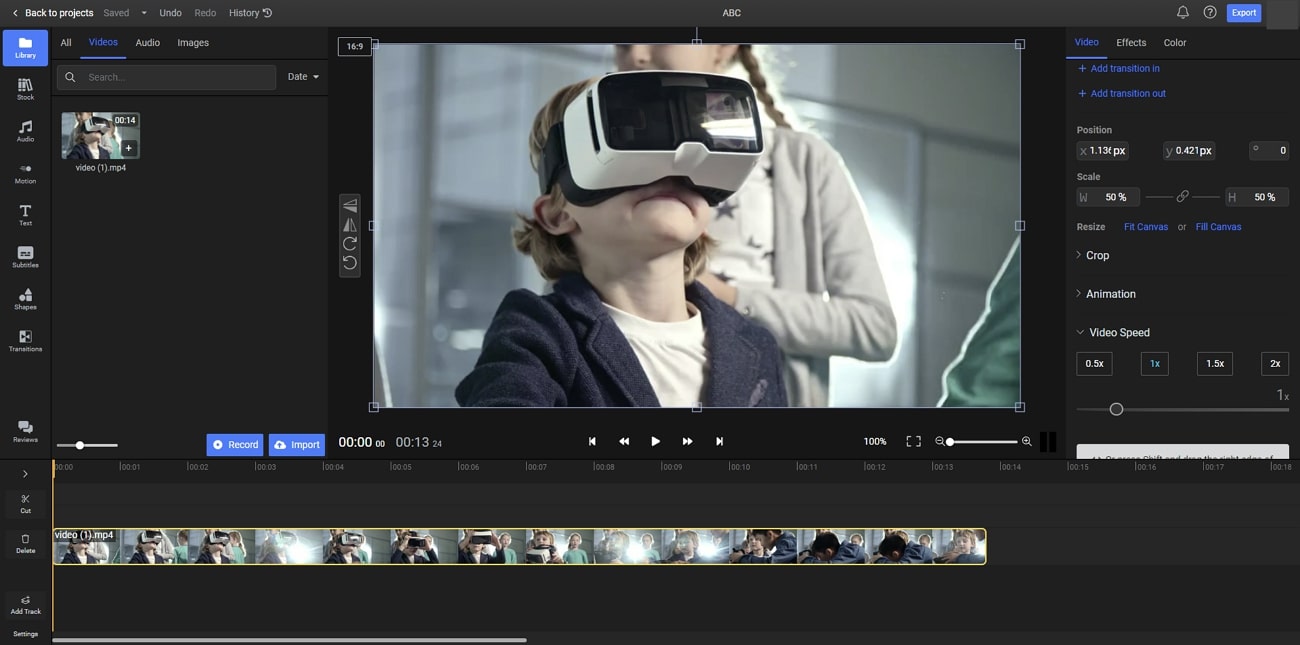
5. Flixier
This online video editor slow motion free tool has an easy-to-use interface that you can operate without watching tutorials. It can slow down a video at any frame rate without decreasing its quality. To reduce the video speed, you can drag the slider with great ease. Moreover, you can add powerful effects to enhance the slowed-down video. Hence, it’s an advanced tool for creating slow-motion videos.
Pros
- It contains an AI subtitle generator through which you can transcribe your videos. It supports all common languages for the generation of video subtitles.
- To make your video pleasing in a visual way, you can add many filters. This tool consists of many filters which can improve your facial appearance.
Cons
- Flixier takes extra time to process video files. Thus, making slow-motion videos with this tool is time-consuming.
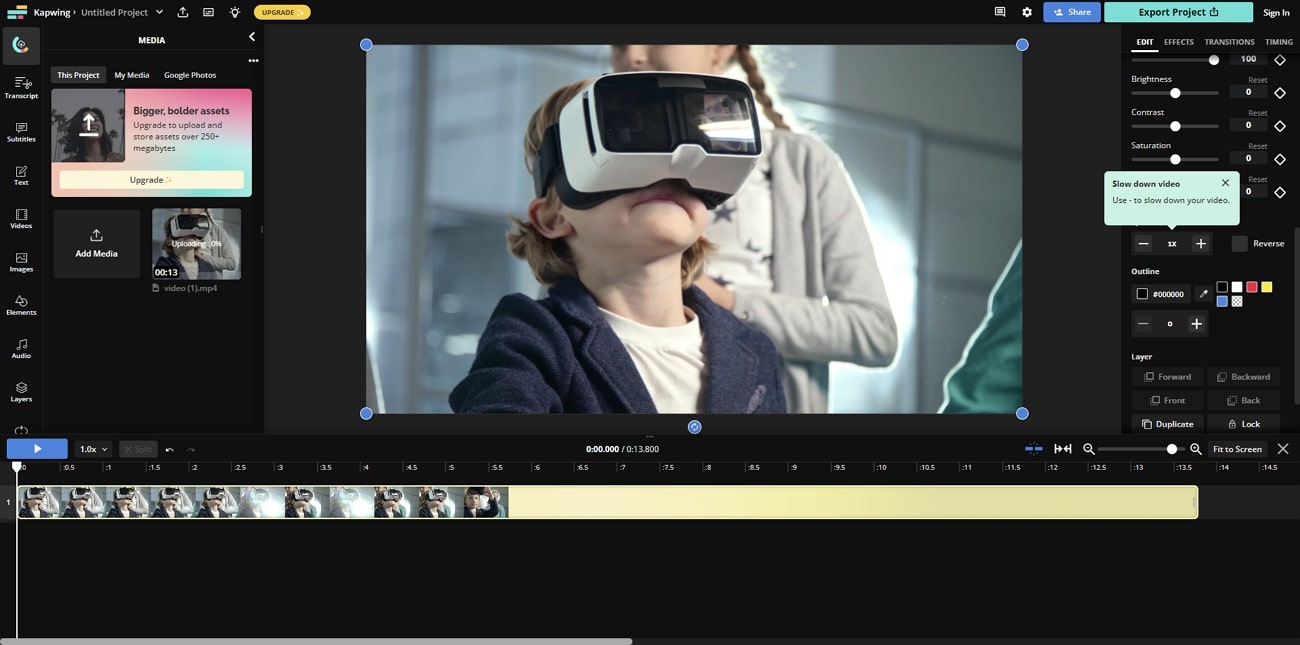
6. Kapwing
This online tool uses advanced technology to slow down a video without losing quality. Whether your video is 4K or 1080p, the tool maintains the original resolution of the video. You can import the video from your device within a few seconds. It also allows you to paste the URL of the video quickly. Afterward, you can adjust the speed slider to manage the video speed in a preferred way.
Pros
- Kapwing is an all-round video editor offering many features. Using this video editor, users can combine and split video tracks.
- The AI audio enhancer of this tool can improve the sound quality of your audio. You can improve the quality of your voice recording and background music with this feature.
Cons
- To use its premium features, you must buy its subscription plans. However, its subscription plans can be expensive for some users.
7. Clideo
Do you want a basic tool for slowing down videos? Clideo is one of the simple tools that has intuitive controls to modify a video. It has a fast processing speed to offer users instant results. It provides six commonly used speeds for video clips. In addition, you can use the speed slider to adjust the speed in a personalized way. Meanwhile, the tool ensures complete security to protect your valuable video files.

Pros
- This slow down video online free can function as a great video compressor. It decreases the video file size without compromising its resolution.
- It acts as a video maker, allowing you to create videos from images. Moreover, you can produce videos with GIFs of desired quality.
Cons
- It adds a watermark to the videos in its free version.
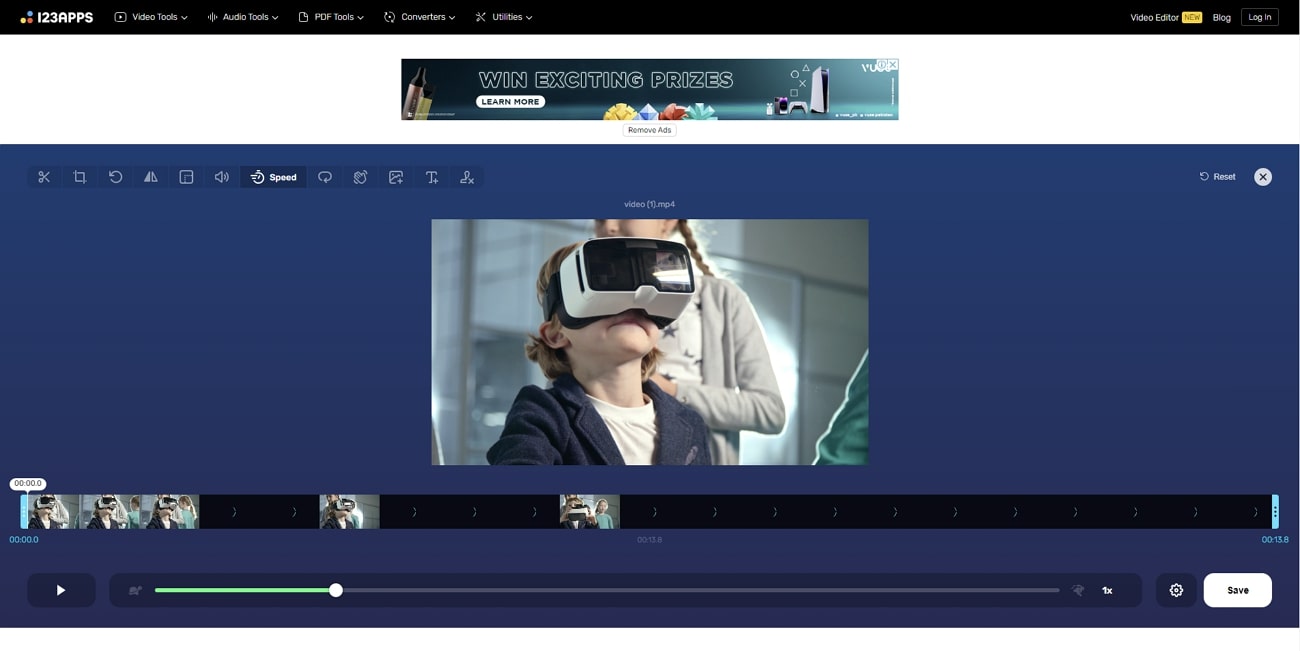
8. Online Video Cutter
This comprehensive slow motion video online without watermark tool offers a great user experience in making slow-motion videos. Without adding a watermark, it can create slow-mo videos as best as possible. Along with various video speeds, it provides many file formats. Moreover, you can slow down videos without creating an account. Within a few taps, you can make slow-motion videos in high resolution.
Pros
- To describe your video clips, add text to them using this tool. It lets you select the desired text font, style, size, and color.
- It contains a screen recorder to capture the current activities of your desktop. After recording, you can edit and export the video flawlessly.
Cons
- The interface of this tool contains many pop-up ads, which can be annoying.
Part 2: Alternative For Better Results: Wondershare Filmora
After knowing the drawbacks of online tools, you must want an alternative. Wondershare Filmora is a skillful tool comprising good qualities as a video editor. It targets every need of a professional video editor with its robust features. With its friendly user interface, you can perform video editing without hurdles. It lets you apply effects, transitions, animations, and other modifications with ease.
Moreover, it allows users to control the speed of the videos. After dragging the video to the timeline, you can adjust its speed accordingly. It retains the frame rate of the video with high-end rendering. Also, it contains tons of AI options to improvise the video clip. Hence, Filmora is a must-have offline tool catering to all the needs of video editors.
Free Download For Win 7 or later(64-bit)
Free Download For macOS 10.14 or later
Directions to Make Slow-Motion Video
In this section, we will enlist the simple steps to create slow-motion videos. Thus, check the following instructions to generate slow-motion videos in a flawless way.
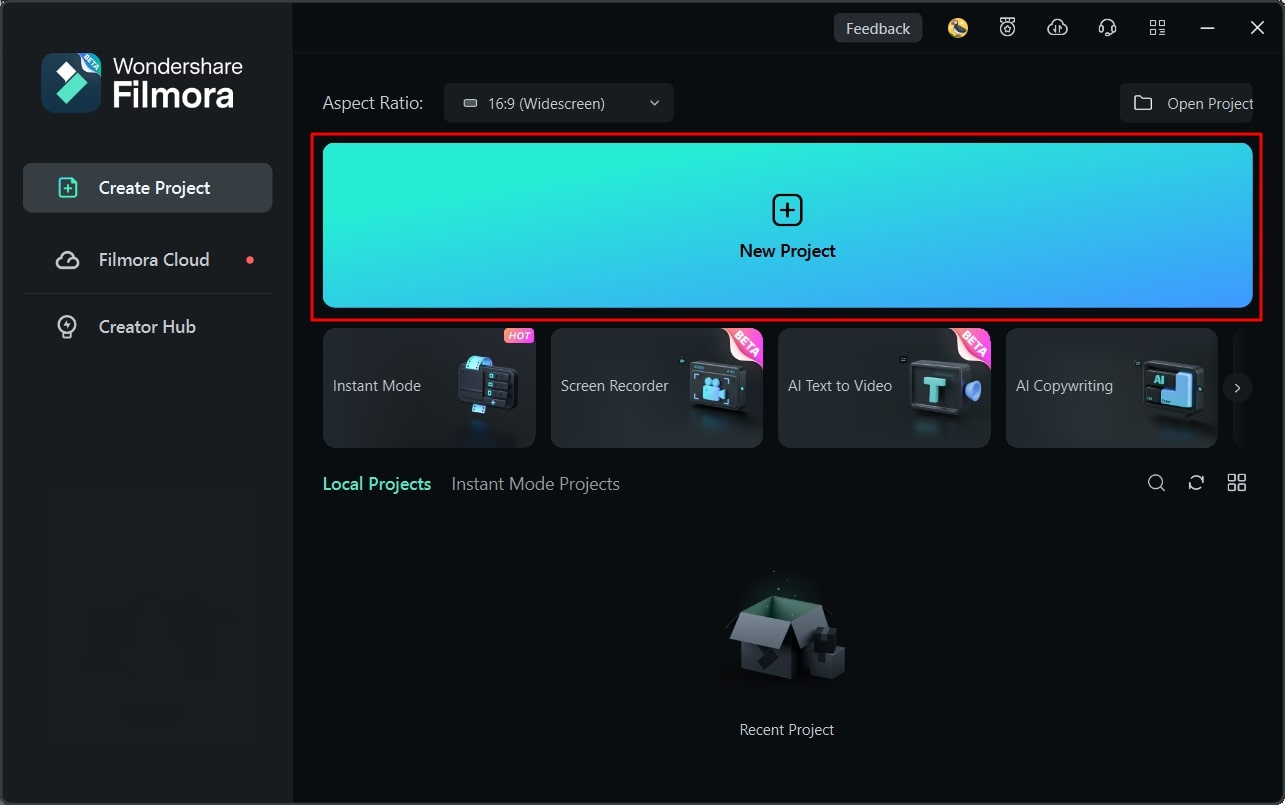
Step 1Sign Into Filmora
Start by launching Filmora on your PC. Once done, head to the top bar and select “Profile”. From there, sign into the account and select the “New Project” button.
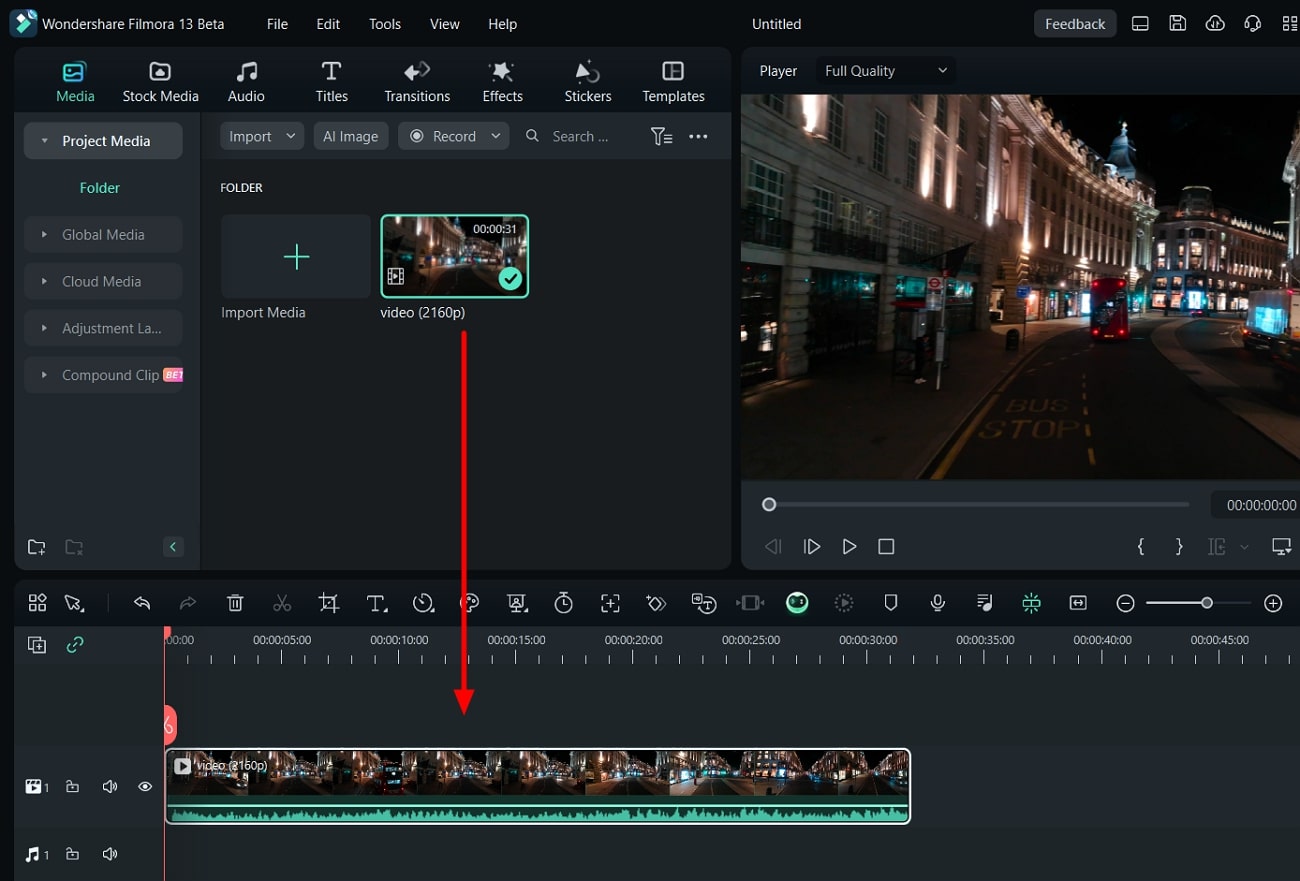
Step 2Add Video on Timeline
Now, on the main interface of Filmora, press “Ctrl + I”. In this manner, you can import the video clips from your computer. Once done, drag and drop the video file to the timeline for editing.
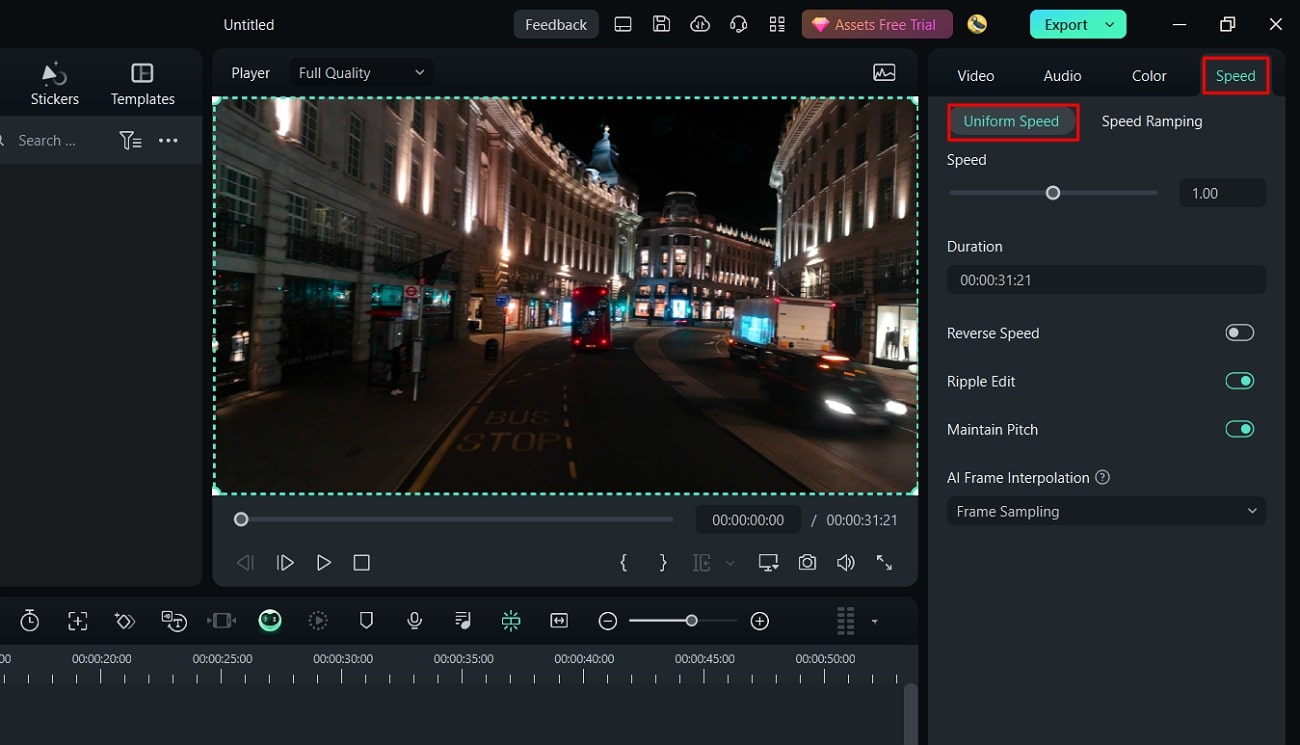
Step 3Go to the Speed Tab
Select the video on the timeline and go to the right panel. Through this panel, click on the “Speed” tab and tap “Uniform Speed”.
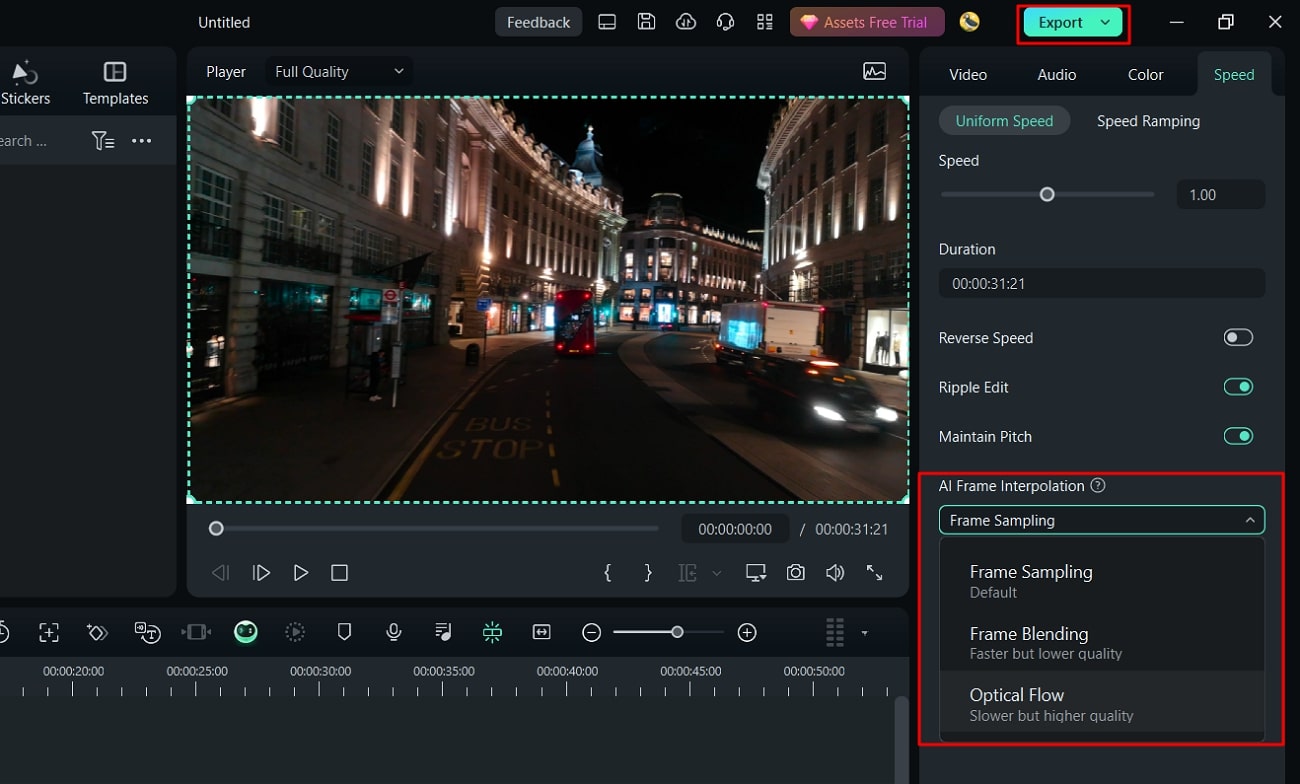
Step 4Choose Optical Flow
Expand “AI Frame Interpolation” and tap “Optical Flow”. Now, stay on the timeline and select “Render Preview” from the top toolbar. By doing so, you can export the video in the selected file format.
Key Features Highlighting Filmora
AI Vocal Remover: This AI feature isolates the music from any song. It preserves the high resolution of the video while removing vocals. Also, it extracts other unwanted elements from audio. Hence, it automatically removes vocals from an audio file.
AI Copywriting: This feature is integrated with ChatGPT to produce AI-generated scripts. Content creators can generate YouTube descriptions and titles from this smart feature. To do so, you can enter the question in the given box. After some seconds, the AI tool will answer your queries.
AI Image: By using this feature, you can convert your text to images in an automated way. You can describe the image in the text in the given box. Afterward, the tool will create an AI image in three resolutions.
Part 3: What Are Some Major Drawbacks to Using Online Slow Motion Video Editors Compared to Offline Editors?
There are some disadvantages to using online slow-motion video editors as compared to offline tools. Here are some of the common drawbacks of slow motion video editor online free that you should consider:
Network Dependency
Online slow-motion video editors need credible and fast internet connections. You can’t access their website with a poor internet connection. If there is a poor network connection, the tool will take extra time to upload and process videos.
Limitations of Features
Unlike offline slow-motion video editors, online free tools have limited features. They don’t offer advanced options to make professional enhancements. Moreover, advanced tools need high-end computing sources. This may not be present on web-based slow-motion video editors.
Privacy Concerns
Desktop tools use enhanced encryption methods for data privacy. However, online sites may contain hidden malicious files which can harm your data. Hence, online users may face privacy threats when making slow-motion videos.
User Interface and Subscription Packages
It’s common that online slow-motion video editors lack intuitive controls. The interface of online tools is difficult to operate for beginners. Moreover, the subscription packages can be expensive for some users. In contrast, desktop tools have better user interface experience with affordable plans.
Conclusion
Slow-motion videos are useful for deep analysis. It helps in highlighting the minor details of a product. There are many online video editors slow motion free to create slow-motion effects. However, desktop tools like Filmora are a better alternative to such online tools. This tool uses high-end computing algorithms to make slow-motion videos with precision.
Make A Slow Motion Video Make A Slow Motion Video More Features

Part 1: [Top List] Best Slow Motion Video Editors To Work Within 2024
Have you ever worked with slow-motion video editors? In this section, we will shed light on some of the best online video editors that are slow-motion free. By using them, you can produce professional quality slow-motion videos with ease:
1. VEED.io
VEED.io is a prominent tool that you can access through a web browser. Along with its many features, this tool lets you slow down a video with proficiency. It lets you change the video speed to up to 0.5x. Moreover, you can enter the custom speed for more modification. For precision, you can slow down certain parts by splitting the clips. Hence, this tool gives you complete control for making slow-motion videos.

Pros
- This tool shows compatibility with many file formats. For example, you can import videos in MOV, MP3, AVI, and other formats.
- After slowing down a video, this tool lets you perform basic video editing. You can cut, crop, trim, and annotate the slow-motion video.
Cons
- This tool freezes and lacks fast processing speed.
2. Canva
Have you ever edited a video through Canva? This famous edit video slow motion online free tool offers many tools to execute basic and advanced editing. Among them, it contains the feature to add a slow-motion effect to a video. After uploading the video, you can reduce the speed to 0.1x. While adding a slow-motion effect, you can add comments to the video for more modification.

Pros
- This tool provides many options for uploading a video. For instance, you can upload videos from Facebook, Google Drive, Google Photos, or Dropbox.
- It includes a collaboration link to help your teammates access the video. You can also enter groups, people, and tags for collaboration.
Cons
- The options for template designs and export are limited.
3. Typito
Typito is a reliable tool that supports over 20 video file formats. With its video speed modifier, you can speed up or slow down a video file without hassle. Furthermore, it supports many aspect ratios, like a square letterbox, vertical, etc. Moreover, it contains a stock media library containing royalty-free videos and images. Thus, it’s a competent online tool featuring a reliable option to make slow-motion videos.

Pros
- You can display your own brand video with this tool. It allows you to upload your brand colors, designs, and fonts for brand marketing.
- It offers a real-time video preview to analyze the final result. By doing so, you can download satisfactory slow-motion videos.
Cons
- Sometimes, the tool encounters glitches, which can disrupt its overall performance.
4. Media.io
Media.io is a capable online tool famous for its flawless results. After importing the video, you can reduce it to the lowest speed, which is 0.25x. Meanwhile, you can also increase the video speed to 4x efficiently. One of the best things about this tool is that it can edit the motion effect to YouTube URLs directly. Hence, this slow down video online free can benefit you in making slow-motion videos.

Pros
- This tool contains many free additional features. For instance, it contains a video converter, letting you convert the file format into another one.
- To remove unwanted audio from a video, you can mute the video. Thus, with a single click, you can mute the video instantly.
Cons
- You cannot upload large file sizes on this tool. Thus, you can face file size restrictions on Media.io.
5. Flixier
This online video editor slow motion free tool has an easy-to-use interface that you can operate without watching tutorials. It can slow down a video at any frame rate without decreasing its quality. To reduce the video speed, you can drag the slider with great ease. Moreover, you can add powerful effects to enhance the slowed-down video. Hence, it’s an advanced tool for creating slow-motion videos.

Pros
- It contains an AI subtitle generator through which you can transcribe your videos. It supports all common languages for the generation of video subtitles.
- To make your video pleasing in a visual way, you can add many filters. This tool consists of many filters which can improve your facial appearance.
Cons
- Flixier takes extra time to process video files. Thus, making slow-motion videos with this tool is time-consuming.
6. Kapwing
This online tool uses advanced technology to slow down a video without losing quality. Whether your video is 4K or 1080p, the tool maintains the original resolution of the video. You can import the video from your device within a few seconds. It also allows you to paste the URL of the video quickly. Afterward, you can adjust the speed slider to manage the video speed in a preferred way.

Pros
- Kapwing is an all-round video editor offering many features. Using this video editor, users can combine and split video tracks.
- The AI audio enhancer of this tool can improve the sound quality of your audio. You can improve the quality of your voice recording and background music with this feature.
Cons
- To use its premium features, you must buy its subscription plans. However, its subscription plans can be expensive for some users.
7. Clideo
Do you want a basic tool for slowing down videos? Clideo is one of the simple tools that has intuitive controls to modify a video. It has a fast processing speed to offer users instant results. It provides six commonly used speeds for video clips. In addition, you can use the speed slider to adjust the speed in a personalized way. Meanwhile, the tool ensures complete security to protect your valuable video files.

Pros
- This slow down video online free can function as a great video compressor. It decreases the video file size without compromising its resolution.
- It acts as a video maker, allowing you to create videos from images. Moreover, you can produce videos with GIFs of desired quality.
Cons
- It adds a watermark to the videos in its free version.
8. Online Video Cutter
This comprehensive slow motion video online without watermark tool offers a great user experience in making slow-motion videos. Without adding a watermark, it can create slow-mo videos as best as possible. Along with various video speeds, it provides many file formats. Moreover, you can slow down videos without creating an account. Within a few taps, you can make slow-motion videos in high resolution.

Pros
- To describe your video clips, add text to them using this tool. It lets you select the desired text font, style, size, and color.
- It contains a screen recorder to capture the current activities of your desktop. After recording, you can edit and export the video flawlessly.
Cons
- The interface of this tool contains many pop-up ads, which can be annoying.
Part 2: Alternative For Better Results: Wondershare Filmora
After knowing the drawbacks of online tools, you must want an alternative. Wondershare Filmora is a skillful tool comprising good qualities as a video editor. It targets every need of a professional video editor with its robust features. With its friendly user interface, you can perform video editing without hurdles. It lets you apply effects, transitions, animations, and other modifications with ease.
Moreover, it allows users to control the speed of the videos. After dragging the video to the timeline, you can adjust its speed accordingly. It retains the frame rate of the video with high-end rendering. Also, it contains tons of AI options to improvise the video clip. Hence, Filmora is a must-have offline tool catering to all the needs of video editors.
Free Download For Win 7 or later(64-bit)
Free Download For macOS 10.14 or later
Directions to Make Slow-Motion Video
In this section, we will enlist the simple steps to create slow-motion videos. Thus, check the following instructions to generate slow-motion videos in a flawless way.
Step 1Sign Into Filmora
Start by launching Filmora on your PC. Once done, head to the top bar and select “Profile”. From there, sign into the account and select the “New Project” button.

Step 2Add Video on Timeline
Now, on the main interface of Filmora, press “Ctrl + I”. In this manner, you can import the video clips from your computer. Once done, drag and drop the video file to the timeline for editing.

Step 3Go to the Speed Tab
Select the video on the timeline and go to the right panel. Through this panel, click on the “Speed” tab and tap “Uniform Speed”.

Step 4Choose Optical Flow
Expand “AI Frame Interpolation” and tap “Optical Flow”. Now, stay on the timeline and select “Render Preview” from the top toolbar. By doing so, you can export the video in the selected file format.

Key Features Highlighting Filmora
AI Vocal Remover: This AI feature isolates the music from any song. It preserves the high resolution of the video while removing vocals. Also, it extracts other unwanted elements from audio. Hence, it automatically removes vocals from an audio file.
AI Copywriting: This feature is integrated with ChatGPT to produce AI-generated scripts. Content creators can generate YouTube descriptions and titles from this smart feature. To do so, you can enter the question in the given box. After some seconds, the AI tool will answer your queries.
AI Image: By using this feature, you can convert your text to images in an automated way. You can describe the image in the text in the given box. Afterward, the tool will create an AI image in three resolutions.
Part 3: What Are Some Major Drawbacks to Using Online Slow Motion Video Editors Compared to Offline Editors?
There are some disadvantages to using online slow-motion video editors as compared to offline tools. Here are some of the common drawbacks of slow motion video editor online free that you should consider:
Network Dependency
Online slow-motion video editors need credible and fast internet connections. You can’t access their website with a poor internet connection. If there is a poor network connection, the tool will take extra time to upload and process videos.
Limitations of Features
Unlike offline slow-motion video editors, online free tools have limited features. They don’t offer advanced options to make professional enhancements. Moreover, advanced tools need high-end computing sources. This may not be present on web-based slow-motion video editors.
Privacy Concerns
Desktop tools use enhanced encryption methods for data privacy. However, online sites may contain hidden malicious files which can harm your data. Hence, online users may face privacy threats when making slow-motion videos.
User Interface and Subscription Packages
It’s common that online slow-motion video editors lack intuitive controls. The interface of online tools is difficult to operate for beginners. Moreover, the subscription packages can be expensive for some users. In contrast, desktop tools have better user interface experience with affordable plans.
Conclusion
Slow-motion videos are useful for deep analysis. It helps in highlighting the minor details of a product. There are many online video editors slow motion free to create slow-motion effects. However, desktop tools like Filmora are a better alternative to such online tools. This tool uses high-end computing algorithms to make slow-motion videos with precision.
Guide to Create Freeze Frame Clone Effect Video
Preparation
What you need to prepare:
- A computer (Windows or macOS)
- Your video materials.
- Filmora video editor
Step 1
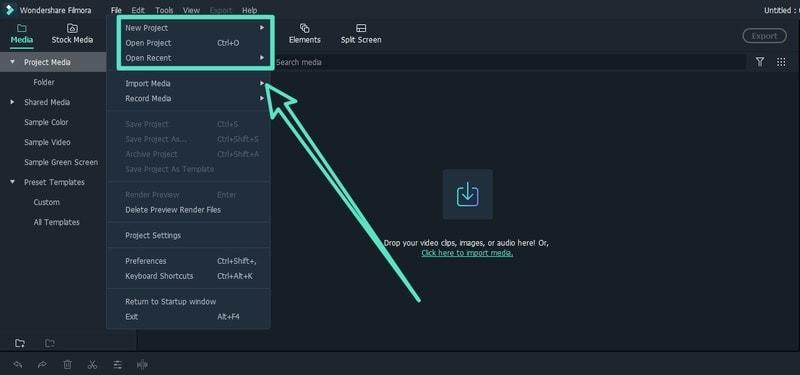
Download and install Wondershare Filmora on your computer. Launch Filmora and click on New Project on the welcome screen. Alternatively, go to File menu and select New Project option.
Step 2
Import your video clip to Project Media folder. Go to File> Import Media and click on Import Media Files option. Select the video clip from your hard drive. Otherwise, you can drag and drop the video clip directly into the Project Media folder. Finally, drop the video clip from Project Media folder onto the timeline.
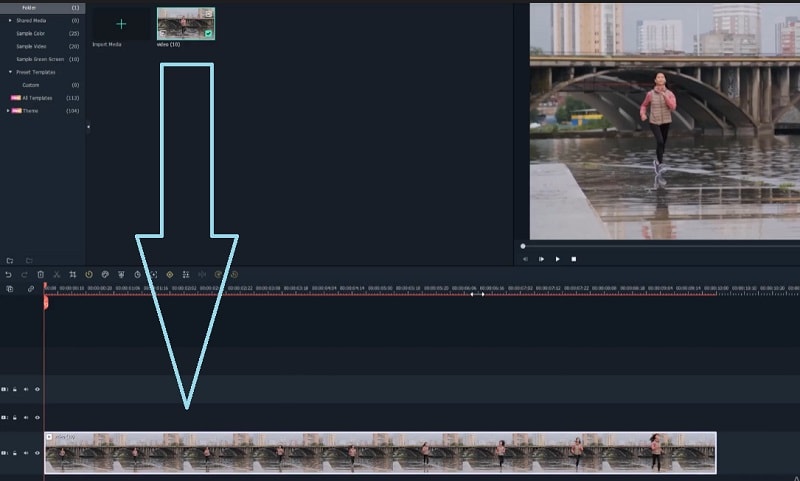
Step 3
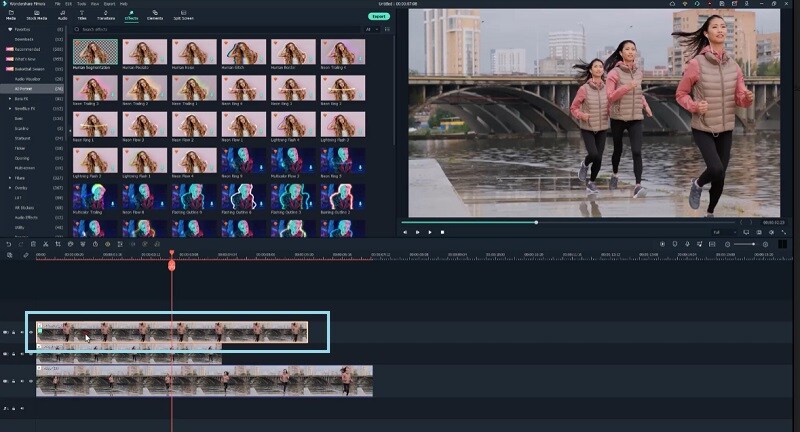
Place the marker where you want the frame to freeze. Click on Camera icon under Program window. This will take a snapshot of the current frame and place it under Project Media folder. Drag and drop the snapshot onto the timeline.
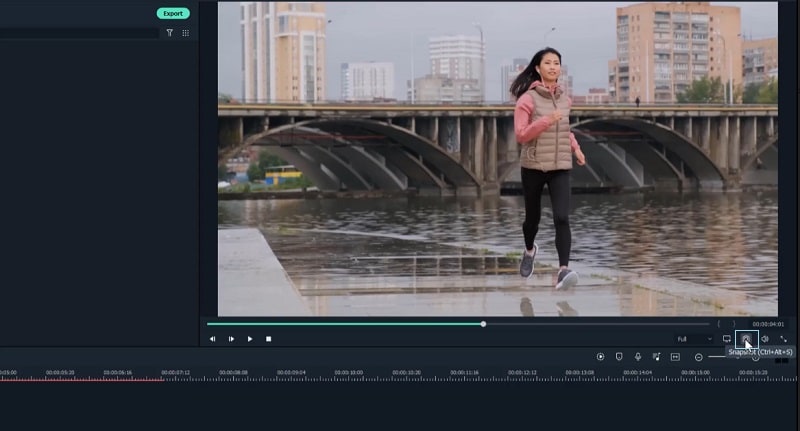
Step 4
Match the duration of the snapshot with the point where you want the frame to freeze. Go to Effects> AI Portrait> Human Segmentation and drop the effect on the snapshot layer to make the background disappear.
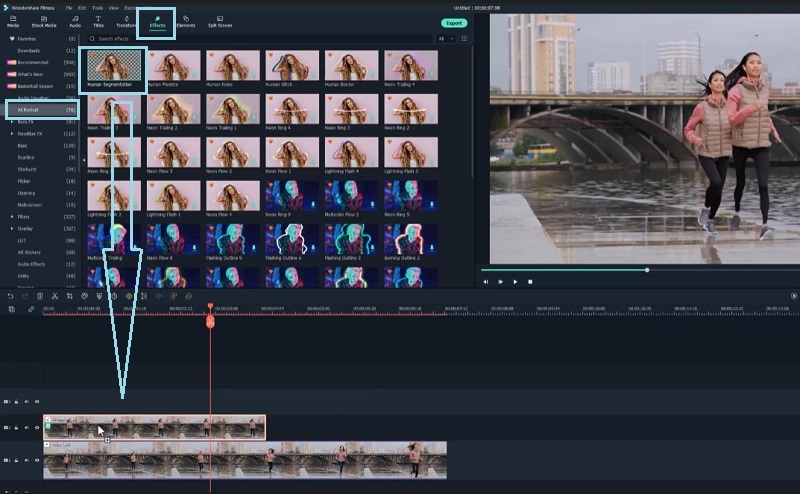
Step 5
Double-click on the snapshot layer. Go to Effect and adjust the Edge thickness so that it looks perfect. Click on OK button and play the video to check out the effect.
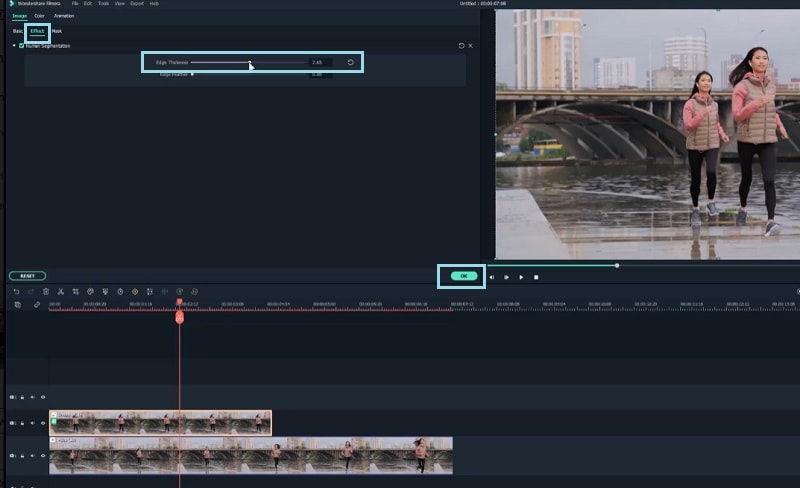
Step 6
Perform Step 3 to Step 5 again where you need to select a frame to freeze, take snapshot, drop onto timeline and remove background. Finally, play the video to check out the freeze frame clone effect. Save the video on your hard drive by click on Export button.
Summary
What you’ve learned:
- How to take snapshot from a video for freeze frame
- How to remove background from snapshot
- How to mix snapshots and video for cloning effect
What you need to prepare:
- A computer (Windows or macOS)
- Your video materials.
- Filmora video editor
Step 1
Download and install Wondershare Filmora on your computer. Launch Filmora and click on New Project on the welcome screen. Alternatively, go to File menu and select New Project option.

Step 2
Import your video clip to Project Media folder. Go to File> Import Media and click on Import Media Files option. Select the video clip from your hard drive. Otherwise, you can drag and drop the video clip directly into the Project Media folder. Finally, drop the video clip from Project Media folder onto the timeline.

Step 3
Place the marker where you want the frame to freeze. Click on Camera icon under Program window. This will take a snapshot of the current frame and place it under Project Media folder. Drag and drop the snapshot onto the timeline.

Step 4
Match the duration of the snapshot with the point where you want the frame to freeze. Go to Effects> AI Portrait> Human Segmentation and drop the effect on the snapshot layer to make the background disappear.

Step 5
Double-click on the snapshot layer. Go to Effect and adjust the Edge thickness so that it looks perfect. Click on OK button and play the video to check out the effect.

Step 6
Perform Step 3 to Step 5 again where you need to select a frame to freeze, take snapshot, drop onto timeline and remove background. Finally, play the video to check out the freeze frame clone effect. Save the video on your hard drive by click on Export button.

Summary
What you’ve learned:
- How to take snapshot from a video for freeze frame
- How to remove background from snapshot
- How to mix snapshots and video for cloning effect
What you need to prepare:
- A computer (Windows or macOS)
- Your video materials.
- Filmora video editor
Step 1
Download and install Wondershare Filmora on your computer. Launch Filmora and click on New Project on the welcome screen. Alternatively, go to File menu and select New Project option.

Step 2
Import your video clip to Project Media folder. Go to File> Import Media and click on Import Media Files option. Select the video clip from your hard drive. Otherwise, you can drag and drop the video clip directly into the Project Media folder. Finally, drop the video clip from Project Media folder onto the timeline.

Step 3
Place the marker where you want the frame to freeze. Click on Camera icon under Program window. This will take a snapshot of the current frame and place it under Project Media folder. Drag and drop the snapshot onto the timeline.

Step 4
Match the duration of the snapshot with the point where you want the frame to freeze. Go to Effects> AI Portrait> Human Segmentation and drop the effect on the snapshot layer to make the background disappear.

Step 5
Double-click on the snapshot layer. Go to Effect and adjust the Edge thickness so that it looks perfect. Click on OK button and play the video to check out the effect.

Step 6
Perform Step 3 to Step 5 again where you need to select a frame to freeze, take snapshot, drop onto timeline and remove background. Finally, play the video to check out the freeze frame clone effect. Save the video on your hard drive by click on Export button.

Summary
What you’ve learned:
- How to take snapshot from a video for freeze frame
- How to remove background from snapshot
- How to mix snapshots and video for cloning effect
What you need to prepare:
- A computer (Windows or macOS)
- Your video materials.
- Filmora video editor
Step 1
Download and install Wondershare Filmora on your computer. Launch Filmora and click on New Project on the welcome screen. Alternatively, go to File menu and select New Project option.

Step 2
Import your video clip to Project Media folder. Go to File> Import Media and click on Import Media Files option. Select the video clip from your hard drive. Otherwise, you can drag and drop the video clip directly into the Project Media folder. Finally, drop the video clip from Project Media folder onto the timeline.

Step 3
Place the marker where you want the frame to freeze. Click on Camera icon under Program window. This will take a snapshot of the current frame and place it under Project Media folder. Drag and drop the snapshot onto the timeline.

Step 4
Match the duration of the snapshot with the point where you want the frame to freeze. Go to Effects> AI Portrait> Human Segmentation and drop the effect on the snapshot layer to make the background disappear.

Step 5
Double-click on the snapshot layer. Go to Effect and adjust the Edge thickness so that it looks perfect. Click on OK button and play the video to check out the effect.

Step 6
Perform Step 3 to Step 5 again where you need to select a frame to freeze, take snapshot, drop onto timeline and remove background. Finally, play the video to check out the freeze frame clone effect. Save the video on your hard drive by click on Export button.

Summary
What you’ve learned:
- How to take snapshot from a video for freeze frame
- How to remove background from snapshot
- How to mix snapshots and video for cloning effect
How to Create Cinematic Style Videos? [Easy Guide for Beginners]
Do you find cinematic-style videos appealing? Do you wish to give your content a cinematic vibe? Hold on to this article for more!
A cinematic video style resembles a film. The act is employed in film making and visual storytelling that considers aspect ratio, composition, color, lighting style, type of film, editing, filters, and set design. The cinematic background music plays an equally important role. The article is a guide to creating a cinematic intro for YouTube.
Additionally, we will discuss the procedure to work on travel intro for a vlog. So, let us not waste time anymore! Time to start the adventure!
In this article
01 How to Create a Cinematic Intro for Your Video?
02 How to Cinematic Travel Intro for Your Travel Vlog?
03 3 Trendy Sites to Download Cinematic Background Music
Part 1: How to Create a Cinematic Intro for Your Video?
Every content creator wishes to bring new ideas to the set. The part played by cinematic background music cannot be avoided no matter what innovation is ahead of us. A cinematic and classy intro to your video displays the effort performed on your work. It compels the audience to keep following you.
For this very reason, the article conveys a guide to creating a powerful cinematic intro. Let us begin this!
For Win 7 or later (64-bit)
For macOS 10.12 or later
Step 1: Launch Wondershare Filmora to begin. Import the targeted music in the program and drag it to the timeline. Now, trim the music to 30 seconds and listen to the end part. Select the last note to match the beat in the beginning part of the music.

Step 2: Moving on, add markers to the music. Use “M” from the keyboard to mark the specific part of the track. After you are done, drag the first track onto the timeline. Trim the video to match it to the first marker.

Step 3: Perform a similar process for the rest of the video clips and trim them according to the markers. The user is directed to create a 2.35:1 widescreen cinemascope bar opener. To do so, drag two black mattes onto the timeline on top of each other.

Step 4: Drag the end of both clips to match the length of the whole video. Now, it is time to animate it. Insert 240° in the y-axis for the first keyframe. Similarly, use 422.2° for the second keyframe. For the bottom y-axis, use -240° for the first keyframe and -422.2° for the second keyframe.

Step 5: After the animation is completed, head to the “Titles” tab and look for cinematic packs. Choose one and drag it onto the timeline. Secondly, alter the duration and animation of the title. The user is expected to insert a dissolve transition at the end of the title.

Step 6: Perform the same process for the rest of the tracks. Time the titles to match the clip’s ending. Now, add a dissolve transition at the end of the clip. Trim the clip into two parts and apply square blur by navigating to the “Effects” tab to blur the video clips.

Step 7: Moving on, adjust the alpha for blur intensity. Add a dissolve transition between the cuts. In the final step, go to the “Animation” and then “Customize.” Reframe the last clip and animate a zoom-out effect. Reduce the “Scale” percent to do so. A creative cinematic intro is ready!

Part 2: How to Cinematic Travel Intro for Your Travel Vlog?
Vacationing and traveling offer exposure to learn more about people and the world around us. Are you a traveler? Do you prefer a solo vacation or with your family? Whatever your answer might be, we have got you!
To make an astonishing and engaging cinematic travel for your travel vlog, Filmora is there for us. The section shall reflect on the whole procedure using royalty-free cinematic music. Let us initiate!
For Win 7 or later (64-bit)
For macOS 10.12 or later
Step 1: The first step is simple. Open Wondershare Filmora and head to the “Media” tab. Import the targeted travel video clips onto the timeline and rearrange them. Now, navigate to the “Effects” section and search “cinematic.”

Step 2: Pick one and drag it onto the second track to present cinematic bars and a widescreen look to the video. Now, move to the “Titles” section and choose the suitable one. Drag it to the third track. Double click on it to access the “Advanced settings” and make the required alterations.

Step 3: You can modify the font size, color, and timing of the video. Again, use the “Titles” panel and hit the “Subtitles” category. Select one and drag to the third track. Make relevant changes through the same procedure as above.

Step 4: After that, duplicate the subtitle track on the timeline and repeat the required changes. Sync the text to the audio once you are done with the process.

Step 5: The user is instructed to go back to the “Titles” section and search “cinematic end credits.” Pick one and drag it to the third track. Double click on it to make a few alterations. You have performed the procedure successfully.

Part 3: 3 Trendy Sites to Download Cinematic Background Music
The use of royalty-free cinematic music creates an unmatched vibe. If you do not use it, you might not run for competition. Therefore, you need to access a great music platform for this purpose. Allow us to introduce you to three workable marketplaces. The cinematic background music that they offer is mind-boggling for sure. So, let’s go? Shall we?
Pixabay
Pixabay is an online marketplace that can be accessed effortlessly. The user is free to tailor the filter options to give the system an idea of the music requirement. You can change the results from genre to movement and theme to categories as needed. Essentially, royalty-free cinematic music can be downloaded with one tap of a button.
Moreover, the duration of the track is shown to decide consciously. Cinematic dramatic, caves of dawn, honor and sword, the introvert, and chill abstract are some music offered by Pixabay.

Chosic
Chosic is a house for a wide range of cinematic background music tracks. You can preview the audio tracks before downloading them and tackle the search bar according to your movie themes and type of set design.
Furthermore, the search filters are tailored based on relevancy, popularity, and random audios. Press the download button to have the audio in MP3 format. Epic cinematic, the inspiration, discovery, and the battle are renowned cinematic background music from Chosic.

Mixkit
Mixkit has got to be an excellent choice to deal with your everyday needs of royalty-free cinematic music. With Mixkit in the frame, the user can create movie magic using the impeccable cinematic music collection. Cinematic trailer, slow trail, piano horror, motivational cinematic, and silent descent are a few examples of a strong cinematic collection.

Final Thoughts
Every content creator wishes to transform their work using different effects and filters. Adding a cinematic style video compels the audience to be on the verge of their seats, giving them a film notion. The article highlighted three apps to download good quality and cinematic background music. Filmora also brought a thrill to the vlogs and YouTube intros.
Versatile Video Editor - Wondershare Filmora
An easy yet powerful editor
Numerous effects to choose from
Detailed tutorials provided by the official channel
02 How to Cinematic Travel Intro for Your Travel Vlog?
03 3 Trendy Sites to Download Cinematic Background Music
Part 1: How to Create a Cinematic Intro for Your Video?
Every content creator wishes to bring new ideas to the set. The part played by cinematic background music cannot be avoided no matter what innovation is ahead of us. A cinematic and classy intro to your video displays the effort performed on your work. It compels the audience to keep following you.
For this very reason, the article conveys a guide to creating a powerful cinematic intro. Let us begin this!
For Win 7 or later (64-bit)
For macOS 10.12 or later
Step 1: Launch Wondershare Filmora to begin. Import the targeted music in the program and drag it to the timeline. Now, trim the music to 30 seconds and listen to the end part. Select the last note to match the beat in the beginning part of the music.

Step 2: Moving on, add markers to the music. Use “M” from the keyboard to mark the specific part of the track. After you are done, drag the first track onto the timeline. Trim the video to match it to the first marker.

Step 3: Perform a similar process for the rest of the video clips and trim them according to the markers. The user is directed to create a 2.35:1 widescreen cinemascope bar opener. To do so, drag two black mattes onto the timeline on top of each other.

Step 4: Drag the end of both clips to match the length of the whole video. Now, it is time to animate it. Insert 240° in the y-axis for the first keyframe. Similarly, use 422.2° for the second keyframe. For the bottom y-axis, use -240° for the first keyframe and -422.2° for the second keyframe.

Step 5: After the animation is completed, head to the “Titles” tab and look for cinematic packs. Choose one and drag it onto the timeline. Secondly, alter the duration and animation of the title. The user is expected to insert a dissolve transition at the end of the title.

Step 6: Perform the same process for the rest of the tracks. Time the titles to match the clip’s ending. Now, add a dissolve transition at the end of the clip. Trim the clip into two parts and apply square blur by navigating to the “Effects” tab to blur the video clips.

Step 7: Moving on, adjust the alpha for blur intensity. Add a dissolve transition between the cuts. In the final step, go to the “Animation” and then “Customize.” Reframe the last clip and animate a zoom-out effect. Reduce the “Scale” percent to do so. A creative cinematic intro is ready!

Part 2: How to Cinematic Travel Intro for Your Travel Vlog?
Vacationing and traveling offer exposure to learn more about people and the world around us. Are you a traveler? Do you prefer a solo vacation or with your family? Whatever your answer might be, we have got you!
To make an astonishing and engaging cinematic travel for your travel vlog, Filmora is there for us. The section shall reflect on the whole procedure using royalty-free cinematic music. Let us initiate!
For Win 7 or later (64-bit)
For macOS 10.12 or later
Step 1: The first step is simple. Open Wondershare Filmora and head to the “Media” tab. Import the targeted travel video clips onto the timeline and rearrange them. Now, navigate to the “Effects” section and search “cinematic.”

Step 2: Pick one and drag it onto the second track to present cinematic bars and a widescreen look to the video. Now, move to the “Titles” section and choose the suitable one. Drag it to the third track. Double click on it to access the “Advanced settings” and make the required alterations.

Step 3: You can modify the font size, color, and timing of the video. Again, use the “Titles” panel and hit the “Subtitles” category. Select one and drag to the third track. Make relevant changes through the same procedure as above.

Step 4: After that, duplicate the subtitle track on the timeline and repeat the required changes. Sync the text to the audio once you are done with the process.

Step 5: The user is instructed to go back to the “Titles” section and search “cinematic end credits.” Pick one and drag it to the third track. Double click on it to make a few alterations. You have performed the procedure successfully.

Part 3: 3 Trendy Sites to Download Cinematic Background Music
The use of royalty-free cinematic music creates an unmatched vibe. If you do not use it, you might not run for competition. Therefore, you need to access a great music platform for this purpose. Allow us to introduce you to three workable marketplaces. The cinematic background music that they offer is mind-boggling for sure. So, let’s go? Shall we?
Pixabay
Pixabay is an online marketplace that can be accessed effortlessly. The user is free to tailor the filter options to give the system an idea of the music requirement. You can change the results from genre to movement and theme to categories as needed. Essentially, royalty-free cinematic music can be downloaded with one tap of a button.
Moreover, the duration of the track is shown to decide consciously. Cinematic dramatic, caves of dawn, honor and sword, the introvert, and chill abstract are some music offered by Pixabay.

Chosic
Chosic is a house for a wide range of cinematic background music tracks. You can preview the audio tracks before downloading them and tackle the search bar according to your movie themes and type of set design.
Furthermore, the search filters are tailored based on relevancy, popularity, and random audios. Press the download button to have the audio in MP3 format. Epic cinematic, the inspiration, discovery, and the battle are renowned cinematic background music from Chosic.

Mixkit
Mixkit has got to be an excellent choice to deal with your everyday needs of royalty-free cinematic music. With Mixkit in the frame, the user can create movie magic using the impeccable cinematic music collection. Cinematic trailer, slow trail, piano horror, motivational cinematic, and silent descent are a few examples of a strong cinematic collection.

Final Thoughts
Every content creator wishes to transform their work using different effects and filters. Adding a cinematic style video compels the audience to be on the verge of their seats, giving them a film notion. The article highlighted three apps to download good quality and cinematic background music. Filmora also brought a thrill to the vlogs and YouTube intros.
Versatile Video Editor - Wondershare Filmora
An easy yet powerful editor
Numerous effects to choose from
Detailed tutorials provided by the official channel
02 How to Cinematic Travel Intro for Your Travel Vlog?
03 3 Trendy Sites to Download Cinematic Background Music
Part 1: How to Create a Cinematic Intro for Your Video?
Every content creator wishes to bring new ideas to the set. The part played by cinematic background music cannot be avoided no matter what innovation is ahead of us. A cinematic and classy intro to your video displays the effort performed on your work. It compels the audience to keep following you.
For this very reason, the article conveys a guide to creating a powerful cinematic intro. Let us begin this!
For Win 7 or later (64-bit)
For macOS 10.12 or later
Step 1: Launch Wondershare Filmora to begin. Import the targeted music in the program and drag it to the timeline. Now, trim the music to 30 seconds and listen to the end part. Select the last note to match the beat in the beginning part of the music.

Step 2: Moving on, add markers to the music. Use “M” from the keyboard to mark the specific part of the track. After you are done, drag the first track onto the timeline. Trim the video to match it to the first marker.

Step 3: Perform a similar process for the rest of the video clips and trim them according to the markers. The user is directed to create a 2.35:1 widescreen cinemascope bar opener. To do so, drag two black mattes onto the timeline on top of each other.

Step 4: Drag the end of both clips to match the length of the whole video. Now, it is time to animate it. Insert 240° in the y-axis for the first keyframe. Similarly, use 422.2° for the second keyframe. For the bottom y-axis, use -240° for the first keyframe and -422.2° for the second keyframe.

Step 5: After the animation is completed, head to the “Titles” tab and look for cinematic packs. Choose one and drag it onto the timeline. Secondly, alter the duration and animation of the title. The user is expected to insert a dissolve transition at the end of the title.

Step 6: Perform the same process for the rest of the tracks. Time the titles to match the clip’s ending. Now, add a dissolve transition at the end of the clip. Trim the clip into two parts and apply square blur by navigating to the “Effects” tab to blur the video clips.

Step 7: Moving on, adjust the alpha for blur intensity. Add a dissolve transition between the cuts. In the final step, go to the “Animation” and then “Customize.” Reframe the last clip and animate a zoom-out effect. Reduce the “Scale” percent to do so. A creative cinematic intro is ready!

Part 2: How to Cinematic Travel Intro for Your Travel Vlog?
Vacationing and traveling offer exposure to learn more about people and the world around us. Are you a traveler? Do you prefer a solo vacation or with your family? Whatever your answer might be, we have got you!
To make an astonishing and engaging cinematic travel for your travel vlog, Filmora is there for us. The section shall reflect on the whole procedure using royalty-free cinematic music. Let us initiate!
For Win 7 or later (64-bit)
For macOS 10.12 or later
Step 1: The first step is simple. Open Wondershare Filmora and head to the “Media” tab. Import the targeted travel video clips onto the timeline and rearrange them. Now, navigate to the “Effects” section and search “cinematic.”

Step 2: Pick one and drag it onto the second track to present cinematic bars and a widescreen look to the video. Now, move to the “Titles” section and choose the suitable one. Drag it to the third track. Double click on it to access the “Advanced settings” and make the required alterations.

Step 3: You can modify the font size, color, and timing of the video. Again, use the “Titles” panel and hit the “Subtitles” category. Select one and drag to the third track. Make relevant changes through the same procedure as above.

Step 4: After that, duplicate the subtitle track on the timeline and repeat the required changes. Sync the text to the audio once you are done with the process.

Step 5: The user is instructed to go back to the “Titles” section and search “cinematic end credits.” Pick one and drag it to the third track. Double click on it to make a few alterations. You have performed the procedure successfully.

Part 3: 3 Trendy Sites to Download Cinematic Background Music
The use of royalty-free cinematic music creates an unmatched vibe. If you do not use it, you might not run for competition. Therefore, you need to access a great music platform for this purpose. Allow us to introduce you to three workable marketplaces. The cinematic background music that they offer is mind-boggling for sure. So, let’s go? Shall we?
Pixabay
Pixabay is an online marketplace that can be accessed effortlessly. The user is free to tailor the filter options to give the system an idea of the music requirement. You can change the results from genre to movement and theme to categories as needed. Essentially, royalty-free cinematic music can be downloaded with one tap of a button.
Moreover, the duration of the track is shown to decide consciously. Cinematic dramatic, caves of dawn, honor and sword, the introvert, and chill abstract are some music offered by Pixabay.

Chosic
Chosic is a house for a wide range of cinematic background music tracks. You can preview the audio tracks before downloading them and tackle the search bar according to your movie themes and type of set design.
Furthermore, the search filters are tailored based on relevancy, popularity, and random audios. Press the download button to have the audio in MP3 format. Epic cinematic, the inspiration, discovery, and the battle are renowned cinematic background music from Chosic.

Mixkit
Mixkit has got to be an excellent choice to deal with your everyday needs of royalty-free cinematic music. With Mixkit in the frame, the user can create movie magic using the impeccable cinematic music collection. Cinematic trailer, slow trail, piano horror, motivational cinematic, and silent descent are a few examples of a strong cinematic collection.

Final Thoughts
Every content creator wishes to transform their work using different effects and filters. Adding a cinematic style video compels the audience to be on the verge of their seats, giving them a film notion. The article highlighted three apps to download good quality and cinematic background music. Filmora also brought a thrill to the vlogs and YouTube intros.
Versatile Video Editor - Wondershare Filmora
An easy yet powerful editor
Numerous effects to choose from
Detailed tutorials provided by the official channel
02 How to Cinematic Travel Intro for Your Travel Vlog?
03 3 Trendy Sites to Download Cinematic Background Music
Part 1: How to Create a Cinematic Intro for Your Video?
Every content creator wishes to bring new ideas to the set. The part played by cinematic background music cannot be avoided no matter what innovation is ahead of us. A cinematic and classy intro to your video displays the effort performed on your work. It compels the audience to keep following you.
For this very reason, the article conveys a guide to creating a powerful cinematic intro. Let us begin this!
For Win 7 or later (64-bit)
For macOS 10.12 or later
Step 1: Launch Wondershare Filmora to begin. Import the targeted music in the program and drag it to the timeline. Now, trim the music to 30 seconds and listen to the end part. Select the last note to match the beat in the beginning part of the music.

Step 2: Moving on, add markers to the music. Use “M” from the keyboard to mark the specific part of the track. After you are done, drag the first track onto the timeline. Trim the video to match it to the first marker.

Step 3: Perform a similar process for the rest of the video clips and trim them according to the markers. The user is directed to create a 2.35:1 widescreen cinemascope bar opener. To do so, drag two black mattes onto the timeline on top of each other.

Step 4: Drag the end of both clips to match the length of the whole video. Now, it is time to animate it. Insert 240° in the y-axis for the first keyframe. Similarly, use 422.2° for the second keyframe. For the bottom y-axis, use -240° for the first keyframe and -422.2° for the second keyframe.

Step 5: After the animation is completed, head to the “Titles” tab and look for cinematic packs. Choose one and drag it onto the timeline. Secondly, alter the duration and animation of the title. The user is expected to insert a dissolve transition at the end of the title.

Step 6: Perform the same process for the rest of the tracks. Time the titles to match the clip’s ending. Now, add a dissolve transition at the end of the clip. Trim the clip into two parts and apply square blur by navigating to the “Effects” tab to blur the video clips.

Step 7: Moving on, adjust the alpha for blur intensity. Add a dissolve transition between the cuts. In the final step, go to the “Animation” and then “Customize.” Reframe the last clip and animate a zoom-out effect. Reduce the “Scale” percent to do so. A creative cinematic intro is ready!

Part 2: How to Cinematic Travel Intro for Your Travel Vlog?
Vacationing and traveling offer exposure to learn more about people and the world around us. Are you a traveler? Do you prefer a solo vacation or with your family? Whatever your answer might be, we have got you!
To make an astonishing and engaging cinematic travel for your travel vlog, Filmora is there for us. The section shall reflect on the whole procedure using royalty-free cinematic music. Let us initiate!
For Win 7 or later (64-bit)
For macOS 10.12 or later
Step 1: The first step is simple. Open Wondershare Filmora and head to the “Media” tab. Import the targeted travel video clips onto the timeline and rearrange them. Now, navigate to the “Effects” section and search “cinematic.”

Step 2: Pick one and drag it onto the second track to present cinematic bars and a widescreen look to the video. Now, move to the “Titles” section and choose the suitable one. Drag it to the third track. Double click on it to access the “Advanced settings” and make the required alterations.

Step 3: You can modify the font size, color, and timing of the video. Again, use the “Titles” panel and hit the “Subtitles” category. Select one and drag to the third track. Make relevant changes through the same procedure as above.

Step 4: After that, duplicate the subtitle track on the timeline and repeat the required changes. Sync the text to the audio once you are done with the process.

Step 5: The user is instructed to go back to the “Titles” section and search “cinematic end credits.” Pick one and drag it to the third track. Double click on it to make a few alterations. You have performed the procedure successfully.

Part 3: 3 Trendy Sites to Download Cinematic Background Music
The use of royalty-free cinematic music creates an unmatched vibe. If you do not use it, you might not run for competition. Therefore, you need to access a great music platform for this purpose. Allow us to introduce you to three workable marketplaces. The cinematic background music that they offer is mind-boggling for sure. So, let’s go? Shall we?
Pixabay
Pixabay is an online marketplace that can be accessed effortlessly. The user is free to tailor the filter options to give the system an idea of the music requirement. You can change the results from genre to movement and theme to categories as needed. Essentially, royalty-free cinematic music can be downloaded with one tap of a button.
Moreover, the duration of the track is shown to decide consciously. Cinematic dramatic, caves of dawn, honor and sword, the introvert, and chill abstract are some music offered by Pixabay.

Chosic
Chosic is a house for a wide range of cinematic background music tracks. You can preview the audio tracks before downloading them and tackle the search bar according to your movie themes and type of set design.
Furthermore, the search filters are tailored based on relevancy, popularity, and random audios. Press the download button to have the audio in MP3 format. Epic cinematic, the inspiration, discovery, and the battle are renowned cinematic background music from Chosic.

Mixkit
Mixkit has got to be an excellent choice to deal with your everyday needs of royalty-free cinematic music. With Mixkit in the frame, the user can create movie magic using the impeccable cinematic music collection. Cinematic trailer, slow trail, piano horror, motivational cinematic, and silent descent are a few examples of a strong cinematic collection.

Final Thoughts
Every content creator wishes to transform their work using different effects and filters. Adding a cinematic style video compels the audience to be on the verge of their seats, giving them a film notion. The article highlighted three apps to download good quality and cinematic background music. Filmora also brought a thrill to the vlogs and YouTube intros.
Versatile Video Editor - Wondershare Filmora
An easy yet powerful editor
Numerous effects to choose from
Detailed tutorials provided by the official channel
Also read:
- Updated In 2024, Zoom In and Zoom Out on YouTube
- 2024 Approved How to Get Motion Blur in Roblox?
- Updated Synchronizing Videos Can Be Hectic, but Do You Wish to Know a Good Tool for This Purpose? This Article Will Discuss Wondershare Filmora, Which Is Perfect for This
- Updated 2024 Approved With This Article, We Will Be Looking at Steps to Rotate a Video in Cyberlink PowerDirector to Help You when Required. We Have Also Mentioned the Steps You Will Need to Follow in Wondershare Filmora
- Updated In 2024, Know How to Make a Video Background Transparent? Export Transparent Background Video After Adding Effects. Steps to Remove White Background From Video
- 2024 Approved Add Stylish Text to Videos
- Updated Have You Ever Created a Slow Motion Video on Your Phonr or Camera? This Article Will Show You some Knowledge About Slow Motion Photography
- Do You Want to Create Slow-Motion Videos? This Article Shows Methods to Create Slow-Mo Videos without Changing the Medias Quality
- 2024 Approved The Definite Guide to Craig Bot Discord
- Elevate Your Designs with Feather Shapes in After Effects
- A Complete Overview of VSCO Video Editor for 2024
- Updated 2024 Approved Time Lapse Videos Play an Important Part in Videography. If You Want to Start Video Shooting, Then You Shouldnt Miss Time Lapse Video. This Article Will Show You some Ideas over This
- Top VHS Sound Effect That You Can Use in Video Making
- Updated In 2024, So, You Are a Gamer and Have Been on the Cool App Discord for a While, and You Keep Hearing People Talk About Game Bots in Discord, Like, Robot Gamers? This Article Will Discuss All Discord Game Bots and Much More
- Create a Transparent Image in Minimal Steps with Right Tools. Try Out Best Transparent Maker and Know How to Use Them. In No Time, the Desired Image Will Be Right There with You for 2024
- 15 Stunning GIF Splitter Examples You Need to Bookmark for 2024
- How To Make a Video Podcast for 2024
- New Free 3D Intro Makers for 2024
- Updated In 2024, What Are The Stages Of Film Production - 2023
- 2024 Approved Green Screens Are a Fun Way for Creators to Bring Their Personality to Their Stream, Allowing Them to Dynamically Alter Their Stream Background and Make Their Content Appear Even More Engaging and Polished
- Want to Add Life to Your Customary Business Presentations and Videos on a MacOs Device with Expressive Emojis? Dive in to Have an Insight Into the Credibility of Using Emojis on a Mac for 2024
- Forgot iPhone 11 Password? – Here are the Best Solutions | Stellar
- In 2024, Android Unlock Code Sim Unlock Your Samsung Galaxy XCover 6 Pro Tactical Edition Phone and Remove Locked Screen
- A Working Guide For Pachirisu Pokemon Go Map On Tecno Spark Go (2023) | Dr.fone
- In 2024, 6 Proven Ways to Unlock Realme Narzo 60 Pro 5G Phone When You Forget the Password
- In 2024, Full Guide to Fix iToolab AnyGO Not Working On Nokia C12 Plus | Dr.fone
- In 2024, Process of Screen Sharing Vivo V27e to PC- Detailed Steps | Dr.fone
- How to identify some outdated drivers with Windows Device Manager in Windows 11 & 10
- In 2024, The Complete Guide to Nokia C210 FRP Bypass Everything You Need to Know
- Updated 2024 Approved What Is AI API?
- In 2024, Is GSM Flasher ADB Legit? Full Review To Bypass Your Motorola G54 5GFRP Lock
- In 2024, Step-by-Step Tutorial How To Bypass Oppo Find N3 FRP
- How to Restore Deleted Oppo Reno 10 Pro+ 5G Photos An Easy Method Explained.
- 4 Ways to Transfer Messages from Apple iPhone 15 Plus to iPhone Including iPhone 15 | Dr.fone
- 3 Solutions to Find Your Xiaomi Civi 3 Disney 100th Anniversary Edition Current Location of a Mobile Number | Dr.fone
- In 2024, How to Remove a Previously Synced Google Account from Your Realme GT Neo 5 SE
- In 2024, Preparation to Beat Giovani in Pokemon Go For Tecno Camon 20 Premier 5G | Dr.fone
- Does find my friends work on Vivo S17t | Dr.fone
- Easy Steps on How To Create a New Apple ID Account On iPhone 11
- Vivo Y200 Unlock Tool - Remove android phone password, PIN, Pattern and fingerprint
- In 2024, How to Change/Add Location Filters on Snapchat For your Vivo X Flip | Dr.fone
- Quickly Remove Google FRP Lock on Nokia C12 Plus
- Title: New How to Make Custom Lower Thirds with Filmora for 2024
- Author: Morgan
- Created at : 2024-04-24 01:06:12
- Updated at : 2024-04-25 01:06:12
- Link: https://ai-video-editing.techidaily.com/new-how-to-make-custom-lower-thirds-with-filmora-for-2024/
- License: This work is licensed under CC BY-NC-SA 4.0.

