
:max_bytes(150000):strip_icc():format(webp)/GettyImages-664800650-4349941504c24712b81975694798236b.jpg)
New How to Make Vintage Film Effect 1980S for 2024
How to Make Vintage Film Effect 1980S
The 1980s is widely regarded as the golden era of music and film-making. If you play a video recorded in the 80s, you’ll notice graininess, blurriness, and light exposure, giving the footage a dreamy vintage touch. So, in this short tutorial, we’ll learn how to create a vintage 1980-style video with a retro effect that will leave your audience yearning for more.
Preparation

In this tutorial, you’ll need at least two video clips. First, take clear footage of a hoop dancer playing to music and a disco ball footage that you’ll add to the background. You can also add another footage to give your dancing video the perfect transition.
How to create a retro-style music video shot in the 80s:
Step1 Import the video clips on Filmora
Free Download For Win 7 or later(64-bit)
Free Download For macOS 10.14 or later

First, run Wondershare Filmora and add the video with the hoop dancer on the first track. Then, move the disco ball footage right above the first video track.
Step2 Add an animation keyframe

With the two videos imported on Filmora, move the playhead to the point where the hoop dancer begins to dance and double-click the disco ball footage.

Now find the Animation tab, then click the Customize tab. Next, click Add to apply a keyframe to this point of the video. Don’t stop there. Move the playhead to the right and add another keyframe to the footage before changing the opacity to 50%.

Meanwhile, we’ll add a keyframe to the third video with a lady removing her sunglasses. To do that, add the footage to the third track, then double-click the video track. After that, place the playhead at the start of the video and apply an animation keyframe before changing the opacity to 0%. Move the playhead a few keyframes forward and add another animation keyframe.
Step3 Add retro filters and effects to the video

Go to the Effect tab and choose Overlay. Once that is done, select the TV Static option before choosing the VHS Distortion effect. This effect will give your video the retro feeling of the 1980s. Don’t be afraid to try out the TV Static effects to find what works best in your video.
Summary
Creating a retro-style 1980s film is as easy as pie with Wondershare Filmora. You can also check out more 80s-inspired video effects on Wondershare’s Filmstock library. Ready to go back to the 80s? Hope so!
Free Download For macOS 10.14 or later
First, run Wondershare Filmora and add the video with the hoop dancer on the first track. Then, move the disco ball footage right above the first video track.
Step2 Add an animation keyframe
With the two videos imported on Filmora, move the playhead to the point where the hoop dancer begins to dance and double-click the disco ball footage.
Now find the Animation tab, then click the Customize tab. Next, click Add to apply a keyframe to this point of the video. Don’t stop there. Move the playhead to the right and add another keyframe to the footage before changing the opacity to 50%.
Meanwhile, we’ll add a keyframe to the third video with a lady removing her sunglasses. To do that, add the footage to the third track, then double-click the video track. After that, place the playhead at the start of the video and apply an animation keyframe before changing the opacity to 0%. Move the playhead a few keyframes forward and add another animation keyframe.
Step3 Add retro filters and effects to the video
Go to the Effect tab and choose Overlay. Once that is done, select the TV Static option before choosing the VHS Distortion effect. This effect will give your video the retro feeling of the 1980s. Don’t be afraid to try out the TV Static effects to find what works best in your video.
Summary
Creating a retro-style 1980s film is as easy as pie with Wondershare Filmora. You can also check out more 80s-inspired video effects on Wondershare’s Filmstock library. Ready to go back to the 80s? Hope so!
Add Text Animation to A Video Online
Do you want to make a creative video? Do you want your presentation or video to be easy to follow and entertaining? You can take the video to another level with the help of text animation. This article will discuss how to add text animation to online videos. You can use a good video editor from where you can select fresh styles and make the best video from there. One of the simplest ways to elevate your movie from good to excellent is with understandable text animation.
Text animation and short captions can broaden the audience for your content as more consumers view videos without sound these days. It matters what fonts you use in the videos, and they establish the mood and facilitate interaction with most viewers who rely on video captions. Add text, alter the font, add transitions, and use text effects to draw the user’s attention as they scroll. Please continue reading to discover how simple it is to make interactive video titles, words, and supers.
1. Use Kapwing animation text editor
(https://www.kapwing.com/animated-text-video-maker )
You can use the potent online editor Kapwing to add animated text to videos online, utilizing music, videos, GIFs, and images. There are no downloads required because everything is already present inside the browser. Kapwing is a capable tool for content production that is simple enough for everyone to use. The majority of video formats, GIF and image, including avi, png, jpg, gif, MOV, mp4, and more, are supported by Kapwing.
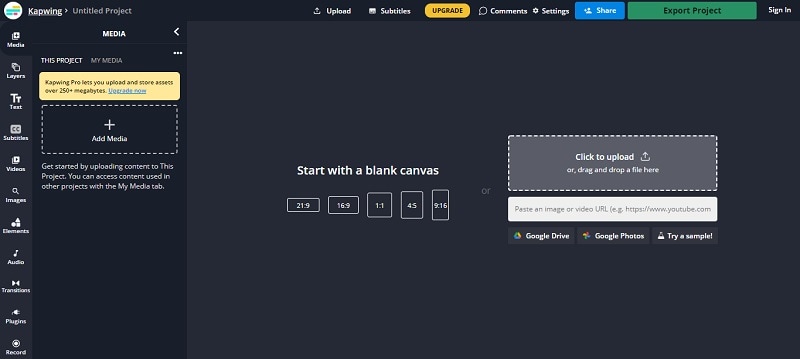
Step1 Upload the Video to Kapwing
You can open Kapwing with the device and tap on “Start Editing” to open up Kapwimg studio. After that, one can use the drag and drop option to upload the video in the studio. You can click on upload or use the link to upload.
If you have a more than 250 MB video, then you will require the Pro version.
Step2 Add the Text
When the video gets uploaded, now you can add your text. You must click the “Text” option on the left and type the text. After that, you can pick your favorite color, background, and color to add style.
You will always want that your text to get animated, but it doesn’t mean that you will have to use explosive fonts or funky or bright, which are very funky. The animation will make your text look attractive, and you can experiment with the colors and fonts to find the best combination.
Step3 Animate the Text
Now the fun part starts; choose the text box present on the right side and click on the “Animate” tab. It will allow the user to select animations like fade, flicker, hue rotates, and many more. Choose the speed according to your requirement, and if you want to change the background and color, you can do it too.
Use “Apply To” for applying this animation in the outro, intro, or both. It will help you to make the text fade out, fade in, or transition out and in with animation. Now the animation library has nine options:
- Drop: It appears on top of the text box
- Flicker: This one is like a candle’s flicker, and text flashes disappear and appear before staying.
- Fade: Opacity can be changed from 0% to 100%.
- Pop:- This grows the text more extensive than the text box and shrinks back to the place.
- Reveal:- Rolls from the left side to the right side
- Wipe:- Rolls from the left side to the right side with a colored background.
- Vibrate: The text box shakes in every direction.
- Hue rotates:- Colour of text cycles through the hue values..
You can use a timeline to adjust the animation’s termination when you set text animation. You can even drag that layer after the start time or use it on end/start time sliders to decrease or increase the time of your video. Text animation can get started when the cursor reaches the start time.
Step4 Export
The video with animated text is now ready to boom. You can click on “Export Video” present at the top and wait for the process. After that, you can download that video and use the links to share it on your social media platform.
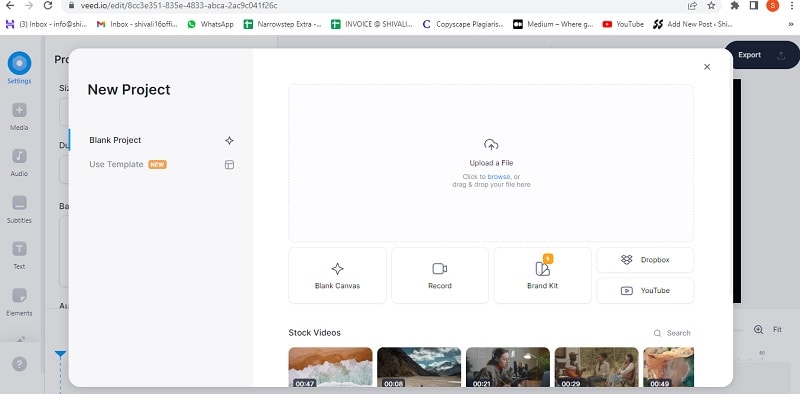
2. Use veed.io text video editor
(https://www.veed.io/create/text-video-maker )
Veed is one of the best video editor text effects online, which allows you to add text to online videos. You can easily add style, color, text, and font in a few clicks. You can upload the video and tap the text to get started. Add title and text or select handwriting font. One can select it from templates. Change transparency, alignment, and font size of the text.
This online software is perfect for creating attractive videos on social media. This is free, which omits the usage of expensive software. It is much easier to avoid many complex video editor apps. With the help of VEED, you can create an excellent video without any experience and do it with a few clicks. Let’s see how to add animated text to photos online.
Step1 Upload the video
Tap on “Choose Video” and choose the file you want to upload on VEED. One can even use the drag and drop option from the folder to the editor.
Step2 Add text
After that, you can add the text by tapping on the “Text” option on the left menu. You can select the text style and start typing.
Step3 Export
Save the video with the text you placed by tapping on “Export.” The video gets saved in an MP4 file.
3. Use Animaker text maker
(https://www.animaker.com/text-animation-maker )
The Animaker is one of the best-animated video makers. This app offers the best collection of charts, BGs, and animated characters. With the help of Animaker, you can make the text disappear or appear off-screen in the best way. After you finish your video, you can download the format in MP4.
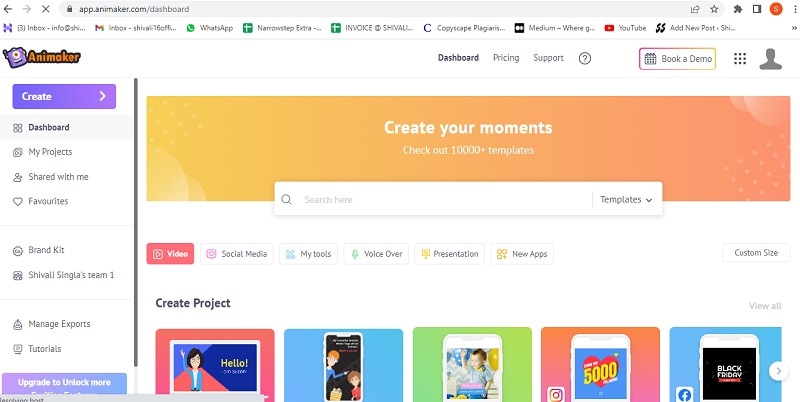
Step1 Upload the video clip
First, you can upload your video clip present on top that you wish to add text animation.
- Tap on the “Upload section” on the bottom left. You can upload your video where you wish to add the animated text.
- The video will get uploaded to “My Files.”
- Click on the uploaded video in the library to load it on the workspace.
Step2 Add text to the video
- You can add text in their text section
- In the next section, one can find two different text types. At the top, you will discover plain text options, and at the bottom, you can find pre-designed boxes seasoned at Animaker.
Let’s see how you can use pre-built text boxes.
- Tap on pre-built designs for your text animation. One can see the text appearing in the center of the workspace, and you can click it and type new text if you want to customize it.
- You can notice widespread options appearing with your text. It is known as the item menu. It will allow the user to modify their text. One can change font size, color, style, etc. Your text will come with pre-defined effects, which will help you to animate text instantly.
- You must have noticed that the purple color bar appears on the timeline, representing the duration of the text visible in the video. For example, if you want that text to get visible between 4rth to 8th seconds, then you will have to drag the edges of that purple bar to the same duration.
To see the scene, you must click on the play button on top of the timeline.
Let’s check the other ways of adding animated text to the video. In the previous one, you have seen how you can add text animation using pre-built boxes. Now you will get to know about doing it by using blank boxes.
- Start tapping the “text section”. Select the bank textbox.
- Click on them and then opt to add new text.
- Opt for clicking the cog icon that is there in the item menu.
- You will notice the settings tab that is on the screen’s right side.
- You can easily opt for the customization of the text in the way you wish. You can start by modifying the style of the font. One can change the size and color of the font as well.
- Use these options and opt for the application of enter and/or exit effects to text. Now, opt to click on the effect option to get more than 50 options. You can select the effect from there.
- Once the animation effect is applied to your timeline, you can notice the pink part in the bar i.e. purple. This completes creating text animation by using Animaker.
Step3 Download the Video
- You can visit the publish option in the right window to download the video.
- Tap on the “download video” option for downloading.
Conclusion
Now, you are aware of how to add text animation to video online and the three best video editors that will help you add animated text to your videos. At this point, you can choose the best one according to your needs and usage. These steps will help you create a unique and good video that will be easy to understand and entertaining.
Free Download For Win 7 or later(64-bit)
Free Download For macOS 10.14 or later
Free Download For macOS 10.14 or later
Some Facts About GIF Background You Didn’t Know
Some Facts About GIF Background You Didn’t Know
An easy yet powerful editor
Numerous effects to choose from
Detailed tutorials provided by the official channel
Once you start using GIFs in your everyday conversations, there’s no going back. GIFs make the conversation more immersive and enjoyable and add a sense of emotion that is not possible with ordinary text. You probably loved some gifs more than others, or there were moments when you wanted to turn them into gifs and wished you could use them as a gif background on your device or presentation but couldn’t figure out how to do it. But, now you don’t have to bury your wish any longer. During this article, you will learn everything there is to know about all the different ways you can use gifs as your background and many more. In addition, you will learn how to use them as your background and how to create them.
In this article
01 [How to Use a GIF as Your Desktop Background on Windows](#Part 1)
02 [How to Make GIF Background on Windows/Mac/Android/iPhone](#Part 2)
03 [How to Make GIF Powerpoint Background](#Part 3)
04 [How to Make GIF Without Background - Free & Efficiently?](#Part 4)
Part 1 How to Use a GIF as Your Desktop Background on Windows?
Although Windows doesn’t have native support to keep animated gif backgrounds, you can use third-party services to keep gifs as background images.
Using Plastuer or BioniX wallpaper changer as a 3rd party software is the best way to use animated gifs for your desktop.
As a starting point, we’ll cover plastuer, which uses WebGL and chromium-browser to make gifs as your background.

The software includes selecting different screens where you want the wallpaper to appear, making it possible to apply it to different screens at once.
To select the gif you want:
● You can paste the URL of the gif you want to use.
● You can also use the “create playlist” field to add multiple gifs as your background.
● You can select a file from your device using the “select file” option.
● Or you can choose from hundreds of gifs present in the plastuer library.
● You can disable the wallpaper whenever you wish by clicking on the “disable wallpaper” option.

How to use the bioniX wallpaper changer?
BioniX comes with several options that one may need to apply to their Windows device’s background, and animated gif backgrounds are one of them.

You will need to download the software and once it is installed, launch it on your PC to apply cool gif backgrounds. To choose files from the device itself, you will have to use the shortcut command “CTRL+F”, or you can also choose to insert the URL of the gif you want to use as your background.
Once your image gets uploaded into the software, double click on it to set it as your windows wallpaper. You can also choose a launch of gifs, create a playlist, and select the timer to change wallpaper regularly.
Part 2 How to Make GIF Background on Windows/Mac/Android/iPhone?
So, how can you create moving background gifs on your different devices like Windows/Mac/Android/iPhone?
In case you thought that was hard, you were entirely mistaken. Now, you can easily create or customize cool background gifs for your computer, tablet, phone, or other devices that you own. The best part is that you don’t need any technical skills to use different tools.
You can create gifs with the help of many tools such as Giphy and share them with your family, friends, and coworkers.
01Giphy
Giphy is a one-stop destination for all of your gifs needs. You can create or choose from thousands of gifs present in their library. Furthermore, one can make personalized gifs with all the tools they provide and add custom stickers, texts or different filters. There is also a live wallpaper section present in giphy, from where you can download hundreds of cool gif backgrounds and make your old machine look fabulous again.

02Pinterest
It’s no secret that Pinterest has a lot of great images, but did you know you can also find gif backgrounds here in various genres that you like and then download them?
It’s straightforward to use, and you can also find anime gif backgrounds on Pinterest if you are an anime fan.

03Tenor
This site offers online gif backgrounds. One may choose from a wide selection of wallpapers and backgrounds available on this site. Online Library is filled up with all sorts of aesthetic gif backgrounds and other types of background that people like.
A few more tools fit the need, but most of them are not reliable, and the tools mentioned above are currently the best ones available for you to use.

Part 3 How to Make a GIF Powerpoint Background?
If you make PowerPoint presentations, you can use various tools to modify your presentation. But did you know that you can also include an aesthetic gif background as part of your presentation?
The steps to creating a gif PowerPoint background are very simple, and below you will find all the steps you need to follow:
● You’ll need to choose the PPTx file that you want to use the GIF background on to get started. Then you can choose the specific slide.
● Navigate to the “design” tab, then to the “background” section. You will see a “background styles” option where you will have to select “format background” to complete the process.
● Select “fill” in the left-hand side panel of the appeared window. Now, select “picture or texture fill” and choose the “file” button, which will lead to another window.
● In the “look in” menu, find the folder or file where the required gif is present. Go on to select the “ok” option. You can either select “close” to apply the gif to a particular slide or “apply to all” to use the gif background in the whole presentation.
Part 4 How to Make GIF Without Background - Free & Efficiently?
One may also look for transparent gif maker websites that will help them make gifs without background and use them on different devices they own.
Here are a few websites that are best for this job; they won’t only help you make transparent gifs but also edit various features like delay time, animation speed etc.
01Using EzGif
Using EzGif is probably one of the best options available in the market at the moment. You can go to their website and create a transparent gif background of high resolution.
Doing that is easy; you need to upload PNG type images that don’t have a background or combine transparent background to form a gif. You can choose up to 2000 images with a maximum file size of 100 MB for all images combined.
To create a gif, go on their site, then to the “gif maker” section to upload the images, and click on “make a gif” to make a transparent gif from the selected images. Once the gif is created, you can use it as a moving gif background and share it with friends or family.
02Use animizer.net to create a gif without background
It is effortless to use software to create transparent gifs by uploading multiple transparent PNG images and combining them to form a gif.
You can use unlimited images for your gif and animated gif background. It also lets you adjust various settings for your transparent gifs like loops, animation speed and much more.
03Use filmora for making gifs without background easily
Wondershare Filmora Video Editor is an all in one tool that will help you create all sorts of gifs, including transparent gifs. You can take advantage of their easy to use tools that are fir for people who have no technical skills at all.
You can easily upload the images and remove their background in the software itself and later use it in the gif you are willing to create.

Wondershare Filmora - Best Video Editor for Mac/Windows
5,481,435 people have downloaded it.
Build unique custom animations without breaking a sweat.
Focus on creating epic stories and leave the details to Filmora’s auto features.
Start a creative adventure with drag & drop effects and endless possibilities.
Filmora simplifies advanced features to save you time and effort.
Filmora cuts out repetition so you can move on to your next creative breakthrough.
This is probably one of the best options if you are looking for an all in one tool for all your needs.
● Ending Thoughts →
● The techniques that we have talked about in this guide may help you discover things about gif backgrounds you have not known before.
● They are incredible and can help you utilize gifs in ways you hadn’t even considered.
● Create a moving gif background and apply it to any device easily.
● Of course, a simple background won’t provide the same type of effect as a moving gif. With this guide, you’ll learn about every tool that you may use and how to apply or create a cool gif background on your own.
Once you start using GIFs in your everyday conversations, there’s no going back. GIFs make the conversation more immersive and enjoyable and add a sense of emotion that is not possible with ordinary text. You probably loved some gifs more than others, or there were moments when you wanted to turn them into gifs and wished you could use them as a gif background on your device or presentation but couldn’t figure out how to do it. But, now you don’t have to bury your wish any longer. During this article, you will learn everything there is to know about all the different ways you can use gifs as your background and many more. In addition, you will learn how to use them as your background and how to create them.
In this article
01 [How to Use a GIF as Your Desktop Background on Windows](#Part 1)
02 [How to Make GIF Background on Windows/Mac/Android/iPhone](#Part 2)
03 [How to Make GIF Powerpoint Background](#Part 3)
04 [How to Make GIF Without Background - Free & Efficiently?](#Part 4)
Part 1 How to Use a GIF as Your Desktop Background on Windows?
Although Windows doesn’t have native support to keep animated gif backgrounds, you can use third-party services to keep gifs as background images.
Using Plastuer or BioniX wallpaper changer as a 3rd party software is the best way to use animated gifs for your desktop.
As a starting point, we’ll cover plastuer, which uses WebGL and chromium-browser to make gifs as your background.
The software includes selecting different screens where you want the wallpaper to appear, making it possible to apply it to different screens at once.
To select the gif you want:
● You can paste the URL of the gif you want to use.
● You can also use the “create playlist” field to add multiple gifs as your background.
● You can select a file from your device using the “select file” option.
● Or you can choose from hundreds of gifs present in the plastuer library.
● You can disable the wallpaper whenever you wish by clicking on the “disable wallpaper” option.
How to use the bioniX wallpaper changer?
BioniX comes with several options that one may need to apply to their Windows device’s background, and animated gif backgrounds are one of them.
You will need to download the software and once it is installed, launch it on your PC to apply cool gif backgrounds. To choose files from the device itself, you will have to use the shortcut command “CTRL+F”, or you can also choose to insert the URL of the gif you want to use as your background.
Once your image gets uploaded into the software, double click on it to set it as your windows wallpaper. You can also choose a launch of gifs, create a playlist, and select the timer to change wallpaper regularly.
Part 2 How to Make GIF Background on Windows/Mac/Android/iPhone?
So, how can you create moving background gifs on your different devices like Windows/Mac/Android/iPhone?
In case you thought that was hard, you were entirely mistaken. Now, you can easily create or customize cool background gifs for your computer, tablet, phone, or other devices that you own. The best part is that you don’t need any technical skills to use different tools.
You can create gifs with the help of many tools such as Giphy and share them with your family, friends, and coworkers.
01Giphy
Giphy is a one-stop destination for all of your gifs needs. You can create or choose from thousands of gifs present in their library. Furthermore, one can make personalized gifs with all the tools they provide and add custom stickers, texts or different filters. There is also a live wallpaper section present in giphy, from where you can download hundreds of cool gif backgrounds and make your old machine look fabulous again.
02Pinterest
It’s no secret that Pinterest has a lot of great images, but did you know you can also find gif backgrounds here in various genres that you like and then download them?
It’s straightforward to use, and you can also find anime gif backgrounds on Pinterest if you are an anime fan.
03Tenor
This site offers online gif backgrounds. One may choose from a wide selection of wallpapers and backgrounds available on this site. Online Library is filled up with all sorts of aesthetic gif backgrounds and other types of background that people like.
A few more tools fit the need, but most of them are not reliable, and the tools mentioned above are currently the best ones available for you to use.
Part 3 How to Make a GIF Powerpoint Background?
If you make PowerPoint presentations, you can use various tools to modify your presentation. But did you know that you can also include an aesthetic gif background as part of your presentation?
The steps to creating a gif PowerPoint background are very simple, and below you will find all the steps you need to follow:
● You’ll need to choose the PPTx file that you want to use the GIF background on to get started. Then you can choose the specific slide.
● Navigate to the “design” tab, then to the “background” section. You will see a “background styles” option where you will have to select “format background” to complete the process.
● Select “fill” in the left-hand side panel of the appeared window. Now, select “picture or texture fill” and choose the “file” button, which will lead to another window.
● In the “look in” menu, find the folder or file where the required gif is present. Go on to select the “ok” option. You can either select “close” to apply the gif to a particular slide or “apply to all” to use the gif background in the whole presentation.
Part 4 How to Make GIF Without Background - Free & Efficiently?
One may also look for transparent gif maker websites that will help them make gifs without background and use them on different devices they own.
Here are a few websites that are best for this job; they won’t only help you make transparent gifs but also edit various features like delay time, animation speed etc.
01Using EzGif
Using EzGif is probably one of the best options available in the market at the moment. You can go to their website and create a transparent gif background of high resolution.
Doing that is easy; you need to upload PNG type images that don’t have a background or combine transparent background to form a gif. You can choose up to 2000 images with a maximum file size of 100 MB for all images combined.
To create a gif, go on their site, then to the “gif maker” section to upload the images, and click on “make a gif” to make a transparent gif from the selected images. Once the gif is created, you can use it as a moving gif background and share it with friends or family.
02Use animizer.net to create a gif without background
It is effortless to use software to create transparent gifs by uploading multiple transparent PNG images and combining them to form a gif.
You can use unlimited images for your gif and animated gif background. It also lets you adjust various settings for your transparent gifs like loops, animation speed and much more.
03Use filmora for making gifs without background easily
Wondershare Filmora Video Editor is an all in one tool that will help you create all sorts of gifs, including transparent gifs. You can take advantage of their easy to use tools that are fir for people who have no technical skills at all.
You can easily upload the images and remove their background in the software itself and later use it in the gif you are willing to create.
Wondershare Filmora - Best Video Editor for Mac/Windows
5,481,435 people have downloaded it.
Build unique custom animations without breaking a sweat.
Focus on creating epic stories and leave the details to Filmora’s auto features.
Start a creative adventure with drag & drop effects and endless possibilities.
Filmora simplifies advanced features to save you time and effort.
Filmora cuts out repetition so you can move on to your next creative breakthrough.
This is probably one of the best options if you are looking for an all in one tool for all your needs.
● Ending Thoughts →
● The techniques that we have talked about in this guide may help you discover things about gif backgrounds you have not known before.
● They are incredible and can help you utilize gifs in ways you hadn’t even considered.
● Create a moving gif background and apply it to any device easily.
● Of course, a simple background won’t provide the same type of effect as a moving gif. With this guide, you’ll learn about every tool that you may use and how to apply or create a cool gif background on your own.
Hitfilm Express Video Editor Review
If you are involved in video editing, you better know the importance of using hitfilm express download. This video editing tool helps the users to perform video editing efficiently. Along with basic features, the program also provides advanced-level functionality that makes edited videos phenomenal. Every casual video editor gets attracted to the hitfilm express download for its extraordinary features. Anyone can download the video editing software from an online platform named FXHome.
The free software is so impressive that it can give tough competition to paid video editing platforms like Studio, Adobe Premiere Pro, and After Effects. For both novice and seasoned youtubers, this platform provides some amusing features like 400+ visual effects, compositing tools presets, and cinematic features to unveil their creativity at its best.
1. How to download and install Hitfilm Express?
People increasingly depend on this software since it is free to download. Available for both Mac and Windows, this software works as exceptional community support. The software comes with documentation and tutorials so that new users don’t face any difficulty getting used to the platform. You can download hitfilm express editing software from any third-party platform, but it is advisable to download the video editor from the official website directly. You only have to ensure that your internet connection is speedy enough for activation.
Here is the step-by-step process for the online installation of HitFilm Express.

- First, go to the official website of HItFilm Express and click the download button.
- You have to fill in the details directly on the registration page. You will get the download URL in your mail address by doing this. Check your inbox to download the installer.
- Now, allow the installation file to run and then follow the steps.
- Once the installation is completed, it’s time to activate the software. A dialog box will appear on opening the program with options like login and activation. Click the “Get Free License” to land on the website.
- After getting into the website, log in to your previously created FXhome account. When you have finally logged in to your account, search the serial code.
- Revert the software and hit the Activate and Unlock button to enter the serial code and opt for software activation. It is how your entire installation process will be completed.
2. Key Features of Hitfilm Express
If you want to take your video editing to the next level like a professional, hitfilm express editing software is your one-stop solution. Here is a wide array of features that provides amateurs to professionals a seamless experience.
**Professional project quality: The UHD support and RAM preview of HitFilm Express provide the users the supreme quality formats. Whatever footage you collect from documentaries captured by high-end cameras or smartphones, HItFilm will manage everything.
**Commentator recorder: Once you click the button, you will easily adjoin voiceover to the uploaded videos without leaving the HitFilm. The HitFilm Express is designed so that your recording will promptly add to a soundtrack so that you can do the finishing touches with the audio effects.
**Integrated timelines: Keep switching from one tab to another, same as you do on the browser, as per your needs. You can edit in one tab, make a composition in the other, and then get back to the editor without the necessity of loading other software.
**Customized playback: You can personalize playback. It will help you get exposed to non-stop playback in the trimmer, thus preventing lagging and making edits easier. It allows you to control the playback quality and make hasty edits.
**Smart search: With the help of HitFilm Express, you can locate your desired keyword quickly. It will also help you find properties for all the effects, media, and timelines. In case you come from a different software system, the algorithm of hitfilm express editor identifies the keyword links and assists you in finding your search.
**Numerous streams: To allow the gamers to have a rejoicing experience, HitFilm allows importing files with multiple audio streams and provides you with complete flexibility over workflow.
**Adjustable trimmer: With HitFilm Express, you can re-trim clips even after adding to the timeline. The moment you double-click the clip, it will automatically get sent to the trimmer panel to allow you to make necessary adjustments. Once you have completed the changes, the clip will be again updated.
**Cinematic outlook: You can prepare your film with the classic cine-effects of HItFilm Express. Choose your most preferred effects like Day For Night, Three-Strip Color, Film Grain, and other styles to give a cinematic edge.
3. How to edit videos with Hitfilm Express?
Editing is cutting and accumulating the selected clips to tell the story better. Editing consists of adding sound effects, transitions, and other visual elements to help it view excellent results.

You have to set up the editor timeline and start importing clips to edit your clips. Use the editor tools like roll, slip, drag, selection, ripple, and others to customize your edit.

- Choose the Set in point button from the point where you want to start the clip. In the timeline, you will notice an orange section representing the part of the clip you want to play.
- Now, skip through, and decide where you want to end the clip. You have to click the Set-out button. You can alternatively use the I and 0 keys as shortcuts.
- Once you get your selected start and endpoint, you can drag down the portion of the video into the timeline. This time, you can get a message that shows the editor settings are different from the adding clip. It is your choice how you want to keep your settings.
- If you find the selected set of a good standard, you can move forward and select “Yes” to ensure that your project gets changed into that setting.
- In the viewer section, you will get to view the final outlook of the video. Here, on the downside of the timeline, you can click on the Zoom bar to see things in detail. Your previews will depend on the selected settings that you have made beforehand.
- If you want to change your default setting, you can come to the hamburger icon for tracking and changing the size of the video to different ones.
- Add a clip to the timeline: Position the play head at the timeline point where you want to start the clip, and then hit the insert clip button.

4. Hitfilm Express Alternative to Edit Videos
Anyone who finds video editing fun filling can try out Filmora . It is an ideal alternative to hitfilm express editing tutorial. Whether you shoot in an entry-level camera or a high-end video camera, Filmora will help you create and edit the most suitable videos. During the video editing procedure, you can experience multiple challenges that help you stay patient and work slowly to come out with the project.

It is the best video editing platform for beginners since it can provide comprehensive support for creating different video formats. The user-friendly interface and powerful editing features make the video editor one of the most used video editing software.
For Win 7 or later (64-bit)
For macOS 10.12 or later
Step-by-step guide for editing videos with Filmora
Step 1: Double click on the Filmora’s icon to start working on your project. Either open the new project or click on the aspect ratio for time-saving editing.
Step 2: Select the “project setting” option to customize the aspect ratio as per your need. Next, you will go to the import media files to choose the import with the instant cutter tool and opt for easy trimming of videos.
You can also use a lens correction tool to improve the quality of videos.
Step 3: Create a new folder and organize the clips alphabetically to increase efficiency.
Step 4: Drag and drop the trimmed videos on the timeline and rearrange them to remove the unnecessary parts. Press the play button to get previews of your added video clips.
Step 5: Now, it’s time to add audio and visual effects to your trimmed footage. You can also add opening titles and subtitles and use text templates to work on the video transition.
Step 6: With the help of a color correction tool, you can make the videos look vivid. It takes enough time and dedication to master color correction for your videos.
Step 7: When you are 100% sure about the final outlook of the project, you have to export the videos on YouTube for fast uploading on social media networks. Otherwise, you can opt for saving the video on the hard drives.
5. FAQs about Hitfilm Express
1.Is Hitfilm Express still free?
Ans: HitFilm Express is still free with alternative paid add-ons. The free video editing software helps make excellent films and video games with the professional-grade VFX. From students, beginners, and gamers to you Tubers – anyone can work on their creativity without spending a penny.
2.Is Hitfilm Express safe to download?
Ans: With more than 5 million active users across 160 countries, HitFilm Express is safe and legit software to download. If you are susceptible to using this platform, it is an excellent option to experience some remarkable features and learn A to Z of video editing.
3.Is Hitfilm Express still worth it?
Ans: IF anyone opts for the paid version, it will be expensive. However, the video editing software has beginner-friendly features like different AI tools for guided editing, 4K support, and others that hardly make any sense compared with other free software.
Looking at its professional features and high-quality editing, it is the most powerful video editing platform.
Conclusion
In a nutshell, HItFilm is an entirely free version of video editing software. Beginners can quickly learn it since the editing features can be easily grasped. To create amateur videos for professional ones, HitFilm Express is your one-stop solution. The customizable effects and compositing layers provide your videos with an excellent cinematic look. Everything you will get without spending any money.
Therefore, if you want to learn the A to Z of video editing for absolutely free, you can blindly rely on the hitfilm express editor.
2. Key Features of Hitfilm Express
If you want to take your video editing to the next level like a professional, hitfilm express editing software is your one-stop solution. Here is a wide array of features that provides amateurs to professionals a seamless experience.
**Professional project quality: The UHD support and RAM preview of HitFilm Express provide the users the supreme quality formats. Whatever footage you collect from documentaries captured by high-end cameras or smartphones, HItFilm will manage everything.
**Commentator recorder: Once you click the button, you will easily adjoin voiceover to the uploaded videos without leaving the HitFilm. The HitFilm Express is designed so that your recording will promptly add to a soundtrack so that you can do the finishing touches with the audio effects.
**Integrated timelines: Keep switching from one tab to another, same as you do on the browser, as per your needs. You can edit in one tab, make a composition in the other, and then get back to the editor without the necessity of loading other software.
**Customized playback: You can personalize playback. It will help you get exposed to non-stop playback in the trimmer, thus preventing lagging and making edits easier. It allows you to control the playback quality and make hasty edits.
**Smart search: With the help of HitFilm Express, you can locate your desired keyword quickly. It will also help you find properties for all the effects, media, and timelines. In case you come from a different software system, the algorithm of hitfilm express editor identifies the keyword links and assists you in finding your search.
**Numerous streams: To allow the gamers to have a rejoicing experience, HitFilm allows importing files with multiple audio streams and provides you with complete flexibility over workflow.
**Adjustable trimmer: With HitFilm Express, you can re-trim clips even after adding to the timeline. The moment you double-click the clip, it will automatically get sent to the trimmer panel to allow you to make necessary adjustments. Once you have completed the changes, the clip will be again updated.
**Cinematic outlook: You can prepare your film with the classic cine-effects of HItFilm Express. Choose your most preferred effects like Day For Night, Three-Strip Color, Film Grain, and other styles to give a cinematic edge.
3. How to edit videos with Hitfilm Express?
Editing is cutting and accumulating the selected clips to tell the story better. Editing consists of adding sound effects, transitions, and other visual elements to help it view excellent results.
You have to set up the editor timeline and start importing clips to edit your clips. Use the editor tools like roll, slip, drag, selection, ripple, and others to customize your edit.
- Choose the Set in point button from the point where you want to start the clip. In the timeline, you will notice an orange section representing the part of the clip you want to play.
- Now, skip through, and decide where you want to end the clip. You have to click the Set-out button. You can alternatively use the I and 0 keys as shortcuts.
- Once you get your selected start and endpoint, you can drag down the portion of the video into the timeline. This time, you can get a message that shows the editor settings are different from the adding clip. It is your choice how you want to keep your settings.
- If you find the selected set of a good standard, you can move forward and select “Yes” to ensure that your project gets changed into that setting.
- In the viewer section, you will get to view the final outlook of the video. Here, on the downside of the timeline, you can click on the Zoom bar to see things in detail. Your previews will depend on the selected settings that you have made beforehand.
- If you want to change your default setting, you can come to the hamburger icon for tracking and changing the size of the video to different ones.
- Add a clip to the timeline: Position the play head at the timeline point where you want to start the clip, and then hit the insert clip button.
4. Hitfilm Express Alternative to Edit Videos
Anyone who finds video editing fun filling can try out Filmora . It is an ideal alternative to hitfilm express editing tutorial. Whether you shoot in an entry-level camera or a high-end video camera, Filmora will help you create and edit the most suitable videos. During the video editing procedure, you can experience multiple challenges that help you stay patient and work slowly to come out with the project.
It is the best video editing platform for beginners since it can provide comprehensive support for creating different video formats. The user-friendly interface and powerful editing features make the video editor one of the most used video editing software.
For Win 7 or later (64-bit)
For macOS 10.12 or later
Step-by-step guide for editing videos with Filmora
Step 1: Double click on the Filmora’s icon to start working on your project. Either open the new project or click on the aspect ratio for time-saving editing.
Step 2: Select the “project setting” option to customize the aspect ratio as per your need. Next, you will go to the import media files to choose the import with the instant cutter tool and opt for easy trimming of videos.
You can also use a lens correction tool to improve the quality of videos.
Step 3: Create a new folder and organize the clips alphabetically to increase efficiency.
Step 4: Drag and drop the trimmed videos on the timeline and rearrange them to remove the unnecessary parts. Press the play button to get previews of your added video clips.
Step 5: Now, it’s time to add audio and visual effects to your trimmed footage. You can also add opening titles and subtitles and use text templates to work on the video transition.
Step 6: With the help of a color correction tool, you can make the videos look vivid. It takes enough time and dedication to master color correction for your videos.
Step 7: When you are 100% sure about the final outlook of the project, you have to export the videos on YouTube for fast uploading on social media networks. Otherwise, you can opt for saving the video on the hard drives.
5. FAQs about Hitfilm Express
1.Is Hitfilm Express still free?
Ans: HitFilm Express is still free with alternative paid add-ons. The free video editing software helps make excellent films and video games with the professional-grade VFX. From students, beginners, and gamers to you Tubers – anyone can work on their creativity without spending a penny.
2.Is Hitfilm Express safe to download?
Ans: With more than 5 million active users across 160 countries, HitFilm Express is safe and legit software to download. If you are susceptible to using this platform, it is an excellent option to experience some remarkable features and learn A to Z of video editing.
3.Is Hitfilm Express still worth it?
Ans: IF anyone opts for the paid version, it will be expensive. However, the video editing software has beginner-friendly features like different AI tools for guided editing, 4K support, and others that hardly make any sense compared with other free software.
Looking at its professional features and high-quality editing, it is the most powerful video editing platform.
Conclusion
In a nutshell, HItFilm is an entirely free version of video editing software. Beginners can quickly learn it since the editing features can be easily grasped. To create amateur videos for professional ones, HitFilm Express is your one-stop solution. The customizable effects and compositing layers provide your videos with an excellent cinematic look. Everything you will get without spending any money.
Therefore, if you want to learn the A to Z of video editing for absolutely free, you can blindly rely on the hitfilm express editor.
Also read:
- New To Help You Perform This Action, in This Article, We List the Steps You Will Need for Cropping Into Video Clips with PowerDirector. As an Added Bonus, We Have Also Included the Method to Perform the Same Actions in WonderShare Filmora for 2024
- Updated 2024 Approved Learn to Create Custom Sequence Presets in Premiere Pro for Efficient Video Editing. Ensure Consistency and Speed up Your Workflow with Personalized Settings
- New 2024 Approved What Are the Top 15 Slideshow Presentation Examples Your Audience Will
- Updated How to Speed Up Video on Instagram Reels for 2024
- In 2024, 2 Practical Ways to Combine Videos on TikTok
- New In 2024, How to Change Aspect Ratio of Video?
- New How Much Wedding Videographer Cost for 2024
- How to Customize Your Loading Text Effect for 2024
- New Best GIF to AVI Converters (Online + Software Solutions) for 2024
- In 2024, 18 Video Editors Weve Tested Heres What We Learned
- New How to Fade to Black Premiere Pro for 2024
- The Best Wedding LUTs for Premiere Pro for 2024
- Updated 20 Best Text To Speech Software Windows, Mac, Android, iPhone & O for 2024
- Top 18 Video Editors for PC and Mac
- New Looking for the Tools that Can Let You Blend Images Perfectly for Creating an Awesome Collage? Shortlisted for You Are the Best Bend Collage Program for an Effortless Task for 2024
- How to Create Vintage Film Effect 1950S for 2024
- Updated 2024 Approved What Is First Impression Review Video
- In 2024, Guide Adopting Lumetri Color Presets in Effective Color Grading
- If You Are a Marketer Who Want to Create Facebook Ads to Boost Your Business, You Are Coming to the Right Place. Well Share You some Useful Tips to Start Your First FB Ads Campaign for 2024
- New You Can Learn How to Color Grade Your Picture in Lightroom Effectively. By Understanding the Process of Color Grading in Lightroom, You Can Create Unique Works, and Improve Your Abilities
- Updated Detailed Guide to Rotate Videos in Blender for 2024
- Updated Top Fixes to Resolve Issues with Premiere Pro Slow Playback for 2024
- Updated How to Concatenate Videos Using FFmpeg
- Updated In 2024, How to Create Sports Intro and YouTube Endscreen?
- Updated Best Video Grabbers for Chrome for 2024
- Updated Color Lut in Video - Color Grade Your Video for 2024
- New In 2024, Everything You Need to Know About Color Grading in Photography
- Updated Learn to Merge Clips in DaVinci Resolve with Simple Steps for 2024
- Updated 2024 Approved Best 8 Augmented Reality Video Games
- New 2024 Approved This Article Presents the Guide to Using Magic Effects for Creating Competent Films with Step-by-Step Instructions and Filmoras Grow and Win Program Contest
- Updated Polish and Enshrine Your Music Videos with the Best Editing Software, Filmora. Add Cuts to Your Beat, Light Leaks, and Much More for 2024
- Updated Here Is a Step-by-Step Guide to Color Correct and Color Grade a Video Professionally with Wondershare Filmora. Lets Get Going
- New In 2024, How to Make Video Slow Motion? Complete Guide
- Want to Add Life to Your Customary Business Presentations and Videos on a MacOs Device with Expressive Emojis? Dive in to Have an Insight Into the Credibility of Using Emojis on a Mac for 2024
- Updated Do You Wish to Create the Best Video Collages ? No Problem, because Wondershare Filmora Will Help You Make the Best Video Collages
- Updated In 2024, Read This Review to Learn Everything You Need to Know About Leeming LUT Pro and How to Apply Pro LUTs Using Different Video Editors
- Updated In 2024, The Best GIF Editors Weve Tested Heres What We Learned
- New Want to Apply a Filter on Your Video Using Your iPhone or Mac? Here Are the Simple Steps to Put Add Filters on iMovie. Find Out a Better iMovie Alternative with More Filters
- Updated 2024 Approved Add Flesh to Your Video Content Before Posting Them for Your Audience to See Using Meme Texts. Use the Tutorial Guide Shared in This Post
- Start Making Procreate GIFs and Take Your Editing Creativity to the Next Level for 2024
- How to Apply Gaussian Blur Effect to Videos In Premiere Pro?
- 2024 Approved Learn How to Use and Download KineMaster Templates Like a Pro. Discover Alternative Video Templates to Elevate Your Video Creation
- Updated In 2024, You Can Learn How to Color Grade Your Picture in Lightroom Effectively. By Understanding the Process of Color Grading in Lightroom, You Can Create Unique Works, and Improve Your Abilities
- In 2024, How to jailbreak iCloud locked iPhone 11 Pro Max
- How to Huawei Nova Y91 Get Deleted Phone Number Back with Ease and Safety
- How to identify missing or malfunctioning hardware drivers with Windows Device Manager in Windows 7
- Delete Gmail Account With/Without Password On Samsung Galaxy A15 5G
- Mastering Lock Screen Settings How to Enable and Disable on Vivo Y100t
- In 2024, How to Change Your Location on Apple iPhone 8 Plus | Dr.fone
- All You Need To Know About Mega Greninja For Realme Narzo N53 | Dr.fone
- Recommended Best Applications for Mirroring Your Samsung Galaxy S24 Ultra Screen | Dr.fone
- How Can I Unlock My Apple iPhone XS Max After Forgetting my PIN Code? | Dr.fone
- In 2024, A Step-by-Step Guide on Using ADB and Fastboot to Remove FRP Lock on your Xiaomi 13 Ultra
- 3 Methods to Mirror Vivo Y78+ (T1) Edition to Roku | Dr.fone
- New 2024 Approved Demystifying AI Game Generators
- The Best iSpoofer Alternative to Try On Honor 100 Pro | Dr.fone
- 2024 Approved Diverse Template
- How to Fake Snapchat Location without Jailbreak On Samsung Galaxy S24 | Dr.fone
- In 2024, Ultimate Guide on Apple iPhone 13 Pro iCloud Activation Lock Bypass
- Rootjunky APK To Bypass Google FRP Lock For Poco M6 5G
- How to Bypass Google FRP Lock on Motorola Moto E13 Devices
- Full Guide to Fix iToolab AnyGO Not Working On Realme Narzo 60 Pro 5G | Dr.fone
- In 2024, Pattern Locks Are Unsafe Secure Your Vivo X100 Pro Phone Now with These Tips
- Top 8 Live Selling Platforms & Beginners Tool Suggestion for 2024
- How to Reset Nokia G310 without Losing Data | Dr.fone
- In 2024, How to Migrate Android Data From Itel P55 5G to New Android Phone? | Dr.fone
- How to Mirror PC Screen to Samsung Galaxy S23+ Phones? | Dr.fone
- A Comprehensive Guide to iPhone 14 Pro Max Blacklist Removal Tips and Tools | Dr.fone
- Solved Warning Camera Failed on Vivo V30 | Dr.fone
- 8 Workable Fixes to the SIM not provisioned MM#2 Error on OnePlus 12R | Dr.fone
- Recover your music after Realme V30 has been deleted
- Insert signature in .dotm file
- Home Button Not Working on Gionee F3 Pro? Here Are Real Fixes | Dr.fone
- Can’t view HEVC H.265 content on Galaxy A54 5G
- 3 Effective Ways to Unlock iCloud Account Without Password From Apple iPhone 15 Pro Max
- Possible solutions to restore deleted messages from S18e
- A Step-by-Step Guide on Using ADB and Fastboot to Remove FRP Lock from your Asus ROG Phone 8
- Use Device Manager to reinstall your drivers on Windows 10 & 7
- List of Pokémon Go Joysticks On Apple iPhone 12 | Dr.fone
- Title: New How to Make Vintage Film Effect 1980S for 2024
- Author: Morgan
- Created at : 2024-04-24 01:02:49
- Updated at : 2024-04-25 01:02:49
- Link: https://ai-video-editing.techidaily.com/new-how-to-make-vintage-film-effect-1980s-for-2024/
- License: This work is licensed under CC BY-NC-SA 4.0.
