
New How to Merge Audio and Video Using FFmpeg

How to Merge Audio and Video Using FFmpeg
Welcome to the world of video production! Whether you’re a beginner or an experienced video creator, one of the most important skills to master is merging audio and video seamlessly. In this article, we’ll focus on FFmpeg, a powerful command-line tool that can help you easily merge audio and video.
FFmpeg is open-source software that allows you to convert, edit, and stream multimedia files. It’s widely used by professionals and enthusiasts and has many capabilities, including merging audio and video files. This guide will walk you through merging audio and video using FFmpeg. So, whether you’re creating a YouTube video, a podcast, or a movie, you’ll have the skills to make it sound and look great.
Preparation
Are you ready to master the art of merging audio and video? Then let’s dive into the world of FFmpeg, a powerful and versatile tool that can help you achieve professional results.
With FFmpeg, you can record, convert, and stream audio and video files in any format, making it a complete and cross-platform solution. It’s also a great tool for decoding, encoding, transcoding, muxing, demuxing, streaming, filtering, and playing any media type.
But before we start merging video files using FFmpeg, it’s important to understand the basics of container formats and video codecs. These are the building blocks of your videos, and the specific types you’re working with will determine the method you’ll use to merge them. So, buckle up, and let’s get started!
How To Combine Video With Two Audio Using FFmpeg
Are you looking to add multiple audio tracks to your video? With FFmpeg, you can easily combine video with two audio streams. Whether creating a foreign-language version of your video or adding an alternate audio track, this method will help you achieve professional results. This section will guide you through combining video with two audio streams using FFmpeg’s command-line interface. So, let’s get started!
Mixing Two Audios Into a Video
Combining multiple audio tracks into one video can be done easily with FFmpeg’s command-line interface. In this example, we will combine two audio tracks into one video so that the voiceover will play over the background music. Here’s the step-by-step process:
Step1 Open your command prompt or terminal and navigate to the directory where your video and audio files are located.
Step2 Replace “video1.mp4“ and “audio1.mp3“ with the names of your actual video and audio files.
ffmpeg \
-i video1.mp4 -i audio1.mp3 \
Step3 The -c:v copy flag tells FFmpeg to copy the video stream from the source file without re-encoding it. This helps to speed up the process and avoid quality loss.
-c:v copy \
-filter_complex “ \
Step4 The command “amix=inputs=2:duration=longest“ tells amix to accept 2 inputs (0:a and 1:a) and combine them into an output stream called audio_out, with the duration of the longest input.
[0:a][1:a] amix=inputs=2:duration=longest [audio_out] \
Step5 Map the video stream (0:v) and the mixed audio stream (audio_out) into the final output video.
-map 0:v -map “[audio_out]“ \
Step6 The -y flag tells FFmpeg to overwrite the output file if it already exists.
-y output.mp4
Once complete, you’ll find the newly created video file with the mixed audio in the specified output location.
Mixing Two Audios Into a Video Adjusting Volume
We will be taking a step further and show you how to merge two audio tracks into a video while adjusting the volume of one of the audio tracks. This can be useful when you want to emphasize one audio track over the other, for example, to make the voiceover more prominent in a video.
And here’s the step-by-step process:
Step1 Start the command by specifying the input files.
ffmpeg \
-i video1.mp4 -i audio1.mp3 \
Step2 Use the filter_complex option to specify a filter graph.
-filter_complex “ \
[0:a] volume=0.5 [music];
Step3 Use the amix filter to take the “music“ stream and audio1.mp3 and mix them.
[music][1:a] amix=inputs=2:duration=longest [audio_out] \
“ \
Step4 Use the map option to specify which streams from the input files should be included in the output file.
-map 0:v -map “[audio_out]“ \
Step5 Specify the output file name as “output.mp4“ and the -y flag to overwrite the output file without asking for confirmation if it already exists.
-y output.mp4
Mixing Two Audios Into a Video With Delay
When creating videos, sometimes the audio needs to be synced with the video, or you want to add a delay to the audio track. Here’s how to add delay to an audio track using FFmpeg.
Step1 Use the adelay filter to add delay to the audio track.
[1:a] adelay=2100|2100 [voice];
Step2 Mix the delayed audio track with the original audio track
[0:a][voice] amix=inputs=2:duration=longest [audio_out]
Step3 Map the video and audio tracks to the output file
-map 0:v -map “[audio_out]“
Step4 Use the -y flag to overwrite the output file
-y output.mp4
The final command would look like this:
ffmpeg \
-i video1.mp4 -i audio1.mp3 \
-filter_complex “ \
[1:a] adelay=2100|2100 [voice]; \
[0:a][voice] amix=inputs=2:duration=longest [audio_out] \
“ \
-map 0:v -map “[audio_out]“ \
-y output.mp4
This command will delay the audio track by 2100 milliseconds and then mix it with the original audio track, resulting in a new video file with the delayed audio.
It May Interest You - Merge Audio and Video Files With Filmora
While FFmpeg is a powerful tool for merging audio and video files, its learning curve can be steep for some users. If you’re looking for an easier option, you may consider using video editing software like Filmora.
What Is Filmora?
Wondershare Filmora is a video editing software that allows users to create professional-looking videos easily. It offers a user-friendly interface, making it an excellent option for those needing a more extensive video editing experience.
Free Download For Win 7 or later(64-bit)
Free Download For macOS 10.14 or later
This software offers an intuitive interface and a wide range of features that make it easy to merge audio and video files, even for beginners. In addition, Filmora provides various options for editing and enhancing the audio and video files, giving you more control over the final output. Filmora is a great alternative to FFmpeg for those who want to merge audio and video files quickly and easily.
How To Combine Audio and Video Files Using Filmora
Filmora is a user-friendly video editing software that allows you to easily combine audio and video files to create a polished and professional final product. So here’s the step-by-step process of combining audio and video files using Filmora.
Step1 Import audio and video files into Filmora using drag-and-drop or the “Import Media“ button.

Step2 Place the media files in the timeline and align the video with the audio.

Step3 Replace the original audio by right-clicking the video, selecting “Detach Audio,” deleting the original audio, and replacing it with new audio.

Step4 Export the final video by selecting a format and clicking “Export,” or publish directly to YouTube or burn to DVD.

People Also Ask
Here are some frequently asked questions regarding the merging function of FFmpeg and other related topics:
Q1. How To Merge Image and Video in FFmpeg?
To merge an image and a video using FFmpeg, first, use the -loop option on the image to loop it for the duration of the video, then use the overlay filter to overlay the image on the video. The command would look like this:
ffmpeg -i video.mp4 -i image.jpg -filter_complex “[0:v][1:v] overlay=0:0” -pix_fmt yuv420p -c:a copy output.mp4
This command takes the input video and image, applies the overlay filter to overlay the image on the video starting at the top left corner (0:0), and outputs the result to output.mp4. The -pix_fmt yuv420p and -c:a copy options ensure compatibility with most devices.
Q2. Can I Merge 2 MP4 Files Into 1?
Yes, you can merge two MP4 files into one using Filmora. To do this, follow these steps:
Step1 Open Filmora and import the video files
Step2 Drag the videos to the timeline
Step3 Align the second video with the first without leaving any gaps
Step4 Click “Export“ and select desired settings
Step5 Click “Export“ again to save the combined video on your computer.
Q3. How Can I Merge the Video and Subtitle?
To merge video and subtitle in Filmora, follow these steps:
Step1 Open Filmora and import your SRT subtitle file.
Step2 Place the SRT file on the timeline and right-click on it. Select “Advanced Edit“ from the options.
Step3 Adjust the subtitle’s time code, text, color, font, and other settings. When finished, choose “Export Subtitle file“ to save the changes.
Still want to learn more tricks about adding subtitles to your video? Check out the video below:
Conclusion
Using FFmpeg and Filmora, you can easily combine video with audio, merge multiple video files, and add subtitles to your videos. Both tools offer different features and learning curves, so it’s important to understand what you need before choosing one. Filmora is a great option for beginners and those who want a user-friendly interface, while FFmpeg is a powerful command-line tool for advanced users.
- “-i INPUT_FILE.mp4“ flag specifies INPUT_FILE.mp4 as the input source.
- “-i AUDIO.wav,” tells FFmpeg to take AUDIO.wav as an input source.
- The “-c:v copy“ flag is a short form of “-codec:v copy,” which means to copy the video stream from the source files to the destination file.
- The “-c:a aac“ flag means selecting all the audio streams from the source files and then encoding them with the AAC encoder.
- “mp4“ specifies the name of the output file.
Step3 In case you don’t want any audio conversion, drop the aac part in the command and replace it with copy; the command would look like this:
ffmpeg -i INPUT_FILE.mp4 -i AUDIO.aac -c:v copy -c:a copy OUTPUT_FILE.mp4
-->
How To Combine Video With Two Audio Using FFmpeg
Are you looking to add multiple audio tracks to your video? With FFmpeg, you can easily combine video with two audio streams. Whether creating a foreign-language version of your video or adding an alternate audio track, this method will help you achieve professional results. This section will guide you through combining video with two audio streams using FFmpeg’s command-line interface. So, let’s get started!
Mixing Two Audios Into a Video
Combining multiple audio tracks into one video can be done easily with FFmpeg’s command-line interface. In this example, we will combine two audio tracks into one video so that the voiceover will play over the background music. Here’s the step-by-step process:
Step1 Open your command prompt or terminal and navigate to the directory where your video and audio files are located.
Step2 Replace “video1.mp4“ and “audio1.mp3“ with the names of your actual video and audio files.
ffmpeg \
-i video1.mp4 -i audio1.mp3 \
Step3 The -c:v copy flag tells FFmpeg to copy the video stream from the source file without re-encoding it. This helps to speed up the process and avoid quality loss.
-c:v copy \
-filter_complex “ \
Step4 The command “amix=inputs=2:duration=longest“ tells amix to accept 2 inputs (0:a and 1:a) and combine them into an output stream called audio_out, with the duration of the longest input.
[0:a][1:a] amix=inputs=2:duration=longest [audio_out] \
Step5 Map the video stream (0:v) and the mixed audio stream (audio_out) into the final output video.
-map 0:v -map “[audio_out]“ \
Step6 The -y flag tells FFmpeg to overwrite the output file if it already exists.
-y output.mp4
Once complete, you’ll find the newly created video file with the mixed audio in the specified output location.
Mixing Two Audios Into a Video Adjusting Volume
We will be taking a step further and show you how to merge two audio tracks into a video while adjusting the volume of one of the audio tracks. This can be useful when you want to emphasize one audio track over the other, for example, to make the voiceover more prominent in a video.
And here’s the step-by-step process:
Step1 Start the command by specifying the input files.
ffmpeg \
-i video1.mp4 -i audio1.mp3 \
Step2 Use the filter_complex option to specify a filter graph.
-filter_complex “ \
[0:a] volume=0.5 [music];
Step3 Use the amix filter to take the “music“ stream and audio1.mp3 and mix them.
[music][1:a] amix=inputs=2:duration=longest [audio_out] \
“ \
Step4 Use the map option to specify which streams from the input files should be included in the output file.
-map 0:v -map “[audio_out]“ \
Step5 Specify the output file name as “output.mp4“ and the -y flag to overwrite the output file without asking for confirmation if it already exists.
-y output.mp4
Mixing Two Audios Into a Video With Delay
When creating videos, sometimes the audio needs to be synced with the video, or you want to add a delay to the audio track. Here’s how to add delay to an audio track using FFmpeg.
Step1 Use the adelay filter to add delay to the audio track.
[1:a] adelay=2100|2100 [voice];
Step2 Mix the delayed audio track with the original audio track
[0:a][voice] amix=inputs=2:duration=longest [audio_out]
Step3 Map the video and audio tracks to the output file
-map 0:v -map “[audio_out]“
Step4 Use the -y flag to overwrite the output file
-y output.mp4
The final command would look like this:
ffmpeg \
-i video1.mp4 -i audio1.mp3 \
-filter_complex “ \
[1:a] adelay=2100|2100 [voice]; \
[0:a][voice] amix=inputs=2:duration=longest [audio_out] \
“ \
-map 0:v -map “[audio_out]“ \
-y output.mp4
This command will delay the audio track by 2100 milliseconds and then mix it with the original audio track, resulting in a new video file with the delayed audio.
It May Interest You - Merge Audio and Video Files With Filmora
While FFmpeg is a powerful tool for merging audio and video files, its learning curve can be steep for some users. If you’re looking for an easier option, you may consider using video editing software like Filmora.
What Is Filmora?
Wondershare Filmora is a video editing software that allows users to create professional-looking videos easily. It offers a user-friendly interface, making it an excellent option for those needing a more extensive video editing experience.
Free Download For Win 7 or later(64-bit)
Free Download For macOS 10.14 or later
This software offers an intuitive interface and a wide range of features that make it easy to merge audio and video files, even for beginners. In addition, Filmora provides various options for editing and enhancing the audio and video files, giving you more control over the final output. Filmora is a great alternative to FFmpeg for those who want to merge audio and video files quickly and easily.
How To Combine Audio and Video Files Using Filmora
Filmora is a user-friendly video editing software that allows you to easily combine audio and video files to create a polished and professional final product. So here’s the step-by-step process of combining audio and video files using Filmora.
Step1 Import audio and video files into Filmora using drag-and-drop or the “Import Media“ button.

Step2 Place the media files in the timeline and align the video with the audio.

Step3 Replace the original audio by right-clicking the video, selecting “Detach Audio,” deleting the original audio, and replacing it with new audio.

Step4 Export the final video by selecting a format and clicking “Export,” or publish directly to YouTube or burn to DVD.

People Also Ask
Here are some frequently asked questions regarding the merging function of FFmpeg and other related topics:
Q1. How To Merge Image and Video in FFmpeg?
To merge an image and a video using FFmpeg, first, use the -loop option on the image to loop it for the duration of the video, then use the overlay filter to overlay the image on the video. The command would look like this:
ffmpeg -i video.mp4 -i image.jpg -filter_complex “[0:v][1:v] overlay=0:0” -pix_fmt yuv420p -c:a copy output.mp4
This command takes the input video and image, applies the overlay filter to overlay the image on the video starting at the top left corner (0:0), and outputs the result to output.mp4. The -pix_fmt yuv420p and -c:a copy options ensure compatibility with most devices.
Q2. Can I Merge 2 MP4 Files Into 1?
Yes, you can merge two MP4 files into one using Filmora. To do this, follow these steps:
Step1 Open Filmora and import the video files
Step2 Drag the videos to the timeline
Step3 Align the second video with the first without leaving any gaps
Step4 Click “Export“ and select desired settings
Step5 Click “Export“ again to save the combined video on your computer.
Q3. How Can I Merge the Video and Subtitle?
To merge video and subtitle in Filmora, follow these steps:
Step1 Open Filmora and import your SRT subtitle file.
Step2 Place the SRT file on the timeline and right-click on it. Select “Advanced Edit“ from the options.
Step3 Adjust the subtitle’s time code, text, color, font, and other settings. When finished, choose “Export Subtitle file“ to save the changes.
Still want to learn more tricks about adding subtitles to your video? Check out the video below:
Conclusion
Using FFmpeg and Filmora, you can easily combine video with audio, merge multiple video files, and add subtitles to your videos. Both tools offer different features and learning curves, so it’s important to understand what you need before choosing one. Filmora is a great option for beginners and those who want a user-friendly interface, while FFmpeg is a powerful command-line tool for advanced users.
How to Slow Down Time-Lapse Videos on iPhone
There are moments that need highlighting and there are moments that need a flashing speed. You can control both moments if you are just wondering can slow down a time lapse. There are video editing softwares like Filmora if you want to know how to slow down time lapse on iPhone. Let’s discuss some of the best time lapse editing tools and also learn about how to slow down a time lapse
What Is Time-Lapse?
Time-lapse is a cinematography and photography technique that captures a series of images or frames at specific intervals over a prolonged period of time and then plays them back at a much faster rate. This creates a visually captivating effect where time appears to be moving faster than in real life.
In a time-lapse video, moments typically occur slowly or over an extended period, such as the movement of clouds, the growth of plants, or construction of buildings are compressed into a short video clip. Time-lapse is a powerful storytelling tool and if you are tempted to learn how to slow down a time lapse video because sometimes they can be faster than we intend them to be. Let’s discuss how you can slow down time lapse video.
Method 1: Using Filmora To Change Time Lapse Speed
Filmora is one of the best video editing software whose user-friendly interface allows both beginners and professionals to create compelling videos effortlessly. With Filmora, you can cut, trim, slow down time lapse video, and edit videos. You can also apply built-in effects and transitions, and adjust the playback speed to create stunning time-lapse or slow-motion effects.
Filmora also offers advanced color grading tools so that you can correct and enhance the color in your videos to make them visually appealing. Additionally, Filmora supports a wide range of video formats and allows easy exporting of edited videos to various platforms, making the sharing process convenient and straightforward. With its rich library of royalty-free music and sound effects. Let’s discuss how to change time lapse speed on iPhone.
AI Time-Lapse For Win 7 or later(64-bit)
AI Time-Lapse For macOS 10.14 or later
- Open Filmora and start a new project.
- Import your time-lapse video by either clicking on “Import” or dragging and dropping the file into the media library.
- Drag the imported video from the media library to the timeline at the bottom of the screen.
- Click on the video in the timeline to select it. You should see editing options appear.
- Look for a speed option, often represented as a speedometer icon. Click on it to open the speed settings.
- In the speed settings, you can slow down time lapse video. You can make it slower according to your preference.
- After adjusting the speed, play the video in the preview window to see if it’s at the desired speed.
- Once done with performing time lapse slower, save and export your edited time-lapse video by choosing the “Export” option.
- Choose the desired output format and save location, then click “Export” to save the edited video.
Method 2: Using Imovie To Change Time Lapse Speed
- Open iMovie on your iOS device.
- Import the time-lapse video you want to edit.
- Drag and drop the video onto the timeline.
- Select the video clip on the timeline.
- Look for the speed adjustment settings; it is usually represented by a turtle or hare icon.
- Click on the speed adjustment icon, and a slider or option to change the speed will appear.
- Adjust the speed according to your preference by dragging the slider or entering a value.
- Play the video to preview the new speed.
- Once you are done with the slow down time lapse video, you can save or export the edited video.
Summary
Learning how to slow down time lapse videos on iPhone enhances the storytelling power of your cinematography, allowing viewers to engage more deeply with your content. There are video editing tools like Filmora and iMovie which have revolutionized the editing process, making it feasible to slow down time lapse video directly on your iPhone. These tools are user-friendly
TRANSLATE with x
English
TRANSLATE with
COPY THE URL BELOW
Back
EMBED THE SNIPPET BELOW IN YOUR SITE
Enable collaborative features and customize widget: Bing Webmaster Portal
Back
Step by Step to Crop a Video with CyberLink PowerDirector
Video Editing is an art form dependent on various elements and factors that are part of your video; this means people, items, or objects in the background can often make or break the viewing experience.
Can you imagine having shot a scene with impeccable attention to detail, but a small uncontrollable action leaves a portion of an unwanted cable or equipment in the frame? Bummer, right? But luckily, due to the power of video editing software, it is not hard to deal with such problems.
A way to work with such clips is to use the crop function while editing, as it can help emphasize or detract attention from a particular part of any video project.
Author’s Note: While filming, try to capture footage in the highest resolution allowed by the available camera hardware; this will give you more room to play with while using the crop function.
To preface, CyberLink PowerDirector is a free video editing tool capable of accomplishing this and providing a professional touch to your video projects. And like other competing software, the program not only allows you to crop into clips but also uses keyframes to modify aspects like panning and zoom. So to help you perform this action, in this article, we list the steps you will need for cropping into video clips with PowerDirector. As an added bonus, we have also included the method to perform the same actions in WonderShare Filmora.
Note: We documented the steps in this guide with PowerDirector 365 and WonderShare Filmora X.
How to Crop Videos with CyberLink PowerDirector?
The idea of cropping into clips has always been an easy action to perform; once you have PowerDirector 365 open, follow the steps listed below.
If you do not already have CyberLink PowerDirector 365, download the software by visiting Cyberlink’s official website.
Step 1: Create a new video project in Cyberlink PowerDirector 365 by choosing Full Mode.

Note: Full Mode in Cyberlink PowerDirector 365 provides access to a full-featured video editing tool, similar to Wondershare Filmora. The other available options cater to distinct video types.
Step 2: Import media onto the Timeline from the Media Library; in this guide, we have gone ahead and used the pre-existing stock footage.

Step 3: Now, click on the video file on the Timeline; this will activate the video toolbar giving you access to the various controls built into PowerDirector 365. Hover over the tools open, following which you need to click on the Crop, Zoom, and Pan option.

Step 4: Pick either corner of the frame visible around the video and set the area you want the clip to focus upon; following this, click Save.
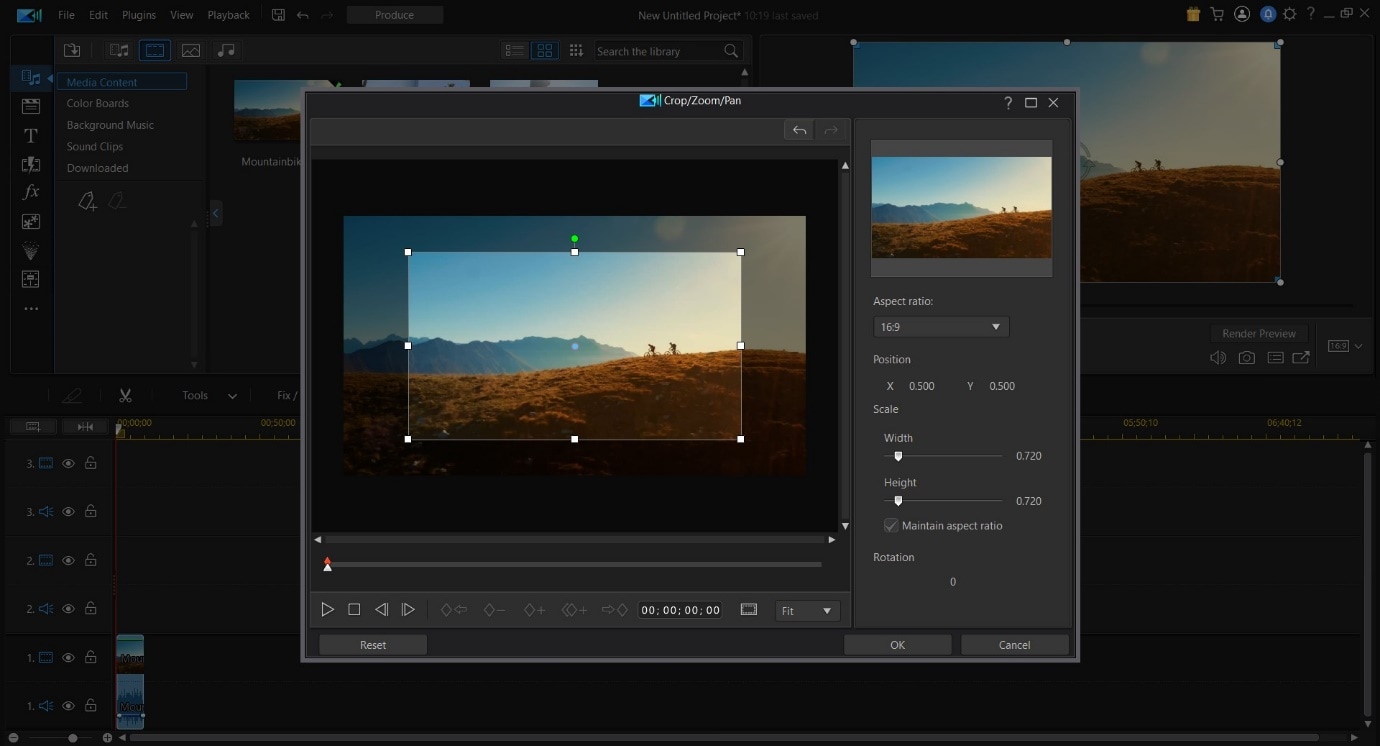
This action will crop the video clip according to your desired size.
Tip:
The activation of Keyframes while cropping will allow you to create an effect that slowly zooms into the footage. To do this, set Keyframe Point 1 at a specific time (say the fifth second) and at one zoom level (say zero) and create Keyframe Point 2 at another time (fifteenth second) and a different zoom level (say fifty). So, between the fifth second and fifteenth second, the zoom will steadily increase and raise emphasis on an object. You can also add an element of position to this action if you want the focus to be on something not in the center of the screen.
Definition: Keyframes while Video Editing is a software-based feature that allows you to set In and Out Points, giving clips between the two positions different properties that change as the playhead continues to move. These properties can be increased zoom, rotation, different colors, or even a gradual pan.
We recommend experimenting with this feature if you want to bring a more dynamic feeling to your video project.
An Easier Way to Crop Video with Wondershare Filmora
While Cyberlink PowerDirector 365 is a powerful video editing tool, in our experience, its menus are not as simple to navigate as some of the other competing video editing tools available, Wondershare Filmora Video Editor included.
An emphasis on quick accessibility is present with Filmora, and we believe this is a huge plus for beginning creators. The use of iconography resemblant to mobile software is another aspect that helps increase familiarity.
If you do not already have Wondershare Filmora, you can download the software by visiting the official website.
Now, to help you learn how to use the Crop Tool and to show you an example of what we mean, here is how you can use the feature Wondershare Filmora to get the desired output.
For Win 7 or later (64-bit)
For macOS 10.14 or later
Once you have the software open, follow the steps listed below.
Step 1: Import the Media File into your Video Project.

Step 2: Drag the clip onto the Timeline and then select it to activate further interactions.

Step 3: Choose the Crop Options (marked in Red) to open the Crop window.
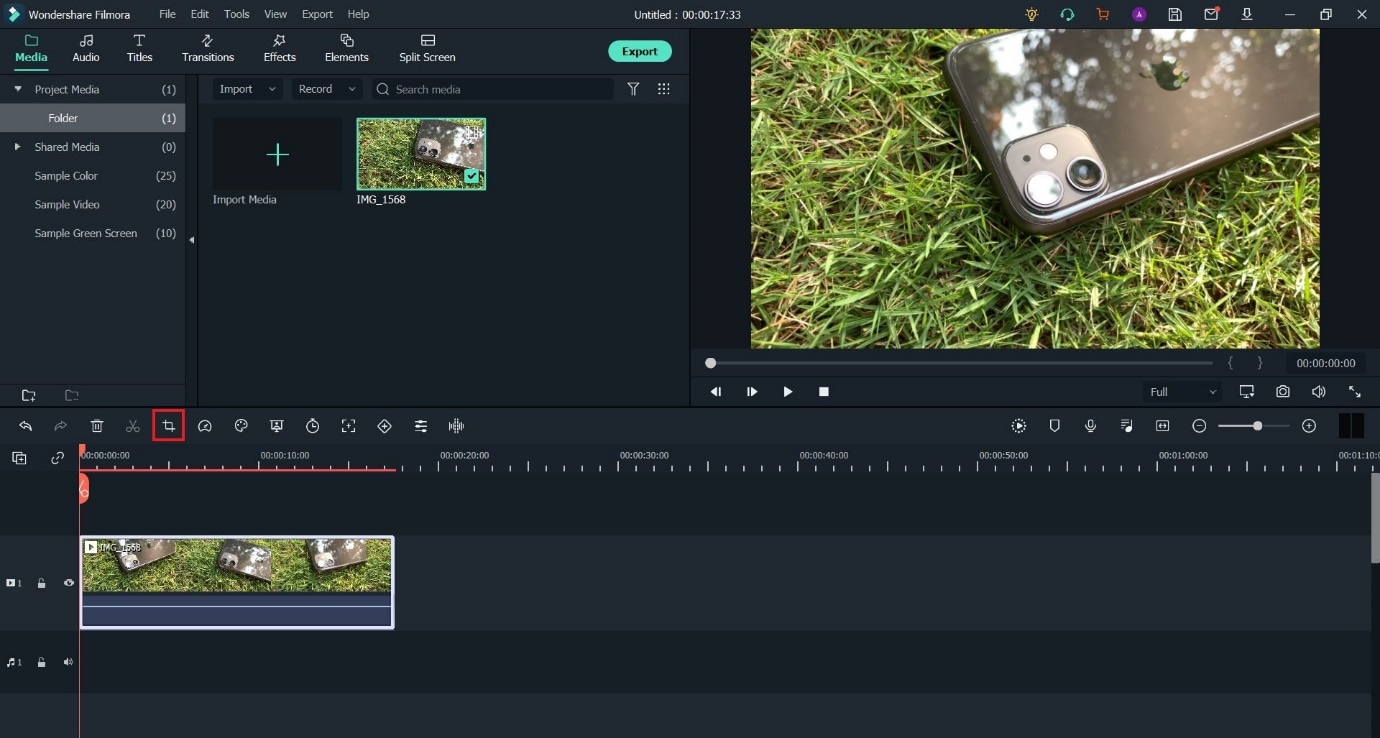
Step 4: Pick any edge within the visible box and resize them to select the portion you want to keep in the clip.
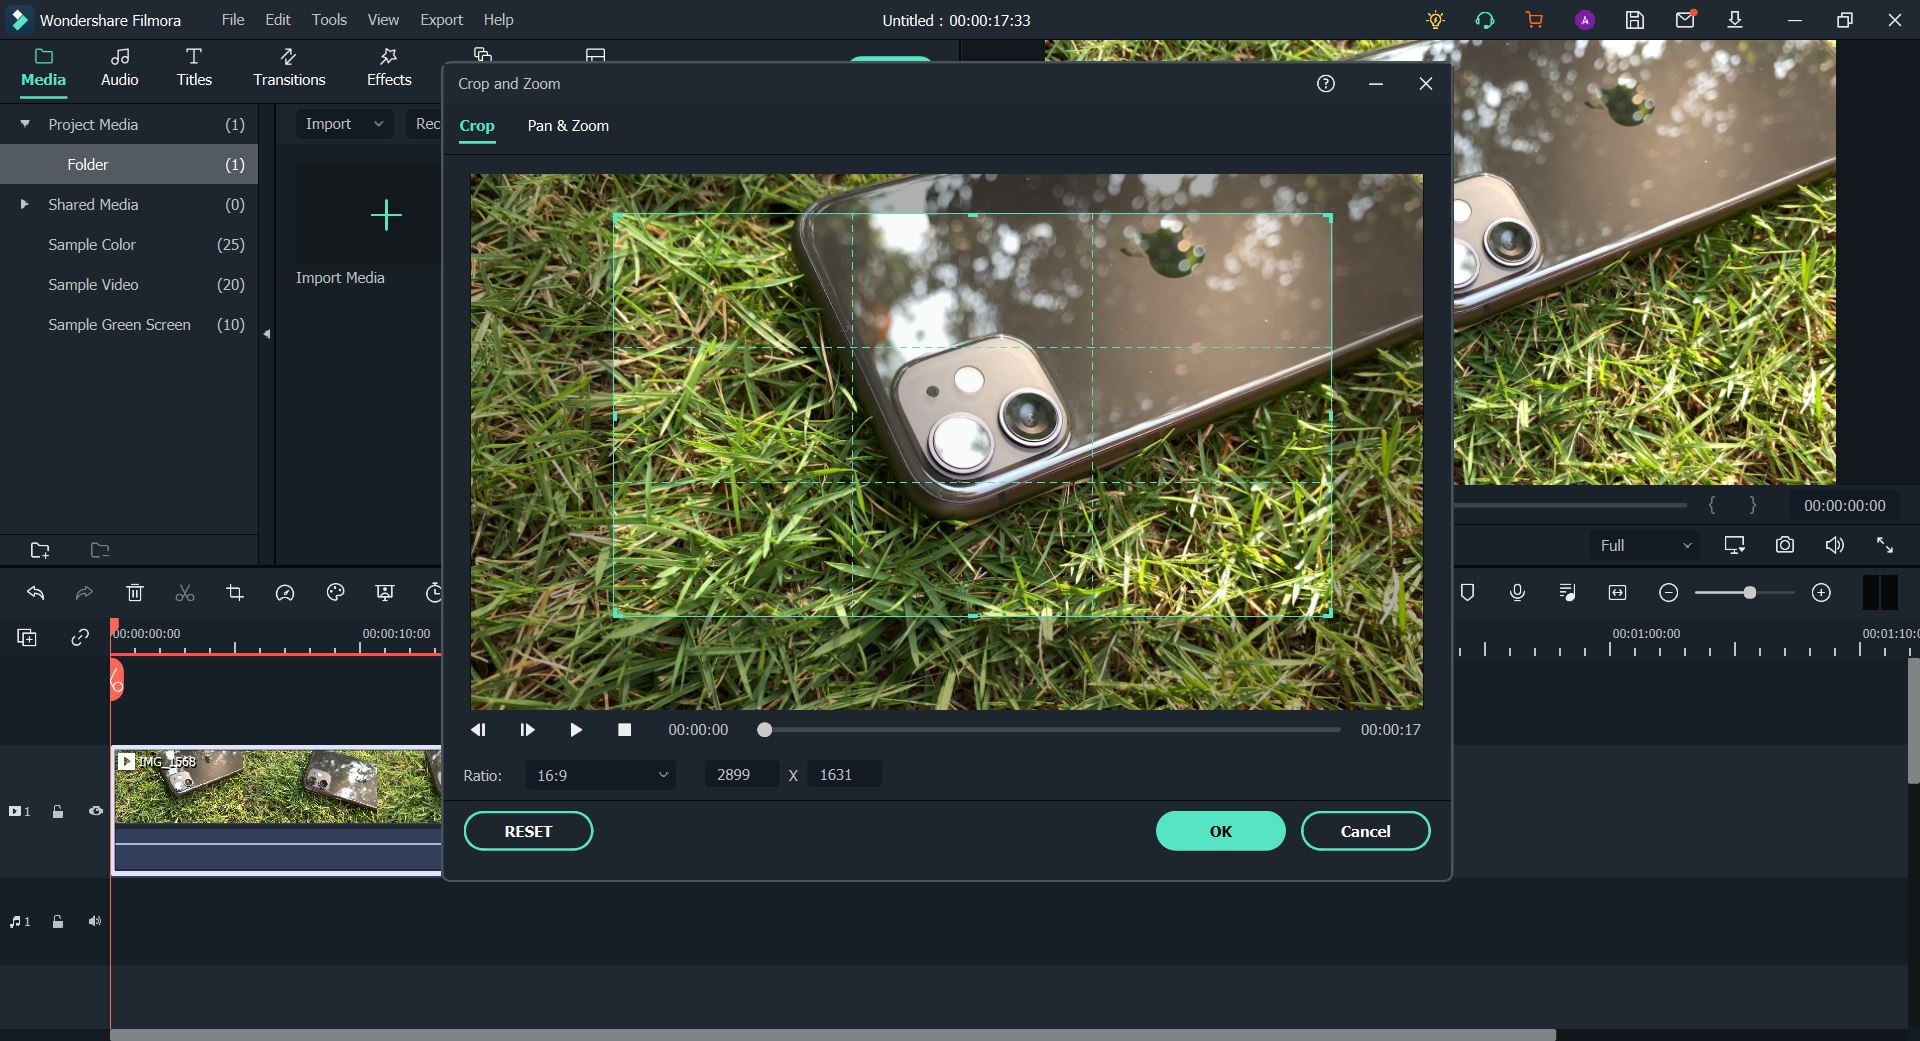
Having read this bit of the guide, we believe you may have noticed how Filmora is more convenient due to the easier access it provides to the crop function.
The Bottom Line
So, at the end of the day, both software listed in this article are fully functional and highly-capable video editing tools, but saving time spent in front of the computer is a huge factor for any video editor.
And Wondershare Filmora does just that with its modern iconography and increased accessibility. With its thoughtful, less-frills approach, Filmora is the one to pick if you do not want to be bogged down by needless menus and have to hunt for actions that will help you create a video that you would want to watch yourself.
Note: Full Mode in Cyberlink PowerDirector 365 provides access to a full-featured video editing tool, similar to Wondershare Filmora. The other available options cater to distinct video types.
Step 2: Import media onto the Timeline from the Media Library; in this guide, we have gone ahead and used the pre-existing stock footage.

Step 3: Now, click on the video file on the Timeline; this will activate the video toolbar giving you access to the various controls built into PowerDirector 365. Hover over the tools open, following which you need to click on the Crop, Zoom, and Pan option.

Step 4: Pick either corner of the frame visible around the video and set the area you want the clip to focus upon; following this, click Save.

This action will crop the video clip according to your desired size.
Tip:
The activation of Keyframes while cropping will allow you to create an effect that slowly zooms into the footage. To do this, set Keyframe Point 1 at a specific time (say the fifth second) and at one zoom level (say zero) and create Keyframe Point 2 at another time (fifteenth second) and a different zoom level (say fifty). So, between the fifth second and fifteenth second, the zoom will steadily increase and raise emphasis on an object. You can also add an element of position to this action if you want the focus to be on something not in the center of the screen.
Definition: Keyframes while Video Editing is a software-based feature that allows you to set In and Out Points, giving clips between the two positions different properties that change as the playhead continues to move. These properties can be increased zoom, rotation, different colors, or even a gradual pan.
We recommend experimenting with this feature if you want to bring a more dynamic feeling to your video project.
An Easier Way to Crop Video with Wondershare Filmora
While Cyberlink PowerDirector 365 is a powerful video editing tool, in our experience, its menus are not as simple to navigate as some of the other competing video editing tools available, Wondershare Filmora Video Editor included.
An emphasis on quick accessibility is present with Filmora, and we believe this is a huge plus for beginning creators. The use of iconography resemblant to mobile software is another aspect that helps increase familiarity.
If you do not already have Wondershare Filmora, you can download the software by visiting the official website.
Now, to help you learn how to use the Crop Tool and to show you an example of what we mean, here is how you can use the feature Wondershare Filmora to get the desired output.
For Win 7 or later (64-bit)
For macOS 10.14 or later
Once you have the software open, follow the steps listed below.
Step 1: Import the Media File into your Video Project.

Step 2: Drag the clip onto the Timeline and then select it to activate further interactions.

Step 3: Choose the Crop Options (marked in Red) to open the Crop window.

Step 4: Pick any edge within the visible box and resize them to select the portion you want to keep in the clip.

Having read this bit of the guide, we believe you may have noticed how Filmora is more convenient due to the easier access it provides to the crop function.
The Bottom Line
So, at the end of the day, both software listed in this article are fully functional and highly-capable video editing tools, but saving time spent in front of the computer is a huge factor for any video editor.
And Wondershare Filmora does just that with its modern iconography and increased accessibility. With its thoughtful, less-frills approach, Filmora is the one to pick if you do not want to be bogged down by needless menus and have to hunt for actions that will help you create a video that you would want to watch yourself.
Note: Full Mode in Cyberlink PowerDirector 365 provides access to a full-featured video editing tool, similar to Wondershare Filmora. The other available options cater to distinct video types.
Step 2: Import media onto the Timeline from the Media Library; in this guide, we have gone ahead and used the pre-existing stock footage.

Step 3: Now, click on the video file on the Timeline; this will activate the video toolbar giving you access to the various controls built into PowerDirector 365. Hover over the tools open, following which you need to click on the Crop, Zoom, and Pan option.

Step 4: Pick either corner of the frame visible around the video and set the area you want the clip to focus upon; following this, click Save.

This action will crop the video clip according to your desired size.
Tip:
The activation of Keyframes while cropping will allow you to create an effect that slowly zooms into the footage. To do this, set Keyframe Point 1 at a specific time (say the fifth second) and at one zoom level (say zero) and create Keyframe Point 2 at another time (fifteenth second) and a different zoom level (say fifty). So, between the fifth second and fifteenth second, the zoom will steadily increase and raise emphasis on an object. You can also add an element of position to this action if you want the focus to be on something not in the center of the screen.
Definition: Keyframes while Video Editing is a software-based feature that allows you to set In and Out Points, giving clips between the two positions different properties that change as the playhead continues to move. These properties can be increased zoom, rotation, different colors, or even a gradual pan.
We recommend experimenting with this feature if you want to bring a more dynamic feeling to your video project.
An Easier Way to Crop Video with Wondershare Filmora
While Cyberlink PowerDirector 365 is a powerful video editing tool, in our experience, its menus are not as simple to navigate as some of the other competing video editing tools available, Wondershare Filmora Video Editor included.
An emphasis on quick accessibility is present with Filmora, and we believe this is a huge plus for beginning creators. The use of iconography resemblant to mobile software is another aspect that helps increase familiarity.
If you do not already have Wondershare Filmora, you can download the software by visiting the official website.
Now, to help you learn how to use the Crop Tool and to show you an example of what we mean, here is how you can use the feature Wondershare Filmora to get the desired output.
For Win 7 or later (64-bit)
For macOS 10.14 or later
Once you have the software open, follow the steps listed below.
Step 1: Import the Media File into your Video Project.

Step 2: Drag the clip onto the Timeline and then select it to activate further interactions.

Step 3: Choose the Crop Options (marked in Red) to open the Crop window.

Step 4: Pick any edge within the visible box and resize them to select the portion you want to keep in the clip.

Having read this bit of the guide, we believe you may have noticed how Filmora is more convenient due to the easier access it provides to the crop function.
The Bottom Line
So, at the end of the day, both software listed in this article are fully functional and highly-capable video editing tools, but saving time spent in front of the computer is a huge factor for any video editor.
And Wondershare Filmora does just that with its modern iconography and increased accessibility. With its thoughtful, less-frills approach, Filmora is the one to pick if you do not want to be bogged down by needless menus and have to hunt for actions that will help you create a video that you would want to watch yourself.
Note: Full Mode in Cyberlink PowerDirector 365 provides access to a full-featured video editing tool, similar to Wondershare Filmora. The other available options cater to distinct video types.
Step 2: Import media onto the Timeline from the Media Library; in this guide, we have gone ahead and used the pre-existing stock footage.

Step 3: Now, click on the video file on the Timeline; this will activate the video toolbar giving you access to the various controls built into PowerDirector 365. Hover over the tools open, following which you need to click on the Crop, Zoom, and Pan option.

Step 4: Pick either corner of the frame visible around the video and set the area you want the clip to focus upon; following this, click Save.

This action will crop the video clip according to your desired size.
Tip:
The activation of Keyframes while cropping will allow you to create an effect that slowly zooms into the footage. To do this, set Keyframe Point 1 at a specific time (say the fifth second) and at one zoom level (say zero) and create Keyframe Point 2 at another time (fifteenth second) and a different zoom level (say fifty). So, between the fifth second and fifteenth second, the zoom will steadily increase and raise emphasis on an object. You can also add an element of position to this action if you want the focus to be on something not in the center of the screen.
Definition: Keyframes while Video Editing is a software-based feature that allows you to set In and Out Points, giving clips between the two positions different properties that change as the playhead continues to move. These properties can be increased zoom, rotation, different colors, or even a gradual pan.
We recommend experimenting with this feature if you want to bring a more dynamic feeling to your video project.
An Easier Way to Crop Video with Wondershare Filmora
While Cyberlink PowerDirector 365 is a powerful video editing tool, in our experience, its menus are not as simple to navigate as some of the other competing video editing tools available, Wondershare Filmora Video Editor included.
An emphasis on quick accessibility is present with Filmora, and we believe this is a huge plus for beginning creators. The use of iconography resemblant to mobile software is another aspect that helps increase familiarity.
If you do not already have Wondershare Filmora, you can download the software by visiting the official website.
Now, to help you learn how to use the Crop Tool and to show you an example of what we mean, here is how you can use the feature Wondershare Filmora to get the desired output.
For Win 7 or later (64-bit)
For macOS 10.14 or later
Once you have the software open, follow the steps listed below.
Step 1: Import the Media File into your Video Project.

Step 2: Drag the clip onto the Timeline and then select it to activate further interactions.

Step 3: Choose the Crop Options (marked in Red) to open the Crop window.

Step 4: Pick any edge within the visible box and resize them to select the portion you want to keep in the clip.

Having read this bit of the guide, we believe you may have noticed how Filmora is more convenient due to the easier access it provides to the crop function.
The Bottom Line
So, at the end of the day, both software listed in this article are fully functional and highly-capable video editing tools, but saving time spent in front of the computer is a huge factor for any video editor.
And Wondershare Filmora does just that with its modern iconography and increased accessibility. With its thoughtful, less-frills approach, Filmora is the one to pick if you do not want to be bogged down by needless menus and have to hunt for actions that will help you create a video that you would want to watch yourself.
How to Remove Background From a Video in Premier Pro
Adobe Premiere Pro is one of the leading video editing software. You can use to create or remove a video’s background. Advanced Chroma Key features such as Color Key and Ultra Key make it possible to produce background-free content quickly.
Although both Keys work similarly, many users prefer to use the Ultra key for a better result in the video. This article will explain how to remove video background in Premiere Pro if you are a newbie.
Let’s get right to it and start the tutorial!
How to Use Premiere Pro to Remove Video Background?
Adobe Premiere Pro can remove video backgrounds quickly using the Ultra Key feature with the following steps:
Step1 In the first step, launch a browser, and download the appropriate Adobe Premiere Pro version for your Windows PC or Mac . Next, install the software on your system and launch it from your Desktop or Dock.
Step2 Now, use the Media Browser panel in the software to browse the video clips you want to import into the software. Next, right-click on your selected video file in which you want to remove the background and choose the “Import” option.
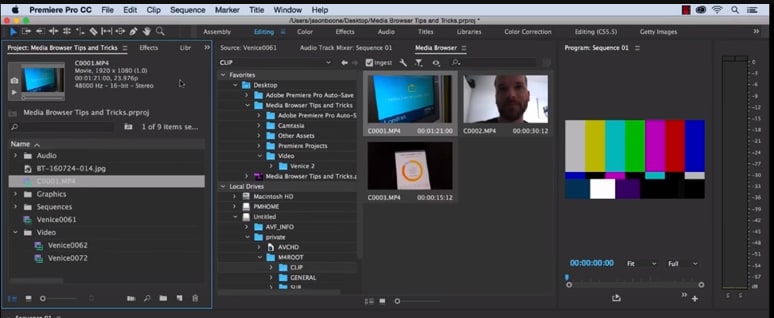
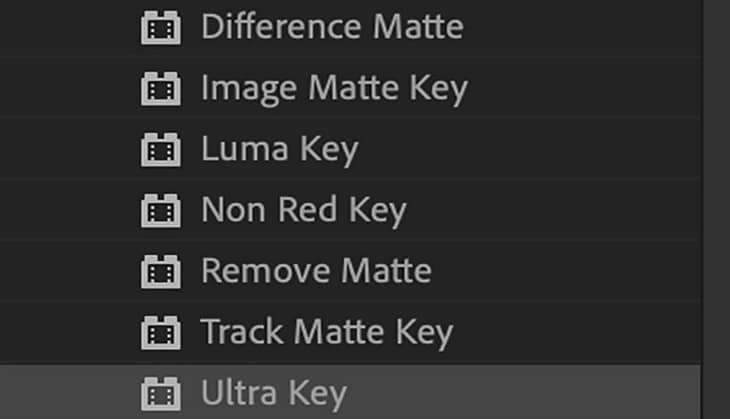
Step3 Click the “Effects” tab in the software panel and select Video Effects. Here, you will see the “Keying” option; select the Ultra Key, press and hold it to grab the key, and place it on your video clip.
![]()
Note: You can also search for the Ultra Key in the Adobe Premiere Pro search bar. Drag it to the video clip containing a background you want to remove.
Step4 As soon as you drop the Ultra Key to your footage, an Effects Control panel will pop up. Next, use the eyedropper tool in the Effects Control panel. Finally, select the background color on your video that you want to remove.
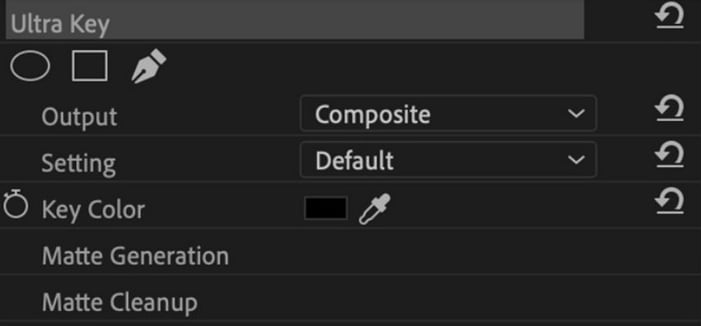
Step5 In the next step, click the drop-down menu next to the “Output” option, and select “Alpha Channel” from the list. This will reveal the details of your video and the edits. Also, click the “Setting” drop-down menu and select the Relaxed, Aggressive, or Custom option for the video effect.

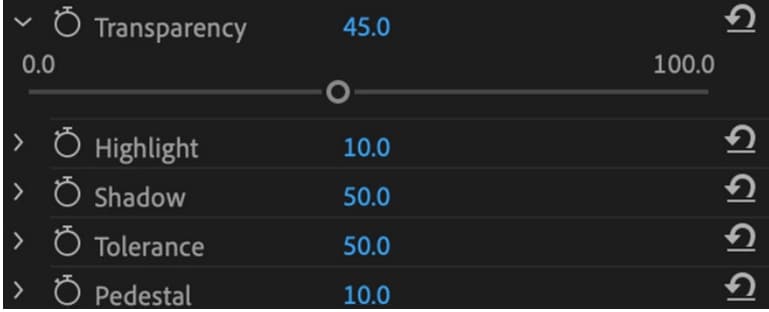
Step6 Select the “Matte Generation“ below Key Color. Try different levels for Highlight, Shadow, Tolerance, Transparency, Pedestal, and other settings to further clean the matte for a premium effect.
Step7 In this step,choose the “Matte Cleanup” option to expand its settings and clean up the edges of your clip. You will see various options here, but the most important one is “Choke.” It will shrink the object’s borders and “Soften” to add fuzz.

If you see a background color spill on your video after playing with the above settings, click “Spill Suppression” beneath Matte Cleanup to expand its options and choose the desired settings to resolve this issue.
That’s about it! You have successfully removed the video background in Premiere Pro.
Step8 In the last step, you need to save, render, and export your video with the removed background. To do this, click the “File” option on the Premiere Pro Media Browser, and choose “Export” to explore the “Media” menu.
Choose the format in the Export Settings, as it is compatible with most devices. Next, choose a valid Preset and resolution, and click “Export” to begin the rendering process. Finally, save your edited background video again, and export the video to the desired destination.
Is There Any Best Alternative to Remove Video’s Background?
Although Adobe Premiere Pro is an excellent choice, the software can be a little overzealous for beginners. But don’t fret; there is an alternative for newbie to remove the video background.
Many video content creators recommended Wondershare Filmora as a user-friendly video editing software. This software loads with customization options and compact feature, including the Human Segmentation effect. With it, you can isolate objects from the background of a video without a green screen.
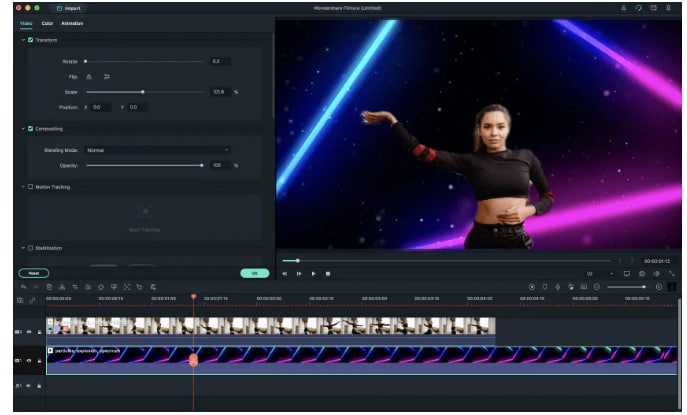
Let’s take a quick look at Filmora video editing marvel features:
- Comes with a free trial and is priced to meet most video designers’ production needs.
- Remove the video background with four quick steps.
- View the foreground of your video in real-time after background removal.
- Numerous customization options to add a different background or an image to the original content.
- Add the removed background as an overlay on top of another clip.
- Drag and drop a video clip to another track in the timeline for cutting, trimming, and elimination purposes.
- Using the “Human Segregation effect” in the AI Portrait on any imported video is simple.
- See objects isolated from the background in the Preview mode, which allows you to adjust the edges, feathers, and thickness accordingly.
- Easy export options supporting various compatible formats.
Additionally, we have provided you with a video tutorial about How to Remove and Change Video Background Without Green Screen with Filmora:
Free Download For Win 7 or later(64-bit)
Free Download For macOS 10.14 or later
Conclusion
This comprehensive guide explains how to remove the video background in Premier Pro using the Ultra key instead of the Color Key.
We have also discussed an excellent alternative to Premier Pro that can eliminate any background in your video content within minutes.
This article helped solve your queries. As a result, you can now create quality video content for your audience without paying thousands of dollars to professional video editors to do the background removal for you.
Step4 As soon as you drop the Ultra Key to your footage, an Effects Control panel will pop up. Next, use the eyedropper tool in the Effects Control panel. Finally, select the background color on your video that you want to remove.

Step5 In the next step, click the drop-down menu next to the “Output” option, and select “Alpha Channel” from the list. This will reveal the details of your video and the edits. Also, click the “Setting” drop-down menu and select the Relaxed, Aggressive, or Custom option for the video effect.

Step6 Select the “Matte Generation“ below Key Color. Try different levels for Highlight, Shadow, Tolerance, Transparency, Pedestal, and other settings to further clean the matte for a premium effect.

Step7 In this step,choose the “Matte Cleanup” option to expand its settings and clean up the edges of your clip. You will see various options here, but the most important one is “Choke.” It will shrink the object’s borders and “Soften” to add fuzz.

If you see a background color spill on your video after playing with the above settings, click “Spill Suppression” beneath Matte Cleanup to expand its options and choose the desired settings to resolve this issue.
That’s about it! You have successfully removed the video background in Premiere Pro.
Step8 In the last step, you need to save, render, and export your video with the removed background. To do this, click the “File” option on the Premiere Pro Media Browser, and choose “Export” to explore the “Media” menu.
Choose the format in the Export Settings, as it is compatible with most devices. Next, choose a valid Preset and resolution, and click “Export” to begin the rendering process. Finally, save your edited background video again, and export the video to the desired destination.
Is There Any Best Alternative to Remove Video’s Background?
Although Adobe Premiere Pro is an excellent choice, the software can be a little overzealous for beginners. But don’t fret; there is an alternative for newbie to remove the video background.
Many video content creators recommended Wondershare Filmora as a user-friendly video editing software. This software loads with customization options and compact feature, including the Human Segmentation effect. With it, you can isolate objects from the background of a video without a green screen.

Let’s take a quick look at Filmora video editing marvel features:
- Comes with a free trial and is priced to meet most video designers’ production needs.
- Remove the video background with four quick steps.
- View the foreground of your video in real-time after background removal.
- Numerous customization options to add a different background or an image to the original content.
- Add the removed background as an overlay on top of another clip.
- Drag and drop a video clip to another track in the timeline for cutting, trimming, and elimination purposes.
- Using the “Human Segregation effect” in the AI Portrait on any imported video is simple.
- See objects isolated from the background in the Preview mode, which allows you to adjust the edges, feathers, and thickness accordingly.
- Easy export options supporting various compatible formats.
Additionally, we have provided you with a video tutorial about How to Remove and Change Video Background Without Green Screen with Filmora:
Free Download For Win 7 or later(64-bit)
Free Download For macOS 10.14 or later
Conclusion
This comprehensive guide explains how to remove the video background in Premier Pro using the Ultra key instead of the Color Key.
We have also discussed an excellent alternative to Premier Pro that can eliminate any background in your video content within minutes.
This article helped solve your queries. As a result, you can now create quality video content for your audience without paying thousands of dollars to professional video editors to do the background removal for you.
Also read:
- In 2024, Do You Wish to Know How FFmpeg Can Remove Audio From a Video? If Yes, Keep Scrolling This Guide to Remove Audio From Video with FFmpeg and Other Alternative Software
- Do You Want to Get Green Screen Effects on Your Video without Green Screen Setup in Your Background? Learn How to Get Virtual Green Screen Background and Shoot Videos Like a Pro for 2024
- 2024 Approved Logo Intro Videos Are the Hottest Trend in Town and Are Gaining Popularity Quickly. Keep Reading This Article to Learn Their Importance and How to Design One
- New 2024 Approved How Have Game Recording Software Improved Their Stature in the Market? An Overview
- New In 2024, Are You Searching for Professional Subtitle Apps? Read This Article to Explore Various Compatible Subtitle Apps that You Can Run on Multiple Platforms
- Updated How to Be a Good Podcast Host for 2024
- Updated How to Add a Spooky Shadow Effect for 2024
- New 2024 Approved 15 Best Free MP4 Video Rotators Windows,Mac, Android, iPhone & Online
- In 2024, Want to Play a Video on Loop on Vimeo so that It Plays Again and Again? Here Are All the Different Ways to Loop a Video on Vimeo in Simple Steps
- Updated 2024 Approved How to Use LUTs in Adobe Premiere Pro
- Splice App for Android - How to Download & Use for 2024
- How to Find a High-Quality Video Marketing Agency for 2024
- Updated In 2024, Which 10 Best Video Editing Online Makers Is Worth Your Attention?
- Updated 2024 Approved Finest Approach to Slow Down a Video CapCut All-in-One Video Editor
- Updated 2024 Approved 15 Best Vloggers That You Should Follow for Travel
- Updated In 2024, This Article Covers a Lot of Information About the Freeze-Frame Effect. It Includes Its Power, Its Usage in Films, and How to Create It in Your Videos Using Filmora. It Will Get You a Super Exciting Cinematic Effect
- List of Supported iPhone Video Formats and Best iPhone Video Editor for 2024
- In 2024, Tips & Tricks To Perfectly Use the Audio Mixer in Filmora
- Remove Google Lock Screen without Password(Google )
- How does the stardust trade cost In pokemon go On Apple iPhone 11? | Dr.fone
- Fix Unfortunately Settings Has Stopped on Samsung Galaxy S23 FE Quickly | Dr.fone
- 3 Easy Solutions to Hard Reset Xiaomi Redmi Note 12 5G | Dr.fone
- How to Downgrade iPhone 13 to an Older iOS Version? | Dr.fone
- How to Track Lava Yuva 2 Pro by Phone Number | Dr.fone
- All About Factory Reset, What Is It and What It Does to Your Huawei Nova Y71? | Dr.fone
- What is Fake GPS Location Pro and Is It Good On Xiaomi 14 Ultra? | Dr.fone
- How can I get more stardust in pokemon go On Asus ROG Phone 7? | Dr.fone
- How to Fake Snapchat Location on Vivo T2 Pro 5G | Dr.fone
- In 2024, The Most Effective Ways to Bypass iPhone 7 Activation Lock
- The Complete Guide to Vivo Y27 4G FRP Bypass Everything You Need to Know
- A Guide Oppo A18 Wireless and Wired Screen Mirroring | Dr.fone
- Pattern Locks Are Unsafe Secure Your Infinix GT 10 Pro Phone Now with These Tips
- In 2024, 5 Solutions For Realme Narzo N55 Unlock Without Password
- How to Change Poco M6 5G Location on Skout | Dr.fone
- In 2024, FRP Hijacker by Hagard Download and Bypass your Vivo Y200 FRP Locks
- iPogo will be the new iSpoofer On Vivo V29e? | Dr.fone
- Title: New How to Merge Audio and Video Using FFmpeg
- Author: Morgan
- Created at : 2024-06-15 18:56:26
- Updated at : 2024-06-16 18:56:26
- Link: https://ai-video-editing.techidaily.com/new-how-to-merge-audio-and-video-using-ffmpeg/
- License: This work is licensed under CC BY-NC-SA 4.0.


