:max_bytes(150000):strip_icc():format(webp)/social-media-text-588a94263df78caebc620f05.jpg)
New How to Split a Video Into Parts on All Platforms

How to Split a Video Into Parts on All Platforms
Digitalization and increased competition on social media platforms have significantly increased the demand for video editing software to split videos into multiple parts. Despite the introduction and availability of numerous software, you might find it challenging to decide on one software that fits your video editing criteria.
This guide will introduce some powerful software that can be used for different systems, such as Android, Mac, Windows, Linux, iPhone, etc., to split your videos into parts.
Part 1: How to split a video into parts on Windows?
Some video editors can help you accomplish your goal of easily splitting videos on your computer with half the work! Next, we’ll suggest a few light and user-friendly video editors for the Windows operating system.
1. Wondershare Filmora
Filmora is a video editor for Windows that makes creating beautiful and compelling videos simple. It only takes a few easy steps to create videos using Filmora’s built-in editing features.
To cut your video into clips, you have to follow the steps:
Step1Install the Filmora video cutter on your PC.
Step2Launch Filmora, click on the New Project and import the video you need to split.
Step3Once you have uploaded the video, drag the video mark to the point you want the video to split. Now, click on the split icon or press Ctrl+B to automatically divide it into parts.
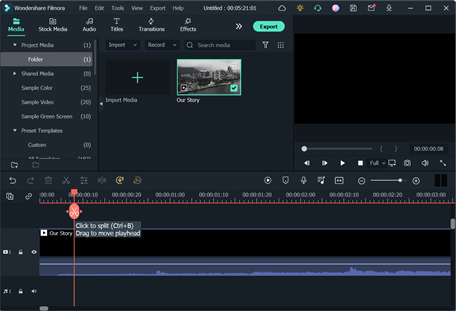
Step4Select the part you want to delete and click on the Delete icon; your unnecessary parts will be cut.
Step5Apply filters and transitions if required. Then, export and save the split video.
2. Wondershare UniConverter
Along with helping you convert different video formats, UniConverter also supports you in completing the video’s first editing. It removes extras and gives it an elegant appearance. You need to follow the instructions to obtain your preferred video. These videos can be shared on YouTube and other websites.
You can use the following steps to divide your video into parts on Windows:
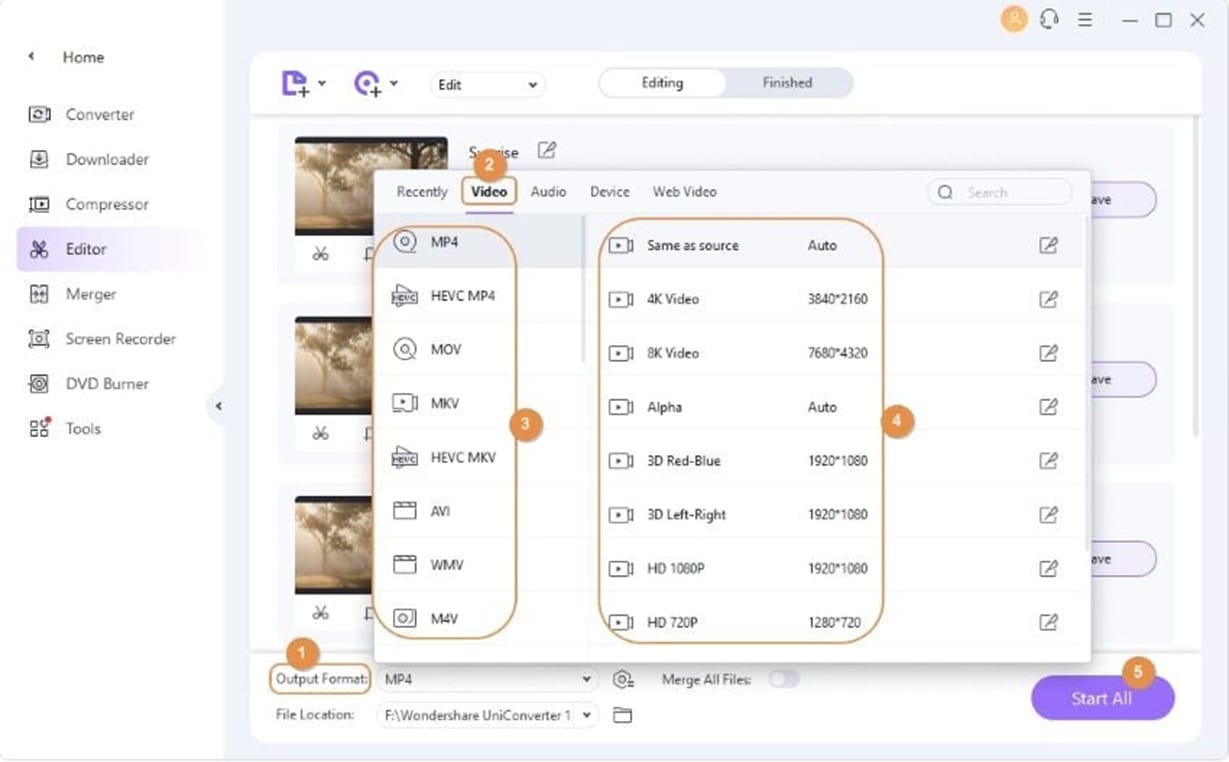
Step1Download and launch Wondershare UniConverter and click on Editor to start editing the video.
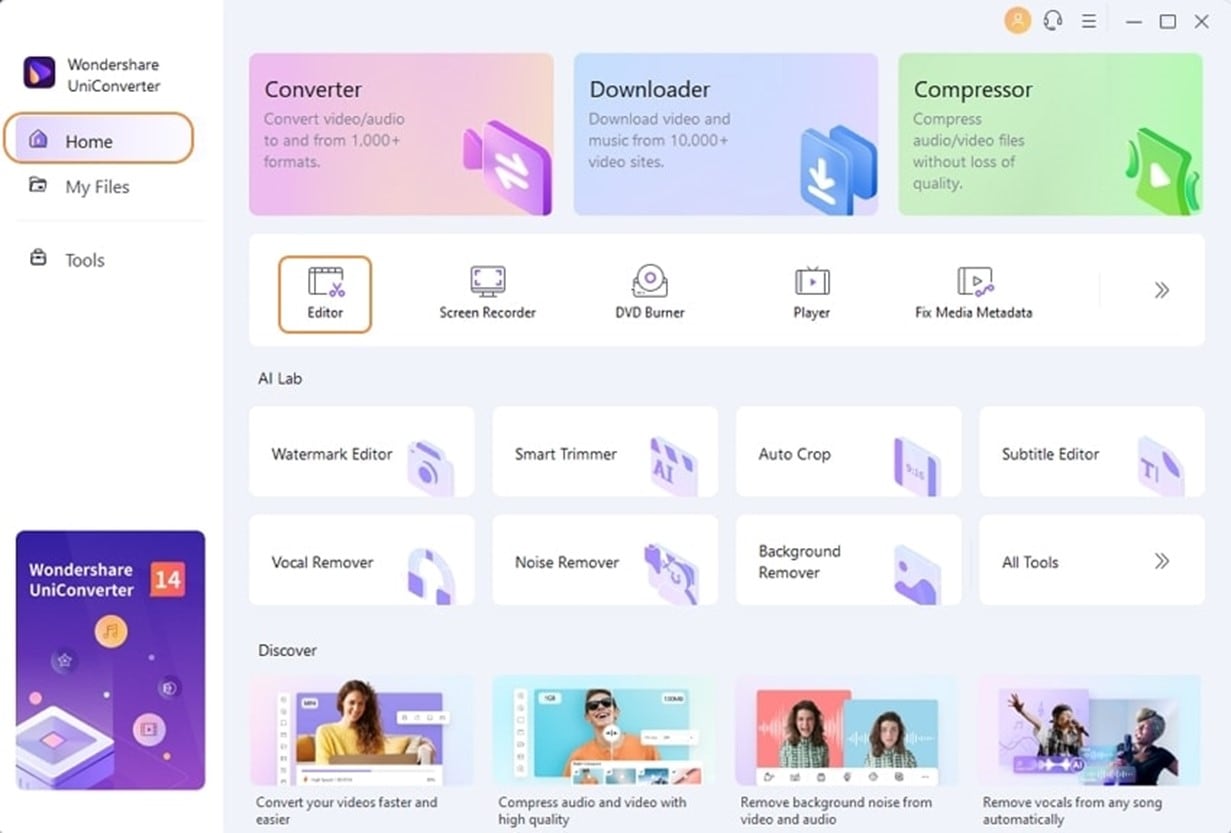
Step2From the options that appear on your screen, select trim to cut and edit the video.
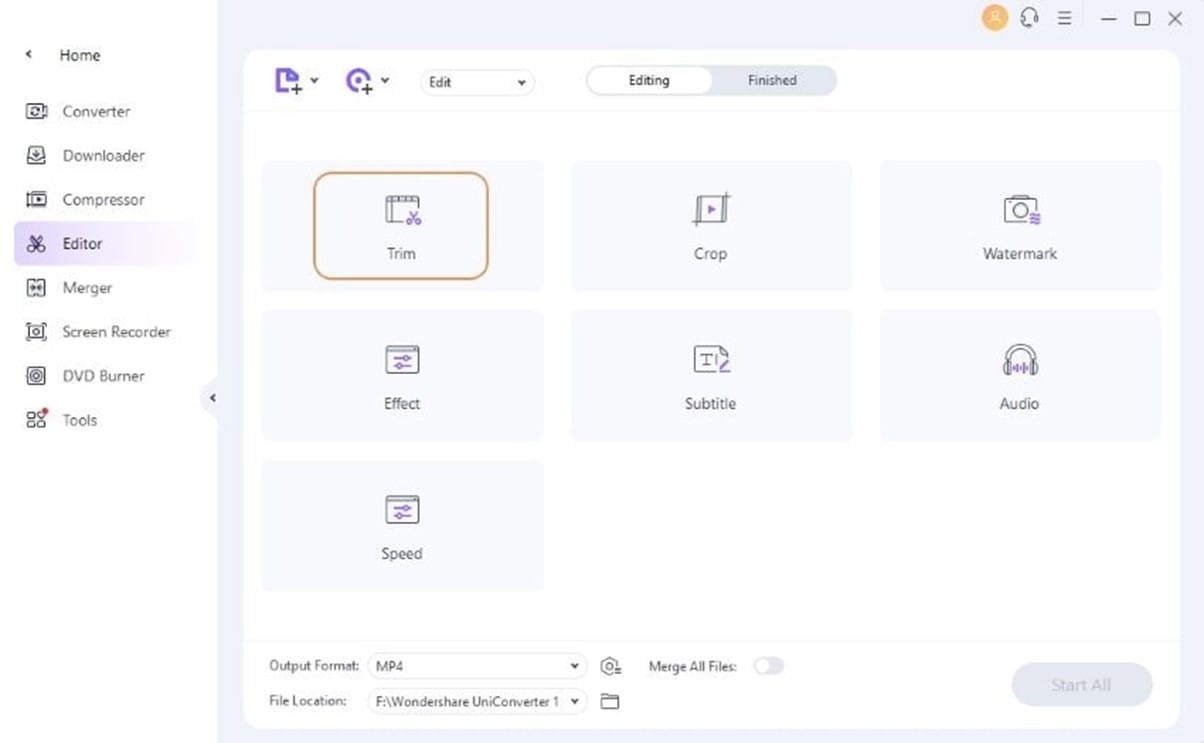
Step3To split a video, select the clip you don’t want and click the scissor icon.
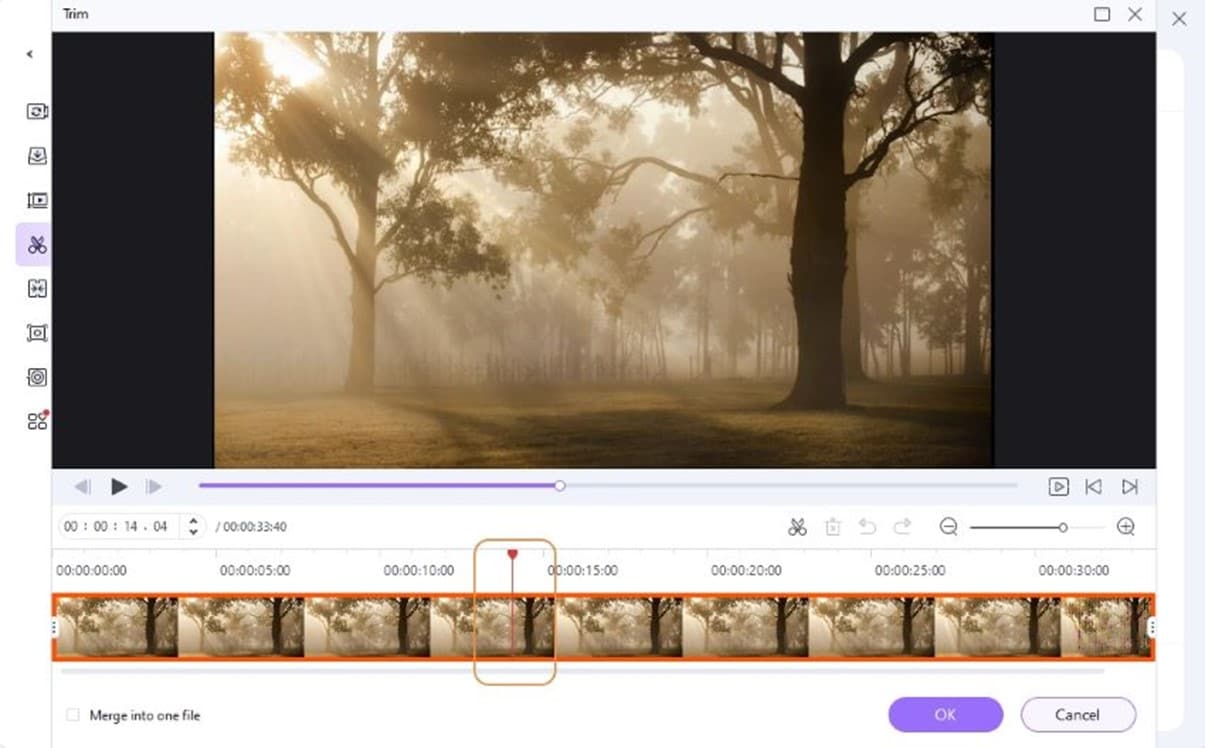
Step4Once you have split the videos into different parts, you can move to the final step to export and save the video file.
Part 2: How to split a video into parts on Mac?
If you want to edit your video and trim, you can do it by Filmora on Mac. They are
1. Wondershare Filmora for Mac
Wondershare Filmora is a video editing program with a delightfully user-friendly interface that enables anyone to become an excellent video editor. With the help of various strong editing tools and Wondershare Filmora, users may quickly and easily make great videos.
You can easily split the video into different parts by following these steps:
Step1Install the Filmora video editor on your Mac.
Step2Start Filmora, select New Project, then import the video you want to split.
Step3On the timeline, drag the red scissor icon to the place where you wish to split it, then right-click on it. Click the “Split” option when you see it now.
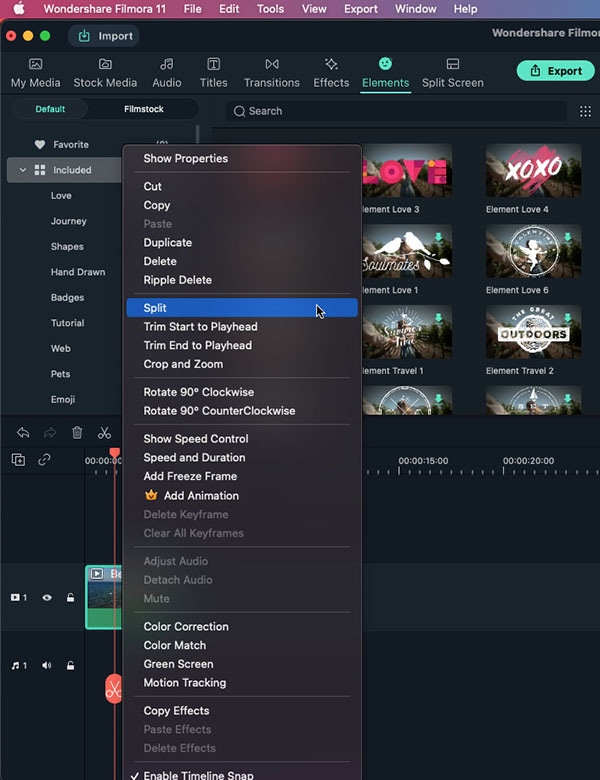
Or choose the video from the timeline, slide the red line to the target dot, and then click the red scissor or the scissor at the top of the timeline to split it.

Step4You can export your video after finishing all the editing.
2. iMovie
iMovie is a video editing software designed and built by Apple Inc. for their products, such as Mac. This video editing software involves a wide range of features that include the modification and enhancement of video quality, split, trimming, or crop videos, adding transitions, and some other valuable and useful features.
There are steps to get your edited video by iMovie.
Step1Download and launch iMovie on your device.
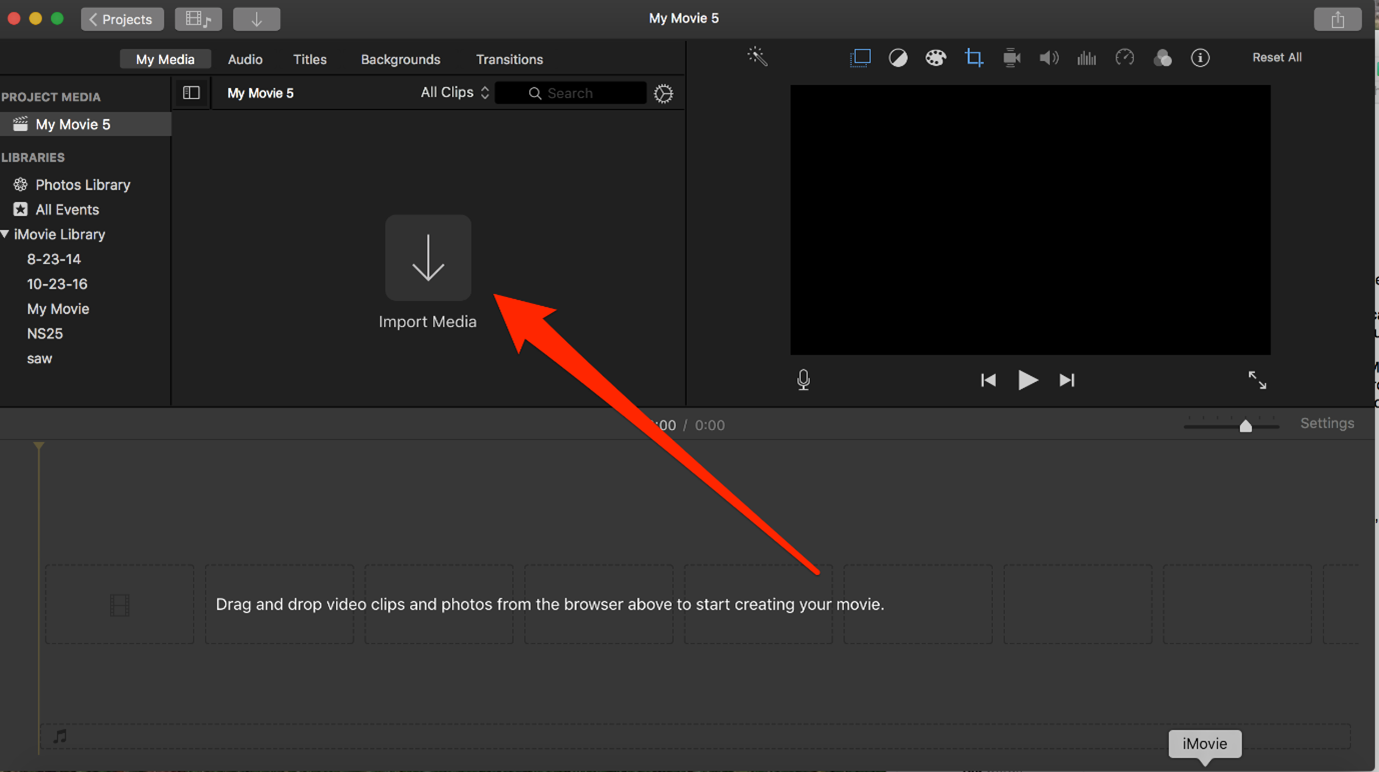
Step2Upload the video for editing by clicking on Create Project.
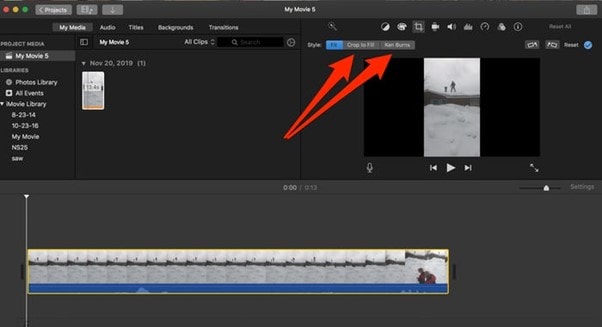
Step3Trim or Split the video.
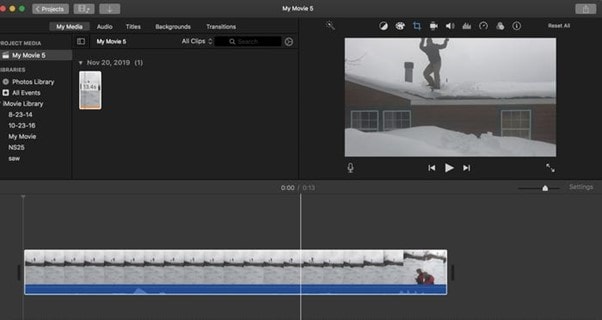
Step4Export and save the video.
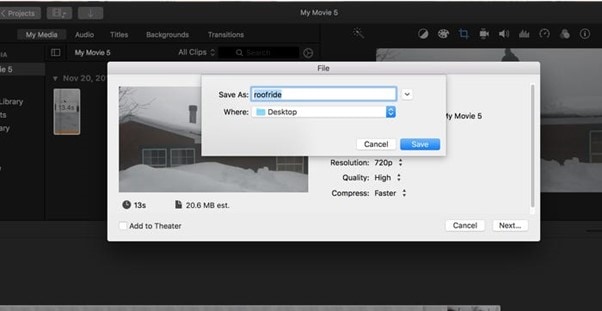
Part 3: How to split a video into parts on Linux?
OpenShot is a potent free video editor that supports more than 70 languages and has a variety of useful functions, including video motion effects. It is unquestionably a simple, quick-to-learn, yet surprisingly effective video editor.
We can be done this by using OpenShot on Linux after going through the steps below:
Step1Install the OpenShot on your Linux and launch it.
Step2Import the video files, then select Split Clip from the context menu by right-clicking. You can also use the keyboard shortcut Ctrl + X.
Step3In the preview window, select the start screen and click Start (the end screen and click End). When finished, press Create. This video will then be extracted and show up in your media library as a separate clip.
Part 4: How to split the video into parts on iPhone?
1. Built-in Photos App
We advise using the editing feature in the iPhone’s built-in Photo app if you only want to do basic video editing.
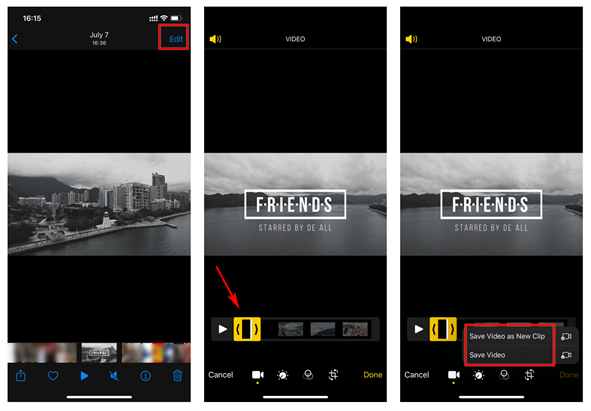
Step1Open the Photos App and press the Edit button to split the video.
Step2Move the pointer on the desired clip to modify the selection, then click the Done button in the bottom right corner to save the video.
Step3You have the option of immediately replacing the original or selecting Save Video as New Clip.
2. Filmora
You can cut your video by iPhone by the following method:
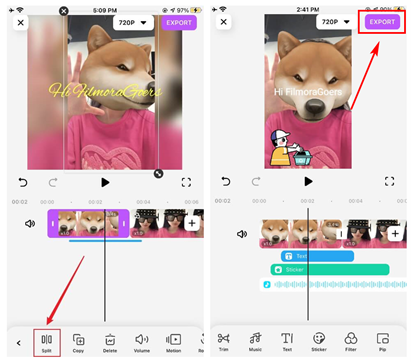
Step1Install the Filmora application from the play store and launch it. Click on New Project to upload the video.
Step2To split a frame, you must drag the video clip onto the timeline while allowing the playhead to remain where you want it. To finish separating, tap the Split button.
Step3Tap the Export button once you’ve finished editing the video.
Part 5: How to split the video into parts on Android?
1. Built-in Gallery app on android
There is the easiest way to divide your videos into multiple parts by Android. You can cut it into pieces or edit a video by using this one.
Step1Open gallery on your phone and tap on the item you need to split. Then, click on the Pencil icon.
Step2Edit the video by touching on the scissor i.e., allowing you to split the video.
Step3Once you have completed editing the video, save the video.

2. Filmora on Android
As in iPhone, Filmora also helps to cut, delete, or edit the video according to our choice in Android. It makes the clip of the movie short or pure. To get all the processes keenly study the steps below:
Step1Install the Filmora application from the play store and launch it. Click on New Project to upload the video.
Step2Upload the video.
Step3Split the video into as many parts as you want. Delete the other parts if you do not need them.
Step4Once you have edited the video, export and save it.
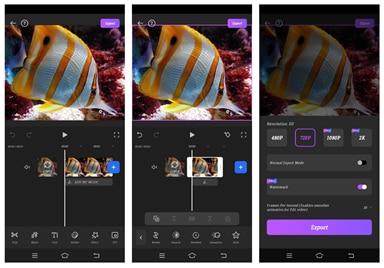
Part 6: How to split the video into parts online?
All the above methods are possible if we install and download the software or apps. But in the online method, you go to the website and can get your video in trimmed form any time. No need to download it before work. They are:
Veed.io
Users can make video and audio playlists using the online video editor VEED and then share them on social media websites. Moreover, it has a lot of editing options that might help you realize more potential for your videos.
Use the following instructions:
Step1Open Veed.io on Google and click Choose video.
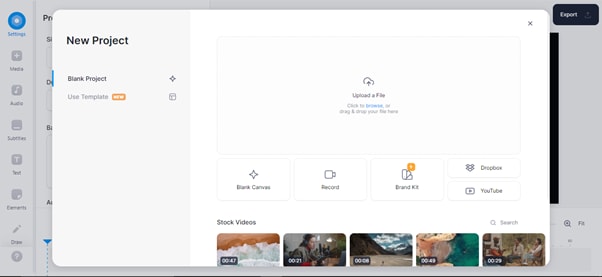
Step2Upload your video item**, then** drag and splice your video in the timeline.
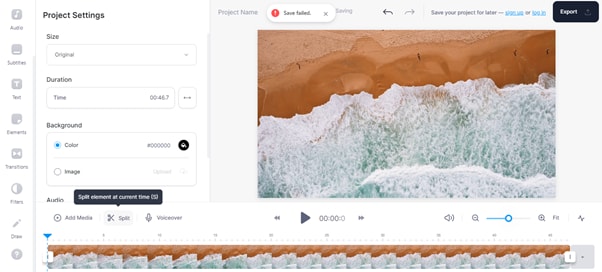
Step3The video will be divided into many parts as you want
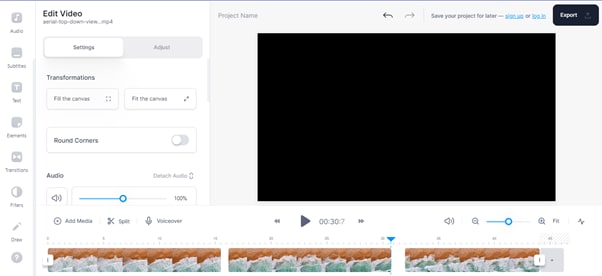
Step4Delete them by clicking Split or S on the keyboard
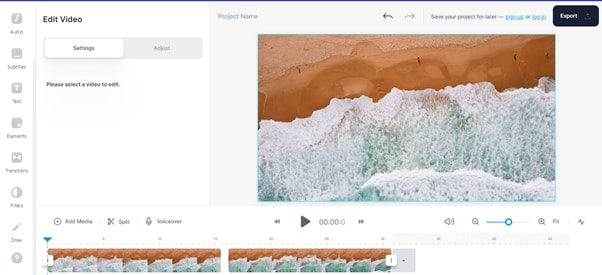
Step5Click the Export to save the edited video.
Conclusion
Today, we recommend the most user-friendly video editors available for each platform, in which Filmora is one of the best editing software which can be used easily. It can be used on many devices, as discussed above. They can cut and make our videos better for you. Usually, you guys need to edit your videos according to your will. Filmora helps you in it and makes your presentation well.
Free Download For Win 7 or later(64-bit)
Free Download For macOS 10.14 or later
Part 4: How to split the video into parts on iPhone?
1. Built-in Photos App
We advise using the editing feature in the iPhone’s built-in Photo app if you only want to do basic video editing.
Step1Open the Photos App and press the Edit button to split the video.
Step2Move the pointer on the desired clip to modify the selection, then click the Done button in the bottom right corner to save the video.
Step3You have the option of immediately replacing the original or selecting Save Video as New Clip.

2. Filmora
You can cut your video by iPhone by the following method:
Step1Install the Filmora application from the play store and launch it. Click on New Project to upload the video.
Step2To split a frame, you must drag the video clip onto the timeline while allowing the playhead to remain where you want it. To finish separating, tap the Split button.
Step3Tap the Export button once you’ve finished editing the video.

Part 5: How to split the video into parts on Android?
1. Built-in Gallery app on android
There is the easiest way to divide your videos into multiple parts by Android. You can cut it into pieces or edit a video by using this one.
Step1Open gallery on your phone and tap on the item you need to split. Then, click on the Pencil icon.
Step2Edit the video by touching on the scissor i.e., allowing you to split the video.
Step3Once you have completed editing the video, save the video.

2. Filmora on Android
As in iPhone, Filmora also helps to cut, delete, or edit the video according to our choice in Android. It makes the clip of the movie short or pure. To get all the processes keenly study the steps below:
Step1Install the Filmora application from the play store and launch it. Click on New Project to upload the video.
Step2Upload the video.
Step3Split the video into as many parts as you want. Delete the other parts if you do not need them.
Step4Once you have edited the video, export and save it.

Part 6: How to split the video into parts online?
All the above methods are possible if we install and download the software or apps. But in the online method, you go to the website and can get your video in trimmed form any time. No need to download it before work. They are:
Veed.io
Users can make video and audio playlists using the online video editor VEED and then share them on social media websites. Moreover, it has a lot of editing options that might help you realize more potential for your videos.
Use the following instructions:
Step1Open Veed.io on Google and click Choose video.

Step2Upload your video item**, then** drag and splice your video in the timeline.

Step3The video will be divided into many parts as you want

Step4Delete them by clicking Split or S on the keyboard

Step5Click the Export to save the edited video.
Conclusion
Today, we recommend the most user-friendly video editors available for each platform, in which Filmora is one of the best editing software which can be used easily. It can be used on many devices, as discussed above. They can cut and make our videos better for you. Usually, you guys need to edit your videos according to your will. Filmora helps you in it and makes your presentation well.
Free Download For Win 7 or later(64-bit)
Free Download For macOS 10.14 or later
Free Titles For Final Cut Pro
Final Cut Pro is one of the best ways to edit videos, especially for Mac users. One of the main reasons many video editors choose Final Cut Pro is that it works very well with third-party templates and plugins to allow the user to come up with highly unique productions.
In this article, we will look at some of the best free titles for Final Cut Pro. These are the title templates that you can use to create unique titles in your Final Cut Pro project.
- Trendy Final Cut Pro Title
- Kinetic Title Templates
- Abstract Fast Glitch Titles
- Free Gradient Shape Title Template
- Hand Drawn Brush Titles Pack
- Free Fullscreen Glitch Title Template
- Call-Out Titles and Elements
- Social Titles
- Motion Typography Template
- Quotes and Motivation Title Templates
Free Titles for Final Cut Pro
The following are some of the best title templates for Final Cut Pro;
Trendy Final Cut Pro Title
This is a template pack that comes with multiple designs to make the most stylish or bold titles for your video project. Most of the templates that you will find in this bundle are suitable for promo videos, social media videos, and YouTube videos. All the templates in the bundle are available in 4K resolution.

Kinetic Title Templates
This is the most ideal template package to choose for technology or futuristic video productions. But thanks to its numerous customizations, you can use it for other genres as well. All templates are compatible with both Apple Motion and Final Cut Pro.

Abstract Fast Glitch Titles
This is one of the best templates if you want to create quick intros for your YouTube videos. There are 10 different title templates in the bundle and each one can be customized in various ways, including adding text animations.

Free Gradient Shape Title Template
As the name suggests, this is a bundle of templates that feature a gradient shape in very colorful backgrounds. Because of the spectacular colors, this is an ideal title design template for slideshows and event promo videos.

Hand Drawn Brush Titles Pack
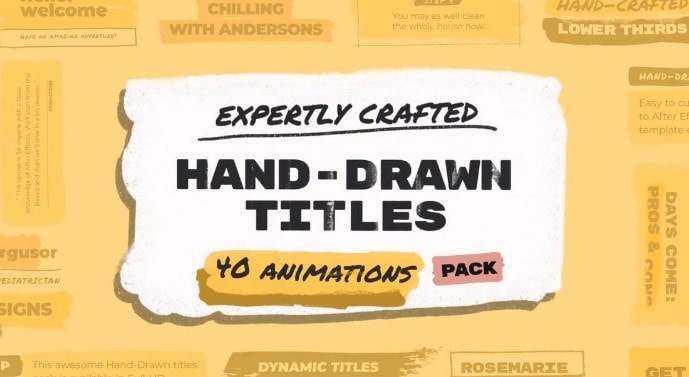
This is the title template pack to choose from if you want your videos to stand out. It comes with unique brush-style titles that you can customize to fit into your video and they can make your video appear more playful and creative. There are more than 40 templates in this pack.
Free Fullscreen Glitch Title Template
This template contains a very bold title design that also comes with the glitching animation. It is one of the most popular titles for social media promos because when done right, the glitching animation can be very attention-grabbing. It is fully customizable.

Call-Out Titles and Elements
If you would like a title that will do more than just announce the video’s title and subject. The Call-Out Titles and Elements pack is one of the best. Since it allows you to add the title as well as additional elements like call-outs, it is the most ideal title template for promotional videos. This pack is made up of 78 different callout elements and titles to choose from.

Social Titles
This is a collection of Final Cut Pro templates that also comes with text animations. The main appeal of the templates in this pack is that the styling is minimal, but creative typography still makes the title ideal for Instagram and certain YouTube genres.

Motion Typography Template
This is a collection of templates that are suited to corporate and business-style videos. With more than 30 templates to choose from and unlimited customizations, you can create the ideal title for any presentation or promo video. They are suitable for both Final Cut Pro and Apple Motion.

Quotes and Motivation Title Templates
This is a collection of templates that you can use to add quotes to any section of the video. Each of these templates also comes with text animations to make the quotes stand out even more. You can also customize all other aspects of the title including the size of the title.

How to Edit Titles in FCXP
Now that you have the perfect title for your video project, you may be wondering how you can add it to the video. Here’s how to add and edit titles to a video in Final Cut Pro;
Step1 Once you have added the title clip to the timeline, select it and then move the playhead over the title.
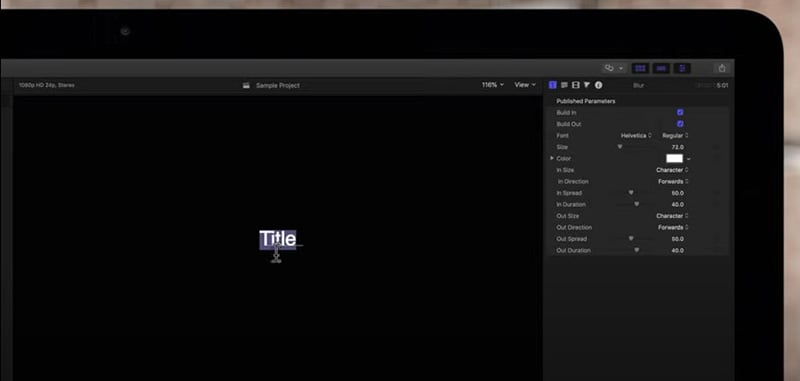
Step2 Double click on the title and it will appear in the viewer. You can then double-click the text object in the viewer or select the text in the “Text Inspector.
Step3 Use the Command-Return keyboard shortcut to edit any existing text.
Alternative Way to Edit Titles
You can also very easily edit the title on any video using Wondershare Filmora . Filmora is one of the best video editing tools for both Windows and macOS that you can use to add and edit titles. It is very easy to use and provides a lot of customizations that are useful for the different genres of videos that you can create.
Here’s how to use Filmora to add and edit titles to your video;
Free Download For Win 7 or later(64-bit)
Free Download For macOS 10.14 or later
Step1 Download and install Wondershare Filmora onto your computer. Open the program and then click on the “Import” button to start. You can also just drag and drop the video to the main window to open it.
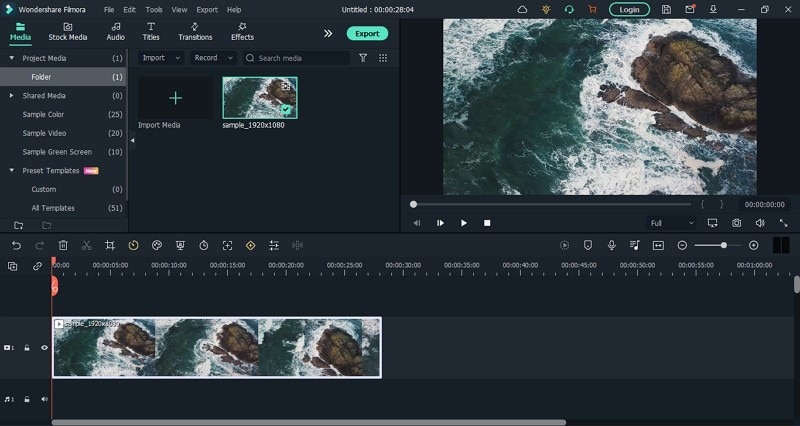
Step2 Once the video is open in Filmora, you will need to drag it to the timeline panel before you can start to edit it.

Step3 Click on the “Titles” tab at the top to open the text and title presets that you will need to add text to the document. Filmora offers more than 200 text effects to choose from. Just double-click on one of the presents to select it and then the preview window to see it in real-time.

Step4 If you like the preset that you have selected, place the cursor on the position in the timeline where you would like to add the text and then drag and drop the title track above the video in the timeline.

Step5 If you would like to change the duration of the text simply drag the edge of the timeline until you get the length that you desire. Filmora also allows you to edit and customize the text. To do that, double-click on the “Title” time frame to get some customization options.

Step6 Once you are happy with all the changes you have made, click on “Export” and choose an output format to save and export your video.
Takeaway
Titles are a vital part of any video as they can be used to provide a preview of the content the audience can expect. Now you have a huge selection of pre-made video templates to make your video unique and you can easily edit them in Final Cut Pro or Filmora .
The following are some of the best title templates for Final Cut Pro;Trendy Final Cut Pro Title
This is a template pack that comes with multiple designs to make the most stylish or bold titles for your video project. Most of the templates that you will find in this bundle are suitable for promo videos, social media videos, and YouTube videos. All the templates in the bundle are available in 4K resolution.

Kinetic Title Templates
This is the most ideal template package to choose for technology or futuristic video productions. But thanks to its numerous customizations, you can use it for other genres as well. All templates are compatible with both Apple Motion and Final Cut Pro.

Abstract Fast Glitch Titles
This is one of the best templates if you want to create quick intros for your YouTube videos. There are 10 different title templates in the bundle and each one can be customized in various ways, including adding text animations.

Free Gradient Shape Title Template
As the name suggests, this is a bundle of templates that feature a gradient shape in very colorful backgrounds. Because of the spectacular colors, this is an ideal title design template for slideshows and event promo videos.

Hand Drawn Brush Titles Pack
This is the title template pack to choose from if you want your videos to stand out. It comes with unique brush-style titles that you can customize to fit into your video and they can make your video appear more playful and creative. There are more than 40 templates in this pack.

Free Fullscreen Glitch Title Template
This template contains a very bold title design that also comes with the glitching animation. It is one of the most popular titles for social media promos because when done right, the glitching animation can be very attention-grabbing. It is fully customizable.

Call-Out Titles and Elements
If you would like a title that will do more than just announce the video’s title and subject. The Call-Out Titles and Elements pack is one of the best. Since it allows you to add the title as well as additional elements like call-outs, it is the most ideal title template for promotional videos. This pack is made up of 78 different callout elements and titles to choose from.

Social Titles
This is a collection of Final Cut Pro templates that also comes with text animations. The main appeal of the templates in this pack is that the styling is minimal, but creative typography still makes the title ideal for Instagram and certain YouTube genres.

Motion Typography Template
This is a collection of templates that are suited to corporate and business-style videos. With more than 30 templates to choose from and unlimited customizations, you can create the ideal title for any presentation or promo video. They are suitable for both Final Cut Pro and Apple Motion.

Quotes and Motivation Title Templates
This is a collection of templates that you can use to add quotes to any section of the video. Each of these templates also comes with text animations to make the quotes stand out even more. You can also customize all other aspects of the title including the size of the title.

How to Edit Titles in FCXP
Now that you have the perfect title for your video project, you may be wondering how you can add it to the video. Here’s how to add and edit titles to a video in Final Cut Pro;
Step1 Once you have added the title clip to the timeline, select it and then move the playhead over the title.
Step2 Double click on the title and it will appear in the viewer. You can then double-click the text object in the viewer or select the text in the “Text Inspector.
Step3 Use the Command-Return keyboard shortcut to edit any existing text.

Alternative Way to Edit Titles
You can also very easily edit the title on any video using Wondershare Filmora . Filmora is one of the best video editing tools for both Windows and macOS that you can use to add and edit titles. It is very easy to use and provides a lot of customizations that are useful for the different genres of videos that you can create.
Here’s how to use Filmora to add and edit titles to your video;
Free Download For Win 7 or later(64-bit)
Free Download For macOS 10.14 or later
Step1 Download and install Wondershare Filmora onto your computer. Open the program and then click on the “Import” button to start. You can also just drag and drop the video to the main window to open it.
Step2 Once the video is open in Filmora, you will need to drag it to the timeline panel before you can start to edit it.

Step3 Click on the “Titles” tab at the top to open the text and title presets that you will need to add text to the document. Filmora offers more than 200 text effects to choose from. Just double-click on one of the presents to select it and then the preview window to see it in real-time.

Step4 If you like the preset that you have selected, place the cursor on the position in the timeline where you would like to add the text and then drag and drop the title track above the video in the timeline.

Step5 If you would like to change the duration of the text simply drag the edge of the timeline until you get the length that you desire. Filmora also allows you to edit and customize the text. To do that, double-click on the “Title” time frame to get some customization options.

Step6 Once you are happy with all the changes you have made, click on “Export” and choose an output format to save and export your video.
Takeaway
Titles are a vital part of any video as they can be used to provide a preview of the content the audience can expect. Now you have a huge selection of pre-made video templates to make your video unique and you can easily edit them in Final Cut Pro or Filmora .
Best 6 WebM to GIF Converters
Powerful Video Editor - Wondershare Filmora
Provide abundant video effects - A creative video editor
Powerful color correction and grading
Detailed tutorials provided by the official channel
Video content has become an essential element on almost every platform. With its growing rise to fame, multiple video file formats are now available, including MP4, WebM, and GIF files. The WebM video format is helpful in web-based scenarios due to its high quality and smaller file size support.
Most browsers with HTML5 support the WebM format. In contrast, GIF formats offer a much smaller file size and increased compatibility with all web browsers. If you want to convert your WebM to a GIF file, you can use the various format converter tools available. Here, discover some of the best WebM to GIF converter tools to help you with the task.
In this article
Part 1: Best 3 WebM to GIF Converter Software
Part 2: Top 3 WebM to GIF Converters
Part 3: How to Convert WebM to GIF Using CloudConvert?
Part 1: Best 3 WebM to GIF Converter Software
We have some info for you if you are looking for software that can help convert WebM to GIF files. Here are our top picks for programs that you can easily use as WebM to GIF converters:
1. Wondershare Filmora
| Compatibility | Pricing |
|---|---|
| Windows/Mac | $28.98/Monthly $68.98/Annual $98.98/Perpetual |
Wondershare Filmora is one of the most prestigious video editing software that can also act as a WebM to GIF converter tool. Filmora offers its users various visual effects, stock footage, intuitive templates, and more to enhance their video content. Users can create robust and lively videos suited to their skill level using Filmora.
Filmora can turn all your video storytelling dreams into reality with its creative assets and easy-to-use features. After editing a WebM video on Filmora, you can export it to your local system’s library into several file formats, including GIF. Thus, you can convert WebM to GIF files efficiently and instantly using Filmora.
Pros
Filmora offers built-in templates and creative assets for an easy start.
You can add smooth transitions and effects to your video using Filmora’s keyframing.
Filmora offers powerful motion tracking tools for better quality realistic visuals.
Filmora’s Auto Reframe option lets you resize your videos easily and automatically.
Cons
The free version of Filmora retains a watermark on the video.
2. Adobe Premium Pro
| Compatibility | Pricing |
|---|---|
| Windows/Mac | $20.99/Monthly |
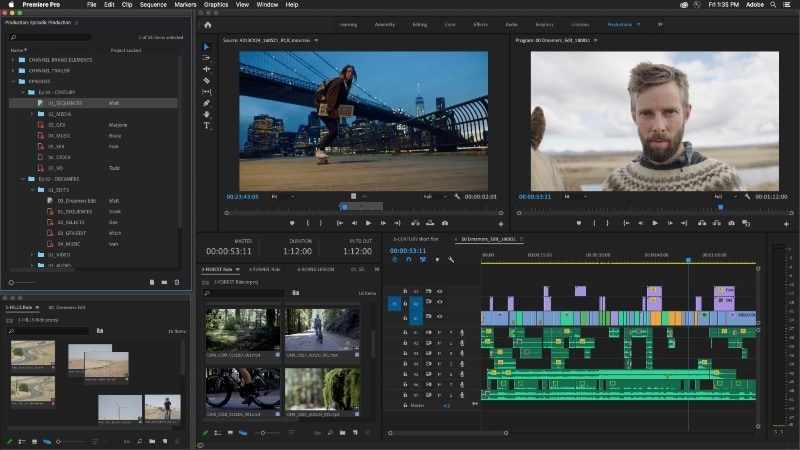
Adobe Premium Pro is a professional-level video editor and filmmaking software. Premium Pro can help you with everything from creating marketing content to cinematic masterpieces. You can shape your stories with Adobe’s one-of-a-kind tools. Premium Pro contains everything you might need to make your content shine, from audio tools to professional templates.
If you want to convert WebM to GIF, Premium Pro can help you. Using Adobe’s powerful features, you can import your WebM file to the program’s interface and customize its various aspects. Once you have finished the conversion, you can export your video file into a format of your choice, i.e., the GIF file format.
Pros
Premium Pro now offers up to 100GB of cloud storage with Adobe’s Creative Cloud.
You can edit up to five projects at a time, accompanied by live sharing.
Premium Pro allows powerful and accurate auto color adjustments on your projects.
You can send your camera’s feed directly to Premium Pro for live processing.
Cons
The software requires technical skills and is not well-suited for beginners.
3. Movavi Video Editor Plus
| Compatibility | Pricing |
|---|---|
| Windows/Mac | $49.95/Year $69.95/Lifetime |
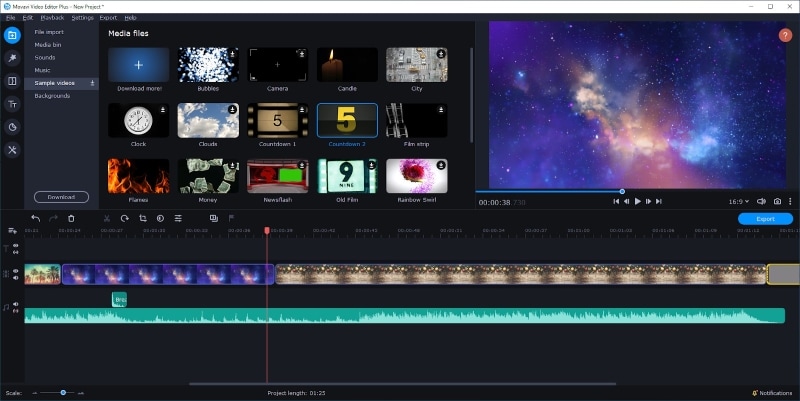
Movavi is a great video editing software that can help harness your creative abilities and inspirations into meaningful content. Movavi can also act as a WebM to GIF converter tool for both Mac and Windows computers. With its unique special effects, animations, and templates, you can bring all your intuitive ideas to life.
Movavi offers fast processing and high-quality results. The program supports multiple formats that can be converted into one another, such as WebM to GIF and vice versa. Once you import your WebM file into Movavi’s interface, you can customize every aspect of the video to enhance your vision and export it to a GIF format with just a few clicks.
Pros
You can record your desktop screens and add them to your video using Movavi.
It offers various advanced editing options such as Chroma key and motion tracking.
Using its Stabilization feature, you can fix motion distortion and shakes in your video.
Movavi lets you adjust the audio and normalize the audio volume using its Equalizer tool.
Cons
Movavi offers limited control over some effects, such as title additions.
Part 2: Top 3 WebM to GIF Converters
If you are looking for web-based tools dedicated to video file format conversions, we have a lot in store for you. Below, you can find the top 3 WebM to GIF online converter tools to make your task easier.
1. CloudConvert
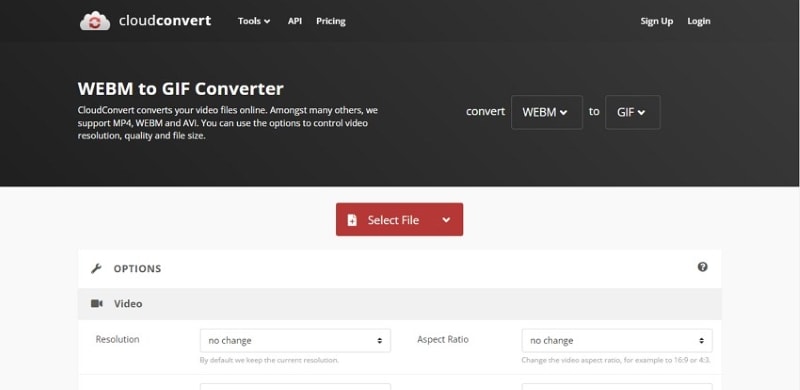
CloudConvert is a notable file converter tool that offers services across the web. The tool features an easy-to-use and interactive user interface. CloudConvert provides extensive support to help convert your WebM files into GIF images in a few simple clicks. You can use it to transform your WebM to GIF without losing the quality of the product.
Pros
CloudConvert offers up to 25 free conversions per day, with premium quality results.
It supports more than 200 file formats for images, videos, audio, etc.
CloudConvert offers enhanced security for your file without the risk of viruses, redirects, popups, etc.
Before conversion, you can change your file’s various aspects, including the resolution and frame rate.
Cons
CloudConvert does not offer support for batch conversion.
2. Convertio
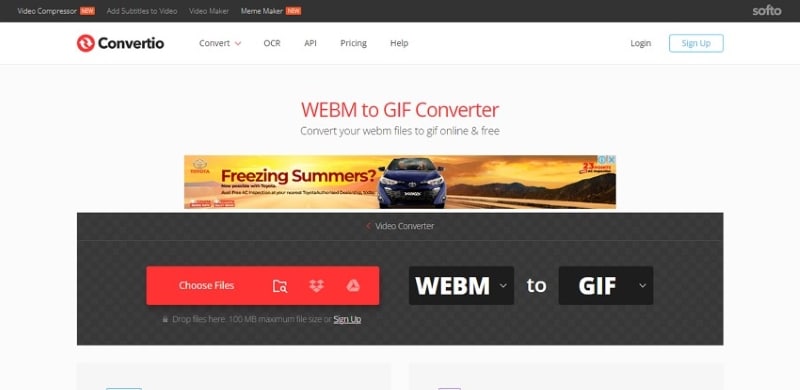
An incredible web-based tool that can help you convert WebM to GIF files is Convertio. This tool offers high-quality conversion from a wide range of supported formats. Compatible with all modern browsers and OS, Convertio features a simple interface that ensures a smooth and trouble-free conversion process.
Pros
Convertio offers major Cloud Storage services integration, including Google Drive and Dropbox.
The tool offers batch processing support so you can convert multiple files at the same time.
It is highly versatile and offers conversions for multiple file types.
Convertio also offers a video compression feature.
Cons
You can only upload maximum file size of 100MBs on Convertio.
3. EZGIF.com
Another notable online tool that you can use as a WebM to GIF converter is EZGIF.com. It is an intuitive website dedicated to GIF file format. You can access this free web-based service to convert a file into GIF format or edit your created GIFs in virtually every way possible. The conversion process is also quick and straightforward on EZGIF.com.
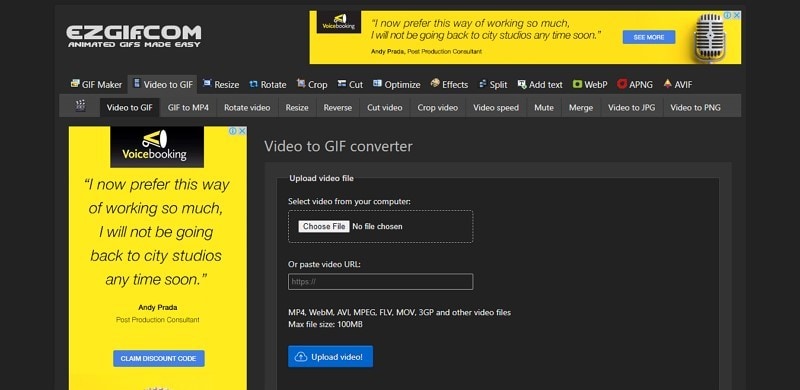
Pros
You can easily adjust your output file’s size and dimensions on EZGIF.
The tool offers easy markers and pauses options to help you accurately select the start and end positions for your GIF.
You can crop, rotate, or trim your video prior to conversion.
EZGIF can also help you create GIFs from images.
Cons
The website currently does not offer integration with Cloud Storage services.
Part 3: How to Convert WebM to GIF Using CloudConvert?
CloudConvert is a remarkable WebM to GIF converter tool that offers web-based services across multiple platforms. If you want to convert your WebM video file to a GIF format, here is how you can do that using CloudConvert:
Step 1: Upload Video
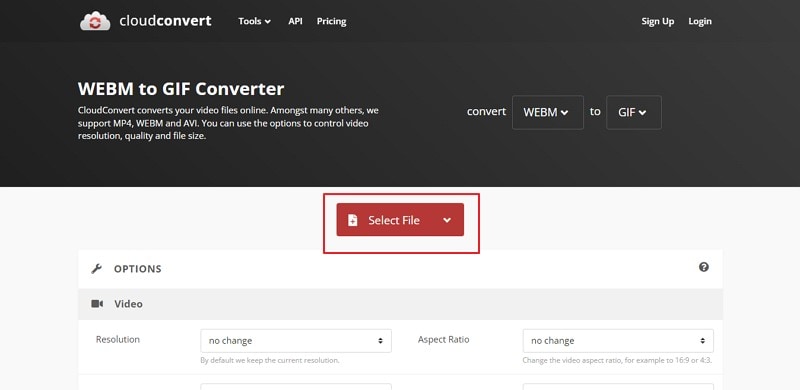
After opening the website on your device, click on the “Select File” button on the program’s interface. You can choose to upload your file from the local computer, by a URL, or through a cloud storage service.
Step 2: Specify Options
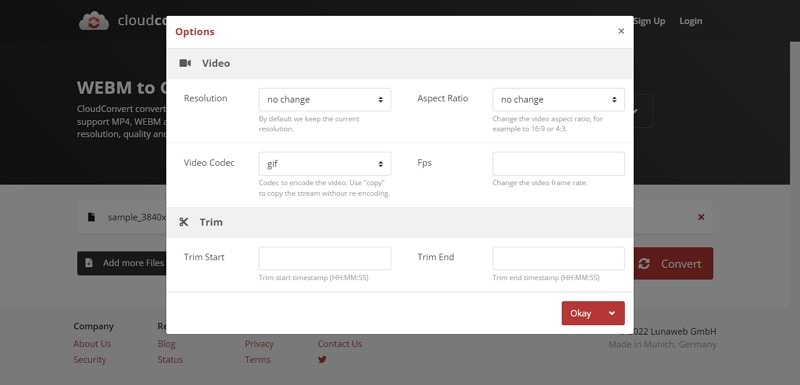
You can now select the specifications of your video, such as choosing the resolution, aspect ratio, and frame rate. CloudConvert also allows you to trim your video during the conversion process.
Step 3: Convert to GIF and Save
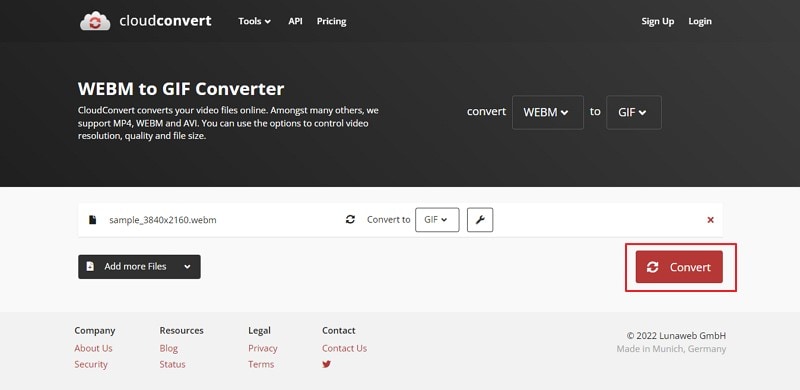
Once you have specified your video details, hit the “Convert option.” When CloudConvert has converted your video format from WebM to GIF, click “Download” to save your file.
Conclusion
The choice of a suitable file format depends greatly on the final use of your video. Your video file type can influence the quality and the file size of your content. Format converters are handy tools if your file is incompatible with your chosen platform.
If you want to convert WebM to GIF files, you can do so effectively with the converter software and websites mentioned above. If you’re going to refine your video with post-processing further, you can try the wonderful features offered by Wondershare Filmora. The software comes loaded with remarkable tools to help your video content stand apart.
Video content has become an essential element on almost every platform. With its growing rise to fame, multiple video file formats are now available, including MP4, WebM, and GIF files. The WebM video format is helpful in web-based scenarios due to its high quality and smaller file size support.
Most browsers with HTML5 support the WebM format. In contrast, GIF formats offer a much smaller file size and increased compatibility with all web browsers. If you want to convert your WebM to a GIF file, you can use the various format converter tools available. Here, discover some of the best WebM to GIF converter tools to help you with the task.
In this article
Part 1: Best 3 WebM to GIF Converter Software
Part 2: Top 3 WebM to GIF Converters
Part 3: How to Convert WebM to GIF Using CloudConvert?
Part 1: Best 3 WebM to GIF Converter Software
We have some info for you if you are looking for software that can help convert WebM to GIF files. Here are our top picks for programs that you can easily use as WebM to GIF converters:
1. Wondershare Filmora
| Compatibility | Pricing |
|---|---|
| Windows/Mac | $28.98/Monthly $68.98/Annual $98.98/Perpetual |
Wondershare Filmora is one of the most prestigious video editing software that can also act as a WebM to GIF converter tool. Filmora offers its users various visual effects, stock footage, intuitive templates, and more to enhance their video content. Users can create robust and lively videos suited to their skill level using Filmora.
Filmora can turn all your video storytelling dreams into reality with its creative assets and easy-to-use features. After editing a WebM video on Filmora, you can export it to your local system’s library into several file formats, including GIF. Thus, you can convert WebM to GIF files efficiently and instantly using Filmora.

Pros
Filmora offers built-in templates and creative assets for an easy start.
You can add smooth transitions and effects to your video using Filmora’s keyframing.
Filmora offers powerful motion tracking tools for better quality realistic visuals.
Filmora’s Auto Reframe option lets you resize your videos easily and automatically.
Cons
The free version of Filmora retains a watermark on the video.
2. Adobe Premium Pro
| Compatibility | Pricing |
|---|---|
| Windows/Mac | $20.99/Monthly |
Adobe Premium Pro is a professional-level video editor and filmmaking software. Premium Pro can help you with everything from creating marketing content to cinematic masterpieces. You can shape your stories with Adobe’s one-of-a-kind tools. Premium Pro contains everything you might need to make your content shine, from audio tools to professional templates.
If you want to convert WebM to GIF, Premium Pro can help you. Using Adobe’s powerful features, you can import your WebM file to the program’s interface and customize its various aspects. Once you have finished the conversion, you can export your video file into a format of your choice, i.e., the GIF file format.

Pros
Premium Pro now offers up to 100GB of cloud storage with Adobe’s Creative Cloud.
You can edit up to five projects at a time, accompanied by live sharing.
Premium Pro allows powerful and accurate auto color adjustments on your projects.
You can send your camera’s feed directly to Premium Pro for live processing.
Cons
The software requires technical skills and is not well-suited for beginners.
3. Movavi Video Editor Plus
| Compatibility | Pricing |
|---|---|
| Windows/Mac | $49.95/Year $69.95/Lifetime |
Movavi is a great video editing software that can help harness your creative abilities and inspirations into meaningful content. Movavi can also act as a WebM to GIF converter tool for both Mac and Windows computers. With its unique special effects, animations, and templates, you can bring all your intuitive ideas to life.
Movavi offers fast processing and high-quality results. The program supports multiple formats that can be converted into one another, such as WebM to GIF and vice versa. Once you import your WebM file into Movavi’s interface, you can customize every aspect of the video to enhance your vision and export it to a GIF format with just a few clicks.

Pros
You can record your desktop screens and add them to your video using Movavi.
It offers various advanced editing options such as Chroma key and motion tracking.
Using its Stabilization feature, you can fix motion distortion and shakes in your video.
Movavi lets you adjust the audio and normalize the audio volume using its Equalizer tool.
Cons
Movavi offers limited control over some effects, such as title additions.
Part 2: Top 3 WebM to GIF Converters
If you are looking for web-based tools dedicated to video file format conversions, we have a lot in store for you. Below, you can find the top 3 WebM to GIF online converter tools to make your task easier.
1. CloudConvert
CloudConvert is a notable file converter tool that offers services across the web. The tool features an easy-to-use and interactive user interface. CloudConvert provides extensive support to help convert your WebM files into GIF images in a few simple clicks. You can use it to transform your WebM to GIF without losing the quality of the product.

Pros
CloudConvert offers up to 25 free conversions per day, with premium quality results.
It supports more than 200 file formats for images, videos, audio, etc.
CloudConvert offers enhanced security for your file without the risk of viruses, redirects, popups, etc.
Before conversion, you can change your file’s various aspects, including the resolution and frame rate.
Cons
CloudConvert does not offer support for batch conversion.
2. Convertio
An incredible web-based tool that can help you convert WebM to GIF files is Convertio. This tool offers high-quality conversion from a wide range of supported formats. Compatible with all modern browsers and OS, Convertio features a simple interface that ensures a smooth and trouble-free conversion process.

Pros
Convertio offers major Cloud Storage services integration, including Google Drive and Dropbox.
The tool offers batch processing support so you can convert multiple files at the same time.
It is highly versatile and offers conversions for multiple file types.
Convertio also offers a video compression feature.
Cons
You can only upload maximum file size of 100MBs on Convertio.
3. EZGIF.com
Another notable online tool that you can use as a WebM to GIF converter is EZGIF.com. It is an intuitive website dedicated to GIF file format. You can access this free web-based service to convert a file into GIF format or edit your created GIFs in virtually every way possible. The conversion process is also quick and straightforward on EZGIF.com.

Pros
You can easily adjust your output file’s size and dimensions on EZGIF.
The tool offers easy markers and pauses options to help you accurately select the start and end positions for your GIF.
You can crop, rotate, or trim your video prior to conversion.
EZGIF can also help you create GIFs from images.
Cons
The website currently does not offer integration with Cloud Storage services.
Part 3: How to Convert WebM to GIF Using CloudConvert?
CloudConvert is a remarkable WebM to GIF converter tool that offers web-based services across multiple platforms. If you want to convert your WebM video file to a GIF format, here is how you can do that using CloudConvert:
Step 1: Upload Video
After opening the website on your device, click on the “Select File” button on the program’s interface. You can choose to upload your file from the local computer, by a URL, or through a cloud storage service.

Step 2: Specify Options
You can now select the specifications of your video, such as choosing the resolution, aspect ratio, and frame rate. CloudConvert also allows you to trim your video during the conversion process.

Step 3: Convert to GIF and Save
Once you have specified your video details, hit the “Convert option.” When CloudConvert has converted your video format from WebM to GIF, click “Download” to save your file.

Conclusion
The choice of a suitable file format depends greatly on the final use of your video. Your video file type can influence the quality and the file size of your content. Format converters are handy tools if your file is incompatible with your chosen platform.
If you want to convert WebM to GIF files, you can do so effectively with the converter software and websites mentioned above. If you’re going to refine your video with post-processing further, you can try the wonderful features offered by Wondershare Filmora. The software comes loaded with remarkable tools to help your video content stand apart.
Video content has become an essential element on almost every platform. With its growing rise to fame, multiple video file formats are now available, including MP4, WebM, and GIF files. The WebM video format is helpful in web-based scenarios due to its high quality and smaller file size support.
Most browsers with HTML5 support the WebM format. In contrast, GIF formats offer a much smaller file size and increased compatibility with all web browsers. If you want to convert your WebM to a GIF file, you can use the various format converter tools available. Here, discover some of the best WebM to GIF converter tools to help you with the task.
In this article
Part 1: Best 3 WebM to GIF Converter Software
Part 2: Top 3 WebM to GIF Converters
Part 3: How to Convert WebM to GIF Using CloudConvert?
Part 1: Best 3 WebM to GIF Converter Software
We have some info for you if you are looking for software that can help convert WebM to GIF files. Here are our top picks for programs that you can easily use as WebM to GIF converters:
1. Wondershare Filmora
| Compatibility | Pricing |
|---|---|
| Windows/Mac | $28.98/Monthly $68.98/Annual $98.98/Perpetual |
Wondershare Filmora is one of the most prestigious video editing software that can also act as a WebM to GIF converter tool. Filmora offers its users various visual effects, stock footage, intuitive templates, and more to enhance their video content. Users can create robust and lively videos suited to their skill level using Filmora.
Filmora can turn all your video storytelling dreams into reality with its creative assets and easy-to-use features. After editing a WebM video on Filmora, you can export it to your local system’s library into several file formats, including GIF. Thus, you can convert WebM to GIF files efficiently and instantly using Filmora.

Pros
Filmora offers built-in templates and creative assets for an easy start.
You can add smooth transitions and effects to your video using Filmora’s keyframing.
Filmora offers powerful motion tracking tools for better quality realistic visuals.
Filmora’s Auto Reframe option lets you resize your videos easily and automatically.
Cons
The free version of Filmora retains a watermark on the video.
2. Adobe Premium Pro
| Compatibility | Pricing |
|---|---|
| Windows/Mac | $20.99/Monthly |
Adobe Premium Pro is a professional-level video editor and filmmaking software. Premium Pro can help you with everything from creating marketing content to cinematic masterpieces. You can shape your stories with Adobe’s one-of-a-kind tools. Premium Pro contains everything you might need to make your content shine, from audio tools to professional templates.
If you want to convert WebM to GIF, Premium Pro can help you. Using Adobe’s powerful features, you can import your WebM file to the program’s interface and customize its various aspects. Once you have finished the conversion, you can export your video file into a format of your choice, i.e., the GIF file format.

Pros
Premium Pro now offers up to 100GB of cloud storage with Adobe’s Creative Cloud.
You can edit up to five projects at a time, accompanied by live sharing.
Premium Pro allows powerful and accurate auto color adjustments on your projects.
You can send your camera’s feed directly to Premium Pro for live processing.
Cons
The software requires technical skills and is not well-suited for beginners.
3. Movavi Video Editor Plus
| Compatibility | Pricing |
|---|---|
| Windows/Mac | $49.95/Year $69.95/Lifetime |
Movavi is a great video editing software that can help harness your creative abilities and inspirations into meaningful content. Movavi can also act as a WebM to GIF converter tool for both Mac and Windows computers. With its unique special effects, animations, and templates, you can bring all your intuitive ideas to life.
Movavi offers fast processing and high-quality results. The program supports multiple formats that can be converted into one another, such as WebM to GIF and vice versa. Once you import your WebM file into Movavi’s interface, you can customize every aspect of the video to enhance your vision and export it to a GIF format with just a few clicks.

Pros
You can record your desktop screens and add them to your video using Movavi.
It offers various advanced editing options such as Chroma key and motion tracking.
Using its Stabilization feature, you can fix motion distortion and shakes in your video.
Movavi lets you adjust the audio and normalize the audio volume using its Equalizer tool.
Cons
Movavi offers limited control over some effects, such as title additions.
Part 2: Top 3 WebM to GIF Converters
If you are looking for web-based tools dedicated to video file format conversions, we have a lot in store for you. Below, you can find the top 3 WebM to GIF online converter tools to make your task easier.
1. CloudConvert
CloudConvert is a notable file converter tool that offers services across the web. The tool features an easy-to-use and interactive user interface. CloudConvert provides extensive support to help convert your WebM files into GIF images in a few simple clicks. You can use it to transform your WebM to GIF without losing the quality of the product.

Pros
CloudConvert offers up to 25 free conversions per day, with premium quality results.
It supports more than 200 file formats for images, videos, audio, etc.
CloudConvert offers enhanced security for your file without the risk of viruses, redirects, popups, etc.
Before conversion, you can change your file’s various aspects, including the resolution and frame rate.
Cons
CloudConvert does not offer support for batch conversion.
2. Convertio
An incredible web-based tool that can help you convert WebM to GIF files is Convertio. This tool offers high-quality conversion from a wide range of supported formats. Compatible with all modern browsers and OS, Convertio features a simple interface that ensures a smooth and trouble-free conversion process.

Pros
Convertio offers major Cloud Storage services integration, including Google Drive and Dropbox.
The tool offers batch processing support so you can convert multiple files at the same time.
It is highly versatile and offers conversions for multiple file types.
Convertio also offers a video compression feature.
Cons
You can only upload maximum file size of 100MBs on Convertio.
3. EZGIF.com
Another notable online tool that you can use as a WebM to GIF converter is EZGIF.com. It is an intuitive website dedicated to GIF file format. You can access this free web-based service to convert a file into GIF format or edit your created GIFs in virtually every way possible. The conversion process is also quick and straightforward on EZGIF.com.

Pros
You can easily adjust your output file’s size and dimensions on EZGIF.
The tool offers easy markers and pauses options to help you accurately select the start and end positions for your GIF.
You can crop, rotate, or trim your video prior to conversion.
EZGIF can also help you create GIFs from images.
Cons
The website currently does not offer integration with Cloud Storage services.
Part 3: How to Convert WebM to GIF Using CloudConvert?
CloudConvert is a remarkable WebM to GIF converter tool that offers web-based services across multiple platforms. If you want to convert your WebM video file to a GIF format, here is how you can do that using CloudConvert:
Step 1: Upload Video
After opening the website on your device, click on the “Select File” button on the program’s interface. You can choose to upload your file from the local computer, by a URL, or through a cloud storage service.

Step 2: Specify Options
You can now select the specifications of your video, such as choosing the resolution, aspect ratio, and frame rate. CloudConvert also allows you to trim your video during the conversion process.

Step 3: Convert to GIF and Save
Once you have specified your video details, hit the “Convert option.” When CloudConvert has converted your video format from WebM to GIF, click “Download” to save your file.

Conclusion
The choice of a suitable file format depends greatly on the final use of your video. Your video file type can influence the quality and the file size of your content. Format converters are handy tools if your file is incompatible with your chosen platform.
If you want to convert WebM to GIF files, you can do so effectively with the converter software and websites mentioned above. If you’re going to refine your video with post-processing further, you can try the wonderful features offered by Wondershare Filmora. The software comes loaded with remarkable tools to help your video content stand apart.
Video content has become an essential element on almost every platform. With its growing rise to fame, multiple video file formats are now available, including MP4, WebM, and GIF files. The WebM video format is helpful in web-based scenarios due to its high quality and smaller file size support.
Most browsers with HTML5 support the WebM format. In contrast, GIF formats offer a much smaller file size and increased compatibility with all web browsers. If you want to convert your WebM to a GIF file, you can use the various format converter tools available. Here, discover some of the best WebM to GIF converter tools to help you with the task.
In this article
Part 1: Best 3 WebM to GIF Converter Software
Part 2: Top 3 WebM to GIF Converters
Part 3: How to Convert WebM to GIF Using CloudConvert?
Part 1: Best 3 WebM to GIF Converter Software
We have some info for you if you are looking for software that can help convert WebM to GIF files. Here are our top picks for programs that you can easily use as WebM to GIF converters:
1. Wondershare Filmora
| Compatibility | Pricing |
|---|---|
| Windows/Mac | $28.98/Monthly $68.98/Annual $98.98/Perpetual |
Wondershare Filmora is one of the most prestigious video editing software that can also act as a WebM to GIF converter tool. Filmora offers its users various visual effects, stock footage, intuitive templates, and more to enhance their video content. Users can create robust and lively videos suited to their skill level using Filmora.
Filmora can turn all your video storytelling dreams into reality with its creative assets and easy-to-use features. After editing a WebM video on Filmora, you can export it to your local system’s library into several file formats, including GIF. Thus, you can convert WebM to GIF files efficiently and instantly using Filmora.

Pros
Filmora offers built-in templates and creative assets for an easy start.
You can add smooth transitions and effects to your video using Filmora’s keyframing.
Filmora offers powerful motion tracking tools for better quality realistic visuals.
Filmora’s Auto Reframe option lets you resize your videos easily and automatically.
Cons
The free version of Filmora retains a watermark on the video.
2. Adobe Premium Pro
| Compatibility | Pricing |
|---|---|
| Windows/Mac | $20.99/Monthly |
Adobe Premium Pro is a professional-level video editor and filmmaking software. Premium Pro can help you with everything from creating marketing content to cinematic masterpieces. You can shape your stories with Adobe’s one-of-a-kind tools. Premium Pro contains everything you might need to make your content shine, from audio tools to professional templates.
If you want to convert WebM to GIF, Premium Pro can help you. Using Adobe’s powerful features, you can import your WebM file to the program’s interface and customize its various aspects. Once you have finished the conversion, you can export your video file into a format of your choice, i.e., the GIF file format.

Pros
Premium Pro now offers up to 100GB of cloud storage with Adobe’s Creative Cloud.
You can edit up to five projects at a time, accompanied by live sharing.
Premium Pro allows powerful and accurate auto color adjustments on your projects.
You can send your camera’s feed directly to Premium Pro for live processing.
Cons
The software requires technical skills and is not well-suited for beginners.
3. Movavi Video Editor Plus
| Compatibility | Pricing |
|---|---|
| Windows/Mac | $49.95/Year $69.95/Lifetime |
Movavi is a great video editing software that can help harness your creative abilities and inspirations into meaningful content. Movavi can also act as a WebM to GIF converter tool for both Mac and Windows computers. With its unique special effects, animations, and templates, you can bring all your intuitive ideas to life.
Movavi offers fast processing and high-quality results. The program supports multiple formats that can be converted into one another, such as WebM to GIF and vice versa. Once you import your WebM file into Movavi’s interface, you can customize every aspect of the video to enhance your vision and export it to a GIF format with just a few clicks.

Pros
You can record your desktop screens and add them to your video using Movavi.
It offers various advanced editing options such as Chroma key and motion tracking.
Using its Stabilization feature, you can fix motion distortion and shakes in your video.
Movavi lets you adjust the audio and normalize the audio volume using its Equalizer tool.
Cons
Movavi offers limited control over some effects, such as title additions.
Part 2: Top 3 WebM to GIF Converters
If you are looking for web-based tools dedicated to video file format conversions, we have a lot in store for you. Below, you can find the top 3 WebM to GIF online converter tools to make your task easier.
1. CloudConvert
CloudConvert is a notable file converter tool that offers services across the web. The tool features an easy-to-use and interactive user interface. CloudConvert provides extensive support to help convert your WebM files into GIF images in a few simple clicks. You can use it to transform your WebM to GIF without losing the quality of the product.

Pros
CloudConvert offers up to 25 free conversions per day, with premium quality results.
It supports more than 200 file formats for images, videos, audio, etc.
CloudConvert offers enhanced security for your file without the risk of viruses, redirects, popups, etc.
Before conversion, you can change your file’s various aspects, including the resolution and frame rate.
Cons
CloudConvert does not offer support for batch conversion.
2. Convertio
An incredible web-based tool that can help you convert WebM to GIF files is Convertio. This tool offers high-quality conversion from a wide range of supported formats. Compatible with all modern browsers and OS, Convertio features a simple interface that ensures a smooth and trouble-free conversion process.

Pros
Convertio offers major Cloud Storage services integration, including Google Drive and Dropbox.
The tool offers batch processing support so you can convert multiple files at the same time.
It is highly versatile and offers conversions for multiple file types.
Convertio also offers a video compression feature.
Cons
You can only upload maximum file size of 100MBs on Convertio.
3. EZGIF.com
Another notable online tool that you can use as a WebM to GIF converter is EZGIF.com. It is an intuitive website dedicated to GIF file format. You can access this free web-based service to convert a file into GIF format or edit your created GIFs in virtually every way possible. The conversion process is also quick and straightforward on EZGIF.com.

Pros
You can easily adjust your output file’s size and dimensions on EZGIF.
The tool offers easy markers and pauses options to help you accurately select the start and end positions for your GIF.
You can crop, rotate, or trim your video prior to conversion.
EZGIF can also help you create GIFs from images.
Cons
The website currently does not offer integration with Cloud Storage services.
Part 3: How to Convert WebM to GIF Using CloudConvert?
CloudConvert is a remarkable WebM to GIF converter tool that offers web-based services across multiple platforms. If you want to convert your WebM video file to a GIF format, here is how you can do that using CloudConvert:
Step 1: Upload Video
After opening the website on your device, click on the “Select File” button on the program’s interface. You can choose to upload your file from the local computer, by a URL, or through a cloud storage service.

Step 2: Specify Options
You can now select the specifications of your video, such as choosing the resolution, aspect ratio, and frame rate. CloudConvert also allows you to trim your video during the conversion process.

Step 3: Convert to GIF and Save
Once you have specified your video details, hit the “Convert option.” When CloudConvert has converted your video format from WebM to GIF, click “Download” to save your file.

Conclusion
The choice of a suitable file format depends greatly on the final use of your video. Your video file type can influence the quality and the file size of your content. Format converters are handy tools if your file is incompatible with your chosen platform.
If you want to convert WebM to GIF files, you can do so effectively with the converter software and websites mentioned above. If you’re going to refine your video with post-processing further, you can try the wonderful features offered by Wondershare Filmora. The software comes loaded with remarkable tools to help your video content stand apart.
7 Tips to Create Teaching Videos
For many teachers, online classes begin with a live recording of their lectures or lessons. Sending the recorded lectures to the students allows them to pause the video and rewatch it multiple times.
Recording lectures before class can assist lecturers in filling gaps that may arise due to your absence. You don’t have to worry about missing lessons if you’re going on vacation or to be sick for an extended time.

You can keep the class continuing even if you are absent by using pre-recorded lectures and sending the file to the class, so they know the lesson. With the help of an online lecture software or tool available on the internet, you can download it free.
These are the steps in creating an instructional video in your classes:
Know Your Target Audience
Before you record the video to present in your classes, you need to know your target audience. We all know that some teachers handle grade school, and some handle high school level. We need to discover what kind of knowledge or skills your students hope to gain in your class learning the topic you presented. Try to use your book, or maybe add some research and then use that information to help you discuss with your students.

Things you need to remember before you proceed to the next step:
- Who is your audience? We, educators, already know our audience. It depends on the school and what level we are going to handle. It’s either grade school level or high school level.
- What is your topic/s? There are a lot of topics and subjects in the field of teaching but try to pick only one topic or subject to present to your class. For example, Computer Subject because I’m a computer teacher. I will be using this subject or topic about computers to create my instructional video for the class.
- What is the learning objective or learning outcome of your video? The learning objective of your video is the outcome that captures precisely what knowledge, skills, and attitudes the students should be able to exhibit following the instructions.
- How will your video benefit your audience? The students will learn and understand the lesson you are discussing, helping them gain knowledge of that subject to answer all the assignments, quizzes, or maybe an activity you will give them.
Write a Script
Once you know your audience and have the topic you need, it’s time to write a script. Think about your plan for presenting your video in your classes.

- Here are a few more writing script tips to help you in your classes:
Go to the mirror and practice. This tip may help some teachers instead of calling their loved ones and getting feedback about the script they write.
- Explain what you’re doing and why you’re doing it. You are not only presenting the topic and explaining it but also showing the class what the topic is all about, which will be suitable for your students. Present some examples, pictures, or videos for them to know better what your discussion is all about.
- Knowing your script 100% is important. Make sure that you already know your script before you record. If you forget something or make a mistake, go back to the beginning and repeat it correctly. Remember as a teacher that we are not allowed to make mistakes in the eyes of the students. So, double-check everything before you record it and show it to the class.
Record the Narration
After writing your script, let’s try to record the narration. You don’t need any application software where you can record the narration. Simply using your mobile phone and having a good background is enough.

Using a microphone to record the narration is necessary. Getting those headphones with one connected microphone is good. Some of that has noise cancellation, providing a much better sound quality while recording and ensuring that your videos don’t contain background noise. Then, find a quiet place to record. Explain to your family members that no one will ever talk loud or shout while you are recording the narration.
Once you are ready to hit that record button, speak clearly. Nobody is perfect, so it’s ok if you make a mistake. You don’t need to start over, just pause and start again. You can remove the error or mistake by editing your finished product. Make sure your narration will be the same on the screen while recording your video.
Record and Edit your Video
The first thing you need to do in recording your video is to clean up your computer screen and close all the unnecessary applications. You need to turn off also the notifications that will pop up on your computer before you start recording. You can also add your recorded narration to your video.
Here are a few simple tips for editing your video:
- Add some interactive elements like motions to highlight key points of your video.
- Adding music to your video is optional but may elevate a decent video to the next level. Pick something cheery. You want your audience to feel good while learning.
The Video Duration
I’d say it’s one of the first things students look at before they click the ‘play’ button of the video. It will benefit both teacher and the students if the video is brief and direct to the point. Some students are more likely to want a short video, or maybe let’s focus on the time between 20 - 30 minutes video, where they can watch and learn on any platform, anytime. After that, you can add time by adding other pieces of information and giving activities and assignments.
Be Yourself
Be yourself, and don’t be afraid to make mistakes sometimes. Make sure that your personality shines throughout the video. Try to research how some teachers or maybe some speakers speak naturally and have a conversational manner with an enthusiastic tone.
When you are recording yourself talking, look right at the camera so students can feel eye contact with you, even if it is online. Sometimes we forget the words we need to say to the class, so try to prepare a note next to your webcam. The messages you prepare will help you don’t look away from the camera all the time. Don’t pretend to the class that you’re reading something, just talk naturally as you would in real classrooms.
Sharing your Video
Instead of sharing your recorded video with your students, you can also share it directly to online video platforms like YouTube, Facebook, and Vimeo or save the video as a local file to upload on a social media platform. They can go there and watch the video. You can also upload your file to the school learning management system like Google Classroom. Please take note of this; before sending the recorded video to your students, share it with first to a few people to get some video feedback about what you created. This might help you ensure that your message is clear and that your video accomplishes your goals for your students.
There’s a chance that your recorded video doesn’t meet your requirements or you are not satisfied with that for the first time. Don’t worry; try it again, even if you recorded it once or several times. You need to trust yourself by doing it because we are teachers; we are doing our best for the students to learn something from us.
Free Download For Win 7 or later(64-bit)
Free Download For macOS 10.14 or later
Free Download For macOS 10.14 or later
Also read:
- Updated And when It Comes to Voice Changers for Discord, None Is as Easy to Operate as the Voicemod. Here Is a Detailed Guide About How to Use Voicemod on Discord on Mobile and Desktop Devices for 2024
- Updated 5 Ways to Denoise a Video
- New 2024 Approved Creating a Slideshow Is Necessity of the Modern Time. Whether You Plan a Business Meeting or You Are Going to Do some Family Event with Slideshow Presentation, a Good Slideshow Maker Will Help You in This Direction
- Top 10 Video Editing Online Makers Is Worth Your Attention for 2024
- 2024 Approved 3GP Video Format What Is 3GP Format And How To Open It?
- Updated Want to Make Your Slideshows More Fun and Exciting? Follow the Given Discussion to Know How to Make a Slideshow Gif, Thereby Making Your Slideshow More Enjoyable than Ever
- Updated Best Ai Generated Memes
- Best Animated Video Makers for 2024
- New In 2024, How to Color Grading in Final Cut Pro
- New If You Are Into GIFs and Want to Know a Great Extent of Information About It Then We Have Got You Covered in This Article. Here Is What We Have Learned so Far About It
- New 2024 Approved This Article Aims to Show You How to Export Videos in Filmora
- How to Crop a Video in Windows Media Player
- New In 2024, Create Slow Motion Videos Using Final Cut Pro with Ease
- Updated 10 Best Free Text to Speech Software Windows, Mac,Android, iPhone & Online
- The Audio You Produce Will Inevitably Be Flawed Throughout the Production Process. So, Learn How Adobe Audition Removes Echo to Sound Better Instead of Throwing It Away
- In 2024, How to Get Motion Blur in Valorant?
- Updated In 2024, Lets Look at Four Different Ways of Merging Audios and Videos. The Tools Will Help You Craft High-End Videos without Involving Any Complex Steps. You Can Make Your Videos Beautiful by Using the Following Easy to Use Tools
- This Article Will Help You Understand How to Create Video Contents that Convert Sales
- How To Create a Polaroid Collage, In 2024
- How to Make Coin Magic With Filmora
- 2024 Approved Text Animation Intro Tutorial in Filmora
- New 2024 Approved Are You Looking to Create some Impressive Slow-Motion Video Content? Get This Done with some Impressive Android Slow Motion Video Apps
- Want to Uninstall Google Play Service from OnePlus Ace 2? Here is How | Dr.fone
- A Comprehensive Guide to Mastering iPogo for Pokémon GO On Apple iPhone 6s | Dr.fone
- In 2024, Complete Review & Guide to Techeligible FRP Bypass and More For Samsung Galaxy S24+
- 9 Solutions to Fix Honor Magic 6 Lite System Crash Issue | Dr.fone
- A Quick Guide to Vivo T2x 5G FRP Bypass Instantly
- How to Stop My Spouse from Spying on My Samsung Galaxy A23 5G | Dr.fone
- In 2024, How to Share/Fake Location on WhatsApp for Oppo A79 5G | Dr.fone
- In 2024, How To Remove Screen Lock PIN On Xiaomi Civi 3 Like A Pro 5 Easy Ways
- Updated 2024 Approved A Beginners Guide for Learning 3D Animation
- Guide to Mirror Your Lava Yuva 3 to Other Android devices | Dr.fone
- Title: New How to Split a Video Into Parts on All Platforms
- Author: Morgan
- Created at : 2024-05-19 05:12:20
- Updated at : 2024-05-20 05:12:20
- Link: https://ai-video-editing.techidaily.com/new-how-to-split-a-video-into-parts-on-all-platforms/
- License: This work is licensed under CC BY-NC-SA 4.0.

