
:max_bytes(150000):strip_icc():format(webp)/watch-free-movies-online-1356647-32f79b8cc3ed484ca1f9f898f503e416.png)
New How to Use Adjustment Layer in Final Cut Pro
How to Use Adjustment Layer in Final Cut Pro
Final Cut Pro is an advanced editing software that is available for Mac users exclusively. Using this high-end software, you can create compelling storytelling in your video clips. It offers different features through which you can effortlessly add audio and motion graphics to your videos. You can also add cinematic effects to your videos using Final Cut Pro to modify their focus points.
You can also add adjustment layers in Final Cut Pro to efficiently add the effects in video clips. By reading this article, you will learn how to add an adjustment layer in Final Cut Pro.

Part 1: What is Adjustment Layer in Final Cut Pro?
The adjustment layer in video editing can provide you with great ease as you can apply effects to multiple videos using this particular layer. Using the adjustment layer, you can apply effects and color grading to your video clips that come beneath this layer. So, apart from adding effects and executing color correction to individual clips, you can use an adjustment layer to generate quicker results.
After creating an adjustment layer in any video editor, you can easily cut and extend it like any other clip. You can also remove it anytime from your timeline with a single tap. In Final Cut Pro, you cannot insert adjustment layers in its timeline directly, like in Premiere Pro or After Effects.
To do so, you have to use third-party tools to create adjustment layers from scratch in Final Cut Pro. The process of creating an adjustment layer in Final Cut Pro is a little bit longer compared to other editors. To learn more about the adjustment layer in FCPX, continue reading this article.

Part 2: How to Add an Adjustment Layer in Final Cut Pro?
Are you eager to know how to add adjustment layers in Final Cut Pro? In this section, you can find simple instructions to generate an adjustment layer in Final Cut Pro without hassle.
Step1 First, click on this link to download the adjustment layer in your MacBook. Once done, copy your “Adjustment Layer” folder to the “User” folder. Afterward, move it to “Movies” and then “Motion Templates.” Once done, copy it to the “Titles” folder eventually.

Step2 Now open Final Cut Pro and locate the “Adjustment Layer” under the “Titles” section. After locating it, drag and drop it into the timeline. This adjustment layer was created as a title layer in Apple Motion that got published in Final Cut Pro using the built-in publishing tools.

Step3 Once you have created the adjustment layer, you can apply any sort of effects to the video clips. However, you should make sure to place the adjustment layer above in the layers stack.

Bonus Tips – How to Use Adjustment Layers in the Best Alternative to FCPX?
If you want to use an alternative to Final Cut Pro for creating the adjustment layer, you can try Wondershare Filmora 12 . You can edit your videos in an advanced and secure environment using this tool. It supports all multiple platforms, such as Windows, Mac, Android, and iOS. You can do color correction in your videos to manage the saturation, brightness, contrast, exposure, and other factors in Filmora.
Free Download For Win 7 or later(64-bit)
Free Download For macOS 10.14 or later
Moreover, you can also create 3D animated titles in Filmora to give your project a unique look. It also provides a wide range of keyboard shortcut presets through which you can make your editing easier and faster. Apart from editing and modifying your videos, you can also increase their vibrancy by using Filmora effects. You can explore and select a diverse range of visual effects in Filmora to give a new dimension to your video clips.
Key Features of Filmora
- Filmora offers cloud services that allow you to collaborate with your team members effectively. On its workspace cloud platform, you can share and review the edited video clips with your team members in a comfortable environment.
- It offers a pen tool through which you can draw complex mask shapes, such as straight lines or curves around the objects.
- Using the AI Smart Cutout feature, you can use advanced technology to select people or objects in the video effectively.
- Are you annoyed by the background noises in your video clips? You can try the AI Denoise feature of Filmora that can help you to eradicate background noises from the video clips precisely.
How to Add an Adjustment Layer Using Filmora
To create and use the adjustment layer in Wondershare Filmora 12, you can proceed to the following steps:
Step1 Import the Video Clip
Launch Filmora and click on the “New Project” button. Afterward, upload the video file on the project media and then drag and drop it into the timeline.

Step2 Add the Adjustment Layer
Now head to the “Media” section on the left side, where you can find the option of the “Adjustment Layer.” Next, drag and drop the adjustment layer into the timeline. You can double-click on it to change its settings effectively.

Step3 Add Multiple Presets to Adjustment Layer
From the settings, you can change blending mode, rotation, position, and opacity easily. Moreover, you can add different presets to the adjustment layer for more modifications. You can use the color match tool to adjust the colors in your video clip. With this tool, you can also add a border across the video clips using the adjustment layer. Also, you can color code the adjustment layer to create a more attractive look in the video clip.

Conclusion
Adjustment layers can make your editing process easy and fast. If you want to pursue video editing as your profession, you should know how to use the adjustment layer in famous tools like Final Cut Pro. After reading this article, you have learned how to create an adjustment layer in Final Cut Pro without complications.
However, if you want a more compatible and easier-to-use tool to generate adjustment layers, you can try Wondershare Filmora. It’s a powerful video editor that you can use to perform professional editing using adjustment layers.
Free Download For macOS 10.14 or later
Moreover, you can also create 3D animated titles in Filmora to give your project a unique look. It also provides a wide range of keyboard shortcut presets through which you can make your editing easier and faster. Apart from editing and modifying your videos, you can also increase their vibrancy by using Filmora effects. You can explore and select a diverse range of visual effects in Filmora to give a new dimension to your video clips.
Key Features of Filmora
- Filmora offers cloud services that allow you to collaborate with your team members effectively. On its workspace cloud platform, you can share and review the edited video clips with your team members in a comfortable environment.
- It offers a pen tool through which you can draw complex mask shapes, such as straight lines or curves around the objects.
- Using the AI Smart Cutout feature, you can use advanced technology to select people or objects in the video effectively.
- Are you annoyed by the background noises in your video clips? You can try the AI Denoise feature of Filmora that can help you to eradicate background noises from the video clips precisely.
How to Add an Adjustment Layer Using Filmora
To create and use the adjustment layer in Wondershare Filmora 12, you can proceed to the following steps:
Step1 Import the Video Clip
Launch Filmora and click on the “New Project” button. Afterward, upload the video file on the project media and then drag and drop it into the timeline.
Step2 Add the Adjustment Layer
Now head to the “Media” section on the left side, where you can find the option of the “Adjustment Layer.” Next, drag and drop the adjustment layer into the timeline. You can double-click on it to change its settings effectively.
Step3 Add Multiple Presets to Adjustment Layer
From the settings, you can change blending mode, rotation, position, and opacity easily. Moreover, you can add different presets to the adjustment layer for more modifications. You can use the color match tool to adjust the colors in your video clip. With this tool, you can also add a border across the video clips using the adjustment layer. Also, you can color code the adjustment layer to create a more attractive look in the video clip.
Conclusion
Adjustment layers can make your editing process easy and fast. If you want to pursue video editing as your profession, you should know how to use the adjustment layer in famous tools like Final Cut Pro. After reading this article, you have learned how to create an adjustment layer in Final Cut Pro without complications.
However, if you want a more compatible and easier-to-use tool to generate adjustment layers, you can try Wondershare Filmora. It’s a powerful video editor that you can use to perform professional editing using adjustment layers.
How to Remove Background Noise From Video Sony Vegas
The most popular activity you’ll get from video creators is to remove unpleasant noises like rumble or buzz from a final film, whether a promotional video, a short story, a short advertisement, or something else entirely. When mixing and capturing sound effects or even other multimedia design elements, it’s typical to have to remove background noises.
Thankfully, there are some techniques for eliminating these background noises. In this guide, I will illustrate how to eliminate background noise on Windows, Mac, and Online.
How to Remove Background Noise from Video Sony Vegas?
Nothing is more frustrating than watching your film’s current video footage and hearing excessive background noise. Well, if you’re unfamiliar with Vegas Pro, don’t worry; we’ll show you how to reduce noise with these simple steps.
Here’s a quick guide on reducing background noise in Sony Vegas. Follow these techniques to minimize background noise quickly and effectively, leaving you with clear audio:
Method #1: Lower the Volume
Consider lowering the volume of your video. Low-level noise is frequently seen in audio at the lowest volume settings. Simply decrease the general volume levels to fight this, and it may clean any mild, below-the-floor background noise.
Slide down the volume lever in the track to the left to lower the level of all audio occurrences within the track. To equalize the course, press the top of the track and drag the gain level down.

Method #2: Utilize the Noise Gate Feature
Reducing the volume and implementing the first method does not always eliminate background noise, so you must explore further.
There may be circumstances where the background noise is louder than the speaker, and decreasing the total volume makes it incomprehensible.
I suggest that you consider the Noise Gate if the background noise is a constant hiss. Noise Gate effectively suppresses sound below a specific volume, and background noise volume is lesser than the audio you want to include in your edit. As a result, using the Noise Gate is the best option.
To use the Noise Gate, go to the Track FX section of the interface and click the Audio FX button. Now select “Noise Gate.” The choices for this are now visible. Raise the threshold level; this establishes the total volume quality threshold. The Noise Gate will remove all audio below the threshold.

Alternative Ways to Remove Background Noise from Video
The learning curve of Sony Vegas may be a bit too complicated for you; then, there is nothing to worry about because you are in the right place. In this article, I also prepared a few alternative ways that you can use to remove background noises from your video. Let’s skip the talk and start learning:
#1: Wondershare Filmora – Overall Best
It is available on Windows and Mac.
Although there are many applications available for removing background noise, experts recommend Wondershare Filmora Video Editor. Let’s get right to the point.
Aside from the standard audio editing tools, Filmora now includes better wavelengths, volume keyframing, peak detection, and audio fades, resulting in a higher-quality audio editing interface. Here are some of the trump cards of using Filmora to remove background audio noise:
- Waveform audio editing with adjustable track height
- Remove background noise with ONE click using the Denoise function.
- Adjust the Denoise level to Weak, Mid, or Strong for improved noise reduction outcomes.
Here’s a guide on how to use Filmora to improve video footage, including how to eliminate background noise:
- In the Wondershare Filmora timeline panel, upload your clip. Trim and erase the video sections that you don’t wish to keep.
- Hover over the Audio option after right-clicking the clip in the timeline. The four choices available are silence detection, modification audio, removal audio, and mute. Select the “Audio Detach” feature to extract the audio from the video.

- Double-click on the audio file and select “Remove background noise” in the Edit Menu to eliminate the background noise instantly. You may also reach the Editing panel by double-clicking the video in the timeline without removing audio from the video and switching to the Audio page to edit audio and remove noise.

- You may also use the Equalizer tool to fine-tune the audio to make it seem more authentic. Simply tweak the music to fit the visual frame by frame if you want a better assessment. After analyzing the results, click Export to save the noise-reduced clip to your device or share it immediately to YouTube or Vimeo.
#2: Audacity
It is available on Windows, Mac, and Linux.
Audacity is a free, accessible, high-quality audio editing program that runs on Windows, Mac OS X, and Linux. You may use it to record live audio, modify it with capabilities like a cut, copy, and paste, and visualize advanced audio analysis using the Spectrogram view mode.You may also use it to eliminate background noise from your audio or video files for free.
The improved detailed instructions for removing background noise in Audacity in 2022 are listed below:
Step #1: Import Files to Audacity
Move to the File menu and hit Open or Import after running the program to load the audio or video source into Audacity. Before editing, Audacity will prompt you to make a copy of the audio track. This impresses me as extremely thoughtful. If you want to import a video file into Audacity, you’ll have to download and install FFmpeg Library beforehand. Otherwise, you’ll need to separate the audio from the video or transcode the video to a suitable audio format.

Step #2: Detect the Noise Segment
Locate a portion with pure background noise by zooming in on the track or adjusting the Track Size under the View menu.

Choose “Noise Reduction” from the Effect tab, begin with the defaults, and then hit “Get Noise Profile” to have Audacity determine what to filter out based on the specified section.
Step #3: Eliminate Background Noise with Noise Profile
Next, select the entire audio track that requires noise reduction, return to the Noise Reduction panels, select how much noise you want to eliminate, and click OK to eliminate the noise. You may use the default settings. Audacity will automatically minimize the noise, and the outcome will be visible on the audio track right away.
Step #4: Calibrate the Settings
To address the white noise of your audio, go to Effect and Amplify. To see if the noise has been gone, click “Preview.” Click “OK” and then export the denoised clip from Audacity to MP3, WAV, or other codecs.

#4: Remove the Entire Audio from Video Online Free
It is available on Windows, Mac, and Online.
You can use several online audio removers if you don’t want to install apps to eliminate the background noise. For example, I discovered AudioRemover.com, a free online audio extractor. In just two actions, you may eradicate audio from video.
- Choose a video file first, then click the Upload Video button below. Depending on the size of the video, this could take some time.
- Click the download file to save it to your PC after it’s finished.

On the other hand, this online audio remover will eliminate all of your audio, background noise, narration, music, and sound. A video file can only be 500MB in size. It can play MP4, AVI, MOV, and other video formats.
Frequently Asked Questions
What is the best way to remove background noise from a video?
I highly recommend using Wondershare Filmora video editor; all you have to do is activate the Denoise feature in the Audio editing window to eliminate the background noise from the video. Furthermore, it will instantly delete the background noise, such as the breeze.
Is it possible to eliminate background noise from a video online?
You certainly can. Background noise can be removed online using online video editors like Veed.
How do I get rid of the background noise in a YouTube video?
To eliminate background audio noise from YouTube videos, you may first have to download the video, then use the Filmora video editor to eliminate the noise with a single click.
Method #2: Utilize the Noise Gate Feature
Reducing the volume and implementing the first method does not always eliminate background noise, so you must explore further.
There may be circumstances where the background noise is louder than the speaker, and decreasing the total volume makes it incomprehensible.
I suggest that you consider the Noise Gate if the background noise is a constant hiss. Noise Gate effectively suppresses sound below a specific volume, and background noise volume is lesser than the audio you want to include in your edit. As a result, using the Noise Gate is the best option.
To use the Noise Gate, go to the Track FX section of the interface and click the Audio FX button. Now select “Noise Gate.” The choices for this are now visible. Raise the threshold level; this establishes the total volume quality threshold. The Noise Gate will remove all audio below the threshold.
Alternative Ways to Remove Background Noise from Video
The learning curve of Sony Vegas may be a bit too complicated for you; then, there is nothing to worry about because you are in the right place. In this article, I also prepared a few alternative ways that you can use to remove background noises from your video. Let’s skip the talk and start learning:
#1: Wondershare Filmora – Overall Best
It is available on Windows and Mac.
Although there are many applications available for removing background noise, experts recommend Wondershare Filmora Video Editor. Let’s get right to the point.
Aside from the standard audio editing tools, Filmora now includes better wavelengths, volume keyframing, peak detection, and audio fades, resulting in a higher-quality audio editing interface. Here are some of the trump cards of using Filmora to remove background audio noise:
- Waveform audio editing with adjustable track height
- Remove background noise with ONE click using the Denoise function.
- Adjust the Denoise level to Weak, Mid, or Strong for improved noise reduction outcomes.
Here’s a guide on how to use Filmora to improve video footage, including how to eliminate background noise:
- In the Wondershare Filmora timeline panel, upload your clip. Trim and erase the video sections that you don’t wish to keep.
- Hover over the Audio option after right-clicking the clip in the timeline. The four choices available are silence detection, modification audio, removal audio, and mute. Select the “Audio Detach” feature to extract the audio from the video.
- Double-click on the audio file and select “Remove background noise” in the Edit Menu to eliminate the background noise instantly. You may also reach the Editing panel by double-clicking the video in the timeline without removing audio from the video and switching to the Audio page to edit audio and remove noise.
- You may also use the Equalizer tool to fine-tune the audio to make it seem more authentic. Simply tweak the music to fit the visual frame by frame if you want a better assessment. After analyzing the results, click Export to save the noise-reduced clip to your device or share it immediately to YouTube or Vimeo.
#2: Audacity
It is available on Windows, Mac, and Linux.
Audacity is a free, accessible, high-quality audio editing program that runs on Windows, Mac OS X, and Linux. You may use it to record live audio, modify it with capabilities like a cut, copy, and paste, and visualize advanced audio analysis using the Spectrogram view mode.You may also use it to eliminate background noise from your audio or video files for free.
The improved detailed instructions for removing background noise in Audacity in 2022 are listed below:
Step #1: Import Files to Audacity
Move to the File menu and hit Open or Import after running the program to load the audio or video source into Audacity. Before editing, Audacity will prompt you to make a copy of the audio track. This impresses me as extremely thoughtful. If you want to import a video file into Audacity, you’ll have to download and install FFmpeg Library beforehand. Otherwise, you’ll need to separate the audio from the video or transcode the video to a suitable audio format.
Step #2: Detect the Noise Segment
Locate a portion with pure background noise by zooming in on the track or adjusting the Track Size under the View menu.
Choose “Noise Reduction” from the Effect tab, begin with the defaults, and then hit “Get Noise Profile” to have Audacity determine what to filter out based on the specified section.
Step #3: Eliminate Background Noise with Noise Profile
Next, select the entire audio track that requires noise reduction, return to the Noise Reduction panels, select how much noise you want to eliminate, and click OK to eliminate the noise. You may use the default settings. Audacity will automatically minimize the noise, and the outcome will be visible on the audio track right away.
Step #4: Calibrate the Settings
To address the white noise of your audio, go to Effect and Amplify. To see if the noise has been gone, click “Preview.” Click “OK” and then export the denoised clip from Audacity to MP3, WAV, or other codecs.
#4: Remove the Entire Audio from Video Online Free
It is available on Windows, Mac, and Online.
You can use several online audio removers if you don’t want to install apps to eliminate the background noise. For example, I discovered AudioRemover.com, a free online audio extractor. In just two actions, you may eradicate audio from video.
- Choose a video file first, then click the Upload Video button below. Depending on the size of the video, this could take some time.
- Click the download file to save it to your PC after it’s finished.
On the other hand, this online audio remover will eliminate all of your audio, background noise, narration, music, and sound. A video file can only be 500MB in size. It can play MP4, AVI, MOV, and other video formats.
Frequently Asked Questions
What is the best way to remove background noise from a video?
I highly recommend using Wondershare Filmora video editor; all you have to do is activate the Denoise feature in the Audio editing window to eliminate the background noise from the video. Furthermore, it will instantly delete the background noise, such as the breeze.
Is it possible to eliminate background noise from a video online?
You certainly can. Background noise can be removed online using online video editors like Veed.
How do I get rid of the background noise in a YouTube video?
To eliminate background audio noise from YouTube videos, you may first have to download the video, then use the Filmora video editor to eliminate the noise with a single click.
Add Green Screen Video on TikTok
TikTok is the most popular platform for making short videos. You can create creative short videos and upload to TikTok so that they can entertain your followers and make your videos go viral. To add variety to your video content, the use of green screen in short videos is a great idea. You can replace the green screen with any background in your TikTok video. You need to know how to add green screen video on TikTok.
Adding green screen on TikTok videos has become a trend now as there are several green screen TikTok videos that have gone viral. In fact, creative green screen videos are extremely popular on social media platforms. Instead of replacing the green screen in your video with a single photo, you can replace it with multiple pictures on TikTok. We will illustrate how to add multiple pictures on TikTok green screen.
Part 1. How to Add Green Screen on TikTok?
To add green screen on TikTok video, you need to have a background of uniform color. It does not necessarily have to be a green screen. For example, if you are shooting a video of your legs and the floor tiles have uniform color, you can use green screen on TikTok to replace the tiles with any picture. Instead of using one picture on TikTok short video, you can use multiple pictures in the background to create stunning TikTok videos. Here are the steps on how to add multiple pictures to TikTok green screen.
Step1 Open TikTok app on your phone. Tap on Plus icon located at the bottom of the app screen to make a new video.
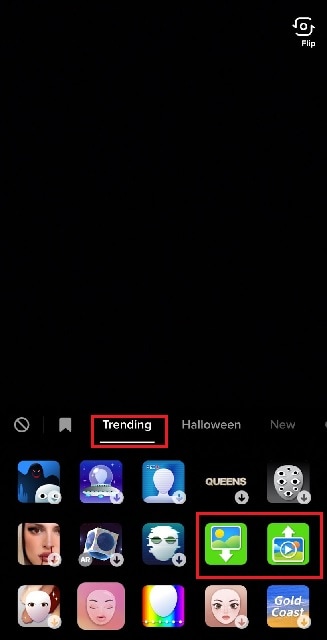
Step2 Choose the duration of the video as per your preference. Thereafter, tap on Effects option located at the bottom-left corner to see the different effects available on TikTok.
![]()
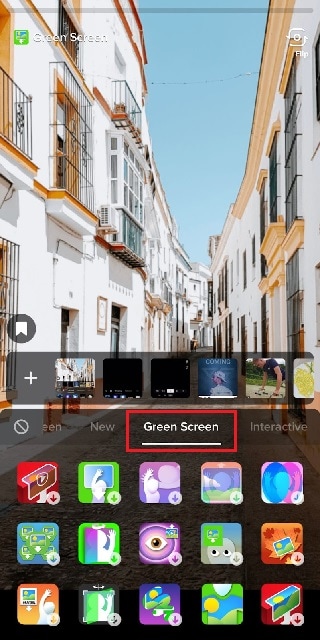
Step3 Go to Trending tab and you will see Green Screen and Green Screen Video icons. If you want your video to have green screen photo, tap on Green Screen icon. If you want your video to have green screen video, tap on Green Screen Video icon.
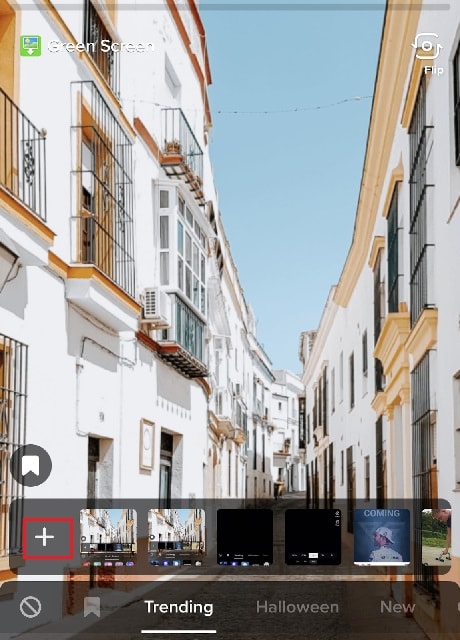
Step4 You will get a generic background and you can choose any preset background or select photo or video from your phone gallery by tapping on Plus icon. Once you are done, tap on Record button.
Step5 In order to use multiple pictures, you should stop recording in between and change your green screen image to anything you desire. Then tap on Record button again. TikTok will string your clips and it would appear that you have been changing multiple pictures of your background for your video.
If you want to experiment with green scree effects, you can scroll down after tapping on Green Screen icon under Effects. You will see different types of green screen videos possible on TikTok to choose from.
Part 2. Creative Ideas to Make TikTok Green Screen Video
Now that you know how to add a video on TikTok green screen, you have to make the most out of it. If you are wondering how you can use green screen in your TikTok videos, here are some creative ideas for you.
Walking Out Videos – You can use green screen effect to show that you are walking out of plane, walking vertically on the wall like inception, walking on the roof of a building. In fact, you can show that you are walking out of popular monuments and palaces and trick your viewers into thinking that you were actually there.
Photoshoot Location – Create a TikTok video showing your favorite locations across the world where you dream of doing photoshoot. You can pose differently and place the location in your background through green screen effect.
How-To Video – If your TikTok channel is about tutorial and learning videos, you can explain things better by putting screenshots and multiple relevant pictures in the background so that viewers can get a pictorial representation of what you are speaking to them.
Mystery Story – You can a create short video describing unknowing facts and mysteries around certain places in the world. You can put photos or video clips of those mysterious places in your background to keep your viewers hooked and related to your narration.
Rate Them Video – You can use green screen effect to showcase your old Instagram photos or videos and rate them. This is an extremely popular trend in TikTok where people show their old photos, display work from the past, and rate them today.
Reveal Your Creation – Share your secrets or interesting stories behind some of the photos or videos you took in the past. You can talk about how creatively you took certain photos and put those photos in the background while discussing them.
Part 3. How to Make Green Screen Video on Computer?
If you have a computer and a webcam, you can record a green screen video on your computer. You can place the green screen in the background perfectly and place the webcam so that the background stays within the green screen. You will need a video recorder and a video editor to make green screen video as well as replace the green screen with any photo or video. We recommend Wondershare Filmora where you can record as well as edit green screen video.
Filmora is a professional video editor where you can record your computer screen as well as your webcam video with green screen background in Picture-in-Picture mode. After recording the video, you can replace the green screen with any video clip or photo instantly in a few steps. You can also fine-tune green screen effect for perfection. Therefore, you can save the video in any resolution and file format as per your preference.

Free Download For Win 7 or later(64-bit)
Free Download For macOS 10.14 or later
Conclusion
Adding green screen effect on TikTok videos can make your videos stand out. We have illustrated how to add multiple green screen videos on TikTok and your videos will have a better chance of getting viral. Keep the green screen ideas in mind while making TikTok green screen videos. If you want to make and edit green screen videos on computer, Wondershare Filmora is the best application available for Windows and Mac users.
How to Resize FLV Videos Efficiently [Windows, Mac,Android, iPhone & Online]
FLV Videos are Flash Video files with a .flv file extension. FLV video files were once one of the most popular video file types and the standard video format used for embedding videos on the internet and streaming. Even though video files like mp4 and mkv have gained more popularity today, you can still come across many Flv videos on the internet.
In this article, you’ll be learning How to Resize FLV Videos Efficiently on all the platforms. But wait, what exactly does the resizing mean? When you are working with videos, resizing can mean two things: one is changing the aspect ratio or resolution of the video and another is changing the file size of the video. So let’s see how we can resize the flv videos efficiently on different platforms:
Best FLV Editor to Resize FLV Videos on Windows and Mac – Filmora Video Editor [with steps]
Among many different video editors available today, Filmora Video Editor is the one that climbs up the rank to the top. It is the best FLV editor on Windows and Mac for resizing and editing flv videos. Different social media platforms require videos of different sizes, resolutions, and aspect ratios. For eg: YouTube requires horizontal video, TikTok requires vertical, Emails have a size limit for every file, etc. That’s when the Filmora Video Editor comes into play for fast and easy resizing of any video for different platforms.
For Win 7 or later (64-bit)
For macOS 10.14 or later
Why choose Filmora Video Editor for resizing FLV videos, you say?
- Simple UI and easy interface
- Easily crop or change the aspect ratio of the video
- Not all video editors support FLV video format, but the Filmora does
- Advanced export options to compress or change the file size of video
- Suitable for beginners as well as professionals
- Regular software updates and improvements
Plus, Filmora Video Editor has a free version, so you can instantly download the program, install it, and get started on resizing FLV Videos. Below is a step-by-step guide to resize FLV Videos on Windows and Mac with Wondershare Filmora Video Editor, so you can follow along!
Steps to resize FLV videos with Filmora Video Editor:
- Launch Filmora and open a new project
Run the Wondershare Filmora application on Windows or Mac after installing it. Then you should automatically be inside a new project. If not, you can manually open a new project by going to File on the top left corner and then clicking on ‘**New Project**’.

- Import the FLV video and add it to timeline
Click on ‘**Import Media Files**’ and import the flv video into project media from your computer’s file explorer. Then add the video to the timeline by dragging it inside the timeline.

- Edit and perform desired modifications (Optional)
If you are just looking to resize the FLV video file, then you can skip this step and move to step no. 4. Otherwise, you can do various editings on the video like cropping, muting, trimming, animating, etc. before resizing the video. Filmora provides a wide range of features for editing and adding effects to the video.

- Resize the video by changing the aspect ratio
Aspect ratio defines the shape of your video like if you want the video to be horizontal, vertical, square, or custom. Generally, the term ‘resizing video’ refers to changing the aspect ratio of the video. For that, go to the File and then to the Project Settings. Then on the Aspect Ratio box, select the one that you prefer or you can try custom scaling. You can choose your preferred resolution of the project too while you’re at it.

- Resize the video by cropping
When you change the aspect ratio of the project, some parts of your flv video might not fit or it might be shrunk small to fit. So you need to resize the flv video by cropping so that you can crop and focus on the part of the video you like. To crop the video, select the flv video clip in the timeline and click on the crop icon in the timeline toolbar. Now choose the ratio you want to crop and select the part you’d like to keep. Then click OK and your flv video will be resized.

- Adjust the file size of the video through export settings
After you’ve cropped and resized the Flv video, you need to export it by clicking the Export button on the top center part. There are different settings available for exporting the video. Click on the Settings button near the resolution and you’ll be shown some detailed preferences for exporting. Every setting here like frame rate, resolution, bitrate, etc. can affect the size of the output video.

Filmora Video Editor really makes the task of editing and resizing FLV videos easier, simpler, and faster. Since you now know the steps, it’s time you try it and resize your own FLV videos with this best FLV Editor for Windows and Mac.
Alternative Way to Resize FLV Videos on Windows
In case you want to try something different than Filmora, here are two alternative software (one paid and another free) that you can use to resize your FLV Videos on Windows:
- Movavi Video Editor Plus

Movavi Video Editor Plus is one of the best easy-to-use video editors that can help you to resize FLV videos as well as edit them on Windows. Its interface and functionalities are somewhat similar to that of the Filmora Video Editor. This is a paid software available for download on both Windows and Mac but you can try it for free with their 7 days trial version.
Steps to resize FLV videos on Windows with Movavi Video Editor:
- Install Movavi Video Editor and run the software on your PC. Then you should automatically be inside a new project in it.

- Import the FLV video file you want to resize through the ‘File Import’ tab on the left and drag it to the timeline.

- To resize the aspect ratio, expand the resolution options near the preview screen above the export button and select the preferred ratio.

- To crop or resize the video, select the clip in the timeline and use the crop tool to make adjustments as you wish. Then hit Apply to save changes.

- After the video is ready, export it with the Export button on the right side of the screen. Then choose your preferred settings for output and click on Start after which your video will be rendered and saved to your PC.

- VSDC Free Video Editor

VSDC Free Video Editor is another alternative to Filmora for resizing FLV videos on Windows. It is a free video editor that packs a wide range of editing features without any restrictions. However, it does have a paid version with some advanced features and hardware acceleration.
Steps to resize FLV videos on Windows with VSDC Free Video Editor:
- Install and open VSDC video editor on your PC. Then create a new project with preferred settings through the ‘Projects’ tab on the top left corner.

- Import the video file into the project by dragging and dropping it directly into the timeline.

- To resize the aspect ratio, click on the Projects Explorer and click on your project name. Then in the Properties windows on the right, manually adjust width, height, resolution, etc. according to your preferences.

- To crop and reposition your video, select the clip in the timeline and go to the Editor tab on the top. Then use the crop tool and adjust your video accordingly.

- Finally export your design through the Export project tab at the top with preferred settings.

Alternative Way to Resize FLV Videos on Mac
Wondershare Filmora Video Editor is also available for Mac operating system which is recommended to resize FLV videos but if you want to try out some other alternatives, then below are the two ways to resize FLV videos on Mac:
- VideoProc Converter

VideoProc is a powerful video editor/ converter that helps you edit, convert, and resize any kind of video. It also supports a wide range of codecs and video formats including flv. It is a paid software but you can also try their free trial version with some limitations.
Steps to resize FLV videos on Mac with VideoProc:
- Launch VideoProc on a Mac device and go inside the Video

- Add files in VideoProc by drag and drop method or directly through the ‘Add Video’ option.

- Then click on the Options (codec) on the right side of the video and change the resolutions and aspect ratio of the video as you want. You can also manage export settings like quality, codec, fps, bitrate, etc. from this tab.

- Then go to the Crop section inside the Edit Video tab and crop the video as you like with preview and different other options.

- Finally click Done to go back and hit the Run This’ll start rendering the video and will save it to your Mac device.

- Shotcut

Shotcut is another alternative to Filmora Video Editor for resizing FLV videos on Mac. It is a free, open-source, and cross-platform video editor that has a sleek and intuitive interface with many useful editing features which really makes it suitable for both beginners as well as advanced editors.
Steps to resize FLV videos on Mac with Shotcut:
- Run the Shotcut program on your Mac after installing it and create a new project.

- Import the Flv video file to the project by drag and drop method into the timeline.

- To change the resolution and aspect ratio of the video, go to the Settings tab, then Video mode, and choose the format you want.

- To crop the video, select the clip in the timeline and go to the Filters Now click on the ‘**+**’ icon and select Size, Position & Rotate under the Favorite section. Then adjust crop settings as you like.

- Finally, go to the Export section at the top and click on Advanced. Then configure the output settings as you like and click on Export File.

2 Ways to Resize FLV Videos on Android
Wouldn’t it be great if you could resize FLV videos on your android device rather than having to open your computer for every small task? Previously, this was a major issue due to a lack of good video editors for android with flv support but that’s no longer the case. Below are two ways to resize FLV videos on android:
- Inshot

InShot is a powerful all-in-one video editor for android which acts both as a basic video editor as well as an advanced video editor with its simple design yet powerful features. There aren’t many video editors in Android that supports Flv or some older codecs, but InShot is one of the very few editors that support these video formats. It is a paid app but also has a limited free version to try.
Steps to resize FLV videos on Android with InShot:
- Open the Inshot app on your android device and click on Video.

- Now select the FLV video file and click on the tick icon near the bottom right.

- Then tap on the Crop option from the tools at the bottom.

- Now select the aspect ratio you like and crop accordingly.

- To save the video, tap on the Save button at the top right. Then choose the resolution and finally save the video to your device.

- AndroVid – Video Editor, Video Maker

AndroVid is an easy-to-use, full-featured video editor especially developed to edit videos for social media like YouTube, TikTok, Facebook, Instagram, etc. It is not a very popular application with just over 300k+ downloads in Google Play Store, but after testing it out, we thought it deserves to be in this article. It is available for free to download from Google Play Store.
Steps to resize FLV videos on Android with AndroVid Video Editor:
- Open AndroVid Video Editor on an android phone and go inside the Videos

- Now select the FLV video file that you want to resize.

- Inside editor, tap on the Crop tool in the toolbar at the top.

- Then select the preferred Aspect ratio from the top right, reposition the video area and tap on the tick icon to save the video.

- If you need to change the resolution too, click on the three dots at the top right after the video is saved successfully. Then choose the preferred resolution, quality, and format and click on the tick icon to export.

2 Ways to Resize FLV Videos on iPhone
Like Android, you can also resize FLV videos on your iPhone on the go without needing to use your computer. Doing such editing on mobile phones can really save your time and effort, so here are 2 ways for you to resize FLV videos on iPhone:
- Cyberlink Powerdirector

Cyberlink Powerdirector is one of the most popular as well as powerful video editors for Android and iOS. It is a full-featured mobile video editor with over 130M+ downloads on the App Store which allows you to do an advanced level of editing. It is a paid software but also has a free version available for download.
Steps to resize FLV videos on iPhone with PowerDirector:
- Launch the PowerDirector app on your iPhone and create a new project. Unlike other apps, you cannot change the aspect ratio later, so you need to set the aspect ratio you want while creating a new project.

- Now add the FLV video file into the timeline by tapping on the ‘**+**’ icon on the video. Then tap on the play button at the top right to enter the editor.

- To resize the video, select the video clip in the timeline and tap on the pencil icon at the bottom left. Then use different crop tools available to resize your video as you want.

- After you resize the video, tap on the export button on the top right to export it. Then tap on Produce and Share, and produce resized video with preferred settings.

- Splice – Video Editor & Maker

Splice – Video Editor & Maker is a simple yet powerful application that makes it easy to create fully customized and professional-looking videos on iPhone. It is another great app for resizing FLV videos on iPhone with over 70M+ downloads on App Store and it is available for free.
Steps to resize FLV videos on iPhone with Splice:
- Open the Splice app on the iPhone and tap on the ‘**+**’ icon to create a new project.

- Now select the flv video file to add and start the project.

- To resize the video, tap on the gear icon at the top right corner which opens up Project settings from where you can change the aspect ratio.

- To crop the video, select the clip in the timeline and tap on the Crop option in the toolbar. You can crop and reposition the video from there.

- Then click on the Export icon at the top right corner to export the video with preferred configurations.

2 Ways to Resize FLV Videos Online
Resizing is not that big of a task and you might just want to quickly resize your Flv video and share it. So why bother installing and running large video editing programs on your computer or even mobile phones when you can easily resize your videos in the web browser? Yes, you read that right, and below are the 2 ways for you to resize FLV videos online:
- io

Veed is a simple online video editing tool that you can access from any device with the help of a web browser. It can help you resize your Flv videos easily within just a few clicks. It has a clean and beautiful interface with a responsive design which provides you with a good editing experience while using it. It is a paid tool but you can also try it for free before purchasing it.
Steps to resize FLV videos online with Veed.io:
- Go to veed.io on your web browser and click on ‘Upload Your Video’ to get started without any account.

- Now upload the FLV video or you can directly drag and drop the video there.

- After you upload the video, you’ll be taken inside the Veed editor. To change the aspect ratio, go to the Size section inside Project Settings and choose the size you want to resize to.

- To crop the video, select the clip in the timeline and directly resize the video from the preview area. And you can also use settings like ‘Fill the canvas’ and ‘Fit the canvas’ at the left side for ease.

- Then click on the Export button at the top right corner to open Export settings. Configure the settings as you like and click on ‘Export Video’ to render and download the video.

- Clideo

When it comes to resizing or editing videos online, Clideo is one of the best tools you can rely on. Like Veed.io, it has a clean and responsive interface and supports many video formats including flv. Clideo is free to use but also comes with various subscription plans for extra functionalities.
Steps to resize FLV videos online with Clideo:
- Go to clideo.com/resize-video and upload your video through ‘Choose file’ button.

- To resize the aspect ratio, choose your desired formats in the ‘Resize for’ section. You can also manually set the aspect ratio.

- Then just below that, you’ll find various cropping options. Use them to crop or resize the video as you like.

- Finally, click on the Export button at the bottom right corner to export the video. You can download the video or can directly save to cloud storage like Drive, Dropbox, etc.

FAQs about Resizing FLV Video
Here are some of the Frequently Asked Questions (FAQs) related to resizing FLV videos that you might be interested in:
- How do I make FLV files smaller?
You can make FLV files smaller with the help of any video editor that supports Flv video format by cutting and cropping out unnecessary parts, decreasing the resolution, and bitrate, and converting flv into another lighter file format.
- Which video editors support FLV file format?
There are few video editors like Filmora, Movavi, VSDC, etc. that support the FLV file format. But when it comes to editing FLV videos, Filmora Video Editor is the best choice.
- How do I view an FLV file?
FLV is one of the oldest video formats due to which most new and modern video players don’t recognize it or can’t play it. However, there are few programs like VLC media players which can help you view an FLV file. Or you can also convert the FLV file into other supported video formats with the help of a video converter.
- Can I convert a horizontal FLV video into a vertical one?
Yes, and that’s a piece of cake when you use Filmora Video Editor or other similar video editors. You just need to change the aspect ratio of the video or the project from horizontal (generally 16:9) to vertical (generally 9:16).
- Can I resize FLV video files on my mobile?
Though video editors on mobile are not as powerful as those on PC, there are some that are still capable enough to let you easily resize FLV video files on mobile devices. Some examples are InShot, Splice, Powerdirector, etc.
For macOS 10.14 or later
Why choose Filmora Video Editor for resizing FLV videos, you say?
- Simple UI and easy interface
- Easily crop or change the aspect ratio of the video
- Not all video editors support FLV video format, but the Filmora does
- Advanced export options to compress or change the file size of video
- Suitable for beginners as well as professionals
- Regular software updates and improvements
Plus, Filmora Video Editor has a free version, so you can instantly download the program, install it, and get started on resizing FLV Videos. Below is a step-by-step guide to resize FLV Videos on Windows and Mac with Wondershare Filmora Video Editor, so you can follow along!
Steps to resize FLV videos with Filmora Video Editor:
- Launch Filmora and open a new project
Run the Wondershare Filmora application on Windows or Mac after installing it. Then you should automatically be inside a new project. If not, you can manually open a new project by going to File on the top left corner and then clicking on ‘**New Project**’.
- Import the FLV video and add it to timeline
Click on ‘**Import Media Files**’ and import the flv video into project media from your computer’s file explorer. Then add the video to the timeline by dragging it inside the timeline.
- Edit and perform desired modifications (Optional)
If you are just looking to resize the FLV video file, then you can skip this step and move to step no. 4. Otherwise, you can do various editings on the video like cropping, muting, trimming, animating, etc. before resizing the video. Filmora provides a wide range of features for editing and adding effects to the video.
- Resize the video by changing the aspect ratio
Aspect ratio defines the shape of your video like if you want the video to be horizontal, vertical, square, or custom. Generally, the term ‘resizing video’ refers to changing the aspect ratio of the video. For that, go to the File and then to the Project Settings. Then on the Aspect Ratio box, select the one that you prefer or you can try custom scaling. You can choose your preferred resolution of the project too while you’re at it.
- Resize the video by cropping
When you change the aspect ratio of the project, some parts of your flv video might not fit or it might be shrunk small to fit. So you need to resize the flv video by cropping so that you can crop and focus on the part of the video you like. To crop the video, select the flv video clip in the timeline and click on the crop icon in the timeline toolbar. Now choose the ratio you want to crop and select the part you’d like to keep. Then click OK and your flv video will be resized.
- Adjust the file size of the video through export settings
After you’ve cropped and resized the Flv video, you need to export it by clicking the Export button on the top center part. There are different settings available for exporting the video. Click on the Settings button near the resolution and you’ll be shown some detailed preferences for exporting. Every setting here like frame rate, resolution, bitrate, etc. can affect the size of the output video.
Filmora Video Editor really makes the task of editing and resizing FLV videos easier, simpler, and faster. Since you now know the steps, it’s time you try it and resize your own FLV videos with this best FLV Editor for Windows and Mac.
Alternative Way to Resize FLV Videos on Windows
In case you want to try something different than Filmora, here are two alternative software (one paid and another free) that you can use to resize your FLV Videos on Windows:
- Movavi Video Editor Plus
Movavi Video Editor Plus is one of the best easy-to-use video editors that can help you to resize FLV videos as well as edit them on Windows. Its interface and functionalities are somewhat similar to that of the Filmora Video Editor. This is a paid software available for download on both Windows and Mac but you can try it for free with their 7 days trial version.
Steps to resize FLV videos on Windows with Movavi Video Editor:
- Install Movavi Video Editor and run the software on your PC. Then you should automatically be inside a new project in it.
- Import the FLV video file you want to resize through the ‘File Import’ tab on the left and drag it to the timeline.
- To resize the aspect ratio, expand the resolution options near the preview screen above the export button and select the preferred ratio.
- To crop or resize the video, select the clip in the timeline and use the crop tool to make adjustments as you wish. Then hit Apply to save changes.
- After the video is ready, export it with the Export button on the right side of the screen. Then choose your preferred settings for output and click on Start after which your video will be rendered and saved to your PC.
- VSDC Free Video Editor
VSDC Free Video Editor is another alternative to Filmora for resizing FLV videos on Windows. It is a free video editor that packs a wide range of editing features without any restrictions. However, it does have a paid version with some advanced features and hardware acceleration.
Steps to resize FLV videos on Windows with VSDC Free Video Editor:
- Install and open VSDC video editor on your PC. Then create a new project with preferred settings through the ‘Projects’ tab on the top left corner.
- Import the video file into the project by dragging and dropping it directly into the timeline.
- To resize the aspect ratio, click on the Projects Explorer and click on your project name. Then in the Properties windows on the right, manually adjust width, height, resolution, etc. according to your preferences.
- To crop and reposition your video, select the clip in the timeline and go to the Editor tab on the top. Then use the crop tool and adjust your video accordingly.
- Finally export your design through the Export project tab at the top with preferred settings.
Alternative Way to Resize FLV Videos on Mac
Wondershare Filmora Video Editor is also available for Mac operating system which is recommended to resize FLV videos but if you want to try out some other alternatives, then below are the two ways to resize FLV videos on Mac:
- VideoProc Converter
VideoProc is a powerful video editor/ converter that helps you edit, convert, and resize any kind of video. It also supports a wide range of codecs and video formats including flv. It is a paid software but you can also try their free trial version with some limitations.
Steps to resize FLV videos on Mac with VideoProc:
- Launch VideoProc on a Mac device and go inside the Video
- Add files in VideoProc by drag and drop method or directly through the ‘Add Video’ option.
- Then click on the Options (codec) on the right side of the video and change the resolutions and aspect ratio of the video as you want. You can also manage export settings like quality, codec, fps, bitrate, etc. from this tab.
- Then go to the Crop section inside the Edit Video tab and crop the video as you like with preview and different other options.
- Finally click Done to go back and hit the Run This’ll start rendering the video and will save it to your Mac device.
- Shotcut
Shotcut is another alternative to Filmora Video Editor for resizing FLV videos on Mac. It is a free, open-source, and cross-platform video editor that has a sleek and intuitive interface with many useful editing features which really makes it suitable for both beginners as well as advanced editors.
Steps to resize FLV videos on Mac with Shotcut:
- Run the Shotcut program on your Mac after installing it and create a new project.
- Import the Flv video file to the project by drag and drop method into the timeline.
- To change the resolution and aspect ratio of the video, go to the Settings tab, then Video mode, and choose the format you want.
- To crop the video, select the clip in the timeline and go to the Filters Now click on the ‘**+**’ icon and select Size, Position & Rotate under the Favorite section. Then adjust crop settings as you like.
- Finally, go to the Export section at the top and click on Advanced. Then configure the output settings as you like and click on Export File.
2 Ways to Resize FLV Videos on Android
Wouldn’t it be great if you could resize FLV videos on your android device rather than having to open your computer for every small task? Previously, this was a major issue due to a lack of good video editors for android with flv support but that’s no longer the case. Below are two ways to resize FLV videos on android:
- Inshot
InShot is a powerful all-in-one video editor for android which acts both as a basic video editor as well as an advanced video editor with its simple design yet powerful features. There aren’t many video editors in Android that supports Flv or some older codecs, but InShot is one of the very few editors that support these video formats. It is a paid app but also has a limited free version to try.
Steps to resize FLV videos on Android with InShot:
- Open the Inshot app on your android device and click on Video.
- Now select the FLV video file and click on the tick icon near the bottom right.
- Then tap on the Crop option from the tools at the bottom.
- Now select the aspect ratio you like and crop accordingly.
- To save the video, tap on the Save button at the top right. Then choose the resolution and finally save the video to your device.
- AndroVid – Video Editor, Video Maker
AndroVid is an easy-to-use, full-featured video editor especially developed to edit videos for social media like YouTube, TikTok, Facebook, Instagram, etc. It is not a very popular application with just over 300k+ downloads in Google Play Store, but after testing it out, we thought it deserves to be in this article. It is available for free to download from Google Play Store.
Steps to resize FLV videos on Android with AndroVid Video Editor:
- Open AndroVid Video Editor on an android phone and go inside the Videos
- Now select the FLV video file that you want to resize.
- Inside editor, tap on the Crop tool in the toolbar at the top.
- Then select the preferred Aspect ratio from the top right, reposition the video area and tap on the tick icon to save the video.
- If you need to change the resolution too, click on the three dots at the top right after the video is saved successfully. Then choose the preferred resolution, quality, and format and click on the tick icon to export.
2 Ways to Resize FLV Videos on iPhone
Like Android, you can also resize FLV videos on your iPhone on the go without needing to use your computer. Doing such editing on mobile phones can really save your time and effort, so here are 2 ways for you to resize FLV videos on iPhone:
- Cyberlink Powerdirector
Cyberlink Powerdirector is one of the most popular as well as powerful video editors for Android and iOS. It is a full-featured mobile video editor with over 130M+ downloads on the App Store which allows you to do an advanced level of editing. It is a paid software but also has a free version available for download.
Steps to resize FLV videos on iPhone with PowerDirector:
- Launch the PowerDirector app on your iPhone and create a new project. Unlike other apps, you cannot change the aspect ratio later, so you need to set the aspect ratio you want while creating a new project.
- Now add the FLV video file into the timeline by tapping on the ‘**+**’ icon on the video. Then tap on the play button at the top right to enter the editor.
- To resize the video, select the video clip in the timeline and tap on the pencil icon at the bottom left. Then use different crop tools available to resize your video as you want.
- After you resize the video, tap on the export button on the top right to export it. Then tap on Produce and Share, and produce resized video with preferred settings.
- Splice – Video Editor & Maker
Splice – Video Editor & Maker is a simple yet powerful application that makes it easy to create fully customized and professional-looking videos on iPhone. It is another great app for resizing FLV videos on iPhone with over 70M+ downloads on App Store and it is available for free.
Steps to resize FLV videos on iPhone with Splice:
- Open the Splice app on the iPhone and tap on the ‘**+**’ icon to create a new project.
- Now select the flv video file to add and start the project.
- To resize the video, tap on the gear icon at the top right corner which opens up Project settings from where you can change the aspect ratio.
- To crop the video, select the clip in the timeline and tap on the Crop option in the toolbar. You can crop and reposition the video from there.
- Then click on the Export icon at the top right corner to export the video with preferred configurations.
2 Ways to Resize FLV Videos Online
Resizing is not that big of a task and you might just want to quickly resize your Flv video and share it. So why bother installing and running large video editing programs on your computer or even mobile phones when you can easily resize your videos in the web browser? Yes, you read that right, and below are the 2 ways for you to resize FLV videos online:
- io
Veed is a simple online video editing tool that you can access from any device with the help of a web browser. It can help you resize your Flv videos easily within just a few clicks. It has a clean and beautiful interface with a responsive design which provides you with a good editing experience while using it. It is a paid tool but you can also try it for free before purchasing it.
Steps to resize FLV videos online with Veed.io:
- Go to veed.io on your web browser and click on ‘Upload Your Video’ to get started without any account.
- Now upload the FLV video or you can directly drag and drop the video there.
- After you upload the video, you’ll be taken inside the Veed editor. To change the aspect ratio, go to the Size section inside Project Settings and choose the size you want to resize to.
- To crop the video, select the clip in the timeline and directly resize the video from the preview area. And you can also use settings like ‘Fill the canvas’ and ‘Fit the canvas’ at the left side for ease.
- Then click on the Export button at the top right corner to open Export settings. Configure the settings as you like and click on ‘Export Video’ to render and download the video.
- Clideo
When it comes to resizing or editing videos online, Clideo is one of the best tools you can rely on. Like Veed.io, it has a clean and responsive interface and supports many video formats including flv. Clideo is free to use but also comes with various subscription plans for extra functionalities.
Steps to resize FLV videos online with Clideo:
- Go to clideo.com/resize-video and upload your video through ‘Choose file’ button.
- To resize the aspect ratio, choose your desired formats in the ‘Resize for’ section. You can also manually set the aspect ratio.
- Then just below that, you’ll find various cropping options. Use them to crop or resize the video as you like.
- Finally, click on the Export button at the bottom right corner to export the video. You can download the video or can directly save to cloud storage like Drive, Dropbox, etc.
FAQs about Resizing FLV Video
Here are some of the Frequently Asked Questions (FAQs) related to resizing FLV videos that you might be interested in:
- How do I make FLV files smaller?
You can make FLV files smaller with the help of any video editor that supports Flv video format by cutting and cropping out unnecessary parts, decreasing the resolution, and bitrate, and converting flv into another lighter file format.
- Which video editors support FLV file format?
There are few video editors like Filmora, Movavi, VSDC, etc. that support the FLV file format. But when it comes to editing FLV videos, Filmora Video Editor is the best choice.
- How do I view an FLV file?
FLV is one of the oldest video formats due to which most new and modern video players don’t recognize it or can’t play it. However, there are few programs like VLC media players which can help you view an FLV file. Or you can also convert the FLV file into other supported video formats with the help of a video converter.
- Can I convert a horizontal FLV video into a vertical one?
Yes, and that’s a piece of cake when you use Filmora Video Editor or other similar video editors. You just need to change the aspect ratio of the video or the project from horizontal (generally 16:9) to vertical (generally 9:16).
- Can I resize FLV video files on my mobile?
Though video editors on mobile are not as powerful as those on PC, there are some that are still capable enough to let you easily resize FLV video files on mobile devices. Some examples are InShot, Splice, Powerdirector, etc.
Also read:
- Updated Gimp Green Screen for 2024
- New Best 8 Srt File Creators for 2024
- Customize PowerPoint Slideshow Icon in 8 Simple Ways
- New 2024 Approved What Are The Stages Of Film Production
- New In 2024, Troubleshoot Snapchat Camera Zoomed in Issue 4 Tips
- New In 2024, Master Premiere Pro Custom Sequence Presets
- Updated If You Are Experiencing a Color Distortion in Your Video, You Are in the Right Place. We Have Provided a Detailed Guide with Three Methods that Will Help You Correct This Issue
- New 2024 Approved Efficient Ways to Change Slow Motion Video to Normal on iPhone
- 2024 Approved The Best GIF Editors Weve Tested Heres What We Learned
- How to Make Coin Magic With Filmora
- Updated 2024 Approved Premiere Pro Best Slow Motion Effects To Use
- Updated How to Make a Slow Motion Video Complete Guide for 2024
- New In 2024, Here, You Will Get the Basic Steps to Use the Speed Ramping Effect in Your Videos by Wondershare Filmora Software. In This Article, You Get a Guide to Adding the BCC Glitch Effect to Give Your Sports Montages a More Professional Look
- Updated 3 Best Motion Blur Plugins for Adobe After Effects for 2024
- Updated Best 4 Love Video Maker with Music
- Updated The Way to Quick and Efficient Editing | Keyboard Shortcuts in Filmora
- Updated How to Livestream Zoom on Facebook for 2024
- New In 2024, Looking for the Simple Steps to Add a Filter to Your Video in Premiere Pro? Here Are the Complete Steps Along with the List of Free Premiere Filter Presets to Use
- Updated VSCO Slow Motion
- In 2024, Why is iPogo not working On Apple iPhone 6 Plus? Fixed | Dr.fone
- In 2024, How to Change Google Play Location On Samsung Galaxy S21 FE 5G (2023) | Dr.fone
- How To Recover Apple iPhone 13 Pro Max Data From iTunes? | Dr.fone
- In 2024, How to Unlock Samsung Galaxy A05 Phone with Broken Screen
- Fixes for Apps Keep Crashing on Xiaomi Redmi A2+ | Dr.fone
- In 2024, Top 10 Nokia C12 Android SIM Unlock APK
- Home Button Not Working on Oppo A58 4G? Here Are Real Fixes | Dr.fone
- In 2024, Universal Unlock Pattern for Samsung Galaxy A24
- Top 10 Fingerprint Lock Apps to Lock Your Vivo Y36 Phone
- How Do You Remove Restricted Mode on Apple iPhone 6s | Dr.fone
- Title: New How to Use Adjustment Layer in Final Cut Pro
- Author: Morgan
- Created at : 2024-05-19 05:12:21
- Updated at : 2024-05-20 05:12:21
- Link: https://ai-video-editing.techidaily.com/new-how-to-use-adjustment-layer-in-final-cut-pro/
- License: This work is licensed under CC BY-NC-SA 4.0.
