
:max_bytes(150000):strip_icc():format(webp)/reddit-app-for-andoird-652f6fcd646245e9807afbac25a072ee.jpg)
New How to Use LUTs in VN Editor – Complete Guide and Best LUTs Download for 2024
How to Use LUTs in VN Editor – Complete Guide and Best LUTs Download
Hello and welcome to another article full of information and excitement. The topic of this article is LUT for the VN editor. So it will be exciting for those who want to use LUTs in their video to make them look nice and well. As we will discuss today that what is VN editor and how you can add LUTs to your videos using it on the devices it is compatible for. Moreover, where you can download some fantastic LUTs like moody LUTs, which help your videos to look nice, and which software you should use for this purpose if you are running a device on which the VN editor is not compatible. So let’s begin!
Part 1. What is VN editor?
VN editor is one of the best choices for video editing on mobiles and Mac. Fast editing, transitions, effects, filters, colors, subtitles, music, and many other features make the VN video editing app a great tool for producing and editing videos. It aims to make editing shorter and more feature-rich, empowering everyone to take control of their own lives. You cannot only produce great videos but good films as well. In the following, we will discuss how you can add LUTs to your videos using it.

Part 2. How to use LUTs in VN editor?
First, we must know that it is compatible with which platforms. So, it is now available for Android, iOS, and Mac OS only. However, you can also use it on Windows with some Android or iOS emulators, but it is not a very continent way in our suggestions. Even after doing this, it does not work well on your Windows. Maybe you will face some glitches or malfunctioning problems. So it is better to use it on only those platforms for which it is primarily available. Please read the instructions below since we will go through how to use LUTs in it later on.
On Mac:
First of all, we will learn how you can do it on Mac:
- Download the VN Editor for Mac and open it.
- Add your video and then tap the filters option.
- Now choose custom filters and then select the LUTs pack.

- Select the desired LUT and apply.
On Mobile:
Secondly, we will discuss how we can do this on our mobiles (Android or iOS). The procedure on both devices (Android or iOS) is almost comparable. Therefore, we will discuss the steps from the perspective of both of these here:
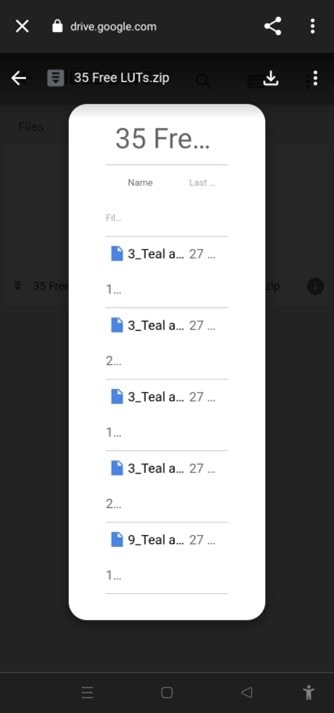
- First, download the VN editor from your mobile app store (Android or iOS) and the LUTs pack you want to use in your video.
- After downloading them on your mobile, open the VN editor application.
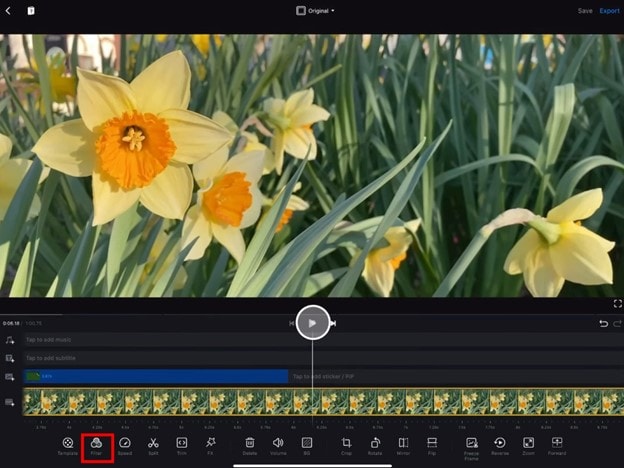
- Create a new project and add your video to it.

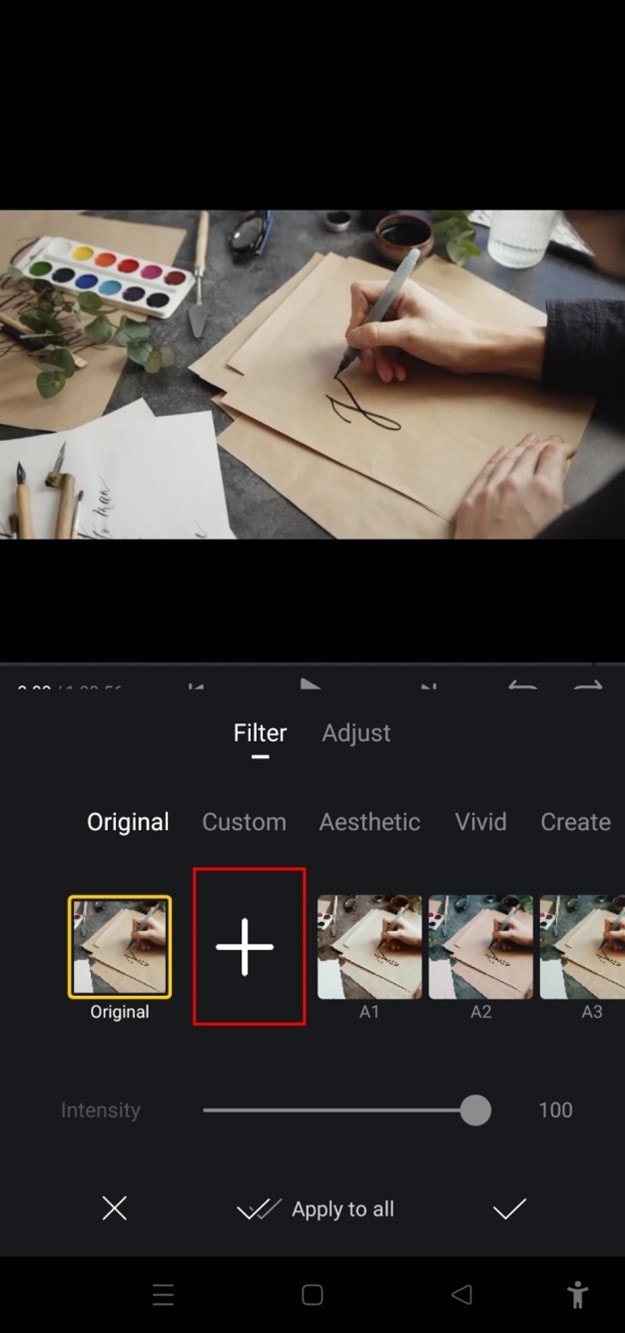
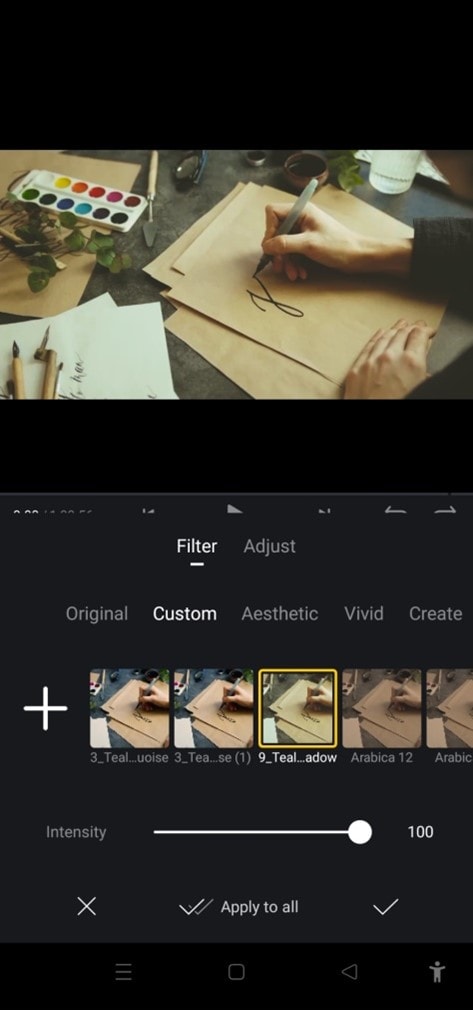
- Then click on the Filters option and select add external or custom filters option next to the existing filters.
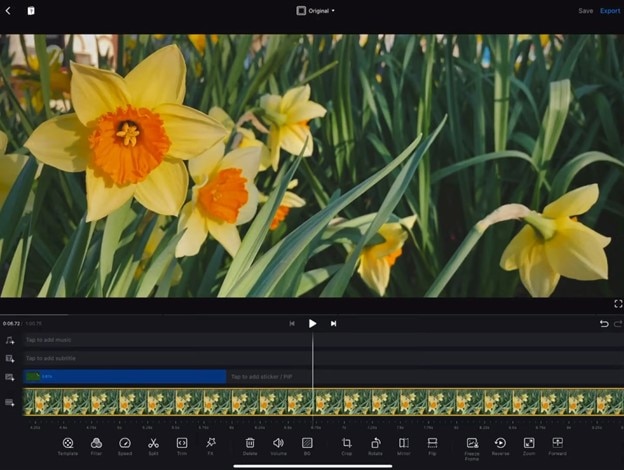
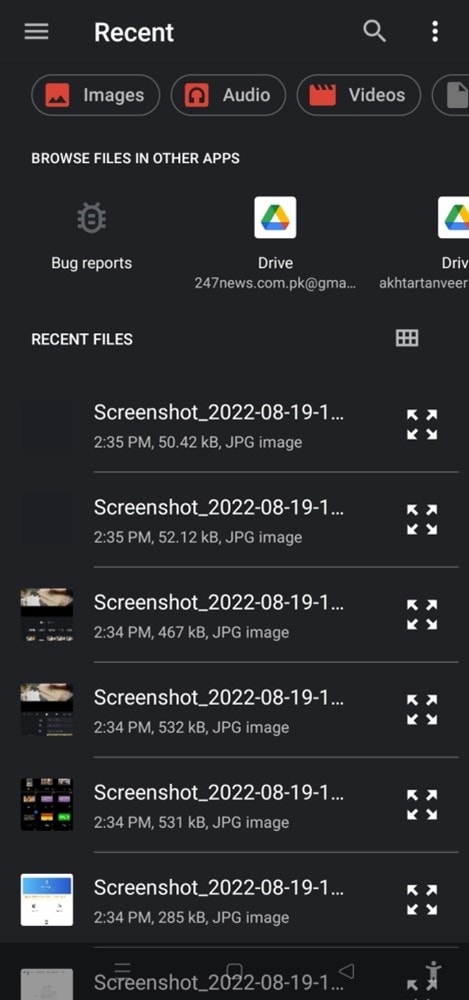
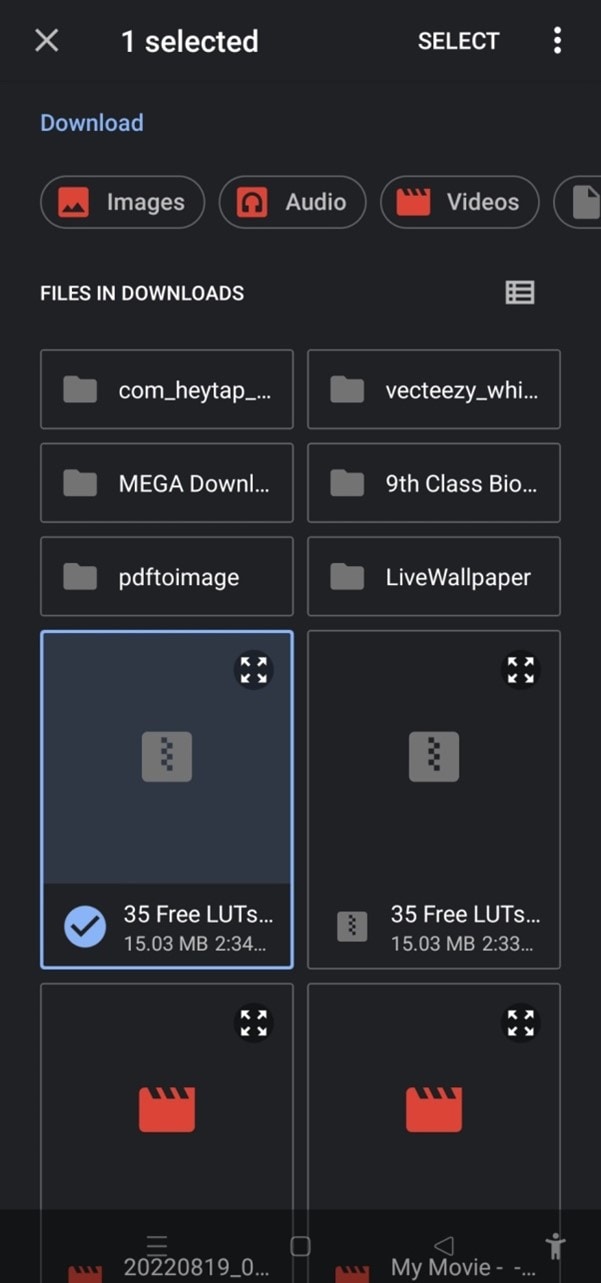
- It will take you to the File manager of your mobile, from which you have to find the folder in which you have stored your LUTs.
- After finding them, you can select those LUTs you want to use in your video and then click on the done or select button.
- Your downloaded LUTs start showing in the VN editor, and you can use them in your videos as you want.
Part 3. Best LUTs resource for VN video editor
1. Presets Store
Presets Store is an online platform that helps you with various Filters, LUTs, and other presets. So you can download LUTs for your videos for the VN editor using it. However, it’s not a free service. You have to pay for the LUTs you want to download from here. You can visit their YouTube channel to follow the latest LUTs, Filters and other presets on this platform.
2. Apna Editz
Apna Editz is another online platform you can use for this purpose. It also provides you with a fantastic variety of Presets like LUTs, Filters, and many other similar effects, which you can use in your video using the VN editor. The main Pros of this recommendation are that it’s a free website. So you can download LUTs for your videos from it for free. Keep an eye on their YouTube channel to be updated about the latest LUTs.
3. Lut Preset
Lut Preset is another alternative to all the above ones. You can get almost all your favorite LUTs for VN editor for free here and then use them in your videos as you want. They also share the latest LUTs on their YouTube Channel.
4. Pencil Hub
Pencil Hub is also a good option in this concern. However, it does not have too much variety of VN LUTs, but you can still use it to download some of the best LUTs for VN editors. To get informed of their every new effect and LUTs, their YouTube channel is the primary source.
5. YRP EDITZ
YRP ETIDZ is another good option if you are still looking for some fantastic VN LUTs. They, too not have a large variety of presets and LUTs. However, if you want some most commonly used LUTs for VN Editor, then they are a good option. You’ll notify of their most website updates by checking their YouTube channel.
Part 4. How to add LUTs to the best alternative to the VN editor?
VN Editor is undoubtedly an excellent choice to add LUTs to your videos. However, the VN editor is best suitable for mobile devices. To enhance your LUTs and effects, it would be great if you used some desktop software. Wondershare Filmora offers a great variety of built-in LUTs to choose from. Let’s look at how we can use Filmora to add LUTs:
- Add your video and tap the tools, then click the Color option.
- Now select the Color Correction option and then choose 3D LUT.
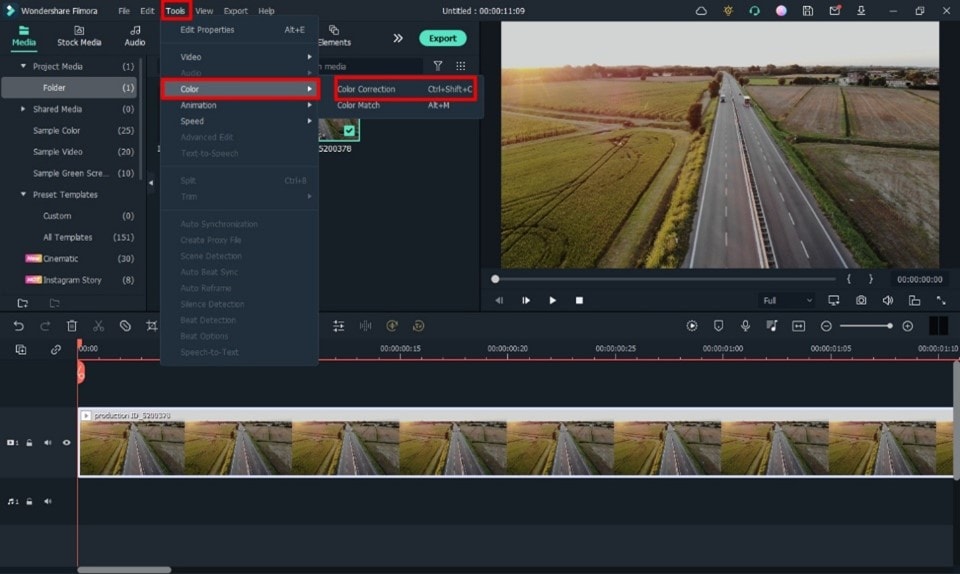
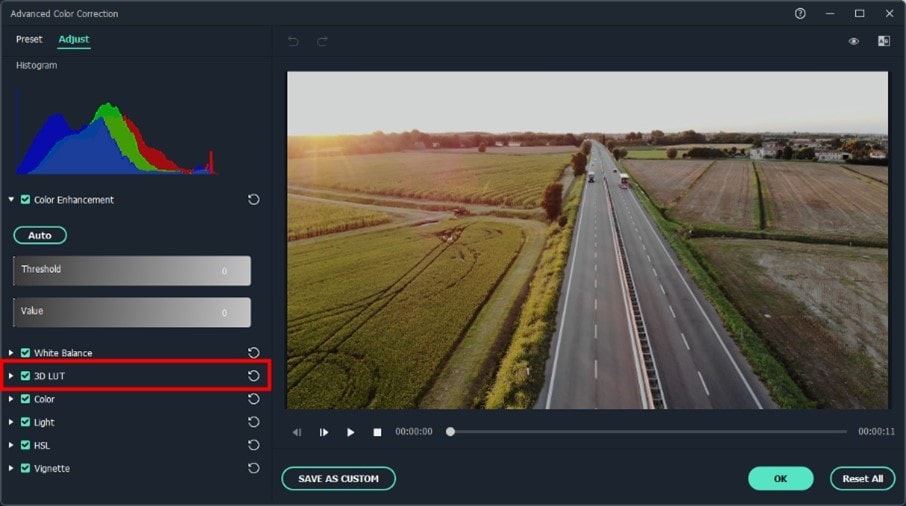
- Click the drop-down menu and select the Load new LUT option. Here you can import other downloaded preset LUTs to use
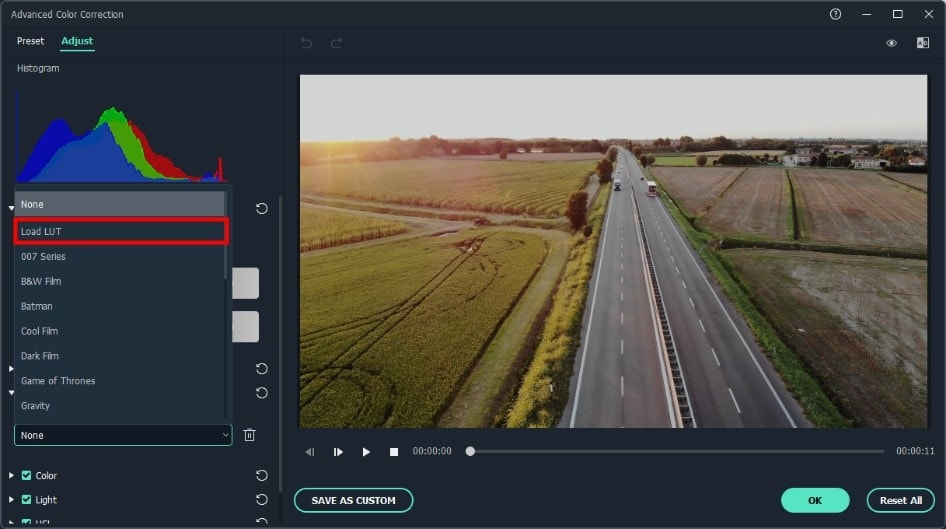
- Choose the LUT and click OK. Your new fantastic video is ready now.

Closing Thoughts
This post recommends several lut resources and demonstrates how to import them if you are a devoted user of VN editor and want to learn how to utilize it for video color grading. The more potent desktop editor Wondershare Filmora, which offers a range of built-in LUT sources and supports color grading settings, is of course recommended if you want to take your videos to the next level. Thanks for reading.
Free Download For Win 7 or later(64-bit)
Free Download For macOS 10.14 or later
2. Apna Editz
Apna Editz is another online platform you can use for this purpose. It also provides you with a fantastic variety of Presets like LUTs, Filters, and many other similar effects, which you can use in your video using the VN editor. The main Pros of this recommendation are that it’s a free website. So you can download LUTs for your videos from it for free. Keep an eye on their YouTube channel to be updated about the latest LUTs.
3. Lut Preset
Lut Preset is another alternative to all the above ones. You can get almost all your favorite LUTs for VN editor for free here and then use them in your videos as you want. They also share the latest LUTs on their YouTube Channel.
4. Pencil Hub
Pencil Hub is also a good option in this concern. However, it does not have too much variety of VN LUTs, but you can still use it to download some of the best LUTs for VN editors. To get informed of their every new effect and LUTs, their YouTube channel is the primary source.
5. YRP EDITZ
YRP ETIDZ is another good option if you are still looking for some fantastic VN LUTs. They, too not have a large variety of presets and LUTs. However, if you want some most commonly used LUTs for VN Editor, then they are a good option. You’ll notify of their most website updates by checking their YouTube channel.
Part 4. How to add LUTs to the best alternative to the VN editor?
VN Editor is undoubtedly an excellent choice to add LUTs to your videos. However, the VN editor is best suitable for mobile devices. To enhance your LUTs and effects, it would be great if you used some desktop software. Wondershare Filmora offers a great variety of built-in LUTs to choose from. Let’s look at how we can use Filmora to add LUTs:
- Add your video and tap the tools, then click the Color option.
- Now select the Color Correction option and then choose 3D LUT.
- Click the drop-down menu and select the Load new LUT option. Here you can import other downloaded preset LUTs to use
- Choose the LUT and click OK. Your new fantastic video is ready now.
Closing Thoughts
This post recommends several lut resources and demonstrates how to import them if you are a devoted user of VN editor and want to learn how to utilize it for video color grading. The more potent desktop editor Wondershare Filmora, which offers a range of built-in LUT sources and supports color grading settings, is of course recommended if you want to take your videos to the next level. Thanks for reading.
Free Download For Win 7 or later(64-bit)
Free Download For macOS 10.14 or later
How to Rotate Videos With Media Player Classic
The Internet and social media have become a staple in our daily lives. Internet users post thousands of videos every day that you can watch online or download and rewatch in your free time. Suppose you encounter a video that is upside down or shot at an angle that makes it difficult for you to enjoy it fully.
It would be nice to find a way to rotate the video to portrait mode so you can watch it without any distractions. Fortunately, this article will discuss using Media Player Classic to rotate any video. We also discuss an excellent alternative to the aforementioned media player.

What Is Media Player Classic?
In a nutshell, Media Player Classic is an open-source media player suitable for 32-bit and 64-bit Microsoft Windows. If you have used the original interface, you might notice that it resembles Windows Media Player 6.4. The only key difference is that the former is more feature-rich and provides more options. In addition, Media Player Classic is very compact and lightweight.

A programmer named “Gabest’’ created and designed this platform as a closed-source application. Things changed, and he later relicensed the media player as free under the terms of the GLP-2.0 license. He released the final version, MPC 6.4.9.0, on 20th March 2006.
Unfortunately, development stalled in 2006, much to the disappointment of many users who had grown to love it. Gabest made a public statement in 2007 saying that Media Player Classic was not dead, just that he couldn’t work on it anymore.
How To Rotate Video in Media Player Classic?
Media Player Classic allows you to rotate your video around three axes, X, Y, and Z. Once you are done, you can fix a video that was initially upside down or in landscape mode for a better viewing experience. Another perk of using Media Player Classic to rotate a video is that you can use shortcuts to make your work easier.
Before we teach you how to rotate video in windows Media Player Classic, there are a few things you should know. Unfortunately, this platform doesn’t allow you to rotate a video in its graphical user interface. You can’t also use it to edit a video. Suppose you want to add text or overwrite the original video clip. Media Player Classic can only allow you to playback a video or rotate it.
Here is a simple guide on how to rotate videos in Media Player Classic.
Step1 Launch Media Player Classic and click on the “View” tab. Select “Options” or click “O” to display the “Options” window.

Step2 Navigate to the left pane to the Player Group and click on “Keys.” If the Player Group is not expanded by the time, you launch the platform, double-click it and wait a few seconds. You can then navigate to the “PnS Rotate” command on the Keys list.

Step3 Go to the “PnS Rotate+” command and double-click the “Key” field. You can then click on any key to rotate your video around the x-axis. Once you are satisfied with the results, click “…” to apply the changes you have made.

Step4 You can now assign shortcuts to “PnS Rotate” commands. For instance, you could assign PnS Rotate Y for rotation along the Y axis and PnS Z for rotation along the Z axis. After each axis has a shortcut, select “Apply” then “OK” to save your changes and close the Options window respectively.

Step5 Select “Output” on the Options window and navigate to the DirectShow Video section to confirm whether the Media Classic Player supports rotation for the rendered video. Ascertain the Rotation feature has a green check mark, which indicates that the platform promotes rotation for the video. If the video has a red X, select “Apply” and click “OK.”

Step6 Use the shortcuts you assigned to the keys in Step 4 to rotate your video as you see fit. Since the rotation occurs gradually, you might need to press the keys numerous times or press and hold to see a visible change.
For instance, you can rotate your video from landscape to portrait by clicking “Alt-Num 1” and “Alt-Num 3,” respectively. To revert your video to its original state, press “Alt-Num 5.”
Need an alternative to Media Player Classic? Try Wondershare Filmora To Rotate a Video
Free Download For Win 7 or later(64-bit)
Free Download For macOS 10.14 or later
You might need a better alternative to Media Classic Player to help rotate your videos. As we mentioned, Media Classic Player doesn’t allow you to change the video. The scope of this platform only extends to playing and rotating videos along three axes. In our opinion, Wondershare Filmora is an excellent alternative.

This feature-rich platform is your one-stop solution for any creator who wants to make a mark with their videos. You can download it free on your desktop, laptop, or smartphone and use it anytime. The cloud storage allows you to snap a photo and upload it for editing at a later time.
In addition, the platform has a co-creation space where you can share your work with other users and compare notes. Here is a list of other nifty features we guarantee you will enjoy.
- Motion tracking
- Auto beat sync
- Split screen
- Title Editing
- Preset templates
- AI Portrait
- Mask and blend
- Text to speech
- Silence detection
- Audio visualizer
How To Rotate a Video 90 Degrees With Wondershare Filmora?
Now that you have seen how different this platform is from Media Classic Player, you might be curious about how effectively it rotates your videos. Perhaps our detailed guide will help you decide whether you want to give Wondershare Filmora a shot.
Stick around to learn how to rotate a video 90 degrees with Wondershare Filmora.
Step1 Import the video you want to rotate to Wondershare Filmora and drag and drop it to the timeline as shown below.

Step2 Click on the monitor icon and select “Change Project Aspect Ratio” in the drop-down menu.

Step3 In the “Project Settings” window, you can change your video’s Aspect Ratio, Resolution, Frame Rate, and Color space.

Step4 Once you are happy with your changes, click “OK” and close the window.

Step5 Double-click the video track and navigate to the Rotate option in the window. Hover your mouse over the dot in the Rotate tab until you get to 90 degrees. You could also adjust the rotation of the video by clicking on the pivot in the media player till the video is at 90 degrees.

Step6 Click “Export” to save a copy of the rotated video to your device.

Which Is Better To Rotate a Video? Media Player Classic or Wondershare Filmora?
Having seen both sides of the coin, you might wonder which option is better to help you rotate a video. In this section of the article, we pit Wondershare Filmora against Media Player Classic to help you determine which option will work best for you.
Take a look at the table below.
| Media Player Classic | Wondershare Filmora | |
|---|---|---|
| Operating System | Microsoft Windows | Windows & Mac |
| Ratings from G2 | N/A | 4.4/5 stars |
| Pricing | Free | Annual Plan – US$49.99/yearCross Platform Plan - US$59.99/YearPerpetual Plan - US$79.99 |
| Features | ● Enhanced video rendering● Removal of tearing● Supports SVCD, VCD, and DVD playback● AVI subtitles● Customizable toolbar | ● AI Portrait● Mask and blend● Text to speech● Silence detection● Audio visualizer● Motion tracking● Auto beat sync● Split screen● Title Editing● Preset templates |
As you have seen, Media player Classic doesn’t have the Rotate feature per se. However, you can assign shortcuts to the keys to rotate a video along three axes as you see fit. You can also use a combination of keys like Alt and Num to change how your video sits so you can enjoy it as you like.
On the other hand, Wondershare Filmora has a more comprehensive Rotate feature that allows you to drag your pointer along a bar till the video sits at the correct number of degrees.
This platform also provides additional features, like allowing you to scale the video to fit the screen and adjusting project settings like the resolution and frame rate. If you don’t want to use the sliding bar, you can use your pointer to manually adjust the rotation by clicking on the pivot with your pointer.
In a nutshell, Windows Media Player is the ideal choice if you want to rotate your video and leave it at that. However, if you are looking for more advanced features, you are better off choosing Wondershare Filmora. The latter option also makes your videos look more polished like they were edited by a professional.
Conclusion
Videos might be trickier to edit than photos, especially when you want to rotate them. Fortunately, developers have been working tirelessly to ensure you have many tools at your disposal to edit your videos from any device at any time.
If you don’t fancy editing videos on your laptop, you could download the software to your smartphone and rotate videos on the move. Technology is truly a blessing that has come to make our work easier. Hopefully, after reading this article, you can effortlessly rotate any video you encounter.
Free Download For macOS 10.14 or later
You might need a better alternative to Media Classic Player to help rotate your videos. As we mentioned, Media Classic Player doesn’t allow you to change the video. The scope of this platform only extends to playing and rotating videos along three axes. In our opinion, Wondershare Filmora is an excellent alternative.
This feature-rich platform is your one-stop solution for any creator who wants to make a mark with their videos. You can download it free on your desktop, laptop, or smartphone and use it anytime. The cloud storage allows you to snap a photo and upload it for editing at a later time.
In addition, the platform has a co-creation space where you can share your work with other users and compare notes. Here is a list of other nifty features we guarantee you will enjoy.
- Motion tracking
- Auto beat sync
- Split screen
- Title Editing
- Preset templates
- AI Portrait
- Mask and blend
- Text to speech
- Silence detection
- Audio visualizer
How To Rotate a Video 90 Degrees With Wondershare Filmora?
Now that you have seen how different this platform is from Media Classic Player, you might be curious about how effectively it rotates your videos. Perhaps our detailed guide will help you decide whether you want to give Wondershare Filmora a shot.
Stick around to learn how to rotate a video 90 degrees with Wondershare Filmora.
Step1 Import the video you want to rotate to Wondershare Filmora and drag and drop it to the timeline as shown below.
Step2 Click on the monitor icon and select “Change Project Aspect Ratio” in the drop-down menu.
Step3 In the “Project Settings” window, you can change your video’s Aspect Ratio, Resolution, Frame Rate, and Color space.
Step4 Once you are happy with your changes, click “OK” and close the window.
Step5 Double-click the video track and navigate to the Rotate option in the window. Hover your mouse over the dot in the Rotate tab until you get to 90 degrees. You could also adjust the rotation of the video by clicking on the pivot in the media player till the video is at 90 degrees.
Step6 Click “Export” to save a copy of the rotated video to your device.
Which Is Better To Rotate a Video? Media Player Classic or Wondershare Filmora?
Having seen both sides of the coin, you might wonder which option is better to help you rotate a video. In this section of the article, we pit Wondershare Filmora against Media Player Classic to help you determine which option will work best for you.
Take a look at the table below.
| Media Player Classic | Wondershare Filmora | |
|---|---|---|
| Operating System | Microsoft Windows | Windows & Mac |
| Ratings from G2 | N/A | 4.4/5 stars |
| Pricing | Free | Annual Plan – US$49.99/yearCross Platform Plan - US$59.99/YearPerpetual Plan - US$79.99 |
| Features | ● Enhanced video rendering● Removal of tearing● Supports SVCD, VCD, and DVD playback● AVI subtitles● Customizable toolbar | ● AI Portrait● Mask and blend● Text to speech● Silence detection● Audio visualizer● Motion tracking● Auto beat sync● Split screen● Title Editing● Preset templates |
As you have seen, Media player Classic doesn’t have the Rotate feature per se. However, you can assign shortcuts to the keys to rotate a video along three axes as you see fit. You can also use a combination of keys like Alt and Num to change how your video sits so you can enjoy it as you like.
On the other hand, Wondershare Filmora has a more comprehensive Rotate feature that allows you to drag your pointer along a bar till the video sits at the correct number of degrees.
This platform also provides additional features, like allowing you to scale the video to fit the screen and adjusting project settings like the resolution and frame rate. If you don’t want to use the sliding bar, you can use your pointer to manually adjust the rotation by clicking on the pivot with your pointer.
In a nutshell, Windows Media Player is the ideal choice if you want to rotate your video and leave it at that. However, if you are looking for more advanced features, you are better off choosing Wondershare Filmora. The latter option also makes your videos look more polished like they were edited by a professional.
Conclusion
Videos might be trickier to edit than photos, especially when you want to rotate them. Fortunately, developers have been working tirelessly to ensure you have many tools at your disposal to edit your videos from any device at any time.
If you don’t fancy editing videos on your laptop, you could download the software to your smartphone and rotate videos on the move. Technology is truly a blessing that has come to make our work easier. Hopefully, after reading this article, you can effortlessly rotate any video you encounter.
How to Make a Slideshow with Movavi Slideshow Maker
How to Create a Slideshow with Movavi Slideshow Maker
An easy yet powerful editor
Numerous effects to choose from
Detailed tutorials provided by the official channel
Movavi slideshow maker is a well-known maker which is trusted by millions of people all around the world for its quality and supportive Features. The application is easy to use, simple to run and exciting to use. You can use the Movavi slideshow maker activation key for the installation of the software.

In this article
01 [Stepwise Guide For Making A Slideshow With Music And Effects Using Movavi For Windows And Mac](#Part 1)
02 [Five Movavi Slideshow Maker Alternatives](#Part 2)
Part 1 Stepwise Guide For Making A Slideshow With Music And Effects Using Movavi For Windows And Mac

So, you are willing to make creative and interesting videos without any hassles? Well, Movavi video editor is full of good Features which are easy to use. You can utilize this advance slideshow creator anywhere. First you need Movavi slideshow maker download options. Here is stepwise guide for creating a slideshow on windows. Want to add music and effects? Well, you can easily grab the deal. Let’s learn through Movavi slideshow maker key –
Installation
The first thing you need to do while making a slideshow with Movavi slideshow maker 7 is to install the application. You will love to know that Movavi is an easy to use program with more than 40 titles and over 100 transitions. Download the tool and run the file to install it. You will get very easy instructions for this purpose from Movavi. When you visit the slideshow maker menu of the software and click on activate software, you will receive Movavi slideshow maker 7 activation key free copy and paste option in your email and you can activate the software from there.
Choose the mode to work

You will be surprised to know that there are two ways through which you can make a slideshow with Movavi slideshow maker. You can either choose the slideshow wizard or go to the manual mode for video making.
If you pick the slideshow wizard, it will allow you to create photo videos easily through a automatic procedure. You will have to just follow the instructions given by the wizard and your slideshow will be ready.
Another option gives you more space for implementing creativity and customizing effects etc. according to yourself. You can go with the option of creating a movie in manual mode and enjoy taking control over the video. The freedom of adjusting settings, creating the process and inserting effects in Movavi slide show maker makes this mode preferable. So, for making a slideshow with sound, music and effects of your choice, it will be better to go with manual mode of slideshow making in Movavi.
Creating the slideshow
Next step in the procedure is creating a Movavi slideshow. Again you will have two options to choose from. You can pick the easy way and upload your photos. The photos will be compiled into a video. You can drag the photos to rearrange their sequence and even add or remove photos if you want. So, this is the easy way to make slideshow in Movavi slideshow maker.
Another option of creating the slideshow comes with theme. You can pick a theme such as family, romantic, vacation, beach etc. and add your photos. The readymade theme comes with various transitions, effects, sounds and captions. You can go with no theme if you want to add your own music, transitions and captions.
So, the easy mode will be comprised of following steps –
Step 1
Click on file tab and choose add files. Add the photos of your choice.
Step 2
Drag the photos for changing arrangement if required. Remove a photo if it is not required in the slideshow and add more photos if needed.
Step 3 (optional)
Next step is choose theme.
Follow the steps given below if you choose readymade theme -
Step 1
Import photos which are selected for slideshow by clicking on add files. Upload the photos and they will automatically be redirected to the timeline.
Step 2
Click on add music and pick a track of your preference. In built audio files are also there if you want to choose from.
Step 3
Next step is preview. You can preview the whole video and add titles in starting and end. Set the duration of music and remove unwanted black sidebars of the video. Now click on slideshow and go through the whole video.
Choose no theme if you want to customize the video manually and follow steps mentioned below -
Step 1
Click on no theme and go to next.
Step 2
Click add file and select the photos you want. Video clips can also be uploaded. Your photos and videos will be added to the timeline automatically.
Step 3
Then put some interesting transitions in your video. There are dozens of stylish transitions in Movavi slideshow maker and you are free to insert transitions you love in between videos and photos. Just click on transition tab and make your video attractive.
Step 4
It’s time to add some music now. Select music and then click on add files. Choose the track you love.
Step 5
At last add titles and captions in your video. Go to the left pane and select titles. Add the title you want by writing it on the text box. Titles can be edited by double tapping on them. If you want to change text style, font and color etc. of title, you can double click the title on timeline and change settings. Click Apply to save the edited details.
Step 6
Then click on export and select save the video. Choose the appropriate format for saving the video such as OGV, MP4 or webM and you are done. Get Movavi slideshow maker full for all Features. Just click on Movavi slideshow maker 7 activation key in your email and enjoy the customer friendly slide sow making platform. Learn more about Movavi slideshow maker 6 and search for Movavi slideshow maker crack too as it has exciting Features.
Part 2 Five Movavi Slideshow Maker Alternatives
You have already read the step-by-step guidelines for making slideshow in Movavi video maker and hope you love the Movavi slideshow maker review. If you want to know some other slide show makers, here is the list of five more video makers which can be used in place of Movavi.
01iMovie

Learning video editing is very easy in iMovie. This extraordinary slideshowmaker is available from a longer period and work upon the idea of clean and clear interface. Free version of the app is available to begin with.
Key Features
● Green screen effect
● Variety of Features
● Soundtracks for free
Pros
● Easy to use in mobile devices
Cons
● Can’t be used in windows
02Focusky

This sophisticated slideshow maker cannot be forget for its helpful designs and ease of creating dynamic presentation. No matter, what operating system you use, Focusky supports the user very well for creating attractive slideshow.
Features
● Offline editing
● Screen sharing
● User friendly interface
Pros
● In built media library
● Can be used in Windows and Mac
Cons
● Free version has limited Features
● Full version is costly
03Filmora

Already well known as a customer friendly video editing tool, Wondershare Filmora Video Editor can be used for making high quality videos and editing them. The styling, custom options and ease of adding effects in the video make this app popular. You can play with the theme, insert audio of your choice and add text. The application is well equipped with a wide variety of slideshow making tools.
For Win 7 or later (64-bit)
For macOS 10.12 or later
Key Features
● Audio mixing feature
● Tilt shift
● Multiple video clips layer facility
● Adding and editing text feature
● Preview framewise
● Video stabilizer
Pros
● Features like transition and effects for improving quality of the video.
● Mosaic functionality to blur particular areas
● Advance text editing; volume can be down when text appears.
Cons
● If you go with the free version, you will be disappointed with the watermark on your prepared videos.
04Icecream

If you are looking for a slideshow maker which supports you to create, collaborate and share your slideshow, you can choose Icrecream. The flexible user platform is very responsive and full of drag and drop Features. It comes with in-built music so that you can create slideshows with the soundtracks available in the program.
Features
● format support
● In-built music
Pros
● Multiple export format
● Easy to use platform
Cons
● Multi platform is not available
● Trial version has limited Features
05Kizoa

Kizoa is a very different slideshow maker which brings ease for photography professionals. Lots of challenges they faced earlier, are solved with Kizoa. Especially, managing and saving raw files is easy with this vide maker and you can use them afterwards.
Features
● Lots of cloud storage
● Customer friendly
● Allows creating your own GIFs
Pros
● Full HD video processing
● Rich export feature
Cons
● Basic version has limited Features
● Limitations of video duration
● Ending Thoughts →
● Never use a complicated slideshow maker for creating presentations if you don’t have enough time. Go with the automated theme and insert your pictures with appropriate text.
● Pick the trial version of slideshow maker first and then go for full version if you love its Features and user interface.
● You will never get all the required Features in one slideshow maker, so either make a list of your preferable Features or use 3-4 slideshow makers to work on a single video.
Movavi slideshow maker is a well-known maker which is trusted by millions of people all around the world for its quality and supportive Features. The application is easy to use, simple to run and exciting to use. You can use the Movavi slideshow maker activation key for the installation of the software.
In this article
01 [Stepwise Guide For Making A Slideshow With Music And Effects Using Movavi For Windows And Mac](#Part 1)
02 [Five Movavi Slideshow Maker Alternatives](#Part 2)
Part 1 Stepwise Guide For Making A Slideshow With Music And Effects Using Movavi For Windows And Mac
So, you are willing to make creative and interesting videos without any hassles? Well, Movavi video editor is full of good Features which are easy to use. You can utilize this advance slideshow creator anywhere. First you need Movavi slideshow maker download options. Here is stepwise guide for creating a slideshow on windows. Want to add music and effects? Well, you can easily grab the deal. Let’s learn through Movavi slideshow maker key –
Installation
The first thing you need to do while making a slideshow with Movavi slideshow maker 7 is to install the application. You will love to know that Movavi is an easy to use program with more than 40 titles and over 100 transitions. Download the tool and run the file to install it. You will get very easy instructions for this purpose from Movavi. When you visit the slideshow maker menu of the software and click on activate software, you will receive Movavi slideshow maker 7 activation key free copy and paste option in your email and you can activate the software from there.
Choose the mode to work
You will be surprised to know that there are two ways through which you can make a slideshow with Movavi slideshow maker. You can either choose the slideshow wizard or go to the manual mode for video making.
If you pick the slideshow wizard, it will allow you to create photo videos easily through a automatic procedure. You will have to just follow the instructions given by the wizard and your slideshow will be ready.
Another option gives you more space for implementing creativity and customizing effects etc. according to yourself. You can go with the option of creating a movie in manual mode and enjoy taking control over the video. The freedom of adjusting settings, creating the process and inserting effects in Movavi slide show maker makes this mode preferable. So, for making a slideshow with sound, music and effects of your choice, it will be better to go with manual mode of slideshow making in Movavi.
Creating the slideshow
Next step in the procedure is creating a Movavi slideshow. Again you will have two options to choose from. You can pick the easy way and upload your photos. The photos will be compiled into a video. You can drag the photos to rearrange their sequence and even add or remove photos if you want. So, this is the easy way to make slideshow in Movavi slideshow maker.
Another option of creating the slideshow comes with theme. You can pick a theme such as family, romantic, vacation, beach etc. and add your photos. The readymade theme comes with various transitions, effects, sounds and captions. You can go with no theme if you want to add your own music, transitions and captions.
So, the easy mode will be comprised of following steps –
Step 1
Click on file tab and choose add files. Add the photos of your choice.
Step 2
Drag the photos for changing arrangement if required. Remove a photo if it is not required in the slideshow and add more photos if needed.
Step 3 (optional)
Next step is choose theme.
Follow the steps given below if you choose readymade theme -
Step 1
Import photos which are selected for slideshow by clicking on add files. Upload the photos and they will automatically be redirected to the timeline.
Step 2
Click on add music and pick a track of your preference. In built audio files are also there if you want to choose from.
Step 3
Next step is preview. You can preview the whole video and add titles in starting and end. Set the duration of music and remove unwanted black sidebars of the video. Now click on slideshow and go through the whole video.
Choose no theme if you want to customize the video manually and follow steps mentioned below -
Step 1
Click on no theme and go to next.
Step 2
Click add file and select the photos you want. Video clips can also be uploaded. Your photos and videos will be added to the timeline automatically.
Step 3
Then put some interesting transitions in your video. There are dozens of stylish transitions in Movavi slideshow maker and you are free to insert transitions you love in between videos and photos. Just click on transition tab and make your video attractive.
Step 4
It’s time to add some music now. Select music and then click on add files. Choose the track you love.
Step 5
At last add titles and captions in your video. Go to the left pane and select titles. Add the title you want by writing it on the text box. Titles can be edited by double tapping on them. If you want to change text style, font and color etc. of title, you can double click the title on timeline and change settings. Click Apply to save the edited details.
Step 6
Then click on export and select save the video. Choose the appropriate format for saving the video such as OGV, MP4 or webM and you are done. Get Movavi slideshow maker full for all Features. Just click on Movavi slideshow maker 7 activation key in your email and enjoy the customer friendly slide sow making platform. Learn more about Movavi slideshow maker 6 and search for Movavi slideshow maker crack too as it has exciting Features.
Part 2 Five Movavi Slideshow Maker Alternatives
You have already read the step-by-step guidelines for making slideshow in Movavi video maker and hope you love the Movavi slideshow maker review. If you want to know some other slide show makers, here is the list of five more video makers which can be used in place of Movavi.
01iMovie
Learning video editing is very easy in iMovie. This extraordinary slideshowmaker is available from a longer period and work upon the idea of clean and clear interface. Free version of the app is available to begin with.
Key Features
● Green screen effect
● Variety of Features
● Soundtracks for free
Pros
● Easy to use in mobile devices
Cons
● Can’t be used in windows
02Focusky
This sophisticated slideshow maker cannot be forget for its helpful designs and ease of creating dynamic presentation. No matter, what operating system you use, Focusky supports the user very well for creating attractive slideshow.
Features
● Offline editing
● Screen sharing
● User friendly interface
Pros
● In built media library
● Can be used in Windows and Mac
Cons
● Free version has limited Features
● Full version is costly
03Filmora
Already well known as a customer friendly video editing tool, Wondershare Filmora Video Editor can be used for making high quality videos and editing them. The styling, custom options and ease of adding effects in the video make this app popular. You can play with the theme, insert audio of your choice and add text. The application is well equipped with a wide variety of slideshow making tools.
For Win 7 or later (64-bit)
For macOS 10.12 or later
Key Features
● Audio mixing feature
● Tilt shift
● Multiple video clips layer facility
● Adding and editing text feature
● Preview framewise
● Video stabilizer
Pros
● Features like transition and effects for improving quality of the video.
● Mosaic functionality to blur particular areas
● Advance text editing; volume can be down when text appears.
Cons
● If you go with the free version, you will be disappointed with the watermark on your prepared videos.
04Icecream
If you are looking for a slideshow maker which supports you to create, collaborate and share your slideshow, you can choose Icrecream. The flexible user platform is very responsive and full of drag and drop Features. It comes with in-built music so that you can create slideshows with the soundtracks available in the program.
Features
● format support
● In-built music
Pros
● Multiple export format
● Easy to use platform
Cons
● Multi platform is not available
● Trial version has limited Features
05Kizoa
Kizoa is a very different slideshow maker which brings ease for photography professionals. Lots of challenges they faced earlier, are solved with Kizoa. Especially, managing and saving raw files is easy with this vide maker and you can use them afterwards.
Features
● Lots of cloud storage
● Customer friendly
● Allows creating your own GIFs
Pros
● Full HD video processing
● Rich export feature
Cons
● Basic version has limited Features
● Limitations of video duration
● Ending Thoughts →
● Never use a complicated slideshow maker for creating presentations if you don’t have enough time. Go with the automated theme and insert your pictures with appropriate text.
● Pick the trial version of slideshow maker first and then go for full version if you love its Features and user interface.
● You will never get all the required Features in one slideshow maker, so either make a list of your preferable Features or use 3-4 slideshow makers to work on a single video.
How To Blur The Video Background in After Effects
While capturing a video, it may be possible that the background of the video looks dull or tedious. Or, unwanted people in the background are ruining the overall presentation. To get rid of this, many people use Adobe After Effects to blur the background in the video. If you don’t know how to use After Effects, this article will provide you with accurate guidance. Moreover, we will also highlight an alternative to Adobe After Effects for additional help.
Part 1: What Do You Need To Blur Background in Videos?
There are many scenarios in which blurring the video background becomes necessary. In this part of the article, we will discuss some common scenarios in which people feel it is mandatory to blur the video background.
1. To Put Focus on Subject
If you want to keep the spotlight on the main subject of the video, blurring the background becomes essential. By doing so, you can highlight and grab viewers’ attention to the subject of your video.
2. Replacing Background
Sometimes choosing and capturing a vibrant background for your video is tough. So, if you have a dull background in your videos that does not look aesthetic, you can simply blur it. There are various blur effects that you can add to the background of your video to create an overall sophisticated presentation.
3. Hiding Sensitive Information
There are some places, such as museums or private properties, where you cannot take a video without the owner’s permission. The reason is that there might be sensitive information in such places that needs to be confidential. So, if you are making a vlog in such places, you can blur the video background to avoid copyright strikes on social media platforms.
4. Ensuring Privacy
If you are making a tutorial video while sitting at home, you may concern about the privacy of your family members or house. Thus, in such cases, blurring the video background can be a safe idea to ensure the privacy of your home.
Part 2: How to Blur the Video Background in After Effects?
Do you want to blur the background in the video where the subject is moving continuously? This may sound complicated to you; however, using Adobe After Effects can make this process quite simple and easy. Adobe After Effects is a professional software that many users utilize to execute professional editing. Using this efficient platform, you can smoothly make eye-catchy intros and outros for your videos.
Moreover, you can add transitions to your videos to generate compelling results. So, if you want to add stunning and appealing visual effects to your video, Adobe After Effects is the best choice. Furthermore, you can use Adobe After Effects for 2D animation and motion graphics. That’s why many content creators use this software in TV, films, and the web to manipulate videos proficiently.
Moreover, you can also merge tons of images and videos using this tool to display your creative editing skills. This part will guide you on efficiently using Adobe After Effects Blur Background feature.
Steps to Blur Background in Adobe After Effects
Adobe After Effects is an amazing tool for applying aesthetic visual effects to your videos. To make background blur in After Effects easily, check the following steps:
Step1 Open Adobe After Effects and upload the video clip you want to edit. Once done, double-click the video you have added to the timeline to select the clip you want to blur.
Step2 Now head to the ROTO brush displayed on top and click on it. The green circle can be used to select the part you would need. In comparison, the red circle can be used to highlight the part that you don’t need. To shift between these two colors, you can press the Alt key. So, carefully use the green color to select the needed part. You can also zoom in to make selections effortlessly.

Step3 Once you have made the selection, play the video to do the calculations. After giving some time to do calculations, copy the layer from the timeline. To blur the background in the video, search for “Gaussian Blur” in the effects tab. After applying this effect to the copied layer, increase the blur effect and wait for the calculations.

Step4 Now adjust the feather value from the left side to 20% on Layer 1. Once done, you can see the results in the preview window.

Bonus Tip – The Alternative to After Effects to Blur Face in Videos
If you have a fixed background in a video and your subject is not constantly moving around, we can provide you with a simple alternative to Adobe After Effects blur background tool. To accomplish the best results in the scenario mentioned above, you can try Wondershare Filmora . This tool offers tons of presets that can help you in creating and edit videos with perfection. Moreover, you can do basic editing as well on Filmora to crop, resize, trim, and merge video clips.
Free Download For Win 7 or later(64-bit)
Free Download For macOS 10.14 or later
Filmora also provides various effects that can help you add a new perspective to your videos. To make your video look cinematic and aesthetic, you can use its vintage and retro effects. Furthermore, you can use its background blur effects to hide unwanted parts from your videos. In this section, we will address basic instructions that can help you blur the selective parts of the video.
Steps to Add Blur Effect Using Filmora
Have you ever tried Filmora to add blur effects to your video? Here are the simple instructions that can help you in adding a blur effect to your videos:
Step1 Create a New Filmora Project
After launching Filmora, hit the “Create New Project” option to begin. Now hit the “Arrow” icon to import the desired video clip to the project media section. Once done, drag and drop the video into the timeline.

Step2 Select the Background Blur Effect
Now head to the “Effects” tab and locate the “Background Blur” option on the left. By selecting this option, you can explore various background effects that you can add. Once you have chosen the background effect, apply it to your video on the timeline.

Step3 Export your Blurred Video
After adding the blur effect, double-click on it to open the blur settings. From the settings, you can modify the opacity and blur strength according to your preference. Once done, hit the “Export” button to save your video with blurred background.

Conclusion
To improve your video outlook, paying attention to the background is essential. However, you can use the After Effects blur background tool if you have captured unwanted things in your video. After reading this article, you have learned the complete guide to using Adobe After Effects to blur the background in videos efficiently.
If you want a simpler and more professional tool, we recommend using Wondershare Filmora. This tool has a friendly interface that you can operate efficiently without any inconvenience.
Free Download For macOS 10.14 or later
Filmora also provides various effects that can help you add a new perspective to your videos. To make your video look cinematic and aesthetic, you can use its vintage and retro effects. Furthermore, you can use its background blur effects to hide unwanted parts from your videos. In this section, we will address basic instructions that can help you blur the selective parts of the video.
Steps to Add Blur Effect Using Filmora
Have you ever tried Filmora to add blur effects to your video? Here are the simple instructions that can help you in adding a blur effect to your videos:
Step1 Create a New Filmora Project
After launching Filmora, hit the “Create New Project” option to begin. Now hit the “Arrow” icon to import the desired video clip to the project media section. Once done, drag and drop the video into the timeline.
Step2 Select the Background Blur Effect
Now head to the “Effects” tab and locate the “Background Blur” option on the left. By selecting this option, you can explore various background effects that you can add. Once you have chosen the background effect, apply it to your video on the timeline.
Step3 Export your Blurred Video
After adding the blur effect, double-click on it to open the blur settings. From the settings, you can modify the opacity and blur strength according to your preference. Once done, hit the “Export” button to save your video with blurred background.
Conclusion
To improve your video outlook, paying attention to the background is essential. However, you can use the After Effects blur background tool if you have captured unwanted things in your video. After reading this article, you have learned the complete guide to using Adobe After Effects to blur the background in videos efficiently.
If you want a simpler and more professional tool, we recommend using Wondershare Filmora. This tool has a friendly interface that you can operate efficiently without any inconvenience.
Also read:
- New In 2024, A Countdown Effect Is Widely Used in Gaming and Report Videos. So How to Create Your Own Countdown Video? This Article Will Tell You some Ideas About Contdown Video Editing
- In 2024, It Is Easy to Separate the Audio From the Video in DaVinci Resolve. But, to Avail of This Feature, You Need to Follow Proper Steps, and This Article Is All About It
- New 2024 Approved This Well-Written Article Will Share a Descriptive Method on How to Stream Zoom to YouTube Quickly. By Doing so, You Can Share Your Zoom Session Live with Your YouTube Audience Effortlessly
- Updated Are You Looking to Freeze-Frame in FCP? If Yes, Read One, as Here Is a Guide About How to Freeze-Frame in Final Cut Pro (FCP) with Ease
- How to Add Text Behind Objects in Video for 2024
- In 2024, If You Are Experiencing a Color Distortion in Your Video, You Are in the Right Place. We Have Provided a Detailed Guide with Three Methods that Will Help You Correct This Issue
- Updated 2024 Approved What Is the Best FPS for YouTube Videos?
- Updated Top 5 Websites and Software to Convert Powerpoint to Mp4
- Updated | Top GIF to MP4 Converters
- New Have You Ever Wondered How Those PowerPoint, Looping Slideshows You See in Conferences and Reception Areas Display and Move to the Next Slide Automatically without Clicking a Mouse? You Dont Have to Be Amazed at This for 2024
- 2024 Approved A Guide to Adding Audio in Wondershare Filmora
- In 2024, How to Export Video From iMovie
- Updated Shoot Video with Virtual Green Screen for 2024
- New In 2024, Brighten a Video in Windows 10 Easily When Video Clips You Recorded on Your Windows 10 Computer or Those Downloaded From YouTube Are Too Dark or Too Bright, You Can Easily Adjust the Color Levels in a Few Clicks
- Updated Weve Picked up the Best Online as Well as Offline MOV to GIF Converters . These Converters Are Easy to Use and Have No Limitations on Size. Get Your One for 2024
- Updated 2024 Approved Easy Ways to Change Aspect Ratio in iMovie?
- New DVD Slideshow Builder Review and Tutorial
- Updated 2024 Approved The Most Complete Guide to Make Fortnite Montage
- New In 2024, Do You Want to Use the Best LUTs for Your Media Content but Need Help Finding Them? Here Is the Overview of the Best Free LUTs for You to Use
- New The Complete Guide to Converting GIF to SVG With Ease
- 2024 Approved How to Got Free After Effects Templates Slideshow with Simple Trick
- New How To Trim Video In Premiere Pro in Different Ways
- New 2024 Approved Event Videography Is Popular in Weddings, Graduation, Family Reunion and Other Great Moments. Here Im Going to Share some of the Tips to Make a Better Event Videography
- Updated In 2024, How To Add Scrolling Text Effect
- 2024 Approved Change Speed of a Video on iPhone
- New Denoise a Video in Adobe Premiere Pro – Audio and Video Noise Removal
- New 2024 Approved This Article Talks About Pixel Art Wallpapers. It Gives Examples of Different Pixel Art to Show You How to Customize Your Own Pixel Art Wallpapers, and How to Make a Pixel Art Gif on Filmora
- Make Your Presentation More Attractive with Best Google Slideshows Templates. How to Make a Google Slideshow in Simple Step, In 2024 Do You Know How to Create Google Images Slideshow?
- Troubleshoot Snapchat Camera Zoomed in Issue 4 Tips
- Updated How to Apply Video Filters
- New In 2024, Splice Video Editor Online - Get Your Videos Splice
- Updated 2024 Approved Do You Have the Habit to Create Subtitle for Your Video? You Can Always Add Open and Close Subtitles to Your Video to Make It Perfect. Follow This Article to Learn More About It
- How to Add Filter to Video in Premiere Pro for 2024
- New In 2024, Are You Looking to Make a Thumbnail for Your Fortnite Video? This Article Features a Guide Explaining Creating a Fortnite Motion Blur Thumbnail
- New 2024 Approved How to Cut Videos on Mac without Using FFmpeg?
- In 2024, Doable Ways to Make Transparent Background in Procreate
- End Screen Makers for 2024
- How Do I Restore Excel 2007 File ? | Stellar
- In 2024, How Do You Get Sun Stone Evolutions in Pokémon For Vivo T2 5G? | Dr.fone
- Unlocking iPhone 12 Pro Passcode without a Computer | Dr.fone
- Will the iPogo Get You Banned and How to Solve It On Samsung Galaxy S24 | Dr.fone
- In 2024, A Working Guide For Pachirisu Pokemon Go Map On Realme Narzo N55 | Dr.fone
- In 2024, Solutions to Spy on Samsung Galaxy M34 with and without jailbreak | Dr.fone
- How to Transfer Data from Oppo Reno 9A to Other Android Devices? | Dr.fone
- In 2024, Delete Gmail Account With/Without Password On Infinix GT 10 Pro
- Pokémon Go Cooldown Chart On Vivo V29 Pro | Dr.fone
- Updated Learn 3D Logo Animation and Templates for 2024
- Title: New How to Use LUTs in VN Editor – Complete Guide and Best LUTs Download for 2024
- Author: Morgan
- Created at : 2024-04-24 01:06:38
- Updated at : 2024-04-25 01:06:38
- Link: https://ai-video-editing.techidaily.com/new-how-to-use-luts-in-vn-editor-complete-guide-and-best-luts-download-for-2024/
- License: This work is licensed under CC BY-NC-SA 4.0.
