
New How to Use Rule of Thirds in Video

How to Use Rule of Thirds in Video
So you have your work flow sorted out and you’re well on your way with Filmora but you’re not quite happy with your results or something just seems off when you watch your videos back. You may be missing an important element of all visual media and that’s composition. This is where the building blocks of every frame come together to make a visually pleasing piece for the viewer and helps the eyes concentrate on the content rather than trying to figure out what they are looking at.
I’m sure you may have heard of the rule of thirds for art or photography and you may not know or understand what it is. You may even be wondering how the rule of thirds can help you with your video creation. Well, that is what I’m going to show and explain to you today.
What is the rule of thirds
At its core the rule of thirds is a guide to follow whenever you create something visual.
You break an image into thirds both horizontally and vertically, in doing this you are left with nine boxes and four gridlines, the rule states that by placing key elements in line with gridlines you will have an overall better composition.
To gain a better understanding of this here is a visual example of the gridlines and nine boxes.
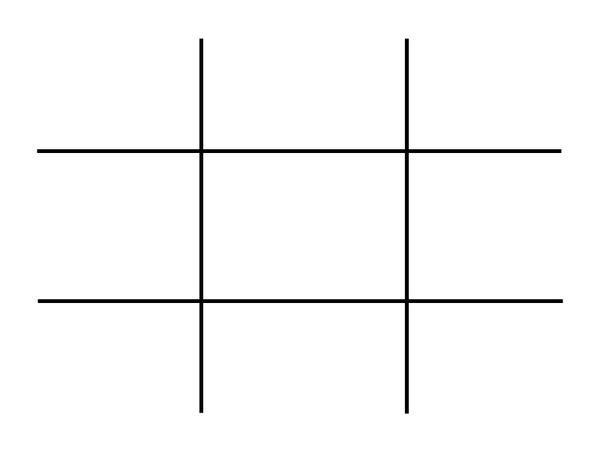
This may seem simple but is often overlooked due to time restraints and eagerness to get that video out there. By following these guidelines your overall composition will gain interesting and pleasing results that can help with viewer engagement. This is only one piece of the puzzle but as any photography professional or artist will tell you, It’s the small things that add up.
How to use the rule of thirds
To show how to use the rule of thirds I will be showing an image with and without the use of the guidelines. In doing this you will be able to see how impactful this system is and how it can help with your own creations within Filmora .
This will be our scene example, you can see buildings, boats, water and skyline. This may be typical of a backdrop or an insert for a holiday picture amongst many other things.
I will now show this picture with no compositional thought and without the use of the thirds system.

Notice how all the elements are in the scene but it just looks interesting and something just seems off when you look at it. You may find yourself searching for understanding of the image rather than taking the image in and concentrating on what the creator intended. This is seen commonly due to the need to fit every element in the scene but sometimes it is best to sacrifice something you may see as important for the sake of the whole picture.
We will now look at the example image with the rule of thirds in place and see if overall this makes a more interesting scene.

We have aligned the skyline with the first horizontal grid line and aligned the boats with the vertical grid lines. We have sacrificed the crane in the scene but overall I’m sure you can agree that this is more pleasing and makes more sense when you’re viewing this. The whole middle section of the scene now has information within it and the contrast between the middle and the rest of the scene directs your eyes to what was intended to be viewed, This is called effect use of empty space. In doing this you save yourself time from adding more information to direct the viewer.
Placing key elements directly in the center of your scene can seem static and boring but by placing elements to one side or using the first and second horizontal grid lines you create something called Dynamism , where the viewer sees an element along the grid and takes a journey through the rest of the image.
Studies have shown that this is the humans natural way of viewing imagery, we first find something interesting to look at and then journey around that. So by using this rule you are creating a more natural process for your viewer.
Tips when starting using the rule of thirds
The first tip I would say is to view other videos, YouTube is a good starting point. Watch interviews and notice where the chairs are aligned. Watch reviewers and notice where they position themselves in the scene. Lastly watch movies and pause on an interesting scene and try to deconstruct where everything is placed and why they chose that composition.
The idea with the rule is to have it become something you do naturally, by always considering the form you save yourself time in the editing process. The key things you have in your mind whenever you make a scene should be.
1. What is the key element in my scene or what am I trying to make the viewer focus on.
2. where do I intend to place these in my scene?
3. Have I created a balanced scene with enough negative space to direct the eye.
If you consider this with every video you make then in time this will become as natural as drinking water on a hot day. As a practice you could open some old projects and apply this rule to your video to see the results and you may find yourself impressed with the change.
When is it best to not use the rule of thirds?
The rule is very useful when you’re aiming to grab the attention towards a certain element but that being said, when you have a symmetrical scene you can get away with not using the rule as your eyes can make sense of symmetry very well.
Even when working with a symmetrical scene you can incorporate the rule within for elements such as people or key figures but in this situation it is down to the creator to figure what they feel is best in any given shot.
How to Use Rule of Thirds in Filmora
The tools provided within Filmora are generous and one great feature is the crop and size tool.
When inserting an image or movie file you can right click on the timeline and select crop and size bringing up a handy screen with the gridlines already there for you. It’s just a matter of aligning your shot for the best composition.
For reference I will show you what this looks like.
First right click the timeline on the image you want to reposition. Alternatively you can select the desired insert and press Alt+C this will also bring up the same editing box.
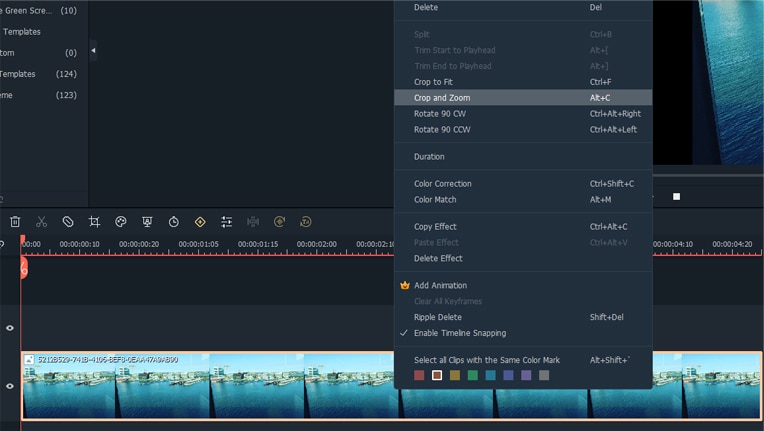
Now click on the crop and zoom option and this editor will appear.
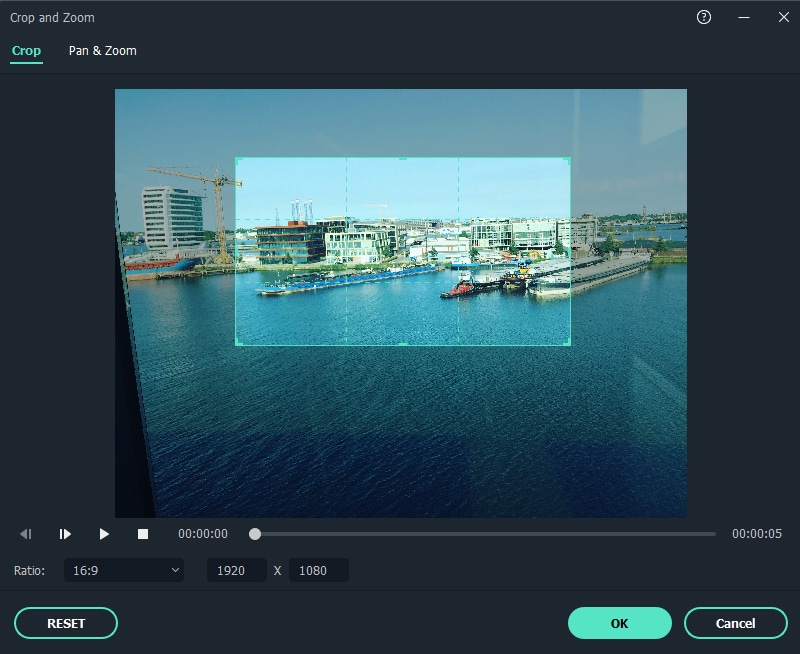
As you can see you are able to align the shot and change the aspect ratio to align with your project. For a better look at the built in grid lines see image below.

Conclusion
To conclude, the rule of thirds is very important within visual media and is tough within the fundamentals of art and photography from beginner level right up to the highest point of education, Practice thinking about your placement of key elements within your videos and how this affects your overall composition. The goal is to have this as an automatic thought when shooting your videos or still images. This is a small change you can make but has a big impact on how a viewer engages your content and in return leaves a positive opinion towards your creativity and eye for detail.
Free Download For Win 7 or later(64-bit)
Free Download For macOS 10.14 or later
Free Download For macOS 10.14 or later
List of Supported iPhone Video Formats and Best iPhone Video Editor
We all know that iPhone is different from other devices. You must have noticed that there are different apps for iOS and Android. Like this, iPhone supports different files and different formats. For an iPhone user, it’s essential to have complete knowledge about the supporting devices, formats, apps, etc.
If you are struggling to play specific files on your iPhone, it’s because of the format incompatibility. Read the article below and learn about iPhone video formats. We will also introduce video editors and video converters for iPhone video file format.
In this article
01 What Video Formats Are Supported by iPhone? [Playback & Recording]
02 3 Best Video Editor for iPhone
03 3 Best Video Converters for iPhone
Part 1. What Video Formats Are Supported by iPhone? [Playback & Recording]
As we mentioned above, you should have complete knowledge regarding the file formats and the device you are using. For this scenario, it’s iPhone. Do you know how many codecs iPhone supports? Well, it supports most of the video codecs, including; , , MPEG-4, M-JPEG, etc.
Does this mean that there are no unsupported codecs? You are wrong if you think like this because iPhone does not support VP9 and AVI codecs. Thus, this causes problems like iPhone users can’t play 4K videos on YouTube. This is because Google encoded a 4K video with the VP9 codec. Let’s guide you more about iPhone Playback and Recording.
Supported Formats – Playback
- M4V, MP4, MOV file formats are encoded with: / video, up to 4K/60 fps, High Profile level 4.2 with audio up to 160 Kbps, 48kHz, stereo audio.
- M4V, MP4, MOV file formats are encoded with: MPEG-4 video up to 2.5 Mbps, 480p/30 fps, Simple Profile with audio up to 160 Kbps, 48kHz, stereo audio;
- AVI file formats are encoded with: Motion JPEG (M-JPEG) up to 35 Mbps, 1280 by 720 pixels, 30 frames per second, audio in ulaw, PCM stereo audio.
Supported Formats – Recording
- Different files are saved at different Frames per second, for instance, 720p HD at 30 fps, 1080p HD at 30 fps, and 1080p HD at 60 fps.
- If we talk about 4K resolution, then 4K at 24 fps, 4K at 30 fps, and 4K at 60 fps.
- Select the ‘High Efficiency’ option if you want smart storage with reduced file size.
Part 2. 3 Best Video Editor for iPhone
The world has changed, and not everyone wants to edit videos on a laptop or desktop. This is the reason why the demand for iPhone video editors has increased. In this section, we are suggesting to you the best iPhone video editors.
1. Filmora – Video Editor and Maker
Average Rating: 4.6/5
Filmora is a video editor with advanced features. You can be creative with editing while using this easy-to-use application because it has a simple and attractive interface. Filmora is a powerful iPhone video file format editor. It is easy to save the edited video on the device and share it to social media platforms like YouTube, Instagram, and Facebook.
Filmora helps you adjust playback speed as per demands for fast or slow motion. It makes you capable of cutting and splitting videos along with being able to duplicate or merge videos. Filmora makes you capable of adding video effects that are available in the application for use. It also gives you access to sounds. You can either use the available sounds or add of your choice or even record your voice.

3. VN Video Editor
Average Rating: 4.7/5
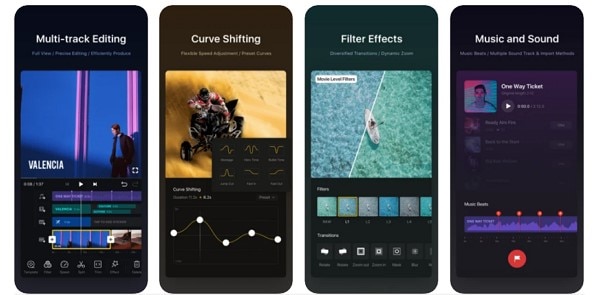
VN Video Editor is an easy-to-use iOS format editor that is also used by professionals. It is the best for accurate editing. You can zoom in and can cut frames as small as 0.05 seconds. VN Video Editor made it easy for the consumer to sort out the videos that are to be used and delete the unrequired content. VN Video Editor automatically saves the editing during the edit, so if you leave the editing session, you can continue from where you left.
VN Video Editor allows you to add text and emojis when editing the video. It also gives them access to the users to import music. It supports adding multiple music and sounds. VN Video Editor has more than 9 built-in transition options that enhance the creativity of the creator.
Part 3. 3 Best Video Converters for iPhone
Editing the content is important, but knowing editor tools and formats are also essential. If the file format is not supported by iPhone, you will need a video converter. We are about to discuss 3 Apple video format converters.
1. Video Converter and Compressor
Average Rating: 4.7/5
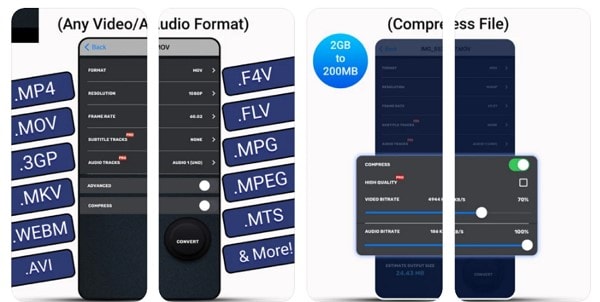
Video Converter and Compressor is an application developed by Inverse. AI. It is a video converter and editor that support M4V, WAV, FLAC, M4A, AC3, MPG, and MTS format. It is considered the fastest audio video converter and compressor when working with MP4, FLV, MP3, MOV, AVI, MKV, and 3GP. It gives an option to keep the original subtitles; you can discard them if you don’t want them.
You can choose the video resolution from 240p up to 4K resolution as per your demands. You can also flip your videos horizontally or vertically as per your needs.
2. iConv - Video & PDF Converter
Average Rating: Not Rated
Have you used any converter that can do all the work on one platform? iConv Converter is the answer. It supports a variety of conversions, including iPhone video format conversion. This converter can convert batches of videos and audios into supported Apple video format. It also supports compression and decompression of files.
The iConv is an easy-to-use application. It has an attractive and streamlined interface that shows all that can be done using the converter. It allows you to trim audio and video according to your needs with customized settings. iConv allows you to do drag and drop files in split-screen tasks.

3. The Video Converter
Average Rating: 4.3/5
Is there any converter that can change your video to any other audio or video format? The Video Converter might help you out. It is capable of converting your video into almost any audio or iPhone video format, including WebM, FLAC, GIF, MOV, WMV, AVI, 3G2, and FLV formats. It is also capable of converting into M4A, MP4, MKV, WAV, MP3, and MPG.
You can use The Video Converter to save and share the converted files to other applications or any other social media platform that you like. You can even AirDrop the files to Mac or any other Apple device. The conversions are done on a cloud server that makes it fast and easier, and battery friendly. Using this application, it takes 15 seconds to convert the file.

Bottom Line
This article is a package of knowledge for all iPhone users. We hope that after reading this article, you have a better understanding of different iPhone video file formats. Apart from this, we also talked about the 3 best video editors and video converters.
Wondershare Filmora
Get started easily with Filmora’s powerful performance, intuitive interface, and countless effects

02 3 Best Video Editor for iPhone
03 3 Best Video Converters for iPhone
Part 1. What Video Formats Are Supported by iPhone? [Playback & Recording]
As we mentioned above, you should have complete knowledge regarding the file formats and the device you are using. For this scenario, it’s iPhone. Do you know how many codecs iPhone supports? Well, it supports most of the video codecs, including; , , MPEG-4, M-JPEG, etc.
Does this mean that there are no unsupported codecs? You are wrong if you think like this because iPhone does not support VP9 and AVI codecs. Thus, this causes problems like iPhone users can’t play 4K videos on YouTube. This is because Google encoded a 4K video with the VP9 codec. Let’s guide you more about iPhone Playback and Recording.
Supported Formats – Playback
- M4V, MP4, MOV file formats are encoded with: / video, up to 4K/60 fps, High Profile level 4.2 with audio up to 160 Kbps, 48kHz, stereo audio.
- M4V, MP4, MOV file formats are encoded with: MPEG-4 video up to 2.5 Mbps, 480p/30 fps, Simple Profile with audio up to 160 Kbps, 48kHz, stereo audio;
- AVI file formats are encoded with: Motion JPEG (M-JPEG) up to 35 Mbps, 1280 by 720 pixels, 30 frames per second, audio in ulaw, PCM stereo audio.
Supported Formats – Recording
- Different files are saved at different Frames per second, for instance, 720p HD at 30 fps, 1080p HD at 30 fps, and 1080p HD at 60 fps.
- If we talk about 4K resolution, then 4K at 24 fps, 4K at 30 fps, and 4K at 60 fps.
- Select the ‘High Efficiency’ option if you want smart storage with reduced file size.
Part 2. 3 Best Video Editor for iPhone
The world has changed, and not everyone wants to edit videos on a laptop or desktop. This is the reason why the demand for iPhone video editors has increased. In this section, we are suggesting to you the best iPhone video editors.
1. Filmora – Video Editor and Maker
Average Rating: 4.6/5
Filmora is a video editor with advanced features. You can be creative with editing while using this easy-to-use application because it has a simple and attractive interface. Filmora is a powerful iPhone video file format editor. It is easy to save the edited video on the device and share it to social media platforms like YouTube, Instagram, and Facebook.
Filmora helps you adjust playback speed as per demands for fast or slow motion. It makes you capable of cutting and splitting videos along with being able to duplicate or merge videos. Filmora makes you capable of adding video effects that are available in the application for use. It also gives you access to sounds. You can either use the available sounds or add of your choice or even record your voice.

3. VN Video Editor
Average Rating: 4.7/5
VN Video Editor is an easy-to-use iOS format editor that is also used by professionals. It is the best for accurate editing. You can zoom in and can cut frames as small as 0.05 seconds. VN Video Editor made it easy for the consumer to sort out the videos that are to be used and delete the unrequired content. VN Video Editor automatically saves the editing during the edit, so if you leave the editing session, you can continue from where you left.
VN Video Editor allows you to add text and emojis when editing the video. It also gives them access to the users to import music. It supports adding multiple music and sounds. VN Video Editor has more than 9 built-in transition options that enhance the creativity of the creator.

Part 3. 3 Best Video Converters for iPhone
Editing the content is important, but knowing editor tools and formats are also essential. If the file format is not supported by iPhone, you will need a video converter. We are about to discuss 3 Apple video format converters.
1. Video Converter and Compressor
Average Rating: 4.7/5
Video Converter and Compressor is an application developed by Inverse. AI. It is a video converter and editor that support M4V, WAV, FLAC, M4A, AC3, MPG, and MTS format. It is considered the fastest audio video converter and compressor when working with MP4, FLV, MP3, MOV, AVI, MKV, and 3GP. It gives an option to keep the original subtitles; you can discard them if you don’t want them.
You can choose the video resolution from 240p up to 4K resolution as per your demands. You can also flip your videos horizontally or vertically as per your needs.

2. iConv - Video & PDF Converter
Average Rating: Not Rated
Have you used any converter that can do all the work on one platform? iConv Converter is the answer. It supports a variety of conversions, including iPhone video format conversion. This converter can convert batches of videos and audios into supported Apple video format. It also supports compression and decompression of files.
The iConv is an easy-to-use application. It has an attractive and streamlined interface that shows all that can be done using the converter. It allows you to trim audio and video according to your needs with customized settings. iConv allows you to do drag and drop files in split-screen tasks.

3. The Video Converter
Average Rating: 4.3/5
Is there any converter that can change your video to any other audio or video format? The Video Converter might help you out. It is capable of converting your video into almost any audio or iPhone video format, including WebM, FLAC, GIF, MOV, WMV, AVI, 3G2, and FLV formats. It is also capable of converting into M4A, MP4, MKV, WAV, MP3, and MPG.
You can use The Video Converter to save and share the converted files to other applications or any other social media platform that you like. You can even AirDrop the files to Mac or any other Apple device. The conversions are done on a cloud server that makes it fast and easier, and battery friendly. Using this application, it takes 15 seconds to convert the file.

Bottom Line
This article is a package of knowledge for all iPhone users. We hope that after reading this article, you have a better understanding of different iPhone video file formats. Apart from this, we also talked about the 3 best video editors and video converters.
Wondershare Filmora
Get started easily with Filmora’s powerful performance, intuitive interface, and countless effects

02 3 Best Video Editor for iPhone
03 3 Best Video Converters for iPhone
Part 1. What Video Formats Are Supported by iPhone? [Playback & Recording]
As we mentioned above, you should have complete knowledge regarding the file formats and the device you are using. For this scenario, it’s iPhone. Do you know how many codecs iPhone supports? Well, it supports most of the video codecs, including; , , MPEG-4, M-JPEG, etc.
Does this mean that there are no unsupported codecs? You are wrong if you think like this because iPhone does not support VP9 and AVI codecs. Thus, this causes problems like iPhone users can’t play 4K videos on YouTube. This is because Google encoded a 4K video with the VP9 codec. Let’s guide you more about iPhone Playback and Recording.
Supported Formats – Playback
- M4V, MP4, MOV file formats are encoded with: / video, up to 4K/60 fps, High Profile level 4.2 with audio up to 160 Kbps, 48kHz, stereo audio.
- M4V, MP4, MOV file formats are encoded with: MPEG-4 video up to 2.5 Mbps, 480p/30 fps, Simple Profile with audio up to 160 Kbps, 48kHz, stereo audio;
- AVI file formats are encoded with: Motion JPEG (M-JPEG) up to 35 Mbps, 1280 by 720 pixels, 30 frames per second, audio in ulaw, PCM stereo audio.
Supported Formats – Recording
- Different files are saved at different Frames per second, for instance, 720p HD at 30 fps, 1080p HD at 30 fps, and 1080p HD at 60 fps.
- If we talk about 4K resolution, then 4K at 24 fps, 4K at 30 fps, and 4K at 60 fps.
- Select the ‘High Efficiency’ option if you want smart storage with reduced file size.
Part 2. 3 Best Video Editor for iPhone
The world has changed, and not everyone wants to edit videos on a laptop or desktop. This is the reason why the demand for iPhone video editors has increased. In this section, we are suggesting to you the best iPhone video editors.
1. Filmora – Video Editor and Maker
Average Rating: 4.6/5
Filmora is a video editor with advanced features. You can be creative with editing while using this easy-to-use application because it has a simple and attractive interface. Filmora is a powerful iPhone video file format editor. It is easy to save the edited video on the device and share it to social media platforms like YouTube, Instagram, and Facebook.
Filmora helps you adjust playback speed as per demands for fast or slow motion. It makes you capable of cutting and splitting videos along with being able to duplicate or merge videos. Filmora makes you capable of adding video effects that are available in the application for use. It also gives you access to sounds. You can either use the available sounds or add of your choice or even record your voice.

3. VN Video Editor
Average Rating: 4.7/5
VN Video Editor is an easy-to-use iOS format editor that is also used by professionals. It is the best for accurate editing. You can zoom in and can cut frames as small as 0.05 seconds. VN Video Editor made it easy for the consumer to sort out the videos that are to be used and delete the unrequired content. VN Video Editor automatically saves the editing during the edit, so if you leave the editing session, you can continue from where you left.
VN Video Editor allows you to add text and emojis when editing the video. It also gives them access to the users to import music. It supports adding multiple music and sounds. VN Video Editor has more than 9 built-in transition options that enhance the creativity of the creator.

Part 3. 3 Best Video Converters for iPhone
Editing the content is important, but knowing editor tools and formats are also essential. If the file format is not supported by iPhone, you will need a video converter. We are about to discuss 3 Apple video format converters.
1. Video Converter and Compressor
Average Rating: 4.7/5
Video Converter and Compressor is an application developed by Inverse. AI. It is a video converter and editor that support M4V, WAV, FLAC, M4A, AC3, MPG, and MTS format. It is considered the fastest audio video converter and compressor when working with MP4, FLV, MP3, MOV, AVI, MKV, and 3GP. It gives an option to keep the original subtitles; you can discard them if you don’t want them.
You can choose the video resolution from 240p up to 4K resolution as per your demands. You can also flip your videos horizontally or vertically as per your needs.

2. iConv - Video & PDF Converter
Average Rating: Not Rated
Have you used any converter that can do all the work on one platform? iConv Converter is the answer. It supports a variety of conversions, including iPhone video format conversion. This converter can convert batches of videos and audios into supported Apple video format. It also supports compression and decompression of files.
The iConv is an easy-to-use application. It has an attractive and streamlined interface that shows all that can be done using the converter. It allows you to trim audio and video according to your needs with customized settings. iConv allows you to do drag and drop files in split-screen tasks.

3. The Video Converter
Average Rating: 4.3/5
Is there any converter that can change your video to any other audio or video format? The Video Converter might help you out. It is capable of converting your video into almost any audio or iPhone video format, including WebM, FLAC, GIF, MOV, WMV, AVI, 3G2, and FLV formats. It is also capable of converting into M4A, MP4, MKV, WAV, MP3, and MPG.
You can use The Video Converter to save and share the converted files to other applications or any other social media platform that you like. You can even AirDrop the files to Mac or any other Apple device. The conversions are done on a cloud server that makes it fast and easier, and battery friendly. Using this application, it takes 15 seconds to convert the file.

Bottom Line
This article is a package of knowledge for all iPhone users. We hope that after reading this article, you have a better understanding of different iPhone video file formats. Apart from this, we also talked about the 3 best video editors and video converters.
Wondershare Filmora
Get started easily with Filmora’s powerful performance, intuitive interface, and countless effects

02 3 Best Video Editor for iPhone
03 3 Best Video Converters for iPhone
Part 1. What Video Formats Are Supported by iPhone? [Playback & Recording]
As we mentioned above, you should have complete knowledge regarding the file formats and the device you are using. For this scenario, it’s iPhone. Do you know how many codecs iPhone supports? Well, it supports most of the video codecs, including; , , MPEG-4, M-JPEG, etc.
Does this mean that there are no unsupported codecs? You are wrong if you think like this because iPhone does not support VP9 and AVI codecs. Thus, this causes problems like iPhone users can’t play 4K videos on YouTube. This is because Google encoded a 4K video with the VP9 codec. Let’s guide you more about iPhone Playback and Recording.
Supported Formats – Playback
- M4V, MP4, MOV file formats are encoded with: / video, up to 4K/60 fps, High Profile level 4.2 with audio up to 160 Kbps, 48kHz, stereo audio.
- M4V, MP4, MOV file formats are encoded with: MPEG-4 video up to 2.5 Mbps, 480p/30 fps, Simple Profile with audio up to 160 Kbps, 48kHz, stereo audio;
- AVI file formats are encoded with: Motion JPEG (M-JPEG) up to 35 Mbps, 1280 by 720 pixels, 30 frames per second, audio in ulaw, PCM stereo audio.
Supported Formats – Recording
- Different files are saved at different Frames per second, for instance, 720p HD at 30 fps, 1080p HD at 30 fps, and 1080p HD at 60 fps.
- If we talk about 4K resolution, then 4K at 24 fps, 4K at 30 fps, and 4K at 60 fps.
- Select the ‘High Efficiency’ option if you want smart storage with reduced file size.
Part 2. 3 Best Video Editor for iPhone
The world has changed, and not everyone wants to edit videos on a laptop or desktop. This is the reason why the demand for iPhone video editors has increased. In this section, we are suggesting to you the best iPhone video editors.
1. Filmora – Video Editor and Maker
Average Rating: 4.6/5
Filmora is a video editor with advanced features. You can be creative with editing while using this easy-to-use application because it has a simple and attractive interface. Filmora is a powerful iPhone video file format editor. It is easy to save the edited video on the device and share it to social media platforms like YouTube, Instagram, and Facebook.
Filmora helps you adjust playback speed as per demands for fast or slow motion. It makes you capable of cutting and splitting videos along with being able to duplicate or merge videos. Filmora makes you capable of adding video effects that are available in the application for use. It also gives you access to sounds. You can either use the available sounds or add of your choice or even record your voice.

3. VN Video Editor
Average Rating: 4.7/5
VN Video Editor is an easy-to-use iOS format editor that is also used by professionals. It is the best for accurate editing. You can zoom in and can cut frames as small as 0.05 seconds. VN Video Editor made it easy for the consumer to sort out the videos that are to be used and delete the unrequired content. VN Video Editor automatically saves the editing during the edit, so if you leave the editing session, you can continue from where you left.
VN Video Editor allows you to add text and emojis when editing the video. It also gives them access to the users to import music. It supports adding multiple music and sounds. VN Video Editor has more than 9 built-in transition options that enhance the creativity of the creator.

Part 3. 3 Best Video Converters for iPhone
Editing the content is important, but knowing editor tools and formats are also essential. If the file format is not supported by iPhone, you will need a video converter. We are about to discuss 3 Apple video format converters.
1. Video Converter and Compressor
Average Rating: 4.7/5
Video Converter and Compressor is an application developed by Inverse. AI. It is a video converter and editor that support M4V, WAV, FLAC, M4A, AC3, MPG, and MTS format. It is considered the fastest audio video converter and compressor when working with MP4, FLV, MP3, MOV, AVI, MKV, and 3GP. It gives an option to keep the original subtitles; you can discard them if you don’t want them.
You can choose the video resolution from 240p up to 4K resolution as per your demands. You can also flip your videos horizontally or vertically as per your needs.

2. iConv - Video & PDF Converter
Average Rating: Not Rated
Have you used any converter that can do all the work on one platform? iConv Converter is the answer. It supports a variety of conversions, including iPhone video format conversion. This converter can convert batches of videos and audios into supported Apple video format. It also supports compression and decompression of files.
The iConv is an easy-to-use application. It has an attractive and streamlined interface that shows all that can be done using the converter. It allows you to trim audio and video according to your needs with customized settings. iConv allows you to do drag and drop files in split-screen tasks.

3. The Video Converter
Average Rating: 4.3/5
Is there any converter that can change your video to any other audio or video format? The Video Converter might help you out. It is capable of converting your video into almost any audio or iPhone video format, including WebM, FLAC, GIF, MOV, WMV, AVI, 3G2, and FLV formats. It is also capable of converting into M4A, MP4, MKV, WAV, MP3, and MPG.
You can use The Video Converter to save and share the converted files to other applications or any other social media platform that you like. You can even AirDrop the files to Mac or any other Apple device. The conversions are done on a cloud server that makes it fast and easier, and battery friendly. Using this application, it takes 15 seconds to convert the file.

Bottom Line
This article is a package of knowledge for all iPhone users. We hope that after reading this article, you have a better understanding of different iPhone video file formats. Apart from this, we also talked about the 3 best video editors and video converters.
Wondershare Filmora
Get started easily with Filmora’s powerful performance, intuitive interface, and countless effects

How to Create Glowing Edge Effect in TikTok Dancing Video
Preparation
What you need to prepare:
- A computer (Windows or macOS)
- Your video materials.
- Filmora video editor
Step 1
Download Filmora and run the program. Once it starts, click on “New Project”.
Step 2
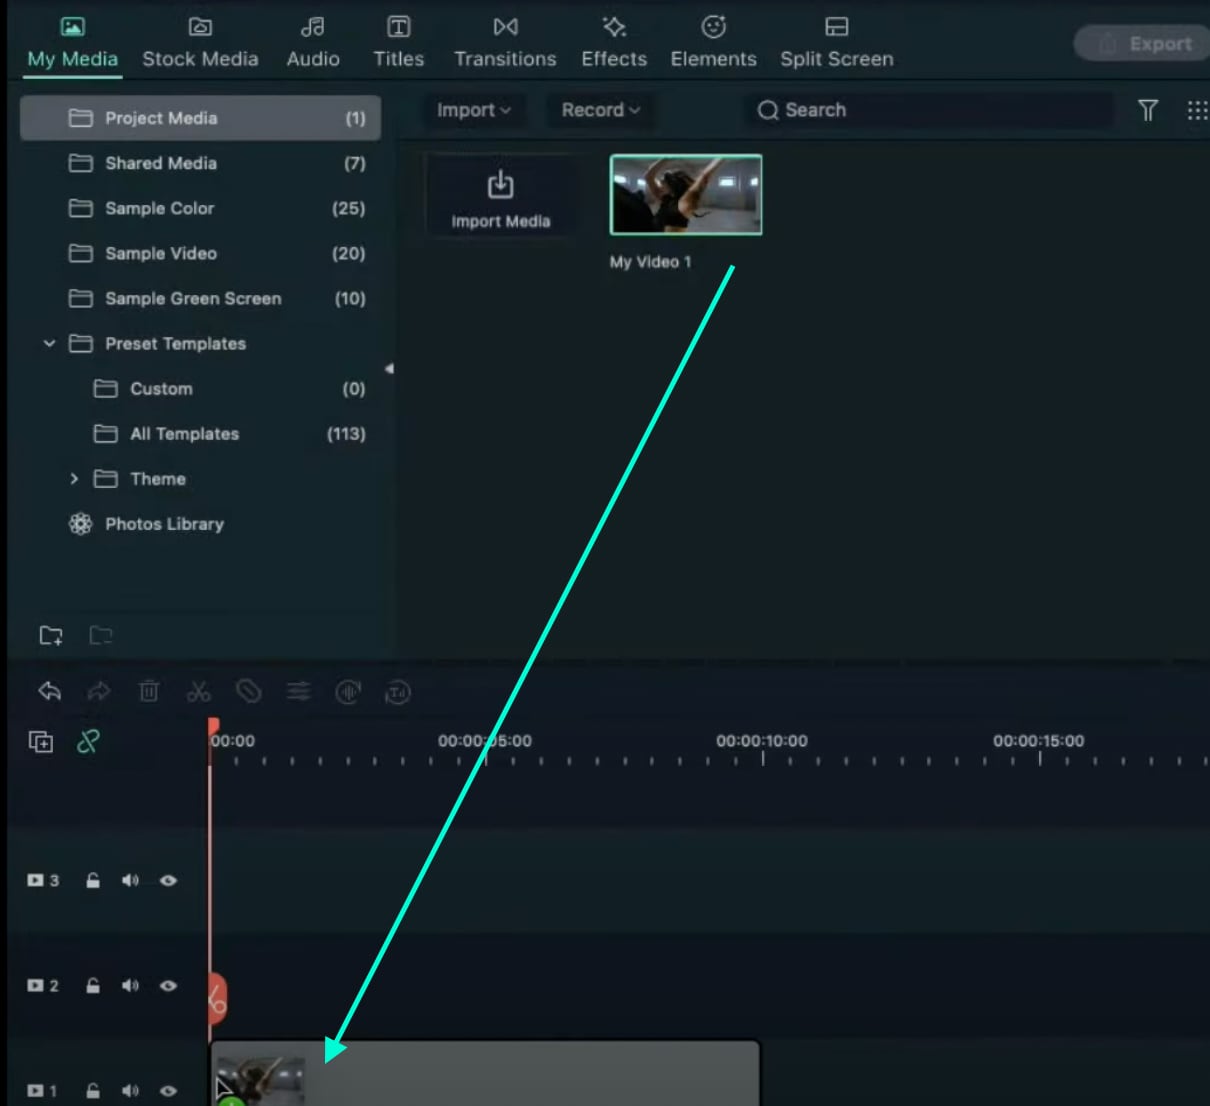
Go to My Media and Import any video you want to add a glowing edge effect to. Then, drag the video to Track 1 on the Timeline.
Step 3
Copy the Clip from Track 1 and paste it on Track 2.
Step 4
Go to the Effects tab and apply the “Pixelated Edges” effect to the clip on Track 1. Then, hide Track 2 by clicking the “eye” button.

Step 5
Double-click on the Clip in Track 1. Go to Video → Effects. Here, change the color to anything you want. This will determine what color your glowing edge effect will be. When you’re done choosing a color, click OK.

Step 6
Next, Unhide the Track 2. Double-click on the clip in Track 2 and go to Video → Basic. Scroll down and change the Blending Mode to “Difference”. Click OK and Export the clip at a higher rate. Click on the blue Export button at the top center.

Step 7
Delete the clip on Track 1. Then, move the clip from Track 2 to Track 1. Now, Import the clip that you just Exported and drag it to Track 2.

Step 8
Go to Effects and find the Blur effect. Drag the Blur effect to the clip on Track 2.

Step 9
Double-click on the clip in Track 2. Go to Video → Effects. Change the Zoom Rate to 1. Click OK. Now, find the Glow effect in the Effects tab and apply it two times to the clip on Track 2. Copy the Track 2 clip and paste it on Track 3.
Step 10
Search for the Wash effect in the Effects tab and apply it twice to the Track 2 clip again. Just drag it two times on top of the clip.
Step 11
Double-click on the clip in Track 2 and change its Blending Mode to “Screen”. Do the same thing for the clip in Track 3.
Step 12
You’re done. The glow effect will now be applied to your video. You have successfully created a glowing edge effect in any dancing video you want. Congratulations!

Summary
What you’ve learned:
- How to add a glowing edge effect on any video you want
- How to add other effects to clips in Filmora
- Edit the settings and features of these effects and make them more unique
What you need to prepare:
- A computer (Windows or macOS)
- Your video materials.
- Filmora video editor
Step 1
Download Filmora and run the program. Once it starts, click on “New Project”.
Step 2
Go to My Media and Import any video you want to add a glowing edge effect to. Then, drag the video to Track 1 on the Timeline.

Step 3
Copy the Clip from Track 1 and paste it on Track 2.
Step 4
Go to the Effects tab and apply the “Pixelated Edges” effect to the clip on Track 1. Then, hide Track 2 by clicking the “eye” button.

Step 5
Double-click on the Clip in Track 1. Go to Video → Effects. Here, change the color to anything you want. This will determine what color your glowing edge effect will be. When you’re done choosing a color, click OK.

Step 6
Next, Unhide the Track 2. Double-click on the clip in Track 2 and go to Video → Basic. Scroll down and change the Blending Mode to “Difference”. Click OK and Export the clip at a higher rate. Click on the blue Export button at the top center.

Step 7
Delete the clip on Track 1. Then, move the clip from Track 2 to Track 1. Now, Import the clip that you just Exported and drag it to Track 2.

Step 8
Go to Effects and find the Blur effect. Drag the Blur effect to the clip on Track 2.

Step 9
Double-click on the clip in Track 2. Go to Video → Effects. Change the Zoom Rate to 1. Click OK. Now, find the Glow effect in the Effects tab and apply it two times to the clip on Track 2. Copy the Track 2 clip and paste it on Track 3.
Step 10
Search for the Wash effect in the Effects tab and apply it twice to the Track 2 clip again. Just drag it two times on top of the clip.
Step 11
Double-click on the clip in Track 2 and change its Blending Mode to “Screen”. Do the same thing for the clip in Track 3.
Step 12
You’re done. The glow effect will now be applied to your video. You have successfully created a glowing edge effect in any dancing video you want. Congratulations!

Summary
What you’ve learned:
- How to add a glowing edge effect on any video you want
- How to add other effects to clips in Filmora
- Edit the settings and features of these effects and make them more unique
What you need to prepare:
- A computer (Windows or macOS)
- Your video materials.
- Filmora video editor
Step 1
Download Filmora and run the program. Once it starts, click on “New Project”.
Step 2
Go to My Media and Import any video you want to add a glowing edge effect to. Then, drag the video to Track 1 on the Timeline.

Step 3
Copy the Clip from Track 1 and paste it on Track 2.
Step 4
Go to the Effects tab and apply the “Pixelated Edges” effect to the clip on Track 1. Then, hide Track 2 by clicking the “eye” button.

Step 5
Double-click on the Clip in Track 1. Go to Video → Effects. Here, change the color to anything you want. This will determine what color your glowing edge effect will be. When you’re done choosing a color, click OK.

Step 6
Next, Unhide the Track 2. Double-click on the clip in Track 2 and go to Video → Basic. Scroll down and change the Blending Mode to “Difference”. Click OK and Export the clip at a higher rate. Click on the blue Export button at the top center.

Step 7
Delete the clip on Track 1. Then, move the clip from Track 2 to Track 1. Now, Import the clip that you just Exported and drag it to Track 2.

Step 8
Go to Effects and find the Blur effect. Drag the Blur effect to the clip on Track 2.

Step 9
Double-click on the clip in Track 2. Go to Video → Effects. Change the Zoom Rate to 1. Click OK. Now, find the Glow effect in the Effects tab and apply it two times to the clip on Track 2. Copy the Track 2 clip and paste it on Track 3.
Step 10
Search for the Wash effect in the Effects tab and apply it twice to the Track 2 clip again. Just drag it two times on top of the clip.
Step 11
Double-click on the clip in Track 2 and change its Blending Mode to “Screen”. Do the same thing for the clip in Track 3.
Step 12
You’re done. The glow effect will now be applied to your video. You have successfully created a glowing edge effect in any dancing video you want. Congratulations!

Summary
What you’ve learned:
- How to add a glowing edge effect on any video you want
- How to add other effects to clips in Filmora
- Edit the settings and features of these effects and make them more unique
What you need to prepare:
- A computer (Windows or macOS)
- Your video materials.
- Filmora video editor
Step 1
Download Filmora and run the program. Once it starts, click on “New Project”.
Step 2
Go to My Media and Import any video you want to add a glowing edge effect to. Then, drag the video to Track 1 on the Timeline.

Step 3
Copy the Clip from Track 1 and paste it on Track 2.
Step 4
Go to the Effects tab and apply the “Pixelated Edges” effect to the clip on Track 1. Then, hide Track 2 by clicking the “eye” button.

Step 5
Double-click on the Clip in Track 1. Go to Video → Effects. Here, change the color to anything you want. This will determine what color your glowing edge effect will be. When you’re done choosing a color, click OK.

Step 6
Next, Unhide the Track 2. Double-click on the clip in Track 2 and go to Video → Basic. Scroll down and change the Blending Mode to “Difference”. Click OK and Export the clip at a higher rate. Click on the blue Export button at the top center.

Step 7
Delete the clip on Track 1. Then, move the clip from Track 2 to Track 1. Now, Import the clip that you just Exported and drag it to Track 2.

Step 8
Go to Effects and find the Blur effect. Drag the Blur effect to the clip on Track 2.

Step 9
Double-click on the clip in Track 2. Go to Video → Effects. Change the Zoom Rate to 1. Click OK. Now, find the Glow effect in the Effects tab and apply it two times to the clip on Track 2. Copy the Track 2 clip and paste it on Track 3.
Step 10
Search for the Wash effect in the Effects tab and apply it twice to the Track 2 clip again. Just drag it two times on top of the clip.
Step 11
Double-click on the clip in Track 2 and change its Blending Mode to “Screen”. Do the same thing for the clip in Track 3.
Step 12
You’re done. The glow effect will now be applied to your video. You have successfully created a glowing edge effect in any dancing video you want. Congratulations!

Summary
What you’ve learned:
- How to add a glowing edge effect on any video you want
- How to add other effects to clips in Filmora
- Edit the settings and features of these effects and make them more unique
Tactics to Make Transparent Image in Minimal Steps
Tactics to Make Transparent Image in Minimal Steps
An easy yet powerful editor
Numerous effects to choose from
Detailed tutorials provided by the official channel
We always want to have the images that give us the power to do customizations as needed. Until and unless an image with appropriate adjustments is not there, we cannot think of editing them as wanted. But how can we forget sometimes the images are already occupied that we cannot make the changes. This sometimes makes us feel annoyed too. But don’t worry about it as now different tools to make pictures transparent are available. After making the image transparent, you can add on the effects as needed.
If you are having confusion how to use these tools or anything else, then keep reading till the last. In this read, we are discussing some transparent image makers that will help you to do it seamlessly. Let’s get started!
In this article
01 [Similarities and Differences Between PNG Vs. JPG Vs. GIF](#Part 1)
02 [Minimal Steps to Make Background Transparent](#Part 2)
03 [How to Insert Transparent Image in Video](#Part 3)
Part 1 Similarities and Differences Between PNG Vs. JPG Vs. GIF
As we all know, there are so many formats in which these images are available. But sometimes it happens we are not aware of the similarities and differences corresponding to them. This confusion sometimes let us chooses the wrong format. But not anymore, and in this section, we are discussing the similarities and differences between PNG Vs. JPG Vs. GIF.
● PNG
PNG is a lossless compression format which means that it can be compressed without losing any data. It also supports transparency. The compression ratio is usually higher than JPG and GIF.
● JPG
JPG is a lossy compression format which means that it can be compressed without losing any data, but the image quality will suffer because of the loss of information. It supports transparency but is not as good as PNG.
● GIF
GIF is a lossless or lossy compression format which means that it can be compressed without losing any data or quality respectively. It does not support transparency and has a limited color range compared to PNG or JPG.
Part 2 Minimal Steps to Make Background Transparent
In this section, we are discussing the steps that you need to follow with transparent image-makers. Here we discuss some of the best tools available so that you can feel a bit confident in utilizing them for editing. This list includes:-
● Canva
Canva is a graphic design tool that helps users creates professional-quality designs. It has easy to use templates and fonts that are free to use. Users can also customize their own templates and fonts, add images and videos, make collages, infographics, and other designs.
Steps to Make in Canva
Step 1: Get “Canva” available on your system and open it.

Step 2: Mode to “Edit Image” and “upload the image” in which you wish to make the background transparent.

Step 3: Choose the “Effect tab” and select the “background remover” option.


Step 4: If you wish to add on any other effect, do it.
Step 5: Click on the “Download icon” and save it for future use.
● Photoshop
Photoshop can be used to edit video footage and create special effects. You can cut video clips together and shape them into a movie sequence by adding transitions and overlays to visualize the actions between shots. You can also use it to add graphics or other visual elements, like animations or even text. But don’t forget this tool also gives you the option to make the backgrounds transparent.
Steps to Make in Photoshop
Step 1: Get Photoshop o your system and import the image you wish to edit.
Step 2: Press Ctrl+J in order to create duplicate layers. (This is important in order to keep an eye on the section you are doing for making the editing.)

Step 3: Move to “Windows” and click on “Properties”

Step 4: From the list of options, hit on “Remove Background”

Step 5: Click on the “Eye icon” to view the transparent image.

Step 6: Save the image for future use.
● Picsart
Picsart is a robust photo editing app which has features such as filters, stickers, and overlays. It also has the ability to create collages and videos. The app also has a feature called “edit & share” which allows the user to edit the photo right in the app, then share it with their friends on social media. Picsart doesn’t require any special knowledge or expertise in photography; so anyone can pick up the basics of using it in no time.
Steps to use Picsart
Step 1: Get the Picsart app in your device or visit the online portal.
Step 2: Upload the image you wish to edit.

Step 3: Click on “Start Editing” button and then choose either of the option from “Behind Person” or “Behind Object” as per your situation.


Step 4: The tool will automatically remove the background and make it transparent. Download the image now.

Part 3 How to Insert Transparent Image in Video
After creating outstanding video content, there is a possibility that you might be looking forward to integrating any transparent image into it. Well, in this case, it is important that you have access to the best tool. Until and unless the best software or tool is not here, you cannot think of getting the task done. Don’t worry because for catering to this need, Filmora is one of the best options to choose.
Wondershare Filmora Video Editor is all-in-one video editing software to help people edit their videos and make them look professional. The best thing about this software is that it doesn’t require any expertise or knowledge of video editing before using it. The user can create a video from scratch just by importing the photos and videos from their camera roll, which are automatically combined into a single video with transitions and music in just a few steps.
For Win 7 or later (64-bit)
For macOS 10.12 or later
Also, this software is both intuitive and easy to use. It also provides many features that you can customize depending on what outcome you want. In addition, this tool also includes tutorials and support services via phone, email or chat line, so all your questions are answered quickly and efficiently.
Furthermore, this allows you to make your videos better by inserting transparent images or graphics in them. You can achieve amazing effects and superimpose without having to spend hours editing your video. With Filmora, it’s simple to create professional-quality videos without using any other software and spending too much time on the editing process.
● Steps to use Filmora
Step 1: After browsing all these features, you might be curious to try out the features integrated into it. The steps you need to follow are:-
Step 2: Get Filmora available on your system. It is compatible with Windows and Mac both.
Step 3: Open Filmora and select “Import-Import Media Files”.

Step 4: Add the imported images. You can do this by doing the right-click and selecting the insert image option. Alternatively you can do it u drag and drop option too.

Step 5: The inserted images will appear in the timeline, and double click on them. The settings menu appear to select the “Chroma key” and enable it.

Step 6: The image will get transparent in no time. If you wish to add on any extra colour or effect to the image, choose it from the editing menu available. The “Color Picker” option is also there that will be helpful in adding the colors.
Step 7: Click on “Ok” to make the changes saved.

Step 7: After getting the expected transparent image, you can simply overlay it into the video.

● Ending Thoughts →
● Transparent images give you the chance to make the editing as required. This simply means there will be no need for you to occupy the image with unnecessary stuff because after making the image transparent only the required content will have a pace on it.
● Filmora is the best tool to insert transparent images in the video. This tool have innovative interface and let users have the best options to make the editing in the video they are creating. Along with making the background transparent, this tool has other editing features too.
● Making transparent images is just a matter of a few steps. One just needs to be sure of the right tools. If they are not having the right tool gett9ing the expected outcome will not be their thing.
We always want to have the images that give us the power to do customizations as needed. Until and unless an image with appropriate adjustments is not there, we cannot think of editing them as wanted. But how can we forget sometimes the images are already occupied that we cannot make the changes. This sometimes makes us feel annoyed too. But don’t worry about it as now different tools to make pictures transparent are available. After making the image transparent, you can add on the effects as needed.
If you are having confusion how to use these tools or anything else, then keep reading till the last. In this read, we are discussing some transparent image makers that will help you to do it seamlessly. Let’s get started!
In this article
01 [Similarities and Differences Between PNG Vs. JPG Vs. GIF](#Part 1)
02 [Minimal Steps to Make Background Transparent](#Part 2)
03 [How to Insert Transparent Image in Video](#Part 3)
Part 1 Similarities and Differences Between PNG Vs. JPG Vs. GIF
As we all know, there are so many formats in which these images are available. But sometimes it happens we are not aware of the similarities and differences corresponding to them. This confusion sometimes let us chooses the wrong format. But not anymore, and in this section, we are discussing the similarities and differences between PNG Vs. JPG Vs. GIF.
● PNG
PNG is a lossless compression format which means that it can be compressed without losing any data. It also supports transparency. The compression ratio is usually higher than JPG and GIF.
● JPG
JPG is a lossy compression format which means that it can be compressed without losing any data, but the image quality will suffer because of the loss of information. It supports transparency but is not as good as PNG.
● GIF
GIF is a lossless or lossy compression format which means that it can be compressed without losing any data or quality respectively. It does not support transparency and has a limited color range compared to PNG or JPG.
Part 2 Minimal Steps to Make Background Transparent
In this section, we are discussing the steps that you need to follow with transparent image-makers. Here we discuss some of the best tools available so that you can feel a bit confident in utilizing them for editing. This list includes:-
● Canva
Canva is a graphic design tool that helps users creates professional-quality designs. It has easy to use templates and fonts that are free to use. Users can also customize their own templates and fonts, add images and videos, make collages, infographics, and other designs.
Steps to Make in Canva
Step 1: Get “Canva” available on your system and open it.

Step 2: Mode to “Edit Image” and “upload the image” in which you wish to make the background transparent.

Step 3: Choose the “Effect tab” and select the “background remover” option.


Step 4: If you wish to add on any other effect, do it.
Step 5: Click on the “Download icon” and save it for future use.
● Photoshop
Photoshop can be used to edit video footage and create special effects. You can cut video clips together and shape them into a movie sequence by adding transitions and overlays to visualize the actions between shots. You can also use it to add graphics or other visual elements, like animations or even text. But don’t forget this tool also gives you the option to make the backgrounds transparent.
Steps to Make in Photoshop
Step 1: Get Photoshop o your system and import the image you wish to edit.
Step 2: Press Ctrl+J in order to create duplicate layers. (This is important in order to keep an eye on the section you are doing for making the editing.)

Step 3: Move to “Windows” and click on “Properties”

Step 4: From the list of options, hit on “Remove Background”

Step 5: Click on the “Eye icon” to view the transparent image.

Step 6: Save the image for future use.
● Picsart
Picsart is a robust photo editing app which has features such as filters, stickers, and overlays. It also has the ability to create collages and videos. The app also has a feature called “edit & share” which allows the user to edit the photo right in the app, then share it with their friends on social media. Picsart doesn’t require any special knowledge or expertise in photography; so anyone can pick up the basics of using it in no time.
Steps to use Picsart
Step 1: Get the Picsart app in your device or visit the online portal.
Step 2: Upload the image you wish to edit.

Step 3: Click on “Start Editing” button and then choose either of the option from “Behind Person” or “Behind Object” as per your situation.


Step 4: The tool will automatically remove the background and make it transparent. Download the image now.

Part 3 How to Insert Transparent Image in Video
After creating outstanding video content, there is a possibility that you might be looking forward to integrating any transparent image into it. Well, in this case, it is important that you have access to the best tool. Until and unless the best software or tool is not here, you cannot think of getting the task done. Don’t worry because for catering to this need, Filmora is one of the best options to choose.
Wondershare Filmora Video Editor is all-in-one video editing software to help people edit their videos and make them look professional. The best thing about this software is that it doesn’t require any expertise or knowledge of video editing before using it. The user can create a video from scratch just by importing the photos and videos from their camera roll, which are automatically combined into a single video with transitions and music in just a few steps.
For Win 7 or later (64-bit)
For macOS 10.12 or later
Also, this software is both intuitive and easy to use. It also provides many features that you can customize depending on what outcome you want. In addition, this tool also includes tutorials and support services via phone, email or chat line, so all your questions are answered quickly and efficiently.
Furthermore, this allows you to make your videos better by inserting transparent images or graphics in them. You can achieve amazing effects and superimpose without having to spend hours editing your video. With Filmora, it’s simple to create professional-quality videos without using any other software and spending too much time on the editing process.
● Steps to use Filmora
Step 1: After browsing all these features, you might be curious to try out the features integrated into it. The steps you need to follow are:-
Step 2: Get Filmora available on your system. It is compatible with Windows and Mac both.
Step 3: Open Filmora and select “Import-Import Media Files”.

Step 4: Add the imported images. You can do this by doing the right-click and selecting the insert image option. Alternatively you can do it u drag and drop option too.

Step 5: The inserted images will appear in the timeline, and double click on them. The settings menu appear to select the “Chroma key” and enable it.

Step 6: The image will get transparent in no time. If you wish to add on any extra colour or effect to the image, choose it from the editing menu available. The “Color Picker” option is also there that will be helpful in adding the colors.
Step 7: Click on “Ok” to make the changes saved.

Step 7: After getting the expected transparent image, you can simply overlay it into the video.

● Ending Thoughts →
● Transparent images give you the chance to make the editing as required. This simply means there will be no need for you to occupy the image with unnecessary stuff because after making the image transparent only the required content will have a pace on it.
● Filmora is the best tool to insert transparent images in the video. This tool have innovative interface and let users have the best options to make the editing in the video they are creating. Along with making the background transparent, this tool has other editing features too.
● Making transparent images is just a matter of a few steps. One just needs to be sure of the right tools. If they are not having the right tool gett9ing the expected outcome will not be their thing.
We always want to have the images that give us the power to do customizations as needed. Until and unless an image with appropriate adjustments is not there, we cannot think of editing them as wanted. But how can we forget sometimes the images are already occupied that we cannot make the changes. This sometimes makes us feel annoyed too. But don’t worry about it as now different tools to make pictures transparent are available. After making the image transparent, you can add on the effects as needed.
If you are having confusion how to use these tools or anything else, then keep reading till the last. In this read, we are discussing some transparent image makers that will help you to do it seamlessly. Let’s get started!
In this article
01 [Similarities and Differences Between PNG Vs. JPG Vs. GIF](#Part 1)
02 [Minimal Steps to Make Background Transparent](#Part 2)
03 [How to Insert Transparent Image in Video](#Part 3)
Part 1 Similarities and Differences Between PNG Vs. JPG Vs. GIF
As we all know, there are so many formats in which these images are available. But sometimes it happens we are not aware of the similarities and differences corresponding to them. This confusion sometimes let us chooses the wrong format. But not anymore, and in this section, we are discussing the similarities and differences between PNG Vs. JPG Vs. GIF.
● PNG
PNG is a lossless compression format which means that it can be compressed without losing any data. It also supports transparency. The compression ratio is usually higher than JPG and GIF.
● JPG
JPG is a lossy compression format which means that it can be compressed without losing any data, but the image quality will suffer because of the loss of information. It supports transparency but is not as good as PNG.
● GIF
GIF is a lossless or lossy compression format which means that it can be compressed without losing any data or quality respectively. It does not support transparency and has a limited color range compared to PNG or JPG.
Part 2 Minimal Steps to Make Background Transparent
In this section, we are discussing the steps that you need to follow with transparent image-makers. Here we discuss some of the best tools available so that you can feel a bit confident in utilizing them for editing. This list includes:-
● Canva
Canva is a graphic design tool that helps users creates professional-quality designs. It has easy to use templates and fonts that are free to use. Users can also customize their own templates and fonts, add images and videos, make collages, infographics, and other designs.
Steps to Make in Canva
Step 1: Get “Canva” available on your system and open it.

Step 2: Mode to “Edit Image” and “upload the image” in which you wish to make the background transparent.

Step 3: Choose the “Effect tab” and select the “background remover” option.


Step 4: If you wish to add on any other effect, do it.
Step 5: Click on the “Download icon” and save it for future use.
● Photoshop
Photoshop can be used to edit video footage and create special effects. You can cut video clips together and shape them into a movie sequence by adding transitions and overlays to visualize the actions between shots. You can also use it to add graphics or other visual elements, like animations or even text. But don’t forget this tool also gives you the option to make the backgrounds transparent.
Steps to Make in Photoshop
Step 1: Get Photoshop o your system and import the image you wish to edit.
Step 2: Press Ctrl+J in order to create duplicate layers. (This is important in order to keep an eye on the section you are doing for making the editing.)

Step 3: Move to “Windows” and click on “Properties”

Step 4: From the list of options, hit on “Remove Background”

Step 5: Click on the “Eye icon” to view the transparent image.

Step 6: Save the image for future use.
● Picsart
Picsart is a robust photo editing app which has features such as filters, stickers, and overlays. It also has the ability to create collages and videos. The app also has a feature called “edit & share” which allows the user to edit the photo right in the app, then share it with their friends on social media. Picsart doesn’t require any special knowledge or expertise in photography; so anyone can pick up the basics of using it in no time.
Steps to use Picsart
Step 1: Get the Picsart app in your device or visit the online portal.
Step 2: Upload the image you wish to edit.

Step 3: Click on “Start Editing” button and then choose either of the option from “Behind Person” or “Behind Object” as per your situation.


Step 4: The tool will automatically remove the background and make it transparent. Download the image now.

Part 3 How to Insert Transparent Image in Video
After creating outstanding video content, there is a possibility that you might be looking forward to integrating any transparent image into it. Well, in this case, it is important that you have access to the best tool. Until and unless the best software or tool is not here, you cannot think of getting the task done. Don’t worry because for catering to this need, Filmora is one of the best options to choose.
Wondershare Filmora Video Editor is all-in-one video editing software to help people edit their videos and make them look professional. The best thing about this software is that it doesn’t require any expertise or knowledge of video editing before using it. The user can create a video from scratch just by importing the photos and videos from their camera roll, which are automatically combined into a single video with transitions and music in just a few steps.
For Win 7 or later (64-bit)
For macOS 10.12 or later
Also, this software is both intuitive and easy to use. It also provides many features that you can customize depending on what outcome you want. In addition, this tool also includes tutorials and support services via phone, email or chat line, so all your questions are answered quickly and efficiently.
Furthermore, this allows you to make your videos better by inserting transparent images or graphics in them. You can achieve amazing effects and superimpose without having to spend hours editing your video. With Filmora, it’s simple to create professional-quality videos without using any other software and spending too much time on the editing process.
● Steps to use Filmora
Step 1: After browsing all these features, you might be curious to try out the features integrated into it. The steps you need to follow are:-
Step 2: Get Filmora available on your system. It is compatible with Windows and Mac both.
Step 3: Open Filmora and select “Import-Import Media Files”.

Step 4: Add the imported images. You can do this by doing the right-click and selecting the insert image option. Alternatively you can do it u drag and drop option too.

Step 5: The inserted images will appear in the timeline, and double click on them. The settings menu appear to select the “Chroma key” and enable it.

Step 6: The image will get transparent in no time. If you wish to add on any extra colour or effect to the image, choose it from the editing menu available. The “Color Picker” option is also there that will be helpful in adding the colors.
Step 7: Click on “Ok” to make the changes saved.

Step 7: After getting the expected transparent image, you can simply overlay it into the video.

● Ending Thoughts →
● Transparent images give you the chance to make the editing as required. This simply means there will be no need for you to occupy the image with unnecessary stuff because after making the image transparent only the required content will have a pace on it.
● Filmora is the best tool to insert transparent images in the video. This tool have innovative interface and let users have the best options to make the editing in the video they are creating. Along with making the background transparent, this tool has other editing features too.
● Making transparent images is just a matter of a few steps. One just needs to be sure of the right tools. If they are not having the right tool gett9ing the expected outcome will not be their thing.
We always want to have the images that give us the power to do customizations as needed. Until and unless an image with appropriate adjustments is not there, we cannot think of editing them as wanted. But how can we forget sometimes the images are already occupied that we cannot make the changes. This sometimes makes us feel annoyed too. But don’t worry about it as now different tools to make pictures transparent are available. After making the image transparent, you can add on the effects as needed.
If you are having confusion how to use these tools or anything else, then keep reading till the last. In this read, we are discussing some transparent image makers that will help you to do it seamlessly. Let’s get started!
In this article
01 [Similarities and Differences Between PNG Vs. JPG Vs. GIF](#Part 1)
02 [Minimal Steps to Make Background Transparent](#Part 2)
03 [How to Insert Transparent Image in Video](#Part 3)
Part 1 Similarities and Differences Between PNG Vs. JPG Vs. GIF
As we all know, there are so many formats in which these images are available. But sometimes it happens we are not aware of the similarities and differences corresponding to them. This confusion sometimes let us chooses the wrong format. But not anymore, and in this section, we are discussing the similarities and differences between PNG Vs. JPG Vs. GIF.
● PNG
PNG is a lossless compression format which means that it can be compressed without losing any data. It also supports transparency. The compression ratio is usually higher than JPG and GIF.
● JPG
JPG is a lossy compression format which means that it can be compressed without losing any data, but the image quality will suffer because of the loss of information. It supports transparency but is not as good as PNG.
● GIF
GIF is a lossless or lossy compression format which means that it can be compressed without losing any data or quality respectively. It does not support transparency and has a limited color range compared to PNG or JPG.
Part 2 Minimal Steps to Make Background Transparent
In this section, we are discussing the steps that you need to follow with transparent image-makers. Here we discuss some of the best tools available so that you can feel a bit confident in utilizing them for editing. This list includes:-
● Canva
Canva is a graphic design tool that helps users creates professional-quality designs. It has easy to use templates and fonts that are free to use. Users can also customize their own templates and fonts, add images and videos, make collages, infographics, and other designs.
Steps to Make in Canva
Step 1: Get “Canva” available on your system and open it.

Step 2: Mode to “Edit Image” and “upload the image” in which you wish to make the background transparent.

Step 3: Choose the “Effect tab” and select the “background remover” option.


Step 4: If you wish to add on any other effect, do it.
Step 5: Click on the “Download icon” and save it for future use.
● Photoshop
Photoshop can be used to edit video footage and create special effects. You can cut video clips together and shape them into a movie sequence by adding transitions and overlays to visualize the actions between shots. You can also use it to add graphics or other visual elements, like animations or even text. But don’t forget this tool also gives you the option to make the backgrounds transparent.
Steps to Make in Photoshop
Step 1: Get Photoshop o your system and import the image you wish to edit.
Step 2: Press Ctrl+J in order to create duplicate layers. (This is important in order to keep an eye on the section you are doing for making the editing.)

Step 3: Move to “Windows” and click on “Properties”

Step 4: From the list of options, hit on “Remove Background”

Step 5: Click on the “Eye icon” to view the transparent image.

Step 6: Save the image for future use.
● Picsart
Picsart is a robust photo editing app which has features such as filters, stickers, and overlays. It also has the ability to create collages and videos. The app also has a feature called “edit & share” which allows the user to edit the photo right in the app, then share it with their friends on social media. Picsart doesn’t require any special knowledge or expertise in photography; so anyone can pick up the basics of using it in no time.
Steps to use Picsart
Step 1: Get the Picsart app in your device or visit the online portal.
Step 2: Upload the image you wish to edit.

Step 3: Click on “Start Editing” button and then choose either of the option from “Behind Person” or “Behind Object” as per your situation.


Step 4: The tool will automatically remove the background and make it transparent. Download the image now.

Part 3 How to Insert Transparent Image in Video
After creating outstanding video content, there is a possibility that you might be looking forward to integrating any transparent image into it. Well, in this case, it is important that you have access to the best tool. Until and unless the best software or tool is not here, you cannot think of getting the task done. Don’t worry because for catering to this need, Filmora is one of the best options to choose.
Wondershare Filmora Video Editor is all-in-one video editing software to help people edit their videos and make them look professional. The best thing about this software is that it doesn’t require any expertise or knowledge of video editing before using it. The user can create a video from scratch just by importing the photos and videos from their camera roll, which are automatically combined into a single video with transitions and music in just a few steps.
For Win 7 or later (64-bit)
For macOS 10.12 or later
Also, this software is both intuitive and easy to use. It also provides many features that you can customize depending on what outcome you want. In addition, this tool also includes tutorials and support services via phone, email or chat line, so all your questions are answered quickly and efficiently.
Furthermore, this allows you to make your videos better by inserting transparent images or graphics in them. You can achieve amazing effects and superimpose without having to spend hours editing your video. With Filmora, it’s simple to create professional-quality videos without using any other software and spending too much time on the editing process.
● Steps to use Filmora
Step 1: After browsing all these features, you might be curious to try out the features integrated into it. The steps you need to follow are:-
Step 2: Get Filmora available on your system. It is compatible with Windows and Mac both.
Step 3: Open Filmora and select “Import-Import Media Files”.

Step 4: Add the imported images. You can do this by doing the right-click and selecting the insert image option. Alternatively you can do it u drag and drop option too.

Step 5: The inserted images will appear in the timeline, and double click on them. The settings menu appear to select the “Chroma key” and enable it.

Step 6: The image will get transparent in no time. If you wish to add on any extra colour or effect to the image, choose it from the editing menu available. The “Color Picker” option is also there that will be helpful in adding the colors.
Step 7: Click on “Ok” to make the changes saved.

Step 7: After getting the expected transparent image, you can simply overlay it into the video.

● Ending Thoughts →
● Transparent images give you the chance to make the editing as required. This simply means there will be no need for you to occupy the image with unnecessary stuff because after making the image transparent only the required content will have a pace on it.
● Filmora is the best tool to insert transparent images in the video. This tool have innovative interface and let users have the best options to make the editing in the video they are creating. Along with making the background transparent, this tool has other editing features too.
● Making transparent images is just a matter of a few steps. One just needs to be sure of the right tools. If they are not having the right tool gett9ing the expected outcome will not be their thing.
Also read:
- New 2024 Approved Learn to Splice Videos Together on iPhone
- In 2024, 5 Methods to Make a Fake Facetime Call Video
- In 2024, Are You the One Who Is Confused About What to Opt Between Camtasia vs Captivate? No More Confusion! Here We Are Going to Reveal the Answer to Camtasia vs Captivate Which Is Better? Learn More
- Updated In 2024, Best Phantom Slow-Mo Camera For Recording Slow Motion Videos
- New 2024 Approved How to Use LUTs in Lumafusion & Free LUTs Resource
- Frame Rates, Speed, and Wondershare Filmora
- If You Are Looking Forward to Make Attractive and Customized Slideshows, Lightroom Is One of the Best Options that You Can Consider
- Unraveling How the Slow Motion Guys Have Revolutionized The Slow Motion Game
- How to Add Expression in After Effects
- Updated 2024 Approved Learn Color Correction in After Effects with These Videos
- New Are You Surfing for some Way to Make Your Animated Emoji Discord Using Videos, GIFs, Images, or Text? Read Through This Article as Well Guide You Through the Process
- New 2024 Approved Whatre the Best Alternatives to Pexels?
- New How to Create a Clideo Slideshow
- An Ultimate Guide to Flexclip Online Trimmer for 2024
- Updated In 2024, How To Quickly Create A Screen Print Effect In Photoshop Detailed Guide
- New CapCut Lenta Template How It Benefits Slow Motion Video for 2024
- New How to Merge Videos in HandBrake? Expectation Vs. Reality for 2024
- Updated In 2024, Looking for a Way to Learn How to Merge Videos in HandBrake? Theres a Better Solution Waiting for You Inside
- Updated 2024 Approved Create a Stunning Light Sweep Effect in Filmora. Use Simple and Easy Steps to Export a High-Quality Video that Will Impress Even Pro Video Editors
- 2024 Approved Learn How to Add Dynamic Shake Effects to Your Videos Using Alight Motion. Our Step-by-Step Guide Makes It Easy to Create Cinematic Footage
- New Best LUTs for Vlog A 2024 Overview
- New In 2024, KineMaster Templates 101 How to Get the Most Out of Video Templates
- Updated Looking Forward to Try Hands at Using the Icecream Slideshow Maker Program to Create High End Slideshow Presentations? Stay Here for a Complete Insight Into the Process for 2024
- New In 2024, How to Add Freeze Frame to Your Video From Any Device?
- Updated 2024 Approved Create Glitch Text Effect
- Updated 2024 Approved How to Create a Makeup Video
- New How to Make Animated Text Video on Computer/iPhone/Android/Online
- Updated In 2024, Best 5 PDF to GIF Converters You Should Know
- Featuring The Use of Camera Shake in Creating the Best Videos
- 4 Methods for Rotating Your GoPro Videos Professionally for 2024
- In 2024, Learn How to Make Your CSGO Montage Impressive
- Updated 11 Tools To Create Radial Blur Photo Mobile And Desktop for 2024
- New How to Export Video From iMovie for 2024
- New In 2024, Finding The Finest Way to Add Subtitles to Videos | Filmora
- To Add SRT to MP4 Is Not as Hard as You Might Think. All You Just Need Is the Right Tool to Help You Get the Job Done. Read This Article and Learn the 8 Latest Methods to Merge SRT with MP4 Effortlessly
- 3 Actionable Ways to Create Countdown Animation for Videos
- Updated 2024 Approved 3 Actionable Ways to Create Countdown Animation for Videos
- Updated How to Use Speed Ramping to Create a Footage
- In 2024, List of Supported iPhone Video Formats and Best iPhone Video Editor
- Updated 2024 Approved Do You Want to Explore some Available Opportunities to Create Slow Motion? Discover the Best Slow-Motion Video Editors for Desktop, Android, and iPhone Here
- 2024 Approved Best Online GIF to Image (PNG/JPG) Converters
- In 2024, How to Unlock Apple iPhone 13 mini with IMEI Code?
- Is GSM Flasher ADB Legit? Full Review To Bypass Your Nokia G310 Phone FRP Lock
- Here are Some Pro Tips for Pokemon Go PvP Battles On Vivo Y77t | Dr.fone
- How to Find iSpoofer Pro Activation Key On Oppo Reno 11 Pro 5G? | Dr.fone
- Process of Screen Sharing Honor Magic 6 Lite to PC- Detailed Steps | Dr.fone
- Complete guide for recovering video files on Galaxy Z Flip 5
- How to Bypass Google FRP Lock on Samsung Galaxy F34 5G Devices
- 3 Solutions to Find Your Oppo K11 5G Current Location of a Mobile Number | Dr.fone
- Your Complete Guide To Reset Realme GT 3 | Dr.fone
- All You Need To Know About Mega Greninja For Itel P40+ | Dr.fone
- How to Transfer Data from Honor 90 Lite to Other Android Devices? | Dr.fone
- How To Fix Part of the Touch Screen Not Working on Tecno Spark 10C | Dr.fone
- Pokémon Go Cooldown Chart On Vivo Y100A | Dr.fone
- 11 Best Location Changers for Oppo Find X7 | Dr.fone
- How to Turn Off Find My Apple iPhone 13 when Phone is Broken?
- Catch or Beat Sleeping Snorlax on Pokemon Go For Honor 100 | Dr.fone
- In 2024, A Comprehensive Guide to iCloud Unlock On iPhone 12 Online
- 7 Ways to Unlock a Locked Motorola Edge 2023 Phone
- In 2024, Can I use iTools gpx file to catch the rare Pokemon On Sony Xperia 10 V | Dr.fone
- Home Button Not Working on Tecno Pova 5? Here Are Real Fixes | Dr.fone
- Undelete lost photos from Oppo A2.
- How To Remove Screen Lock PIN On Vivo Y100i Like A Pro 5 Easy Ways
- Best Samsung Galaxy S23+ Pattern Lock Removal Tools Remove Android Pattern Lock Without Losing Data
- 6 Solutions to Fix Error 505 in Google Play Store on Samsung Galaxy A15 4G | Dr.fone
- Forgot iPhone Passcode Again? Unlock iPhone 8 Plus Without Passcode Now | Dr.fone
- In 2024, How To Bypass Honor 90 FRP In 3 Different Ways
- In 2024, How to Track Xiaomi Redmi 13C Location without Installing Software? | Dr.fone
- Bypassing Google Account With vnROM Bypass For Xiaomi Redmi 12
- Can Life360 Track Or See Text Messages? What Can You Do with Life360 On Vivo Y02T? | Dr.fone
- Preparation to Beat Giovani in Pokemon Go For Motorola Moto G73 5G | Dr.fone
- How to insert sign in .wps file
- 2024 Approved 12 Aesthetic GIF Instagram for Marketers
- How to Rescue Lost Contacts from Oppo A79 5G?
- Wondering the Best Alternative to Hola On Apple iPhone 6s? Here Is the Answer | Dr.fone
- How To Get Out of Recovery or DFU Mode on Apple iPhone XS? | Dr.fone
- In 2024, How and Where to Find a Shiny Stone Pokémon For Oppo A38? | Dr.fone
- Remove Google FRP lock on Itel A05s
- Remove FRP Lock on Honor
- Title: New How to Use Rule of Thirds in Video
- Author: Morgan
- Created at : 2024-06-24 01:30:19
- Updated at : 2024-06-25 01:30:19
- Link: https://ai-video-editing.techidaily.com/new-how-to-use-rule-of-thirds-in-video/
- License: This work is licensed under CC BY-NC-SA 4.0.

