
:max_bytes(150000):strip_icc():format(webp)/Instagram_Login-5c004ff2c9e77c000104174d.png)
New How to Use Visual Effect for Zoom
How to Use Visual Effect for Zoom
Zoom, a video calling software, has been quite popular over the last several months and is still one of the most used videos calling applications by millions of people worldwide. The site is a favorite among working professionals, but it is also utilized by individuals to connect with their friends and loved ones. Additionally, despite the app’s abundance of practical built-in tools and functions, it lacks the fun filters and special effects that the majority of users are used to when using a camera. Zoom has ingrained itself in our vocabulary during the last year. It seemed almost inevitable given that everything, from meetings to parties, has moved online.
You don’t need to seek farther than Zoom visual effects to inject a little jazz into the routine Zoom meetings during these hard times. By making adjustments to your Video configuration either before or during a video call, you may add visual effects in Zoom. Zoom meetings may be tedious to conduct over extended periods of time. Additionally, it would be helpful if you recorded the condition of your room before any Zoom meetings. You wouldn’t want to reveal your disorganized space while in a meeting. In these situations, adding visual effects will keep your private area private while also making your Zoom meetings entertaining and exciting. It will also prevent others from seeing your filthy room. This tutorial will walk you through the process of adding visual effects to Zoom step-by-step. In addition, you will get acquainted with the numerous camera functions and visual effects that you may employ during a Zoom video conversation.
- 1. What apps can add visual effect on Zoom?
- 2. How do I add visual effects to Zoom in Mobile?
- 3. How do you download Zoom effects?
Part 1: Popular Visual Effects you can add to Zoom
You may apply one of four main graphic effects to your Zoom meetings. The visual effects that you may use in your next Zoom video chat are briefly summarized below.
1. Visual Backgrounds
Virtual backdrops may transform any plain wall into an artistic setting. Zoom provides you the choice to add photographs to your backdrop in addition to offering you a few pre-made backdrops. Zoom lets you add a movie to your backdrop in addition to simply photographs. With the help of this imaginative feature, gather your pals and enjoy your favorite meme or video. A presentation’s collection of photos, a video, or a single image may all serve as virtual backdrops. A green screen would often be used as your real backdrop and consistent lighting would be required.
To avoid having to reveal your real surroundings while in a conference, you may add any picture or video as a virtual backdrop in Zoom. You have the option of adding own photos and movies or selecting from the pre-existing backdrop films and images. The file type for video backgrounds should be MP4 or MOV, and the resolution should range from 360p to a maximum of 1080p. Ensure that the mirroring of your video is deselected in the Zoom’s Video settings if your backdrop picture has text that may be read. By using virtual backdrops, you may alter the background of your video as it appears to the audience member with whom you are speaking. During the video conference you’re in, the other participants will be able to view your face and body overlaid on the backdrop of your choice.
2. Filters
With these filters, you can have fun in all of your Zoom meetings! Filters are a fun way to spend time with loved ones who are far away, particularly at a period when maintaining social distance is crucial. Filters are the modifications you make to yourself during Zoom meetings (such as a mustache, beard, etc.). They enliven the proceedings and contribute to the fun and memorability of your Zoom meetings.
Your films’ colors may be changed, and video filters can also add new aspects. By selecting a filter appropriate for each event, like team meetings or game nights, you may create the right atmosphere. You may embellish your face in the video with flowers or animal traits by using Zoom’s various filters. Alternately, you might just convert your video’s color to black and white. The video filters from a different program, however, allow you to apply more vibrant filters and place a greater emphasis on special effects.
3. Lighting and Touch-ups
The Lighting function enhances lighting effects and makes adjustments for low light situations to make you seem more professional during a Zoom conference. Similar to this, Touch-up enhances your facial characteristics by making your skin shine, erasing wrinkles, and giving your face a radiant appearance.
On your Zoom videos, changing your lighting and applying touch-ups may improve how you seem. By adjusting your lighting, you can make even dim illumination look bright. By doing touch-ups, you may get a smoother skin texture and get rid of any obvious imperfections.
4. Studio Effects
Zoom has been developing on a new feature called Studio Effects that would give customers the option of using virtual cosmetics in their movies. They are still checking it out before formally releasing it since it is still in beta. However, it is still available to users under the Backgrounds & Filters area. You may adjust the opacity as you like. You have the option to choose a new color or one of the predefined colors. Additionally, you may decide to employ the face effects in all of your next meetings, albeit doing so might be problematic if you use Zoom for business. Don’t worry if you’re running late. Zoom can give your face a natural-looking cosmetic makeover in only one minute!
This function is intended for less formal settings, such as gatherings of friends or family. Anyone who wants to seem more professional during meetings has access to Studio Effects, which offers the choice of various eyebrow colors, beards, and lipsticks. These are a few recently added features. You may add mustaches, beards, and brows in a variety of designs, hues, and intensities. Additionally, you have the option of coloring your lips.
Part 2: How to Add Visual Effects to Zoom
Along with facilitating online meetings, the Zoom program also lets you play with its visual effects. You just need to make a few adjustments to the video settings or utilize another third-party program to be ready to go.
Step1Start a Zoom meeting
You can download Zoom, install it on your computer, and log into your account if you don’t already have it if you don’t already have it.
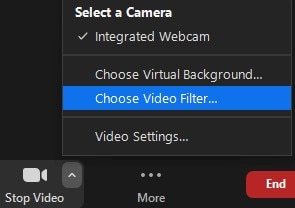
Step2Tap Background and Filters
After logging in to Zoom, use these settings. - Options > Camera > Video

Step3Faucet Filters
Here, you may play with a variety of visual effects and customize them to suit your tastes. Pick one of the numerous filters that are offered. To activate the filter, tap it.
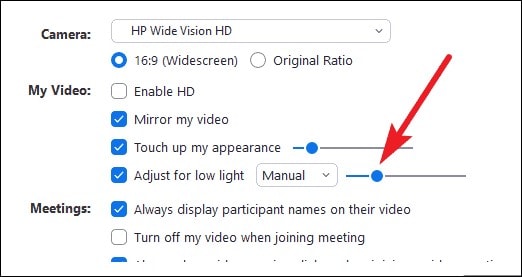
Step4Set Lighting Effects to on
Select “Adjust for low light” in the video options. For your lighting, you may choose between Auto and Manual effects. Zoom will automatically detect and adapt for the lighting in your room if you choose Auto.
Use Zoom’s noise reduction option to keep your conversation focused during your video conference in addition to adding visual elements. To do this, go to “Audio Settings” and choose “High” under “Suppress background noise.” Once you start speaking during the video conference, this essentially cancels out any background noise.
Part 3: Related FAQs
1. What apps can add visual effect on Zoom?
Following is the list of top three apps that you can use to utilize visual effects Zoom application:
Snap Camera is regarded as the most user-friendly. It is a software that you can download for Windows or Mac that works with live broadcasts and video chats. Because it was created by the people who founded Snapchat, it shares a broad variety of filters with that platform.
Link: Snap Camera
The Mac is the only platform on which CamTwist may be used. You may also use it to give your movies additional filters and unique effects. This program lets you pick from a variety of pre-made effects while also allowing you to create your own.
Link: CamTwist
Another desktop application that lets you change and even blur your backdrop is ManyCam. It enables you to apply digital effects, filters, and 3-D masks to your face. Using this tool, you can also build layers and presets.
Link: ManyCam
2. How do I add visual effects to Zoom in Mobile?
Zoom includes a function that might be useful if you don’t want to tidy up or want to add some entertainment to your calls. You may utilize Zoom virtual backdrops to alter your surroundings and take you to a more pleasant location on both the desktop and mobile apps. After joining one on a mobile device, pick Virtual backdrop by tapping the More icon in the bottom right corner. Choose a photo from the list of choices, or click the plus sign (+) to add a photo or video from your gallery.
3. How do you download Zoom effects?
Pressing the Studio Effects button after installing Zoom for the first time will prompt a pop-up asking you to download the Studio Effects package. Several filters, suited for both business meetings and conversations with friends, let you customize the video and audio during your video calls. To start downloading the Effects bundle, click the Download button. The “Studio Effects” window will appear on the right-hand side of the Background & Filter page after the download is finished. All the face components and choices are available in this Studio Effects window.
Conclusion
The most popular video meeting tool worldwide is Zoom. Family, friends, coworkers, and any two people who want to video chat utilize it. Zoom visual effects are the ideal tool for injecting some humor into otherwise dull Zoom sessions and meetings. A few simple steps will get you a striking backdrop, a humorous filter, and some interesting effects. Since the majority of formal work is now completed from home, Zoom has taken over as the standard video conferencing program. Try out as many of the effects as you like, and use this page as a companion and a map to help you along the way.
- 1. What apps can add visual effect on Zoom?
- 2. How do I add visual effects to Zoom in Mobile?
- 3. How do you download Zoom effects?
Part 1: Popular Visual Effects you can add to Zoom
You may apply one of four main graphic effects to your Zoom meetings. The visual effects that you may use in your next Zoom video chat are briefly summarized below.
1. Visual Backgrounds
Virtual backdrops may transform any plain wall into an artistic setting. Zoom provides you the choice to add photographs to your backdrop in addition to offering you a few pre-made backdrops. Zoom lets you add a movie to your backdrop in addition to simply photographs. With the help of this imaginative feature, gather your pals and enjoy your favorite meme or video. A presentation’s collection of photos, a video, or a single image may all serve as virtual backdrops. A green screen would often be used as your real backdrop and consistent lighting would be required.
To avoid having to reveal your real surroundings while in a conference, you may add any picture or video as a virtual backdrop in Zoom. You have the option of adding own photos and movies or selecting from the pre-existing backdrop films and images. The file type for video backgrounds should be MP4 or MOV, and the resolution should range from 360p to a maximum of 1080p. Ensure that the mirroring of your video is deselected in the Zoom’s Video settings if your backdrop picture has text that may be read. By using virtual backdrops, you may alter the background of your video as it appears to the audience member with whom you are speaking. During the video conference you’re in, the other participants will be able to view your face and body overlaid on the backdrop of your choice.
2. Filters
With these filters, you can have fun in all of your Zoom meetings! Filters are a fun way to spend time with loved ones who are far away, particularly at a period when maintaining social distance is crucial. Filters are the modifications you make to yourself during Zoom meetings (such as a mustache, beard, etc.). They enliven the proceedings and contribute to the fun and memorability of your Zoom meetings.
Your films’ colors may be changed, and video filters can also add new aspects. By selecting a filter appropriate for each event, like team meetings or game nights, you may create the right atmosphere. You may embellish your face in the video with flowers or animal traits by using Zoom’s various filters. Alternately, you might just convert your video’s color to black and white. The video filters from a different program, however, allow you to apply more vibrant filters and place a greater emphasis on special effects.
3. Lighting and Touch-ups
The Lighting function enhances lighting effects and makes adjustments for low light situations to make you seem more professional during a Zoom conference. Similar to this, Touch-up enhances your facial characteristics by making your skin shine, erasing wrinkles, and giving your face a radiant appearance.
On your Zoom videos, changing your lighting and applying touch-ups may improve how you seem. By adjusting your lighting, you can make even dim illumination look bright. By doing touch-ups, you may get a smoother skin texture and get rid of any obvious imperfections.
4. Studio Effects
Zoom has been developing on a new feature called Studio Effects that would give customers the option of using virtual cosmetics in their movies. They are still checking it out before formally releasing it since it is still in beta. However, it is still available to users under the Backgrounds & Filters area. You may adjust the opacity as you like. You have the option to choose a new color or one of the predefined colors. Additionally, you may decide to employ the face effects in all of your next meetings, albeit doing so might be problematic if you use Zoom for business. Don’t worry if you’re running late. Zoom can give your face a natural-looking cosmetic makeover in only one minute!
This function is intended for less formal settings, such as gatherings of friends or family. Anyone who wants to seem more professional during meetings has access to Studio Effects, which offers the choice of various eyebrow colors, beards, and lipsticks. These are a few recently added features. You may add mustaches, beards, and brows in a variety of designs, hues, and intensities. Additionally, you have the option of coloring your lips.
Part 2: How to Add Visual Effects to Zoom
Along with facilitating online meetings, the Zoom program also lets you play with its visual effects. You just need to make a few adjustments to the video settings or utilize another third-party program to be ready to go.
Step1Start a Zoom meeting
You can download Zoom, install it on your computer, and log into your account if you don’t already have it if you don’t already have it.
Step2Tap Background and Filters
After logging in to Zoom, use these settings. - Options > Camera > Video
Step3Faucet Filters
Here, you may play with a variety of visual effects and customize them to suit your tastes. Pick one of the numerous filters that are offered. To activate the filter, tap it.
Step4Set Lighting Effects to on
Select “Adjust for low light” in the video options. For your lighting, you may choose between Auto and Manual effects. Zoom will automatically detect and adapt for the lighting in your room if you choose Auto.
Use Zoom’s noise reduction option to keep your conversation focused during your video conference in addition to adding visual elements. To do this, go to “Audio Settings” and choose “High” under “Suppress background noise.” Once you start speaking during the video conference, this essentially cancels out any background noise.
Part 3: Related FAQs
1. What apps can add visual effect on Zoom?
Following is the list of top three apps that you can use to utilize visual effects Zoom application:
Snap Camera is regarded as the most user-friendly. It is a software that you can download for Windows or Mac that works with live broadcasts and video chats. Because it was created by the people who founded Snapchat, it shares a broad variety of filters with that platform.
Link: Snap Camera
The Mac is the only platform on which CamTwist may be used. You may also use it to give your movies additional filters and unique effects. This program lets you pick from a variety of pre-made effects while also allowing you to create your own.
Link: CamTwist
Another desktop application that lets you change and even blur your backdrop is ManyCam. It enables you to apply digital effects, filters, and 3-D masks to your face. Using this tool, you can also build layers and presets.
Link: ManyCam
2. How do I add visual effects to Zoom in Mobile?
Zoom includes a function that might be useful if you don’t want to tidy up or want to add some entertainment to your calls. You may utilize Zoom virtual backdrops to alter your surroundings and take you to a more pleasant location on both the desktop and mobile apps. After joining one on a mobile device, pick Virtual backdrop by tapping the More icon in the bottom right corner. Choose a photo from the list of choices, or click the plus sign (+) to add a photo or video from your gallery.
3. How do you download Zoom effects?
Pressing the Studio Effects button after installing Zoom for the first time will prompt a pop-up asking you to download the Studio Effects package. Several filters, suited for both business meetings and conversations with friends, let you customize the video and audio during your video calls. To start downloading the Effects bundle, click the Download button. The “Studio Effects” window will appear on the right-hand side of the Background & Filter page after the download is finished. All the face components and choices are available in this Studio Effects window.
Conclusion
The most popular video meeting tool worldwide is Zoom. Family, friends, coworkers, and any two people who want to video chat utilize it. Zoom visual effects are the ideal tool for injecting some humor into otherwise dull Zoom sessions and meetings. A few simple steps will get you a striking backdrop, a humorous filter, and some interesting effects. Since the majority of formal work is now completed from home, Zoom has taken over as the standard video conferencing program. Try out as many of the effects as you like, and use this page as a companion and a map to help you along the way.
Tips That Show Anybody How To Make Youtube Slideshow – Guaranteed
Tips That Show Anybody How to Make Youtube Slideshow – Guaranteed
An easy yet powerful editor
Numerous effects to choose from
Detailed tutorials provided by the official channel
Making a slideshow on YouTube is quite easy. You can make your slideshow look more beautiful by adding amazing transitions and effects. Also you can add music to your slideshow.
In this article
01 [How to Make a Slideshow for YouTube (with Pictures and Music)](#Part 1)
02 [Best Six YouTube Slideshow Creator](#Part 2)
03 [Five Best Slideshow Video Templates](#Part 3)
04 [FAQ of Making YouTube Slideshow](#Part 4)
Part 1 How to Make a Slideshow for YouTube (with pictures and music)
If you want to make an attractive photo video slideshow for YouTube, you can make it by using SmartSHOW 3D software. It is a slideshow maker from which you can make 3D movies as well. You can create animated slideshow with photos and videos by using its amazing templates and effects. Make your slideshow more attractive by adding music, voice over, title clips and a lot more. Here are steps to make a photo video slideshow using SmartSHOW 3D.
Step 1: Decide on the Project Type
SmartSHOW 3D comes with two choices of projects. It has variety of premade templates in which you just have to insert your images and now your professionally looking slideshow is ready in no time. If you have any concept of making a slideshow, then you can go to New Project option where you can create everything from the starting.

Step 2: Add Pictures and Videos
Select your pictures and videos and drag and drop them in timeline. You can add many images but don’t try to pack a lot of images otherwise your slideshow will not be interesting. You can set the images in the order you want them, depending on the concept.

Step 3: Add Music
You can add music of your own choice which will suit your photo video slideshow perfectly. So, add a music which will make your slideshow more interesting. SmartSHOW 3D comes with a vast library of 200+ sound tracks and with amazing sound effects. The categories and genres are divided so it will make it easy for you to choose from it.

Step 4: Add Effects
Do you want that your video look alluring and interesting from others? Add transitions according to the slide of the video with a huge library, like gradient, 3D, mosaics and curtain swipes etc. You can put in a little bit of magic using nature effects like, snow falling, bubbles, cherry blossom and leaves. You can also use animation effects if you want to make your slide more interesting like fade in, fade out, zoom in, zoom out, pan left, rotate or flip.

Step 5: Make your YouTube Slideshow
Now you have successfully completed all the process and your photo video slideshow is ready. SmartSHOW 3D is very easy to use as you can create a slideshow with your best images, add the music of your own but it should comply with YouTube’s licensed regulations. Also you add transitions and effects to make your photo video slideshow much more interesting.

Part 2 Best Six YouTube Slideshow Creator
01Movavi Slideshow
Movavi is an amazing slideshow maker. If you want to make an alluring slideshow with pictures, videos and add some music to it, you can simply use Movavi slideshow maker. It provides you a vast variety of features with 150+ amazing effects and filters. If you are a beginner or don’t know how to use this software don’t be afraid, you can easily use this to make amazing slideshows.
Movavi allows you to save your photo or your video slideshow in all formats and allows you straight to upload it on YouTube or Google Drive.

02Focusky Presentation Maker
Focusky presentation maker is a free slideshow maker with customizable templates. It has its own media gallery which helps you to make amazing slideshows online as well as offline. It allows you to make zestful presentations that can be shared with anyone. It also has outstanding web work environment.

03Microsoft PowerPoint
Create your own well – designed slides with the help of PowerPoint. PowerPoint has ready to use templates with customizable themes, amazing transitions and effects. It also has 3D object support. You can create your outstanding presentations with PowerPoint. Now, you can also share it on YouTube. The best thing is that it is easy to use due to its simple interface.

04PixTeller Slideshow Maker
PixTeller allows you to create amazing small slideshows and videos in a few minutes. With the availability of so many options like customizable templates, unique text properties, transitions and effects, you can easily, render, save and share the slideshow directly on your social media. You can also download it in any format like JPG, PNG or PDF on your system.

05Promo
This is a web slideshow creator which you can use if you don’t have enough time. You can work on it online there is no need to download the file. You can easily share the slideshows on it. It has huge collection of templates using which you can create Promo videos and ads for your social media platforms. There is also a vast music library available that allows bringing customization in the slideshow. You can also promote your business or event through a Promo video..

06Slide Maker
Using Slide Maker you can create a beautiful photos video using different filters. You can add music using the built-in music library along with stylish transitions. For your instagram, it can adjust the length of the slideshow. After successfully creating your slideshow you can post it on your YouTube.

Part 3 Five Best Slideshow Video Templates
01Floral Photo Gallery Template
You can create an aesthetic look to your video slideshows with Floral Photo Gallery Template. Create a beautiful slideshow by adding images or videos to it. The template has a lot of floral patterns from which you can choose floral templates with particular flower designing only at the borders, or fully covered with flowers. It totally depends on which one you prefer for yourself.
02Award Show Package
Using this template you can create amazing and glamorous videos in a few minutes. It allows you to customize the videos using different color scheme, add videos and photos. This template will give a feel of reputed award shows like Oscars to your video with its sharp transitions and particle effects. It is best for introductions, invitations and announcements. The best thing is that it is available for free.
03Real Estate Template
You can use real estate template to present the houses, apartments, and commercial buildings. This template can be used by real estate companies, agencies or brokers to present their properties. They can also make a video presentation. You can promote your business simply using this template. Just write the text, add pictures and then render it. Now, your photo video presentation is ready.
04 Happy Birthday Template
You can surprise your loved ones by simply congratulating them with the birthday slideshow using happy birthday template. It will make it easy for you to create the slideshow using the template. Add photos and text to the template and in few minutes your photo video slideshow is ready. Your friends and relatives are definitely going to love it.
05Lovely Couple Template
You can make a photo video slideshow using lovely couple template to keep your precious moments in a video. Choose the images or video parts which you want, write romantic quotes and make a slideshow. Your couple slideshow is ready using the lovely couple template. It is perfect for love confessions, family and marriage proposals. Make your partner feel more special by creating a beautiful slideshow using this template.
Part 4 FAQ’S of Making YouTube Slideshow
How can you make a photo video slideshow?
A. If you want to spread your project, the best way to do it is to compile all the images and videos, add related content to it and make a photo video slideshow. Now, you can upload your slideshow as it was a video.
What are the best YouTube slideshow makers?
A. There are a lot of options available online from which you can choose the best for you. Here are some of them:
● SmartSHOW 3D
● Wondershare Filmora Video Editor
● Movavi Slideshow
● Microsoft PowerPoint
● Promo
● Videoshop
● Focusky Presentation Maker
What will be the best templates for making the slideshow on YouTube?
For Win 7 or later (64-bit)
For macOS 10.12 or later
A. There are a lot of templates from which you can choose according to the theme of your slideshow. Here are some of them:
● Happy birthday template
● Lovely couple template
● Real estate template
● Award show template
● Floral photo template
How can you share a slideshow on YouTube?
A. After creating your slideshow in a video format, click on the upload option in YouTube. Select the video which you want to upload and do adjustments in the privacy settings. After the video is being uploaded, click on the publish button to make it visible to the viewers.
How can you make an impactful slideshow on YouTube?
A. Things that make your presentation more impactful are:
● Focus on what the audience wants to see
● Make it simple and concise
● Use attractive templates
● Try to tell a story
FILMORA
Making a photo video slideshow on YouTube is a great choice but still you have an alternate option like Filmora. You can make a slideshow with Filmora as it has amazing features like adding text, adding music to it from its own in-built gallery. It also has a feature of audio mixer. It has 4K format support. It has amazing transitions and effects which will make your slideshow look more professional and attractive.
● Ending Thoughts →
● Making a photo video YouTube slideshow is a quite easy to create using SmartSHOW 3D, Promo, and others apps.
● Creating as YouTube slideshow using these apps is simple as you just have to put images, add text, and music and yes your slideshow is ready in few minutes.
● You can consider Filmora for making a photo video slideshow as it has amazing features like transitions, effects, music from its own in-built soundtrack.
Making a slideshow on YouTube is quite easy. You can make your slideshow look more beautiful by adding amazing transitions and effects. Also you can add music to your slideshow.
In this article
01 [How to Make a Slideshow for YouTube (with Pictures and Music)](#Part 1)
02 [Best Six YouTube Slideshow Creator](#Part 2)
03 [Five Best Slideshow Video Templates](#Part 3)
04 [FAQ of Making YouTube Slideshow](#Part 4)
Part 1 How to Make a Slideshow for YouTube (with pictures and music)
If you want to make an attractive photo video slideshow for YouTube, you can make it by using SmartSHOW 3D software. It is a slideshow maker from which you can make 3D movies as well. You can create animated slideshow with photos and videos by using its amazing templates and effects. Make your slideshow more attractive by adding music, voice over, title clips and a lot more. Here are steps to make a photo video slideshow using SmartSHOW 3D.
Step 1: Decide on the Project Type
SmartSHOW 3D comes with two choices of projects. It has variety of premade templates in which you just have to insert your images and now your professionally looking slideshow is ready in no time. If you have any concept of making a slideshow, then you can go to New Project option where you can create everything from the starting.
Step 2: Add Pictures and Videos
Select your pictures and videos and drag and drop them in timeline. You can add many images but don’t try to pack a lot of images otherwise your slideshow will not be interesting. You can set the images in the order you want them, depending on the concept.
Step 3: Add Music
You can add music of your own choice which will suit your photo video slideshow perfectly. So, add a music which will make your slideshow more interesting. SmartSHOW 3D comes with a vast library of 200+ sound tracks and with amazing sound effects. The categories and genres are divided so it will make it easy for you to choose from it.
Step 4: Add Effects
Do you want that your video look alluring and interesting from others? Add transitions according to the slide of the video with a huge library, like gradient, 3D, mosaics and curtain swipes etc. You can put in a little bit of magic using nature effects like, snow falling, bubbles, cherry blossom and leaves. You can also use animation effects if you want to make your slide more interesting like fade in, fade out, zoom in, zoom out, pan left, rotate or flip.
Step 5: Make your YouTube Slideshow
Now you have successfully completed all the process and your photo video slideshow is ready. SmartSHOW 3D is very easy to use as you can create a slideshow with your best images, add the music of your own but it should comply with YouTube’s licensed regulations. Also you add transitions and effects to make your photo video slideshow much more interesting.
Part 2 Best Six YouTube Slideshow Creator
01Movavi Slideshow
Movavi is an amazing slideshow maker. If you want to make an alluring slideshow with pictures, videos and add some music to it, you can simply use Movavi slideshow maker. It provides you a vast variety of features with 150+ amazing effects and filters. If you are a beginner or don’t know how to use this software don’t be afraid, you can easily use this to make amazing slideshows.
Movavi allows you to save your photo or your video slideshow in all formats and allows you straight to upload it on YouTube or Google Drive.
02Focusky Presentation Maker
Focusky presentation maker is a free slideshow maker with customizable templates. It has its own media gallery which helps you to make amazing slideshows online as well as offline. It allows you to make zestful presentations that can be shared with anyone. It also has outstanding web work environment.
03Microsoft PowerPoint
Create your own well – designed slides with the help of PowerPoint. PowerPoint has ready to use templates with customizable themes, amazing transitions and effects. It also has 3D object support. You can create your outstanding presentations with PowerPoint. Now, you can also share it on YouTube. The best thing is that it is easy to use due to its simple interface.
04PixTeller Slideshow Maker
PixTeller allows you to create amazing small slideshows and videos in a few minutes. With the availability of so many options like customizable templates, unique text properties, transitions and effects, you can easily, render, save and share the slideshow directly on your social media. You can also download it in any format like JPG, PNG or PDF on your system.
05Promo
This is a web slideshow creator which you can use if you don’t have enough time. You can work on it online there is no need to download the file. You can easily share the slideshows on it. It has huge collection of templates using which you can create Promo videos and ads for your social media platforms. There is also a vast music library available that allows bringing customization in the slideshow. You can also promote your business or event through a Promo video..
06Slide Maker
Using Slide Maker you can create a beautiful photos video using different filters. You can add music using the built-in music library along with stylish transitions. For your instagram, it can adjust the length of the slideshow. After successfully creating your slideshow you can post it on your YouTube.
Part 3 Five Best Slideshow Video Templates
01Floral Photo Gallery Template
You can create an aesthetic look to your video slideshows with Floral Photo Gallery Template. Create a beautiful slideshow by adding images or videos to it. The template has a lot of floral patterns from which you can choose floral templates with particular flower designing only at the borders, or fully covered with flowers. It totally depends on which one you prefer for yourself.
02Award Show Package
Using this template you can create amazing and glamorous videos in a few minutes. It allows you to customize the videos using different color scheme, add videos and photos. This template will give a feel of reputed award shows like Oscars to your video with its sharp transitions and particle effects. It is best for introductions, invitations and announcements. The best thing is that it is available for free.
03Real Estate Template
You can use real estate template to present the houses, apartments, and commercial buildings. This template can be used by real estate companies, agencies or brokers to present their properties. They can also make a video presentation. You can promote your business simply using this template. Just write the text, add pictures and then render it. Now, your photo video presentation is ready.
04 Happy Birthday Template
You can surprise your loved ones by simply congratulating them with the birthday slideshow using happy birthday template. It will make it easy for you to create the slideshow using the template. Add photos and text to the template and in few minutes your photo video slideshow is ready. Your friends and relatives are definitely going to love it.
05Lovely Couple Template
You can make a photo video slideshow using lovely couple template to keep your precious moments in a video. Choose the images or video parts which you want, write romantic quotes and make a slideshow. Your couple slideshow is ready using the lovely couple template. It is perfect for love confessions, family and marriage proposals. Make your partner feel more special by creating a beautiful slideshow using this template.
Part 4 FAQ’S of Making YouTube Slideshow
How can you make a photo video slideshow?
A. If you want to spread your project, the best way to do it is to compile all the images and videos, add related content to it and make a photo video slideshow. Now, you can upload your slideshow as it was a video.
What are the best YouTube slideshow makers?
A. There are a lot of options available online from which you can choose the best for you. Here are some of them:
● SmartSHOW 3D
● Wondershare Filmora Video Editor
● Movavi Slideshow
● Microsoft PowerPoint
● Promo
● Videoshop
● Focusky Presentation Maker
What will be the best templates for making the slideshow on YouTube?
For Win 7 or later (64-bit)
For macOS 10.12 or later
A. There are a lot of templates from which you can choose according to the theme of your slideshow. Here are some of them:
● Happy birthday template
● Lovely couple template
● Real estate template
● Award show template
● Floral photo template
How can you share a slideshow on YouTube?
A. After creating your slideshow in a video format, click on the upload option in YouTube. Select the video which you want to upload and do adjustments in the privacy settings. After the video is being uploaded, click on the publish button to make it visible to the viewers.
How can you make an impactful slideshow on YouTube?
A. Things that make your presentation more impactful are:
● Focus on what the audience wants to see
● Make it simple and concise
● Use attractive templates
● Try to tell a story
FILMORA
Making a photo video slideshow on YouTube is a great choice but still you have an alternate option like Filmora. You can make a slideshow with Filmora as it has amazing features like adding text, adding music to it from its own in-built gallery. It also has a feature of audio mixer. It has 4K format support. It has amazing transitions and effects which will make your slideshow look more professional and attractive.
● Ending Thoughts →
● Making a photo video YouTube slideshow is a quite easy to create using SmartSHOW 3D, Promo, and others apps.
● Creating as YouTube slideshow using these apps is simple as you just have to put images, add text, and music and yes your slideshow is ready in few minutes.
● You can consider Filmora for making a photo video slideshow as it has amazing features like transitions, effects, music from its own in-built soundtrack.
How to Add Photos to Tik Tok Video
Our globe is filled up with the talented people who are making different shades of creativity. The credit also goes to the built-in featured tools which empowers the people to show their creative ideas and present them in a better way.
In this era, the world has completely transformed and social media is playing its vital role. A few years back, we can hardly send or receive messages and can make calls from phones. But today, there are hundreds of social media platforms that are interconnected and can perform a lot more than just messaging and calls. The Tik Tok is one of them and you can easily edit your videos at the palm of our hand.

How to Add Photos to Tik Tok Video Directly
Today I am going to discuss few things about the Tik Tok including how to add pictures to the video directly. However, it is pretty simple and you can accomplish the skill of making Tik Tok videos professionally after reading this article.
So lets dive in…
Before you start editing the video or pictures, it is important to download the Tik Tok app on your device and make an account. Although, you can get access to your Tik Tok with local browser and without downloading the application.

Your pictures will be displayed automatically one by one and you can add animations, music, or voiceover, and can even add effects and transitions to the video.
. Let us get started.
1. Adding a Picture from Effects.
- Go to the bottom of the screen and press that + sign.

- Select the large red icon Camera to take short video.
- Hit the Effects tab at the left of the Record button.

- Click on the green screen.
Here you can select the different effects.
- Now you can take your selfie or take a photo and if you want to choose the photo from the album, you can add that way.
- Hit the effect shown below and you can make your picture size smaller, larger and you can also move it on the screen.

Now click on the Next button and hit the Post button.
So, that’s how you can add photos to your Tik Tok videos and can easily edit to make them eye catching.
Here you will get a few options to add photos to your pictures.
2. Adding a Picture via Uploading.
- Open the Tik Tok app and hit the “+”

- The interphase will change and you will see a large red button in the center.
- Tap that Camera button and directly take a shot.

- Tap on the Photos to select the Image you want to upload.

- Click the

- After editing the images select the Post

3. Adding a picture via Photo Template.
Here is another way to add pictures to your video that is the Photos Template. You will use the pre-designed images.
- Open the Tik Tok app and hit the “+” sign.

- Select the Templates button from the lower bottom of the screen.

- Select the desired Template from the list and it will be downloaded.
- Now select the Photos icon under the Templates icon. You will be referred to the gallery.

- Select the desired image and after complete editing hit the Post

Using Wonder Share Filmora 11.
The rising tendency toward making the Tik Tok videos has proven that filmmaking is not difficult but the emerging number of professional video editors has made it more simple. Tik Tok is the fastest growing and amazing social media platform so one should make sure to make a video that stands out from the crowd. For this, I am introducing a very professional but easy-to-use application “Wonder Share Filmora 11”.
Filmora 11 is one of the most powerful video editors and allows you to edit videos from smartphones, DSLRs, and all types of digital cameras. It provides hundreds of eye-catching visual and audio effects.

Adding a photo to the Tik Tok video.
Before you start the editing process, organize your Media Library. Most of the time our library is flooded with excess pictures and it consumes a lot of time to select the right photos. However, it is not a compulsory step but you can do it to enjoy your editing. So let’s get started!
- Open the Filmora 11 and click on the New Project.
- Import the video file and the photo you want to add. You can drag and drop the image and click on the Import button to get the image.

- Set the same Aspect Ratio and Resolution for both the video and the image.
- Drag the video and drop it into the timeline.
- Now drag the image and drop it above the video track.

In the above screenshot, you can see the image is added to the video. You can further edit it to set it in the proper position you want.
- Drag the image in the timeline and place it at the point you want.
- You can extend or cut the length of the image.
- In the same way, you can directly resize your image in the preview window.
- Drag the edge of the photo and resize it. You can also move it to adjust the placement of the image.

Besides this, you have a wide range of customizable options.
- Double click on the picture in the preview window.
- You will see the Image editing panel on the left side to edit more professionally.
- Hit on the Transform under the Basic
- You can rotate, flip, scale and change the position of the image.

- Select the compositing tab and hit the Blending Mode, you can change the color of the added image. I have selected Linear light, you can select anyone from the drop-down list.
- Here you can change the opacity of the image.

You can even further edit your image by adding Effects, Transitions, Text, overlays, filters, and many more to make it interesting and eye-catching.
- Hit the green Export button in the center of the window.
- Set the Name, Resolution, Frame Rate, Duration, and Format of the video.
- Click on the Auto Highlight and open the drop-down list.
- Click on 15s (Tik Tok) under the upload section.
- Now select the Export button.

Using Kapwing for Online.
We will use Kapwing’s online video editor to add photos to the videos and then upload them on Tik Tok. You just need to do is to have a good internet connection and a browser. You can use the Kapwing on your iPhone, Android, Windows, Tablet, etc. so let’s get started…
- Open the Kapwing App in your browser.
- Click on start editing to proceed and you will find the window below

- Click the upload tab or paste the URL to add a video.

Once you have added a video;
- Click on the upload tab to add the picture to the video.
- Here you can edit your image and hit the Publish tab.

Using BeeCut for Mac.
Bee Cut is a very powerful and easy-to-use application, especially for Mac users. However, it can be installed on iOS, Android, and Windows. Although, its interphase is simple but has many advanced features that make your video stand out. Let’s start,
- Install the Bee Cut app from the app store.
- After the download completes, hit the “Next step” and select the desired Aspect ratio for your Tik Tok video.
- Enjoy amazing editing of your Tik Tok video in this interphase shown down below.

- Once you are done with editing, hit the Export button and share your Tik Tok with family and friends.
Using Inshot for Android.
Inshot is another powerful all-in-one video editor tool. It is one of the most popular video editors among social media influencers. It provides very easy and professional tools for Tik Tok users. You can make your precious moments into an amazing video within a few minutes and a few clicks. The good thing about the app is, that it is used on your smartphone and you can edit by simply dragging and dropping. Inshot is not recommended for long videos, it experiences glitches so, and it works perfectly for the Tik Tok because it has short videos.

FAQS on Dealing with Pictures on TikTok
- How to add a Profile photo or video on Tik Tok?
- Tap on
- Hit Edit profile.
- Select Change Photo or Change Video.
- Take a Photo or Upload it from the gallery. A photo should be 20x20 pixels.
- Why can’t you upload Images on the Tik Tok?
- Don’t have a good internet
- Don’t have the latest version of the app.
- Check your Permission settings.
- How to add Text after adding Pictures on Tik Tok?
- Tap the Text at the bottom of the editing screen.
- Select the desired font, color, and background of your text.
- Select
- Tap on the text to set the position over the image.
- How do I link Google Photos to Tik Tok?
- Open the Google photos app on your device.
- Select a photo you want to share.
- Tap Share under Share to apps select Tik Tok.
- Click on Create link.
How to Add Photos to Tik Tok Video Directly
Today I am going to discuss few things about the Tik Tok including how to add pictures to the video directly. However, it is pretty simple and you can accomplish the skill of making Tik Tok videos professionally after reading this article.
So lets dive in…
Before you start editing the video or pictures, it is important to download the Tik Tok app on your device and make an account. Although, you can get access to your Tik Tok with local browser and without downloading the application.
Your pictures will be displayed automatically one by one and you can add animations, music, or voiceover, and can even add effects and transitions to the video.
. Let us get started.
1. Adding a Picture from Effects.
- Go to the bottom of the screen and press that + sign.
- Select the large red icon Camera to take short video.
- Hit the Effects tab at the left of the Record button.
- Click on the green screen.
Here you can select the different effects.
- Now you can take your selfie or take a photo and if you want to choose the photo from the album, you can add that way.
- Hit the effect shown below and you can make your picture size smaller, larger and you can also move it on the screen.
Now click on the Next button and hit the Post button.
So, that’s how you can add photos to your Tik Tok videos and can easily edit to make them eye catching.
Here you will get a few options to add photos to your pictures.
2. Adding a Picture via Uploading.
- Open the Tik Tok app and hit the “+”
- The interphase will change and you will see a large red button in the center.
- Tap that Camera button and directly take a shot.
- Tap on the Photos to select the Image you want to upload.
- Click the
- After editing the images select the Post
3. Adding a picture via Photo Template.
Here is another way to add pictures to your video that is the Photos Template. You will use the pre-designed images.
- Open the Tik Tok app and hit the “+” sign.
- Select the Templates button from the lower bottom of the screen.
- Select the desired Template from the list and it will be downloaded.
- Now select the Photos icon under the Templates icon. You will be referred to the gallery.
- Select the desired image and after complete editing hit the Post
Using Wonder Share Filmora 11.
The rising tendency toward making the Tik Tok videos has proven that filmmaking is not difficult but the emerging number of professional video editors has made it more simple. Tik Tok is the fastest growing and amazing social media platform so one should make sure to make a video that stands out from the crowd. For this, I am introducing a very professional but easy-to-use application “Wonder Share Filmora 11”.
Filmora 11 is one of the most powerful video editors and allows you to edit videos from smartphones, DSLRs, and all types of digital cameras. It provides hundreds of eye-catching visual and audio effects.
Adding a photo to the Tik Tok video.
Before you start the editing process, organize your Media Library. Most of the time our library is flooded with excess pictures and it consumes a lot of time to select the right photos. However, it is not a compulsory step but you can do it to enjoy your editing. So let’s get started!
- Open the Filmora 11 and click on the New Project.
- Import the video file and the photo you want to add. You can drag and drop the image and click on the Import button to get the image.
- Set the same Aspect Ratio and Resolution for both the video and the image.
- Drag the video and drop it into the timeline.
- Now drag the image and drop it above the video track.
In the above screenshot, you can see the image is added to the video. You can further edit it to set it in the proper position you want.
- Drag the image in the timeline and place it at the point you want.
- You can extend or cut the length of the image.
- In the same way, you can directly resize your image in the preview window.
- Drag the edge of the photo and resize it. You can also move it to adjust the placement of the image.
Besides this, you have a wide range of customizable options.
- Double click on the picture in the preview window.
- You will see the Image editing panel on the left side to edit more professionally.
- Hit on the Transform under the Basic
- You can rotate, flip, scale and change the position of the image.
- Select the compositing tab and hit the Blending Mode, you can change the color of the added image. I have selected Linear light, you can select anyone from the drop-down list.
- Here you can change the opacity of the image.
You can even further edit your image by adding Effects, Transitions, Text, overlays, filters, and many more to make it interesting and eye-catching.
- Hit the green Export button in the center of the window.
- Set the Name, Resolution, Frame Rate, Duration, and Format of the video.
- Click on the Auto Highlight and open the drop-down list.
- Click on 15s (Tik Tok) under the upload section.
- Now select the Export button.
Using Kapwing for Online.
We will use Kapwing’s online video editor to add photos to the videos and then upload them on Tik Tok. You just need to do is to have a good internet connection and a browser. You can use the Kapwing on your iPhone, Android, Windows, Tablet, etc. so let’s get started…
- Open the Kapwing App in your browser.
- Click on start editing to proceed and you will find the window below
- Click the upload tab or paste the URL to add a video.
Once you have added a video;
- Click on the upload tab to add the picture to the video.
- Here you can edit your image and hit the Publish tab.
Using BeeCut for Mac.
Bee Cut is a very powerful and easy-to-use application, especially for Mac users. However, it can be installed on iOS, Android, and Windows. Although, its interphase is simple but has many advanced features that make your video stand out. Let’s start,
- Install the Bee Cut app from the app store.
- After the download completes, hit the “Next step” and select the desired Aspect ratio for your Tik Tok video.
- Enjoy amazing editing of your Tik Tok video in this interphase shown down below.
- Once you are done with editing, hit the Export button and share your Tik Tok with family and friends.
Using Inshot for Android.
Inshot is another powerful all-in-one video editor tool. It is one of the most popular video editors among social media influencers. It provides very easy and professional tools for Tik Tok users. You can make your precious moments into an amazing video within a few minutes and a few clicks. The good thing about the app is, that it is used on your smartphone and you can edit by simply dragging and dropping. Inshot is not recommended for long videos, it experiences glitches so, and it works perfectly for the Tik Tok because it has short videos.
FAQS on Dealing with Pictures on TikTok
- How to add a Profile photo or video on Tik Tok?
- Tap on
- Hit Edit profile.
- Select Change Photo or Change Video.
- Take a Photo or Upload it from the gallery. A photo should be 20x20 pixels.
- Why can’t you upload Images on the Tik Tok?
- Don’t have a good internet
- Don’t have the latest version of the app.
- Check your Permission settings.
- How to add Text after adding Pictures on Tik Tok?
- Tap the Text at the bottom of the editing screen.
- Select the desired font, color, and background of your text.
- Select
- Tap on the text to set the position over the image.
- How do I link Google Photos to Tik Tok?
- Open the Google photos app on your device.
- Select a photo you want to share.
- Tap Share under Share to apps select Tik Tok.
- Click on Create link.
Things You Need to Know About Color Grading in Photography
Create High-Quality Video - Wondershare Filmora
An easy and powerful YouTube video editor
Numerous video and audio effects to choose from
Detailed tutorials provided by the official channel
Have you recognized how flat your images look when you take them with your camera? While the scenery may be beautiful and your photography skills may be amazing, there’s always something missing. That “thing” is color grading, and that may be why your favorite superstar’s pictures appear better than yours. You can color grade your videos to produce the same effect too.
Color grading photography refers to a post-production process that improves your images by altering their color. The result of an excellent color grading process is an image that looks more appealing and refined. It’s what gives a picture some professional touch.
If you want to learn more about color grading photography, this article will let you in on all you need to know. From essential color grading steps to terms, tools, etc., you can begin your journey to cool and exciting images after reading.
In this article
01 Don’t Confuse Color Grading With Color Correction
03 Common Steps To Color Grade a Photo
04 Tips For Color Grading Photography
Don’t Confuse Color Grading With Color Correction
The first way to fully appreciate color grading is by differentiating it from its closest term—color correction. Many people use both of them interchangeably, and that’s wrong. Although color grading and color correction are post-production processes that enhance image colors, they perform different roles.
Here’s how to differentiate color grading from color correction:
| Differentiating Factor | Color Grading ; | Color Correction |
|---|---|---|
| Definition | Color grading is a process that enhances an image’s color by stylizing or giving it a cinematic appearance. | Color correction is a process that adjusts color mistakes in an image by giving it a consistent appearance. This process balances colors by adjusting whites and blacks. |
| Purpose | The primary aim of color grading an image is to evoke specific emotions in the viewers. Color grading leverages the emotional and psychological effects of colors to manipulate the viewers’ moods. You can use color grading to give your images different tones or themes like fear, femininity, youthfulness, passion, anger, sadness, etc. | Unlike color grading, the color correction does very little in setting the tone or mood that an image carries. Instead, it corrects specific mistakes in the image to make it look as natural to the human eyes as possible. Generally, camera lenses and the human eyes view pictures differently. Color correction changes a photo’s look to make it more appealing to humans than the camera. It makes black colors appear darker and adds more white to whites to create the desired effect. |
| Stage in the production process | Color grading typically comes after color correction in the post-production process. That’s because the effects of color grading are more appealing on a color-corrected picture. | Color correction comes before color grading. This process does the major work of balancing colors and correcting errors. Color grading only fine-tunes what color correction has done, giving it a professional finish. |
| Example | One of the most obvious examples of color grading is in motion pictures. For example, Sci-Fi movies typically have a very saturated blue color. However, you will notice a little redder in romantic movies. Note that filmmakers can use different color grades in movies to draw attention to specific details or represent changes in the storyline. Color grading produces the same effects in pictures. | Color correction is most prominent in documentaries to make pictures and videos look more real to the human eye. Other times, color corrections just adjust one color to merge the rest of the image or video. |

Terms and Tools Used In Color Grading
These are the most common terminologies photo editors use when color grading an image:
● Hue
Hue is the general name for describing pure color. That means it defines color without alluding to its brightness, vividness, etc. It describes a color’s position in the color wheel.
● Saturation
When a photo editor talks about saturation, they refer to the hue concentration that defines a specific color. Saturation describes color shades and focuses on how colorful they are. Examples of colors with zero saturation are white, black, and grey.

● Luminance
Luminous describes how bright, well-lighted or dark a color is. Highlights, mids, and shadows can influence luminance.

● Additive Color
Additive colors are non-primary colors. However, they typically result from mixing primary colors (blue, red, green).
● Color Cast
Color cast means that the image’s coloring doesn’t look as natural as it should be. This usually happens when different light sources get mixed.
● Temperature
Temperature defines how cool or warm a color is. Cool temperatures typically describe blues and purples, while orange and red represent the warmth.
The essential tools for color grading include
● White Balance
White balance helps to make your photos look more natural by correcting color cast issues. After using white balance, the result is that the whites in your pictures would look exactly like the human eye will perceive it. White balance adjusts your image’s color cast to make them look warmer or cooler.
● Brightness and Contrast
Brightness and contrast are essential in color grading and are among the most used photo editing tools. Different sliders control brightness and contrast during editing. It’s important to note that your image’s brightness will affect the contrast and vice-versa. That’s why they usually appear together, even if they refer to different tools.
● The Three-Way Color Corrector
Many photographers refer to the three-way corrector as the color correction’s workhorse. That’s because this tool adjusts hue, saturation, brightness, and contrast in a single interface. The three-way corrector performs the job of three tools in one interface. Using the three-way corrector ensures that you work faster than usual.
● The Fast Color Corrector
The fast color corrector is like the three-way corrector. However, there are many limitations with the number of potential looks you can achieve with this tool. The fast color corrector primarily focuses on adjusting tint and saturation. Its major advantage over the three-way corrector is its user-friendliness and simplicity.
● Curves
While using curves is pretty complicated, the tool offers impressive functionality that you can’t refuse. Curves are very powerful and precise. Their main function is to overhaul or remove your image’s brightness altogether to give it a distinctive look.
● The Unsharp Mask and Sharpening Tools
With the unsharp mask and sharpening tools, you can give your picture’s edges a sharp illusion by modifying the contrast. This is typically useful for images that you shoot in dark conditions.
Sharp pictures are always a lovely sight. However, these tools can’t correct pictures taken out of focus. To get the best results from these tools. Then you can start moving them back till you get your desired sharpness.
● Color Match
As the make implies, color match tools modify a target picture’s colors to fit the reference image. This is an automatic process and helps to save time.
Common Steps To Color Grade a Photo
These are the essential stages for color grading your images:
● Step 1:
The first step in color grading is deciding how warm or cool you want your image to look. Then, modify the white balance to suit your desired warmth or coolness.
● Step 2:
After adjusting the white balance, the next step is to adjust saturation or hue.
● Step 3:
The next step is to focus on the histogram. A histogram is a common feature in many photo editing software that informs you of your image’s tonal values. The goal in this stage is to ensure equal color distribution. Keep adjusting your image till the colors are even.
● Step 4:
Work on your highlights and shadows by modifying the green, red, and blue curves. Also, adjust your vibrancy setting for a good effect.
● Step 5:
Explore split toning. Split toning is a process that involves adding colors to highlight and shadows independently. Learning how to split tone can make a difference in your photo editing.
Tips For Color Grading Photography
The following best practices will enhance your color grading:
- About oversaturation or under-saturation. Your saturation should be just right to produce the perfect result. So, always be sure to pay maximum attention to this process. This tip is particularly useful when working with portraits.
- Remember that color grading doesn’t fix a bad shot. So, be sure to improve your photography skills and take the best shots for excellent color grading results.
- Shoot your images in RAW. Doing this guarantees more control over your pictures’ colors.
- Always experiment with different looks until you get your precise effect. Lightroom is one of the best color grading apps to use.
- Exercise maximum caution when manipulating backgrounds. Don’t do too much, especially when you’re taking an indoor shot. That’s because manipulating indoor backgrounds too much can mismatch the foreground and background, making your portrait look weird.
Conclusion
● While your photography skills are essential in influencing your image’s outcome; your color grading skills will take it to another level. It’s one of the fastest ways to make a budding photo editor look like a pro.
● After reading this article, you can be sure that you have the basic information you need to achieve your editing goals. However, you mustn’t stop here. Continuous learning, especially through constant practice, is the way to go. You can visit Filmora today for the best color grading packages and tools.
Have you recognized how flat your images look when you take them with your camera? While the scenery may be beautiful and your photography skills may be amazing, there’s always something missing. That “thing” is color grading, and that may be why your favorite superstar’s pictures appear better than yours. You can color grade your videos to produce the same effect too.
Color grading photography refers to a post-production process that improves your images by altering their color. The result of an excellent color grading process is an image that looks more appealing and refined. It’s what gives a picture some professional touch.
If you want to learn more about color grading photography, this article will let you in on all you need to know. From essential color grading steps to terms, tools, etc., you can begin your journey to cool and exciting images after reading.
In this article
01 Don’t Confuse Color Grading With Color Correction
03 Common Steps To Color Grade a Photo
04 Tips For Color Grading Photography
Don’t Confuse Color Grading With Color Correction
The first way to fully appreciate color grading is by differentiating it from its closest term—color correction. Many people use both of them interchangeably, and that’s wrong. Although color grading and color correction are post-production processes that enhance image colors, they perform different roles.
Here’s how to differentiate color grading from color correction:
| Differentiating Factor | Color Grading ; | Color Correction |
|---|---|---|
| Definition | Color grading is a process that enhances an image’s color by stylizing or giving it a cinematic appearance. | Color correction is a process that adjusts color mistakes in an image by giving it a consistent appearance. This process balances colors by adjusting whites and blacks. |
| Purpose | The primary aim of color grading an image is to evoke specific emotions in the viewers. Color grading leverages the emotional and psychological effects of colors to manipulate the viewers’ moods. You can use color grading to give your images different tones or themes like fear, femininity, youthfulness, passion, anger, sadness, etc. | Unlike color grading, the color correction does very little in setting the tone or mood that an image carries. Instead, it corrects specific mistakes in the image to make it look as natural to the human eyes as possible. Generally, camera lenses and the human eyes view pictures differently. Color correction changes a photo’s look to make it more appealing to humans than the camera. It makes black colors appear darker and adds more white to whites to create the desired effect. |
| Stage in the production process | Color grading typically comes after color correction in the post-production process. That’s because the effects of color grading are more appealing on a color-corrected picture. | Color correction comes before color grading. This process does the major work of balancing colors and correcting errors. Color grading only fine-tunes what color correction has done, giving it a professional finish. |
| Example | One of the most obvious examples of color grading is in motion pictures. For example, Sci-Fi movies typically have a very saturated blue color. However, you will notice a little redder in romantic movies. Note that filmmakers can use different color grades in movies to draw attention to specific details or represent changes in the storyline. Color grading produces the same effects in pictures. | Color correction is most prominent in documentaries to make pictures and videos look more real to the human eye. Other times, color corrections just adjust one color to merge the rest of the image or video. |
Terms and Tools Used In Color Grading
These are the most common terminologies photo editors use when color grading an image:
● Hue
Hue is the general name for describing pure color. That means it defines color without alluding to its brightness, vividness, etc. It describes a color’s position in the color wheel.
● Saturation
When a photo editor talks about saturation, they refer to the hue concentration that defines a specific color. Saturation describes color shades and focuses on how colorful they are. Examples of colors with zero saturation are white, black, and grey.
● Luminance
Luminous describes how bright, well-lighted or dark a color is. Highlights, mids, and shadows can influence luminance.
● Additive Color
Additive colors are non-primary colors. However, they typically result from mixing primary colors (blue, red, green).
● Color Cast
Color cast means that the image’s coloring doesn’t look as natural as it should be. This usually happens when different light sources get mixed.
● Temperature
Temperature defines how cool or warm a color is. Cool temperatures typically describe blues and purples, while orange and red represent the warmth.
The essential tools for color grading include
● White Balance
White balance helps to make your photos look more natural by correcting color cast issues. After using white balance, the result is that the whites in your pictures would look exactly like the human eye will perceive it. White balance adjusts your image’s color cast to make them look warmer or cooler.
● Brightness and Contrast
Brightness and contrast are essential in color grading and are among the most used photo editing tools. Different sliders control brightness and contrast during editing. It’s important to note that your image’s brightness will affect the contrast and vice-versa. That’s why they usually appear together, even if they refer to different tools.
● The Three-Way Color Corrector
Many photographers refer to the three-way corrector as the color correction’s workhorse. That’s because this tool adjusts hue, saturation, brightness, and contrast in a single interface. The three-way corrector performs the job of three tools in one interface. Using the three-way corrector ensures that you work faster than usual.
● The Fast Color Corrector
The fast color corrector is like the three-way corrector. However, there are many limitations with the number of potential looks you can achieve with this tool. The fast color corrector primarily focuses on adjusting tint and saturation. Its major advantage over the three-way corrector is its user-friendliness and simplicity.
● Curves
While using curves is pretty complicated, the tool offers impressive functionality that you can’t refuse. Curves are very powerful and precise. Their main function is to overhaul or remove your image’s brightness altogether to give it a distinctive look.
● The Unsharp Mask and Sharpening Tools
With the unsharp mask and sharpening tools, you can give your picture’s edges a sharp illusion by modifying the contrast. This is typically useful for images that you shoot in dark conditions.
Sharp pictures are always a lovely sight. However, these tools can’t correct pictures taken out of focus. To get the best results from these tools. Then you can start moving them back till you get your desired sharpness.
● Color Match
As the make implies, color match tools modify a target picture’s colors to fit the reference image. This is an automatic process and helps to save time.
Common Steps To Color Grade a Photo
These are the essential stages for color grading your images:
● Step 1:
The first step in color grading is deciding how warm or cool you want your image to look. Then, modify the white balance to suit your desired warmth or coolness.
● Step 2:
After adjusting the white balance, the next step is to adjust saturation or hue.
● Step 3:
The next step is to focus on the histogram. A histogram is a common feature in many photo editing software that informs you of your image’s tonal values. The goal in this stage is to ensure equal color distribution. Keep adjusting your image till the colors are even.
● Step 4:
Work on your highlights and shadows by modifying the green, red, and blue curves. Also, adjust your vibrancy setting for a good effect.
● Step 5:
Explore split toning. Split toning is a process that involves adding colors to highlight and shadows independently. Learning how to split tone can make a difference in your photo editing.
Tips For Color Grading Photography
The following best practices will enhance your color grading:
- About oversaturation or under-saturation. Your saturation should be just right to produce the perfect result. So, always be sure to pay maximum attention to this process. This tip is particularly useful when working with portraits.
- Remember that color grading doesn’t fix a bad shot. So, be sure to improve your photography skills and take the best shots for excellent color grading results.
- Shoot your images in RAW. Doing this guarantees more control over your pictures’ colors.
- Always experiment with different looks until you get your precise effect. Lightroom is one of the best color grading apps to use.
- Exercise maximum caution when manipulating backgrounds. Don’t do too much, especially when you’re taking an indoor shot. That’s because manipulating indoor backgrounds too much can mismatch the foreground and background, making your portrait look weird.
Conclusion
● While your photography skills are essential in influencing your image’s outcome; your color grading skills will take it to another level. It’s one of the fastest ways to make a budding photo editor look like a pro.
● After reading this article, you can be sure that you have the basic information you need to achieve your editing goals. However, you mustn’t stop here. Continuous learning, especially through constant practice, is the way to go. You can visit Filmora today for the best color grading packages and tools.
Also read:
- New Mastering OpenCV Object Tracking A Comprehensive Guide for Beginners and Experts for 2024
- Which 10 Best Video Editing Online Makers Is Worth Your Attention for 2024
- Updated 2024 Approved 2 Easy Methods | How To Zoom In On TikTok Videos?
- In 2024, What Is the Best MP4 Cutters for YouTubers on Mac?
- Updated In 2024, Add Selective Color Effect to Your Videos Using Filmora
- Split a Video in the Lightworks Step by Step for 2024
- In 2024, 6 Ways to Mimic Professional Filming Gears
- New How to Color Correct in OBS
- A Roster of 8 Top Color Match Generators for 2024
- Updated Are You a Gaming YouTuber or Content Creator Whose Main Game Is COD Warzone? How Kickass Are Your Warzone Thumbnails? Heres a Guide on How to Make One for Free for 2024
- 2024 Approved What Is a Transparent Logo and Why Do You Need It
- New A Complete Overview of VSCO Video Editor for 2024
- Have You Ever Watched YouTube Live Streams? In Fact, You Can Also Start a Live Streaming on YouTube if You Want. Here Well Share some Tips to Live Stream on YouTube
- Best iOS Slow Motion Apps To Work With
- Updated In 2024, How Can Filmora Create an Audio Visualizer Project for a Song? All Steps, From Launching the App to Editing the Text, Are Detailed Here
- Updated In 2024, 4 Solutions to Add White Border to Video on Mobile and Desktop
- New 2024 Approved Learn Topaz Video Enhance AI Review and Achieve Powerful Video Conversion
- Updated 2024 Approved What Does It Mean to Color Grade Your Images, and Why Is It so Important? Does It Mean the Same Thing as a Color Correction? Read on to Gather All the Information You Need on Color Grading Photography
- How to Fix Android App Not Installed Error on Huawei P60 Quickly? | Dr.fone
- 4 Most-Known Ways to Find Someone on Tinder For Nokia C210 by Name | Dr.fone
- In 2024, How to Send and Fake Live Location on Facebook Messenger Of your Huawei P60 | Dr.fone
- Why Is My Oppo A58 4G Offline? Troubleshooting Guide | Dr.fone
- 8 Ultimate Fixes for Google Play Your Vivo G2 Isnt Compatible | Dr.fone
- In 2024, Guide to Mirror Your Vivo S18 to Other Android devices | Dr.fone
- In 2024, How Can Tecno Pop 8Mirror Share to PC? | Dr.fone
- How to Fake Snapchat Location without Jailbreak On Motorola Edge 2023 | Dr.fone
- Top 9 ZTE Axon 40 Lite Monitoring Apps for Parental Controls | Dr.fone
- Overview of the Best Poco X6 Screen Mirroring App | Dr.fone
- How to Unlock Apple iPhone XS Max with IMEI Code?
- How to Mirror PC Screen to Oppo Reno 9A Phones? | Dr.fone
- In 2024, 3 Effective Methods to Fake GPS location on Android For your Honor X50i | Dr.fone
- In 2024, How to Unlock Realme Narzo N53 PIN Code/Pattern Lock/Password
- In 2024, Planning to Use a Pokemon Go Joystick on Samsung Galaxy M54 5G? | Dr.fone
- Title: New How to Use Visual Effect for Zoom
- Author: Morgan
- Created at : 2024-05-19 05:12:21
- Updated at : 2024-05-20 05:12:21
- Link: https://ai-video-editing.techidaily.com/new-how-to-use-visual-effect-for-zoom/
- License: This work is licensed under CC BY-NC-SA 4.0.
