
New In 2024, 3 In-Camera Transitions Tricks To Make Videos

3 In-Camera Transitions Tricks To Make Videos
You must have seen it in videos when a scene changes to another place or time. How is it possible? Video transitions are a post-production technique that connects two different shots together. And it makes the whole video goes smooth and fluent.
Hopping directly from one clip to the next looks pretty queer. It disturbs the whole dynamics and charm of the video. To avoid this, we use video transitions. This makes the video appear much smoother and more linked.
You may think it is not easy, but after reading this article, you will know how simple it is. All you need is a camera and a few skills. In this article, we will focus on different in-camera transitions and let you know how to edit in a powerful video editor Filmora .
Whip Your Camera
You may have noticed that when an object moves quickly, the camera creates a blurred image of the object. We call it motion blur. The idea with this transition is to cut and paste your shots together by whipping your camera at the end of your first shot and at the beginning of your second one. This effect depends on two aspects. The first is by the speedy motion of the object out of the frame, and the second is by the camera’s movement.
Here is a stepwise guide for you to try
- Plan your shots, where and in what direction you will make the whip.
- Then take the first shot and whip the camera at the end of the shot in the direction the object is moving.
- For the next shot, whip the camera into the action and complete the shot.
- Import both shots in your editing tool and find the point of blur in both.
- Cut and paste them to add a blurring effect to your video.
You can whip your camera in any direction you want. Make sure the movement is fast enough to create a motion blur.
The result would be a smooth transition from the first shot to the second, as in this clip:

Fill The Frame
In this in-camera transition technique, you must fill the frame with an object or subject. Compose the shot with the main subject filling the frame from edge to edge. In this way, those who view the video immediately know what you want them to see.
Here is step-by-step guidance for this transition
- Plan the two shots you are going to take.
- Find a subject or an action that will fill the frame during recording.
- In the first shot, please make the subject move toward the frame so that it fills the frame.
- The second shot will take place at another time or place.
- To record the second shot, cover the frame with an object and then reveal the shot.
- Import both shots into Wondershare Filmora .
- Cut the two shots to the point where the frame is filled and paste these shots together.
Free Download For Win 7 or later(64-bit)
Free Download For macOS 10.14 or later
One important thing is to match the color and brightness of the object or subject. It will provide you with much better results. The video attached below explains all the steps of filling the frame.

Match Cut
In a video, a match cut transitions from one shot to another. During this, the composition of the two shots is matched by action, subject, and subject matter. The goal is to make a visual match between two situations that don’t have a direct link. Here are the steps to creating a match-cut transition in your videos.
- Plan the shot you are going to take.
- Record the action in the first shot, for example, clapping your hands.
- Go to another place or scene to record the second shot.
- Repeat the same action in the second shot.
- Import both camera shots to Wondershare Filmora .
- Cut one shot to another when the action is at its peak.
This way, you can smoothly transition from one place or scene to another. There is a video attached below for a better understanding of the steps.

Final Words
You can use these techniques to create sublime in-camera transitions. Make sure to follow all the steps in the correct order. These transitions will make your videos look more creative and artistic. Plan your ideas, add these transitions to your videos, and create cool videos at home to post on social media.
If you find this article informative, remember to share it with your friends. Which of these transitions did you like the most, and are you going to try them?
Free Download For Win 7 or later(64-bit)
Free Download For macOS 10.14 or later
Free Download For macOS 10.14 or later
One important thing is to match the color and brightness of the object or subject. It will provide you with much better results. The video attached below explains all the steps of filling the frame.

Match Cut
In a video, a match cut transitions from one shot to another. During this, the composition of the two shots is matched by action, subject, and subject matter. The goal is to make a visual match between two situations that don’t have a direct link. Here are the steps to creating a match-cut transition in your videos.
- Plan the shot you are going to take.
- Record the action in the first shot, for example, clapping your hands.
- Go to another place or scene to record the second shot.
- Repeat the same action in the second shot.
- Import both camera shots to Wondershare Filmora .
- Cut one shot to another when the action is at its peak.
This way, you can smoothly transition from one place or scene to another. There is a video attached below for a better understanding of the steps.

Final Words
You can use these techniques to create sublime in-camera transitions. Make sure to follow all the steps in the correct order. These transitions will make your videos look more creative and artistic. Plan your ideas, add these transitions to your videos, and create cool videos at home to post on social media.
If you find this article informative, remember to share it with your friends. Which of these transitions did you like the most, and are you going to try them?
Free Download For Win 7 or later(64-bit)
Free Download For macOS 10.14 or later
Splitting a Video Into Frames with the FFmpeg [Step by Step]
FFmpeg is the particular framework that is leading in the multimedia industry. It is a complete solution that runs on multiple platforms for converting, recording and streaming videos and audios. FFmpeg allows you to encode, decode, filter, mux, demux, and transcode much better than humans. FFmpeg runs, complies, and tests using the FATE infrastructure on different operating systems.
It includes Mac OS X, Linux, Windows, Solaris and BSDs. This framework works in a number of built-in environment configurations and architectures of the types of machinery from a technical point of view. It is the appropriate solution for the developers for their applications, and the end-users are similar. You can share the codes at the maximum level in the parts of the FFmpeg. Online support is available for your assistance.
In this article, you will learn about splitting the Video into the frames in FFmpeg and mentioning the easy option for doing the same task in a few seconds by Wondershare Filmora.
How can you split the video clips into frames by using FFmpeg?
There is 7 number of ways, or you can say 7 functions are available splitting the video clips in FFmpeg that are as follows:
- Splitting Video into frames
- Splitting Video by their sizes
- Dividing the videos into the parts with the same duration
- Split the videos by width and in the horizontal direction
To split the Video in FFmpeg, you need to use the correct command to fulfil all your tasks. It helps in extracting the particular frames from your Video. These are the files of the images that are making the whole Video. The working of this command is the following:
Step 1:
The first step is opening the terminal in Mac operating system. Enter the command below for navigating the folder of pictures and videos. Must change the directory whenever you are in the terminal. First, change the location wherever the video file is in your system. Remember that you run these commands in the same folder where the source of the videos is.
Cd ~/Videos and press enter.

Step 2:
This specific command is for splitting the videos into frames. It saves every image separately as the thumbnail file. FFmpeg -I video.mp4 thumb%04d.jpg -hide_banner
splitting is done into the frames. Go to your same folder and choose your image according to your requirement.
An easier way to split the video into the frames
As you see above, it is just 2 significant steps for splitting the Video into frames by FFmpeg. But what if you don’t remember the command or are not familiar with the technical background. Then you need to look for better options and even most straightforward than FFmpeg. There is just one answer to all these questions that is Filmora Video Editor . It is not only a powerful tool but also all the tools are right in front of the screen—no need to enter any command or change of the directory.
For Win 7 or later (64-bit)
For macOS 10.14 or later
Features
- Trimming, rotating, resizing of the clips
- Easy to remove the noise in the background
- Simple to export and share the videos
- Splitting of the screens
- Correcting and matching of the colours
- Availability of controls for audio and Video
The best part is that the Video’s quality remains the same in this software. It is just a few clicks, and the extraction will be done. All the images are high resolution, so no worries about losing any frame quality and images saved in your media library. Follow the easy steps below to begin the extraction of the frames from the Video in Wondershare Filmora.
Step 1. First, import the video file or drag and drop it in the window. Videos are visible in the library so that you can select them accordingly. Click on the Video’s thumbnail if you want the same resolution of the frame as the Video.
Click the Play button for the preview. After the preview, click on the Camera icon to extract frames. Automatically, all the frames are saved in the library of media files.
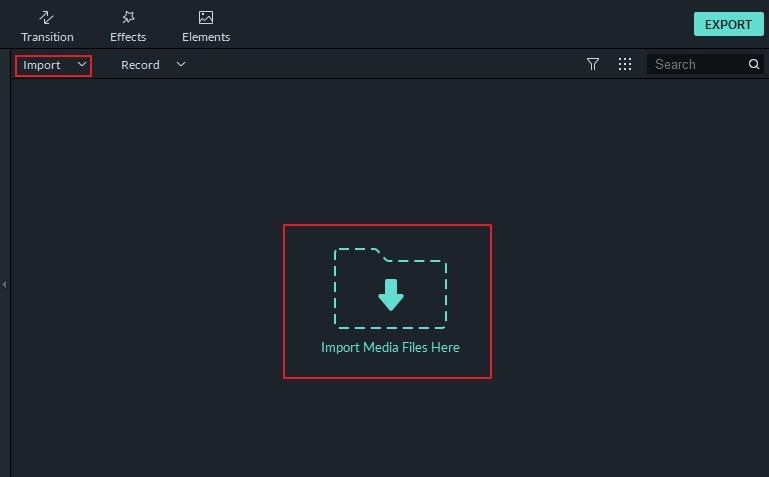
Step 2. Sometimes, you require to see the preview of the Video in the form of frames for extraction purposes. Simply drag and drop the file in the timeline. To begin the preview, press the space bar on the keyboard and take the screenshot whenever the Video starts.
Press the icon of snapshot or press the keys CRTL+ALT+S. Use the left or right keys for playing back the video frame to frame and save it in the form of an image. Select the “Reveal in Explorer” option when you click the screenshot in the library of media files.
The frame extractor of Wondershare Filmora is absolutely free so that you won’t find any watermark on the images. You won’t face any difficulty while extracting your frames as a user. Even you can edit these frames and save them in the format of your own choice.

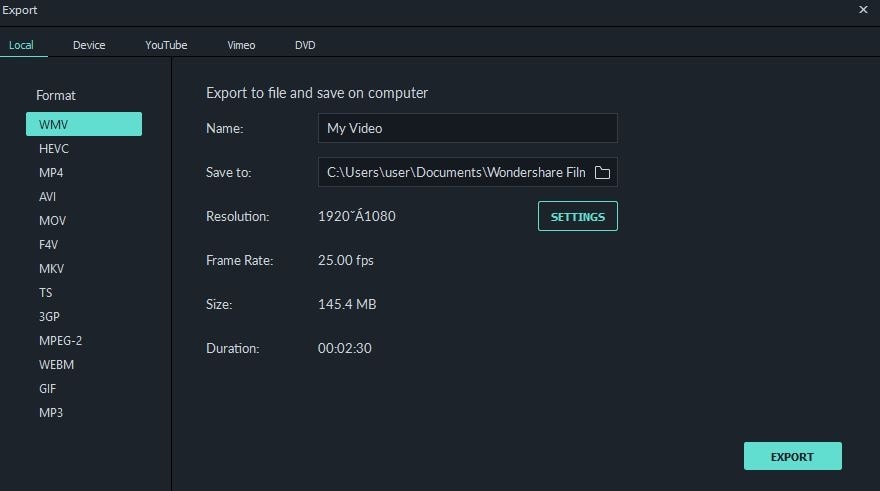
Although there is a huge range of editing software, including FFmpeg, they always have some disadvantages when you keep finding the replacement. Even FFmpeg is an open-source program, and beginners can’t handle it properly.
They need to be familiar with the technicalities. There are many benefits to using Wondershare Filmora for extracting the frames from the videos.
It is supportive to 4K resolution means saving the images in the same resolution. No loss of video quality enables you to explore all the details very clearly. The whole editor appears right before you to edit all the frames.
You can also export these images wherever you want or save them for backup purposes. Even you can upload them on your social networking sites. So, what are you waiting for? No more thinking now; let’s start exploring and using Wondershare Filmora
Step 2:
This specific command is for splitting the videos into frames. It saves every image separately as the thumbnail file. FFmpeg -I video.mp4 thumb%04d.jpg -hide_banner
splitting is done into the frames. Go to your same folder and choose your image according to your requirement.
An easier way to split the video into the frames
As you see above, it is just 2 significant steps for splitting the Video into frames by FFmpeg. But what if you don’t remember the command or are not familiar with the technical background. Then you need to look for better options and even most straightforward than FFmpeg. There is just one answer to all these questions that is Filmora Video Editor . It is not only a powerful tool but also all the tools are right in front of the screen—no need to enter any command or change of the directory.
For Win 7 or later (64-bit)
For macOS 10.14 or later
Features
- Trimming, rotating, resizing of the clips
- Easy to remove the noise in the background
- Simple to export and share the videos
- Splitting of the screens
- Correcting and matching of the colours
- Availability of controls for audio and Video
The best part is that the Video’s quality remains the same in this software. It is just a few clicks, and the extraction will be done. All the images are high resolution, so no worries about losing any frame quality and images saved in your media library. Follow the easy steps below to begin the extraction of the frames from the Video in Wondershare Filmora.
Step 1. First, import the video file or drag and drop it in the window. Videos are visible in the library so that you can select them accordingly. Click on the Video’s thumbnail if you want the same resolution of the frame as the Video.
Click the Play button for the preview. After the preview, click on the Camera icon to extract frames. Automatically, all the frames are saved in the library of media files.

Step 2. Sometimes, you require to see the preview of the Video in the form of frames for extraction purposes. Simply drag and drop the file in the timeline. To begin the preview, press the space bar on the keyboard and take the screenshot whenever the Video starts.
Press the icon of snapshot or press the keys CRTL+ALT+S. Use the left or right keys for playing back the video frame to frame and save it in the form of an image. Select the “Reveal in Explorer” option when you click the screenshot in the library of media files.
The frame extractor of Wondershare Filmora is absolutely free so that you won’t find any watermark on the images. You won’t face any difficulty while extracting your frames as a user. Even you can edit these frames and save them in the format of your own choice.


Although there is a huge range of editing software, including FFmpeg, they always have some disadvantages when you keep finding the replacement. Even FFmpeg is an open-source program, and beginners can’t handle it properly.
They need to be familiar with the technicalities. There are many benefits to using Wondershare Filmora for extracting the frames from the videos.
It is supportive to 4K resolution means saving the images in the same resolution. No loss of video quality enables you to explore all the details very clearly. The whole editor appears right before you to edit all the frames.
You can also export these images wherever you want or save them for backup purposes. Even you can upload them on your social networking sites. So, what are you waiting for? No more thinking now; let’s start exploring and using Wondershare Filmora
Step 2:
This specific command is for splitting the videos into frames. It saves every image separately as the thumbnail file. FFmpeg -I video.mp4 thumb%04d.jpg -hide_banner
splitting is done into the frames. Go to your same folder and choose your image according to your requirement.
An easier way to split the video into the frames
As you see above, it is just 2 significant steps for splitting the Video into frames by FFmpeg. But what if you don’t remember the command or are not familiar with the technical background. Then you need to look for better options and even most straightforward than FFmpeg. There is just one answer to all these questions that is Filmora Video Editor . It is not only a powerful tool but also all the tools are right in front of the screen—no need to enter any command or change of the directory.
For Win 7 or later (64-bit)
For macOS 10.14 or later
Features
- Trimming, rotating, resizing of the clips
- Easy to remove the noise in the background
- Simple to export and share the videos
- Splitting of the screens
- Correcting and matching of the colours
- Availability of controls for audio and Video
The best part is that the Video’s quality remains the same in this software. It is just a few clicks, and the extraction will be done. All the images are high resolution, so no worries about losing any frame quality and images saved in your media library. Follow the easy steps below to begin the extraction of the frames from the Video in Wondershare Filmora.
Step 1. First, import the video file or drag and drop it in the window. Videos are visible in the library so that you can select them accordingly. Click on the Video’s thumbnail if you want the same resolution of the frame as the Video.
Click the Play button for the preview. After the preview, click on the Camera icon to extract frames. Automatically, all the frames are saved in the library of media files.

Step 2. Sometimes, you require to see the preview of the Video in the form of frames for extraction purposes. Simply drag and drop the file in the timeline. To begin the preview, press the space bar on the keyboard and take the screenshot whenever the Video starts.
Press the icon of snapshot or press the keys CRTL+ALT+S. Use the left or right keys for playing back the video frame to frame and save it in the form of an image. Select the “Reveal in Explorer” option when you click the screenshot in the library of media files.
The frame extractor of Wondershare Filmora is absolutely free so that you won’t find any watermark on the images. You won’t face any difficulty while extracting your frames as a user. Even you can edit these frames and save them in the format of your own choice.


Although there is a huge range of editing software, including FFmpeg, they always have some disadvantages when you keep finding the replacement. Even FFmpeg is an open-source program, and beginners can’t handle it properly.
They need to be familiar with the technicalities. There are many benefits to using Wondershare Filmora for extracting the frames from the videos.
It is supportive to 4K resolution means saving the images in the same resolution. No loss of video quality enables you to explore all the details very clearly. The whole editor appears right before you to edit all the frames.
You can also export these images wherever you want or save them for backup purposes. Even you can upload them on your social networking sites. So, what are you waiting for? No more thinking now; let’s start exploring and using Wondershare Filmora
Step 2:
This specific command is for splitting the videos into frames. It saves every image separately as the thumbnail file. FFmpeg -I video.mp4 thumb%04d.jpg -hide_banner
splitting is done into the frames. Go to your same folder and choose your image according to your requirement.
An easier way to split the video into the frames
As you see above, it is just 2 significant steps for splitting the Video into frames by FFmpeg. But what if you don’t remember the command or are not familiar with the technical background. Then you need to look for better options and even most straightforward than FFmpeg. There is just one answer to all these questions that is Filmora Video Editor . It is not only a powerful tool but also all the tools are right in front of the screen—no need to enter any command or change of the directory.
For Win 7 or later (64-bit)
For macOS 10.14 or later
Features
- Trimming, rotating, resizing of the clips
- Easy to remove the noise in the background
- Simple to export and share the videos
- Splitting of the screens
- Correcting and matching of the colours
- Availability of controls for audio and Video
The best part is that the Video’s quality remains the same in this software. It is just a few clicks, and the extraction will be done. All the images are high resolution, so no worries about losing any frame quality and images saved in your media library. Follow the easy steps below to begin the extraction of the frames from the Video in Wondershare Filmora.
Step 1. First, import the video file or drag and drop it in the window. Videos are visible in the library so that you can select them accordingly. Click on the Video’s thumbnail if you want the same resolution of the frame as the Video.
Click the Play button for the preview. After the preview, click on the Camera icon to extract frames. Automatically, all the frames are saved in the library of media files.

Step 2. Sometimes, you require to see the preview of the Video in the form of frames for extraction purposes. Simply drag and drop the file in the timeline. To begin the preview, press the space bar on the keyboard and take the screenshot whenever the Video starts.
Press the icon of snapshot or press the keys CRTL+ALT+S. Use the left or right keys for playing back the video frame to frame and save it in the form of an image. Select the “Reveal in Explorer” option when you click the screenshot in the library of media files.
The frame extractor of Wondershare Filmora is absolutely free so that you won’t find any watermark on the images. You won’t face any difficulty while extracting your frames as a user. Even you can edit these frames and save them in the format of your own choice.


Although there is a huge range of editing software, including FFmpeg, they always have some disadvantages when you keep finding the replacement. Even FFmpeg is an open-source program, and beginners can’t handle it properly.
They need to be familiar with the technicalities. There are many benefits to using Wondershare Filmora for extracting the frames from the videos.
It is supportive to 4K resolution means saving the images in the same resolution. No loss of video quality enables you to explore all the details very clearly. The whole editor appears right before you to edit all the frames.
You can also export these images wherever you want or save them for backup purposes. Even you can upload them on your social networking sites. So, what are you waiting for? No more thinking now; let’s start exploring and using Wondershare Filmora
How to Create Intro Video with Filmora
If you’re just starting out as a YouTuber, you should have an introductory video, especially when people don’t know you that well yet. When you want to start a YouTube career one of the things you need to think about is How to make a YouTube intro video.
Whether you’re a beginner or a pro, knowing how to create a video intro for YouTube can help you introduce your audience to your content, pique their interest and boost your brand. Stand out and engage your audience with quick and easy YouTube intro animations. Not sure how to make a YouTube intro? We’ve built this guide on how to make a video intro using Wondershare Filmora an editing software.
- Start by introducing yourself
- Get into details
- Add a call to action
- Add personalization to your video
- Video length
What is Intro Video
There are also different ways of using the intro video, it can be used in business, in YouTube channels and others.
Introductory videos are short videos which you personally introduce yourself, your business, your brands and your brand’s mission and show your personality to your audience.
Introductory videos can help you stand out from the competition and gain favorability because you’re talking to your users on a personal level. People love seeing faces behind a brand, having an introductory video will ensure that people remember you.
YouTube intro videos are short, introductory clips that play at the beginning of a YouTube channel. They usually include the tittle of the YouTube channel, brand features like logos and colors animation and an accompanying snippet of music.
As the word suggest, intro are visuals that mark the beginning of a video. Likewise, outro are the closing visuals that appear at the end of the video. The two are widely used in educational, entertaining, business videos, webcasts, podcast, corporate presentations and the like. There are several reasons why an intro are vital elements of any professional video.
It goes without saying that intros should not be too complicated or to confusing. Other wise they will fail in their purpose and will drive the audience away. Instead, they should be simply but thoughtfully designed.
YouTube intro Videos usually include:
- Memorable background music
- Text and titles
- Stickers and GIFs
- Emojis

Goal of a Video Introduction to Follow
Making intro video is not just only in doing a YouTube channel but you can also use this guide for any businesses like brand presentation, educational etc.
Step1 Start by introducing yourself.
Step2 Get into details.
Step3 Add a call to action.
Step4 Add personalization to your video.
Step5 Video Length.
1. Start by introducing yourself
You can always start your intro by introducing yourself but don’t just state your name and what
you do, tell them why you do it, what your core values are and what motivates and dives you to
do this kind of career. Because you all know doing vlog on YouTube is a job, work, and a career.
Share emotions with your audience, and help them relate to you. Doing so is going to help you stand out immediately from the crowd and get audiences interested enough to watch the remainder of your video’s content.
2. Get into details
Tip is always direct to the point, add a few facts about yourself, like your interest or previous experiences or who you are as a person. If you are a business owner and would want to talk about your business you can always share how it started.
If we are talking about the YouTube intro video. Every good YouTube intro video usually includes beneficial information for subscribers and viewers. Add any short important text that you feel is necessary from the video titles, your YouTube channel name, and social media handles. Keep your informative text in a consistent format and branding style.
3. Add a call to action
if you have successfully maintained the interest of your viewer until the very end of your video, use this opportunity to invite them to engage with your content more. It’s worth including a call to action in each video. Take a full advantage of YouTube to provide your audience with your social media channels and maybe a link or two to your other videos that might interest them,
4. Add personalization to your video
Even though an intro can be more than logo animation, the latter should still be a part of it. Otherwise, there’s a sense that something is messing. Include eye catchy visuals effects to your videos to stands out, so that people can easily remember your YouTube channel.

5. Video length
A long intro, even if it’s spectacular, can get boring once your audience has seen it a few times. An ideal length for intros is up to 8-10 seconds only. Just enough time to deliver your message and branding, and hook audiences in for the rest of the video. Any longer than that, and you might lose viewers who are waiting to see the video that they clicked on.
In the era of social media, tempting distractions and short attention spans, it’s critical to keep your content as short and sharp as you can.
How to Create Intro Video using Filmora
Wondershare Filmora is an editing software that is available to download in google. This software is easy to use and includes products for a range of users from beginner to intermediate. Common features of Filmora include a timeline, preview window and effects library that you can use to create a nice and creative introduction video for your YouTube channel.
Free Download For Win 7 or later(64-bit)
Free Download For macOS 10.14 or later
Free trails are available to demo the product before purchasing. Pricing options for the various programs are available on the official Filmora website.
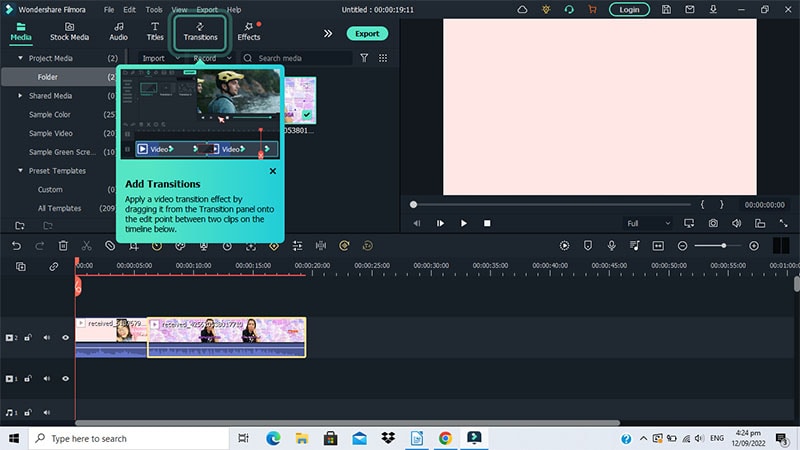
Start your own design from scratch or you can search for a YouTube video template
Select the best video that you like to be your intro, either create a video introducing yourself or just a video with some creative effects.
First you can check the Stock Media and go click some GIFs find your best fit and start customizing. You can always download some free template online that you think much better to used.
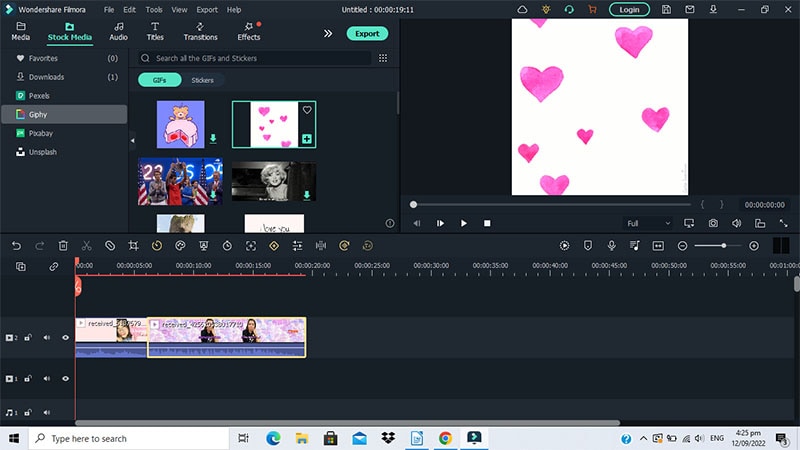
Add ready made animated graphic stickers to your YouTube intro videos by dragging and dropping them into design. Just choose “Elements” and then “Stickers” to browse a library of options.
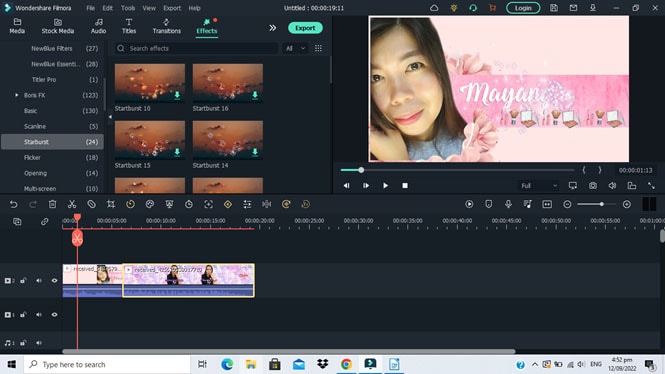
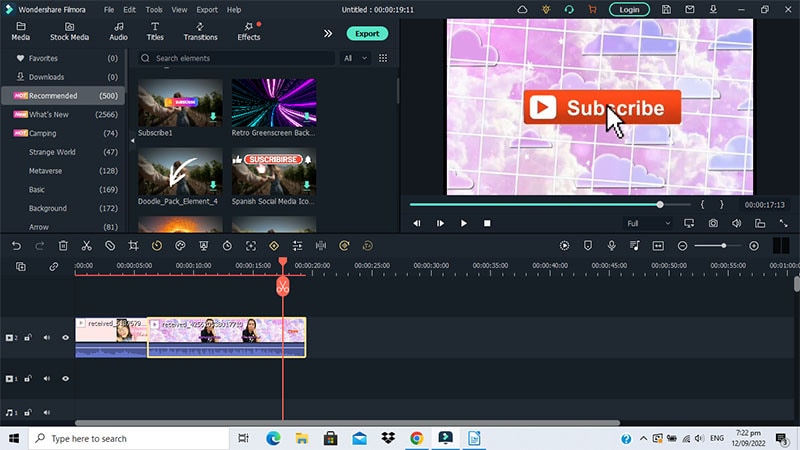
Change the image on your YouTube intro video by uploading your own or choosing from millions of free photos, graphics, and illustration in Filmora library.
Start editing your videos to make them look seamless and professional on any platforms. Whether it’s on a widescreen, tablet, or mobile device. Click some effects to add some creative design on your intro videos.
You can split, resize trim or cut your videos to tailor it to your needs.
Change the text and insert your own channel title and tagline. You can also change the font style, color, and size to better suit your brand look.
Finally, add music to your YouTube intro video by uploading a clip from a stock music of Filmora library. You can also make your own YouTube intro music using instrument or digital tools
Conclusion
Hope with these tips, you’ll be able to create quality video introductions that draw the audience in and help them get to know you better. Introduce your brand, explain your business, and connect with your prospective customers like never before. Whether your intro clips start off your YouTube videos or plays after the teaser clip, YouTube intro videos can be a valuable tool for any creator.
Remember your video doesn’t have to be a high-budget production or you don’t have to spend a lot of money on making a creative video. You could create a video that works with pretty much of any smartphone today. Have fun creating your introductions videos, set a positive mind and positive creation will come out.
What is Intro Video
There are also different ways of using the intro video, it can be used in business, in YouTube channels and others.
Introductory videos are short videos which you personally introduce yourself, your business, your brands and your brand’s mission and show your personality to your audience.
Introductory videos can help you stand out from the competition and gain favorability because you’re talking to your users on a personal level. People love seeing faces behind a brand, having an introductory video will ensure that people remember you.
YouTube intro videos are short, introductory clips that play at the beginning of a YouTube channel. They usually include the tittle of the YouTube channel, brand features like logos and colors animation and an accompanying snippet of music.
As the word suggest, intro are visuals that mark the beginning of a video. Likewise, outro are the closing visuals that appear at the end of the video. The two are widely used in educational, entertaining, business videos, webcasts, podcast, corporate presentations and the like. There are several reasons why an intro are vital elements of any professional video.
It goes without saying that intros should not be too complicated or to confusing. Other wise they will fail in their purpose and will drive the audience away. Instead, they should be simply but thoughtfully designed.
YouTube intro Videos usually include:
- Memorable background music
- Text and titles
- Stickers and GIFs
- Emojis

Goal of a Video Introduction to Follow
Making intro video is not just only in doing a YouTube channel but you can also use this guide for any businesses like brand presentation, educational etc.
Step1 Start by introducing yourself.
Step2 Get into details.
Step3 Add a call to action.
Step4 Add personalization to your video.
Step5 Video Length.
1. Start by introducing yourself
You can always start your intro by introducing yourself but don’t just state your name and what
you do, tell them why you do it, what your core values are and what motivates and dives you to
do this kind of career. Because you all know doing vlog on YouTube is a job, work, and a career.
Share emotions with your audience, and help them relate to you. Doing so is going to help you stand out immediately from the crowd and get audiences interested enough to watch the remainder of your video’s content.
2. Get into details
Tip is always direct to the point, add a few facts about yourself, like your interest or previous experiences or who you are as a person. If you are a business owner and would want to talk about your business you can always share how it started.
If we are talking about the YouTube intro video. Every good YouTube intro video usually includes beneficial information for subscribers and viewers. Add any short important text that you feel is necessary from the video titles, your YouTube channel name, and social media handles. Keep your informative text in a consistent format and branding style.
3. Add a call to action
if you have successfully maintained the interest of your viewer until the very end of your video, use this opportunity to invite them to engage with your content more. It’s worth including a call to action in each video. Take a full advantage of YouTube to provide your audience with your social media channels and maybe a link or two to your other videos that might interest them,
4. Add personalization to your video
Even though an intro can be more than logo animation, the latter should still be a part of it. Otherwise, there’s a sense that something is messing. Include eye catchy visuals effects to your videos to stands out, so that people can easily remember your YouTube channel.

5. Video length
A long intro, even if it’s spectacular, can get boring once your audience has seen it a few times. An ideal length for intros is up to 8-10 seconds only. Just enough time to deliver your message and branding, and hook audiences in for the rest of the video. Any longer than that, and you might lose viewers who are waiting to see the video that they clicked on.
In the era of social media, tempting distractions and short attention spans, it’s critical to keep your content as short and sharp as you can.
How to Create Intro Video using Filmora
Wondershare Filmora is an editing software that is available to download in google. This software is easy to use and includes products for a range of users from beginner to intermediate. Common features of Filmora include a timeline, preview window and effects library that you can use to create a nice and creative introduction video for your YouTube channel.
Free Download For Win 7 or later(64-bit)
Free Download For macOS 10.14 or later
Free trails are available to demo the product before purchasing. Pricing options for the various programs are available on the official Filmora website.

Start your own design from scratch or you can search for a YouTube video template
Select the best video that you like to be your intro, either create a video introducing yourself or just a video with some creative effects.
First you can check the Stock Media and go click some GIFs find your best fit and start customizing. You can always download some free template online that you think much better to used.

Add ready made animated graphic stickers to your YouTube intro videos by dragging and dropping them into design. Just choose “Elements” and then “Stickers” to browse a library of options.

Change the image on your YouTube intro video by uploading your own or choosing from millions of free photos, graphics, and illustration in Filmora library.
Start editing your videos to make them look seamless and professional on any platforms. Whether it’s on a widescreen, tablet, or mobile device. Click some effects to add some creative design on your intro videos.
You can split, resize trim or cut your videos to tailor it to your needs.
Change the text and insert your own channel title and tagline. You can also change the font style, color, and size to better suit your brand look.
Finally, add music to your YouTube intro video by uploading a clip from a stock music of Filmora library. You can also make your own YouTube intro music using instrument or digital tools

Conclusion
Hope with these tips, you’ll be able to create quality video introductions that draw the audience in and help them get to know you better. Introduce your brand, explain your business, and connect with your prospective customers like never before. Whether your intro clips start off your YouTube videos or plays after the teaser clip, YouTube intro videos can be a valuable tool for any creator.
Remember your video doesn’t have to be a high-budget production or you don’t have to spend a lot of money on making a creative video. You could create a video that works with pretty much of any smartphone today. Have fun creating your introductions videos, set a positive mind and positive creation will come out.
Detailed Steps to Rotate Videos in Lightworks
Lightworks is a professional non-linear video editing software application developed by EditShare. It supports Windows and Linux, and macOS.
Lightworks has a very simple and intuitive user interface. The basic workflow is: import your media files into the project, then edit them using the various tools available. When you’re finished, export your project as a video file.
Lightworks can be used for a variety of purposes, including creating videos for social media, corporate videos, documentaries, and more. It’s also been used to edit some major Hollywood films, such as The Wolf of Wall Street and The King’s Speech.
In this article, we will discuss how to rotate videos in the Lightworks application. Below is a way to rotate videos in Lightworks manually, here, we will use the Z-axis rotation.
Step-by-step on how to rotate videos in Lightworks
How to Manually Rotate a Video in Lightworks
To manually rotate a video in Lightworks, follow these steps:
Step 1: Import your video into the project.
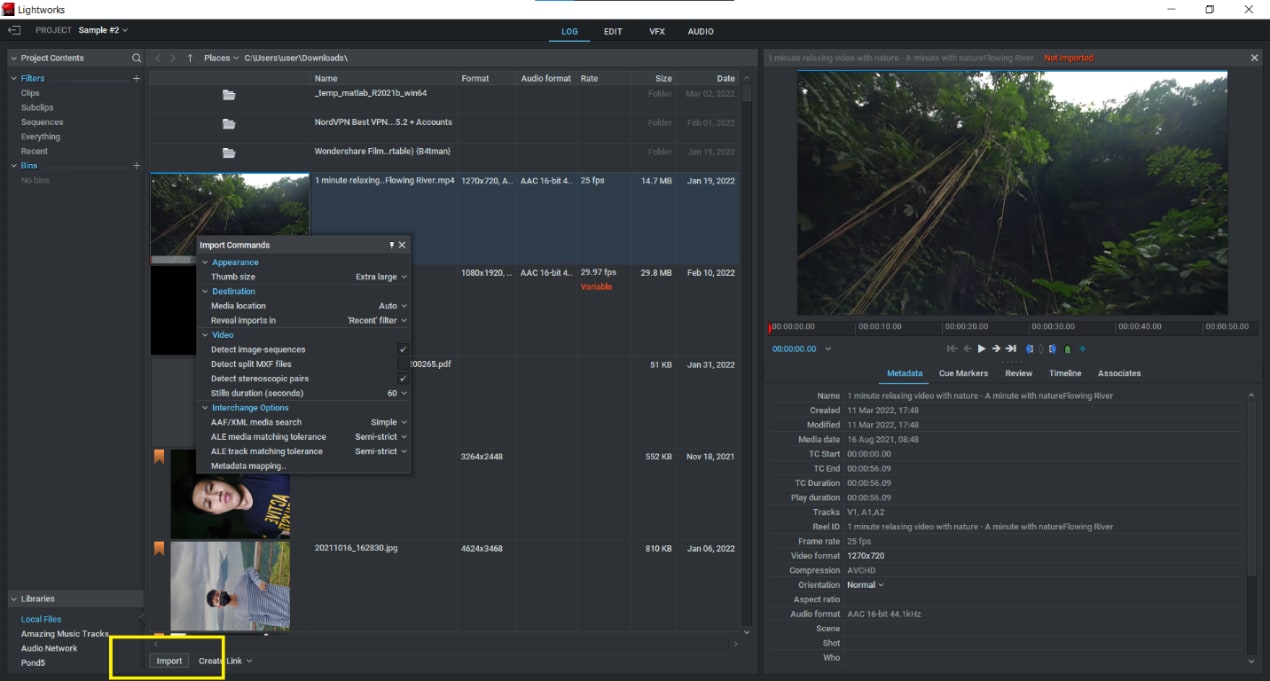
Step 2: Choose the portion of the video you want to rotate; if you want to rotate the entire movie, simply choose the entire video instead of a specific portion.

Step 3: Click on the “VFX” tab and go to the “3D DVE” section.
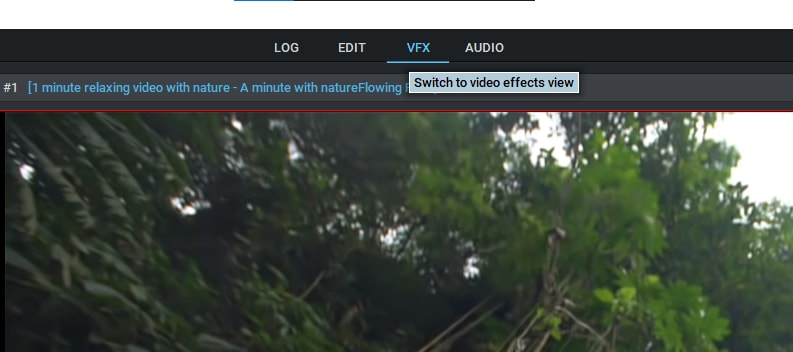
Step 4: Choose the Z axis and rotate the video to the desired degree. You can also modify the orientation of the video by entering a value in the box provided in front of the Z-axis.

Step 5: Click on the Enter in the keyboard button.
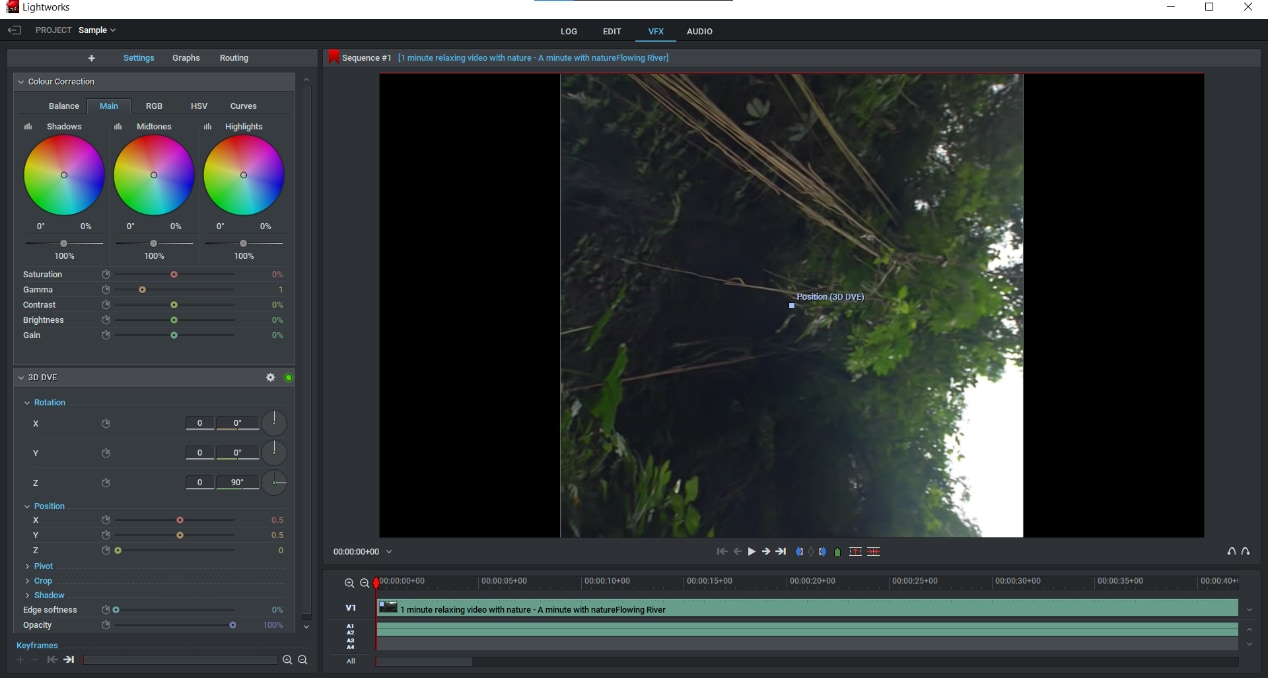
Your video will now be rotated by the selected number of degrees.
How to Rotate Videos in Filmora
On the other hand, Lightworks has an alternative video editing tool which is Filmora Video Editor . If you are looking for a lightweight video editor with an easy-to-use interface, then Filmora is the best option for you. It offers powerful features such as motion graphics, text editing, and audio editing, while still being very easy to use.
You can try it for free by downloading the trial version from the Filmora website. Filmora also offers a wide range of export options, so you can easily share your videos with others. You can export your video as an MP4 or MOV file, or upload it directly to YouTube or Facebook.
For Win 7 or later (64-bit)
For macOS 10.14 or later
Step-by-step on how to rotate videos in Filmora
How to Manually Rotate a Video in Filmora
To rotate videos in Filmora manually…
Step 1: Import your video into the project.

Step 2: Click the video clip you want to rotate.
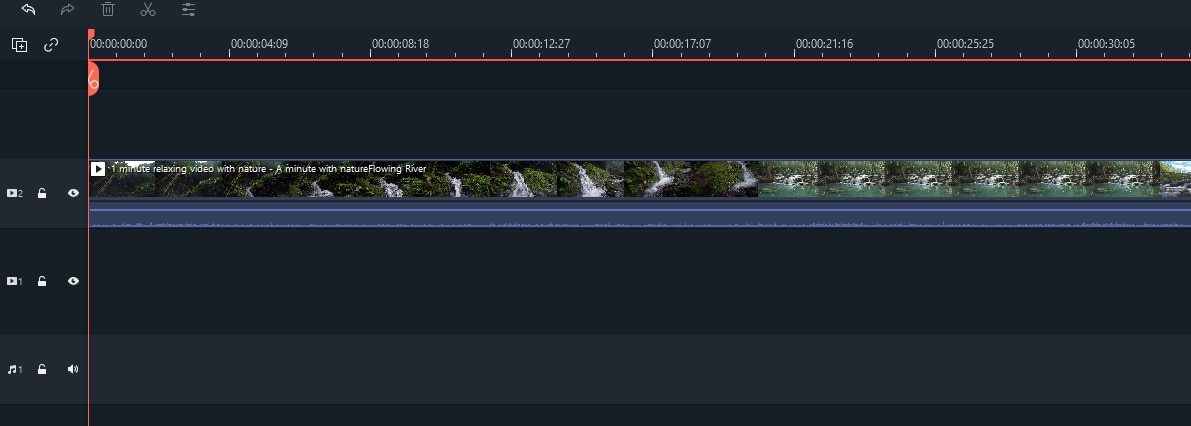
Step 3: Click on the “Edit” tool above the timeline and go to the “Transform” section. Then, select the “Rotate” option.
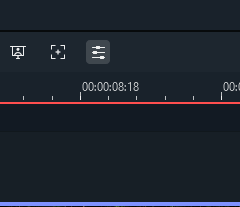

Step 4: Select the desired rotation option.

Step 5: Click on the “Ok” button.

Your video will now be rotated by the selected number of degrees.
In conclusion, Lightworks is a powerful video editing application that offers a lot of features and options. If you’re looking for something with all the features you need, then it’s a great choice. However, if you’re on a tight budget, there are other applications available that may be more suitable for your needs.
Filmora is a lightweight video editor that is easy to use and offers powerful features such as motion graphics, text editing, and audio editing. You can try it for free by downloading the trial version from the Filmora website.
Step 2: Choose the portion of the video you want to rotate; if you want to rotate the entire movie, simply choose the entire video instead of a specific portion.

Step 3: Click on the “VFX” tab and go to the “3D DVE” section.

Step 4: Choose the Z axis and rotate the video to the desired degree. You can also modify the orientation of the video by entering a value in the box provided in front of the Z-axis.

Step 5: Click on the Enter in the keyboard button.

Your video will now be rotated by the selected number of degrees.
How to Rotate Videos in Filmora
On the other hand, Lightworks has an alternative video editing tool which is Filmora Video Editor . If you are looking for a lightweight video editor with an easy-to-use interface, then Filmora is the best option for you. It offers powerful features such as motion graphics, text editing, and audio editing, while still being very easy to use.
You can try it for free by downloading the trial version from the Filmora website. Filmora also offers a wide range of export options, so you can easily share your videos with others. You can export your video as an MP4 or MOV file, or upload it directly to YouTube or Facebook.
For Win 7 or later (64-bit)
For macOS 10.14 or later
Step-by-step on how to rotate videos in Filmora
How to Manually Rotate a Video in Filmora
To rotate videos in Filmora manually…
Step 1: Import your video into the project.

Step 2: Click the video clip you want to rotate.

Step 3: Click on the “Edit” tool above the timeline and go to the “Transform” section. Then, select the “Rotate” option.


Step 4: Select the desired rotation option.

Step 5: Click on the “Ok” button.

Your video will now be rotated by the selected number of degrees.
In conclusion, Lightworks is a powerful video editing application that offers a lot of features and options. If you’re looking for something with all the features you need, then it’s a great choice. However, if you’re on a tight budget, there are other applications available that may be more suitable for your needs.
Filmora is a lightweight video editor that is easy to use and offers powerful features such as motion graphics, text editing, and audio editing. You can try it for free by downloading the trial version from the Filmora website.
Step 2: Choose the portion of the video you want to rotate; if you want to rotate the entire movie, simply choose the entire video instead of a specific portion.

Step 3: Click on the “VFX” tab and go to the “3D DVE” section.

Step 4: Choose the Z axis and rotate the video to the desired degree. You can also modify the orientation of the video by entering a value in the box provided in front of the Z-axis.

Step 5: Click on the Enter in the keyboard button.

Your video will now be rotated by the selected number of degrees.
How to Rotate Videos in Filmora
On the other hand, Lightworks has an alternative video editing tool which is Filmora Video Editor . If you are looking for a lightweight video editor with an easy-to-use interface, then Filmora is the best option for you. It offers powerful features such as motion graphics, text editing, and audio editing, while still being very easy to use.
You can try it for free by downloading the trial version from the Filmora website. Filmora also offers a wide range of export options, so you can easily share your videos with others. You can export your video as an MP4 or MOV file, or upload it directly to YouTube or Facebook.
For Win 7 or later (64-bit)
For macOS 10.14 or later
Step-by-step on how to rotate videos in Filmora
How to Manually Rotate a Video in Filmora
To rotate videos in Filmora manually…
Step 1: Import your video into the project.

Step 2: Click the video clip you want to rotate.

Step 3: Click on the “Edit” tool above the timeline and go to the “Transform” section. Then, select the “Rotate” option.


Step 4: Select the desired rotation option.

Step 5: Click on the “Ok” button.

Your video will now be rotated by the selected number of degrees.
In conclusion, Lightworks is a powerful video editing application that offers a lot of features and options. If you’re looking for something with all the features you need, then it’s a great choice. However, if you’re on a tight budget, there are other applications available that may be more suitable for your needs.
Filmora is a lightweight video editor that is easy to use and offers powerful features such as motion graphics, text editing, and audio editing. You can try it for free by downloading the trial version from the Filmora website.
Step 2: Choose the portion of the video you want to rotate; if you want to rotate the entire movie, simply choose the entire video instead of a specific portion.

Step 3: Click on the “VFX” tab and go to the “3D DVE” section.

Step 4: Choose the Z axis and rotate the video to the desired degree. You can also modify the orientation of the video by entering a value in the box provided in front of the Z-axis.

Step 5: Click on the Enter in the keyboard button.

Your video will now be rotated by the selected number of degrees.
How to Rotate Videos in Filmora
On the other hand, Lightworks has an alternative video editing tool which is Filmora Video Editor . If you are looking for a lightweight video editor with an easy-to-use interface, then Filmora is the best option for you. It offers powerful features such as motion graphics, text editing, and audio editing, while still being very easy to use.
You can try it for free by downloading the trial version from the Filmora website. Filmora also offers a wide range of export options, so you can easily share your videos with others. You can export your video as an MP4 or MOV file, or upload it directly to YouTube or Facebook.
For Win 7 or later (64-bit)
For macOS 10.14 or later
Step-by-step on how to rotate videos in Filmora
How to Manually Rotate a Video in Filmora
To rotate videos in Filmora manually…
Step 1: Import your video into the project.

Step 2: Click the video clip you want to rotate.

Step 3: Click on the “Edit” tool above the timeline and go to the “Transform” section. Then, select the “Rotate” option.


Step 4: Select the desired rotation option.

Step 5: Click on the “Ok” button.

Your video will now be rotated by the selected number of degrees.
In conclusion, Lightworks is a powerful video editing application that offers a lot of features and options. If you’re looking for something with all the features you need, then it’s a great choice. However, if you’re on a tight budget, there are other applications available that may be more suitable for your needs.
Filmora is a lightweight video editor that is easy to use and offers powerful features such as motion graphics, text editing, and audio editing. You can try it for free by downloading the trial version from the Filmora website.
Also read:
- In 2024, Guide To Slowing Down Videos in Snapchat Discussing the Details
- Updated How To Synchronize Your Audio And Videos Properly for 2024
- New 2024 Approved Learn How to Create Your Own Custom Animated Text Intro in the Filmora Video Editor. Follow a Few Simple Steps to Create Something that Looks Incredible
- New In 2024, Ultimate Guide on Making A Slideshow Video
- 2024 Approved How to Create Your Own LUTs for Your Video with Filmora
- 2024 Approved Guide To Slowing Down Videos in Snapchat Discussing the Details
- New 100+ Best TikTok Captions Enhance Your Content for 2024
- New In 2024, 10 Best Innovative AR Video Effects to Check Out
- New How to Animate Text in A Video
- Updated In 2024, Ultimate Guide on How to Film Better in Public
- 2024 Approved A Review of 3D LUT Mobile App - A Composite Application for Editing Media
- How to Add Green Screen Effects In Phhotoshop for 2024
- 2024 Approved How to Create a Freeze Frame Sequence Effect
- Updated Learn Color Correction in After Effects with These Videos
- Ultimate Guide on Converting Word to SRT
- New In 2024, Premiere Pro Tutorial How To Change Video Frame Rate
- New Why You Should Master Slideshows In Lightroom, In 2024
- Are You Seeking an Answer for What Is a LUT in the Video? In This Article, We Will Provide You with Detailed Information About LUTs and Their Utility for 2024
- Updated How to Remove or Mute Audio in Video with Android Phones, In 2024
- Updated 2024 Approved Looking for a Way to Learn How to Merge Videos in HandBrake? Theres a Better Solution Waiting for You Inside
- Updated Here We Will Investigate AI-Based Video Interview, How It Is Being Used, and How to Master an Artificial Intelligence Video Interview Act for 2024
- Updated In 2024, 7 Best MP4 Editors on Mac Edit MP4 in Mac
- New How to Create Intro with Legend Intro Maker for 2024
- 2024 Approved Change Aspect Ratio of Video
- Updated Something That You Should Know About MP4 Video Format
- New Are You Ready to Learn About Something Free yet Amazing? We Are Talking About All Format Video Players for PC that You Should Know , Lets Begin
- Updated Looking for the Simple Steps to Add Transition Effects in Your Video? We Will Illustrate How to Add Transition in Filmora and Mention Tips and Tricks for Video Transition Effects
- How to Create a Slideshow on iPhone for 2024
- New 2024 Approved Green Screens Are a Fun Way for Creators to Bring Their Personality to Their Stream, Allowing Them to Dynamically Alter Their Stream Background and Make Their Content Appear Even More Engaging and Polished
- Updated In 2024, How to Rotate Video in iMovie with Alternative
- New This Article Talks in Detail About How to Download Windows Movie Maker 2012 Version, the Key Features, How to Use It, Etc. It Further Discusses an Alternative Way to Create Videos on Windows PC. Check Out
- Updated 2024 Approved Slow Down the GIF to Emphasize Details Better. To Do so, Read This Guide and Learn to Use the Best Platforms for Slow-Motion GIFs
- Updated The Best Way To Color Grading & Color Correction in Filmora for 2024
- Best AR Video App - Top 10 Picks
- Updated 2024 Approved A Full Review of Leeming LUT Pro
- Updated In 2024, Step by Step to Rotate Videos Using Kdenlive
- 2024 Approved List of Supported Whatsapp Video Format You May Want to Know
- A Guide to Adding Audio in Wondershare Filmora for 2024
- 2024 Approved Wondershare Filmora Tutorial | Using The AI Auto Reframe Feature
- Updated Powerpoint Supported Video Format and Advanced User Tips
- Updated 2024 Approved You Must Be Wondering Which the Best Online Transparent Image-Maker Is! Well, There Is No Need to Get Confused as Here; You Will Get a Curated List for the Same
- New You May Want to Create Your Video Tutorial and Share Your Knowledge with Others. Fortunately, You Can Easily Create a Professionally Edited Tutorial Video with Filmora. Keep Reading This Article Since We Will Show You How to Do It for 2024
- Will iSpoofer update On Apple iPhone XS | Dr.fone
- How to restore wiped messages on Tecno Spark 10 4G
- 8 Ultimate Fixes for Google Play Your Xiaomi 14 Ultra Isnt Compatible | Dr.fone
- New 2024 Approved How To Auto Translate YouTube Videos Into Different Languages
- In 2024, Top 15 Apps To Hack WiFi Password On Vivo Y100
- In 2024, Easy Guide to Nokia C12 FRP Bypass With Best Methods
- 8 Ultimate Fixes for Google Play Your OnePlus Nord 3 5G Isnt Compatible | Dr.fone
- In 2024, Network Locked SIM Card Inserted On Your Oppo A56s 5G Phone? Unlock It Now
- How To Stream Anything From Oppo Reno 8T to Apple TV | Dr.fone
- Updated Elevate Your Content with the Best Free Video Translator Apps for 2024
- Ways To Find Unlocking Codes For Vivo T2x 5G Phones
- In 2024, Top 15 Apps To Hack WiFi Password On Infinix Note 30 5G
- Easily Unlock Your Oppo A1x 5G Device SIM
- Identify missing or malfunctioning drivers with Windows Device Manager on Windows 7
- In 2024, 15 Best Strongest Pokémon To Use in Pokémon GO PvP Leagues For Samsung Galaxy M54 5G | Dr.fone
- Apple iPhone XS Mirror to PC? Top Apps You Must Know | Dr.fone
- FRP Hijacker by Hagard Download and Bypass your ZTE Nubia Flip 5G FRP Locks
- How to get the dragon scale and evolution-enabled pokemon On Apple iPhone 14? | Dr.fone
- How to sign Word 2016 free
- Updated Facebook Live Shopping A Comprehensive Guide for 2024
- Updated Techniques for Creating Animated Logo That Few People Know About for 2024
- In 2024, How to Sign Out of Apple ID On Apple iPhone 12 mini without Password?
- Title: New In 2024, 3 In-Camera Transitions Tricks To Make Videos
- Author: Morgan
- Created at : 2024-07-01 13:02:17
- Updated at : 2024-07-02 13:02:17
- Link: https://ai-video-editing.techidaily.com/new-in-2024-3-in-camera-transitions-tricks-to-make-videos/
- License: This work is licensed under CC BY-NC-SA 4.0.

