
:max_bytes(150000):strip_icc():format(webp)/6-best-parental-control-apps-of-2019-featured-c5b50932ab9c4c0fbc0757665e46b6b2.jpg)
New In 2024, 4 Methods How To Make a Recap Video
4 Methods: How To Make a Recap Video
Recap videos are a great way to capture the highlights of an event and share them with a wider audience. Whether you’re a professional videographer or a hobbyist, creating a recap video can be a fun and rewarding experience. But with so many different techniques and approaches, knowing where to start can be challenging.
In this article, we’ll explore four methods for making a recap video to help you capture the essence of your event and keep your audience engaged. From planning and scripting to shooting and editing, we’ll cover all the key steps in creating a high-quality recap video. Whether a seasoned pro or a beginner, you can find something valuable in this guide.

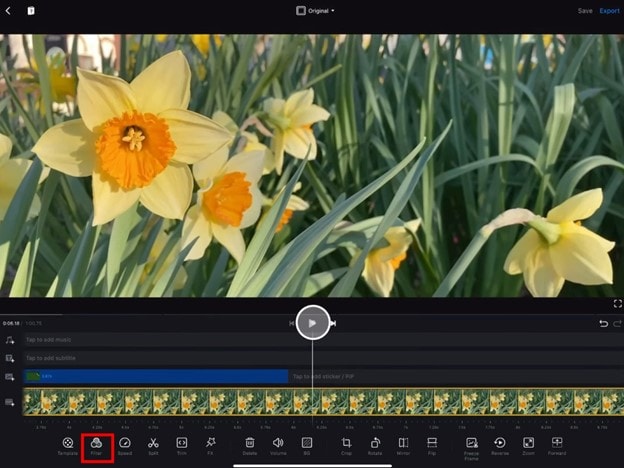
Method 1. How To Make a Recap Video from Scratch Using Filmora for Desktop
One approach to creating a recap video is to start from scratch using video editing software like Wondershare Filmora for Desktop. This powerful software offers a wide range of tools and features that allow you to create professional-looking videos easily.
Free Download For Win 7 or later(64-bit)
Free Download For macOS 10.14 or later
Whether you’re a beginner or an experienced video editor, Filmora for Desktop provides all the tools you need to create a stunning recap video that showcases the best moments from your event. With its intuitive interface and easy-to-use features, Filmora for Desktop makes it simple to bring your vision to life and create a video that truly captures the spirit of your event.
Here’s how to make the recap video from scratch using Wondershare Filmora for Desktop:
Step1 Download New Year Memory Book Pack from FilmStock

Step2 Open Filmora and go to “Effects“ > “FilmStock“ > “New Year Memory Book.”
Step3 Drag and drop media like clips, overlay, and tracks to the timeline

Step4 Import photos and videos.

Step5 Add the imported media and edit the clip.
Step6 Add some effects and overlay to the timeline

Step7 Adjust the Overlay duration of the clip.
Step8 Apply all the transitions and overlay to the clip. Edit the text and save it.

For more detailed instructions, you can watch the video tutorial:
Method 2. How To Make an Event Recap Video Using Filmora Templates on a Desktop
Another approach to creating a recap video is using templates from Filmora for Desktop. Filmora offers various templates specifically designed for event recap videos, making it easy to create a professional-looking video without spending hours editing.
These templates come pre-designed with stunning graphics, animations, and transitions and can be easily customized to match your event. With the help of the templates, you can create an event recap video in a matter of minutes without needing any prior editing experience.
Step1 Begin by creating a new project in Filmora and importing your photos and footage into the software.
Step2 Next, navigate to the “Templates“ tab and search for “Retro“ or “Recap“ to find a template that suits your event. Drag the desired template to the timeline.
Step3 Drag your footage onto the timeline, and when prompted, select “Replace“ to replace the sample footage with your own.
Step4 Customize the texts in the template to match the details of your event.
Step5 Preview the final result in the player window, and if satisfied, click “Export“ and adjust the output settings in the “Output Settings“ window.
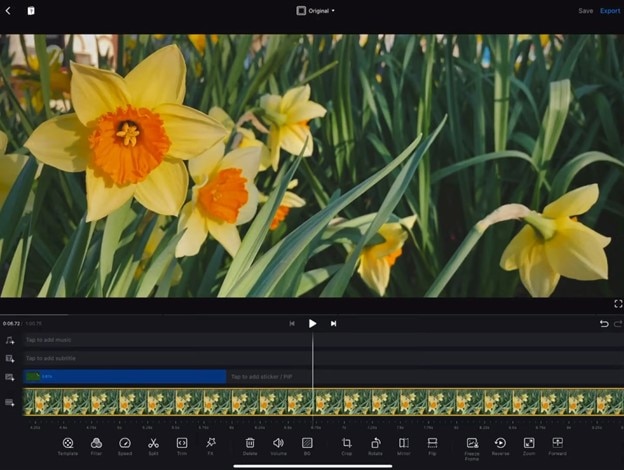
Method 3. How to Create an End-of-Year Recap Video With Filmora for Mobile
Creating a recap video doesn’t have to be limited to desktop editing software. With Filmora for mobile, you can create a professional-looking end-of-year recap video from the convenience of your mobile device.
With Filmora for mobile, you have access to a wide range of editing tools and features, including filters, transitions, and text options, so you can create a video that truly captures the essence of your event. So whether you’re on the go or prefer to edit on your mobile device, Filmora for mobile makes it easy to create a high-quality recap video that you can share with your audience.
Step1 Start by launching the Filmora for mobile app and selecting the “Templates“ option.

Step2 Tap the “New Year“ panel for an end-of-year recap video template.

Step3 Select the template and tap on “Make Video“ to start editing.
Step4 Add your photos and footage to the template, then tap “Go.”

Step5 Preview the output. Tap “Pro Export“

Step6 Users can share the video on social platforms or tap “More“ to download the video.

Step7 Save the final video to your device

Method 4. How To Create a Memories Recap Video on Instagram Reel
Another way to create a memories recap video is using the Instagram Reel feature. Instagram Reel is a short-form video feature that allows users to create and share videos up to 60 seconds long. With Instagram Reel, you can easily create a recap video of your event by compiling short clips, adding music and text, and sharing it with your followers.
Instagram Reel provides a platform to reach a wider audience and create engaging content. It’s a great way to engage with your followers and share the highlights of your event in a creative and visually appealing way.
Step1 Start a new Reel on Instagram

Step2 Choose a template

Step3 Compile clips, add music, text, and effects

Step4 Post and share the Reel on Instagram and other platforms.

Tips for Making Event Recap Videos
When creating an event recap video, there are key tips to remember to ensure that your video is engaging and effective.
- Know your audience: Tailor the content of your video to your audience to ensure that it resonates with them.
- Highlight the key moments: Be selective and focus on your event’s most memorable and impactful moments.
- Music and Sound Design: The right music can help set the tone and mood of your video and can greatly enhance the overall impact of your video.
- Quality Footage: Make sure to focus on the quality of your footage and use various shots and angles to keep the video interesting and engaging.
- Editing: Keep the pacing of your video brisk and engaging, and use transitions, special effects, and text overlays to help tie the various elements of your video together.
- Plan the video: Careful planning is crucial for creating a great event recap video.
- Use the right tools: Use the appropriate software and equipment to create a professional-looking video.
- Test the video: Preview the video before publishing and make any necessary adjustments to ensure it meets your standards.
- Post-production: After filming, spend time on post-production, such as color correction, audio mixing, and adding text.
- Share it widely: Share the video on different platforms to reach a wider audience.
By following these tips and working with the right tools and techniques, you can create a video that truly captures the essence of your event and resonates with your audience.
Conclusion
Creating an engaging event recap video is an excellent way to share the highlights of your event with a wider audience. With the right tools and techniques, you can create a professional-looking video that truly captures the essence of your event.
Filmora for desktop, Filmora for mobile, and Instagram Reel are all great options that provide a wide range of editing tools and features to help you create a high-quality video. Whether a seasoned pro or a beginner, these tools make it easy to bring your vision to life and create a video that resonates with your audience.
Free Download For macOS 10.14 or later
Whether you’re a beginner or an experienced video editor, Filmora for Desktop provides all the tools you need to create a stunning recap video that showcases the best moments from your event. With its intuitive interface and easy-to-use features, Filmora for Desktop makes it simple to bring your vision to life and create a video that truly captures the spirit of your event.
Here’s how to make the recap video from scratch using Wondershare Filmora for Desktop:
Step1 Download New Year Memory Book Pack from FilmStock
Step2 Open Filmora and go to “Effects“ > “FilmStock“ > “New Year Memory Book.”
Step3 Drag and drop media like clips, overlay, and tracks to the timeline
Step4 Import photos and videos.
Step5 Add the imported media and edit the clip.
Step6 Add some effects and overlay to the timeline
Step7 Adjust the Overlay duration of the clip.
Step8 Apply all the transitions and overlay to the clip. Edit the text and save it.
For more detailed instructions, you can watch the video tutorial:
Method 2. How To Make an Event Recap Video Using Filmora Templates on a Desktop
Another approach to creating a recap video is using templates from Filmora for Desktop. Filmora offers various templates specifically designed for event recap videos, making it easy to create a professional-looking video without spending hours editing.
These templates come pre-designed with stunning graphics, animations, and transitions and can be easily customized to match your event. With the help of the templates, you can create an event recap video in a matter of minutes without needing any prior editing experience.
Step1 Begin by creating a new project in Filmora and importing your photos and footage into the software.
Step2 Next, navigate to the “Templates“ tab and search for “Retro“ or “Recap“ to find a template that suits your event. Drag the desired template to the timeline.
Step3 Drag your footage onto the timeline, and when prompted, select “Replace“ to replace the sample footage with your own.
Step4 Customize the texts in the template to match the details of your event.
Step5 Preview the final result in the player window, and if satisfied, click “Export“ and adjust the output settings in the “Output Settings“ window.
Method 3. How to Create an End-of-Year Recap Video With Filmora for Mobile
Creating a recap video doesn’t have to be limited to desktop editing software. With Filmora for mobile, you can create a professional-looking end-of-year recap video from the convenience of your mobile device.
With Filmora for mobile, you have access to a wide range of editing tools and features, including filters, transitions, and text options, so you can create a video that truly captures the essence of your event. So whether you’re on the go or prefer to edit on your mobile device, Filmora for mobile makes it easy to create a high-quality recap video that you can share with your audience.
Step1 Start by launching the Filmora for mobile app and selecting the “Templates“ option.
Step2 Tap the “New Year“ panel for an end-of-year recap video template.
Step3 Select the template and tap on “Make Video“ to start editing.
Step4 Add your photos and footage to the template, then tap “Go.”
Step5 Preview the output. Tap “Pro Export“
Step6 Users can share the video on social platforms or tap “More“ to download the video.
Step7 Save the final video to your device
Method 4. How To Create a Memories Recap Video on Instagram Reel
Another way to create a memories recap video is using the Instagram Reel feature. Instagram Reel is a short-form video feature that allows users to create and share videos up to 60 seconds long. With Instagram Reel, you can easily create a recap video of your event by compiling short clips, adding music and text, and sharing it with your followers.
Instagram Reel provides a platform to reach a wider audience and create engaging content. It’s a great way to engage with your followers and share the highlights of your event in a creative and visually appealing way.
Step1 Start a new Reel on Instagram
Step2 Choose a template
Step3 Compile clips, add music, text, and effects
Step4 Post and share the Reel on Instagram and other platforms.
Tips for Making Event Recap Videos
When creating an event recap video, there are key tips to remember to ensure that your video is engaging and effective.
- Know your audience: Tailor the content of your video to your audience to ensure that it resonates with them.
- Highlight the key moments: Be selective and focus on your event’s most memorable and impactful moments.
- Music and Sound Design: The right music can help set the tone and mood of your video and can greatly enhance the overall impact of your video.
- Quality Footage: Make sure to focus on the quality of your footage and use various shots and angles to keep the video interesting and engaging.
- Editing: Keep the pacing of your video brisk and engaging, and use transitions, special effects, and text overlays to help tie the various elements of your video together.
- Plan the video: Careful planning is crucial for creating a great event recap video.
- Use the right tools: Use the appropriate software and equipment to create a professional-looking video.
- Test the video: Preview the video before publishing and make any necessary adjustments to ensure it meets your standards.
- Post-production: After filming, spend time on post-production, such as color correction, audio mixing, and adding text.
- Share it widely: Share the video on different platforms to reach a wider audience.
By following these tips and working with the right tools and techniques, you can create a video that truly captures the essence of your event and resonates with your audience.
Conclusion
Creating an engaging event recap video is an excellent way to share the highlights of your event with a wider audience. With the right tools and techniques, you can create a professional-looking video that truly captures the essence of your event.
Filmora for desktop, Filmora for mobile, and Instagram Reel are all great options that provide a wide range of editing tools and features to help you create a high-quality video. Whether a seasoned pro or a beginner, these tools make it easy to bring your vision to life and create a video that resonates with your audience.
Leading Applications to Create Fast Motion in iPhone
Fast motion has always been a time saver since it covers the unnecessary details in seconds. Acquiring this skill is important if you are a content creator or videographer. You might already be aware of how to make fast-motion videos on iPhone.
However, if this is unheard of or you are new to video editing, we’ve got you covered. This article covers the ins and outs of how to make a video fast-motion iPhone. In addition, users can gain insights into some applications and their guides. Moreover, we’ll discuss an AI alternative to those applications.
Slow Motion Video Maker Slow your video’s speed with better control of your keyframes to create unique cinematic effects!
Make A Slow Motion Video Make A Slow Motion Video More Features

Part 1: What are the Different Use Cases of Fast-Motion Videos?
The fast motion effect covers multiple creative ways of speed increase that you can incorporate. All these ways apply to different genres of videos. This section diverts your focus on different use cases of fast-motion videos. Here is how to make video fast motion on iPhone for different purposes:
1. Construction and Development Videos
Fast-motion videos help in video creation where development is happening. Such videos show the before and after results of an area, location, or building. The construction or manufacturing process is shown in fast motion in engineering videos. It also helps in showing the transformation of a non-populated or undeveloped city.
2. Nature Photography or Documentaries
Natural phenomenon like the blooming of a flower usually occurs at a slower rate. Capturing them takes a long time, but the audience may not like such a long duration. Hence, editors can increase the speed of such videos to speed up the phenomenon. In addition, if you watch wildlife or nature documentaries, they also use this effect.
3. Aesthetic Expression
Fast-paced videos bring a sense of creativity to your videos as they are an artistic expression of time. To indicate the passing of time in movies or to show a scene at a railway station or airport. It also indicates that the filmmakers and editors have put in an effort.
Part 2: Different Tools to Help You Make Fast Motion Video on iPhone
Fast-motion tools are important in video editing since they offer a chance at creativity. They have a wide range of applications in the filmmaking and media industry. Do you know how to make a video fast-motion iPhone using a third-party application? If not, here is a detailed guide on some of them:
1. iMovie
If you are looking for an accessible application with an easy-to-use interface, this is for you. The process of speed manipulation consists of a slider for control. After editing, you can integrate multiple soundtracks from 130 pre-assembled tracks. The application is compatible with iPhone X and newer versions.
Steps to Create a Fast Motion Video Using iMovie
Do you want to learn how to make fast-motion videos on your iPhone with this application? Given Below is your perfect guide to crafting a fast-paced video:
Step 1: After downloading the application on your iPhone, access it and “Start New Project.” Then, select a video from your media library to edit.

Step 2: After importing the video, click the “Pen” icon to access editing options. Then, click the “Edit Clip” option to do so.

Step 3: Move to the bottom of the screen and slide the given option to access “Speed.” Click it and drag the speed slider towards the right side to increase the speed of the video.

Step 4: Hit the “Play” button to see the speed of the video and re-adjust if required. Go to the top right corner of the screen, locate the “Export” icon, and click it.

2. Video Speed Changer – Editor
Want to learn how to make video fast motion on iPhone without additional technicalities? This application ensures a comprehensive narrative just for speed change. Users can formulate 3 fast motion effects with it at specific frames. For pre-recorded or new videos, it offers Time Wrap, Time Lapse, and Hyper-lapse. The application has been found to support iOS 12.3 and later versions.
Steps to Create a Fast Motion Video Using Video Speed Changer
Multiple applications provide similar services, but none can compare to its UI. Here is how to make a video fast motion iPhone using this
Step 1: Access this application from the App Store and launch it after installation. Click on the “Select Video” button and import a clip.

Step 2: Once you have selected a video, it will take you straight to the speed change option. Change the position of the given slider. Finally, preview the video and click the “Save Video” button to save it on your device.

3. Slow Motion Video FX Edit
Although the name indicates otherwise, this video editor is capable of high-speed change. It comes with an intuitive user interface and is easy for anyone to employ. In addition to speed alteration, you can insert 40 different filters into your video. You can also commence its freeze frame action to add an extra layer of creativity. The tool is compatible with iOS 13.0 and higher versions.
Steps to Create Fast Motion Using Slow Motion Video FX
This is another editor to gain insights on how to make fast-motion videos on an iPhone. We have given the verified step-by-step guide to using this app:
Step 1: After launching this application, click the “Choose From Library” option. Then, select a clip from your device’s gallery.

Step 2: Once the video is compressed, you’ll be taken to the speed change screen. From there, you can alter the speed of different clip sections. Move the slider of the relevant section upward to increase the speed.

Step 3: Once you have altered the speed, navigate towards the top right corner and click the “Export” icon.

Part 3: Desktop Solution: Remedy for Those Who Want to Speed Up Video on Their Computer
If you have gone through the above applications, you know the fast-motion effect. Do you want to know how to make a video fast motion on an iPhone using a computer? Wondershare Filmora is the best alternative to the above applications for creating this effect. The software is compatible with all the macOS and iOS devices and allows seamless editing.
With this editor, you get multiple options to create a fast-motion video. In this article, we will use the Uniform Speed feature. The operating process is very accessible and designed to assist both professionals and beginners. You can also apply the AI Frame Interpolation option to apply “Frame Bending.”
Free Download For Win 7 or later(64-bit)
Free Download For macOS 10.14 or later
Step-by-Step Guide to Speed Up Video with Filmora
After reading the article till now, you have gained knowledge of Filmora’s speeding options. How to make fast motion video on iPhone now seems like an easy option. Even though the process is easy, we want you to stay ahead. Hence, here is a step-by-step procedure for creating fast motion in Filmora:
Step 1Create a New Project and Import Media
First, connect your iOS device to your Wondershare Filmora device. After that, launch Filmora to access the main menu. From there, click on the “New Project” tab fashioned in the center. Expand the “Import” option in the Project Media section and select the suitable option. In this case, choose the “Import from Phone or Camera” option.

Step 2Access the Uniform Speed Section
After bringing the imported media to the timeline, select it to access the settings panel. Select the “Speed > Uniform Speed” tab from the appeared panel. Then, drag the Speed slider on the right side to increase speed. Afterward, click the “Play” button on the preview screen to see the results.

Step 3Apply Frame Bending and Export
This part is optional, but if you find an irregularity or roughness to the video, apply this. Go to the “AI Frame Interpolation” section at the bottom and expand the options. From the dropdown menu, select the “Frame Bending” option and do the rendering from the timeline. After everything is set, select the “Export” button at the top right corner.

Trending Video Editing Features of Wondershare Filmora
Filmora is a versatile tool that is not confined to speed manipulation or fast motion only. This editor offers audio, text, AI editing options, and video. Here are some prominent key features of Wondershare Filmora to help you in editing:
1. Speed Ramping
The other option for speed modification mentioned previously is speed ramping. This option comes with 6 editable speed change presets for automated editing. However, you can also employ the custom preset to create your own way. Moreover, it allows the audio pitch option to enable automated maintenance of audio.
2. AI Smart Cutout
There is more than one way of removing and replacing a background in Filmora. Smart Cutout offers an AI-integrated masking option to cut out the selected parts. You can also set preferences for Edge Thickness or Edge Feather for accuracy. Afterward, you can introduce three background options: color, grid, or more.
3. AI Text-to-Video
Bring your imagination to visuals with this amazing generative AI video creator. It creates videos from text and covers the voice and graphical elements. Users can customize the AI voice and ratio before generating a video. The prompt section offers up to 1000 characters for adding a script or giving directions.
4. AI Smart Masking
Are there any effects or filters you want to introduce to only a specific part of the video? Use Filmora’s AI mask for automated masking of an object or background. The mask brush selects the relevant area on its own. Besides AI masks, there is a manual masking option or mask shapes to apply. You can also customize the Brush size according to the video.
Conclusion
The article highlighted the importance of increasing video speed in many industries. In addition, we discussed some tools that make fast motion with ease. We also provided step-by-step guides on how to make fast motion video on iPhone. Wondershare Filmora stands amongst all those applications to create fast motion. We recommend this software due to its multiple functionalities and detailed editing abilities.
Make A Slow Motion Video Make A Slow Motion Video More Features
Part 1: What are the Different Use Cases of Fast-Motion Videos?
The fast motion effect covers multiple creative ways of speed increase that you can incorporate. All these ways apply to different genres of videos. This section diverts your focus on different use cases of fast-motion videos. Here is how to make video fast motion on iPhone for different purposes:
1. Construction and Development Videos
Fast-motion videos help in video creation where development is happening. Such videos show the before and after results of an area, location, or building. The construction or manufacturing process is shown in fast motion in engineering videos. It also helps in showing the transformation of a non-populated or undeveloped city.
2. Nature Photography or Documentaries
Natural phenomenon like the blooming of a flower usually occurs at a slower rate. Capturing them takes a long time, but the audience may not like such a long duration. Hence, editors can increase the speed of such videos to speed up the phenomenon. In addition, if you watch wildlife or nature documentaries, they also use this effect.
3. Aesthetic Expression
Fast-paced videos bring a sense of creativity to your videos as they are an artistic expression of time. To indicate the passing of time in movies or to show a scene at a railway station or airport. It also indicates that the filmmakers and editors have put in an effort.
Part 2: Different Tools to Help You Make Fast Motion Video on iPhone
Fast-motion tools are important in video editing since they offer a chance at creativity. They have a wide range of applications in the filmmaking and media industry. Do you know how to make a video fast-motion iPhone using a third-party application? If not, here is a detailed guide on some of them:
1. iMovie
If you are looking for an accessible application with an easy-to-use interface, this is for you. The process of speed manipulation consists of a slider for control. After editing, you can integrate multiple soundtracks from 130 pre-assembled tracks. The application is compatible with iPhone X and newer versions.
Steps to Create a Fast Motion Video Using iMovie
Do you want to learn how to make fast-motion videos on your iPhone with this application? Given Below is your perfect guide to crafting a fast-paced video:
Step 1: After downloading the application on your iPhone, access it and “Start New Project.” Then, select a video from your media library to edit.
Step 2: After importing the video, click the “Pen” icon to access editing options. Then, click the “Edit Clip” option to do so.
Step 3: Move to the bottom of the screen and slide the given option to access “Speed.” Click it and drag the speed slider towards the right side to increase the speed of the video.
Step 4: Hit the “Play” button to see the speed of the video and re-adjust if required. Go to the top right corner of the screen, locate the “Export” icon, and click it.
2. Video Speed Changer – Editor
Want to learn how to make video fast motion on iPhone without additional technicalities? This application ensures a comprehensive narrative just for speed change. Users can formulate 3 fast motion effects with it at specific frames. For pre-recorded or new videos, it offers Time Wrap, Time Lapse, and Hyper-lapse. The application has been found to support iOS 12.3 and later versions.
Steps to Create a Fast Motion Video Using Video Speed Changer
Multiple applications provide similar services, but none can compare to its UI. Here is how to make a video fast motion iPhone using this
Step 1: Access this application from the App Store and launch it after installation. Click on the “Select Video” button and import a clip.
Step 2: Once you have selected a video, it will take you straight to the speed change option. Change the position of the given slider. Finally, preview the video and click the “Save Video” button to save it on your device.
3. Slow Motion Video FX Edit
Although the name indicates otherwise, this video editor is capable of high-speed change. It comes with an intuitive user interface and is easy for anyone to employ. In addition to speed alteration, you can insert 40 different filters into your video. You can also commence its freeze frame action to add an extra layer of creativity. The tool is compatible with iOS 13.0 and higher versions.
Steps to Create Fast Motion Using Slow Motion Video FX
This is another editor to gain insights on how to make fast-motion videos on an iPhone. We have given the verified step-by-step guide to using this app:
Step 1: After launching this application, click the “Choose From Library” option. Then, select a clip from your device’s gallery.
Step 2: Once the video is compressed, you’ll be taken to the speed change screen. From there, you can alter the speed of different clip sections. Move the slider of the relevant section upward to increase the speed.
Step 3: Once you have altered the speed, navigate towards the top right corner and click the “Export” icon.
Part 3: Desktop Solution: Remedy for Those Who Want to Speed Up Video on Their Computer
If you have gone through the above applications, you know the fast-motion effect. Do you want to know how to make a video fast motion on an iPhone using a computer? Wondershare Filmora is the best alternative to the above applications for creating this effect. The software is compatible with all the macOS and iOS devices and allows seamless editing.
With this editor, you get multiple options to create a fast-motion video. In this article, we will use the Uniform Speed feature. The operating process is very accessible and designed to assist both professionals and beginners. You can also apply the AI Frame Interpolation option to apply “Frame Bending.”
Free Download For Win 7 or later(64-bit)
Free Download For macOS 10.14 or later
Step-by-Step Guide to Speed Up Video with Filmora
After reading the article till now, you have gained knowledge of Filmora’s speeding options. How to make fast motion video on iPhone now seems like an easy option. Even though the process is easy, we want you to stay ahead. Hence, here is a step-by-step procedure for creating fast motion in Filmora:
Step 1Create a New Project and Import Media
First, connect your iOS device to your Wondershare Filmora device. After that, launch Filmora to access the main menu. From there, click on the “New Project” tab fashioned in the center. Expand the “Import” option in the Project Media section and select the suitable option. In this case, choose the “Import from Phone or Camera” option.
Step 2Access the Uniform Speed Section
After bringing the imported media to the timeline, select it to access the settings panel. Select the “Speed > Uniform Speed” tab from the appeared panel. Then, drag the Speed slider on the right side to increase speed. Afterward, click the “Play” button on the preview screen to see the results.
Step 3Apply Frame Bending and Export
This part is optional, but if you find an irregularity or roughness to the video, apply this. Go to the “AI Frame Interpolation” section at the bottom and expand the options. From the dropdown menu, select the “Frame Bending” option and do the rendering from the timeline. After everything is set, select the “Export” button at the top right corner.
Trending Video Editing Features of Wondershare Filmora
Filmora is a versatile tool that is not confined to speed manipulation or fast motion only. This editor offers audio, text, AI editing options, and video. Here are some prominent key features of Wondershare Filmora to help you in editing:
1. Speed Ramping
The other option for speed modification mentioned previously is speed ramping. This option comes with 6 editable speed change presets for automated editing. However, you can also employ the custom preset to create your own way. Moreover, it allows the audio pitch option to enable automated maintenance of audio.
2. AI Smart Cutout
There is more than one way of removing and replacing a background in Filmora. Smart Cutout offers an AI-integrated masking option to cut out the selected parts. You can also set preferences for Edge Thickness or Edge Feather for accuracy. Afterward, you can introduce three background options: color, grid, or more.
3. AI Text-to-Video
Bring your imagination to visuals with this amazing generative AI video creator. It creates videos from text and covers the voice and graphical elements. Users can customize the AI voice and ratio before generating a video. The prompt section offers up to 1000 characters for adding a script or giving directions.
4. AI Smart Masking
Are there any effects or filters you want to introduce to only a specific part of the video? Use Filmora’s AI mask for automated masking of an object or background. The mask brush selects the relevant area on its own. Besides AI masks, there is a manual masking option or mask shapes to apply. You can also customize the Brush size according to the video.
Conclusion
The article highlighted the importance of increasing video speed in many industries. In addition, we discussed some tools that make fast motion with ease. We also provided step-by-step guides on how to make fast motion video on iPhone. Wondershare Filmora stands amongst all those applications to create fast motion. We recommend this software due to its multiple functionalities and detailed editing abilities.
Splice App for Android - Guide to Download & Use
Create High-Quality Video - Wondershare Filmora
An easy and powerful YouTube video editor
Numerous video and audio effects to choose from
Detailed tutorials provided by the official channel
The ease of use and ready availability push most people to choose Android phones. Likewise, they are compatible with many devices, needing just a simple plug-and-play action. Besides, you can perform various actions with your Android device, like taking photos, capturing videos, and sharing them with friends.
You may also wish to combine your videos and compile a beautiful story. You also need to make your videos stand out and engage your viewers. Well, several apps are available to splice Android and make an interesting single video. Find how to use various apps in this article to splice your videos on Android.

In this article
01 Is Splice available on Android?
02 How to Use Splice for Android Video Editing
03Additional Video Splice Apps for Android
Is Splice available on Android?
Yes! The Android operating system can facilitate the splicing of videos. Even though it may not be available on some older versions by default, you can incorporate and install apps to use for Android splicing. By this, you’ll be able to add various effects to your videos, such as incorporating music, adding text, including titles, and other effects. You can also crop and trim your clip to a desirable play level. Nonetheless, you can use online methods to splice your videos instantly without installing any app.
This article proves that apart from using Splice video editor for Android, you can use other engaging apps to merge your videos. And it doesn’t end there!
Easily share your spliced clips on other platforms. To do this, ensure you set the output format and other settings to suit specific platforms like YouTube, WhatsApp, and Twitter. Check out the steps to follow to splice Android with various apps.
How to Use Splice for Android Video Editing
The Splice Video Editor is a powerful tool that is also easy to use. It suits on-the-go editing action, enabling you to capture and edit your videos without the need to transfer them to a computer. It also brings you various simple editing features like cropping, muting, adding audio, reversing video, merging, blurring, fast and slow motion, among many other effects.
More so, it will effectively convert your video into several output formats like MP3 and GIF. It works pretty fast, and you have a perfect chance to directly share your edited videos on media sites like Facebook, WhatsApp, Instagram, Twitter, and many others.
Step-by-step instructions for using the Splice app on Android to splice videos together
The Splice video editor for Android is at your reach to merge several videos in simple steps. And with the escalating rate of technology usage, Splice has just got you covered. You can use it for free with limited features. Follow these steps to splice the apk.
Step 1: Begin a new project
Ensure you have installed the Splice app for Android on your device. Once launched, go to the app screen and press the “+” button. You can then give your project a name before you continue with some other settings of the project. These include the transition selection, the orientation of the project, border options, etc. Next, click on the “Done” button to confirm your selections.

Step 2: Begin your project
Begin the creation of your project and choose the purpose of your video. Enter the title of your project, then continue to set room for your photos or videos. You can also set the text and zoom options.
Step 3: Insert your videos
Next, add the “+” button to the title’s right side. Likewise, add the video button to enable you to include the videos for splicing. You should notice the album screen opening up. Now, select the videos you wish to add to the project from the album screen. Ensure you put them in the order you want them to appear once sliced. Next, indicate the transition to be applied to your videos and wait for the chosen videos to be uploaded into the project. The Spice app allows you to view your project before exporting it.
Step 4. Edit and export
Most importantly, you should edit your video and make it splendid for your viewers. To do so, click on the “Pencil” button to unleash other editing options. Among the edits you can make include cropping, adjusting speed, trimming, and much more. Likewise, utilize the slider points to edit the start and endpoints of your video. You can also edit the audio and adjust the volumes where necessary.

Additional Video Splice Apps for Android
You can’t run out of options when it comes to splicing video. Here are some useful video splice apps for Android at your reach.
• Filmora
Filmora is suitable for mobile phone editing. It is rich in editing features to record, select a theme, apply effects, and easily share your video on other platforms. With this app, you can add animated text, adjust video color and brightness, customize watermarks, and much more. It is, however, slow and often crashes when dealing with larger files. Follow these steps to splice Android.
Step 1. Once successfully downloaded and installed, launch the app on your Android phone and select a built-in template to use.
Step 2. Then go to your Android gallery and choose the videos you wish to splice. Remember, you can add several clips for merging. Remember to load your videos in the order you wish them to appear in the spliced video.

Step 3. Merge the videos and then start to edit your video clips. You can trim, add filters, overlays, music, and much more. It is also important to add some background music to make your video engaging and attractive to your audience.
Step 4. The final step is to click on the “Export” tab to save your spliced video and share it on social media platforms. You can directly share your videos on YouTube, Facebook, and Twitter, among others.
• Vimeo Create
Vimeo supports mobile applications and can be used to splice Android. Sign up for the app on your Android, and launch it. Then follow these steps to merge the video.
Step 1. To begin splicing your video, select the “Start” button, then compose the main interface. Then go to the “Storyboard” and begin to choose the videos you wish to combine.

Step 2. Head on over to the “Style” area and choose one to use, then click on the “Next” button.
Step 3. Additionally, you can easily add background music to make it more engaging. Vimeo doesn’t allow you to add music from other sites. However, it brings you a rich catalog from which to choose any kind of music.

Step 4. Preview and export your video. You can see what your video looks like before sharing it. Use the “Preview” feature to check if your video is good enough or needs amendments. Next, select the “Save” option to save and share your video.
Conclusion
● It is worthwhile to produce quality and engaging videos for your audience. One aspect always stands out – combining the best videos for a detailed message. You have learned about the best splice video editor for Android to compose any kind of video. Besides, these apps let you edit your video by adding quality precepts, transitions, and other effects for a professional-looking piece./p>
The ease of use and ready availability push most people to choose Android phones. Likewise, they are compatible with many devices, needing just a simple plug-and-play action. Besides, you can perform various actions with your Android device, like taking photos, capturing videos, and sharing them with friends.
You may also wish to combine your videos and compile a beautiful story. You also need to make your videos stand out and engage your viewers. Well, several apps are available to splice Android and make an interesting single video. Find how to use various apps in this article to splice your videos on Android.
In this article
01 Is Splice available on Android?
02 How to Use Splice for Android Video Editing
03Additional Video Splice Apps for Android
Is Splice available on Android?
Yes! The Android operating system can facilitate the splicing of videos. Even though it may not be available on some older versions by default, you can incorporate and install apps to use for Android splicing. By this, you’ll be able to add various effects to your videos, such as incorporating music, adding text, including titles, and other effects. You can also crop and trim your clip to a desirable play level. Nonetheless, you can use online methods to splice your videos instantly without installing any app.
This article proves that apart from using Splice video editor for Android, you can use other engaging apps to merge your videos. And it doesn’t end there!
Easily share your spliced clips on other platforms. To do this, ensure you set the output format and other settings to suit specific platforms like YouTube, WhatsApp, and Twitter. Check out the steps to follow to splice Android with various apps.
How to Use Splice for Android Video Editing
The Splice Video Editor is a powerful tool that is also easy to use. It suits on-the-go editing action, enabling you to capture and edit your videos without the need to transfer them to a computer. It also brings you various simple editing features like cropping, muting, adding audio, reversing video, merging, blurring, fast and slow motion, among many other effects.
More so, it will effectively convert your video into several output formats like MP3 and GIF. It works pretty fast, and you have a perfect chance to directly share your edited videos on media sites like Facebook, WhatsApp, Instagram, Twitter, and many others.
Step-by-step instructions for using the Splice app on Android to splice videos together
The Splice video editor for Android is at your reach to merge several videos in simple steps. And with the escalating rate of technology usage, Splice has just got you covered. You can use it for free with limited features. Follow these steps to splice the apk.
Step 1: Begin a new project
Ensure you have installed the Splice app for Android on your device. Once launched, go to the app screen and press the “+” button. You can then give your project a name before you continue with some other settings of the project. These include the transition selection, the orientation of the project, border options, etc. Next, click on the “Done” button to confirm your selections.
Step 2: Begin your project
Begin the creation of your project and choose the purpose of your video. Enter the title of your project, then continue to set room for your photos or videos. You can also set the text and zoom options.
Step 3: Insert your videos
Next, add the “+” button to the title’s right side. Likewise, add the video button to enable you to include the videos for splicing. You should notice the album screen opening up. Now, select the videos you wish to add to the project from the album screen. Ensure you put them in the order you want them to appear once sliced. Next, indicate the transition to be applied to your videos and wait for the chosen videos to be uploaded into the project. The Spice app allows you to view your project before exporting it.
Step 4. Edit and export
Most importantly, you should edit your video and make it splendid for your viewers. To do so, click on the “Pencil” button to unleash other editing options. Among the edits you can make include cropping, adjusting speed, trimming, and much more. Likewise, utilize the slider points to edit the start and endpoints of your video. You can also edit the audio and adjust the volumes where necessary.
Additional Video Splice Apps for Android
You can’t run out of options when it comes to splicing video. Here are some useful video splice apps for Android at your reach.
• Filmora
Filmora is suitable for mobile phone editing. It is rich in editing features to record, select a theme, apply effects, and easily share your video on other platforms. With this app, you can add animated text, adjust video color and brightness, customize watermarks, and much more. It is, however, slow and often crashes when dealing with larger files. Follow these steps to splice Android.
Step 1. Once successfully downloaded and installed, launch the app on your Android phone and select a built-in template to use.
Step 2. Then go to your Android gallery and choose the videos you wish to splice. Remember, you can add several clips for merging. Remember to load your videos in the order you wish them to appear in the spliced video.
Step 3. Merge the videos and then start to edit your video clips. You can trim, add filters, overlays, music, and much more. It is also important to add some background music to make your video engaging and attractive to your audience.
Step 4. The final step is to click on the “Export” tab to save your spliced video and share it on social media platforms. You can directly share your videos on YouTube, Facebook, and Twitter, among others.
• Vimeo Create
Vimeo supports mobile applications and can be used to splice Android. Sign up for the app on your Android, and launch it. Then follow these steps to merge the video.
Step 1. To begin splicing your video, select the “Start” button, then compose the main interface. Then go to the “Storyboard” and begin to choose the videos you wish to combine.
Step 2. Head on over to the “Style” area and choose one to use, then click on the “Next” button.
Step 3. Additionally, you can easily add background music to make it more engaging. Vimeo doesn’t allow you to add music from other sites. However, it brings you a rich catalog from which to choose any kind of music.
Step 4. Preview and export your video. You can see what your video looks like before sharing it. Use the “Preview” feature to check if your video is good enough or needs amendments. Next, select the “Save” option to save and share your video.
Conclusion
● It is worthwhile to produce quality and engaging videos for your audience. One aspect always stands out – combining the best videos for a detailed message. You have learned about the best splice video editor for Android to compose any kind of video. Besides, these apps let you edit your video by adding quality precepts, transitions, and other effects for a professional-looking piece./p>
How to Use LUTs in VN Editor – Complete Guide and Best LUTs Download
Hello and welcome to another article full of information and excitement. The topic of this article is LUT for the VN editor. So it will be exciting for those who want to use LUTs in their video to make them look nice and well. As we will discuss today that what is VN editor and how you can add LUTs to your videos using it on the devices it is compatible for. Moreover, where you can download some fantastic LUTs like moody LUTs, which help your videos to look nice, and which software you should use for this purpose if you are running a device on which the VN editor is not compatible. So let’s begin!
Part 1. What is VN editor?
VN editor is one of the best choices for video editing on mobiles and Mac. Fast editing, transitions, effects, filters, colors, subtitles, music, and many other features make the VN video editing app a great tool for producing and editing videos. It aims to make editing shorter and more feature-rich, empowering everyone to take control of their own lives. You cannot only produce great videos but good films as well. In the following, we will discuss how you can add LUTs to your videos using it.

Part 2. How to use LUTs in VN editor?
First, we must know that it is compatible with which platforms. So, it is now available for Android, iOS, and Mac OS only. However, you can also use it on Windows with some Android or iOS emulators, but it is not a very continent way in our suggestions. Even after doing this, it does not work well on your Windows. Maybe you will face some glitches or malfunctioning problems. So it is better to use it on only those platforms for which it is primarily available. Please read the instructions below since we will go through how to use LUTs in it later on.
On Mac:
First of all, we will learn how you can do it on Mac:
- Download the VN Editor for Mac and open it.
- Add your video and then tap the filters option.
- Now choose custom filters and then select the LUTs pack.

- Select the desired LUT and apply.
On Mobile:
Secondly, we will discuss how we can do this on our mobiles (Android or iOS). The procedure on both devices (Android or iOS) is almost comparable. Therefore, we will discuss the steps from the perspective of both of these here:
- First, download the VN editor from your mobile app store (Android or iOS) and the LUTs pack you want to use in your video.
- After downloading them on your mobile, open the VN editor application.
- Create a new project and add your video to it.

- Then click on the Filters option and select add external or custom filters option next to the existing filters.
- It will take you to the File manager of your mobile, from which you have to find the folder in which you have stored your LUTs.
- After finding them, you can select those LUTs you want to use in your video and then click on the done or select button.
- Your downloaded LUTs start showing in the VN editor, and you can use them in your videos as you want.
Part 3. Best LUTs resource for VN video editor
1. Presets Store
Presets Store is an online platform that helps you with various Filters, LUTs, and other presets. So you can download LUTs for your videos for the VN editor using it. However, it’s not a free service. You have to pay for the LUTs you want to download from here. You can visit their YouTube channel to follow the latest LUTs, Filters and other presets on this platform.
2. Apna Editz
Apna Editz is another online platform you can use for this purpose. It also provides you with a fantastic variety of Presets like LUTs, Filters, and many other similar effects, which you can use in your video using the VN editor. The main Pros of this recommendation are that it’s a free website. So you can download LUTs for your videos from it for free. Keep an eye on their YouTube channel to be updated about the latest LUTs.
3. Lut Preset
Lut Preset is another alternative to all the above ones. You can get almost all your favorite LUTs for VN editor for free here and then use them in your videos as you want. They also share the latest LUTs on their YouTube Channel.
4. Pencil Hub
Pencil Hub is also a good option in this concern. However, it does not have too much variety of VN LUTs, but you can still use it to download some of the best LUTs for VN editors. To get informed of their every new effect and LUTs, their YouTube channel is the primary source.
5. YRP EDITZ
YRP ETIDZ is another good option if you are still looking for some fantastic VN LUTs. They, too not have a large variety of presets and LUTs. However, if you want some most commonly used LUTs for VN Editor, then they are a good option. You’ll notify of their most website updates by checking their YouTube channel.
Part 4. How to add LUTs to the best alternative to the VN editor?
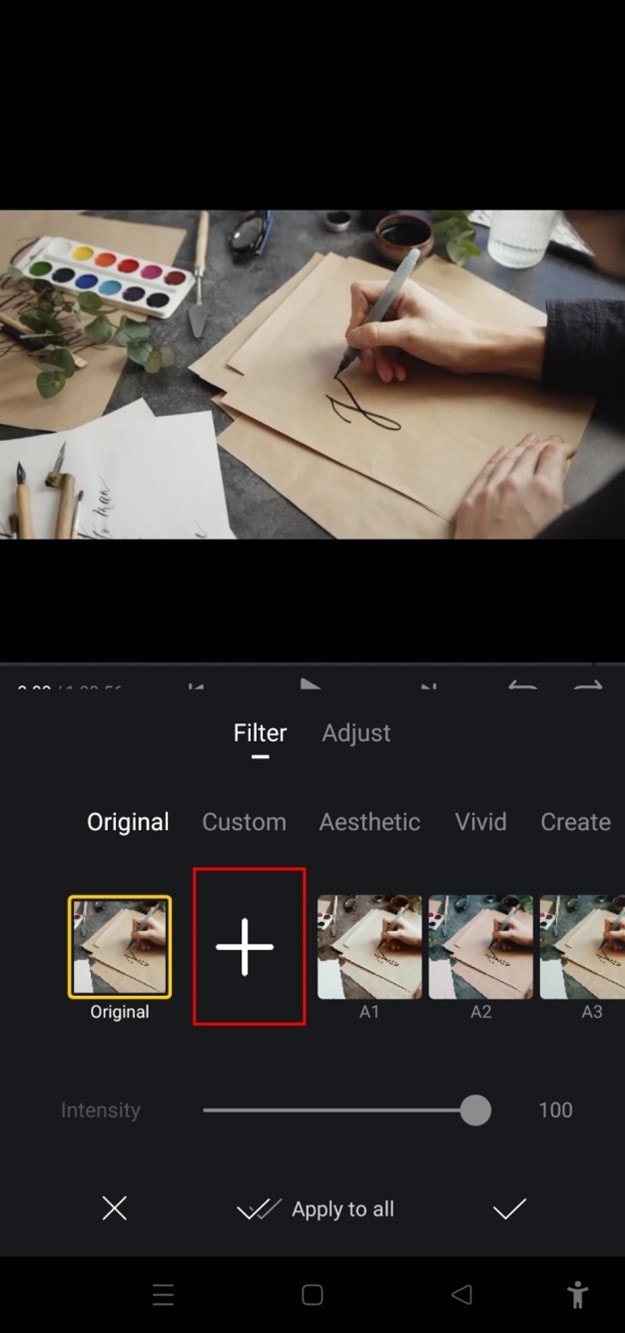
VN Editor is undoubtedly an excellent choice to add LUTs to your videos. However, the VN editor is best suitable for mobile devices. To enhance your LUTs and effects, it would be great if you used some desktop software. Wondershare Filmora offers a great variety of built-in LUTs to choose from. Let’s look at how we can use Filmora to add LUTs:
- Add your video and tap the tools, then click the Color option.
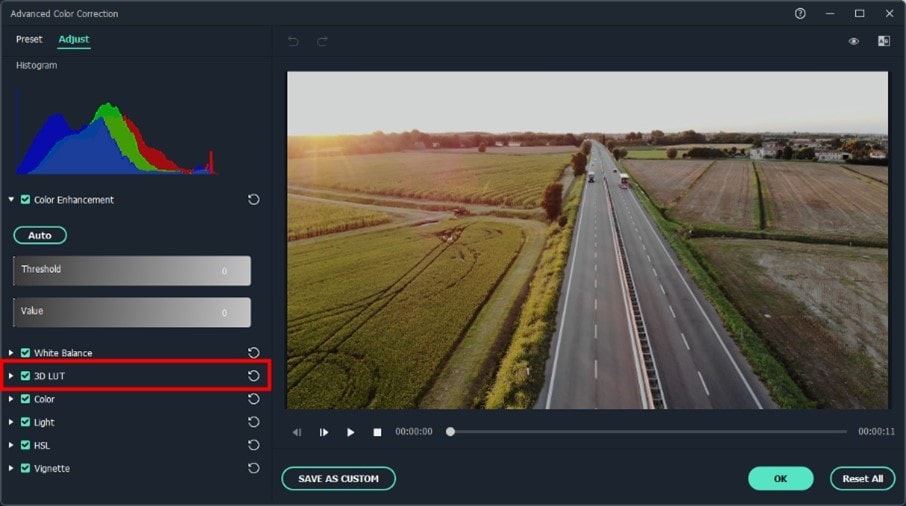
- Now select the Color Correction option and then choose 3D LUT.
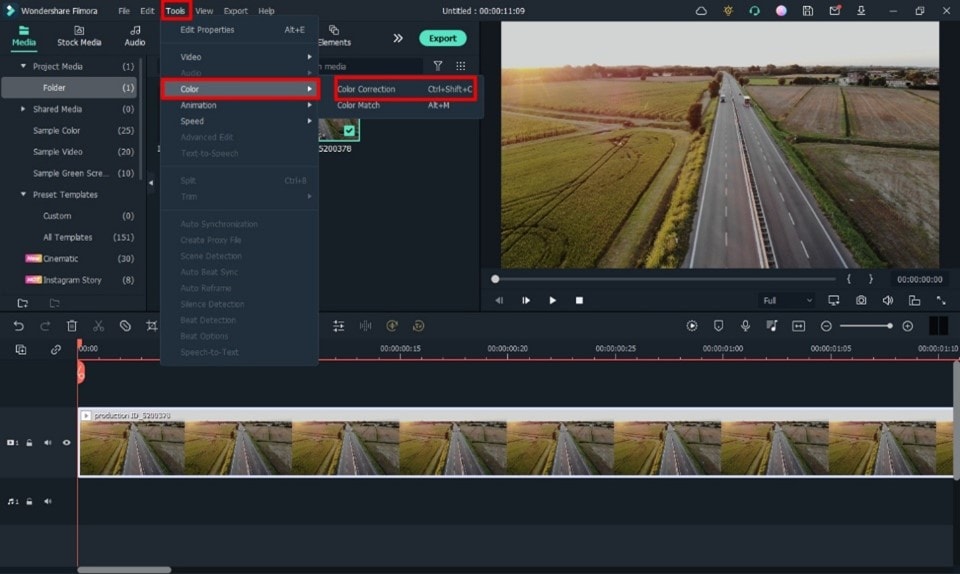
- Click the drop-down menu and select the Load new LUT option. Here you can import other downloaded preset LUTs to use
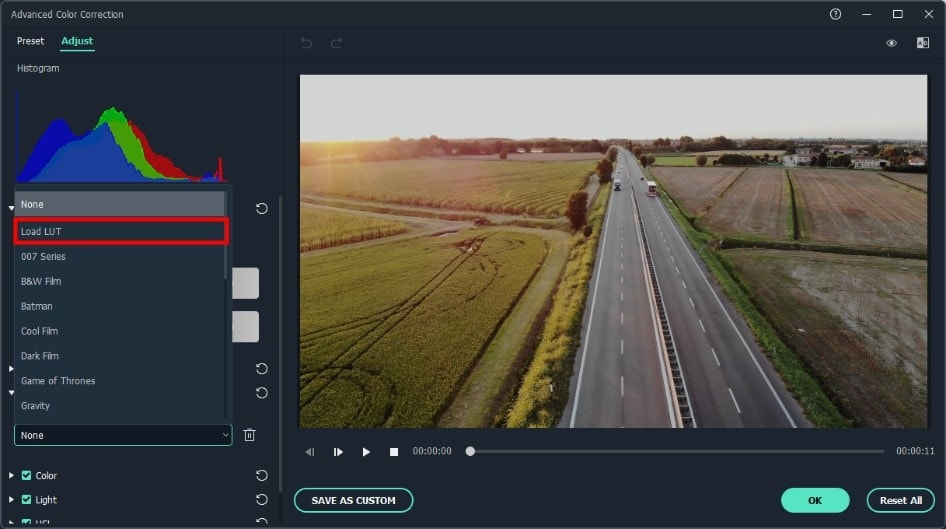
- Choose the LUT and click OK. Your new fantastic video is ready now.

Closing Thoughts
This post recommends several lut resources and demonstrates how to import them if you are a devoted user of VN editor and want to learn how to utilize it for video color grading. The more potent desktop editor Wondershare Filmora, which offers a range of built-in LUT sources and supports color grading settings, is of course recommended if you want to take your videos to the next level. Thanks for reading.
Free Download For Win 7 or later(64-bit)
Free Download For macOS 10.14 or later
2. Apna Editz
Apna Editz is another online platform you can use for this purpose. It also provides you with a fantastic variety of Presets like LUTs, Filters, and many other similar effects, which you can use in your video using the VN editor. The main Pros of this recommendation are that it’s a free website. So you can download LUTs for your videos from it for free. Keep an eye on their YouTube channel to be updated about the latest LUTs.
3. Lut Preset
Lut Preset is another alternative to all the above ones. You can get almost all your favorite LUTs for VN editor for free here and then use them in your videos as you want. They also share the latest LUTs on their YouTube Channel.
4. Pencil Hub
Pencil Hub is also a good option in this concern. However, it does not have too much variety of VN LUTs, but you can still use it to download some of the best LUTs for VN editors. To get informed of their every new effect and LUTs, their YouTube channel is the primary source.
5. YRP EDITZ
YRP ETIDZ is another good option if you are still looking for some fantastic VN LUTs. They, too not have a large variety of presets and LUTs. However, if you want some most commonly used LUTs for VN Editor, then they are a good option. You’ll notify of their most website updates by checking their YouTube channel.
Part 4. How to add LUTs to the best alternative to the VN editor?
VN Editor is undoubtedly an excellent choice to add LUTs to your videos. However, the VN editor is best suitable for mobile devices. To enhance your LUTs and effects, it would be great if you used some desktop software. Wondershare Filmora offers a great variety of built-in LUTs to choose from. Let’s look at how we can use Filmora to add LUTs:
- Add your video and tap the tools, then click the Color option.
- Now select the Color Correction option and then choose 3D LUT.
- Click the drop-down menu and select the Load new LUT option. Here you can import other downloaded preset LUTs to use
- Choose the LUT and click OK. Your new fantastic video is ready now.
Closing Thoughts
This post recommends several lut resources and demonstrates how to import them if you are a devoted user of VN editor and want to learn how to utilize it for video color grading. The more potent desktop editor Wondershare Filmora, which offers a range of built-in LUT sources and supports color grading settings, is of course recommended if you want to take your videos to the next level. Thanks for reading.
Free Download For Win 7 or later(64-bit)
Free Download For macOS 10.14 or later
Also read:
- Updated 2024 Approved Use Path Blur In Photoshop To Create Motion Effect
- 2024 Approved Best GIF to MOV Converters
- New Are You Looking for Funny Discord Emojis to Massively Improve Your Discord Experience? Using some Fun Bots for Discord Is an Excellent Way of Doing That! Thus, We Compiled a List of 10 Fun Discord Bots You Need for 2024
- Updated 2024 Approved This Article Talks in Detail About How to Download Windows Movie Maker 2012 Version, the Key Features, How to Use It, Etc. It Further Discusses an Alternative Way to Create Videos on Windows PC. Check Out
- New Best Guide of 8 Photo Collage Apps for PC
- Updated How to Create a Slideshow on iPhone for 2024
- Updated Best Tips on How to Design Travel Slideshow
- New 2024 Approved How to Edit FLV Video Files with FLV Editor Windows, Mac,Android, iPhone & Online
- Updated Elevate Your TikTok Game with Catchy Captions! Explore the Trendiest 2024 TikTok Captions for Every Occasion and Style. Up Your TikTok Content with Style
- New In 2024, Add Zoom Blur Effect In Photoshop Step by Step
- Updated In 2024, Step by Step to Crop Videos with CyberLink PowerDirector
- Updated Ultimate Guide to Countdown Animation in Videos for 2024
- Updated 4 Ways to Add White Borders on Mobile and Desktop for 2024
- New In 2024, 10 Best Free GIF Background Remover for PC and Online
- New Searching for the Best Video Editor to Make Your Video More Attractive? This Article Introduce You Everything About Choosing a Video Editing Software
- A Complete Overview of VSCO Video Editor
- New In 2024, Time Bending Brilliance The Ultimate Slow Motion Video Makers
- New In 2024, This Well-Written Article Will Share a Descriptive Method on How to Stream Zoom to YouTube Quickly. By Doing so, You Can Share Your Zoom Session Live with Your YouTube Audience Effortlessly
- How to Use Rules of Thirds for 2024
- New How To Import and Adjust the Video Clips on Wondershare Filmora?
- Updated Do You Want to Give Your Videos and Photos a Cinematic Look but Couldnt Find How? Here Are Different Cinematic LUTs Discussed that You Can Try and Use
- Thousands Already Know What Ezgif Is and So Can You for 2024
- Updated Detailed Steps to Rotate Video Using KMPlayer
- Top 12 AI Video Generators to Pick
- New In 2024, How to Use Frame Blending in Adobe Premiere Pro
- New How Can You DIY VHS Overlay in After Effects?
- New 2024 Approved How to Animate Text in A Video
- Wondering How to Replace Sky in After Effects? Learn How
- Updated S-Log Is a Gamma Curve Optimized for Digital Cameras to Maximize the Image Sensors Performance. Although These Videos May Look Flat and Washed Out, They Contain Lots of Color Information
- New A Complete Overview of VSCO Video Editor for 2024
- In 2024, This Blog Post Shows How to Create an Eye-Catching Paper Rip Effect for Your Videos Using Wondershare Filmora with These Easy-to-Follow Steps
- New 2024 Approved Steps to Create Green Screen Videos in After Effects
- Updated 2024 Approved How to Make a YouTube Intro by Filmora
- New Top 5 Best Video Denoisers
- In 2024, How to Rotate AVI in Vertical/Portrait Orientation Windows, Mac,Android, iPhone & Online
- 2024 Approved We Will Give You the Best-Suggested List of Color Match Generators to Help You Choose From an Efficient Collection Rather than Finding It Aimlessly
- 2024 Approved Do You Also Use Android to Create and Edit Videos? Read About the Efectum Video Effects Editor, Which Is Available in Your App Stores for Seamless Editing
- How to Share YouTube Video on Zoom, In 2024
- New This Is the Method Employed During Every Evening Weather Broadcast The Newscaster Is Standing in Front of a Blank Screen, but the Viewers at Home See a Weather Map for 2024
- 2024 Approved Exploring the Top Professional Tools to Perform Mask Tracking
- New Create Your Face Zoom TikTok Now
- How to Factory Reset Motorola Razr 40 Ultra in 5 Easy Ways | Dr.fone
- Step-by-Step Tutorial How To Bypass Infinix Note 30 VIP FRP
- Honor Magic Vs 2 Bootloop Problem, How to Fix it Without Data Loss | Dr.fone
- In 2024, Here are Some Pro Tips for Pokemon Go PvP Battles On Nubia Z50S Pro | Dr.fone
- Top 4 Android System Repair Software for Vivo V27e Bricked Devices | Dr.fone
- Life360 Circle Everything You Need to Know On Vivo Y28 5G | Dr.fone
- In 2024, Hassle-Free Ways to Remove FRP Lock on Tecno Spark 10 4G Phones with/without a PC
- Best Samsung Galaxy A05s Pattern Lock Removal Tools Remove Android Pattern Lock Without Losing Data
- How can I get more stardust in pokemon go On Nokia C12 Plus? | Dr.fone
- Detailed Review of doctorSIM Unlock Service For iPhone 13 Pro | Dr.fone
- Easy Steps on How To Create a New Apple ID Account On iPhone XR
- Can I Bypass a Forgotten Phone Password Of Xiaomi Redmi K70E?
- Does Airplane Mode Turn off GPS Location On Honor 90 Lite? | Dr.fone
- Title: New In 2024, 4 Methods How To Make a Recap Video
- Author: Morgan
- Created at : 2024-05-19 05:12:51
- Updated at : 2024-05-20 05:12:51
- Link: https://ai-video-editing.techidaily.com/new-in-2024-4-methods-how-to-make-a-recap-video/
- License: This work is licensed under CC BY-NC-SA 4.0.
