
New In 2024, Add Selective Color Effect to Your Videos Using Filmora

Add Selective Color Effect to Your Videos Using Filmora
Selective color is an effect that lets you desaturate all the colors in a photo or video while preserving one or more colors of your choice. It is done by isolating a specific color of your choice in the frame while all other colors turn into black and white, just like this.

By using this effect, we can draw viewers’ attention to a specific point in the clip. If you want your video do the same, Filmora can be a good helper. Alright, we’ll be creating selective color effects in two examples. Let’s get started.
Tutorial 1 on making color isolation by selective color effect
In this first example, we are going to use stock footage showing a subject on a bike.
To add a selective color effect, download Wondershare Filmora on your PC or Mac. Now follow the steps as explained below to add this effect and isolate the color of your choice.
Free Download For Win 7 or later(64-bit)
Free Download For macOS 10.14 or later
Step1 Launch Wondershare Filmora and drag and drop your clip to the timeline.
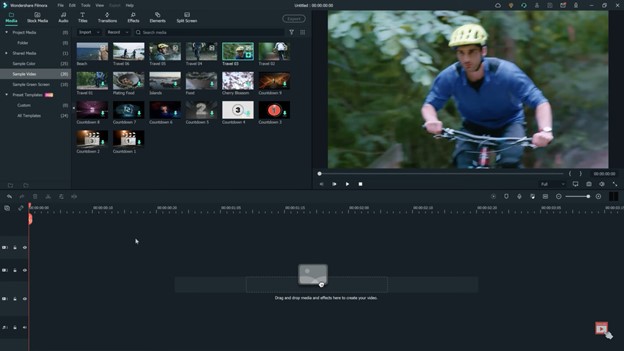
Step2 Go to effects and then click “NewBlue FX” option and select Newblue filters.
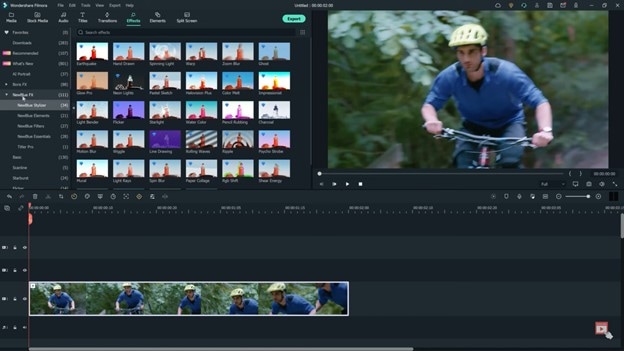
Step3 Find the Selective Color Effect and drag it onto the clip. The effect will be instantly applied.
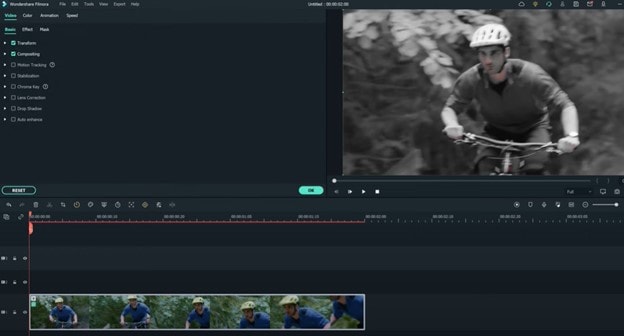
Step4 Next, double-click on the clip and check out the effects menu at the top of the screen.
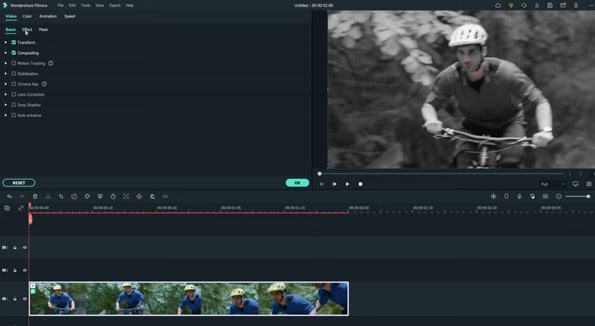
Step5 Open the preset drop-down menu. There will be a lot of presets with different colors. Select the preset you want to use. In this scenario, let us select Just Blue.
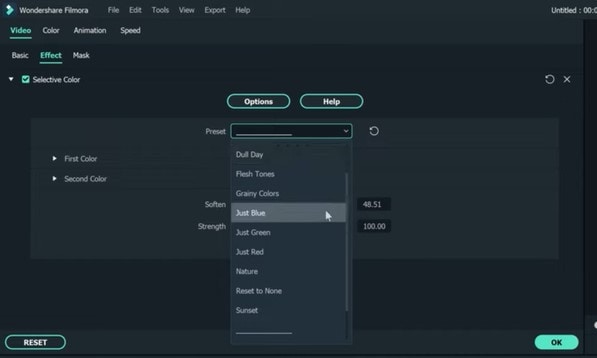
Step6 If you see a blue tint at a place or object which you want to be white and black, click on the first color.
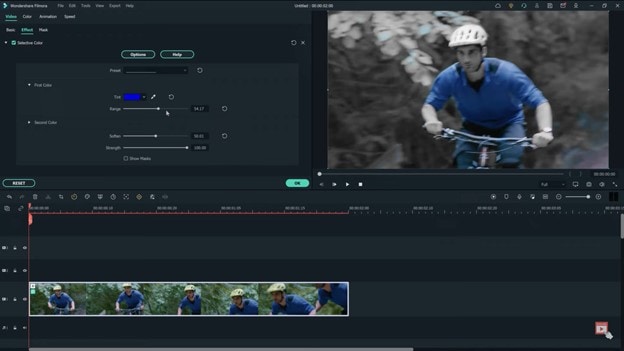
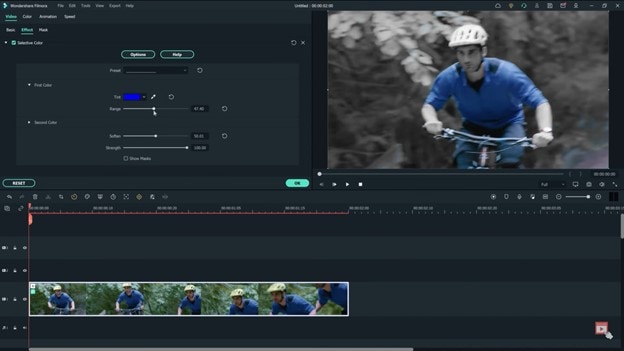
Step7 Now adjust the range slider to decrease the number of unwanted tints.
Step8 To blur the edges of the effects, turn up the softened slider and remove any unwanted tint previously remaining.
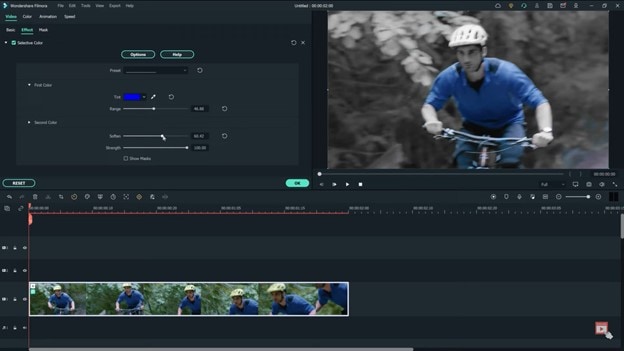
In this way, you can add a selective color effect to your video clips and isolate the color of your choice.
Tutorial 2 on make color isolation using eyedropper tool
You might ask how do we use the eyedropper tool here. It can sample colors from anywhere in a video or an image and add them to your swatch panel. The steps to use the eyedropper tool to add a selective color to your video are below.
Step1 As same as the first one, launching Wondershare Filmora is the first priority. And drag your clip to the timeline.
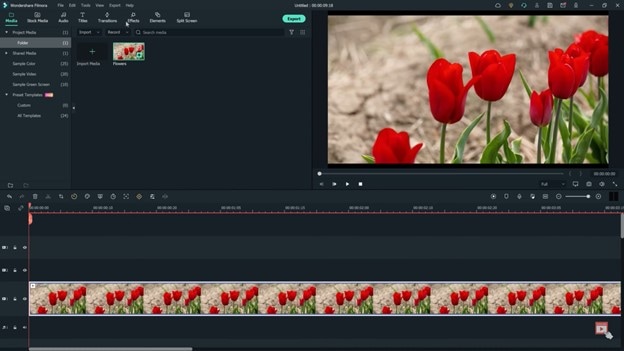
Step2 Go to effects at the top, and find Newblue effects, and click on the Newblue filters.
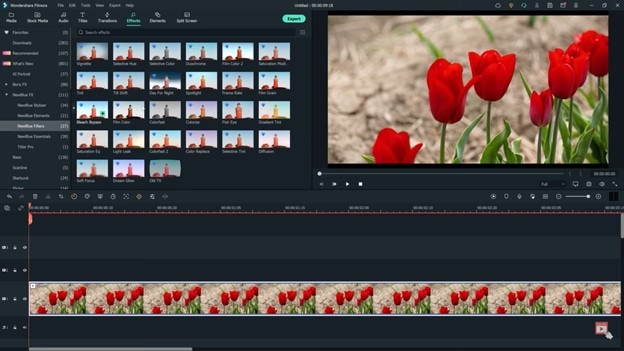
Step3 Find the selective color effect and drag it to the clip.
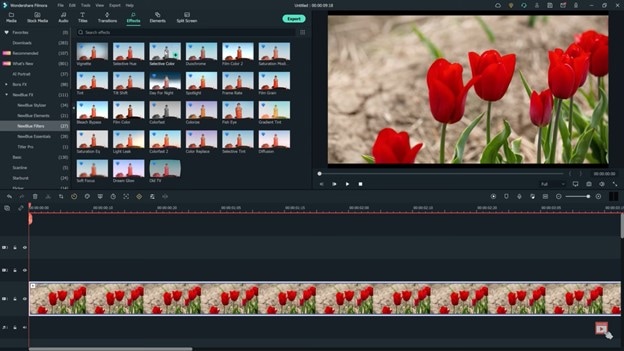
Step4 Double-click on the clip and visit the effects menu at the top of the screen.
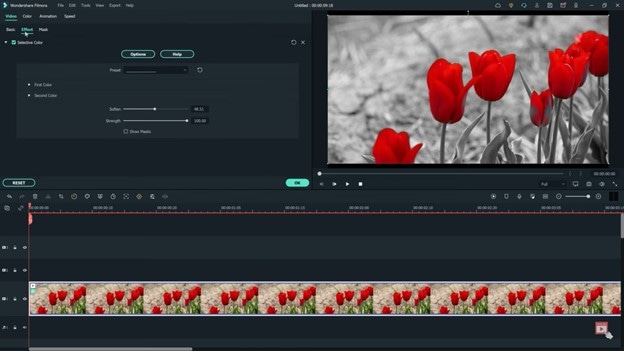
Step5 Click on the ‘first color’ and select the eye dropper tool. This will allow us to select the red flower in the preview window. You can also click different parts of the image to get the color that we want.
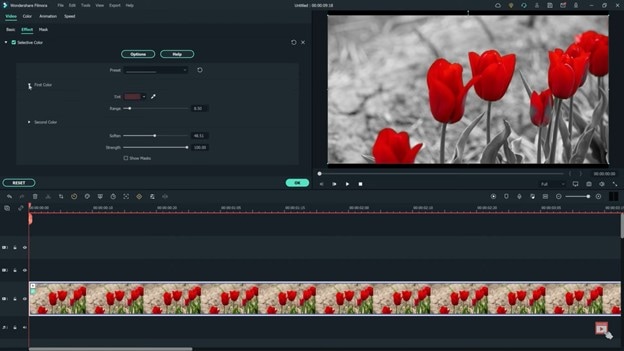
Step6 Next, try selecting a second color to isolate within our shot. In this example, we are going to make the stems on the flowers stand out as well. Select second color and go to the tint section. And find a color that is close to the second color, which will be green in this case.
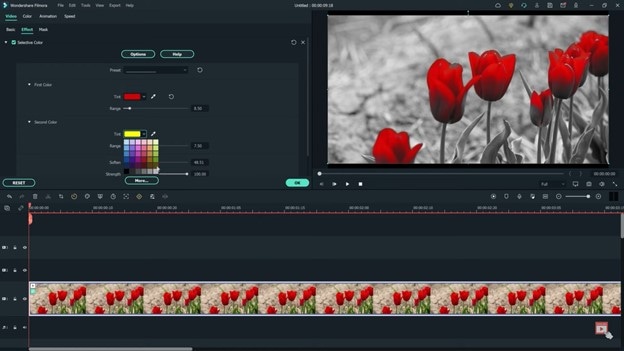
Step7 Pick the eyedropper tool and click it on the green part of the clip. Then adjust the range slider as needed.
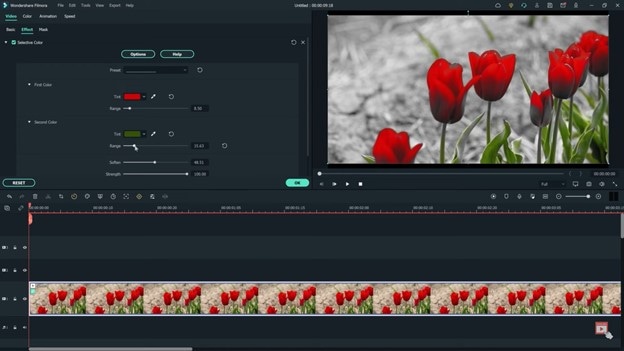
Alright, let’s watch back the video to see how both colors are now isolated.

Follow all the steps in the correct order. This is how you can use NewBlue effects for color isolation using Wondershare Filmora. The color isolation using the selective color effect defines the point of interest in the clip for the viewers.
Free Download For macOS 10.14 or later
Step1 Launch Wondershare Filmora and drag and drop your clip to the timeline.

Step2 Go to effects and then click “NewBlue FX” option and select Newblue filters.

Step3 Find the Selective Color Effect and drag it onto the clip. The effect will be instantly applied.

Step4 Next, double-click on the clip and check out the effects menu at the top of the screen.

Step5 Open the preset drop-down menu. There will be a lot of presets with different colors. Select the preset you want to use. In this scenario, let us select Just Blue.

Step6 If you see a blue tint at a place or object which you want to be white and black, click on the first color.

Step7 Now adjust the range slider to decrease the number of unwanted tints.

Step8 To blur the edges of the effects, turn up the softened slider and remove any unwanted tint previously remaining.

In this way, you can add a selective color effect to your video clips and isolate the color of your choice.
Tutorial 2 on make color isolation using eyedropper tool
You might ask how do we use the eyedropper tool here. It can sample colors from anywhere in a video or an image and add them to your swatch panel. The steps to use the eyedropper tool to add a selective color to your video are below.
Step1 As same as the first one, launching Wondershare Filmora is the first priority. And drag your clip to the timeline.

Step2 Go to effects at the top, and find Newblue effects, and click on the Newblue filters.

Step3 Find the selective color effect and drag it to the clip.

Step4 Double-click on the clip and visit the effects menu at the top of the screen.

Step5 Click on the ‘first color’ and select the eye dropper tool. This will allow us to select the red flower in the preview window. You can also click different parts of the image to get the color that we want.

Step6 Next, try selecting a second color to isolate within our shot. In this example, we are going to make the stems on the flowers stand out as well. Select second color and go to the tint section. And find a color that is close to the second color, which will be green in this case.

Step7 Pick the eyedropper tool and click it on the green part of the clip. Then adjust the range slider as needed.

Alright, let’s watch back the video to see how both colors are now isolated.

Follow all the steps in the correct order. This is how you can use NewBlue effects for color isolation using Wondershare Filmora. The color isolation using the selective color effect defines the point of interest in the clip for the viewers.
Turn Your Text Into a Podcast Made Possible (+ EASY Editing Tips)
Being a content creator, either writing or generating videos, requires podcast text-to-speech knowledge. The impact of content depends on how many people see it. It means finding new ways to get it into real and virtual places where customers and users might be.
Depending on the context, podcasting can be a perfect alternative for sharing content.
This article will address your questions about the easiest way to turn a blog into a podcast. Let’s begin with the reasons why you should do a podcast.
Part 1. Why You Should Podcast
Podcasts are one of the simplest and most cost-effective ways. It helps to advertise yourself and your products to a highly targeted audience. Podcasts are also excellent for engaging with potential clients interested in your content. In your field, you can achieve fame and expertise.

Repurposing of Content
Podcasters can maximize their potential for successful episodes and repurposing their podcast into multiple content pieces.
This podcasting strategy can help you reach more people by putting your podcasts on more channels and engaging more people who might be interested.
More Fulfilling than Articles
Unlike music, news, TV, and social media, podcast listeners don’t have to watch the screen like they do with YouTube videos or TV shows. This means they can listen while walking or driving home from work.
Podcasts are the best way to get people to pay attention and make fundamental societal changes. They can keep people interested for a long time, so you can go into detail and get personal without turning off your audience.
Minimal Start-Up Costs
To start a podcast, you can spend a little money. Even some of the most famous podcasts use a microphone, a computer, and software for recording. But it’s common to spend more money on advertising and better hosting.
Starting a podcast doesn’t cost much, as you can get everything you need for about $145.
Expansion of Search Potential
In the past few years, many big brands and small to medium-sized businesses have started using podcasts as a marketing strategy. This is because podcasts are becoming more and more popular and can help raise your company’s profile.
Podcasting is another way to disseminate your study to a broader audience, whether that audience consists of policymakers or interested citizens.
Potential to Monetize
Using an affiliate program podcast, you can earn money. Businesses can increase their income by offering paid advertising sponsorships to monetize podcasts. Suppose you accept an affiliate offer to sell ads. In that case, you become the company’s voice and put recorded ads in your podcast episodes.
The most common way to make money from a podcast is through sponsorship. It’s also the easiest way to make money because you don’t have to make or sell anything. You just have to make a deal with a sponsor.
Part 2. Why Are Writers Hesitant to Start a Podcast?
Even after knowing all these benefits, writers are still hesitant to start a podcast. One of the main reasons a writer may be reluctant to launch a podcast is the cost of the necessary equipment. You will need at least $80 to $500 for this unpromissing business.
However, let me tell you a secret that many podcastors didn’t buy any audio equipment for the launch of their podcast channel on Spotify.
Moreover, many writers don’t want to show their voice through recordings. This is because they couldn’t just make a recording and hand it off to a sound specialist. Besides, finding their voice through the stories they write is the routine.
But we all need to get the truth that many podcastors don’t record a single word of the podcast with their own voice. Due to a solution: text-to-speech, technology like this has been around for a while and continues to improve.
The two important issues have been solved, so what are you waiting for? Platform building has always relied heavily on content marketing. With blog posts and social media, additional support was provided, and now podcasts are becoming more commonplace.
Part 3. How to Turn a Text Into a Podcast?
Text To Speech
To turn your text into audible content, Text-to-speech (TTS) is an assistive technology. With a single click, TTS reads your written text aloud. Many people also use it for writing and editing to maintain audience concentration.
Text-to-speech technology is compatible with all digital devices, including computers, tablets, and smartphones. Increasing numbers of websites and products now have developed this function. For example, you can find it within the trusted video editing software like Filmora. With Filmora’s Text to Speech (TTS) feature , you may add extra aspects to your video by turning your text files into voiceovers.
Why we regard text to speech as a good
For writers, imagination is the only tool to construct their stories. To bring our stories to life, all we need is a laptop. The same holds for text-to-speech technologies, which can significantly assist writing and editing by allowing the author to hear their words without using their voice.
- Text-to-speech applications can assist you in repurposing your material.
Your written work can be converted into spoken language or a podcast. A podcast can be converted into a YouTube video with a few alterations. All of these factors can help you reach new audiences.
Repurposing material permits your audience to consume it in a variety of ways. The audience can read, listen to, or view your content.
- Text-to-speech systems enable authors to create information that is accessible.
As per World Health Organization, there are almost 285 million visually impaired persons and 39 million blind people. We writers can create a more inclusive world by constantly keeping accessibility in mind.
The limitations of text to speech
Text-to-speech software is becoming increasingly lifelike thanks to technological advancements. However, it cannot still express genuine human emotions. However, this should allow you to utilize these tools. The positives significantly exceed the disadvantages, and technology is continually improving.
Easiest Fix: Turn Texts Into Podcasts With TTS in Filmora
So how can you use text-to-speech? Andhow you can turn your texts into audio podcasts in a daily routine? Filmora , a all-in-one video editor, gets you the solution.
Free Download For Win 7 or later(64-bit)
Free Download For macOS 10.14 or later
Step1 Download and install Filmora on your PC or Mac.
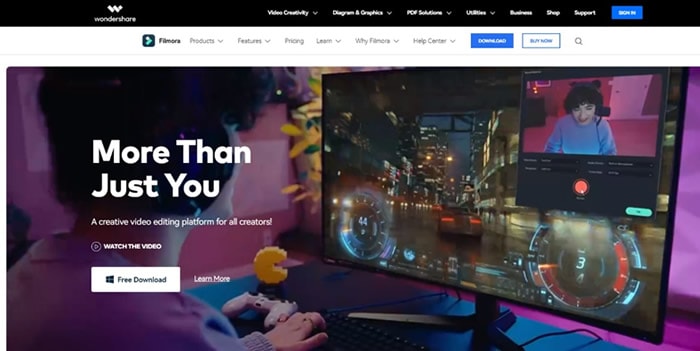
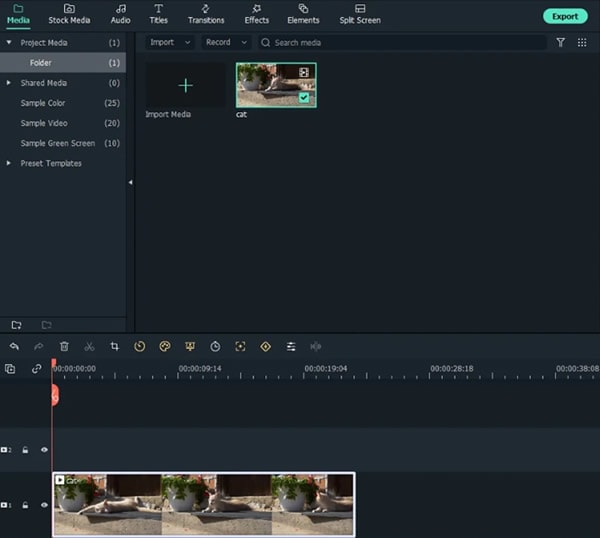
Step2 Open Filmora and select the video on which you wish to add audio.
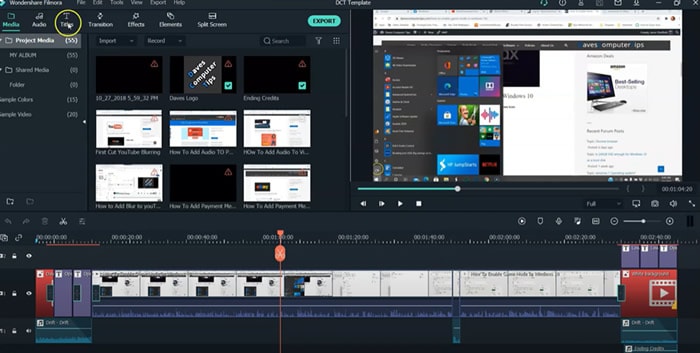
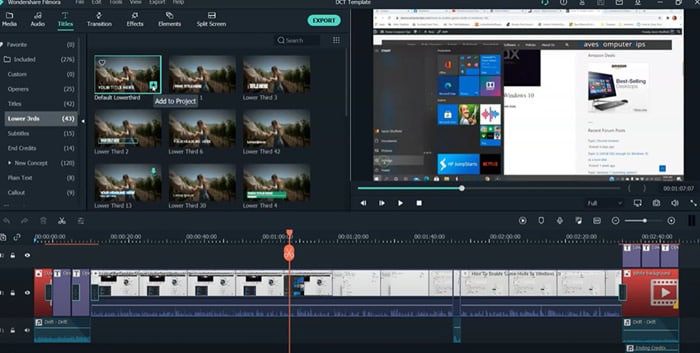
Step3 After adding your selected video, select the option “Titles” to add text to your video.
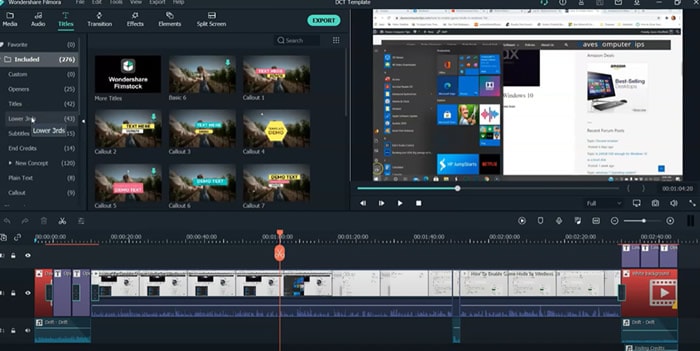
Step4 Select your favorite position for text in the video, like “lower third,” which is used the most in video titles.
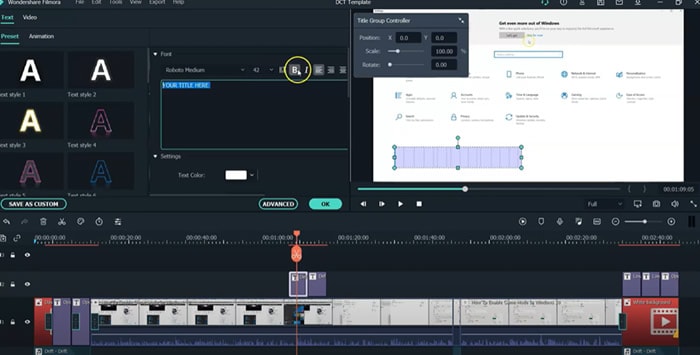
Step5 Add text to the timeline and click “Ok.” You can move the red timeline marker if you want your text in a certain spot.
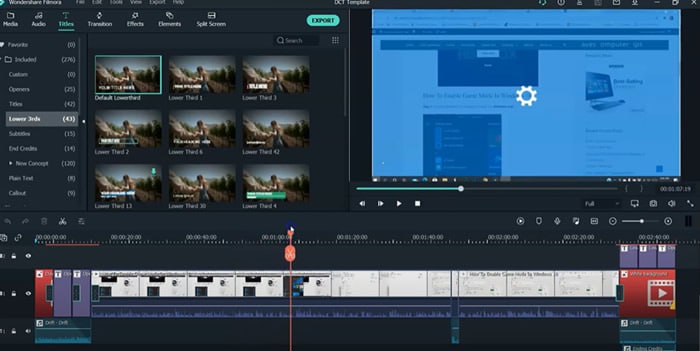
Click the “+” button marked in the picture below to add text.
You can also edit the text by changing its style, color, and font or by animating it.
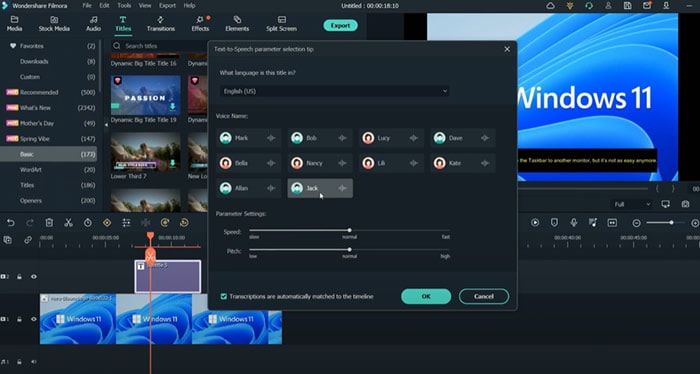
Step6 Press the “Text-to-Speech” button in the lower right side and choose your preferred voice. For example, Lilly’s voice resembles Siri.
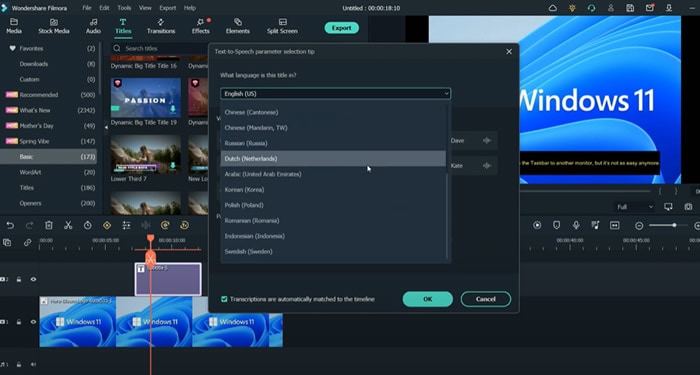
You can also choose another language other than English.
Click “Ok” once you’ve selected everything according to your requirements.
Step7 Once the transcription is completed, go ahead and test the video and audio to see if it’s synching.
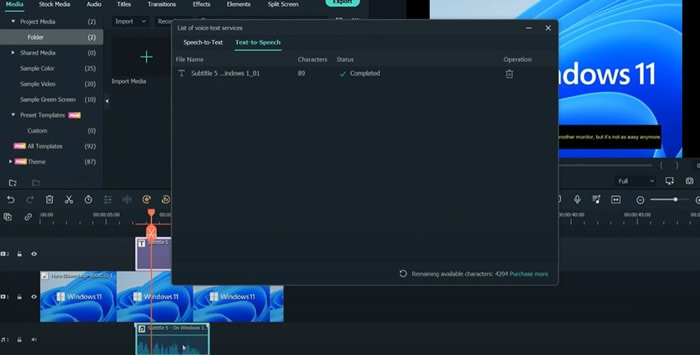
And that’s done. This is how easy it is to turn your texts into speech using Filmora.
Part 4. Hot FAQs on Podcast Text to Speech
How do I convert podcasts to text?
With the help of the smartphone app Google Recorder you can easily convert podcasts to texts for free.
- Open the app on your phone, start recording to it, and start recording your podcast simultaneously.
- The words will be automatically recorded and entered into the application as you talk into your phone’s microphone.
- After you click stop on the app, you can store and share the files once you finish your recording.
You have an option of sharing the text, the audio, or both. Alternatively, you can save them to your Google Drive if you don’t want to share them.
How to turn my podcast into a sound?
To convert your video podcasts into audio through Filmora. Follow these steps:
- Drag the imported video from the media library into the video timeline.
- To extract the audio from the video, right-click the video clip and select “Audio Detach.”
- After a while, audio and video will be seen on separate tracks.
Can I save the sound after converting text to speech?
Once the text has been converted to speech, you can save the sound. Select your preferred format after clicking the “export” option in Filmora.
Conclusion
Many of us wish to launch a podcast and blog. A productive podcast’s essence is turning writing into audio using various podcasting techniques. AI-powered text-to-speech softwares can quickly convert articles into podcasts. Or, you can invite significant people to your podcast to personalize it. Podcasting can give outdated content a new life.
Free Download For macOS 10.14 or later
Step1 Download and install Filmora on your PC or Mac.

Step2 Open Filmora and select the video on which you wish to add audio.

Step3 After adding your selected video, select the option “Titles” to add text to your video.

Step4 Select your favorite position for text in the video, like “lower third,” which is used the most in video titles.

Step5 Add text to the timeline and click “Ok.” You can move the red timeline marker if you want your text in a certain spot.

Click the “+” button marked in the picture below to add text.

You can also edit the text by changing its style, color, and font or by animating it.

Step6 Press the “Text-to-Speech” button in the lower right side and choose your preferred voice. For example, Lilly’s voice resembles Siri.

You can also choose another language other than English.

Click “Ok” once you’ve selected everything according to your requirements.
Step7 Once the transcription is completed, go ahead and test the video and audio to see if it’s synching.

And that’s done. This is how easy it is to turn your texts into speech using Filmora.
Part 4. Hot FAQs on Podcast Text to Speech
How do I convert podcasts to text?
With the help of the smartphone app Google Recorder you can easily convert podcasts to texts for free.
- Open the app on your phone, start recording to it, and start recording your podcast simultaneously.
- The words will be automatically recorded and entered into the application as you talk into your phone’s microphone.
- After you click stop on the app, you can store and share the files once you finish your recording.
You have an option of sharing the text, the audio, or both. Alternatively, you can save them to your Google Drive if you don’t want to share them.
How to turn my podcast into a sound?
To convert your video podcasts into audio through Filmora. Follow these steps:
- Drag the imported video from the media library into the video timeline.
- To extract the audio from the video, right-click the video clip and select “Audio Detach.”
- After a while, audio and video will be seen on separate tracks.
Can I save the sound after converting text to speech?
Once the text has been converted to speech, you can save the sound. Select your preferred format after clicking the “export” option in Filmora.
Conclusion
Many of us wish to launch a podcast and blog. A productive podcast’s essence is turning writing into audio using various podcasting techniques. AI-powered text-to-speech softwares can quickly convert articles into podcasts. Or, you can invite significant people to your podcast to personalize it. Podcasting can give outdated content a new life.
Discover the Top 6 Online Video Speed Controllers Compatible with Chrome, Safari, Firefox for Enhanced Video Playback and Viewing Experience
Social media and video streaming apps like Facebook, Instagram and YouTube let the user control the video speed, but the speed controls are not smart enough. What if you want to watch the YouTube video at more than 2x speed? That’s where the video speed controller comes in.
AI speed control For Win 7 or later(64-bit)
AI speed control For macOS 10.14 or later
These speed controllers let you speed control video at your liking. If you want to take control of video playback speeds, you can go for the video speed controller download options. Let’s discuss some of the best speed controllers apps and extensions.
- Video Speed Controller
- YouTube Playback Speed Control
- Accelerate for Safari
- Playback Speed
- SpeedUp
- PlayerFab All-in-One
TOP 6 Online Video Speed Controller
01 Video Speed Controller
Video speed controller Chrome extension is one of the best speed control video extensions. You can adjust the playback speed, navigate forward or backward, and control HTML5 audio/video using keyboard shortcuts. The best thing about this speed controller extension is its ability to rewind video for a few seconds without changing playback speeds.
Customizable speed control video adjustments.
Easy shortcuts using a keyboard.
Simple user interface to control the video speed.
Sometime forget settings
02 YouTube Playback Speed Control
If you are looking for the video speed controller download, YouTube Playback Speed Control comes with plenty of speed control video options. The simple pressing of ‘+’ key to increase and ‘-’ to decrease playback speed makes it a favorite extension of every browser user. It is one of the best speed controller extension without any annoying popups on your streaming screen.
Control YouTube video playback speed using keyboard shortcuts.
Customize the keyboard buttons used for controlling playback speed.
Functional with HTML5 YouTube players embedded in other websites.
Doesn’t work with other video streaming options.
03 Accelerate for Safari
If you are a Mac, iPhone or iPad user, you can also download the video speed controller Safari. Accelate for Safari also supports Picture-in-Picture and AirPlay, which means you are not bound to stay in Safari browser to stream the video at your preferred pace. You can play the video in the background and continue browsing. The great thing about this video speed controller Safari extension is that it works with all the streaming and video platforms.
Customize video playback speed and controls in Safari.
Supports keyboard shortcuts for various video controls including play/pause and speed adjustment.
Compatible with major video platforms like YouTube, Netflix, Hulu, and more.
First time setup could be a hassle if you are not techie enough. 04 Playback Speed
04 Playback Speed
If you use Firefox like millions of others but feel sad that we haven’t mentioned video speed controller Firefox extension, well, you shouldn’t be. Playback Speed is one of the best speed controller extension on Firefox that lets you customize the playback controls. Another great thing, you won’t see annoying pop ups as its control center is next to the video link search bar. The setup is easier and the settings user interface is pleasing on the eyes with slider controls.
Play HTML5 videos on YouTube at customizable speeds.
Simple and one touch user interface to control settings
Slow playback speed options are limited.
Limited function availability across other streaming platforms.
05 SpeedUp
SpeedUp is a popular video speed controller Firefox extension with hundreds of downloads. There are many extensions that ask for tracking permission across all websites but SpeedUp doesn’t track any activity even on the video platform. Another great thing is that you can enable in-video buttons to control the video as per your preference. If you use a Firefox browser, you use go for the video speed controller download.
Control speed of all the video streaming platforms and websites.
Support for HTML5 videos on any website.
simple user interface provided by Speedify. Disadvantages
The speed playback buttons could be clumsy sometimes.
06 PlayerFab All-in-One
PlayerFab lets you play back local videos, DVD/Blu-ray/UHD discs, and videos from Amazon and Netflix, and other streaming platforms. As a streaming playback platform, it lets you watch and play videos in one place. All you have to do is type the name of the movie/show, and it will play the video while giving you access to video playback controls.
You can watch videos in FHD, and it supports EAC3 5.1 audio quality.
All in one solution for all the streaming platforms.
Lets you adjust the playback speed.
Hi-Res Audio and Video support.
Lifetime license for premium features needs one time purchase.
Conclusion
If you are looking for a video speed controller that lets you speed control video, we have discussed some of the best video speed controller download options. We have chosen some of the best speed controller extensions for Google Chrome, Mozilla Firefox and Safari.
If you are looking for a speed controller extension, you can download any of the extensions mentioned. However, all these free chrome extensions have some compromises. If you don’t want to compromise on features and control access, you can purchase PlayerFab All-in-One.
Backup and Organize Your Footage in Minutes
Backing up your data is deemed significantly necessary among video editing communities. Files get corrupted easily. Having a backup drive can save your day and countless hours. You can back up your data any way you deem fit. However, it will do you right if you follow the advice of professionals.
The article is written explicitly after due consideration and suggestions from the professional video editor. You can follow the steps in it to make backup files. Let us start with very straightforward steps to help you understand the professional way of backing up and organizing your footage.
Part 1. Back Up Your Files
Backing up your files gives you peace of mind. If one file is lost, the whole project becomes vulnerable to failure. Therefore, every effort must be made to ensure the protection of files. The best way to protect the files from any misfortune is to back them up.
Remember, there is no specific way to back up your files. Depending on the project’s requirements, you can do that differently. The following steps will light up how you can back up your files.
Step1Back up your files in two different places
It is crucial to do that. If one backup drive corrupts, you have the second option. It gives you an opportunity to back up files.
- You can make two different external backup hard drives.

- You can also use your internal and external devices as two backup options.

Step2Make specific folders for each purpose of the video
The next step is how you back up your files properly and safely. Make separate folders for the different formats you are importing in your drive. Always use the primary source to make a copy of your files.
Follow the steps below to understand how to back up your files in two drives.
- Create a folder in your drive.
- Name it. You can name it according to the given format. The choice is yours.

- Your backup folder is created.
- Make new folders based on the files that are imported into the file. We are making two folders for the project, 01 Footage, and 02 Audio.
- 01 Footage is for the original footage.
- 02 Audio is for audio files provided by the music artist.

Step3Repeat the same process in your second backup drive
- Make the same folders and sub-folders in your secondary backup drive.

Step4Transfer files to your primary and secondary folders
- Transfer files to folders and sub-folders in your first backup drive.
- Transfer files to folders and sub-folders in your secondary backup drive.
![]()
Note: Most people make the mistake of making a backup drive and then using the same drive to make the second backup. The approach needs to be corrected.
We are done with backing up our files. It is time to organize the files in your drive.
Part 2. Organize Your Files in Filmora
Organizing your files is vital for any operation in video and editing. It makes everything streamlined. The risk of losing your data become negligible. Let us enlighten you on how you can organize your files.
Free Download For Win 7 or later(64-bit)
Free Download For macOS 10.14 or later
Step1Create new folders to lay the foundation for your video editing project
You can imitate the format we have chosen. However, you can choose any way you deem fit.
- Create 02 Project Files and 03 Exports.
- 02 Project contains the files that we will edit in Filmora .
- 03 Exports will have files that will be exported out of Filmora.

- In the 01 Media folder, create a new folder, 03 Graphics. It will contain graphics the artist will provide, such as a logo. You can also add your graphics to the folder if you want.

The format will help you if you move files from one device to the next case. In that case, you will only have to move one folder with the artist’s name.

Step2Create a new project
In this step, we will organize our files in Filmora. It will help us to keep discipline and order in file organization. It makes work easy and fun.
- Create a new project when you open Filmora on your PC or Mac.

- Save the project in any name you want. We have saved the project in the format explained above.
- Save the file in 02 Project Files.

Step3Edit your workspace if you want
Users can edit the workspace in Filmora. You can customize it to your liking. Also, it is entirely optional.
- Go to layout mode. Change the layout if you want.

- You can manually change the panels by simply dragging them across the screen.

The workspace settings will be saved automatically. The next time you start Filmora, you will not need to readjust the panels.
- Save the file
Step4Recreate the file structure in your 02 project files
Now, you create folders in your project. For that, you can follow our structure, or you can follow your instincts.
- Create the folders in Filmora, as you have created them in your drive. The folders will be created in your 02 Project Files.
These new folders are the exact copies of your media files that you have got from the producer and music artist.

- Import the files into respective folders. Footage should include all the original videos given to your producers.

Step5Save the project
You can save the file using the button on Filmora, as shown below.

- You can save the files using short keys.

Conclusion
Making a backup file for your project is crucial. For a video editor, it is quite painful to learn that the final product has a missing file. Therefore, one must ensure that all the files are backed up before beginning the editing phase.
Apart from that, one must also keep updating the files in Filmora . You performed some editing. Make sure to save the file then and there. Any minor mistake can cause great worry for the professional editor. Thus, it is better to take proactive actions.
Free Download For Win 7 or later(64-bit)
Free Download For macOS 10.14 or later
We are done with backing up our files. It is time to organize the files in your drive.
Part 2. Organize Your Files in Filmora
Organizing your files is vital for any operation in video and editing. It makes everything streamlined. The risk of losing your data become negligible. Let us enlighten you on how you can organize your files.
Free Download For Win 7 or later(64-bit)
Free Download For macOS 10.14 or later
Step1Create new folders to lay the foundation for your video editing project
You can imitate the format we have chosen. However, you can choose any way you deem fit.
- Create 02 Project Files and 03 Exports.
- 02 Project contains the files that we will edit in Filmora .
- 03 Exports will have files that will be exported out of Filmora.

- In the 01 Media folder, create a new folder, 03 Graphics. It will contain graphics the artist will provide, such as a logo. You can also add your graphics to the folder if you want.

The format will help you if you move files from one device to the next case. In that case, you will only have to move one folder with the artist’s name.

Step2Create a new project
In this step, we will organize our files in Filmora. It will help us to keep discipline and order in file organization. It makes work easy and fun.
- Create a new project when you open Filmora on your PC or Mac.

- Save the project in any name you want. We have saved the project in the format explained above.
- Save the file in 02 Project Files.

Step3Edit your workspace if you want
Users can edit the workspace in Filmora. You can customize it to your liking. Also, it is entirely optional.
- Go to layout mode. Change the layout if you want.

- You can manually change the panels by simply dragging them across the screen.

The workspace settings will be saved automatically. The next time you start Filmora, you will not need to readjust the panels.
- Save the file
Step4Recreate the file structure in your 02 project files
Now, you create folders in your project. For that, you can follow our structure, or you can follow your instincts.
- Create the folders in Filmora, as you have created them in your drive. The folders will be created in your 02 Project Files.
These new folders are the exact copies of your media files that you have got from the producer and music artist.

- Import the files into respective folders. Footage should include all the original videos given to your producers.

Step5Save the project
You can save the file using the button on Filmora, as shown below.

- You can save the files using short keys.

Conclusion
Making a backup file for your project is crucial. For a video editor, it is quite painful to learn that the final product has a missing file. Therefore, one must ensure that all the files are backed up before beginning the editing phase.
Apart from that, one must also keep updating the files in Filmora . You performed some editing. Make sure to save the file then and there. Any minor mistake can cause great worry for the professional editor. Thus, it is better to take proactive actions.
Free Download For Win 7 or later(64-bit)
Free Download For macOS 10.14 or later
Also read:
- [Updated] Best Practices for Laptop-Based PPT Presentations on Google Meet for 2024
- [Updated] Simplifying Social Media Sharing From TikTok to FB
- 2024 Approved Pro Level Webcams The Ultimate Choice for Your Podcasts
- 3 Easy Ways to Factory Reset a Locked iPhone 14 Pro Max Without iTunes
- 5 Easy Ways to Copy Contacts from Vivo Y27 4G to iPhone 14 and 15 | Dr.fone
- Edible Escapades World's Best Food on TikTok
- Generate Official Travel-Ready Portraits – Download 10 FREE Photos Today for 2024
- In 2024, How to Reset a Locked Vivo Y200e 5G Phone
- New 2024 Approved Slow Down Videos on Instagram With Perfection A Guide
- New 2024 Approved Top 15 Slow Motion CapCut Templates to Work With
- New Having GoPro Accessories Is Easy, but Editing on GoPro Quik Is Challenging. Read This Guide and, Stepwise, Learn to Use GoPro Slow-Motion for Perfect Shots for 2024
- New In 2024, Recording Slow-Motion Videos Is Not More Difficult Using a Smartphone. Learn Everything From How to Record Slow-Motion Video and Edit a Video to Slow Down It
- New In 2024, Slow Motion Videos Are Taking over Social Media and Becoming a New Trend. Read This Article if You Want to Learn How to Slow Down Video in After Effects
- Step-by-Step Process for Deleting Stickers From TikTok
- Updated Are You Interested in the Best LUTs ? Do You Want to Enhance Your Photos and Images with High-End Quality? Then, Quickly Step Into This Article for Mind-Blowing Facts on It for 2024
- Updated In 2024, The Benefits Of Using Video For Social Media Marketing
- Updated Use The Best LUTs for Lightroom for 2024
- Title: New In 2024, Add Selective Color Effect to Your Videos Using Filmora
- Author: Morgan
- Created at : 2024-09-25 21:40:52
- Updated at : 2024-09-30 16:10:28
- Link: https://ai-video-editing.techidaily.com/new-in-2024-add-selective-color-effect-to-your-videos-using-filmora/
- License: This work is licensed under CC BY-NC-SA 4.0.