:max_bytes(150000):strip_icc():format(webp)/Google-Cloud-Next-59a9cb4a03e644389e2ffa9939c420f8.jpg)
New In 2024, Add Zoom Blur Effect In Photoshop Step by Step

Add Zoom Blur Effect In Photoshop [Step by Step]
People add blurry effects to their photos to add a sense of focus effortlessly. It helps to grasp the viewers’ attention as blurry effects add a depth of field. There are various kinds of blurry effects, such as motion blur, zoom blur, etc.
One of the commonly used blurry effects is zoom blur which helps to highlight a specific area of the image. This article will help you to add zoom blur Photoshop through simple means.
Part 1: What is Zoom Blur?
Zoom blur is a creative effect that adds a new dimension to your captured photos. It creates an illusion where the captured shot appears to blur from the center direction. It gives an abstract feel and adds a certain movement to the picture. You can quickly draw attention to your subject by adding a zoom motion blur.

To create a zoom blur effect while capturing the photo, you should consider some conditions. For example, you can successfully create this effect by taking a picture in low-light conditions. Moreover, you should use a tripod to acquire the best results.
Part 2: How to Add Zoom Blur Effect to Photos in Photoshop?
Photoshop is widely used to alter images with distinct features. It can easily handle diverse file types with great efficiency. It gives complete control to the user as it comprises a friendly user interface. Moreover, you can utilize its color grading tools to adjust the saturation, hue, contrast, and brightness of the photo.
You can also discover AI-supported neural filters that can be a game-changer for you. It also provides a sky replacement tool that you can use to replace the sky in your captured photos effortlessly. For zoom blur Photoshop, you can manually create this effect with a few clicks. For this purpose, you can take help from the following guidelines:
Step1 Navigate to your Photoshop tool and import your desired photo. Go to the “Layers” section on your screen and press “Ctrl + J” to duplicate the first layer. If you are a MacBook user, you can press “Command + J.”

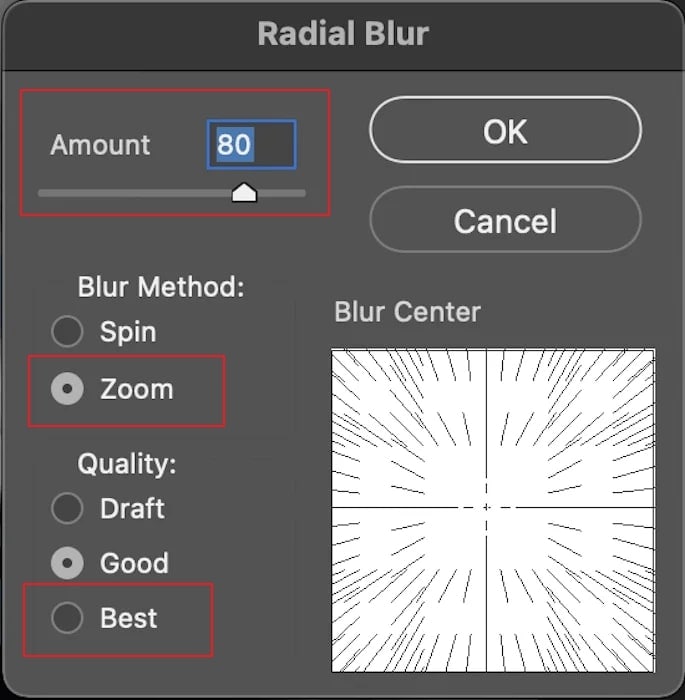
Step2 To proceed, go to the “Filter” option given above and select the “Blur” option. From its drop-down menu, select “Radial Blur .”Now you would be able to see a new window of Radial Blur on your screen. Here, change the amount to 10, and under the “Blur Method” section, select “Zoom .”Also, choose “Best” in the “Quality” section.
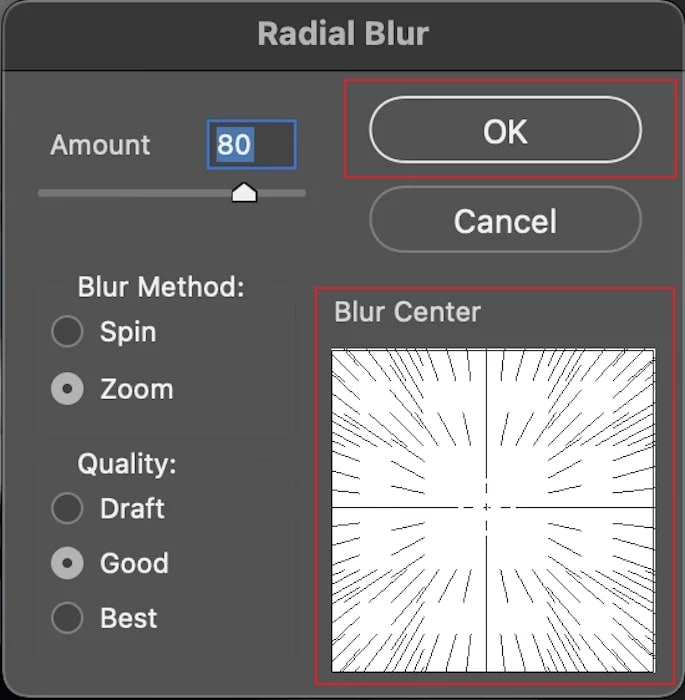
Step3 By staying on the Radial Blur window, adjust the “Blur Center” according to your desire. It will add focus to the central point while blurring the surroundings of your image. Once done, hit the “OK” button. To add further modifications, you can open the Radial Blur window again and modify the “Blur Center” easily.
Part 3: Add the Motion Blur with an Alternative to Photoshop
Are you searching the alternatives to Photoshop? It may be possible that you don’t get desired final results using zoom blur Photoshop. For this, you can check the following tools to achieve the best results.
1. GIFGIT.com
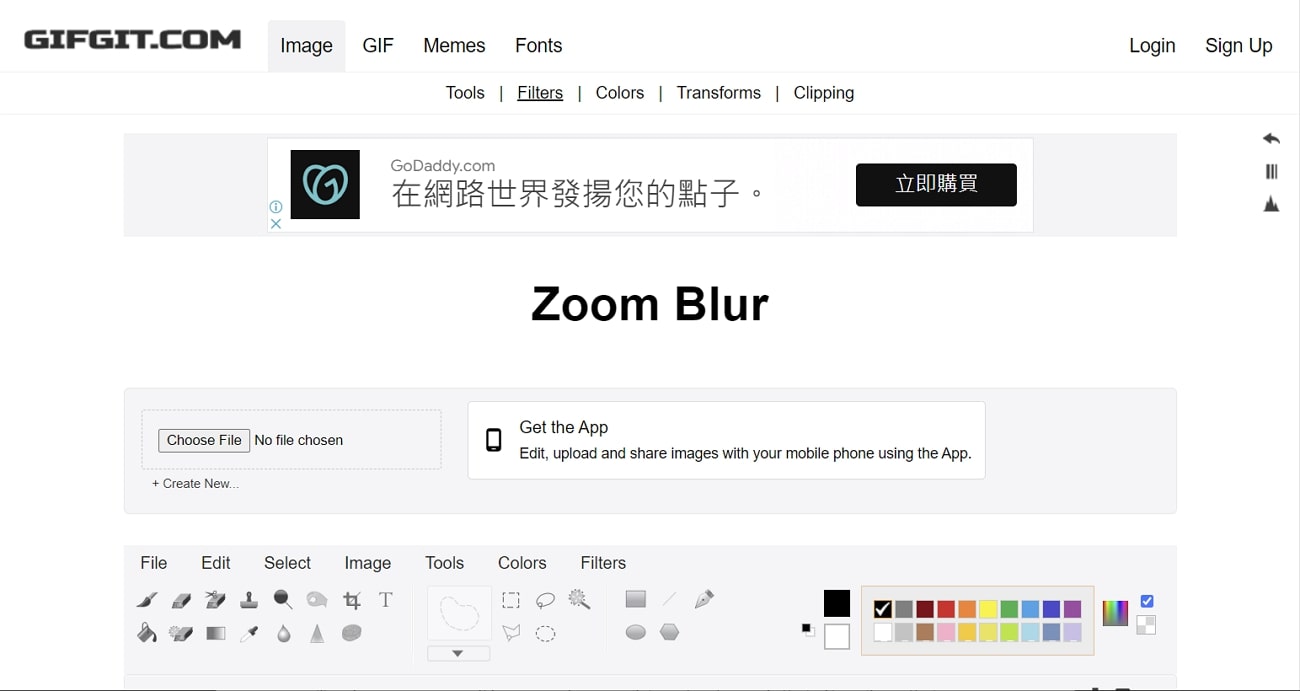
This online tool is an easy-to-use platform through which you can edit your images without any complications. It contains different tools through which you can add modifications instantly. For instance, you can utilize its advanced features such as Color Picker, Background Eraser, Gradient Tool, Magic Eraser, etc. Through its Blur Tool, you can defocus an image precisely in the desired manner.
To use this tool, navigate to the website of GIFGIT through your web browser. From its various tools, select the “Blur” tool. Afterward, click the “Choose File” button and upload your image. From the above editing toolbar, access the “Zoom Blur” slider to use the blur option. Adjust the ratio of the blur by increasing or decreasing the value through the slider or by entering the number inside the box.
2. Luxa.org
Do you want a professional tool to add a zoom blur effect? Luxa.org has a friendly user interface that comprises different options, such as PDF tools and image tools. For the image tools, you can find various options to execute the editing. For instance, you can add colored borders to your images and text in the desired font. You can also modify the brightness level of your pictures through this tool.
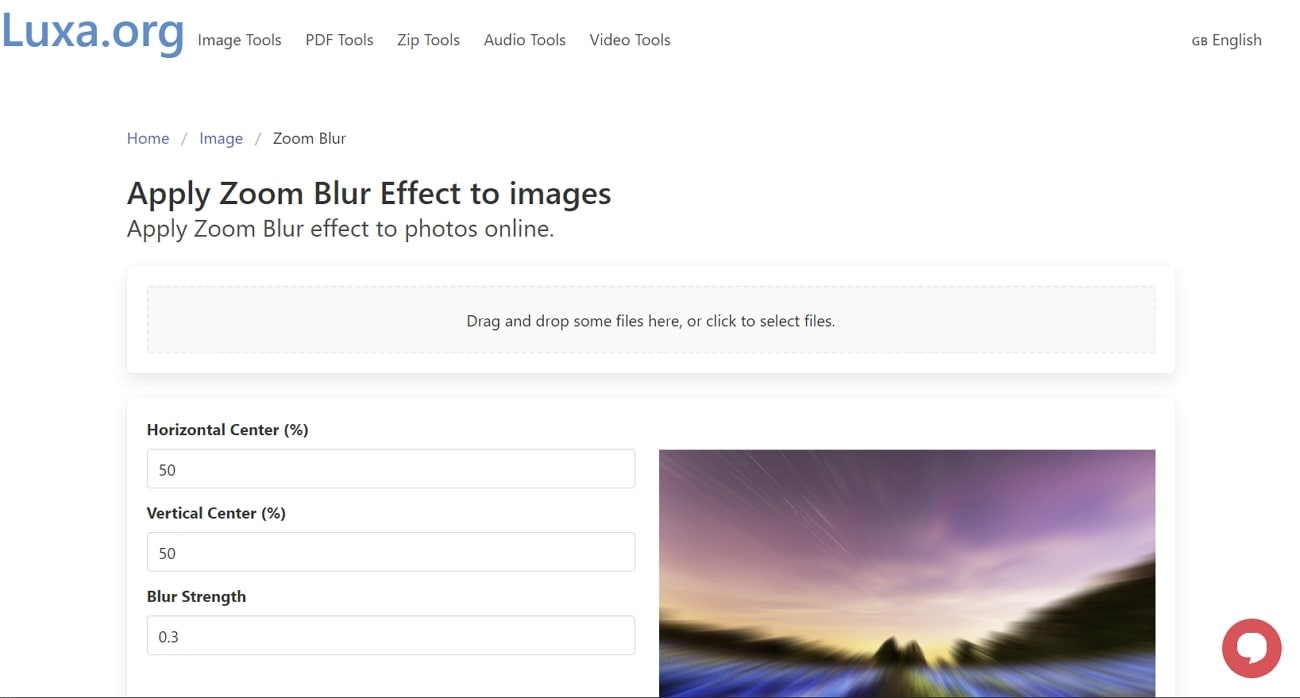
To add a zoom motion blur effect, this tool provides a special online blur tool. To utilize it, access the website of Luxa.org and go to its image tools. From there, navigate to the zoom blur feature. Now upload your image on this tool and set the horizontal and vertical strengths. Also, adjust the blur strength accordingly. Once the zoom blur effect gets added to your photo, click on the “Download” button.
3. Wondershare Filmora
Have you ever tried Wondershare Filmora before? Filmora is a complete toolbox through which you can execute basic and advanced image editing without complications. It contains different kinds of built-in presets that can help you express your creativity. Moreover, it provides stock images that you use without any restrictions.
Free Download For Win 7 or later(64-bit)
Free Download For macOS 10.14 or later
To enhance your images, Filmora provides you with tons of professional effects. Using these effects, you can also add a zoom blur effect to your photos along with modification options. Furthermore, you can also export the edited image in the desired file format and resolution on this platform. To use this platform for adding a zoom blur effect, check the following instructions:
Step1 Import the Particular Image
After launching Filmora, select the “Create New Project” option to begin. Afterward, import the image from your computer to which you want to add the zoom blur effect. Once done, drag and drop the picture into the timeline.

Step2 Add the Zoom Blur Effect
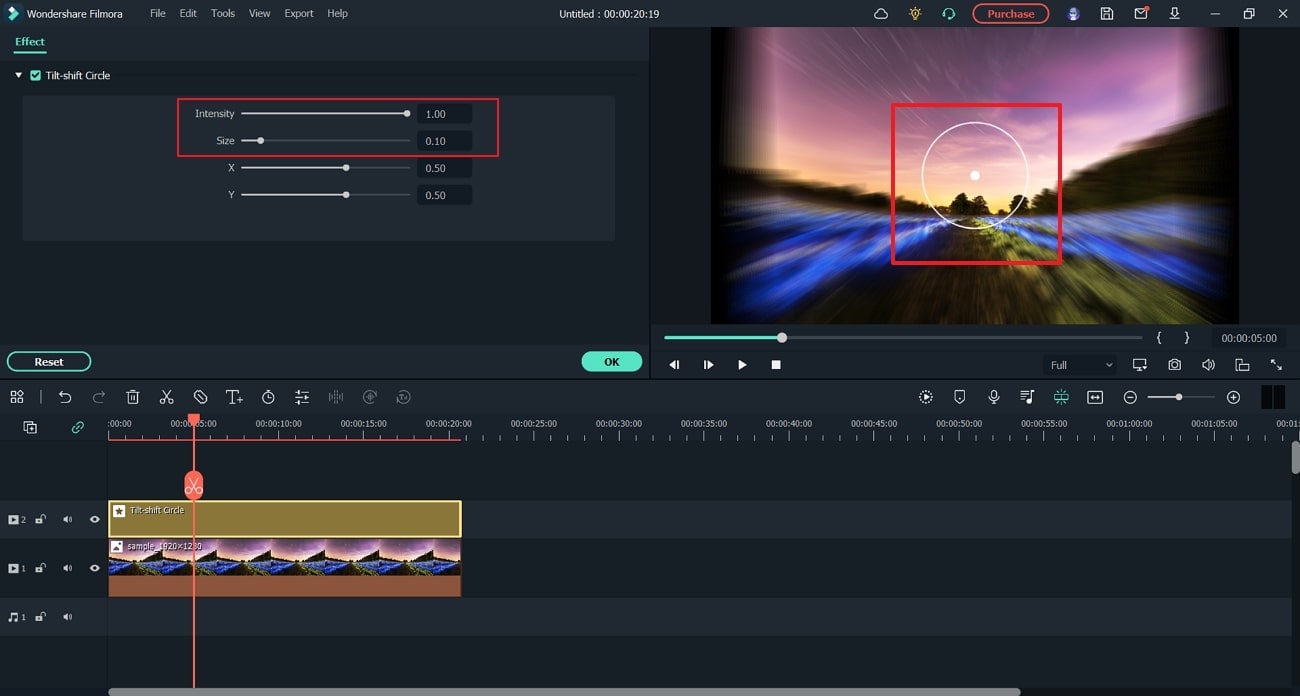
Go to the Effect section and select “Utility” under the “Video Effects” section. From there, search “Tilt-Shift Circle” effect. Select and drop this effect to the timeline to proceed. Also, make sure to adjust the duration of the added effect according to your clip.

Step3 Adjust the Blur Settings
Now, double-click the added effect to adjust the intensity of the effect. Through the circle, you can apply the zoom blur effect to the photo precisely. You can adjust the intensity and size of the zoom motion blur effect.
Last Words
The zoom blur effect can instantly add focus to the subject in a dramatic manner. It can also highlight a specific point of the image effortlessly. In this article, we have addressed how to add zoom motion blur using Photoshop. To use the best alternative to Photoshop, we highly recommend using Wondershare Filmora. This tool has an easy-to-use interface and enables you to add a zoom blur effect easily.
Part 1: What is Zoom Blur?
Zoom blur is a creative effect that adds a new dimension to your captured photos. It creates an illusion where the captured shot appears to blur from the center direction. It gives an abstract feel and adds a certain movement to the picture. You can quickly draw attention to your subject by adding a zoom motion blur.

To create a zoom blur effect while capturing the photo, you should consider some conditions. For example, you can successfully create this effect by taking a picture in low-light conditions. Moreover, you should use a tripod to acquire the best results.
Part 2: How to Add Zoom Blur Effect to Photos in Photoshop?
Photoshop is widely used to alter images with distinct features. It can easily handle diverse file types with great efficiency. It gives complete control to the user as it comprises a friendly user interface. Moreover, you can utilize its color grading tools to adjust the saturation, hue, contrast, and brightness of the photo.
You can also discover AI-supported neural filters that can be a game-changer for you. It also provides a sky replacement tool that you can use to replace the sky in your captured photos effortlessly. For zoom blur Photoshop, you can manually create this effect with a few clicks. For this purpose, you can take help from the following guidelines:
Step1 Navigate to your Photoshop tool and import your desired photo. Go to the “Layers” section on your screen and press “Ctrl + J” to duplicate the first layer. If you are a MacBook user, you can press “Command + J.”

Step2 To proceed, go to the “Filter” option given above and select the “Blur” option. From its drop-down menu, select “Radial Blur .”Now you would be able to see a new window of Radial Blur on your screen. Here, change the amount to 10, and under the “Blur Method” section, select “Zoom .”Also, choose “Best” in the “Quality” section.

Step3 By staying on the Radial Blur window, adjust the “Blur Center” according to your desire. It will add focus to the central point while blurring the surroundings of your image. Once done, hit the “OK” button. To add further modifications, you can open the Radial Blur window again and modify the “Blur Center” easily.

Part 3: Add the Motion Blur with an Alternative to Photoshop
Are you searching the alternatives to Photoshop? It may be possible that you don’t get desired final results using zoom blur Photoshop. For this, you can check the following tools to achieve the best results.
1. GIFGIT.com
This online tool is an easy-to-use platform through which you can edit your images without any complications. It contains different tools through which you can add modifications instantly. For instance, you can utilize its advanced features such as Color Picker, Background Eraser, Gradient Tool, Magic Eraser, etc. Through its Blur Tool, you can defocus an image precisely in the desired manner.
To use this tool, navigate to the website of GIFGIT through your web browser. From its various tools, select the “Blur” tool. Afterward, click the “Choose File” button and upload your image. From the above editing toolbar, access the “Zoom Blur” slider to use the blur option. Adjust the ratio of the blur by increasing or decreasing the value through the slider or by entering the number inside the box.

2. Luxa.org
Do you want a professional tool to add a zoom blur effect? Luxa.org has a friendly user interface that comprises different options, such as PDF tools and image tools. For the image tools, you can find various options to execute the editing. For instance, you can add colored borders to your images and text in the desired font. You can also modify the brightness level of your pictures through this tool.
To add a zoom motion blur effect, this tool provides a special online blur tool. To utilize it, access the website of Luxa.org and go to its image tools. From there, navigate to the zoom blur feature. Now upload your image on this tool and set the horizontal and vertical strengths. Also, adjust the blur strength accordingly. Once the zoom blur effect gets added to your photo, click on the “Download” button.

3. Wondershare Filmora
Have you ever tried Wondershare Filmora before? Filmora is a complete toolbox through which you can execute basic and advanced image editing without complications. It contains different kinds of built-in presets that can help you express your creativity. Moreover, it provides stock images that you use without any restrictions.
Free Download For Win 7 or later(64-bit)
Free Download For macOS 10.14 or later
To enhance your images, Filmora provides you with tons of professional effects. Using these effects, you can also add a zoom blur effect to your photos along with modification options. Furthermore, you can also export the edited image in the desired file format and resolution on this platform. To use this platform for adding a zoom blur effect, check the following instructions:
Step1 Import the Particular Image
After launching Filmora, select the “Create New Project” option to begin. Afterward, import the image from your computer to which you want to add the zoom blur effect. Once done, drag and drop the picture into the timeline.

Step2 Add the Zoom Blur Effect
Go to the Effect section and select “Utility” under the “Video Effects” section. From there, search “Tilt-Shift Circle” effect. Select and drop this effect to the timeline to proceed. Also, make sure to adjust the duration of the added effect according to your clip.

Step3 Adjust the Blur Settings
Now, double-click the added effect to adjust the intensity of the effect. Through the circle, you can apply the zoom blur effect to the photo precisely. You can adjust the intensity and size of the zoom motion blur effect.

Last Words
The zoom blur effect can instantly add focus to the subject in a dramatic manner. It can also highlight a specific point of the image effortlessly. In this article, we have addressed how to add zoom motion blur using Photoshop. To use the best alternative to Photoshop, we highly recommend using Wondershare Filmora. This tool has an easy-to-use interface and enables you to add a zoom blur effect easily.
Motion Tracking Using The Best Video Editors
One of the powerful editing features offered by several premium-grade video editors is motion tracking. It not only boosts the overall video quality but also helps ensuring the object is engaged throughout the video. Many users fail to apply the motion tracking effect to the videos because they don’t use a reliable tool. The primary motive of this discussion is to provide you with the best-in-class motion tracker.
Not only will we tell you the name of the software, but we will also guide you through the procedure of doing this. Moreover, many of you don’t know what motion tracking is. So, this article will also provide significant information about this.
Part 1: What Is Motion Tracking in Video Editing?
Motion tracking helps you analyze the movements of different objects in your video content. This process involves various tasks that can be very helpful in video editing. For example, tracking and identifying the position of elements over time. The main purpose of motion tracking is to add graphics. Moreover, you can also add digital effects to the tracked objects.
You will need special software or video editing tools to perform this process. Here’s how you can understand the motion tracking process with ease:
Selection of Object
The editor can select the object that he wants to track in an effective manner. This object can be a person or any moving element that needs tracking. Moreover, it can also be a moving vehicle or a logo as well. Tracking these moving elements in the frame can allow the editor to improve the areas which have high contrast or distinct features.
Tracking Points
Selecting the object allows the software to identify specific points in the frame. These points can have distinct features or a high contrast that may affect the video quality. With the help of video motion tracking, the editor can note down these areas and improve them to enhance the viewer experience.
Data Mapping
Once the software tracks the movements, it can be very useful for the editor. This is because it calculates the changes in position and rotation of each point. Moreover, it also maps the tracked data into a visual representation for the coordinating system. Using this system, the movements of the objects can be recreated in a 3D space.
Using Effects and Refinement
After obtaining the motion tracking data, the video editor can apply different effects on the object. These effects can include adding graphics and text to the scene. Moreover, it can also help in animation or compositing visual elements. To ensure the accurate alignment of the effects, the editor may need to use extra tracking techniques or manual adjustments.
Start Motion Tracking For Win 7 or later(64-bit)
Start Motion Tracking For macOS 10.14 or later
Part 2: How to Perform Motion Tracking in Adobe After Effects?
As you have gained knowledge about motion tracking, there are many platforms that offer this feature. Adobe After Effects is a video editing platform that can help you perform video motion tracking. If you are a user of this tool, you can learn the steps to motion track your video below:
Step 1: Open Adobe After Effects on your computer and import your video files to the timeline of the platform. Add the object you wish to motion track on Adobe After Effects.
![]()
Step 2: Lead to the “Layer” tab from the top and select the “New” option from the drop-down menu. Continue to select “Null Object” to add a layer to the timeline.
![]()
Step 3: Select the video clip and continue to the “Animation” tab from the top. Select “Track Motion” from the drop-down menu that appears. This will generate a box for selecting the object for motion tracking. You can extend the box and drag it anywhere in the video clip. To check the motion tracking object, click the “Analyze Forward” button on the bottom-right corner of the screen.
![]()
Step 4: As the object is analyzed, click the “Edit Target” button to open a new screen. Continue to change the layer to “Null Object” and click “OK.” Continue to select “Apply” and click “OK” against the pop-up menu that opens. This is how Adobe After Effects applies the motion tracker.
![]()
Part 3: Wondershare Filmora: A Comprehensive Solution to Video Editing
Do you know that there is a video editing platform that makes all video motion tracking process easy? Wondershare Filmora presents a coherent video editing system for its users with high-quality outputs. The platform integrates some of the greatest features and makes it useful for all users. Even if you are a rookie in video editing, this video editing platform can help you make the best of videos.
Start Motion Tracking For Win 7 or later(64-bit)
Start Motion Tracking For macOS 10.14 or later
Motion Tracking is possible with Wondershare Filmora, which is entirely automated. All you have to do is click a button, and the process will execute. Wondershare Filmora helps users apply different effects and track them within the videos. Instead of objects, you can increase your video motion tracking into effects and other elements.
![]()
Features of Wondershare Filmora Video Editor
To know more about this video editing platform, look into the prominent features offered by Filmora. There is much that this software provides apart from motion tracking videos. This will help you generate a better understanding of this best motion-tracking software.
Auto Beat Sync
You can synchronize your audio and videos across this automated video editor. Filmora provides an auto beat sync function that helps users create videos that can be synchronized. Smoothen your videos and make them look professional with a single click. This does not leave behind any noise or echo within the videos .
Text-to-Speech Function
Wondershare Filmora features a dedicated AI text-to-speech functionality. This helps in the automatic conversion of text into speech across the video editor. Users have to add text which will be converted to speech. In this way, creating voiceovers is not only easy but also quick.
Speed Ramping
While you can motion-track your videos, the platform also provides a speed ramping system. Adjusting the speed uniformly or through ramping is effective with Filmora, as it makes it simple to cover. You can adjust the speeds using sliders and graphs.
Part 4: Guide: Perform Paper Motion Tracking With High Quality Using Wondershare Filmora
Filmora is a popular video editing platform among video editors for motion track videos. It offers exquisite features along with a smooth and sleek interface. You can also ensure the best quality integration of motion tracking in videos with Filmora. Do you wish to learn the steps to perform motion tracking with this best motion tracking software? Worry no more because the below-given steps will help you in this matter:
Start Motion Tracking For Win 7 or later(64-bit)
Start Motion Tracking For macOS 10.14 or later
Step 1: Import Video in Filmora
To get started, launch Filmora on your device, select “New Project,” and choose the “Click here to import media” option. To proceed, add the video you want to apply motion tracking. Once the video is visible in the “Import Media” section, drag it to “Timeline.”
![]()
Step 2: Add Motion Tracking in the Video
Select the video in “Timeline” and click the “Motion Tracking” button from the “Toolbar” present above the “Timeline.” Conversely, double-click the video and choose the “Video” tab from the editing settings.
![]()
Step 3: Customize Motion Tracking and Initiate It
To enable the box customization, double-click the “Motion Tracking Box.” Drag the “Motion Tracking Box” on the moving object and cover the whole object in the box. You can also adjust the duration of motion tracking by trimming the video in the timeline. Once done, click the “Click to start Motion Track” button and wait a few moments.
![]()
Step 4: Add Elements or Effects to the Video
Next, select “OK” from the prompt window and go to the “Element” section. Choose an “Element” and drag it into “Timeline” above your video section. To adjust the element, you must double-click on it. There is no restriction on using an element, as you can add “Effects” or other things.
You need to revert to the “Motion Tracking” section and select the drop-down appearing against the option. Choose the name of your “Effect” or “Element” that you’ve applied to before. The particular motion track will be enhanced through an effect or element.
![]()
Step 5: Export Motion Tracked Video in Device
For exporting video, click the “Export” button and personalize the “Export Settings.” Finally, tap “Export” and save the video on your device.
![]()
Conclusion
This article has pointed out the prominence of motion tracking in video editing. An idea for performing video motion tracking in Adobe After Effects has been provided. The article has offered Wondershare Filmora as the ideal solution to this requirement.
You can embed the motion tracking function and perform all the processes within a few seconds. If you have an object that you want to focus on in a video, trying motion tracking is the best option for this.
Start Motion Tracking For Win 7 or later(64-bit)
Start Motion Tracking For macOS 10.14 or later
Part 2: How to Perform Motion Tracking in Adobe After Effects?
As you have gained knowledge about motion tracking, there are many platforms that offer this feature. Adobe After Effects is a video editing platform that can help you perform video motion tracking. If you are a user of this tool, you can learn the steps to motion track your video below:
Step 1: Open Adobe After Effects on your computer and import your video files to the timeline of the platform. Add the object you wish to motion track on Adobe After Effects.
![]()
Step 2: Lead to the “Layer” tab from the top and select the “New” option from the drop-down menu. Continue to select “Null Object” to add a layer to the timeline.
![]()
Step 3: Select the video clip and continue to the “Animation” tab from the top. Select “Track Motion” from the drop-down menu that appears. This will generate a box for selecting the object for motion tracking. You can extend the box and drag it anywhere in the video clip. To check the motion tracking object, click the “Analyze Forward” button on the bottom-right corner of the screen.
![]()
Step 4: As the object is analyzed, click the “Edit Target” button to open a new screen. Continue to change the layer to “Null Object” and click “OK.” Continue to select “Apply” and click “OK” against the pop-up menu that opens. This is how Adobe After Effects applies the motion tracker.
![]()
Part 3: Wondershare Filmora: A Comprehensive Solution to Video Editing
Do you know that there is a video editing platform that makes all video motion tracking process easy? Wondershare Filmora presents a coherent video editing system for its users with high-quality outputs. The platform integrates some of the greatest features and makes it useful for all users. Even if you are a rookie in video editing, this video editing platform can help you make the best of videos.
Start Motion Tracking For Win 7 or later(64-bit)
Start Motion Tracking For macOS 10.14 or later
Motion Tracking is possible with Wondershare Filmora, which is entirely automated. All you have to do is click a button, and the process will execute. Wondershare Filmora helps users apply different effects and track them within the videos. Instead of objects, you can increase your video motion tracking into effects and other elements.
![]()
Features of Wondershare Filmora Video Editor
To know more about this video editing platform, look into the prominent features offered by Filmora. There is much that this software provides apart from motion tracking videos. This will help you generate a better understanding of this best motion-tracking software.
Auto Beat Sync
You can synchronize your audio and videos across this automated video editor. Filmora provides an auto beat sync function that helps users create videos that can be synchronized. Smoothen your videos and make them look professional with a single click. This does not leave behind any noise or echo within the videos .
Text-to-Speech Function
Wondershare Filmora features a dedicated AI text-to-speech functionality. This helps in the automatic conversion of text into speech across the video editor. Users have to add text which will be converted to speech. In this way, creating voiceovers is not only easy but also quick.
Speed Ramping
While you can motion-track your videos, the platform also provides a speed ramping system. Adjusting the speed uniformly or through ramping is effective with Filmora, as it makes it simple to cover. You can adjust the speeds using sliders and graphs.
Part 4: Guide: Perform Paper Motion Tracking With High Quality Using Wondershare Filmora
Filmora is a popular video editing platform among video editors for motion track videos. It offers exquisite features along with a smooth and sleek interface. You can also ensure the best quality integration of motion tracking in videos with Filmora. Do you wish to learn the steps to perform motion tracking with this best motion tracking software? Worry no more because the below-given steps will help you in this matter:
Start Motion Tracking For Win 7 or later(64-bit)
Start Motion Tracking For macOS 10.14 or later
Step 1: Import Video in Filmora
To get started, launch Filmora on your device, select “New Project,” and choose the “Click here to import media” option. To proceed, add the video you want to apply motion tracking. Once the video is visible in the “Import Media” section, drag it to “Timeline.”
![]()
Step 2: Add Motion Tracking in the Video
Select the video in “Timeline” and click the “Motion Tracking” button from the “Toolbar” present above the “Timeline.” Conversely, double-click the video and choose the “Video” tab from the editing settings.
![]()
Step 3: Customize Motion Tracking and Initiate It
To enable the box customization, double-click the “Motion Tracking Box.” Drag the “Motion Tracking Box” on the moving object and cover the whole object in the box. You can also adjust the duration of motion tracking by trimming the video in the timeline. Once done, click the “Click to start Motion Track” button and wait a few moments.
![]()
Step 4: Add Elements or Effects to the Video
Next, select “OK” from the prompt window and go to the “Element” section. Choose an “Element” and drag it into “Timeline” above your video section. To adjust the element, you must double-click on it. There is no restriction on using an element, as you can add “Effects” or other things.
You need to revert to the “Motion Tracking” section and select the drop-down appearing against the option. Choose the name of your “Effect” or “Element” that you’ve applied to before. The particular motion track will be enhanced through an effect or element.
![]()
Step 5: Export Motion Tracked Video in Device
For exporting video, click the “Export” button and personalize the “Export Settings.” Finally, tap “Export” and save the video on your device.
![]()
Conclusion
This article has pointed out the prominence of motion tracking in video editing. An idea for performing video motion tracking in Adobe After Effects has been provided. The article has offered Wondershare Filmora as the ideal solution to this requirement.
You can embed the motion tracking function and perform all the processes within a few seconds. If you have an object that you want to focus on in a video, trying motion tracking is the best option for this.
How to Use Renderforest Intro Video Maker
When individuals hear about free online items, they frequently associate them with being of poor quality, ineffective, or unreliable. Renderforest, on the other hand, is an exception. This can be precisely what you need if you’re seeking a cheap—or even free—high-quality online video editing platform. The service offers both freemium and premium solutions. The more expensive solutions provide the most flexibility.
What is Renderforest?
A free online tool for making animated videos and slideshows is Renderforest. The web platform makes it simple, quick, and affordable for organizations and individuals to produce slideshows, explainer and promotional business movies, logo animations, and much more.
The online video creation platform Renderforest enables people and companies to produce “broadcast grade” videos for personal or professional usage. Anyone may register as a user in just a few easy steps, and using it is free.
Users can produce an infinite number of high-quality videos, export them, and then share them online or on social media.
The web platform already provides various tailor-made options for blog animations, wedding and photo slideshows, instructional films, and video invites for personal use.
Additionally, the platform offers simple-to-use alternatives for company presentations, invites to events, promotional films, kinetic typography, explainer videos, testimonials, and more.
Renderforest’s Primary Attributes include:
- Videos of high quality
- A sizable collection of animation templates and storylines
- Access to more than 195,000 Royalty-free stock footage clips with an intuitive online movie editor
- One-click video publishing to YouTube channels or Facebook pages
- A music library with commercial licenses for use in making videos
Added characteristics:
- A voiceover generator for text
- Create an infinite number of color schemes
- Countless font uploads
- Obtainable 1,000,000+ premium video templates
- Including a custom watermark
- A reseller’s permit
- Working in teams
How it Works
Choose a video template from their selection by browsing. Once you register, you can utilize any of the hundreds of editable templates that they have available.
You will be presented with various categories when you choose video templates, from promotional templates to logo animation templates to slide displays and everything in between.
You may freely post high-quality photographs, audio, and voice-over, an incredibly fantastic feature. The ability to share their tales in a way that customers can relate to is given to business owners by this.
After you’ve finished editing, the video must render for a while before it’s prepared for publishing. Click the edit button if you want to make some changes to the video or are unsatisfied with it. The video can be edited as many times as you like.
Users can directly post their videos on social media platforms, including Facebook, Twitter, Google+, Pinterest, and Instagram, through the website.
Renderforest maintains all your projects on your dashboard for as long as you use the service, so you don’t have to fear that you’ll lose your work..
Pricing
Regarding costs, Renderforest provides four different kinds of subscription options. The Free, Amateur, Pro, and Business plans are among them. The Free program makes a fantastic study aid. It’s possible to take your time with it, hone your talents, and upgrade to the paid plans after becoming familiar with the platform.
Regarding the free plan, you may watch and share your films on social media but not download them. You must utilize one of the paying subscriptions to download your videos. Choose the Business package if you don’t want Renderforest’s watermark to appear on your video. If you select monthly billing, it will cost you $149.99 per month or $49.99 per year.
If you want to take your company to the next level with distinctive videos, think about selecting one of the expertly produced video production packages. The starting package, which starts at $699, is the least priced.
Tutorial on How to Create an Intro Using Renderforest
Professional video creators are likely aware that starting a video without a suitable introduction is equivalent to sneaking into someone’s house without permission. A good intro is a doorbell to let people know you’ve arrived.
A strong introduction ensures that more people will view your film. Adults have an attention span of about 12 seconds, according to studies from 2000. It is now only 8 seconds. You have 8 seconds to entice viewers to watch your video, so don’t waste it. A captivating introduction will give your content a professional touch and pique your audience’s interest. This task is worthwhile if you want to advertise your videos successfully.
These days, you don’t necessarily need to hire a pro to make a film if you need one. The majority of the available tools are free. We’ll demonstrate in this lesson how to use Renderforest to create a polished video intro. Our intro maker will let you start strong, whether for a fun birthday video or commercial use.
When you’re prepared to begin producing your videos, go to Renderforest, register for an account, or sign in if you already have one.
Check out the vast selection of templates under “Intros and logos“ in the “Create Video“ section of the navigation menu. Here, you can select the intro you like most and begin altering it, or use our advanced search filters to locate the specific content you require.
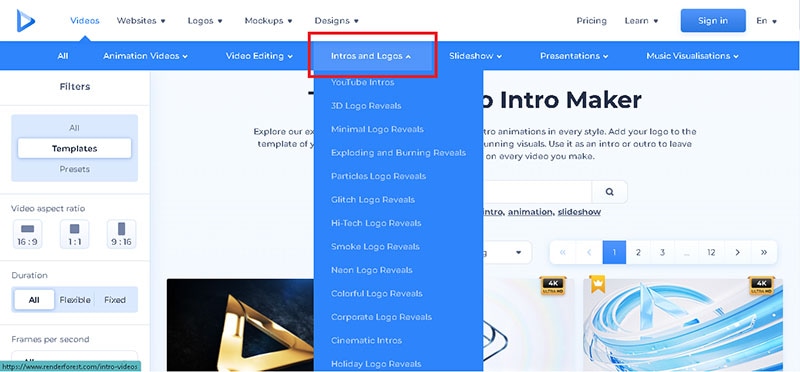
We’ll use the “Swift Glitch Logo“ template for this tutorial, enabling you to present your logo with glitch effects. This template may produce intro and outro movies for presentations, your YouTube channel, lobby backgrounds, and other uses.
Select your preferred template and click the “Create now“ button to start.

Your logo should now be uploaded with a transparent background (PNG). You can upload it in one of three ways: using an image URL directly from your device or selecting an existing file from your “Media library.” If you don’t already have one, you may make one right away using our logo maker tool, which is also accessible in the editor.
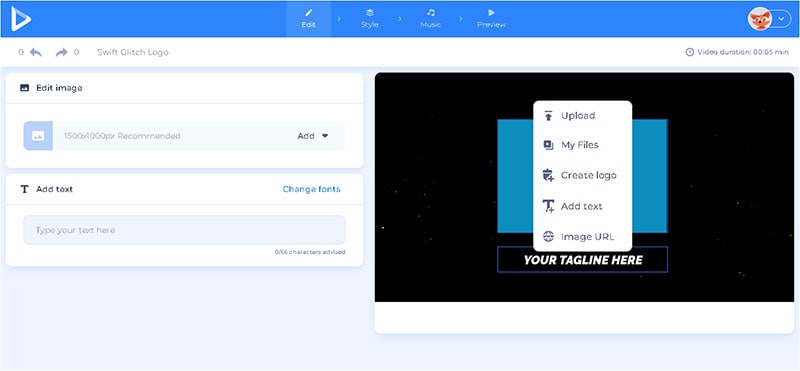
Write your company’s name, tagline, or other brief words in the text field once you’ve added your logo. To save the changes, don’t forget to click “Save and close.”
You can select the overall design of your logo and the preferred font style in the “Style” section.
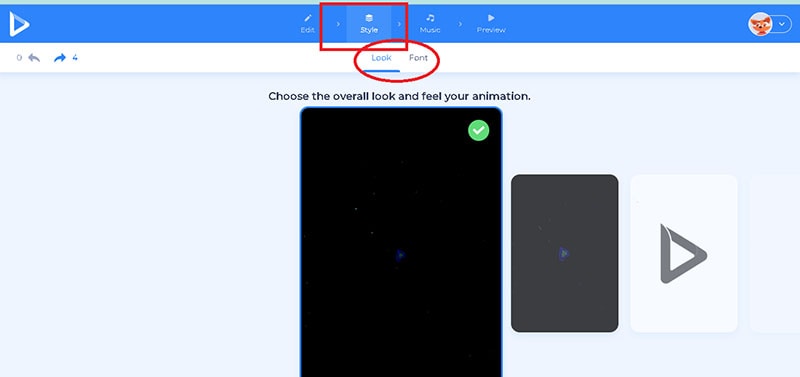
Select your preferred color scheme in the “Color“ section now. You can choose between two color schemes made by our design team and manually selectable custom colors in this section.
Go to the “Music“ area to select a song for your intro. You can add one or pick from our “Music collection.” You can record a voice-over in the editor or upload one for your introduction.
Well done! Let’s check out your introduction in the “Preview“ area now. Click “Free preview“ to check your video and ensure you like the outcome. Click back and tweak the introduction if you need to make any adjustments.
Instantly create professional introduction videos in your browser! Utilize our intro maker, and let its unique touch set your videos apart from the competition.
Enjoy making videos with Renderforest, where your imagination is the only restriction.
Renderforest Pros & Cons
This section is for you if you need to learn quickly about Renderforest’s advantages and disadvantages and are short on time. We’ve studied all the relevant reviews available and created a list of advantages and disadvantages for you to consider.
To determine if this is the best product for your company’s needs, look over these Renderforest advantages and disadvantages.
Pros
- Many lovely and contemporary templates
- a 4K video export feature
- 5-in-1 solution
- use is limitless for all services
- Quick and friendly client support
Cons
- With free version, watermark
- Only paying customers have access to font modification
- Costly single-project packages
- Free high-quality video preview unavailable
- a few templates allow for limited customisation
Competition to Renderforest
Animoto and PowToon are a couple of the site’s main rivals. These are excellent online video editing tools, but Renderforest stands out because it is simple to use and enables even novice users to create, share quickly, and download “broadcast grade videos.”
Renderforest vs PowToon
One of the most popular Renderforest Video alternatives available is PowToon. It’s challenging to decide which of these two platforms is superior because they are the best on the market. What you want as a business owner ultimately determines everything.
PowToon is a similar business that focuses on corporate videos but doesn’t provide the extra things Renderforest delivers (logo maker, graphic design, mockups, website builder). Pro customers pay $89 per month ($20 if invoiced annually), which is significantly more expensive than the alternative. Fortunately, they offer a complimentary bundle so you can sample the goods.
PowToon offers many more customizing choices than Renderforest because it is a video-based platform, but it will cost you.
Renderforest is a more cost-effective option if you need a range of services for your small business. PowToon is a better option for more prominent firms seeking a professional video creation platform.
Currently, some internet video services might be pricey and time-consuming to use. Renderforest will be welcomed by many small businesses looking for an economical and user-friendly online video editing platform.
Renderforest combines the top tools under a single subscription bundle in terms of features. In the end, you can manage your website, branding, and marketing visual production for less than $25 per month.
Fortunately, you don’t have to believe us. You may experience all the main advantages of Renderforest yourself by giving it a try. Check out the pros and drawbacks list in our Renderforest review if you need more assistance.
Free Download For Win 7 or later(64-bit)
Free Download For macOS 10.14 or later
How to Perfectly Use Canva Color Match?
How to Perfectly Use Canva Color Match?
An easy yet powerful editor
Numerous effects to choose from
Detailed tutorials provided by the official channel
Color combination is the essential thing that you need to keep in mind designing. It helps create eye-catchy designs and can create a positive impact on the target audience.
This is the greatest secret of creating attractive and wonderful designs. Reading further will help you to understand the Canva color match in detail. So, without any further dues, let’s get started!
In this article
01 [What is the Canva Color Picker?](#Part 1)
02 [Why Use the Color Match Tool?](#Part 2)
03 [How to Use Color Match in Canva to Match Your Brand](#Part 3)
04 [Alternative to Canva Color Match](#Part 4)
Part 1 What is the Canva Color Picker?
Canva is one of the simplest and easiest ways of creating great and eye-catchy graphic designs. Color combinations help us to make these designs more attractive. But earlier, there were some limitations in Canva regarding the color picker tool; designers had to use browser extensions like ColorZilla to match the color combinations perfectly. They faced many problems while selecting the perfect color of their choice while designing their pins, social media content, logos, online invitations, etc. They had to find the perfect color code of their choice from an external source and paste it into the Canva, which was simply very time-consuming.
The most-awaited color picker tool was introduced in Canva at the end of November 202This new design tool makes the design very convenient while using Canva for graphic designing. With this tool, you don’t need to spend hours searching for the right color that matches the background. Color picker helps you to find a perfect color match according to the image, logo, or anything else uploaded on Canva.
But before using this new color match tool, you must ensure that:
● You are using the updated version of the Canva desktop app.
● You have the latest version of the browsers like Chrome, Mozilla, Internet Explorer, etc.
Part 2 Why Use the Color Match Tool?
This color match tool is the most-demanded feature that has been updated on Canva. It helps choose the perfect color match very efficiently without wasting time and effort. It works like an eyedropper tool available in graphic designing software like Photoshop. It is elementary and valuable to use, and it saves a lot of time in creating attractive and wonderful designs.
It helps determine the different colors available in a particular image uploaded on the Canva app. You can easily choose the appropriate color by placing the tool in the place that has your desired color. It is a compassionate tool, so you should be very careful while choosing the color of your choice. You can press the ‘Esc’ button to exit the command without choosing any color.
This color match tool magically helps select the desired color in seconds without using any external color picker browser extension. This tool is readily available on the color pallet in the updated version of the Canva desktop app.
Part 3 How to Use Color Match in Canva to Match Your Brand
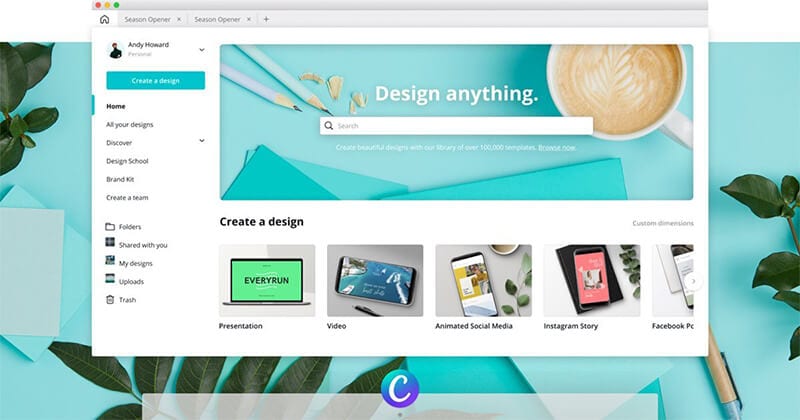
The color match tool is now inbuilt in the Canva desktop app, which is very easy and convenient. You need to download the Canva desktop app to use this feature from the official website of Canva.
The designers need to follow the simple steps given below to use the color match tool (eyedropper tool) in the updated version of the Canva desktop app:
● First of all, open the Canva desktop app.
● After this, open any design or image of your choice that you want to edit. This color match tool can work on any type of image, regardless of the shape and size.
● Now, select the particular part of the image whose color you want to change.
● After this, click on the color block available at the top corner to open the color customization options.
● A color pallet will open.
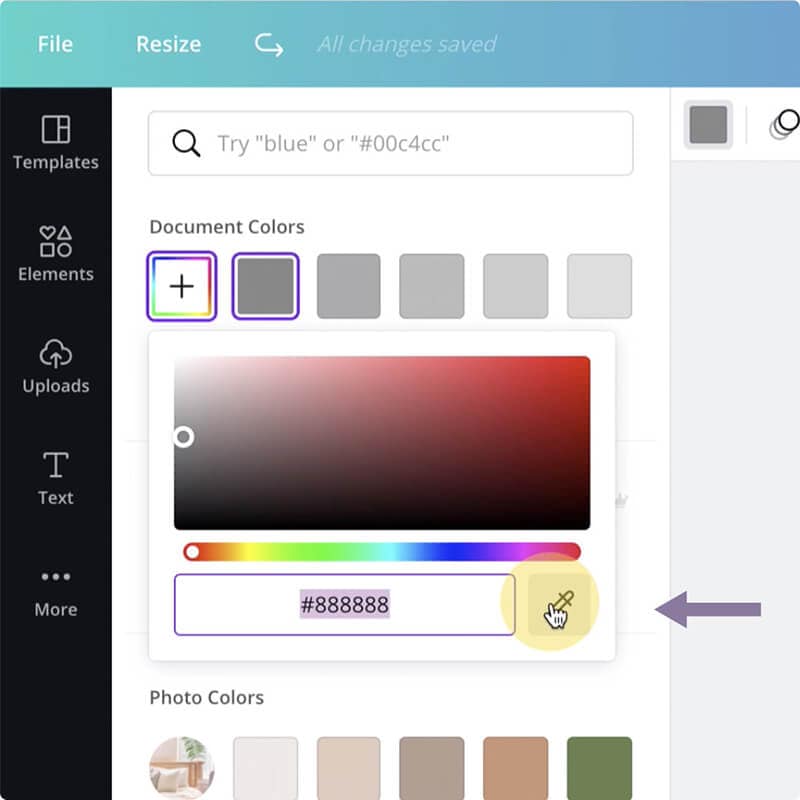
● On the top of the color pallet, you will see a ‘+’ (add new color) button, this button has a colorful square outline.
● After this, a color chart will appear under that button. You will see the color code written over there and an eyedropper tool will be available next to that color code (hex code).
● Click on this eyedropper tool and select the color of your choice either from the image or any other color available in Canva.
● After selecting the color tap on the particular part of the image whose color you want to change.
This is how you can change the color using the new color picker tool available in Canva and enjoy editing your images using the new Canva desktop app.
Part 4 Alternative to Canva Color Match
As we all know, Canva is the most accessible online graphic designing platform used for image editing and video editing. But there are certain limitations of using it, so here we have listed some of the other graphic designing tools for both image and video editing that can be used as an alternative to the Canva app:
● Visme: It is a drag and drops editing and graphic designing tool. Using; this tool is effortless to use, and you can easily create attractive presentations, infographics, social media graphics, logos, etc. This tool can be used by anyone like students (to create their school activities), educators (to create easy to learn infographics), business people (to create attractive presentations), graphic designers (to create different content), etc.
It contains a lot of features like:
● Data Visualization Tools
● Variety of Professionally Designed Easy to Use Templates
● Infographic Maker
● A Large Number of Editing Tools
● Animation Feature with Hover Effects
● Analytics Feature
● Adobe Spark: It is an online tool launched by Adobe. Although it can’t compete with professional software like Photoshop and Illustrator, it can be treated as the best alternative for Canva. It is used to create social media posts, logos, and graphic designs easily and efficiently. The only limitation it has is that non-designers and newcomers can’t use it without any knowledge of graphic design.
● PicMonkey: PicMonkey is another great alternative to Canva, just like Visme. It has many features that help both professional and non-professional designers create attractive and wonderful designs very easily and efficiently. It has many exciting features like photo re-toucher, pattern & effects tools, etc., just like Photoshop, but it is relatively easier to use and can be used by anyone who wants to create beautiful and creative graphic designs.
● ****Wondershare Filmora Video Editor **: Filmora is a video editing software and can be used as an alternative to Canva if you create and edit the videos to medium & advanced levels. It is used to create and edit short videos for social media and ad campaigns very quickly, with many features available in professional software like Adobe Premiere Pro. It is easy-to-use with an intuitive user interface that is very helpful for non-professional and less experienced video editors.
For Win 7 or later (64-bit)
For macOS 10.12 or later
● Key Takeaways from This Episode →
● It can be concluded that Canva is a fantastic graphic designing tool for all the non-professionals and newcomers in the field of design. It helps people create attractive and creative designs with less effort and less time consumption.
● No doubt, everything has its pros and cons. Similarly, Canva also has certain limitations compared to the other professional graphic designing tools like Photoshop, Illustrator, etc.
● But still, it is continuously updating and removing those limitations. For example- the new color match tool is introduced to this platform for easy and convenient graphic designing.
● This color match tool (eyedropper tool) was demanded by the designers who use Canva for their graphics and creating attractive social media posts, infographics, video editing, etc.
Color combination is the essential thing that you need to keep in mind designing. It helps create eye-catchy designs and can create a positive impact on the target audience.

This is the greatest secret of creating attractive and wonderful designs. Reading further will help you to understand the Canva color match in detail. So, without any further dues, let’s get started!
In this article
01 [What is the Canva Color Picker?](#Part 1)
02 [Why Use the Color Match Tool?](#Part 2)
03 [How to Use Color Match in Canva to Match Your Brand](#Part 3)
04 [Alternative to Canva Color Match](#Part 4)
Part 1 What is the Canva Color Picker?
Canva is one of the simplest and easiest ways of creating great and eye-catchy graphic designs. Color combinations help us to make these designs more attractive. But earlier, there were some limitations in Canva regarding the color picker tool; designers had to use browser extensions like ColorZilla to match the color combinations perfectly. They faced many problems while selecting the perfect color of their choice while designing their pins, social media content, logos, online invitations, etc. They had to find the perfect color code of their choice from an external source and paste it into the Canva, which was simply very time-consuming.
The most-awaited color picker tool was introduced in Canva at the end of November 202This new design tool makes the design very convenient while using Canva for graphic designing. With this tool, you don’t need to spend hours searching for the right color that matches the background. Color picker helps you to find a perfect color match according to the image, logo, or anything else uploaded on Canva.

But before using this new color match tool, you must ensure that:
● You are using the updated version of the Canva desktop app.
● You have the latest version of the browsers like Chrome, Mozilla, Internet Explorer, etc.
Part 2 Why Use the Color Match Tool?

This color match tool is the most-demanded feature that has been updated on Canva. It helps choose the perfect color match very efficiently without wasting time and effort. It works like an eyedropper tool available in graphic designing software like Photoshop. It is elementary and valuable to use, and it saves a lot of time in creating attractive and wonderful designs.
It helps determine the different colors available in a particular image uploaded on the Canva app. You can easily choose the appropriate color by placing the tool in the place that has your desired color. It is a compassionate tool, so you should be very careful while choosing the color of your choice. You can press the ‘Esc’ button to exit the command without choosing any color.
This color match tool magically helps select the desired color in seconds without using any external color picker browser extension. This tool is readily available on the color pallet in the updated version of the Canva desktop app.
Part 3 How to Use Color Match in Canva to Match Your Brand
The color match tool is now inbuilt in the Canva desktop app, which is very easy and convenient. You need to download the Canva desktop app to use this feature from the official website of Canva.

The designers need to follow the simple steps given below to use the color match tool (eyedropper tool) in the updated version of the Canva desktop app:
● First of all, open the Canva desktop app.
● After this, open any design or image of your choice that you want to edit. This color match tool can work on any type of image, regardless of the shape and size.
● Now, select the particular part of the image whose color you want to change.
● After this, click on the color block available at the top corner to open the color customization options.
● A color pallet will open.
● On the top of the color pallet, you will see a ‘+’ (add new color) button, this button has a colorful square outline.
● After this, a color chart will appear under that button. You will see the color code written over there and an eyedropper tool will be available next to that color code (hex code).
● Click on this eyedropper tool and select the color of your choice either from the image or any other color available in Canva.
● After selecting the color tap on the particular part of the image whose color you want to change.
This is how you can change the color using the new color picker tool available in Canva and enjoy editing your images using the new Canva desktop app.
Part 4 Alternative to Canva Color Match
As we all know, Canva is the most accessible online graphic designing platform used for image editing and video editing. But there are certain limitations of using it, so here we have listed some of the other graphic designing tools for both image and video editing that can be used as an alternative to the Canva app:
● Visme: It is a drag and drops editing and graphic designing tool. Using; this tool is effortless to use, and you can easily create attractive presentations, infographics, social media graphics, logos, etc. This tool can be used by anyone like students (to create their school activities), educators (to create easy to learn infographics), business people (to create attractive presentations), graphic designers (to create different content), etc.
It contains a lot of features like:
● Data Visualization Tools
● Variety of Professionally Designed Easy to Use Templates
● Infographic Maker
● A Large Number of Editing Tools
● Animation Feature with Hover Effects
● Analytics Feature
● Adobe Spark: It is an online tool launched by Adobe. Although it can’t compete with professional software like Photoshop and Illustrator, it can be treated as the best alternative for Canva. It is used to create social media posts, logos, and graphic designs easily and efficiently. The only limitation it has is that non-designers and newcomers can’t use it without any knowledge of graphic design.
● PicMonkey: PicMonkey is another great alternative to Canva, just like Visme. It has many features that help both professional and non-professional designers create attractive and wonderful designs very easily and efficiently. It has many exciting features like photo re-toucher, pattern & effects tools, etc., just like Photoshop, but it is relatively easier to use and can be used by anyone who wants to create beautiful and creative graphic designs.
● ****Wondershare Filmora Video Editor **: Filmora is a video editing software and can be used as an alternative to Canva if you create and edit the videos to medium & advanced levels. It is used to create and edit short videos for social media and ad campaigns very quickly, with many features available in professional software like Adobe Premiere Pro. It is easy-to-use with an intuitive user interface that is very helpful for non-professional and less experienced video editors.
For Win 7 or later (64-bit)
For macOS 10.12 or later
● Key Takeaways from This Episode →
● It can be concluded that Canva is a fantastic graphic designing tool for all the non-professionals and newcomers in the field of design. It helps people create attractive and creative designs with less effort and less time consumption.
● No doubt, everything has its pros and cons. Similarly, Canva also has certain limitations compared to the other professional graphic designing tools like Photoshop, Illustrator, etc.
● But still, it is continuously updating and removing those limitations. For example- the new color match tool is introduced to this platform for easy and convenient graphic designing.
● This color match tool (eyedropper tool) was demanded by the designers who use Canva for their graphics and creating attractive social media posts, infographics, video editing, etc.
Color combination is the essential thing that you need to keep in mind designing. It helps create eye-catchy designs and can create a positive impact on the target audience.

This is the greatest secret of creating attractive and wonderful designs. Reading further will help you to understand the Canva color match in detail. So, without any further dues, let’s get started!
In this article
01 [What is the Canva Color Picker?](#Part 1)
02 [Why Use the Color Match Tool?](#Part 2)
03 [How to Use Color Match in Canva to Match Your Brand](#Part 3)
04 [Alternative to Canva Color Match](#Part 4)
Part 1 What is the Canva Color Picker?
Canva is one of the simplest and easiest ways of creating great and eye-catchy graphic designs. Color combinations help us to make these designs more attractive. But earlier, there were some limitations in Canva regarding the color picker tool; designers had to use browser extensions like ColorZilla to match the color combinations perfectly. They faced many problems while selecting the perfect color of their choice while designing their pins, social media content, logos, online invitations, etc. They had to find the perfect color code of their choice from an external source and paste it into the Canva, which was simply very time-consuming.
The most-awaited color picker tool was introduced in Canva at the end of November 202This new design tool makes the design very convenient while using Canva for graphic designing. With this tool, you don’t need to spend hours searching for the right color that matches the background. Color picker helps you to find a perfect color match according to the image, logo, or anything else uploaded on Canva.

But before using this new color match tool, you must ensure that:
● You are using the updated version of the Canva desktop app.
● You have the latest version of the browsers like Chrome, Mozilla, Internet Explorer, etc.
Part 2 Why Use the Color Match Tool?

This color match tool is the most-demanded feature that has been updated on Canva. It helps choose the perfect color match very efficiently without wasting time and effort. It works like an eyedropper tool available in graphic designing software like Photoshop. It is elementary and valuable to use, and it saves a lot of time in creating attractive and wonderful designs.
It helps determine the different colors available in a particular image uploaded on the Canva app. You can easily choose the appropriate color by placing the tool in the place that has your desired color. It is a compassionate tool, so you should be very careful while choosing the color of your choice. You can press the ‘Esc’ button to exit the command without choosing any color.
This color match tool magically helps select the desired color in seconds without using any external color picker browser extension. This tool is readily available on the color pallet in the updated version of the Canva desktop app.
Part 3 How to Use Color Match in Canva to Match Your Brand
The color match tool is now inbuilt in the Canva desktop app, which is very easy and convenient. You need to download the Canva desktop app to use this feature from the official website of Canva.

The designers need to follow the simple steps given below to use the color match tool (eyedropper tool) in the updated version of the Canva desktop app:
● First of all, open the Canva desktop app.
● After this, open any design or image of your choice that you want to edit. This color match tool can work on any type of image, regardless of the shape and size.
● Now, select the particular part of the image whose color you want to change.
● After this, click on the color block available at the top corner to open the color customization options.
● A color pallet will open.
● On the top of the color pallet, you will see a ‘+’ (add new color) button, this button has a colorful square outline.
● After this, a color chart will appear under that button. You will see the color code written over there and an eyedropper tool will be available next to that color code (hex code).
● Click on this eyedropper tool and select the color of your choice either from the image or any other color available in Canva.
● After selecting the color tap on the particular part of the image whose color you want to change.
This is how you can change the color using the new color picker tool available in Canva and enjoy editing your images using the new Canva desktop app.
Part 4 Alternative to Canva Color Match
As we all know, Canva is the most accessible online graphic designing platform used for image editing and video editing. But there are certain limitations of using it, so here we have listed some of the other graphic designing tools for both image and video editing that can be used as an alternative to the Canva app:
● Visme: It is a drag and drops editing and graphic designing tool. Using; this tool is effortless to use, and you can easily create attractive presentations, infographics, social media graphics, logos, etc. This tool can be used by anyone like students (to create their school activities), educators (to create easy to learn infographics), business people (to create attractive presentations), graphic designers (to create different content), etc.
It contains a lot of features like:
● Data Visualization Tools
● Variety of Professionally Designed Easy to Use Templates
● Infographic Maker
● A Large Number of Editing Tools
● Animation Feature with Hover Effects
● Analytics Feature
● Adobe Spark: It is an online tool launched by Adobe. Although it can’t compete with professional software like Photoshop and Illustrator, it can be treated as the best alternative for Canva. It is used to create social media posts, logos, and graphic designs easily and efficiently. The only limitation it has is that non-designers and newcomers can’t use it without any knowledge of graphic design.
● PicMonkey: PicMonkey is another great alternative to Canva, just like Visme. It has many features that help both professional and non-professional designers create attractive and wonderful designs very easily and efficiently. It has many exciting features like photo re-toucher, pattern & effects tools, etc., just like Photoshop, but it is relatively easier to use and can be used by anyone who wants to create beautiful and creative graphic designs.
● ****Wondershare Filmora Video Editor **: Filmora is a video editing software and can be used as an alternative to Canva if you create and edit the videos to medium & advanced levels. It is used to create and edit short videos for social media and ad campaigns very quickly, with many features available in professional software like Adobe Premiere Pro. It is easy-to-use with an intuitive user interface that is very helpful for non-professional and less experienced video editors.
For Win 7 or later (64-bit)
For macOS 10.12 or later
● Key Takeaways from This Episode →
● It can be concluded that Canva is a fantastic graphic designing tool for all the non-professionals and newcomers in the field of design. It helps people create attractive and creative designs with less effort and less time consumption.
● No doubt, everything has its pros and cons. Similarly, Canva also has certain limitations compared to the other professional graphic designing tools like Photoshop, Illustrator, etc.
● But still, it is continuously updating and removing those limitations. For example- the new color match tool is introduced to this platform for easy and convenient graphic designing.
● This color match tool (eyedropper tool) was demanded by the designers who use Canva for their graphics and creating attractive social media posts, infographics, video editing, etc.
Color combination is the essential thing that you need to keep in mind designing. It helps create eye-catchy designs and can create a positive impact on the target audience.

This is the greatest secret of creating attractive and wonderful designs. Reading further will help you to understand the Canva color match in detail. So, without any further dues, let’s get started!
In this article
01 [What is the Canva Color Picker?](#Part 1)
02 [Why Use the Color Match Tool?](#Part 2)
03 [How to Use Color Match in Canva to Match Your Brand](#Part 3)
04 [Alternative to Canva Color Match](#Part 4)
Part 1 What is the Canva Color Picker?
Canva is one of the simplest and easiest ways of creating great and eye-catchy graphic designs. Color combinations help us to make these designs more attractive. But earlier, there were some limitations in Canva regarding the color picker tool; designers had to use browser extensions like ColorZilla to match the color combinations perfectly. They faced many problems while selecting the perfect color of their choice while designing their pins, social media content, logos, online invitations, etc. They had to find the perfect color code of their choice from an external source and paste it into the Canva, which was simply very time-consuming.
The most-awaited color picker tool was introduced in Canva at the end of November 202This new design tool makes the design very convenient while using Canva for graphic designing. With this tool, you don’t need to spend hours searching for the right color that matches the background. Color picker helps you to find a perfect color match according to the image, logo, or anything else uploaded on Canva.

But before using this new color match tool, you must ensure that:
● You are using the updated version of the Canva desktop app.
● You have the latest version of the browsers like Chrome, Mozilla, Internet Explorer, etc.
Part 2 Why Use the Color Match Tool?

This color match tool is the most-demanded feature that has been updated on Canva. It helps choose the perfect color match very efficiently without wasting time and effort. It works like an eyedropper tool available in graphic designing software like Photoshop. It is elementary and valuable to use, and it saves a lot of time in creating attractive and wonderful designs.
It helps determine the different colors available in a particular image uploaded on the Canva app. You can easily choose the appropriate color by placing the tool in the place that has your desired color. It is a compassionate tool, so you should be very careful while choosing the color of your choice. You can press the ‘Esc’ button to exit the command without choosing any color.
This color match tool magically helps select the desired color in seconds without using any external color picker browser extension. This tool is readily available on the color pallet in the updated version of the Canva desktop app.
Part 3 How to Use Color Match in Canva to Match Your Brand
The color match tool is now inbuilt in the Canva desktop app, which is very easy and convenient. You need to download the Canva desktop app to use this feature from the official website of Canva.

The designers need to follow the simple steps given below to use the color match tool (eyedropper tool) in the updated version of the Canva desktop app:
● First of all, open the Canva desktop app.
● After this, open any design or image of your choice that you want to edit. This color match tool can work on any type of image, regardless of the shape and size.
● Now, select the particular part of the image whose color you want to change.
● After this, click on the color block available at the top corner to open the color customization options.
● A color pallet will open.
● On the top of the color pallet, you will see a ‘+’ (add new color) button, this button has a colorful square outline.
● After this, a color chart will appear under that button. You will see the color code written over there and an eyedropper tool will be available next to that color code (hex code).
● Click on this eyedropper tool and select the color of your choice either from the image or any other color available in Canva.
● After selecting the color tap on the particular part of the image whose color you want to change.
This is how you can change the color using the new color picker tool available in Canva and enjoy editing your images using the new Canva desktop app.
Part 4 Alternative to Canva Color Match
As we all know, Canva is the most accessible online graphic designing platform used for image editing and video editing. But there are certain limitations of using it, so here we have listed some of the other graphic designing tools for both image and video editing that can be used as an alternative to the Canva app:
● Visme: It is a drag and drops editing and graphic designing tool. Using; this tool is effortless to use, and you can easily create attractive presentations, infographics, social media graphics, logos, etc. This tool can be used by anyone like students (to create their school activities), educators (to create easy to learn infographics), business people (to create attractive presentations), graphic designers (to create different content), etc.
It contains a lot of features like:
● Data Visualization Tools
● Variety of Professionally Designed Easy to Use Templates
● Infographic Maker
● A Large Number of Editing Tools
● Animation Feature with Hover Effects
● Analytics Feature
● Adobe Spark: It is an online tool launched by Adobe. Although it can’t compete with professional software like Photoshop and Illustrator, it can be treated as the best alternative for Canva. It is used to create social media posts, logos, and graphic designs easily and efficiently. The only limitation it has is that non-designers and newcomers can’t use it without any knowledge of graphic design.
● PicMonkey: PicMonkey is another great alternative to Canva, just like Visme. It has many features that help both professional and non-professional designers create attractive and wonderful designs very easily and efficiently. It has many exciting features like photo re-toucher, pattern & effects tools, etc., just like Photoshop, but it is relatively easier to use and can be used by anyone who wants to create beautiful and creative graphic designs.
● ****Wondershare Filmora Video Editor **: Filmora is a video editing software and can be used as an alternative to Canva if you create and edit the videos to medium & advanced levels. It is used to create and edit short videos for social media and ad campaigns very quickly, with many features available in professional software like Adobe Premiere Pro. It is easy-to-use with an intuitive user interface that is very helpful for non-professional and less experienced video editors.
For Win 7 or later (64-bit)
For macOS 10.12 or later
● Key Takeaways from This Episode →
● It can be concluded that Canva is a fantastic graphic designing tool for all the non-professionals and newcomers in the field of design. It helps people create attractive and creative designs with less effort and less time consumption.
● No doubt, everything has its pros and cons. Similarly, Canva also has certain limitations compared to the other professional graphic designing tools like Photoshop, Illustrator, etc.
● But still, it is continuously updating and removing those limitations. For example- the new color match tool is introduced to this platform for easy and convenient graphic designing.
● This color match tool (eyedropper tool) was demanded by the designers who use Canva for their graphics and creating attractive social media posts, infographics, video editing, etc.
Also read:
- How To Add Motion Blur Effect To Photos in GIMP
- New 2024 Approved In This Article, We Will Introduce You Our Top 5 Picks of Websites and Software Converter Online to Convert Powerpoint to Mp4
- New Best Shortcut Towards Timeline Template for 2024
- Updated Camtasia Video Editor Review
- New In 2024, Are You Eager to Discover the Method of Video Scaling in Filmora? You Are in the Right Place because This Discussion Will Cover the Content on This Matter
- Have You Ever Watched YouTube Live Streams? In Fact, You Can Also Start a Live Streaming on YouTube if You Want. Here Well Share some Tips to Live Stream on YouTube
- Updated Do You Want to Know How to Remove Audio From a Video without a Watermark? Keep Reading This Article Since We Have the Answers for You. Complete with the Guide on How to Do It for 2024
- Updated How to Remove Echo From Videos with Adobe Audition
- New In 2024, Finding the Best Voice Changers for WhatsApp Free and Paid
- Updated Want to Buy a Drone for Better Videography Creating? This Article Will Review 6 of the Best Drones on the Market for You to Consider for 2024
- 2024 Approved Learn How to Slow Down Time-Lapse Videos on iPhone to Make Detailed and Captivating Slow-Motion Effects in Your Time-Lapse Captures
- New Learn How to Make Your CSGO Montage Impressive for 2024
- Updated Split a Clip in DaVinci Resolve Step by Step for 2024
- New Why You Should Master Slideshows In Lightroom, In 2024
- Updated Do You Want to Excel at Using Adobe Premiere Pro Software for Splitting Videos and Audio? Learn About Splitting a Video and Audio Using Different Tools and Add a New Skill to Your Skillset with a Step-by-Step Guide in This Article for 2024
- 2024 Approved Top Applications That Can Help Apply The Best VHS Camera Effect
- New 2024 Approved What If YouTube Zoom to Fill Not Working?
- Updated In 2024, Leveraging the Vectorscope for Better Color Correction in Premiere Pro
- In 2024, Get to Know How Excellent Sparkle Video Effects Can Significantly Impact Different Projects. Its Miraculous. Read Below to Learn More and Add Sparkle Effect to Your Videos
- Updated Top Ways to Make Fast Motion Video on iPhone Solved
- Updated Whatre the Best Alternatives to Pexels, In 2024
- In 2024, Secret Tips & Tricks to Use in Filmora
- Deleting White Background in Photoshop Is Hard, In 2024
- How to Create a PowerPoint Looping Slideshow for 2024
- Updated 3GP Video Format What Is 3GP Format And How To Play It, In 2024
- New Hard to Remove Black Background in After Effects? Heres the Best Way to Deal With It for 2024
- New In 2024, Are You Seeking Free Lumetri Presets to Enhance Your Videos? Find Out All About Lumetri Color Presets and How to Use Them in Presenting Proper Color Grading
- Updated In 2024, How to Do Datamoshing Effect in After Effects?
- New How to Add Subtitles in Canva?
- 2024 Approved Step by Step to Cut a Video in Lightworks
- 2024 Approved Learn How to Slow Down Time-Lapse Videos on Your iPhone to Make Detailed Slow-Motion Effects in Your Time-Lapse Captures
- Updated 2024 Approved How to Make a Bokeh Effect
- How to Add Expression in After Effects for 2024
- Updated How to Loop QuickTime Video
- New In 2024, Are You Finding It Challenging to Convert GIFs Into JPG or PNG Images? Do Not Worry! The Best Free Online Tool and Software to Change Your GIF Into PNG or JPG Images Are Below
- Updated 2024 Approved Steps to Create Gold Text Effects After Effects
- Art of Time Manipulation A Guide to After Effects Slow Motion Mastery
- Updated An Intro Video Describing You and Your Content Is the First and the Foremost Thing Which a Viewer Sees. Thinking of How to Make an Interesting Intro Video, This Blog Is Surely a Supportive Guide for You. Learn More Here for 2024
- This Article Talks in Detail About Why People Look for a Free Title Maker, and 8 Options that Will Benefit Their Work. It Includes Tools Like SEMrush Title Generator, Hubspot Title Generator, and More. Check Out for 2024
- How to Remove MDM from iPhone XS?
- In 2024, How Can Vivo T2 5GMirror Share to PC? | Dr.fone
- Overview of the Best Realme GT 5 (240W) Screen Mirroring App | Dr.fone
- In 2024, Complete Tutorial to Use VPNa to Fake GPS Location On Apple iPhone 6 | Dr.fone
- In 2024, How and Where to Find a Shiny Stone Pokémon For Lava Yuva 3? | Dr.fone
- 3 Ways of How to Get Someones Apple ID Off Apple iPhone 12 mini without Password
- Recommended Best Applications for Mirroring Your Honor Play 8T Screen | Dr.fone
- In 2024, 6 Proven Ways to Unlock Infinix Zero 30 5G Phone When You Forget the Password
- In 2024, Full Guide to Bypass Motorola Edge 2023 FRP
- How To Transfer WhatsApp From Apple iPhone 15 Plus to other iPhone 11 Pro devices? | Dr.fone
- 8 Solutions to Fix Find My Friends Location Not Available On Oppo Find N3 | Dr.fone
- Best Methods for Infinix Note 30 Wont Turn On | Dr.fone
- Stuck at Android System Recovery Of Samsung Galaxy S23 FE ? Fix It Easily | Dr.fone
- A Working Guide For Pachirisu Pokemon Go Map On Xiaomi Redmi Note 13 5G | Dr.fone
- Top 11 Free Apps to Check IMEI on Samsung Galaxy S23 Ultra Phones
- In 2024, A Step-by-Step Guide on Using ADB and Fastboot to Remove FRP Lock on your Motorola Razr 40 Ultra
- How to Fix Life360 Shows Wrong Location On Xiaomi Redmi K70? | Dr.fone
- Fake the Location to Get Around the MLB Blackouts on Samsung Galaxy A23 5G | Dr.fone
- In 2024, For People Wanting to Mock GPS on Samsung Galaxy M14 4G Devices | Dr.fone
- Best Tecno Camon 20 Premier 5G Pattern Lock Removal Tools Remove Android Pattern Lock Without Losing Data
- In 2024, Hassle-Free Ways to Remove FRP Lock from Vivo Y27 5G Phones with/without a PC
- In 2024, What Does Enter PUK Code Mean And Why Did The Sim Get PUK Blocked On Samsung Galaxy M14 4G Device
- How to Unlock iPhone 6s Plus without Passcode or Face ID | Dr.fone
- OnePlus 12R Stuck on Screen – Finding Solutions For Stuck on Boot | Dr.fone
- Title: New In 2024, Add Zoom Blur Effect In Photoshop Step by Step
- Author: Morgan
- Created at : 2024-05-19 05:12:56
- Updated at : 2024-05-20 05:12:56
- Link: https://ai-video-editing.techidaily.com/new-in-2024-add-zoom-blur-effect-in-photoshop-step-by-step/
- License: This work is licensed under CC BY-NC-SA 4.0.


