
:max_bytes(150000):strip_icc():format(webp)/streamfreesportsonline-5b1994178023b900364a81e5.jpg)
New In 2024, Best Love Video Maker with Music
Best Love Video Maker with Music
What could be more amazing than sharing a love video on a special day through social media platforms? How about showing your beloved person a special love video containing all of your special moments? Even though every lover wants to make a special video for their loved ones, the idea of creating video with knowledge scares them off. However, it is very easy these days to create a love video with a love video marker.
If you have the photos of your beautiful memories with your loved one readily available on your computer, we have the best love video maker selected for you. You are more likely to have the photos on your phone as most people use phone camera to capture photos. Therefore, we have listed the best love video maker apps with music to create amazing love videos.
Part 1. Best Love Video Maker for PC and Mac
If you are a computer user and you want to make your special love video on your computer from your photos, we recommend Wondershare Filmora. Filmora is a professional video creator and editor that is available for Windows and Mac users. But the user interface is highly intuitive so that all users can use the application without any prior experience.
You can stretch any photo according to the duration you want in the video. There are beautiful love transitions and effects available to make the video eye-catching. Most importantly, you can import any love song and add that as the background music so that the video feels truly special. Here are the steps to make a love video with Filmora.
For Win 7 or later (64-bit)
For macOS 10.12 or later
**Step 1: Install Filmora and Start Your Video Project
Download and install Wondershare Filmora. Launch Filmora and click on New Project from the welcome screen. Drag and drop your love photos into Project Media folder.
**Step 2: Arrange The Photos on Timeline
Drag and drop the imported photos on the timeline. Arrange them in proper order so that they appear perfectly on the video. You can stretch the duration of photos as per your requirements. Make sure there is no gap in between the photos on the timeline to avoid a black screen during the transition from one photo to another.

**Step 3: Add Beautiful Transition Effects
It is time to apply transition effects so that the photos change from one another with beautiful graphical effects. There are dedicated wedding and love transition effects available to select from. Drag and drop the transitions and place them on the photos one by one.

**Step 4: Add Background Music
Now, drag and drop the love song on Project Media folder that you want the video to play in the background. Drag and drop on the audio timeline below the existing timeline.

**Step 5: Export Your Video
Play the video on Filmora and make any adjustment as you think appropriate. Thereafter, click on Export button and export your video to your hard drive in your desired file format.

Part 2. Best Love Video Creator Apps
If you want to make a love video with your photos on your smartphone, here are the best love maker apps you can consider for the best result.
1. Love Video Maker with Music
Love Video Maker with Music is a popular video maker app where you can instantly make love videos from your photos and share anywhere you want. In fact, social media users prefer the app to create short videos from photos and add romantic music and publish them online. There are beautiful frames available where the photos will be featured and thereby, making the video eye-catching and engaging.
Along with frames, there are different types of romantic text styles available to write anything on the photos and frames. Moreover, you can use different love stickers to enhance the video content. The app allows creating HD quality videos and it is best for Android users. Here are the top features of Love Video Maker with Music app.
- Import as many as 60 photos for video creation.
- Includes photo editor that comes with filters and collage feature.
- Different themes, frames, and text designs available.
- Add music file and trim as per length requirements.
- Add different background effects and adjust speed.
- Square format to post on Instagram and Facebook.
2. Love Video Maker with Songs
Love Video Maker with Songs is exclusively available for iOS users. You can create romantic videos, and you will get all the options to enhance your video quality and content exactly the way you want to. You can add different transitions and animations. The app allows adding music from different sources including iTunes. You can even add your voiceover for personalization.
There are standard video editing options available such as trimming, cropping, changing speed, and much more. There is also no dearth of love stickers and frames. You can also add stylish texts and share the video directly from the app to online platforms. Here are the top features of Love Video Maker with Songs.
- Wide range of video filters and graphical effects.
- Standard video editor for trim, crop, speed change.
- Latest love stickers and frames present.
- Add music from iTunes, other videos, and voiceover.
- Set photo animation duration and stylish texts.
- Instant share on social media platforms directly from the app.
3. Love Video Maker from Microsoft
If you are for a love video maker app for your Windows 10 phone, tablet, or even computer, Love Video Maker from Microsoft is a great choice. Creating a love video from your romantic photos is super easy. Select the photos, add a theme, add background music and thereafter, add stunning filters and your video will be ready to instant saving.
The app comes with a standard photo editing tool where you can edit the photos before adding them to the video. You can blur background, add borders and frames, attach cute stickers and custom texts as per your preference. Here are the top features of Love Video Maker.
- Unlimited photos can be selected for video creation.
- Add different themes and overlay effects with filters.
- Add different borders, frames, and stickers to your photos.
- Blur background, add effects, and custom texts to your photos.
- Save and share videos on social media platforms.
Conclusion
Making love and romantic videos for personal collection as well as sharing them on social media platforms is quite a regular thing. You should have a high-quality love video maker where you should have all the different romantic video making tools and options. We have picked the best video maker for computer users as well as top love video making apps for smartphone users. We recommend Wondershare Filmora as there are unlimited effects, elements, and music for publishing best-quality love videos.
For macOS 10.12 or later
**Step 1: Install Filmora and Start Your Video Project
Download and install Wondershare Filmora. Launch Filmora and click on New Project from the welcome screen. Drag and drop your love photos into Project Media folder.
**Step 2: Arrange The Photos on Timeline
Drag and drop the imported photos on the timeline. Arrange them in proper order so that they appear perfectly on the video. You can stretch the duration of photos as per your requirements. Make sure there is no gap in between the photos on the timeline to avoid a black screen during the transition from one photo to another.
**Step 3: Add Beautiful Transition Effects
It is time to apply transition effects so that the photos change from one another with beautiful graphical effects. There are dedicated wedding and love transition effects available to select from. Drag and drop the transitions and place them on the photos one by one.
**Step 4: Add Background Music
Now, drag and drop the love song on Project Media folder that you want the video to play in the background. Drag and drop on the audio timeline below the existing timeline.
**Step 5: Export Your Video
Play the video on Filmora and make any adjustment as you think appropriate. Thereafter, click on Export button and export your video to your hard drive in your desired file format.
Part 2. Best Love Video Creator Apps
If you want to make a love video with your photos on your smartphone, here are the best love maker apps you can consider for the best result.
1. Love Video Maker with Music
Love Video Maker with Music is a popular video maker app where you can instantly make love videos from your photos and share anywhere you want. In fact, social media users prefer the app to create short videos from photos and add romantic music and publish them online. There are beautiful frames available where the photos will be featured and thereby, making the video eye-catching and engaging.
Along with frames, there are different types of romantic text styles available to write anything on the photos and frames. Moreover, you can use different love stickers to enhance the video content. The app allows creating HD quality videos and it is best for Android users. Here are the top features of Love Video Maker with Music app.
- Import as many as 60 photos for video creation.
- Includes photo editor that comes with filters and collage feature.
- Different themes, frames, and text designs available.
- Add music file and trim as per length requirements.
- Add different background effects and adjust speed.
- Square format to post on Instagram and Facebook.
2. Love Video Maker with Songs
Love Video Maker with Songs is exclusively available for iOS users. You can create romantic videos, and you will get all the options to enhance your video quality and content exactly the way you want to. You can add different transitions and animations. The app allows adding music from different sources including iTunes. You can even add your voiceover for personalization.
There are standard video editing options available such as trimming, cropping, changing speed, and much more. There is also no dearth of love stickers and frames. You can also add stylish texts and share the video directly from the app to online platforms. Here are the top features of Love Video Maker with Songs.
- Wide range of video filters and graphical effects.
- Standard video editor for trim, crop, speed change.
- Latest love stickers and frames present.
- Add music from iTunes, other videos, and voiceover.
- Set photo animation duration and stylish texts.
- Instant share on social media platforms directly from the app.
3. Love Video Maker from Microsoft
If you are for a love video maker app for your Windows 10 phone, tablet, or even computer, Love Video Maker from Microsoft is a great choice. Creating a love video from your romantic photos is super easy. Select the photos, add a theme, add background music and thereafter, add stunning filters and your video will be ready to instant saving.
The app comes with a standard photo editing tool where you can edit the photos before adding them to the video. You can blur background, add borders and frames, attach cute stickers and custom texts as per your preference. Here are the top features of Love Video Maker.
- Unlimited photos can be selected for video creation.
- Add different themes and overlay effects with filters.
- Add different borders, frames, and stickers to your photos.
- Blur background, add effects, and custom texts to your photos.
- Save and share videos on social media platforms.
Conclusion
Making love and romantic videos for personal collection as well as sharing them on social media platforms is quite a regular thing. You should have a high-quality love video maker where you should have all the different romantic video making tools and options. We have picked the best video maker for computer users as well as top love video making apps for smartphone users. We recommend Wondershare Filmora as there are unlimited effects, elements, and music for publishing best-quality love videos.
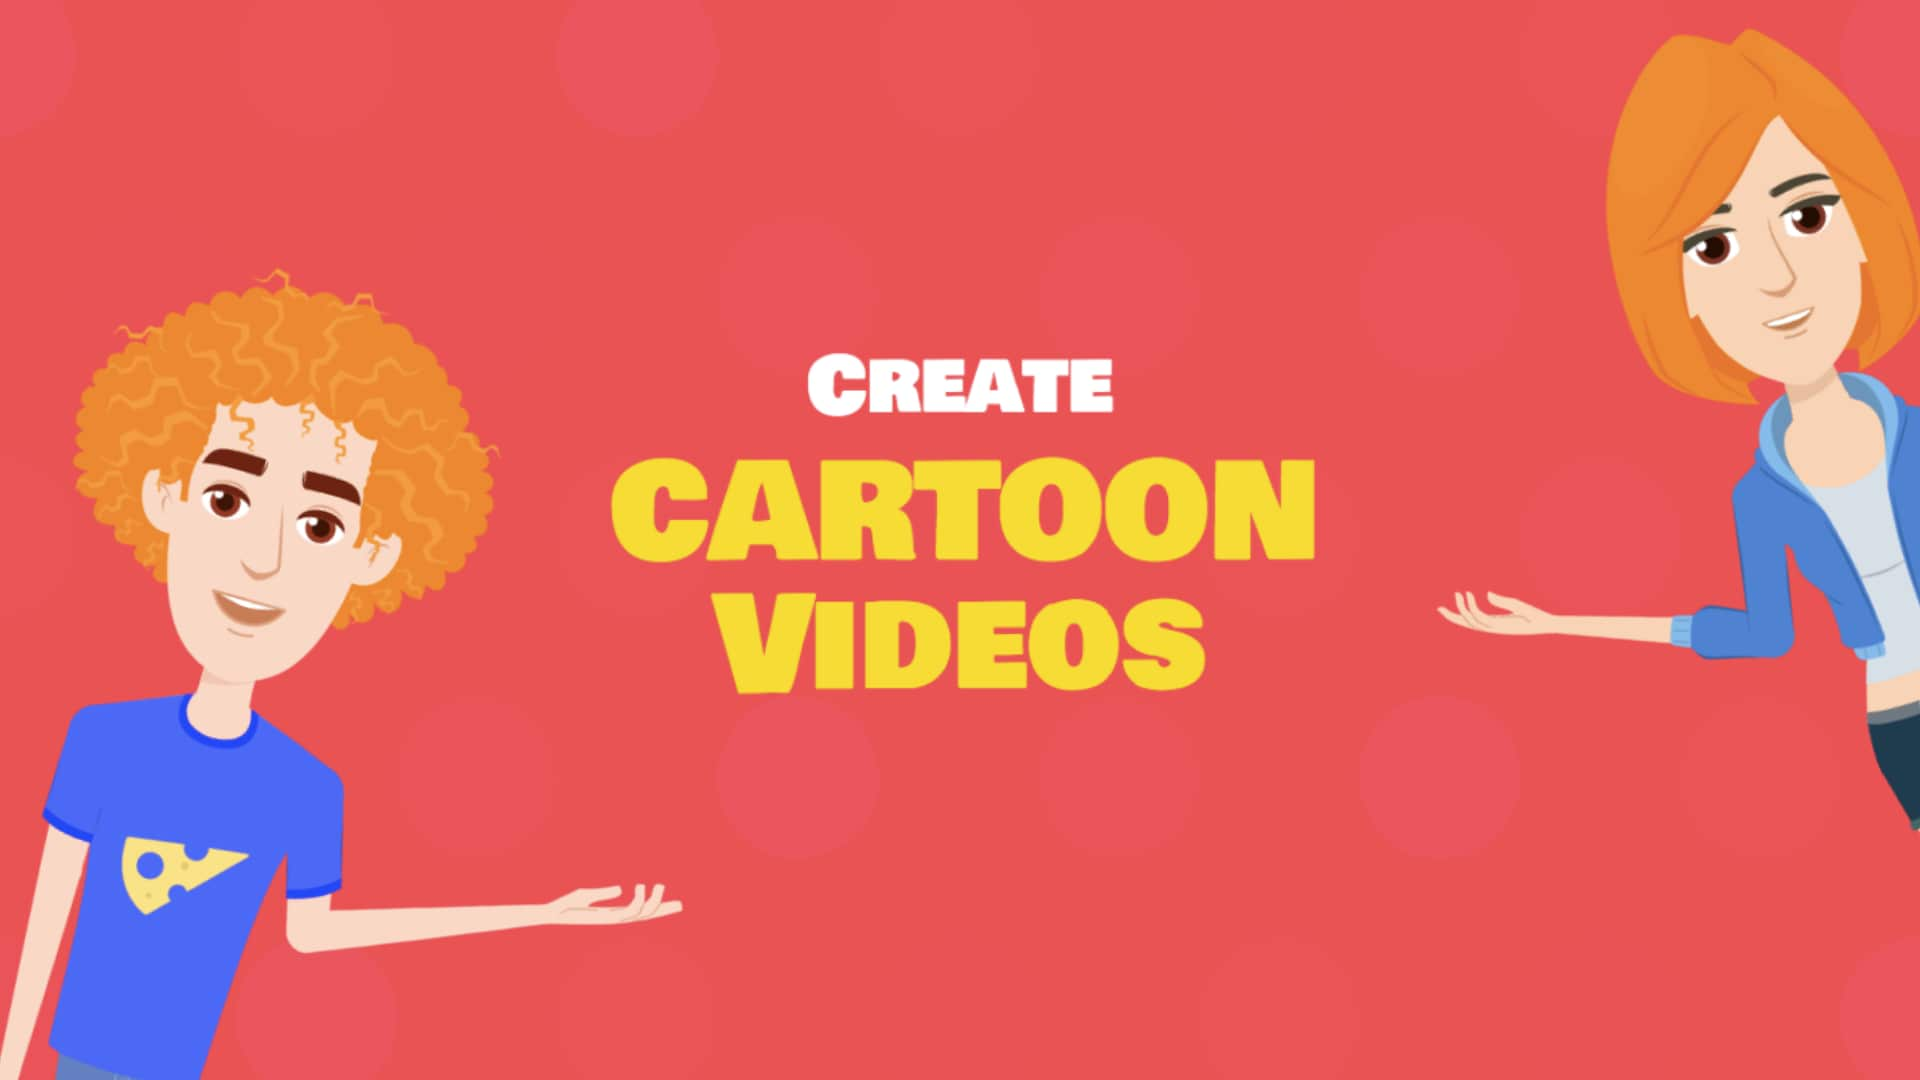
Top 10 Online And PC Cartoon Video Maker 2022 [For Beginner]
Abundant Video Effects - Wondershare Filmora
Provide abundant video effects - A creative video editor
Powerful color correction and grading
Detailed tutorials are provided by the official channel
Introduction
There are some issues common to the video production process. However, animated or cartoon videos have helped to combat such issues. You do not need to scout for locations, go through a seemingly endless casting process, or rent the pricey equipment. A cartoon is simply a type of animation or an illustration that usually appears in a semi-realistic or an unreal style. In addition, it uses simple, satirical, and humorous drawing language to tell the story.
Although there are restrictions, there are a lot of possibilities cartoon video makers still offer to their users. Therefore, this article will share the top 10 best cartoon video makers online and on PC that you can use before diving into an animated video world.
So, here is what we shall learn about cartoon makers today:
In this article
01 Best 5 Online Cartoon Makers
02 Cartoon Video Maker for Desktop (Win and Mac)
03 How Can I Create My Own Cartoon Using Wondershare Anireel
Part 1: Best 5 Online Cartoon Makers
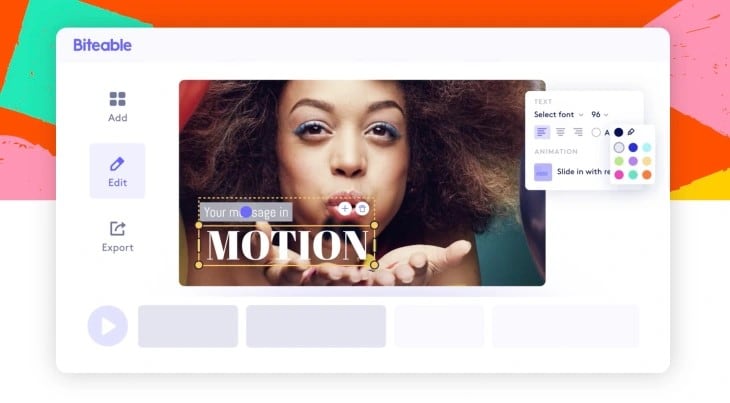
1. Biteable
Biteable provides a seemingly endless list of template categories to cater to your online media marketing needs. Aside from offering entertaining cartoon-making templates, the platform also allows users to create motion graphics or content, and Facebook covers for their social media channels.
Price: Free, $23 per month, billed annually.
Features:
- Offering library with lots of templates to choose from
- Free to use, except you are looking for additional features
- Five simple steps to an incredible cartoon video
- It has an easily customizable template
Pros
- It is a perfect option for social media managers
- Quickly create entertaining cartoons
- Used by biggies like Amazon, Microsoft, Google, Disney, BBC, Shopify, Samsung, and salesforce.
- Over 9 million users
Cons
- There is a mandatory registration
- There are no audio editing options
- The file-sharing capabilities are limited to YouTube and Facebook
- The download option is disabled in the free version
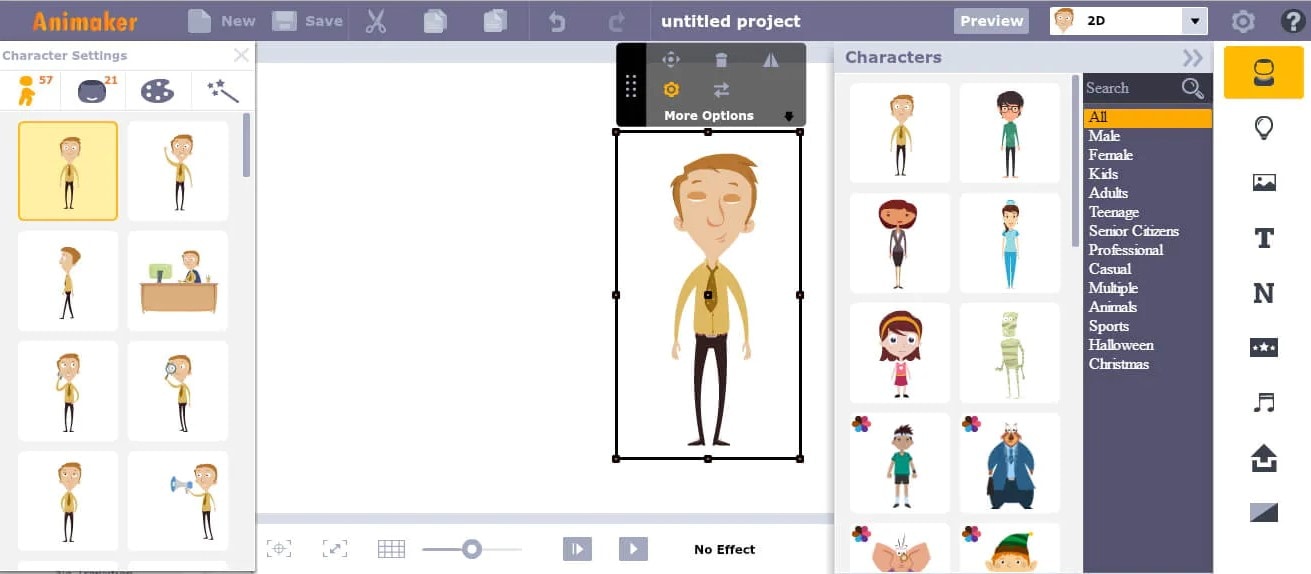
2. Animaker
With this animated maker, you get access to hundreds of animated characters, maps, and backgrounds. There are six (6) video styles available in this cartoon maker: Typography, Infographic, or 2D for different types of projects.
Price: Free version available. Subscription plans start at $12 per month/billed annually.
Features
- Different video styles, marketing, explainer, or 2D animation.
- Posts itself as the number 1 cartoon maker
- No need for a credit card to start.
- Four-step process; select template, customize it, add music, and download or share.
- 200+ voices, 25+ languages, and loads of customizable options.
- It offers auto-lip sync with advanced animation effects.
- There is a rich selection of 1000+ templates
Pros:
- Superb audio editing options
- Excellent and quick animation tools.
- Over 10 million users so far and still counting.
- Currently used by Amazon, Bosch, HP, Nokia, and Philips.
Cons:
- The monthly fee is pricey
- Account creation is mandatory for a free version
- The free version contains a watermark
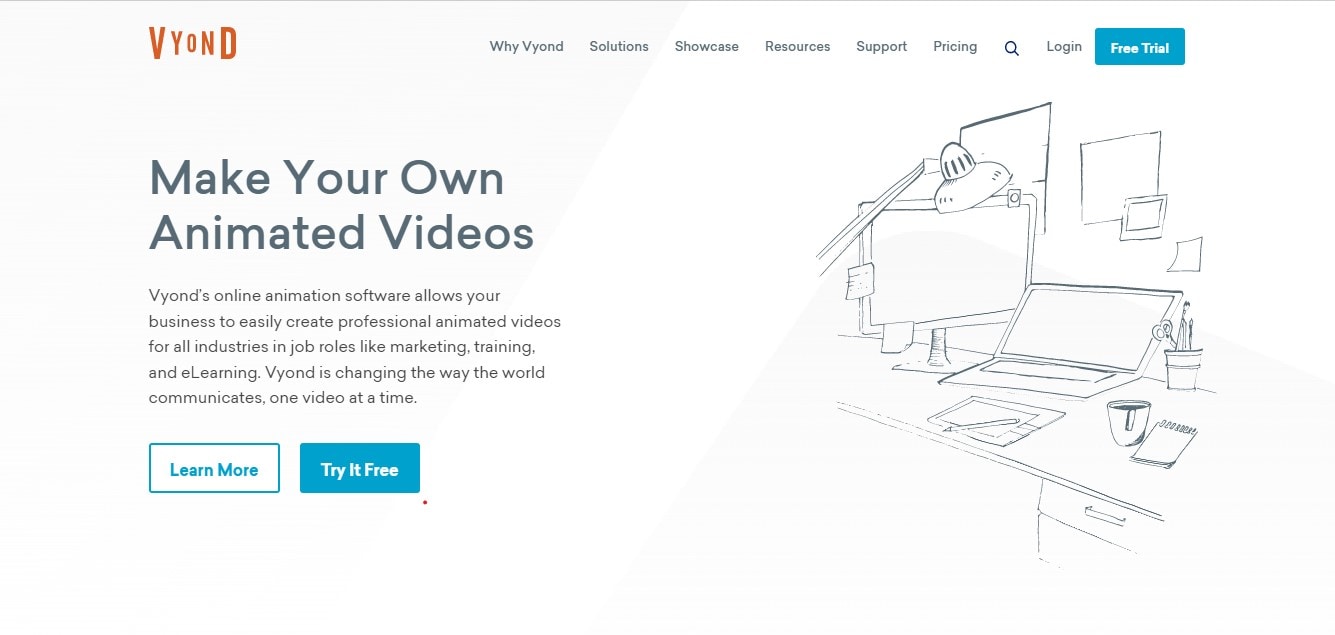
3. Vyond
Vyond, the cartoon creator launched in 2007, is probably one of the oldest online cartoon video makers. Additionally, it is still one of the most popular online destinations meant for anyone who wants to create an animated video quickly.
Price: Subscription plans start from $39 per month, billed annually.
Features:
- Perfect for animated video creation
- There is automatic character lip-syncing
- Try it for free before purchasing
- Make videos for training, e-learning, marketing, human resources, etc.
- The maximum duration of the video is 120 minutes
Pros:
- It has a fully customizable template
- There are high-end object and character animated features
- Certified by GDPR, TrustArc, BSI, and CCPA
- A wholesome cartoon makerfor enterprise and individual
- Data security and privacy assurance by BSI, CCPA, and GPDR.
Cons:
- It is quite expensive
- Vyond is not the best option for inexperienced animators
- The features depend on the subscription model
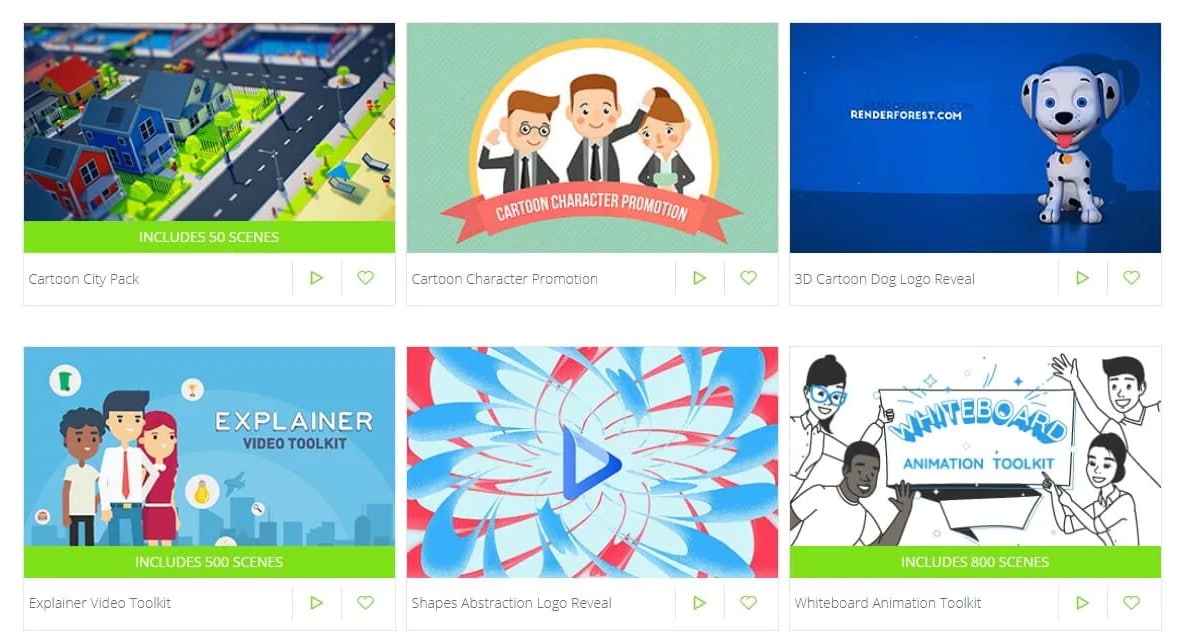
4. Renderforest
This is a famous online cartoon video maker for many purposes. Among the numerous options, the platform offers to its user. They include; 3D explainer videos, logo animations, or professional presentations.
Price: Free version available. Subscription plans start at $16 per month, billed annually.
Features:
- There is an extensive library of templates with numerous options
- Has a large online storage
- Was among the top 100 software companies in 2019.
- Top ranked solution holder for 2020
- Up to 250GB of online storage space
- Use the in-built template to make a story, customize the video, and then export it to share with your friends.
- Amadeus, Bose, BBC, Vodafone, Sony Music, and many others use Renderforest.
Pros:
- Produce videos like a pro
- Comes with an ultimate animation pack.
- Trusted by millions and one of the oldest cartoon makers.
Cons:
- A limited amount of commercial music tracks
- There are modest export options
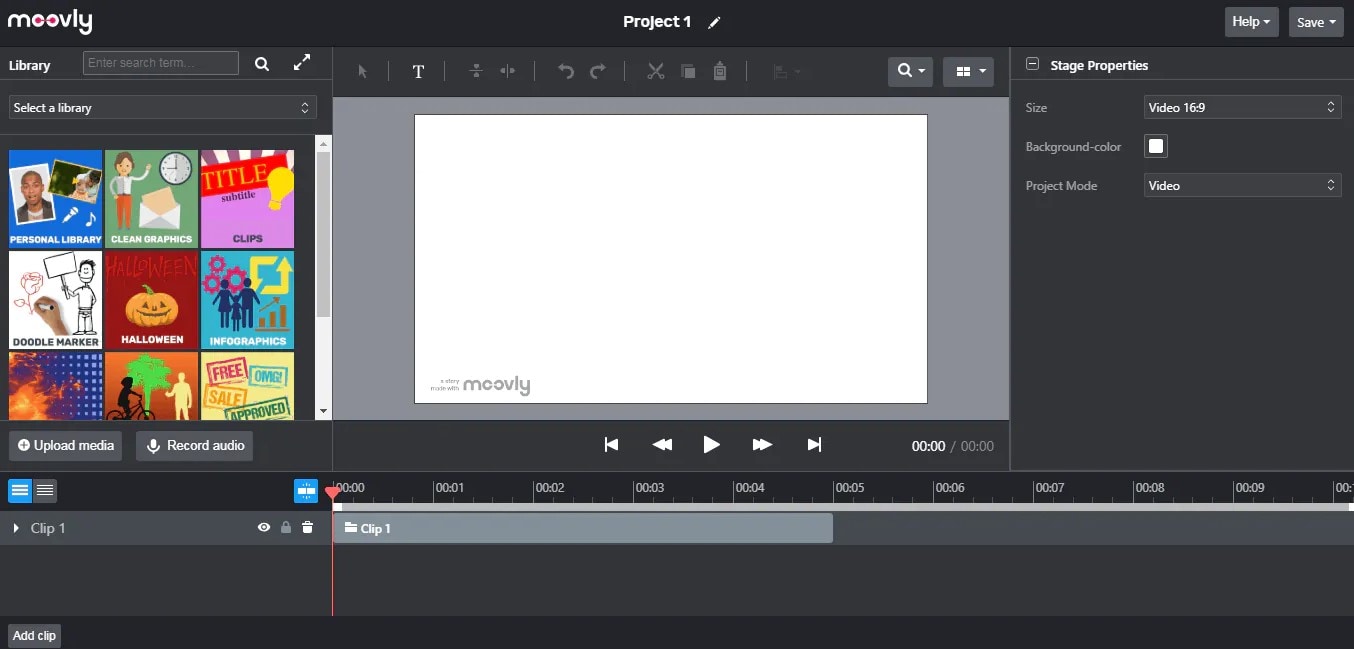
5. Moovly
With this cartoon maker, users must first log in. However, there is no need to create a new account as you can use your LinkedIn or Google account to sign in quickly.
Price: Free 30-day trial, $24.92 per month billed annually.
Features:
- Moovly is the perfect cartoon video maker for sales&marketing, human resources, internal communication, learning&development, agencies, and education.
- Apply expert features in one click with Moovly.
- Create videos and edit with browser-based or drag and drop features without installing software.
- Moovly has over 1.3 million free media, like images, sounds, music, and royalty-free stock videos at no extra charge.
- Besides, it offers 100 million extra media you can try and then purchase.
- You can add your images, music, and videos to create unique clips in style.
- Add text, remove color, add subtitles or generate them, auto-translate your text and subtitles, import PPT files, structure your content, record yourself or your computer screen, edit, mix, etc.
Pros:
- Even if users need to log in, they don’t need to create an account
- Allows users to import content from online sources like Storyblock, Shutterstock, etc.
- It is the number 1 customizable and straightforward solution to making cartoons.
- Use by Colgate-Palmolive, NHS, Teradata, Amadeus, Cisco, Continental, and Logitech.
- The interface is intuitive and user-friendly.
Cons:
- Watermarked videos during the free trial
- To export videos in HD 1080p quality, one needs to purchase one of the available plans.
Renderforest is the best cartoon maker online of the listed five in this article due to the vast library template and large online bandwidth.
Part 2: Cartoon Video Maker for Desktop (Win and Mac)
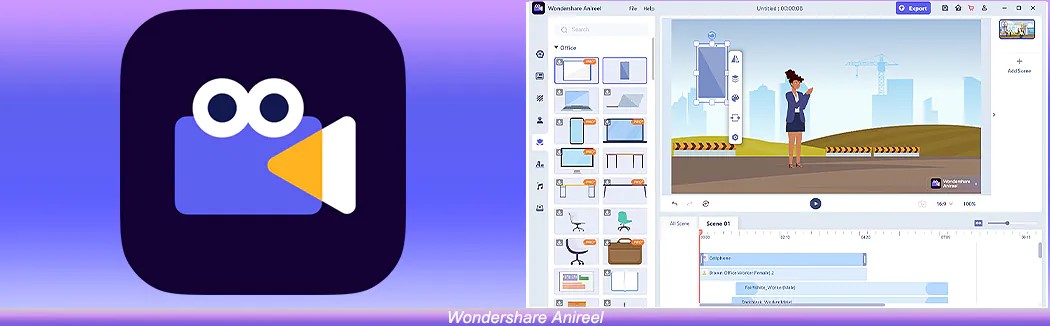
1. Wondershare Anireel
Anireel is one of the top animation software on the internet that allows users to bring their imaginations to life with a huge range of customizable elements and features.
Price: $9.99 per month billed annually and $19.99 monthly
Features:
- 40+ customizable templates
- Top animation software
- Compatible with Windows 11/10/8.1 (64 bit OS)
- Only three steps to an excellent animated video.
- Import images, videos, and sound in almost all formats.
- Create unique avatar, logo images, and more specific to your brand.
- The Deep Learning tech offers quick text-to-speech conversion.
- Animate camera movements, entry and exit effects, motion path, etc.
- Use the one-click option and change scripts to clips.
- Anireel cartoon video makercan lip-sync your characters with perfection.
- Quick and easy drag and drop editing.
Pros:
- It is convenient and simple to use
- Anireel has an intuitive interface
- The cartoon makeroffers a practical and seamless animated video editing
- It comes at an affordable and competitive price
Cons:
- It has a limited amount of assets
- Not suitable for too professional people to use.
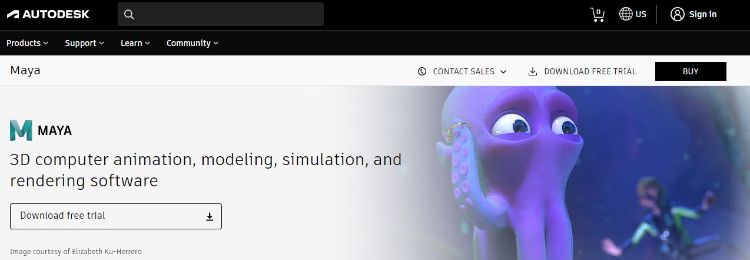
2. Autodesk Maya
Autodesk Maya is one of the best animation tools used to create animation pictures, video games, and add 3D effects in motion pictures. Plus, this cartoon maker is the best if you require a high-quality visual impact.
Price: Free trial, $225 billed monthly.
Features:
- It offers AutoDesk financing for new buyers.
- Maya is the go-to shop for architects, engineers, designers, media, and entertainment.
- Shape 3D objects and add realistic effects with Maya cartoon maker’s NURBS modeling.
- The Integrated Arnold rendering technology lets you view scene changes in real-time.
- Maya has been part of the top movie makers, including the MCU.
- This cartoon video maker offers geometry-based polygon modeling and helps create accurate simulations for visual programming.
- Maya can load and change vast data sets at a faster pace.
Pros:
- It makes complex hand-made animation tasks extremely easy
- Efficient color management
- Allows the creation of realistic effects like cloth simulations and explosions
- 30-day free trial and 30-day money-back guarantee
- Meet deadlines, add fine details to develop even the most complex shots or characters.
- Excellent tool for professionals
Cons:
- The pro is quite expensive
3. Adobe Animate
This is one of the most powerful animation software products on the internet that has been available for decades. It can animate images used for games, film, or online and produce HTML 5, WebGL, or Flash content.
Price: This cartoon creator offers three pricing plans starting at US$24.14/month
Features:
- Excellent for complex animation
- The capability of freehand drawing
- Animate, illustrate, and make 3D typography.
- Import and add vector drawings for further editing.
- Export your work as HTML5 Canvas, WebGL, Flash/Adobe AIR, GIF, or QuickTime movie.
- With the Bone tool, make your cartoon characters fluid and natural.
- Synchronize sounds and music for your project.
- Choose parts of the clip to be animated.
Pros:
- It has Puppeting features
- It is an excellent choice for complex animations
- It includes freehand drawing capability
Cons:
- It is not suitable for beginners
- Other Adobe software may be required while working on a project
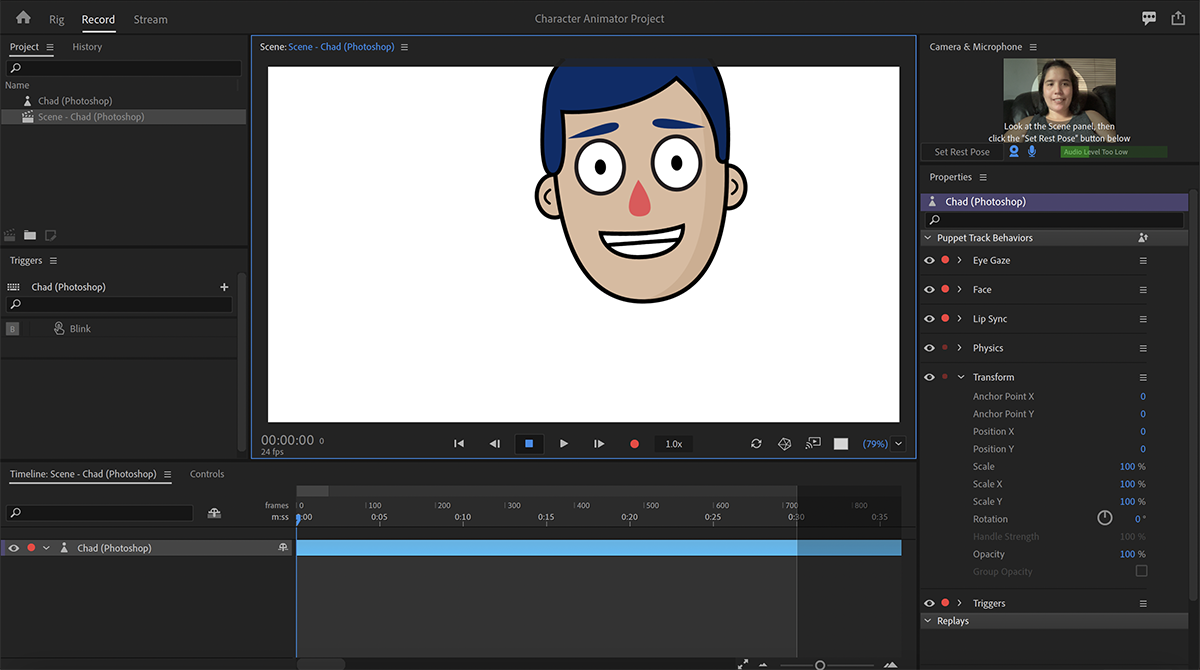
4. Adobe Character Animator
Adobe Character Animator is another type of Adobe’s animation software stack that allows users to use motion to capture and create live animations of their 2D characters.
Price: Adobe Character Animator has two pricing plans starting at US$34,49/month for the first year
Features:
- This product requires other Adobe products to function
- Lots of options to export and import.
- Make your real-life cartoon using the Motion Capture feature in five steps.
- The Avatar will walk, talk, and copy your expressions in real-time.
- Integrate and add assets from other Adobe Creative Cloud apps.
- Auto lip-syncing and real-time facial movement capture.
- Works on iOS and Android.
Pros:
- Easy to replicate real-life movements and expressions with facial tracking.
- There are various import and export options.
Cons:
- It is not a standalone product.
- Users need to have a webcam and microphone to use the motion capture feature.
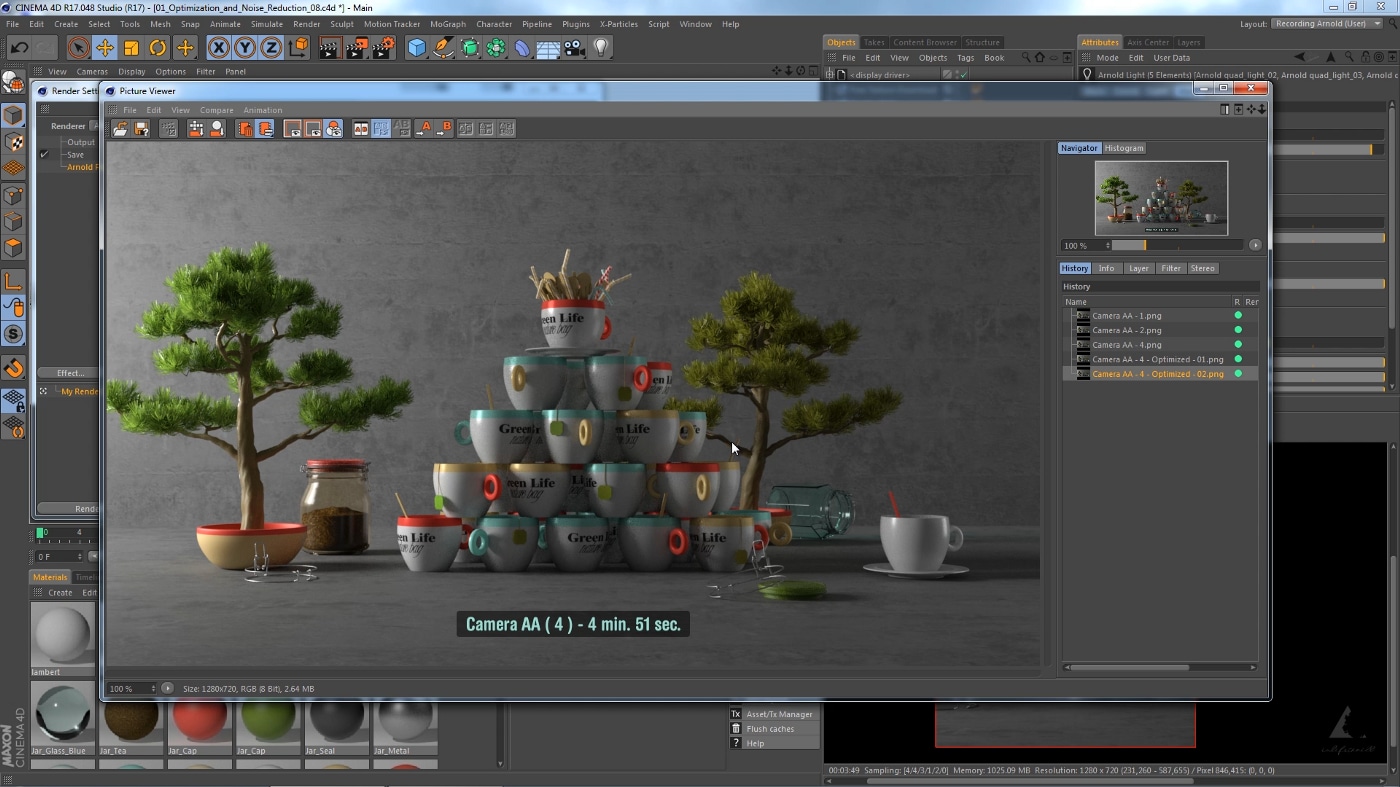
5. Cinema 4D
This cartoon maker has a 3D application interface that offers a keyframe animation, life-like characters, simulation building, object tracking, flexible rig building, cartoon styling, and animation basics.
Price: 4 pricing plans, starting at $99.91/month and $1199.00 billed annually.
Features:
- Keyframing animation effect
- It has a 3d interface
- The ZRemesher for retopology and new tools for modeling add to the new features.
- The Cloth Simulation features help make your cartoon more real.
- It supports CPU rendering with Redshift, which helps you preview, import, and export in high quality.
Pros:
- It is pretty easy to use.
- Lots of exciting design templates are available
- Many editing features are available
Cons
- It is pretty expensive compared to other software
- Not good for beginners
Wondershare Anireel is the best cartoon maker of the five listed in this article. It has lots of advanced features and templates to choose from.
Part 3: How Can I Create My Own Cartoon Using Wondershare Anireel
As stated, Wondershare Anireel has become our top cartoon creator pick due to its affordable pricing, secure server, and ease of use.
So, let us view the simple steps to create your cartoon using the Anireel software.
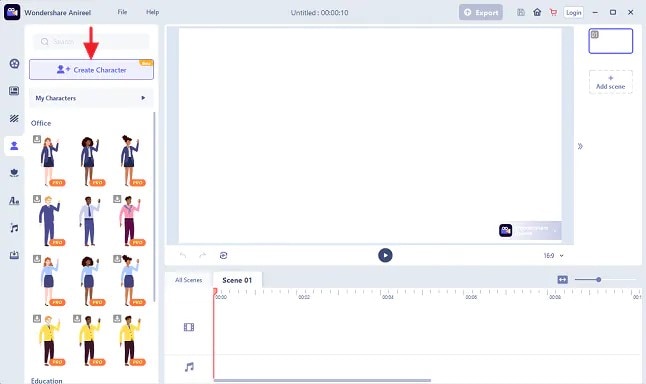
Step 1: Download, install and Create Character
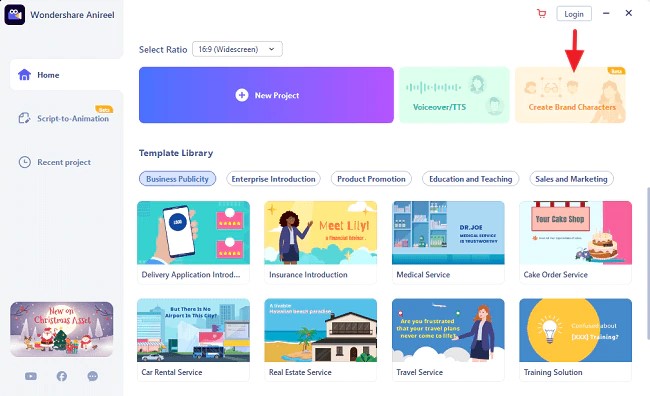
Run Anireel on your device, visit Characters Tab and then click on Create a Character option, or you may click on the Create Brand Characters tab on the home screen.
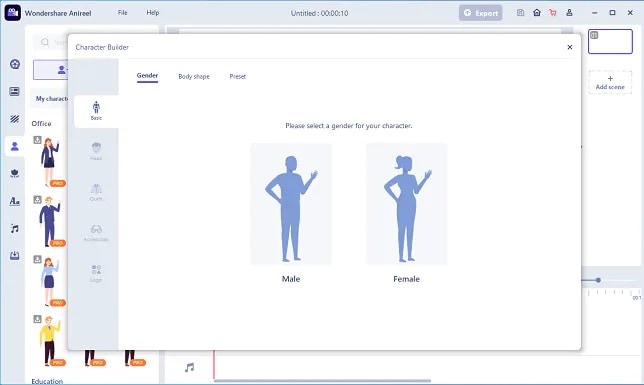
Step 2: Start Creating your Cartoon Character
Choose your gender and body shape, and apply some preset suits.
Now, you can start building facial features using the Head tab to customize the shape of the face, eyes, hairstyle, nose, mouth, ears, and eyebrows.
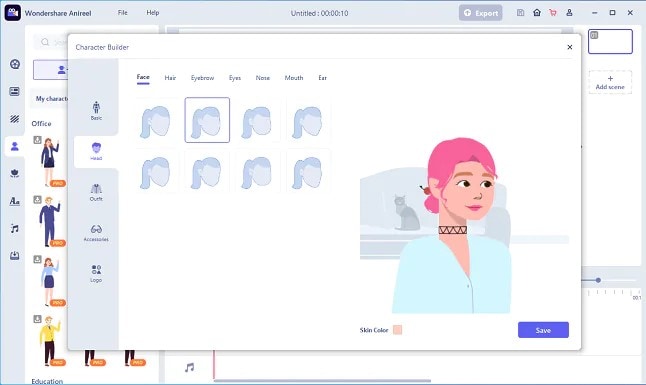
You can also choose to change the skin tone to match yours.
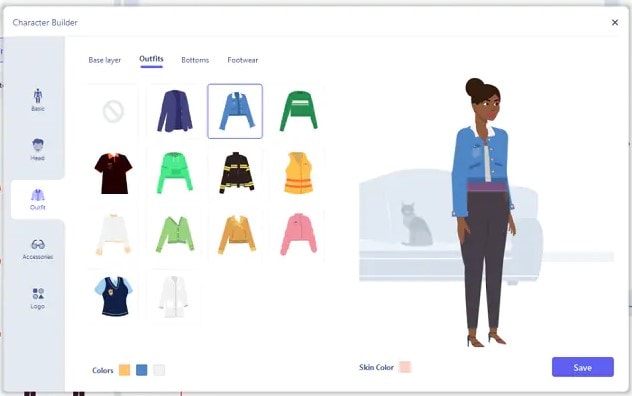
Step 3: Add an Outfit and Accessories
Choose the Outfit tab in Character Builder to select the base layer, outfit, bottom wear, and footwear. Pick what you want to use on your cartoon and keep adding.
Next, reach the Accessories tab to add glasses, necklaces, and more to your cartoon character.
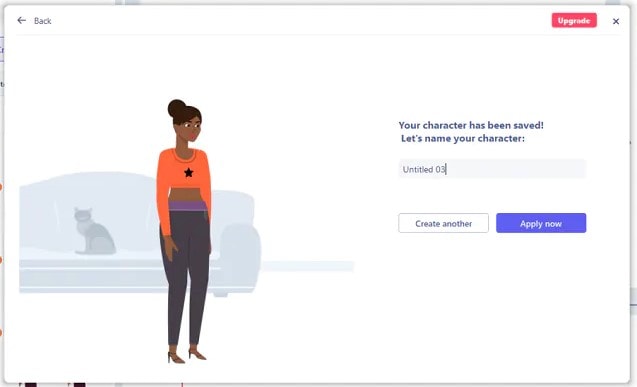
Step 4: Name your Cartoon and Apply
Click on Save and add a name to your cartoon when all done. Finally, click Apply Now to add your cartoon character to your Anireel cartoon maker canvas or My Characters tab.
Part 4: People Also Want to Know
Below are some answers to a few queries about cartoon creators. Let us look at them one by one.
1. What is the best free cartoon maker?
Wondershare Anireel is the best cartoon maker for Android as it is free to use with lots of advanced features and templates to choose from.
2. What is the best app to make a cartoon?
Wondershare Anireel’s Microsoft app is also one of the best cartoon applications that are very flexible and easy to use on the go.
Conclusion
In this article, we explained the best cartoon creators in the industry. Also, we gave the best cartoon video maker from the list. Thus, as you saw, in this report, we have summarized a few essential points regarding cartoon video makers. You learned:
- The cartoon video maker for free that you should know of.
- The ten best cartoon video makers.
- Why are Wondershare Anireel and Renderforest excellent online cartoon video makers?
- How does Anireel, cartoon creator, work?
- Finally, a few FAQs for users to better understand the cartoon maker
Introduction
There are some issues common to the video production process. However, animated or cartoon videos have helped to combat such issues. You do not need to scout for locations, go through a seemingly endless casting process, or rent the pricey equipment. A cartoon is simply a type of animation or an illustration that usually appears in a semi-realistic or an unreal style. In addition, it uses simple, satirical, and humorous drawing language to tell the story.
Although there are restrictions, there are a lot of possibilities cartoon video makers still offer to their users. Therefore, this article will share the top 10 best cartoon video makers online and on PC that you can use before diving into an animated video world.
So, here is what we shall learn about cartoon makers today:
In this article
01 Best 5 Online Cartoon Makers
02 Cartoon Video Maker for Desktop (Win and Mac)
03 How Can I Create My Own Cartoon Using Wondershare Anireel
Part 1: Best 5 Online Cartoon Makers
1. Biteable
Biteable provides a seemingly endless list of template categories to cater to your online media marketing needs. Aside from offering entertaining cartoon-making templates, the platform also allows users to create motion graphics or content, and Facebook covers for their social media channels.
Price: Free, $23 per month, billed annually.
Features:
- Offering library with lots of templates to choose from
- Free to use, except you are looking for additional features
- Five simple steps to an incredible cartoon video
- It has an easily customizable template
Pros
- It is a perfect option for social media managers
- Quickly create entertaining cartoons
- Used by biggies like Amazon, Microsoft, Google, Disney, BBC, Shopify, Samsung, and salesforce.
- Over 9 million users
Cons
- There is a mandatory registration
- There are no audio editing options
- The file-sharing capabilities are limited to YouTube and Facebook
- The download option is disabled in the free version
2. Animaker
With this animated maker, you get access to hundreds of animated characters, maps, and backgrounds. There are six (6) video styles available in this cartoon maker: Typography, Infographic, or 2D for different types of projects.
Price: Free version available. Subscription plans start at $12 per month/billed annually.
Features
- Different video styles, marketing, explainer, or 2D animation.
- Posts itself as the number 1 cartoon maker
- No need for a credit card to start.
- Four-step process; select template, customize it, add music, and download or share.
- 200+ voices, 25+ languages, and loads of customizable options.
- It offers auto-lip sync with advanced animation effects.
- There is a rich selection of 1000+ templates
Pros:
- Superb audio editing options
- Excellent and quick animation tools.
- Over 10 million users so far and still counting.
- Currently used by Amazon, Bosch, HP, Nokia, and Philips.
Cons:
- The monthly fee is pricey
- Account creation is mandatory for a free version
- The free version contains a watermark
3. Vyond
Vyond, the cartoon creator launched in 2007, is probably one of the oldest online cartoon video makers. Additionally, it is still one of the most popular online destinations meant for anyone who wants to create an animated video quickly.
Price: Subscription plans start from $39 per month, billed annually.
Features:
- Perfect for animated video creation
- There is automatic character lip-syncing
- Try it for free before purchasing
- Make videos for training, e-learning, marketing, human resources, etc.
- The maximum duration of the video is 120 minutes
Pros:
- It has a fully customizable template
- There are high-end object and character animated features
- Certified by GDPR, TrustArc, BSI, and CCPA
- A wholesome cartoon makerfor enterprise and individual
- Data security and privacy assurance by BSI, CCPA, and GPDR.
Cons:
- It is quite expensive
- Vyond is not the best option for inexperienced animators
- The features depend on the subscription model
4. Renderforest
This is a famous online cartoon video maker for many purposes. Among the numerous options, the platform offers to its user. They include; 3D explainer videos, logo animations, or professional presentations.
Price: Free version available. Subscription plans start at $16 per month, billed annually.
Features:
- There is an extensive library of templates with numerous options
- Has a large online storage
- Was among the top 100 software companies in 2019.
- Top ranked solution holder for 2020
- Up to 250GB of online storage space
- Use the in-built template to make a story, customize the video, and then export it to share with your friends.
- Amadeus, Bose, BBC, Vodafone, Sony Music, and many others use Renderforest.
Pros:
- Produce videos like a pro
- Comes with an ultimate animation pack.
- Trusted by millions and one of the oldest cartoon makers.
Cons:
- A limited amount of commercial music tracks
- There are modest export options
5. Moovly
With this cartoon maker, users must first log in. However, there is no need to create a new account as you can use your LinkedIn or Google account to sign in quickly.
Price: Free 30-day trial, $24.92 per month billed annually.
Features:
- Moovly is the perfect cartoon video maker for sales&marketing, human resources, internal communication, learning&development, agencies, and education.
- Apply expert features in one click with Moovly.
- Create videos and edit with browser-based or drag and drop features without installing software.
- Moovly has over 1.3 million free media, like images, sounds, music, and royalty-free stock videos at no extra charge.
- Besides, it offers 100 million extra media you can try and then purchase.
- You can add your images, music, and videos to create unique clips in style.
- Add text, remove color, add subtitles or generate them, auto-translate your text and subtitles, import PPT files, structure your content, record yourself or your computer screen, edit, mix, etc.
Pros:
- Even if users need to log in, they don’t need to create an account
- Allows users to import content from online sources like Storyblock, Shutterstock, etc.
- It is the number 1 customizable and straightforward solution to making cartoons.
- Use by Colgate-Palmolive, NHS, Teradata, Amadeus, Cisco, Continental, and Logitech.
- The interface is intuitive and user-friendly.
Cons:
- Watermarked videos during the free trial
- To export videos in HD 1080p quality, one needs to purchase one of the available plans.
Renderforest is the best cartoon maker online of the listed five in this article due to the vast library template and large online bandwidth.
Part 2: Cartoon Video Maker for Desktop (Win and Mac)
1. Wondershare Anireel
Anireel is one of the top animation software on the internet that allows users to bring their imaginations to life with a huge range of customizable elements and features.
Price: $9.99 per month billed annually and $19.99 monthly
Features:
- 40+ customizable templates
- Top animation software
- Compatible with Windows 11/10/8.1 (64 bit OS)
- Only three steps to an excellent animated video.
- Import images, videos, and sound in almost all formats.
- Create unique avatar, logo images, and more specific to your brand.
- The Deep Learning tech offers quick text-to-speech conversion.
- Animate camera movements, entry and exit effects, motion path, etc.
- Use the one-click option and change scripts to clips.
- Anireel cartoon video makercan lip-sync your characters with perfection.
- Quick and easy drag and drop editing.
Pros:
- It is convenient and simple to use
- Anireel has an intuitive interface
- The cartoon makeroffers a practical and seamless animated video editing
- It comes at an affordable and competitive price
Cons:
- It has a limited amount of assets
- Not suitable for too professional people to use.
2. Autodesk Maya
Autodesk Maya is one of the best animation tools used to create animation pictures, video games, and add 3D effects in motion pictures. Plus, this cartoon maker is the best if you require a high-quality visual impact.
Price: Free trial, $225 billed monthly.
Features:
- It offers AutoDesk financing for new buyers.
- Maya is the go-to shop for architects, engineers, designers, media, and entertainment.
- Shape 3D objects and add realistic effects with Maya cartoon maker’s NURBS modeling.
- The Integrated Arnold rendering technology lets you view scene changes in real-time.
- Maya has been part of the top movie makers, including the MCU.
- This cartoon video maker offers geometry-based polygon modeling and helps create accurate simulations for visual programming.
- Maya can load and change vast data sets at a faster pace.
Pros:
- It makes complex hand-made animation tasks extremely easy
- Efficient color management
- Allows the creation of realistic effects like cloth simulations and explosions
- 30-day free trial and 30-day money-back guarantee
- Meet deadlines, add fine details to develop even the most complex shots or characters.
- Excellent tool for professionals
Cons:
- The pro is quite expensive
3. Adobe Animate
This is one of the most powerful animation software products on the internet that has been available for decades. It can animate images used for games, film, or online and produce HTML 5, WebGL, or Flash content.
Price: This cartoon creator offers three pricing plans starting at US$24.14/month
Features:
- Excellent for complex animation
- The capability of freehand drawing
- Animate, illustrate, and make 3D typography.
- Import and add vector drawings for further editing.
- Export your work as HTML5 Canvas, WebGL, Flash/Adobe AIR, GIF, or QuickTime movie.
- With the Bone tool, make your cartoon characters fluid and natural.
- Synchronize sounds and music for your project.
- Choose parts of the clip to be animated.
Pros:
- It has Puppeting features
- It is an excellent choice for complex animations
- It includes freehand drawing capability
Cons:
- It is not suitable for beginners
- Other Adobe software may be required while working on a project
4. Adobe Character Animator
Adobe Character Animator is another type of Adobe’s animation software stack that allows users to use motion to capture and create live animations of their 2D characters.
Price: Adobe Character Animator has two pricing plans starting at US$34,49/month for the first year
Features:
- This product requires other Adobe products to function
- Lots of options to export and import.
- Make your real-life cartoon using the Motion Capture feature in five steps.
- The Avatar will walk, talk, and copy your expressions in real-time.
- Integrate and add assets from other Adobe Creative Cloud apps.
- Auto lip-syncing and real-time facial movement capture.
- Works on iOS and Android.
Pros:
- Easy to replicate real-life movements and expressions with facial tracking.
- There are various import and export options.
Cons:
- It is not a standalone product.
- Users need to have a webcam and microphone to use the motion capture feature.
5. Cinema 4D
This cartoon maker has a 3D application interface that offers a keyframe animation, life-like characters, simulation building, object tracking, flexible rig building, cartoon styling, and animation basics.
Price: 4 pricing plans, starting at $99.91/month and $1199.00 billed annually.
Features:
- Keyframing animation effect
- It has a 3d interface
- The ZRemesher for retopology and new tools for modeling add to the new features.
- The Cloth Simulation features help make your cartoon more real.
- It supports CPU rendering with Redshift, which helps you preview, import, and export in high quality.
Pros:
- It is pretty easy to use.
- Lots of exciting design templates are available
- Many editing features are available
Cons
- It is pretty expensive compared to other software
- Not good for beginners
Wondershare Anireel is the best cartoon maker of the five listed in this article. It has lots of advanced features and templates to choose from.
Part 3: How Can I Create My Own Cartoon Using Wondershare Anireel
As stated, Wondershare Anireel has become our top cartoon creator pick due to its affordable pricing, secure server, and ease of use.
So, let us view the simple steps to create your cartoon using the Anireel software.
Step 1: Download, install and Create Character
Run Anireel on your device, visit Characters Tab and then click on Create a Character option, or you may click on the Create Brand Characters tab on the home screen.
Step 2: Start Creating your Cartoon Character
Choose your gender and body shape, and apply some preset suits.
Now, you can start building facial features using the Head tab to customize the shape of the face, eyes, hairstyle, nose, mouth, ears, and eyebrows.
You can also choose to change the skin tone to match yours.
Step 3: Add an Outfit and Accessories
Choose the Outfit tab in Character Builder to select the base layer, outfit, bottom wear, and footwear. Pick what you want to use on your cartoon and keep adding.
Next, reach the Accessories tab to add glasses, necklaces, and more to your cartoon character.
Step 4: Name your Cartoon and Apply
Click on Save and add a name to your cartoon when all done. Finally, click Apply Now to add your cartoon character to your Anireel cartoon maker canvas or My Characters tab.
Part 4: People Also Want to Know
Below are some answers to a few queries about cartoon creators. Let us look at them one by one.
1. What is the best free cartoon maker?
Wondershare Anireel is the best cartoon maker for Android as it is free to use with lots of advanced features and templates to choose from.
2. What is the best app to make a cartoon?
Wondershare Anireel’s Microsoft app is also one of the best cartoon applications that are very flexible and easy to use on the go.
Conclusion
In this article, we explained the best cartoon creators in the industry. Also, we gave the best cartoon video maker from the list. Thus, as you saw, in this report, we have summarized a few essential points regarding cartoon video makers. You learned:
- The cartoon video maker for free that you should know of.
- The ten best cartoon video makers.
- Why are Wondershare Anireel and Renderforest excellent online cartoon video makers?
- How does Anireel, cartoon creator, work?
- Finally, a few FAQs for users to better understand the cartoon maker
Best Way to Freeze-Frame in Final Cut Pro
Best Way to Freeze Frame in Final Cut Pro
An easy yet powerful editor
Numerous effects to choose from
Detailed tutorials provided by the official channel
The primary purpose of freezing frames is to hold a particular frame in clips in one place, temporarily to stop the action onscreen. You can create the Freeze-Frame clip from any video clip in the browser or the timeline. If a Freeze-Frame clip is created from the browser, it gets affixed to the major storyline at the Playhead location as a connecting clip.

Now, Final Cut Pro is a fantastic video editor available for macOS. It is an entire video editing tool perfect for basic video editing. In addition, it can be valuable to Freeze-Frames in a video. This article will explain why to Freeze-Frame in FCP and its alternatives. We will also introduce how to add a Freeze-Frame Final Cut Pro video editor that can make your videos more appealing.
In this article
01 [Why Do You Need to Freeze-Frame](#Part 1)
02 [How to Freeze-Frames in Final Cut Pro?](#Part 2)
03 [3 Alternative to Freeze-Frames and Why](#Part 3)
Part 1 Why Do You Need to Freeze-Frame
Freeze-Frames is an effective and quick way to begin a drama session when you want to edit a movie. Besides, users of any age, ranging from children to adults, can easily handle it. Participants can use it to create an image using their bodies with no movement, and Freeze-Frames can also be made by individuals, a whole group, or a small group.
Another perfect way to describe a Freeze-Frame is a “still image.” It is a way of pressing the pause button on the remote control and making a statue or taking a photo. The image creation can be quick without discussion, planned, or rehearsed.
Here are some reasons you need a Freeze-Frame app:
● They are beneficial as a quick way of communicating ideas or telling a story.
● In addition, Freeze-Frame can represent objects or people and even abstract concepts like atmosphere or emotions.
● Freeze-Frames can help shyer performers to gain confidence, as there are no lines to learn.

Part 2 How to Freeze-Frames in Final Cut Pro?
FCPX Freeze-Frame clips can temporarily hold a particular frame in place and stop the action onscreen. The Freeze-Frame, as its phrase, freezes or contains the specific frame you want to feature or focus on in a video.
You have to pick or select the frame you want to freeze and follow the steps in the article to freeze the frame of your choice.
In addition, if you do not want to create a separate freeze-frame clip, make a hold segment to stop the action for part of a clip temporarily. This action offers more precise control, especially when a variable speed effect is created.
You can Freeze-Frame on the fly by navigating to a specific frame in a clip or during playback. Thus, A Freeze-Frame clip will preserve any attributes applied to the source clip, such as settings and effects.
Here is how to Freeze-Frame in Final Cut Pro effectively.
Step 1: In the browser or in the timeline in Final Cut Pro, do any one of the following:
● Begin playback of the clip and pause
● Move the Skimmer or Playhead to the portion you wish to freeze.

Step 2: Choose Edit > Add Freeze-Frame (or press Option-F).
Note: How Freeze-Frame gets added to the project depends on whether it got created from the browser or the timeline:
● If the Freeze-Frame was from a browser clip, a new freeze-frame clip gets attached as a connected clip at the Playhead site in the timeline.
● Alternatively, if the freeze-frame was from the timeline, a new freeze-frame clip gets inserted at the Playhead location or the Skimmer in the timeline.

Part 3 Alternative to Freeze-Frames and Why
There are a lot of alternatives to Freeze-Frame in Final-Cut Pro all over the Internet. However, you must be careful while choosing when you want to add customization to your videos.
Additionally, if you are looking for the best editor to add a Freeze-Frame effect to your video, we recommend trying Filmora. Wondershare Filmora Video Editor for Mac and Windows devices comes with tons of Freeze-Frame impacts that you can use to spice-up your video.
For Win 7 or later (64-bit)
For macOS 10.12 or later
Some of the alternatives to adding a Freeze-Frame on Final Cut Pro include:
01AZ Screen Recorder
This is a free android APK alternative to Freeze-Frames in FCP. It is a great application available for anyone who needs to have the ability to record what is happening on their Android device’s screen. One great benefit of using this application is that your Android device does need to be rooted to experience the best the app has to offer.
A blinking red dot will be noticed in the screen’s right bottom corner when users begin to record with this application. This is an indicator that the recording is in progress. In addition, users can pause the recording as per their requirements by just tapping the screen. If you are not comfortable with the location of the blinking red dot, hold and move it to anywhere on the screen that can better suit your needs. Thus, this is an excellent alternative to Final Cut Pro X Freeze-Frame with the exceptional video quality.
Features
● Simple, clean, and easy to use interface
● The application settings options allow users to adjust things like the video output quality and how the clip recording interacts with the screen while the application is running.
● The four icons located in the middle of the application’s home screen clearly outline their options when the application is first open. The four options include adjusting the application’s settings, accessing previously recorded video files, starting recording, and the option to exit.
Pros:
● It has options to increase video quality.
● No watermark
● No time limits
● No frame loss
Cons:
● No option to live stream.

02AndroVid
This Android application allows the creation of new videos by cutting and combining two or more video effects on your phone. Additionally, this application is typically different from the others that let you watch videos or share them with other sites. Bits and pieces can be cut from two or more videos and combined to make a new video. In addition, it is fun to use if you want to create a new music video that features the same song but different steps made when various people are being used.
Users can easily cut and paste with simple instructions, and the application also lets you work with any video stored on your phone.
Features
● Add subtitles to the videos that you create
● Create titles in any color or font that is available with the application
● making the videos from the clips a little more personal and customized before sharing.
Pros
● Allows multiple videos editing
● Allows the addition of a subtitle
● Users can reverse video content
Cons
● You cannot save a lot of work automatically
● It takes time to get the video adjusted

03Action Director
This Android editor also serves as an alternative to Final Cut Pro X Freeze-Frame. This video editing tool allows users to create quality compositions in no time at all. Additionally, you can change the image’s color, cut video clips, add a soundtrack, or insert text with this Video Editor using effortless control. With just a few finger taps on the screen, you can customize any video. This excellent video editing tool lets you create and share your videos quickly and easily.
Features
● Record videos with this Android app.
● Edit video and apply effects from its exclusive list.
● Get more than 12 transitions for your videos
● The useful movie editing guide helps you create videos with action effects and edits.
● Share your videos with your friends.
Pros
● It is fast and easy to use
● It is elementary to control
● Has video sharing option to share videos on another website
Cons
● Requires premium version to export video in high quality
● Ending Thoughts →
● About Final Cut Pro X Freeze-Frame and explained to the user how to use Freeze-Frame in FCP.
● Additionally, the article listed and presented three alternatives to Freeze-Frame and
● Recommended Filmora as the best editing software to use Freeze-Frame effects due to its many editing options.
The primary purpose of freezing frames is to hold a particular frame in clips in one place, temporarily to stop the action onscreen. You can create the Freeze-Frame clip from any video clip in the browser or the timeline. If a Freeze-Frame clip is created from the browser, it gets affixed to the major storyline at the Playhead location as a connecting clip.
Now, Final Cut Pro is a fantastic video editor available for macOS. It is an entire video editing tool perfect for basic video editing. In addition, it can be valuable to Freeze-Frames in a video. This article will explain why to Freeze-Frame in FCP and its alternatives. We will also introduce how to add a Freeze-Frame Final Cut Pro video editor that can make your videos more appealing.
In this article
01 [Why Do You Need to Freeze-Frame](#Part 1)
02 [How to Freeze-Frames in Final Cut Pro?](#Part 2)
03 [3 Alternative to Freeze-Frames and Why](#Part 3)
Part 1 Why Do You Need to Freeze-Frame
Freeze-Frames is an effective and quick way to begin a drama session when you want to edit a movie. Besides, users of any age, ranging from children to adults, can easily handle it. Participants can use it to create an image using their bodies with no movement, and Freeze-Frames can also be made by individuals, a whole group, or a small group.
Another perfect way to describe a Freeze-Frame is a “still image.” It is a way of pressing the pause button on the remote control and making a statue or taking a photo. The image creation can be quick without discussion, planned, or rehearsed.
Here are some reasons you need a Freeze-Frame app:
● They are beneficial as a quick way of communicating ideas or telling a story.
● In addition, Freeze-Frame can represent objects or people and even abstract concepts like atmosphere or emotions.
● Freeze-Frames can help shyer performers to gain confidence, as there are no lines to learn.
Part 2 How to Freeze-Frames in Final Cut Pro?
FCPX Freeze-Frame clips can temporarily hold a particular frame in place and stop the action onscreen. The Freeze-Frame, as its phrase, freezes or contains the specific frame you want to feature or focus on in a video.
You have to pick or select the frame you want to freeze and follow the steps in the article to freeze the frame of your choice.
In addition, if you do not want to create a separate freeze-frame clip, make a hold segment to stop the action for part of a clip temporarily. This action offers more precise control, especially when a variable speed effect is created.
You can Freeze-Frame on the fly by navigating to a specific frame in a clip or during playback. Thus, A Freeze-Frame clip will preserve any attributes applied to the source clip, such as settings and effects.
Here is how to Freeze-Frame in Final Cut Pro effectively.
Step 1: In the browser or in the timeline in Final Cut Pro, do any one of the following:
● Begin playback of the clip and pause
● Move the Skimmer or Playhead to the portion you wish to freeze.
Step 2: Choose Edit > Add Freeze-Frame (or press Option-F).
Note: How Freeze-Frame gets added to the project depends on whether it got created from the browser or the timeline:
● If the Freeze-Frame was from a browser clip, a new freeze-frame clip gets attached as a connected clip at the Playhead site in the timeline.
● Alternatively, if the freeze-frame was from the timeline, a new freeze-frame clip gets inserted at the Playhead location or the Skimmer in the timeline.
Part 3 Alternative to Freeze-Frames and Why
There are a lot of alternatives to Freeze-Frame in Final-Cut Pro all over the Internet. However, you must be careful while choosing when you want to add customization to your videos.
Additionally, if you are looking for the best editor to add a Freeze-Frame effect to your video, we recommend trying Filmora. Wondershare Filmora Video Editor for Mac and Windows devices comes with tons of Freeze-Frame impacts that you can use to spice-up your video.
For Win 7 or later (64-bit)
For macOS 10.12 or later
Some of the alternatives to adding a Freeze-Frame on Final Cut Pro include:
01AZ Screen Recorder
This is a free android APK alternative to Freeze-Frames in FCP. It is a great application available for anyone who needs to have the ability to record what is happening on their Android device’s screen. One great benefit of using this application is that your Android device does need to be rooted to experience the best the app has to offer.
A blinking red dot will be noticed in the screen’s right bottom corner when users begin to record with this application. This is an indicator that the recording is in progress. In addition, users can pause the recording as per their requirements by just tapping the screen. If you are not comfortable with the location of the blinking red dot, hold and move it to anywhere on the screen that can better suit your needs. Thus, this is an excellent alternative to Final Cut Pro X Freeze-Frame with the exceptional video quality.
Features
● Simple, clean, and easy to use interface
● The application settings options allow users to adjust things like the video output quality and how the clip recording interacts with the screen while the application is running.
● The four icons located in the middle of the application’s home screen clearly outline their options when the application is first open. The four options include adjusting the application’s settings, accessing previously recorded video files, starting recording, and the option to exit.
Pros:
● It has options to increase video quality.
● No watermark
● No time limits
● No frame loss
Cons:
● No option to live stream.
02AndroVid
This Android application allows the creation of new videos by cutting and combining two or more video effects on your phone. Additionally, this application is typically different from the others that let you watch videos or share them with other sites. Bits and pieces can be cut from two or more videos and combined to make a new video. In addition, it is fun to use if you want to create a new music video that features the same song but different steps made when various people are being used.
Users can easily cut and paste with simple instructions, and the application also lets you work with any video stored on your phone.
Features
● Add subtitles to the videos that you create
● Create titles in any color or font that is available with the application
● making the videos from the clips a little more personal and customized before sharing.
Pros
● Allows multiple videos editing
● Allows the addition of a subtitle
● Users can reverse video content
Cons
● You cannot save a lot of work automatically
● It takes time to get the video adjusted
03Action Director
This Android editor also serves as an alternative to Final Cut Pro X Freeze-Frame. This video editing tool allows users to create quality compositions in no time at all. Additionally, you can change the image’s color, cut video clips, add a soundtrack, or insert text with this Video Editor using effortless control. With just a few finger taps on the screen, you can customize any video. This excellent video editing tool lets you create and share your videos quickly and easily.
Features
● Record videos with this Android app.
● Edit video and apply effects from its exclusive list.
● Get more than 12 transitions for your videos
● The useful movie editing guide helps you create videos with action effects and edits.
● Share your videos with your friends.
Pros
● It is fast and easy to use
● It is elementary to control
● Has video sharing option to share videos on another website
Cons
● Requires premium version to export video in high quality
● Ending Thoughts →
● About Final Cut Pro X Freeze-Frame and explained to the user how to use Freeze-Frame in FCP.
● Additionally, the article listed and presented three alternatives to Freeze-Frame and
● Recommended Filmora as the best editing software to use Freeze-Frame effects due to its many editing options.
Phone Aspect Ratio Vertical Definition, Types and Tips
Versatile Video Editor - Wondershare Filmora
If you are a professional video or image creator, you know what aspect ratio is and why aspect ratio is important. Even people passionate about their cameras and visual art enthusiasts know it. If you are a newbie, Let us make it easy for you. This article will talk about the vertical phone aspect ratio ratio, its definition, types, iPhone vertical video dimensions, etc. We’ll also provide you solid tips on mobile vertical video size and how to create phone vertical videos easily. Let’s jump into the topic and see what you can learn.
In this article
01 [What is Phone Aspect Ratio Vertical?](#Part 1)
02 [Types of Phone Aspect Ratio Vertical](#Part 2)
03 [Tips to Create Phone Vertical Videos](#Part 3)
Part 1 What is Phone Aspect Ratio Vertical?
The vertical phone aspect ratio is the “proportional” relationship between the screen’s width and height. For example, if your image or video has an aspect ratio of 4:5, it simply means the width of the screen (photo or video) is four times the height of the image.
The vertical phone aspect ratio is the “proportional” relationship between the screen’s width and height. For example, if your image or video has an aspect ratio of 4:5, it simply means the width of the screen (photo or video) is four times the height of the image.
Back in the television days, you might have seen certain old pictures with black padding on either side of the screen. It was just that they were shot in different aspect ratios and your television screen had different aspect ratios.
Aspect Ratio Vs Resolution
Remember that aspect ratio does not refer to the physical size of an image or its dimensions in pixels (resolution). So aspect ratio 3:1 does not refer to the actual width and height of the image or video; it just describes their relationship.
You are wrong if you think aspect ratio is just another fancy name for resolution. Think again. Check out how it is calculated.
“
| | Aspect Ratio | Resolution | |
| ————— | ————————————————————– | ———————————————————————————- |
| Definition | The Ratio of the width of an image to the height of the image. | Total number of pixels displayed on your screen (computer, cell phone, television) |
| Commonly Used | ● 1:1 ● 3:1 ● 3:2 ● 4:3 ● 5:4 ● 9:1 ● 16:9 | ● 640x480 ● 800x600 ● 1024x768 |
Aspect Ratio Calculator
To get the resolution, you need to multiply width times the height. To get aspect ratio, the formula is: Divide the width by the height or simply divide the long side by the short side.
There are multiple online aspect ratio calculators available. Check out the value for both the images and the videos generated through the photo ratio calculator for your ease.
| Common Aspect Ratio | AR Width | AR Height | Image Width | Image Height |
|---|---|---|---|---|
| 1:1(square) | 1 | 1 | 1920 | 1920 |
| 5:4 (large and medium format cameras) | 5 | 4 | 1920 | 1536 |
| 4:3 Standard | 4 | 3 | 1920 | 1440 |
| 3:2 (35mm camera) | 3 | 2 | 1920 | 1280 |
| 16:9 | 16 | 9 | 1920 | 1080 |
| 3:1 Panoramic | 3 | 1 | 1920 | 640 |
| 9:16 | 9 | 16 | 1080 | 1920 |
For example, the aspect ratio of 3:1 may be an image of 3m wide and 1m high. At the same time it can be 3 feet wide and 1 foot high. For further simplification, consider dimensions in pixels: a 6000×4000 image has 3:2 aspect ratios.
Always remember this small but crucial point. The aspect ratio refers to the image or video you captured or recorded and the display (or screen) in which your video or image would be displayed.
Why is the aspect ratio important?
In the age of web content, asking why aspect ratio is important? Some may consider it naïve. Images need to be uploaded at different aspect ratios for different uses (desktop vs. mobile or blog vs. social media). Incorrect aspect ratio affects your final image and end-user experience.
Choice of the wrong aspect ratio can eliminate the potential for editing (cropping and resizing). In addition, using the correct aspect ratios saves you from facing the trouble of distortion or clipping.
Part 2 Types of Phone Aspect Ratio Vertical
Image Aspect Ratios
The aspect ratio decides and changes the entire composition and how the audience perceives the image. First, let us see some common image aspect ratios.

● 1:1 Ratio

If you have seen a square-shaped image, it had probably a 1:1 aspect ratio. It simply means both sides (width and height of the image) are equal. It was initially the aspect ratio of square television sets. However, this is commonly used for print photos, mobile screens, and social platforms.
● 3:2 Ratio

Initially used for classic 35 mm film and still photography, aspect ratio 3:5 is still used on some laptops, tablets, and handheld game consoles. The famous example of this aspect ratio Images framed at 1080×720 pixels or 6″x4″.
● 5:4 Ratio

It was commonly used for photography and art prints. For Images having dimensions, 8″x10″ and 16x20 have the 5:4 aspect ratios.
Video Aspect Ratios

Like the image aspect ratios, video aspect ratios would also profoundly affect its composition and thus how your directed viewers perceive it. Some common mobile vertical video size or video aspect ratios are given below.
● 16:9 Ratio

If you have seen presentation slides, computer monitors, or widescreee seen this slimmer and more elongated rectangular-shaped 16:9 Ratio. This is the standardized widescreen aspect ratio that you see everywhere on the web. In terms of pixel common dimension for 16:9 is 1920×1080 pixels and 1280×720 pixels.
● 9:16 Ratio (Vertical)

When smartphones started coming with video capabilities, this Ratio became popular. Likewise, today this Ratio is trendy for social media platforms with video story capabilities.
The Instagram story typically consists of 1080x1920 pixels, which in terms of aspect ratio is 9:16. Most phones, such as iPhone, have a feature that allows you to record footage in both (16:9 as well as 9:16).
Phone aspect ratio vertical
Back in the day, taking aspect ratio vertical (portrait mode) footage was considered unprofessional and a sign of an amateur. But the digital revolution has changed that. Now from unforgivable sin, the vewayal mode has practically become a mainstream media sensation. Vertical style has now become the dominant format.

Phone aspect ratio vertical simply means taller screen than wider. The most common type is 9:16 (1080x1920 pixels), a typical vertical videos aspect ratio. Although this phone aspect ratio vertical comes in a few more shapes and sizes such as 4:5, 2:3.
Part 3 Tips to Create Phone Vertical Videos
Creating vertical videos is crucial for getting engagements and growing your brand. It is easy with a phone because most smartphones, by default, record in 9:16, which is the standard vertical aspect ratio. But with a camera, you have to manually edit to the correct aspect ratio before you shoot it.
You can also shoot horizontally and then change it to vertical, but it needs professional videographer expertise.
Who wants to rotate their phones watching videos? Well, as far as the trend, Let us see some tiny but handy tips for creating vertical phone videos.
1. Choose the correct aspect ratio
Video taller than the 1:1 aspect ratio is commonly considered Vertical video. Types of these vertical aspects ratio include 4:5 (social), 2:3 and 9:16. They are all taller than they are wide, thus vertical.
Choosing the correct aspect ratio for your vertical video, always think about why and where you intend to use the video. The second important thing you should consider is your plans for editing that video.
Cropping horizontal can be irritating and sometimes disappointing at the same time. Producing a 9:16 vertical frame at HD resolution from a horizontal HD frame may result in very pixelated and low-quality footage.
If, for some reason, you still want first to shoot it horizontal and then change it back to mobile vertical video size. You may need to shoot in 4K horizontally to get extra pixels to work with. It can later be cropped in the sides to 9:16 (Vertical phone aspect ratio). Plus, you won’t need to scale it anymore.
2. Direct your viewer’s eyes
For hooking social media viewers, you need to put your most interesting visual upfront. These include GIFs, colourful stop-motion or looping animation. Always try to match your first couple of shots with your overall brand personality.
3. Screen splitting into two or more

A tall vertical screen can be styled with multiple horizontal clips on top of each other. These clips must relate to your relevant content and overall look. Natural lines or patterns can help display them in the most creative ways.
4. Be close to your subject
For producing an intimate experience with the vertical frame, you should get closer to the subject. Most of the action will be positioned to the centre as your viewers scroll. Do not let cut off or cover up your main subject by any text and make sure you leave enough room for text, emojis and stickers.
5. Filling the vertical space
First, make sure that your subject is vertical-friendly. Then get closer and fill the space within the vertical frame. The vertical frame can be filled through the following:
● Up-close shot (if the subject is personal).
● Raising the camera high and tilting it down (to film things like a long, empty road).
● Bird’s-eye view from above.
5. Rule of Third

This photography rule says not to place the main subject directly in the center of the frame. Create more dynamic composition by creating imaginary (Horizontal & Vertical) lines that divide your frame into thirds.
You have to place your subject either on the lines or where the lines meet up. And guess what? You don’t need to draw imaginary nowadays. Most cameras and smartphones provide you with this option.
6. Avoid Shaking
You do not want to distract your viewers with shaky camera moments. Normal pan and 360-degree rotation are acceptable or maybe even essential. But moving side to side too quickly will make it difficult for the camera to process that information. You better use a selfie stick or gimbal.
Now, check out the best vertical video ratios for various social platforms.
Best video aspect ratios for Facebook

● 1:1 or 4:5 (Feed)
● 9:16 (Stories) Full portrait/Vertical
● 1:1 (Video Carousel)
● 16:9 (In streams, ads) -> Full landscape
● 9:16 (Audience Network)
● 2:3 (Vertical)
Best video aspect ratios for Instagram
● 1:1 (Feed)
● 4:5 (Feed ads)
● 9:16 (Stories)
● 9:16 (Reels)
● 9:16 (ICTV)
Best video aspect ratios for Twitter

● 1:1 (Promoted Videos)
● 1:1 or 9:16 (Sponsorship)
● 16:9 (Live Videos)
● 1:11 or 16:9 (Video Posts)
Best video aspect ratios for TikTok
● 9:16, 1:1, or 16:9 (For ads)
● 9:16 (For organic videos)
Wondershare Filmora
Being a newbie and producing perfect and professional vertical video content can be challenging, especially for the social platform. And then perfection requires delicate skills. If you want to change the aspect ratio after capturing an image or shooting a video, you need post-processing software.
There are tons of post-processing software available that have aspect ratio tools. As a tech geek, I even want essential tools that can serve all my needs and are also simple to use. Wondershare Filmora (iOS and Android) and Wondershare Filmora (Windows) is just that platform where you simply record, edit and share right away. It is loaded with easy-to-use editing features, special effects, social media integration options, and your desired music.
The best thing about Filmora Go is that it is for every skill level, unlike the other video editing software. Moreover, it lets you build unique custom build animation without breaking a sweat. So if you have a horizontal video, Filmora Go makes it easy to edit it into a Vertical one.
Features:
● Allows users to make videos anywhere using your iOS or Android device.
● The powerful editing tools of Filmora and Filmora help you create excellent iPhone vertical video dimensions.
● A dynamic music library helps users to add great background music in the videos.
● Both Filmora and Filmora (Desktop) have a user-friendly and intuitive user interface.
● The new Video Beautification feature helps you modify the shape of your face, lips, or nose in the picture.
Wondershare Filmora
Get started easily with Filmora’s powerful performance, intuitive interface, and countless effects!
Try It Free Try It Free Try It Free Learn More >

Conclusion
The vertical phone aspect ratio may seem avoidable, but you need a near-perfect influence on your desired audience to engage and grow. Thus, the Aspect ratio is not something to avoid if you want to compete in the business. Smartphone digital evolution has shifted the balance towards the phone aspect ratio vertical. In this article, we also talked about iPhone video dimensions vertical, hope it will help you. Platforms like Filmora provides comprehensive and easy editing solutions to edit aspect ratio as desired.
If you are a professional video or image creator, you know what aspect ratio is and why aspect ratio is important. Even people passionate about their cameras and visual art enthusiasts know it. If you are a newbie, Let us make it easy for you. This article will talk about the vertical phone aspect ratio ratio, its definition, types, iPhone vertical video dimensions, etc. We’ll also provide you solid tips on mobile vertical video size and how to create phone vertical videos easily. Let’s jump into the topic and see what you can learn.
In this article
01 [What is Phone Aspect Ratio Vertical?](#Part 1)
02 [Types of Phone Aspect Ratio Vertical](#Part 2)
03 [Tips to Create Phone Vertical Videos](#Part 3)
Part 1 What is Phone Aspect Ratio Vertical?
The vertical phone aspect ratio is the “proportional” relationship between the screen’s width and height. For example, if your image or video has an aspect ratio of 4:5, it simply means the width of the screen (photo or video) is four times the height of the image.
The vertical phone aspect ratio is the “proportional” relationship between the screen’s width and height. For example, if your image or video has an aspect ratio of 4:5, it simply means the width of the screen (photo or video) is four times the height of the image.
Back in the television days, you might have seen certain old pictures with black padding on either side of the screen. It was just that they were shot in different aspect ratios and your television screen had different aspect ratios.
Aspect Ratio Vs Resolution
Remember that aspect ratio does not refer to the physical size of an image or its dimensions in pixels (resolution). So aspect ratio 3:1 does not refer to the actual width and height of the image or video; it just describes their relationship.
You are wrong if you think aspect ratio is just another fancy name for resolution. Think again. Check out how it is calculated.
“
| | Aspect Ratio | Resolution | |
| ————— | ————————————————————– | ———————————————————————————- |
| Definition | The Ratio of the width of an image to the height of the image. | Total number of pixels displayed on your screen (computer, cell phone, television) |
| Commonly Used | ● 1:1 ● 3:1 ● 3:2 ● 4:3 ● 5:4 ● 9:1 ● 16:9 | ● 640x480 ● 800x600 ● 1024x768 |
Aspect Ratio Calculator
To get the resolution, you need to multiply width times the height. To get aspect ratio, the formula is: Divide the width by the height or simply divide the long side by the short side.
There are multiple online aspect ratio calculators available. Check out the value for both the images and the videos generated through the photo ratio calculator for your ease.
| Common Aspect Ratio | AR Width | AR Height | Image Width | Image Height |
|---|---|---|---|---|
| 1:1(square) | 1 | 1 | 1920 | 1920 |
| 5:4 (large and medium format cameras) | 5 | 4 | 1920 | 1536 |
| 4:3 Standard | 4 | 3 | 1920 | 1440 |
| 3:2 (35mm camera) | 3 | 2 | 1920 | 1280 |
| 16:9 | 16 | 9 | 1920 | 1080 |
| 3:1 Panoramic | 3 | 1 | 1920 | 640 |
| 9:16 | 9 | 16 | 1080 | 1920 |
For example, the aspect ratio of 3:1 may be an image of 3m wide and 1m high. At the same time it can be 3 feet wide and 1 foot high. For further simplification, consider dimensions in pixels: a 6000×4000 image has 3:2 aspect ratios.
Always remember this small but crucial point. The aspect ratio refers to the image or video you captured or recorded and the display (or screen) in which your video or image would be displayed.
Why is the aspect ratio important?
In the age of web content, asking why aspect ratio is important? Some may consider it naïve. Images need to be uploaded at different aspect ratios for different uses (desktop vs. mobile or blog vs. social media). Incorrect aspect ratio affects your final image and end-user experience.
Choice of the wrong aspect ratio can eliminate the potential for editing (cropping and resizing). In addition, using the correct aspect ratios saves you from facing the trouble of distortion or clipping.
Part 2 Types of Phone Aspect Ratio Vertical
Image Aspect Ratios
The aspect ratio decides and changes the entire composition and how the audience perceives the image. First, let us see some common image aspect ratios.
● 1:1 Ratio
If you have seen a square-shaped image, it had probably a 1:1 aspect ratio. It simply means both sides (width and height of the image) are equal. It was initially the aspect ratio of square television sets. However, this is commonly used for print photos, mobile screens, and social platforms.
● 3:2 Ratio
Initially used for classic 35 mm film and still photography, aspect ratio 3:5 is still used on some laptops, tablets, and handheld game consoles. The famous example of this aspect ratio Images framed at 1080×720 pixels or 6″x4″.
● 5:4 Ratio
It was commonly used for photography and art prints. For Images having dimensions, 8″x10″ and 16x20 have the 5:4 aspect ratios.
Video Aspect Ratios
Like the image aspect ratios, video aspect ratios would also profoundly affect its composition and thus how your directed viewers perceive it. Some common mobile vertical video size or video aspect ratios are given below.
● 16:9 Ratio
If you have seen presentation slides, computer monitors, or widescreee seen this slimmer and more elongated rectangular-shaped 16:9 Ratio. This is the standardized widescreen aspect ratio that you see everywhere on the web. In terms of pixel common dimension for 16:9 is 1920×1080 pixels and 1280×720 pixels.
● 9:16 Ratio (Vertical)
When smartphones started coming with video capabilities, this Ratio became popular. Likewise, today this Ratio is trendy for social media platforms with video story capabilities.
The Instagram story typically consists of 1080x1920 pixels, which in terms of aspect ratio is 9:16. Most phones, such as iPhone, have a feature that allows you to record footage in both (16:9 as well as 9:16).
Phone aspect ratio vertical
Back in the day, taking aspect ratio vertical (portrait mode) footage was considered unprofessional and a sign of an amateur. But the digital revolution has changed that. Now from unforgivable sin, the vewayal mode has practically become a mainstream media sensation. Vertical style has now become the dominant format.
Phone aspect ratio vertical simply means taller screen than wider. The most common type is 9:16 (1080x1920 pixels), a typical vertical videos aspect ratio. Although this phone aspect ratio vertical comes in a few more shapes and sizes such as 4:5, 2:3.
Part 3 Tips to Create Phone Vertical Videos
Creating vertical videos is crucial for getting engagements and growing your brand. It is easy with a phone because most smartphones, by default, record in 9:16, which is the standard vertical aspect ratio. But with a camera, you have to manually edit to the correct aspect ratio before you shoot it.
You can also shoot horizontally and then change it to vertical, but it needs professional videographer expertise.
Who wants to rotate their phones watching videos? Well, as far as the trend, Let us see some tiny but handy tips for creating vertical phone videos.
1. Choose the correct aspect ratio
Video taller than the 1:1 aspect ratio is commonly considered Vertical video. Types of these vertical aspects ratio include 4:5 (social), 2:3 and 9:16. They are all taller than they are wide, thus vertical.
Choosing the correct aspect ratio for your vertical video, always think about why and where you intend to use the video. The second important thing you should consider is your plans for editing that video.
Cropping horizontal can be irritating and sometimes disappointing at the same time. Producing a 9:16 vertical frame at HD resolution from a horizontal HD frame may result in very pixelated and low-quality footage.
If, for some reason, you still want first to shoot it horizontal and then change it back to mobile vertical video size. You may need to shoot in 4K horizontally to get extra pixels to work with. It can later be cropped in the sides to 9:16 (Vertical phone aspect ratio). Plus, you won’t need to scale it anymore.
2. Direct your viewer’s eyes
For hooking social media viewers, you need to put your most interesting visual upfront. These include GIFs, colourful stop-motion or looping animation. Always try to match your first couple of shots with your overall brand personality.
3. Screen splitting into two or more
A tall vertical screen can be styled with multiple horizontal clips on top of each other. These clips must relate to your relevant content and overall look. Natural lines or patterns can help display them in the most creative ways.
4. Be close to your subject
For producing an intimate experience with the vertical frame, you should get closer to the subject. Most of the action will be positioned to the centre as your viewers scroll. Do not let cut off or cover up your main subject by any text and make sure you leave enough room for text, emojis and stickers.
5. Filling the vertical space
First, make sure that your subject is vertical-friendly. Then get closer and fill the space within the vertical frame. The vertical frame can be filled through the following:
● Up-close shot (if the subject is personal).
● Raising the camera high and tilting it down (to film things like a long, empty road).
● Bird’s-eye view from above.
5. Rule of Third
This photography rule says not to place the main subject directly in the center of the frame. Create more dynamic composition by creating imaginary (Horizontal & Vertical) lines that divide your frame into thirds.
You have to place your subject either on the lines or where the lines meet up. And guess what? You don’t need to draw imaginary nowadays. Most cameras and smartphones provide you with this option.
6. Avoid Shaking
You do not want to distract your viewers with shaky camera moments. Normal pan and 360-degree rotation are acceptable or maybe even essential. But moving side to side too quickly will make it difficult for the camera to process that information. You better use a selfie stick or gimbal.
Now, check out the best vertical video ratios for various social platforms.
Best video aspect ratios for Facebook
● 1:1 or 4:5 (Feed)
● 9:16 (Stories) Full portrait/Vertical
● 1:1 (Video Carousel)
● 16:9 (In streams, ads) -> Full landscape
● 9:16 (Audience Network)
● 2:3 (Vertical)
Best video aspect ratios for Instagram
● 1:1 (Feed)
● 4:5 (Feed ads)
● 9:16 (Stories)
● 9:16 (Reels)
● 9:16 (ICTV)
Best video aspect ratios for Twitter
● 1:1 (Promoted Videos)
● 1:1 or 9:16 (Sponsorship)
● 16:9 (Live Videos)
● 1:11 or 16:9 (Video Posts)
Best video aspect ratios for TikTok
● 9:16, 1:1, or 16:9 (For ads)
● 9:16 (For organic videos)
Wondershare Filmora
Being a newbie and producing perfect and professional vertical video content can be challenging, especially for the social platform. And then perfection requires delicate skills. If you want to change the aspect ratio after capturing an image or shooting a video, you need post-processing software.
There are tons of post-processing software available that have aspect ratio tools. As a tech geek, I even want essential tools that can serve all my needs and are also simple to use. Wondershare Filmora (iOS and Android) and Wondershare Filmora (Windows) is just that platform where you simply record, edit and share right away. It is loaded with easy-to-use editing features, special effects, social media integration options, and your desired music.
The best thing about Filmora Go is that it is for every skill level, unlike the other video editing software. Moreover, it lets you build unique custom build animation without breaking a sweat. So if you have a horizontal video, Filmora Go makes it easy to edit it into a Vertical one.
Features:
● Allows users to make videos anywhere using your iOS or Android device.
● The powerful editing tools of Filmora and Filmora help you create excellent iPhone vertical video dimensions.
● A dynamic music library helps users to add great background music in the videos.
● Both Filmora and Filmora (Desktop) have a user-friendly and intuitive user interface.
● The new Video Beautification feature helps you modify the shape of your face, lips, or nose in the picture.
Wondershare Filmora
Get started easily with Filmora’s powerful performance, intuitive interface, and countless effects!
Try It Free Try It Free Try It Free Learn More >
Conclusion
The vertical phone aspect ratio may seem avoidable, but you need a near-perfect influence on your desired audience to engage and grow. Thus, the Aspect ratio is not something to avoid if you want to compete in the business. Smartphone digital evolution has shifted the balance towards the phone aspect ratio vertical. In this article, we also talked about iPhone video dimensions vertical, hope it will help you. Platforms like Filmora provides comprehensive and easy editing solutions to edit aspect ratio as desired.
Also read:
- In 2024, How To Make Ninja Jump Effect
- 2024 Approved Scaling and Setting Videos in Filmora | Tutorial
- Updated In 2024, Are You Looking for the Best Way to Add Subtitles to Your Video? The Top SRT File Creators Can Help You Do That
- Updated Best 10 Tools To Make Quiz Videos for 2024
- 2024 Approved Have You Ever Applied the Gaussian Blur Effect to Your Videos? Read This Article to Find a Reliable and Convenient Tool to Generate the Gaussian Blur Effect
- In 2024, This Blog Post Shows How to Create an Eye-Catching Paper Rip Effect for Your Videos Using Wondershare Filmora with These Easy-to-Follow Steps
- New In 2024, The Article Is a Guide About the Split of the Videos in VLC. There Is Also a Particular Description of Its Alternative Wondershare Filmora. It Is Suitable as Well as Reasonable
- How to Take Slow Motion Videos for 2024
- New Make Super Easy Coin Magic With Filmora for 2024
- Updated In 2024, How to Create the Stranger Things Upside Down Effect
- New How To Use Speed Ramping to Create an Intense Action Footage for 2024
- Updated Video Inspiration for Birthday Slideshow
- New In 2024, To Find the Best Tool Out of Hundreds of Online and Offline GIF to Video Converters, You Need to Check These Specifications. Read This Review and Get the Best Out of the Best
- Updated 2024 Approved Best 7 Color Match Paint Apps
- Updated Best 10 Anime Movies for All Time
- Find Out What Ray Tracing Is in After Effects, How It Works, and Learn About Ray-Traced 3D Settings with Simple Instructions
- 2024 Approved The Best Jump Cut Editing Tricks Make Your Videos Snappy!
- 2024 Approved How to Loop a Video on Vimeo?
- Updated 2024 Approved A Vlog Has Many Elements to Answer. While Setting up Ideas for It, There Are Several Things Into Which You Should Look. This Article Presents a Picture of How a Vlog Video Is Made Perfectly
- 2024 Approved Templates Take Your Music Video From Drab to Fab and Add some Spice to the Catchy Song. Here Are some Templates You Could Use to Make Your Music Video Popular
- Updated In 2024, Powerpoint Supported Video Format and User Tips
- Want to Immediately Know All About Discord GIF?
- Updated In 2024, 6 Instant Mp4 to GIF Online Tools
- If You Are a Marketer Who Want to Create Facebook Ads to Boost Your Business, You Are Coming to the Right Place. Well Share You some Useful Tips to Start Your First FB Ads Campaign for 2024
- Updated Exploring the Top Professional Tools to Perform Mask Tracking
- In 2024, 6 Ways to Mimic Professional Filming Gears
- New 2024 Approved How to Delete White Background in Photoshop. How to Create a Transparent Background in Photoshop? Steps to Get Rid of White Background in Photoshop
- In 2024, How to Use LUTs in Adobe Premiere Pro
- In 2024, 6 Best Methods to Make a Video Longer
- Updated 8 Free Title Makers to Use for 2024
- New Efficient Ways to Change Slow Motion Video to Normal on iPhone
- In 2024, How to Create The Best Video Collages ?
- In 2024, Introduction to LUTs Their Overview and Benefits
- In 2024, Add Background to Video With/Without a Green Screen
- 2024 Approved A Complete Overview of VSCO Video Editor
- Updated 2024 Approved Want to Know the Simplest Way to Match the Colors of Your Photos in Photoshop? The Following Discussion Will Help Match Color in Photoshop, Almost Effortlessly
- In 2024, Knowing All Ways To Slow Down Video With Adobe Premiere Pro
- Updated 2024 Approved To Help You Perform This Action, in This Article, We List the Steps You Will Need for Cropping Into Video Clips with PowerDirector. As an Added Bonus, We Have Also Included the Method to Perform the Same Actions in WonderShare Filmora
- New Techniques for Creating Animated Logo That Few People Know About for 2024
- Fix the Error of Unfortunately the Process.com.android.phone Has Stopped on Gionee F3 Pro | Dr.fone
- Your Complete Guide To Reset Realme 11X 5G | Dr.fone
- In 2024, How to Mirror PC Screen to Honor 90 Lite Phones? | Dr.fone
- How to Change Netflix Location to Get More Country Version On Oppo Reno 11F 5G | Dr.fone
- Does find my friends work on Realme 12 5G | Dr.fone
- Full Guide to Unlock Apple iPhone 6 with iTunes | Dr.fone
- In 2024, How to Fix Pokemon Go Route Not Working On Samsung Galaxy A15 4G? | Dr.fone
- Complete Tutorial to Use VPNa to Fake GPS Location On Apple iPhone 7 | Dr.fone
- New Google Translate Video A Complete Guide To Translate Video With Google for 2024
- In 2024, Will Pokémon Go Ban the Account if You Use PGSharp On Apple iPhone 14 Pro Max | Dr.fone
- 2024 Approved Download/Install/Register/Uninstall
- The Easiest Methods to Hard Reset Samsung Galaxy F14 5G | Dr.fone
- Resolve Your iPhone 13 Keeps Asking for Outlook Password
- In 2024, Android to Apple How To Transfer Photos From Samsung Galaxy M34 5G to iPad Easily | Dr.fone
- Preparation to Beat Giovani in Pokemon Go For Motorola Moto G34 5G | Dr.fone
- Recommended Best Applications for Mirroring Your Google Pixel 8 Pro Screen | Dr.fone
- In 2024, All You Need To Know About Mega Greninja For Honor Magic 5 | Dr.fone
- In 2024, Complete Tutorial Sending Photos From Apple iPhone XR to iPad | Dr.fone
- How to Transfer Data from Samsung Galaxy S23 FE to Other Android Devices? | Dr.fone
- In 2024, Proven Ways in How To Hide Location on Life360 For Oppo A38 | Dr.fone
- How to Unlock Realme GT Neo 5 SE Phone without Any Data Loss
- 4 Things You Must Know About Apple iPhone 14 Pro Activation Lock
- 6 Ways to Change Spotify Location On Your Poco X5 Pro | Dr.fone
- Advance Repair for Bad and Corrupt Video Files of Honor 90 Lite
- In 2024, How to Change Your Apple iPhone 6s Location on life360 Without Anyone Knowing? | Dr.fone
- In 2024, How to Unlock iPhone 13 Pro Max with IMEI Code?
- In 2024, 5 Quick Methods to Bypass Vivo Y100t FRP
- In 2024, How Can We Bypass OnePlus Nord N30 SE FRP?
- Where Is the Best Place to Catch Dratini On Honor Magic 5 Pro | Dr.fone
- In 2024, How to Watch Hulu Outside US On ZTE Axon 40 Lite | Dr.fone
- Hassle-Free Ways to Remove FRP Lock on Oppo K11xwith/without a PC
- In 2024, How To Fix OEM Unlock Missing on Itel P40+?
- Unlock Vivo S18e Phone Password Without Factory Reset Full Guide Here
- How to Get and Use Pokemon Go Promo Codes On Vivo Y27 4G | Dr.fone
- Title: New In 2024, Best Love Video Maker with Music
- Author: Morgan
- Created at : 2024-05-19 05:13:01
- Updated at : 2024-05-20 05:13:01
- Link: https://ai-video-editing.techidaily.com/new-in-2024-best-love-video-maker-with-music/
- License: This work is licensed under CC BY-NC-SA 4.0.
