:max_bytes(150000):strip_icc():format(webp)/coffeecup-free-html-editor-profile-3467555-8876645f89c444c8b94addcf4307b22d.png)
New In 2024, Create the Night-to-Day Effect Videos

How to Create the Night-to-Day Effect Video
Do you wish you could control when it’s nighttime to daytime? It would make getting ready in the morning much faster! This tutorial will show you how to use the keyframe and mask feature in Filmora to make a remarkable night-to-day transition.
How-to Guide
1) Preparation
For this effect, you will need to shoot two footage shots with the same frame. The first is for the daytime clip, and the second is for nighttime.
But before that, you need to prepare some things, such as:
- Tripod to ensure your camera stays at the same point, so the frame doesn’t change.
- Mark the place where you want to shoot the scene. You can put a marker on the floor to ensure that you perform at the same spot in different shots.
Once done, let’s start shooting to get the footage.
2) Steps
Shooting footages
First, get the daytime shot. For this tutorial, we will pretend that you are walking and transitioning into nighttime at the spot you have marked.

Now, let’s film the nighttime clip. You will walk through the living room and do the same movement again at the same spot. You can dim the light and change the camera’s white balance settings to bluer to create a night feeling.

After you have both clips that you need, let’s go to Filmora and start editing.
Night-to-day transition
Step1 Launch Filmora and import the footage into the program. If you haven’t installed it, you can download Filmora on their website here: https://filmora.wondershare.com
Step2 Place the nighttime video clip on the first video track of the timeline and place the daytime clip on the top.

Step3 Find the spot where you want to create a transition between the day and nighttime. Then, you can delete the unwanted part.

Step4 Since the transition for this tutorial is where the subject started waving, make sure to place the daytime clip at the same time the subject started waving in the nighttime clip. Hence, the timing in both clips syncs.
Masking transition
For the next step, we will make a masking transition with the Filmora mask feature.
Step1 Double-click the daytime clip on the timeline. In the Filmora setting, find the Mask section > Circle. You can see the mask is applied in the preview screen.

Step2 Scroll down the setting and click add a keyframe at the beginning of the clip.

Step3 Change the scale of the mask to the smallest number and adjust the Width and Height down to 0. You can set the blur strength to 15 to make the transition edge smoother.

Step4 Move the play head to find the spot where you want the mask fully opens up, then add another keyframe. Change the scale of the mask to 2 and the Width and Height to 50. Make sure the mask occupies the whole frame.

Now, if you play back, you can see the nighttime becomes daytime through the mask.

If the movement in the two clips is a bit off, you can fix it by adding more keyframes on the mask.
3) Pro tips
You can add one more effect in Filmora to make it more magical. To do this, open the Effects window on the top left and find “Heartbeat” under the Basic section.

Drag and drop it onto the third video track and start the effect when the mask opens up. Then, trim the effect length to match the movement. Adjust the speed of this effect if needed.

The final result will look like this:

Summary
That is how to do this night-to-day transition night-to-day time shift effect in Filmora. By the end of this tutorial, you should be able to use the masking transition technique. You can apply and adjust it based on your needs.
Free Download For Win 7 or later(64-bit)
Free Download For macOS 10.14 or later
Free Download For macOS 10.14 or later
How To Record Video in Slow Motion: Comprehending Important Points
Slow motion helps filmmakers to achieve several goals in their projects. Slo-mo can dramatize emotions, set the right mood for watching action films, and so on. Recording slow-motion videos with high-end cameras was a matter of the past. In this tech-based era, capturing moments in slow motion is a built-in feature in your smartphone.
Amplify your message in slow-motion videos by understanding how to record slow-motion video. You will learn how to record a slow-motion video using any model of Android and iPhones. Besides, there are some aspects that you should know before start recording scenes. As a plus point, here you can find a top-notch editing app with a guide on how to record slow-motion video.
Slow Motion Video Maker Slow your video’s speed with better control of your keyframes to create unique cinematic effects!
Make A Slow Motion Video Make A Slow Motion Video More Features

Part 1: Some Important Deliverables to Ensure While Recording Videos in Slow Motion
Capture fleeting moments in the slow-motion mode of the camera to emphasize details. It’s the only way to highlight important aspects of sports and action scenes. Recording in slow motion is not difficult when you will learn how to record slow-motion video. Before learning, let’s understand important aspects you should look at while recording.
- Frame Rate: For slow-motion video, choosing the right frame rate is crucial. A higher framerate, such as 120fps and 240fps, allows smoother playback. So, before recording, ensure that your camera supports a good framerate.
- Resolution: Maintaining high-resolution videos is important to get good quality. Usually, slow-motion footage uses 4K and HD (High Definition) resolution. Having a high video resolution means providing clarity in details in videos.
- Shutter Speed: It refers to the speed at which the camera closes and controls exposure. Adjust the shutter speed to faster mode to capture every crisp in slow motion. It will prevent motion blur and help in freezing fast-moving objects.
- Audio Consideration: You should know that recording slow motion will affect the original audio. Meanwhile, some cameras preserve the original sound. So, be prepared and test your camera’s audio speed to ease the editing process.
- Focus and Stability: Minimize your camera shake and enable a stabilizer or tripod. Stable footage is essential to enhance the video quality. Moreover, try to keep your main subject in camera focus. In this regard, you can use manual focus control if necessary.
- Editing Software Compatibility: Another thing that you must consider is tool compatibility. It’s better to check it before recording so you will not regret it later. Check your editing tools are supporting the file format of the recorded slow-motion video.
- Storage Space: The “No More Storage” sign is a nightmare when you have recorded a perfect shot. Slow-motion videos consume large storage because of high resolution and frame rate. Thus, consider this aspect before recording to avoid inconvenience and arrange storage media.
Part 2: How to Record a Slow-Motion Video on Android/iPhone?
No matter your smartphone, recording slow-mo is just one click away. Luckily, you don’t need any separate app and technical equipment for this task. If you want to record slow motion now, keep reading this section for detailed steps. Here, you will find how to record a slow-motion video using an iPhone and Android.
Record Slow Motion Using an iPhone
Apple has offered a slow-motion feature since 2013 with the release of the iPhone 5s. Subsequent iPhone models also support this feature. Following are the steps that you can follow to record a slow-motion video on an iPhone:
Step 1
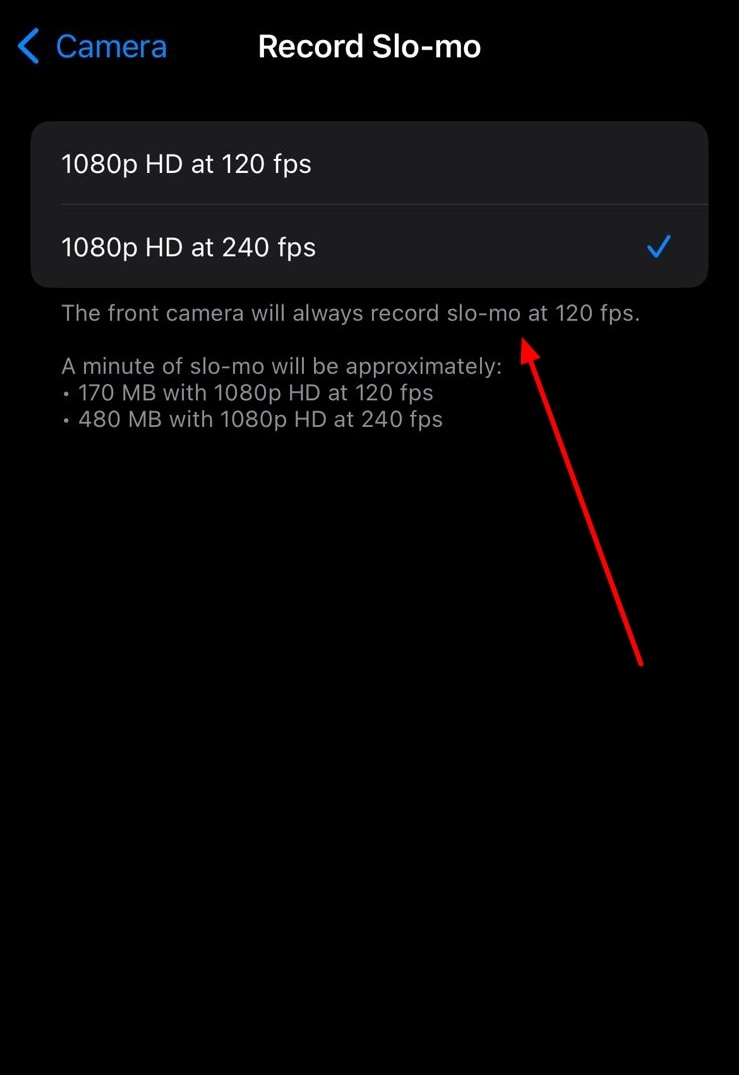
Before recording, set frame rate and resolution. To do so, go to “Settings” and scroll until you find “Camera.” After choosing the camera, touch the “Record Slo-mo.” From the given two choices, select one frame rate and resolution option.
Step 2
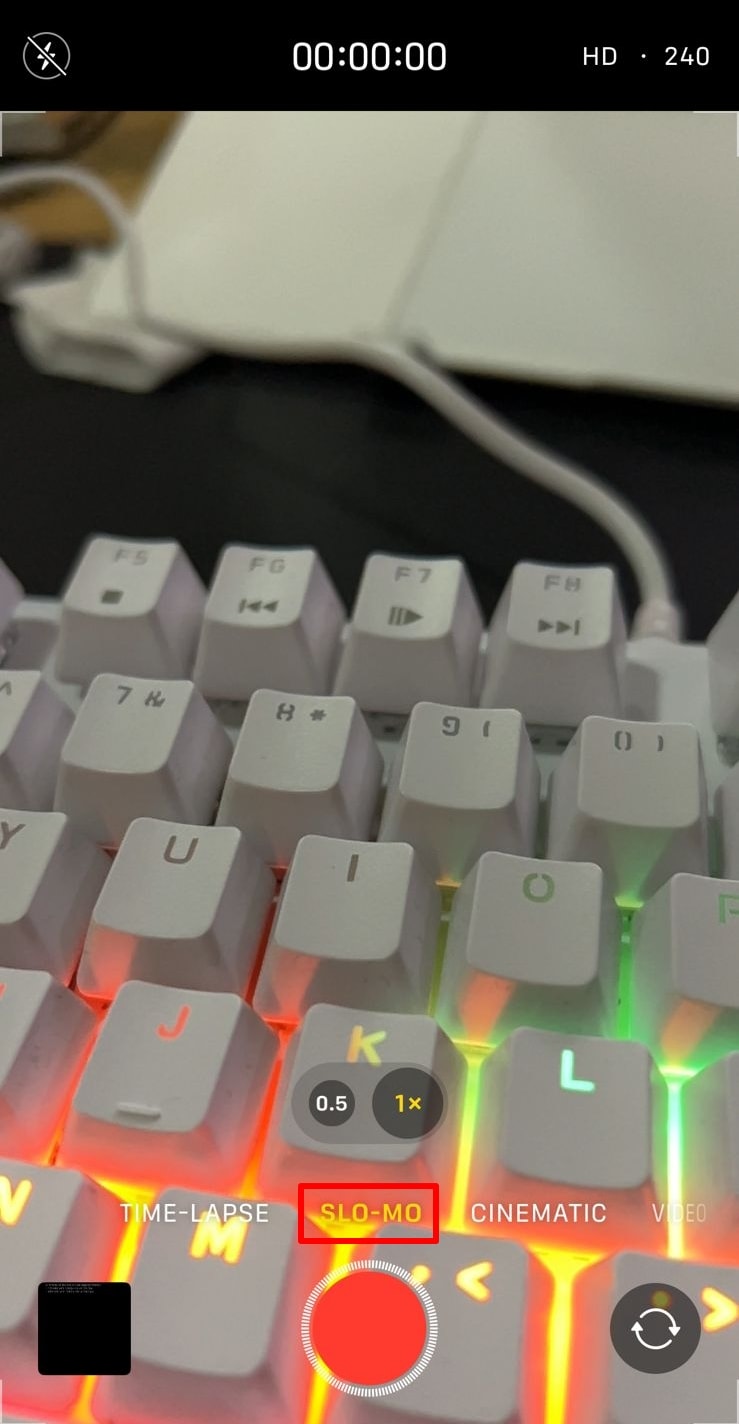
Now, tap on the “Camera” app on the home screen of your iPhone. Click on the “Slo-Mo” option next to the “Video.” Then, touch the red “Record” button and capture moments till you want. Finally, stop recording by hitting the same red button. Your footage will automatically be saved in your gallery.
Record Slow Motion Using Android
Who needs a third-party app when Android also supports a slow-motion recording feature? Currently, almost all Android phones are offering slow-motion. The location and access to slow-motion options might differ per Android phone model. To start recording, look at the given steps:
Step 1
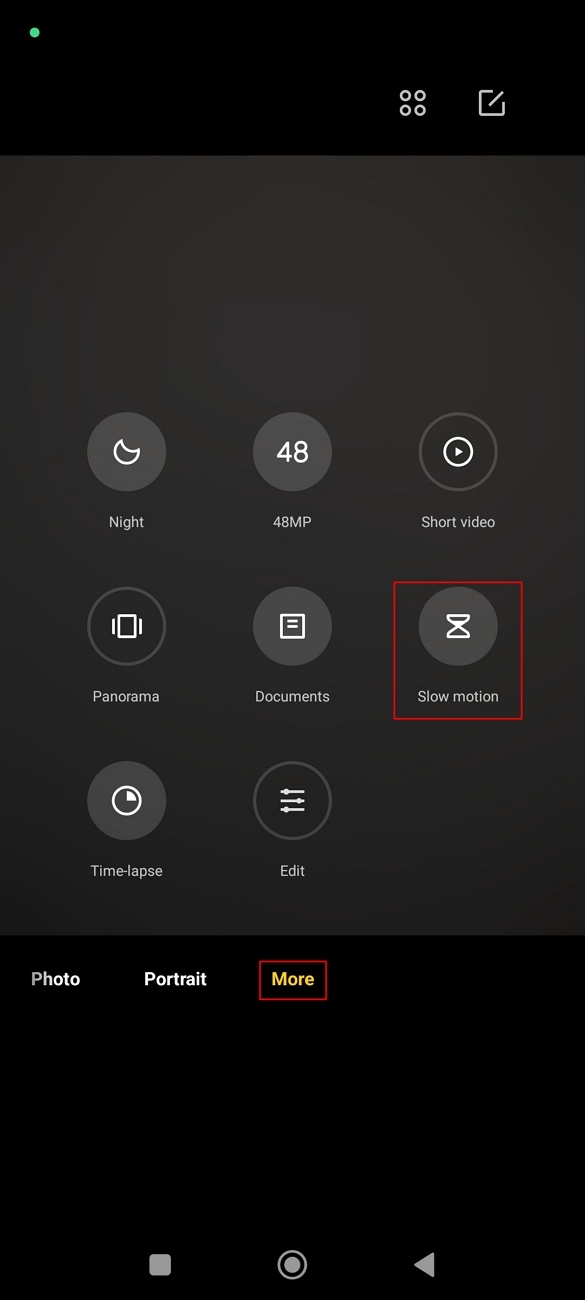
Unlock your phone and click on the “Camera” from the main screen. Click on the “More” option next to the “Portrait.” From the next menu, look for the “Slow Motion” circle icon.
Step 2
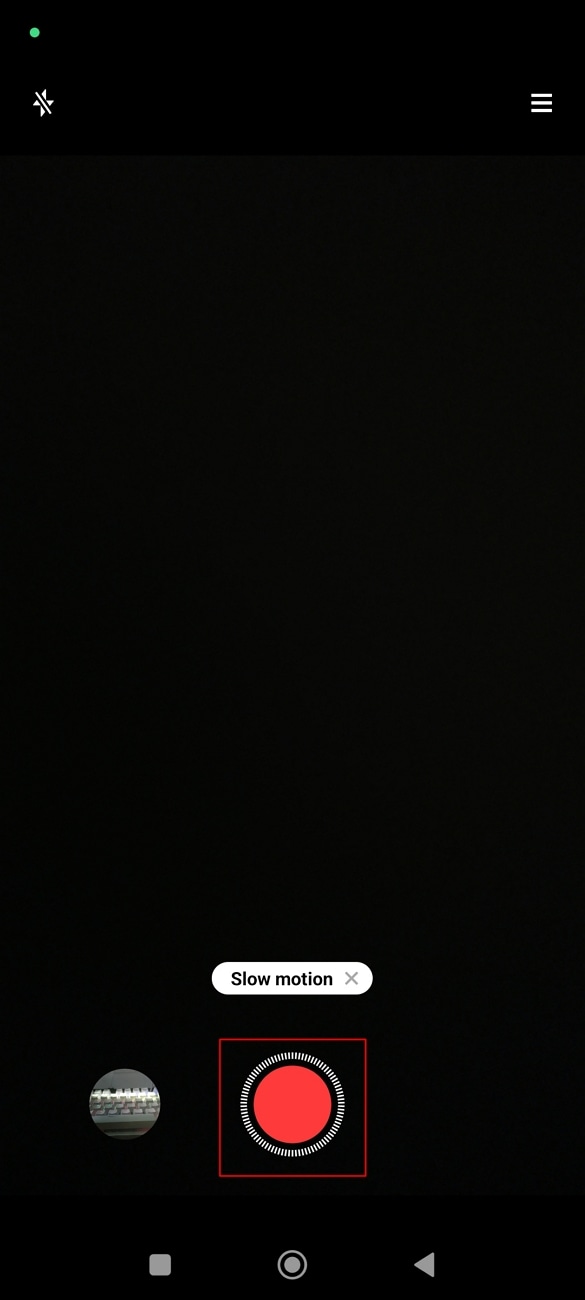
After selecting slow motion, adjust the focus manually. Head to the top-right corner and click on the small menu icon. Choose a frame rate and resolution from the displayed options. To start recording, touch the red “Record” button. When you capture the desired shots, press the red button again and get the video on your phone.
Part 3: Making Recorded Video in Slow Motion Using the Right Tools
Now, you are pretty much familiar with how to record slow-motion video using smartphones. A phenomenon that arises here is, can we slow down the normally recorded video? The simple answer is yes. There are many editing apps designed for this purpose. Adobe Premiere Pro is one such editing app to slow down the pre-recorded videos.
Step 1
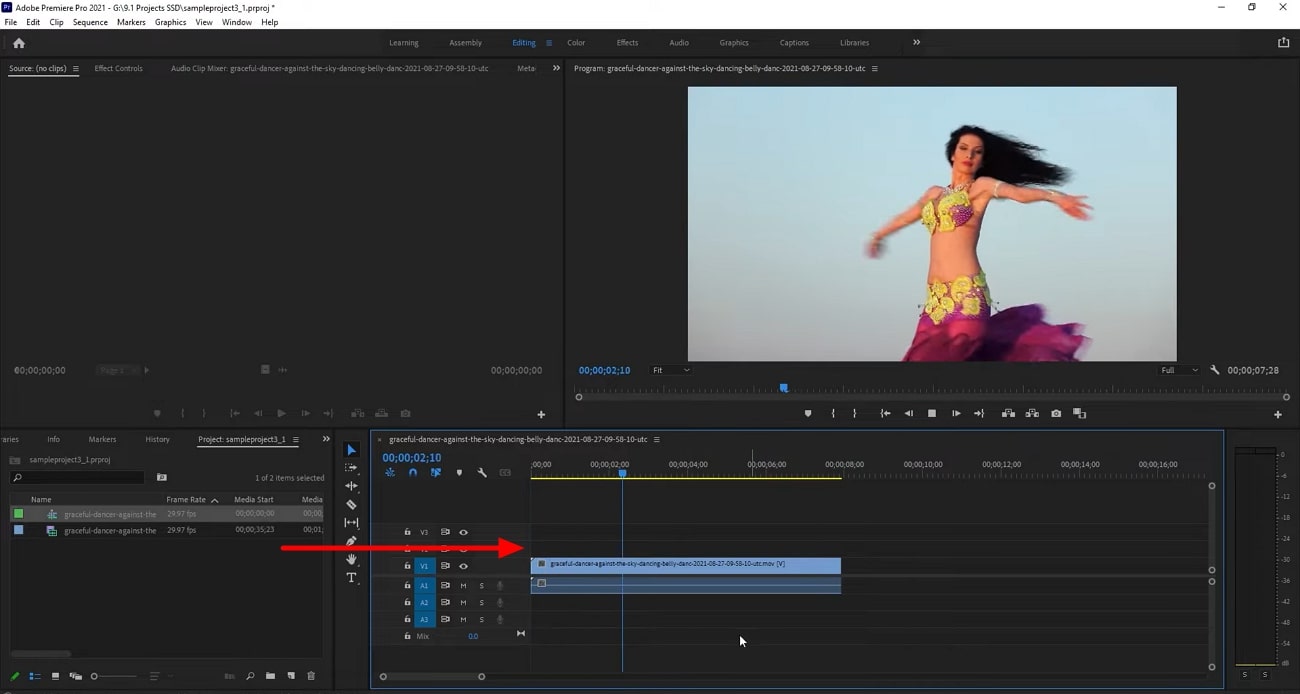
Access your Adobe Premiere Pro application and import a video in the timeline. Identify the frame rate of your video clip for a non-choppy playback.
Step 2
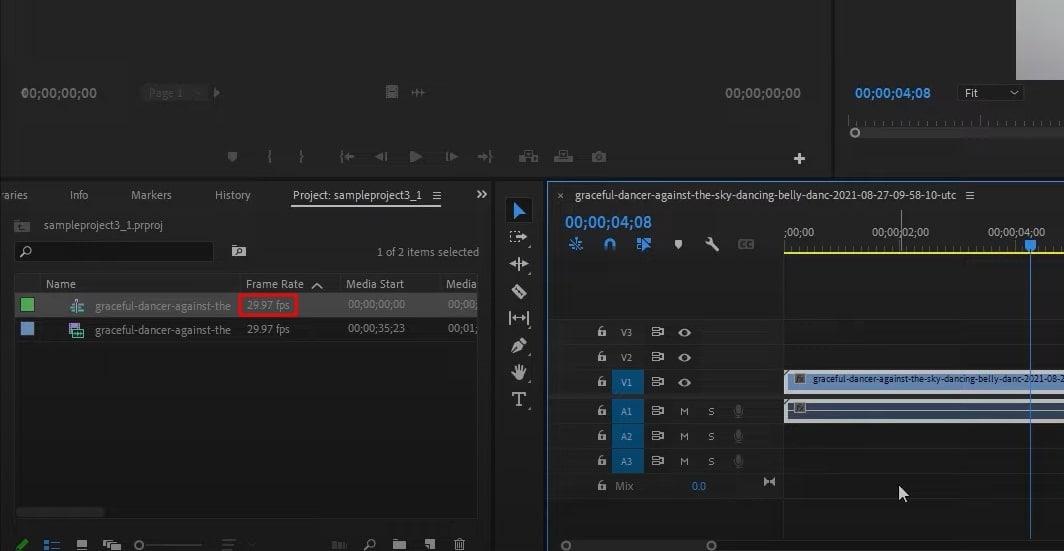
The frame rate will tell you how much you need to slow down the video. To do so, use this “(Timeline Frame Rate ÷ Footage Frame Rate) x 100” formula. Before moving, analyze the slow motion you can add in your clip as per their frame rate.
Step 3
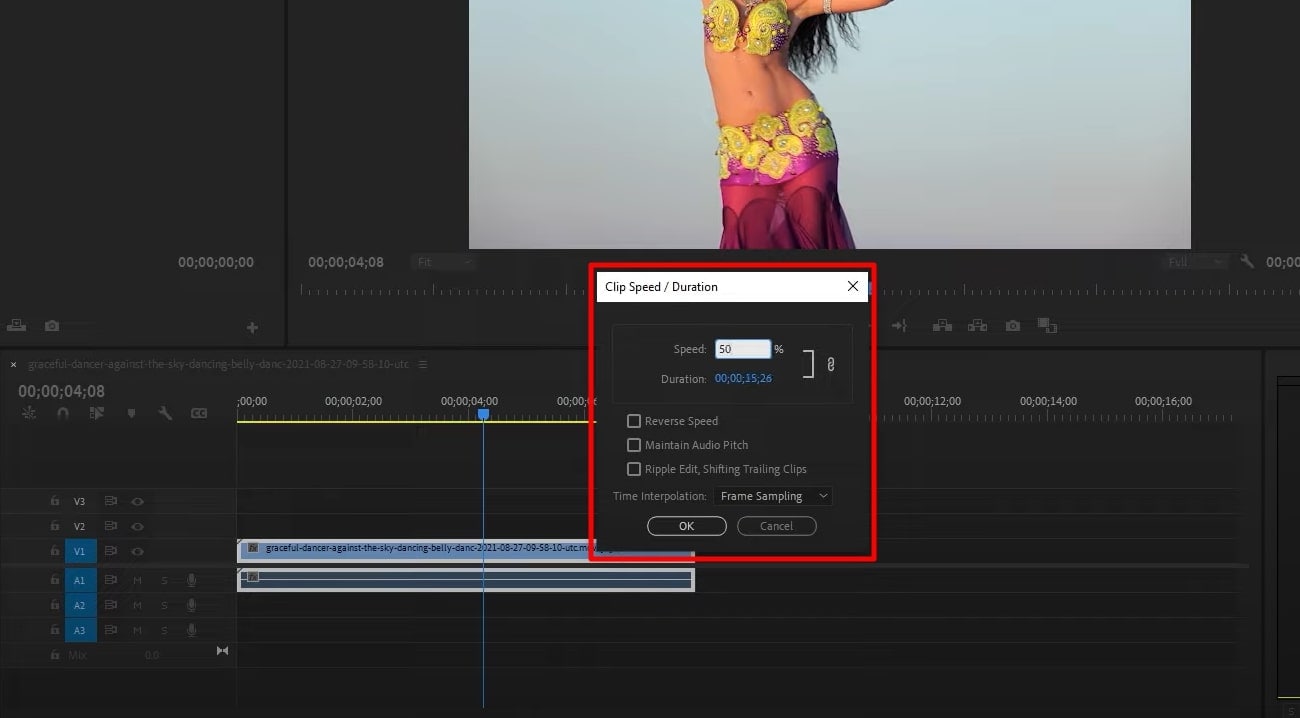
After making calculations, right-click on your footage in the timeline. Select the “Speed/Duration” option from the list and get a small pop-up screen. There, type any number; suppose you type 40% in the box given next to the “Speed.” Finally, click on the “OK” and press the Space bar to get a preview.
Bonus Part: Making Video Editing Simpler! Use Wondershare Filmora to Slow Down Your Video
Apart from Adobe Premiere Pro, there are many other software to do the same task. From multiple options, it’s quite difficult to pick the best option. Let us ease your selection by introducing Wondershare Filmora . It’s a video editing app that is much easier to operate than any other option. With AI integration, many time-consuming editing tasks are now a matter of seconds.
Free Download For Win 7 or later(64-bit)
Free Download For macOS 10.14 or later
How to Turn a Video into Slow-Motion with Optical Flow
As discussed earlier, Filmora can slow down your videos with customization options. Users can set their video to optical flow to automatically get slow speed with high quality.
Step 1Import a Project in Timeline after Launching Filmora
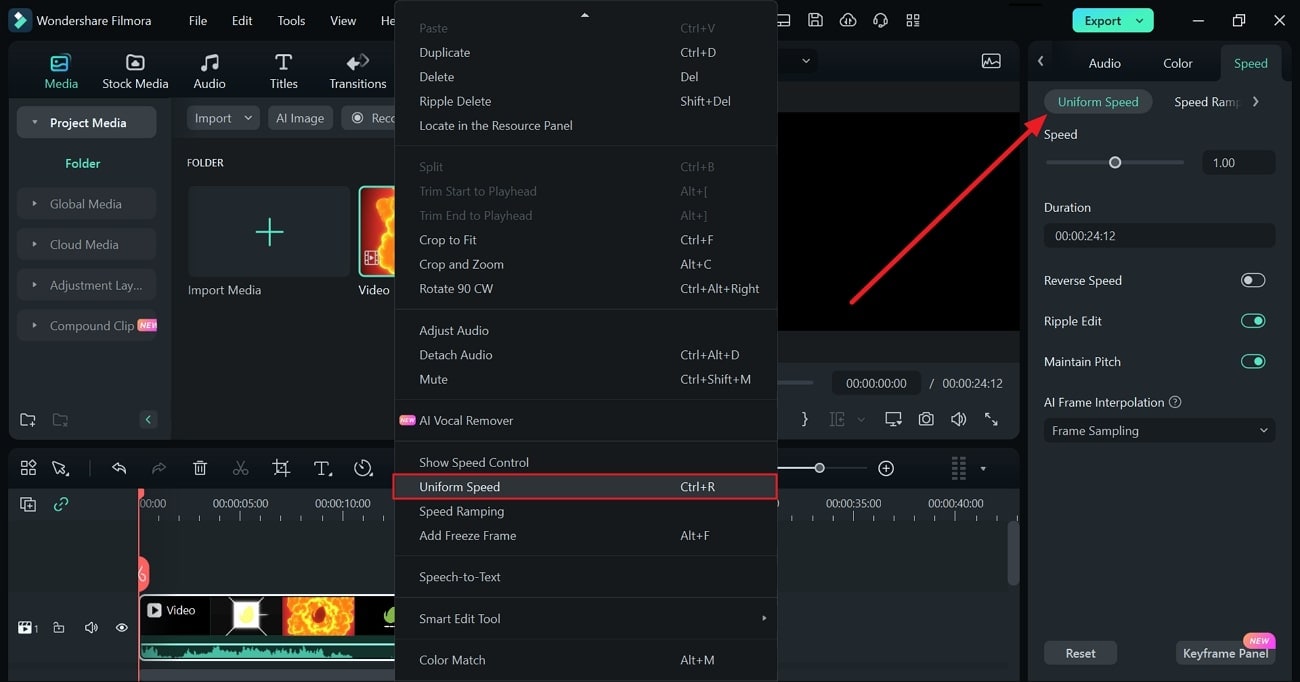
Launch the latest version of Filmora on your device. Access the main interface and choose the “New Project” option to start editing. From the editing screen, look for the “Import” option and bring your media to the timeline. Now, right-click on your video in the timeline to get an extended list. Select the “Uniform Speed” option to get a panel on the right side.
Step 2Explore the Uniform Speed option to Slow Down Videos
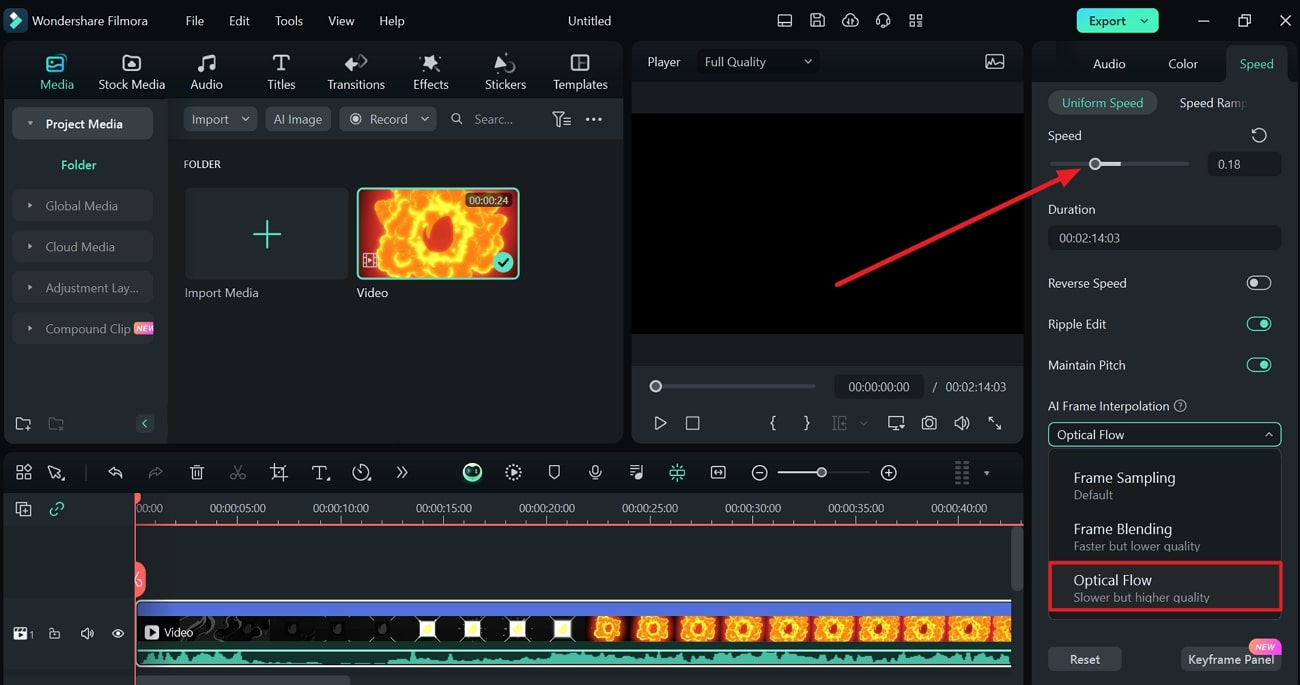
Move to that panel, hold, and drag the “Speed” slider towards the left. Drop the slider at your desired speed for slow-motion video. Go downward and click on the downward icon of “AI Interpolation.” From the extended menu, pick the “Optical Flow” option.
Step 3Head to Export Button Once You Finish Editing
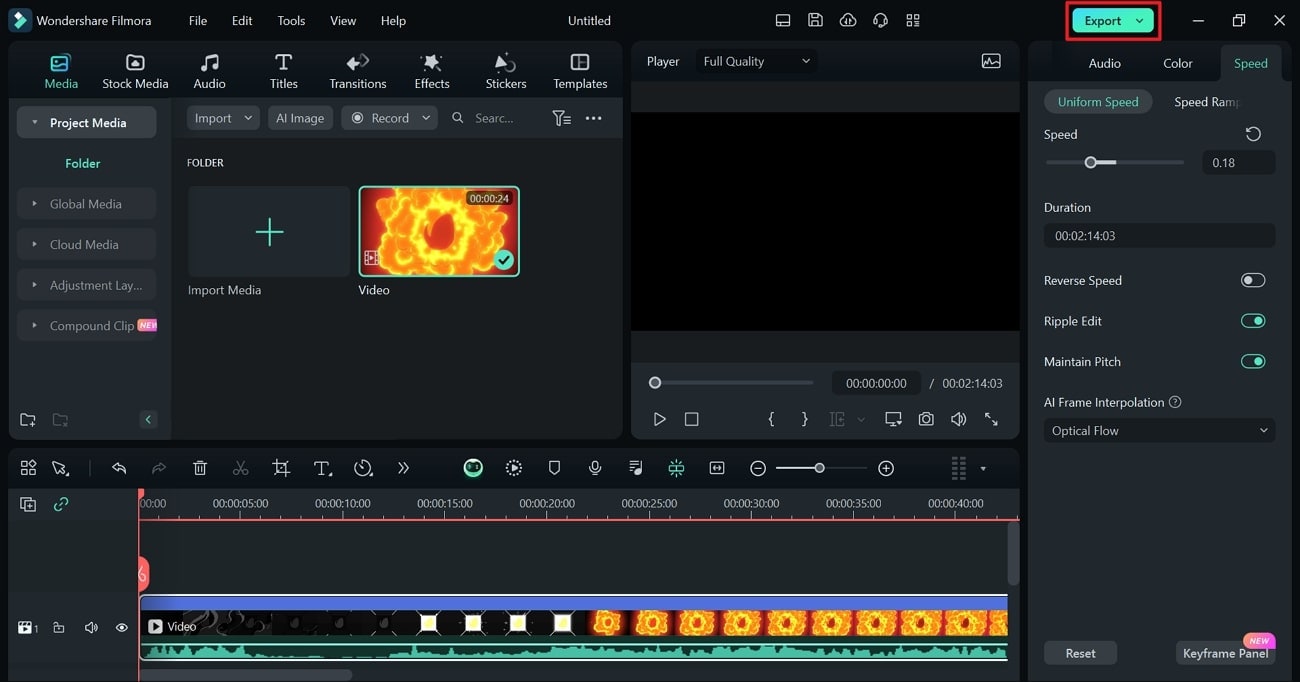
Get a preview of the slow-motion video and decide whether to continue editing or quit. If you are done with editing, move to the top right corner and click on the “Export” button. Assign parameters of your choice and again press the “Export” option to get the file on your PC.
In slow-motion video editing, you can slow down videos to the extent you want. In addition, users can try the AI features of Filmora to explore its powerful functionalities. Keep reading to know some of the key features that Filmora offers to ensure your workflow.
1. AI Copilot Editing
Have you ever imagined AI as your assistant in video editing? Filmora offers an AI copilot editor to assist you in complex editing tasks. To optimize your workflow, it provides valuable insights and guidance with navigations. It ensures that your projects maintain high quality, so it detects conflicting parameters. Afterward, it sends error messages to prevent any issues.
2. AI Text-Based Editing
Getting editable text out of videos is no more challenging with this feature of Filmora. It offers transformative leap technology that converts audio into video and text. After getting transcribed text from the video, users can edit it as per their preferences. You can save work hours because AI can add subtitles to your movies. Also, it allows you to export, translate, and rewrite the subtitles.
3. AI Image
If you are searching for an image that matches your content needs, look no forward. You can generate your own image after giving instructions to AI. This creative concept of Filmora aims to bring your imagination into visual content. In this regard, you just have to describe your image in simple words. Later, users can pick one resolution and image style from endless options.
4. AI Thumbnail Creator
As a content creator, you might know that thumbnail creates a first impression on viewers. A stunning and informative thumbnail attracts viewers to watch the video. For this purpose, Filmora automatically detects the best shots out of your video as a thumbnail. Despite that, you can choose any thumbnail from the professional thumbnail templates library.
5. AI Music Generator
Finding a musical video according to the video content is a hectic job. What if AI generates a soundtrack tailored to your needs? Filmora can generate a musical video by assigning musical choices and sound duration. In addition, you can prompt the number of musical tracks you want. The generated music will be royalty-free and further editable.
Conclusion
Overall, slow-motion videos are becoming a necessity for digital media. That’s why smartphones are offering built-in slow-motion recording features. In this guide, you have learned how to record a slow-motion video and edit it using Premiere Pro. Still, there lies a need to get a better and easier option. For this, you can rely on Filmora, which offers powerful AI features to boost productivity.
Make A Slow Motion Video Make A Slow Motion Video More Features

Part 1: Some Important Deliverables to Ensure While Recording Videos in Slow Motion
Capture fleeting moments in the slow-motion mode of the camera to emphasize details. It’s the only way to highlight important aspects of sports and action scenes. Recording in slow motion is not difficult when you will learn how to record slow-motion video. Before learning, let’s understand important aspects you should look at while recording.
- Frame Rate: For slow-motion video, choosing the right frame rate is crucial. A higher framerate, such as 120fps and 240fps, allows smoother playback. So, before recording, ensure that your camera supports a good framerate.
- Resolution: Maintaining high-resolution videos is important to get good quality. Usually, slow-motion footage uses 4K and HD (High Definition) resolution. Having a high video resolution means providing clarity in details in videos.
- Shutter Speed: It refers to the speed at which the camera closes and controls exposure. Adjust the shutter speed to faster mode to capture every crisp in slow motion. It will prevent motion blur and help in freezing fast-moving objects.
- Audio Consideration: You should know that recording slow motion will affect the original audio. Meanwhile, some cameras preserve the original sound. So, be prepared and test your camera’s audio speed to ease the editing process.
- Focus and Stability: Minimize your camera shake and enable a stabilizer or tripod. Stable footage is essential to enhance the video quality. Moreover, try to keep your main subject in camera focus. In this regard, you can use manual focus control if necessary.
- Editing Software Compatibility: Another thing that you must consider is tool compatibility. It’s better to check it before recording so you will not regret it later. Check your editing tools are supporting the file format of the recorded slow-motion video.
- Storage Space: The “No More Storage” sign is a nightmare when you have recorded a perfect shot. Slow-motion videos consume large storage because of high resolution and frame rate. Thus, consider this aspect before recording to avoid inconvenience and arrange storage media.
Part 2: How to Record a Slow-Motion Video on Android/iPhone?
No matter your smartphone, recording slow-mo is just one click away. Luckily, you don’t need any separate app and technical equipment for this task. If you want to record slow motion now, keep reading this section for detailed steps. Here, you will find how to record a slow-motion video using an iPhone and Android.
Record Slow Motion Using an iPhone
Apple has offered a slow-motion feature since 2013 with the release of the iPhone 5s. Subsequent iPhone models also support this feature. Following are the steps that you can follow to record a slow-motion video on an iPhone:
Step 1
Before recording, set frame rate and resolution. To do so, go to “Settings” and scroll until you find “Camera.” After choosing the camera, touch the “Record Slo-mo.” From the given two choices, select one frame rate and resolution option.

Step 2
Now, tap on the “Camera” app on the home screen of your iPhone. Click on the “Slo-Mo” option next to the “Video.” Then, touch the red “Record” button and capture moments till you want. Finally, stop recording by hitting the same red button. Your footage will automatically be saved in your gallery.

Record Slow Motion Using Android
Who needs a third-party app when Android also supports a slow-motion recording feature? Currently, almost all Android phones are offering slow-motion. The location and access to slow-motion options might differ per Android phone model. To start recording, look at the given steps:
Step 1
Unlock your phone and click on the “Camera” from the main screen. Click on the “More” option next to the “Portrait.” From the next menu, look for the “Slow Motion” circle icon.

Step 2
After selecting slow motion, adjust the focus manually. Head to the top-right corner and click on the small menu icon. Choose a frame rate and resolution from the displayed options. To start recording, touch the red “Record” button. When you capture the desired shots, press the red button again and get the video on your phone.

Part 3: Making Recorded Video in Slow Motion Using the Right Tools
Now, you are pretty much familiar with how to record slow-motion video using smartphones. A phenomenon that arises here is, can we slow down the normally recorded video? The simple answer is yes. There are many editing apps designed for this purpose. Adobe Premiere Pro is one such editing app to slow down the pre-recorded videos.
Step 1
Access your Adobe Premiere Pro application and import a video in the timeline. Identify the frame rate of your video clip for a non-choppy playback.

Step 2
The frame rate will tell you how much you need to slow down the video. To do so, use this “(Timeline Frame Rate ÷ Footage Frame Rate) x 100” formula. Before moving, analyze the slow motion you can add in your clip as per their frame rate.

Step 3
After making calculations, right-click on your footage in the timeline. Select the “Speed/Duration” option from the list and get a small pop-up screen. There, type any number; suppose you type 40% in the box given next to the “Speed.” Finally, click on the “OK” and press the Space bar to get a preview.

Bonus Part: Making Video Editing Simpler! Use Wondershare Filmora to Slow Down Your Video
Apart from Adobe Premiere Pro, there are many other software to do the same task. From multiple options, it’s quite difficult to pick the best option. Let us ease your selection by introducing Wondershare Filmora . It’s a video editing app that is much easier to operate than any other option. With AI integration, many time-consuming editing tasks are now a matter of seconds.
Free Download For Win 7 or later(64-bit)
Free Download For macOS 10.14 or later
How to Turn a Video into Slow-Motion with Optical Flow
As discussed earlier, Filmora can slow down your videos with customization options. Users can set their video to optical flow to automatically get slow speed with high quality.
Step 1Import a Project in Timeline after Launching Filmora
Launch the latest version of Filmora on your device. Access the main interface and choose the “New Project” option to start editing. From the editing screen, look for the “Import” option and bring your media to the timeline. Now, right-click on your video in the timeline to get an extended list. Select the “Uniform Speed” option to get a panel on the right side.

Step 2Explore the Uniform Speed option to Slow Down Videos
Move to that panel, hold, and drag the “Speed” slider towards the left. Drop the slider at your desired speed for slow-motion video. Go downward and click on the downward icon of “AI Interpolation.” From the extended menu, pick the “Optical Flow” option.

Step 3Head to Export Button Once You Finish Editing
Get a preview of the slow-motion video and decide whether to continue editing or quit. If you are done with editing, move to the top right corner and click on the “Export” button. Assign parameters of your choice and again press the “Export” option to get the file on your PC.

In slow-motion video editing, you can slow down videos to the extent you want. In addition, users can try the AI features of Filmora to explore its powerful functionalities. Keep reading to know some of the key features that Filmora offers to ensure your workflow.
1. AI Copilot Editing
Have you ever imagined AI as your assistant in video editing? Filmora offers an AI copilot editor to assist you in complex editing tasks. To optimize your workflow, it provides valuable insights and guidance with navigations. It ensures that your projects maintain high quality, so it detects conflicting parameters. Afterward, it sends error messages to prevent any issues.
2. AI Text-Based Editing
Getting editable text out of videos is no more challenging with this feature of Filmora. It offers transformative leap technology that converts audio into video and text. After getting transcribed text from the video, users can edit it as per their preferences. You can save work hours because AI can add subtitles to your movies. Also, it allows you to export, translate, and rewrite the subtitles.
3. AI Image
If you are searching for an image that matches your content needs, look no forward. You can generate your own image after giving instructions to AI. This creative concept of Filmora aims to bring your imagination into visual content. In this regard, you just have to describe your image in simple words. Later, users can pick one resolution and image style from endless options.
4. AI Thumbnail Creator
As a content creator, you might know that thumbnail creates a first impression on viewers. A stunning and informative thumbnail attracts viewers to watch the video. For this purpose, Filmora automatically detects the best shots out of your video as a thumbnail. Despite that, you can choose any thumbnail from the professional thumbnail templates library.
5. AI Music Generator
Finding a musical video according to the video content is a hectic job. What if AI generates a soundtrack tailored to your needs? Filmora can generate a musical video by assigning musical choices and sound duration. In addition, you can prompt the number of musical tracks you want. The generated music will be royalty-free and further editable.
Conclusion
Overall, slow-motion videos are becoming a necessity for digital media. That’s why smartphones are offering built-in slow-motion recording features. In this guide, you have learned how to record a slow-motion video and edit it using Premiere Pro. Still, there lies a need to get a better and easier option. For this, you can rely on Filmora, which offers powerful AI features to boost productivity.
How to Correct Lens Distortion With Filmora
The distortion in your video may irritate you when you’re working on the video’s edit. When you take images or record sound, you frequently end up with distorted results due to lens distortion. In this article, we will discuss what lens distortion is, how it may be fixed, and the factors you need to pay attention to avoid lens distortion when taking or recording videos.
Part 1: Basic introduction to lens distortion
1. What is lens distortion
Distortion means that the straight rectilinear projection is not straight. In the pinhole camera model, lens distortion is measured by how far from the image’s ideal projection is. From a geometric optics point of view, the scene’s straight lines don’t look straight in the image.
When you take a picture, the camera lens can somehow change the shape of the image. It is called camera lens distortion. In simple terms, we can tell you that this is the case because distortion in-camera is when the lens makes curved lines in an image and doesn’t show the straight lines from the scene.
2. What cause it
Lens distortion happens with all lenses. It is because of several things, such as how the lens is curved, how far away the subject is, and the angle at which the photo was taken. Furthermore, it changes the image in many ways, but you can see it most when straight lines at the frame’s edges are no longer parallel.
Most geometric lens distortions happen when the focal distance is short (barrel distortion), long (pincushion distortion), or when a fish-eye lens is used to take a picture from a low angle (keystone distortion).
Part 2: How to correct a distorted lens?
A lot of times, with lower-end wide-angle lenses, especially action cams like GoPro, you get pretty gnarly distortion when you’re filming. As we know, the Earth is round, but it shouldn’t look like this when you take a picture. Indeed, it’s very distorted, it has the horizon line bending all over the place, and basically, all of the lines in the video have some level of curvature.
Hence, follow all the steps below to know how to fix it:
Step1 Import your video to Filmora .

Free Download For Win 7 or later(64-bit)
Free Download For macOS 10.14 or later
Step2 Click on the clip and head over to the lens correction. Choose the “Camera model” based on what you used, but in this tutorial, the video was taken with a GoPro Hero 7. However, you can choose some other camera model options there.

Step3 To adjust the distortion, you can slide the bar to the left or the right. If you slide the bar to the right (maximum level), there will be no adjustment. However, if you slide the bar to the left, you can see it pulling those lines as high up as possible.
You can see a bit of curvature, but it looks much more natural, and all of the lines in the video look so much better.

Step4 Lastly, if you play the video back, you will see the video look much better than before.

Part 3: How to avoid distorted lens while shooting?
1. Avoid very wide-angle lenses
The more distortion there is in a lens, like a 15mm prime, the wider it is. Sometimes you need a very wide-angle lens, and distortion is unavoidable. If you have room to move back, you could try using a lens with a different focal length.
2. Avoid getting too close
Doing so will enhance optical distortion in many lenses and the likelihood of perspective distortion in all lenses.
3. Be mindful of your composition
There are numerous instances where distortion is acceptable or even intended. Others must be carefully examined, such as utilizing a wide-angle lens to photograph a row of people. When you get too close to a group, the distortion makes the people at each end appear considerably wider! Therefore, consider your composition. Stand back and add space around your group; if necessary, you can trim the image afterward.
4. Use a 50mm lens
50mm lenses are often called “all-purpose” lenses. There is a good reason
for this. A 50mm lens is great for portraits, street photography, and many other kinds of photography, including architecture. If your subject is big, you just need space to stand back. You will see that a 50mm lens rarely distorts the image.
Free Download For macOS 10.14 or later
Step2 Click on the clip and head over to the lens correction. Choose the “Camera model” based on what you used, but in this tutorial, the video was taken with a GoPro Hero 7. However, you can choose some other camera model options there.

Step3 To adjust the distortion, you can slide the bar to the left or the right. If you slide the bar to the right (maximum level), there will be no adjustment. However, if you slide the bar to the left, you can see it pulling those lines as high up as possible.
You can see a bit of curvature, but it looks much more natural, and all of the lines in the video look so much better.

Step4 Lastly, if you play the video back, you will see the video look much better than before.

Part 3: How to avoid distorted lens while shooting?
1. Avoid very wide-angle lenses
The more distortion there is in a lens, like a 15mm prime, the wider it is. Sometimes you need a very wide-angle lens, and distortion is unavoidable. If you have room to move back, you could try using a lens with a different focal length.
2. Avoid getting too close
Doing so will enhance optical distortion in many lenses and the likelihood of perspective distortion in all lenses.
3. Be mindful of your composition
There are numerous instances where distortion is acceptable or even intended. Others must be carefully examined, such as utilizing a wide-angle lens to photograph a row of people. When you get too close to a group, the distortion makes the people at each end appear considerably wider! Therefore, consider your composition. Stand back and add space around your group; if necessary, you can trim the image afterward.
4. Use a 50mm lens
50mm lenses are often called “all-purpose” lenses. There is a good reason
for this. A 50mm lens is great for portraits, street photography, and many other kinds of photography, including architecture. If your subject is big, you just need space to stand back. You will see that a 50mm lens rarely distorts the image.
Are You a Teacher? Are You Looking for Educational Background Music? This Article Has Everything You Will Need to Know for Creating Outstanding Educational Teaching Videos
Pandemic bought the toughest time for everyone. Some unpredictable decisions were made. Among those decisions, one was online education. Teachers used to record lectures and share them. It was hard for the teachers to record lectures. It was equally hard for the students to study in this way. Teachers record boring lectures, which make it difficult to study and concentrate.
Teachers can add educational background music to their lectures to maintain students’ interest. School videos are not the only educational videos. There are various tutorials on the internet teaching you something. Explainer videos and instructional videos are also kinds of educational videos. This article will share tips to improve your educational teaching videos. Stay with us and learn to make better videos.
In this article
01 Ideas for Making an Outstanding Educational Teaching Video
02 How to Edit A Teacher Introduction Video?
03 3 Recommended Sites to Download Educational Background Music for Studying
Part 1. Ideas for Making an Outstanding Educational Teaching Video
Creating an educational video is not enough. There are a few elements that should be kept in mind. Your content should be good enough. Another thing that needs attention is your viewers’ interest. Your educational video is of no use if it cannot sustain the audience’s interest.
What could be done to improve your videos? How can someone create outstanding educational teaching videos? All your questions will be answered in this section of the article. We are going to share ideas for good educational videos.
· Digital Storytelling
How can digital storytelling help in educational videos? Well, it’s simple. You need to attract and motivate students to study. For this purpose, digital storytelling is the best choice. You can merge different images and videos.
Add cute images from your institute. Insert videos of students working together. All these will attract the student to study.
· Get Dressed
Do you think someone will listen to you with interest if you don’t have a personality? What we wear, how we present ourselves show our personality. If you want to create stunning educational videos, then work a little on yourself first.
Before you start recording, make sure you are well dressed. The more formally you present yourself, the more your students will be attracted.
· Plan Everything
A pro tip for creating outstanding educational videos is your planning. Before properly planning everything, you should never start making a video. You need to gather everything you might need during the video. You should properly compose yourself before you start speaking and teaching.
You should make a mind map of how you will explain things. A storyboard for the sequence of actions should be specified well before. It helps stay on top of things.
· Busy World
What if the video you want to watch is too long and you don’t have that much time? We are very busy in different aspects. For this purpose, it is essential to keep in mind that the educational video should be concise. The video must deliver the actual concept but in a short span of time.
· Audience Hunt
You should have clear knowledge regarding your audience. You must know what content they are looking for. What platform is the most suitable for sharing your content? If you are putting effort into creating amazing educational videos, then a proper audience hunt is also necessary.
Part 2. How to Edit A Teacher Introduction Video?
Have you been searching for the best video editing tool? Let us do the honors and introduce Wondershare Filmora to you. This is the perfect blend between an editing tool and a media library. Filmora has a massive media library. You can get a variety of transitions, effects, titles, etc., from there.
If we talk about the Filmora editing tool, this is amazing for all video creators. The tool is very useful for beginners, experts everyone. With Filmora, edit classy videos. You can edit without limits. Add effects like motion tracing, keyframing from Filmora. It can also be used to edit educational videos. Let us share a step-by-step guideline for making Teachers Introduction in Filmora, shall we?
For Win 7 or later (64-bit)
For macOS 10.12 or later
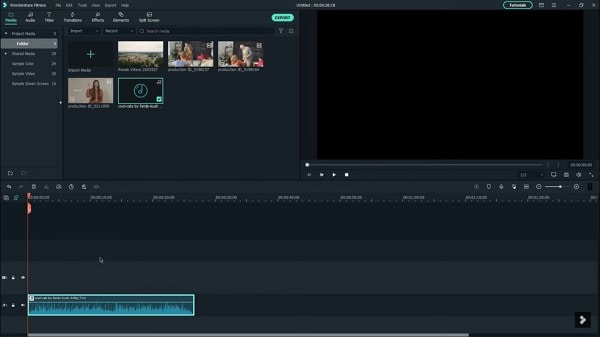
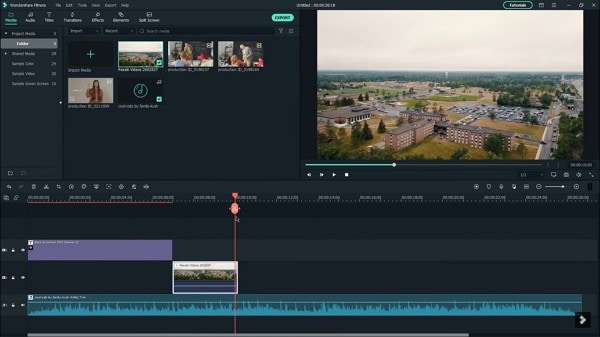
Step 1: To start making teachers intro in Filmora, firstly, import the background music for work that you want to add to your video. After that, simply drag and drop the music to the timeline.
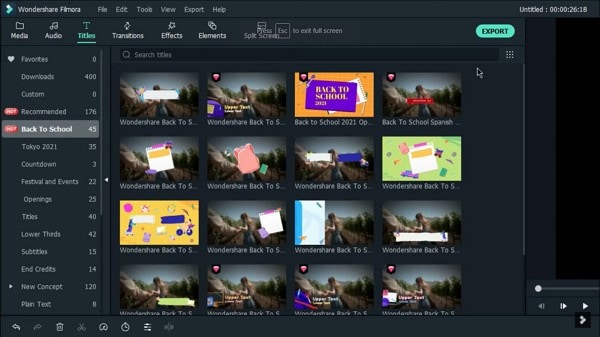
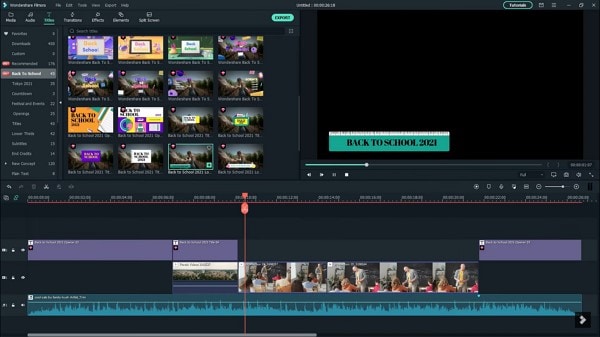
Step 2: Next, it’s time to add a title to your intro. For that, you need to head over to the ‘Titles’ tab. There search for ‘Back to School’ titles. Select your favorite template from all the available templates and drag it to the timeline. You can edit and customize the template if you want to.
Step 3: Now comes the fun part. Add something to introduce yourself. This will build up the viewers’ interest. You can also add school clips to make an attractive video. Drag the desired media to timeline and trim them accordingly.
Step 4: After adding all the clips, it’s time to do some classy edits. With Filmora, you can easily add Lower Thirds. They can be located in the ‘Titles’ Tab. Lower Thirds can also be customized and edited.
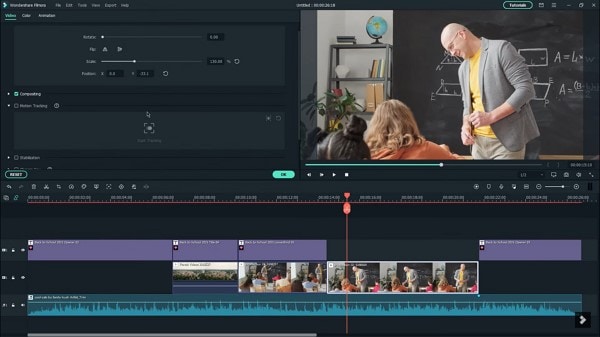
Step 5: With the stunning Filmora editor, you can do wonders. You can perform color correction on your images and clips. With Filmora, add ‘Motion Tracking’ in your video and whatnot.
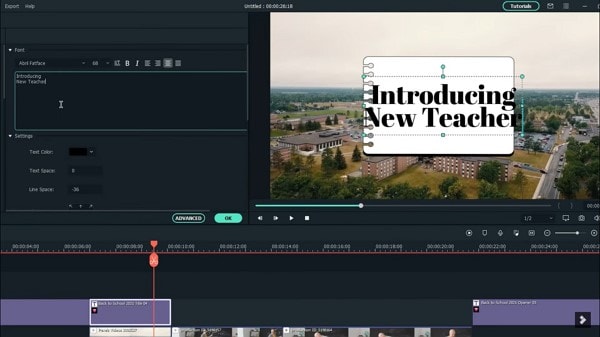
Step 6: You can conclude your introduction video in very cute ways. For that, head over to the ‘Titles’ tab and select another template. Edit and customize the template according to the video end and drag it on the timeline.
Part 3. 3 Recommended Sites to Download Educational Background Music for Studying
Some people study songs because it helps to concentrate. In the same way, music in educational videos also helps to retain the viewers’ interest. There is appropriate background music for studying available on the internet.
The question here is how can someone find the perfect educational background music? Let us answer your question. The following section of this article will share 3 sites to download work-appropriate background music.
1. Chosic
The first site to be discussed is Chosic. It allows you to download free background music for work. You can find royalty-free MP3 music here. With Chosic, find the perfect work music according to your mood. It offers various genres. The search process is also very convenient. You can search for music by using the tags.

2. Storyblocks
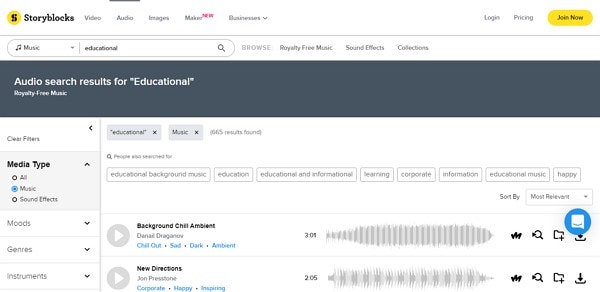
Another site that offers royalty-free music is Storyblocks. It has a lot to offer. You can download your favorite educational background music with Storyblocks. It also lets you create a folder and save your music there. The best thing about Storyblocks is that you can edit the music with its ‘Maker’ feature. Search the music according to your desired genre, instrument choice, moods, etc.
3. TakeTones
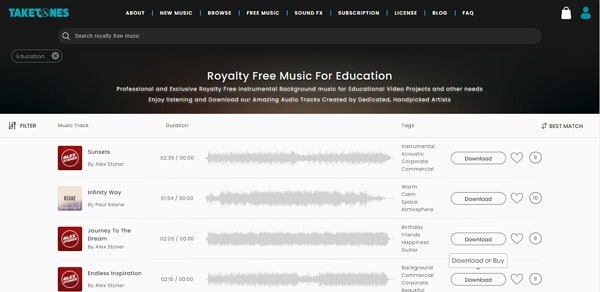
With TakeTones, you can find amazing instrumental background music for studying. If you don’t know, TakeTones has royalty-free music. You can not only listen to music but can also download it. The site displays complete details about the music—the music track, its duration, tags, etc. You can either download the music or else add it to your favorites to enjoy it later.
Bottom Line
After taking notes from this article, you will surely create interesting educational teaching videos. The article has shared every bit of information that is needed to create outstanding educational videos. We also introduced the best editor, Filmora. You can take help from Wondershare Filmora to edit mind-blowing videos. In addition to that, we also shed light on sites to download background music for work.
Wondershare Filmora
Get started easily with Filmora’s powerful performance, intuitive interface, and countless effects!
Try It Free Try It Free Try It Free Learn More >

02 How to Edit A Teacher Introduction Video?
03 3 Recommended Sites to Download Educational Background Music for Studying
Part 1. Ideas for Making an Outstanding Educational Teaching Video
Creating an educational video is not enough. There are a few elements that should be kept in mind. Your content should be good enough. Another thing that needs attention is your viewers’ interest. Your educational video is of no use if it cannot sustain the audience’s interest.
What could be done to improve your videos? How can someone create outstanding educational teaching videos? All your questions will be answered in this section of the article. We are going to share ideas for good educational videos.
· Digital Storytelling
How can digital storytelling help in educational videos? Well, it’s simple. You need to attract and motivate students to study. For this purpose, digital storytelling is the best choice. You can merge different images and videos.
Add cute images from your institute. Insert videos of students working together. All these will attract the student to study.
· Get Dressed
Do you think someone will listen to you with interest if you don’t have a personality? What we wear, how we present ourselves show our personality. If you want to create stunning educational videos, then work a little on yourself first.
Before you start recording, make sure you are well dressed. The more formally you present yourself, the more your students will be attracted.
· Plan Everything
A pro tip for creating outstanding educational videos is your planning. Before properly planning everything, you should never start making a video. You need to gather everything you might need during the video. You should properly compose yourself before you start speaking and teaching.
You should make a mind map of how you will explain things. A storyboard for the sequence of actions should be specified well before. It helps stay on top of things.
· Busy World
What if the video you want to watch is too long and you don’t have that much time? We are very busy in different aspects. For this purpose, it is essential to keep in mind that the educational video should be concise. The video must deliver the actual concept but in a short span of time.
· Audience Hunt
You should have clear knowledge regarding your audience. You must know what content they are looking for. What platform is the most suitable for sharing your content? If you are putting effort into creating amazing educational videos, then a proper audience hunt is also necessary.
Part 2. How to Edit A Teacher Introduction Video?
Have you been searching for the best video editing tool? Let us do the honors and introduce Wondershare Filmora to you. This is the perfect blend between an editing tool and a media library. Filmora has a massive media library. You can get a variety of transitions, effects, titles, etc., from there.
If we talk about the Filmora editing tool, this is amazing for all video creators. The tool is very useful for beginners, experts everyone. With Filmora, edit classy videos. You can edit without limits. Add effects like motion tracing, keyframing from Filmora. It can also be used to edit educational videos. Let us share a step-by-step guideline for making Teachers Introduction in Filmora, shall we?
For Win 7 or later (64-bit)
For macOS 10.12 or later
Step 1: To start making teachers intro in Filmora, firstly, import the background music for work that you want to add to your video. After that, simply drag and drop the music to the timeline.

Step 2: Next, it’s time to add a title to your intro. For that, you need to head over to the ‘Titles’ tab. There search for ‘Back to School’ titles. Select your favorite template from all the available templates and drag it to the timeline. You can edit and customize the template if you want to.

Step 3: Now comes the fun part. Add something to introduce yourself. This will build up the viewers’ interest. You can also add school clips to make an attractive video. Drag the desired media to timeline and trim them accordingly.

Step 4: After adding all the clips, it’s time to do some classy edits. With Filmora, you can easily add Lower Thirds. They can be located in the ‘Titles’ Tab. Lower Thirds can also be customized and edited.

Step 5: With the stunning Filmora editor, you can do wonders. You can perform color correction on your images and clips. With Filmora, add ‘Motion Tracking’ in your video and whatnot.

Step 6: You can conclude your introduction video in very cute ways. For that, head over to the ‘Titles’ tab and select another template. Edit and customize the template according to the video end and drag it on the timeline.

Part 3. 3 Recommended Sites to Download Educational Background Music for Studying
Some people study songs because it helps to concentrate. In the same way, music in educational videos also helps to retain the viewers’ interest. There is appropriate background music for studying available on the internet.
The question here is how can someone find the perfect educational background music? Let us answer your question. The following section of this article will share 3 sites to download work-appropriate background music.
1. Chosic
The first site to be discussed is Chosic. It allows you to download free background music for work. You can find royalty-free MP3 music here. With Chosic, find the perfect work music according to your mood. It offers various genres. The search process is also very convenient. You can search for music by using the tags.

2. Storyblocks
Another site that offers royalty-free music is Storyblocks. It has a lot to offer. You can download your favorite educational background music with Storyblocks. It also lets you create a folder and save your music there. The best thing about Storyblocks is that you can edit the music with its ‘Maker’ feature. Search the music according to your desired genre, instrument choice, moods, etc.

3. TakeTones
With TakeTones, you can find amazing instrumental background music for studying. If you don’t know, TakeTones has royalty-free music. You can not only listen to music but can also download it. The site displays complete details about the music—the music track, its duration, tags, etc. You can either download the music or else add it to your favorites to enjoy it later.

Bottom Line
After taking notes from this article, you will surely create interesting educational teaching videos. The article has shared every bit of information that is needed to create outstanding educational videos. We also introduced the best editor, Filmora. You can take help from Wondershare Filmora to edit mind-blowing videos. In addition to that, we also shed light on sites to download background music for work.
Wondershare Filmora
Get started easily with Filmora’s powerful performance, intuitive interface, and countless effects!
Try It Free Try It Free Try It Free Learn More >

02 How to Edit A Teacher Introduction Video?
03 3 Recommended Sites to Download Educational Background Music for Studying
Part 1. Ideas for Making an Outstanding Educational Teaching Video
Creating an educational video is not enough. There are a few elements that should be kept in mind. Your content should be good enough. Another thing that needs attention is your viewers’ interest. Your educational video is of no use if it cannot sustain the audience’s interest.
What could be done to improve your videos? How can someone create outstanding educational teaching videos? All your questions will be answered in this section of the article. We are going to share ideas for good educational videos.
· Digital Storytelling
How can digital storytelling help in educational videos? Well, it’s simple. You need to attract and motivate students to study. For this purpose, digital storytelling is the best choice. You can merge different images and videos.
Add cute images from your institute. Insert videos of students working together. All these will attract the student to study.
· Get Dressed
Do you think someone will listen to you with interest if you don’t have a personality? What we wear, how we present ourselves show our personality. If you want to create stunning educational videos, then work a little on yourself first.
Before you start recording, make sure you are well dressed. The more formally you present yourself, the more your students will be attracted.
· Plan Everything
A pro tip for creating outstanding educational videos is your planning. Before properly planning everything, you should never start making a video. You need to gather everything you might need during the video. You should properly compose yourself before you start speaking and teaching.
You should make a mind map of how you will explain things. A storyboard for the sequence of actions should be specified well before. It helps stay on top of things.
· Busy World
What if the video you want to watch is too long and you don’t have that much time? We are very busy in different aspects. For this purpose, it is essential to keep in mind that the educational video should be concise. The video must deliver the actual concept but in a short span of time.
· Audience Hunt
You should have clear knowledge regarding your audience. You must know what content they are looking for. What platform is the most suitable for sharing your content? If you are putting effort into creating amazing educational videos, then a proper audience hunt is also necessary.
Part 2. How to Edit A Teacher Introduction Video?
Have you been searching for the best video editing tool? Let us do the honors and introduce Wondershare Filmora to you. This is the perfect blend between an editing tool and a media library. Filmora has a massive media library. You can get a variety of transitions, effects, titles, etc., from there.
If we talk about the Filmora editing tool, this is amazing for all video creators. The tool is very useful for beginners, experts everyone. With Filmora, edit classy videos. You can edit without limits. Add effects like motion tracing, keyframing from Filmora. It can also be used to edit educational videos. Let us share a step-by-step guideline for making Teachers Introduction in Filmora, shall we?
For Win 7 or later (64-bit)
For macOS 10.12 or later
Step 1: To start making teachers intro in Filmora, firstly, import the background music for work that you want to add to your video. After that, simply drag and drop the music to the timeline.

Step 2: Next, it’s time to add a title to your intro. For that, you need to head over to the ‘Titles’ tab. There search for ‘Back to School’ titles. Select your favorite template from all the available templates and drag it to the timeline. You can edit and customize the template if you want to.

Step 3: Now comes the fun part. Add something to introduce yourself. This will build up the viewers’ interest. You can also add school clips to make an attractive video. Drag the desired media to timeline and trim them accordingly.

Step 4: After adding all the clips, it’s time to do some classy edits. With Filmora, you can easily add Lower Thirds. They can be located in the ‘Titles’ Tab. Lower Thirds can also be customized and edited.

Step 5: With the stunning Filmora editor, you can do wonders. You can perform color correction on your images and clips. With Filmora, add ‘Motion Tracking’ in your video and whatnot.

Step 6: You can conclude your introduction video in very cute ways. For that, head over to the ‘Titles’ tab and select another template. Edit and customize the template according to the video end and drag it on the timeline.

Part 3. 3 Recommended Sites to Download Educational Background Music for Studying
Some people study songs because it helps to concentrate. In the same way, music in educational videos also helps to retain the viewers’ interest. There is appropriate background music for studying available on the internet.
The question here is how can someone find the perfect educational background music? Let us answer your question. The following section of this article will share 3 sites to download work-appropriate background music.
1. Chosic
The first site to be discussed is Chosic. It allows you to download free background music for work. You can find royalty-free MP3 music here. With Chosic, find the perfect work music according to your mood. It offers various genres. The search process is also very convenient. You can search for music by using the tags.

2. Storyblocks
Another site that offers royalty-free music is Storyblocks. It has a lot to offer. You can download your favorite educational background music with Storyblocks. It also lets you create a folder and save your music there. The best thing about Storyblocks is that you can edit the music with its ‘Maker’ feature. Search the music according to your desired genre, instrument choice, moods, etc.

3. TakeTones
With TakeTones, you can find amazing instrumental background music for studying. If you don’t know, TakeTones has royalty-free music. You can not only listen to music but can also download it. The site displays complete details about the music—the music track, its duration, tags, etc. You can either download the music or else add it to your favorites to enjoy it later.

Bottom Line
After taking notes from this article, you will surely create interesting educational teaching videos. The article has shared every bit of information that is needed to create outstanding educational videos. We also introduced the best editor, Filmora. You can take help from Wondershare Filmora to edit mind-blowing videos. In addition to that, we also shed light on sites to download background music for work.
Wondershare Filmora
Get started easily with Filmora’s powerful performance, intuitive interface, and countless effects!
Try It Free Try It Free Try It Free Learn More >

02 How to Edit A Teacher Introduction Video?
03 3 Recommended Sites to Download Educational Background Music for Studying
Part 1. Ideas for Making an Outstanding Educational Teaching Video
Creating an educational video is not enough. There are a few elements that should be kept in mind. Your content should be good enough. Another thing that needs attention is your viewers’ interest. Your educational video is of no use if it cannot sustain the audience’s interest.
What could be done to improve your videos? How can someone create outstanding educational teaching videos? All your questions will be answered in this section of the article. We are going to share ideas for good educational videos.
· Digital Storytelling
How can digital storytelling help in educational videos? Well, it’s simple. You need to attract and motivate students to study. For this purpose, digital storytelling is the best choice. You can merge different images and videos.
Add cute images from your institute. Insert videos of students working together. All these will attract the student to study.
· Get Dressed
Do you think someone will listen to you with interest if you don’t have a personality? What we wear, how we present ourselves show our personality. If you want to create stunning educational videos, then work a little on yourself first.
Before you start recording, make sure you are well dressed. The more formally you present yourself, the more your students will be attracted.
· Plan Everything
A pro tip for creating outstanding educational videos is your planning. Before properly planning everything, you should never start making a video. You need to gather everything you might need during the video. You should properly compose yourself before you start speaking and teaching.
You should make a mind map of how you will explain things. A storyboard for the sequence of actions should be specified well before. It helps stay on top of things.
· Busy World
What if the video you want to watch is too long and you don’t have that much time? We are very busy in different aspects. For this purpose, it is essential to keep in mind that the educational video should be concise. The video must deliver the actual concept but in a short span of time.
· Audience Hunt
You should have clear knowledge regarding your audience. You must know what content they are looking for. What platform is the most suitable for sharing your content? If you are putting effort into creating amazing educational videos, then a proper audience hunt is also necessary.
Part 2. How to Edit A Teacher Introduction Video?
Have you been searching for the best video editing tool? Let us do the honors and introduce Wondershare Filmora to you. This is the perfect blend between an editing tool and a media library. Filmora has a massive media library. You can get a variety of transitions, effects, titles, etc., from there.
If we talk about the Filmora editing tool, this is amazing for all video creators. The tool is very useful for beginners, experts everyone. With Filmora, edit classy videos. You can edit without limits. Add effects like motion tracing, keyframing from Filmora. It can also be used to edit educational videos. Let us share a step-by-step guideline for making Teachers Introduction in Filmora, shall we?
For Win 7 or later (64-bit)
For macOS 10.12 or later
Step 1: To start making teachers intro in Filmora, firstly, import the background music for work that you want to add to your video. After that, simply drag and drop the music to the timeline.

Step 2: Next, it’s time to add a title to your intro. For that, you need to head over to the ‘Titles’ tab. There search for ‘Back to School’ titles. Select your favorite template from all the available templates and drag it to the timeline. You can edit and customize the template if you want to.

Step 3: Now comes the fun part. Add something to introduce yourself. This will build up the viewers’ interest. You can also add school clips to make an attractive video. Drag the desired media to timeline and trim them accordingly.

Step 4: After adding all the clips, it’s time to do some classy edits. With Filmora, you can easily add Lower Thirds. They can be located in the ‘Titles’ Tab. Lower Thirds can also be customized and edited.

Step 5: With the stunning Filmora editor, you can do wonders. You can perform color correction on your images and clips. With Filmora, add ‘Motion Tracking’ in your video and whatnot.

Step 6: You can conclude your introduction video in very cute ways. For that, head over to the ‘Titles’ tab and select another template. Edit and customize the template according to the video end and drag it on the timeline.

Part 3. 3 Recommended Sites to Download Educational Background Music for Studying
Some people study songs because it helps to concentrate. In the same way, music in educational videos also helps to retain the viewers’ interest. There is appropriate background music for studying available on the internet.
The question here is how can someone find the perfect educational background music? Let us answer your question. The following section of this article will share 3 sites to download work-appropriate background music.
1. Chosic
The first site to be discussed is Chosic. It allows you to download free background music for work. You can find royalty-free MP3 music here. With Chosic, find the perfect work music according to your mood. It offers various genres. The search process is also very convenient. You can search for music by using the tags.

2. Storyblocks
Another site that offers royalty-free music is Storyblocks. It has a lot to offer. You can download your favorite educational background music with Storyblocks. It also lets you create a folder and save your music there. The best thing about Storyblocks is that you can edit the music with its ‘Maker’ feature. Search the music according to your desired genre, instrument choice, moods, etc.

3. TakeTones
With TakeTones, you can find amazing instrumental background music for studying. If you don’t know, TakeTones has royalty-free music. You can not only listen to music but can also download it. The site displays complete details about the music—the music track, its duration, tags, etc. You can either download the music or else add it to your favorites to enjoy it later.

Bottom Line
After taking notes from this article, you will surely create interesting educational teaching videos. The article has shared every bit of information that is needed to create outstanding educational videos. We also introduced the best editor, Filmora. You can take help from Wondershare Filmora to edit mind-blowing videos. In addition to that, we also shed light on sites to download background music for work.
Wondershare Filmora
Get started easily with Filmora’s powerful performance, intuitive interface, and countless effects!
Try It Free Try It Free Try It Free Learn More >

Also read:
- Top Silence Detection Tools for Better Film Production
- New In 2024, How to Create a Vacation Slideshow in 5 Minutes
- New Do You Need More Time to Explain a Particular Screen or Moment in Your Recording Using an Extended Freeze-Frame? Learn How to Use Camtasia Freeze-Frame to Extend Parts of a Video Effectively
- Updated In 2024, Top 10 Best Free Video Compressors
- Updated In 2024, Looking for Final Cut Pro Alternative App for Your Android Smartphone or iPhone? Here Is the List of the Best FCP Alternative Apps for Android and iOS Users
- New 2024 Approved Finding The Finest Way to Add Subtitles to Videos | Filmora
- 3GP Video Format What Is 3GP Format And How To Open It?
- New Steps to Create One Click Video Reverse Effect in Filmora
- Updated Want to Make Your Slideshows More Fun and Exciting? Follow the Given Discussion to Know How to Make a Slideshow Gif, Thereby Making Your Slideshow More Enjoyable than Ever
- Updated In 2024, If You Dont Know How to Blur a Part of a Video, Youre in the Right Place. We Have Provided All the Details You Need to Help You Blur a Still or Moving Portion of Your Video
- New 2024 Approved Phone Aspect Ratio Vertical Definition, Types & Tips
- New In This Article, We Shall Take a Look at the Various Steps of Making a Photo Collage in Microsoft Word, and Also at Other Details of the Process, Which Might Be Relevant for 2024
- New In 2024, Detailed Review of Kodak LUTs
- New 2024 Approved Top List of Best VHS Video Effect Makers
- Updated Replacing Sky Background Using Adobe Photoshop A Comprehensive Guide
- New How to Build A Video Editing Career
- Updated How to Slow Down a Video on iPhone and Android The Easy Way
- In 2024, Lets Create a New Premiere Pro Project, Import some Video, and Control Video Playback Speed. Also, Find Alternative Software (WonderShare Filmora) to Control Playback Speed in Minutes
- In 2024, You Can Create a Photo Video Slideshow on YouTube. In Slideshow on YouTube You Can Add Photos and Videos, Effects and Transitions and Make a Quality Slideshow
- Updated In 2024, Learn How to Convert MP4 Videos to 60 FPS GIFs with This Easy-to-Follow Tutorial. Get Smooth and Crisp Motion in Your GIFs in Just a Few Simple Steps
- Updated In 2024, Boost the Pace of Your Instagram Reels Videos with These Simple Tricks
- Is GSM Flasher ADB Legit? Full Review To Bypass Your Lava Blaze Pro 5GFRP Lock
- Complete Tutorial for Motorola Moto E13 Hard Reset | Dr.fone
- Ultimate Guide to Free PPTP VPN For Beginners On Tecno Spark 10 Pro | Dr.fone
- In 2024, Top 10 Telegram Spy Tools On Xiaomi Redmi Note 13 Pro+ 5G for Parents | Dr.fone
- Looking For A Location Changer On Lava Blaze 2 5G? Look No Further | Dr.fone
- In 2024, 6 Ways To Transfer Contacts From Infinix GT 10 Pro to iPhone | Dr.fone
- Does Life360 Notify When You Log Out On Oppo Find X7? | Dr.fone
- In 2024, Top 10 AirPlay Apps in OnePlus 11 5G for Streaming | Dr.fone
- Updated 2024 Approved Top 8 Tools Tell You How to Make Slideshows for Instagram
- In 2024, How To Stream Anything From Oppo A18 to Apple TV | Dr.fone
- In 2024, How to Unlock Oppo A79 5G Phone Password Without Factory Reset?
- In 2024, 3 Facts You Need to Know about Screen Mirroring Infinix Note 30 VIP Racing Edition | Dr.fone
- 8 Quick Fixes Unfortunately, Snapchat has Stopped on Vivo Y200e 5G | Dr.fone
- Guide on How To Remove Apple ID From Apple iPhone 8 Plus
- In 2024, Best Pokemons for PVP Matches in Pokemon Go For Tecno Camon 30 Pro 5G | Dr.fone
- Top 11 Free Apps to Check IMEI on iPhone SE
- Hassle-Free Ways to Remove FRP Lock from Vivo Y78+ (T1) Edition Phones with/without a PC
- Infinix Smart 7 Stuck on Screen – Finding Solutions For Stuck on Boot | Dr.fone
- In 2024, A Step-by-Step Guide on Using ADB and Fastboot to Remove FRP Lock on your Tecno Spark 10 Pro
- How to Recover Deleted Photos from Android Gallery App on Honor 90 GT
- Title: New In 2024, Create the Night-to-Day Effect Videos
- Author: Morgan
- Created at : 2024-05-19 05:13:02
- Updated at : 2024-05-20 05:13:02
- Link: https://ai-video-editing.techidaily.com/new-in-2024-create-the-night-to-day-effect-videos/
- License: This work is licensed under CC BY-NC-SA 4.0.

