
:max_bytes(150000):strip_icc():format(webp)/GettyImages-753288077-5bb0f9b2cff47e00261aa8fc.jpg)
New In 2024, Do You Want to Make Your Photos and Videos Look Different From Others? There Are Many Lightroom LUTs Free, and They Make Your Media Content Stand Out From Others
Do You Want to Make Your Photos and Videos Look Different From Others? There Are Many Lightroom LUTs Free, and They Make Your Media Content Stand Out From Others
Colors play an essential role in our lives. They add emotions, create moods, and set the tone for our experiences. Using colors in media is significant as they help create an atmosphere that improves your story. That’s why filmmakers and photographers focus so much on color grading and adjustment. For this purpose, they use different tools like LUTs.
You can use LUTs in your images and videos to achieve a particular look or feel in Lightroom. With LUTs, you can make fantastic color grading in Lightroom. Many paid and free LUTs for Lightroom are available to download and use for your media. Moreover, LUTs can save time and give your story perspective and emotion.
Part 1: How Are LUTs Influencing Video Editors?
There are many ways in which LUTs can help and influence content creators and video editors. From Lightroom presets to Premiere Pro presets, you can download any. However, you need to learn the many ways in which LUTs are helping editors.
Efficiency
LUTs (Lookup Tables) are a powerful tool that can help you in many ways if you are a video editor. First, they can make your editing process more efficient. You can apply color grading and correction to your footage, saving you time and increasing productivity. Instead of manually adjusting the colors for each clip, you can use LUTs to achieve a particular look.
Creativity
In addition to efficiency, LUTs also offer a wide range of creative options. You can use LUTs to explore different styles and moods, from vintage looks to modern cinematic ones. It can help you create a unique style for your videos and make them look more meaningful. With LUTs, you can experiment with different colors and effects to achieve the perfect look for your footage.
Consistency
Another benefit of using LUTs is consistency. With LUTs, you can maintain a consistent look and feel across different video clips. It gives all clips in a project a cohesive and professional appearance. These LUTs can be especially helpful if you work on a long-term project or with multiple editors. It will give a uniform look and feel throughout your project.
Accessibility
LUTs are also becoming more accessible than ever before. With free and paid online options, video editors of all skill levels can access these tools for their video projects. You don’t need extensive training or experience in color grading to use LUTs for your videos. Moreover, anyone can use LUTs with simple steps and make their content look more professional.
Part 2: Top Free LUTs for Lightroom
You don’t need to search for free LUTs for Lightroom for your media content. Here is a list of 5 Lightroom LUTs free to download to color grade your media in different tones.
1.50 Vintage Cinematic Lightroom Presets and LUTs
It is a pack of 50 Cinematic-style vintage LUTs you can apply to your media files. This LUT pack has a warm and orangey tone to give a golden hour and warm color scheme touch. You can use it to create a vintage, nostalgic look for your content. Furthermore, you can use your travel photos or outdoor adventure videos to give them a dreamy rusty vibe.

2. Free LUTs Ciné Green
If you want to add a cool and moody feel to your content, try using this LUT. It has a greenish-blue tone that can give your photos and videos a mysterious and cinematic look. Moreover, this LUT is excellent for nighttime cityscape shots or dramatic portrait photography. Furthermore, you can use it to create a dark and edgy vibe for your content.

3.Urban LUTs
Urban LUT is a pack of 10 rich-color LUTs you can use on your photos and videos. This pack has a bright and cheerful feel to it. It enhances the colors in your photos and videos, making them pop and look more vibrant. Additionally, you can use it to create a fun and lively atmosphere for your content. Moreover, you can try this pack for your vacation photos or family videos to give them an energetic feel.

4.90’s Vintage LUT Presets
If you want to add a vintage and retro look to your content, 90’s Vintage LUT Presets are perfect. It has a yellow and orange tone that can give your photos and videos an old-fashioned and nostalgic feel. Moreover, it gives your media a 90s feel with ten different LUTs. This pack can create a vintage feel for your content and give your project a throwback look.

5. 8 Free Pastel Day Lightroom Presets and LUTs
This LUT offers eight paste color-grade presets for photos and videos. This pack has a soft and pastel tone to give your media a dreamy and romantic look for your content. It’s excellent for portrait photography, especially for outdoor shoots with natural lighting. Additionally, you can use it to create a soft and gentle vibe for your content with a more delicate touch.

Bonus Part: Wondershare Filmora: A Great Haven for LUTs
Wondershare Filmora might just be what you need to give your videos a cinematic touch. This powerful tool has over 200+ LUTs in its library to give your videos the perfect tone and color grading. You can even adjust the intensity of the LUTs to match the mood of your videos. Furthermore, you can tweak with basic options like hue, saturation, exposure, white balance, and more.
In addition, Wondershare Filmora offers over 10 billion free stock media for you to use in your photos and videos. Moreover, you can even save your music videos up to 4K resolution with sharper and more detailed results. Additionally, you can use the audio visualizer to match the sound of your video automatically. You can choose from different transitions and effects for your videos as well.

Empower your videos with a new mood using different LUTs. Filmora now offers 100+ top-quality 3D LUTs cover a broad range of scenarios. Transform your videos with Filmora’s powerful 3D LUTs.
Apply LUT on Videos Apply LUT on Videos Learn More


Conclusion
In conclusion, LUTs are a powerful tool for video editors who want to give their videos a cinematic look. You can easily achieve the perfect tone and color grading for your videos and pictures. Moreover, LUTs can save you time and effort in video editing. With many paid and free LUTs for Lightroom available that you can use to create professional-looking videos.
Part 1: How Are LUTs Influencing Video Editors?
There are many ways in which LUTs can help and influence content creators and video editors. From Lightroom presets to Premiere Pro presets, you can download any. However, you need to learn the many ways in which LUTs are helping editors.
Efficiency
LUTs (Lookup Tables) are a powerful tool that can help you in many ways if you are a video editor. First, they can make your editing process more efficient. You can apply color grading and correction to your footage, saving you time and increasing productivity. Instead of manually adjusting the colors for each clip, you can use LUTs to achieve a particular look.
Creativity
In addition to efficiency, LUTs also offer a wide range of creative options. You can use LUTs to explore different styles and moods, from vintage looks to modern cinematic ones. It can help you create a unique style for your videos and make them look more meaningful. With LUTs, you can experiment with different colors and effects to achieve the perfect look for your footage.
Consistency
Another benefit of using LUTs is consistency. With LUTs, you can maintain a consistent look and feel across different video clips. It gives all clips in a project a cohesive and professional appearance. These LUTs can be especially helpful if you work on a long-term project or with multiple editors. It will give a uniform look and feel throughout your project.
Accessibility
LUTs are also becoming more accessible than ever before. With free and paid online options, video editors of all skill levels can access these tools for their video projects. You don’t need extensive training or experience in color grading to use LUTs for your videos. Moreover, anyone can use LUTs with simple steps and make their content look more professional.
Part 2: Top Free LUTs for Lightroom
You don’t need to search for free LUTs for Lightroom for your media content. Here is a list of 5 Lightroom LUTs free to download to color grade your media in different tones.
1.50 Vintage Cinematic Lightroom Presets and LUTs
It is a pack of 50 Cinematic-style vintage LUTs you can apply to your media files. This LUT pack has a warm and orangey tone to give a golden hour and warm color scheme touch. You can use it to create a vintage, nostalgic look for your content. Furthermore, you can use your travel photos or outdoor adventure videos to give them a dreamy rusty vibe.
2. Free LUTs Ciné Green
If you want to add a cool and moody feel to your content, try using this LUT. It has a greenish-blue tone that can give your photos and videos a mysterious and cinematic look. Moreover, this LUT is excellent for nighttime cityscape shots or dramatic portrait photography. Furthermore, you can use it to create a dark and edgy vibe for your content.
3.Urban LUTs
Urban LUT is a pack of 10 rich-color LUTs you can use on your photos and videos. This pack has a bright and cheerful feel to it. It enhances the colors in your photos and videos, making them pop and look more vibrant. Additionally, you can use it to create a fun and lively atmosphere for your content. Moreover, you can try this pack for your vacation photos or family videos to give them an energetic feel.
4.90’s Vintage LUT Presets
If you want to add a vintage and retro look to your content, 90’s Vintage LUT Presets are perfect. It has a yellow and orange tone that can give your photos and videos an old-fashioned and nostalgic feel. Moreover, it gives your media a 90s feel with ten different LUTs. This pack can create a vintage feel for your content and give your project a throwback look.
5. 8 Free Pastel Day Lightroom Presets and LUTs
This LUT offers eight paste color-grade presets for photos and videos. This pack has a soft and pastel tone to give your media a dreamy and romantic look for your content. It’s excellent for portrait photography, especially for outdoor shoots with natural lighting. Additionally, you can use it to create a soft and gentle vibe for your content with a more delicate touch.
Bonus Part: Wondershare Filmora: A Great Haven for LUTs
Wondershare Filmora might just be what you need to give your videos a cinematic touch. This powerful tool has over 200+ LUTs in its library to give your videos the perfect tone and color grading. You can even adjust the intensity of the LUTs to match the mood of your videos. Furthermore, you can tweak with basic options like hue, saturation, exposure, white balance, and more.
In addition, Wondershare Filmora offers over 10 billion free stock media for you to use in your photos and videos. Moreover, you can even save your music videos up to 4K resolution with sharper and more detailed results. Additionally, you can use the audio visualizer to match the sound of your video automatically. You can choose from different transitions and effects for your videos as well.
Empower your videos with a new mood using different LUTs. Filmora now offers 100+ top-quality 3D LUTs cover a broad range of scenarios. Transform your videos with Filmora’s powerful 3D LUTs.
Apply LUT on Videos Apply LUT on Videos Learn More
Conclusion
In conclusion, LUTs are a powerful tool for video editors who want to give their videos a cinematic look. You can easily achieve the perfect tone and color grading for your videos and pictures. Moreover, LUTs can save you time and effort in video editing. With many paid and free LUTs for Lightroom available that you can use to create professional-looking videos.
Finding Best GIF Websites Is Easy as Pie — Here’s What You Should Know
Finding Best GIF Websites Is Easy as Pie — Here’s What You Should Know
An easy yet powerful editor
Numerous effects to choose from
Detailed tutorials provided by the official channel
Want a heap of the most exiting GIFs? Here are the best websites to visit.
In this article
01 [10 Sites for Finding the Perfect GIF](#Part 1)
02 [How to Use Animated GIF Makers](#Part 2)
03 [5 Stunning Examples of Gifs in Web Design](#Part 3)
Part 1 Sites for Finding the Perfect GIF
Information was never so expressive until GIFs came up as delivery platform. Looking through the frame of content diversity and effective delivery, there’s possibly nothing that is left untouched by these short, precise and creative snippets. When the talk is about long term user credibility, creativity is one thing, while reach is the other.
No doubt about the creative aspect, but the convenient availability holds equal importance. However captivating a utility nay be, you would certainly not be interested to spend quality time searching the apt content. Let’s take a look at some of the most popular and convenient GIF website that will surely put a full stop on your search spree for a relatable GIF.
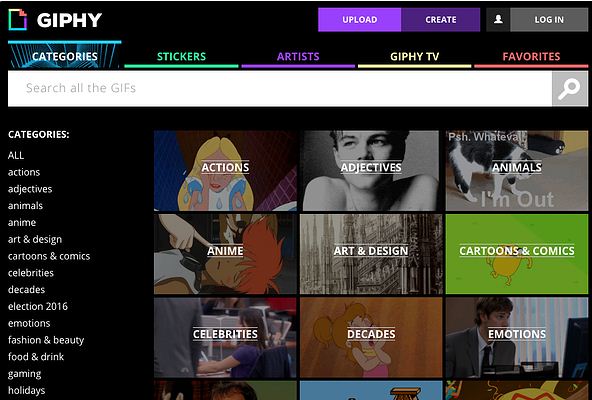
01GIPHY
Initially launched as a GIF search engine, thin is a complete storehouse on almost everything that you can possibly think of. The extensive content library of this site is all set to meet your most specific content requirements in less than a blink’s time. You get an access to quality content in music, science, nature and what not on this free GIF website.
Talking of search flexibility, GIPHY is known to have the most advanced and updated search bar that ensures that top quality and fresh content is always at the hand of its users. You can browse through the vast GIF categories of the site or look for your exact content using a specific search keyword.
02Reddit
You can regard this site as a GIF membership community, where you can find a variety of impressive sub-reddits in the GIF category. The best part is, you will never find recursive content on any two or more sub-reddits as each one is developed and updated keeping different content specifications in mind.

You are given access to even finer content libraries in some particular sub-reddits that follow a sequential guideline to filter their entries according to user preferences. Some popular sub-reddits are listed below:
03Tumblr
Originally a blogging site, Tumblr is simply heaven for creating and sharing GIFs across media platforms. What’s interesting about the site is its content categorization, where bloggers on the site group relatable content under specific categories, which facilitates an easy, quick and hassle free search. Most of the GIF content on the site is either created in Photoshop or taken from across the web.
While the site has exciting GIF content for almost every scenario, the comedy genre is the st5arb attraction of this GIF platform. The huge comic content library of the site has hilarious memes and GIFs that will certainly leave you rolling over the floor. To enjoy your favorite content daily, you just need to search a relatable hashtag and follow some blogs on your searched content.

04Gfycat
This one lands among the most preferred GIF sites and is packed with an enormous inventory of memes and GIFs. Not just this, this one is a free GIF maker website that allows you to convert videos from almost every media platform into GIFs, independent of the video file format via its ‘Video to GIF Converter’ tool.
You can set a daily dose of your favorite, exciting GIF content by using either the search bar or the ‘Selection Menu’ in the left of the site’s Home page. You can even browse through latest GIF categories by navigating to the ‘Trending’ and ‘Explore’ sections.

05Tenor
You can prefer this site to enjoy your favorite GIFs on your PC or iOS device. The site gives you the liberty to share GIFs and memes directly from its library into any of your Instant Messaging chats or community conversations on social media platforms.
All you need to do is navigate to the Tenor search bar, put in a suitable keyword and there you can see loads of GIF content on your screen in less than a second’s time. With periodic updates and a cohesive interface, this site is your storehouse of latest and trendy GIFs, anytime and anywhere.
06Reaction GIFs
This site is known for having an exact content database for almost every thought that crosses your mind. It serves you with a refined search mechanism, having a different pathway for every search, depending on the content you are looking for. This is a perfect aid to get exactly what you want, without having to fuss out with unwanted stuff.
Talking of search methods, you will find a drop-down menu at the right to search GIFs that express ‘Emotions’ or one word answers (preferably a ‘Yes’ or a ‘No’). If you want something related to a more specific category, you can browse through the ‘Galleries’ and ‘Tags’ of the site (categories, like, OMG, LOL, etc).

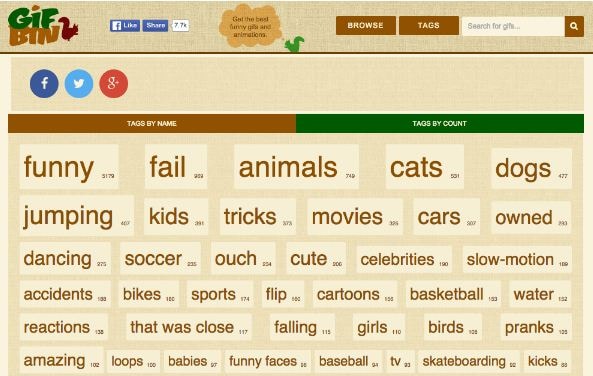
07GIFbin
This is again a trunk of latest, funny and entertaining GIFs tom watch and share. On this site, you get to add search filters, like, ‘Most Viewed’, ‘Latest’, ‘Top Rated’, etc., that refine your search to fetch exactly what you are looking for. You are also free to use ‘Search Tags’ grouped according to name and search count on the site.
The tag names are standard keywords (like, animals, sports, nature, etc.) and the count feature keeps a track of the most frequent searches, thus allowing you to find out your favorite GIFs in a more explicit manner. If you are clueless about anything specific, don’t worry. Hit the ‘Random GIFs’ button to explore a whole new world of fun and excitement.
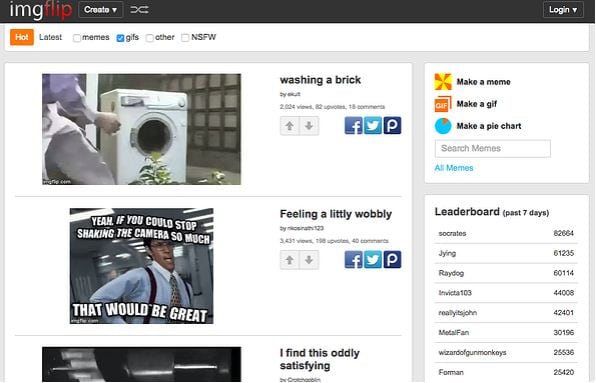
08Imgur
This site is popular in the meme world as a GIF sub-reddit that has explicitly no text threads. You can take this one as a free, GIF hosting and sharing website. While you can find loads of quality content on the site convenient to almost any genre, it is a leader in comic and funny GIFs. You can use different search tags for hilarious movie snippets, or some other fun element of your liking. This site’s image library is a hub of latest and nostalgic content.

09Imgflip
This is one more hotspot for relatable GIFs and memes. The best thing about the site is that it has separate search pathways to refine your search in cohesion with your content preference. Some common pathways are explained below:
● Browse the site’s homepage for the latest and trending GIF content.
● Simplify your search on specific content pages using the ‘Random’, ‘Next’ or ‘Previous’ navigation options.
● Prefer using ‘Image Hotkeys’ on the content pages.
● Try on ‘Tagging’ specific content pages (sunrise, snowfall, cats, etc.).
If you like competing with fellow visitors on the site, you can experiment with creating GIFs of your own and get ranked on the creator scoreboard. Bag a high vote count to get your GIF trending on the site.
10Gyazo
Last on the list, this is a somewhat different site in terms of features and search constraints. The exclusively unique ’Screen Capture’ feature of this site allows you to take a video of your device screen and use it to create a GIF of your own, making itself a quick and effective ‘Video to GIF Converter’ tool.
You will require creating an account on the site to maintain a library of your searched contents, which you can either tag on the site or downloaded to your device. You can further, export and share your creations across media platforms through this site.

Part 2 How to Use Animated GIF Makers
Landing into the creative and exciting world of GIFs, you can easily get motivated to try hands on making your own GIFs. The online market is a pool of solutions that claim of adhering to this concern in the most effective ways. When looking for the best GIF maker tools and software, you can definitely count upon the following choices:
01**Wondershare Filmora Video Editor **
This one is undoubtedly the best GIF creator software in current times. Using the plethora of audio-visual features, effects and image filters that are offered by this tool, creating animated GIFs is a spic and span process. The software grants you the liberty to play with and explore your editing skills to generate professional quality GIFs within minutes.

Wondershare Filmora - Best Video Editor for Mac/Windows
5,481,435 people have downloaded it.
Build unique custom animations without breaking a sweat.
Focus on creating epic stories and leave the details to Filmora’s auto features.
Start a creative adventure with drag & drop effects and endless possibilities.
Filmora simplifies advanced features to save you time and effort.
Filmora cuts out repetition so you can move on to your next creative breakthrough.
Here’s how you can use this software to become a pro at creating GIFs:
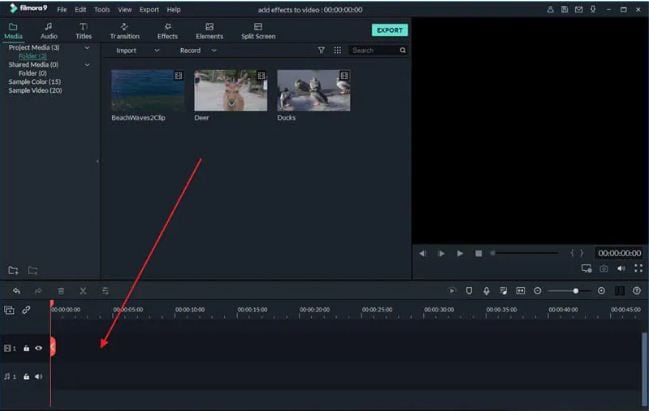
● Step 1: Import Required Media Files
To begin with, select any desired set of images or a particular video file to the Filmora timeline. You don’t need to be format specific; the software is compatible with over 150 different file formats.
● Step 2: Drag Files to Edit
Once you are done with selecting the files, you need to drag the same to the Filmora Editor Timeline, where you can transform the file contents with your editing skills.
● Step 3: Let’s Get Editing.
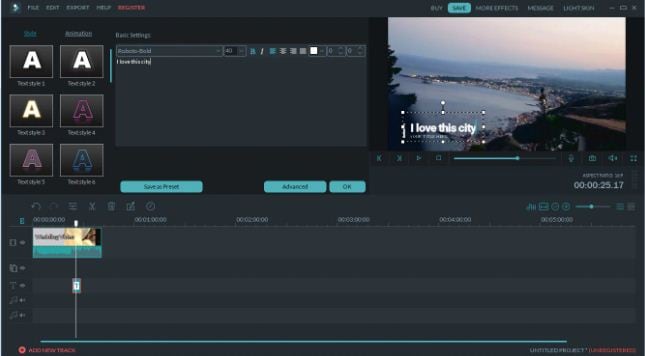
In the editor window, you are free tom choose from a range of effects, tools and filters suitable to your GIF content to give your artwork a new and engaging look. You can experiment with the cutting, cropping and trimming tools or play with effects, like, overlays, rotation and speed adjustments and even add texts to deliver messages that intensify your GIF.
● Step 4: Time to Save and Share.
Now is the time to save your work locally to your device using the .gif extension with your created file, as well as share it among your peers on social communities.

03Deal With It
This one is an online GIF maker tool that allows you to make top quality animated GIFs within a few seconds and you don’t even need to take up any third party software installation. Creating GIFs with this user friendly, clean interface and quick GIF generator utility is an absolute fun, to say the least.
Once you are done creating, the tools gives you the liberty to experiment with effects like, texts and glasses that would further intensify your GIF to the next level, and the best part is, all of this is available to you without having to spend a penny out of your pocket.
Explained below is the step wise user guide to use this tool for creating GIFs:
● Step 1:
Navigate to official website of the GIF creator tool.
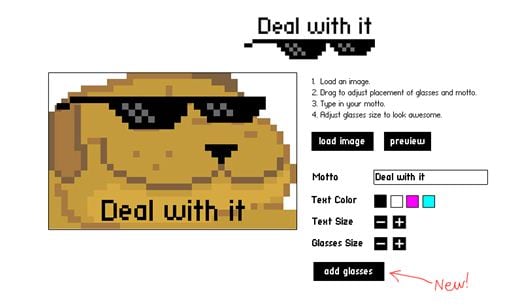
● Step 2:
Choose a desired locally saved image from your device and upload it in the tool’s editor window. To do this, click on the ‘Load Image’ button.
● Step 3:
You can now modify the uploaded image with text and glasses. This is it. Your GIF is ready to save and export.

03LunaPic
This one lands among the most preferred GIF maker tools available across the web. It comes with a clean interface, is free to use and does not require any third party software installation. You can create catchy and interesting GIF banners, or make captivating, animated GIF files with a series of still images using this tool. However, this GIF maker does not give you the liberty to take up editing and speed or accuracy modifications on your creation.
You need to follow the steps explained below to create your own GIF with LunaPic:
● Step 1:
Open the official site of LunaPic in your web browser.
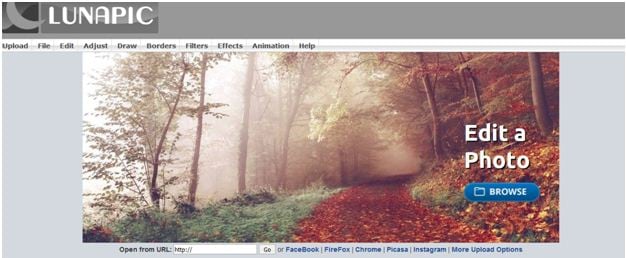
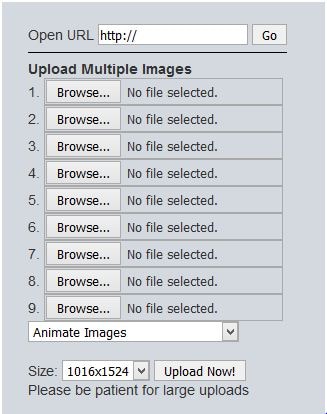
● Step 2:
Upload a desired one or a set of images you wish to use for making your GIF on the site. To do this, select a group of images from your device and tap ‘Upload’
.

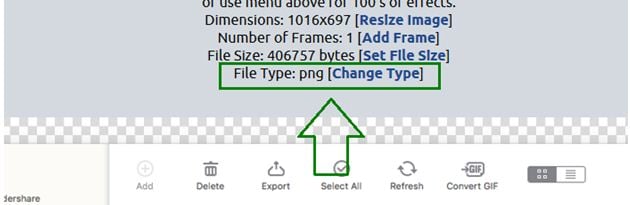
● Step 3:
Once uploaded, you can use your creativity to play with the effects library of the site and edit your images in its editing interface.
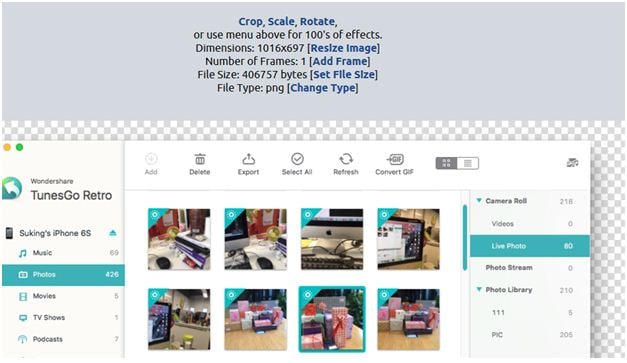
● Step 4:
When satisfied, choose the file type as GIF and hit the ‘Save’ option at the bottom. This will save your creation locally in your device, once the file conversion gets completed.
Image Name: Finding-best-gif-websites-is-easy-as-pie—here’s-what-you-should-know-22
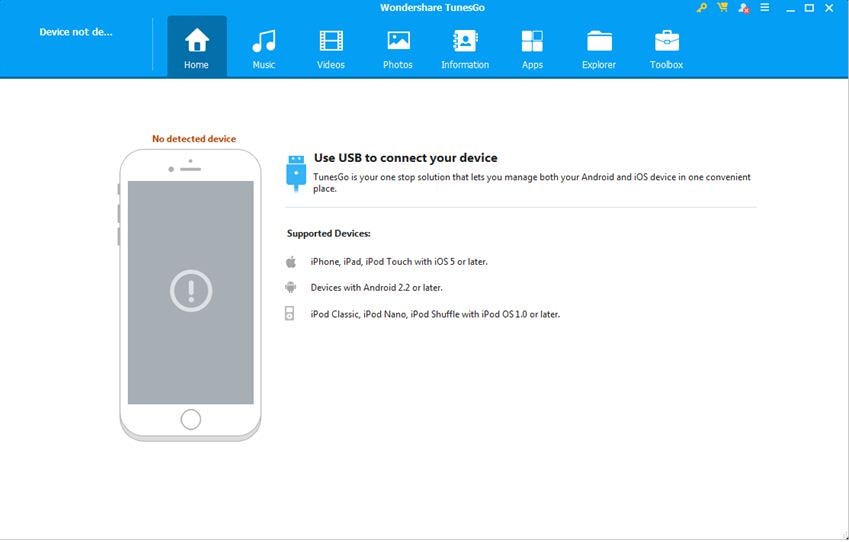
04Wondershare TunesGo
This one is another efficient animated GIF creator utility on the internet. Available to you as free online software, this tool promises you an amazing and hassle free GIF making experience. You can either create stunning GIFs of your own, or convert video files and even live photos into the same using this software. It allows you to set time slots for file conversions and make speed and flow adjustments for GIF frames, along with offering a plethora of editing effects to play with.
Here’s the know-how of using this software to create top quality animated GIFs:
● Step 1: Download and Launch the Software
Pay a visit to the official TunesGo website to download the software. Begin with installing and launching the same on your preferred device. When you finish, click on the ‘Toolbox’ tab at the top in the welcome screen.
● Step 2: Upload Media Files
In the software’s opening interface, choose the GIF Maker tool. In the following window that pops-up, click on ‘Add’ to upload the desired media files saved in your device, you want to create a GIF with.
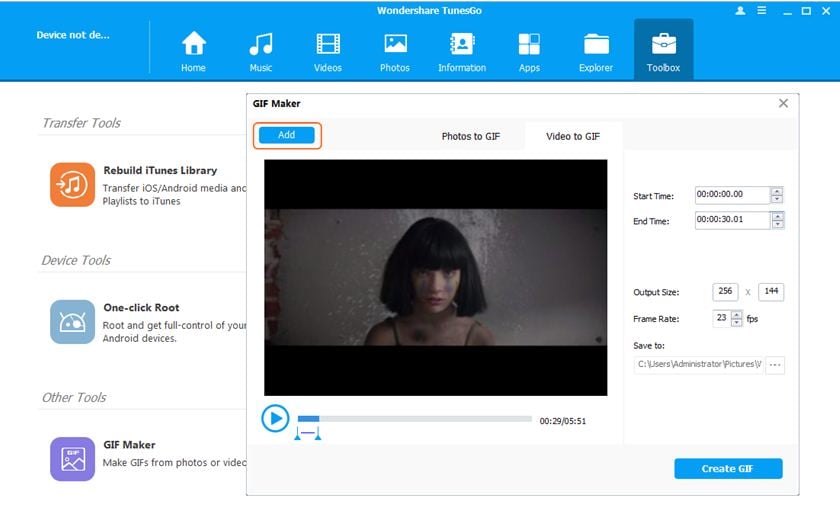
● Step 3: Convert to GIF
Set the media file to GIF conversion time and tap the ‘Create GIF’ button in the bottom-right to initiate the conversion process.

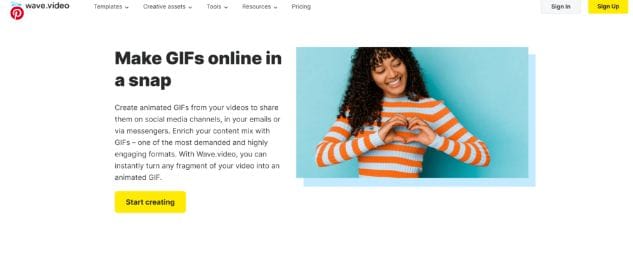
05Wave.video
This one is among the latest GIF maker tools that allow you to create animated GIFs from videos. What’s quite interesting about this Gif creation platform is, you can trim videos to the exact part depending on your content preference before beginning with the conversion process. You can also save your creation as a group of trimmed clips. It is a user friendly, free access online tool that does not ask you to install any third party software, and GIF creation with its mess-free interface is absolute fun.

Take the steps listed below to make GIFs with this online tool:
● Step 1: Choose a Project
To start working with this tool, you need to create an account on its official site. Having done that, just log into your account and upload a desired video you would like to use for creating a GIF. You have a choice to select a locally saved video, choose one from the templates available on the site or create something of your own.
● Step 2: Customization and Publishing
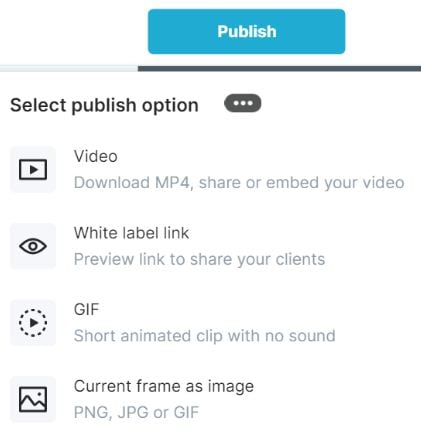
It is now time to try hands on editing your video with stunning effects like, overlays glasses, etc., or add impactful elements, such as, texts, stickers, etc., to make your artwork more impressive. When you are happy, navigate to the top-right and tap ‘Publish’. From the menu that drops down, select ‘GIF’.
● Step 3: Download Your Creation
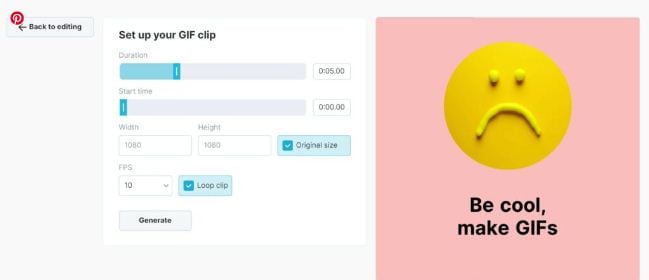
Select the section of your video you wish to convert into a GIF and proceed to fix the GIF start time and play duration. Check for any frame resize requirements, set an adequate frame rate and lastly, click on the ‘Loop Clip’ checkbox. This will produce an infinite loop GIF. When everything seems perfect, tap on ‘Generate’ followed by ‘Download’ to save your creation and share it on social media.
Part 3 5 Stunning Examples of Gifs in Web Design
The credibility of GIFs in market oriented content sharing and information publishing evidently does not require an introduction. These attractive snippets are expert means of business growth and customer appealing strategy planning to address attract a massive target audience within seconds.
Now that you are quite accustomed with the market reliability of GIFs, you may visibly feel motivated to use them to improvise your product websites for a next level market approach. However, before you plunge into using GIFs for your brand promotion, consider sparing a few minutes to browse through some top class product based GIFs to enhance your GIF creation and implementation aptitude.
Described below are some eye-catching examples of GIF for website background, you should certainly look forward to using in your business campaigns:
01Headscape
Having its roots in the United Kingdom, this is a top rated, digital media design corporation that excels in providing web design solutions to a diverse global clientele. Their unique idea of using GIFs in grayscale to depict conducive business settings is just perfect.
The monochromatic color balance with parallax scrolls makes this GIF all the more impactful. You can find impressive ways of using GIFs with a professional instinct on the company website and begin to add appeal to your market buildup strategies.
02Invision
This is another high ranked application marketing site that uses GIF for website background to improvise its product promotion. Equipped with a preset world class page makeover, the site’s look and appeal simply gets a boost with floating-text animated GIFs on an otherwise normal webpage.
As you move further on the Invision homepage, you will get to see a demonstration of the site’s prototype tool through GIFs that explain its working functionalities in the most interesting and convenient manner, thus putting forward and outrageously professional and effective marketing strategy.
03Macaw
This one is an excellent design utility that is equally suited to both web designers as well as site developers. On visiting the tool’s homepage, you are welcomed with a streamlined text setting on a black and white theme. Move a bit downwards, and there you see a cluster of animated GIFs in action to get you familiar with the interface and usage pattern of the Macaw design utility with utmost ease. It is convenient enough to make you feel as if you are actually using the tool.

04Giant Ant
Established as a creative firm, this one is known for its appealing website design. As you navigate through the site, you will find a still image complemented by cohesive text overlays. Beneath that, there are caricature forms of everyday objects, but the real magic happens when you click on a particular object and woosh. It instantly turns into an animated GIF. This explicit style of infusing dynamism to your website is simply awesome, to say the least.
05Tinke
This is intuitively a fitness tracker that keeps a record of your system vitals in the most effective manner. But that’s not all. The tracker website is equally amazing, setting the perfect example of using GIFs to improve market buildup. The site majorly utilizes the parallax scroll effect with animated GIFs to facilitate a live demonstration of the tracker functionality, coupled with an iPhone user guide and ways of sharing relatable content with fellow users.
● Key Takeaways from This Episode →
● Surfing the internet, you will land across some of the best GIF creator and downloader sites that are flooded with brilliant GIF content suited for almost every purpose.
● You can create your own animated GIFs on any GIF maker website or enjoy pre-made stuff to your heart’s content, where using Filmora is certainly the best choice. To explore something more exciting, try hands on using GIFs for product marketing and brand promotions on your business sites.
Want a heap of the most exiting GIFs? Here are the best websites to visit.
In this article
01 [10 Sites for Finding the Perfect GIF](#Part 1)
02 [How to Use Animated GIF Makers](#Part 2)
03 [5 Stunning Examples of Gifs in Web Design](#Part 3)
Part 1 Sites for Finding the Perfect GIF
Information was never so expressive until GIFs came up as delivery platform. Looking through the frame of content diversity and effective delivery, there’s possibly nothing that is left untouched by these short, precise and creative snippets. When the talk is about long term user credibility, creativity is one thing, while reach is the other.
No doubt about the creative aspect, but the convenient availability holds equal importance. However captivating a utility nay be, you would certainly not be interested to spend quality time searching the apt content. Let’s take a look at some of the most popular and convenient GIF website that will surely put a full stop on your search spree for a relatable GIF.
01GIPHY
Initially launched as a GIF search engine, thin is a complete storehouse on almost everything that you can possibly think of. The extensive content library of this site is all set to meet your most specific content requirements in less than a blink’s time. You get an access to quality content in music, science, nature and what not on this free GIF website.
Talking of search flexibility, GIPHY is known to have the most advanced and updated search bar that ensures that top quality and fresh content is always at the hand of its users. You can browse through the vast GIF categories of the site or look for your exact content using a specific search keyword.
02Reddit
You can regard this site as a GIF membership community, where you can find a variety of impressive sub-reddits in the GIF category. The best part is, you will never find recursive content on any two or more sub-reddits as each one is developed and updated keeping different content specifications in mind.
You are given access to even finer content libraries in some particular sub-reddits that follow a sequential guideline to filter their entries according to user preferences. Some popular sub-reddits are listed below:
03Tumblr
Originally a blogging site, Tumblr is simply heaven for creating and sharing GIFs across media platforms. What’s interesting about the site is its content categorization, where bloggers on the site group relatable content under specific categories, which facilitates an easy, quick and hassle free search. Most of the GIF content on the site is either created in Photoshop or taken from across the web.
While the site has exciting GIF content for almost every scenario, the comedy genre is the st5arb attraction of this GIF platform. The huge comic content library of the site has hilarious memes and GIFs that will certainly leave you rolling over the floor. To enjoy your favorite content daily, you just need to search a relatable hashtag and follow some blogs on your searched content.
04Gfycat
This one lands among the most preferred GIF sites and is packed with an enormous inventory of memes and GIFs. Not just this, this one is a free GIF maker website that allows you to convert videos from almost every media platform into GIFs, independent of the video file format via its ‘Video to GIF Converter’ tool.
You can set a daily dose of your favorite, exciting GIF content by using either the search bar or the ‘Selection Menu’ in the left of the site’s Home page. You can even browse through latest GIF categories by navigating to the ‘Trending’ and ‘Explore’ sections.
05Tenor
You can prefer this site to enjoy your favorite GIFs on your PC or iOS device. The site gives you the liberty to share GIFs and memes directly from its library into any of your Instant Messaging chats or community conversations on social media platforms.
All you need to do is navigate to the Tenor search bar, put in a suitable keyword and there you can see loads of GIF content on your screen in less than a second’s time. With periodic updates and a cohesive interface, this site is your storehouse of latest and trendy GIFs, anytime and anywhere.
06Reaction GIFs
This site is known for having an exact content database for almost every thought that crosses your mind. It serves you with a refined search mechanism, having a different pathway for every search, depending on the content you are looking for. This is a perfect aid to get exactly what you want, without having to fuss out with unwanted stuff.
Talking of search methods, you will find a drop-down menu at the right to search GIFs that express ‘Emotions’ or one word answers (preferably a ‘Yes’ or a ‘No’). If you want something related to a more specific category, you can browse through the ‘Galleries’ and ‘Tags’ of the site (categories, like, OMG, LOL, etc).
07GIFbin
This is again a trunk of latest, funny and entertaining GIFs tom watch and share. On this site, you get to add search filters, like, ‘Most Viewed’, ‘Latest’, ‘Top Rated’, etc., that refine your search to fetch exactly what you are looking for. You are also free to use ‘Search Tags’ grouped according to name and search count on the site.
The tag names are standard keywords (like, animals, sports, nature, etc.) and the count feature keeps a track of the most frequent searches, thus allowing you to find out your favorite GIFs in a more explicit manner. If you are clueless about anything specific, don’t worry. Hit the ‘Random GIFs’ button to explore a whole new world of fun and excitement.
08Imgur
This site is popular in the meme world as a GIF sub-reddit that has explicitly no text threads. You can take this one as a free, GIF hosting and sharing website. While you can find loads of quality content on the site convenient to almost any genre, it is a leader in comic and funny GIFs. You can use different search tags for hilarious movie snippets, or some other fun element of your liking. This site’s image library is a hub of latest and nostalgic content.
09Imgflip
This is one more hotspot for relatable GIFs and memes. The best thing about the site is that it has separate search pathways to refine your search in cohesion with your content preference. Some common pathways are explained below:
● Browse the site’s homepage for the latest and trending GIF content.
● Simplify your search on specific content pages using the ‘Random’, ‘Next’ or ‘Previous’ navigation options.
● Prefer using ‘Image Hotkeys’ on the content pages.
● Try on ‘Tagging’ specific content pages (sunrise, snowfall, cats, etc.).
If you like competing with fellow visitors on the site, you can experiment with creating GIFs of your own and get ranked on the creator scoreboard. Bag a high vote count to get your GIF trending on the site.
10Gyazo
Last on the list, this is a somewhat different site in terms of features and search constraints. The exclusively unique ’Screen Capture’ feature of this site allows you to take a video of your device screen and use it to create a GIF of your own, making itself a quick and effective ‘Video to GIF Converter’ tool.
You will require creating an account on the site to maintain a library of your searched contents, which you can either tag on the site or downloaded to your device. You can further, export and share your creations across media platforms through this site.
Part 2 How to Use Animated GIF Makers
Landing into the creative and exciting world of GIFs, you can easily get motivated to try hands on making your own GIFs. The online market is a pool of solutions that claim of adhering to this concern in the most effective ways. When looking for the best GIF maker tools and software, you can definitely count upon the following choices:
01**Wondershare Filmora Video Editor **
This one is undoubtedly the best GIF creator software in current times. Using the plethora of audio-visual features, effects and image filters that are offered by this tool, creating animated GIFs is a spic and span process. The software grants you the liberty to play with and explore your editing skills to generate professional quality GIFs within minutes.
Wondershare Filmora - Best Video Editor for Mac/Windows
5,481,435 people have downloaded it.
Build unique custom animations without breaking a sweat.
Focus on creating epic stories and leave the details to Filmora’s auto features.
Start a creative adventure with drag & drop effects and endless possibilities.
Filmora simplifies advanced features to save you time and effort.
Filmora cuts out repetition so you can move on to your next creative breakthrough.
Here’s how you can use this software to become a pro at creating GIFs:
● Step 1: Import Required Media Files
To begin with, select any desired set of images or a particular video file to the Filmora timeline. You don’t need to be format specific; the software is compatible with over 150 different file formats.
● Step 2: Drag Files to Edit
Once you are done with selecting the files, you need to drag the same to the Filmora Editor Timeline, where you can transform the file contents with your editing skills.
● Step 3: Let’s Get Editing.
In the editor window, you are free tom choose from a range of effects, tools and filters suitable to your GIF content to give your artwork a new and engaging look. You can experiment with the cutting, cropping and trimming tools or play with effects, like, overlays, rotation and speed adjustments and even add texts to deliver messages that intensify your GIF.
● Step 4: Time to Save and Share.
Now is the time to save your work locally to your device using the .gif extension with your created file, as well as share it among your peers on social communities.
03Deal With It
This one is an online GIF maker tool that allows you to make top quality animated GIFs within a few seconds and you don’t even need to take up any third party software installation. Creating GIFs with this user friendly, clean interface and quick GIF generator utility is an absolute fun, to say the least.
Once you are done creating, the tools gives you the liberty to experiment with effects like, texts and glasses that would further intensify your GIF to the next level, and the best part is, all of this is available to you without having to spend a penny out of your pocket.
Explained below is the step wise user guide to use this tool for creating GIFs:
● Step 1:
Navigate to official website of the GIF creator tool.
● Step 2:
Choose a desired locally saved image from your device and upload it in the tool’s editor window. To do this, click on the ‘Load Image’ button.
● Step 3:
You can now modify the uploaded image with text and glasses. This is it. Your GIF is ready to save and export.
03LunaPic
This one lands among the most preferred GIF maker tools available across the web. It comes with a clean interface, is free to use and does not require any third party software installation. You can create catchy and interesting GIF banners, or make captivating, animated GIF files with a series of still images using this tool. However, this GIF maker does not give you the liberty to take up editing and speed or accuracy modifications on your creation.
You need to follow the steps explained below to create your own GIF with LunaPic:
● Step 1:
Open the official site of LunaPic in your web browser.
● Step 2:
Upload a desired one or a set of images you wish to use for making your GIF on the site. To do this, select a group of images from your device and tap ‘Upload’
.
● Step 3:
Once uploaded, you can use your creativity to play with the effects library of the site and edit your images in its editing interface.
● Step 4:
When satisfied, choose the file type as GIF and hit the ‘Save’ option at the bottom. This will save your creation locally in your device, once the file conversion gets completed.
Image Name: Finding-best-gif-websites-is-easy-as-pie—here’s-what-you-should-know-22
04Wondershare TunesGo
This one is another efficient animated GIF creator utility on the internet. Available to you as free online software, this tool promises you an amazing and hassle free GIF making experience. You can either create stunning GIFs of your own, or convert video files and even live photos into the same using this software. It allows you to set time slots for file conversions and make speed and flow adjustments for GIF frames, along with offering a plethora of editing effects to play with.
Here’s the know-how of using this software to create top quality animated GIFs:
● Step 1: Download and Launch the Software
Pay a visit to the official TunesGo website to download the software. Begin with installing and launching the same on your preferred device. When you finish, click on the ‘Toolbox’ tab at the top in the welcome screen.
● Step 2: Upload Media Files
In the software’s opening interface, choose the GIF Maker tool. In the following window that pops-up, click on ‘Add’ to upload the desired media files saved in your device, you want to create a GIF with.
● Step 3: Convert to GIF
Set the media file to GIF conversion time and tap the ‘Create GIF’ button in the bottom-right to initiate the conversion process.
05Wave.video
This one is among the latest GIF maker tools that allow you to create animated GIFs from videos. What’s quite interesting about this Gif creation platform is, you can trim videos to the exact part depending on your content preference before beginning with the conversion process. You can also save your creation as a group of trimmed clips. It is a user friendly, free access online tool that does not ask you to install any third party software, and GIF creation with its mess-free interface is absolute fun.
Take the steps listed below to make GIFs with this online tool:
● Step 1: Choose a Project
To start working with this tool, you need to create an account on its official site. Having done that, just log into your account and upload a desired video you would like to use for creating a GIF. You have a choice to select a locally saved video, choose one from the templates available on the site or create something of your own.
● Step 2: Customization and Publishing
It is now time to try hands on editing your video with stunning effects like, overlays glasses, etc., or add impactful elements, such as, texts, stickers, etc., to make your artwork more impressive. When you are happy, navigate to the top-right and tap ‘Publish’. From the menu that drops down, select ‘GIF’.
● Step 3: Download Your Creation
Select the section of your video you wish to convert into a GIF and proceed to fix the GIF start time and play duration. Check for any frame resize requirements, set an adequate frame rate and lastly, click on the ‘Loop Clip’ checkbox. This will produce an infinite loop GIF. When everything seems perfect, tap on ‘Generate’ followed by ‘Download’ to save your creation and share it on social media.
Part 3 5 Stunning Examples of Gifs in Web Design
The credibility of GIFs in market oriented content sharing and information publishing evidently does not require an introduction. These attractive snippets are expert means of business growth and customer appealing strategy planning to address attract a massive target audience within seconds.
Now that you are quite accustomed with the market reliability of GIFs, you may visibly feel motivated to use them to improvise your product websites for a next level market approach. However, before you plunge into using GIFs for your brand promotion, consider sparing a few minutes to browse through some top class product based GIFs to enhance your GIF creation and implementation aptitude.
Described below are some eye-catching examples of GIF for website background, you should certainly look forward to using in your business campaigns:
01Headscape
Having its roots in the United Kingdom, this is a top rated, digital media design corporation that excels in providing web design solutions to a diverse global clientele. Their unique idea of using GIFs in grayscale to depict conducive business settings is just perfect.
The monochromatic color balance with parallax scrolls makes this GIF all the more impactful. You can find impressive ways of using GIFs with a professional instinct on the company website and begin to add appeal to your market buildup strategies.
02Invision
This is another high ranked application marketing site that uses GIF for website background to improvise its product promotion. Equipped with a preset world class page makeover, the site’s look and appeal simply gets a boost with floating-text animated GIFs on an otherwise normal webpage.
As you move further on the Invision homepage, you will get to see a demonstration of the site’s prototype tool through GIFs that explain its working functionalities in the most interesting and convenient manner, thus putting forward and outrageously professional and effective marketing strategy.
03Macaw
This one is an excellent design utility that is equally suited to both web designers as well as site developers. On visiting the tool’s homepage, you are welcomed with a streamlined text setting on a black and white theme. Move a bit downwards, and there you see a cluster of animated GIFs in action to get you familiar with the interface and usage pattern of the Macaw design utility with utmost ease. It is convenient enough to make you feel as if you are actually using the tool.
04Giant Ant
Established as a creative firm, this one is known for its appealing website design. As you navigate through the site, you will find a still image complemented by cohesive text overlays. Beneath that, there are caricature forms of everyday objects, but the real magic happens when you click on a particular object and woosh. It instantly turns into an animated GIF. This explicit style of infusing dynamism to your website is simply awesome, to say the least.
05Tinke
This is intuitively a fitness tracker that keeps a record of your system vitals in the most effective manner. But that’s not all. The tracker website is equally amazing, setting the perfect example of using GIFs to improve market buildup. The site majorly utilizes the parallax scroll effect with animated GIFs to facilitate a live demonstration of the tracker functionality, coupled with an iPhone user guide and ways of sharing relatable content with fellow users.
● Key Takeaways from This Episode →
● Surfing the internet, you will land across some of the best GIF creator and downloader sites that are flooded with brilliant GIF content suited for almost every purpose.
● You can create your own animated GIFs on any GIF maker website or enjoy pre-made stuff to your heart’s content, where using Filmora is certainly the best choice. To explore something more exciting, try hands on using GIFs for product marketing and brand promotions on your business sites.
Want a heap of the most exiting GIFs? Here are the best websites to visit.
In this article
01 [10 Sites for Finding the Perfect GIF](#Part 1)
02 [How to Use Animated GIF Makers](#Part 2)
03 [5 Stunning Examples of Gifs in Web Design](#Part 3)
Part 1 Sites for Finding the Perfect GIF
Information was never so expressive until GIFs came up as delivery platform. Looking through the frame of content diversity and effective delivery, there’s possibly nothing that is left untouched by these short, precise and creative snippets. When the talk is about long term user credibility, creativity is one thing, while reach is the other.
No doubt about the creative aspect, but the convenient availability holds equal importance. However captivating a utility nay be, you would certainly not be interested to spend quality time searching the apt content. Let’s take a look at some of the most popular and convenient GIF website that will surely put a full stop on your search spree for a relatable GIF.
01GIPHY
Initially launched as a GIF search engine, thin is a complete storehouse on almost everything that you can possibly think of. The extensive content library of this site is all set to meet your most specific content requirements in less than a blink’s time. You get an access to quality content in music, science, nature and what not on this free GIF website.
Talking of search flexibility, GIPHY is known to have the most advanced and updated search bar that ensures that top quality and fresh content is always at the hand of its users. You can browse through the vast GIF categories of the site or look for your exact content using a specific search keyword.
02Reddit
You can regard this site as a GIF membership community, where you can find a variety of impressive sub-reddits in the GIF category. The best part is, you will never find recursive content on any two or more sub-reddits as each one is developed and updated keeping different content specifications in mind.
You are given access to even finer content libraries in some particular sub-reddits that follow a sequential guideline to filter their entries according to user preferences. Some popular sub-reddits are listed below:
03Tumblr
Originally a blogging site, Tumblr is simply heaven for creating and sharing GIFs across media platforms. What’s interesting about the site is its content categorization, where bloggers on the site group relatable content under specific categories, which facilitates an easy, quick and hassle free search. Most of the GIF content on the site is either created in Photoshop or taken from across the web.
While the site has exciting GIF content for almost every scenario, the comedy genre is the st5arb attraction of this GIF platform. The huge comic content library of the site has hilarious memes and GIFs that will certainly leave you rolling over the floor. To enjoy your favorite content daily, you just need to search a relatable hashtag and follow some blogs on your searched content.
04Gfycat
This one lands among the most preferred GIF sites and is packed with an enormous inventory of memes and GIFs. Not just this, this one is a free GIF maker website that allows you to convert videos from almost every media platform into GIFs, independent of the video file format via its ‘Video to GIF Converter’ tool.
You can set a daily dose of your favorite, exciting GIF content by using either the search bar or the ‘Selection Menu’ in the left of the site’s Home page. You can even browse through latest GIF categories by navigating to the ‘Trending’ and ‘Explore’ sections.
05Tenor
You can prefer this site to enjoy your favorite GIFs on your PC or iOS device. The site gives you the liberty to share GIFs and memes directly from its library into any of your Instant Messaging chats or community conversations on social media platforms.
All you need to do is navigate to the Tenor search bar, put in a suitable keyword and there you can see loads of GIF content on your screen in less than a second’s time. With periodic updates and a cohesive interface, this site is your storehouse of latest and trendy GIFs, anytime and anywhere.
06Reaction GIFs
This site is known for having an exact content database for almost every thought that crosses your mind. It serves you with a refined search mechanism, having a different pathway for every search, depending on the content you are looking for. This is a perfect aid to get exactly what you want, without having to fuss out with unwanted stuff.
Talking of search methods, you will find a drop-down menu at the right to search GIFs that express ‘Emotions’ or one word answers (preferably a ‘Yes’ or a ‘No’). If you want something related to a more specific category, you can browse through the ‘Galleries’ and ‘Tags’ of the site (categories, like, OMG, LOL, etc).
07GIFbin
This is again a trunk of latest, funny and entertaining GIFs tom watch and share. On this site, you get to add search filters, like, ‘Most Viewed’, ‘Latest’, ‘Top Rated’, etc., that refine your search to fetch exactly what you are looking for. You are also free to use ‘Search Tags’ grouped according to name and search count on the site.
The tag names are standard keywords (like, animals, sports, nature, etc.) and the count feature keeps a track of the most frequent searches, thus allowing you to find out your favorite GIFs in a more explicit manner. If you are clueless about anything specific, don’t worry. Hit the ‘Random GIFs’ button to explore a whole new world of fun and excitement.
08Imgur
This site is popular in the meme world as a GIF sub-reddit that has explicitly no text threads. You can take this one as a free, GIF hosting and sharing website. While you can find loads of quality content on the site convenient to almost any genre, it is a leader in comic and funny GIFs. You can use different search tags for hilarious movie snippets, or some other fun element of your liking. This site’s image library is a hub of latest and nostalgic content.
09Imgflip
This is one more hotspot for relatable GIFs and memes. The best thing about the site is that it has separate search pathways to refine your search in cohesion with your content preference. Some common pathways are explained below:
● Browse the site’s homepage for the latest and trending GIF content.
● Simplify your search on specific content pages using the ‘Random’, ‘Next’ or ‘Previous’ navigation options.
● Prefer using ‘Image Hotkeys’ on the content pages.
● Try on ‘Tagging’ specific content pages (sunrise, snowfall, cats, etc.).
If you like competing with fellow visitors on the site, you can experiment with creating GIFs of your own and get ranked on the creator scoreboard. Bag a high vote count to get your GIF trending on the site.
10Gyazo
Last on the list, this is a somewhat different site in terms of features and search constraints. The exclusively unique ’Screen Capture’ feature of this site allows you to take a video of your device screen and use it to create a GIF of your own, making itself a quick and effective ‘Video to GIF Converter’ tool.
You will require creating an account on the site to maintain a library of your searched contents, which you can either tag on the site or downloaded to your device. You can further, export and share your creations across media platforms through this site.
Part 2 How to Use Animated GIF Makers
Landing into the creative and exciting world of GIFs, you can easily get motivated to try hands on making your own GIFs. The online market is a pool of solutions that claim of adhering to this concern in the most effective ways. When looking for the best GIF maker tools and software, you can definitely count upon the following choices:
01**Wondershare Filmora Video Editor **
This one is undoubtedly the best GIF creator software in current times. Using the plethora of audio-visual features, effects and image filters that are offered by this tool, creating animated GIFs is a spic and span process. The software grants you the liberty to play with and explore your editing skills to generate professional quality GIFs within minutes.
Wondershare Filmora - Best Video Editor for Mac/Windows
5,481,435 people have downloaded it.
Build unique custom animations without breaking a sweat.
Focus on creating epic stories and leave the details to Filmora’s auto features.
Start a creative adventure with drag & drop effects and endless possibilities.
Filmora simplifies advanced features to save you time and effort.
Filmora cuts out repetition so you can move on to your next creative breakthrough.
Here’s how you can use this software to become a pro at creating GIFs:
● Step 1: Import Required Media Files
To begin with, select any desired set of images or a particular video file to the Filmora timeline. You don’t need to be format specific; the software is compatible with over 150 different file formats.
● Step 2: Drag Files to Edit
Once you are done with selecting the files, you need to drag the same to the Filmora Editor Timeline, where you can transform the file contents with your editing skills.
● Step 3: Let’s Get Editing.
In the editor window, you are free tom choose from a range of effects, tools and filters suitable to your GIF content to give your artwork a new and engaging look. You can experiment with the cutting, cropping and trimming tools or play with effects, like, overlays, rotation and speed adjustments and even add texts to deliver messages that intensify your GIF.
● Step 4: Time to Save and Share.
Now is the time to save your work locally to your device using the .gif extension with your created file, as well as share it among your peers on social communities.
03Deal With It
This one is an online GIF maker tool that allows you to make top quality animated GIFs within a few seconds and you don’t even need to take up any third party software installation. Creating GIFs with this user friendly, clean interface and quick GIF generator utility is an absolute fun, to say the least.
Once you are done creating, the tools gives you the liberty to experiment with effects like, texts and glasses that would further intensify your GIF to the next level, and the best part is, all of this is available to you without having to spend a penny out of your pocket.
Explained below is the step wise user guide to use this tool for creating GIFs:
● Step 1:
Navigate to official website of the GIF creator tool.
● Step 2:
Choose a desired locally saved image from your device and upload it in the tool’s editor window. To do this, click on the ‘Load Image’ button.
● Step 3:
You can now modify the uploaded image with text and glasses. This is it. Your GIF is ready to save and export.
03LunaPic
This one lands among the most preferred GIF maker tools available across the web. It comes with a clean interface, is free to use and does not require any third party software installation. You can create catchy and interesting GIF banners, or make captivating, animated GIF files with a series of still images using this tool. However, this GIF maker does not give you the liberty to take up editing and speed or accuracy modifications on your creation.
You need to follow the steps explained below to create your own GIF with LunaPic:
● Step 1:
Open the official site of LunaPic in your web browser.
● Step 2:
Upload a desired one or a set of images you wish to use for making your GIF on the site. To do this, select a group of images from your device and tap ‘Upload’
.
● Step 3:
Once uploaded, you can use your creativity to play with the effects library of the site and edit your images in its editing interface.
● Step 4:
When satisfied, choose the file type as GIF and hit the ‘Save’ option at the bottom. This will save your creation locally in your device, once the file conversion gets completed.
Image Name: Finding-best-gif-websites-is-easy-as-pie—here’s-what-you-should-know-22
04Wondershare TunesGo
This one is another efficient animated GIF creator utility on the internet. Available to you as free online software, this tool promises you an amazing and hassle free GIF making experience. You can either create stunning GIFs of your own, or convert video files and even live photos into the same using this software. It allows you to set time slots for file conversions and make speed and flow adjustments for GIF frames, along with offering a plethora of editing effects to play with.
Here’s the know-how of using this software to create top quality animated GIFs:
● Step 1: Download and Launch the Software
Pay a visit to the official TunesGo website to download the software. Begin with installing and launching the same on your preferred device. When you finish, click on the ‘Toolbox’ tab at the top in the welcome screen.
● Step 2: Upload Media Files
In the software’s opening interface, choose the GIF Maker tool. In the following window that pops-up, click on ‘Add’ to upload the desired media files saved in your device, you want to create a GIF with.
● Step 3: Convert to GIF
Set the media file to GIF conversion time and tap the ‘Create GIF’ button in the bottom-right to initiate the conversion process.
05Wave.video
This one is among the latest GIF maker tools that allow you to create animated GIFs from videos. What’s quite interesting about this Gif creation platform is, you can trim videos to the exact part depending on your content preference before beginning with the conversion process. You can also save your creation as a group of trimmed clips. It is a user friendly, free access online tool that does not ask you to install any third party software, and GIF creation with its mess-free interface is absolute fun.
Take the steps listed below to make GIFs with this online tool:
● Step 1: Choose a Project
To start working with this tool, you need to create an account on its official site. Having done that, just log into your account and upload a desired video you would like to use for creating a GIF. You have a choice to select a locally saved video, choose one from the templates available on the site or create something of your own.
● Step 2: Customization and Publishing
It is now time to try hands on editing your video with stunning effects like, overlays glasses, etc., or add impactful elements, such as, texts, stickers, etc., to make your artwork more impressive. When you are happy, navigate to the top-right and tap ‘Publish’. From the menu that drops down, select ‘GIF’.
● Step 3: Download Your Creation
Select the section of your video you wish to convert into a GIF and proceed to fix the GIF start time and play duration. Check for any frame resize requirements, set an adequate frame rate and lastly, click on the ‘Loop Clip’ checkbox. This will produce an infinite loop GIF. When everything seems perfect, tap on ‘Generate’ followed by ‘Download’ to save your creation and share it on social media.
Part 3 5 Stunning Examples of Gifs in Web Design
The credibility of GIFs in market oriented content sharing and information publishing evidently does not require an introduction. These attractive snippets are expert means of business growth and customer appealing strategy planning to address attract a massive target audience within seconds.
Now that you are quite accustomed with the market reliability of GIFs, you may visibly feel motivated to use them to improvise your product websites for a next level market approach. However, before you plunge into using GIFs for your brand promotion, consider sparing a few minutes to browse through some top class product based GIFs to enhance your GIF creation and implementation aptitude.
Described below are some eye-catching examples of GIF for website background, you should certainly look forward to using in your business campaigns:
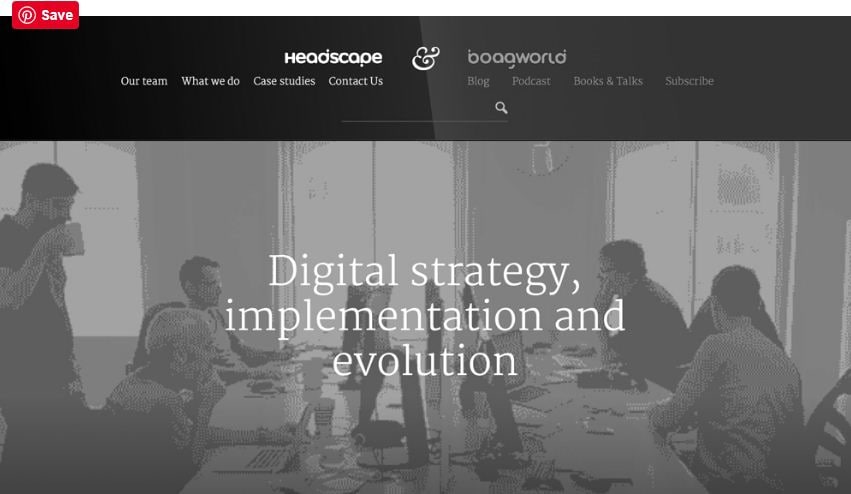
01Headscape
Having its roots in the United Kingdom, this is a top rated, digital media design corporation that excels in providing web design solutions to a diverse global clientele. Their unique idea of using GIFs in grayscale to depict conducive business settings is just perfect.
The monochromatic color balance with parallax scrolls makes this GIF all the more impactful. You can find impressive ways of using GIFs with a professional instinct on the company website and begin to add appeal to your market buildup strategies.
02Invision
This is another high ranked application marketing site that uses GIF for website background to improvise its product promotion. Equipped with a preset world class page makeover, the site’s look and appeal simply gets a boost with floating-text animated GIFs on an otherwise normal webpage.
As you move further on the Invision homepage, you will get to see a demonstration of the site’s prototype tool through GIFs that explain its working functionalities in the most interesting and convenient manner, thus putting forward and outrageously professional and effective marketing strategy.
03Macaw
This one is an excellent design utility that is equally suited to both web designers as well as site developers. On visiting the tool’s homepage, you are welcomed with a streamlined text setting on a black and white theme. Move a bit downwards, and there you see a cluster of animated GIFs in action to get you familiar with the interface and usage pattern of the Macaw design utility with utmost ease. It is convenient enough to make you feel as if you are actually using the tool.
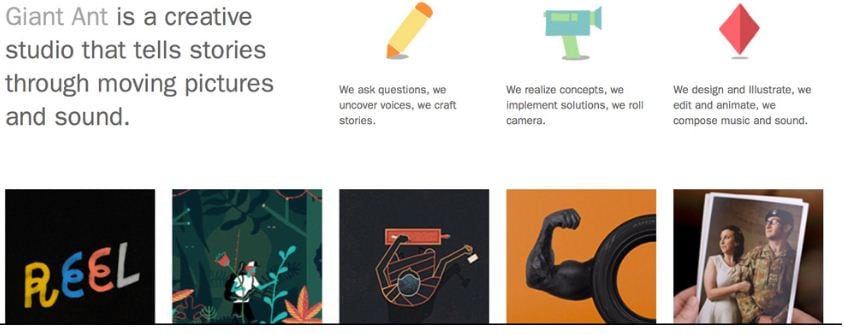
04Giant Ant
Established as a creative firm, this one is known for its appealing website design. As you navigate through the site, you will find a still image complemented by cohesive text overlays. Beneath that, there are caricature forms of everyday objects, but the real magic happens when you click on a particular object and woosh. It instantly turns into an animated GIF. This explicit style of infusing dynamism to your website is simply awesome, to say the least.
05Tinke
This is intuitively a fitness tracker that keeps a record of your system vitals in the most effective manner. But that’s not all. The tracker website is equally amazing, setting the perfect example of using GIFs to improve market buildup. The site majorly utilizes the parallax scroll effect with animated GIFs to facilitate a live demonstration of the tracker functionality, coupled with an iPhone user guide and ways of sharing relatable content with fellow users.
● Key Takeaways from This Episode →
● Surfing the internet, you will land across some of the best GIF creator and downloader sites that are flooded with brilliant GIF content suited for almost every purpose.
● You can create your own animated GIFs on any GIF maker website or enjoy pre-made stuff to your heart’s content, where using Filmora is certainly the best choice. To explore something more exciting, try hands on using GIFs for product marketing and brand promotions on your business sites.
Want a heap of the most exiting GIFs? Here are the best websites to visit.
In this article
01 [10 Sites for Finding the Perfect GIF](#Part 1)
02 [How to Use Animated GIF Makers](#Part 2)
03 [5 Stunning Examples of Gifs in Web Design](#Part 3)
Part 1 Sites for Finding the Perfect GIF
Information was never so expressive until GIFs came up as delivery platform. Looking through the frame of content diversity and effective delivery, there’s possibly nothing that is left untouched by these short, precise and creative snippets. When the talk is about long term user credibility, creativity is one thing, while reach is the other.
No doubt about the creative aspect, but the convenient availability holds equal importance. However captivating a utility nay be, you would certainly not be interested to spend quality time searching the apt content. Let’s take a look at some of the most popular and convenient GIF website that will surely put a full stop on your search spree for a relatable GIF.
01GIPHY
Initially launched as a GIF search engine, thin is a complete storehouse on almost everything that you can possibly think of. The extensive content library of this site is all set to meet your most specific content requirements in less than a blink’s time. You get an access to quality content in music, science, nature and what not on this free GIF website.
Talking of search flexibility, GIPHY is known to have the most advanced and updated search bar that ensures that top quality and fresh content is always at the hand of its users. You can browse through the vast GIF categories of the site or look for your exact content using a specific search keyword.
02Reddit
You can regard this site as a GIF membership community, where you can find a variety of impressive sub-reddits in the GIF category. The best part is, you will never find recursive content on any two or more sub-reddits as each one is developed and updated keeping different content specifications in mind.
You are given access to even finer content libraries in some particular sub-reddits that follow a sequential guideline to filter their entries according to user preferences. Some popular sub-reddits are listed below:
03Tumblr
Originally a blogging site, Tumblr is simply heaven for creating and sharing GIFs across media platforms. What’s interesting about the site is its content categorization, where bloggers on the site group relatable content under specific categories, which facilitates an easy, quick and hassle free search. Most of the GIF content on the site is either created in Photoshop or taken from across the web.
While the site has exciting GIF content for almost every scenario, the comedy genre is the st5arb attraction of this GIF platform. The huge comic content library of the site has hilarious memes and GIFs that will certainly leave you rolling over the floor. To enjoy your favorite content daily, you just need to search a relatable hashtag and follow some blogs on your searched content.
04Gfycat
This one lands among the most preferred GIF sites and is packed with an enormous inventory of memes and GIFs. Not just this, this one is a free GIF maker website that allows you to convert videos from almost every media platform into GIFs, independent of the video file format via its ‘Video to GIF Converter’ tool.
You can set a daily dose of your favorite, exciting GIF content by using either the search bar or the ‘Selection Menu’ in the left of the site’s Home page. You can even browse through latest GIF categories by navigating to the ‘Trending’ and ‘Explore’ sections.
05Tenor
You can prefer this site to enjoy your favorite GIFs on your PC or iOS device. The site gives you the liberty to share GIFs and memes directly from its library into any of your Instant Messaging chats or community conversations on social media platforms.
All you need to do is navigate to the Tenor search bar, put in a suitable keyword and there you can see loads of GIF content on your screen in less than a second’s time. With periodic updates and a cohesive interface, this site is your storehouse of latest and trendy GIFs, anytime and anywhere.
06Reaction GIFs
This site is known for having an exact content database for almost every thought that crosses your mind. It serves you with a refined search mechanism, having a different pathway for every search, depending on the content you are looking for. This is a perfect aid to get exactly what you want, without having to fuss out with unwanted stuff.
Talking of search methods, you will find a drop-down menu at the right to search GIFs that express ‘Emotions’ or one word answers (preferably a ‘Yes’ or a ‘No’). If you want something related to a more specific category, you can browse through the ‘Galleries’ and ‘Tags’ of the site (categories, like, OMG, LOL, etc).
07GIFbin
This is again a trunk of latest, funny and entertaining GIFs tom watch and share. On this site, you get to add search filters, like, ‘Most Viewed’, ‘Latest’, ‘Top Rated’, etc., that refine your search to fetch exactly what you are looking for. You are also free to use ‘Search Tags’ grouped according to name and search count on the site.
The tag names are standard keywords (like, animals, sports, nature, etc.) and the count feature keeps a track of the most frequent searches, thus allowing you to find out your favorite GIFs in a more explicit manner. If you are clueless about anything specific, don’t worry. Hit the ‘Random GIFs’ button to explore a whole new world of fun and excitement.
08Imgur
This site is popular in the meme world as a GIF sub-reddit that has explicitly no text threads. You can take this one as a free, GIF hosting and sharing website. While you can find loads of quality content on the site convenient to almost any genre, it is a leader in comic and funny GIFs. You can use different search tags for hilarious movie snippets, or some other fun element of your liking. This site’s image library is a hub of latest and nostalgic content.
09Imgflip
This is one more hotspot for relatable GIFs and memes. The best thing about the site is that it has separate search pathways to refine your search in cohesion with your content preference. Some common pathways are explained below:
● Browse the site’s homepage for the latest and trending GIF content.
● Simplify your search on specific content pages using the ‘Random’, ‘Next’ or ‘Previous’ navigation options.
● Prefer using ‘Image Hotkeys’ on the content pages.
● Try on ‘Tagging’ specific content pages (sunrise, snowfall, cats, etc.).
If you like competing with fellow visitors on the site, you can experiment with creating GIFs of your own and get ranked on the creator scoreboard. Bag a high vote count to get your GIF trending on the site.
10Gyazo
Last on the list, this is a somewhat different site in terms of features and search constraints. The exclusively unique ’Screen Capture’ feature of this site allows you to take a video of your device screen and use it to create a GIF of your own, making itself a quick and effective ‘Video to GIF Converter’ tool.
You will require creating an account on the site to maintain a library of your searched contents, which you can either tag on the site or downloaded to your device. You can further, export and share your creations across media platforms through this site.
Part 2 How to Use Animated GIF Makers
Landing into the creative and exciting world of GIFs, you can easily get motivated to try hands on making your own GIFs. The online market is a pool of solutions that claim of adhering to this concern in the most effective ways. When looking for the best GIF maker tools and software, you can definitely count upon the following choices:
01**Wondershare Filmora Video Editor **
This one is undoubtedly the best GIF creator software in current times. Using the plethora of audio-visual features, effects and image filters that are offered by this tool, creating animated GIFs is a spic and span process. The software grants you the liberty to play with and explore your editing skills to generate professional quality GIFs within minutes.
Wondershare Filmora - Best Video Editor for Mac/Windows
5,481,435 people have downloaded it.
Build unique custom animations without breaking a sweat.
Focus on creating epic stories and leave the details to Filmora’s auto features.
Start a creative adventure with drag & drop effects and endless possibilities.
Filmora simplifies advanced features to save you time and effort.
Filmora cuts out repetition so you can move on to your next creative breakthrough.
Here’s how you can use this software to become a pro at creating GIFs:
● Step 1: Import Required Media Files
To begin with, select any desired set of images or a particular video file to the Filmora timeline. You don’t need to be format specific; the software is compatible with over 150 different file formats.
● Step 2: Drag Files to Edit
Once you are done with selecting the files, you need to drag the same to the Filmora Editor Timeline, where you can transform the file contents with your editing skills.
● Step 3: Let’s Get Editing.
In the editor window, you are free tom choose from a range of effects, tools and filters suitable to your GIF content to give your artwork a new and engaging look. You can experiment with the cutting, cropping and trimming tools or play with effects, like, overlays, rotation and speed adjustments and even add texts to deliver messages that intensify your GIF.
● Step 4: Time to Save and Share.
Now is the time to save your work locally to your device using the .gif extension with your created file, as well as share it among your peers on social communities.
03Deal With It
This one is an online GIF maker tool that allows you to make top quality animated GIFs within a few seconds and you don’t even need to take up any third party software installation. Creating GIFs with this user friendly, clean interface and quick GIF generator utility is an absolute fun, to say the least.
Once you are done creating, the tools gives you the liberty to experiment with effects like, texts and glasses that would further intensify your GIF to the next level, and the best part is, all of this is available to you without having to spend a penny out of your pocket.
Explained below is the step wise user guide to use this tool for creating GIFs:
● Step 1:
Navigate to official website of the GIF creator tool.
● Step 2:
Choose a desired locally saved image from your device and upload it in the tool’s editor window. To do this, click on the ‘Load Image’ button.
● Step 3:
You can now modify the uploaded image with text and glasses. This is it. Your GIF is ready to save and export.
03LunaPic
This one lands among the most preferred GIF maker tools available across the web. It comes with a clean interface, is free to use and does not require any third party software installation. You can create catchy and interesting GIF banners, or make captivating, animated GIF files with a series of still images using this tool. However, this GIF maker does not give you the liberty to take up editing and speed or accuracy modifications on your creation.
You need to follow the steps explained below to create your own GIF with LunaPic:
● Step 1:
Open the official site of LunaPic in your web browser.
● Step 2:
Upload a desired one or a set of images you wish to use for making your GIF on the site. To do this, select a group of images from your device and tap ‘Upload’
.
● Step 3:
Once uploaded, you can use your creativity to play with the effects library of the site and edit your images in its editing interface.
● Step 4:
When satisfied, choose the file type as GIF and hit the ‘Save’ option at the bottom. This will save your creation locally in your device, once the file conversion gets completed.
Image Name: Finding-best-gif-websites-is-easy-as-pie—here’s-what-you-should-know-22
04Wondershare TunesGo
This one is another efficient animated GIF creator utility on the internet. Available to you as free online software, this tool promises you an amazing and hassle free GIF making experience. You can either create stunning GIFs of your own, or convert video files and even live photos into the same using this software. It allows you to set time slots for file conversions and make speed and flow adjustments for GIF frames, along with offering a plethora of editing effects to play with.
Here’s the know-how of using this software to create top quality animated GIFs:
● Step 1: Download and Launch the Software
Pay a visit to the official TunesGo website to download the software. Begin with installing and launching the same on your preferred device. When you finish, click on the ‘Toolbox’ tab at the top in the welcome screen.
● Step 2: Upload Media Files
In the software’s opening interface, choose the GIF Maker tool. In the following window that pops-up, click on ‘Add’ to upload the desired media files saved in your device, you want to create a GIF with.
● Step 3: Convert to GIF
Set the media file to GIF conversion time and tap the ‘Create GIF’ button in the bottom-right to initiate the conversion process.
05Wave.video
This one is among the latest GIF maker tools that allow you to create animated GIFs from videos. What’s quite interesting about this Gif creation platform is, you can trim videos to the exact part depending on your content preference before beginning with the conversion process. You can also save your creation as a group of trimmed clips. It is a user friendly, free access online tool that does not ask you to install any third party software, and GIF creation with its mess-free interface is absolute fun.
Take the steps listed below to make GIFs with this online tool:
● Step 1: Choose a Project
To start working with this tool, you need to create an account on its official site. Having done that, just log into your account and upload a desired video you would like to use for creating a GIF. You have a choice to select a locally saved video, choose one from the templates available on the site or create something of your own.
● Step 2: Customization and Publishing
It is now time to try hands on editing your video with stunning effects like, overlays glasses, etc., or add impactful elements, such as, texts, stickers, etc., to make your artwork more impressive. When you are happy, navigate to the top-right and tap ‘Publish’. From the menu that drops down, select ‘GIF’.
● Step 3: Download Your Creation
Select the section of your video you wish to convert into a GIF and proceed to fix the GIF start time and play duration. Check for any frame resize requirements, set an adequate frame rate and lastly, click on the ‘Loop Clip’ checkbox. This will produce an infinite loop GIF. When everything seems perfect, tap on ‘Generate’ followed by ‘Download’ to save your creation and share it on social media.
Part 3 5 Stunning Examples of Gifs in Web Design
The credibility of GIFs in market oriented content sharing and information publishing evidently does not require an introduction. These attractive snippets are expert means of business growth and customer appealing strategy planning to address attract a massive target audience within seconds.
Now that you are quite accustomed with the market reliability of GIFs, you may visibly feel motivated to use them to improvise your product websites for a next level market approach. However, before you plunge into using GIFs for your brand promotion, consider sparing a few minutes to browse through some top class product based GIFs to enhance your GIF creation and implementation aptitude.
Described below are some eye-catching examples of GIF for website background, you should certainly look forward to using in your business campaigns:
01Headscape
Having its roots in the United Kingdom, this is a top rated, digital media design corporation that excels in providing web design solutions to a diverse global clientele. Their unique idea of using GIFs in grayscale to depict conducive business settings is just perfect.
The monochromatic color balance with parallax scrolls makes this GIF all the more impactful. You can find impressive ways of using GIFs with a professional instinct on the company website and begin to add appeal to your market buildup strategies.
02Invision
This is another high ranked application marketing site that uses GIF for website background to improvise its product promotion. Equipped with a preset world class page makeover, the site’s look and appeal simply gets a boost with floating-text animated GIFs on an otherwise normal webpage.
As you move further on the Invision homepage, you will get to see a demonstration of the site’s prototype tool through GIFs that explain its working functionalities in the most interesting and convenient manner, thus putting forward and outrageously professional and effective marketing strategy.
03Macaw
This one is an excellent design utility that is equally suited to both web designers as well as site developers. On visiting the tool’s homepage, you are welcomed with a streamlined text setting on a black and white theme. Move a bit downwards, and there you see a cluster of animated GIFs in action to get you familiar with the interface and usage pattern of the Macaw design utility with utmost ease. It is convenient enough to make you feel as if you are actually using the tool.
04Giant Ant
Established as a creative firm, this one is known for its appealing website design. As you navigate through the site, you will find a still image complemented by cohesive text overlays. Beneath that, there are caricature forms of everyday objects, but the real magic happens when you click on a particular object and woosh. It instantly turns into an animated GIF. This explicit style of infusing dynamism to your website is simply awesome, to say the least.
05Tinke
This is intuitively a fitness tracker that keeps a record of your system vitals in the most effective manner. But that’s not all. The tracker website is equally amazing, setting the perfect example of using GIFs to improve market buildup. The site majorly utilizes the parallax scroll effect with animated GIFs to facilitate a live demonstration of the tracker functionality, coupled with an iPhone user guide and ways of sharing relatable content with fellow users.
● Key Takeaways from This Episode →
● Surfing the internet, you will land across some of the best GIF creator and downloader sites that are flooded with brilliant GIF content suited for almost every purpose.
● You can create your own animated GIFs on any GIF maker website or enjoy pre-made stuff to your heart’s content, where using Filmora is certainly the best choice. To explore something more exciting, try hands on using GIFs for product marketing and brand promotions on your business sites.
How to Resize FLV Videos Efficiently [Windows, Mac,Android, iPhone & Online]
FLV Videos are Flash Video files with a .flv file extension. FLV video files were once one of the most popular video file types and the standard video format used for embedding videos on the internet and streaming. Even though video files like mp4 and mkv have gained more popularity today, you can still come across many Flv videos on the internet.
In this article, you’ll be learning How to Resize FLV Videos Efficiently on all the platforms. But wait, what exactly does the resizing mean? When you are working with videos, resizing can mean two things: one is changing the aspect ratio or resolution of the video and another is changing the file size of the video. So let’s see how we can resize the flv videos efficiently on different platforms:
Best FLV Editor to Resize FLV Videos on Windows and Mac – Filmora Video Editor [with steps]
Among many different video editors available today, Filmora Video Editor is the one that climbs up the rank to the top. It is the best FLV editor on Windows and Mac for resizing and editing flv videos. Different social media platforms require videos of different sizes, resolutions, and aspect ratios. For eg: YouTube requires horizontal video, TikTok requires vertical, Emails have a size limit for every file, etc. That’s when the Filmora Video Editor comes into play for fast and easy resizing of any video for different platforms.
For Win 7 or later (64-bit)
For macOS 10.14 or later
Why choose Filmora Video Editor for resizing FLV videos, you say?
- Simple UI and easy interface
- Easily crop or change the aspect ratio of the video
- Not all video editors support FLV video format, but the Filmora does
- Advanced export options to compress or change the file size of video
- Suitable for beginners as well as professionals
- Regular software updates and improvements
Plus, Filmora Video Editor has a free version, so you can instantly download the program, install it, and get started on resizing FLV Videos. Below is a step-by-step guide to resize FLV Videos on Windows and Mac with Wondershare Filmora Video Editor, so you can follow along!
Steps to resize FLV videos with Filmora Video Editor:
- Launch Filmora and open a new project
Run the Wondershare Filmora application on Windows or Mac after installing it. Then you should automatically be inside a new project. If not, you can manually open a new project by going to File on the top left corner and then clicking on ‘**New Project**’.

- Import the FLV video and add it to timeline
Click on ‘**Import Media Files**’ and import the flv video into project media from your computer’s file explorer. Then add the video to the timeline by dragging it inside the timeline.

- Edit and perform desired modifications (Optional)
If you are just looking to resize the FLV video file, then you can skip this step and move to step no. 4. Otherwise, you can do various editings on the video like cropping, muting, trimming, animating, etc. before resizing the video. Filmora provides a wide range of features for editing and adding effects to the video.

- Resize the video by changing the aspect ratio
Aspect ratio defines the shape of your video like if you want the video to be horizontal, vertical, square, or custom. Generally, the term ‘resizing video’ refers to changing the aspect ratio of the video. For that, go to the File and then to the Project Settings. Then on the Aspect Ratio box, select the one that you prefer or you can try custom scaling. You can choose your preferred resolution of the project too while you’re at it.

- Resize the video by cropping
When you change the aspect ratio of the project, some parts of your flv video might not fit or it might be shrunk small to fit. So you need to resize the flv video by cropping so that you can crop and focus on the part of the video you like. To crop the video, select the flv video clip in the timeline and click on the crop icon in the timeline toolbar. Now choose the ratio you want to crop and select the part you’d like to keep. Then click OK and your flv video will be resized.

- Adjust the file size of the video through export settings
After you’ve cropped and resized the Flv video, you need to export it by clicking the Export button on the top center part. There are different settings available for exporting the video. Click on the Settings button near the resolution and you’ll be shown some detailed preferences for exporting. Every setting here like frame rate, resolution, bitrate, etc. can affect the size of the output video.

Filmora Video Editor really makes the task of editing and resizing FLV videos easier, simpler, and faster. Since you now know the steps, it’s time you try it and resize your own FLV videos with this best FLV Editor for Windows and Mac.
Alternative Way to Resize FLV Videos on Windows
In case you want to try something different than Filmora, here are two alternative software (one paid and another free) that you can use to resize your FLV Videos on Windows:
- Movavi Video Editor Plus

Movavi Video Editor Plus is one of the best easy-to-use video editors that can help you to resize FLV videos as well as edit them on Windows. Its interface and functionalities are somewhat similar to that of the Filmora Video Editor. This is a paid software available for download on both Windows and Mac but you can try it for free with their 7 days trial version.
Steps to resize FLV videos on Windows with Movavi Video Editor:
- Install Movavi Video Editor and run the software on your PC. Then you should automatically be inside a new project in it.

- Import the FLV video file you want to resize through the ‘File Import’ tab on the left and drag it to the timeline.

- To resize the aspect ratio, expand the resolution options near the preview screen above the export button and select the preferred ratio.

- To crop or resize the video, select the clip in the timeline and use the crop tool to make adjustments as you wish. Then hit Apply to save changes.

- After the video is ready, export it with the Export button on the right side of the screen. Then choose your preferred settings for output and click on Start after which your video will be rendered and saved to your PC.

- VSDC Free Video Editor

VSDC Free Video Editor is another alternative to Filmora for resizing FLV videos on Windows. It is a free video editor that packs a wide range of editing features without any restrictions. However, it does have a paid version with some advanced features and hardware acceleration.
Steps to resize FLV videos on Windows with VSDC Free Video Editor:
- Install and open VSDC video editor on your PC. Then create a new project with preferred settings through the ‘Projects’ tab on the top left corner.

- Import the video file into the project by dragging and dropping it directly into the timeline.

- To resize the aspect ratio, click on the Projects Explorer and click on your project name. Then in the Properties windows on the right, manually adjust width, height, resolution, etc. according to your preferences.

- To crop and reposition your video, select the clip in the timeline and go to the Editor tab on the top. Then use the crop tool and adjust your video accordingly.

- Finally export your design through the Export project tab at the top with preferred settings.

Alternative Way to Resize FLV Videos on Mac
Wondershare Filmora Video Editor is also available for Mac operating system which is recommended to resize FLV videos but if you want to try out some other alternatives, then below are the two ways to resize FLV videos on Mac:
- VideoProc Converter

VideoProc is a powerful video editor/ converter that helps you edit, convert, and resize any kind of video. It also supports a wide range of codecs and video formats including flv. It is a paid software but you can also try their free trial version with some limitations.
Steps to resize FLV videos on Mac with VideoProc:
- Launch VideoProc on a Mac device and go inside the Video

- Add files in VideoProc by drag and drop method or directly through the ‘Add Video’ option.

- Then click on the Options (codec) on the right side of the video and change the resolutions and aspect ratio of the video as you want. You can also manage export settings like quality, codec, fps, bitrate, etc. from this tab.

- Then go to the Crop section inside the Edit Video tab and crop the video as you like with preview and different other options.

- Finally click Done to go back and hit the Run This’ll start rendering the video and will save it to your Mac device.

- Shotcut

Shotcut is another alternative to Filmora Video Editor for resizing FLV videos on Mac. It is a free, open-source, and cross-platform video editor that has a sleek and intuitive interface with many useful editing features which really makes it suitable for both beginners as well as advanced editors.
Steps to resize FLV videos on Mac with Shotcut:
- Run the Shotcut program on your Mac after installing it and create a new project.

- Import the Flv video file to the project by drag and drop method into the timeline.

- To change the resolution and aspect ratio of the video, go to the Settings tab, then Video mode, and choose the format you want.

- To crop the video, select the clip in the timeline and go to the Filters Now click on the ‘**+**’ icon and select Size, Position & Rotate under the Favorite section. Then adjust crop settings as you like.

- Finally, go to the Export section at the top and click on Advanced. Then configure the output settings as you like and click on Export File.

2 Ways to Resize FLV Videos on Android
Wouldn’t it be great if you could resize FLV videos on your android device rather than having to open your computer for every small task? Previously, this was a major issue due to a lack of good video editors for android with flv support but that’s no longer the case. Below are two ways to resize FLV videos on android:
- Inshot

InShot is a powerful all-in-one video editor for android which acts both as a basic video editor as well as an advanced video editor with its simple design yet powerful features. There aren’t many video editors in Android that supports Flv or some older codecs, but InShot is one of the very few editors that support these video formats. It is a paid app but also has a limited free version to try.
Steps to resize FLV videos on Android with InShot:
- Open the Inshot app on your android device and click on Video.

- Now select the FLV video file and click on the tick icon near the bottom right.

- Then tap on the Crop option from the tools at the bottom.

- Now select the aspect ratio you like and crop accordingly.

- To save the video, tap on the Save button at the top right. Then choose the resolution and finally save the video to your device.

- AndroVid – Video Editor, Video Maker

AndroVid is an easy-to-use, full-featured video editor especially developed to edit videos for social media like YouTube, TikTok, Facebook, Instagram, etc. It is not a very popular application with just over 300k+ downloads in Google Play Store, but after testing it out, we thought it deserves to be in this article. It is available for free to download from Google Play Store.
Steps to resize FLV videos on Android with AndroVid Video Editor:
- Open AndroVid Video Editor on an android phone and go inside the Videos

- Now select the FLV video file that you want to resize.

- Inside editor, tap on the Crop tool in the toolbar at the top.

- Then select the preferred Aspect ratio from the top right, reposition the video area and tap on the tick icon to save the video.

- If you need to change the resolution too, click on the three dots at the top right after the video is saved successfully. Then choose the preferred resolution, quality, and format and click on the tick icon to export.

2 Ways to Resize FLV Videos on iPhone
Like Android, you can also resize FLV videos on your iPhone on the go without needing to use your computer. Doing such editing on mobile phones can really save your time and effort, so here are 2 ways for you to resize FLV videos on iPhone:
- Cyberlink Powerdirector

Cyberlink Powerdirector is one of the most popular as well as powerful video editors for Android and iOS. It is a full-featured mobile video editor with over 130M+ downloads on the App Store which allows you to do an advanced level of editing. It is a paid software but also has a free version available for download.
Steps to resize FLV videos on iPhone with PowerDirector:
- Launch the PowerDirector app on your iPhone and create a new project. Unlike other apps, you cannot change the aspect ratio later, so you need to set the aspect ratio you want while creating a new project.

- Now add the FLV video file into the timeline by tapping on the ‘**+**’ icon on the video. Then tap on the play button at the top right to enter the editor.

- To resize the video, select the video clip in the timeline and tap on the pencil icon at the bottom left. Then use different crop tools available to resize your video as you want.

- After you resize the video, tap on the export button on the top right to export it. Then tap on Produce and Share, and produce resized video with preferred settings.

- Splice – Video Editor & Maker

Splice – Video Editor & Maker is a simple yet powerful application that makes it easy to create fully customized and professional-looking videos on iPhone. It is another great app for resizing FLV videos on iPhone with over 70M+ downloads on App Store and it is available for free.
Steps to resize FLV videos on iPhone with Splice:
- Open the Splice app on the iPhone and tap on the ‘**+**’ icon to create a new project.

- Now select the flv video file to add and start the project.

- To resize the video, tap on the gear icon at the top right corner which opens up Project settings from where you can change the aspect ratio.

- To crop the video, select the clip in the timeline and tap on the Crop option in the toolbar. You can crop and reposition the video from there.

- Then click on the Export icon at the top right corner to export the video with preferred configurations.

2 Ways to Resize FLV Videos Online
Resizing is not that big of a task and you might just want to quickly resize your Flv video and share it. So why bother installing and running large video editing programs on your computer or even mobile phones when you can easily resize your videos in the web browser? Yes, you read that right, and below are the 2 ways for you to resize FLV videos online:
- io

Veed is a simple online video editing tool that you can access from any device with the help of a web browser. It can help you resize your Flv videos easily within just a few clicks. It has a clean and beautiful interface with a responsive design which provides you with a good editing experience while using it. It is a paid tool but you can also try it for free before purchasing it.
Steps to resize FLV videos online with Veed.io:
- Go to veed.io on your web browser and click on ‘Upload Your Video’ to get started without any account.

- Now upload the FLV video or you can directly drag and drop the video there.

- After you upload the video, you’ll be taken inside the Veed editor. To change the aspect ratio, go to the Size section inside Project Settings and choose the size you want to resize to.

- To crop the video, select the clip in the timeline and directly resize the video from the preview area. And you can also use settings like ‘Fill the canvas’ and ‘Fit the canvas’ at the left side for ease.

- Then click on the Export button at the top right corner to open Export settings. Configure the settings as you like and click on ‘Export Video’ to render and download the video.

- Clideo

When it comes to resizing or editing videos online, Clideo is one of the best tools you can rely on. Like Veed.io, it has a clean and responsive interface and supports many video formats including flv. Clideo is free to use but also comes with various subscription plans for extra functionalities.
Steps to resize FLV videos online with Clideo:
- Go to clideo.com/resize-video and upload your video through ‘Choose file’ button.

- To resize the aspect ratio, choose your desired formats in the ‘Resize for’ section. You can also manually set the aspect ratio.

- Then just below that, you’ll find various cropping options. Use them to crop or resize the video as you like.

- Finally, click on the Export button at the bottom right corner to export the video. You can download the video or can directly save to cloud storage like Drive, Dropbox, etc.

FAQs about Resizing FLV Video
Here are some of the Frequently Asked Questions (FAQs) related to resizing FLV videos that you might be interested in:
- How do I make FLV files smaller?
You can make FLV files smaller with the help of any video editor that supports Flv video format by cutting and cropping out unnecessary parts, decreasing the resolution, and bitrate, and converting flv into another lighter file format.
- Which video editors support FLV file format?
There are few video editors like Filmora, Movavi, VSDC, etc. that support the FLV file format. But when it comes to editing FLV videos, Filmora Video Editor is the best choice.
- How do I view an FLV file?
FLV is one of the oldest video formats due to which most new and modern video players don’t recognize it or can’t play it. However, there are few programs like VLC media players which can help you view an FLV file. Or you can also convert the FLV file into other supported video formats with the help of a video converter.
- Can I convert a horizontal FLV video into a vertical one?
Yes, and that’s a piece of cake when you use Filmora Video Editor or other similar video editors. You just need to change the aspect ratio of the video or the project from horizontal (generally 16:9) to vertical (generally 9:16).
- Can I resize FLV video files on my mobile?
Though video editors on mobile are not as powerful as those on PC, there are some that are still capable enough to let you easily resize FLV video files on mobile devices. Some examples are InShot, Splice, Powerdirector, etc.
For macOS 10.14 or later
Why choose Filmora Video Editor for resizing FLV videos, you say?
- Simple UI and easy interface
- Easily crop or change the aspect ratio of the video
- Not all video editors support FLV video format, but the Filmora does
- Advanced export options to compress or change the file size of video
- Suitable for beginners as well as professionals
- Regular software updates and improvements
Plus, Filmora Video Editor has a free version, so you can instantly download the program, install it, and get started on resizing FLV Videos. Below is a step-by-step guide to resize FLV Videos on Windows and Mac with Wondershare Filmora Video Editor, so you can follow along!
Steps to resize FLV videos with Filmora Video Editor:
- Launch Filmora and open a new project
Run the Wondershare Filmora application on Windows or Mac after installing it. Then you should automatically be inside a new project. If not, you can manually open a new project by going to File on the top left corner and then clicking on ‘**New Project**’.
- Import the FLV video and add it to timeline
Click on ‘**Import Media Files**’ and import the flv video into project media from your computer’s file explorer. Then add the video to the timeline by dragging it inside the timeline.
- Edit and perform desired modifications (Optional)
If you are just looking to resize the FLV video file, then you can skip this step and move to step no. 4. Otherwise, you can do various editings on the video like cropping, muting, trimming, animating, etc. before resizing the video. Filmora provides a wide range of features for editing and adding effects to the video.
- Resize the video by changing the aspect ratio
Aspect ratio defines the shape of your video like if you want the video to be horizontal, vertical, square, or custom. Generally, the term ‘resizing video’ refers to changing the aspect ratio of the video. For that, go to the File and then to the Project Settings. Then on the Aspect Ratio box, select the one that you prefer or you can try custom scaling. You can choose your preferred resolution of the project too while you’re at it.
- Resize the video by cropping
When you change the aspect ratio of the project, some parts of your flv video might not fit or it might be shrunk small to fit. So you need to resize the flv video by cropping so that you can crop and focus on the part of the video you like. To crop the video, select the flv video clip in the timeline and click on the crop icon in the timeline toolbar. Now choose the ratio you want to crop and select the part you’d like to keep. Then click OK and your flv video will be resized.
- Adjust the file size of the video through export settings
After you’ve cropped and resized the Flv video, you need to export it by clicking the Export button on the top center part. There are different settings available for exporting the video. Click on the Settings button near the resolution and you’ll be shown some detailed preferences for exporting. Every setting here like frame rate, resolution, bitrate, etc. can affect the size of the output video.
Filmora Video Editor really makes the task of editing and resizing FLV videos easier, simpler, and faster. Since you now know the steps, it’s time you try it and resize your own FLV videos with this best FLV Editor for Windows and Mac.
Alternative Way to Resize FLV Videos on Windows
In case you want to try something different than Filmora, here are two alternative software (one paid and another free) that you can use to resize your FLV Videos on Windows:
- Movavi Video Editor Plus
Movavi Video Editor Plus is one of the best easy-to-use video editors that can help you to resize FLV videos as well as edit them on Windows. Its interface and functionalities are somewhat similar to that of the Filmora Video Editor. This is a paid software available for download on both Windows and Mac but you can try it for free with their 7 days trial version.
Steps to resize FLV videos on Windows with Movavi Video Editor:
- Install Movavi Video Editor and run the software on your PC. Then you should automatically be inside a new project in it.
- Import the FLV video file you want to resize through the ‘File Import’ tab on the left and drag it to the timeline.
- To resize the aspect ratio, expand the resolution options near the preview screen above the export button and select the preferred ratio.
- To crop or resize the video, select the clip in the timeline and use the crop tool to make adjustments as you wish. Then hit Apply to save changes.
- After the video is ready, export it with the Export button on the right side of the screen. Then choose your preferred settings for output and click on Start after which your video will be rendered and saved to your PC.
- VSDC Free Video Editor
VSDC Free Video Editor is another alternative to Filmora for resizing FLV videos on Windows. It is a free video editor that packs a wide range of editing features without any restrictions. However, it does have a paid version with some advanced features and hardware acceleration.
Steps to resize FLV videos on Windows with VSDC Free Video Editor:
- Install and open VSDC video editor on your PC. Then create a new project with preferred settings through the ‘Projects’ tab on the top left corner.
- Import the video file into the project by dragging and dropping it directly into the timeline.
- To resize the aspect ratio, click on the Projects Explorer and click on your project name. Then in the Properties windows on the right, manually adjust width, height, resolution, etc. according to your preferences.
- To crop and reposition your video, select the clip in the timeline and go to the Editor tab on the top. Then use the crop tool and adjust your video accordingly.
- Finally export your design through the Export project tab at the top with preferred settings.
Alternative Way to Resize FLV Videos on Mac
Wondershare Filmora Video Editor is also available for Mac operating system which is recommended to resize FLV videos but if you want to try out some other alternatives, then below are the two ways to resize FLV videos on Mac:
- VideoProc Converter
VideoProc is a powerful video editor/ converter that helps you edit, convert, and resize any kind of video. It also supports a wide range of codecs and video formats including flv. It is a paid software but you can also try their free trial version with some limitations.
Steps to resize FLV videos on Mac with VideoProc:
- Launch VideoProc on a Mac device and go inside the Video
- Add files in VideoProc by drag and drop method or directly through the ‘Add Video’ option.
- Then click on the Options (codec) on the right side of the video and change the resolutions and aspect ratio of the video as you want. You can also manage export settings like quality, codec, fps, bitrate, etc. from this tab.
- Then go to the Crop section inside the Edit Video tab and crop the video as you like with preview and different other options.
- Finally click Done to go back and hit the Run This’ll start rendering the video and will save it to your Mac device.
- Shotcut
Shotcut is another alternative to Filmora Video Editor for resizing FLV videos on Mac. It is a free, open-source, and cross-platform video editor that has a sleek and intuitive interface with many useful editing features which really makes it suitable for both beginners as well as advanced editors.
Steps to resize FLV videos on Mac with Shotcut:
- Run the Shotcut program on your Mac after installing it and create a new project.
- Import the Flv video file to the project by drag and drop method into the timeline.
- To change the resolution and aspect ratio of the video, go to the Settings tab, then Video mode, and choose the format you want.
- To crop the video, select the clip in the timeline and go to the Filters Now click on the ‘**+**’ icon and select Size, Position & Rotate under the Favorite section. Then adjust crop settings as you like.
- Finally, go to the Export section at the top and click on Advanced. Then configure the output settings as you like and click on Export File.
2 Ways to Resize FLV Videos on Android
Wouldn’t it be great if you could resize FLV videos on your android device rather than having to open your computer for every small task? Previously, this was a major issue due to a lack of good video editors for android with flv support but that’s no longer the case. Below are two ways to resize FLV videos on android:
- Inshot
InShot is a powerful all-in-one video editor for android which acts both as a basic video editor as well as an advanced video editor with its simple design yet powerful features. There aren’t many video editors in Android that supports Flv or some older codecs, but InShot is one of the very few editors that support these video formats. It is a paid app but also has a limited free version to try.
Steps to resize FLV videos on Android with InShot:
- Open the Inshot app on your android device and click on Video.
- Now select the FLV video file and click on the tick icon near the bottom right.
- Then tap on the Crop option from the tools at the bottom.
- Now select the aspect ratio you like and crop accordingly.
- To save the video, tap on the Save button at the top right. Then choose the resolution and finally save the video to your device.
- AndroVid – Video Editor, Video Maker
AndroVid is an easy-to-use, full-featured video editor especially developed to edit videos for social media like YouTube, TikTok, Facebook, Instagram, etc. It is not a very popular application with just over 300k+ downloads in Google Play Store, but after testing it out, we thought it deserves to be in this article. It is available for free to download from Google Play Store.
Steps to resize FLV videos on Android with AndroVid Video Editor:
- Open AndroVid Video Editor on an android phone and go inside the Videos
- Now select the FLV video file that you want to resize.
- Inside editor, tap on the Crop tool in the toolbar at the top.
- Then select the preferred Aspect ratio from the top right, reposition the video area and tap on the tick icon to save the video.
- If you need to change the resolution too, click on the three dots at the top right after the video is saved successfully. Then choose the preferred resolution, quality, and format and click on the tick icon to export.
2 Ways to Resize FLV Videos on iPhone
Like Android, you can also resize FLV videos on your iPhone on the go without needing to use your computer. Doing such editing on mobile phones can really save your time and effort, so here are 2 ways for you to resize FLV videos on iPhone:
- Cyberlink Powerdirector
Cyberlink Powerdirector is one of the most popular as well as powerful video editors for Android and iOS. It is a full-featured mobile video editor with over 130M+ downloads on the App Store which allows you to do an advanced level of editing. It is a paid software but also has a free version available for download.
Steps to resize FLV videos on iPhone with PowerDirector:
- Launch the PowerDirector app on your iPhone and create a new project. Unlike other apps, you cannot change the aspect ratio later, so you need to set the aspect ratio you want while creating a new project.
- Now add the FLV video file into the timeline by tapping on the ‘**+**’ icon on the video. Then tap on the play button at the top right to enter the editor.
- To resize the video, select the video clip in the timeline and tap on the pencil icon at the bottom left. Then use different crop tools available to resize your video as you want.
- After you resize the video, tap on the export button on the top right to export it. Then tap on Produce and Share, and produce resized video with preferred settings.
- Splice – Video Editor & Maker
Splice – Video Editor & Maker is a simple yet powerful application that makes it easy to create fully customized and professional-looking videos on iPhone. It is another great app for resizing FLV videos on iPhone with over 70M+ downloads on App Store and it is available for free.
Steps to resize FLV videos on iPhone with Splice:
- Open the Splice app on the iPhone and tap on the ‘**+**’ icon to create a new project.
- Now select the flv video file to add and start the project.
- To resize the video, tap on the gear icon at the top right corner which opens up Project settings from where you can change the aspect ratio.
- To crop the video, select the clip in the timeline and tap on the Crop option in the toolbar. You can crop and reposition the video from there.
- Then click on the Export icon at the top right corner to export the video with preferred configurations.
2 Ways to Resize FLV Videos Online
Resizing is not that big of a task and you might just want to quickly resize your Flv video and share it. So why bother installing and running large video editing programs on your computer or even mobile phones when you can easily resize your videos in the web browser? Yes, you read that right, and below are the 2 ways for you to resize FLV videos online:
- io
Veed is a simple online video editing tool that you can access from any device with the help of a web browser. It can help you resize your Flv videos easily within just a few clicks. It has a clean and beautiful interface with a responsive design which provides you with a good editing experience while using it. It is a paid tool but you can also try it for free before purchasing it.
Steps to resize FLV videos online with Veed.io:
- Go to veed.io on your web browser and click on ‘Upload Your Video’ to get started without any account.
- Now upload the FLV video or you can directly drag and drop the video there.
- After you upload the video, you’ll be taken inside the Veed editor. To change the aspect ratio, go to the Size section inside Project Settings and choose the size you want to resize to.
- To crop the video, select the clip in the timeline and directly resize the video from the preview area. And you can also use settings like ‘Fill the canvas’ and ‘Fit the canvas’ at the left side for ease.
- Then click on the Export button at the top right corner to open Export settings. Configure the settings as you like and click on ‘Export Video’ to render and download the video.
- Clideo
When it comes to resizing or editing videos online, Clideo is one of the best tools you can rely on. Like Veed.io, it has a clean and responsive interface and supports many video formats including flv. Clideo is free to use but also comes with various subscription plans for extra functionalities.
Steps to resize FLV videos online with Clideo:
- Go to clideo.com/resize-video and upload your video through ‘Choose file’ button.
- To resize the aspect ratio, choose your desired formats in the ‘Resize for’ section. You can also manually set the aspect ratio.
- Then just below that, you’ll find various cropping options. Use them to crop or resize the video as you like.
- Finally, click on the Export button at the bottom right corner to export the video. You can download the video or can directly save to cloud storage like Drive, Dropbox, etc.
FAQs about Resizing FLV Video
Here are some of the Frequently Asked Questions (FAQs) related to resizing FLV videos that you might be interested in:
- How do I make FLV files smaller?
You can make FLV files smaller with the help of any video editor that supports Flv video format by cutting and cropping out unnecessary parts, decreasing the resolution, and bitrate, and converting flv into another lighter file format.
- Which video editors support FLV file format?
There are few video editors like Filmora, Movavi, VSDC, etc. that support the FLV file format. But when it comes to editing FLV videos, Filmora Video Editor is the best choice.
- How do I view an FLV file?
FLV is one of the oldest video formats due to which most new and modern video players don’t recognize it or can’t play it. However, there are few programs like VLC media players which can help you view an FLV file. Or you can also convert the FLV file into other supported video formats with the help of a video converter.
- Can I convert a horizontal FLV video into a vertical one?
Yes, and that’s a piece of cake when you use Filmora Video Editor or other similar video editors. You just need to change the aspect ratio of the video or the project from horizontal (generally 16:9) to vertical (generally 9:16).
- Can I resize FLV video files on my mobile?
Though video editors on mobile are not as powerful as those on PC, there are some that are still capable enough to let you easily resize FLV video files on mobile devices. Some examples are InShot, Splice, Powerdirector, etc.
How to Put a Background on A Green Screen
The use of green screen in photos and videos is a common phenomenon. Starting from news broadcaster studios to visual effects in action movies, the use of green screen has become a commodity in photo and video shoots. This is because you can add background to green screen video and photo during the post-production phase as per your requirements.
Starting from replacing the green screen with a studio setup like news broadcasting to adding characters visiting an alien planet in movies, everything you can imagine is possible to including in your videos and photos. You will need a professional video editor and the steps on how to put a background on a green screen.
Part 1. How to put a background on a green screen to video?
The first thing you need to do is shoot your video with high-quality green screen in the background. Make sure that it is evenly spread and lit up so that there are no light and dark patches. Now that you have green screen video, you will need a professional video editor to replace the green screen with any background as per your requirements. Here are the three ways on how to add background to green screen.
Way 1. Use Filmora
Wondershare Filmora is the easiest video editor to add a background to green screen video instantly. Filmora is a professional video editor with an intuitive user interface. There are loads of tools to add visual effects and perform basic to advanced editing. Filmora is available for Windows and Mac users and you have to transfer your recorded green screen video to your computer. You can replace green screen with a video as well as photo as per your preference. Here are the steps to put a background on green screen video using Filmora.
Free Download For Win 7 or later(64-bit)
Free Download For macOS 10.14 or later
Step1 Download and install Filmora . Launch the application and click on New Project. You should have the green screen video as well as the background replacement video or photo ready with which you want to replace green screen background.
Step2 Import your green screen video as well as the background video or photo under Project Media folder. Drag and drop both of them to Timeline. Make sure the green screen video is on top of the replacement background video or photo.

Step3 Double-click on the video clip that you have dropped on Timeline. Go to Video tab and turn on Chroma Key option.

Step4 You will see on the Instant Viewer that the green screen of recorded video is replaced with the replacement background immediately. You can adjust the parameters under Chroma Key such as offset, tolerance, and edge thickness as required.
Step5 Finally, play the video and if you are satisfied, click on Export button to save the video in your desired file format.

Way 2. Use iMovie
iMovie is one of the most preferred video editors among Mac and iPhone users. This is because the app comes from Apple, and there are ample features to enhance your video content and quality with effects. Adding a background to a green screen video using iMovie is quite easy. But replacing a background of a video without green screen is rather tough.
Step1 Launch iMovie from Applications folder on your Mac as it comes pre-installed.
Step2 Import your green screen video as well as replacement background video or photo to Project Media folder.
Step3 Drag and drop them into Timeline and place the green screen video above the replacement background video/photo. Make sure that the duration of both videos is the same.

Step4 Click on the green screen video and click on Video Overlay Settings and select Green/Blue Screen option from the drop-down menu.

Step5 You can adjust Softness as well as Clean-up option so that the green screen effect is perfect.

Way 3. Use Premiere Pro
When it comes to professional video editing, Premiere Pro is undoubted one of the most widely used video editors. The learning curve is steep for amateurs, but professionals love to edit videos in Premiere Pro. You can edit 4K videos, 3D videos, multi-cam videos, and it supports cross-platform project workflow. You can replace green screen background with any desired background video or image. Here are the steps on how to add background to green screen in Premiere Pro.
Step1 Launch Adobe Premiere Pro and go to File> Import option. Select the green screen video clip as well as replacement background video and click on Open button.

Step2 Drag the video clips from the Project panel and place them to Timeline so that the green screen video stays at the top.
Step3 Go to Effects tab and click on Effects> Keying> Ultra Key.

Step4 Click on eyedropper tool under Ultra Key and use the tool to select the green screen background color.

Step5 Go to Ultra Key> Output> and select Alpha Channel option. Set Setting located under Output to Aggressive.

Step6 Go to Matte Generation and adjust Transparency using the slider available.

Step7 You will see the green screen get replaced by the video or photo you have placed below the green screen video in Timeline.

Part 2. How to change the background of green screen image?
Adobe Photoshop is one of the best photo editors that professionals use to edit photos as per requirements. You can change the background of green screen image and replace the green screen with any image of your liking. You should have a green screen image as well as a replacement image. Here are the steps how to change green screen image on Photoshop.
Step1 Launch Adobe Photoshop and import the green screen image as well as the replacement background image.
Step2 Copy the replacement image and paste it on the green screen image. Make sure you move the layer of the replacement image is placed below the green screen image so that it stays hidden.

Step3 Now select green screen image layer and go to Select menu and click on Color Range. You will get an eyedropper tool. Press Shift key and click the areas where green screen background is there so that you can remove it. Click on OK button when done.

Step4 Go to Select menu and click on Inverse option. Go to Select menu and click on Refine Edge option. This is to smoothen the edges so that no green screen is visible. Click on Ok button.

Step5 Go to Select menu and click on Inverse option. Press Delete key and the green screen background will disappear and the replacement image will appear in the background.

The Bottom Line
We have illustrated how you can add a background to your green screen video on your computer and also explained how you can replace green screen background in your photo with any image. However, for the best results, you need to use a green screen and use Filmora to add a background instantly.
The first thing you need to do is shoot your video with high-quality green screen in the background. Make sure that it is evenly spread and lit up so that there are no light and dark patches. Now that you have green screen video, you will need a professional video editor to replace the green screen with any background as per your requirements. Here are the three ways on how to add background to green screen.Way 1. Use Filmora
Wondershare Filmora is the easiest video editor to add a background to green screen video instantly. Filmora is a professional video editor with an intuitive user interface. There are loads of tools to add visual effects and perform basic to advanced editing. Filmora is available for Windows and Mac users and you have to transfer your recorded green screen video to your computer. You can replace green screen with a video as well as photo as per your preference. Here are the steps to put a background on green screen video using Filmora.
Free Download For Win 7 or later(64-bit)
Free Download For macOS 10.14 or later
Step1 Download and install Filmora . Launch the application and click on New Project. You should have the green screen video as well as the background replacement video or photo ready with which you want to replace green screen background.
Step2 Import your green screen video as well as the background video or photo under Project Media folder. Drag and drop both of them to Timeline. Make sure the green screen video is on top of the replacement background video or photo.
Step3 Double-click on the video clip that you have dropped on Timeline. Go to Video tab and turn on Chroma Key option.
Step4 You will see on the Instant Viewer that the green screen of recorded video is replaced with the replacement background immediately. You can adjust the parameters under Chroma Key such as offset, tolerance, and edge thickness as required.
Step5 Finally, play the video and if you are satisfied, click on Export button to save the video in your desired file format.
Way 2. Use iMovie
iMovie is one of the most preferred video editors among Mac and iPhone users. This is because the app comes from Apple, and there are ample features to enhance your video content and quality with effects. Adding a background to a green screen video using iMovie is quite easy. But replacing a background of a video without green screen is rather tough.
Step1 Launch iMovie from Applications folder on your Mac as it comes pre-installed.
Step2 Import your green screen video as well as replacement background video or photo to Project Media folder.
Step3 Drag and drop them into Timeline and place the green screen video above the replacement background video/photo. Make sure that the duration of both videos is the same.
Step4 Click on the green screen video and click on Video Overlay Settings and select Green/Blue Screen option from the drop-down menu.
Step5 You can adjust Softness as well as Clean-up option so that the green screen effect is perfect.
Way 3. Use Premiere Pro
When it comes to professional video editing, Premiere Pro is undoubted one of the most widely used video editors. The learning curve is steep for amateurs, but professionals love to edit videos in Premiere Pro. You can edit 4K videos, 3D videos, multi-cam videos, and it supports cross-platform project workflow. You can replace green screen background with any desired background video or image. Here are the steps on how to add background to green screen in Premiere Pro.
Step1 Launch Adobe Premiere Pro and go to File> Import option. Select the green screen video clip as well as replacement background video and click on Open button.
Step2 Drag the video clips from the Project panel and place them to Timeline so that the green screen video stays at the top.
Step3 Go to Effects tab and click on Effects> Keying> Ultra Key.
Step4 Click on eyedropper tool under Ultra Key and use the tool to select the green screen background color.
Step5 Go to Ultra Key> Output> and select Alpha Channel option. Set Setting located under Output to Aggressive.
Step6 Go to Matte Generation and adjust Transparency using the slider available.
Step7 You will see the green screen get replaced by the video or photo you have placed below the green screen video in Timeline.
Part 2. How to change the background of green screen image?
Adobe Photoshop is one of the best photo editors that professionals use to edit photos as per requirements. You can change the background of green screen image and replace the green screen with any image of your liking. You should have a green screen image as well as a replacement image. Here are the steps how to change green screen image on Photoshop.
Step1 Launch Adobe Photoshop and import the green screen image as well as the replacement background image.
Step2 Copy the replacement image and paste it on the green screen image. Make sure you move the layer of the replacement image is placed below the green screen image so that it stays hidden.
Step3 Now select green screen image layer and go to Select menu and click on Color Range. You will get an eyedropper tool. Press Shift key and click the areas where green screen background is there so that you can remove it. Click on OK button when done.
Step4 Go to Select menu and click on Inverse option. Go to Select menu and click on Refine Edge option. This is to smoothen the edges so that no green screen is visible. Click on Ok button.
Step5 Go to Select menu and click on Inverse option. Press Delete key and the green screen background will disappear and the replacement image will appear in the background.
The Bottom Line
We have illustrated how you can add a background to your green screen video on your computer and also explained how you can replace green screen background in your photo with any image. However, for the best results, you need to use a green screen and use Filmora to add a background instantly.
Also read:
- New 2024 Approved Top 10 Audio Visualizers Windows, Mac, Android, iPhone & Online
- Discover the Ultimate LUTs for Wondershare Filmora Uncover the Answer
- New | Best 8 Online GIF to APNG Converters
- Updated 2024 Approved How Do You Create In-Camera Transitions in Your Videos? A Complete Guide for Beginners to Create These Transitions Using Their Camera at Home
- Updated Some Facts About GIF Background You Didnt Know for 2024
- Updated How to Speed up a Video on Splice for 2024
- Have You Ever Played Roblox Games? Read This Article to Find Out How to Get Motion Blur in Roblox Using Simple and Efficient Ways
- 2024 Approved How to Change Aspect Ratio of Video?
- New 2024 Approved Ideas That Will Help You Out in Converting AVI to GIF
- New Mastering the Technique Playing Videos in Slow Motion on Your iPhone Like a Pro for 2024
- Updated Find Out The Best Dark Moody LUTs During Editing
- Updated Detailed Tutorial to Crop Videos Using Openshot?
- Updated | Top GIF to MP4 Converters
- Updated Detailed Guide to Merge Videos in VLC Media Player for 2024
- Updated In 2024, This Article Will Focus on Understanding the Secret Tips in Wondershare Filmora that You Can Use to Edit Videos Faster and More Efficiently
- Updated In 2024, The Best 10 GIF to JPGPNG Converters
- In 2024, How to Remove Audio From Video Without Watermark?
- Detailed Tutorial to Resize Your Video in VLC
- New 10 Matching Color Combination That Works Together for 2024
- New How to Record Video Streams With FFmpeg on Windows and Mac for 2024
- Updated A Full Guide to Funcall Voice Changer and Its Alternatives for 2024
- Updated How to Fade to Black Premiere Pro
- In 2024, How to Track Oppo Reno 9A by Phone Number | Dr.fone
- 4 Feasible Ways to Fake Location on Facebook For your Tecno Camon 20 | Dr.fone
- How To Repair Apple iPhone SE (2020) iOS System? | Dr.fone
- Top 7 Skype Hacker to Hack Any Skype Account On your Apple iPhone 6 Plus | Dr.fone
- In 2024, Bypassing Google Account With vnROM Bypass For Oppo Find X7
- In 2024, The Best Android SIM Unlock Code Generators Unlock Your Samsung Galaxy F54 5G Phone Hassle-Free
- In 2024, How to Remove Forgotten PIN Of Your Infinix Zero 30 5G
- In 2024, How to Fake Snapchat Location on Apple iPhone 12 mini | Dr.fone
- Getting the Pokemon Go GPS Signal Not Found 11 Error in Vivo Y78t | Dr.fone
- 3 Things You Must Know about Fake Snapchat Location On Itel A60s | Dr.fone
- How to share/fake gps on Uber for Xiaomi Redmi Note 13 Pro+ 5G | Dr.fone
- In 2024, 3 Ways to Unlock Your Apple iPhone 15 Pro for Free
- Title: New In 2024, Do You Want to Make Your Photos and Videos Look Different From Others? There Are Many Lightroom LUTs Free, and They Make Your Media Content Stand Out From Others
- Author: Morgan
- Created at : 2024-04-24 01:09:21
- Updated at : 2024-04-25 01:09:21
- Link: https://ai-video-editing.techidaily.com/new-in-2024-do-you-want-to-make-your-photos-and-videos-look-different-from-others-there-are-many-lightroom-luts-free-and-they-make-your-media-content-stand-/
- License: This work is licensed under CC BY-NC-SA 4.0.
