:max_bytes(150000):strip_icc():format(webp)/the-17-best-graphic-design-software-2024-1dd6c15b34124b25b65e4b096e4e6ba4.jpg)
New In 2024, Find Out How to Add Subtitles in the VLC Media Player on Your Windows and Mac System with Quick and Simple Instructions

Find Out How to Add Subtitles in the VLC Media Player on Your Windows and Mac System with Quick and Simple Instructions
VLC is a free, open-source, and easy-to-use cross-platform multimedia player that supports numerous audio and video file formats. You can use the program on different devices, including smartphones, TVs, and PCs.
With the VLC media player, you can not only watch your favorite movie or video clip but can also add subtitles to them. This can be useful to improve your video-watching experience, especially if you are playing a foreign film or one with poor audio quality. Moreover, subtitles can also help people with hearing impairments to follow along.
Want to learn how to add subtitles in the VLC media player? Keep reading to find out!
How To Add Subtitle Files In VLC Media Player?
You can download subtitles for the language you want from a subtitle site and enjoy them while watching the movie or video clip in VLC Media Player. However, this method won’t add the SRT file permanently to your videos.
Here’s how you can add subtitles in the VLC media player on your video clip:
Step1 Visit the subtitles website of your choice and download the file for the video you are watching.
Step2 Save the SRT file along with your video in the same folder.
Step3 Right-click the video, click “Open With,” and choose VLC media player. Alternatively, launch the player, click “Media,” and select “Open file…” to import the video.

Step4 VLC Media Player will automatically detect and add the subtitles file. If not, click the “Subtitles” option in the toolbar, select “Sub Track,” and choose the relevant file within the listing.
Step5 The VLC player will now display the subtitles along with your video. However, if it is still unable to find the subtitles file, click “Subtitles” > “Add Subtitles” and manually add the file you’ve downloaded.

![]()
Note: If the subtitles are not playing correctly along the video, you can adjust the playback delay using the G and H keys on your keyboard. This will toggle between 50ms delays.
How To Add Subtitles To Video In VLC Media Player Permanently?
Since the above method only adds subtitles temporarily, you might be looking for a solution to permanently attach the SRT file to your clip to provide a better viewing experience to your viewers or add extra information for those who have difficulty understanding the audio.
Below we’ve provided step-by-step methods to add subtitles to video in the VLC media player on your Windows and Mac.
On Windows
You can permanently embed the subtitles to your video in the VLC media player on your Windows in the following way:
Step1 Launch the VLC media player on your Windows PC/laptop and click “Media.” Scroll down and click the “Stream” option.

Step2 Now, click “Add” in the pop-up menu and choose the video you want to play. To add a subtitles file, check the “Use a Subtitles File” option and click “Browse.” Now, add the relevant SRT file you’ve downloaded.

Step3 Next, click the “Stream” option and choose “Next.” To set the destination for your video, select “File” and click “Add.” A new window will open, click the “Browse” option and enter your footage/video name.
Make sure to set the format as .mp4 or any other video format. Choose the folder for your video and click “Save.” Click the “Next” option to proceed further.
Step4 Check the box next to “Active Transcoding,” click the Wrench icon, and head to the “Subtitles” tab. Check the boxes next to “Subtitles” and “Overlay Subtitles on the Video.
Finally, click the “Save” option, select “Next,” and click “Stream” in the new window. Wait for the processing to complete, and your video with subtitles will be saved to the folder you’ve selected.

On Mac
Here’s how you can permanently add subtitles to your video clip in the VLC media player on your Mac:
Step1 Launch the VLC media player on your Mac and click the “File” option from the top toolbar. Click “Advanced Open File.”

Step2 Now, click “Browse” on the next page and add the video to which you want to attach the subtitles. Checkmark the “Add Subtitles File” option and click “Choose.” Browse and add the SRT file. Click “OK” to confirm.
Step3 Checkmark the “Stream Outputs” option and click “Settings.” Next, click “Browse” in the next window to configure the output file name and folder. Afterward, click “Save” and set the Encapsulation method as “MPEG 4.”
Under the Transcoding tab, checkmark the boxes next to Video and Audio. Next, click “OK” and select “Open.” You can now turn on the subtitles by navigating to “Subtitles” > “Subtitles Track.”

How To Create Subtitles In VLC Media Player?
It is possible to create subtitles in the VLC media player if you’re unable to find an appropriate SRT file online or want to add some extra details by editing the existing one. For this method to work, you will first need to format your file in the SRT format.
Furthermore, you have to rank the text in order with a number and add timestamps in minutes, seconds, and milliseconds to determine the duration. To avoid plain text, you can also add effects to the subtitles by using HTML.
Step1 Launch a text editoron your PC, import your video to the editor, and save it in .srt format.

Step2 Open the VLC media player and play the video. Now, edit the subtitles while matching them with the timestamps.
Step3 Next, add a new line, timestamp, and subtitle for each caption.
Step4 Repeat the process to create and add all the required subtitles.
Bonus Tips: How To Add And Edit Subtitles In The Best VLC Alternative
If you find the above method difficult to understand, we recommend using Filmora . With this software program, you can not only edit your videos to make them engaging and appealing to watch but can also add and edit subtitles to them using the ten pre-build subtitles templates.
Free Download For Win 7 or later(64-bit)
Free Download For macOS 10.14 or later
Filmora can help you to format the subtitles to match your video and add various font styles, such as WordArt, Basic, Titles, and more. In addition, you can create text with different parameters, including color fills, gradient fills, and 12 shadow effects. You can also make your captions alive with the animation effects.
Here’s how you can add and edit subtitles on your videos using Filmora:
Step1 Launch the Filmora software on your PC and click “Create New Project.” Drag and drop your video or select “Click here to import media” to add your video.

Step2 Add the video to the timeline and play it. Listen to the voiceover and press the “M” key to add a marker.
Now, click the “Titles” option and head to the “Subtitles” tab from the left menu. Double-click a subtitle to download and preview it.

Step3 Drag and drop the subtitle you want to use in the timeline and adjust it along the marker point.
Next, double-click the subtitle box in the timeline and type the text from the voiceover. Add color, text template, and adjust the text space.

Step4 Head to the “Advanced” tab, delete the preset text and adjust the one you’ve just typed. You can also add animation effects from the “Animation” tab and click “OK.”

Repeat the process to add and edit the subtitles on your video till the end. Once you are satisfied, click “Export” and save the file on your PC.
Conclusion
In this article, we’ve explored different methods to show you how to add subtitles in the VLC media player to make your videos more engaging and easy to understand, even for those with hearing impairment.
We’ve also provided step-by-step instructions to use Filmora as an alternative to add and edit the subtitles on your video real quickly.
Hopefully, you’ve enjoyed reading this article and can now enjoy watching a video in any language with ease.
How To Add Subtitles To Video In VLC Media Player Permanently?
Since the above method only adds subtitles temporarily, you might be looking for a solution to permanently attach the SRT file to your clip to provide a better viewing experience to your viewers or add extra information for those who have difficulty understanding the audio.
Below we’ve provided step-by-step methods to add subtitles to video in the VLC media player on your Windows and Mac.
On Windows
You can permanently embed the subtitles to your video in the VLC media player on your Windows in the following way:
Step1 Launch the VLC media player on your Windows PC/laptop and click “Media.” Scroll down and click the “Stream” option.

Step2 Now, click “Add” in the pop-up menu and choose the video you want to play. To add a subtitles file, check the “Use a Subtitles File” option and click “Browse.” Now, add the relevant SRT file you’ve downloaded.

Step3 Next, click the “Stream” option and choose “Next.” To set the destination for your video, select “File” and click “Add.” A new window will open, click the “Browse” option and enter your footage/video name.
Make sure to set the format as .mp4 or any other video format. Choose the folder for your video and click “Save.” Click the “Next” option to proceed further.
Step4 Check the box next to “Active Transcoding,” click the Wrench icon, and head to the “Subtitles” tab. Check the boxes next to “Subtitles” and “Overlay Subtitles on the Video.
Finally, click the “Save” option, select “Next,” and click “Stream” in the new window. Wait for the processing to complete, and your video with subtitles will be saved to the folder you’ve selected.

On Mac
Here’s how you can permanently add subtitles to your video clip in the VLC media player on your Mac:
Step1 Launch the VLC media player on your Mac and click the “File” option from the top toolbar. Click “Advanced Open File.”

Step2 Now, click “Browse” on the next page and add the video to which you want to attach the subtitles. Checkmark the “Add Subtitles File” option and click “Choose.” Browse and add the SRT file. Click “OK” to confirm.
Step3 Checkmark the “Stream Outputs” option and click “Settings.” Next, click “Browse” in the next window to configure the output file name and folder. Afterward, click “Save” and set the Encapsulation method as “MPEG 4.”
Under the Transcoding tab, checkmark the boxes next to Video and Audio. Next, click “OK” and select “Open.” You can now turn on the subtitles by navigating to “Subtitles” > “Subtitles Track.”

How To Create Subtitles In VLC Media Player?
It is possible to create subtitles in the VLC media player if you’re unable to find an appropriate SRT file online or want to add some extra details by editing the existing one. For this method to work, you will first need to format your file in the SRT format.
Furthermore, you have to rank the text in order with a number and add timestamps in minutes, seconds, and milliseconds to determine the duration. To avoid plain text, you can also add effects to the subtitles by using HTML.
Step1 Launch a text editoron your PC, import your video to the editor, and save it in .srt format.

Step2 Open the VLC media player and play the video. Now, edit the subtitles while matching them with the timestamps.
Step3 Next, add a new line, timestamp, and subtitle for each caption.
Step4 Repeat the process to create and add all the required subtitles.
Bonus Tips: How To Add And Edit Subtitles In The Best VLC Alternative
If you find the above method difficult to understand, we recommend using Filmora . With this software program, you can not only edit your videos to make them engaging and appealing to watch but can also add and edit subtitles to them using the ten pre-build subtitles templates.
Free Download For Win 7 or later(64-bit)
Free Download For macOS 10.14 or later
Filmora can help you to format the subtitles to match your video and add various font styles, such as WordArt, Basic, Titles, and more. In addition, you can create text with different parameters, including color fills, gradient fills, and 12 shadow effects. You can also make your captions alive with the animation effects.
Here’s how you can add and edit subtitles on your videos using Filmora:
Step1 Launch the Filmora software on your PC and click “Create New Project.” Drag and drop your video or select “Click here to import media” to add your video.

Step2 Add the video to the timeline and play it. Listen to the voiceover and press the “M” key to add a marker.
Now, click the “Titles” option and head to the “Subtitles” tab from the left menu. Double-click a subtitle to download and preview it.

Step3 Drag and drop the subtitle you want to use in the timeline and adjust it along the marker point.
Next, double-click the subtitle box in the timeline and type the text from the voiceover. Add color, text template, and adjust the text space.

Step4 Head to the “Advanced” tab, delete the preset text and adjust the one you’ve just typed. You can also add animation effects from the “Animation” tab and click “OK.”

Repeat the process to add and edit the subtitles on your video till the end. Once you are satisfied, click “Export” and save the file on your PC.
Conclusion
In this article, we’ve explored different methods to show you how to add subtitles in the VLC media player to make your videos more engaging and easy to understand, even for those with hearing impairment.
We’ve also provided step-by-step instructions to use Filmora as an alternative to add and edit the subtitles on your video real quickly.
Hopefully, you’ve enjoyed reading this article and can now enjoy watching a video in any language with ease.
How Does Sony’s S&Q Feature Help Recording Slow-Motion Video
Creating slomos has become essential to videography, cinema, and content generation. However, regarding professional-grade slomos, you cannot trust just any camera. Sony S&Q is one of those professional-grade cameras that help shoot in slow motion.
This article will provide a brief review of S&Q mode and Sony Vegas slow motion. In addition, you’ll come across a professional-grade video editor performing this task. This alternative is software that provides diverse slow-motion creation options.
Slow Motion Video Maker Slow your video’s speed with better control of your keyframes to create unique cinematic effects!
Make A Slow Motion Video Make A Slow Motion Video More Features

Part 1: Capturing Slow Motion Videos with Sony S&Q Feature
Who hasn’t heard about Sony and its services in the world of videography? Along with many features, the cameras offer a Sony S&Q mode for slo-mo creation. This model can manipulate video frame rates higher than standard cameras. It offers three frame rate options to select from 25p, 50p, and 60p. Here is a chance to learn to capture a slow-motion shot using S&Q mode Sony:
Step 1
From your camera’s dial, select the “S&Q” option. Access the camera’s display screen and go to “Menu 2” from the top bar. Then, “S&Q Settings” in the featured section.
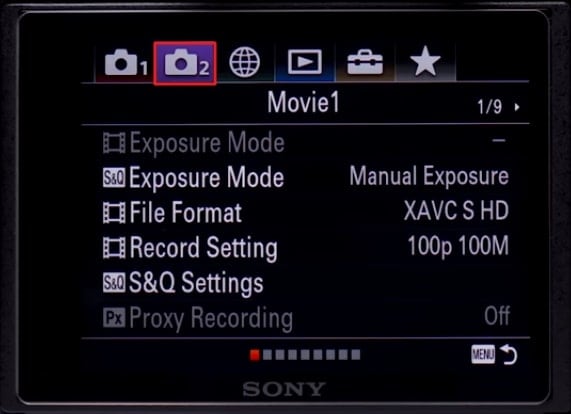
Step 2
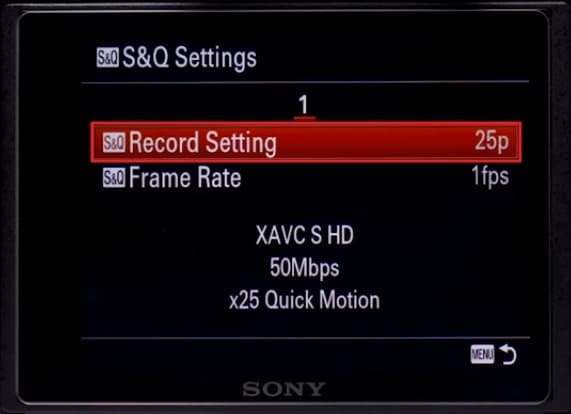
Once you reach the Sony S&Q mode settings, click “Record Settings.” This will decide the output frame rate of your video. In PAL, you have two record options: 25p and 50p. On the other hand, in the NTSC, you’ll have three options: 25p, 50p, and 60p.
Step 3
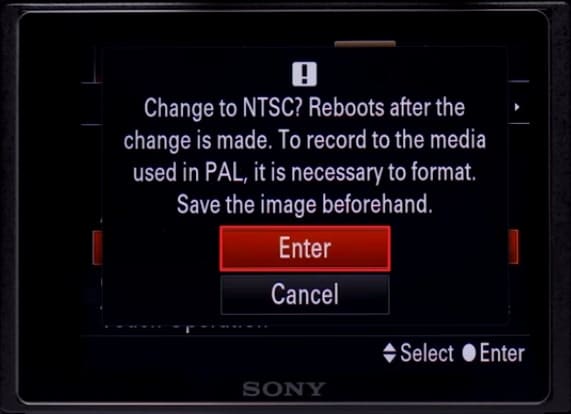
Click the “Enter” option to finalize the Record settings.
Step 4
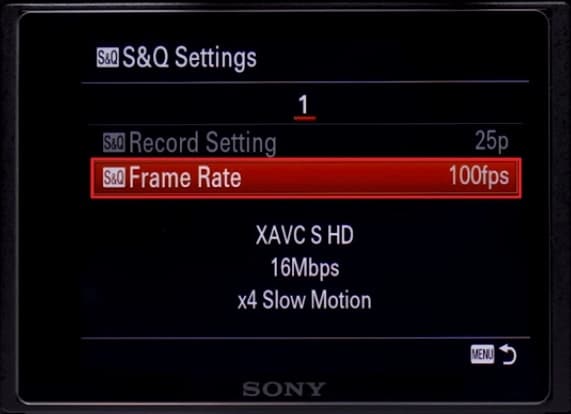
Upon accessing the “Frame Rate” settings, you’ll find many options there. The highest frame rate in PAL is 100 fps, while in NTSC, itit is 120 fps. You can also choose the Exposure settings for your camera according to footage. After setting these preferences, start capturing a video in slow motion.
Part 2: Different Sony Cameras Offering S&Q Feature
There is no lack of devices that help you capture any scene with perfection. Someone obsessed with videography can understand the worth of a high-quality camera. Sony launched two such products named A7iii and Sony ZV E10 slow motion. Both are high-output, professional-grade cameras to assist in slo-mo creation. Here is a brief review of these cameras for you to compare and select better:
1. Sony A7 III
Sony A7iii slow motion camera launch occurred in 2018 with a bundle of features. This camera offers 120fps video capture for creating slomos or high-speed effects. It has an APS-C size, 24.2-megapixel, and an Exmor CMOS sensor for more precise results. In addition, it possesses a 4K Ultra-High Resolution of 3840 x 2160 for videos. The camera also has an LCD touch screen, which proves productive in settings.

2. Sony ZV-E10
This is an upgraded S&Q mode Sony camera that first emerged in 2021 with a fully articulated screen. It has an APS-C size, 24.2-megapixel, and an Exmor CMOS sensor for balanced shooting. This version also has the highest video frame rate of 120 fps for the professional slo-mo effect. It captures slomos in 4K (UHD) 3840 x 1920 video resolution for quality maintenance. It has a directional 3-capsule microphone for high-definition audio.

Part 3: How to Slow Down Video in Sony Vegas Pro?
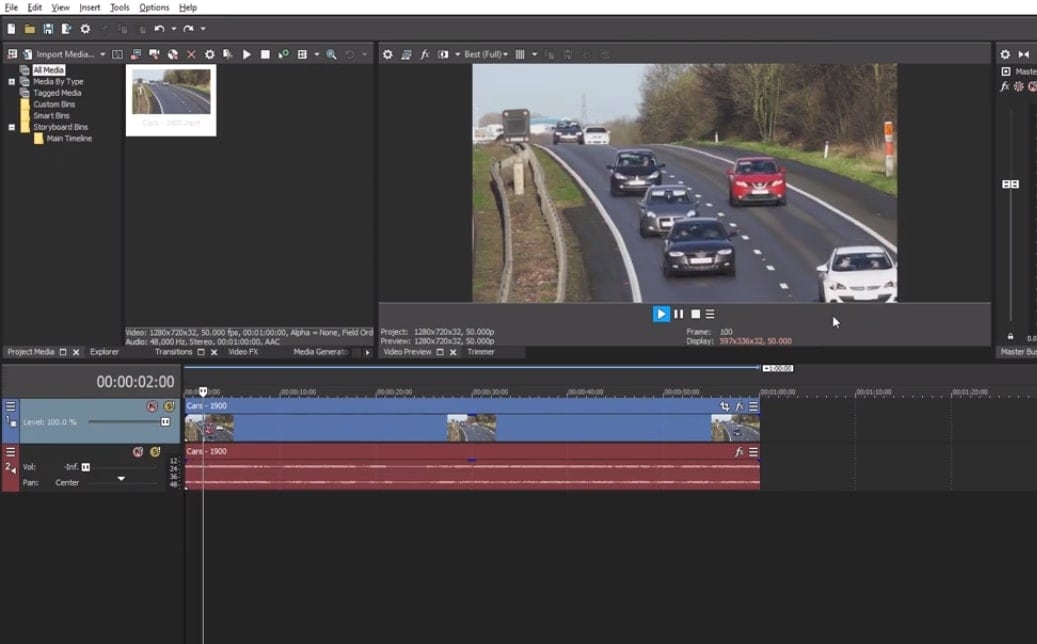
Vegas Pro stands amongst the top video editors who excel at creating slow motions. With its powerful speed manipulation, it can curate cinematic slo-mo effects. In addition, the tool offers an Optical Flow option for ultra-high-quality slomos. It offers a non-linear timeline editing, which means selective durations to apply this effect. Given below is the step-by-step guide to Sony V egas slow motion:
Step 1
After launching the software, import the video and bring it to the timeline.
Step 2
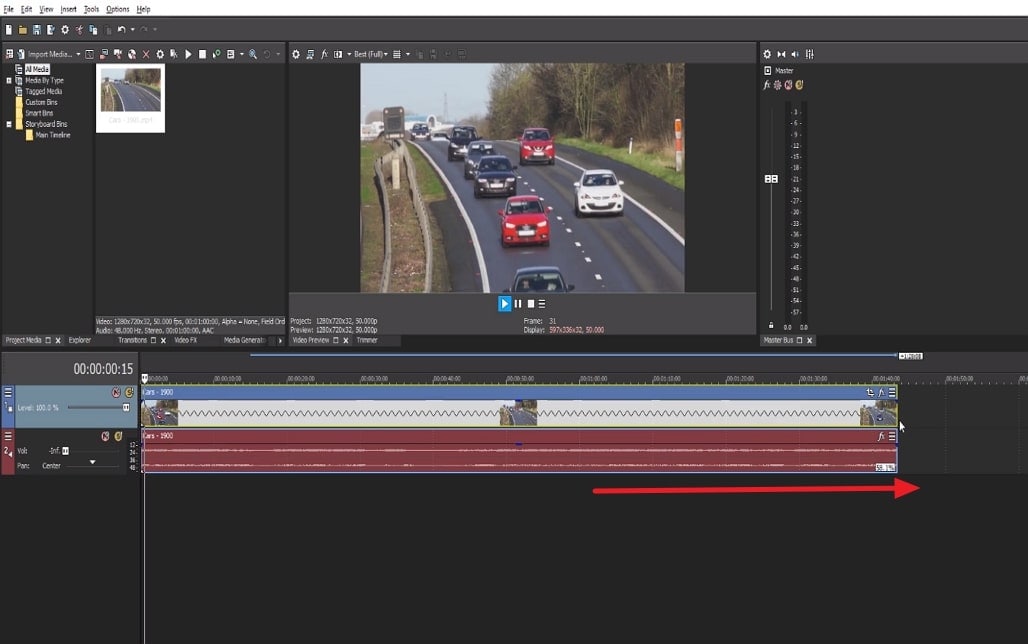
Navigate towards the editing panel where the clip and audio track are showing. Place your cursor at the finishing line of the clip and stretch it throughout the timeline. This will add a slow-motion effect to your video.
Part 4: Wondershare Filmora: Comprehending the Best Alternative for Slowing Down Videos
All the above slow-motion solutions are adequate but not reliable. This is because shooting in So ny S& Q mode declines video quality upon export. In addition, the Sony Vegas slow motion subscription plans start at more than $500. This seems expensive for someone who just started editing and is a beginner.
Wondershare Filmora is the perfect alternative to S ony ZY E10 slow motion and other devices. It offers an intuitive speed change interface at affordable prices. In addition, there is more than one method to alter its speed with optical flow. Moreover, the software offers extensive export settings to set video resolution.
Free Download For Win 7 or later(64-bit)
Free Download For macOS 10.14 or later
Step-by-Step Guide to Creating Slow Motion in Filmora
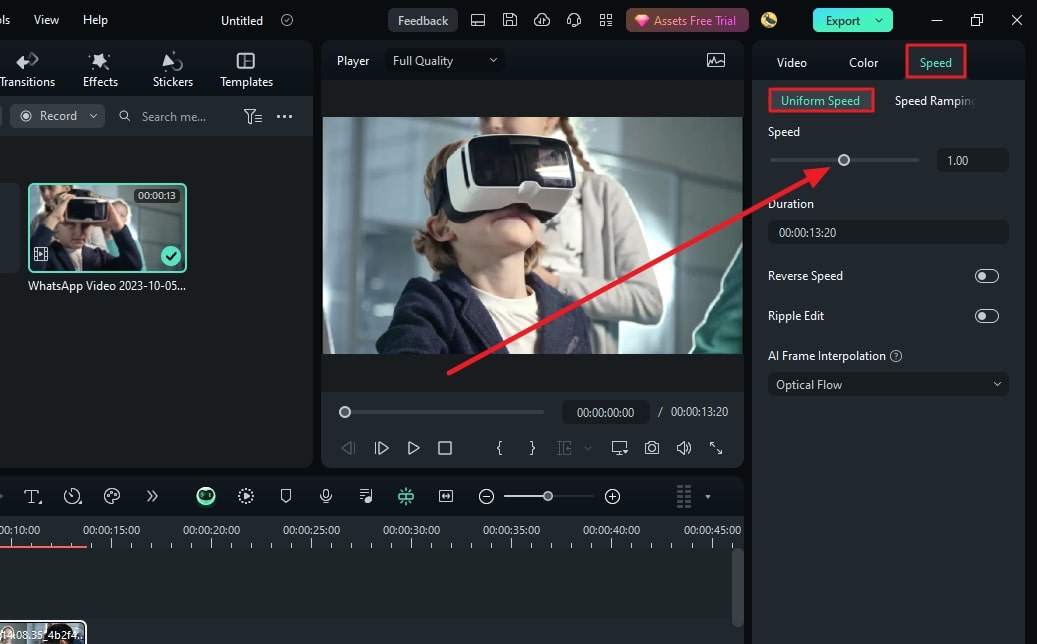
The fundamental technique for achieving slow motion in Filmora involves Uniform Speed. This method simply adjusts the playback speed of a video through a slider. The process of creating slow-motion content is mentioned below:
Step 1Import Media to Initiate Slow-Motion Creation
Initiate Filmora by clicking the “New Project” button and access the editing interface. Hit the “Ctrl + I” keys to import media and bring it to the timeline. After selecting the clip in the timeline, navigate to the settings panel. Proceed to the “Speed” > “Uniform Speed” to access the speed change slider. Drag the slider towards the left to adjust the slow-motion speed.
Step 2Access AI Frame Interpolation Settings
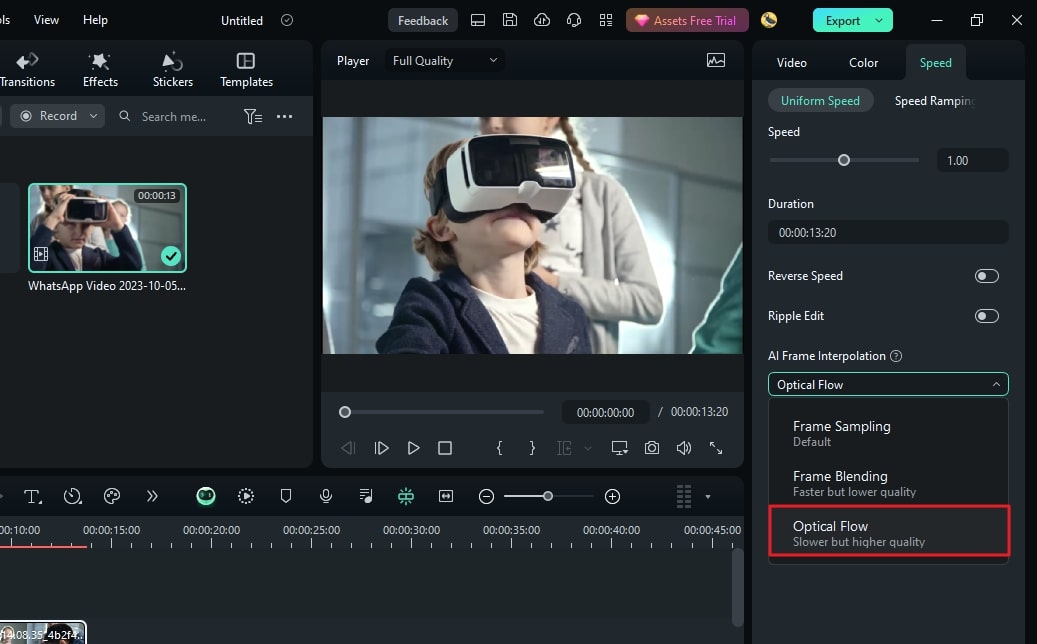
To achieve smooth slow motion, access AI Frame Interpolation at the bottom. Expand this section and opt for the “Optical Flow” to apply.
Step 3Enable Render Preview to Review Results
Once all adjustments are complete, select the video and return to the timeline panel. Use your cursor to access the “File” tab in the top toolbar and choose “Render Preview.” Utilize the preview options before exporting the video.
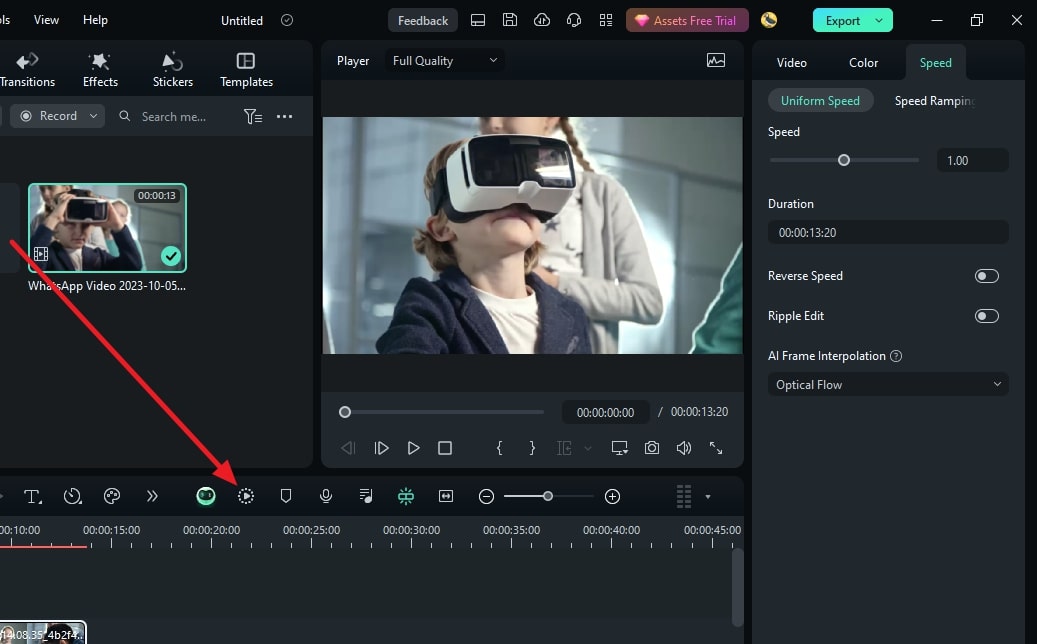
Key Features of Filmora
Filmora doesn’t just claim to be the best; there are multiple features to support this claim. If you want to explore the features of this S ony A7iii slow motio n, read this section:
AI Copilot Editing: We understand the confusion of being an amateur at editing. The unfamiliarity with a tool increases it. Hence, Filmora offers this feature. As the name suggests, it acts as your assistant to run errands in Filmora. Ask it about any feature, and it will give direction and editing suggestions.
AI Text-Based Editing: Filmora excels in cutting or trimming videos for editing. It has recently introduced text-based editing AI to convert video speech to text. Afterward, users can remove a specific text to eliminate the video section.
Remove Background: With Filmora, video editing is more accessible than ever. The AI Smart Cutout option removes the video backgrounds with precision. Afterward, you can replace it with Filmora’s pre-developed background. This includes solid colors, gradients, and other graphics.
AI Image: Can’t spare time to capture images for your new content idea? With Filmora’s text to generate AI, you can now curate images. The AI only requires you to add a prompt and craft results accordingly. Upon creation, users can also select a preferred image resolution.
Conclusion
This article has discussed the purpose of Sony S&Q and how to use it for slo-mo creation. In addition, users learned about two of Sony’s cameras, which are popular for slow-motion. Afterward, we discussed a desktop method to create slow motion. Considering all the drawbacks of these methods, we recommended Filmora. It is a desktop alternative to these tools with AI abilities to enhance task achievement.
Make A Slow Motion Video Make A Slow Motion Video More Features

Part 1: Capturing Slow Motion Videos with Sony S&Q Feature
Who hasn’t heard about Sony and its services in the world of videography? Along with many features, the cameras offer a Sony S&Q mode for slo-mo creation. This model can manipulate video frame rates higher than standard cameras. It offers three frame rate options to select from 25p, 50p, and 60p. Here is a chance to learn to capture a slow-motion shot using S&Q mode Sony:
Step 1
From your camera’s dial, select the “S&Q” option. Access the camera’s display screen and go to “Menu 2” from the top bar. Then, “S&Q Settings” in the featured section.

Step 2
Once you reach the Sony S&Q mode settings, click “Record Settings.” This will decide the output frame rate of your video. In PAL, you have two record options: 25p and 50p. On the other hand, in the NTSC, you’ll have three options: 25p, 50p, and 60p.

Step 3
Click the “Enter” option to finalize the Record settings.

Step 4
Upon accessing the “Frame Rate” settings, you’ll find many options there. The highest frame rate in PAL is 100 fps, while in NTSC, itit is 120 fps. You can also choose the Exposure settings for your camera according to footage. After setting these preferences, start capturing a video in slow motion.

Part 2: Different Sony Cameras Offering S&Q Feature
There is no lack of devices that help you capture any scene with perfection. Someone obsessed with videography can understand the worth of a high-quality camera. Sony launched two such products named A7iii and Sony ZV E10 slow motion. Both are high-output, professional-grade cameras to assist in slo-mo creation. Here is a brief review of these cameras for you to compare and select better:
1. Sony A7 III
Sony A7iii slow motion camera launch occurred in 2018 with a bundle of features. This camera offers 120fps video capture for creating slomos or high-speed effects. It has an APS-C size, 24.2-megapixel, and an Exmor CMOS sensor for more precise results. In addition, it possesses a 4K Ultra-High Resolution of 3840 x 2160 for videos. The camera also has an LCD touch screen, which proves productive in settings.

2. Sony ZV-E10
This is an upgraded S&Q mode Sony camera that first emerged in 2021 with a fully articulated screen. It has an APS-C size, 24.2-megapixel, and an Exmor CMOS sensor for balanced shooting. This version also has the highest video frame rate of 120 fps for the professional slo-mo effect. It captures slomos in 4K (UHD) 3840 x 1920 video resolution for quality maintenance. It has a directional 3-capsule microphone for high-definition audio.

Part 3: How to Slow Down Video in Sony Vegas Pro?
Vegas Pro stands amongst the top video editors who excel at creating slow motions. With its powerful speed manipulation, it can curate cinematic slo-mo effects. In addition, the tool offers an Optical Flow option for ultra-high-quality slomos. It offers a non-linear timeline editing, which means selective durations to apply this effect. Given below is the step-by-step guide to Sony V egas slow motion:
Step 1
After launching the software, import the video and bring it to the timeline.

Step 2
Navigate towards the editing panel where the clip and audio track are showing. Place your cursor at the finishing line of the clip and stretch it throughout the timeline. This will add a slow-motion effect to your video.

Part 4: Wondershare Filmora: Comprehending the Best Alternative for Slowing Down Videos
All the above slow-motion solutions are adequate but not reliable. This is because shooting in So ny S& Q mode declines video quality upon export. In addition, the Sony Vegas slow motion subscription plans start at more than $500. This seems expensive for someone who just started editing and is a beginner.
Wondershare Filmora is the perfect alternative to S ony ZY E10 slow motion and other devices. It offers an intuitive speed change interface at affordable prices. In addition, there is more than one method to alter its speed with optical flow. Moreover, the software offers extensive export settings to set video resolution.
Free Download For Win 7 or later(64-bit)
Free Download For macOS 10.14 or later
Step-by-Step Guide to Creating Slow Motion in Filmora
The fundamental technique for achieving slow motion in Filmora involves Uniform Speed. This method simply adjusts the playback speed of a video through a slider. The process of creating slow-motion content is mentioned below:
Step 1Import Media to Initiate Slow-Motion Creation
Initiate Filmora by clicking the “New Project” button and access the editing interface. Hit the “Ctrl + I” keys to import media and bring it to the timeline. After selecting the clip in the timeline, navigate to the settings panel. Proceed to the “Speed” > “Uniform Speed” to access the speed change slider. Drag the slider towards the left to adjust the slow-motion speed.

Step 2Access AI Frame Interpolation Settings
To achieve smooth slow motion, access AI Frame Interpolation at the bottom. Expand this section and opt for the “Optical Flow” to apply.

Step 3Enable Render Preview to Review Results
Once all adjustments are complete, select the video and return to the timeline panel. Use your cursor to access the “File” tab in the top toolbar and choose “Render Preview.” Utilize the preview options before exporting the video.

Key Features of Filmora
Filmora doesn’t just claim to be the best; there are multiple features to support this claim. If you want to explore the features of this S ony A7iii slow motio n, read this section:
AI Copilot Editing: We understand the confusion of being an amateur at editing. The unfamiliarity with a tool increases it. Hence, Filmora offers this feature. As the name suggests, it acts as your assistant to run errands in Filmora. Ask it about any feature, and it will give direction and editing suggestions.
AI Text-Based Editing: Filmora excels in cutting or trimming videos for editing. It has recently introduced text-based editing AI to convert video speech to text. Afterward, users can remove a specific text to eliminate the video section.
Remove Background: With Filmora, video editing is more accessible than ever. The AI Smart Cutout option removes the video backgrounds with precision. Afterward, you can replace it with Filmora’s pre-developed background. This includes solid colors, gradients, and other graphics.
AI Image: Can’t spare time to capture images for your new content idea? With Filmora’s text to generate AI, you can now curate images. The AI only requires you to add a prompt and craft results accordingly. Upon creation, users can also select a preferred image resolution.
Conclusion
This article has discussed the purpose of Sony S&Q and how to use it for slo-mo creation. In addition, users learned about two of Sony’s cameras, which are popular for slow-motion. Afterward, we discussed a desktop method to create slow motion. Considering all the drawbacks of these methods, we recommended Filmora. It is a desktop alternative to these tools with AI abilities to enhance task achievement.
A Comprehensive Guide on Converting Slo-Mo Videos to Normal Speed Videos On iPhone
Thanks to the eccentric and offbeat elements, slow-motion videos have become the super-fun, state-of-the-art trend. Whether you’re in the bar trying to click the aesthetic, cinematic video or capture cool, unique, and enticing birthday moments, you can always rely on the slow-mo feature.

But do you ever feel like converting the slow-motion video in your iOS device to a normal video? Perhaps you thought the slow-mo video would be more attractive, but it’s not, or maybe you want to determine how to remove slow-motion from a video iPhone.
No matter the reason, there are numerous ways to remove slow motion from iPhone video. In this article, you’ll learn the various methods to convert slow-motion video into a regular video on your iPhone or iPad. Also, learn the steps involved in achieving it.
So, let’s start.
How To Convert Slow Motion Video to Normal on iPhone and iPad
Due to the slow-motion and Time-lapse modes that are built into the iPhone, people may quickly record slo-mo and time-lapse clips using their iOS smartphone cameras.
Access the iPhone camera, select Slo-mo, press the Record icon once to begin filming, and then press it once more to stop. This will create a slo-mo video.
Do you ever wish to get your video’s slow motion removed? How to convert slow-motion video to normal on an iPhone? Well, here’s your answer.
Method 1. Using the Photos App
The Photos app is an in-built app for iPhone and iPad that features editing capabilities like rotation, resizing, and auto-enhancement, in addition to helping you manage videos and images.

You may quickly and effortlessly turn a slow-mo video into a regular-speed one with the Photos app’s tucked-away slow-motion converter feature. Additionally, there won’t be any quality loss in your video.
And here are the steps on how to remove slow-mo from iPhone video using the Photos app on an iPad or iPhone to turn it to normal speed.
Step1: Take your iPad or iPhone, navigate to the Photos app, open it, and then go to the bottom to hit the Albums tab.
Step2: Choose the Slo-mo option, and subsequently select the video you wish to turn into a regular speed video. Go to the top right corner of the screen and hit the Edit button.
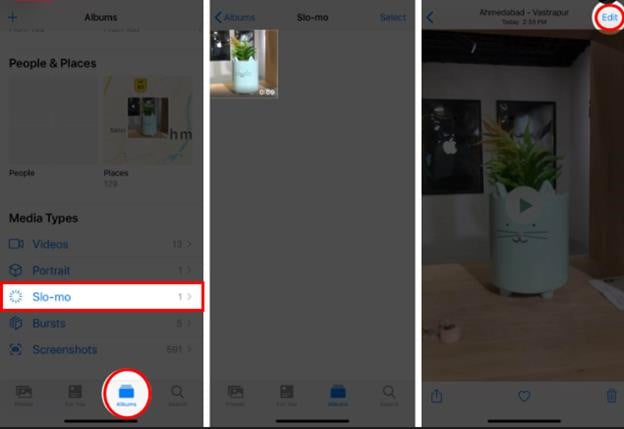
Step3: If you look under the timeline, you’ll find vertical lines. Here, the area with apart spaces signifies slow motion.
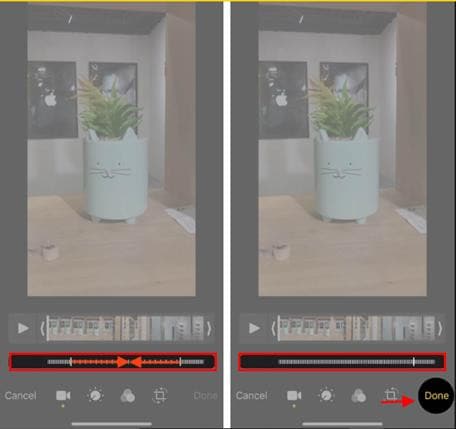
Step4: To learn how to remove slow mo from iPhone video is to learn how to turn it into regular speed. To do so, select the slow-motion bar and drag it towards the other one to position the lines at a close distance.
Step5: When finished, hit the Done button and save this video. However, if you think this change was unnecessary or incorrect, you can discard it by clicking on Edit → Revert → Revert To Original.

Editing Tip
- The Photos app on iPhone doesn’t allow you to convert any video shot at 24fps or 30fps to slow motion.
- You cannot reduce or decrease the overall size of the video after conversion.
Pros & Cons
Pros
- It is a built-in app on every iOS device.
- Saves the hassle of downloading any third-party app.
- No charges are applicable for using this app.
- Excellent slow-mo video convertor.
Cons
- Limited speed adjustment for the conversion of slow-mo videos into regular videos.
Method 2: Using Other Converter Apps
You may think that converting slow-mo video to a regular speed video on your iPad or iPhone is convenient, but there’s a drawback too. The method mentioned above can only help you with minimalistic speed changes, which may not give you the desired result.
However, other converter apps also help you change slow-mo video to regular iPhone video. These apps work seamlessly on your PC or Mac to turn your slow-mo videos on the iPhone or Mac to normal-speed video using customized and high-resolution settings.
Overview of The Apps
| Particulars | iMovie | Slow-Fast Motion Video Editor |
|---|---|---|
| Type (versatile or specialized) | Versatile | Specialized |
| Supported OS | iOS, Mac | iOS, Mac |
| Average Rating | 3.9/5 | 4.7/5 |
| Price | Free | Free |
| Best for | Video editing with cinematic effects | Slo-mo video conversion |
1) iMovie

iMovie is an excellent option if you’re looking for an application to modify a video with additional tools and convert the slow-mo to a regular pace. Among the top video converters for the iPhone is iMovie.
It offers a wide range of tools and capabilities that allow you to change the video transition, audio, and speed, add music, animated text, video overlay effects, normal video effects, and more. Additionally, it aids users in producing stunning films and commercials in a Cinematic manner.
iMovie could convert slow-mo footage to normal speed, in case you didn’t know. Did you ever attempt to change slow mot to regular speed in iMovie? With the use of iMovie, how can slow-motion video be made normally on an iPhone?
Here are the instructions.
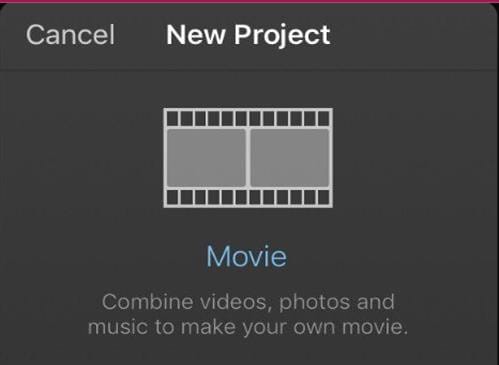
Step1: Open the iMovie app, click on the ‘Create Project’ option, → tap on ‘Movie → Media → Video.

Step2: Tap on the slow-mo option, select the slow-motion video you want to convert and hit the ‘Create Movie’ option.
Step3: Get to know the editing options by clicking on the timeline. Then, click on the clock (speed) icon. At the beginning of the lines, you’ll find a turtle. It demonstrates slow motion. Plus, the number right behind the rabbit at the end signifies the speed.

Step4: To turn this slow-motion video into a regular speed video, drag and slide the speed control slider until the number turns 1x.
Step5: To save the changes, tap on the Done option. Subsequently, edit the video as per your preference.
2) Slow-Fast Motion Video Editor
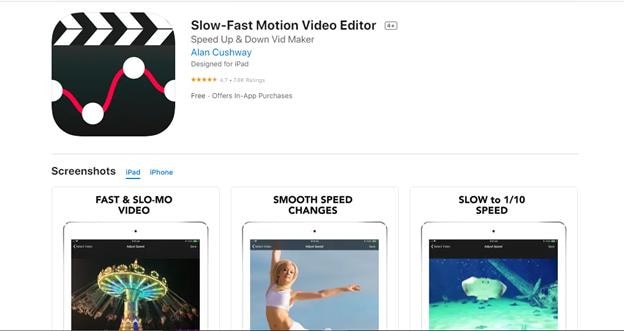
This slow-mo video converter app helps you slow down or speed up any slow-motion video without any watermark and charges. This free app supports both landscape or portrait operation, unlimited video length, and corrected audio pitch.
The application is convenient to use and seamless to speed up or slow down any parts or clips of your videos. Without charging a penny, this app meets the users’ expectations. If you’re wondering how to use this converter app, here’s a step-by-step guide:
Method 3. Using Third-Party Online Tools
The smartphone sector’s most cutting-edge functionalities can be found on iPhones. Users may capture slow-motion videos, for instance. However, you may consider accelerating the slo-mo movie to regular video speed once it has been recorded.
Using your smartphone, how would you go about doing that? Well, we have seen that using the built-in Photos app and converter apps like iMovie can help, but can they really provide the level of customization and outcomes you need?
When things get professional and the expectations are too high, it’s best to use third-party online tools. So, here are a few practical choices:
Overview of the Online Tools
| Particulars | KAPWING | Clideo | EZGIF |
|---|---|---|---|
| Supported File Format | .AVI, .FLV, 3GP, and other edge file types. | MP4, MOV, WMV, AVI, WEBM, FLV, MKV, MPG, MPEG, MTS. | MNG files |
| Watermark | Not Available | Only in Free version | Not Available |
| Available Speed Option | As fast as 4x for an accelerated video | 0.25 times to 2 times | 0.25 times to 2 times |
| Time Consuming | No | Moderate | No |
1) KAPWING
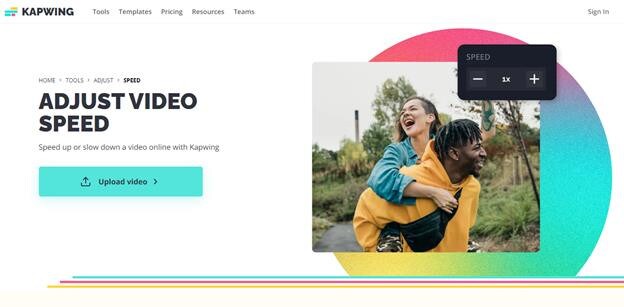
Kapwing is a tool for group film editing that enables people to collaborate to produce original videos. For individuals to create the ideal video, Kapwing offers a collection of pre-built themes, stock footage, and materials.
Kapwing acts as a digital office solution that enables individuals to organize all of their resources in one location and work together on projects utilizing sharing features. Amid its vast range of features, its slow-mo converter is the most famous and widely used one.
- Rating: 4.1/5
- Price: Plan starts at $20 per month
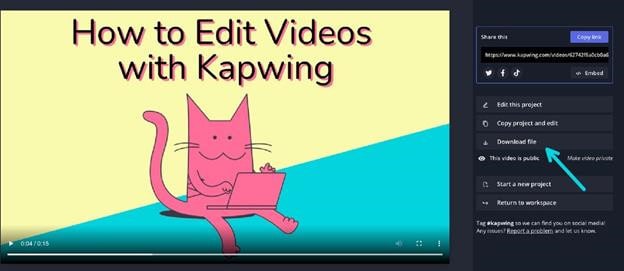
Step-By-Step Guide To Convert Slow-Mo on Iphone Using Kapwing App
Step1: First, download and install the Kapwing app from the App Store.
Step2: Upload the slow-mo video that you want to speed up.
![]()
Note: Kapwing also lets you speed up any slow-mo video present on TikTok, Twitter, or YouTube.
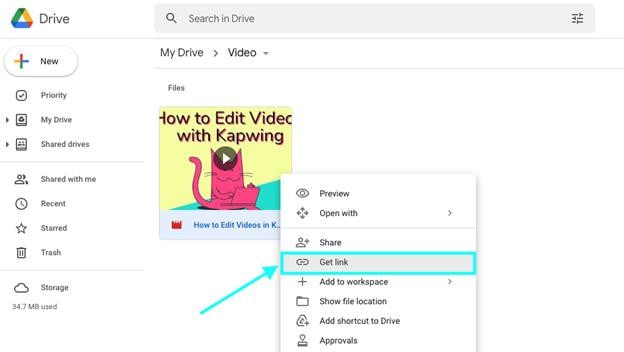
Step3: Perform the video clip speed adjustment by utilizing the Kapwing sidebar. You can accelerate the video clip speed up to four times the original speed. If not, you can play in every level in between.
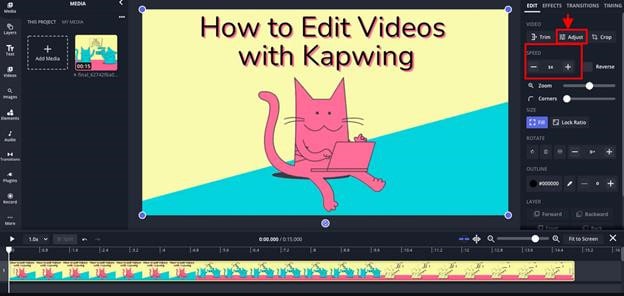
Step4: Finally, click on the Export option, and the final video clip with all speed adjustments will be generated within a few seconds.
2) Clideo
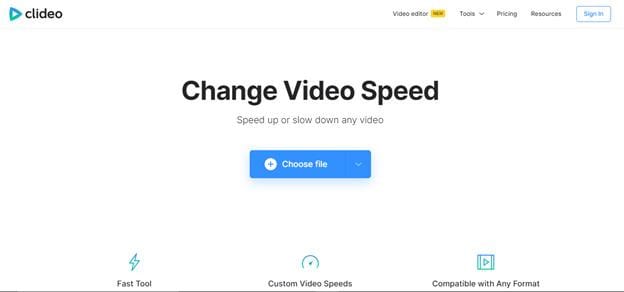
Among the finest free tools for rapid photo or video editing is Clideo. You can start upgrading your material by uploading files in a wide range of formats to their site.
Limitless customization is possible with the paid version for just $9 a month. The capabilities, though, aren’t as varied as those offered by rivals, and there aren’t any mobile apps for people who want to generate material while on the go.
- Ratings: 4.3/5
- Price: Starts at $9 per month
Step-By-Step Guide To Convert Slow-Mo on Iphone Using Clideo App:
Step1: From your computer (Mac) or mobile device (iPhone), upload a video. You can also add from a Dropbox or Google Drive account.
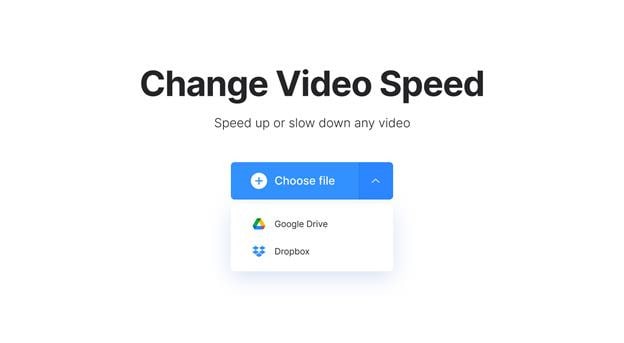
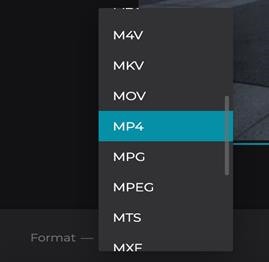
Step2: Select to speed up the video after it has been recorded. Then, if required, muffle its sound and alter the file type.
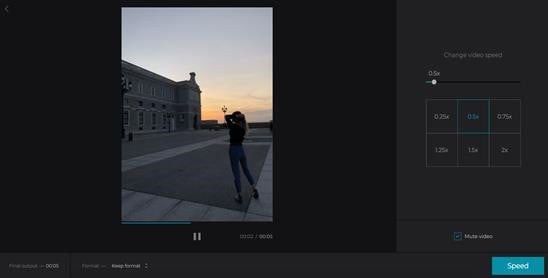
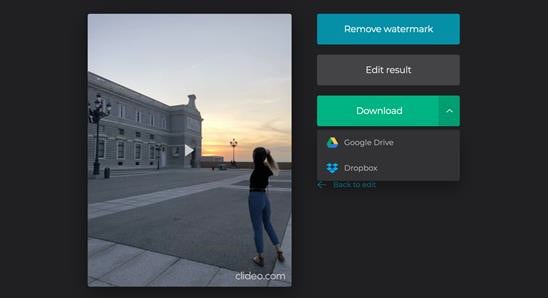
Step3: The video can be seen directly in your browser. Click “Download” after you are finished and delighted with your creation.
3) EZGIF
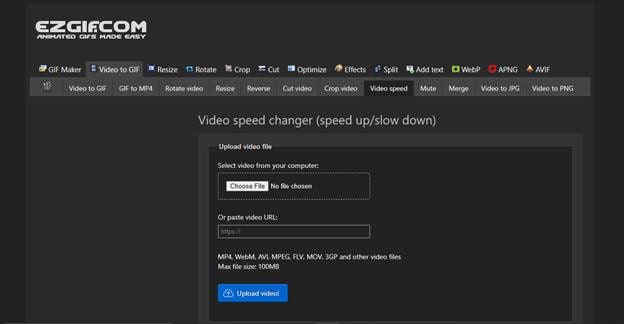
EZGIF is a free online editing tool that enables individuals to change the playback speed of any video. Not only does it effectively convert your slow-mo video on an iOS device to a normal speed video, but it also comes with many other features (later on that). The website has a simple, outdated interface, but except for that, it’s a fine app for beginners.
Step-By-Step Guide To Convert Slow-Mo on Iphone Using Clideo App:
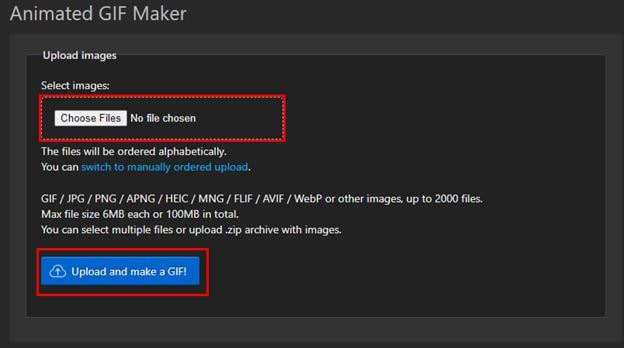
Step1: Upload the video clip and choose a speed multiplier to start using this program.
Step2: A number less than one will slow down playback; a number greater than one will quicken it.
Step3: Thus, input 0.5 to run the program at 1/2 its normal speed, and so forth.
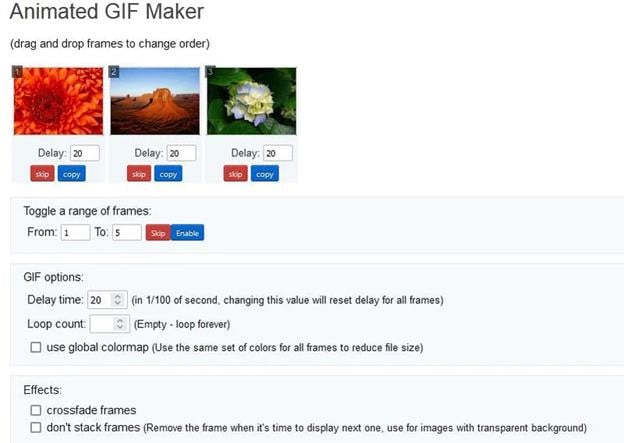
Step4: You can preserve the audio track’s original tempo, vary the speed along with the video, or silence the audio entirely.
Convert Your Slo-Mo Videos Into Regular Ones In a Few Simple Steps With Filmora
Filmora is a leading online video editing software that has become the preferred choice of all professionals and amateurs. From everyday needs to something formal, it helps you edit videos for every occasion.
You can change pace swiftly or consistently in Filmora and vary the pace of the audio or video recordings. Use the Speed Ramping tool in Filmora. If you want to remove slow-mo or add it, you can use Filmora’s speed ramping feature anytime.
Free Download For Win 7 or later(64-bit)
Free Download For macOS 10.14 or later
We will share some details on how to use this feature here, but for a comprehensive, detailed guide, read to the end.
Step-By-Step Guide to Speed Changing
Step1Launch the Video
Activate Wondershare Filmora on your computer. To increase the speed and runtime of the movie, explore the desired video and enter it into the software. You can drag and drop the movie onto the interface as well.
Step2Speed Adjustment

Press the left mouse button as soon as the video shows on the screen. And click the speed tab in the toolbar. There is then a contextual menu displayed. To double the rate, select 2x from the “Fast” menu. The participant may use any fundamental that has more than one.
Step3Save & Export
When finished, select “Save Project” from the list of available options in the “File” panel. Press “Save” after renaming the project.
Using Filmora’s “Export” feature, selecting “Export,” and then modifying the file name is the alternative way to export the video. A device, a system, or even YouTube can receive the exported video. Next, click “Export.”
Bonus Tips. 2 More Methods to Normalize Your Video Speed
Filmora offers you 2 more advanced methods to increase or decrease the speed of the video, one is uniform speed and the other, is speed ramping . Want to learn more about changing speed in Filmora, watch this video tutorial to get a quick start on using them.
Conclusion
That’s basically it! So that’s how you turn any slow-motion video into a regular one.
This article covers all major techniques to convert videos to slow motion on iOS and Mac. You can pick one of them to convert video to slow motion or to slow down slow motion.
So, are you now prepared to convert slow-motion videos on your iPad or iPhone device to ordinary speed? Try the Filmora video editor if you’re looking for something really professional.
It makes it much easier to convert slow-motion videos from your smartphone or tablet to regular speed. It has powerful video editing features and is more comfortable to use. So, get started today!
Method 2: Using Other Converter Apps
You may think that converting slow-mo video to a regular speed video on your iPad or iPhone is convenient, but there’s a drawback too. The method mentioned above can only help you with minimalistic speed changes, which may not give you the desired result.
However, other converter apps also help you change slow-mo video to regular iPhone video. These apps work seamlessly on your PC or Mac to turn your slow-mo videos on the iPhone or Mac to normal-speed video using customized and high-resolution settings.
Overview of The Apps
| Particulars | iMovie | Slow-Fast Motion Video Editor |
|---|---|---|
| Type (versatile or specialized) | Versatile | Specialized |
| Supported OS | iOS, Mac | iOS, Mac |
| Average Rating | 3.9/5 | 4.7/5 |
| Price | Free | Free |
| Best for | Video editing with cinematic effects | Slo-mo video conversion |
1) iMovie

iMovie is an excellent option if you’re looking for an application to modify a video with additional tools and convert the slow-mo to a regular pace. Among the top video converters for the iPhone is iMovie.
It offers a wide range of tools and capabilities that allow you to change the video transition, audio, and speed, add music, animated text, video overlay effects, normal video effects, and more. Additionally, it aids users in producing stunning films and commercials in a Cinematic manner.
iMovie could convert slow-mo footage to normal speed, in case you didn’t know. Did you ever attempt to change slow mot to regular speed in iMovie? With the use of iMovie, how can slow-motion video be made normally on an iPhone?
Here are the instructions.
Step1: Open the iMovie app, click on the ‘Create Project’ option, → tap on ‘Movie → Media → Video.

Step2: Tap on the slow-mo option, select the slow-motion video you want to convert and hit the ‘Create Movie’ option.

Step3: Get to know the editing options by clicking on the timeline. Then, click on the clock (speed) icon. At the beginning of the lines, you’ll find a turtle. It demonstrates slow motion. Plus, the number right behind the rabbit at the end signifies the speed.

Step4: To turn this slow-motion video into a regular speed video, drag and slide the speed control slider until the number turns 1x.
Step5: To save the changes, tap on the Done option. Subsequently, edit the video as per your preference.
2) Slow-Fast Motion Video Editor

This slow-mo video converter app helps you slow down or speed up any slow-motion video without any watermark and charges. This free app supports both landscape or portrait operation, unlimited video length, and corrected audio pitch.
The application is convenient to use and seamless to speed up or slow down any parts or clips of your videos. Without charging a penny, this app meets the users’ expectations. If you’re wondering how to use this converter app, here’s a step-by-step guide:
Method 3. Using Third-Party Online Tools
The smartphone sector’s most cutting-edge functionalities can be found on iPhones. Users may capture slow-motion videos, for instance. However, you may consider accelerating the slo-mo movie to regular video speed once it has been recorded.
Using your smartphone, how would you go about doing that? Well, we have seen that using the built-in Photos app and converter apps like iMovie can help, but can they really provide the level of customization and outcomes you need?
When things get professional and the expectations are too high, it’s best to use third-party online tools. So, here are a few practical choices:
Overview of the Online Tools
| Particulars | KAPWING | Clideo | EZGIF |
|---|---|---|---|
| Supported File Format | .AVI, .FLV, 3GP, and other edge file types. | MP4, MOV, WMV, AVI, WEBM, FLV, MKV, MPG, MPEG, MTS. | MNG files |
| Watermark | Not Available | Only in Free version | Not Available |
| Available Speed Option | As fast as 4x for an accelerated video | 0.25 times to 2 times | 0.25 times to 2 times |
| Time Consuming | No | Moderate | No |
1) KAPWING

Kapwing is a tool for group film editing that enables people to collaborate to produce original videos. For individuals to create the ideal video, Kapwing offers a collection of pre-built themes, stock footage, and materials.
Kapwing acts as a digital office solution that enables individuals to organize all of their resources in one location and work together on projects utilizing sharing features. Amid its vast range of features, its slow-mo converter is the most famous and widely used one.
- Rating: 4.1/5
- Price: Plan starts at $20 per month
Step-By-Step Guide To Convert Slow-Mo on Iphone Using Kapwing App
Step1: First, download and install the Kapwing app from the App Store.
Step2: Upload the slow-mo video that you want to speed up.
![]()
Note: Kapwing also lets you speed up any slow-mo video present on TikTok, Twitter, or YouTube.

Step3: Perform the video clip speed adjustment by utilizing the Kapwing sidebar. You can accelerate the video clip speed up to four times the original speed. If not, you can play in every level in between.

Step4: Finally, click on the Export option, and the final video clip with all speed adjustments will be generated within a few seconds.

2) Clideo

Among the finest free tools for rapid photo or video editing is Clideo. You can start upgrading your material by uploading files in a wide range of formats to their site.
Limitless customization is possible with the paid version for just $9 a month. The capabilities, though, aren’t as varied as those offered by rivals, and there aren’t any mobile apps for people who want to generate material while on the go.
- Ratings: 4.3/5
- Price: Starts at $9 per month
Step-By-Step Guide To Convert Slow-Mo on Iphone Using Clideo App:
Step1: From your computer (Mac) or mobile device (iPhone), upload a video. You can also add from a Dropbox or Google Drive account.

Step2: Select to speed up the video after it has been recorded. Then, if required, muffle its sound and alter the file type.


Step3: The video can be seen directly in your browser. Click “Download” after you are finished and delighted with your creation.

3) EZGIF

EZGIF is a free online editing tool that enables individuals to change the playback speed of any video. Not only does it effectively convert your slow-mo video on an iOS device to a normal speed video, but it also comes with many other features (later on that). The website has a simple, outdated interface, but except for that, it’s a fine app for beginners.
Step-By-Step Guide To Convert Slow-Mo on Iphone Using Clideo App:
Step1: Upload the video clip and choose a speed multiplier to start using this program.

Step2: A number less than one will slow down playback; a number greater than one will quicken it.
Step3: Thus, input 0.5 to run the program at 1/2 its normal speed, and so forth.

Step4: You can preserve the audio track’s original tempo, vary the speed along with the video, or silence the audio entirely.
Convert Your Slo-Mo Videos Into Regular Ones In a Few Simple Steps With Filmora
Filmora is a leading online video editing software that has become the preferred choice of all professionals and amateurs. From everyday needs to something formal, it helps you edit videos for every occasion.
You can change pace swiftly or consistently in Filmora and vary the pace of the audio or video recordings. Use the Speed Ramping tool in Filmora. If you want to remove slow-mo or add it, you can use Filmora’s speed ramping feature anytime.
Free Download For Win 7 or later(64-bit)
Free Download For macOS 10.14 or later
We will share some details on how to use this feature here, but for a comprehensive, detailed guide, read to the end.
Step-By-Step Guide to Speed Changing
Step1Launch the Video
Activate Wondershare Filmora on your computer. To increase the speed and runtime of the movie, explore the desired video and enter it into the software. You can drag and drop the movie onto the interface as well.
Step2Speed Adjustment

Press the left mouse button as soon as the video shows on the screen. And click the speed tab in the toolbar. There is then a contextual menu displayed. To double the rate, select 2x from the “Fast” menu. The participant may use any fundamental that has more than one.
Step3Save & Export
When finished, select “Save Project” from the list of available options in the “File” panel. Press “Save” after renaming the project.
Using Filmora’s “Export” feature, selecting “Export,” and then modifying the file name is the alternative way to export the video. A device, a system, or even YouTube can receive the exported video. Next, click “Export.”
Bonus Tips. 2 More Methods to Normalize Your Video Speed
Filmora offers you 2 more advanced methods to increase or decrease the speed of the video, one is uniform speed and the other, is speed ramping . Want to learn more about changing speed in Filmora, watch this video tutorial to get a quick start on using them.
Conclusion
That’s basically it! So that’s how you turn any slow-motion video into a regular one.
This article covers all major techniques to convert videos to slow motion on iOS and Mac. You can pick one of them to convert video to slow motion or to slow down slow motion.
So, are you now prepared to convert slow-motion videos on your iPad or iPhone device to ordinary speed? Try the Filmora video editor if you’re looking for something really professional.
It makes it much easier to convert slow-motion videos from your smartphone or tablet to regular speed. It has powerful video editing features and is more comfortable to use. So, get started today!
How to Take Slow Motion Videos
Scenes that might otherwise be monotonous can be made more interesting by the use of slow-motion photography in movies and television shows. For instance, a battle sequence between two characters can be portrayed in its entirety, but if it is later replayed in slow motion, the intensity of the action is amplified significantly.
Let’s dive in!
1. What is slow motion?
Filmmakers use the slow-motion effect to create the illusion that the passage of time has been slowed down on the screen. In the early 20th century, an Austrian priest named August Musger was the one who came up with the idea. Playing normally recorded material at a slower pace is another method for creating the illusion of slow motion.
When a film is recorded at 25 frames per second, but played back at 24 frames per second, it will seem as if it is being shown in slow motion because all of the movements will be slightly slower than when they were actually performed. This is because the film was recorded at 25 frames per second, but the playback was done at 24 frames per second.
Because there are not enough frames to show all of the details of each frame when a 24-frame animation is played at a 25-frame rate (or a 30-frame animation at a 32-frame rate), certain frames have to be repeated (every 5th one in this case). When there is a dramatic event taking place, this manipulation of the film speed makes the action on screen appear even more dramatic or “tensioned.”

2. Understanding frame rates
When filming video, there are a set number of frames per second that you can choose from. One picture is all you get when you take a still photograph. Click. That is only one example. A frame is the name of that picture. With video, however, you take 30 or 24 images per second, which you then combine. You now have footage.
The video is a combination of tens of thousands of frames or images that are flashing before your eyes. With a normal frame rate of 24 frames per second, you are essentially taking 24 pictures per second and stitching them together to create video. When you stretch it out in post for slow motion, you double or triple the frame rate, which results in more images per second and eliminates empty gaps and jarring actions.
This is how video that has been sped up for slow motion may still preserve its quality. But you can’t just choose a frame rate based on taste. Frame rates vary depending on the different types of emotions. 60 fps will do if the video is a slo-mo of a person’s emotion. However, if your shot contains a lot of movement and you want to show it, such as when automobiles collide or explode, you may require a higher frame rate, such as 120 fps.

3. Post processing
This is when it gets a bit complicated. Some cameras come equipped with a slow-motion feature. To capture the video in slow motion at a higher frame rate, go to your settings. You might not have this built-in slow-motion feature in other models.
Therefore, even though the footage was taken at a higher frame rate, the camera is playing the movie back at the same pace it was shot at, so when you shoot at a higher frame rate, you end up with footage of a normal speed. There is a solution to that. The footage’s speed can be adjusted during post-production.
The 24/30 fps editing timelines are pre-set. The majority of the video you capture at this frame rate plays back just nicely on this timeline. You must stretch out video that was shot at a higher frame rate to match this timeline, though. That effectively doubles or triples the length of a video, depending on the multiple of the timeline’s typical frame rate.

4. Lighting
While watching TV or movies, you might have observed anything. The majority of the extremely slow photos happen in broad daylight. Not after dark or in dimly lit areas. The reason for this is that sufficient lighting is required in order to capture motion. Lighting becomes crucial as your frame rate exceeds 300 frames per second. Therefore, if you must take these pictures, you must do so in a studio environment with lots of artificial lighting.
To create that cinematic magic, you can use high CRI lighting. On the screen, a flickering light may spell doom. Flickering lights have the potential to damage slow-motion film even though they would be OK for any other scene. Because there is no risk of voltage fluctuation, LED lights are a safe bet. The reason for this is that some models do not require an electrical outlet to function. Prior to departure, make sure you have checked each and every light.
If you are filming during the day and you point your camera toward the sun, you may end up with a significant amount of glare that cannot be hidden up in the post-production stage nor can it be ignored. This is not merely a problem that occurs throughout the daytime. Flares can also be obtained from moving vehicles and various other sources of light. If you use a flat lens when you’re out at night, you can eliminate the risk of something like that happening.

5. Why use slow motion?
When you first begin working with slow-motion video, you need to ask yourself, “What exactly is the purpose behind me choosing this effect?” Once you have an answer to that question, you may move on to the next step.
In most cases, there are often two primary causes for it.
1. It makes sense to present emotions on the screen for a longer period of time in order for the audience to be able to absorb and comprehend it in its whole if they are shown for a longer period of time since moments that are packed with emotions seem to endure longer than ordinary ones.
2. The second strategy is to draw attention to striking visuals that you might have overlooked in other circumstances and that contribute significantly to the aesthetic value of your setting. A flutter of the eyelid, a butterfly stretching its wings, rains falling on a flower petal, shards of fire breaking free, etc. are all examples of how quickly things may happen. You need to have a good reason for using slow motion, and you shouldn’t abuse the effect too much too. You should only do so at those moments where it makes logical sense to do so.

Subconscious slow-motion. Overusing or misusing a function ruins its appeal. Filming isn’t an exact science, but it does nothing unnecessary. For a cinematic effect, slow-motion should be introduced carefully.
Free Download For Win 7 or later(64-bit)
Free Download For macOS 10.14 or later
Free Download For macOS 10.14 or later
Also read:
- New How To Change Speed of Video in Final Cut Pro?
- New In 2024, How to Add Selective Color Effect to Your Videos
- New How to Use LUTs in Adobe Premiere Pro for 2024
- 2024 Approved 8 Best Sites to Get Glitch Transition for Premiere Pro
- Updated One of the Latest Tools for Editing Video and Images Is AI Composite Video App Which Is Popular Among Users. Learn All About This Tool and Its Functioning
- In 2024, How to Correct Lens Distortion With Filmora
- New 2024 Approved How to Use Zoom in Google
- New In 2024, Looking for the Best Websites for 3D Text PNG? Weve Covered You with Our Top 8 Picks for Your Upcoming Work
- Updated 2024 Approved Steps to Add Subtitles in Canva
- Best Phantom Slow-Mo Camera For Recording Slow Motion Videos
- New 2024 Approved How To Change Font In Premiere Pro
- New How Can You Make a Slideshow Look Aesthetic? Follow the Given Discussion to Learn About Creating an Aesthetic Slideshow All by Yourself for 2024
- Updated This Article Describes Different Ways for Removing Gif Backgrounds, How We Can Use Them, and How This Way Differs From One Another for 2024
- Updated 2024 Approved Learn About some of the Best Photo Collage with Music Tools
- Top 6 Best Alternatives to Clownfish Voice Changer
- Are You Looking for the Best Way to Add Subtitles to Your Video? The Top SRT File Creators Can Help You Do That
- In 2024, Browse the List of the Best 8 Scanners or Converters for Converting the Slides to Digital Images. Also, Know the Other Important Information of Slides to Digital Conversion
- 2024 Approved Top 10 Movie Trailer Voice Generators Windows, Mac, Android, iPhone
- New How To Fade Audio In Kinemaster
- New In 2024, How To Make a Photo Collage in Microsoft Word
- Updated Here Is a Guide on How You Can Resize Videos via Handbrake and Wondershare Filmora. The Former Is a Lightweight Tool Perfect for Batch Resizing Videos, While the Latter Is a Powerful Free Video Editing Software for 2024
- New This Article Discusses What Is Blender Video Editor, How to Download, Install and Use It, and Its Key Features. It Further Discusses Its Alternative for Editing Your Videos and More. Check Out Now for 2024
- New In 2024, Hyperlapse VS Timelapse Videos
- Updated 2024 Approved Do You Want to Show Your Mood in Your Digital Media Content but Dont Know How To? There Are Many Moody LUTs Available that Highlight Your Mood in Your Content
- Updated Practical Ways to Resize Video in Handbrake
- New 2024 Approved Best 10 Options Slow Down Video Online with Perfection
- New In 2024, Ways to Make Canva Collages
- Updated Do You Know You Can Trim and Cut Your Video Into the Desired Portions Using a Reliable Video Splitter? Get an Easy Video Splitter Now to Simplify Your Work. Here Are 33 Carefully Chosen Apps to Help You in This for 2024
- Updated 2024 Approved Are You Looking for the Best Way to Add Subtitles to Your Video? The Top SRT File Creators Can Help You Do That
- New This Article Talks in Detail About How to Download Windows Movie Maker 2012 Version, the Key Features, How to Use It, Etc. It Further Discusses an Alternative Way to Create Videos on Windows PC. Check Out
- Do You Know that You Can Apply Different LUTs and Create Your Own? There Are Many LUT Online and Offline Generators that You Can Use to Create Your LUT for 2024
- In 2024, A Comprehensive Guide to iPhone XS Max Blacklist Removal Tips and Tools
- In 2024, How To Change Country on App Store for Apple iPhone 6s With 7 Methods | Dr.fone
- In 2024, How to Fix Pokemon Go Route Not Working On Tecno Spark Go (2023)? | Dr.fone
- In 2024, 9 Best Free Android Monitoring Apps to Monitor Phone Remotely For your Infinix Hot 40i | Dr.fone
- How to Change/Fake Your Apple iPhone 13 mini Location on Viber | Dr.fone
- Sign .docx Documents Online for Free
- Guide to Mirror Your Honor X50 to Other Android devices | Dr.fone
- In 2024, Unlock Xiaomi Redmi A2+ Phone Password Without Factory Reset Full Guide Here
- How to Reset a Infinix Note 30 5G Phone that is Locked?
- Pokemon Go Error 12 Failed to Detect Location On Vivo Y27s? | Dr.fone
- How To Recover Data from Apple iPhone 15 Pro? | Dr.fone
- In 2024, How to Reset a Honor X9b Phone that is Locked?
- How to Access Your Apple iPhone XR When You Forget the Passcode?
- In 2024, How to Use Google Assistant on Your Lock Screen Of Realme GT Neo 5 Phone
- How to Bypass iPhone 6 Passcode Easily Video Inside
- In 2024, Android to Apple How To Transfer Photos From Infinix Smart 8 HD to iPad Easily | Dr.fone
- Top 7 Skype Hacker to Hack Any Skype Account On your Samsung Galaxy M14 4G | Dr.fone
- Top 7 Phone Number Locators To Track Xiaomi Redmi Note 12 Pro 5G Location | Dr.fone
- Easy Guide How To Bypass Samsung Galaxy S24 FRP Android 10/11/12/13
- How to Mirror PC Screen to Infinix Smart 7 HD Phones? | Dr.fone
- Why Your WhatsApp Live Location is Not Updating and How to Fix on your Huawei Nova Y91 | Dr.fone
- In 2024, How to Change/Fake Your Apple iPhone 15 Location on Viber | Dr.fone
- Title: New In 2024, Find Out How to Add Subtitles in the VLC Media Player on Your Windows and Mac System with Quick and Simple Instructions
- Author: Morgan
- Created at : 2024-04-24 01:09:37
- Updated at : 2024-04-25 01:09:37
- Link: https://ai-video-editing.techidaily.com/new-in-2024-find-out-how-to-add-subtitles-in-the-vlc-media-player-on-your-windows-and-mac-system-with-quick-and-simple-instructions/
- License: This work is licensed under CC BY-NC-SA 4.0.

