
:max_bytes(150000):strip_icc():format(webp)/how-to-fix-it-when-reddit-apps-arent-working-f4c8fe50a9ff4c90a28e6a056b427208.jpg)
New In 2024, How to Animate Text in A Video
How to Animate Text in A Video
If you need to add text to video, you should animate the text part so that it looks attractive and enhance the video content. When you want to animate the texts and titles in your video, you should have the best animated text video tools where there is a wide range of text effects and animations templates and presets.
We have listed the best platforms for animating texts and titles in your video. You can check out their pros and cons and select the perfect one to get started. We have illustrated the simple steps for stunning text animation using Wondershare Filmora.
Part 1. Best Animated Text Video Tools
Here is the list of the best tools that you can use to animate the text in your video. Starting from desktop applications to online platforms, we have reviewed them for your easy selection.
1. Premiere Pro
Best for: Professional video editors
Price: $20.99 per month(subscription)
Compatible OS: Windows and macOS
Adobe Premiere Pro is one of the most preferred video editors in the professional video editing world. Premiere Pro is designed for experienced video editors and amateur video editors can find its user interface difficult to get used to without thorough tutorials. In fact, it is a great platform to work as a team for editing a large video project.

There are advanced video editing options available that you generally do not get in a regular video editor. Starting from video effects, color correction to audio editing and text effects, all the different features are available. As a matter of fact, you can edit VR as well as multi-cam videos as well. The software also supports importing and exporting different types of video file formats.
Pros
- Huge library of video and text effects and presets.
- Multi-cam editing and VR support.
- Dedicated options for audio editing and mixing.
- Stunning stabilization and color grading options.
- Supports a wide range of video file formats.
- Easy workflow for a team of video editors.
Cons
- Required high-end systems for smooth operation.
- Learning curve is steep for amateurs and beginners.
2. Filmora
Best for: beginners as well as professionals who are looking for a wide range of text effects.
Price: $49.99 annually
Compatible OS: Windows and macOS
Wondershare Filmora is the best animated text maker. In comparison to popular video editors, Filmora has the widest range of text effects and animations that you can apply to the text in your video instantly. Most importantly, you can customize and personalize the effects and animations as per your requirements.

The user interface is super intuitive and hence, both beginners as well as professionals prefer it. There are tons of stock photos, videos, and backgrounds that you can use in your video without any copyright claim. This is why Filmora is one of the most preferred video editors among video creators for social media and video streaming platforms.
Pros
- Vast stock media library of photos, videos, and GIFs.
- Various graphical elements, transitions, and audio.
- Motion tracking, audio ducking, and color matching.
- Wide collection of text effects and animation.
- User-friendly interface and faster rendering.
- Supports different types of video file formats.
- Highly affordable pricing and responsive support team.
Cons
- There is scope for improvement in advanced video editing features.
3. iMovie
Best for: beginners who use Apple computers and mobile devices.
Price: Free
Compatible OS: macOS and iOS

iMovie by Apple comes pre-installed on MacBook and Mac. It is the most preferred video editor for beginners who do not want to invest in purchasing a premium video editor. iMovie is a standard video editor where you can get all the basic tools for effects and animations. There are themes and templates available with easy customization options. Most importantly, iMovie has cross-device support as iMovie is available for all Apple devices.
Pros
- Cinematic effects, beautiful styles, and chrome key.
- Decent range of text effect, video effects, and enhancements.
- User-friendly interface for easy operation.
- Easy sharing on cloud, video streaming, and social media platforms.
- Work on any Apple device starting from MacBook to iPad.
Cons
- The output file size is huge.
- Importing MP4 file format is complicated.
- You can work with two video tracks only.
4. Veed.io
Best for: those who prefer online text animation maker.
Price: $12 per month
Compatible OS: Windows, Linux, macOS, Android, and iOS.

Veed.io is a popular online video editor and it is perfect for you if you do not want to install a dedicated video editor on your computer. In fact, it is suitable for low-end computers without low storage space. You can add text effects and animations on the go from your web browser. The platform also supports collaborative video project editing. There are loads of text effects and animation templates available to pick from.
Pros
- Powerful video editor and comparable to premium ones.
- Wide range of video effects, text animation templates available.
- The user interface is intuitive and suitable for everyone.
- Option to add subtitle and supports various video file formats.
- The support team is highly responsive.
Cons
- Users have complained about bugs and hangs.
- Advanced text animation editing options not available.
- Does not have a dedicated app for mobile users.
5. Kapwing
Best for: social media video creators who need videos in different aspect ratios.
Price: $16 per month
Compatible OS: Windows, Linux, and macOS.

Kapwing is a great online editor where you can get to animate the texts and titles in your videos pretty easily. Starting from editing your photos to videos and even creating GIFs, the platform serves all the needs of the users completely. It is particularly popular among social media video creators as there are several aspect ratios and templates available for creating shorts, stories, and regular videos. There is a dedicated app available for mobile users.
Pros
- Different types of text and video templates available.
- Wide range of elements, transitions, and stock media files.
- Quick transformation into different aspect ratio.
- Multi-lingual subtitle support and direct recording option.
- User-friendly and intuitive interface and support for plugins.
Cons
- It gets slower on a low-end computer.
- Does not support a wide range of file formats.
- The support team is not that responsive.
6. Flixier
Best for: those looking for faster and cheaper online text animation maker
Price: $8 per month
Compatible OS: Windows, Linux, macOS and mobile OS.

Flixier is a powerful video editor that you can access from any popular web browser from any device. It is one of the fastest text animation makers and the pricing is highly affordable. The platform is quite popular among social media video creators. There are dedicated formats available for Facebook, Instagram, and YouTube. The user interface feels like a premium video editor with timeline and you can even record video through Flixier.
Pros
- Different text motion presets for animations and effects.
- Allows working with multiple tracks.
- Stock media files such as photos, videos, and audio files.
- Simple but powerful user interface for smooth operation.
- Speeds up collaborative work and cloud integration.
Cons
- Lacks certain advanced editing features.
- Limited file format support and compatibility.
Part 2. Creative Fonts Resource for The Animated Text
Fonts play an important role in text animations. If the typography of the text is not up to the mark, the animation won’t come out as intended. Therefore, you should have trendy and dynamic fonts in your possession to type in your texts and titles.
Trendy Fonts to Use
You have to follow the trend in the animation so that your text animation gets instant traction and stays relevant. You will need to have trendy fonts so that your creative text animations look eye-catching and engaging. Here is the list of the best trendy fonts to use in the animated text.
- Redwing font
If you want to display titles in uppercase as well as in large-sized letters, Redwing should match your requirements perfectly. The font can be considered an upgrade over the popular Impact font that most people use for showing one-word texts and titles in bold style and large sizes.

- Takota font
If you are looking for something cool and funky, Takota font should be at the top of your list. You will find people using similar fonts for showing cool text animations over beautiful landscapes in the background. Every character in this font has its individuality and uniqueness in design.

- Basement grotesque font
This font is inspired by 19th-century typeface where boldness gets the upper hand. It is one of the best display typefaces to showcase titles in brutal fashion. The font strikes a mark in the mind of the viewers instantly. You might see this font in newspapers especially in the titles and headlines.

- Meraki
If you are looking for a compact and modern font to animate the text, Meraki is perfect. You can fit more words in a sentence within a video frame. You must have seen this font in games, t-shirts, logos, and much more. You can consider an upgrade to Sans Serif font.

- Ashfiana
Ashfiana is another upgrade to the regular Sans Serif font but this one has high contrast and it looks more elegant. It is quite slim and you can use the font for titles and text blocks and you can use it more elegantly in oblique style.

- Clap hand
If you are looking for a fun and cute typeface, clap hand font can be great. It is particularly popular among video creators who make videos for kids. You must have seen similar font among brands selling kids’ products. The font is impactful for titles, banners, logos, and short paragraphs.

- Made mellow
You can consider this a serious typeface of Clap Hand font. You get different variations in weights from light to black and it is particularly popular for showing full screen texts and titles. You can apply several stunning text effects on it so that the effects become prominently visible and the animation comes out superb.

- Wonder type
This font has unique design for each character and it gives out cuteness as well as positivity. The font is bold and it has a rustic look. There are several numeral text styles and there are different textures for uppercase and lowercase. The font is modern as well as elegant for all types of text effects and animations.

Dynamic Fonts to Choose
A dynamic font is highly useful in text animation as the characters are not static and they have their own individuality. The characters could have their own texture even though the overall theme of the font stays the same. Besides, the characters have their own animations and effects. Here are some of the popular dynamic fonts to choose from.
- Wicked Mouse Font
If you want to have a cartoon-based text effect and animation, Wicked mouse font is the best option. The font style is large and bold and the characters come in uppercase. When you type in lowercase and uppercase characters, you can notice certain variations and there is 3D text version available.

- Animated Alphabet
It is needless to say that the animated alphabet font is the go-to font when there are texts in a video that needs to be animated. There are so many different variations of animated alphabet fonts that you will find on popular font resource websites and you should download as per your preference.

- Halloween Titles
When you add mysterious or suspenseful typography to your texts and titles, it gets more traction than usual. In this pack, you will get different types of dynamic fonts and text animations that are simple yet impactful. You can use them to create unique and engaging text animations for your video.

- Instagram Title Pack
If you are making videos for Instagram or social media platforms, this is a pack that you should definitely have. In this pack, you will get text fonts for stories and posts, animated titles, dynamic texts for transitions and swipe up activities. For each category, there are several variations to post creative text animations.

- Chalkboard Animated Handwriting
The chalkboard animated handwriting pack has the classic text animation with customization options. There are different variations available along with rubbing the displayed text off with duster animation. It is great for titles as well as showing lengthy text and you can change the texture, border, color, and much more.

- Glitch Titles
The glitch text animation is one of the trending text effects in the modern videos. The glitch animation is often accompanied by heavy bass sound effect for opening and closing titles. The glitch titles preset comes with several variations so that your videos do not look the same to the viewers and get appreciation of the text animations.

- Glow Text Animations
The glow text animations font is suitable for titles, transitions, as well as low thirds. The font has 3D effect along with the glow effect and both of them make the text instantly engaging. There are different variations available such as cool glow, fiery glow, sober glow, and icy glow effect.

- Neon Short Circuit Titles
For text animations, dynamic fonts based on neon effects are always in high demand. Neon short circuit titles combine the neon as well as the short circuit animation together. That is why it is more refreshing and eye-catching than regular neon fonts and you must use it for text animations especially when you have a darker background.

Part 3. How to Animate Text in A Video
Out of the top video tools to animate text in a video, we have picked Wondershare Filmora as the best animated text maker. Filmora Video Editor has all the different categories of text animations to cater to all the different video niches. Therefore, you can have appropriate and creative text animations based on your video content to make it eye-catching and engaging. Here are the detailed steps to animate the text in video.
Free Download For Win 7 or later(64-bit)
Free Download For macOS 10.14 or later
- How to add text in Filmora?
First of all, you need to add text to your video project to get started. Launch Filmora and import any video that you want to place in the background. You can also go to Stock Media and select any background photo or video as per your preference. Click on Quick Text option from the toolbar above the timeline.
This will add a text layer on the timeline with a default text. Double-click on the text layer and edit the default text. The text layer should be over the background layer and you can reposition the text layer depending on where you want the text to appear on the video. You can adjust the position of the text on the video from Viewer.

- How to edit font in Filmora?
Now that you have placed and positioned the text in your video properly, it is time to edit the text style. Double-click on the text layer and go to Title>Preset> Font section. Select the font, size, and alignment. If there are multiple texts in the template, select them one by one from Viewer and edit them. Go to Settings section and change text color and spacing as appropriate. There are also several text style templates available to choose from if you want to.

- How to use animation in text in Filmora?
Double-click on the text layer again and this time, you need to go to Animation tab. You will see all the popular text animation templates on the left panel. Place your mouse pointer over them to get a preview. Select any one of these animations by double-clicking on the animation and click on Ok button. Play the video to watch the applied animation.

- How to use text preset in Filmora?
If you want to make the text animation eye-catching and attention-grabbing, you need to select a text animation preset in Filmora. Go to Titles and check out the left panel where you will find all the different categories of text effects and animations. Go to the category that matches your video content and select any template and drop it on the timeline. Double-click on the text layer to edit the default text and text style as per your preference.

Part 4. How to Make Creative Text Animation?
Depending on the video content, you have to select the text effect and create text animation accordingly. We have already stated that Filmora has different categories of text animation templates to satisfy all your video requirements perfectly. You can choose appropriate text animation templates that go well with your video category and use them to come up with creative text animations.
- Social media
If you are making videos for social media platforms such as Facebook or for video streaming platforms like YouTube, you should select text animations from Social Media category in Filmora. There are over 200+ text animation templates available that have all the common text animations you usually see as well as creative text animations that will make your video stand out.

All you need to do is import your video and place it in the background. Go to Titles and select Social Media category and drop any desired text animation on the timeline. Thereafter, edit and customize the text layer and style along with the animation as per your preference.
- Education
If your video belongs to education nice such as you are explaining a concept or demonstrating a tutorial, you need to use text animations that are graceful for your video content. Filmora has a dedicated section for text animations related to education. Go to Titles> Tutorials and you will see around 400 text effects and animations that you can use in your educational video effectively.

- Business
If you are creating videos for brands and businesses, there are certain creative text animations you have to use in order to get traction from the target audiences. Filmora comes with over 150 text effects and animations specifically for business videos so that the branding gets strong and leaves a good impression in the mind of the viewers. Go to Titles> Business and choose the desired text animations and customize them to fit into your brand image.

- Travel
If you are into making traveling vlogs or informational travel videos, Filmora has a specific set of text effects and creative animations. You get to choose from over 250 templates to represent any text and title you want to display in your video. The beautiful and eye-catching animated text will definitely get your message across to the viewers pleasantly. Go to Titles> Travel section and check out all the text animations to choose from.

- Gaming
There are so many gamers who put up their gameplay videos on social media and video streaming platforms. While editing the video, they need to put up animated text so that the video content looks interesting and engaging. If you have a gaming video, Filmora has around 500 text effects and animations to use in your video. Go to Titles> Gaming and select from any creative text animations as per your preference.

2. Filmora
Best for: beginners as well as professionals who are looking for a wide range of text effects.
Price: $49.99 annually
Compatible OS: Windows and macOS
Wondershare Filmora is the best animated text maker. In comparison to popular video editors, Filmora has the widest range of text effects and animations that you can apply to the text in your video instantly. Most importantly, you can customize and personalize the effects and animations as per your requirements.
The user interface is super intuitive and hence, both beginners as well as professionals prefer it. There are tons of stock photos, videos, and backgrounds that you can use in your video without any copyright claim. This is why Filmora is one of the most preferred video editors among video creators for social media and video streaming platforms.
Pros
- Vast stock media library of photos, videos, and GIFs.
- Various graphical elements, transitions, and audio.
- Motion tracking, audio ducking, and color matching.
- Wide collection of text effects and animation.
- User-friendly interface and faster rendering.
- Supports different types of video file formats.
- Highly affordable pricing and responsive support team.
Cons
- There is scope for improvement in advanced video editing features.
3. iMovie
Best for: beginners who use Apple computers and mobile devices.
Price: Free
Compatible OS: macOS and iOS
iMovie by Apple comes pre-installed on MacBook and Mac. It is the most preferred video editor for beginners who do not want to invest in purchasing a premium video editor. iMovie is a standard video editor where you can get all the basic tools for effects and animations. There are themes and templates available with easy customization options. Most importantly, iMovie has cross-device support as iMovie is available for all Apple devices.
Pros
- Cinematic effects, beautiful styles, and chrome key.
- Decent range of text effect, video effects, and enhancements.
- User-friendly interface for easy operation.
- Easy sharing on cloud, video streaming, and social media platforms.
- Work on any Apple device starting from MacBook to iPad.
Cons
- The output file size is huge.
- Importing MP4 file format is complicated.
- You can work with two video tracks only.
4. Veed.io
Best for: those who prefer online text animation maker.
Price: $12 per month
Compatible OS: Windows, Linux, macOS, Android, and iOS.
Veed.io is a popular online video editor and it is perfect for you if you do not want to install a dedicated video editor on your computer. In fact, it is suitable for low-end computers without low storage space. You can add text effects and animations on the go from your web browser. The platform also supports collaborative video project editing. There are loads of text effects and animation templates available to pick from.
Pros
- Powerful video editor and comparable to premium ones.
- Wide range of video effects, text animation templates available.
- The user interface is intuitive and suitable for everyone.
- Option to add subtitle and supports various video file formats.
- The support team is highly responsive.
Cons
- Users have complained about bugs and hangs.
- Advanced text animation editing options not available.
- Does not have a dedicated app for mobile users.
5. Kapwing
Best for: social media video creators who need videos in different aspect ratios.
Price: $16 per month
Compatible OS: Windows, Linux, and macOS.
Kapwing is a great online editor where you can get to animate the texts and titles in your videos pretty easily. Starting from editing your photos to videos and even creating GIFs, the platform serves all the needs of the users completely. It is particularly popular among social media video creators as there are several aspect ratios and templates available for creating shorts, stories, and regular videos. There is a dedicated app available for mobile users.
Pros
- Different types of text and video templates available.
- Wide range of elements, transitions, and stock media files.
- Quick transformation into different aspect ratio.
- Multi-lingual subtitle support and direct recording option.
- User-friendly and intuitive interface and support for plugins.
Cons
- It gets slower on a low-end computer.
- Does not support a wide range of file formats.
- The support team is not that responsive.
6. Flixier
Best for: those looking for faster and cheaper online text animation maker
Price: $8 per month
Compatible OS: Windows, Linux, macOS and mobile OS.
Flixier is a powerful video editor that you can access from any popular web browser from any device. It is one of the fastest text animation makers and the pricing is highly affordable. The platform is quite popular among social media video creators. There are dedicated formats available for Facebook, Instagram, and YouTube. The user interface feels like a premium video editor with timeline and you can even record video through Flixier.
Pros
- Different text motion presets for animations and effects.
- Allows working with multiple tracks.
- Stock media files such as photos, videos, and audio files.
- Simple but powerful user interface for smooth operation.
- Speeds up collaborative work and cloud integration.
Cons
- Lacks certain advanced editing features.
- Limited file format support and compatibility.
Part 2. Creative Fonts Resource for The Animated Text
Fonts play an important role in text animations. If the typography of the text is not up to the mark, the animation won’t come out as intended. Therefore, you should have trendy and dynamic fonts in your possession to type in your texts and titles.
Trendy Fonts to Use
You have to follow the trend in the animation so that your text animation gets instant traction and stays relevant. You will need to have trendy fonts so that your creative text animations look eye-catching and engaging. Here is the list of the best trendy fonts to use in the animated text.
- Redwing font
If you want to display titles in uppercase as well as in large-sized letters, Redwing should match your requirements perfectly. The font can be considered an upgrade over the popular Impact font that most people use for showing one-word texts and titles in bold style and large sizes.
- Takota font
If you are looking for something cool and funky, Takota font should be at the top of your list. You will find people using similar fonts for showing cool text animations over beautiful landscapes in the background. Every character in this font has its individuality and uniqueness in design.
- Basement grotesque font
This font is inspired by 19th-century typeface where boldness gets the upper hand. It is one of the best display typefaces to showcase titles in brutal fashion. The font strikes a mark in the mind of the viewers instantly. You might see this font in newspapers especially in the titles and headlines.
- Meraki
If you are looking for a compact and modern font to animate the text, Meraki is perfect. You can fit more words in a sentence within a video frame. You must have seen this font in games, t-shirts, logos, and much more. You can consider an upgrade to Sans Serif font.
- Ashfiana
Ashfiana is another upgrade to the regular Sans Serif font but this one has high contrast and it looks more elegant. It is quite slim and you can use the font for titles and text blocks and you can use it more elegantly in oblique style.
- Clap hand
If you are looking for a fun and cute typeface, clap hand font can be great. It is particularly popular among video creators who make videos for kids. You must have seen similar font among brands selling kids’ products. The font is impactful for titles, banners, logos, and short paragraphs.
- Made mellow
You can consider this a serious typeface of Clap Hand font. You get different variations in weights from light to black and it is particularly popular for showing full screen texts and titles. You can apply several stunning text effects on it so that the effects become prominently visible and the animation comes out superb.
- Wonder type
This font has unique design for each character and it gives out cuteness as well as positivity. The font is bold and it has a rustic look. There are several numeral text styles and there are different textures for uppercase and lowercase. The font is modern as well as elegant for all types of text effects and animations.
Dynamic Fonts to Choose
A dynamic font is highly useful in text animation as the characters are not static and they have their own individuality. The characters could have their own texture even though the overall theme of the font stays the same. Besides, the characters have their own animations and effects. Here are some of the popular dynamic fonts to choose from.
- Wicked Mouse Font
If you want to have a cartoon-based text effect and animation, Wicked mouse font is the best option. The font style is large and bold and the characters come in uppercase. When you type in lowercase and uppercase characters, you can notice certain variations and there is 3D text version available.
- Animated Alphabet
It is needless to say that the animated alphabet font is the go-to font when there are texts in a video that needs to be animated. There are so many different variations of animated alphabet fonts that you will find on popular font resource websites and you should download as per your preference.
- Halloween Titles
When you add mysterious or suspenseful typography to your texts and titles, it gets more traction than usual. In this pack, you will get different types of dynamic fonts and text animations that are simple yet impactful. You can use them to create unique and engaging text animations for your video.
- Instagram Title Pack
If you are making videos for Instagram or social media platforms, this is a pack that you should definitely have. In this pack, you will get text fonts for stories and posts, animated titles, dynamic texts for transitions and swipe up activities. For each category, there are several variations to post creative text animations.
- Chalkboard Animated Handwriting
The chalkboard animated handwriting pack has the classic text animation with customization options. There are different variations available along with rubbing the displayed text off with duster animation. It is great for titles as well as showing lengthy text and you can change the texture, border, color, and much more.
- Glitch Titles
The glitch text animation is one of the trending text effects in the modern videos. The glitch animation is often accompanied by heavy bass sound effect for opening and closing titles. The glitch titles preset comes with several variations so that your videos do not look the same to the viewers and get appreciation of the text animations.
- Glow Text Animations
The glow text animations font is suitable for titles, transitions, as well as low thirds. The font has 3D effect along with the glow effect and both of them make the text instantly engaging. There are different variations available such as cool glow, fiery glow, sober glow, and icy glow effect.
- Neon Short Circuit Titles
For text animations, dynamic fonts based on neon effects are always in high demand. Neon short circuit titles combine the neon as well as the short circuit animation together. That is why it is more refreshing and eye-catching than regular neon fonts and you must use it for text animations especially when you have a darker background.
Part 3. How to Animate Text in A Video
Out of the top video tools to animate text in a video, we have picked Wondershare Filmora as the best animated text maker. Filmora Video Editor has all the different categories of text animations to cater to all the different video niches. Therefore, you can have appropriate and creative text animations based on your video content to make it eye-catching and engaging. Here are the detailed steps to animate the text in video.
Free Download For Win 7 or later(64-bit)
Free Download For macOS 10.14 or later
- How to add text in Filmora?
First of all, you need to add text to your video project to get started. Launch Filmora and import any video that you want to place in the background. You can also go to Stock Media and select any background photo or video as per your preference. Click on Quick Text option from the toolbar above the timeline.
This will add a text layer on the timeline with a default text. Double-click on the text layer and edit the default text. The text layer should be over the background layer and you can reposition the text layer depending on where you want the text to appear on the video. You can adjust the position of the text on the video from Viewer.
- How to edit font in Filmora?
Now that you have placed and positioned the text in your video properly, it is time to edit the text style. Double-click on the text layer and go to Title>Preset> Font section. Select the font, size, and alignment. If there are multiple texts in the template, select them one by one from Viewer and edit them. Go to Settings section and change text color and spacing as appropriate. There are also several text style templates available to choose from if you want to.
- How to use animation in text in Filmora?
Double-click on the text layer again and this time, you need to go to Animation tab. You will see all the popular text animation templates on the left panel. Place your mouse pointer over them to get a preview. Select any one of these animations by double-clicking on the animation and click on Ok button. Play the video to watch the applied animation.
- How to use text preset in Filmora?
If you want to make the text animation eye-catching and attention-grabbing, you need to select a text animation preset in Filmora. Go to Titles and check out the left panel where you will find all the different categories of text effects and animations. Go to the category that matches your video content and select any template and drop it on the timeline. Double-click on the text layer to edit the default text and text style as per your preference.
Part 4. How to Make Creative Text Animation?
Depending on the video content, you have to select the text effect and create text animation accordingly. We have already stated that Filmora has different categories of text animation templates to satisfy all your video requirements perfectly. You can choose appropriate text animation templates that go well with your video category and use them to come up with creative text animations.
- Social media
If you are making videos for social media platforms such as Facebook or for video streaming platforms like YouTube, you should select text animations from Social Media category in Filmora. There are over 200+ text animation templates available that have all the common text animations you usually see as well as creative text animations that will make your video stand out.
All you need to do is import your video and place it in the background. Go to Titles and select Social Media category and drop any desired text animation on the timeline. Thereafter, edit and customize the text layer and style along with the animation as per your preference.
- Education
If your video belongs to education nice such as you are explaining a concept or demonstrating a tutorial, you need to use text animations that are graceful for your video content. Filmora has a dedicated section for text animations related to education. Go to Titles> Tutorials and you will see around 400 text effects and animations that you can use in your educational video effectively.
- Business
If you are creating videos for brands and businesses, there are certain creative text animations you have to use in order to get traction from the target audiences. Filmora comes with over 150 text effects and animations specifically for business videos so that the branding gets strong and leaves a good impression in the mind of the viewers. Go to Titles> Business and choose the desired text animations and customize them to fit into your brand image.
- Travel
If you are into making traveling vlogs or informational travel videos, Filmora has a specific set of text effects and creative animations. You get to choose from over 250 templates to represent any text and title you want to display in your video. The beautiful and eye-catching animated text will definitely get your message across to the viewers pleasantly. Go to Titles> Travel section and check out all the text animations to choose from.
- Gaming
There are so many gamers who put up their gameplay videos on social media and video streaming platforms. While editing the video, they need to put up animated text so that the video content looks interesting and engaging. If you have a gaming video, Filmora has around 500 text effects and animations to use in your video. Go to Titles> Gaming and select from any creative text animations as per your preference.
How to Zoom Picture in Picture [Easy Solution]
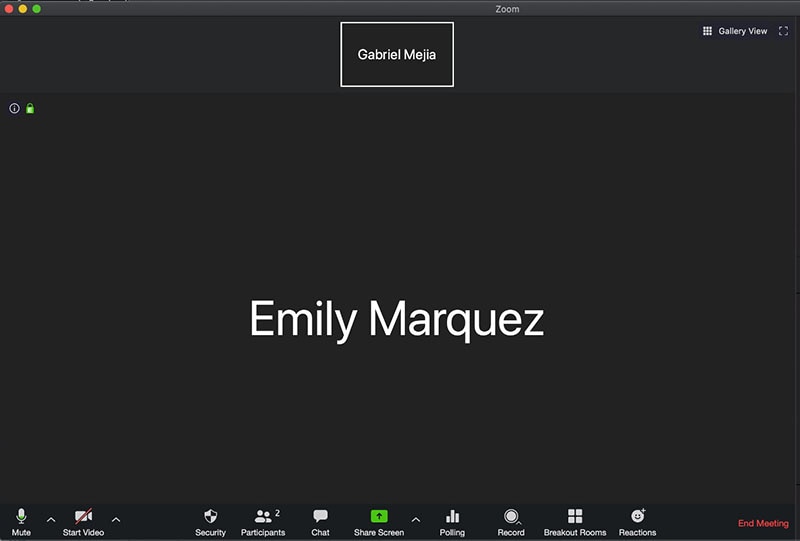
Zoom is one of the greatest options on the market for video conferencing. It doesn’t matter whether you use it at home or in an office environment; it will quickly link the team members. One of the most popular video conferencing programs is Zoom. When in-person meetings aren’t feasible, it enables you to communicate electronically with employees, and it’s been a major popularity for social occasions as well. In case you’re not acquainted, picture-in-picture mode enables you to watch videos from one app while using your PC normally. The movie will keep playing in a tiny thumbnail window so that two applications may work simultaneously on your smartphone.
You may create virtual audio and video conferences, webinars, live chats, screen sharing, and other collaboration tools with Zoom, a cloud-based video communications solution. Zoom’s most recent iPhone apps let you dismiss a Zoom Meeting while keeping the Zoom video call open in a picture-in-picture mode. To join a Zoom conference, you don’t need an account, and because the software works with Mac, Windows, Linux, iOS, and Android devices, nearly anybody can use it. Since using Zoom’s picture-in-picture mode is the same as using it with other applications, you shouldn’t have any trouble if you often use PiP mode. Here are the top 4 methods you can refer to picture in picture in Zoom.
Method 1: Swap Shared Screen with Video
You may move the Zoom Meeting PiP window across the screen, change the thumbnail’s size, and utilize other applications while it remains open, just like any other picture-in-picture window. Before leaving the meeting if you’re not giving a presentation or speaking, you should definitely mute Zoom on your iPhone to prevent noises from your typing or other activities from entering the conversation. Additionally, keep in mind to switch off the camera if you’re engaged in something distracting, at least for the duration of your activity. To reopen the Zoom Meeting and go back to the Zoom app, touch the Picture-in-Picture mode pane. Here are some actions to keep in mind:
Steps to Swap Shared Screen for Zoom Picture in Picture
Step1Launch or enter a Zoom meeting. Keep the video on your main screen at all times, closing the chat and participant list as necessary.
Step2Tap the Home button or swipe up from the bottom of the screen.
Step3Picture-in-picture mode should be activated automatically throughout the meeting.
Method 2: Use Ecamm Live
Live streaming is a fantastic way to provide original content and stand out from the crowd. To prevent any operational difficulties, a more sophisticated virtual camera is absolutely necessary. You now have magical abilities thanks to Ecamm virtual cam, including the ability to add text, animations, observe a live stream, post viewer comments, play music, share your screen, use sound effects, and many more. It offers the Ecamm live virtual camera zoom function for video conferences so you may improve your Zoom discussions by sending output to other PC programs. You could see a quality difference between what you view in Ecamm Live and what your Zoom visitors see while utilizing virtual camera with Zoom. The quality of a Zoom video stream cannot be improved using Ecamm Live. Simply broadcast the Zoom app using Ecamm Live’s Screen Share mode to utilize Ecamm Live for picture-in-picture virtual presentations on Zoom.
Steps to Use Ecamm Live for Zoom Picture in Picture
Step1Download the Ecamm Application
Install Ecamm Live on your computer, then choose the center button in the source switcher at the top of the main window to enter Screen Share mode.
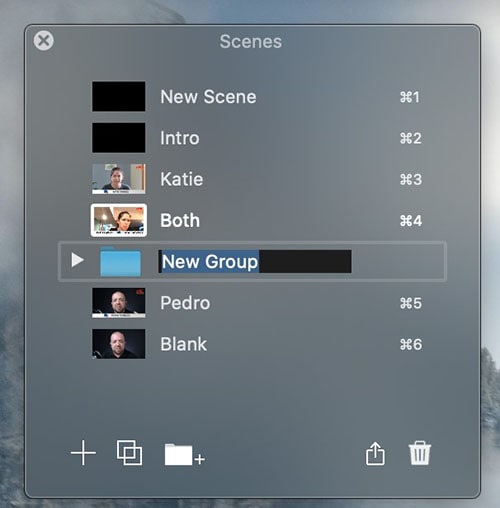
Step2Create Scenes
With the use of Ecamm Live’s Virtual Camera and Virtual Mic capabilities, you may transfer Ecamm Live’s output to almost any other Mac software, including Zoom. After setting, create the scenes in the program to quickly switch between various cameras.
Step3Select Ecamm on Zoom
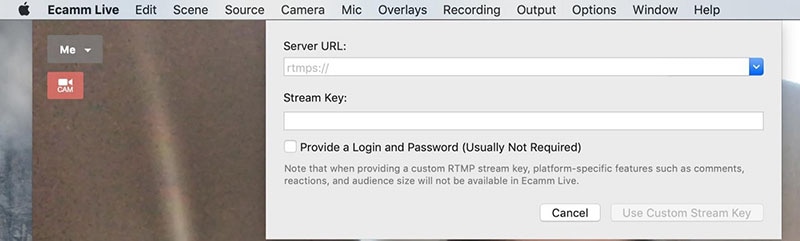
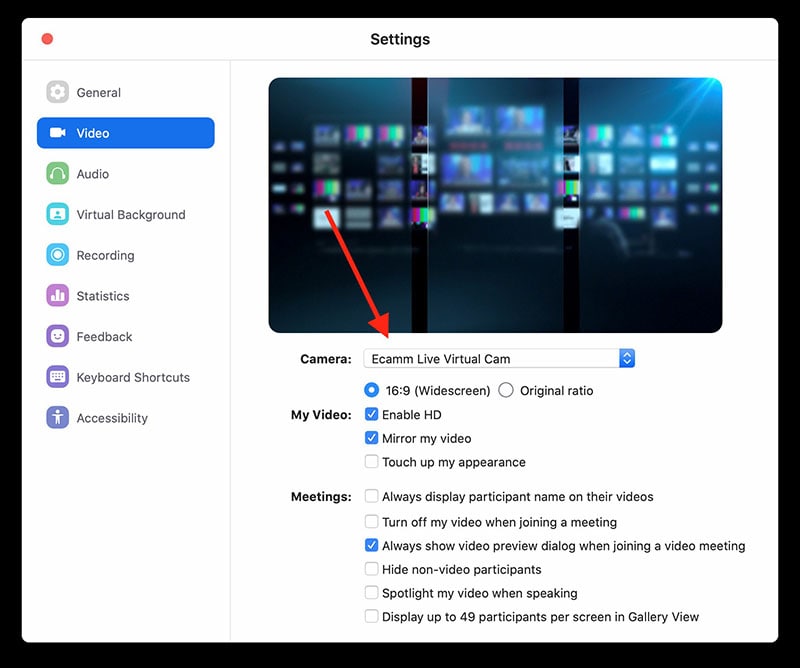
You may also utilize Ecamm Live’s Sharing Window capability to feed Ecamm Live output into Zoom. Simply activate the virtual camera, and then, as seen below, choose Ecamm Live Virtual Camera in Zoom’s video settings:
Step4Begin Your Presentation
Finally, click the PC share option to show your Zoom app to your audience. To conceal a picture-in-picture window that displays your camera image while live streaming, click the PIP button.
Method 3: Use Filmora as A Switcher
Zoom has solutions that will make your meetings simple and secure. It gives your remote staff a secure setting to interact and share crucial information. Ideal control over your film and configuration options to make them aesthetically pleasing is something Zoom lacks. To overcome the drawbacks and improve the quality of your online meetings, you may take use of the capabilities of Zoom in conjunction with Filmora. Filmora was developed with the intention of easing user burden and supporting applications. Though complicated, the program is simple to use. The perhaps most popular web information that may be saved on your computer can be easily captured by just angling your screen. For more information on how to record and save your Zoom for picture in picture, see the guide here.
To broadcast a variety of situations in a grid style, you may also combine inputs from your camera, microphone, computer screen, and web conferencing software. Wondershare -the finest desktop application for recording a Zoom Picture in Picture meeting- is Filmora. With the majority of cameras, this app’s screen recording capability is both user-friendly and feature-rich. Here, users may either choose a particular region to record or record their zoom meetings in Fullscreen mode. Additionally, you may choose the camera and input microphone that will be used while recording a video overlay. The addition of relevant comments like phrases, lines, drawings, symbols, etc. is also possible by users. The detailed procedure for recording a Zoom Picture-in-Picture meeting using a Filmora recorder is given below:
Free Download For Win 7 or later(64-bit)
Free Download For macOS 10.14 or later
Step1Download and Install Filmora Zoom Recorder
You may find both types, i.e., the most recent Windows and Mac versions, by first visiting the usual website and then using this Zoom. Install the program on your computer once you download it to get started.

Step2Initiate Filmora Recorder
After finishing the installation process for this Reside Zoom recorder, launch it from the main menus and choose “New Task” when prompted. It will take you to Filmora’s streamlined user interface where you can immediately start filming. Then, as seen in the picture below, you may adjust the screen recording using your preferred camera, microphone, and system settings:

Step3Begin/End the Recording
When you are through configuring this Zoom picture in picture recorder, click the Record button, and it will immediately begin recording your customized screen. Similar to that, after you’re done recording, click Stop, which will take you inside the video editor where you may edit your recorded information.

Step4Share Recordings
When you have everything ready, export your recording right away. After you’re done with the editing part, you do have a lot of options to choose from when displaying your screen capture and webcam stories. To do so, click the Export button in the item user interface’s top-right corner as shown below:
You may easily choose your preferred way to share from there if you choose to upload your work of zoom picture in picture recordings straight to the YouTube or other reputable websites right now. Simply refer to the Sharing plug-ins in the Export window to find out more.
Method 4: Use Hardware Switcher ATEM Mini Pro
Particularly on Zoom, the ATEM Mini is excellent for video conferences. The Blackmagic ATEM Mini is a USB video interface and HDMI switcher. Four HDMI inputs, or four cameras that can produce an HDMI video stream, may be switched between live. This device integrates Zoom meetings fast and makes it incredibly simple to set up your audio, a sometimes-forgotten aspect of video broadcasting. This sophisticated video switcher promises to offer broadcast-quality multi-camera footage with ease and is targeted at gamers, streamers, and online reviewers. It connects to a computer via a USB-C to USB-A connection. The video feed may then be sent to distant colleagues via a number of well-liked videos streaming services, including Zoom.
Step1The ATEM Mini Pro is a basic control switcher with pro-broadcast performance. Your ATEM Mini Pro is really simple to set up. You can connect a full setup with several cameras and microphones in around 30 minutes.
Step2You may connect several camera sources to the inputs of the ATEM Mini Pro. The 4 HDMI inputs each have a separate standards converter built in. As a result, the ATEM Mini can automatically convert inputs that are 1080p, 1080i, or 720p to the switcher’s video standard. You may make quick changes between inputs with no latency or disruption to your video output by using the ergonomic buttons.
Step3As a third option, Zoom offers ATEM Mini, which enables you to switch between several inputs, add custom visuals, and adjust audio levels all from a single interface. To improve the quality of your production, you may even use smooth transitions like wipes or fades. You can even test any input stream before making it live.
Conclusion
When you are doing a Zoom Meeting and share your screen, only to discover that what the other attendees see is a split screen with your material and the other Attendee cams, it is highly annoying. You may move the Zoom Meeting PiP window across the screen, change the thumbnail’s size, and utilize other applications while it remains open, just like any other picture-in-picture window. Someone must be sharing information in the Zoom conference for the Picture in Picture, or “Split Screen” option, to be active. We’ve listed the top techniques for doing it effectively above. To do this work without difficulty, use them as your guide.
Free Download For macOS 10.14 or later
Step1Download and Install Filmora Zoom Recorder
You may find both types, i.e., the most recent Windows and Mac versions, by first visiting the usual website and then using this Zoom. Install the program on your computer once you download it to get started.
Step2Initiate Filmora Recorder
After finishing the installation process for this Reside Zoom recorder, launch it from the main menus and choose “New Task” when prompted. It will take you to Filmora’s streamlined user interface where you can immediately start filming. Then, as seen in the picture below, you may adjust the screen recording using your preferred camera, microphone, and system settings:
Step3Begin/End the Recording
When you are through configuring this Zoom picture in picture recorder, click the Record button, and it will immediately begin recording your customized screen. Similar to that, after you’re done recording, click Stop, which will take you inside the video editor where you may edit your recorded information.
Step4Share Recordings
When you have everything ready, export your recording right away. After you’re done with the editing part, you do have a lot of options to choose from when displaying your screen capture and webcam stories. To do so, click the Export button in the item user interface’s top-right corner as shown below:
You may easily choose your preferred way to share from there if you choose to upload your work of zoom picture in picture recordings straight to the YouTube or other reputable websites right now. Simply refer to the Sharing plug-ins in the Export window to find out more.
Method 4: Use Hardware Switcher ATEM Mini Pro
Particularly on Zoom, the ATEM Mini is excellent for video conferences. The Blackmagic ATEM Mini is a USB video interface and HDMI switcher. Four HDMI inputs, or four cameras that can produce an HDMI video stream, may be switched between live. This device integrates Zoom meetings fast and makes it incredibly simple to set up your audio, a sometimes-forgotten aspect of video broadcasting. This sophisticated video switcher promises to offer broadcast-quality multi-camera footage with ease and is targeted at gamers, streamers, and online reviewers. It connects to a computer via a USB-C to USB-A connection. The video feed may then be sent to distant colleagues via a number of well-liked videos streaming services, including Zoom.
Step1The ATEM Mini Pro is a basic control switcher with pro-broadcast performance. Your ATEM Mini Pro is really simple to set up. You can connect a full setup with several cameras and microphones in around 30 minutes.
Step2You may connect several camera sources to the inputs of the ATEM Mini Pro. The 4 HDMI inputs each have a separate standards converter built in. As a result, the ATEM Mini can automatically convert inputs that are 1080p, 1080i, or 720p to the switcher’s video standard. You may make quick changes between inputs with no latency or disruption to your video output by using the ergonomic buttons.
Step3As a third option, Zoom offers ATEM Mini, which enables you to switch between several inputs, add custom visuals, and adjust audio levels all from a single interface. To improve the quality of your production, you may even use smooth transitions like wipes or fades. You can even test any input stream before making it live.
Conclusion
When you are doing a Zoom Meeting and share your screen, only to discover that what the other attendees see is a split screen with your material and the other Attendee cams, it is highly annoying. You may move the Zoom Meeting PiP window across the screen, change the thumbnail’s size, and utilize other applications while it remains open, just like any other picture-in-picture window. Someone must be sharing information in the Zoom conference for the Picture in Picture, or “Split Screen” option, to be active. We’ve listed the top techniques for doing it effectively above. To do this work without difficulty, use them as your guide.
10 Best Old Film Overlays to Make Your Videos Look Vintage
Versatile Video Editor - Wondershare Filmora
An easy yet powerful editor
Numerous effects to choose from
Detailed tutorials provided by the official channel
If you like the old film mood in your videos and films, then this guide is for you. In this article, we will go through the best old film overlays to make your videos look vintage.
In this article
01 What is the Old Film Effect Called?
02 10 Amazing Old Film Overlays that Deserve a Try
03 How to Make a Video Look Old?
04 Pro Tips to Create Stunning Retro Video
Part 1: What is the Old Film Effect Called?
The old film effect that has been getting popular over the past years is called film grain and is defined as a random optical texture due to small particles appearing in the film. It is usually described as having a grainy effect and appearing old.
Part 2: 10 Amazing Old Film Overlays that Deserve a Try
In this list, we will present you with some great options that deserve your attention if you are looking to add old film aspects to your videos.
1. The Super 8 Film Grain Overlays Collection
With this collection, you have at your disposal 82 high-resolution clips of a real Super 8 film grain. With features that are easy to use in your videos, like 20-second loopable duration, 1080P Quicktime Pro resolution, each overlay has a small difference in texture and tint, and you also get 37 clips that show you visible areas with sprocket holes.
2. The Old Film Look Collection
This collection brings a large variety of film elements. From flash frames, film clutter, light leaks, countdown leader, film sprockets, 16mm and Super 8mm film. Plus, with this collection, you also get 29 video files and ProRes 1080P.
3. The Damaged 35mm Film Collection
With this collection, you have animated scans of damaged slides of 35mm film. The transparency effects are easy to use because of the white areas. You can add a file that you choose over an existing video and “darken” or “multiply” blending modes. Apart from those features, the Damaged 35mm Film Collection comes with 10 ProRes HD files.

4. The 4K 16 mm Film Overlays Collection
These overlays come from Authentic Old 16mm film, and inside this collection, you can find many effects of film dirt, scratches or dust to bring that old vintage look to your videos. It also comes with 79 ProRes video files, 4K (ULTRA HD) 3840 x 2160, 24fps resolution.
5. The Film Dirt and Scratches Collection
This collection comes with a variety of scratches and dirt textures. From authentic 16mm and Super 8mm film to give you a great old film look effect to your videos. The Film Dirt and Scratches collection comes with 28 video files, 13 minutes of footage, and ProRes 1080P.
6. 4K Super 8 Film Burn Overlays Collection - Kodak 50D
A collection like this is rare to come across. These easy-to-use effects are great for any level of expertise in editing videos. Just place them over the video and click “screen” or “lighten” modes. This collection pack comes with 47 ProRes files, 4 minutes of footage, and 4K High-Quality Scans.
7. 4K 16mm Film Grain Overlays
This collection has three great files of real film grain with dust and grain at your disposal. They use a 16mm camera for a better quality of overlays. This amazing package comes with three video files of 16mm film grain plus three bonus files.
8. 4K Film Burn Effects on 16mm
Shot in an authentic 16mm, this collection has real film burning in a projector. It has close-ups that fit a width of 16/9 screen. It also comes with 33 ProRes Files and 4 minutes of footage.
9. The VHS Effects Collection
This collection has real VHS effects to give your videos an old 80’s tape look to your videos. The collection contains many analog textures, tracking problems, and glitches. It also contains 10 minutes of footage, Quicktime ProRes 1080P file support, and 94 HD files of authentic VHS Retro Effects.
10. The Film Leaders Collection - Super 8mm and 16mm Effects
With authentic vintage countdowns, tail leaders, and old retro heads, this bundle offer you a great range of choices to add an old look to your films and videos.
Part 3: How to Make a Video Look Old?
In Filmora, you can make your videos have that old effect with simple steps.
Wondershare Filmora
Get started easily with Filmora’s powerful performance, intuitive interface, and countless effects!
Try It Free Try It Free Try It Free Learn More >

Step 1: Open Filmora and remove all the pieces of the footage. Then arrange the rest of the footage as you see fit. Click on “Effects” on the upper left corner of your screen and then on “Filters”. Click on the Old Video effect and then drop it. After you add the filter on the segment of your video, you can drag the end of it to cover the whole duration of the movies. Click twice on the filter if you want to adjust the filter settings. Enter the desired values on the “Fade” parameter, “Frequency”, and “Alpha” options. Press “OK”, and this step is concluded.

Step 2: You can apply the black and white filters to any project in Filmora. It is very simple. Add one of the filters above the video you want to add the effect and drag one of the corners to adjust the duration. You can change the intensity through the alpha slider.

Step 3: In Filmora, you can add sepia tone rise or sun-kissed filters to your video. You are able to add desaturated filters while keeping colors like blue and green and with that create the old film style. If you want more brown and red tones, you can use the Sun-Kisser filter that highlights those colors. Adjust the filters with the alpha slider to change intensity.

Step 4: Under the black and white subcategory, you can find Ash and Willow filters. What these do is desaturate the contrast or exposure values as well as preset brightness and bring an older tone to your videos.
Step 5: You can correct any kind of filter. With the Advanced Color Correction Tab, you can navigate through features like Preset and Adjustment and desaturate your video. By clicking on the “Preset tab,” you can open a larger variety of presets, including the Old Film and Black & White presets.

Part 4: Pro Tips to Create Stunning Retro Video
You can make your video look retro with a few simple tips:
- Use several vintage apps like Retro VHS, 8mm Camcorder, and others.
- Keep low highlights and low contrasts.
- Keep low saturation and control the hue, saturation, and luminance of your video.
- Film Overlays. With this, you can bring the mood just right. If you add a soft light overall to start with, it will instantly look slightly more vintage.
- By decreasing contrast, you are darkening your videos and giving them a grainier old look.
- If you bring up the black levels, you will leave more space for other tones to shine and turn the mood around your videos.
- In contrast, if you bring down the whites in your videos, making even the brightest colors turn grey.
Conclusion
There are various ways to turn your videos into old relics. Using Filmora, you have a powerful tool in your hands to change any desired media, and with this step-by-step guide, you will get there in no time.
If you like the old film mood in your videos and films, then this guide is for you. In this article, we will go through the best old film overlays to make your videos look vintage.
In this article
01 What is the Old Film Effect Called?
02 10 Amazing Old Film Overlays that Deserve a Try
03 How to Make a Video Look Old?
04 Pro Tips to Create Stunning Retro Video
Part 1: What is the Old Film Effect Called?
The old film effect that has been getting popular over the past years is called film grain and is defined as a random optical texture due to small particles appearing in the film. It is usually described as having a grainy effect and appearing old.
Part 2: 10 Amazing Old Film Overlays that Deserve a Try
In this list, we will present you with some great options that deserve your attention if you are looking to add old film aspects to your videos.
1. The Super 8 Film Grain Overlays Collection
With this collection, you have at your disposal 82 high-resolution clips of a real Super 8 film grain. With features that are easy to use in your videos, like 20-second loopable duration, 1080P Quicktime Pro resolution, each overlay has a small difference in texture and tint, and you also get 37 clips that show you visible areas with sprocket holes.
2. The Old Film Look Collection
This collection brings a large variety of film elements. From flash frames, film clutter, light leaks, countdown leader, film sprockets, 16mm and Super 8mm film. Plus, with this collection, you also get 29 video files and ProRes 1080P.
3. The Damaged 35mm Film Collection
With this collection, you have animated scans of damaged slides of 35mm film. The transparency effects are easy to use because of the white areas. You can add a file that you choose over an existing video and “darken” or “multiply” blending modes. Apart from those features, the Damaged 35mm Film Collection comes with 10 ProRes HD files.
4. The 4K 16 mm Film Overlays Collection
These overlays come from Authentic Old 16mm film, and inside this collection, you can find many effects of film dirt, scratches or dust to bring that old vintage look to your videos. It also comes with 79 ProRes video files, 4K (ULTRA HD) 3840 x 2160, 24fps resolution.
5. The Film Dirt and Scratches Collection
This collection comes with a variety of scratches and dirt textures. From authentic 16mm and Super 8mm film to give you a great old film look effect to your videos. The Film Dirt and Scratches collection comes with 28 video files, 13 minutes of footage, and ProRes 1080P.
6. 4K Super 8 Film Burn Overlays Collection - Kodak 50D
A collection like this is rare to come across. These easy-to-use effects are great for any level of expertise in editing videos. Just place them over the video and click “screen” or “lighten” modes. This collection pack comes with 47 ProRes files, 4 minutes of footage, and 4K High-Quality Scans.
7. 4K 16mm Film Grain Overlays
This collection has three great files of real film grain with dust and grain at your disposal. They use a 16mm camera for a better quality of overlays. This amazing package comes with three video files of 16mm film grain plus three bonus files.
8. 4K Film Burn Effects on 16mm
Shot in an authentic 16mm, this collection has real film burning in a projector. It has close-ups that fit a width of 16/9 screen. It also comes with 33 ProRes Files and 4 minutes of footage.
9. The VHS Effects Collection
This collection has real VHS effects to give your videos an old 80’s tape look to your videos. The collection contains many analog textures, tracking problems, and glitches. It also contains 10 minutes of footage, Quicktime ProRes 1080P file support, and 94 HD files of authentic VHS Retro Effects.
10. The Film Leaders Collection - Super 8mm and 16mm Effects
With authentic vintage countdowns, tail leaders, and old retro heads, this bundle offer you a great range of choices to add an old look to your films and videos.
Part 3: How to Make a Video Look Old?
In Filmora, you can make your videos have that old effect with simple steps.
Wondershare Filmora
Get started easily with Filmora’s powerful performance, intuitive interface, and countless effects!
Try It Free Try It Free Try It Free Learn More >
Step 1: Open Filmora and remove all the pieces of the footage. Then arrange the rest of the footage as you see fit. Click on “Effects” on the upper left corner of your screen and then on “Filters”. Click on the Old Video effect and then drop it. After you add the filter on the segment of your video, you can drag the end of it to cover the whole duration of the movies. Click twice on the filter if you want to adjust the filter settings. Enter the desired values on the “Fade” parameter, “Frequency”, and “Alpha” options. Press “OK”, and this step is concluded.
Step 2: You can apply the black and white filters to any project in Filmora. It is very simple. Add one of the filters above the video you want to add the effect and drag one of the corners to adjust the duration. You can change the intensity through the alpha slider.
Step 3: In Filmora, you can add sepia tone rise or sun-kissed filters to your video. You are able to add desaturated filters while keeping colors like blue and green and with that create the old film style. If you want more brown and red tones, you can use the Sun-Kisser filter that highlights those colors. Adjust the filters with the alpha slider to change intensity.
Step 4: Under the black and white subcategory, you can find Ash and Willow filters. What these do is desaturate the contrast or exposure values as well as preset brightness and bring an older tone to your videos.
Step 5: You can correct any kind of filter. With the Advanced Color Correction Tab, you can navigate through features like Preset and Adjustment and desaturate your video. By clicking on the “Preset tab,” you can open a larger variety of presets, including the Old Film and Black & White presets.
Part 4: Pro Tips to Create Stunning Retro Video
You can make your video look retro with a few simple tips:
- Use several vintage apps like Retro VHS, 8mm Camcorder, and others.
- Keep low highlights and low contrasts.
- Keep low saturation and control the hue, saturation, and luminance of your video.
- Film Overlays. With this, you can bring the mood just right. If you add a soft light overall to start with, it will instantly look slightly more vintage.
- By decreasing contrast, you are darkening your videos and giving them a grainier old look.
- If you bring up the black levels, you will leave more space for other tones to shine and turn the mood around your videos.
- In contrast, if you bring down the whites in your videos, making even the brightest colors turn grey.
Conclusion
There are various ways to turn your videos into old relics. Using Filmora, you have a powerful tool in your hands to change any desired media, and with this step-by-step guide, you will get there in no time.
Leading Applications to Create Fast Motion in iPhone
Fast motion has always been a time saver since it covers the unnecessary details in seconds. Acquiring this skill is important if you are a content creator or videographer. You might already be aware of how to make fast-motion videos on iPhone.
However, if this is unheard of or you are new to video editing, we’ve got you covered. This article covers the ins and outs of how to make a video fast-motion iPhone. In addition, users can gain insights into some applications and their guides. Moreover, we’ll discuss an AI alternative to those applications.
Slow Motion Video Maker Slow your video’s speed with better control of your keyframes to create unique cinematic effects!
Make A Slow Motion Video Make A Slow Motion Video More Features

Part 1: What are the Different Use Cases of Fast-Motion Videos?
The fast motion effect covers multiple creative ways of speed increase that you can incorporate. All these ways apply to different genres of videos. This section diverts your focus on different use cases of fast-motion videos. Here is how to make video fast motion on iPhone for different purposes:
1. Construction and Development Videos
Fast-motion videos help in video creation where development is happening. Such videos show the before and after results of an area, location, or building. The construction or manufacturing process is shown in fast motion in engineering videos. It also helps in showing the transformation of a non-populated or undeveloped city.
2. Nature Photography or Documentaries
Natural phenomenon like the blooming of a flower usually occurs at a slower rate. Capturing them takes a long time, but the audience may not like such a long duration. Hence, editors can increase the speed of such videos to speed up the phenomenon. In addition, if you watch wildlife or nature documentaries, they also use this effect.
3. Aesthetic Expression
Fast-paced videos bring a sense of creativity to your videos as they are an artistic expression of time. To indicate the passing of time in movies or to show a scene at a railway station or airport. It also indicates that the filmmakers and editors have put in an effort.
Part 2: Different Tools to Help You Make Fast Motion Video on iPhone
Fast-motion tools are important in video editing since they offer a chance at creativity. They have a wide range of applications in the filmmaking and media industry. Do you know how to make a video fast-motion iPhone using a third-party application? If not, here is a detailed guide on some of them:
1. iMovie
If you are looking for an accessible application with an easy-to-use interface, this is for you. The process of speed manipulation consists of a slider for control. After editing, you can integrate multiple soundtracks from 130 pre-assembled tracks. The application is compatible with iPhone X and newer versions.
Steps to Create a Fast Motion Video Using iMovie
Do you want to learn how to make fast-motion videos on your iPhone with this application? Given Below is your perfect guide to crafting a fast-paced video:
Step 1: After downloading the application on your iPhone, access it and “Start New Project.” Then, select a video from your media library to edit.

Step 2: After importing the video, click the “Pen” icon to access editing options. Then, click the “Edit Clip” option to do so.

Step 3: Move to the bottom of the screen and slide the given option to access “Speed.” Click it and drag the speed slider towards the right side to increase the speed of the video.

Step 4: Hit the “Play” button to see the speed of the video and re-adjust if required. Go to the top right corner of the screen, locate the “Export” icon, and click it.

2. Video Speed Changer – Editor
Want to learn how to make video fast motion on iPhone without additional technicalities? This application ensures a comprehensive narrative just for speed change. Users can formulate 3 fast motion effects with it at specific frames. For pre-recorded or new videos, it offers Time Wrap, Time Lapse, and Hyper-lapse. The application has been found to support iOS 12.3 and later versions.
Steps to Create a Fast Motion Video Using Video Speed Changer
Multiple applications provide similar services, but none can compare to its UI. Here is how to make a video fast motion iPhone using this
Step 1: Access this application from the App Store and launch it after installation. Click on the “Select Video” button and import a clip.

Step 2: Once you have selected a video, it will take you straight to the speed change option. Change the position of the given slider. Finally, preview the video and click the “Save Video” button to save it on your device.

3. Slow Motion Video FX Edit
Although the name indicates otherwise, this video editor is capable of high-speed change. It comes with an intuitive user interface and is easy for anyone to employ. In addition to speed alteration, you can insert 40 different filters into your video. You can also commence its freeze frame action to add an extra layer of creativity. The tool is compatible with iOS 13.0 and higher versions.
Steps to Create Fast Motion Using Slow Motion Video FX
This is another editor to gain insights on how to make fast-motion videos on an iPhone. We have given the verified step-by-step guide to using this app:
Step 1: After launching this application, click the “Choose From Library” option. Then, select a clip from your device’s gallery.

Step 2: Once the video is compressed, you’ll be taken to the speed change screen. From there, you can alter the speed of different clip sections. Move the slider of the relevant section upward to increase the speed.

Step 3: Once you have altered the speed, navigate towards the top right corner and click the “Export” icon.

Part 3: Desktop Solution: Remedy for Those Who Want to Speed Up Video on Their Computer
If you have gone through the above applications, you know the fast-motion effect. Do you want to know how to make a video fast motion on an iPhone using a computer? Wondershare Filmora is the best alternative to the above applications for creating this effect. The software is compatible with all the macOS and iOS devices and allows seamless editing.
With this editor, you get multiple options to create a fast-motion video. In this article, we will use the Uniform Speed feature. The operating process is very accessible and designed to assist both professionals and beginners. You can also apply the AI Frame Interpolation option to apply “Frame Bending.”
Free Download For Win 7 or later(64-bit)
Free Download For macOS 10.14 or later
Step-by-Step Guide to Speed Up Video with Filmora
After reading the article till now, you have gained knowledge of Filmora’s speeding options. How to make fast motion video on iPhone now seems like an easy option. Even though the process is easy, we want you to stay ahead. Hence, here is a step-by-step procedure for creating fast motion in Filmora:
Step 1Create a New Project and Import Media
First, connect your iOS device to your Wondershare Filmora device. After that, launch Filmora to access the main menu. From there, click on the “New Project” tab fashioned in the center. Expand the “Import” option in the Project Media section and select the suitable option. In this case, choose the “Import from Phone or Camera” option.

Step 2Access the Uniform Speed Section
After bringing the imported media to the timeline, select it to access the settings panel. Select the “Speed > Uniform Speed” tab from the appeared panel. Then, drag the Speed slider on the right side to increase speed. Afterward, click the “Play” button on the preview screen to see the results.

Step 3Apply Frame Bending and Export
This part is optional, but if you find an irregularity or roughness to the video, apply this. Go to the “AI Frame Interpolation” section at the bottom and expand the options. From the dropdown menu, select the “Frame Bending” option and do the rendering from the timeline. After everything is set, select the “Export” button at the top right corner.

Trending Video Editing Features of Wondershare Filmora
Filmora is a versatile tool that is not confined to speed manipulation or fast motion only. This editor offers audio, text, AI editing options, and video. Here are some prominent key features of Wondershare Filmora to help you in editing:
1. Speed Ramping
The other option for speed modification mentioned previously is speed ramping. This option comes with 6 editable speed change presets for automated editing. However, you can also employ the custom preset to create your own way. Moreover, it allows the audio pitch option to enable automated maintenance of audio.
2. AI Smart Cutout
There is more than one way of removing and replacing a background in Filmora. Smart Cutout offers an AI-integrated masking option to cut out the selected parts. You can also set preferences for Edge Thickness or Edge Feather for accuracy. Afterward, you can introduce three background options: color, grid, or more.
3. AI Text-to-Video
Bring your imagination to visuals with this amazing generative AI video creator. It creates videos from text and covers the voice and graphical elements. Users can customize the AI voice and ratio before generating a video. The prompt section offers up to 1000 characters for adding a script or giving directions.
4. AI Smart Masking
Are there any effects or filters you want to introduce to only a specific part of the video? Use Filmora’s AI mask for automated masking of an object or background. The mask brush selects the relevant area on its own. Besides AI masks, there is a manual masking option or mask shapes to apply. You can also customize the Brush size according to the video.
Conclusion
The article highlighted the importance of increasing video speed in many industries. In addition, we discussed some tools that make fast motion with ease. We also provided step-by-step guides on how to make fast motion video on iPhone. Wondershare Filmora stands amongst all those applications to create fast motion. We recommend this software due to its multiple functionalities and detailed editing abilities.
Make A Slow Motion Video Make A Slow Motion Video More Features
Part 1: What are the Different Use Cases of Fast-Motion Videos?
The fast motion effect covers multiple creative ways of speed increase that you can incorporate. All these ways apply to different genres of videos. This section diverts your focus on different use cases of fast-motion videos. Here is how to make video fast motion on iPhone for different purposes:
1. Construction and Development Videos
Fast-motion videos help in video creation where development is happening. Such videos show the before and after results of an area, location, or building. The construction or manufacturing process is shown in fast motion in engineering videos. It also helps in showing the transformation of a non-populated or undeveloped city.
2. Nature Photography or Documentaries
Natural phenomenon like the blooming of a flower usually occurs at a slower rate. Capturing them takes a long time, but the audience may not like such a long duration. Hence, editors can increase the speed of such videos to speed up the phenomenon. In addition, if you watch wildlife or nature documentaries, they also use this effect.
3. Aesthetic Expression
Fast-paced videos bring a sense of creativity to your videos as they are an artistic expression of time. To indicate the passing of time in movies or to show a scene at a railway station or airport. It also indicates that the filmmakers and editors have put in an effort.
Part 2: Different Tools to Help You Make Fast Motion Video on iPhone
Fast-motion tools are important in video editing since they offer a chance at creativity. They have a wide range of applications in the filmmaking and media industry. Do you know how to make a video fast-motion iPhone using a third-party application? If not, here is a detailed guide on some of them:
1. iMovie
If you are looking for an accessible application with an easy-to-use interface, this is for you. The process of speed manipulation consists of a slider for control. After editing, you can integrate multiple soundtracks from 130 pre-assembled tracks. The application is compatible with iPhone X and newer versions.
Steps to Create a Fast Motion Video Using iMovie
Do you want to learn how to make fast-motion videos on your iPhone with this application? Given Below is your perfect guide to crafting a fast-paced video:
Step 1: After downloading the application on your iPhone, access it and “Start New Project.” Then, select a video from your media library to edit.
Step 2: After importing the video, click the “Pen” icon to access editing options. Then, click the “Edit Clip” option to do so.
Step 3: Move to the bottom of the screen and slide the given option to access “Speed.” Click it and drag the speed slider towards the right side to increase the speed of the video.
Step 4: Hit the “Play” button to see the speed of the video and re-adjust if required. Go to the top right corner of the screen, locate the “Export” icon, and click it.
2. Video Speed Changer – Editor
Want to learn how to make video fast motion on iPhone without additional technicalities? This application ensures a comprehensive narrative just for speed change. Users can formulate 3 fast motion effects with it at specific frames. For pre-recorded or new videos, it offers Time Wrap, Time Lapse, and Hyper-lapse. The application has been found to support iOS 12.3 and later versions.
Steps to Create a Fast Motion Video Using Video Speed Changer
Multiple applications provide similar services, but none can compare to its UI. Here is how to make a video fast motion iPhone using this
Step 1: Access this application from the App Store and launch it after installation. Click on the “Select Video” button and import a clip.
Step 2: Once you have selected a video, it will take you straight to the speed change option. Change the position of the given slider. Finally, preview the video and click the “Save Video” button to save it on your device.
3. Slow Motion Video FX Edit
Although the name indicates otherwise, this video editor is capable of high-speed change. It comes with an intuitive user interface and is easy for anyone to employ. In addition to speed alteration, you can insert 40 different filters into your video. You can also commence its freeze frame action to add an extra layer of creativity. The tool is compatible with iOS 13.0 and higher versions.
Steps to Create Fast Motion Using Slow Motion Video FX
This is another editor to gain insights on how to make fast-motion videos on an iPhone. We have given the verified step-by-step guide to using this app:
Step 1: After launching this application, click the “Choose From Library” option. Then, select a clip from your device’s gallery.
Step 2: Once the video is compressed, you’ll be taken to the speed change screen. From there, you can alter the speed of different clip sections. Move the slider of the relevant section upward to increase the speed.
Step 3: Once you have altered the speed, navigate towards the top right corner and click the “Export” icon.
Part 3: Desktop Solution: Remedy for Those Who Want to Speed Up Video on Their Computer
If you have gone through the above applications, you know the fast-motion effect. Do you want to know how to make a video fast motion on an iPhone using a computer? Wondershare Filmora is the best alternative to the above applications for creating this effect. The software is compatible with all the macOS and iOS devices and allows seamless editing.
With this editor, you get multiple options to create a fast-motion video. In this article, we will use the Uniform Speed feature. The operating process is very accessible and designed to assist both professionals and beginners. You can also apply the AI Frame Interpolation option to apply “Frame Bending.”
Free Download For Win 7 or later(64-bit)
Free Download For macOS 10.14 or later
Step-by-Step Guide to Speed Up Video with Filmora
After reading the article till now, you have gained knowledge of Filmora’s speeding options. How to make fast motion video on iPhone now seems like an easy option. Even though the process is easy, we want you to stay ahead. Hence, here is a step-by-step procedure for creating fast motion in Filmora:
Step 1Create a New Project and Import Media
First, connect your iOS device to your Wondershare Filmora device. After that, launch Filmora to access the main menu. From there, click on the “New Project” tab fashioned in the center. Expand the “Import” option in the Project Media section and select the suitable option. In this case, choose the “Import from Phone or Camera” option.
Step 2Access the Uniform Speed Section
After bringing the imported media to the timeline, select it to access the settings panel. Select the “Speed > Uniform Speed” tab from the appeared panel. Then, drag the Speed slider on the right side to increase speed. Afterward, click the “Play” button on the preview screen to see the results.
Step 3Apply Frame Bending and Export
This part is optional, but if you find an irregularity or roughness to the video, apply this. Go to the “AI Frame Interpolation” section at the bottom and expand the options. From the dropdown menu, select the “Frame Bending” option and do the rendering from the timeline. After everything is set, select the “Export” button at the top right corner.
Trending Video Editing Features of Wondershare Filmora
Filmora is a versatile tool that is not confined to speed manipulation or fast motion only. This editor offers audio, text, AI editing options, and video. Here are some prominent key features of Wondershare Filmora to help you in editing:
1. Speed Ramping
The other option for speed modification mentioned previously is speed ramping. This option comes with 6 editable speed change presets for automated editing. However, you can also employ the custom preset to create your own way. Moreover, it allows the audio pitch option to enable automated maintenance of audio.
2. AI Smart Cutout
There is more than one way of removing and replacing a background in Filmora. Smart Cutout offers an AI-integrated masking option to cut out the selected parts. You can also set preferences for Edge Thickness or Edge Feather for accuracy. Afterward, you can introduce three background options: color, grid, or more.
3. AI Text-to-Video
Bring your imagination to visuals with this amazing generative AI video creator. It creates videos from text and covers the voice and graphical elements. Users can customize the AI voice and ratio before generating a video. The prompt section offers up to 1000 characters for adding a script or giving directions.
4. AI Smart Masking
Are there any effects or filters you want to introduce to only a specific part of the video? Use Filmora’s AI mask for automated masking of an object or background. The mask brush selects the relevant area on its own. Besides AI masks, there is a manual masking option or mask shapes to apply. You can also customize the Brush size according to the video.
Conclusion
The article highlighted the importance of increasing video speed in many industries. In addition, we discussed some tools that make fast motion with ease. We also provided step-by-step guides on how to make fast motion video on iPhone. Wondershare Filmora stands amongst all those applications to create fast motion. We recommend this software due to its multiple functionalities and detailed editing abilities.
Also read:
- New 2024 Approved Easy Guide to Overlay Videos in Premiere Pro
- New In 2024, Different Ways To Trim Video In Premiere Pro
- How to Make Custom Lower Thirds with Filmora for 2024
- New 2024 Approved Step By Step Guide on Using Media Player Classic To Rotate A Video
- Updated In 2024, Easy Steps to Loop YouTube Videos on iPhone
- Updated In 2024, How to Make a Slideshow on iPhone
- New Do You Want to Slow Down Your TikTok Video and Zoom on a Specific Part? This Is No Longer a Difficult Task as This Video Comes up with the Right Set of Methods that Can Be Used to Implement the Slow Zoom Effect TikTok
- New 2024 Approved The Complete Guide to Converting GIF to SVG With Ease
- 2024 Approved How to Make Dynamic Video Collages?
- New In 2024, Perfecting the Art of Slowing Down Video on Instagram
- New Discord Is the Future of Networking. After All, It Is Here to Stay. Have You Heard of the Discord Animated Avatar? If Yes, You Understand Its Power and if Not, Ensure You Study This Article for More Information
- New 8 Best Video Editor with Useful Masking
- New How To Make Transparent Background On Picsart
- Updated How to Export iMovie?
- In 2024, This Article Will Show You How to Make a Tattoo Disappear on Your Body Magically
- 2024 Approved How To Blur Background in Adobe Premiere Pro Detailed Guide
- Splitting the Clips in Adobe After Effects Step by Step for 2024
- Finding The Finest Way To Add Subtitles to Videos | Filmora
- Updated In 2024, 2 Effective Ways to Easily Convert VTT to SRT
- New How to Make Custom Lower Thirds with Filmora for 2024
- Your Powerpoint Slides Are Not Always Perfect and Sometimes Need a Little Editing Before Being Sent to the Client. Here Are some Ways You Can Make Sure Your Powerpoint Is Not Wrong
- Updated How To Use Motion Blur On Video Star for 2024
- Updated 2024 Approved Merging Videos Like a Pro A Step-by-Step Guide to Use FFmpeg
- In 2024, Make A Countdown Video
- Top 8 Video Editor with Useful Masking for 2024
- New 2024 Approved Free 3D Intro Makers
- Updated Have You Ever Wanted to Stop Your Video and Hold on to a Single Frame to Draw Attention to a Point or for Dramatic Flair? Good News! VEGAS Pro Makes It Easy to Do Just That. In This Tutorial, Well Look at How to Make Sony Vegas Freeze Frame
- Updated Top List Best VHS Sound Effect That You Can Use in Video Making
- How to Fix Android.Process.Media Has Stopped on Samsung Galaxy F14 5G | Dr.fone
- In 2024, Detailed Review of doctorSIM Unlock Service For iPhone 11 Pro
- In 2024, How to Unlock Xiaomi Redmi Note 12T Pro Pattern Lock if Forgotten? 6 Ways
- In 2024, How to Detect and Remove Spyware on Asus ROG Phone 8 Pro? | Dr.fone
- Dose Life360 Notify Me When Someone Checks My Location On Samsung Galaxy F04? | Dr.fone
- How To Unlock Itel S23+ Phone Without Password?
- In 2024, All You Need To Know About Mega Greninja For Google Pixel 8 | Dr.fone
- MKV playback issues on Redmi K70 Pro
- Unlock Your Device iCloud DNS Bypass Explained and Tested, Plus Easy Alternatives On Apple iPhone 13 Pro
- In 2024, A Perfect Guide To Remove or Disable Google Smart Lock On Infinix Smart 8 Pro
- How can I get more stardust in pokemon go On Xiaomi 13 Ultra? | Dr.fone
- Can I recover permanently deleted photos from Vivo Y77t
- In 2024, Easy Guide to Samsung Galaxy S21 FE 5G (2023) FRP Bypass With Best Methods
- Forgot Apple iPhone 8 Plus Backup Password? Heres What to Do
- In 2024, How to Reset a Vivo Y36i Phone that is Locked?
- Complete Review & Guide to Techeligible FRP Bypass and More For Realme V30
- Fix Unfortunately Settings Has Stopped on Vivo Y27 5G Quickly | Dr.fone
- Complete Tutorial to Use GPS Joystick to Fake GPS Location On Oppo Reno 10 5G | Dr.fone
- In 2024, Why Does iTools Virtual Location Not Work For Apple iPhone 14 Pro/iPad? Solved | Dr.fone
- What Is a SIM Network Unlock PIN? Get Your Vivo S17 Phone Network-Ready
- Various Methods to Transfer Pictures from Apple iPhone 11 to PC | Dr.fone
- In 2024, AddROM Bypass An Android Tool to Unlock FRP Lock Screen For your Vivo X Flip
- Title: New In 2024, How to Animate Text in A Video
- Author: Morgan
- Created at : 2024-04-24 01:05:27
- Updated at : 2024-04-25 01:05:27
- Link: https://ai-video-editing.techidaily.com/new-in-2024-how-to-animate-text-in-a-video/
- License: This work is licensed under CC BY-NC-SA 4.0.
