
:max_bytes(150000):strip_icc():format(webp)/TheWolfAmongUsBigby-793544cded2749488ae1d20113d8d73a.jpg)
New In 2024, How To Be A Successful YouTuber
How To Be A Successful YouTuber
Over the last few years, YouTube has gone from being a small video website containing funny videos, to the world’s second-largest search engine. YouTube currently boasts more than 2 billion video views per week. It can also provide a low-cost to no-cost solution to making a social marketing channel for your hobby or business. Most of the time, success is not achieved overnight.
Creating a YouTube channel that will be successful takes a lot of time, effort, planning, and work to kickstart it from zero. In this article, we will be covering the most important topics you have to remember when becoming a successful YouTube star.
- Promotion and Marketing
With that said, let’s get into it!

Successful YouTuber
1. Understand ‘Success’ Means
YouTube’s success is based on the premise that all visitors need the same thing. Search, find, and leave as fast as possible. Kind of like a store. But YouTube visitors have much more diverse needs than you might think. Some come to watch short clips of cats doing silly things, others to view TV shows or how to learn an instrument, cooking, maintain a car, and so much more.
The way your success is measured is by the number of viewers you get onto your channel. No matter what kind of content you upload, whether it’s about music, education, when you turn viewers into subscribers, dedicated fans, and supporters, that is how you can measure your success and how you can get as many new people through the door and make them stick around because they love what you do and what value you are to them. We are going more in-depth in the other stages of this article about analytics and measurements.

Understand What ‘Success’ Means
2. Create Your Plan
When it comes to building a successful YouTube channel, consistency is super important. You are more likely to gain success if you have a well-thought-out plan and a strategy for uploading content. Instead of uploading once per month, try once per week if your time schedule allows it so your new viewers know when to expect a new video. Planning is super important because it will allow you to stick to a schedule. If you have a lot of time to create videos, people tend to get used to that schedule. Once you’re planning becomes less structured because of lack of time, it can confuse viewers as consistency is important. People do not like change, or it will take time for them to get used to a new schedule, especially if it changes often.

Create Your Plan
3. Make Your YouTube Videos
After you created your plan, your strategy, and all the preparation, it is time to start filming! We highly recommend working with an upload schedule, so you know which videos to create and when they have to be finished. Try to have a good overall layout and theme for your videos from the start so people know who you are and what you do. Once you started filming you can continue the process and keep producing.
![]()
Note: If you have less time, you can create more videos in one filming session so you have a bulk library you can release over the period when you don’t have time for creating content.

Make Your YouTube Videos
It’s highly recommended to write down a list of topics for videos so you can have your same recording set ready to go for whenever you start shooting. If you are able to keep a dedicated space to keep your set, that’s a huge plus instead of having to tear everything down and setting up again each time you film and it gives your viewers a consistent idea of what they can expect any time new video releases onto your YouTube channel.
4. Use Analytics to Improve
Some marketers could have an unhealthy relationship with analytics. They track too many of the numbers. Maybe we think we can prove any marketing campaign is producing results if there’s an eye-catching percentage. But we all know that some metrics are a lot more revealing than other types of statistics.
We have listed 3 important types of metrics you have to study to truly understand your audience.
❶ Watch Time
The Watch Time is the total amount of minutes viewers have spent watching your content. It’s a key metric because YouTube pushes videos and channels with higher Watch Times in their search results and recommendations section. YouTube does this because the more Watch Time a video has, the more engaging their algorithm knows it is and YouTube like to recommend videos that keep viewers as long as possible on the platform.

Watch Time
In the Watch Time section, you can see the amount of Watch Time your videos have generated. You can also rank each of your videos by Watch Time and group your videos by styles, lengths and themes to determine your most engaging videos.
❷ Average view duration
Your Average view duration is the total Watch Time of your video divided by the total number of video playbacks, also including replays. This metric measures your video’s ability to engage people. If your video can’t engage new visitors, they’ll jump off from your video quite fast, leaving you with an unimpressive average view duration. If you create a high-performing video, your Average view duration and total Watch Time will increase over time and boost your search and recommendations rankings by a lot.

Average View Duration
❸ Audience Retention
Let’s talk about Audience Retention. If your video is longer than five minutes, and Audience Retention is more than 50%, you are going in the right direction. A hook is something that grabs a viewer’s attention and will result in them staying longer on your video or browsing your other content. We recommend regularly reviewing your videos to ensure you aren’t attracting visitors to outdated content. Older videos can turn them away and they may view your YouTube channel as less trustworthy or valuable as a source for the information that they are looking for. Updated videos are high-quality videos.

Audience Retention
5. Promotion and Marketing
Now it is time to let all your hard work pay off! There is one last thing to focus on so your videos will generate your desired results. Promoting your video is important when it comes to letting it find the target audience. We have listed a few options for promoting and marketing your content.

Promotion and Marketing
❶ YouTube’s Community Tab
Tips for You
1. Make a Post
To create a YouTube Community post on your computer or smartphone, go navigate to your YouTube channel, and look for the tab called “Community.”
2. Tag Content Creators
Now you can make a post and add either an image or a video to it to promote it! You can also tag other content creators by writing an @ symbol in front of the channel’s name.
To create a YouTube Community post on your computer or smartphone, go navigate to your YouTube channel, and look for the tab called “Community.” Now you can make a post and add either an image or a video to it to promote it! You can also tag other content creators by writing an @ symbol in front of the channel’s name.
❷ Social Media Advertisements
Tips for You
1. Targeting Teens at Tiktok
When choosing where to place your advertisements, it’s helpful to understand which networks are most popular with your target audience. Targeting teens? TikTok is where to find them. Older generations love Facebook, YouTube, Twitter, and Instagram.
2. Find Social Networks for Your Brand
Try looking at which social networks perform well organically for your brand. Where does your content naturally strike a chord with fans? This is an obvious choice for your first social ad campaign.
With that said, let’s get into it!
Successful YouTuber
1. Understand ‘Success’ Means
YouTube’s success is based on the premise that all visitors need the same thing. Search, find, and leave as fast as possible. Kind of like a store. But YouTube visitors have much more diverse needs than you might think. Some come to watch short clips of cats doing silly things, others to view TV shows or how to learn an instrument, cooking, maintain a car, and so much more.
The way your success is measured is by the number of viewers you get onto your channel. No matter what kind of content you upload, whether it’s about music, education, when you turn viewers into subscribers, dedicated fans, and supporters, that is how you can measure your success and how you can get as many new people through the door and make them stick around because they love what you do and what value you are to them. We are going more in-depth in the other stages of this article about analytics and measurements.
Understand What ‘Success’ Means
2. Create Your Plan
When it comes to building a successful YouTube channel, consistency is super important. You are more likely to gain success if you have a well-thought-out plan and a strategy for uploading content. Instead of uploading once per month, try once per week if your time schedule allows it so your new viewers know when to expect a new video. Planning is super important because it will allow you to stick to a schedule. If you have a lot of time to create videos, people tend to get used to that schedule. Once you’re planning becomes less structured because of lack of time, it can confuse viewers as consistency is important. People do not like change, or it will take time for them to get used to a new schedule, especially if it changes often.
Create Your Plan
3. Make Your YouTube Videos
After you created your plan, your strategy, and all the preparation, it is time to start filming! We highly recommend working with an upload schedule, so you know which videos to create and when they have to be finished. Try to have a good overall layout and theme for your videos from the start so people know who you are and what you do. Once you started filming you can continue the process and keep producing.
![]()
Note: If you have less time, you can create more videos in one filming session so you have a bulk library you can release over the period when you don’t have time for creating content.
Make Your YouTube Videos
It’s highly recommended to write down a list of topics for videos so you can have your same recording set ready to go for whenever you start shooting. If you are able to keep a dedicated space to keep your set, that’s a huge plus instead of having to tear everything down and setting up again each time you film and it gives your viewers a consistent idea of what they can expect any time new video releases onto your YouTube channel.
4. Use Analytics to Improve
Some marketers could have an unhealthy relationship with analytics. They track too many of the numbers. Maybe we think we can prove any marketing campaign is producing results if there’s an eye-catching percentage. But we all know that some metrics are a lot more revealing than other types of statistics.
We have listed 3 important types of metrics you have to study to truly understand your audience.
❶ Watch Time
The Watch Time is the total amount of minutes viewers have spent watching your content. It’s a key metric because YouTube pushes videos and channels with higher Watch Times in their search results and recommendations section. YouTube does this because the more Watch Time a video has, the more engaging their algorithm knows it is and YouTube like to recommend videos that keep viewers as long as possible on the platform.
Watch Time
In the Watch Time section, you can see the amount of Watch Time your videos have generated. You can also rank each of your videos by Watch Time and group your videos by styles, lengths and themes to determine your most engaging videos.
❷ Average view duration
Your Average view duration is the total Watch Time of your video divided by the total number of video playbacks, also including replays. This metric measures your video’s ability to engage people. If your video can’t engage new visitors, they’ll jump off from your video quite fast, leaving you with an unimpressive average view duration. If you create a high-performing video, your Average view duration and total Watch Time will increase over time and boost your search and recommendations rankings by a lot.
Average View Duration
❸ Audience Retention
Let’s talk about Audience Retention. If your video is longer than five minutes, and Audience Retention is more than 50%, you are going in the right direction. A hook is something that grabs a viewer’s attention and will result in them staying longer on your video or browsing your other content. We recommend regularly reviewing your videos to ensure you aren’t attracting visitors to outdated content. Older videos can turn them away and they may view your YouTube channel as less trustworthy or valuable as a source for the information that they are looking for. Updated videos are high-quality videos.
Audience Retention
5. Promotion and Marketing
Now it is time to let all your hard work pay off! There is one last thing to focus on so your videos will generate your desired results. Promoting your video is important when it comes to letting it find the target audience. We have listed a few options for promoting and marketing your content.
Promotion and Marketing
❶ YouTube’s Community Tab
Tips for You
1. Make a Post
To create a YouTube Community post on your computer or smartphone, go navigate to your YouTube channel, and look for the tab called “Community.”
2. Tag Content Creators
Now you can make a post and add either an image or a video to it to promote it! You can also tag other content creators by writing an @ symbol in front of the channel’s name.
To create a YouTube Community post on your computer or smartphone, go navigate to your YouTube channel, and look for the tab called “Community.” Now you can make a post and add either an image or a video to it to promote it! You can also tag other content creators by writing an @ symbol in front of the channel’s name.
❷ Social Media Advertisements
Tips for You
1. Targeting Teens at Tiktok
When choosing where to place your advertisements, it’s helpful to understand which networks are most popular with your target audience. Targeting teens? TikTok is where to find them. Older generations love Facebook, YouTube, Twitter, and Instagram.
2. Find Social Networks for Your Brand
Try looking at which social networks perform well organically for your brand. Where does your content naturally strike a chord with fans? This is an obvious choice for your first social ad campaign.
Top 7 Easy Ways to Convert a Video to a GIF Online
Looking for the best video to gif online conversion tools? No worries, as we have done all the research work and have shortlisted the best tools that can assist you with the task. GIF is short and cute animated files that help in interestingly conveying a message. These short-animated visuals help in reaching and creating an impact on the target audience. So, if you have some videos, GIF animations can be created from them using a good converter tool which can be an online program or system software.
Online programs are preferred by the users owing to their simple and hassle-free use, support for basic features, and cost-saving options. So, here in this topic, we will discuss the top and easy ways to convert video to GIF online.

Part 1: Top 7 Easy Ways to Convert a Video to a GIF Online
Several online tools can be used for converting a video file into GIF, but all do not stand up to the tall claims it makes. So, if you are in search of an easy yet effective tool, shortlisted below are the top 7 tools for video into GIF online conversion.
1. Adobe Express
Powered by Adobe Premiere, this is an excellent online tool that allows converting videos in all key formats in GIF format. The free version allows adding videos for up to 1 hour and the processed files can be downloaded to the local system.
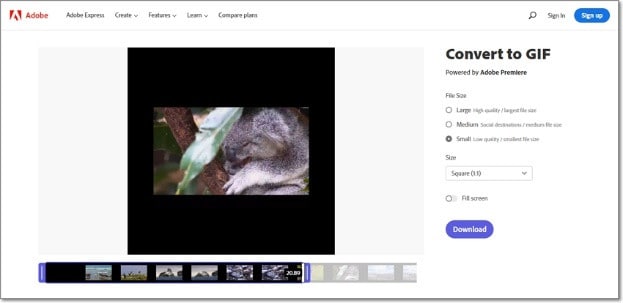
Key features
- Video files in all key formats can be converted to GIF.
- Allows selecting the aspect ratio and the file size of the target file.
- This video to GIF converter online tool support drag and drop feature.
- Allows trimming the video so that the file portion can be selected.
Pros:
- Simple and clean interface.
- Quick file processing.
- Allows selecting aspect ratio and file size.
Cons:
- Only one file at a time can be processed.
- Only desktop files can be added.
- To download the file, you need to free sign-up.
User Review:
A good online multi-platform service that works with interesting features. -TechRadar
This is one of the best programs that comes packed with wide range of features that can assist you in getting the target customized files.
2. Ezgif
Using this browser-based tool, local as well as online videos in key formats can be converted to GIFs. The interface is simple where you just need to add the file and the conversion will be done automatically.
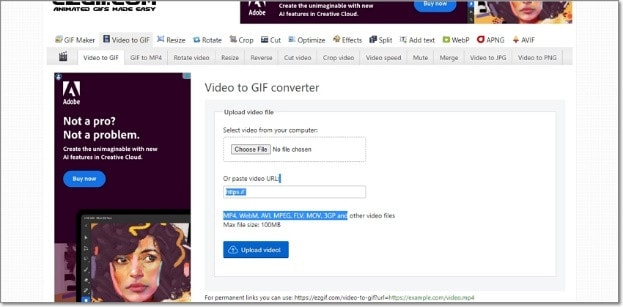
Key features
- GIF can be created from the local and online video files in all key formats.
- Choose the video part for creating the GIF file else by default, the first 5 seconds of the video are used.
Pros:
- All popular video formats like MP4, MPEG, FLV, MOV, and others are supported for conversion to GIF.
- Local, as well as file links in case of online files, can be added.
- Allows selecting the video part for which the GIF has to be created.
- Allows choosing the frame rate, and the size of the video.
This online GIF converter has an option to set static background.
Cons:
- File size limitation of 100 MB.
- Internet dependency.
User Review
“A website with many important and good tools that facilitates making your task easier. You get all features in one place. -Sasa011, Mywot.
This simple online tool is a pocket friendly option for converting your videos into GIF with added option for editing them. Supporting all key formats, the program supports additional tools as well.
3. Img2Go
Your videos on the system, cloud storage, as well as using URLs can be added to this online tool for conversion to GIF format. The look and the quality of GIFs can be adjusted by making changes in the file parameters.

Key features
- Convert all key video files like MP4, MOV, MPEG, and others to GIF.
- Customize the GIF look by editing the file size and applying the color filter.
- This online video to GIF converter allows to choose to enhance, sharpen, equalize, and edit files in other ways.
- Files to be converted can be added from the desktop, Google Drive, Dropbox, as well as URL.
- Processed files can be saved to the cloud storage in addition to the local system.
Pros:
- Multiple sources to add the video file.
- Customize the file parameters and enhance its look.
- Converted file is downloaded automatically to the local system.
Cons:
- Free version allows converting only 3 files at a time.
- Dependency on internet connectivity.
User review:
“This is the best online converter app I have discovered. It is really easy and fast to use. I absolutely recommend it and it really works.”-Maria Ancil, ChromeStats
When you need to convert only a few files at a time in a hassle-free manner consider this simple online tool. After the conversion is done, you would not have any hassles of file downloading as it is automatically saved to the system.
4. CloudConvert
Convert your videos in MP4, FLV, WebM, and other key formats to GIF using this browser-based tool that is simple and free to use. Multiple file parameters can be changed using the tool to get the desired file.

Key Features:
- Allows converting all key video formats.
- Files to be converted can be added from the desktop, URL, Dropbox, Google Drive, and OneDrive.
- Allows adjusting the fit, codec, resolution, aspect ratio, and fps.
- Option to trim the file and also add a watermark.
Pros:
- Files to be converted can be added from multiple sources.
- All key video formats supported.
- Option to control the video size, quality, and aspect ratio.
Cons:
- Free version allows only 25 conversions per day.
- Converted files need to be downloaded.
User Review
“Instant way of converting small-sized files online in many different formats.”
-Sushil, SoftwareAdvice
When conversion of cloud-based files is needed, this works a good online tool that also allows you to edit and change the key file parameters.
5. io
This is a free browser-based tool that allows creating of animated GIF files from videos. There are several video editing options also supported by the tool like split, cut, adding text, and more. You can even add a YouTube video or its link to create a GIF.

Key features:
- Free online tool for creating a GIF file.
- Support all key video formats like MP4, MOV, FLV, and others.
- Local, YouTube as well as videos from Dropbox can be added.
- Option to record the video and create its GIF.
- ‘Allows choosing the size, duration, background color, and several other file parameters.
Pros:
- Videos from multiple sources can be added.
- YouTube videos can also be converted to GIFs.
- Option to record the video and create its GIF.
- Support multiple video editing options.
Cons:
- Slow processing speed.
- Files processed through the free version have a watermark.
- Free version allows processing files under 10 minutes and of 250Mb in size.
User Review:
“It is just a perfect tool and easy to use. It supports a wide variety of media files.” - Koi, Trustpilot.
Option to convert the YouTube videos as well as the recorded videos make this tool different from the others. All popular file formats are supported and you can even customize and change the file parameters as per your requirements.
6. VistaCreate
This is another simple-to-use tool that allows converting all key video formats to a GIF file. The program allows setting various parameters as needed.
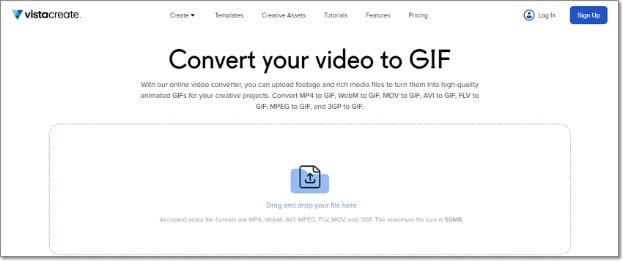
Key Features
- Convert MP4, WebM, AVI, MPEG, FLV, MOV, and 3GP to GIF.
- Support Drag and Drop feature.
- Videos up to 50MB can be processed.
- Allows choosing the video start and the end time for which GIF is to be created. If no time is selected, the first 5 seconds of the video are used.
Pros:
- Simple user interface.
- Allows selecting the video part for which GIF is to be created.
- Choose the frame rate and the speed.
Cons:
- Limited format support.
- Free version has a limitation of 50Mb file size.
- Processing speed is slow.
User Review:
“It is a simple and fast online tool that works. The program allows creating eye-catchy visuals and is free to use.”-Kshitij T, G2. Com
Simple to use, this online tool is apt when you need selected parts of the video for creating a GIF. Though it is compatible with a few selected formats, the process of conversion is simple.
7. XConvert
This online tool support conversion of wide range of file types and formats including videos to GIF. The supported video formats are MP4, WebM, MOV, and MKV. The tool also allows changing the target file parameters.

Key Features
- Free to use online tool with a simple interface.
- Allows converting MO4, MOV, WebM, and MKV videos to GIF.
- Frame Rate and resolution of the target GIF file can be selected.
- Allows adding local as well as files saved to the cloud storage.
Pros:
- Add videos from the desktop, Google Drive, and Dropbox.
- Choose the desired frame rate and resolution.
- Option to save the processed file to the system or Dropbox. Option to get the converted file download link.
Cons:
- Limited file support.
- Converted files need to be downloaded.
- Internet dependency.
User Review:
Portable, nice UI, cross-platform tool and has a lot of actions and run fast. -Roflpancake, Alternativeto
When simple conversion with basic file editing is needed, consider this online tool for your task. In addition to the local system, you can even save the files to your cloud storage.
Part 2: Comparison Table of the Best Video to GIF Converters
The table below compares the above 7 listed tools based on the formats supports, speed of file processing, and the watermark on the processed files.
| Features/Tool | Supported Format | Free Version with watermark or not | Speed of conversion |
|---|---|---|---|
| Adobe Express | All key video formats | No watermark | 2 (Fast) |
| Ezgif | All key formats including MP4, MPEG, FLV, MOV, and others. | No watermark. | 4 (Slow) |
| Img2Go | MP4, FLV, MOV, and all key video formats. | No Watermark | 2 (Fast) |
| CloudConvert | All popular video formats including MP4, MOV, FLV, MPEG, and more. | No Watermark | 2(Fast) |
| Veed.io | All key formats | Yes, free version has a watermark. | 5 (very Slow) |
| VistaCreate | MP4, WebM, AVI, MPEG, FLV, MOV, and 3GP. | No watermark | 5 (Very Slow) |
| XConvert | MP4, WebM, MOV, MKV. | No watermark | 3 (Average) |
Part 3: Best Solution to Convert Video to GIF on Windows/Mac
To convert videos to GIF on your Windows and Mac without worrying about any limitations or internet dependency, desktop software works as the best option. If you too have been looking for one such desktop program, we recommend Filmora Video Editor as the best choice. Though the software is used majorly for advanced video editing options, it is capable of performing a variety of other tasks as well including video to GIF conversion. The software allows file conversion through its export feature.
For Win 7 or later (64-bit)
For macOS 10.14 or later
Key Features
- Almost all video formats like MOV, MP4, MKV, FLV, and others can be converted to GIF.
- High-quality conversion at a fast speed.
- Support batch processing so that multiple files can be processed at a time.
- Allows editing and customizing videos using the built-in features of the software like effects, subtitles, crop, cut, and more.
Pros:
- The interface is simple which makes the software suitable even for beginners.
- Almost all popular video formats are supported.
- High-quality conversion in a hassle-free manner.
- Windows and Mac support.
Cons:
- Being a desktop software, it needs download and installation.
- Need to purchase the software subscription.
Steps to convert videos to GIF using Wondershare Filmora
Step 1. Launch the installed software on your system and the main interface select Create Project > New Project.

Step 2. Click on Import Media Files Here option under the Media tab to browse and add the local video file. Multiple files for batch processing can be added here.

Step 3. After the files are added, now it’s time to move them to the time and for this, you can simply drag and drop them to the bottom. Now at the timeline, using the built-in editing features, customization can be done as required.

Step 4. Finally, tap on the Export button and then choose GIF as the desired target format and also the location to save the converted files.

Conclusion
If one of the above-listed online tools serves your videos for GIF conversion purposes, it’s great. If not, you can use the Wondershare Filmora software. Once downloaded, the software can be used for several editing and other video-related tasks.
For macOS 10.14 or later
Key Features
- Almost all video formats like MOV, MP4, MKV, FLV, and others can be converted to GIF.
- High-quality conversion at a fast speed.
- Support batch processing so that multiple files can be processed at a time.
- Allows editing and customizing videos using the built-in features of the software like effects, subtitles, crop, cut, and more.
Pros:
- The interface is simple which makes the software suitable even for beginners.
- Almost all popular video formats are supported.
- High-quality conversion in a hassle-free manner.
- Windows and Mac support.
Cons:
- Being a desktop software, it needs download and installation.
- Need to purchase the software subscription.
Steps to convert videos to GIF using Wondershare Filmora
Step 1. Launch the installed software on your system and the main interface select Create Project > New Project.
Step 2. Click on Import Media Files Here option under the Media tab to browse and add the local video file. Multiple files for batch processing can be added here.
Step 3. After the files are added, now it’s time to move them to the time and for this, you can simply drag and drop them to the bottom. Now at the timeline, using the built-in editing features, customization can be done as required.
Step 4. Finally, tap on the Export button and then choose GIF as the desired target format and also the location to save the converted files.
Conclusion
If one of the above-listed online tools serves your videos for GIF conversion purposes, it’s great. If not, you can use the Wondershare Filmora software. Once downloaded, the software can be used for several editing and other video-related tasks.
Steps to Add Subtitles in Canva
Have you ever used Canva before? It is a famous online tool that is also available on Windows, Mac, Android, and iOS platforms. It contains various basic editing features that you can use to crop, trim, resize, and rotate your video clips and images. Apart from these basic tools, you can also navigate to the built-in library of Canva to explore its vibrant templates.
As more than 100 million individuals use Canva every month, it’s a well-trusted tool. If you are a frequent user of Canva, this article can help you how to add subtitles in Canva. Keep reading this article to find out the quickest way to add subtitles to videos using Canva.

Part 1: What is Canva?
To create and edit videos flawlessly, Canva offers great options. It contains pre-sized video formats for YouTube, Facebook, and other social media platforms. If you are a beginner and struggling with ideas, Canva offers various templates of different categories, such as fitness, education, fashion, and real estate. Apart from using the built-in media library, you have complete freedom to upload your media files to add further modifications.

Furthermore, using Canva, you can also add exciting animations and transitions to your videos to generate a smooth look. You can also add multiple overlays to add more dimensions to your video clips. Also, you can use the Canvas captions feature to generate customized subtitles for your video files. To learn more about Canva, let’s shed light on its key features, advantages, and pricing plans:
Key Features of Canva
- Multiple Export Options: Canva offers various export formats such as MP3, PNG, GIF, MP4, PPTX, etc. You can also check the video quality before exporting it to your device.
- Add Audio Tracks: To make your videos more engaging, you can add audio tracks and sound effects using this professional tool.
- Background Remover: To remove a dull background from your video without a green screen or professional software, you can use the background remover of Canva. Through this advanced feature, you can remove the background from your videos with a single click.
- Magic Resize: It offers a Magic Resize option that enables you to resize videos in different formats for multiple platforms.
- Brand Tools: Canva’s branding tools allow users to create and save branded templates, colors, and fonts. This makes it easy to maintain consistency across all design materials and ensures that all designs align with the brand’s visual identity.
- Collaboration Features: Canva’s collaboration features make it easy for teams to work together on a design project. Users can share designs with team members and assign roles and permissions, allowing for seamless collaboration and feedback.
Advantages of Using Canva
- If you want to share your videos on social media platforms instantly, Canva is the best option. Using this software, you can share your videos on Instagram or other social media platforms with a single tap.
- Canva can also add voice-overs and narrations to your videos in high audio quality.
- This tool provides various elements such as lines, shapes, stickers, and frames that you can add to your videos.
Pricing Plans
If you want to learn more about Canva’s detailed plan, you can visit its official website .
| Plan Name | Price |
|---|---|
| Canva Pro | $54.99/Year for 1 Person |
| Canva for Teams | $84.90/Year for 5 Person |
Part 2: How to Add Captions to Videos in Canva?
Do you want to know how to add subtitles in Canva? Adding subtitles in Canva is extremely simple and quick. In this section, we have jotted down accurate and simple instructions to add subtitles using the Canva tool:
Step1 Begin by visiting the video editor tool page of Canva through any web browser. After accessing the tool page, click on “Edit a Video.” This will open a new window on your screen.

Step2 Now, hit the “Upload Files” button from the left panel and import the video file on this tool. Once done, navigate to the “Text” tab and tap “Add a little bit of body text.” Now adjust the position of the text box according to your desire. You can write your Canva captions by choosing your preferred font, color, size, and style.

Step3 You can also add effects and animation to your added subtitles for more enhancements. Once done with customizations, click on the “Share” button. Here select MP4 as the video file format and save the video on your system.

Part 3: Is There a Good Alternative to Add Subtitles to Videos?
Canva provides a very basic user interface to create subtitles. If you want to enhance your added subtitles with more possibilities, Wondershare Filmora is the best alternative. You can add subtitles through this tool in multiple ways. You can either add subtitles manually or use its “Speech-to-Text” feature. Through this feature, you can transcribe your voice to generate subtitles automatically.
Free Download For Win 7 or later(64-bit)
Free Download For macOS 10.14 or later
Filmora also offers great styles and font options to customize the subtitles. You can easily check the results from the preview window of this efficient video editor. Hence, Filmora acts as a complete and well-trusted platform to generate subtitles in different ways.
Instructions to Create Subtitles Using Filmora
Are you tired of writing subtitles manually in Canva? Read the precise instructions guided below to create the subtitles automatically in more than 16 languages:
Step1 Upload the Video File
Download and launch Filmora on your desktop to initiate the process. On its main interface, tap “Create New Project,” which will open a new window. Afterward, upload your desired video on the Project Media to proceed.

Step2 Select Speech-to-Text Feature
Once done with uploading the file, drag the video file to the timeline. Click on the “Speech-to-Text” icon displayed on the timeline and hit the “OK” button after selecting the required language and file. After some seconds, subtitles would be automatically added to the timeline.

Step3 Add Modifications to Subtitles
On your timeline, double-click on the auto-generated subtitles to open the edit settings. By going to the Presets section, you can select the subtitle styles. To add more modifications, you can head to the Custom tab as displayed on your screen. From here, you can change the font, style, color, and size of the subtitles. To confirm the subtitles edits, press the “OK” button.

Step4 Export the Video File
Once you are done with all the subtitle edits, click on the “Export” button. Filmora provides you with various export resolution options and file formats that you can choose. Moreover, you can also share the video file to your desired social media platform, such as YouTube, Vimeo, or TikTok.

Conclusion
Being a non-technical individual, adding subtitles may sound tricky. To provide you with complete assistance, this article has shed light on how to add subtitles in Canva. But, Canva has some limitations in generating subtitles. Hence, we recommend you try and explore Wondershare Filmora to craft subtitles. This tool comprises a Speech-to-Text feature through which you can produce subtitles automatically without hassle.
Part 2: How to Add Captions to Videos in Canva?
Do you want to know how to add subtitles in Canva? Adding subtitles in Canva is extremely simple and quick. In this section, we have jotted down accurate and simple instructions to add subtitles using the Canva tool:
Step1 Begin by visiting the video editor tool page of Canva through any web browser. After accessing the tool page, click on “Edit a Video.” This will open a new window on your screen.
Step2 Now, hit the “Upload Files” button from the left panel and import the video file on this tool. Once done, navigate to the “Text” tab and tap “Add a little bit of body text.” Now adjust the position of the text box according to your desire. You can write your Canva captions by choosing your preferred font, color, size, and style.
Step3 You can also add effects and animation to your added subtitles for more enhancements. Once done with customizations, click on the “Share” button. Here select MP4 as the video file format and save the video on your system.
Part 3: Is There a Good Alternative to Add Subtitles to Videos?
Canva provides a very basic user interface to create subtitles. If you want to enhance your added subtitles with more possibilities, Wondershare Filmora is the best alternative. You can add subtitles through this tool in multiple ways. You can either add subtitles manually or use its “Speech-to-Text” feature. Through this feature, you can transcribe your voice to generate subtitles automatically.
Free Download For Win 7 or later(64-bit)
Free Download For macOS 10.14 or later
Filmora also offers great styles and font options to customize the subtitles. You can easily check the results from the preview window of this efficient video editor. Hence, Filmora acts as a complete and well-trusted platform to generate subtitles in different ways.
Instructions to Create Subtitles Using Filmora
Are you tired of writing subtitles manually in Canva? Read the precise instructions guided below to create the subtitles automatically in more than 16 languages:
Step1 Upload the Video File
Download and launch Filmora on your desktop to initiate the process. On its main interface, tap “Create New Project,” which will open a new window. Afterward, upload your desired video on the Project Media to proceed.
Step2 Select Speech-to-Text Feature
Once done with uploading the file, drag the video file to the timeline. Click on the “Speech-to-Text” icon displayed on the timeline and hit the “OK” button after selecting the required language and file. After some seconds, subtitles would be automatically added to the timeline.
Step3 Add Modifications to Subtitles
On your timeline, double-click on the auto-generated subtitles to open the edit settings. By going to the Presets section, you can select the subtitle styles. To add more modifications, you can head to the Custom tab as displayed on your screen. From here, you can change the font, style, color, and size of the subtitles. To confirm the subtitles edits, press the “OK” button.
Step4 Export the Video File
Once you are done with all the subtitle edits, click on the “Export” button. Filmora provides you with various export resolution options and file formats that you can choose. Moreover, you can also share the video file to your desired social media platform, such as YouTube, Vimeo, or TikTok.
Conclusion
Being a non-technical individual, adding subtitles may sound tricky. To provide you with complete assistance, this article has shed light on how to add subtitles in Canva. But, Canva has some limitations in generating subtitles. Hence, we recommend you try and explore Wondershare Filmora to craft subtitles. This tool comprises a Speech-to-Text feature through which you can produce subtitles automatically without hassle.
Use Mobile Phones to Shoot a Video Is Very Convenient Compare with Professional Cameras. In This Article, We’ll List You some Tips to Help Capture a High-Quality Video on Your Phone
Never before has video recording been so simple or effortless. Everybody has a smartphone, which is a capable video camera, in their pocket. In fact, the use of smartphones for mobile creation has increased to the point that some people consider it to be the main function and equally crucial to communication.
Pocket-lint has compiled ten ideas in an effort to assist you in getting whatever it is you want in the best possible way. Even if some of the advice may seem apparent, using it all should always produce fantastic videos.

1. Get ready for filming
Make sure that you have everything you need to start recording your videos, including the necessary
equipment, props, scripts, actors, and locations, before you start the recording process. In addition, ensure that your mobile device is of high quality and that it has a sufficient amount of storage space (available memory) to save the film. High definition (HD) video files can be quite large and storing them can quickly deplete a battery’s capacity.

They add a great point; you need to think about stabilization, and they’ve included a few great options for
obtaining steady video. This video by Filmic Pro titled “5 Things to Do Before You Shoot iPhone Video” covers a lot of what we’ve discussed as well, including memory storage, battery life, audio, and resolution.
2. Use good lighting
Because smartphone cameras have smaller image sensors and lenses, proper illumination has a significant impact on their performance. As much as you can, try to film your video in well-lit environments. By doing this, you can reduce the amount of unwanted shadow and grain in your video. On the other hand, you also need to be cautious to avoid pointing the camera straight towards bright light sources because this will result in useless overexposed footage and lens flare. The lighting should be consistent and steady because most smartphone image sensors take a while to respond to abrupt changes in brightness.

If shooting your video in low light is still difficult, experiment with your phone’s or app’s backlighting and white balance settings. In case your camera is focusing on the incorrect part of your composition, most phones now provide “touch focusing.” The automatic exposure control will have an easier time making minor adjustments if the lighting condition changes once the focus has been placed on the most crucial part of the video.
3. Film horizontally, not vertically
Your natural inclination may be to hold the smartphone in a vertical position when you are using it to record video, just as you do when you are using it for the vast majority of other purposes. However, if you want to edit your video and post it online and on social media, this may place certain restrictions on your ability to do so.

4. Make sure to have good audio
We’re going to go ahead and say that sound is one of the most essential components of any video. The difficulty is in the fact that the audio quality on your smartphone is not always of the highest caliber. When it comes to audio, there is a general rule that the smartphone should be as close to the speaker as is physically possible in order to obtain the clearest sound possible from it. Even if you are only a few meters away from the person whose voice you want to record on your smartphone, you won’t be able to get a good recording of them.
This is not the fault of your smartphone; rather, smartphones are intended to be used by speaking into them at close range; hence, you should think about employing the use of an external microphone in order to improve the sound quality. However, if you are unable to do so, there is no need for concern because you can use an additional smartphone in its place.
You can record audio on your mobile device by opening the voice memo app and selecting the record button. Your audio will immediately be improved if you position the phone’s microphone such that it is facing your topic and is somewhat close to them. Clap once at the beginning of the recording to serve as a reference point for both the video and the audio, which will help you save time while editing. After that, it will be simple for you to locate the point at which the clap occurred and synchronize the high-quality audio that is on the memo with the audio that is in your film.
5. Edit your video
Now that you’ve gathered all of your film, it’s time to cut it up, add some color, and get creative with effects! Fortunately, there are numerous video editing apps available that make it easier and faster than ever to use. You can edit videos on your phone just as you would on a computer using apps like Adobe Rush and iMovie, and it’s easier than you think.

You’ve probably heard of iMovie, Apple’s free video editing software that works on both your iPhone and Mac. You can add titles, music, and additional effects to your video clips, much like in Adobe Rush. iMovie is really easy to use, especially if you’re new to editing. The main distinction between Adobe Rush and iMovie is that Adobe Rush includes more professional and technical changes, whilst iMovie has a considerably larger selection of video effects and transitions.
Adobe Rush is the most user-friendly app for editing and creating high-quality films on your smartphone. One of Adobe Rush’s best features is the ability to incorporate motion graphics, video effects, text, and mix audio. If you prefer a larger screen to edit on, Adobe Rush seamlessly transfers the files to your computer, allowing you to resume editing where you left off on your smartphone. This program is simple to use, and there are numerous guidelines and tutorials available online to help you get started.
Conclusion
You probably weren’t aware of this, but your smartphone is actually a very capable piece of equipment that can be used to record videos of a high quality. You will be able to enhance the quality of your material to a greater extent by putting into practice the strategies that are discussed in this piece. Grab your smartphone and get ready to start producing content that the people in your fanbase will always come back for.
Free Download For Win 7 or later(64-bit)
Free Download For macOS 10.14 or later
Free Download For macOS 10.14 or later
Also read:
- New In 2024, Free 3D Intro Makers
- New Make Transparent Background Video Today
- In 2024, This Article Will Explore in Detail How You Can Use the Features Available in Wondershare Filmora to Export the Video by Changing the Resolution of the Footage
- New 2024 Approved Looking for Simple Steps to Apply Fade in Effect to Your Text in Premiere Pro? Here Are Two Different Methods Along with an Alternative Way to Fade Text in Videos
- New In 2024, Here Is a Complete Overview of VSCO Video Editor; the Best Photo-Editing App that Helps You Adjust Your Pictures Right After You Capture Them
- Updated Do You Know What Is Motion Blur in Fortnite? Read This Article to Find Out How to Apply Motion Blur in Fortnite Efficiently and with Ease for 2024
- 2024 Approved Do You Intend to Include Motion Blur on Your Video Using Video Star? This Article Explains How to Use Motion Blur on Video Star with Exquisite Control
- New How to Create a DIY Green Screen Video Effect for 2024
- Updated VSDC Free Video Editor Review 2023
- New 20 Best LUTs for Music Videos
- In 2024, Best 10 Crazy-Cool Examples of AR Video
- Updated Thousands Already Know Ezgif and So Can You for 2024
- Updated 2024 Approved How to Edit GoPro Videos on Mac
- Updated In 2024, How To Quick Guide for Making Google Slideshows
- New In 2024, Top 10 Online And PC Cartoon Video Maker 2022 For Beginner
- 2024 Approved How to Add Customized Transitions to OBS
- New 2024 Approved Splitting Video in VSDC Step by Step
- New 2024 Approved Phone Aspect Ratio Vertical Definition, Types & Tips
- Some Facts About GIF Background You Didnt Know
- How To Cut Videos For Instagram On Mac for 2024
- Updated Unlocking the Power of DaVinci Resolve Scopes Enhance Your Color Grad for 2024
- 2 Practical Ways to Combine Videos on TikTok for 2024
- 2024 Approved What Is the Best Voice Changer for WhatsApp? Discover the Seven (7) Best Voice Changers for WhatsApp Here in This Post
- New In 2024, Recording Videos with Your Smartphones Is Fun and Fantastic. But Did You Know that Recording in Slo-Mo Has Become a Trend Nowadays? Read More to Learn About How to Convert Videos to Slow Motion Here
- Do You Want to Give Your Videos and Photos a Cinematic Look but Couldnt Find How? Here Are Different Cinematic LUTs Discussed that You Can Try and Use for 2024
- In 2024, Have You Ever Tried to Remove Motion Blur From Photos? This Article Will Address How to Remove the Motion Blur Effect Using Photoshop and Its Alternatives
- New Introduction to The Best Cinematic LUTs in The Market
- Creating Video Testimonials
- In 2024, Looking for a Video Editor Where You Can Edit Your Tutorial and Training Videos? Camtasia Is a Great Choice. But Is It the Best Video Editor Available? Find Out From Our Camtasia Review
- In 2024, How To Change Your SIM PIN Code on Your Vivo Y200 Phone
- In 2024, Fake Android Location without Rooting For Your Xiaomi Civi 3 | Dr.fone
- How to Transfer Data from Lava Storm 5G to Samsung Phone | Dr.fone
- Unova Stone Pokémon Go Evolution List and How Catch Them For Poco X5 | Dr.fone
- How to Factory Reset Xiaomi Redmi Note 13 5G If I Forgot Security Code or Password? | Dr.fone
- 3 Easy Ways to Factory Reset a Locked Apple iPhone 6s Without iTunes | Dr.fone
- How To Fix OEM Unlock Missing on Vivo V27?
- 5 Ways to Track OnePlus Open without App | Dr.fone
- Oppo Data Retrieval tool – restore lost data from Oppo A2
- 15 Best Strongest Pokémon To Use in Pokémon GO PvP Leagues For Xiaomi Redmi 12 5G | Dr.fone
- In 2024, Best Vivo V30 Lite 5G Pattern Lock Removal Tools Remove Android Pattern Lock Without Losing Data
- In 2024, iSpoofer is not working On Google Pixel 8 Pro? Fixed | Dr.fone
- Prevent Cross-Site Tracking on Honor V Purse and Browser | Dr.fone
- How to Factory Reset Samsung Galaxy S23 FE If I Forgot Security Code or Password? | Dr.fone
- Top 12 Prominent Oppo Reno 11 Pro 5G Fingerprint Not Working Solutions
- New 2024 Approved The Most Straightforward Guide to Learning How to Clone Your Voice
- Downloading SamFw FRP Tool 3.0 for Honor 100 Pro
- In 2024, How to get the dragon scale and evolution-enabled pokemon On OnePlus Nord N30 5G? | Dr.fone
- In 2024, Complete Tutorial to Use VPNa to Fake GPS Location On Nokia C12 | Dr.fone
- How to Remove Apple ID from iPhone 15 Pro Max without Password?
- In 2024, How to Unlock iPhone 12, Apples New iPhone | Dr.fone
- Title: New In 2024, How To Be A Successful YouTuber
- Author: Morgan
- Created at : 2024-04-24 01:05:28
- Updated at : 2024-04-25 01:05:28
- Link: https://ai-video-editing.techidaily.com/new-in-2024-how-to-be-a-successful-youtuber/
- License: This work is licensed under CC BY-NC-SA 4.0.
