

New In 2024, How to Blur a Still or Moving Part of Video
Learn How to Blur a Still or Moving Part of Video
Create High-Quality Video - Wondershare Filmora
An easy and powerful YouTube video editor
Numerous video and audio effects to choose from
Detailed tutorials provided by the official channel
Adding a blur effect to your video is vital, especially if you have added unwanted things that could ruin its quality. It often looks awkward when there’s something wrong in the background of your video. Various video editing programs allow you to blur a moving or still part of your video if you don’t want viewers to see it. With that in mind, we’ll look at how to blur part of a video using Filmora.
In this article
01 How to Blur a Part of a Video Using Filmora
02 How to Blur a Moving Part of a Video Using Filmora
03 How to Blur Part of a Video Using OpenShot
There are several ways you can blur part of a video. Filmora allows you to blur a still and moving part of a video. The software is user-friendly and comes with an aesthetically pleasing interface. You don’t have to be tech-savvy to learn how to blur out part of a video with Filmora. You can also use OpenShot to blur part of a video.
How to Blur a Part of a Video Using Filmora
Both Mac and PC owners can use this video editing software to blur part of a video. Here is how to blur a part of video using Filmora.
- Download and install Wondershare Filmora on your device. If you had already installed Filmora on your computer, double-click the program to launch it.
- Next, you need to drag and drop the video file you wish to blur into the Media Library. Alternatively, you could also navigate to the File tab and click it, then choose Import Media and select the Import Media Files option. Find the video you want to edit and select it. You can now hit the Open button to import the video file to Media Library
- After your video file is on Filmora’s Media Library, drag and drop it into the Timeline; this is where the program allows you to assemble effects and media files for your video project.

- Click on the Effects tab; this will allow you to browse through Filmora’s collection of visual effects. Select Utility on the drop-down menu located on the left side of your screen.

- The program will display a range of effects; select the Mosaic option. You can also type in Mosaic in the search bar to find the effect swiftly.
- Drag the Mosaic effect to above the video clip on your Timeline. Dragging the border of your Mosaic clip allows you to adjust its length.
- A small blurred area will appear in the preview window.

- Lock the main tracks.
- Now, click the Mosaic layer to modify the Mosaic size and area. Move it to the part of the video that you would like to blur.
- Double-clicking on the Mosaic clip will allow you to change the mosaic type and adjust the opacity and blur amount. You can choose from six different Mosaic types. Adjusting the opacity allows you to set the degree to which you can see through the blurred area. The blur amount lets you control the intensity of the blur.

- You can now save your blurred video. Click on the File tab and select ‘Save Project.’ Doing this will save your project to the default file. Choose ‘Save Project As’ to save your video to another destination of your choice.
How to Blur a Moving Part of a Video Using Filmora
You can also blur a moving part of your video with Filmora; this program allows you to add the motion-tracking mosaic to any moving object in your video that you do not want your viewers to see. You can use stickers, mosaic, or anything you download on the internet to hide any unwanted moving object.
With that in mind, here is how to blur a moving part of a video using Filmora:
- Run Filmora on your device.
- Import your video into Filmora’s Media Library.
- Drag your video to the Timeline.

- Now, double-click the video in the Timeline. Doing this will open the editing menu.
- Check the box that’s right next to Motion Tracking; this tool allows you to track movement in a video and then have objects like text, images, videos, or elements follow this movement.

- A tracker box will appear on your preview window; move it over the moving object you would like to track. You can increase or reduce the size of the tracker box. Hit the Start Tracking button to render the effect.

- Wait until the tracking process is complete. The duration of this process will depend on the length of your video. You’ll have to do some trimming if other objects block the moving part you’re tracking from time to time.

- WNow, select the Add Mosaic option.
- Choose the Mosaic type you prefer and adjust the opacity and blur amount to ensure the object is unrecognizable.
- Now, select the moving part of the video you want to blur and click OK.
- The object is now blurred, and the mosaic layer will follow its movement everywhere it goes.
- Playback your video to check the result. Filmora allows you to fine-tune the position and size of the object that’s following the track in your Preview Window without restarting tracking. Additionally, you can switch the follower anytime you want.
- When you have finished blurring the moving part on your video, click File > Save Project or Save Project As to save your video.
For Win 7 or later (64-bit)
For macOS 10.12 or later
How to Blur Part of a Video Using OpenShot
Designed for Windows, Mac, and Linux, OpenShot is a free, open-source, and cross-platform video editor. While there’s no predefined function or filter in this tool to help you blur part of a video, OpenShot has another way of blurring static parts of your video: it uses an image.
OpenShot blur part of video is free, and you’ll use its open-source programs as a base program for the edition of the video and GIMP Image Manipulation software to edit photos. Follow the guide below to learn how to blur out something in a video using OpenShot.
Step 1: Download OpenShot and install it on your device.

Step 2: Take a screenshot from your video, where the part you want to blur is easily visible. You can do this by going to a relevant frame and utilizing Save Current Frame with a camera icon, located on the right side of the video preview window in a standard program configuration.

Step 3: Be sure to save your video screenshot on your computer.
Step 4: Since you have exported a relevant frame from your video as a screenshot, you need to open it in a photo editor that can handle PNG pics and transparency, like the GIMP Image Manipulation program. Use any selection tool to select the area of the picture you want to blur on the video. Depending on your preferences, you can choose the free select tool, the ellipse select tool, or the rectangle select tool.

Step 5: In the blur filters submenu, open the Pixelize tool and adjust the options that suit your preferences. You can use CTRL-Z to cancel the operation, and repeat it until you find the best combination of blurring settings.
Step 6: When you are satisfied with blurring, right-click on the blurred area and select Invert in the Select submenu; this will allow you to select the entire part of the frame that has not been blurred, which is the part you would like to get rid of because you will only have to use the blurred part of your video overlay where necessary.
Step 7: Now, cut the section of the picture you do not want to keep. You can do this by using CTRL-X. The blurred filter for your video is now ready.

Step 8: If after cutting you notice a plain color rather than a checkerboard canvas representing transparency, use CTRL-Z to cancel the cut. Then, use CTRL-I to invert the selection again to get control of the blurred selection again, and copy or cut it using CTRL-X or CTRL-C.
Step 9: Create another image using CTRL-N, and ensure you have navigated to the advanced options and selected transparency as the fill-in color, and paste your selection there.
Step 10: You now have a perfect photo with full transparency, which is represented by a checkerboard canvas, except for the section of the video frames you would like to blur that should be pixelized.
Step 11: Use the Export option under the File menu to export the photo to your PC as a . PNG file. To save a picture with a transparency channel, you need to use the . PNG extension.
Step 12: Now return to OpenShot video editor and import the generated picture with a pixelized portion in the OpenShot video project. Next, add the picture as an overlay track. Make sure it’s above the video track.
Step 13: If the program asks you to import the photo as an image sequence, select the NO option because you need to import a still photo, and not a video sequence.
Step 14: The picture will be displayed before the video, blurring only the portion of the video where you modified the frame. The other parts of the video won’t be touched. You can make adjustments to ensure the picture track is only displayed at required moments. And that’s how to blur part of a video using OpenShot.
Conclusion
● Now that you know how to blur out part of a video, you can have fun and censor anything you want in your clips. Use Filmora to blur moving and still parts on your video.
Adding a blur effect to your video is vital, especially if you have added unwanted things that could ruin its quality. It often looks awkward when there’s something wrong in the background of your video. Various video editing programs allow you to blur a moving or still part of your video if you don’t want viewers to see it. With that in mind, we’ll look at how to blur part of a video using Filmora.
In this article
01 How to Blur a Part of a Video Using Filmora
02 How to Blur a Moving Part of a Video Using Filmora
03 How to Blur Part of a Video Using OpenShot
There are several ways you can blur part of a video. Filmora allows you to blur a still and moving part of a video. The software is user-friendly and comes with an aesthetically pleasing interface. You don’t have to be tech-savvy to learn how to blur out part of a video with Filmora. You can also use OpenShot to blur part of a video.
How to Blur a Part of a Video Using Filmora
Both Mac and PC owners can use this video editing software to blur part of a video. Here is how to blur a part of video using Filmora.
- Download and install Wondershare Filmora on your device. If you had already installed Filmora on your computer, double-click the program to launch it.
- Next, you need to drag and drop the video file you wish to blur into the Media Library. Alternatively, you could also navigate to the File tab and click it, then choose Import Media and select the Import Media Files option. Find the video you want to edit and select it. You can now hit the Open button to import the video file to Media Library
- After your video file is on Filmora’s Media Library, drag and drop it into the Timeline; this is where the program allows you to assemble effects and media files for your video project.
- Click on the Effects tab; this will allow you to browse through Filmora’s collection of visual effects. Select Utility on the drop-down menu located on the left side of your screen.
- The program will display a range of effects; select the Mosaic option. You can also type in Mosaic in the search bar to find the effect swiftly.
- Drag the Mosaic effect to above the video clip on your Timeline. Dragging the border of your Mosaic clip allows you to adjust its length.
- A small blurred area will appear in the preview window.
- Lock the main tracks.
- Now, click the Mosaic layer to modify the Mosaic size and area. Move it to the part of the video that you would like to blur.
- Double-clicking on the Mosaic clip will allow you to change the mosaic type and adjust the opacity and blur amount. You can choose from six different Mosaic types. Adjusting the opacity allows you to set the degree to which you can see through the blurred area. The blur amount lets you control the intensity of the blur.
- You can now save your blurred video. Click on the File tab and select ‘Save Project.’ Doing this will save your project to the default file. Choose ‘Save Project As’ to save your video to another destination of your choice.
How to Blur a Moving Part of a Video Using Filmora
You can also blur a moving part of your video with Filmora; this program allows you to add the motion-tracking mosaic to any moving object in your video that you do not want your viewers to see. You can use stickers, mosaic, or anything you download on the internet to hide any unwanted moving object.
With that in mind, here is how to blur a moving part of a video using Filmora:
- Run Filmora on your device.
- Import your video into Filmora’s Media Library.
- Drag your video to the Timeline.
- Now, double-click the video in the Timeline. Doing this will open the editing menu.
- Check the box that’s right next to Motion Tracking; this tool allows you to track movement in a video and then have objects like text, images, videos, or elements follow this movement.
- A tracker box will appear on your preview window; move it over the moving object you would like to track. You can increase or reduce the size of the tracker box. Hit the Start Tracking button to render the effect.
- Wait until the tracking process is complete. The duration of this process will depend on the length of your video. You’ll have to do some trimming if other objects block the moving part you’re tracking from time to time.
- WNow, select the Add Mosaic option.
- Choose the Mosaic type you prefer and adjust the opacity and blur amount to ensure the object is unrecognizable.
- Now, select the moving part of the video you want to blur and click OK.
- The object is now blurred, and the mosaic layer will follow its movement everywhere it goes.
- Playback your video to check the result. Filmora allows you to fine-tune the position and size of the object that’s following the track in your Preview Window without restarting tracking. Additionally, you can switch the follower anytime you want.
- When you have finished blurring the moving part on your video, click File > Save Project or Save Project As to save your video.
For Win 7 or later (64-bit)
For macOS 10.12 or later
How to Blur Part of a Video Using OpenShot
Designed for Windows, Mac, and Linux, OpenShot is a free, open-source, and cross-platform video editor. While there’s no predefined function or filter in this tool to help you blur part of a video, OpenShot has another way of blurring static parts of your video: it uses an image.
OpenShot blur part of video is free, and you’ll use its open-source programs as a base program for the edition of the video and GIMP Image Manipulation software to edit photos. Follow the guide below to learn how to blur out something in a video using OpenShot.
Step 1: Download OpenShot and install it on your device.
Step 2: Take a screenshot from your video, where the part you want to blur is easily visible. You can do this by going to a relevant frame and utilizing Save Current Frame with a camera icon, located on the right side of the video preview window in a standard program configuration.
Step 3: Be sure to save your video screenshot on your computer.
Step 4: Since you have exported a relevant frame from your video as a screenshot, you need to open it in a photo editor that can handle PNG pics and transparency, like the GIMP Image Manipulation program. Use any selection tool to select the area of the picture you want to blur on the video. Depending on your preferences, you can choose the free select tool, the ellipse select tool, or the rectangle select tool.
Step 5: In the blur filters submenu, open the Pixelize tool and adjust the options that suit your preferences. You can use CTRL-Z to cancel the operation, and repeat it until you find the best combination of blurring settings.
Step 6: When you are satisfied with blurring, right-click on the blurred area and select Invert in the Select submenu; this will allow you to select the entire part of the frame that has not been blurred, which is the part you would like to get rid of because you will only have to use the blurred part of your video overlay where necessary.
Step 7: Now, cut the section of the picture you do not want to keep. You can do this by using CTRL-X. The blurred filter for your video is now ready.
Step 8: If after cutting you notice a plain color rather than a checkerboard canvas representing transparency, use CTRL-Z to cancel the cut. Then, use CTRL-I to invert the selection again to get control of the blurred selection again, and copy or cut it using CTRL-X or CTRL-C.
Step 9: Create another image using CTRL-N, and ensure you have navigated to the advanced options and selected transparency as the fill-in color, and paste your selection there.
Step 10: You now have a perfect photo with full transparency, which is represented by a checkerboard canvas, except for the section of the video frames you would like to blur that should be pixelized.
Step 11: Use the Export option under the File menu to export the photo to your PC as a . PNG file. To save a picture with a transparency channel, you need to use the . PNG extension.
Step 12: Now return to OpenShot video editor and import the generated picture with a pixelized portion in the OpenShot video project. Next, add the picture as an overlay track. Make sure it’s above the video track.
Step 13: If the program asks you to import the photo as an image sequence, select the NO option because you need to import a still photo, and not a video sequence.
Step 14: The picture will be displayed before the video, blurring only the portion of the video where you modified the frame. The other parts of the video won’t be touched. You can make adjustments to ensure the picture track is only displayed at required moments. And that’s how to blur part of a video using OpenShot.
Conclusion
● Now that you know how to blur out part of a video, you can have fun and censor anything you want in your clips. Use Filmora to blur moving and still parts on your video.
Add Green Screen Effects in Final Cut Pro
No matter the type of video you are shooting, the background of the video plays a major play. The background determines how eye-pleasing the frame of the entire video looks. A beautiful background enhances the video content while a distracting background can deteriorate the video outlook. You do not need to be in exotic locations or have eye-catching backgrounds in reality while shooting a video thanks to the use of the green screen effect.
Once you shoot a video with green screen background, you can replace the green screen with anything you want. You will need a video editor to replace the green screen, and Final Cut Pro is the most widely used video editor among Mac Users. We will illustrate how to add green screen in Final Cut Pro and get any background for your recorded video. We will also recommend an alternative watt to add green screen effect to your video.
Part 1. How to add green screen on Final Cut Pro
Final Cut Pro is the most popular professional video editor among Mac users. The learning curve is slightly steep, but once you get used to Final Cut Pro, you can take your recorded video to the next level with profound editing. The most important part of adding green screen effect to a video is shooting the video with a proper green screen in the background. Once you have successfully recorded your video, here are the steps on how to add background to green screen Final Cut Pro.
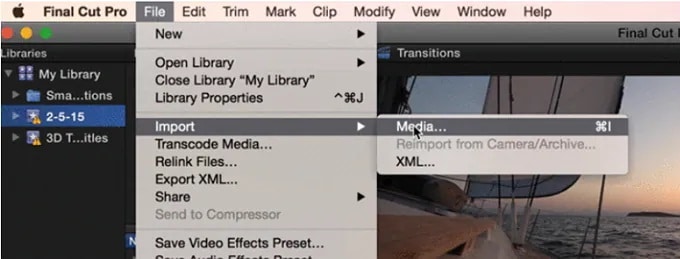
Step1 Launch Final Cut Pro and go to File> Import> Media. Select the video file with green screen background from your storage to import the file into FCP. Similarly, you should import the video or photo with which you want to replace the green screen.
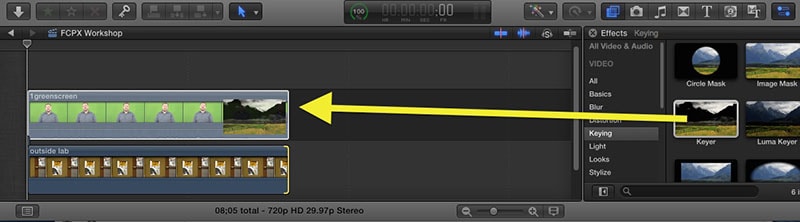
Step2 Drag the video clip with green screen background (called foreground clip) to Timeline and place it to Primary Storyline. Drag the replacement video (called background clip) below the foreground clip in Timeline.
Step3 Select the foreground clip and click on Effects button present at the extreme top-right corner of the Timeline.
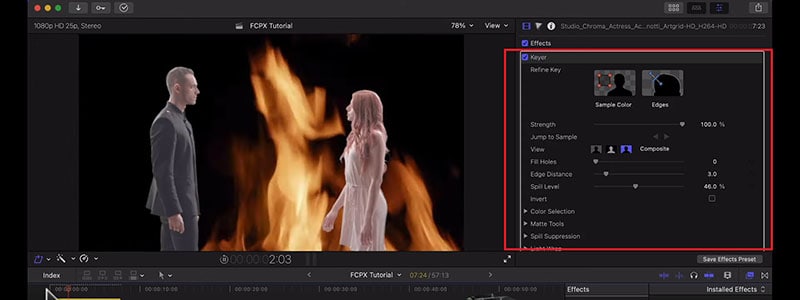
Step4 From the Effects options, select Keyer effect. If you cannot spot it immediately, you can search for it from the search field.
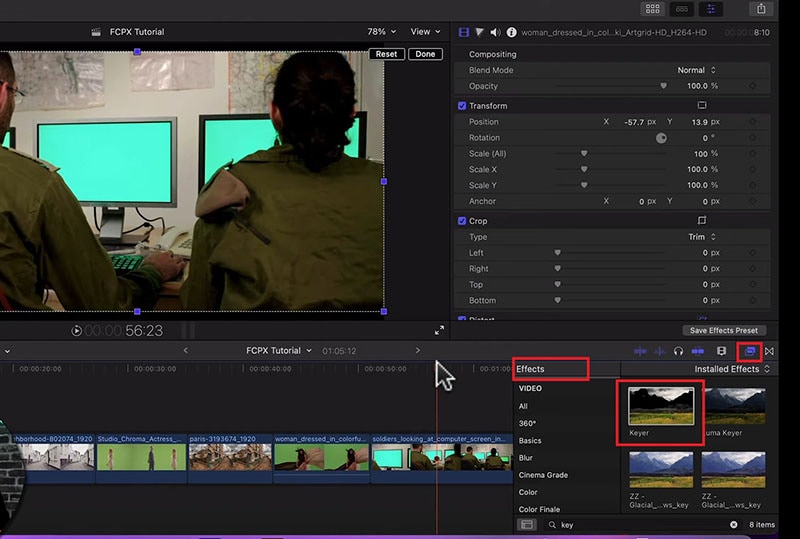
Step5 Drag and drop Keyer effect to the foreground clip. The effect detects the green screen and replaces it with the available background clip.
Step6 You might have to adjust the Keyer effect settings to get the green screen effect perfectly. Go to Inspector Window and click on Sample color and fine-tune the available settings to get it correct.
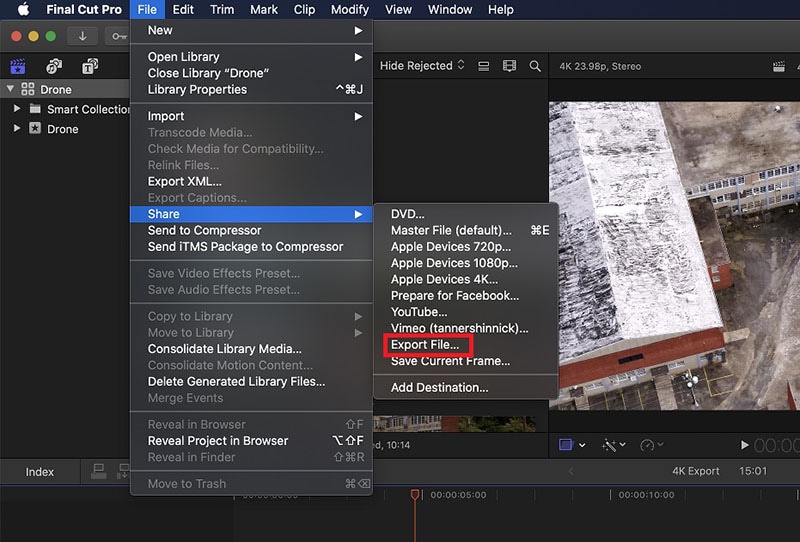
Step7 Once you are satisfied with the effect, go to File> Share> Export File and save the modified video.
Part 2. Alternative Way to Add Green Screen to Videos
Final Cut Pro is a professional but highly expensive video editor. The learning curve is not very suitable for amateur video editors. That is why if you are looking for a better alternative way to add green screen to videos, we recommend Wondershare Filmora . Filmora is a popular video editor that is available for Mac and Windows users. The user interface is extremely intuitive, and adding green screen effect is super easy. Here are the steps on how to add background to green screen effect.
Free Download For Win 7 or later(64-bit)
Free Download For macOS 10.14 or later
Step1 Download and install Filmora on your computer. Launch Filmora and click on New Projects.
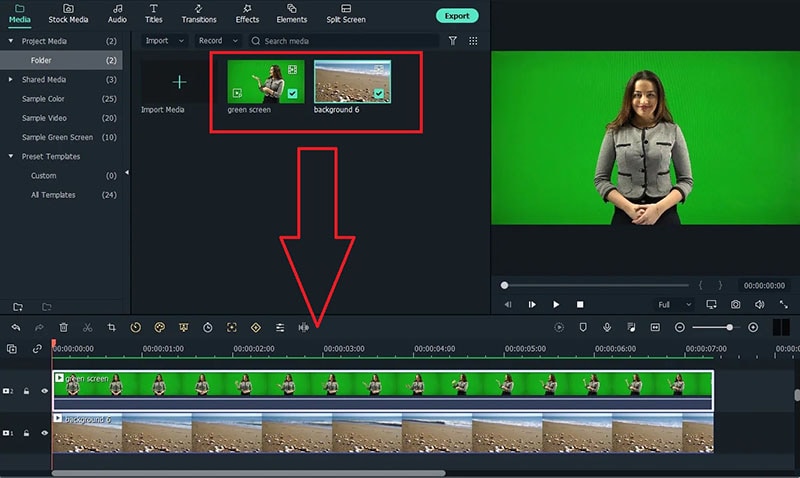
Step2 Under Project Media folder, Drag and drop the video clip with green screen background as well as the photo or video with which you want to replace the green screen.
Step3 Drag and drop the video clips on the Timeline. The video with green screen should be at the top while the replacement video or photo should be below it.
Step4 Double-click on the green screen video clip on Timeline. Go to Video>Basic and turn on Chroma key option.
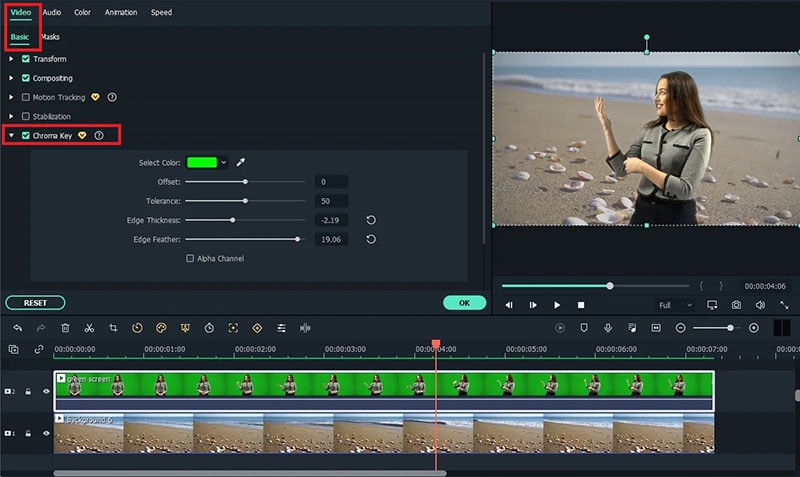
Step5 Adjust the different parameters such as offset to get the effect perfect and click on Ok button.
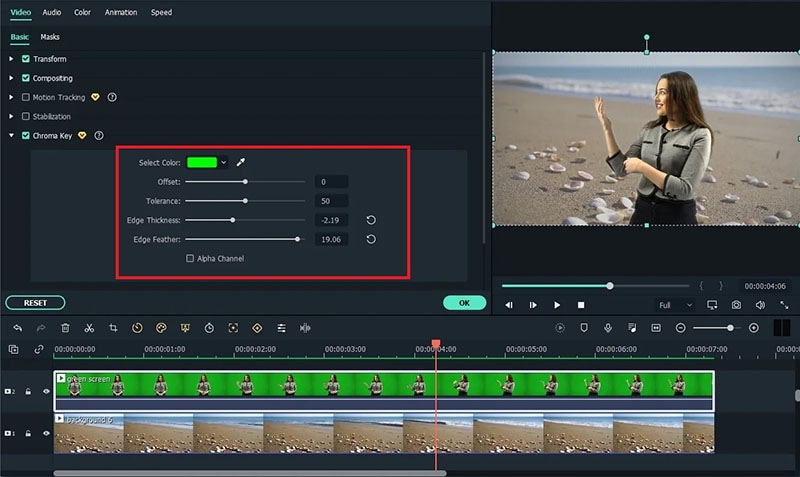
Step6 Play the video and if you are satisfied with the result, click on Export button to save the modified video file.
Part 3. Green Screen Video Tips to Use
We have already stated that replacing green screen in your video with an eye-catching background is the easiest part. On the contrary, shooting the green screen video is the most important part. If you shoot the video perfectly, replacing the background accurately in the video editor becomes super easy. Here are some important tips to use while shooting green screen video.
Distance – There should be enough distance between the subject and the green screen background so that the subject does not cast a shadow on the green screen. This distance is also important to place lights in between so that the green screen is perfectly lit for a great video shooting session.
Quality – You should opt for a high-quality green screen cloth for the background. This means the green screen should have a solid color instead of light and dark patches here and there. Besides, you should ensure that there are no wrinkles on the green screen.
Otherwise, when you will apply green screen effect through the video editor, the transformation will be uneven. You have to spend a lot of time adjusting the parameters to cover up uneven patches in the background.
Lighting – The way you set up your lights plays a major role in shooting green screen video perfectly. The light falling on the green screen will light up the screen evenly so that there are no light and dark patches. Transforming the green screen in the video editor will become that much easier.
You should focus on soft and even lighting for the entire green screen, and you should check through your camera to ensure the lighting is perfect. Sometimes, you can place lights behind the subject if the subject is staying stationary throughout the video. Otherwise, you can place the light above the subject for even distribution.
Aperture – The settings of your camera are equally important to smoothen out the green screen in the background and focus on the subject sharply. That is where aperture comes into the scene, and you need to use low aperture while shooting green screen videos. Low aperture opens up the camera lens, and the green screen turns softer in the background. The subject stands out while the background turns uniformly green.
Shutter Speed – While shooting a green screen video, you should keep a high shutter speed to prevent motion blur and uneven background. If the subject stays fixed throughout, the shutter speed should be double the frame rate. If the subject is moving throughout, the shutter speed should be around 4 times the frame rate such as 1/100.
ISO – The last thing you want in a green screen video is grainy footage. Your life will turn upside down editing the video and getting the green screen effect perfectly in any video editor. ISO determines the sensitivity and thereby, the grainy effect in your video. When the ISO is too high, the chance of getting grains in the video is high. It is better to use a native ISO for green screen effect, but you need to check with a sample recording and adjust if required.
Conclusion
We have answered how to add background to green screen Final Cut Pro. You can replace any green screen in your video with any video or photo for the background of the video. If you do not have Final Cut Pro or you find the steps slightly complicated, we recommend you to use Wondershare Filmora for instant green screen effect and quick adjustments for the best outcome.
Free Download For macOS 10.14 or later
Step1 Download and install Filmora on your computer. Launch Filmora and click on New Projects.
Step2 Under Project Media folder, Drag and drop the video clip with green screen background as well as the photo or video with which you want to replace the green screen.
Step3 Drag and drop the video clips on the Timeline. The video with green screen should be at the top while the replacement video or photo should be below it.
Step4 Double-click on the green screen video clip on Timeline. Go to Video>Basic and turn on Chroma key option.
Step5 Adjust the different parameters such as offset to get the effect perfect and click on Ok button.
Step6 Play the video and if you are satisfied with the result, click on Export button to save the modified video file.
Part 3. Green Screen Video Tips to Use
We have already stated that replacing green screen in your video with an eye-catching background is the easiest part. On the contrary, shooting the green screen video is the most important part. If you shoot the video perfectly, replacing the background accurately in the video editor becomes super easy. Here are some important tips to use while shooting green screen video.
Distance – There should be enough distance between the subject and the green screen background so that the subject does not cast a shadow on the green screen. This distance is also important to place lights in between so that the green screen is perfectly lit for a great video shooting session.
Quality – You should opt for a high-quality green screen cloth for the background. This means the green screen should have a solid color instead of light and dark patches here and there. Besides, you should ensure that there are no wrinkles on the green screen.
Otherwise, when you will apply green screen effect through the video editor, the transformation will be uneven. You have to spend a lot of time adjusting the parameters to cover up uneven patches in the background.
Lighting – The way you set up your lights plays a major role in shooting green screen video perfectly. The light falling on the green screen will light up the screen evenly so that there are no light and dark patches. Transforming the green screen in the video editor will become that much easier.
You should focus on soft and even lighting for the entire green screen, and you should check through your camera to ensure the lighting is perfect. Sometimes, you can place lights behind the subject if the subject is staying stationary throughout the video. Otherwise, you can place the light above the subject for even distribution.
Aperture – The settings of your camera are equally important to smoothen out the green screen in the background and focus on the subject sharply. That is where aperture comes into the scene, and you need to use low aperture while shooting green screen videos. Low aperture opens up the camera lens, and the green screen turns softer in the background. The subject stands out while the background turns uniformly green.
Shutter Speed – While shooting a green screen video, you should keep a high shutter speed to prevent motion blur and uneven background. If the subject stays fixed throughout, the shutter speed should be double the frame rate. If the subject is moving throughout, the shutter speed should be around 4 times the frame rate such as 1/100.
ISO – The last thing you want in a green screen video is grainy footage. Your life will turn upside down editing the video and getting the green screen effect perfectly in any video editor. ISO determines the sensitivity and thereby, the grainy effect in your video. When the ISO is too high, the chance of getting grains in the video is high. It is better to use a native ISO for green screen effect, but you need to check with a sample recording and adjust if required.
Conclusion
We have answered how to add background to green screen Final Cut Pro. You can replace any green screen in your video with any video or photo for the background of the video. If you do not have Final Cut Pro or you find the steps slightly complicated, we recommend you to use Wondershare Filmora for instant green screen effect and quick adjustments for the best outcome.
You’re likely familiar with recording gameplays if you’re involved in the gaming community. The desire to share our gameplay adventures has never been more widely spread. YouTube and Twitch serve as popular hubs for gamers to showcase their skills and build communities.
However, with various game recorders, finding the perfect fit for your next gameplay recording can be challenging. We’ve tested many options to ease your search and made a list to enhance your gaming experience.
In this article
- Part 1. Discussing the Advancements in Game Recording in the Digital Realm
- Part 2. Top Best Game Recorders To Consider for Efficient Recording
- Part 3. Make Screen Recording Simple and Easy: Wondershare Filmora
- Conclusion
Part 1: Discussing the Advancements in Game Recording in the Digital Realm
Game recording has evolved from basic methods to sophisticated tools. In the past, gamers used VHS recorders connected to consoles. Moreover, screen capture software like Fraps became popular in the early 2000s. Afterward, built-in recording features within PlayStation 4 and Xbox One simplified the process.
Platforms like Twitch emerged for live streaming in the late 2010s. Cloud gaming services have revolutionized recording by allowing gameplay on remote servers. Finally, modern game recorders emerged to provide instant replay and webcam integration.
Chronological Understanding of the Advancements in Game Recordings
- Users can now capture gameplay in stunning 4K resolution for top-notch visual quality.
- Frame rate settings ensure smooth playback of recorded videos.
- Bitrate settings let you control recording quality and file size.
- Players can use GPU power for faster and more efficient video encoding.
- Multi-channel audio recording lets you record gameplay audio, microphone input, and other sources. Also, it separates tracks for easy editing and control.
- An infusion of overlays in the webcam adds a personalized touch to gameplay videos, building competition in quality offering.
- Network switching within software is possible without any cross-platform shift, from recording to live streaming.
Example
PewDiePie is one of the leading stars in YouTube stardom. His game screen recording is proof of how online entertainment has changed. He earned his initial fame by playing horror games with funny commentary. People loved his infectious personality and unique style. Furthermore, he expanded his content to include games, vlogs, and entertaining stuff. Now, he has a fan base of 111M, positioning him as the most influential figure in online gaming.
Part 2: Top Best Game Recorders To Consider for Efficient Recording
Most of us play games for fun while wanting to share the gameplay with friends. The game screen recorder helps you share the screen with others to enjoy with them. Let’s go through the options of tools that can record gameplay screens efficiently:
Best Game Recorders for PC
1.Movavi
2.OBS
3.Bandicam
4.XSplit
5.Aqua Demo
6.GoPlay
7.Action! Game Recorder
8.Wondershare DemoCreator
1.Movavi
Movavi lets you do full-screen or custom area recording with various functionalities. Using this tool, you can annotate the screen while recording for real-time experience. For improving viewer’s attention, you can also illuminate mouse cursor and keystrokes within the recording screen. It also features a noise reduction feature to get rid of intrusive voices. Movavi can take scrolling screenshots to capture content that doesn’t fit on one screen.

Pros
- This game screen recording tool has a user-friendly interface and is easy to use without the need for training.
- The tool allows you to capture audio and video simultaneously and separately.
Con
- It offers limited features when it comes to video manipulation while recording games.
2.OBS Studio
Open Broadcaster Software is the best screen recorder for games when it comes to finding open-source recorders. This recorder enables you to record multiple scenes at a time. It offers seamless transitions to switch between the scenes. Users can use the audio mixer feature of the tool for noise suppression and gain. The tool also provides the configuration option to add new sources and replace existing ones.

Pros
- You can capture multiple windows simultaneously with the help of this tool, giving diversified opportunities.
- This screen recorder allows you to preview sources and scenes before live streaming.
Con
- OBS is challenging for beginners due to its steep learning curve.
3.Bandicam
Gamers can record high-resolution gameplay in 4K UHD and 480FPS with Bandicam. Upon utilizing this tool, they record gameplay and voice to share with friends on YouTube. This Lolio game recorder uses a webcam and mic to record gameplay with the player’s live face and voice. Plus, you can also save the audio track of the gameplay record in separate WAV files.

Pros
- This game recorder compresses high-quality video to save space.
- Bandicam supports the latest hardware acceleration from AMD, Intel, and NVIDIA.
Con
- It only works on Windows and does not support Mac, Android, or Linux.
4.XSplit
Content creators and game players can use this all-in-one streaming and recording tool. This video game recorder allows you to switch from a solo camera to a podcast easily. You can start streaming to any broadcast platform with the native plugin of the tool. XSplit Broadcaster enables you to add multiple animation and broadcast effects to your scenes.

Pros
- Users can record multiple scenes at the same time with this screen recorder. This helps you in covering more content in similar timeframes.
- You can do custom transitions of various scenes with the help of this tool.
Con
- Installing XSplit Broadcaster in your system slows down the running of the PC dramatically.
5.Aqua Demo
Aqua Demo is the best way to record gameplay on a PC to produce high-quality video. You can easily record gameplay as the interface of the tool is intuitive and easy to use. It supports various video formats, including AVI, MP4, and MOV, to save the recordings. Users can do editing while recording to make it engaging and interactive.

Image Name: best-game-recorder-for-pc-2024-5.jpg
Image Alt:
Pros
- This tool allows you to record video using the sound of a PC, microphone, or both.
- You can easily schedule when video recording should take place with this tool.
Con
- AceThinker Aqua Demo offers a limited trial version to its users for screen recording.
6.GoPlay
GoPlay is the best software to record gameplay as it allows you to record yourself while gaming. With the help of this software, users can do basic editing of the video before live streaming. Plus, it allows you to record fast-paced games up to 60fps for smooth results. The software offers the feature to remove unwanted noise in the video.

Pros
- This screen recorder offers you the option to dub your own voice within the video recording.
- It helps to adjust the audio of each track on the timeline.
Con
- Unlike other screen recorders, it has a small number of transitions and effects.
7.Action! – Game Recorder
Action! stands out as one of the best screen recorder for games, as it uses low CPU space. Gamers can record smooth HD video of gameplay up to 120fps. You can make 20 times smaller video recordings with the help of this tool. Also, users are able to apply different editing effects to the recorder clips. This tool even enables you to control video recording with a smartphone.

Image Name: best-game-recorder-for-pc-2024-7.jpg
Image Alt:
Pros
- Action supports the webcam and microphone commentary during recording.
- It displays current and average FPS while playing games and saves benchmark results.
Con
- People face usability issues like problems with frame rate drops while recording.
8.Wondershare DemoCreator
Users can use DemoCreator on Windows and Mac to record the screen of gameplay. No doubt, it is a cool game recording software available to users. It also offers lag-free recording for uninterrupted gameplay records. You can plan and automate recording sessions with the help of this software. This game recorder provides a dynamic cursor effect for a visual guide of your audience.

Pros
- Wondershare DemoCreator offers dual monitor recording for an expanded view.
- User can create their own virtual avatars for presenting the content through video.
Con
- The tool has limited functionality in the free version, so you have to buy its premium subscription.
10+ Screen Recorder without Watermark
https://www.youtube.com/watch?v=CVmVxhxfnlU
Part 3: Make Screen Recording Simple and Easy: Wondershare Filmora
Gaming has made a significant impact on people as the associated industry keep producing new games with the latest technology. Moreover, the popularity of streaming games online has also increased. In this case, gamers need an effective game recorder software. Wondershare Filmora is the most efficient solution to effective screen recording. This video game recorder tool can capture any area of your selection.
Filmora also has various built-in editing tools and recording effects. You can also customize the ratio and size of your recording screen by changing the height and width. This tool records the screen and captures the audio from your microphone at the same time. Gamers can schedule their recording with the Record Timer feature. Moreover, you can customize your keystrokes and make hotkey combinations.
Other Features of Wondershare Filmora
- Split Screen: The Split Screen feature has up to 250+ pre-made templates that help you create animated video collages. You can have up to 6 screens for gameplaying or live chat channels on your screen. There are thousands of effects and filters you add to each of the screens.

- AI Thumbnail Creator: Filmora provides a Thumbnail feature that can generate exclusive thumbnails for your videos. It supports advanced text and image editing tools with 58+ templates. You can get stunning thumbnails for your gameplay in seconds with the help of AI.

- AI Vocal Remover: If you are having trouble with unnecessary background noise, remove it with the AI vocal remover feature. Streamers can separate the vocals from their microphone and gameplay. Also, you can dub videos freely without losing audio quality.

Steps-by-Step Guide to Screen Record With Wondershare Filmora
Wondershare Filmora provides the best way to record gameplay on your PC, as it gives you the necessary features. So, let’s discuss the steps on how to record a professional gameplay recording. The following are the steps to record gameplay with Filmora:
Step 1 Launch and Create a New Project on Filmora
After downloading Filmora on your PC and launching the software, go to the “Create Project” tab on the left-side panel. Here, you can click the “New Project” option to open the main editing interface.

Step 2 Record Gameplay on Your PC
On the main interface, click the “Record” option above the media panel. From the drop-down panel, select the “Record PC Screen” option. After that, a small panel screen with the name “Wondershare Screen Recorder” will appear on your PC.

Step 3 Adjust Recording Settings for Gaming
Now, adjust the screen recording settings according to your preference. You can change the screen’s dimensions from full screen to target window. Also, choose to turn on the microphone, audio, and camera by clicking on their icons. Now, hit the dropdown menu of “Settings,” and change the frame rate and other video options. Once you are satisfied with the settings, hit the “Start Recording” button to start.

Conclusion
Gamers need to find the best tool to share their gaming moments in 2024. Filmora is a standout choice among the game recording software for PCs. The software is reliable and enriched with features that are easy to use. You can record, edit, and share your exciting gameplay adventures with the audience. If you’re on the lookout for the best game recorder for your PC, Filmora is a solid recommendation.
- Part 2. Top Best Game Recorders To Consider for Efficient Recording
- Part 3. Make Screen Recording Simple and Easy: Wondershare Filmora
- Conclusion
Part 1: Discussing the Advancements in Game Recording in the Digital Realm
Game recording has evolved from basic methods to sophisticated tools. In the past, gamers used VHS recorders connected to consoles. Moreover, screen capture software like Fraps became popular in the early 2000s. Afterward, built-in recording features within PlayStation 4 and Xbox One simplified the process.
Platforms like Twitch emerged for live streaming in the late 2010s. Cloud gaming services have revolutionized recording by allowing gameplay on remote servers. Finally, modern game recorders emerged to provide instant replay and webcam integration.
Chronological Understanding of the Advancements in Game Recordings
- Users can now capture gameplay in stunning 4K resolution for top-notch visual quality.
- Frame rate settings ensure smooth playback of recorded videos.
- Bitrate settings let you control recording quality and file size.
- Players can use GPU power for faster and more efficient video encoding.
- Multi-channel audio recording lets you record gameplay audio, microphone input, and other sources. Also, it separates tracks for easy editing and control.
- An infusion of overlays in the webcam adds a personalized touch to gameplay videos, building competition in quality offering.
- Network switching within software is possible without any cross-platform shift, from recording to live streaming.
Example
PewDiePie is one of the leading stars in YouTube stardom. His game screen recording is proof of how online entertainment has changed. He earned his initial fame by playing horror games with funny commentary. People loved his infectious personality and unique style. Furthermore, he expanded his content to include games, vlogs, and entertaining stuff. Now, he has a fan base of 111M, positioning him as the most influential figure in online gaming.
Part 2: Top Best Game Recorders To Consider for Efficient Recording
Most of us play games for fun while wanting to share the gameplay with friends. The game screen recorder helps you share the screen with others to enjoy with them. Let’s go through the options of tools that can record gameplay screens efficiently:
Best Game Recorders for PC
1.Movavi
2.OBS
3.Bandicam
4.XSplit
5.Aqua Demo
6.GoPlay
7.Action! Game Recorder
8.Wondershare DemoCreator
1.Movavi
Movavi lets you do full-screen or custom area recording with various functionalities. Using this tool, you can annotate the screen while recording for real-time experience. For improving viewer’s attention, you can also illuminate mouse cursor and keystrokes within the recording screen. It also features a noise reduction feature to get rid of intrusive voices. Movavi can take scrolling screenshots to capture content that doesn’t fit on one screen.
Pros
- This game screen recording tool has a user-friendly interface and is easy to use without the need for training.
- The tool allows you to capture audio and video simultaneously and separately.
Con
- It offers limited features when it comes to video manipulation while recording games.
2.OBS Studio
Open Broadcaster Software is the best screen recorder for games when it comes to finding open-source recorders. This recorder enables you to record multiple scenes at a time. It offers seamless transitions to switch between the scenes. Users can use the audio mixer feature of the tool for noise suppression and gain. The tool also provides the configuration option to add new sources and replace existing ones.
Pros
- You can capture multiple windows simultaneously with the help of this tool, giving diversified opportunities.
- This screen recorder allows you to preview sources and scenes before live streaming.
Con
- OBS is challenging for beginners due to its steep learning curve.
3.Bandicam
Gamers can record high-resolution gameplay in 4K UHD and 480FPS with Bandicam. Upon utilizing this tool, they record gameplay and voice to share with friends on YouTube. This Lolio game recorder uses a webcam and mic to record gameplay with the player’s live face and voice. Plus, you can also save the audio track of the gameplay record in separate WAV files.
Pros
- This game recorder compresses high-quality video to save space.
- Bandicam supports the latest hardware acceleration from AMD, Intel, and NVIDIA.
Con
- It only works on Windows and does not support Mac, Android, or Linux.
4.XSplit
Content creators and game players can use this all-in-one streaming and recording tool. This video game recorder allows you to switch from a solo camera to a podcast easily. You can start streaming to any broadcast platform with the native plugin of the tool. XSplit Broadcaster enables you to add multiple animation and broadcast effects to your scenes.
Pros
- Users can record multiple scenes at the same time with this screen recorder. This helps you in covering more content in similar timeframes.
- You can do custom transitions of various scenes with the help of this tool.
Con
- Installing XSplit Broadcaster in your system slows down the running of the PC dramatically.
5.Aqua Demo
Aqua Demo is the best way to record gameplay on a PC to produce high-quality video. You can easily record gameplay as the interface of the tool is intuitive and easy to use. It supports various video formats, including AVI, MP4, and MOV, to save the recordings. Users can do editing while recording to make it engaging and interactive.
Image Name: best-game-recorder-for-pc-2024-5.jpg
Image Alt:
Pros
- This tool allows you to record video using the sound of a PC, microphone, or both.
- You can easily schedule when video recording should take place with this tool.
Con
- AceThinker Aqua Demo offers a limited trial version to its users for screen recording.
6.GoPlay
GoPlay is the best software to record gameplay as it allows you to record yourself while gaming. With the help of this software, users can do basic editing of the video before live streaming. Plus, it allows you to record fast-paced games up to 60fps for smooth results. The software offers the feature to remove unwanted noise in the video.
Pros
- This screen recorder offers you the option to dub your own voice within the video recording.
- It helps to adjust the audio of each track on the timeline.
Con
- Unlike other screen recorders, it has a small number of transitions and effects.
7.Action! – Game Recorder
Action! stands out as one of the best screen recorder for games, as it uses low CPU space. Gamers can record smooth HD video of gameplay up to 120fps. You can make 20 times smaller video recordings with the help of this tool. Also, users are able to apply different editing effects to the recorder clips. This tool even enables you to control video recording with a smartphone.
Image Name: best-game-recorder-for-pc-2024-7.jpg
Image Alt:
Pros
- Action supports the webcam and microphone commentary during recording.
- It displays current and average FPS while playing games and saves benchmark results.
Con
- People face usability issues like problems with frame rate drops while recording.
8.Wondershare DemoCreator
Users can use DemoCreator on Windows and Mac to record the screen of gameplay. No doubt, it is a cool game recording software available to users. It also offers lag-free recording for uninterrupted gameplay records. You can plan and automate recording sessions with the help of this software. This game recorder provides a dynamic cursor effect for a visual guide of your audience.
Pros
- Wondershare DemoCreator offers dual monitor recording for an expanded view.
- User can create their own virtual avatars for presenting the content through video.
Con
- The tool has limited functionality in the free version, so you have to buy its premium subscription.
10+ Screen Recorder without Watermark
https://www.youtube.com/watch?v=CVmVxhxfnlU
Part 3: Make Screen Recording Simple and Easy: Wondershare Filmora
Gaming has made a significant impact on people as the associated industry keep producing new games with the latest technology. Moreover, the popularity of streaming games online has also increased. In this case, gamers need an effective game recorder software. Wondershare Filmora is the most efficient solution to effective screen recording. This video game recorder tool can capture any area of your selection.
Filmora also has various built-in editing tools and recording effects. You can also customize the ratio and size of your recording screen by changing the height and width. This tool records the screen and captures the audio from your microphone at the same time. Gamers can schedule their recording with the Record Timer feature. Moreover, you can customize your keystrokes and make hotkey combinations.
Other Features of Wondershare Filmora
- Split Screen: The Split Screen feature has up to 250+ pre-made templates that help you create animated video collages. You can have up to 6 screens for gameplaying or live chat channels on your screen. There are thousands of effects and filters you add to each of the screens.
- AI Thumbnail Creator: Filmora provides a Thumbnail feature that can generate exclusive thumbnails for your videos. It supports advanced text and image editing tools with 58+ templates. You can get stunning thumbnails for your gameplay in seconds with the help of AI.
- AI Vocal Remover: If you are having trouble with unnecessary background noise, remove it with the AI vocal remover feature. Streamers can separate the vocals from their microphone and gameplay. Also, you can dub videos freely without losing audio quality.
Steps-by-Step Guide to Screen Record With Wondershare Filmora
Wondershare Filmora provides the best way to record gameplay on your PC, as it gives you the necessary features. So, let’s discuss the steps on how to record a professional gameplay recording. The following are the steps to record gameplay with Filmora:
Step 1 Launch and Create a New Project on Filmora
After downloading Filmora on your PC and launching the software, go to the “Create Project” tab on the left-side panel. Here, you can click the “New Project” option to open the main editing interface.
Step 2 Record Gameplay on Your PC
On the main interface, click the “Record” option above the media panel. From the drop-down panel, select the “Record PC Screen” option. After that, a small panel screen with the name “Wondershare Screen Recorder” will appear on your PC.
Step 3 Adjust Recording Settings for Gaming
Now, adjust the screen recording settings according to your preference. You can change the screen’s dimensions from full screen to target window. Also, choose to turn on the microphone, audio, and camera by clicking on their icons. Now, hit the dropdown menu of “Settings,” and change the frame rate and other video options. Once you are satisfied with the settings, hit the “Start Recording” button to start.
Conclusion
Gamers need to find the best tool to share their gaming moments in 2024. Filmora is a standout choice among the game recording software for PCs. The software is reliable and enriched with features that are easy to use. You can record, edit, and share your exciting gameplay adventures with the audience. If you’re on the lookout for the best game recorder for your PC, Filmora is a solid recommendation.
10 Catchy Pixel Art Wallpapers and How to Custom Your Own
Versatile Video Editor - Wondershare Filmora
An easy yet powerful editor
Numerous effects to choose from
Detailed tutorials provided by the official channel
Pixel art is digital art created through computer software. In this digital art, images are edited on a pixel level. This gives the kind of aesthetic from computer video games using 8-bit and 16-bit technology. In general, this art uses very few color palettes, with some using only two.
The history of pixel art goes back to the 1930s with the monochromatic light bulb displays in New York City.
Pixel art tries to mimic the features of old video game graphics done by computers that were only able to display a few colors at once.
Digital pixel art evolved in such a way that artists are now dedicated to that art, and so create beautiful pixel art wallpapers that we’ll show you in this article.
In this article
01 Where to Look for Pixel Art Wallpapers?
02 10 Attractive Pixel Art Wallpapers Perfect for PC and Mobile
03 How to Customize Your Own Pixel Art Wallpapers
04 How to Make a Pixel Art Wallpaper Gif
Part 1: Where to Look for Pixel Art Wallpapers [for PC and Mobile]
1. alphacoders.com
In Wall.aphacoders you can find more than 900 thousand wallpapers of pixel art wallpapers for every taste. From video game wallpapers to movies and tv shows.
2. Wallpapercave.com
On this easy-to-use website, all you have to do is type what pixel art wallpaper you are looking for on the search bar. In addition, there is a trending section that will guide you through the most popular wallpapers on the website, as well as feature desktop wallpapers.
3. Wallpaperaccess.com [for Mobile]
This website specializes in mobile wallpapers. You can find the latest trending wallpapers. With a large pixel art wallpaper gallery, wallpaperaccess is one of the top wallpaper websites around. It has a search bar at the top to help you navigate the different wallpapers, or you can just scroll down and see trending wallpapers.
Part 2: 10 Attractive Pixel Art Wallpapers Perfect for PC and Mobile
Note: The following images are all from the internet.
1. Modern City
In this pixel art, 4k wallpaper depicts a modern city crossed by a river under an orange sky. It has a color palette ranging from dark gray to light gray and other tones of orange.
![]()
2. The Rainy Night
This is a GIF pixel art wallpaper for mobile. It depicts a town and a street crossing it over. In the background, we can see a bigger city under a starry night. The moving part of the GIF pixel art wallpaper is the continuous rain.
![]()
3. The Forest
In this artistic wallpaper, we have a forest background, seeing it through a margin of a river that crosses it. A fallen log serves as a bridge to cross the river. A deer is standing on the other side under large trees.
![]()
4. The Farm
In this retro wallpaper pixel art, we can see a farm over an orange background. Next to it is a graduation tower—the tones on this wallpaper range from orange to red and brown.
![]()
5. The Sunset City
In this mobile animated pixel art wallpaper, we have the backdrop of a modern city. Tall buildings connected with a bridge can be seen as well as a sun setting that gives the sky tones ranging from purple to light orange.
![]()
6. The Night City
In this mobile pixel art wallpaper, we have a very low palette of colors. It ranges from blue to orange tones. It is a closed street in a city. A person is on the balcony outside.
![]()
7. The Spaceship
In this space-inspired pixel art wallpaper, we can see a spaceship with six people, two onboard, commanding it. One is fixing the spaceship; one is resting on the back, one on top scouting, one on the edging reaching for another in open space. There is also a dog on top of the spaceship and an alien-like creature in open space.
![]()
8. The Old Tree
In this pixel art wallpaper, we have a huge old tree that served as a refuge for passersby. It has a broken wood ladder and a wooden floor on an opening on the tree. The tree is inside a river, and a boat is moored next to it. Two birds rest on rocks on the margin, and we have the perspective behind the birds.
![]()
9. The Broken Earth
In this pixel art wallpaper, we have the planet earth floating in space. One part of the planet is broken and floating away. This pixel art wallpaper uses a black background, as well as blue, green and several tones of blue to make the oceans.
![]()
10. The Airport
In this pixel art wallpaper, we have an airport terminal. We can see a plane landing on the course—workers pulling carts of baggage and other vehicles belonging to that setting. The sun is almost set, and so there is an orange sky above, as well as orange lights.
![]()
Part 3: How to Customize Your Own Pixel Art Wallpapers
It is easy to create your own pixel art wallpapers. There are many free online applications that you can use. For example, Aseprite.
Step 1: Download Aseprite and open.
Step 2: You have tools on the right, click on it and choose the pencil icon, or press “B”. Just click on the left button of your mouse and draw. Left-click to erase it.
Step 3: To change the size of the line, go to the upper menu and type in the size you want by hovering on the search bar.
Step 4: You can also change the size of your brush. Simple go to the upper menu and choose the brush icon. There you have many shapes to choose from.
Step 5: You can choose the color pallet you want to use on your pixel art wallpaper on the left-hand side of the screen.
Step 6: These are the basic tools to start drawing your wallpapers. To save and export your pixel art wallpaper, go to “File” and click on “Export”.
Part 4: How to Make a Pixel Art Wallpaper Gif
Filmora is a video editing software tool focused on editing and making high-quality videos. It supports 4K videos and the latest technologies in that sector. Filmora is also able to create pixel art Gifs, as we will explain below.
Wondershare Filmora
Get started easily with Filmora’s powerful performance, intuitive interface, and countless effects!
Try It Free Try It Free Try It Free Learn More >

Step 1: You can drag and drop your video onto a timeline to better use the editing tools and operate on this file.
Step 2: Once you have your video imported and on the timeline, you can start editing it. Filmora uses all the basic and advanced tools like split, rotate, crop, combine, speed up, speed down, and more.
Step 3: You can also add text, elements, and pixelated effects to your video. It helps explain and add information when editing the video.
Step 4: After you’ve gone through all the steps above, you can export your .gif file. Filmora is linked to the most popular social media platforms, so it is easy for you to share it. To export, go to “File” and click on “Export”. Change the settings as you desire and export your pixel art wallpaper.
Conclusion
Although pixel art is a sort of new art, it is already rich with many artists and people interested in it. It has evolved over the years with the advance of technology, and it has become more complex, even though one of its characteristics is to look dated. This article gives you examples of the different pixel art wallpapers for your computer or mobile phone and how to create your own pixel art wallpapers.
Pixel art is digital art created through computer software. In this digital art, images are edited on a pixel level. This gives the kind of aesthetic from computer video games using 8-bit and 16-bit technology. In general, this art uses very few color palettes, with some using only two.
The history of pixel art goes back to the 1930s with the monochromatic light bulb displays in New York City.
Pixel art tries to mimic the features of old video game graphics done by computers that were only able to display a few colors at once.
Digital pixel art evolved in such a way that artists are now dedicated to that art, and so create beautiful pixel art wallpapers that we’ll show you in this article.
In this article
01 Where to Look for Pixel Art Wallpapers?
02 10 Attractive Pixel Art Wallpapers Perfect for PC and Mobile
03 How to Customize Your Own Pixel Art Wallpapers
04 How to Make a Pixel Art Wallpaper Gif
Part 1: Where to Look for Pixel Art Wallpapers [for PC and Mobile]
1. alphacoders.com
In Wall.aphacoders you can find more than 900 thousand wallpapers of pixel art wallpapers for every taste. From video game wallpapers to movies and tv shows.
2. Wallpapercave.com
On this easy-to-use website, all you have to do is type what pixel art wallpaper you are looking for on the search bar. In addition, there is a trending section that will guide you through the most popular wallpapers on the website, as well as feature desktop wallpapers.
3. Wallpaperaccess.com [for Mobile]
This website specializes in mobile wallpapers. You can find the latest trending wallpapers. With a large pixel art wallpaper gallery, wallpaperaccess is one of the top wallpaper websites around. It has a search bar at the top to help you navigate the different wallpapers, or you can just scroll down and see trending wallpapers.
Part 2: 10 Attractive Pixel Art Wallpapers Perfect for PC and Mobile
Note: The following images are all from the internet.
1. Modern City
In this pixel art, 4k wallpaper depicts a modern city crossed by a river under an orange sky. It has a color palette ranging from dark gray to light gray and other tones of orange.
![]()
2. The Rainy Night
This is a GIF pixel art wallpaper for mobile. It depicts a town and a street crossing it over. In the background, we can see a bigger city under a starry night. The moving part of the GIF pixel art wallpaper is the continuous rain.
![]()
3. The Forest
In this artistic wallpaper, we have a forest background, seeing it through a margin of a river that crosses it. A fallen log serves as a bridge to cross the river. A deer is standing on the other side under large trees.
![]()
4. The Farm
In this retro wallpaper pixel art, we can see a farm over an orange background. Next to it is a graduation tower—the tones on this wallpaper range from orange to red and brown.
![]()
5. The Sunset City
In this mobile animated pixel art wallpaper, we have the backdrop of a modern city. Tall buildings connected with a bridge can be seen as well as a sun setting that gives the sky tones ranging from purple to light orange.
![]()
6. The Night City
In this mobile pixel art wallpaper, we have a very low palette of colors. It ranges from blue to orange tones. It is a closed street in a city. A person is on the balcony outside.
![]()
7. The Spaceship
In this space-inspired pixel art wallpaper, we can see a spaceship with six people, two onboard, commanding it. One is fixing the spaceship; one is resting on the back, one on top scouting, one on the edging reaching for another in open space. There is also a dog on top of the spaceship and an alien-like creature in open space.
![]()
8. The Old Tree
In this pixel art wallpaper, we have a huge old tree that served as a refuge for passersby. It has a broken wood ladder and a wooden floor on an opening on the tree. The tree is inside a river, and a boat is moored next to it. Two birds rest on rocks on the margin, and we have the perspective behind the birds.
![]()
9. The Broken Earth
In this pixel art wallpaper, we have the planet earth floating in space. One part of the planet is broken and floating away. This pixel art wallpaper uses a black background, as well as blue, green and several tones of blue to make the oceans.
![]()
10. The Airport
In this pixel art wallpaper, we have an airport terminal. We can see a plane landing on the course—workers pulling carts of baggage and other vehicles belonging to that setting. The sun is almost set, and so there is an orange sky above, as well as orange lights.
![]()
Part 3: How to Customize Your Own Pixel Art Wallpapers
It is easy to create your own pixel art wallpapers. There are many free online applications that you can use. For example, Aseprite.
Step 1: Download Aseprite and open.
Step 2: You have tools on the right, click on it and choose the pencil icon, or press “B”. Just click on the left button of your mouse and draw. Left-click to erase it.
Step 3: To change the size of the line, go to the upper menu and type in the size you want by hovering on the search bar.
Step 4: You can also change the size of your brush. Simple go to the upper menu and choose the brush icon. There you have many shapes to choose from.
Step 5: You can choose the color pallet you want to use on your pixel art wallpaper on the left-hand side of the screen.
Step 6: These are the basic tools to start drawing your wallpapers. To save and export your pixel art wallpaper, go to “File” and click on “Export”.
Part 4: How to Make a Pixel Art Wallpaper Gif
Filmora is a video editing software tool focused on editing and making high-quality videos. It supports 4K videos and the latest technologies in that sector. Filmora is also able to create pixel art Gifs, as we will explain below.
Wondershare Filmora
Get started easily with Filmora’s powerful performance, intuitive interface, and countless effects!
Try It Free Try It Free Try It Free Learn More >
Step 1: You can drag and drop your video onto a timeline to better use the editing tools and operate on this file.
Step 2: Once you have your video imported and on the timeline, you can start editing it. Filmora uses all the basic and advanced tools like split, rotate, crop, combine, speed up, speed down, and more.
Step 3: You can also add text, elements, and pixelated effects to your video. It helps explain and add information when editing the video.
Step 4: After you’ve gone through all the steps above, you can export your .gif file. Filmora is linked to the most popular social media platforms, so it is easy for you to share it. To export, go to “File” and click on “Export”. Change the settings as you desire and export your pixel art wallpaper.
Conclusion
Although pixel art is a sort of new art, it is already rich with many artists and people interested in it. It has evolved over the years with the advance of technology, and it has become more complex, even though one of its characteristics is to look dated. This article gives you examples of the different pixel art wallpapers for your computer or mobile phone and how to create your own pixel art wallpapers.
Also read:
- New YouTube Lives Are Very Popular Nowadays and People Can Interact with the Anchor at Real Time. If You Want to Comment on a YouTube Live Chat, You Can Follow the Guide Below for 2024
- Updated In 2024, Steps To Fade Audio In Premier Pro
- Updated Want to Play a Video on Loop on Vimeo so that It Plays Again and Again? Here Are All the Different Ways to Loop a Video on Vimeo in Simple Steps
- In 2024, 5 Best Video Denoisers
- New 10 Best Free Video Player for Windows 11 for 2024
- Do You Want to Know How to Add LUTs to Premiere Pro? In This Guide, You Will Find Details and Easy Steps to Proceed with Using LUTs in Premiere Pro for 2024
- 2024 Approved Learning Unique Ways to Slow Down Time Lapse on iPhone
- In 2024, How to Concatenate Videos Using FFmpeg
- Updated 2024 Approved Master Premiere Pro Custom Sequence Presets
- In 2024, How to Use LUTS to Color Grade on Your iPhone
- 2024 Approved How to Zoom In and Out on Mac
- 2024 Approved Create Risograph Effect In Photoshop A Beginners Guide
- How to Create Vintage Film Effect 1990S
- How to Make a Time-Lapse Video Online for 2024
- Updated 2 Easy Methods | How To Zoom In On TikTok Videos for 2024
- New 2024 Approved How to Create Emoji on Mac That Take Less Than 10 Mins
- 4 Most-Known Ways to Find Someone on Tinder For Vivo Y28 5G by Name | Dr.fone
- New 2024 Approved What Is the Meaning of Motion Graphics
- How to convert AVCHD .mts files for Motorola Edge 2023?
- How to Perform Hard Reset on Oppo Reno 8T 5G? | Dr.fone
- Does Life360 Notify When You Log Out On Oppo Reno 8T 5G? | Dr.fone
- Simple Solutions to Fix Android SystemUI Has Stopped Error For Poco F5 Pro 5G | Dr.fone
- How to Stop Life360 from Tracking You On Apple iPhone 8? | Dr.fone
- How to Change Your Realme V30T Location on life360 Without Anyone Knowing? | Dr.fone
- How to Unlock Disabled iPhone 13 Pro/iPad Without Computer
- In 2024, How to Migrate Android Data From Oppo A78 5G to New Android Phone? | Dr.fone
- How To Unlock a Vivo Y100A Easily?
- How to Stop My Spouse from Spying on My Oppo A56s 5G | Dr.fone
- How to Factory Reset Realme 11 Pro in 5 Easy Ways | Dr.fone
- Title: New In 2024, How to Blur a Still or Moving Part of Video
- Author: Morgan
- Created at : 2024-06-15 18:56:41
- Updated at : 2024-06-16 18:56:41
- Link: https://ai-video-editing.techidaily.com/new-in-2024-how-to-blur-a-still-or-moving-part-of-video/
- License: This work is licensed under CC BY-NC-SA 4.0.
