New In 2024, How to Make a Video Loop in QuickTime

How to Make a Video Loop in QuickTime
If you are a Mac user, QuickTime Player is where you play and watch videos. QuickTime by Apple comes pre-installed on every Mac. It happens to be the default video player for macOS users. Under normal circumstances, QuickTime plays a video only once. However, there are times when you want to watch a video repeatedly in a loop.
When you have a short video clip, it is usual that you want to watch it in a loop. The same is applicable to music videos. You may want to listen to the song repeatedly in the background while you work on your Mac. You may also want to show a demonstration video endlessly on the display screen. In all such scenarios, you have to play a loop video on QuickTime. We will illustrate how to play a video in a loop on QuickTime.
Part 1. Steps to Loop Video with QuickTime Player
You can play any video on your Mac via QuickTime Player. But the video player plays the video only once by default. If you want to watch the video again, you have to play it again. Instead of manually playing it over and over again, you can put the video in a loop. Here are the steps on how to loop QuickTime video.
Step 1: Play the video of your choice on QuickTime Player.
Step 2: Click on the View menu from the top menu bar.
Step 3: Click on the Loop option located at the bottom of the View menu. Alternatively, you can press the Option + Command + L shortcut keys to loop the video.
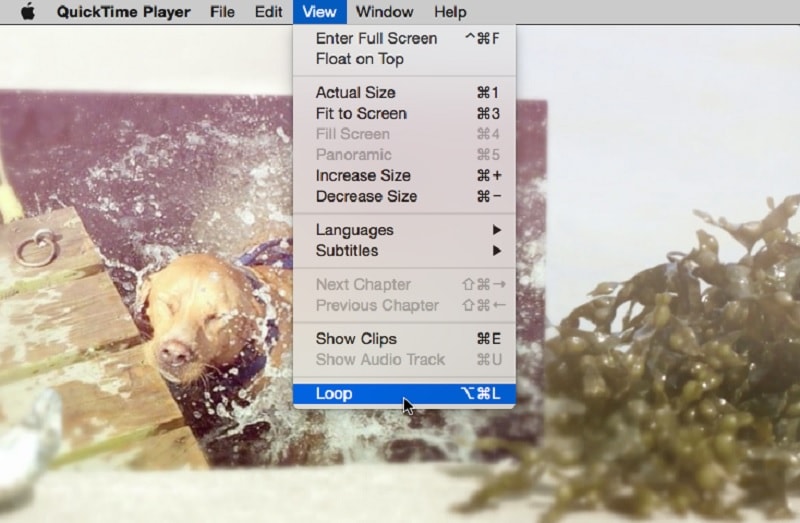
Thereafter, the video you are playing won’t stop at its end mark. It will restart again and again until your pause or close the QuickTime player.
Part 2. QuickTime Alternatives to Loop Video
QuickTime Player is where you can play videos in a loop. However, if you want to loop videos for your video project, you will need a video editor. If you are looking for QuickTime Player alternatives to loop video on your Mac, we have the following options.
1. iMovie
iMovie by Apple comes pre-installed on Mac as well. iMovie is a video editing application. You can import videos on your Mac and extend the video durations by looping. This is useful when you want to play a video clips in your video project multiple times. Here are the steps on how to loop video via iMovie similar to QuickTime loop video.
Step 1: Launch the iMovie app on your Mac. Once iMovie opens, click on Create New option. Thereafter, click on the Movie option to get started.

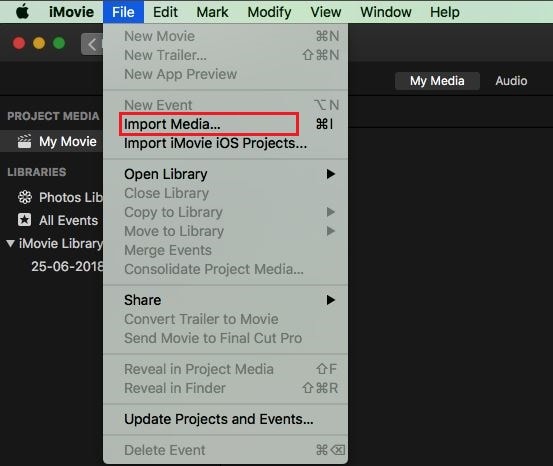
Step 2: Go to the File menu and click on the Import Media option. Select the desired video from your Mac. Alternatively, select any media file from All Events or Photos under the Libraries section.
Step 3: Drop the video on the timeline. You can drag and drop the video clip multiple times on the timeline. This will loop the video and extend the video duration. There should be no gap between the clips on the timeline.

Step 4: Once you have looped the desired video, go to File> Share> File option to save the video file.
2. Filmora for Mac
You already know how to loop video in QuickTime Player. But you cannot extend the video duration by looping permanently in QuickTime Player. You can do that on iMovie, but iMovie has limitations as it is a free app. If you are looking for a premium QuickTime Player alternative, Wondershare Filmora is for you.
Filmora is a premium video editor with a wide range of video editing features. It has a user-friendly interface so that everyone can operate it easily. You can trim a video and add transitions between the loops. Here are the steps on how to loop a video on Filmora for Mac.
Step 1: Download and install Wondershare Filmora. Open Filmora and click on New Project.

Free Download For Win 7 or later(64-bit)
Free Download For macOS 10.14 or later
Step 2: Drag and drop the desired video file from your device into the Project Media folder. Thereafter, drag and drop the video file into the timeline.

Step 3: Drag and drop the video clip into the timeline again. Place it by the side of the first video clip. There should not be any gap and they should be in the same channel on the timeline. Alternative, you can also copy and paste the video clip for looping.

Step 4: Play the video and watch it in a loop through the Viewer on Filmora. If you are satisfied, click on the Export button to save the video in any file format as per your preference.
Part 3. Related FAQs
How do I make my video player loop?
If you are a Mac user, the default video player is QuickTime Player. Go to View> Loop to make your Mac video player loop a video. If you are using any other video player like VLC Media Player, you can look at the View menu. Alternatively, you can look for a Loop icon to repeatedly play the video.
How to loop YouTube video on Mac?
On your Mac, open the video on YouTube that you want to put in a loop. Once you are on the watch screen of the video, right-click on the video. Choose the Loop option to play the video repeatedly.
Can QuickTime player loop audio?
Yes, you can loop any audio file on QuickTime Player. The steps are the same for looping a video. You need to play the audio and go to View> Loop option to play the audio file repeatedly. However, some have complained that looping audio may leave a gap at the beginning of the audio track.
Conclusion
Looping a video that we like to the highest degree is quite common. If you are playing any desired video on QuickTime Player, we have illustrated how to go for it. We have also provided you with a free and a premium QuickTime Player alternative. You can choose any of them as per your requirements to loop a video.
Free Download For macOS 10.14 or later
Step 2: Drag and drop the desired video file from your device into the Project Media folder. Thereafter, drag and drop the video file into the timeline.

Step 3: Drag and drop the video clip into the timeline again. Place it by the side of the first video clip. There should not be any gap and they should be in the same channel on the timeline. Alternative, you can also copy and paste the video clip for looping.

Step 4: Play the video and watch it in a loop through the Viewer on Filmora. If you are satisfied, click on the Export button to save the video in any file format as per your preference.
Part 3. Related FAQs
How do I make my video player loop?
If you are a Mac user, the default video player is QuickTime Player. Go to View> Loop to make your Mac video player loop a video. If you are using any other video player like VLC Media Player, you can look at the View menu. Alternatively, you can look for a Loop icon to repeatedly play the video.
How to loop YouTube video on Mac?
On your Mac, open the video on YouTube that you want to put in a loop. Once you are on the watch screen of the video, right-click on the video. Choose the Loop option to play the video repeatedly.
Can QuickTime player loop audio?
Yes, you can loop any audio file on QuickTime Player. The steps are the same for looping a video. You need to play the audio and go to View> Loop option to play the audio file repeatedly. However, some have complained that looping audio may leave a gap at the beginning of the audio track.
Conclusion
Looping a video that we like to the highest degree is quite common. If you are playing any desired video on QuickTime Player, we have illustrated how to go for it. We have also provided you with a free and a premium QuickTime Player alternative. You can choose any of them as per your requirements to loop a video.
Free Download For macOS 10.14 or later
Step 2: Drag and drop the desired video file from your device into the Project Media folder. Thereafter, drag and drop the video file into the timeline.

Step 3: Drag and drop the video clip into the timeline again. Place it by the side of the first video clip. There should not be any gap and they should be in the same channel on the timeline. Alternative, you can also copy and paste the video clip for looping.

Step 4: Play the video and watch it in a loop through the Viewer on Filmora. If you are satisfied, click on the Export button to save the video in any file format as per your preference.
Part 3. Related FAQs
How do I make my video player loop?
If you are a Mac user, the default video player is QuickTime Player. Go to View> Loop to make your Mac video player loop a video. If you are using any other video player like VLC Media Player, you can look at the View menu. Alternatively, you can look for a Loop icon to repeatedly play the video.
How to loop YouTube video on Mac?
On your Mac, open the video on YouTube that you want to put in a loop. Once you are on the watch screen of the video, right-click on the video. Choose the Loop option to play the video repeatedly.
Can QuickTime player loop audio?
Yes, you can loop any audio file on QuickTime Player. The steps are the same for looping a video. You need to play the audio and go to View> Loop option to play the audio file repeatedly. However, some have complained that looping audio may leave a gap at the beginning of the audio track.
Conclusion
Looping a video that we like to the highest degree is quite common. If you are playing any desired video on QuickTime Player, we have illustrated how to go for it. We have also provided you with a free and a premium QuickTime Player alternative. You can choose any of them as per your requirements to loop a video.
Free Download For macOS 10.14 or later
Step 2: Drag and drop the desired video file from your device into the Project Media folder. Thereafter, drag and drop the video file into the timeline.

Step 3: Drag and drop the video clip into the timeline again. Place it by the side of the first video clip. There should not be any gap and they should be in the same channel on the timeline. Alternative, you can also copy and paste the video clip for looping.

Step 4: Play the video and watch it in a loop through the Viewer on Filmora. If you are satisfied, click on the Export button to save the video in any file format as per your preference.
Part 3. Related FAQs
How do I make my video player loop?
If you are a Mac user, the default video player is QuickTime Player. Go to View> Loop to make your Mac video player loop a video. If you are using any other video player like VLC Media Player, you can look at the View menu. Alternatively, you can look for a Loop icon to repeatedly play the video.
How to loop YouTube video on Mac?
On your Mac, open the video on YouTube that you want to put in a loop. Once you are on the watch screen of the video, right-click on the video. Choose the Loop option to play the video repeatedly.
Can QuickTime player loop audio?
Yes, you can loop any audio file on QuickTime Player. The steps are the same for looping a video. You need to play the audio and go to View> Loop option to play the audio file repeatedly. However, some have complained that looping audio may leave a gap at the beginning of the audio track.
Conclusion
Looping a video that we like to the highest degree is quite common. If you are playing any desired video on QuickTime Player, we have illustrated how to go for it. We have also provided you with a free and a premium QuickTime Player alternative. You can choose any of them as per your requirements to loop a video.
Want to Convert MP4 Video To 60 FPS GIF? Read This
GIFs have become a popular way to share short and engaging videos online. They are widely used on social media platforms and messaging apps, making it easy to share moments, reactions, and emotions with friends and family. But not all GIFs are created equal. Some GIFs can look choppy and low-quality, detracting from the viewing experience.
To improve the quality of your GIFs, you can convert your MP4 videos to 60 FPS (frames per second). This will give your GIFs a smooth, fluid motion that looks professional and visually appealing. In this article, we’ll go over the steps you need to follow to convert your MP4 videos to 60 FPS GIFs and create high-quality GIFs that are perfect for sharing online.
Why Convert MP4 to 60-FPS GIF?
GIFs are a great way to share short, eye-catching videos online, but not all are made the same. GIFs with low frame rates tend to look choppy, and the motion could be smoother, making the video look unprofessional and detracting from the overall viewing experience. On the other hand, GIFs with higher frame rates look smoother, and the motion is more fluid, making the video more visually appealing.
Converting your MP4 videos to GIFs has several benefits:
- Smoother Motion: By converting MP4s to GIFs, you increase the frame rate of your GIFs, giving them a smoother and more fluid motion.
- Increased Detail: Higher frame rates allow for more detail and clarity in fast-moving scenes, making the video more engaging and easier to watch.
- Reduced Ghosting: A higher frame rate reduces the “ghosting” effect in low-frame rate GIFs, making the video clearer and reducing distractions.
- High-Quality Videos: Converting MP4s to GIFs eliminates the ghosting effect and creates high-quality GIFs that are perfect for sharing online.
- Increased Engagement: High-quality GIFs will engage and entertain your audience, making them more likely to share and interact with your content.
Converting MP4s to GIFs is a great way to improve the overall quality of your GIFs and create visually appealing videos that are perfect for sharing online. Whether you’re sharing a reaction, a moment, or an emotion, a high-quality GIF will engage and entertain your audience.
Can I Get a 60 FPS GIF?
While it’s true that many people search for 60 FPS GIFs, it’s important to understand that there is no such thing as a true 60 FPS GIF.

GIFs are an image format designed to display simple animations. GIF files store delay time between frames which is defined as multiples of 1/100th of a second. Value 1 would give you 100 FPS; value 2 would already have half of 100 FPS, that is, 50 FPS; value 3 would give you 33.3 FPS GIF, etc. So there are 20 FPS GIFs, 33.3 FPS GIFs, 50 FPS GIFs, and 100 FPS GIFs.
In addition, many websites or programs (including Google Chrome) ignore value 1 (100 FPS GIFs) and default to a much slower animation speed when viewing GIF files. Therefore, 100 FPS GIFs are technically possible but are rarely used. Value 2 (50 FPS) is the most you can get.
If you want to create high-quality animations, consider using MP4s or alternative image formats better suited for high frame rates and detailed animations.
That being said, some websites may have a “60 FPS GIFs” category, but it’s important to understand that most of the content in these categories is not 60 FPS. Instead, it’s likely to be either an MP4 video or a GIF with a lower frame rate, like 50 FPS, labeled as “60 FPS” for marketing purposes.
Is There Any 60 FPS GIF Maker?
Unfortunately, there is no such thing as a 60 FPS GIF maker. As mentioned before, there is no 60 FPS GIF, so it is impossible to create a 60 FPS GIF using traditional methods. However, many excellent video-to-GIF converters in the market allow you to set the GIF frame rate.
These video-to-GIF converters allow you to convert MP4 videos to GIFs with a higher frame rate, which can give your GIFs a smoother and more fluid motion. While these GIFs may not be 60 FPS, they can still provide a significant quality improvement compared to traditional GIFs.
How To Convert Video to GIF and Set Its FPS on Desktop
Converting videos to GIFs is a simple process that can be done using various tools, including desktop software such as Wondershare Filmora . Filmora is a powerful and user-friendly video editor that makes it easy to convert videos to GIFs and set their frame rate.
Free Download For Win 7 or later(64-bit)
Free Download For macOS 10.14 or later

Not only does it allow you to easily convert your videos to GIFs, but it also allows you to customize the frame rate and other settings to get the perfect results. With its user-friendly interface and powerful features, Filmora makes it simple for anyone to create high-quality GIFs that are perfect for sharing on social media or other platforms.
Here’s how to convert MP4 to GIF using Filmora:
Step1 Open the Filmora software and create a new project

Step2 Import your video to the timeline

Step3 Export the video

Step4 In the export window, select “GIF“ and set the frame rate of the GIF.

How To Convert MP4 to GIF Online for Free
Converting MP4 videos to GIFs online is a quick and convenient way to create animations without needing specialized software. One of the best online tools for this purpose is Media.io . Its simple and user-friendly interface, Media.io, makes it easy to convert MP4 videos to GIFs in just a few clicks.
With Media.io, you can customize the frame rate, duration, and other settings to get the perfect results. Whether you’re looking to create simple animations or more complex and detailed videos, Media.io has everything you need to get started.
Best of all, Media.io is free to use, making it an excellent choice for anyone who wants to convert MP4 and other videos to GIFs without spending a dime. So if you’re looking for a fast, convenient, and reliable way to convert your videos to GIFs, look no further than Media.io.
Follow these steps to convert MP4 to GIF online using Media.io:
Step1 Upload a video from your computer or drag and drop it onto the page.
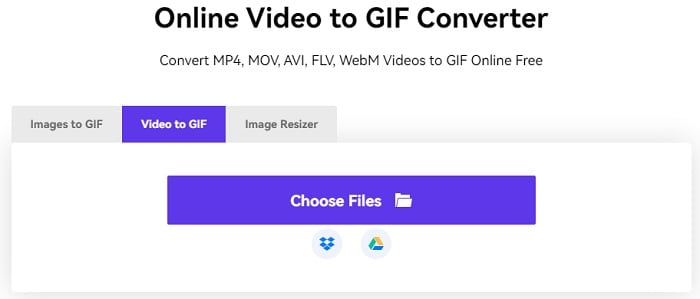
Step2 Customize the output size, frame rate, and length, and add text before creating your GIF.

Step3 Download the resulting GIF file or save it for later.

People Also Ask
Here are some of the most frequently asked questions about converting MP4 to GIF and other related topics:
Q1. Can a GIF be 30 FPS?
It is impossible to get an exact 30 FPS GIF. Frame rate refers to the number of images (frames) displayed per second in a video or animation. That frame rate is stored as an integer (n) that defines n/100ths of a second. So you can specify a frame of 1/100 second (100 FPS), 2/100 second (50 FPS), 3/100 second (33.33 FPS), 4/100 second (25 FPS), etc. but not something like 3.3333…/100 second (30 FPS).
Q2. How Do I Get the FPS of a GIF?
To determine the speed or frame rate of a GIF, you can use online tools that show the delay time between its frames in milliseconds. The frame rate of a GIF is calculated by counting how many delays fit in 1 second of animation. The delay time determines the playback speed and can be adjusted to increase or decrease the frame rate. These tools also allow you to preview the speed changes and compare the input and output GIFs.
Q3. What FPS Should a GIF Be?
GIF files store delay time between frames in whole hundredths of a second. They typically run between 10 and 100 frames per second (FPS). The common frame rate for a GIF is 10 FPS, 20 FPS, 12.5 FPS, 25 FPS, and 50 FPS. With online tools, it’s possible to determine and change the speed of a GIF.
Q4. What Is the Max FPS for a GIF?
The maximum fps for a GIF is 100 FPS, but browsers or consumer screens do not support it. The browser-engine image decoders will automatically reduce the framerate to 10 fps, playing it ten times slower. If a GIF appears slow, the browser has reset the speed to 10 fps. Some software and devices may support higher frame rates.
Conclusion
GIF is a popular format for short animations and videos. The frame rate of a GIF determines its playback speed, which is usually set at 10, 20, 12.5, 25, and 50 per second. However, the highest possible frame rate that can be represented in the GIF format is 100 FPS, but most browsers and consumer screens cannot display it accurately.
There are various tools available, both online and desktop-based, that can convert videos to GIFs and adjust their frame rate as desired. With these tools, you can create high-quality, personalized GIFs that fit your specific needs and preferences.
Free Download For macOS 10.14 or later

Not only does it allow you to easily convert your videos to GIFs, but it also allows you to customize the frame rate and other settings to get the perfect results. With its user-friendly interface and powerful features, Filmora makes it simple for anyone to create high-quality GIFs that are perfect for sharing on social media or other platforms.
Here’s how to convert MP4 to GIF using Filmora:
Step1 Open the Filmora software and create a new project

Step2 Import your video to the timeline

Step3 Export the video

Step4 In the export window, select “GIF“ and set the frame rate of the GIF.

How To Convert MP4 to GIF Online for Free
Converting MP4 videos to GIFs online is a quick and convenient way to create animations without needing specialized software. One of the best online tools for this purpose is Media.io . Its simple and user-friendly interface, Media.io, makes it easy to convert MP4 videos to GIFs in just a few clicks.
With Media.io, you can customize the frame rate, duration, and other settings to get the perfect results. Whether you’re looking to create simple animations or more complex and detailed videos, Media.io has everything you need to get started.
Best of all, Media.io is free to use, making it an excellent choice for anyone who wants to convert MP4 and other videos to GIFs without spending a dime. So if you’re looking for a fast, convenient, and reliable way to convert your videos to GIFs, look no further than Media.io.
Follow these steps to convert MP4 to GIF online using Media.io:
Step1 Upload a video from your computer or drag and drop it onto the page.

Step2 Customize the output size, frame rate, and length, and add text before creating your GIF.

Step3 Download the resulting GIF file or save it for later.

People Also Ask
Here are some of the most frequently asked questions about converting MP4 to GIF and other related topics:
Q1. Can a GIF be 30 FPS?
It is impossible to get an exact 30 FPS GIF. Frame rate refers to the number of images (frames) displayed per second in a video or animation. That frame rate is stored as an integer (n) that defines n/100ths of a second. So you can specify a frame of 1/100 second (100 FPS), 2/100 second (50 FPS), 3/100 second (33.33 FPS), 4/100 second (25 FPS), etc. but not something like 3.3333…/100 second (30 FPS).
Q2. How Do I Get the FPS of a GIF?
To determine the speed or frame rate of a GIF, you can use online tools that show the delay time between its frames in milliseconds. The frame rate of a GIF is calculated by counting how many delays fit in 1 second of animation. The delay time determines the playback speed and can be adjusted to increase or decrease the frame rate. These tools also allow you to preview the speed changes and compare the input and output GIFs.
Q3. What FPS Should a GIF Be?
GIF files store delay time between frames in whole hundredths of a second. They typically run between 10 and 100 frames per second (FPS). The common frame rate for a GIF is 10 FPS, 20 FPS, 12.5 FPS, 25 FPS, and 50 FPS. With online tools, it’s possible to determine and change the speed of a GIF.
Q4. What Is the Max FPS for a GIF?
The maximum fps for a GIF is 100 FPS, but browsers or consumer screens do not support it. The browser-engine image decoders will automatically reduce the framerate to 10 fps, playing it ten times slower. If a GIF appears slow, the browser has reset the speed to 10 fps. Some software and devices may support higher frame rates.
Conclusion
GIF is a popular format for short animations and videos. The frame rate of a GIF determines its playback speed, which is usually set at 10, 20, 12.5, 25, and 50 per second. However, the highest possible frame rate that can be represented in the GIF format is 100 FPS, but most browsers and consumer screens cannot display it accurately.
There are various tools available, both online and desktop-based, that can convert videos to GIFs and adjust their frame rate as desired. With these tools, you can create high-quality, personalized GIFs that fit your specific needs and preferences.
How to Create An Eye-Catching Intro Videos with InVideo
Video is an increasingly popular form of media, and businesses of all sizes are using video to promote their products and services. In today’s fast-paced world, creating an intro for your videos is a great way to quickly engage your viewers and give them a sense of what your content is going to be about.
However, you might think that creating an intro video is a difficult process. Well, it is not! InVideo intro maker makes it possible for even a beginner to create an intro like a professional. It has simplified every useful feature that you need. If you want to learn how to operate InVideo free intro maker, read on carefully.
Part 1. Common Intro Video Types
There are many different types of intro videos that you can create using intro maker InVideo. Each has its own purpose and style. Here, we will give a short overview on some common intro video types, such as Motion intro videos, YouTube intro videos, Movie intro videos, and Ads intro videos.
Motion Intro Videos
A motion intro video for your business or social media help people learn about what you do in a fun way. By using engaging motion visuals, you can quickly communicate key information about your content in a short time.
YouTube Intro Videos
An introduction is one of the first things you’ll need for a YouTube video. It will appear at the beginning of your videos and give viewers a quick overview of who you are and what your channel is all about.
Movie Intro Videos
A movie intro video builds anticipation and excitement to your audience. The intro can be used to set the tone as well as introduce the cast and the house production behind your film.
Ads Intro Videos
Creating a right advertising introduction video is sufficient to promote your products to potential customers. To increase brand awareness, it should include information about your company, your products or services, and your brand.
Part 2. Steps to Make an Intro Video with InVideo
Intro maker InVideo is the answer for creating a simple online video editing platform for any purpose. With a variety of available video templates on InVideo, no need to spend hours in front of a computer! To start making one, simply follow these steps:
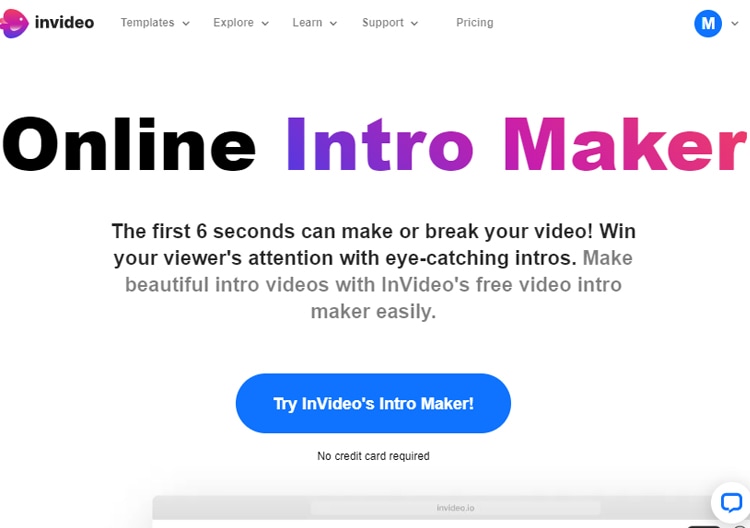
Step1Go to InVideo free intro maker and try InVideo’s intro maker.
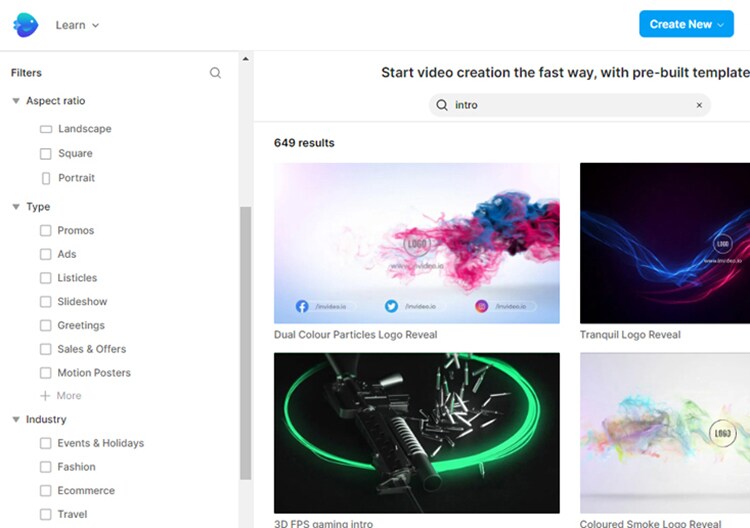
Step2Choose a template that suits your video style. There is also a filter option on the left side to help you narrow down your preferences.
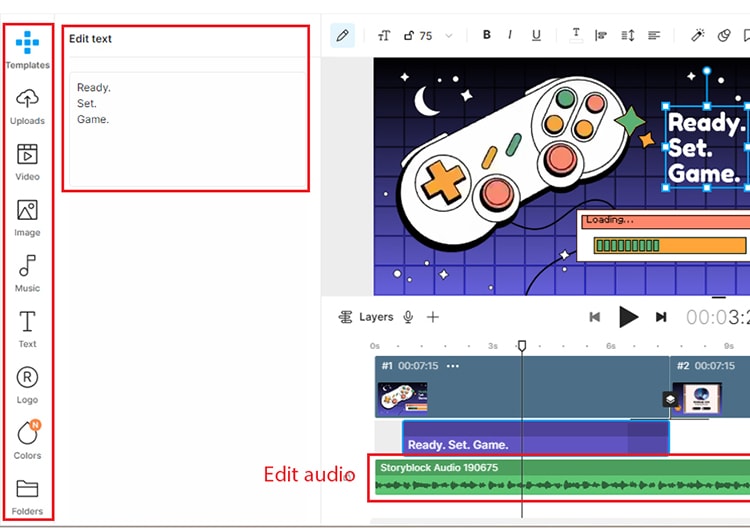
Step3After choosing the template, you can customize it by clicking on the things you want to edit. The tools on the left allow you to add more video, images, or stickers to your project. To edit the audio, click on the audio bar below and the editing tools should appear.
Step4Once you are satisfied with the result, export your video by clicking on the “Export” button on the top-right of your workspace. InVideo will start rendering your video.

Part 3. InVideo Alterative to Make Intro Video on Computer
Aside from InVideo intro maker, Filmora is worth checking out. Filmora is a great alternative software to other more complicated video editors. Whether you are professional or not, it is perfect for those who are looking for a more user-friendly video editing tool that can create professional-looking intro videos.
Filmora offers a wide range of features as a video editing software. It is easy to install and available for both Windows and Mac. Filmora also has a built-in library of some royalty-free music, so copyright issues no longer become your worry. We will show you four easy steps to create intro videos using Filmora templates:
Free Download For Win 7 or later(64-bit)
Free Download For macOS 10.14 or later
Step1After opening the software, choose the aspect ratio that you desire and click New Project.

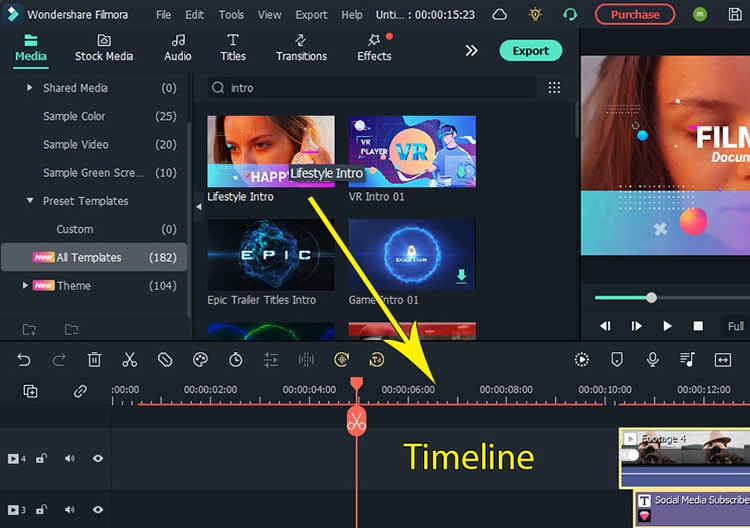
Step2Search for “Intro” from the list of templates on the Media tab. Choose a video clip that you want to use and drag it to your timeline. If you only want to use the free template, avoid the paid assets with a pink diamond icon. Otherwise, you can use free stock video clips included with Filmora.
Step3Edit and customize the texts by double-clicking the text on the preview box. You can change the style, font, size, colors, etc.
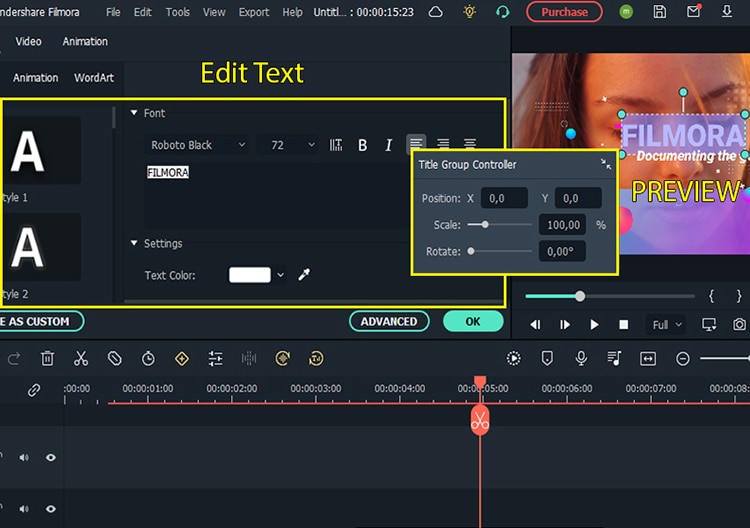
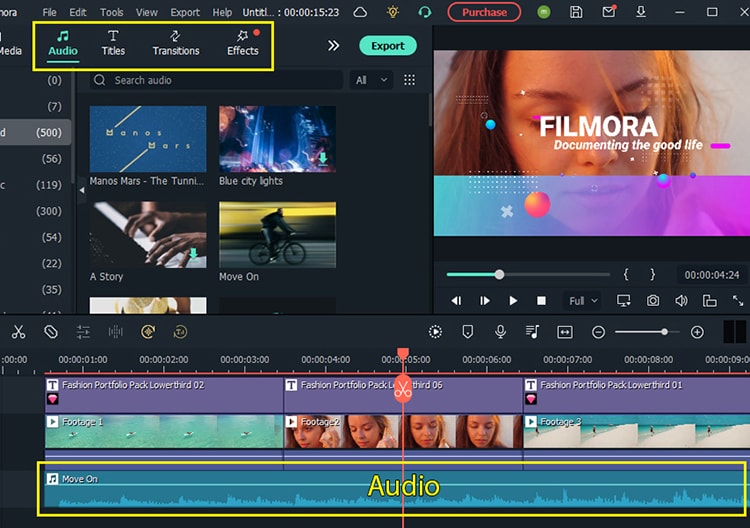
Step4Change, add or customize the audio of your video on the Audio menu. You can also add and customize the text, transition, and effect from other menus. Don’t forget to export your video to the preferred video format and locate it in your desired folder.
Part 4. Related FAQs
- Which software is best for intro making?
The best-used software programs for professional intro-making include Adobe Premiere Pro, Sony Vegas Pro, and Final Cut Pro. However, they are more complex and difficult to operate. Some best intro video makers that are easier to use include Filmora, InVideo, and Animaker.
- How do I make an intro to a video for free?
Many video editing software programs offer free intro templates, such as InVideo intro maker, Canva, Animoto, or Filmora . You can even easily customise their templates based on your content. Another option is to use a video editing program like iMovie or Windows Movie Maker that usually comes with your computers.
- What do YouTubers use to make their intros?
While there is no one-size-fits-all answer to this question, there are some common tools that YouTubers use to make their intro videos. Many YouTubers use software like Adobe Premiere Pro and After Effects, Final Cut Pro, or simpler software like iMovie. Others use online resources like MotionDen or Canva.
Free Download For Win 7 or later(64-bit)
Free Download For macOS 10.14 or later
Free Download For macOS 10.14 or later
Step1After opening the software, choose the aspect ratio that you desire and click New Project.

Step2Search for “Intro” from the list of templates on the Media tab. Choose a video clip that you want to use and drag it to your timeline. If you only want to use the free template, avoid the paid assets with a pink diamond icon. Otherwise, you can use free stock video clips included with Filmora.

Step3Edit and customize the texts by double-clicking the text on the preview box. You can change the style, font, size, colors, etc.

Step4Change, add or customize the audio of your video on the Audio menu. You can also add and customize the text, transition, and effect from other menus. Don’t forget to export your video to the preferred video format and locate it in your desired folder.

Part 4. Related FAQs
- Which software is best for intro making?
The best-used software programs for professional intro-making include Adobe Premiere Pro, Sony Vegas Pro, and Final Cut Pro. However, they are more complex and difficult to operate. Some best intro video makers that are easier to use include Filmora, InVideo, and Animaker.
- How do I make an intro to a video for free?
Many video editing software programs offer free intro templates, such as InVideo intro maker, Canva, Animoto, or Filmora . You can even easily customise their templates based on your content. Another option is to use a video editing program like iMovie or Windows Movie Maker that usually comes with your computers.
- What do YouTubers use to make their intros?
While there is no one-size-fits-all answer to this question, there are some common tools that YouTubers use to make their intro videos. Many YouTubers use software like Adobe Premiere Pro and After Effects, Final Cut Pro, or simpler software like iMovie. Others use online resources like MotionDen or Canva.
Free Download For Win 7 or later(64-bit)
Free Download For macOS 10.14 or later
Efficient Ways to Manage Your Timeline
Do you still have a lot of editing to do after spending hours creating a video for your client? Though you already have a lot on your plate, you can’t continue to devote all of your working hours to only video editing. What if we told you there is a way to make this video editing process much quicker and easier? Keep reading this article to learn how to make the video editing process simpler and more effective.
Part 1: Best Way to Manage your Timeline
We all know that keeping good habits while editing could be helpful, whether you are a professional or a newbie. It could make editing so much more efficient. Today, we will show you some easy tips to organize your media browser and timeline while editing videos. But before we begin, download Filmora from their official website so you can follow all the steps easily.
Free Download For Win 7 or later(64-bit)
Free Download For macOS 10.14 or later
1. Create folders in Filmora
If you have footage from multiple cameras, it is best to create some folders first.
Step1 Create a Folder for Camera 1
If you have video footage from three cameras, you can create one folder for each camera.
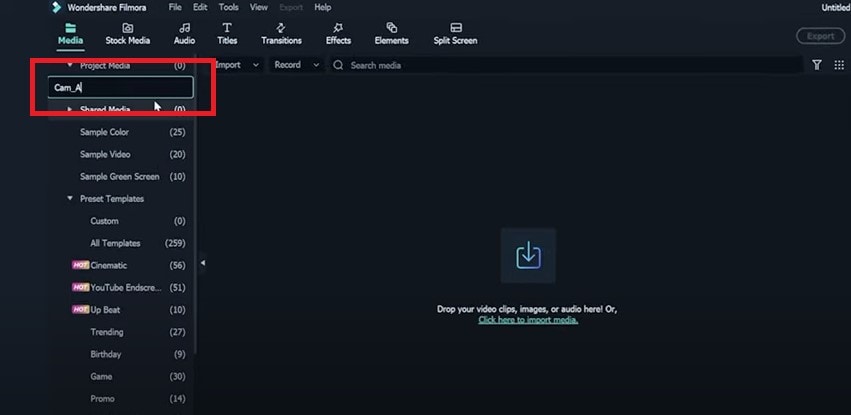
Go to the default folder on the top left and rename it Cam_A.
Step2 Create a Folder for Camera 2
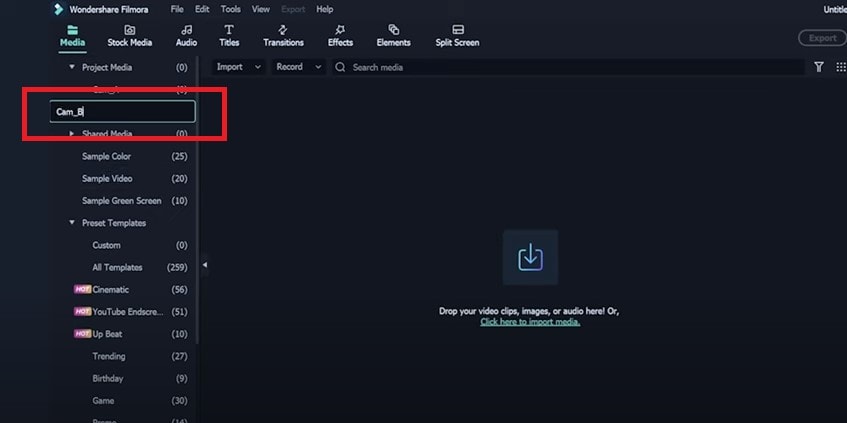
Then go to the bottom left of the media browser and click on this icon to add a new folder. Rename it to Cam_B.
Step3 Create a Folder for Camera 3
Repeat the steps to create another folder called Cam_C. Now you can import footage from your different cameras into each folder.

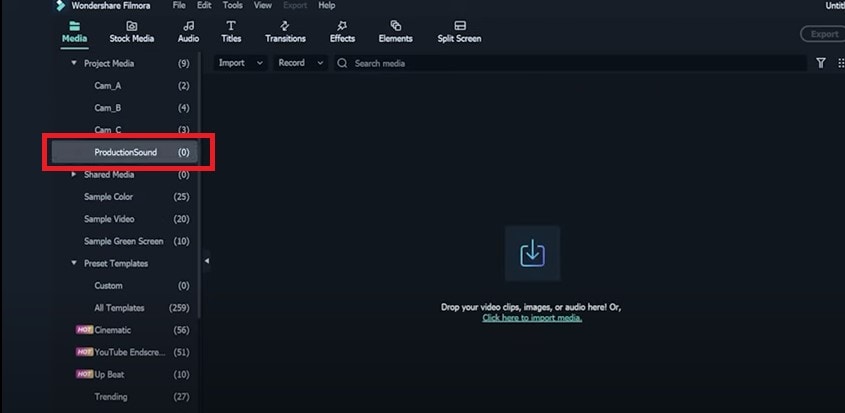
Step4 Create a Folder for Production Sound
After that, add three new folders and rename them to Production Sound, SFX, and Music. Production sound is usually the sound that is recorded on set. If you have recorded all dialects from the subjects on the location, you can put them into this folder.
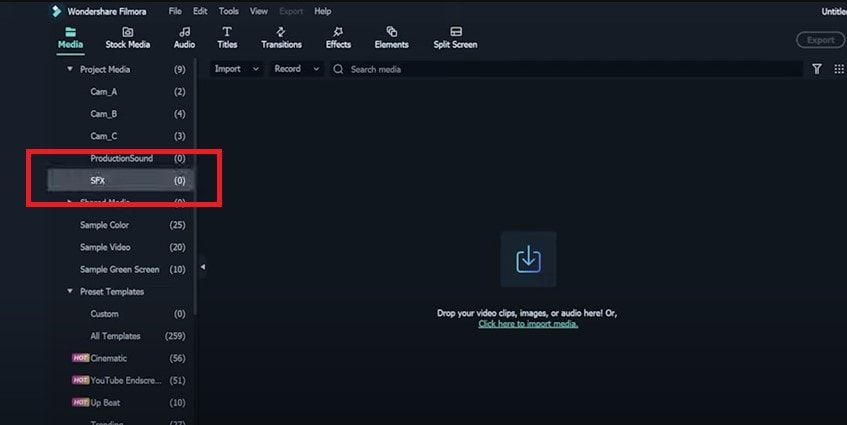
Step5 Create a Folder for SFX
SFX stands for sound effects. You can add push clapping, laughing and other Folly sounds into this folder.
Step6 Create a Folder for Music
Next, import all music files into the music folder. You can create folders for your graphics, B-roll, and stock footage if needed.

2. Organize your Timeline and Video Tracks
Step1 Create Tracks for Picture Editing
Keep the first three tracks for picture editing. These tracks are usually for picture editing that includes footage with no effects or some simple effects—for example resizing, keyframing, transitions, or Green Screen.
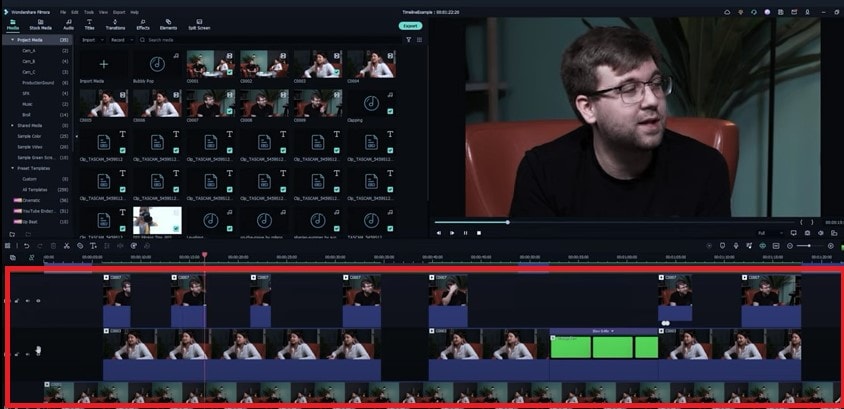
Step2 Create Tracks for Temporary Footage
Set up the fourth track for the temporary footage or placeholders so you can quickly switch the temporary footage without spending extra time looking for them.
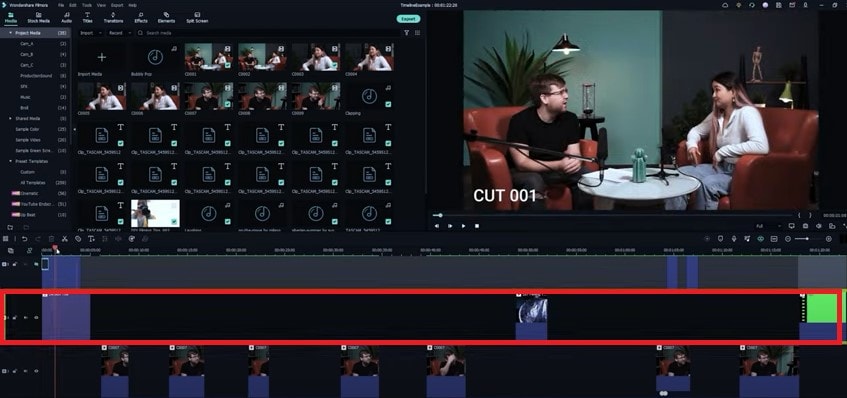
Step3 Create Tracks for Effects
Set the fifth video track as the effect track. It will include all effects from firmware that do not apply to the footage directly.
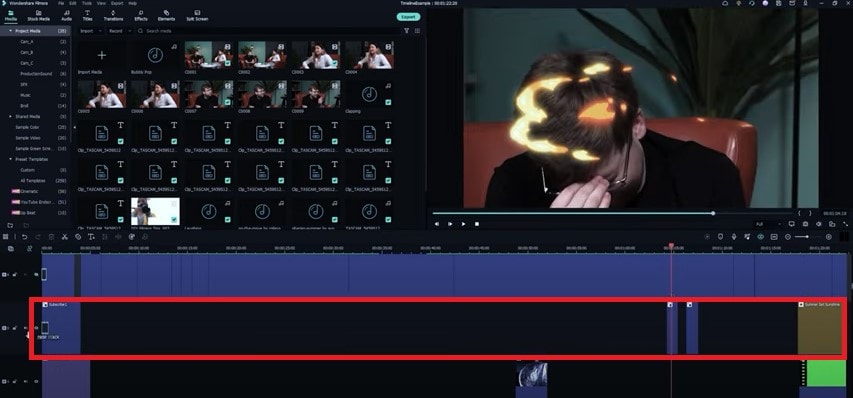
Step4 Create Tracks for On and Off Content
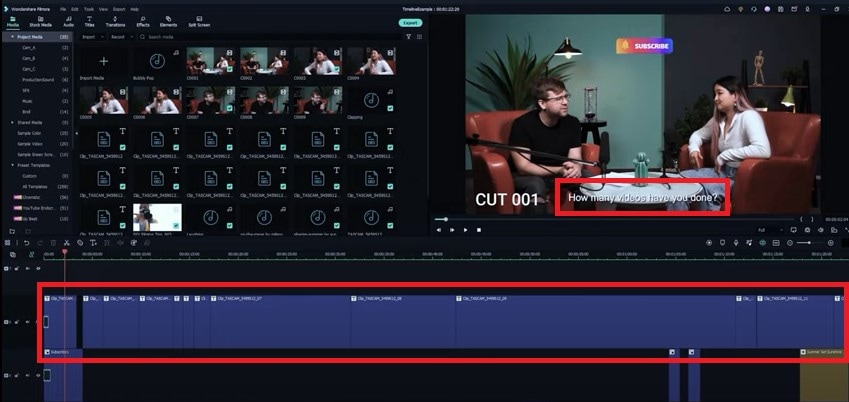
Next, on the sixth video track, you can add the content that you would want to turn on and off from time to time. In this example, you can put the subtitles here.
3. Organize your Audio Tracks
Step1 Create Tracks for Dialects
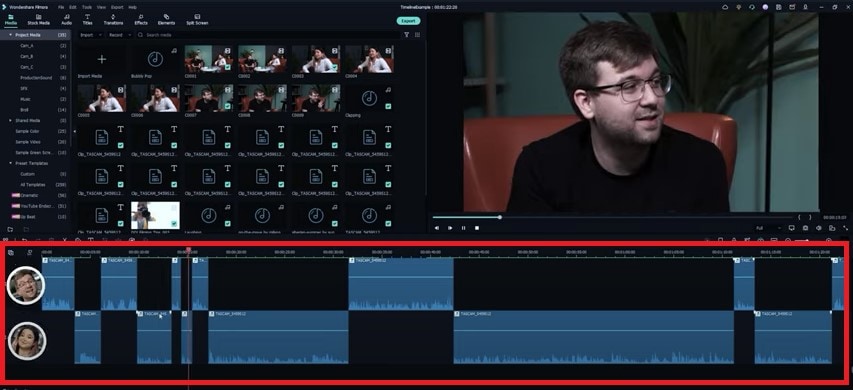
The first two tracks are usually for dialects. You can include all the dialects of characters in these tracks. Keep one track for each character. If you have more characters, feel free to assign more tracks to them.
Step2 Create Tracks for Additional Audio
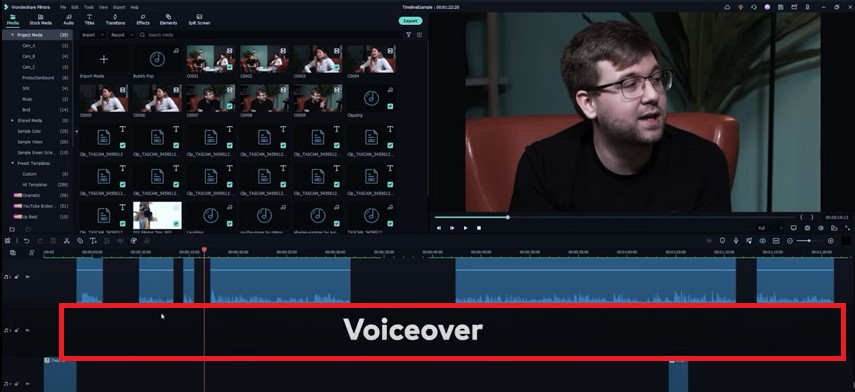
The third audio track could be for any additional audio, such as voiceover. If you don’t have a voiceover in your video, you can leave it empty.
Step3 Create Tracks for Sound Effects
The fourth track could usually be the sound effects track. You can add all the clapping sounds, laughing, and all kinds of other foley sound here.
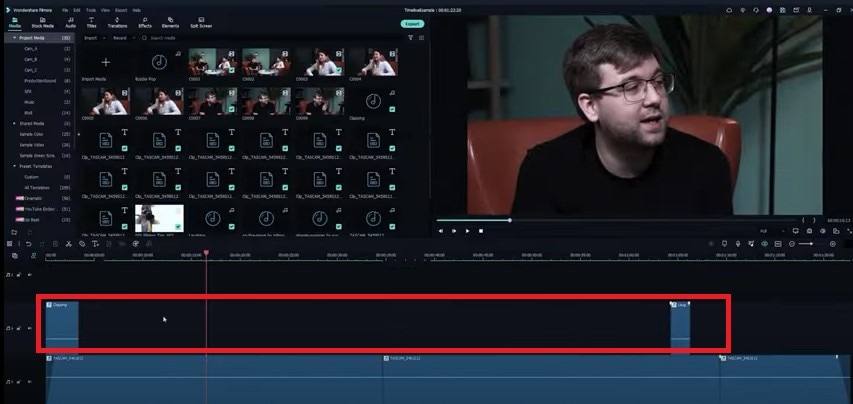
Step4 Create Tracks for Ambient Sound
Keep the fifth track for Ambient sound and room tone. You can use it to keep a very subtle environment sound in specific scenes. For example, you can use the room tone recorded on sets.
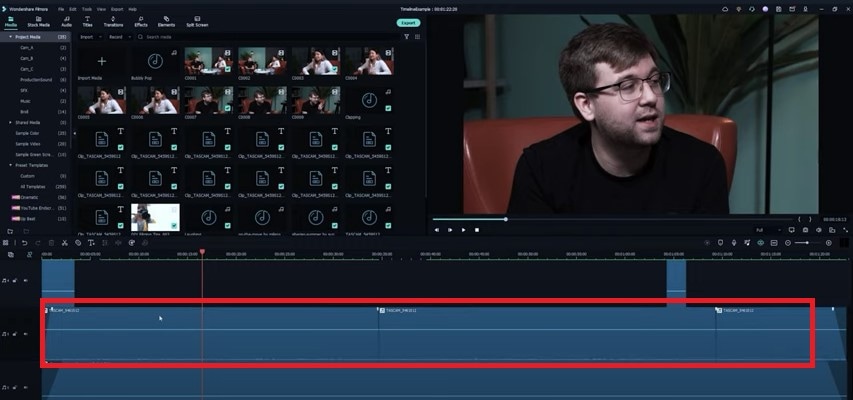
Step5 Create Tracks for Background Music
Finally, the sixth track is usually for background music. But, of course, you could also keep it empty if your project has no background music.
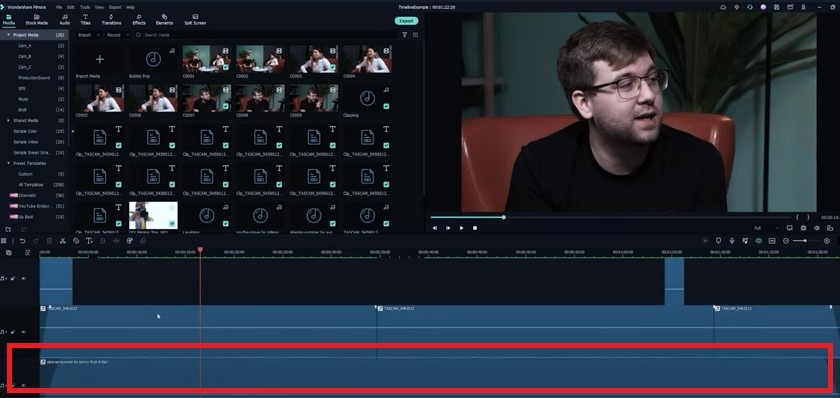
4. Color Code Your Clips
Suppose you want to make the timeline even easier to view. In that case, you can select all clips from a camera or a subject and color code them into a specific color. For example, you can color code the footage from camera A in red, camera B in yellow, and Camera C in blue. Now, when you look at the Timeline, you can quickly distinguish footage from different cameras.
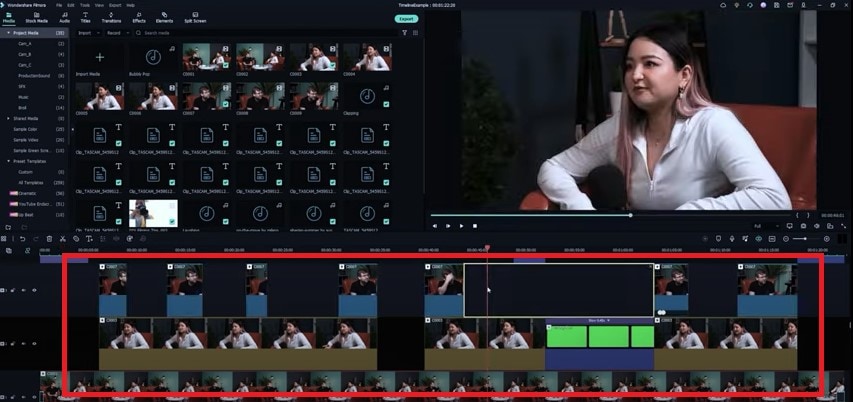
Part 2: Pro Tips about Improving Video Editing Efficiency
1. Rename Individual Clips
It would be much simpler to organize the timeline if you could quickly rename individual clips. Cut a clip into smaller segments and give each clip a different name. Make sure these clips have a name other than the source video to avoid confusion.
2. Remove Empty Timeline
For quick video editing, timeline organization is essential. Organize your materials and footage at all times to prevent delays. Put everything in the correct folders with the proper labels. To keep your timeline organized, select “Delete Empty Tracks” from the context menu when right-clicking on the track window on the left.
3. Use Keyboard Shortcuts
Knowing keyboard shortcuts allows you to carry out the editing process quickly and precisely.
4. Select Good Music
Don’t only concentrate on the images; the music also affects how well your video comes out. For example, suppose you’re making a drama movie. In that case, you should pick the right music track to evoke particular emotions in your viewers.
5. Add Text and Graphics
Depending on the style of the video, adding text, graphics, or stock video to your project could be helpful. You should provide more text than just the title for some videos.
Summary
You don’t need to be an expert in video editing to produce high-quality videos. In reality, you can complete the task without any expensive, high-end professional training. So how? Well, with the proper video editing tools like Wondershare Filmora, anything is possible. Follow the above guide, organize your timeline and keep the tracks consistent while video editing on Filmora so it’s easier to come back and edit a project or share with other editors.
Free Download For macOS 10.14 or later
1. Create folders in Filmora
If you have footage from multiple cameras, it is best to create some folders first.
Step1 Create a Folder for Camera 1
If you have video footage from three cameras, you can create one folder for each camera.
Go to the default folder on the top left and rename it Cam_A.

Step2 Create a Folder for Camera 2
Then go to the bottom left of the media browser and click on this icon to add a new folder. Rename it to Cam_B.

Step3 Create a Folder for Camera 3
Repeat the steps to create another folder called Cam_C. Now you can import footage from your different cameras into each folder.

Step4 Create a Folder for Production Sound
After that, add three new folders and rename them to Production Sound, SFX, and Music. Production sound is usually the sound that is recorded on set. If you have recorded all dialects from the subjects on the location, you can put them into this folder.

Step5 Create a Folder for SFX
SFX stands for sound effects. You can add push clapping, laughing and other Folly sounds into this folder.

Step6 Create a Folder for Music
Next, import all music files into the music folder. You can create folders for your graphics, B-roll, and stock footage if needed.

2. Organize your Timeline and Video Tracks
Step1 Create Tracks for Picture Editing
Keep the first three tracks for picture editing. These tracks are usually for picture editing that includes footage with no effects or some simple effects—for example resizing, keyframing, transitions, or Green Screen.

Step2 Create Tracks for Temporary Footage
Set up the fourth track for the temporary footage or placeholders so you can quickly switch the temporary footage without spending extra time looking for them.

Step3 Create Tracks for Effects
Set the fifth video track as the effect track. It will include all effects from firmware that do not apply to the footage directly.

Step4 Create Tracks for On and Off Content
Next, on the sixth video track, you can add the content that you would want to turn on and off from time to time. In this example, you can put the subtitles here.

3. Organize your Audio Tracks
Step1 Create Tracks for Dialects
The first two tracks are usually for dialects. You can include all the dialects of characters in these tracks. Keep one track for each character. If you have more characters, feel free to assign more tracks to them.

Step2 Create Tracks for Additional Audio
The third audio track could be for any additional audio, such as voiceover. If you don’t have a voiceover in your video, you can leave it empty.

Step3 Create Tracks for Sound Effects
The fourth track could usually be the sound effects track. You can add all the clapping sounds, laughing, and all kinds of other foley sound here.

Step4 Create Tracks for Ambient Sound
Keep the fifth track for Ambient sound and room tone. You can use it to keep a very subtle environment sound in specific scenes. For example, you can use the room tone recorded on sets.

Step5 Create Tracks for Background Music
Finally, the sixth track is usually for background music. But, of course, you could also keep it empty if your project has no background music.

4. Color Code Your Clips
Suppose you want to make the timeline even easier to view. In that case, you can select all clips from a camera or a subject and color code them into a specific color. For example, you can color code the footage from camera A in red, camera B in yellow, and Camera C in blue. Now, when you look at the Timeline, you can quickly distinguish footage from different cameras.

Part 2: Pro Tips about Improving Video Editing Efficiency
1. Rename Individual Clips
It would be much simpler to organize the timeline if you could quickly rename individual clips. Cut a clip into smaller segments and give each clip a different name. Make sure these clips have a name other than the source video to avoid confusion.
2. Remove Empty Timeline
For quick video editing, timeline organization is essential. Organize your materials and footage at all times to prevent delays. Put everything in the correct folders with the proper labels. To keep your timeline organized, select “Delete Empty Tracks” from the context menu when right-clicking on the track window on the left.
3. Use Keyboard Shortcuts
Knowing keyboard shortcuts allows you to carry out the editing process quickly and precisely.
4. Select Good Music
Don’t only concentrate on the images; the music also affects how well your video comes out. For example, suppose you’re making a drama movie. In that case, you should pick the right music track to evoke particular emotions in your viewers.
5. Add Text and Graphics
Depending on the style of the video, adding text, graphics, or stock video to your project could be helpful. You should provide more text than just the title for some videos.
Summary
You don’t need to be an expert in video editing to produce high-quality videos. In reality, you can complete the task without any expensive, high-end professional training. So how? Well, with the proper video editing tools like Wondershare Filmora, anything is possible. Follow the above guide, organize your timeline and keep the tracks consistent while video editing on Filmora so it’s easier to come back and edit a project or share with other editors.
Also read:
- [New] 2024 Approved Electrical Upgrades
- [New] 2024 Approved Strategies for Using YouTube to Boost Classroom Engagement
- [New] Discover Top-Tier PS3 Games on Your PC Today
- [Updated] 2024 Approved Unveiling Celestial Beauty Premium HDR Sky Portals
- [Updated] Elevate Your Videography - 7 Free Sound Effects Collection
- 2024 Approved This Article Provides Helpful Tips for Creating Better Film Footage in Public Places. Learn How to Choose the Right Angle and Re-Record the Audio with Filmora
- Forgotten The Voicemail Password Of Honor Magic 6? Try These Fixes
- In 2024, Joining the Global Game How to Zoom on Xbox One
- New In 2024, Want to Create a Stunning Intro Video on Your Smartphone? Legend Intro Maker Is a Popular Choice. Learn the Steps to Design Intro Video Legend Intro Maker
- New This Article Aims to Show You How to Export Videos in Filmora for 2024
- Uncover Hidden Missing Emails in Gmail with These Simple Techniques
- Update to the Most Recent Epson L3150 Printer Software for Windows Users (Versions 11/8/7)
- Updated 2024 Approved MP3 CUTTER DOWNLOADMP3 Cutter Download Is One of the Most Reliable Tools for Editing of Music Files in a Fast and Friendly Way
- Title: New In 2024, How to Make a Video Loop in QuickTime
- Author: Morgan
- Created at : 2024-09-27 19:33:11
- Updated at : 2024-09-30 17:52:14
- Link: https://ai-video-editing.techidaily.com/new-in-2024-how-to-make-a-video-loop-in-quicktime/
- License: This work is licensed under CC BY-NC-SA 4.0.
