
:max_bytes(150000):strip_icc():format(webp)/the-11-best-whatsapp-tricks-and-tips-in-2020-4782877-fd12628437f34b85ac38f1a9ac95637e.jpg)
New In 2024, How to Use Visual Effect for Zoom
How to Use Visual Effect for Zoom
Zoom, a video calling software, has been quite popular over the last several months and is still one of the most used videos calling applications by millions of people worldwide. The site is a favorite among working professionals, but it is also utilized by individuals to connect with their friends and loved ones. Additionally, despite the app’s abundance of practical built-in tools and functions, it lacks the fun filters and special effects that the majority of users are used to when using a camera. Zoom has ingrained itself in our vocabulary during the last year. It seemed almost inevitable given that everything, from meetings to parties, has moved online.
You don’t need to seek farther than Zoom visual effects to inject a little jazz into the routine Zoom meetings during these hard times. By making adjustments to your Video configuration either before or during a video call, you may add visual effects in Zoom. Zoom meetings may be tedious to conduct over extended periods of time. Additionally, it would be helpful if you recorded the condition of your room before any Zoom meetings. You wouldn’t want to reveal your disorganized space while in a meeting. In these situations, adding visual effects will keep your private area private while also making your Zoom meetings entertaining and exciting. It will also prevent others from seeing your filthy room. This tutorial will walk you through the process of adding visual effects to Zoom step-by-step. In addition, you will get acquainted with the numerous camera functions and visual effects that you may employ during a Zoom video conversation.
- 1. What apps can add visual effect on Zoom?
- 2. How do I add visual effects to Zoom in Mobile?
- 3. How do you download Zoom effects?
Part 1: Popular Visual Effects you can add to Zoom
You may apply one of four main graphic effects to your Zoom meetings. The visual effects that you may use in your next Zoom video chat are briefly summarized below.
1. Visual Backgrounds
Virtual backdrops may transform any plain wall into an artistic setting. Zoom provides you the choice to add photographs to your backdrop in addition to offering you a few pre-made backdrops. Zoom lets you add a movie to your backdrop in addition to simply photographs. With the help of this imaginative feature, gather your pals and enjoy your favorite meme or video. A presentation’s collection of photos, a video, or a single image may all serve as virtual backdrops. A green screen would often be used as your real backdrop and consistent lighting would be required.
To avoid having to reveal your real surroundings while in a conference, you may add any picture or video as a virtual backdrop in Zoom. You have the option of adding own photos and movies or selecting from the pre-existing backdrop films and images. The file type for video backgrounds should be MP4 or MOV, and the resolution should range from 360p to a maximum of 1080p. Ensure that the mirroring of your video is deselected in the Zoom’s Video settings if your backdrop picture has text that may be read. By using virtual backdrops, you may alter the background of your video as it appears to the audience member with whom you are speaking. During the video conference you’re in, the other participants will be able to view your face and body overlaid on the backdrop of your choice.
2. Filters
With these filters, you can have fun in all of your Zoom meetings! Filters are a fun way to spend time with loved ones who are far away, particularly at a period when maintaining social distance is crucial. Filters are the modifications you make to yourself during Zoom meetings (such as a mustache, beard, etc.). They enliven the proceedings and contribute to the fun and memorability of your Zoom meetings.
Your films’ colors may be changed, and video filters can also add new aspects. By selecting a filter appropriate for each event, like team meetings or game nights, you may create the right atmosphere. You may embellish your face in the video with flowers or animal traits by using Zoom’s various filters. Alternately, you might just convert your video’s color to black and white. The video filters from a different program, however, allow you to apply more vibrant filters and place a greater emphasis on special effects.
3. Lighting and Touch-ups
The Lighting function enhances lighting effects and makes adjustments for low light situations to make you seem more professional during a Zoom conference. Similar to this, Touch-up enhances your facial characteristics by making your skin shine, erasing wrinkles, and giving your face a radiant appearance.
On your Zoom videos, changing your lighting and applying touch-ups may improve how you seem. By adjusting your lighting, you can make even dim illumination look bright. By doing touch-ups, you may get a smoother skin texture and get rid of any obvious imperfections.
4. Studio Effects
Zoom has been developing on a new feature called Studio Effects that would give customers the option of using virtual cosmetics in their movies. They are still checking it out before formally releasing it since it is still in beta. However, it is still available to users under the Backgrounds & Filters area. You may adjust the opacity as you like. You have the option to choose a new color or one of the predefined colors. Additionally, you may decide to employ the face effects in all of your next meetings, albeit doing so might be problematic if you use Zoom for business. Don’t worry if you’re running late. Zoom can give your face a natural-looking cosmetic makeover in only one minute!
This function is intended for less formal settings, such as gatherings of friends or family. Anyone who wants to seem more professional during meetings has access to Studio Effects, which offers the choice of various eyebrow colors, beards, and lipsticks. These are a few recently added features. You may add mustaches, beards, and brows in a variety of designs, hues, and intensities. Additionally, you have the option of coloring your lips.
Part 2: How to Add Visual Effects to Zoom
Along with facilitating online meetings, the Zoom program also lets you play with its visual effects. You just need to make a few adjustments to the video settings or utilize another third-party program to be ready to go.
Step1Start a Zoom meeting
You can download Zoom, install it on your computer, and log into your account if you don’t already have it if you don’t already have it.
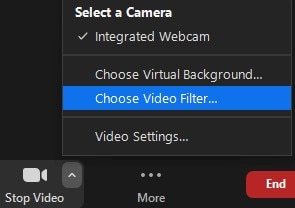
Step2Tap Background and Filters
After logging in to Zoom, use these settings. - Options > Camera > Video

Step3Faucet Filters
Here, you may play with a variety of visual effects and customize them to suit your tastes. Pick one of the numerous filters that are offered. To activate the filter, tap it.
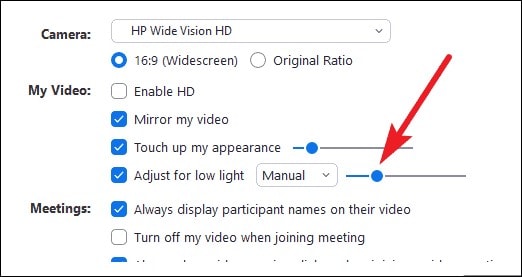
Step4Set Lighting Effects to on
Select “Adjust for low light” in the video options. For your lighting, you may choose between Auto and Manual effects. Zoom will automatically detect and adapt for the lighting in your room if you choose Auto.
Use Zoom’s noise reduction option to keep your conversation focused during your video conference in addition to adding visual elements. To do this, go to “Audio Settings” and choose “High” under “Suppress background noise.” Once you start speaking during the video conference, this essentially cancels out any background noise.
Part 3: Related FAQs
1. What apps can add visual effect on Zoom?
Following is the list of top three apps that you can use to utilize visual effects Zoom application:
Snap Camera is regarded as the most user-friendly. It is a software that you can download for Windows or Mac that works with live broadcasts and video chats. Because it was created by the people who founded Snapchat, it shares a broad variety of filters with that platform.
Link: Snap Camera
The Mac is the only platform on which CamTwist may be used. You may also use it to give your movies additional filters and unique effects. This program lets you pick from a variety of pre-made effects while also allowing you to create your own.
Link: CamTwist
Another desktop application that lets you change and even blur your backdrop is ManyCam. It enables you to apply digital effects, filters, and 3-D masks to your face. Using this tool, you can also build layers and presets.
Link: ManyCam
2. How do I add visual effects to Zoom in Mobile?
Zoom includes a function that might be useful if you don’t want to tidy up or want to add some entertainment to your calls. You may utilize Zoom virtual backdrops to alter your surroundings and take you to a more pleasant location on both the desktop and mobile apps. After joining one on a mobile device, pick Virtual backdrop by tapping the More icon in the bottom right corner. Choose a photo from the list of choices, or click the plus sign (+) to add a photo or video from your gallery.
3. How do you download Zoom effects?
Pressing the Studio Effects button after installing Zoom for the first time will prompt a pop-up asking you to download the Studio Effects package. Several filters, suited for both business meetings and conversations with friends, let you customize the video and audio during your video calls. To start downloading the Effects bundle, click the Download button. The “Studio Effects” window will appear on the right-hand side of the Background & Filter page after the download is finished. All the face components and choices are available in this Studio Effects window.
Conclusion
The most popular video meeting tool worldwide is Zoom. Family, friends, coworkers, and any two people who want to video chat utilize it. Zoom visual effects are the ideal tool for injecting some humor into otherwise dull Zoom sessions and meetings. A few simple steps will get you a striking backdrop, a humorous filter, and some interesting effects. Since the majority of formal work is now completed from home, Zoom has taken over as the standard video conferencing program. Try out as many of the effects as you like, and use this page as a companion and a map to help you along the way.
- 1. What apps can add visual effect on Zoom?
- 2. How do I add visual effects to Zoom in Mobile?
- 3. How do you download Zoom effects?
Part 1: Popular Visual Effects you can add to Zoom
You may apply one of four main graphic effects to your Zoom meetings. The visual effects that you may use in your next Zoom video chat are briefly summarized below.
1. Visual Backgrounds
Virtual backdrops may transform any plain wall into an artistic setting. Zoom provides you the choice to add photographs to your backdrop in addition to offering you a few pre-made backdrops. Zoom lets you add a movie to your backdrop in addition to simply photographs. With the help of this imaginative feature, gather your pals and enjoy your favorite meme or video. A presentation’s collection of photos, a video, or a single image may all serve as virtual backdrops. A green screen would often be used as your real backdrop and consistent lighting would be required.
To avoid having to reveal your real surroundings while in a conference, you may add any picture or video as a virtual backdrop in Zoom. You have the option of adding own photos and movies or selecting from the pre-existing backdrop films and images. The file type for video backgrounds should be MP4 or MOV, and the resolution should range from 360p to a maximum of 1080p. Ensure that the mirroring of your video is deselected in the Zoom’s Video settings if your backdrop picture has text that may be read. By using virtual backdrops, you may alter the background of your video as it appears to the audience member with whom you are speaking. During the video conference you’re in, the other participants will be able to view your face and body overlaid on the backdrop of your choice.
2. Filters
With these filters, you can have fun in all of your Zoom meetings! Filters are a fun way to spend time with loved ones who are far away, particularly at a period when maintaining social distance is crucial. Filters are the modifications you make to yourself during Zoom meetings (such as a mustache, beard, etc.). They enliven the proceedings and contribute to the fun and memorability of your Zoom meetings.
Your films’ colors may be changed, and video filters can also add new aspects. By selecting a filter appropriate for each event, like team meetings or game nights, you may create the right atmosphere. You may embellish your face in the video with flowers or animal traits by using Zoom’s various filters. Alternately, you might just convert your video’s color to black and white. The video filters from a different program, however, allow you to apply more vibrant filters and place a greater emphasis on special effects.
3. Lighting and Touch-ups
The Lighting function enhances lighting effects and makes adjustments for low light situations to make you seem more professional during a Zoom conference. Similar to this, Touch-up enhances your facial characteristics by making your skin shine, erasing wrinkles, and giving your face a radiant appearance.
On your Zoom videos, changing your lighting and applying touch-ups may improve how you seem. By adjusting your lighting, you can make even dim illumination look bright. By doing touch-ups, you may get a smoother skin texture and get rid of any obvious imperfections.
4. Studio Effects
Zoom has been developing on a new feature called Studio Effects that would give customers the option of using virtual cosmetics in their movies. They are still checking it out before formally releasing it since it is still in beta. However, it is still available to users under the Backgrounds & Filters area. You may adjust the opacity as you like. You have the option to choose a new color or one of the predefined colors. Additionally, you may decide to employ the face effects in all of your next meetings, albeit doing so might be problematic if you use Zoom for business. Don’t worry if you’re running late. Zoom can give your face a natural-looking cosmetic makeover in only one minute!
This function is intended for less formal settings, such as gatherings of friends or family. Anyone who wants to seem more professional during meetings has access to Studio Effects, which offers the choice of various eyebrow colors, beards, and lipsticks. These are a few recently added features. You may add mustaches, beards, and brows in a variety of designs, hues, and intensities. Additionally, you have the option of coloring your lips.
Part 2: How to Add Visual Effects to Zoom
Along with facilitating online meetings, the Zoom program also lets you play with its visual effects. You just need to make a few adjustments to the video settings or utilize another third-party program to be ready to go.
Step1Start a Zoom meeting
You can download Zoom, install it on your computer, and log into your account if you don’t already have it if you don’t already have it.
Step2Tap Background and Filters
After logging in to Zoom, use these settings. - Options > Camera > Video
Step3Faucet Filters
Here, you may play with a variety of visual effects and customize them to suit your tastes. Pick one of the numerous filters that are offered. To activate the filter, tap it.
Step4Set Lighting Effects to on
Select “Adjust for low light” in the video options. For your lighting, you may choose between Auto and Manual effects. Zoom will automatically detect and adapt for the lighting in your room if you choose Auto.
Use Zoom’s noise reduction option to keep your conversation focused during your video conference in addition to adding visual elements. To do this, go to “Audio Settings” and choose “High” under “Suppress background noise.” Once you start speaking during the video conference, this essentially cancels out any background noise.
Part 3: Related FAQs
1. What apps can add visual effect on Zoom?
Following is the list of top three apps that you can use to utilize visual effects Zoom application:
Snap Camera is regarded as the most user-friendly. It is a software that you can download for Windows or Mac that works with live broadcasts and video chats. Because it was created by the people who founded Snapchat, it shares a broad variety of filters with that platform.
Link: Snap Camera
The Mac is the only platform on which CamTwist may be used. You may also use it to give your movies additional filters and unique effects. This program lets you pick from a variety of pre-made effects while also allowing you to create your own.
Link: CamTwist
Another desktop application that lets you change and even blur your backdrop is ManyCam. It enables you to apply digital effects, filters, and 3-D masks to your face. Using this tool, you can also build layers and presets.
Link: ManyCam
2. How do I add visual effects to Zoom in Mobile?
Zoom includes a function that might be useful if you don’t want to tidy up or want to add some entertainment to your calls. You may utilize Zoom virtual backdrops to alter your surroundings and take you to a more pleasant location on both the desktop and mobile apps. After joining one on a mobile device, pick Virtual backdrop by tapping the More icon in the bottom right corner. Choose a photo from the list of choices, or click the plus sign (+) to add a photo or video from your gallery.
3. How do you download Zoom effects?
Pressing the Studio Effects button after installing Zoom for the first time will prompt a pop-up asking you to download the Studio Effects package. Several filters, suited for both business meetings and conversations with friends, let you customize the video and audio during your video calls. To start downloading the Effects bundle, click the Download button. The “Studio Effects” window will appear on the right-hand side of the Background & Filter page after the download is finished. All the face components and choices are available in this Studio Effects window.
Conclusion
The most popular video meeting tool worldwide is Zoom. Family, friends, coworkers, and any two people who want to video chat utilize it. Zoom visual effects are the ideal tool for injecting some humor into otherwise dull Zoom sessions and meetings. A few simple steps will get you a striking backdrop, a humorous filter, and some interesting effects. Since the majority of formal work is now completed from home, Zoom has taken over as the standard video conferencing program. Try out as many of the effects as you like, and use this page as a companion and a map to help you along the way.
Top 5 Ways To Convert Hdr To Sdr Videos
HDR or the High Dynamic Range Images points out the brightest and the darkest spots on an image, while an SDR has fewer details and colors. In comparison, HDR has a resolution four times as excellent as an SDR video. With a higher contrast ratio and color information, HDR videos are more vivid and pleasing.
Then why is there a need to convert HDR to SDR? An HDR file is huge and is currently incompatible with many old and some new devices. To view HDR videos, you need to lower the resolution and change the size of the file tidbit to convert it to 1080 SDR without compromising on the quality.
Plenty of HDR converters can perform the task, but only a few have the benefit of retaining the 4K quality of the original video. This article will walk you through the five easiest ways of converting videos from HDR to SDR format. So without further ado, let’s begin.
Easiest Fix - Edit and Convert HDR Videos in Wondershare Filmora [PC & Mac]
You must be living under a rock if you are still unaware of Wondershare Filmora . Filmora is an excellent app to make and edit your videos with the finesse of a professional. Wondershare Filmora comes with professional video editing tools packaged perfectly for beginners.
Filmora is especially a blessing for content creators looking to create unique and exciting videos in any resolution, video quality, and format they want. Apart from its usual video editing tools, a perk of having Wondershare Filmora is that you can easily change the videos from one format to another. For example, you can convert an HDR video to SDR in Filmora so that users with older devices incompatible with HDR can also view the video without burning their eyes.
It does not matter if you have iPhone 12 HDR videos or an HDR clip shot with a professional camera; Filmora can handle it all. The best part of converting the video is that Filmora supports efficient transferring of HDR files from your phone to your PC. So, without further ado, let us start with how you can convert an HDR video to SDR in Filmora.
Free Download For Win 7 or later(64-bit)
Free Download For macOS 10.14 or later
How to Convert an HDR video to SDR without data loss in Filmora
To convert your video to SDR, start by downloading Wondershare Filmora if you do not already have it downloaded.
Download the Application
Download Wondershare Filmora according to your PC type, i.e., Mac or Windows. Install it and run it. Launch the application to get working.
Import Your Videos
- Next, import your HDR video file. To import, click on the Import button in the primary window. From there, select the video file you want to convert to SDR.
- Once imported, drag the file to the timeline. You can tweak or edit it too before converting. You may trim it or cut an unwanted section.

- If you want to change to SDR while editing the project, click the File button and select Project Settings. From the settings, go to Colour space and select the SDR-Rec709 option.

Exporting the File
- If you want to only change the color space setting for the exported file, go to Export and then click on Settings.
- From settings, click on the Colour Space option, and from the drop-down menu, select SDR-Rec709.

- Press Ok to save the changes and export the file in your desired format.
- If you want to adjust the resolution according to the device like iPhone, Samsung, Playstation, or Xbox you can also do that directly with Filmora by clicking the Device tab in the Export Confirm the settings and press Ok.

This is the easiest and cleanest way to get an SDR copy of an HDR file. Filmora does it effortlessly, allowing you to get an SDR video out of an HDR one.
Decode Video from HDR to SDR with a Video Converter
If you have ever worked with converting videos, then you are probably familiar with Handbrake. Handbrake is a household name for video converting, especially when it comes to 4KHDR to SDR video conversions. It has a free open source feature that allows you to convert to SDR videos with an MP4 or MKV format.
Steps of Decoding HDR Video to SDR with Handbrake
Before converting your HDR video to SDR, make sure you have downloaded Handbrake on your computer.
- Open the Handbrake app.
- To import your video to Handbrake, click on File, then Source Selection. You can also drag and drop the video to scan it. Next, wait for Handbrake to scan the title. Once the video scan is complete, all the information will be displayed in the source section.

- Once the file is imported, you can now select the output format from the right panel under General. The default format already specified in Handbrake is Fast 1080p30; you can change that if you are looking for a different form.

- You can also change the format depending on the device type in Handbrake.
- Lastly, go to Presets, click Production, and select Production Standard to convert 4K HDR video to 4K SDR. You can also do that by going to General Profile under the Legacy column.

- Now, select format, quality, resolution, and video codec.
- Lastly, select the destination for the file from the Browse button and press encode to start the conversion.

With a few simple clicks, your HDR file can easily be converted to SDR using Handbrake.
Transcode Video from HDR to SDR by Image Editing [Samsung only]
If you own the latest Samsung S22 phone, you are probably aware of its feature that allows you to record in an HDR10 view. But, what do you do if you want to send the video to someone whose phone is incompatible with HDR? The video will appear too bright and washed out.
By converting the video to SDR, you can send them the video without burning their retinas. This method to convert HDR videos to SDR is especially for Samsung Galaxy phones. The gallery app initially used to have a built-in option to do that, but it’s not there anymore. While the original option is removed, you can still use the method below to convert an HDR video to SDR with just a few taps.
- To convert HDR10+ video to SDR on a Samsung Galaxy phone, you can directly proceed with it on your phone.
- Head to and open Gallery, choose your HDR10+ video and tap three dots in the bottom right corner.
- From the pop-up menu, select Open in Video Player.
- Once the video opens in the video player, click on another three dots in the top right corner.
- From there, tap on the Editor
- In the editor, tap again on three dots on the bottom right and now select Size and Format.
- From this menu, you can change the resolution of the video as well as its format. From the format drop-down, you can select SDR to convert your video to SDR.
- Make sure you do not tap on Save; instead, click on the three dots again and tap on Save as Copy. This will leave your original HDR video untouched and save a copy for the SDR video.
Convert HDR 4K Video to SDR with YouTube [Untested]
HDR videos on Youtube show higher color dynamics and contrast ratios than an SDR video. Viewers with HDR-compatible devices will see ‘HDR’ after every video quality option in the video settings (1080p HDR).
However, the videos uploaded as HDR on youtube can be viewed on HDR unsupported devices too. This happens because youtube automatically converts all HDR videos to SDR to be viewed on non-HDR devices. Here is a brief introduction to the steps of converting HDR to SDR on Youtube:
- Record the metadata by exporting it from an HDR-supported application like Wondershare Filmora . The metadata should be in a codec or container to be played by Youtube correctly.
- Grade your HDR properly as Rec. 2020 with PQ or HLG. Ensure the videos are graded correctly using an HDR transfer function to retain the quality. If you are unsure about the videos graded as HDR, you should not use this method because it can distort the video.
- rectly using an HDR transfer function to retain the quality. If you are not sure about the videos graded as HDR, you should not use this method because it can distort the video.

- Once done, upload it on Youtube. If it detects HDR metadata during the upload, Youtube automatically produces an SDR conversion for non-HDR compatible devices.

- Downloading the video from HDR unsupported devices will save an SDR video.
This method seems easy but has greater risks involved such as distortion of video if improper HDR grading is done.
Get Real-time Video HDR to SDR Conversion by Video Content Providers
With gaming becoming almost a sport, online streaming has grown immensely popular. These streaming services allow you to stream in 4K HDR format. However, a significant downside of this is that many devices are still incompatible with HDR video.
We have listed multiple methods to convert your HDR video clips to SDR, but what about a live stream? We highly recommend checking out the Intel official blog post for converting your HDR videos to SDR in real-time. The blog post describes how you can convert your live stream to SDR with different methods. You can give it a read if you are interested in that.
Hot FAQs on How to Convert HDR to SDR
1. Is SDR better than HDR?
SDR is Standard Dynamic Range, while HDR stands for High Dynamic Range. HDR is the latest technology concerning quality, clear and detailed images. HDR is perfect for videos that require high contrast, shadows, and mixed light.
HDR is definitely better than SDR because the “High” definition takes everything to the next level. However, SDR is frequently used as most devices are not compatible with HDR.
2. Why is HDR smaller than SDR?
Undoubtedly, HDR provides better image quality, colors, and clarity than SDR, but why is the file size smaller then? The answer is quite simple. HDR10 files are equipped with HVAC. HVAC is a very efficient file compressor that compresses the file while keeping its quality intact. SDR files are not compressed with SDR; hence the file size is much bigger.
3. Why does HDR look washed out?
An HDR video might look too bright or washed out if your device is incompatible with HDR color space. Unlike the iPhone 12 or Samsung Galaxy S22, phones have a built-in HDR recording feature. However, older versions may not be able to enjoy the clarity and colors offered by an HDR recording. Hence when an HDR video is sent to someone with an older phone, it looks as if the video is washed out.
Final Words
While HDR might be a superior color space, SDR is frequently used for video clips so maximum people can enjoy the video despite what their devices are compatible with. You can easily convert an HDR video to SDR using Wondershare Filmora or any other methods listed above.
An important point to note is that HDR videos converted to SDR might look a little off sometimes with darker shadows and sharpness. It might be a better idea to record in SDR rather than convert it to SDR later. However, converting is still a popular way to go with an HDR video; you will also have a beautiful high-quality video and an SDR copy.
Free Download For macOS 10.14 or later
How to Convert an HDR video to SDR without data loss in Filmora
To convert your video to SDR, start by downloading Wondershare Filmora if you do not already have it downloaded.
Download the Application
Download Wondershare Filmora according to your PC type, i.e., Mac or Windows. Install it and run it. Launch the application to get working.
Import Your Videos
- Next, import your HDR video file. To import, click on the Import button in the primary window. From there, select the video file you want to convert to SDR.
- Once imported, drag the file to the timeline. You can tweak or edit it too before converting. You may trim it or cut an unwanted section.
- If you want to change to SDR while editing the project, click the File button and select Project Settings. From the settings, go to Colour space and select the SDR-Rec709 option.
Exporting the File
- If you want to only change the color space setting for the exported file, go to Export and then click on Settings.
- From settings, click on the Colour Space option, and from the drop-down menu, select SDR-Rec709.
- Press Ok to save the changes and export the file in your desired format.
- If you want to adjust the resolution according to the device like iPhone, Samsung, Playstation, or Xbox you can also do that directly with Filmora by clicking the Device tab in the Export Confirm the settings and press Ok.
This is the easiest and cleanest way to get an SDR copy of an HDR file. Filmora does it effortlessly, allowing you to get an SDR video out of an HDR one.
Decode Video from HDR to SDR with a Video Converter
If you have ever worked with converting videos, then you are probably familiar with Handbrake. Handbrake is a household name for video converting, especially when it comes to 4KHDR to SDR video conversions. It has a free open source feature that allows you to convert to SDR videos with an MP4 or MKV format.
Steps of Decoding HDR Video to SDR with Handbrake
Before converting your HDR video to SDR, make sure you have downloaded Handbrake on your computer.
- Open the Handbrake app.
- To import your video to Handbrake, click on File, then Source Selection. You can also drag and drop the video to scan it. Next, wait for Handbrake to scan the title. Once the video scan is complete, all the information will be displayed in the source section.
- Once the file is imported, you can now select the output format from the right panel under General. The default format already specified in Handbrake is Fast 1080p30; you can change that if you are looking for a different form.
- You can also change the format depending on the device type in Handbrake.
- Lastly, go to Presets, click Production, and select Production Standard to convert 4K HDR video to 4K SDR. You can also do that by going to General Profile under the Legacy column.
- Now, select format, quality, resolution, and video codec.
- Lastly, select the destination for the file from the Browse button and press encode to start the conversion.
With a few simple clicks, your HDR file can easily be converted to SDR using Handbrake.
Transcode Video from HDR to SDR by Image Editing [Samsung only]
If you own the latest Samsung S22 phone, you are probably aware of its feature that allows you to record in an HDR10 view. But, what do you do if you want to send the video to someone whose phone is incompatible with HDR? The video will appear too bright and washed out.
By converting the video to SDR, you can send them the video without burning their retinas. This method to convert HDR videos to SDR is especially for Samsung Galaxy phones. The gallery app initially used to have a built-in option to do that, but it’s not there anymore. While the original option is removed, you can still use the method below to convert an HDR video to SDR with just a few taps.
- To convert HDR10+ video to SDR on a Samsung Galaxy phone, you can directly proceed with it on your phone.
- Head to and open Gallery, choose your HDR10+ video and tap three dots in the bottom right corner.
- From the pop-up menu, select Open in Video Player.
- Once the video opens in the video player, click on another three dots in the top right corner.
- From there, tap on the Editor
- In the editor, tap again on three dots on the bottom right and now select Size and Format.
- From this menu, you can change the resolution of the video as well as its format. From the format drop-down, you can select SDR to convert your video to SDR.
- Make sure you do not tap on Save; instead, click on the three dots again and tap on Save as Copy. This will leave your original HDR video untouched and save a copy for the SDR video.
Convert HDR 4K Video to SDR with YouTube [Untested]
HDR videos on Youtube show higher color dynamics and contrast ratios than an SDR video. Viewers with HDR-compatible devices will see ‘HDR’ after every video quality option in the video settings (1080p HDR).
However, the videos uploaded as HDR on youtube can be viewed on HDR unsupported devices too. This happens because youtube automatically converts all HDR videos to SDR to be viewed on non-HDR devices. Here is a brief introduction to the steps of converting HDR to SDR on Youtube:
- Record the metadata by exporting it from an HDR-supported application like Wondershare Filmora . The metadata should be in a codec or container to be played by Youtube correctly.
- Grade your HDR properly as Rec. 2020 with PQ or HLG. Ensure the videos are graded correctly using an HDR transfer function to retain the quality. If you are unsure about the videos graded as HDR, you should not use this method because it can distort the video.
- rectly using an HDR transfer function to retain the quality. If you are not sure about the videos graded as HDR, you should not use this method because it can distort the video.
- Once done, upload it on Youtube. If it detects HDR metadata during the upload, Youtube automatically produces an SDR conversion for non-HDR compatible devices.
- Downloading the video from HDR unsupported devices will save an SDR video.
This method seems easy but has greater risks involved such as distortion of video if improper HDR grading is done.
Get Real-time Video HDR to SDR Conversion by Video Content Providers
With gaming becoming almost a sport, online streaming has grown immensely popular. These streaming services allow you to stream in 4K HDR format. However, a significant downside of this is that many devices are still incompatible with HDR video.
We have listed multiple methods to convert your HDR video clips to SDR, but what about a live stream? We highly recommend checking out the Intel official blog post for converting your HDR videos to SDR in real-time. The blog post describes how you can convert your live stream to SDR with different methods. You can give it a read if you are interested in that.
Hot FAQs on How to Convert HDR to SDR
1. Is SDR better than HDR?
SDR is Standard Dynamic Range, while HDR stands for High Dynamic Range. HDR is the latest technology concerning quality, clear and detailed images. HDR is perfect for videos that require high contrast, shadows, and mixed light.
HDR is definitely better than SDR because the “High” definition takes everything to the next level. However, SDR is frequently used as most devices are not compatible with HDR.
2. Why is HDR smaller than SDR?
Undoubtedly, HDR provides better image quality, colors, and clarity than SDR, but why is the file size smaller then? The answer is quite simple. HDR10 files are equipped with HVAC. HVAC is a very efficient file compressor that compresses the file while keeping its quality intact. SDR files are not compressed with SDR; hence the file size is much bigger.
3. Why does HDR look washed out?
An HDR video might look too bright or washed out if your device is incompatible with HDR color space. Unlike the iPhone 12 or Samsung Galaxy S22, phones have a built-in HDR recording feature. However, older versions may not be able to enjoy the clarity and colors offered by an HDR recording. Hence when an HDR video is sent to someone with an older phone, it looks as if the video is washed out.
Final Words
While HDR might be a superior color space, SDR is frequently used for video clips so maximum people can enjoy the video despite what their devices are compatible with. You can easily convert an HDR video to SDR using Wondershare Filmora or any other methods listed above.
An important point to note is that HDR videos converted to SDR might look a little off sometimes with darker shadows and sharpness. It might be a better idea to record in SDR rather than convert it to SDR later. However, converting is still a popular way to go with an HDR video; you will also have a beautiful high-quality video and an SDR copy.
Creating Video Testimonials
Video testimonials are a powerful way to generate trust and conversions. The key is to create videos that showcase your best customers’ most flattering moments, but you need the right elements in place first.
Your script is vital

You know you need a script, but how do you make sure it’s good?
- First, make sure it’s clear and concise. Don’t waste time on lengthy descriptions or flowery language. Your video should be easy to understand, so let the script do the heavy lifting for you. Don’t get overly wordy; use short sentences and phrases that keep the viewer engaged throughout your testimonial.
- Next, research your subject matter thoroughly before writing any script content at all. This will ensure that people watching feel like they’re getting an accurate portrayal of their company/product/service rather than just hearing what they want while they’re busy doing something else (like trying out a new app).
- Lastly, once researched thoroughly enough to write detailed scripts, start working on writing those scripts into something coherent but still engaging enough for anyone watching regardless of whether they have any prior knowledge about whatever topic is being discussed by way of video testimonials.
Your talent is important

Talent is the most important element in creating a quality video testimonial, and this may seem like an obvious statement. However, it is important that you recruit someone who represents your brand well. This can be a celebrity, thought leader, or customer. If you are working with celebrities, for example, make sure they represent your products or services well and are not just there for the money (or social media).
If you are working with someone like a celebrity, be sure to interview them beforehand so that their story feels natural when telling it in front of the camera. In addition to finding someone who fits well with your product/service offering and brand image; look at other aspects such as age range and ethnicity when picking an appropriate talent partner.
Use only HD resolution

- HD resolution is the minimum resolution you should use. If you’re shooting a project that doesn’t need to be broadcast at a high quality, then we recommend shooting your testimonial in standard definition (SD). But if it’s possible, or if you have a higher budget, consider investing in HD equipment and filming in 720p or higher.
- This can make all of the difference when it comes to the clarity and quality of the video. Plus, when using HD cameras and editing software like Wondershare Filmora , Final Cut, or Adobe Premiere, you’ll get more than just better-looking images—you’ll also be able to export files that are larger than those created by SD cameras.
Free Download For Win 7 or later(64-bit)
Free Download For macOS 10.14 or later
Filming elements are essential

To get the most out of your video testimonial, first, you need to be close to the camera and look directly into it. This will increase the rapport between you and your customers, making them feel like they are right there with you—and in turn creating trust.
Then, you also need to be wearing good quality clothing that fits well. Having an outfit that makes you look attractive (but not overly sexy) can make all the difference when it comes to conveying confidence and professionalism.
Finally, smile while filming! This is important because smiling helps people connect with those around them better than any other facial expression can do alone. If possible, try smiling even before turning on your camera so that people can see who they are dealing with before having any contact at all!
Where to place the videos

Now that you’ve got your video testimonials in hand, it’s time to put them to work. There are several key places where you should consider placing your videos:
- On your homepage
- On landing pages
- On blog posts or articles that mention the product/service being promoted (whether yours or a competitor’s)
- In social media posts and ads that promote the product/service being promoted (whether yours or a competitor’s)
- As part of email newsletters sent out by you and your client(s).
Video testimonials are a powerful way to generate trust and conversions
Video testimonials are a powerful way to generate trust and conversions.
In the world of digital marketing, there’s no shortage of ways to get your audience’s attention. But one strategy that continues to work well is the use of video testimonials. Video testimonials are a great way to get your customers talking about how much they love your product or service—and how much it has helped them.
Video testimonials can help you:
- Increase conversion rates by 10-20% or more
- Generate more leads and sales quickly
- Demonstrate the value of your products and services
The Bottom Line
When you put in the right effort, video testimonials can be an incredibly powerful tool for generating trust and conversions. Video testimonials are a great way to show off your product or service, but they’re also a way to build relationships with potential customers by demonstrating how much they’ve helped others. If you want to generate more sales, then consider implementing this strategy into your marketing plan today!
Free Download For macOS 10.14 or later
Filming elements are essential
To get the most out of your video testimonial, first, you need to be close to the camera and look directly into it. This will increase the rapport between you and your customers, making them feel like they are right there with you—and in turn creating trust.
Then, you also need to be wearing good quality clothing that fits well. Having an outfit that makes you look attractive (but not overly sexy) can make all the difference when it comes to conveying confidence and professionalism.
Finally, smile while filming! This is important because smiling helps people connect with those around them better than any other facial expression can do alone. If possible, try smiling even before turning on your camera so that people can see who they are dealing with before having any contact at all!
Where to place the videos
Now that you’ve got your video testimonials in hand, it’s time to put them to work. There are several key places where you should consider placing your videos:
- On your homepage
- On landing pages
- On blog posts or articles that mention the product/service being promoted (whether yours or a competitor’s)
- In social media posts and ads that promote the product/service being promoted (whether yours or a competitor’s)
- As part of email newsletters sent out by you and your client(s).
Video testimonials are a powerful way to generate trust and conversions
Video testimonials are a powerful way to generate trust and conversions.
In the world of digital marketing, there’s no shortage of ways to get your audience’s attention. But one strategy that continues to work well is the use of video testimonials. Video testimonials are a great way to get your customers talking about how much they love your product or service—and how much it has helped them.
Video testimonials can help you:
- Increase conversion rates by 10-20% or more
- Generate more leads and sales quickly
- Demonstrate the value of your products and services
The Bottom Line
When you put in the right effort, video testimonials can be an incredibly powerful tool for generating trust and conversions. Video testimonials are a great way to show off your product or service, but they’re also a way to build relationships with potential customers by demonstrating how much they’ve helped others. If you want to generate more sales, then consider implementing this strategy into your marketing plan today!
Ideas That Help You Out in Making Transparent Image
Ideas That Will Help You Out in Making Transparent Image
An easy yet powerful editor
Numerous effects to choose from
Detailed tutorials provided by the official channel
Want to explore your graphic creativity with transparent images? Stay tuned for the most trending ideas to fill in your social media handles with unlimited likes!
In this article
01 [What Is a Transparent PNG Background?](#Part 1)
02 [Differences Among PNG vs JPG vs GIF](#Part 2)
03 [How to Make an Image Background Transparent](#Part 3)
04 [How to Convert JPG to Transparent PNG](#Part 4)
Part 1 What Is a Transparent PNG Background?
Transparent backgrounds are essentially faded overlays to any graphic content, like, an image or a video, that are useful in emphasizing the main element in the substance. Compatible to a variety of image and video formats, these are the talk of the trend, owing to their excellent content promotion utility. These are the latest and creative examples of information presentation, along with being among the best branding tools that can potentially make your content fresh and unique.
Using a transparent background as a brand promotion tool helps to project forward the major highlights of your product with a supportive background image, like the brand logo. This helps the audience to have a general idea of your brand. Apart from this, you can also assure the authenticity and quality of your brand by using a watermark in the background image.
Images with transparent backgrounds are the current promotion trends, owing to their convenient compatibility with any web design and the flexibility to mix with the most diverse color palettes and different elements on the product webpage. These can further be easily rendered in 3D to present realistic product images.
Part 2 Differences Among PNG vs JPG vs GIF
Diversity in requirement and usage has led to the advent of a variety of image formats, each suited to a specific purpose. On account of this variation, it becomes a confusing task to select the best image format that can fetch the most affordable images results in cohesion with exact user needs.
It is recommenced to use the JPG image format for natural stills that have a smooth variations in intensity and color. If your content requires image transparency, or contains texts and elements that have a sharp contrast image, like a brand logo, you should ideally prefer the PNG image format, while the GIF format is best suited for presenting animated content. As an explanation to the above usage constraints, here’s a comparison of the popular PNG, JPG and GIF image formats in the light of some common credibility parameters.
01Compression
Image compression facilitates a quick data transmission across different web based platforms, owing to the reduced file size. While compression can be either lossy or lossless, choose an image format that maintains the size credibility in resonance with your data needs. A lossless compression guarantees the retrieval of original image, but a lossy compression fails to do so.
JPG
The JPG format is a lossy compressor that plays on your ability to perceive. The format has the credibility of a 1:10 compression ratio, without comprising with the original image quality. However, a further increased compression ratio may generate perceivable differences in image quality.
The JPG compression utilizes the concept of Discrete Cosine Transform, i.e., a color averaging of the image pixels in close proximity. Hence, it is suitable to use this format for natural and scenic stills, having a smooth color and intensity transition. Preferring this image format for a transmission of high contrast and sharpened images is however, not advisable.
PNG
This format supports the Deflate Compression technique and neither introduces artefacts, nor cuts down on the image quality. Choose the PNG image format for a lossless and high quality compression in comparison to JPG. This one is a more effective format with higher image quality, sharper image presentation and occupies a larger memory space on your device.
You can rely on PNG images for presenting data with text, shapes and logos with high contrast pixelation. It is however, not a good choice for transferring digital images that have a high resolution.
GIF
Working on the LZW Compression Algorithm, this image format was originally used to showcase simple website graphics, when the PNG format was still at a developing stage. However, with the advancement of PNG as a more effective compression format, the use of GIF is now restricted to animated content sharing.
02Transparency
Transparency is tern used to describe some invisible content. This is suitable to use in image backgrounds when you need to lay extra stress on the main content, like the logo of your product with a cohesive brand text, etc. the transparent background used here facilitates the use of a particular image with a series of background and color variations.
JPG
The JPG format has a limitation of not being compatible with image transparency, and hence is not suitable for related applications.
PNG
The PNG format gives you the liberty to use image transparency in two selective ways. You can either choose to make your image partially transparent by an alpha channel insertion for a smooth edge-background blend, or use index transparency to make the pixels of any particular color as transparent. PNG8 AND PNG24 versions of the format are supportive of index and alpha channel transparencies respectively.
GIF
This format inherently supports index transparency and declares a chosen color on the palette as transparent. Owing to the absence of alpha channel transparency, there is an unsatisfactory blend of edges with the image background. The unevenness becomes more prominent in case of highly detailed and rounded images.
While it is possible to mitigate this loss to some extent with the use of image dithering, the GIF format is still not a preferred choice for creating images with transparent backgrounds. The PNG format is instead, more credible on that aspect.
03Color
Color is a visibly strong parameter of difference among the JPG, PNG and GIF image formats, with each one supporting as specific number of colors on the palette.
JPG
The color palette of JPG images is a huge inventory of 16 million colors, rendering them suitable for storing natural stills having a smooth color transition.
PNG
The two versions of PNG format differ on color variance. While PNG8 permits 256 colors, the PNG24 format supports 16 million colors, similar to the JPG format. Consider using the PNG8 format for an image with simple shapes and lesser variations in color. It is, on the other hand better to use the PNG24 format for images with transparent backgrounds, high image quality and complex shapes with detailed edges.
GIF
The GIF format is a host to 256 colors, one of which becomes transparent on using index transparency and the other 255 support different color variations.
04Animation
Animation here, is not necessarily restricted to having frame rates, but refers to a certain periodic movement of specific image sections with time. Out of JPG, PNG and GIF, only the last one is compatible with GIFs. You can use this utility to crate and share eye catching banners and advertisements. The advent of GIF specific content platforms, such as, GIPHY, Tumblr, etc., has further uplifted GIF reach and usage.
A variety of image formats are available to choose from for catering to specific content requirements. However, you can always optimize the format selection in cohesion with the current need.
Part 3 How to Make an Image Background Transparent
Having known enough about the credibility of transparent background images, it sounds quite interesting to try your hands at creating these of your own. The software market offers some over the top tools for creating stunning examples of images with transparent backgrounds. When looking for alternatives on how to make an image with a transparent background, some of your best choices are discussed below:
01Canva
This one is a top class image creator and editor tool, which you can use to add that extra tint to your website design material, watermark images or even display your image creativity for fun and entertainment purposes. The tool comes with a simple and quick process to make transparent background images.
This tool grants you the liberty to choose from various s transparency levels, image layers and effects to give the perfect professional look to your creation. The tool further promises you of a clean and subtle transparent background image that is bound to attract viewer attention.
This graphic design tool is available for a free usage, if you limit yourself within image design and effect play. However, if you want to experience the fun of creating transparent background images with this tool, you need to take its paid subscription.
How to Make Canva Transparent Background
Here’s the know how to add transparent background in still images with this tool:
Step 1: Account Creation
In order to use this graphic tool for image design, you need to have its official account. Visit the tool’s official site, launch the same on your system, create a Canva account and log in.

Step 2: Image Selection
Consider browsing through your device to choose an image for creating a transparent background artwork.

Step 3: Background Removal
You now need to remove the background color of the selected image. In the tool’s welcome interface, navigate to ‘Effects’ in the top toolbar and select ‘Background Remover’ from the available options to remove the background layer and make a transparent design.

Step 4: Save Your Image
After removing the image background, download it into your system. To do this, navigate to the ‘Download’ icon at the top right and click on it.

Step 5: File Format Selection
Here, you need to select the PNG file format to get a transparent background image.

Step 6: Transparency
It is now time to make your image background transparent. You can do this by clicking the ‘Transparency’ checkbox below the ‘File Format‘selection dialog box.

Step 7: Download Your Creation
When you are happy with setting the above parameters, hit the ‘Download’ tab to import your artwork to your device gallery.

02Photoshop
This one is excellent image editor and graphic designer tool that allows you to add diversification and class to your brand images. You can play with a variety of display features to enhance and objectify your image to your heart’s content.
Using Photoshop allows a presentation of your content against a dynamic color background, thus favoring a background interaction selective to the viewer’s serene size. Photoshop can create transparent logos for the products on your site, that are suitable to be placed anywhere on the webpage, regardless of the latter’s background color.
How to Make Photoshop Transparent Background
See through the following section of this article for a guided tutorial to create a transparent background image in Photoshop:

Step 1: Download Adobe Photoshop
Navigate to Adobe’s official website and download the Photoshop application in your device. Install and launch the same to reach the app’s welcome interface.

Step 2: Make a Layered Image File
In the main interface, open a selected image and navigate to the ‘Layers Panel’ in the right of the image window. However, if the ‘Layers Panel’ does not show up by default, reach to the top toolbar and hit the ‘Window’ tab. From the drop sown menu that follows, select ‘Layers’.

In this panel, double tap the ‘Background‘layer. This causes the ‘Rename Layer’ dialog box to appear. You can either enter a suitable name or continue with the default ‘Layer 0’ name. When you are done, click on ‘OK’.

Step 3: Let’s Get Creating!
In the application interface, navigate to the toolbar at the left and choose the ‘Magic Wand’ tool. Again, reach to the ‘Options’ bar at the top and choose ‘Select Subject’. This will facilitate the selection of the min object of the image, irrespective of its background and the selection will be visible as ‘marching ants’ around the object.

If you find the selection to be improper, use the ‘Magic Wand’ to ward off excessive background portions by choosing the ’Subtract From Selection’ option, or even add some extra product portions, suited to your requirement. While making your selection, take care to include any holes in the product image.

Step 4: Background Deletion
When you are left with only the selected product, navigate to the top toolbar and hit the ’Select’ tab and choose ‘Inverse’ from the drop down menu that follows. You can alternatively use the ‘Shift+Ctrl+I’ command for a Windows device, or enter ‘Shift+Command+I’ command, in case you are using a Mac supported device.

Make a selection of the inverse background and tap ‘Backspace’ or ‘Delete’ in your Windows and Mac devices respectively. This will cause your background to get transparent. In the Photoshop application, a gray-white checkerboard represents a transparent background.
In case you require deselecting any selection, enter ‘Ctrl+D’ in Windows or ‘Command+D’ in a Mac device.

Step 5: Save Your Creation in a Web Compatible Format
When you are done creating the transparent background artwork, it becomes equally important to save your creation in a web compatible format to export them on different media platforms and product websites.
Talking of the preferable image format, it is highly recommended to use the PNG24 one, owing to its flexibility of alpha channel transparency, which permits partially transparent image backgrounds along with layered transparency. This in turn makes it possible to integrate the image with varying color backgrounds on different sites and platforms without hollow pixelation.
To save your artwork in the PNG24 file format, navigate to the application toolbar bat the top and hit the ‘File’ tab and choose the ‘Export’ option from the drop sown menu that appears. Select the ‘Export As’ option from the ‘Export’ popup menu.
For an older Photoshop version, hit the ‘Export’ tab and choose ‘Save for Web’ from the dropdown menu, followed by selecting the PNG24 option. A format dialog box appears where you can set the transparency settings. To do this, navigate to ‘File Settings’ at the right, choose the PNG file format and check the ‘Transparency’ box. Avoid checking the ‘Smaller Size’ box, else the image will get saved in the PNG8 format.

In the left of the screen, the image file size is displayed. Maintain an affordable file size, preferably within 200 KB, to avoid slower image loading on the sharing platform. You can adjust this in the ‘Image Size’ option at the right.

Set a conveniently reduced dimension, while taking care not to set an extremely small size, else it will produce a pixelated output on the site. It is preferable to set a 50-100% larger image size for a convenient display across different devices.
Step 6: Final Save
Once you are satisfied with all the image settings, tap ‘Export All’ to save your artwork locally in your device. In the ‘File Save’ dialog box, choose a preferred device location, enter a suitable file name and choose the .png extension. At last, click on ‘Save’.
03Filmora
Launched by Wondershare, this is excellent image editor and creator software that you can rely on to make stunning artworks in a variety of file formats. Talking of background transparency in particular, the software comes with a unique ‘Green Screen’ feature to create high quality, transparent background images in a matter of a few clicks. You can further, give a professional touch to your creation with a storehouse of classic video and image editing effects that are just perfect to stand out in the crowd.
How to Make Filmora Transparent Background
A stepwise tutorial on how to create image with transparent background images using Filmora is discussed below:
Step 1: Download the Software
Visit the official website of Wondershare Filmora Video Editor to download and install the software in any of your Windows or Mac devices.
For Win 7 or later (64-bit)
For macOS 10.12 or later
Step 2: Import Media File
Launch the app to reach the main interface, where you will find the ‘Import’ tab. Hit it and choose ‘Import Media File’ from the drop down menu that follows. This will upload your selected image to the software’s media library.

Step 2: Timeline Dragging
You now need to insert the selected image from Filmora’s media library to the software’s editing timeline. You can do this either by right clicking the selected image, followed by choosing the ‘Insert’ option, or a simple ’Drag and Drop’ method.

Step 3: Transparency Adjustments
In the editor timeline, double click your selected image to open the ‘Settings’ tab. Scroll down the tab options to locate ‘Chroma Key Settings’. Make a right toggle to enable the ‘Chroma Key’ and you will see the image get transparent with the default ’Green’ background color.
You can alternatively, navigate to the ‘Select Color’ option and choose ‘Color Picker’ at its right, reach the image section you wish to make transparent and make a single click.

In case you get a partially transparent background, you can make further adjustments in the ‘Chroma Key’ settings, such as, tolerance, edge thickness, offset, edge feather, etc., to ascertain complete background transparency. When you are satisfied with your work, click on ‘OK’.

Step 4: Media Export
You can now try adding the transparent image to any video or export the same to any media platform. To do this, hit the ‘Export’ tab at the top right corner in the editor timeline.

Part 4 How to Convert JPG to Transparent PNG
Taking into account the diverse information sharing and content specification requirements, an obvious need to switch between different file formats may arise at a number of instants. One such example is the conversion of images in JPG format into that of a transparent PNG image. When looking through convenient alternatives to set the issue straight, the software market has a pouring flood of choices.
Discussed below are some of the best JPG to transparent PNG converter solutions you can pick to convert color background JPG stills into transparent PNG background images, while sorting the concern of how to save PNG with transparent background:
Filmora JPG to Transparent PNG Converter
Filmora is top rated and highly preferred graphic design software that caters to all of your video and image design and conversion needs in the most convenient manner. Developed by Wondershare, this is the worthiest pick for all graphic editing. While the software is packed with extensive and over the top features to provide a professional elegance to almost and design artwork, the transparent image backgrounds created by Filmora are simply remarkable.
If you are done with those usual and commonplace captures, try hands at creating transparent background images with this software, which promises you of a stand out result on account of the following features:
● Filmora comes with a distinguished ‘Green Screen’ feature that is known to create transparent background images in time instants shorter than an eye blink. You just need to upload an image in the software timeline and adjust a few chroma settings, and that’s really the end!
● Apart from this, you can play with a diverse inventory of results and image filters, like, graphic and text overlays, subtitles and tons of audio-visual upshots to create an absolute graphic masterpiece.
● The software further, is free to use and welcomes you with a clean, cohesive and responsive user interface, guiding you at each step of the design task.
● Ending Thoughts →
● Transparent image backgrounds are the current in house trends of content branding and product promotion alternatives. While there are varieties of requirement specific image file formats, the PNG format is best suited for creating a transparent background image.
● The software market is an in depth pool of choices for graphic and image editing tools, Wondershare Filmora happens to be a distinguished name among all to create and convert images with transparent backgrounds.
Want to explore your graphic creativity with transparent images? Stay tuned for the most trending ideas to fill in your social media handles with unlimited likes!
In this article
01 [What Is a Transparent PNG Background?](#Part 1)
02 [Differences Among PNG vs JPG vs GIF](#Part 2)
03 [How to Make an Image Background Transparent](#Part 3)
04 [How to Convert JPG to Transparent PNG](#Part 4)
Part 1 What Is a Transparent PNG Background?
Transparent backgrounds are essentially faded overlays to any graphic content, like, an image or a video, that are useful in emphasizing the main element in the substance. Compatible to a variety of image and video formats, these are the talk of the trend, owing to their excellent content promotion utility. These are the latest and creative examples of information presentation, along with being among the best branding tools that can potentially make your content fresh and unique.
Using a transparent background as a brand promotion tool helps to project forward the major highlights of your product with a supportive background image, like the brand logo. This helps the audience to have a general idea of your brand. Apart from this, you can also assure the authenticity and quality of your brand by using a watermark in the background image.
Images with transparent backgrounds are the current promotion trends, owing to their convenient compatibility with any web design and the flexibility to mix with the most diverse color palettes and different elements on the product webpage. These can further be easily rendered in 3D to present realistic product images.
Part 2 Differences Among PNG vs JPG vs GIF
Diversity in requirement and usage has led to the advent of a variety of image formats, each suited to a specific purpose. On account of this variation, it becomes a confusing task to select the best image format that can fetch the most affordable images results in cohesion with exact user needs.
It is recommenced to use the JPG image format for natural stills that have a smooth variations in intensity and color. If your content requires image transparency, or contains texts and elements that have a sharp contrast image, like a brand logo, you should ideally prefer the PNG image format, while the GIF format is best suited for presenting animated content. As an explanation to the above usage constraints, here’s a comparison of the popular PNG, JPG and GIF image formats in the light of some common credibility parameters.
01Compression
Image compression facilitates a quick data transmission across different web based platforms, owing to the reduced file size. While compression can be either lossy or lossless, choose an image format that maintains the size credibility in resonance with your data needs. A lossless compression guarantees the retrieval of original image, but a lossy compression fails to do so.
JPG
The JPG format is a lossy compressor that plays on your ability to perceive. The format has the credibility of a 1:10 compression ratio, without comprising with the original image quality. However, a further increased compression ratio may generate perceivable differences in image quality.
The JPG compression utilizes the concept of Discrete Cosine Transform, i.e., a color averaging of the image pixels in close proximity. Hence, it is suitable to use this format for natural and scenic stills, having a smooth color and intensity transition. Preferring this image format for a transmission of high contrast and sharpened images is however, not advisable.
PNG
This format supports the Deflate Compression technique and neither introduces artefacts, nor cuts down on the image quality. Choose the PNG image format for a lossless and high quality compression in comparison to JPG. This one is a more effective format with higher image quality, sharper image presentation and occupies a larger memory space on your device.
You can rely on PNG images for presenting data with text, shapes and logos with high contrast pixelation. It is however, not a good choice for transferring digital images that have a high resolution.
GIF
Working on the LZW Compression Algorithm, this image format was originally used to showcase simple website graphics, when the PNG format was still at a developing stage. However, with the advancement of PNG as a more effective compression format, the use of GIF is now restricted to animated content sharing.
02Transparency
Transparency is tern used to describe some invisible content. This is suitable to use in image backgrounds when you need to lay extra stress on the main content, like the logo of your product with a cohesive brand text, etc. the transparent background used here facilitates the use of a particular image with a series of background and color variations.
JPG
The JPG format has a limitation of not being compatible with image transparency, and hence is not suitable for related applications.
PNG
The PNG format gives you the liberty to use image transparency in two selective ways. You can either choose to make your image partially transparent by an alpha channel insertion for a smooth edge-background blend, or use index transparency to make the pixels of any particular color as transparent. PNG8 AND PNG24 versions of the format are supportive of index and alpha channel transparencies respectively.
GIF
This format inherently supports index transparency and declares a chosen color on the palette as transparent. Owing to the absence of alpha channel transparency, there is an unsatisfactory blend of edges with the image background. The unevenness becomes more prominent in case of highly detailed and rounded images.
While it is possible to mitigate this loss to some extent with the use of image dithering, the GIF format is still not a preferred choice for creating images with transparent backgrounds. The PNG format is instead, more credible on that aspect.
03Color
Color is a visibly strong parameter of difference among the JPG, PNG and GIF image formats, with each one supporting as specific number of colors on the palette.
JPG
The color palette of JPG images is a huge inventory of 16 million colors, rendering them suitable for storing natural stills having a smooth color transition.
PNG
The two versions of PNG format differ on color variance. While PNG8 permits 256 colors, the PNG24 format supports 16 million colors, similar to the JPG format. Consider using the PNG8 format for an image with simple shapes and lesser variations in color. It is, on the other hand better to use the PNG24 format for images with transparent backgrounds, high image quality and complex shapes with detailed edges.
GIF
The GIF format is a host to 256 colors, one of which becomes transparent on using index transparency and the other 255 support different color variations.
04Animation
Animation here, is not necessarily restricted to having frame rates, but refers to a certain periodic movement of specific image sections with time. Out of JPG, PNG and GIF, only the last one is compatible with GIFs. You can use this utility to crate and share eye catching banners and advertisements. The advent of GIF specific content platforms, such as, GIPHY, Tumblr, etc., has further uplifted GIF reach and usage.
A variety of image formats are available to choose from for catering to specific content requirements. However, you can always optimize the format selection in cohesion with the current need.
Part 3 How to Make an Image Background Transparent
Having known enough about the credibility of transparent background images, it sounds quite interesting to try your hands at creating these of your own. The software market offers some over the top tools for creating stunning examples of images with transparent backgrounds. When looking for alternatives on how to make an image with a transparent background, some of your best choices are discussed below:
01Canva
This one is a top class image creator and editor tool, which you can use to add that extra tint to your website design material, watermark images or even display your image creativity for fun and entertainment purposes. The tool comes with a simple and quick process to make transparent background images.
This tool grants you the liberty to choose from various s transparency levels, image layers and effects to give the perfect professional look to your creation. The tool further promises you of a clean and subtle transparent background image that is bound to attract viewer attention.
This graphic design tool is available for a free usage, if you limit yourself within image design and effect play. However, if you want to experience the fun of creating transparent background images with this tool, you need to take its paid subscription.
How to Make Canva Transparent Background
Here’s the know how to add transparent background in still images with this tool:
Step 1: Account Creation
In order to use this graphic tool for image design, you need to have its official account. Visit the tool’s official site, launch the same on your system, create a Canva account and log in.
Step 2: Image Selection
Consider browsing through your device to choose an image for creating a transparent background artwork.
Step 3: Background Removal
You now need to remove the background color of the selected image. In the tool’s welcome interface, navigate to ‘Effects’ in the top toolbar and select ‘Background Remover’ from the available options to remove the background layer and make a transparent design.
Step 4: Save Your Image
After removing the image background, download it into your system. To do this, navigate to the ‘Download’ icon at the top right and click on it.
Step 5: File Format Selection
Here, you need to select the PNG file format to get a transparent background image.
Step 6: Transparency
It is now time to make your image background transparent. You can do this by clicking the ‘Transparency’ checkbox below the ‘File Format‘selection dialog box.
Step 7: Download Your Creation
When you are happy with setting the above parameters, hit the ‘Download’ tab to import your artwork to your device gallery.
02Photoshop
This one is excellent image editor and graphic designer tool that allows you to add diversification and class to your brand images. You can play with a variety of display features to enhance and objectify your image to your heart’s content.
Using Photoshop allows a presentation of your content against a dynamic color background, thus favoring a background interaction selective to the viewer’s serene size. Photoshop can create transparent logos for the products on your site, that are suitable to be placed anywhere on the webpage, regardless of the latter’s background color.
How to Make Photoshop Transparent Background
See through the following section of this article for a guided tutorial to create a transparent background image in Photoshop:
Step 1: Download Adobe Photoshop
Navigate to Adobe’s official website and download the Photoshop application in your device. Install and launch the same to reach the app’s welcome interface.
Step 2: Make a Layered Image File
In the main interface, open a selected image and navigate to the ‘Layers Panel’ in the right of the image window. However, if the ‘Layers Panel’ does not show up by default, reach to the top toolbar and hit the ‘Window’ tab. From the drop sown menu that follows, select ‘Layers’.
In this panel, double tap the ‘Background‘layer. This causes the ‘Rename Layer’ dialog box to appear. You can either enter a suitable name or continue with the default ‘Layer 0’ name. When you are done, click on ‘OK’.
Step 3: Let’s Get Creating!
In the application interface, navigate to the toolbar at the left and choose the ‘Magic Wand’ tool. Again, reach to the ‘Options’ bar at the top and choose ‘Select Subject’. This will facilitate the selection of the min object of the image, irrespective of its background and the selection will be visible as ‘marching ants’ around the object.
If you find the selection to be improper, use the ‘Magic Wand’ to ward off excessive background portions by choosing the ’Subtract From Selection’ option, or even add some extra product portions, suited to your requirement. While making your selection, take care to include any holes in the product image.
Step 4: Background Deletion
When you are left with only the selected product, navigate to the top toolbar and hit the ’Select’ tab and choose ‘Inverse’ from the drop down menu that follows. You can alternatively use the ‘Shift+Ctrl+I’ command for a Windows device, or enter ‘Shift+Command+I’ command, in case you are using a Mac supported device.
Make a selection of the inverse background and tap ‘Backspace’ or ‘Delete’ in your Windows and Mac devices respectively. This will cause your background to get transparent. In the Photoshop application, a gray-white checkerboard represents a transparent background.
In case you require deselecting any selection, enter ‘Ctrl+D’ in Windows or ‘Command+D’ in a Mac device.
Step 5: Save Your Creation in a Web Compatible Format
When you are done creating the transparent background artwork, it becomes equally important to save your creation in a web compatible format to export them on different media platforms and product websites.
Talking of the preferable image format, it is highly recommended to use the PNG24 one, owing to its flexibility of alpha channel transparency, which permits partially transparent image backgrounds along with layered transparency. This in turn makes it possible to integrate the image with varying color backgrounds on different sites and platforms without hollow pixelation.
To save your artwork in the PNG24 file format, navigate to the application toolbar bat the top and hit the ‘File’ tab and choose the ‘Export’ option from the drop sown menu that appears. Select the ‘Export As’ option from the ‘Export’ popup menu.
For an older Photoshop version, hit the ‘Export’ tab and choose ‘Save for Web’ from the dropdown menu, followed by selecting the PNG24 option. A format dialog box appears where you can set the transparency settings. To do this, navigate to ‘File Settings’ at the right, choose the PNG file format and check the ‘Transparency’ box. Avoid checking the ‘Smaller Size’ box, else the image will get saved in the PNG8 format.
In the left of the screen, the image file size is displayed. Maintain an affordable file size, preferably within 200 KB, to avoid slower image loading on the sharing platform. You can adjust this in the ‘Image Size’ option at the right.
Set a conveniently reduced dimension, while taking care not to set an extremely small size, else it will produce a pixelated output on the site. It is preferable to set a 50-100% larger image size for a convenient display across different devices.
Step 6: Final Save
Once you are satisfied with all the image settings, tap ‘Export All’ to save your artwork locally in your device. In the ‘File Save’ dialog box, choose a preferred device location, enter a suitable file name and choose the .png extension. At last, click on ‘Save’.
03Filmora
Launched by Wondershare, this is excellent image editor and creator software that you can rely on to make stunning artworks in a variety of file formats. Talking of background transparency in particular, the software comes with a unique ‘Green Screen’ feature to create high quality, transparent background images in a matter of a few clicks. You can further, give a professional touch to your creation with a storehouse of classic video and image editing effects that are just perfect to stand out in the crowd.
How to Make Filmora Transparent Background
A stepwise tutorial on how to create image with transparent background images using Filmora is discussed below:
Step 1: Download the Software
Visit the official website of Wondershare Filmora Video Editor to download and install the software in any of your Windows or Mac devices.
For Win 7 or later (64-bit)
For macOS 10.12 or later
Step 2: Import Media File
Launch the app to reach the main interface, where you will find the ‘Import’ tab. Hit it and choose ‘Import Media File’ from the drop down menu that follows. This will upload your selected image to the software’s media library.
Step 2: Timeline Dragging
You now need to insert the selected image from Filmora’s media library to the software’s editing timeline. You can do this either by right clicking the selected image, followed by choosing the ‘Insert’ option, or a simple ’Drag and Drop’ method.
Step 3: Transparency Adjustments
In the editor timeline, double click your selected image to open the ‘Settings’ tab. Scroll down the tab options to locate ‘Chroma Key Settings’. Make a right toggle to enable the ‘Chroma Key’ and you will see the image get transparent with the default ’Green’ background color.
You can alternatively, navigate to the ‘Select Color’ option and choose ‘Color Picker’ at its right, reach the image section you wish to make transparent and make a single click.
In case you get a partially transparent background, you can make further adjustments in the ‘Chroma Key’ settings, such as, tolerance, edge thickness, offset, edge feather, etc., to ascertain complete background transparency. When you are satisfied with your work, click on ‘OK’.
Step 4: Media Export
You can now try adding the transparent image to any video or export the same to any media platform. To do this, hit the ‘Export’ tab at the top right corner in the editor timeline.
Part 4 How to Convert JPG to Transparent PNG
Taking into account the diverse information sharing and content specification requirements, an obvious need to switch between different file formats may arise at a number of instants. One such example is the conversion of images in JPG format into that of a transparent PNG image. When looking through convenient alternatives to set the issue straight, the software market has a pouring flood of choices.
Discussed below are some of the best JPG to transparent PNG converter solutions you can pick to convert color background JPG stills into transparent PNG background images, while sorting the concern of how to save PNG with transparent background:
Filmora JPG to Transparent PNG Converter
Filmora is top rated and highly preferred graphic design software that caters to all of your video and image design and conversion needs in the most convenient manner. Developed by Wondershare, this is the worthiest pick for all graphic editing. While the software is packed with extensive and over the top features to provide a professional elegance to almost and design artwork, the transparent image backgrounds created by Filmora are simply remarkable.
If you are done with those usual and commonplace captures, try hands at creating transparent background images with this software, which promises you of a stand out result on account of the following features:
● Filmora comes with a distinguished ‘Green Screen’ feature that is known to create transparent background images in time instants shorter than an eye blink. You just need to upload an image in the software timeline and adjust a few chroma settings, and that’s really the end!
● Apart from this, you can play with a diverse inventory of results and image filters, like, graphic and text overlays, subtitles and tons of audio-visual upshots to create an absolute graphic masterpiece.
● The software further, is free to use and welcomes you with a clean, cohesive and responsive user interface, guiding you at each step of the design task.
● Ending Thoughts →
● Transparent image backgrounds are the current in house trends of content branding and product promotion alternatives. While there are varieties of requirement specific image file formats, the PNG format is best suited for creating a transparent background image.
● The software market is an in depth pool of choices for graphic and image editing tools, Wondershare Filmora happens to be a distinguished name among all to create and convert images with transparent backgrounds.
Also read:
- Updated In 2024, How To Add Scrolling Text Effect
- In 2024, Finding the Best GIF Websites Was Never Easier
- Updated 2024 Approved Wondering How to Stand Out with Your Adobe Slideshow Presentation? Follow the Given Discussion to Learn All About the Easiest Ways of Making a Slideshow at Adobe
- 2024 Approved Tactics to Create Transparent Image in Minimal Steps
- New Do You Want Your Photos and Videos to Give an Old and Vintage Feel? Here Are some Vintage LUTs Premiere Pro Free and Paid Options Available to Download for 2024
- 2024 Approved How to Animate Your Designs With Canva GIF
- Updated 2024 Approved Learn How to Slow Down Time-Lapse Videos on iPhone to Make Detailed and Captivating Slow-Motion Effects in Your Time-Lapse Captures
- Updated Complete Guide 2024 A Review On 3D LUT Creator
- Updated 2024 Approved Create Your Slow Zoom TikTok in Minutes
- Customize PowerPoint Slideshow Icon in 8 Simple Ways
- Updated In 2024, How to Make Foggy Text Reflection Effect
- In 2024, Want to Make a Single Video From Different Clips? Follow These Ways to Learn About How to Merge Clips in DaVinci Resolve
- Updated In 2024, 10 Best Sony LUT for Different Purposes
- New Color Match Game Tips for You
- A Full Review of Leeming LUT Pro
- Updated Learn How to Perform Velocity Edits on Your PC
- Best Free Video Editing Software to Boost Your Content Creation
- Updated Hyperlapse VS Timelapse Videos for 2024
- Are You Searching the Internet for Top Wedding LUTs Premiere Pro? This Article Provides Suggestions on the Best LUT Color Presets
- Updated The Right Ways to Slow Down a Video on iPhone
- New Want to Learn How to Crop or Trim Video in PowerPoint? We Have Got You Covered; We Have Given a Step-by-Step Guide that Will Allow You to Trim and Crop Videos Using This Presentation Program
- What Are the Best Video Background Changers Online for 2024
- Updated How to Make Vintage Film Effect 1950S
- New How to Use LUTs Perfectly in Final Cut Pro
- | Best 8 Online GIF to APNG Converters for 2024
- Discord Is Becoming More Popular with Time with Millions of Users. Are You Thinking of Getting a GIF for Discord Profile? If Yes, Learn From This Piece Since We Have a Conclusive Summary of Getting a GIF Profile Picture for Discord for 2024
- In This Article Ill Share to You some of the Skin Care Vlog Ideas for You to Start Doing a Skin Care Review on Your YouTube Channel. But Before that Ill Share with You How Important Is Skin Care, In 2024
- In 2024, How to Apply Video Filters
- In 2024, 20 Best Text To Speech Software Windows, Mac, Android, iPhone & O
- New 2024 Approved How to Edit Facebook eCommerce Video Ads
- In 2024, Best Image (JPG/PNG) to GIF Converters
- Updated How to Make a Smooth Speed Ramping in Premiere Pro for 2024
- New In 2024, 3 Best Effects to Appear on Camera
- In 2024, Pattern Locks Are Unsafe Secure Your Realme Narzo 60x 5G Phone Now with These Tips
- The way to get back lost messages from Oppo Find X6
- In 2024, Everything You Need to Know about Lock Screen Settings on your Nokia C22
- Identify missing or malfunctioning drivers with Windows Device Manager on Windows 11/10/7
- In 2024, How to Unlock Vivo Y100A Phone Password Without Factory Reset?
- How to Change Spotify Location After Moving to Another Country On Honor V Purse | Dr.fone
- How to Change Spotify Location After Moving to Another Country On Motorola Moto G 5G (2023) | Dr.fone
- In 2024, Top 10 Best Spy Watches For your Samsung Galaxy M34 5G | Dr.fone
- How To Remove Flashlight From Apple iPhone 13 Pro Lock Screen | Dr.fone
- In 2024, Hassle-Free Ways to Remove FRP Lock from Tecno Camon 20 Premier 5G Phones with/without a PC
- Title: New In 2024, How to Use Visual Effect for Zoom
- Author: Morgan
- Created at : 2024-04-24 01:06:42
- Updated at : 2024-04-25 01:06:42
- Link: https://ai-video-editing.techidaily.com/new-in-2024-how-to-use-visual-effect-for-zoom/
- License: This work is licensed under CC BY-NC-SA 4.0.
