
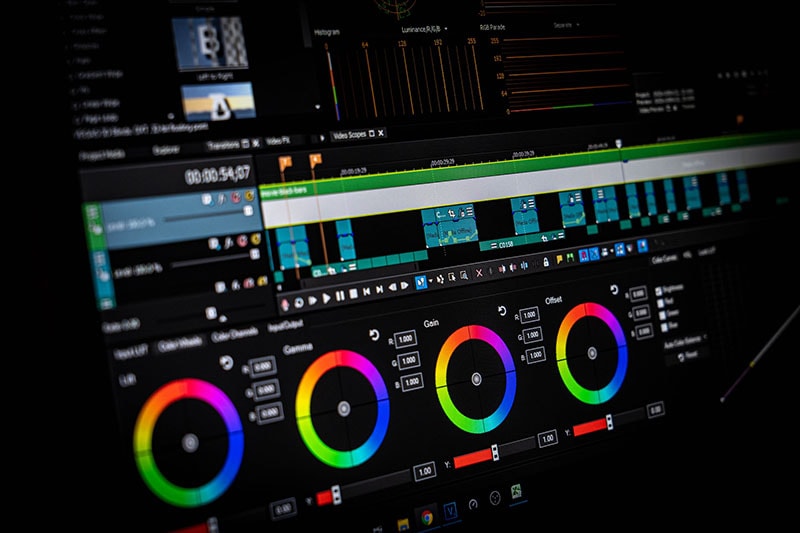
:max_bytes(150000):strip_icc():format(webp)/football-referee-signaling-touchdown-in-stadium-599944339-5a84cb9e875db900367df025.jpg)
New In 2024, Make Eye Zoom Transition Effect with Filmora
How to Make Eye Zoom Transition Effect with Filmora
What is an eye zoom transition effect? It’s a close-up video effect allowing viewers to transit to the next clip from the eye. This effect is commonly used by musicians and travel bloggers to give their videos a more cinematic feel. So, without wasting time, let’s learn how to create an eye zoom transition with Wondershare Filmora .
Free Download For Win 7 or later(64-bit)
Free Download For macOS 10.14 or later
Preparation:
First, you need to create a close-up eye video. Although you can do that with your digital camera, a standard smartphone should do it just fine. Just ask a friend or family member to use your phone’s rear camera to record your eye centered on the screen. Ensure that the eye is as close as possible and you don’t lose focus. The camera should be around 10cm away from your face. And lest I forget, the flash should be ON.

How to Create an Eye-zoom Transition
Step 1 Align the video clips on Filmora
After recording a close-up eye video, add it on Wondershare Filmora and duplicate it. Alternatively, you can add the video to the first and second tracks.

Step 2 Add a freeze frame to the video
Next, we want to add a freeze frame to the section where the eye opens fully. To do that, select the second video track and place the playhead where the eye is fully open. After that, right-click the video track, then choose the Add Freeze Frame option.

Now trim the first video track from where the freeze frame starts on the second video. Also, cut the second video track to leave only the freeze frame
Step 3 Add a masking effect to the eye
With the two video tracks ready, it’s time to apply a masking effect. Tap the Effect tab on the top menu bar and then find the Shape Mask under the utility section. Now drag and drop the effect to the freeze frame.

Double-click on the freeze frame clip to adjust the Shape Mask on the preview screen. Ensure the mask reveals the eye pupil only and check the Invert Mask box. Also, set the Feather number to 10.

Step 4 Add the transition video
Next, add the video you want to edit with an eye-zoom effect next to the first video track. Preview the video, and you’ll notice your new video playing inside the eye mask.
With that done, move the playhead to the start of the freeze frame video and double-click the video clip to launch the settings window. Click the Animation tab before clicking Customize to see the keyframe settings. Tap the Add button to add a keyframe. Then, add a few frames using the playhead before clicking Add. But because we’re zooming in, increase the scale to 160%. You can also add the rotation and position.

After setting the second keyframe, move the playhead to the right and add the third keyframe. This time, increase the scale number to 400%, as well as the rotation and position. Now preview the video, and you’ll notice the rotating eye-zoom effect.
Summary
There you go! That’s how to create an eye-zoom transition using Wondershare Filmora. Don’t forget to play around with this feature-rich video editor to unlock its full capabilities. Enjoy!
Free Download For macOS 10.14 or later
Preparation:
First, you need to create a close-up eye video. Although you can do that with your digital camera, a standard smartphone should do it just fine. Just ask a friend or family member to use your phone’s rear camera to record your eye centered on the screen. Ensure that the eye is as close as possible and you don’t lose focus. The camera should be around 10cm away from your face. And lest I forget, the flash should be ON.
How to Create an Eye-zoom Transition
Step 1 Align the video clips on Filmora
After recording a close-up eye video, add it on Wondershare Filmora and duplicate it. Alternatively, you can add the video to the first and second tracks.
Step 2 Add a freeze frame to the video
Next, we want to add a freeze frame to the section where the eye opens fully. To do that, select the second video track and place the playhead where the eye is fully open. After that, right-click the video track, then choose the Add Freeze Frame option.
Now trim the first video track from where the freeze frame starts on the second video. Also, cut the second video track to leave only the freeze frame
Step 3 Add a masking effect to the eye
With the two video tracks ready, it’s time to apply a masking effect. Tap the Effect tab on the top menu bar and then find the Shape Mask under the utility section. Now drag and drop the effect to the freeze frame.
Double-click on the freeze frame clip to adjust the Shape Mask on the preview screen. Ensure the mask reveals the eye pupil only and check the Invert Mask box. Also, set the Feather number to 10.
Step 4 Add the transition video
Next, add the video you want to edit with an eye-zoom effect next to the first video track. Preview the video, and you’ll notice your new video playing inside the eye mask.
With that done, move the playhead to the start of the freeze frame video and double-click the video clip to launch the settings window. Click the Animation tab before clicking Customize to see the keyframe settings. Tap the Add button to add a keyframe. Then, add a few frames using the playhead before clicking Add. But because we’re zooming in, increase the scale to 160%. You can also add the rotation and position.
After setting the second keyframe, move the playhead to the right and add the third keyframe. This time, increase the scale number to 400%, as well as the rotation and position. Now preview the video, and you’ll notice the rotating eye-zoom effect.
Summary
There you go! That’s how to create an eye-zoom transition using Wondershare Filmora. Don’t forget to play around with this feature-rich video editor to unlock its full capabilities. Enjoy!
How to Build A Video Editing Career
Some people may be perplexed by the term “video editor.” It’s used to describe both the individual who edits films and the program they employ. Working with the director and videographer is a key part of a video editor’s job. They use video editing to create an engaging narrative. Various strategies can be used during video editing to improve both the audio and the video. It’s a job that calls for both perseverance and passion. especially considering that editing a 20-minute video might take up to 16 hours.
Video clips are produced by a director, then edited. The objective is to quickly communicate a story while holding the audience’s attention. In conclusion, video editing is the process of assembling the most relevant clips into a coherent order.
With that said, let’s get started!
1. Select a genre
Numerous genres are constantly developing in the realm of videography. So, if you’ve ever wanted to work as a video editor, I suggest editing the kinds of videos you enjoy. A skilled video editor is necessary for every type of video. To edit cinematics, for example, no one employs a film editor. Therefore, choosing the ideal genre for you should be your first step. And you should only diversify your repertoire when you have mastered one.
You must maintain an open mind if you want to succeed as a video editor. Every day, new methods and technologies are created. As a result, you should try to improve your talents while also keeping an eye on current trends. You’re aware that perfect practice makes perfect. And in the creative industries, this statement is crucial. In order to improve your talents, pick the appropriate tools and progress from easy to complex tasks.
Making the most of every chance is essential if you want to become a professional video editor. In this regard, picking the appropriate genre is just as crucial as the task at hand. Today, the majority of businesses search online for potential applicants. You can apply on employment portals and join online communities. Don’t undervalue the importance of having strong ties. Performing independent work makes it easier to network with others in the field. After all, networking with other editors will improve your own video editing skills. Furthermore, developing a strong portfolio and resume will increase your chances of landing a job.
2. Create a portfolio
Your greatest work is shown in your video editor portfolio, which also facilitates contact with potential clients and employers. Before you start, look through the portfolios of other video editors to understand what works and what can make you stand out. Next take the following actions to develop your digital portfolio:
Select a platform
To showcase your editing skills, choose a professional video portfolio hosting provider like YouTube or Vimeo or build a personal website.
Identify yourself
Include a powerful biography about your work and yourself, as well as links to your social media profiles, phone number, and resume as a video editor. Add any honors or certifications you’ve received as well.
Display your work
To show your versatility and depth, including a variety of video types: Start with B-rolls, stock footage, video reels, and montages. Make sure the work is of a high caliber and showcases your varied abilities and distinctive flair. Include a brief summary of each video so that viewers can learn more about your efforts and workflow.
Include calls to action Viewer engagement with your material can be increased by using CTAs like “watch this” or “click here for the entire video”
Submit a portfolio
If no one sees it, even the most visually appealing supercut of video shorts won’t generate interest. Share your video editor portfolio on social media and invite your friends, family, and coworkers to look at it.
Prior to looking for your future employment, make sure to identify your hobbies. The easiest way to determine what you are seeking as an editor is to view a wide range of content and first consider what makes the job effective (or not). Afterward, start to eliminate options depending on your tastes as an editor and creative. You’ll do your best work on initiatives that are close to your heart or, at the very least, spark your artistic curiosity.
Consider it out: If you’re interested in narrative work, try filming your own material and putting it together in an editing program. Or work on a student movie and gain experience among other budding artists.
3. How much do video editors get paid?
The 21st century has seen an increase in the pay of movie and video editors. Online instructional videos, the production of DVDs by movie studios, and software-assisted scene editing are all on the rise.
Professionals typically get promoted with each project because most of them operate on a per-project basis. They make money while working for news organizations, businesses, or the entertainment industry. According to the US Bureau of Labor Statistics, the average yearly compensation for video editors is close to $59,500. A video editor’s typical hourly wage might be $40. (in the US). A professional editor can earn $80,000 annually, compared to a fresher who can make up to $40,000.
However, for independent contractors, the hourly wage may change. It might be anything between $14 and $80 per hour. It depends on the type of editing and the client’s budget. The typical freelancer makes $25 per hour in earnings. An hourly wage for a film editor often ranges from $20 to $40. In the United States, 59,300 video editors were working in 2016. A video or film’s final draft is heavily influenced by its video editors.
As a result, the businesses rely on them for a variety of duties like color adjustments, cut sequences, screen film, special effects, and sound insertion.
4. Know Your Software
There are several options to study video editing, including classes, university programs, and online training, whether you wish to do it for fun, a side job, or a career move. Given that the video editing sector is expected to expand over the next few years, now is a fantastic moment to enter the field. Here are a few methods for getting started with video editing:
Online classes and tutorials
There are free online lessons that may show you how to maneuver through the workspaces of video editing software, including how to create an interface, manage media, and trim footage, if you’re trying to learn video editing on the side. For its digital visual effects equivalent program, look through the Premiere Pro and After Effects tutorials provided by the American Graphic Institute.
University programs
There are four-year undergraduate degrees in film and cinema accessible for students who are interested in learning video editing over the long term and in a comprehensive way. These programs frequently mix theory and principal learning with project-based learning, enabling graduates to enter the workforce with contacts and experience that will help them land positions in the industry or launch their own video editing businesses.
Core courses for degrees in video editing highlight the critical abilities required for success. A job in video editing can be specialized by taking additional electives in areas like audio editing, animation, and special effects. Professors and coworkers from prior projects can offer letters of recommendation for job applications or reviews for a business website in addition to building a strong foundation.
Independent or self-taught learning
Collecting footage, uploading the clips, and experimenting with effect sequencing and other features are other ways to learn how to use video editing software. Researching the subject and watching tutorials won’t get you very far in the field of video editing; you need to get your hands dirty. However, reading through the software’s user manual to learn about fundamental uses and shortcuts is instructive.
Additionally, advanced techniques like color grading, sound effects, and media management can be learned through tutorials, books, and blog postings. It’s always a good idea to ask industry professionals for guidance. Video editors can produce high-quality work fast and start to identify their own editing preferences and style by using the advice of experts.
The likelihood of being selected to edit a project increases with credibility and expertise. Actively looking for employment possibilities is one approach to develop your skills as a video editor. Building a diversified portfolio and demo reel for new video editors can be facilitated by submitting proposals for video editing to nearby companies or posting job bids on freelance websites.
By enrolling in courses or earning a credential in video editing, you can compete for project bids in another method. Job seekers can establish credibility and show a dedication to learning their craft by taking outside training.
5. Experience
As a video editor, education and practice go hand in hand. Naturally, you can’t begin working as a video editor without training because you first need to learn how to operate the program and comprehend the fundamental ideas and procedures involved in video editing. However, work experience is a crucial component of training because studying video editing on the job is the only way to truly understand it because it is such a collaborative process.
Therefore, you must first enroll in a formal course of some kind (there are some entirely self-taught video editors, but they remain the exception). You might want to pursue a Level 3 or Level 4 Diploma in Creative Media Production in the UK, for example, as this could be situated at a college or university. In the alternative, you could choose the flexibility an online course can provide if you are unable to afford the time and money required for full-time education.
Of course, you’d want to make sure it was a good one, and just because something is pricey doesn’t mean it’s good. If the course providers are unable to show evidence that graduates go on to obtain employment in the sector, you have your answer.
Additionally, you’ll need to learn how to use video editing software, which will definitely require some independent study even if it’s a requirement for your course. When you’re ready, you should start looking for experience anywhere you can. Although it would be ideal, most aspiring video editors will need to go elsewhere for internships, apprenticeships, and job placements. The dream would be to get a training program operated by a broadcaster like the BBC.
Sending out numerous inquiries, along with the greatest showreel you can put together, to production firms, advertising agencies, design studios, and others will probably be required to accomplish this. You will also probably have to endure numerous rejections.
It will also need that you support yourself while working a significant amount of hours for no pay. This is not ideal and severely discriminates against those from impoverished origins, much like the situation in other creative industries. However, it is regrettably the current reality in this intensely competitive profession. On the bright side, long-term perseverance should be rewarded with satisfying and artistically gratifying employment and respectable pay.
6. Spend time on networking
Few things are more annoying than attempting to expand your business network while holed up in a room with no windows for most of the day. but connecting with others who are similarly hiding in their own dark spaces!
Since “I don’t want to annoy people” is the most common objection to sending cold emails, people frequently decide to attend mixers and live events instead because the crowds are friendlier. The issue with this approach is that it relies entirely on chance encounters at these events for your network to grow. You might attend weekly mixers for the rest of your career without ever meeting your perfect mentor or editing hero.
The chances are very high that the people who could give you career advice or even mentorship are stuck in their own dark rooms, working long hours, and avoiding networking events because they too are most likely introverted, given the likelihood that the editors, assistants, etc. that you really want (i.e. NEED to connect with) are introverted.
People want to see you succeed, so believe me when I say that you can’t expect them to come to you. You need to contact them. Because they want to use their free time to give back to the community, many editors at all levels of the industry are starting mentorship sites while also earning some income along in the process.
Nobody wants to read your life narrative if they don’t know who you are, and I’m sorry to have to break it to you. Contrary to what you might believe, this is not your “ONLY chance” I know how daunting it can be to reach out in the cold to someone you like who could potentially revolutionize your career with a simple referral. As I’ve already stated, the main goal of your first email is to elicit a response, so you shouldn’t feel compelled to include everything you’ve ever wanted to say in it.
Consider for a moment what kind of outreach email you would reply to if you were your receiver. Do you want to read about someone’s entire life, no matter how intriguing it may be, in one message? Do you know how to reply even if you did want to read it? Remember that even if you’ve given this message a lot of importance and it could affect your career, this person’s life will still go on even if they disregard your email.
You need to pay attention to the format of your email in addition to being mindful of its length. With smartphones and thumb-scrolling in the digital age, we have all evolved into “skimmers” rather than “readers.” Don’t send a single long text message. Use line breaks and “flag posts” to indicate the topic of each paragraph so the reader knows what to expect from each one.
7. Get your first job
You must first realize that there are numerous ways to become an editor as well as numerous editing specializations. This indicates that there is no obvious course for you to take. This tutorial highlights the key steps you may take to take your first step toward a career in editing. To land your first junior video editing job, use one or more of these strategies:
Assistant video editor
The fact that more and more editing is being done remotely is fantastic. A digital nomad’s fantasy, indeed. Accordingly, some editors are searching for Assistant Editors (both local and remote) to assist them with their projects in every country on earth.
Find Assistant Editor positions that fit you based on your skill level, location, internet speeds, and career objectives by searching online and in forums. The numerous employment boards and recruiting websites, along with Craigslist, Facebook Groups, and membership websites like Shooting People, etc., are some good locations worth looking out.
Contact YouTube creators
A strategy that is becoming more and more popular for getting your first paid job is to approach YouTubers and offer your video editing services. This indicates fierce competitiveness. But if you discover the appropriate creator, you might appreciate the task. Be warned that there are short turnaround times and low pay. Don’t undersell yourself because there will always be someone else prepared to labor for nothing.
Network at events
All film festivals were compelled to be held online due to the COVID virus. As limitations loosened, festivals began hosting both a live event and an online one. As a result, networking is now simpler than ever before — you don’t even need to get up from your desk!
Purchase a ticket to a film festival that showcases the genre of projects you are interested in working on and use the entire event to network. Be personable, not aggressive, and put yourself out there. Additionally, you may browse Vimeo for videos you enjoy and then get in touch with the editor or director to ask about potential opportunities as an assistant. However, networking in person is much simpler. The selling is done by your personality, which is challenging to convey with language.
Use Fiverr or UpWork
This method of landing your first job has a minimal barrier to entry. The problem is that wages are pitiful, and competition is intense. This can be a possibility for you if all you want is to practice and not earn a living. To achieve a position in these marketplaces where you may earn a living, it requires a lot of effort and time. And even then, the labor is generally monotonous. Avoid starting down this road and falling into the Fiverr loop. Due to your lack of connections and lack of expertise in the areas you would genuinely like to edit, it may be challenging for you to move on and work on more intriguing projects.
These are a few methods for getting your first job in video editing. You probably expected something more specific and logical. The problem is that nowadays, a lot of individuals have a PC in their bedroom that is capable of editing videos, so you have to work hard to stand out.
If I were to start again today, I would hound all the editing and post-production companies in my city, utilizing my outgoing personality and creative applications to entice them into granting me an entry-level position.
8. The best locations for video editing
When it comes to launching a career as a video editor, some locations are preferable to others. In this case, California, New Jersey, Hawaii, and New York are the finest states to live in. In California, video editors earn an average pay of $63,678. In contrast, they would average $62,559 and $61,479, respectively, in New Jersey and Hawaii.
Even though the average salary for video editors in New York is only $60,871, this is still greater than the national average. These are the states we found to have the most jobs and the highest salaries. We reduced our list of states to these four by determining the median wage, the cost of living, and the Location Quotient from the Bureau of Labor Statistics.
Los Angeles is the first place that springs to mindink about movies. And for good cause too! In Los Angeles, countless movies are shot, and every single one of them needs to be edited. About 8,810 video editors were employed in L.A. in 2014, and their average yearly salary was $105,370.
“I believe I’ll travel to Boston. In their 2005 song, “Boston,” Augustana sings, “I think I’ll start a new life, I think I’ll start it over.” So, pack your bags and travel to the city that Matt Damon and Ben Affleck adore. Rest easy knowing that the average yearly salary for 420 editors was $54,210.
Atlanta is the new movie location that production companies are picking. Video editors have relocated to Atlanta as a result of the switch to get a taste of the industry. 330 editors in Atlanta earned around $52,300 last year.
The dense forest of lush green trees in the Pacific Northwest is ideal for productions of Portlandia and Grimm. In Portland, where there are so many shows, young video editors are advancing their careers. In Portland, 300 video editors made about $46,560 last year.
Illinois provides a 30% tax credit for all eligible productions, much like Georgia does. If you work as an editor and make above $100,000 a year, Illinois will refund 30% of your earnings. Visit InVideo online to get access to a wealth of tools and features if you’re looking for a free video editing and creating platform that produces the best results.
Places to avoid
A quick look at the website for the Nebraska Film Commission will show you that the state is not the best for filming. Even though the most recent Alexander Payne movie was filmed in this state, its filmography is still quite little.
Mount Rushmore and the worst film commission website in history are both located in South Dakota. South Dakota makes up for its lack of a rich cinema heritage with its picturesque environment.
Idaho has beautiful countryside, but there are few chances for shooting and post-production. Since Idaho does not offer tax credits to filmmakers, many productions choose to shoot elsewhere.
Hawaii, the setting for the television shows Jurassic Park and Lost, comes in last on the list due to its high cost of living and lack of employment opportunities. A short search revealed that there are absolutely no video editing jobs available in Hawaii. It is expensive to reside in and shoot in Hawaii because a one-way ticket from Los Angeles to the islands costs $500.
9. Working in teams
It’s not always necessary to work alone when editing videos. In actuality, as the name implies, it involves the whole team. Reputable companies frequently employ a team of specialists for various aspects of video editing. You’ll probably collaborate with a group that includes sound experts, cinematographers, and special effects creators. Enhancing collaboration guarantees the timely and error-free delivery of high-quality movies. Therefore, before beginning your career as a video editor, you must master this expertise.
Videos and films are frequently filmed out of order. For instance, the final scene might be filmed in the middle of production if the weather is right. As a result, you frequently receive unstructured data. As the video editor, it is your responsibility to follow the narrative.
You can depend on the main script, so don’t worry. But being aware of what’s happening will greatly simplify your life. Keeping in mind the setup of the scene and the intended concepts for each frame, for instance. Sticky notes and a good memory ensure that you never get off track.
The Bottom Line
Due to widespread digitalization, there is a high demand for video editing skills. Several well-known businesses are embracing digital media, particularly in the midst of the recent pandemic. The market has seen a sharp increase in demand for professional video editors. As a result, I covered how to become a video editor in this article along with everything else you need know. Thanks for reading!
Free Download For Win 7 or later(64-bit)
Free Download For macOS 10.14 or later
Free Download For macOS 10.14 or later
10 Creative AR Teaching Examples to Tell You What Is AR in Teaching
10 Innovative AR Teaching Examples to Tell You What Is AR in Teaching
An easy yet powerful editor
Numerous effects to choose from
Detailed tutorials provided by the official channel
In the recent few years, Augmented Reality (AR) has evolved from a sci-fi concept to one of the most prominent technologies in the world. Due to its vast applications, AR has already seeped into many industries and the education world is one of them. Augmented Reality in classrooms can do wonders for the kids and enhance the overall learning experience. Not to mention, by combining AR with other intuitive technologies like Virtual Reality (VR) and Mixed Reality (MR), teachers can uplift the entire learning experience for students and make boring topics slightly more intriguing.
The truth is that conventional teaching methods are now becoming obsolete and many educational institutes and universities are incorporating AR to make teaching more fun. Keeping that in mind, we are going to share a detailed insight into how AR integration can help the entire edtech world. We’ll also share some of the real-world examples of Augmented Reality (AR) in teaching so that you can understand its benefits in the education sector.
In this article
01 [What Is AR in Teaching?](#Part 1)
02 [5 Benefits of Augmented Reality in Education](#Part 2)
03 [10 Creative AR Teaching Examples](#Part 3)
Part 1 What Is AR in Teaching?
For readers who are not familiar with Augmented Reality, here’s what you need to know. Augmented Reality is an immersive technology that combines various virtual elements with the real world. Unlike Virtual Reality (VR), AR doesn’t completely take users away from the real world. Instead, it overlays a few virtual elements onto the physical world to make things more immersive. Let’s understand this with the help of an example.

If you download IKEA’s phone app, it has a feature that allows you to virtually place different pieces of furniture in your home/office. So, before buying something from the IKEA store, you can evaluate if it would look good at your place or not. Like IKEA, there are several other examples of Augmented Reality that prove its benefits in today’s tech-savvy society. So, let’s explore some of the advantages of incorporating Augmented Reality in classrooms and the education sector.
Part 2 Benefits of Augmented Reality in Education
01No Special Equipment Required
One of the biggest advantages of Augmented Reality over other immersive technologies is that it doesn’t require any special equipment. Users can access an AR-based application directly on their smartphones and get access to the entire course material right away. Moreover, teachers can also access AR-based platforms on their laptops and make teaching more interactive for everyone.
02Better Student Engagement
Speaking of interaction, AR has the potential to make learning more engaging for the students. Even the most boring topics can be brought to life by bringing technology like AR into the picture. One of the ways to do this is to gamify the technology and turn conventional training into something more intuitive. This way all the students will sit through the entire lesson and stay engaged till the end.
03Practical Learning
Another major advantage of Augmented Reality in teaching is its ability to boast practical learning. For example, different training institutes can help trainees get familiar with the inner elements of a machine without having to go near the physical machine itself. This also reduces security threats in the workplace and protects training institutes from compromising million-dollar equipment.
04Combined Learning
Our education sector is at a stage where it’s not possible to directly transition from textbooks to complete tech-based learning. However, we can still benefit by combining technologies like AR with conventional teaching methods to achieve an all-around success. With Augmented Reality in schools, students will have the liberty to learn the practical implementation of all the theoretical knowledge they’ve acquired during the lectures.
05Affordable
Finally, the biggest reason why universities, colleges, and training institutes must consider integrating AR into the entire curriculum is its affordability. Since colleges don’t actually need any expensive equipment to access an AR-based tech platform, they won’t have to spend thousands of dollars in the beginning. And, due to its affordable nature, it’s also easier to make AR readily available to all the students.
Part 3 10 Creative AR Teaching Examples
Now, even though it may seem a bit hard to digest, AR classrooms have already become a reality. The technology has managed to garner immense popularity in the education sector and many institutes are relishing its benefits while making learning more fun and interactive for the students. So, as promised in the beginning of the article, here are some of the real-world examples of Augmented Reality in classrooms.
01Exploring the Universe With Skyview
Skyview is a smartphone application that lets users get familiar with the cosmos. To be more precise, students can use the app to know details about different stars they see during the night from their rooftop. To do this, all they have to do is point the camera towards the night sky and the app automatically overlays information regarding the most popular stars on the screen. In fact, they can even use the app to identify the location of planets and nearby satellites. Sounds fun, right?

02Video Editing With Wondershare Filmora Video Editor
In the 21st century, video editing has become one of the most sought-after careers in the world. In fact, there are thousands of kids who want to step into this creative industry and share their stories with the world.

Wondershare Filmora - Best Video Editor for Mac/Windows
5,481,435 people have downloaded it.
Build unique custom animations without breaking a sweat.
Focus on creating epic stories and leave the details to Filmora’s auto features.
Start a creative adventure with drag & drop effects and endless possibilities.
Filmora simplifies advanced features to save you time and effort.
Filmora cuts out repetition so you can move on to your next creative breakthrough.
Now, to get started with video editing, tools like Wondershare Filmora provide kids and (even adults) the ability to edit AR-based videos in an easy-to-navigate editing panel. This way anyone planning to get started in the video editing world can start sailing in the right direction. Filmora also has a built-in store where users can find an array of AR-based stickers and video effects. All these elements could be integrated into the videos within a few clicks and help users learn different dynamics of upscaling the overall production quality.
For Win 7 or later (64-bit)
For macOS 10.12 or later
03Distance Learning With Mondly
Mondly is a language learning platform that’s designed to help students learn different languages in an interactive manner. With the platform, users get a dedicated virtual assistant that helps them work on their skills more effectively. The app replicates real-life settings in many ways and users can get a strong grasp on the desired language.

04Froggipedia
This is where things get interesting. Froggipedia is a great example of Augmented Reality in teaching. It’s basically a smartphone app that lets users explore the internal organs of a frog in a virtual environment. It means students would no longer have to get involved in the mess that dissecting an actual frog creates in the classroom and still get familiar with each organ easily.

05Effective Marketing
Another example of Augmented Reality in the teaching world has nothing to do with learning, but the marketing aspect of the industry. With AR-based platforms, universities and colleges can market their brands among the target consumers and get a higher number of applications in return. They can launch digital publications and AR-powered videos to maximize engagement and achieve the desired results through their marketing campaigns.

06Virtual Classrooms
The COVID-19 pandemic has propelled the growth of virtual classrooms as many schools still haven’t resumed physical classes to restrict the virus’s spread. In VR classrooms, mixed reality - a combination of VR and AR - can help students stay engaged, even if they are sitting apart from each other. Virtual Classrooms will eliminate boredom from remote learning and keep the engagement level high for students.

07Secure Training
As we mentioned earlier, AR integration makes training more effective and risk-free. For example, with Microsoft Holo-lens, medical students understand the inner anatomy of the human body and understand complex procedures without having to risk a patient’s life. Once they are confident and know about each organ, they can move towards the next procedure and gain expertise in the particular domain more effectively.
08Google Expeditions
For a student, exploring the world is a great way to familiarize himself with different cultures. But, it’s not always possible for young kids to go on trips alone. Well, not anymore! Thanks to virtual tour platforms like Google Expeditions, teachers can take their students on virtual trips to different corners of the world, be it Mount Everest Base Camp or the Eiffel Tower in Paris.

09Augmented Reality in Museums
The younger generation craves interactivity. They don’t have the time to read brochures in a Museum. That’s the reason why many Museums have started to launch AR-powered tech to keep the visitors engaged and let them learn various historical facts more precisely. For instance, in a nature-themed museum, visitors can experience digital animals and their position in history.
10Virtual Speech
Not particularly an Augmented Reality (AR) example, Virtual Speech is a combination of AR and VR that lets users virtually practice their public speaking skills without going on a real stage. This is a great tool to fight stage fear and speak with confidence in front of an actual crowd.

● Ending Thoughts →
● Augmented Reality (AR) is no longer a thing of the past. It has become an emerging technology that has seeped into different industries including the education world.
● There are many advantages of integrating AR into the education world. For example, AR integration makes learning more interactive and fun for the students.
● There are dozens of real-life examples of Augmented Reality in education that are a clear indication of how AR can transform the entire education industry.
In the recent few years, Augmented Reality (AR) has evolved from a sci-fi concept to one of the most prominent technologies in the world. Due to its vast applications, AR has already seeped into many industries and the education world is one of them. Augmented Reality in classrooms can do wonders for the kids and enhance the overall learning experience. Not to mention, by combining AR with other intuitive technologies like Virtual Reality (VR) and Mixed Reality (MR), teachers can uplift the entire learning experience for students and make boring topics slightly more intriguing.
The truth is that conventional teaching methods are now becoming obsolete and many educational institutes and universities are incorporating AR to make teaching more fun. Keeping that in mind, we are going to share a detailed insight into how AR integration can help the entire edtech world. We’ll also share some of the real-world examples of Augmented Reality (AR) in teaching so that you can understand its benefits in the education sector.
In this article
01 [What Is AR in Teaching?](#Part 1)
02 [5 Benefits of Augmented Reality in Education](#Part 2)
03 [10 Creative AR Teaching Examples](#Part 3)
Part 1 What Is AR in Teaching?
For readers who are not familiar with Augmented Reality, here’s what you need to know. Augmented Reality is an immersive technology that combines various virtual elements with the real world. Unlike Virtual Reality (VR), AR doesn’t completely take users away from the real world. Instead, it overlays a few virtual elements onto the physical world to make things more immersive. Let’s understand this with the help of an example.
If you download IKEA’s phone app, it has a feature that allows you to virtually place different pieces of furniture in your home/office. So, before buying something from the IKEA store, you can evaluate if it would look good at your place or not. Like IKEA, there are several other examples of Augmented Reality that prove its benefits in today’s tech-savvy society. So, let’s explore some of the advantages of incorporating Augmented Reality in classrooms and the education sector.
Part 2 Benefits of Augmented Reality in Education
01No Special Equipment Required
One of the biggest advantages of Augmented Reality over other immersive technologies is that it doesn’t require any special equipment. Users can access an AR-based application directly on their smartphones and get access to the entire course material right away. Moreover, teachers can also access AR-based platforms on their laptops and make teaching more interactive for everyone.
02Better Student Engagement
Speaking of interaction, AR has the potential to make learning more engaging for the students. Even the most boring topics can be brought to life by bringing technology like AR into the picture. One of the ways to do this is to gamify the technology and turn conventional training into something more intuitive. This way all the students will sit through the entire lesson and stay engaged till the end.
03Practical Learning
Another major advantage of Augmented Reality in teaching is its ability to boast practical learning. For example, different training institutes can help trainees get familiar with the inner elements of a machine without having to go near the physical machine itself. This also reduces security threats in the workplace and protects training institutes from compromising million-dollar equipment.
04Combined Learning
Our education sector is at a stage where it’s not possible to directly transition from textbooks to complete tech-based learning. However, we can still benefit by combining technologies like AR with conventional teaching methods to achieve an all-around success. With Augmented Reality in schools, students will have the liberty to learn the practical implementation of all the theoretical knowledge they’ve acquired during the lectures.
05Affordable
Finally, the biggest reason why universities, colleges, and training institutes must consider integrating AR into the entire curriculum is its affordability. Since colleges don’t actually need any expensive equipment to access an AR-based tech platform, they won’t have to spend thousands of dollars in the beginning. And, due to its affordable nature, it’s also easier to make AR readily available to all the students.
Part 3 10 Creative AR Teaching Examples
Now, even though it may seem a bit hard to digest, AR classrooms have already become a reality. The technology has managed to garner immense popularity in the education sector and many institutes are relishing its benefits while making learning more fun and interactive for the students. So, as promised in the beginning of the article, here are some of the real-world examples of Augmented Reality in classrooms.
01Exploring the Universe With Skyview
Skyview is a smartphone application that lets users get familiar with the cosmos. To be more precise, students can use the app to know details about different stars they see during the night from their rooftop. To do this, all they have to do is point the camera towards the night sky and the app automatically overlays information regarding the most popular stars on the screen. In fact, they can even use the app to identify the location of planets and nearby satellites. Sounds fun, right?
02Video Editing With Wondershare Filmora Video Editor
In the 21st century, video editing has become one of the most sought-after careers in the world. In fact, there are thousands of kids who want to step into this creative industry and share their stories with the world.
Wondershare Filmora - Best Video Editor for Mac/Windows
5,481,435 people have downloaded it.
Build unique custom animations without breaking a sweat.
Focus on creating epic stories and leave the details to Filmora’s auto features.
Start a creative adventure with drag & drop effects and endless possibilities.
Filmora simplifies advanced features to save you time and effort.
Filmora cuts out repetition so you can move on to your next creative breakthrough.
Now, to get started with video editing, tools like Wondershare Filmora provide kids and (even adults) the ability to edit AR-based videos in an easy-to-navigate editing panel. This way anyone planning to get started in the video editing world can start sailing in the right direction. Filmora also has a built-in store where users can find an array of AR-based stickers and video effects. All these elements could be integrated into the videos within a few clicks and help users learn different dynamics of upscaling the overall production quality.
For Win 7 or later (64-bit)
For macOS 10.12 or later
03Distance Learning With Mondly
Mondly is a language learning platform that’s designed to help students learn different languages in an interactive manner. With the platform, users get a dedicated virtual assistant that helps them work on their skills more effectively. The app replicates real-life settings in many ways and users can get a strong grasp on the desired language.
04Froggipedia
This is where things get interesting. Froggipedia is a great example of Augmented Reality in teaching. It’s basically a smartphone app that lets users explore the internal organs of a frog in a virtual environment. It means students would no longer have to get involved in the mess that dissecting an actual frog creates in the classroom and still get familiar with each organ easily.
05Effective Marketing
Another example of Augmented Reality in the teaching world has nothing to do with learning, but the marketing aspect of the industry. With AR-based platforms, universities and colleges can market their brands among the target consumers and get a higher number of applications in return. They can launch digital publications and AR-powered videos to maximize engagement and achieve the desired results through their marketing campaigns.
06Virtual Classrooms
The COVID-19 pandemic has propelled the growth of virtual classrooms as many schools still haven’t resumed physical classes to restrict the virus’s spread. In VR classrooms, mixed reality - a combination of VR and AR - can help students stay engaged, even if they are sitting apart from each other. Virtual Classrooms will eliminate boredom from remote learning and keep the engagement level high for students.
07Secure Training
As we mentioned earlier, AR integration makes training more effective and risk-free. For example, with Microsoft Holo-lens, medical students understand the inner anatomy of the human body and understand complex procedures without having to risk a patient’s life. Once they are confident and know about each organ, they can move towards the next procedure and gain expertise in the particular domain more effectively.
08Google Expeditions
For a student, exploring the world is a great way to familiarize himself with different cultures. But, it’s not always possible for young kids to go on trips alone. Well, not anymore! Thanks to virtual tour platforms like Google Expeditions, teachers can take their students on virtual trips to different corners of the world, be it Mount Everest Base Camp or the Eiffel Tower in Paris.
09Augmented Reality in Museums
The younger generation craves interactivity. They don’t have the time to read brochures in a Museum. That’s the reason why many Museums have started to launch AR-powered tech to keep the visitors engaged and let them learn various historical facts more precisely. For instance, in a nature-themed museum, visitors can experience digital animals and their position in history.
10Virtual Speech
Not particularly an Augmented Reality (AR) example, Virtual Speech is a combination of AR and VR that lets users virtually practice their public speaking skills without going on a real stage. This is a great tool to fight stage fear and speak with confidence in front of an actual crowd.
● Ending Thoughts →
● Augmented Reality (AR) is no longer a thing of the past. It has become an emerging technology that has seeped into different industries including the education world.
● There are many advantages of integrating AR into the education world. For example, AR integration makes learning more interactive and fun for the students.
● There are dozens of real-life examples of Augmented Reality in education that are a clear indication of how AR can transform the entire education industry.
How to Create Discord Logo GIF
How to Make Discord Logo GIF
An easy yet powerful editor
Numerous effects to choose from
Detailed tutorials provided by the official channel
The craze to get a personalized Discord animated icon is increasing with time. As it can deliver your favorite vibe to you and your friends, it’s exciting. Moreover, there are so many options in logos to choose from.
But what if you want a Discord GIF icon for your account? Maybe you’ve seen your friends using it and it’s stunning, isn’t it? That’s why this article is containing all the latest and easiest tricks to make the desired GIF icons Discord. Get the three best ways to make your own Discord logo. And let your friends ask you for the secret.
In this article
01 [Why Discord GIF Become Popular Recently?](#Part 1)
02 [How to Make an Animated Discord Logo Icon (Free Template)](#Part 2)
03 [How to Get Animated Discord PFP](#Part 3)
04 [How to Make Your Discord PFP a GIF on Wondershare Filmora](#Part 4)
Part 1 Why Discord GIF Become Popular Recently?
Think of one online entertainment that Discord is not serving right now. It’s hard to get one in mind. From chatting with friends to watching a movie together, from listening to music to playing together, all the entertainment is under a roof. And who doesn’t want the best appearance on such an engaging platform?
On the other hand, animated icons Discord is immensely popular as they can replicate your expression and mood as you want. Normal profile pictures are back-dated now as these GIFs can make the profile more interesting. You can pick any character or Discord animated icon as per your wish. Moreover, many of these are for free. While using these GIFs on multiple online chatting platforms, users can express their exact thoughts behind a message or reaction. Similarly, by using Discord icons GIFs, people can make their profile more lively and personalized.
Not sure of using GIFs? Imagine your Discord profile with your favorite anime character or a suitable clip. On some social media platforms, we need to be formal out of the profession. But on Discord, you can chill, so your profile. So, why not give it a try?
If you’re here to know the quick guide to set your Discord logo GIF or if you’re facing any error while setting the logo, this article will help you in no time.
Part 2 How to Make an Animated Discord Logo Icon (Free Template)
If you have already decided what will be the type of GIF icon Discord you want, that’s great. Otherwise, decide whether you need something funny or relaxed or it depends on a brand. This decision would help you to pick the template. Similarly, you can make the best Discord GIF icon with the following steps.


● To make a GIF with your choice, use this tool and click on “Edit this template”. This will let you make a customized GIF from any video from your personal collection or download from the Internet.
![]()
● In the next step, you have to choose the template size from the right-hand side of the window. You can keep to the custom 512x512 size as well.
● Now, on the topmost bar in the window, you can find an option named “Upload”. Click on this option to upload the video from where you want to make your Discord icon GIF.
![]()
● You can upload the video from the gallery or drag-and-drop to the uploader window. You can also get videos from Google Drive.
● Now, as the video gets uploaded, you need to edit within the edit window. You can set the frame, time, and size from the tools highlighted in the image.
![]()
● Now, from the top-right side of the window, get the “Export Video” button. Click on the green arrow beside the button to get a drop-down list. From there click on the “Export as GIF” button to save your Discord icon GIF.
![]()
● You can check the download status from the next window.
![]()
● To save the recent GIF, click on “Download”. It will take some seconds to get saved to your system.
![]()
● Now, open Discord in your system and right-click on your “Server” icon from the left-hand side of the window. As a drop-down menu appears, select “Server Settings” followed by “Overview”.
![]()
● A new window will be opened with the existing profile picture of the server. To add the GIF icon Discord, click on “Upload Image”.
![]()
● From the location where you’ve saved the GIF, select it. Then, click on “Apply” to upload the GIF icon to the server profile.
![]()
● When uploading is completed, click on the green button named “Save Changes” to save the GIF icons Discord. Make sure that your GIF file size is less than 10.24 MB. Otherwise, you cannot save the GIF and have to resize it again.
![]()
Part 3 How to Get Animated Discord PFP
To set an exciting avatar in your Discord profile, you need to go through the following quick steps. Firstly, note that you need to have Discord Nitro to set a Discord logo GIF in your user profile. Without Nitro, GIF cannot be used as a PFP. Get all the answers for how to use Discord Nitro or how to get animated Discord PFP here.
● Open Discord and from the bottom-left side panel, click on the “Gear” icon that is the “User Settings”. It will present beside your user name on the “Home” window itself.
![]()
● As the new window gets opened, go to “Discord Nitro” under “Payment Settings”.
![]()
● If you don’t have activated Nitro, then click on “Subscribe” to get a suitable subscription to initiate animated icons Discord for your profile.
![]()
● Then, you’ll be redirected to the subscription options. Choose “Monthly” or “Yearly” subscription and to confirm it, click “Select”. If you choose the yearly plan, you’ll get an additional 16% off.
![]()
● As Discord Nitro is activated after payment and agreeing to the terms and conditions, you can see a pop-up window. Click on “Sweet” to get started.
![]()
● To set your profile avatar with GIF icon Discord, you need some GIFs downloaded to your system. So, make your GIF according to the last technique we mentioned. Or you can search for GIFs on the Internet like Giphy”, “Tenor”, or “Gfycat”. Save the GIFs as images to the system.
● Go the the “Gear” icon like the 1st step and open “User Settings”. Then, Go to the second option under user settings, “User Profile”. In this window, you can find a blue button named “Change Avatar”. Click on this button to set the Discord icon GIF.
![]()
● Now, you need to find the desired GIF from the “File Explorer” opened. Go to the folder where you saved the GIF file. Then, select it and click on “Open”.
![]()
● You can edit the frame of your Discord animated icons in the “edit image’ pop-up window. Then, click on “Apply” to set it finally. If you don’t want to edit the size, click on “Skip” to save the GIF as your profile picture on Discord.
![]()
● Check your profile picture now and match it with your expectations. Then click on “Save Changes” to save the icon. If you want some changes, click on “Change Avatar” and select any GIF from the saved discord icons GIF from the file explorer.
![]()
Part 4 How to Make Your Discord PFP a GIF on Wondershare Filmora
Wondershare Filmora Video Editor is the latest software where you can create a GIF easily to set as a discord GIF icon. Instead of using the same, existing GIFs, you can make your own now. It will help you to make a unique impression and be satisfied with your personalized account. Moreover, this software is just 4 KB in storage size. So, instan5 download and installation is not a problem at all.
Wondershare Filmora - Best Video Editor for Mac/Windows
5,481,435 people have downloaded it.
Build unique custom animations without breaking a sweat.
Focus on creating epic stories and leave the details to Filmora’s auto features.
Start a creative adventure with drag & drop effects and endless possibilities.
Filmora simplifies advanced features to save you time and effort.
Filmora cuts out repetition so you can move on to your next creative breakthrough.
Let’s go through the steps to understand the procedure to make GIF icons discord on Wondershare Filmora.
● Download and Install Wondershare Filmora in your system. It won’t take more than 10 minutes for the complete installation process. This software is available for both Windows and Mac OS.
![]()
● You can observe the installation status on your screen.
![]()
● As the installation is done, click on “Start Now” to open the software on the computer. A new black window will be opened on the screen.
![]()
● Click on the “Import Media Files Here” section to select an editable video file or a collection of photos to make the GIF.
![]()
● As you select the desired video or images to make a discord animated icon from, you can find plenty of editing tools in the bottom section of the window. You can “crop”, “edit”, change the “duration” or apply “chroma-key” to the selected file. You can observe the respective changes on the right-hand side of the window.
![]()
● When you complete the editing process, move to the right-hand section to play the GIF with the triangular-shaped button. It will give you a preview of your edited GIF for discord.
![]()
● If you want to add text to your GIF to make it more interactive, it’s possible with Wondershare Filmora. Firstly, select the “T” button or “Title” option from the menubar in the window. There’ll be multiple title templates available. Choose any one of them and click on the green “Down arrow” on the template.
![]()
● The template will be loaded and then you can click on the small, green “+” button on the selected template to add it to your GIF. Now, click on the GIF frame to edit the text. Then click on “OK”.
![]()
● Now, save the discord icon GIF with a proper gif extension and then upload it as your profile picture.
![]()
● Ending Thoughts →
● This article includes three different ways to make discord icons GIF easily to make a customized avatar.
● There’s no need to stick to the old profile picture in your discord account.
● With these quick and easy steps, creating and setting a GIF as a profile icon would be very easy.
The craze to get a personalized Discord animated icon is increasing with time. As it can deliver your favorite vibe to you and your friends, it’s exciting. Moreover, there are so many options in logos to choose from.
But what if you want a Discord GIF icon for your account? Maybe you’ve seen your friends using it and it’s stunning, isn’t it? That’s why this article is containing all the latest and easiest tricks to make the desired GIF icons Discord. Get the three best ways to make your own Discord logo. And let your friends ask you for the secret.
In this article
01 [Why Discord GIF Become Popular Recently?](#Part 1)
02 [How to Make an Animated Discord Logo Icon (Free Template)](#Part 2)
03 [How to Get Animated Discord PFP](#Part 3)
04 [How to Make Your Discord PFP a GIF on Wondershare Filmora](#Part 4)
Part 1 Why Discord GIF Become Popular Recently?
Think of one online entertainment that Discord is not serving right now. It’s hard to get one in mind. From chatting with friends to watching a movie together, from listening to music to playing together, all the entertainment is under a roof. And who doesn’t want the best appearance on such an engaging platform?
On the other hand, animated icons Discord is immensely popular as they can replicate your expression and mood as you want. Normal profile pictures are back-dated now as these GIFs can make the profile more interesting. You can pick any character or Discord animated icon as per your wish. Moreover, many of these are for free. While using these GIFs on multiple online chatting platforms, users can express their exact thoughts behind a message or reaction. Similarly, by using Discord icons GIFs, people can make their profile more lively and personalized.
Not sure of using GIFs? Imagine your Discord profile with your favorite anime character or a suitable clip. On some social media platforms, we need to be formal out of the profession. But on Discord, you can chill, so your profile. So, why not give it a try?
If you’re here to know the quick guide to set your Discord logo GIF or if you’re facing any error while setting the logo, this article will help you in no time.
Part 2 How to Make an Animated Discord Logo Icon (Free Template)
If you have already decided what will be the type of GIF icon Discord you want, that’s great. Otherwise, decide whether you need something funny or relaxed or it depends on a brand. This decision would help you to pick the template. Similarly, you can make the best Discord GIF icon with the following steps.
● To make a GIF with your choice, use this tool and click on “Edit this template”. This will let you make a customized GIF from any video from your personal collection or download from the Internet.
![]()
● In the next step, you have to choose the template size from the right-hand side of the window. You can keep to the custom 512x512 size as well.
● Now, on the topmost bar in the window, you can find an option named “Upload”. Click on this option to upload the video from where you want to make your Discord icon GIF.
![]()
● You can upload the video from the gallery or drag-and-drop to the uploader window. You can also get videos from Google Drive.
● Now, as the video gets uploaded, you need to edit within the edit window. You can set the frame, time, and size from the tools highlighted in the image.
![]()
● Now, from the top-right side of the window, get the “Export Video” button. Click on the green arrow beside the button to get a drop-down list. From there click on the “Export as GIF” button to save your Discord icon GIF.
![]()
● You can check the download status from the next window.
![]()
● To save the recent GIF, click on “Download”. It will take some seconds to get saved to your system.
![]()
● Now, open Discord in your system and right-click on your “Server” icon from the left-hand side of the window. As a drop-down menu appears, select “Server Settings” followed by “Overview”.
![]()
● A new window will be opened with the existing profile picture of the server. To add the GIF icon Discord, click on “Upload Image”.
![]()
● From the location where you’ve saved the GIF, select it. Then, click on “Apply” to upload the GIF icon to the server profile.
![]()
● When uploading is completed, click on the green button named “Save Changes” to save the GIF icons Discord. Make sure that your GIF file size is less than 10.24 MB. Otherwise, you cannot save the GIF and have to resize it again.
![]()
Part 3 How to Get Animated Discord PFP
To set an exciting avatar in your Discord profile, you need to go through the following quick steps. Firstly, note that you need to have Discord Nitro to set a Discord logo GIF in your user profile. Without Nitro, GIF cannot be used as a PFP. Get all the answers for how to use Discord Nitro or how to get animated Discord PFP here.
● Open Discord and from the bottom-left side panel, click on the “Gear” icon that is the “User Settings”. It will present beside your user name on the “Home” window itself.
![]()
● As the new window gets opened, go to “Discord Nitro” under “Payment Settings”.
![]()
● If you don’t have activated Nitro, then click on “Subscribe” to get a suitable subscription to initiate animated icons Discord for your profile.
![]()
● Then, you’ll be redirected to the subscription options. Choose “Monthly” or “Yearly” subscription and to confirm it, click “Select”. If you choose the yearly plan, you’ll get an additional 16% off.
![]()
● As Discord Nitro is activated after payment and agreeing to the terms and conditions, you can see a pop-up window. Click on “Sweet” to get started.
![]()
● To set your profile avatar with GIF icon Discord, you need some GIFs downloaded to your system. So, make your GIF according to the last technique we mentioned. Or you can search for GIFs on the Internet like Giphy”, “Tenor”, or “Gfycat”. Save the GIFs as images to the system.
● Go the the “Gear” icon like the 1st step and open “User Settings”. Then, Go to the second option under user settings, “User Profile”. In this window, you can find a blue button named “Change Avatar”. Click on this button to set the Discord icon GIF.
![]()
● Now, you need to find the desired GIF from the “File Explorer” opened. Go to the folder where you saved the GIF file. Then, select it and click on “Open”.
![]()
● You can edit the frame of your Discord animated icons in the “edit image’ pop-up window. Then, click on “Apply” to set it finally. If you don’t want to edit the size, click on “Skip” to save the GIF as your profile picture on Discord.
![]()
● Check your profile picture now and match it with your expectations. Then click on “Save Changes” to save the icon. If you want some changes, click on “Change Avatar” and select any GIF from the saved discord icons GIF from the file explorer.
![]()
Part 4 How to Make Your Discord PFP a GIF on Wondershare Filmora
Wondershare Filmora Video Editor is the latest software where you can create a GIF easily to set as a discord GIF icon. Instead of using the same, existing GIFs, you can make your own now. It will help you to make a unique impression and be satisfied with your personalized account. Moreover, this software is just 4 KB in storage size. So, instan5 download and installation is not a problem at all.
Wondershare Filmora - Best Video Editor for Mac/Windows
5,481,435 people have downloaded it.
Build unique custom animations without breaking a sweat.
Focus on creating epic stories and leave the details to Filmora’s auto features.
Start a creative adventure with drag & drop effects and endless possibilities.
Filmora simplifies advanced features to save you time and effort.
Filmora cuts out repetition so you can move on to your next creative breakthrough.
Let’s go through the steps to understand the procedure to make GIF icons discord on Wondershare Filmora.
● Download and Install Wondershare Filmora in your system. It won’t take more than 10 minutes for the complete installation process. This software is available for both Windows and Mac OS.
![]()
● You can observe the installation status on your screen.
![]()
● As the installation is done, click on “Start Now” to open the software on the computer. A new black window will be opened on the screen.
![]()
● Click on the “Import Media Files Here” section to select an editable video file or a collection of photos to make the GIF.
![]()
● As you select the desired video or images to make a discord animated icon from, you can find plenty of editing tools in the bottom section of the window. You can “crop”, “edit”, change the “duration” or apply “chroma-key” to the selected file. You can observe the respective changes on the right-hand side of the window.
![]()
● When you complete the editing process, move to the right-hand section to play the GIF with the triangular-shaped button. It will give you a preview of your edited GIF for discord.
![]()
● If you want to add text to your GIF to make it more interactive, it’s possible with Wondershare Filmora. Firstly, select the “T” button or “Title” option from the menubar in the window. There’ll be multiple title templates available. Choose any one of them and click on the green “Down arrow” on the template.
![]()
● The template will be loaded and then you can click on the small, green “+” button on the selected template to add it to your GIF. Now, click on the GIF frame to edit the text. Then click on “OK”.
![]()
● Now, save the discord icon GIF with a proper gif extension and then upload it as your profile picture.
![]()
● Ending Thoughts →
● This article includes three different ways to make discord icons GIF easily to make a customized avatar.
● There’s no need to stick to the old profile picture in your discord account.
● With these quick and easy steps, creating and setting a GIF as a profile icon would be very easy.
Also read:
- Updated Dollar-Store DIY Hacks to Use for Filmmaking
- 2024 Approved Do You Wish to Learn About some Tools to Slow Down a Video? Discover How to Slow Down Time Lapse on iPhone Throughout This Article
- Updated 2024 Approved Find The Best LUTs for Lightroom
- How To Achieve LumaFusion Color Grading Through LUTs
- New 2024 Approved In Todays Article, We Are Going to Show You How Adding a Simple Lower Third to Your Video Can Add a Degree of Professionalism and Polish to Your Videos While Giving It a Higher Perceived Value
- Updated 2024 Approved Looking for Exciting Methods to Create Alluring GIFs Worthy of Making a Mass Appeal? Heres All About GIF Design You Will Ever Want to Know and Learn
- Updated Discord Is the Future of Networking. After All, It Is Here to Stay. Have You Heard of the Discord Animated Avatar? If Yes, You Understand Its Power and if Not, Ensure You Study This Article for More Information
- New In 2024, Are You Seeking an Answer for What Is a LUT in the Video? In This Article, We Will Provide You with Detailed Information About LUTs and Their Utility
- Updated In 2024, Do You Wish to Make Changes Across Your Video? Are You Looking to Record Your Desktop Screen on Mac? Worry Not, as This Article Provides Details About QuickTime Player that Caters to All User Requirements
- New 2024 Approved Back up and Organize Your Files to Protect Any Misfortune Befalling Them. The Article Will Guide You on How to Back up and Manage Your Footage
- Updated In 2024, This Article Covers a Lot of Information About the Freeze-Frame Effect. It Includes Its Power, Its Usage in Films, and How to Create It in Your Videos Using Filmora. It Will Get You a Super Exciting Cinematic Effect
- Top 5 Tips to Freeze-Frame in After Effects for 2024
- Updated 2024 Approved What Is AI Composite Video App and AI Composite Video Tutorial
- Updated Splitting Audio From a Video in Sony Vegas Step by Step for 2024
- In 2024, Replacing Sky Background Using Adobe Photoshop A Comprehensive Guide
- Updated In 2024, YouTube Zoom to Fill Is a Great Feature for Viewing Things in Depth. This Article Answers All Questions About Fixing YouTube Zoom to Fill Not Working on Your Device
- 2024 Approved How Much Wedding Videographer Cost
- New 15 Amazing GIF Splitter Examples You Need to Bookmark for 2024
- New 2024 Approved This Article Talks in Detail About How to Convert Time-Lapse to Normal Video Using Certain Methods on iPhone, Online Tools, and so On. It Further Discusses Converting Time-Lapse Video to Normal on the Computer. Check Out
- New To Get Cinematographs of a Music Video, You Need to Understand the Basics of Camera Movement. As Well Framing and Lighting of the Setup Are Illustrated in This Article for 2024
- 2024 Approved What Is Color Finale
- Updated In 2024, What Are AR Emoji Stickers & How to Add Them to Your Video
- New Mask Tracking Is Believed to Be a Helpful Procedure for Marking Proper Areas in Videos. Learn How to Perform Premiere Pro Mask Tracking in This Guide for 2024
- Updated Splice Video Editor Online - Get Your Videos Splice Easily for 2024
- List of Supported iPhone Video Formats and Best iPhone Video Editor for 2024
- Updated In 2024, Learn How to Add Dynamic Shake Effects to Your Videos Using Alight Motion. Our Step-by-Step Guide Makes It Easy to Create Cinematic Footage
- Updated How to Zoom in Discord for 2024
- New How to Cut Videos on Mac without Using FFmpeg for 2024
- Updated 2024 Approved An Ultimate Guide to Edit a Music Video Aspect Ratio and First Cut
- New Best Audio Waveform Generator for 2024
- Updated 2024 Approved What Is MOV Format and How To Edit MOV Video Creatively?
- Updated In 2024, How to Make A Jaw-Dropping Time Lapse Video?
- Fun & Easy Masking Tricks Wondershare Filmora Tutorial for 2024
- New Do You Want to Add Subtitles to Your Videos Efficiently? This Article Will Introduce an Online Subtitle Editor that Will Help You to Create Subtitles for Your Video for 2024
- New Ideas That Will Help You Out in Converting AVI to GIF
- In 2024, Are You the One Who Is Confused About What to Opt Between Camtasia vs Captivate? No More Confusion! Here We Are Going to Reveal the Answer to Camtasia vs Captivate Which Is Better? Learn More
- New Top 15 LUTS to Buy for 2024
- New Find The Best LUTs for Lightroom for 2024
- Updated In 2024, Looking for Efficient Ways to Create a Slow-Motion Video? Read the Article for Reliable Solutions that Provide Excellent Results
- Updated 2024 Approved 4 Solutions to Resize a WebM File
- New 2024 Approved Best 5 Apps To Add Song To Video
- 2024 Approved 10 Best Free Text to Speech Software Windows, Mac,Android, iPhone & Online
- 2024 Approved 8 Best Video Editor with Useful Masking
- Updated In 2024, Have You Ever Created a Slow Motion Video on Your Phonr or Camera? This Article Will Show You some Knowledge About Slow Motion Photography
- New In 2024, Free Drone LUTs For Perfect Drone Footage
- In 2024, How to Sign Out of Apple ID On iPhone 15 Pro Max without Password?
- Prevent Cross-Site Tracking on Infinix Hot 30i and Browser | Dr.fone
- In 2024, Catch or Beat Sleeping Snorlax on Pokemon Go For Tecno Camon 20 Premier 5G | Dr.fone
- In 2024, Top 5 ZTE Blade A73 5G Bypass FRP Tools for PC That Actually Work
- In 2024, How to Change Location on TikTok to See More Content On your Asus ROG Phone 8 | Dr.fone
- What Does Jailbreaking iPhone 12 Pro i Do? Get Answers here
- New Users Guide How To Create Photo Talking Videos With the Best Tools?
- In 2024, Planning to Use a Pokemon Go Joystick on Vivo Y100i? | Dr.fone
- Planning to Use a Pokemon Go Joystick on Samsung Galaxy A14 4G? | Dr.fone
- A Detailed VPNa Fake GPS Location Free Review On Samsung Galaxy S23+ | Dr.fone
- Updated In 2024, A Brief Review of CapCut Translate With Alternative
- In 2024, About Xiaomi Redmi K70 FRP Bypass
- Complete Tutorial for Realme 12 5G Hard Reset | Dr.fone
- In 2024, Unlock Samsung Galaxy A15 4G Phone Password Without Factory Reset Full Guide Here
- In 2024, Pokémon Go Cooldown Chart On Lava Agni 2 5G | Dr.fone
- How to Unlock Poco C50 PIN Code/Pattern Lock/Password
- Disabling Apple iPhone XR Parental Restrictions With/Without Password
- Title: New In 2024, Make Eye Zoom Transition Effect with Filmora
- Author: Morgan
- Created at : 2024-04-24 01:06:57
- Updated at : 2024-04-25 01:06:57
- Link: https://ai-video-editing.techidaily.com/new-in-2024-make-eye-zoom-transition-effect-with-filmora/
- License: This work is licensed under CC BY-NC-SA 4.0.
