:max_bytes(150000):strip_icc():format(webp)/X-Logo-on-Phone-35c83db6a3c34b689ab069ff50b96bcc.jpg)
New In 2024, Master Premiere Pro Custom Sequence Presets

Master Premiere Pro: Custom Sequence Presets
You’ve probably heard of Adobe Premiere Pro – it’s a top-tier video editing software that’s widely recognized in the market. But have you delved into the nitty-gritty of sequence presets? A custom sequence preset is your best friend for maintaining consistency across projects.
It allows users to save specific settings for sequence attributes like frame rate, resolution, and audio settings. Instead of reconfiguring these settings for each new project, a custom sequence preset lets you jump right into editing. Now, how do you create one? Keep reading!
Part 1: How to Create a Custom Sequence in Premiere Pro
Creating a custom sequence is like tailoring a shirt to fit you perfectly. Here’s a step-by-step guide to help you do just that:
Step 1: Displays the New Sequence Window
Begin by launching Adobe Premiere Pro. Once opened, navigate to the top menu and select File > New > Sequence. This will open up the New Sequence window, where all the magic happens!
Step 2: Change the Editing Mode to Custom in the Settings Panel
You’ll see several tabs in the New Sequence window, but we will focus on the “Settings” tab for our purposes. Click on it.
Here, you’ll find the ‘Editing Mode’ dropdown menu. By default, it’s set to a specific format like ‘DSLR’ or ‘AVCHD.’ Change this to ‘Custom.’ This will unlock a plethora of options for you to play with.
Deep Dive into Settings:
- Frame Size: Define your video’s width and height. Remember, 1920x1080 is Full HD, and 3840x2160 is 4K. Choose based on your project needs.
- Frame Rate: 24fps is the cinematic standard, but if you’re creating content for TV or web, 30fps or 60fps might be more suitable.
- Pixel Aspect Ratio: Stick with ‘Square Pixels’ unless you have a specific reason to do otherwise.
- Fields: Choose ‘No Fields’ for progressive footage. If you’re unsure, this is a safe bet.
- Audio Settings: Here, you can configure the sample rate, among other things. 48000Hz is standard for video.
Step 3: Give the New Preset a Name and Save It
Once you’ve customized the settings to your satisfaction, it’s time to save this configuration for future use. At the bottom of the New Sequence window, you’ll see a ‘Save Preset’ button. Click on it.
A pop-up window will show up, requesting you to provide a name for your new preset. Choose something descriptive so you can easily recognize it later. Once named, click ‘OK’.
Your custom sequence preset is now saved and will appear under the ‘Custom’ folder in the ‘Sequence Presets’ tab.
Part 2: Why Custom Sequence Presets are Essential for Efficient Editing
As you delve deeper into video editing, you’ll begin to appreciate the little things that shave off minutes from your workflow, allowing you to dedicate more time to the creative process. This is precisely where the utility of custom sequence presets in Premiere Pro comes into play. But why are these presets so crucial?
- Consistency Across Projects: If you’re managing multiple projects or a series of videos, having a standard format ensures that all your content has a uniform look and feel. Consistency is a hallmark of professional-grade content. It’s not just about the visuals – maintaining a uniform audio quality and format is equally significant. With a preset, you no longer need to remember the minutiae of each setting, ensuring consistency effortlessly.
- Speed Up Your Workflow: Every minute you spend adjusting the sequence settings is a minute less you have for cutting, color correcting, audio mixing, or adding those special effects that make your videos pop. Over time, those minutes can add up to hours. By using a custom sequence preset, you can jump straight into the creative part of editing without the preliminary setup.
- Avoid Common Mistakes: Have you ever rendered an entire project only to find that the frame rate was off or the audio was set to the wrong sample rate? These kinds of errors can occur when setting up a new sequence from scratch each time. By relying on a preset, you mitigate the risks of such oversights.
- Personalized Templates for Different Platforms: Different platforms may have varying preferred settings. For instance, the ideal video format for YouTube might differ from that of Instagram or TikTok. Instead of Googling these settings each time, you can have a custom sequence preset ready for each platform, ensuring your content is optimized wherever it’s destined.
- Ease of Collaboration: If you’re working as part of a team, having standard sequence presets ensures everyone is on the same page. This is particularly handy when multiple editors are working on different segments of the same project. With custom presets, you’re not just aligning sequences but also visions.
Incorporating this practice into your editing routine might initially seem trivial, but its benefits compound with time.
Part 3: Summary
Creating a custom sequence preset in Adobe Premiere Pro isn’t just about streamlining your workflow – it’s about ensuring consistency across your projects.
By saving your most-used settings, you’re creating a base template that can be pulled up any time, granting you more time for the creative process.
Adobe Premiere Pro’s interface is designed to make tasks like these intuitive, so even if you’re a beginner, with a bit of practice, you’ll be creating custom sequence presets like a pro.
How to Create an URL for Your Video?
A well-personalized video is an effective way to get your way around the viewers easily. Besides, you can also easily impress them with your products or services by uniquely pressing them.

Now, imagine if you have an easier way to share your videos with audiences on different platforms! Well, this way you will save a lot of time. For this, you need to upload the video to the link, and then you can share the URL link on various platforms. Keep reading to understand the entire process.
Part 1: Method1: Upload videos to a video hosting platform
The method to upload the video to the link will vary based on the video-sharing platform you are using. Let’s understand this with an example. If you are using YouTube, then you need to follow the below-given steps to upload and generate a link for your video.
- First of all, you need to log into your YouTube channel or account.
- Now, you need to click on the video icon. You can find it on the right-hand side of the screen.
- Then, click on the Upload a Video option.
- Click on the Select Files option and choose the video that you want to upload. You can also drag and drop the video to upload it.
- Once done, click on Publish option to complete the process.
Now, to complete your YouTube video upload share, you need to find the link to your video. For this, you need to click on the pause button and then right-click on the video. Now choose the Copy video URL. Now, you can share that video on other platforms just by pasting the video link.
How To Make Video Private and Public?
- Sign in to your YouTube account.
- Choose the Videos option.
- Now choose the video that you want to update.
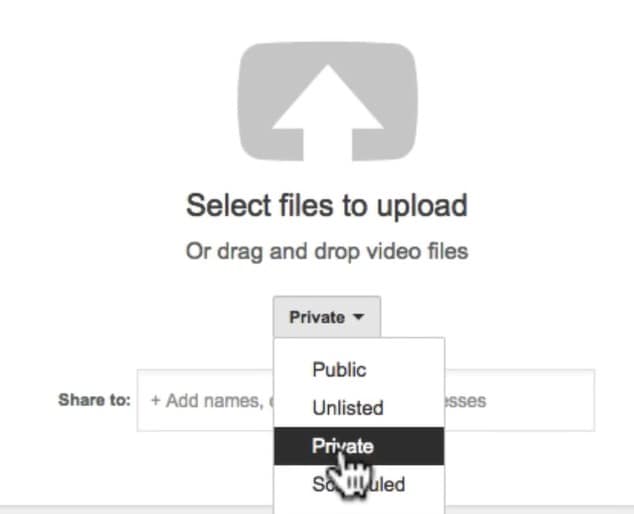
- Then you need to click on the down arrow located under Visibility and select Private or Public based on your preference and then click on the Save option.
Different Video Hosting Platforms that You can Use
1. Vimeo
One of the best alternatives to YouTube is Vimeo. This platform allows the user to create, manage and enjoy an easy video upload share process. This platform has more than 250 million active users. It offers different subscription plans, and for unlimited upload limits, webinars, live streaming and more, you can go for its premium package. Some of the impressive features of this platform are:
- Custom CTAs- Calls to Actions
- Support video hosting in 8K quality.
- Easy access to different video editing templates
- CRM- Customer Relationship Management integrations
- Supports content analytics
- video upload share option for social media
2. Streamable

Speaking about Streamable, this is a video editing as well as sharing tool that will allow you to stream videos in 4K quality, and you can even embed the videos. You will have the freedom to upload your videos in different formats and can also resize them in vertical, landscape and square formats. Some unique features of Streamable are:
- Content management tool
- Brand overlay
- Easy-to-customize templates
- Content Library
- Audio capture
- Faster data export and import and more
3. Uscreen
This is an excellent all-in-one platform that helps video creators to sell, manage and market their content while expanding their business. Besides, the platform also helps the users to create mobile and TV apps and offers tools to market the videos. Some features for Uscreen to consider are:
- Different membership options.
- Support offline viewing of content, including videos.
- A professional video player
- You will enjoy full ownership of your audience’s data
- Supports different retention and marketing tools.
- Supports more than 150 hours of video storage and more.
4. Dailymotion

This platform is also called “the home for videos that matter”. Dailymotion is used by many well-known clients such as MLB, CNN and more to host video content. If you are a creator, you can easily upload your videos on this platform for free. Creators can utilize different features available on the platform, such as:
- Easily embeddable and shareable videos
- Easy video sharing using your video link on social media platforms
- You can upload videos of up to 4K quality.
- Password-protected videos
Part 2: Upload your videos to a cloud disk and share to others
As per some studies, more than 85 percent of businesses utilize videos for marketing strategy. Video content is entertaining, easy to understand and can offer better ROI as you can reuse it. However, with the huge volume of these files, it has become more challenging to find a good storage option.

This is where cloud storage comes to play. There are different cloud disk or storage platforms where you can upload video to link and share your videos with others. For example, Google storage or Google Drive. So, let’s know the process of uploading a video to Google Drive.
- First, visit your Google Drive Account and then click on the new option.
- Now, you need to click on File Upload and then select the video that you want to upload.
- You can now see the selected video uploading in the screen’s lower left corner. It will take some time.
- Once done, Google Drive will begin processing the video.
- Once your video is available on Google Drive, you can move it to different folders or change the name.
Now, let’s talk about how to generate a link to your video and share that link with others.
- Open your Google Drive account.
- Choose the video that you want to share and right-click on it.
- Now, you need to click on the Get Link option.
- Then, choose the Anyone with the Link option from the viewer option.
- Now, click on the Copy Link option, and you can now share that link with anyone you want.
There are different reasons that make cloud storage options a perfect choice for video creators or other users. For example:
- You don’t have to worry about data loss.
- Cloud storage is highly scalable.
- There will be no space or storage limit
- The users can enjoy real-time video content updates
- One can access and share videos using any device.
However, some of the cloud storage platforms are not free to use. You will get up to 10GB to 20GB for free. For more storage limits, you will have to buy a subscription plan. For example, if you are using Dropbox, then you will have to pay around USD 20 per month to get up to 3TB of storage.
Besides, there are some content restrictions that you will have to consider. You are not allowed to upload videos that support malicious attacks, hate speech, graphic violence, predatory behavior or videos that promote any dangerous behavior. Besides, the platforms support certain types of video formats, such as OGG, WebM files, WMV, MTS, AVI, and WMV. FLV, 3GPP, MPEG 4, MOV and other file formats.
If you are looking for some free cloud storage platforms, then you can give Google Drive, Dropbox, Box, NeXT cloud, pCloud, Amazon Cloud Drive and OneDrive a try.
Part 3: How to Make Videos That Go Viral?
To make your videos go viral, you will have to make stunning videos by adding some unique special effects. And for this, you can use the Filmora tool. This is a creative video editing tool for a video creator. The platform offers some great features to vloggers, gamers and others. For example, it supports 4K editing, noise removal, advanced text editor, GIF support, video stabilization, equalizer and more. Now, let’s talk about how to use this platform to make or edit a video.
- Open Filmora and choose the desired aspect ratio. Now, click on the New Project option and import the video.
- Then you need to choose the frame rate and resolution for the video.
- Once done, you can go on and transition music between your video clips, or you can use different visual effects.
- Once you are done with editing, you can then explore the videos and then share the videos on different platforms directly from Filmora.
Free Download For Win 7 or later(64-bit)
Free Download For macOS 10.14 or later
FAQs
Why Create a Video Link?
The first reason to consider here is when upload video to link, you can easily share the videos in various formats. Besides, you can share it without worrying about the video size. The video can be shared on multiple platforms and social media channels. It is a faster way to share your video content.
How To Locate the URL of Your Video?
To locate your video URL, you can open the video online. The link that you will see in the browser’s address bar will be the URL of your video. You can then copy the URL and paste it or share it on other platforms. It also applies to YouTube and other video-sharing platforms.
How Do I Get My YouTube Channel’s URL?
You need to sign in to your YouTube Studio. Then from the left Menu, choose Customization and then choose the Basic info. Under the Channel URL option, you can see the URL of your YouTube channel. Now you can copy the Channel URL and share it with others.
Step by Step to Rotate Videos Using Handbrake
Handbrake is a video editing tool that allows you to rotate videos. It is a free and open source software that is available on Windows, Mac, and Linux. It is used to convert video files from one format to another. You can use it to compress videos, add subtitles, or create chapters. It also allows you to rotate videos in different directions. You can use it to fix videos that are not aligned properly or that have been filmed upside down. A handbrake is a popular tool because it is easy to use and it has a variety of features.
Step-by-step on how to rotate videos using Handbrake
When you import a video into the Handbrake software, it will by default be in a “landscape” orientation, with the long edge of the video oriented horizontally. If you want to rotate the video 90 degrees counterclockwise so that it appears “vertical,” or if you want to rotate it 180 degrees so that it is upside down, you can do so by following these two steps:
Step 1: Open the Handbrake software and import your video.
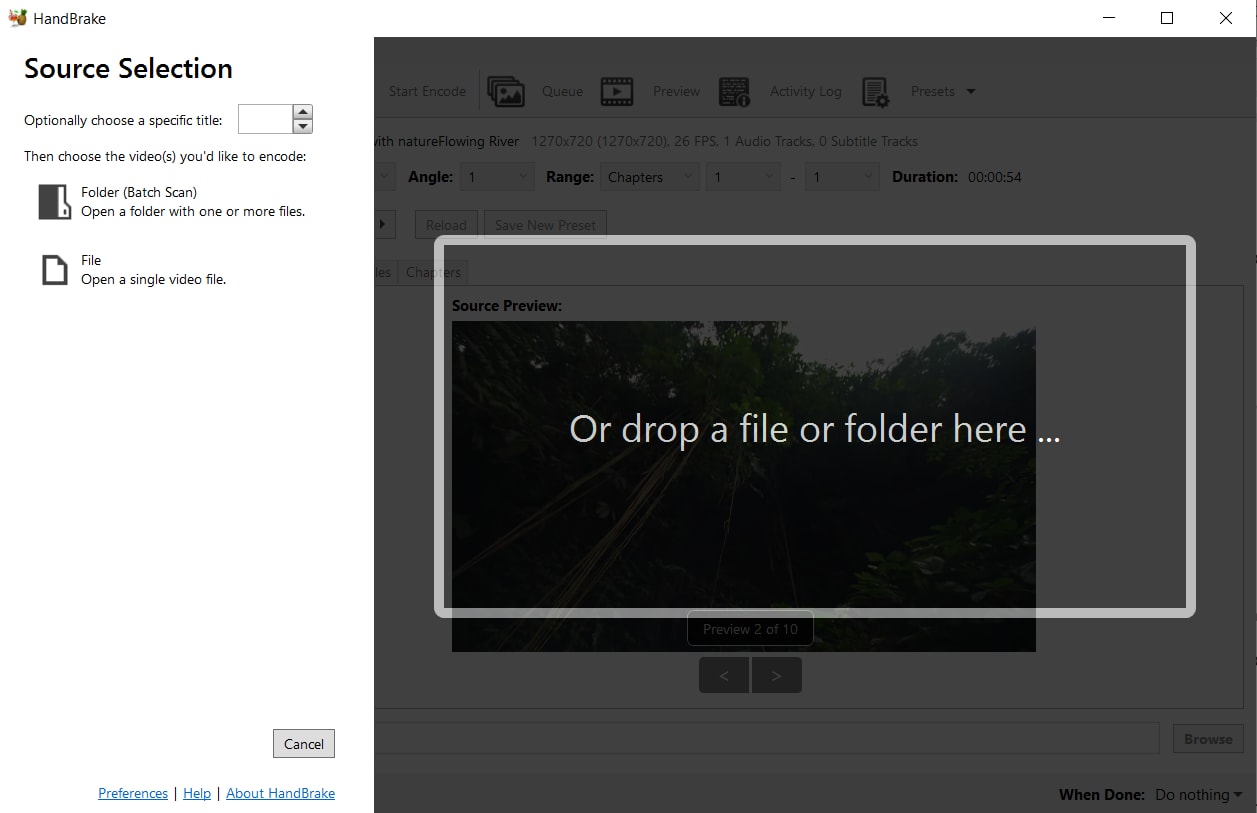
Step 2: Click on the “Dimensions” tab at the top of the Handbrake window.

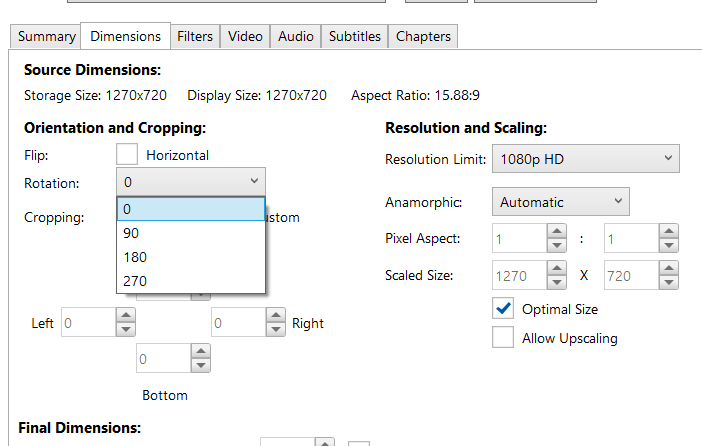
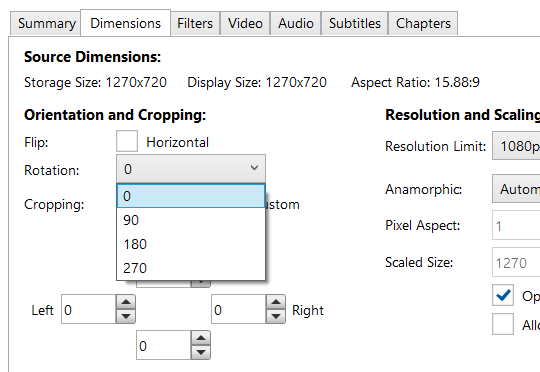
Step 3: Under the “Orientation and Cropping” section, click on one of the options in the “Rotate” menu.
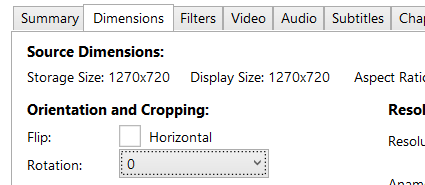
Step 4: If you want to rotate a video 90 degrees counterclockwise, select “90 Degrees CW (Counter-Clockwise).” If you want to rotate the video 180 degrees so that it is upside down, select “180 Degrees.”
Step 5: Click on the “Preview” button at the bottom of the Handbrake window to see a preview of how your rotated video will look. When you are satisfied with the rotation, click on the “Start Encode” button to begin the encoding process.
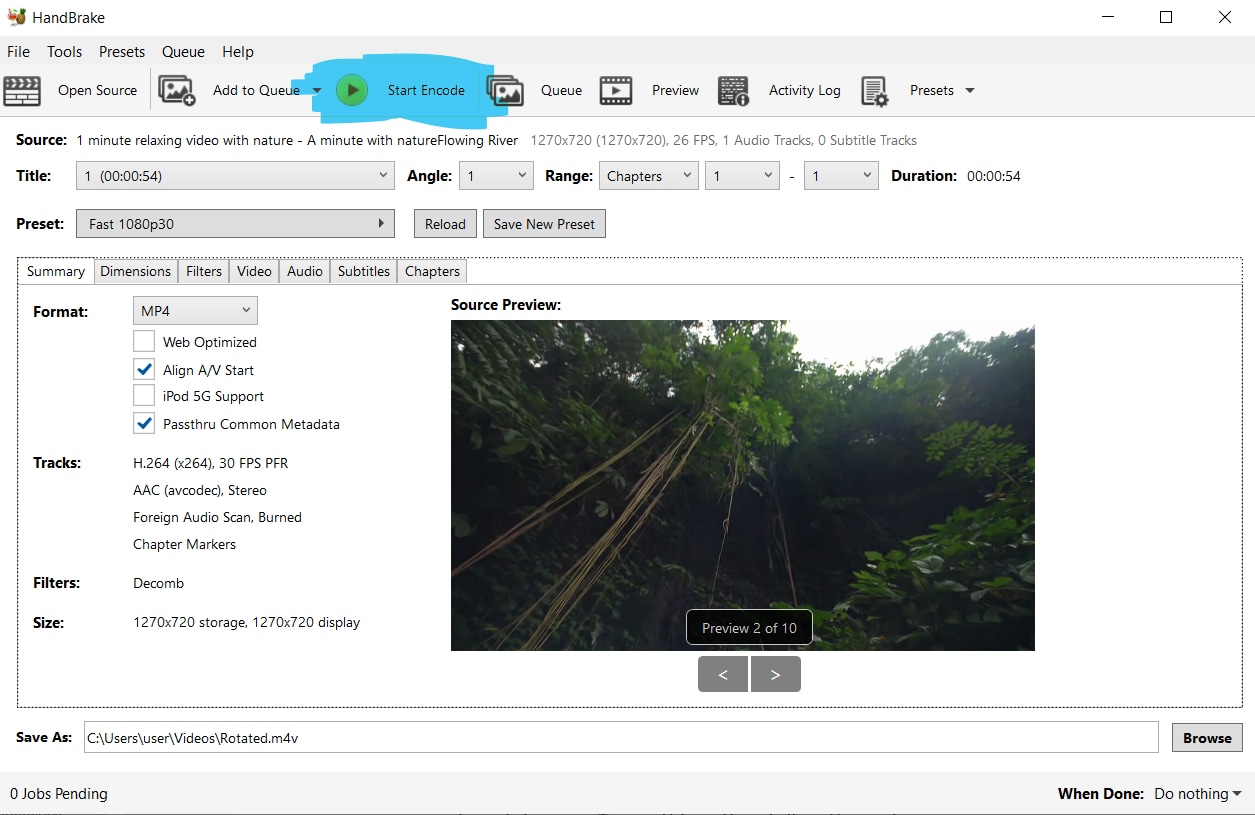
The Handbrake software also offers a “Flip” option which you can do after rotating it, which allows you to slip the video after rotating it. To use this option, follow these steps:
Under the “Orientation and Cropping” section, Go to Rotation and choose the degrees that best is best for your rotation requirements.
Click on “Flip” to flip your video horizontally.
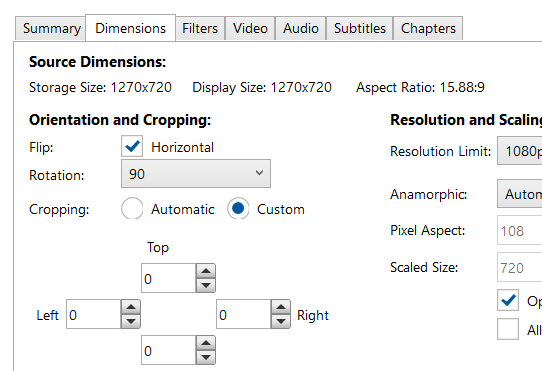
Click on the “Preview” button at the bottom of the Handbrake window to see a preview of how your rotated video will look. When you are satisfied with the rotation, click on the “Start Encode” button to begin the encoding process.
Both of these methods for rotating videos are easy to use and produce good results. Experiment with them to see which method works best for you.
An Easy Way to Rotate Videos Using Filmora
Moreover, instead of using Handbrake, you can use Filmora Video Editor instead. Filmora is a video editor that is very easy to use. It has a variety of features, including the ability to rotate videos. You can download Filmora from the Filmora website. The website has links to the download page for each of the supported platforms.
For Win 7 or later (64-bit)
For macOS 10.14 or later
Step-by-Step on how to rotate videos in Filmora
In order for you to rotate videos in Filmora, follow these simple steps:
Step 1: Import the video that you want to rotate into Filmora.
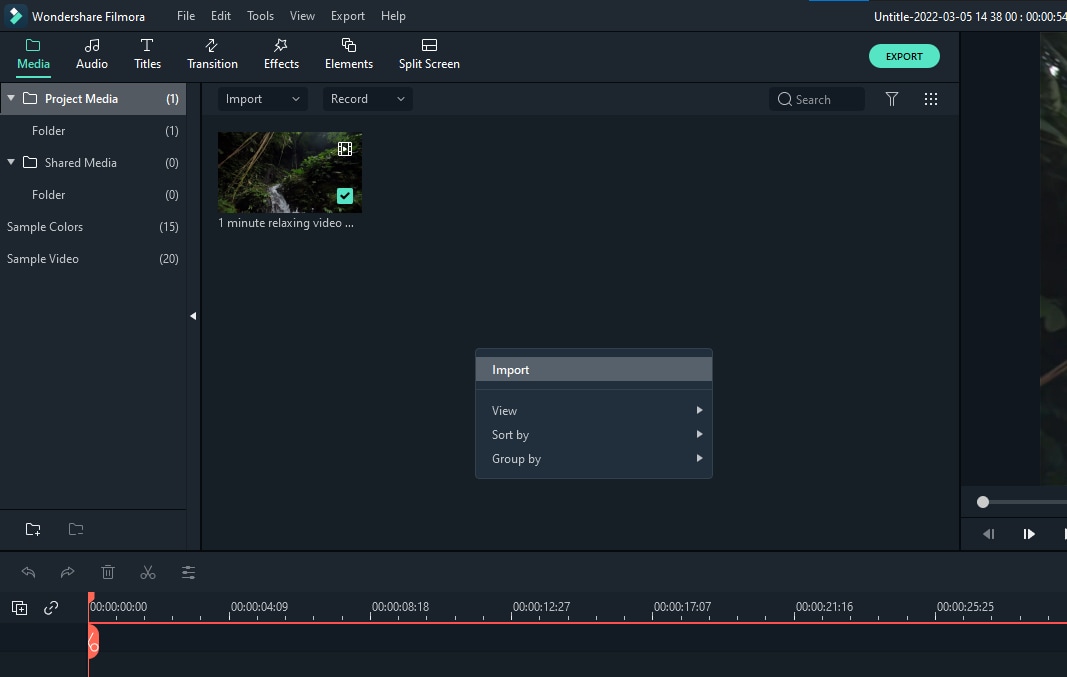
Step 2: Click on the “Edit” tab at the top of the video timeline.
Step 3: Click on the “Rotate” button in the “Transform” section of the toolbar.
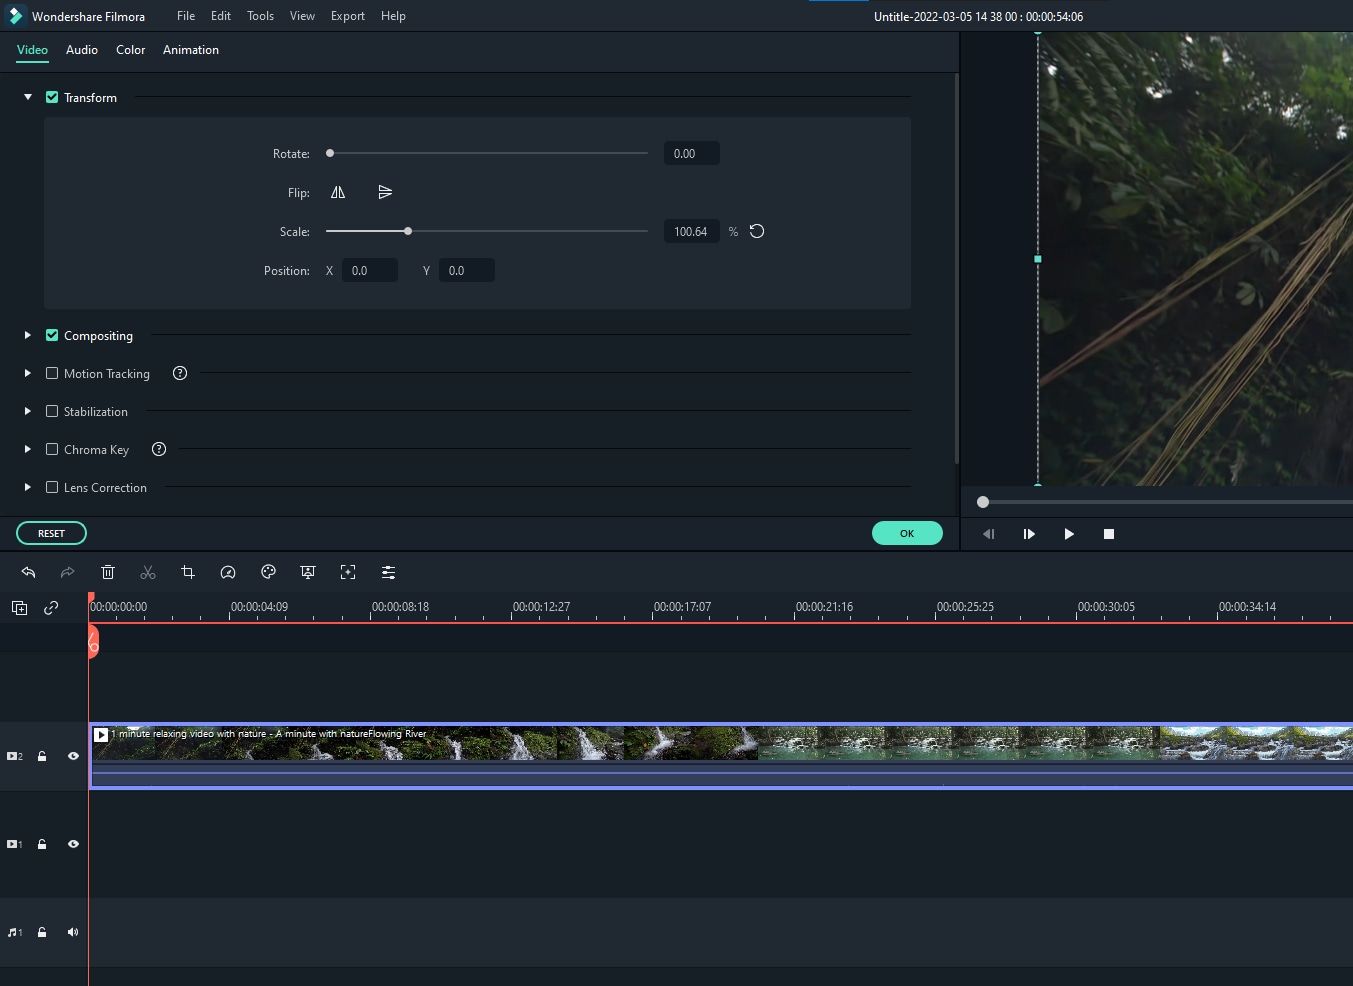
Step 4: Select the rotation angle that you want to rotate the video in the “Rotate” menu.

Step 5: Click on the “Preview” button at the bottom of the Filmora window to see a preview of how your rotated video will look. When you are satisfied with the rotation, click on the “OK” button to apply the rotation.
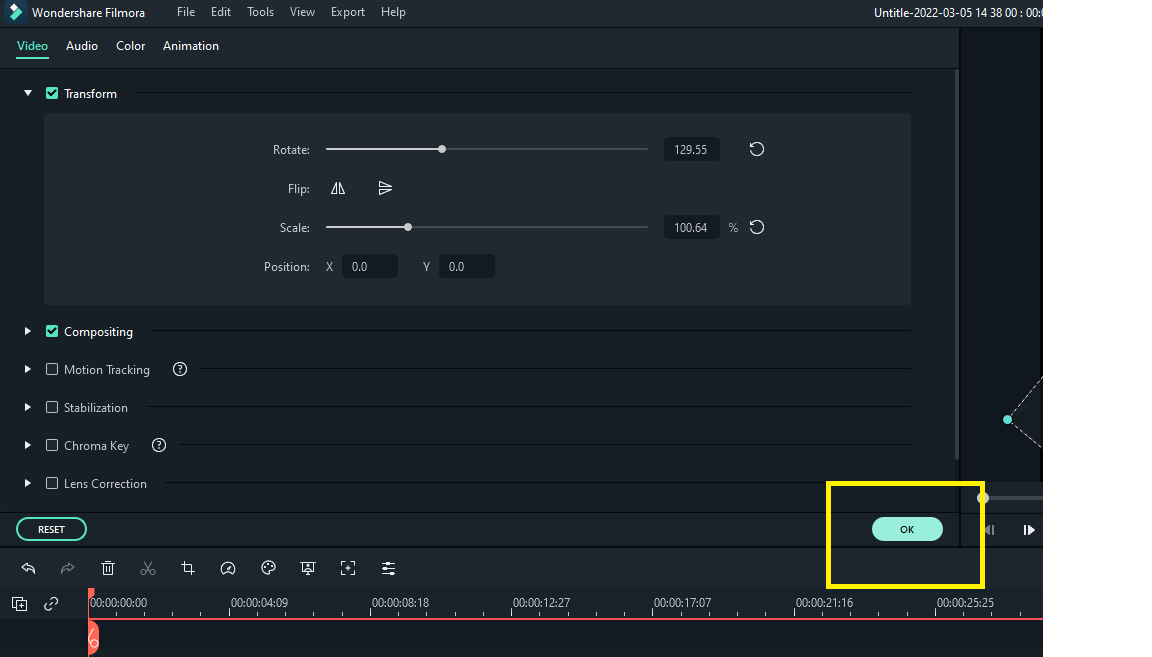
As you can see, rotating videos is a very easy process in both Handbrake and Filmora. Both Handbrake and Filmora offer simple methods for rotating videos. In Handbrake, you can rotate the video 90 degrees counterclockwise or 180 degrees.
In Filmora, you can rotate the video by any number of degrees in either direction. Experiment with these methods to see which one works best for you. Additionally, Filmora offers a number of other features, such as the ability to add text and transitions, that you may find useful.
Step 2: Click on the “Dimensions” tab at the top of the Handbrake window.

Step 3: Under the “Orientation and Cropping” section, click on one of the options in the “Rotate” menu.

Step 4: If you want to rotate a video 90 degrees counterclockwise, select “90 Degrees CW (Counter-Clockwise).” If you want to rotate the video 180 degrees so that it is upside down, select “180 Degrees.”

Step 5: Click on the “Preview” button at the bottom of the Handbrake window to see a preview of how your rotated video will look. When you are satisfied with the rotation, click on the “Start Encode” button to begin the encoding process.

The Handbrake software also offers a “Flip” option which you can do after rotating it, which allows you to slip the video after rotating it. To use this option, follow these steps:
Under the “Orientation and Cropping” section, Go to Rotation and choose the degrees that best is best for your rotation requirements.

Click on “Flip” to flip your video horizontally.

Click on the “Preview” button at the bottom of the Handbrake window to see a preview of how your rotated video will look. When you are satisfied with the rotation, click on the “Start Encode” button to begin the encoding process.
Both of these methods for rotating videos are easy to use and produce good results. Experiment with them to see which method works best for you.
An Easy Way to Rotate Videos Using Filmora
Moreover, instead of using Handbrake, you can use Filmora Video Editor instead. Filmora is a video editor that is very easy to use. It has a variety of features, including the ability to rotate videos. You can download Filmora from the Filmora website. The website has links to the download page for each of the supported platforms.
For Win 7 or later (64-bit)
For macOS 10.14 or later
Step-by-Step on how to rotate videos in Filmora
In order for you to rotate videos in Filmora, follow these simple steps:
Step 1: Import the video that you want to rotate into Filmora.

Step 2: Click on the “Edit” tab at the top of the video timeline.

Step 3: Click on the “Rotate” button in the “Transform” section of the toolbar.

Step 4: Select the rotation angle that you want to rotate the video in the “Rotate” menu.

Step 5: Click on the “Preview” button at the bottom of the Filmora window to see a preview of how your rotated video will look. When you are satisfied with the rotation, click on the “OK” button to apply the rotation.

As you can see, rotating videos is a very easy process in both Handbrake and Filmora. Both Handbrake and Filmora offer simple methods for rotating videos. In Handbrake, you can rotate the video 90 degrees counterclockwise or 180 degrees.
In Filmora, you can rotate the video by any number of degrees in either direction. Experiment with these methods to see which one works best for you. Additionally, Filmora offers a number of other features, such as the ability to add text and transitions, that you may find useful.
Step 2: Click on the “Dimensions” tab at the top of the Handbrake window.

Step 3: Under the “Orientation and Cropping” section, click on one of the options in the “Rotate” menu.

Step 4: If you want to rotate a video 90 degrees counterclockwise, select “90 Degrees CW (Counter-Clockwise).” If you want to rotate the video 180 degrees so that it is upside down, select “180 Degrees.”

Step 5: Click on the “Preview” button at the bottom of the Handbrake window to see a preview of how your rotated video will look. When you are satisfied with the rotation, click on the “Start Encode” button to begin the encoding process.

The Handbrake software also offers a “Flip” option which you can do after rotating it, which allows you to slip the video after rotating it. To use this option, follow these steps:
Under the “Orientation and Cropping” section, Go to Rotation and choose the degrees that best is best for your rotation requirements.

Click on “Flip” to flip your video horizontally.

Click on the “Preview” button at the bottom of the Handbrake window to see a preview of how your rotated video will look. When you are satisfied with the rotation, click on the “Start Encode” button to begin the encoding process.
Both of these methods for rotating videos are easy to use and produce good results. Experiment with them to see which method works best for you.
An Easy Way to Rotate Videos Using Filmora
Moreover, instead of using Handbrake, you can use Filmora Video Editor instead. Filmora is a video editor that is very easy to use. It has a variety of features, including the ability to rotate videos. You can download Filmora from the Filmora website. The website has links to the download page for each of the supported platforms.
For Win 7 or later (64-bit)
For macOS 10.14 or later
Step-by-Step on how to rotate videos in Filmora
In order for you to rotate videos in Filmora, follow these simple steps:
Step 1: Import the video that you want to rotate into Filmora.

Step 2: Click on the “Edit” tab at the top of the video timeline.

Step 3: Click on the “Rotate” button in the “Transform” section of the toolbar.

Step 4: Select the rotation angle that you want to rotate the video in the “Rotate” menu.

Step 5: Click on the “Preview” button at the bottom of the Filmora window to see a preview of how your rotated video will look. When you are satisfied with the rotation, click on the “OK” button to apply the rotation.

As you can see, rotating videos is a very easy process in both Handbrake and Filmora. Both Handbrake and Filmora offer simple methods for rotating videos. In Handbrake, you can rotate the video 90 degrees counterclockwise or 180 degrees.
In Filmora, you can rotate the video by any number of degrees in either direction. Experiment with these methods to see which one works best for you. Additionally, Filmora offers a number of other features, such as the ability to add text and transitions, that you may find useful.
Step 2: Click on the “Dimensions” tab at the top of the Handbrake window.

Step 3: Under the “Orientation and Cropping” section, click on one of the options in the “Rotate” menu.

Step 4: If you want to rotate a video 90 degrees counterclockwise, select “90 Degrees CW (Counter-Clockwise).” If you want to rotate the video 180 degrees so that it is upside down, select “180 Degrees.”

Step 5: Click on the “Preview” button at the bottom of the Handbrake window to see a preview of how your rotated video will look. When you are satisfied with the rotation, click on the “Start Encode” button to begin the encoding process.

The Handbrake software also offers a “Flip” option which you can do after rotating it, which allows you to slip the video after rotating it. To use this option, follow these steps:
Under the “Orientation and Cropping” section, Go to Rotation and choose the degrees that best is best for your rotation requirements.

Click on “Flip” to flip your video horizontally.

Click on the “Preview” button at the bottom of the Handbrake window to see a preview of how your rotated video will look. When you are satisfied with the rotation, click on the “Start Encode” button to begin the encoding process.
Both of these methods for rotating videos are easy to use and produce good results. Experiment with them to see which method works best for you.
An Easy Way to Rotate Videos Using Filmora
Moreover, instead of using Handbrake, you can use Filmora Video Editor instead. Filmora is a video editor that is very easy to use. It has a variety of features, including the ability to rotate videos. You can download Filmora from the Filmora website. The website has links to the download page for each of the supported platforms.
For Win 7 or later (64-bit)
For macOS 10.14 or later
Step-by-Step on how to rotate videos in Filmora
In order for you to rotate videos in Filmora, follow these simple steps:
Step 1: Import the video that you want to rotate into Filmora.

Step 2: Click on the “Edit” tab at the top of the video timeline.

Step 3: Click on the “Rotate” button in the “Transform” section of the toolbar.

Step 4: Select the rotation angle that you want to rotate the video in the “Rotate” menu.

Step 5: Click on the “Preview” button at the bottom of the Filmora window to see a preview of how your rotated video will look. When you are satisfied with the rotation, click on the “OK” button to apply the rotation.

As you can see, rotating videos is a very easy process in both Handbrake and Filmora. Both Handbrake and Filmora offer simple methods for rotating videos. In Handbrake, you can rotate the video 90 degrees counterclockwise or 180 degrees.
In Filmora, you can rotate the video by any number of degrees in either direction. Experiment with these methods to see which one works best for you. Additionally, Filmora offers a number of other features, such as the ability to add text and transitions, that you may find useful.
Understanding The Best Tools for Changing Sky Background
Sky replacement apps have become popular among content creators and social media influencers. Posting natural-looking pictures in front of the sky has become the new aesthetic of 2024, like the clean girl makeup. Many people try to get a flawless shot of themselves in front of the sky. But it’s hard to get the perfect and aesthetically pleasing photos and videos because of the background objects and extra bright or dull sky lightning.
This article will tell you about sky change apps and which apps you should consider. Read the article if you want to create an aesthetic sky picture using a replace sky app.
Sky Replacement A cross-platform works like magic for background removal or sky replacement photos!
Free Download Free Download Learn More

Part 1: Finding The Best iOS Apps to Change Sky Background in Media
Sky replacement apps are a fantastic way to give your pictures an entirely new viewpoint. Here are some of the top sky-changing applications for iOS:
- Background Changer & Eraser
- Bazaart: Design, Photo & Video
- Easy Photo Background Editor
- Superimpose+: Background Eraser
- Background Eraser: BG Remover
1. Background Changer & Eraser
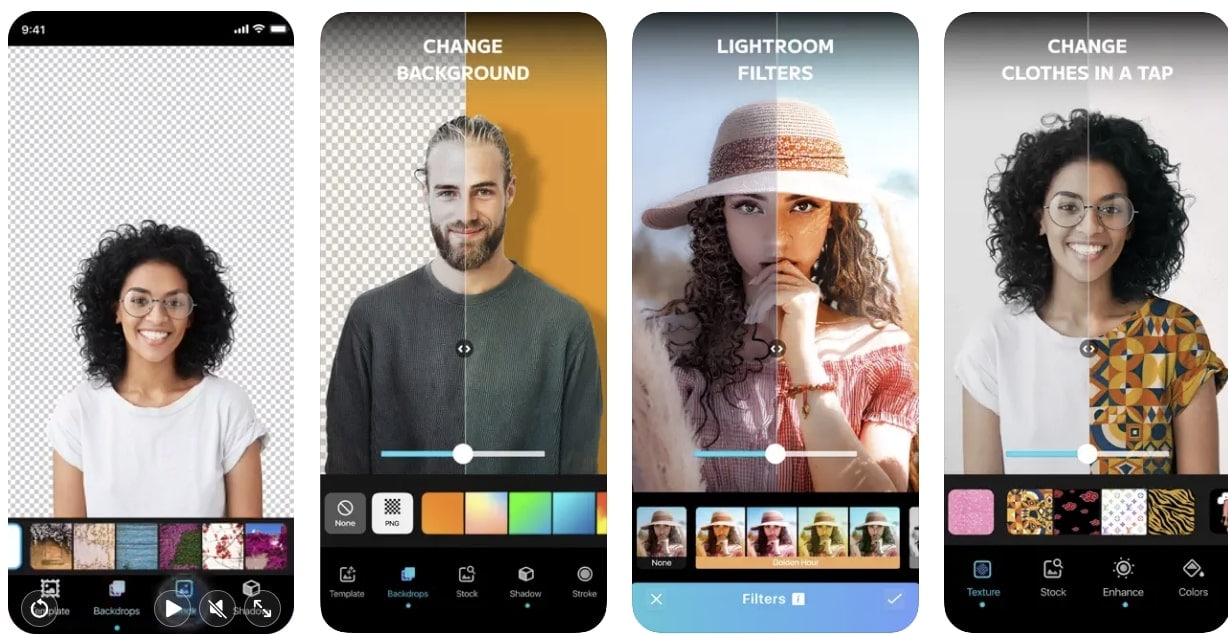
Background Changer & Eraser is your go-to editor if you want to alter the backdrop, create incredible effects and overlays, apply filters, and modify the lighting in your pictures. Everyone who wishes to have gorgeous photos like those edited by a pro can do so with only one click using the one-click background changer and photo editing solution.
Pros
- Erases even the smallest part of a snapshot, easily trims out objects and fixes faults.
- With the extensive selection of overlays, including sparkles, lens flare, and glitter, you can add a little glitz to your photos.
Cons
- The app tends to become glitchy when you keep using it.
2. Bazaart: Design, Photo & Video
Bazaart is a one-stop app for all your design needs that combines the functions of a picture editor, video editor, and design studio. You can create stop motion films, GIFs, stickers, AI art, Reels, stories, logos, posters, flyers, memes, profile pictures, and product photography. Bazaart can assist with anything from digital marketing to social media posting to online sales.

Pros
- The app lets you personalize images and videos by changing exposure, color, highlights, and blur to enhance the media.
- You can add as many as 100 pictures and five video layers; each layer can be edited separately.
Cons
- The tool doesn’t cut out the edges so smoothly. The small leaves or messy hair are not fully cropped out.
3. Easy Photo Background Editor
With the Easy Photo Background Editor, you can share your photos with others by altering their backgrounds like a pro. This image and video sky change app can create beautiful and artistic photos and videos. Thanks to the app’s fantastic capabilities, users can quickly and effortlessly switch out their backgrounds with various high-quality, free HD backdrops available within the app.
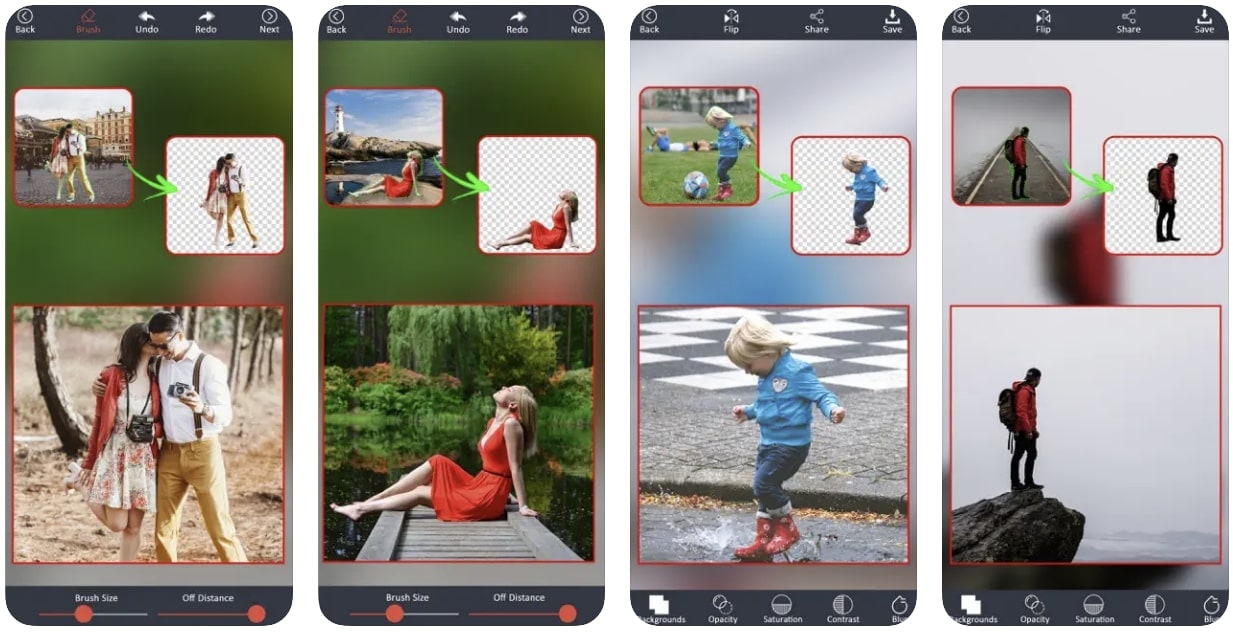
Pros
- You can efficiently change the background of your media and adjust it with the foreground.
- The app has a collection of backgrounds you can choose and add if you don’t have one.
Cons
- The undo button can take a long time to react, which is risky, and you may need to edit your photos again.
4. Superimpose+: Background Eraser
Superimpose+: Background Eraser is an automatic sky replacement tool. People, animals, vehicles, and other objects can all be removed with a single tap. It doesn’t leave a watermark behind, so your photos and videos don’t get ruined. It lets you overlay numerous images and eliminate photo backgrounds within seconds. It also includes simple, automatic, and manual options for removing backgrounds.
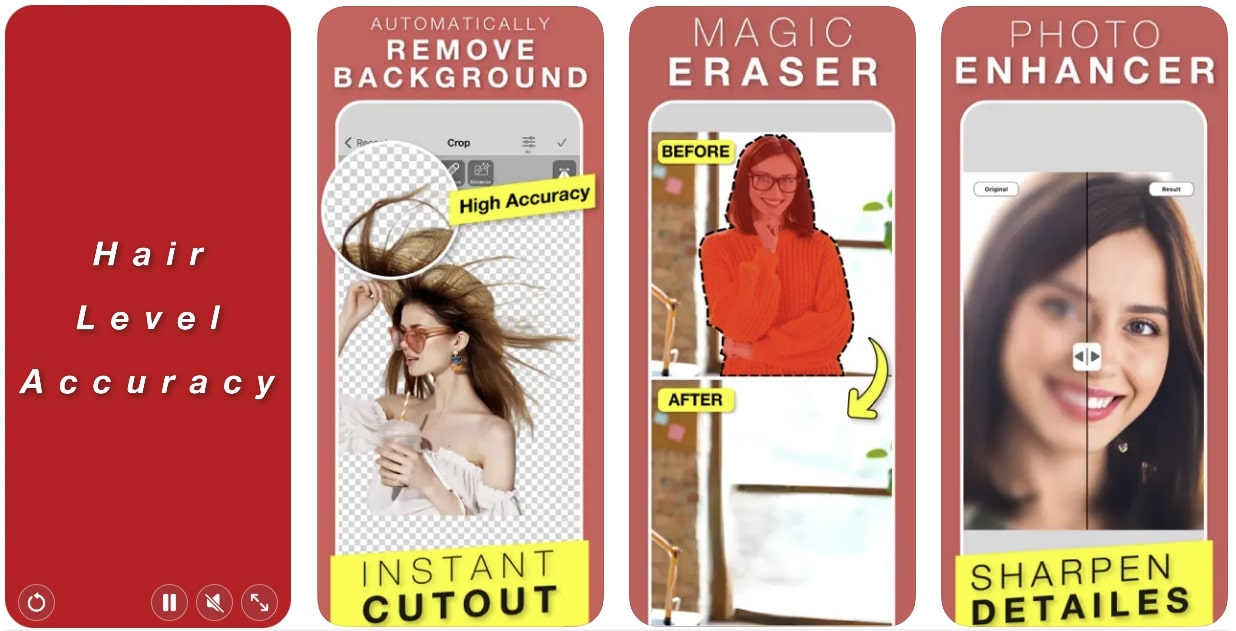
Pros
- The app offers batch processing so that you can add multiple photos and videos and edit them.
- The app replaces or removes your background precisely with a single click.
Cons
- Too many advertisements are shown when editing the media files, which can be annoying.
5. Background Eraser: BG Remover
The background eraser app can quickly remove photos and let your imagination go wild. It is an AI-powered backdrop removal but can also do manual editing. You can add colorful background replacements and immediately share your photos with your viewers. It is one of the best weather apps to replace the dark sky when you are working on an iOS device.
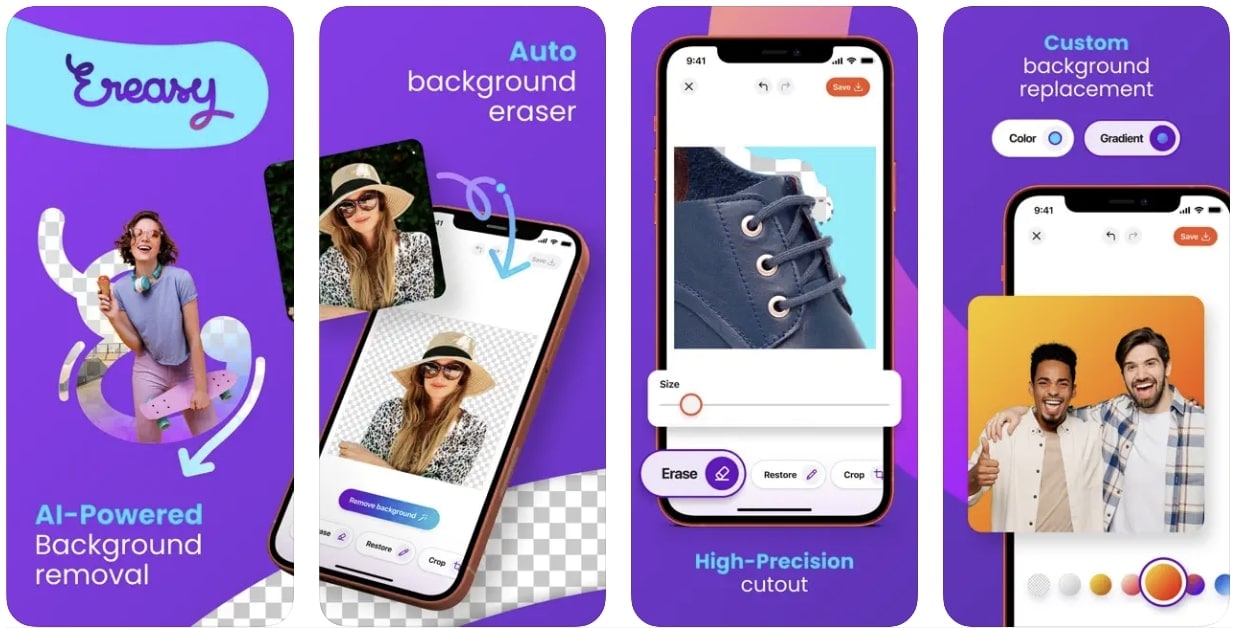
Pros
- You can replace the sky background of your picture with a solid color or gradient shade.
- The auto background accurately recognizes the object and separates the background from it.
Cons
- The tool provides very limited editing options in the free version.
Part 2: Finding The Best Android Apps to Change Sky Background in Media
If you’re an Android user looking for a weather app to replace the dark sky, this is your lucky day. This part is dedicated to telling you about the apps you can use to replace the sky:
- Photo Background Change Editor
- Background Eraser Photo Editor
- PhotoRoom AI Photo Editor
- Photo Editor – Lumii
- Canva
1. Photo Background Change Editor
With the help of the Background Eraser and Changer, you can automatically crop images, eliminate backgrounds, and produce transparent PNG stamps that are precise to each pixel. With just one touch, the app can identify and eliminate your photo’s background, allowing you to swap out dull backdrops for an infinite number of 4K/HD backgrounds that will elevate your images.
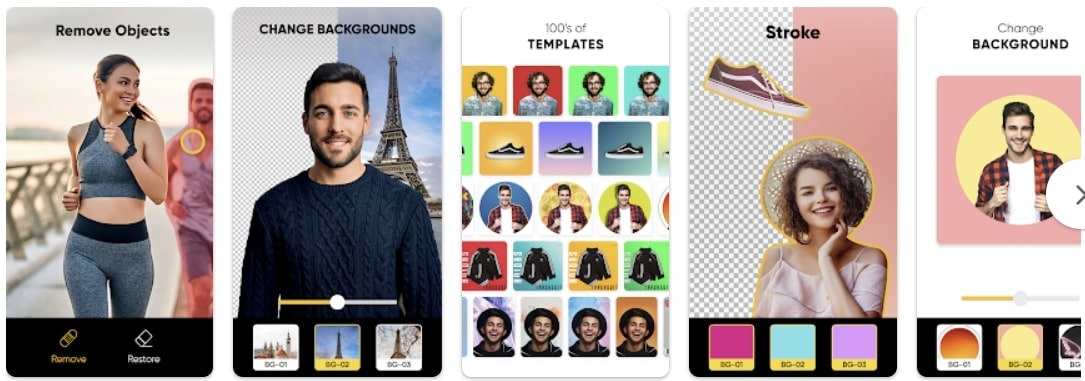
Pros
- The tool offers 100+ background templates. You can choose solid colors, gradients, or images as backdrops.
- You can edit the sky in the background and enhance its look to match the picture.
Cons
- It removes the background with finger smearing, making it hard to remove the backdrop precisely.
2. Background Eraser Photo Editor
The app can cut out pictures automatically and is dedicated to becoming your only photo backdrop eraser and switcher. With over 10 million users, Background Eraser Photo Editor is an incredibly user-friendly tool for changing and editing photos’ backgrounds. Additionally, it has a library of more than 200 images, including sky pictures, which makes it a great dark sky app replacement tool.
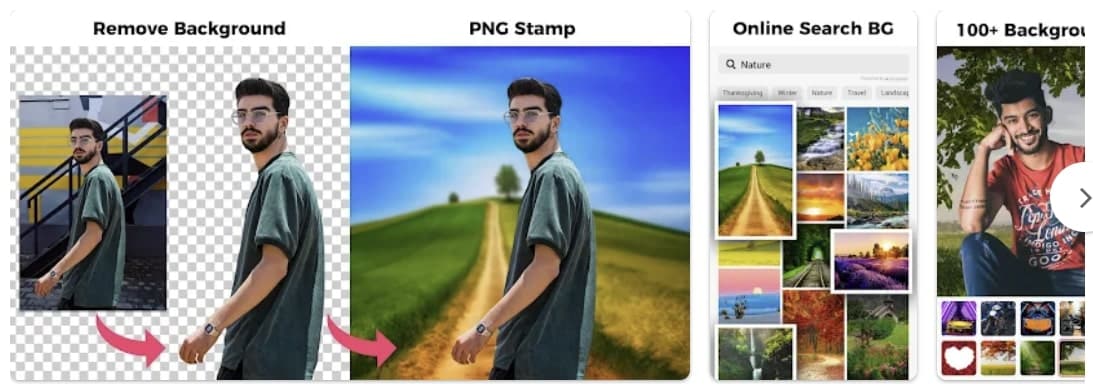
Pros
- The app provides high-quality results by using AI-powered background remover.
- You can directly export and share your creation to popular social media platforms.
Cons
- The tool can only be used to remove the background of the images. You need a different tool for video background removal.
3. PhotoRoom AI Photo Editor
With PhotoRoom, you can manage your business from your phone by editing, designing, and optimizing high-quality visual content all in one app. You can apply presets, cut out or remove photo backgrounds, and produce content. You no longer need to be an expert photographer or designer because PhotoRoom lets you quickly convert your images into high-quality content.
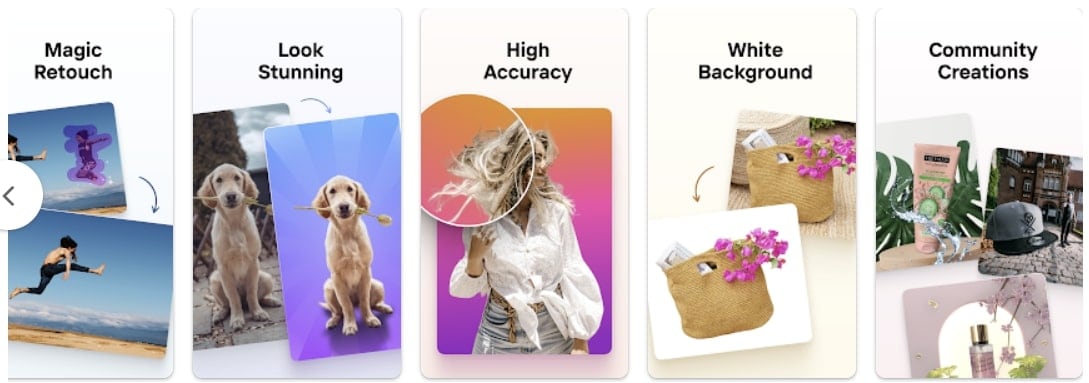
Pros
- The app magically removes the unwanted objects from the background by brushing the magic re-toucher.
- It is a great app to change the sky You can replace it with another sky image from the app’s library.
Cons
- The quality of the images decreases, and the background looks glitchy and blurry due to that.
4. Photo Editor – Lumii
Lumii is a potent photo editor pro that offers trendy picture filters. It’s a great photo editing app that lets you alter photographs with over 100 gorgeous preset filters. Whether you are a beginner or an expert in photo editing and background removal, you can generate images that satisfy your aesthetic requirements using expert editing tools like BG Cutout, HSL, Curve, and Doodle.
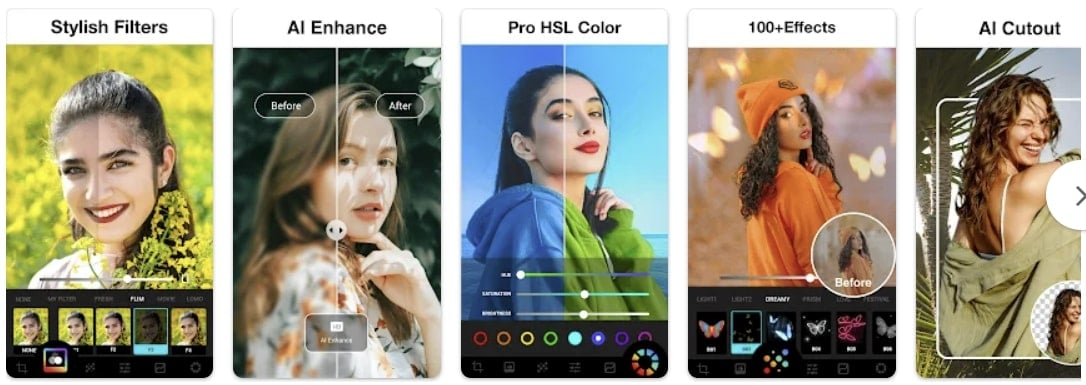
Pros
- AI enhancement tools can automatically enhance the look of your picture and blend the object with the background.
- AI cutout isolates the object from the background with jaw-dropping accuracy.
Cons
- You must watch several advertisements if you want to access the pre-made filters in the app.
5. Canva
Canva is a free graphic design program that combines a photo editor, logo creator, and video editor all in one place. You can access the potent magic AI tools and use editable templates to create gorgeous pictures, videos, social network posts, and collages. The logo creator develops your brand or hones your graphic design talents. Moreover, you can use the Canva app to change the sky in photos and videos.
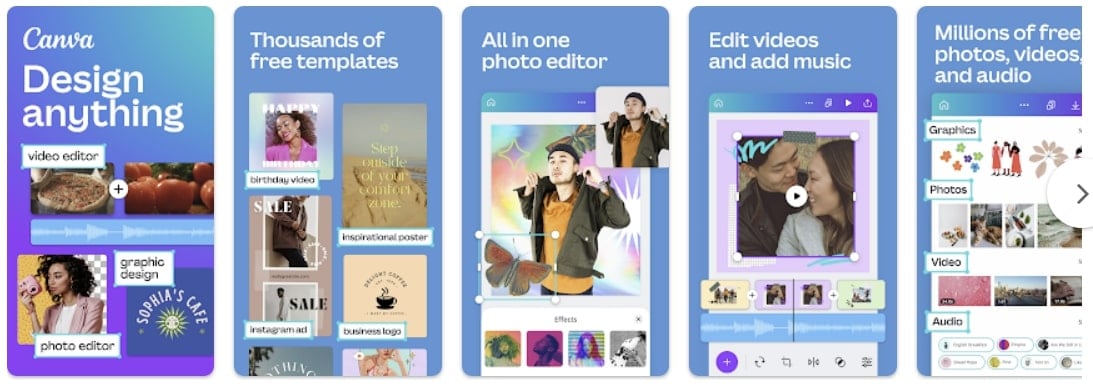
Pros
- The app offers efficient and professional editing and background removal for photos and videos.
- It has millions of photos, video templates, and fun elements to add to your media.
Cons
- It takes up huge space in your phone and provides limited features on the mobile app.
Bonus Part: A Perfect Background Changing Application For PC: Wondershare Filmora
Many professional users prefer editing their media through a PC as it is much easier, and computer editing software offers many more features. But most professional apps cost too much, and paying for them every month is hard. In this confusing situation, only one app comes to mind that can save us from all these troubles and give high-quality results: Wondershare Filmora .
The tool offers many royalty-free editing services that you can use to change the landscape of your video. It is the app that changes the sky and replaces the background of your media with perfection. You can enhance and upscale your video with this pro app and impress your viewers.
Free Download For Win 7 or later(64-bit)
Free Download For macOS 10.14 or later
Other Features of Wondershare Filmora to Look Out For
Wondershare Filmora has many amazing functions. Following are a few of its features that can assist you in creating wonderful content:
- AI Text-to-Video: This feature uses AI algorithms to examine data, including text, photographs, and videos. It then applies machine learning and computer vision techniques to produce a video.
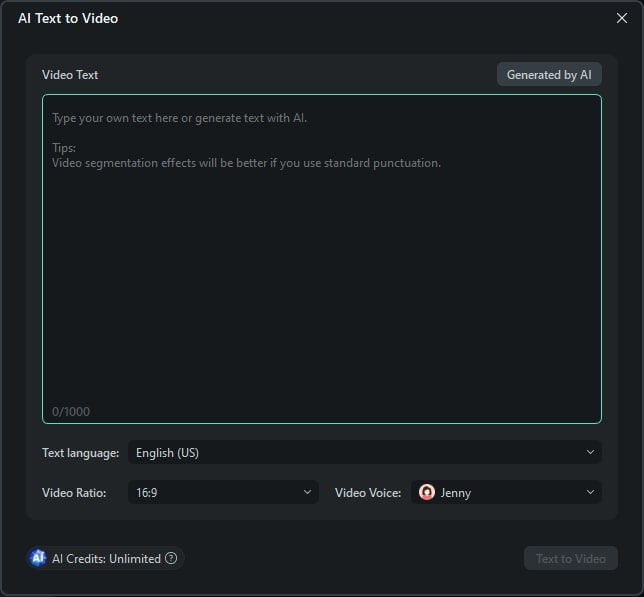
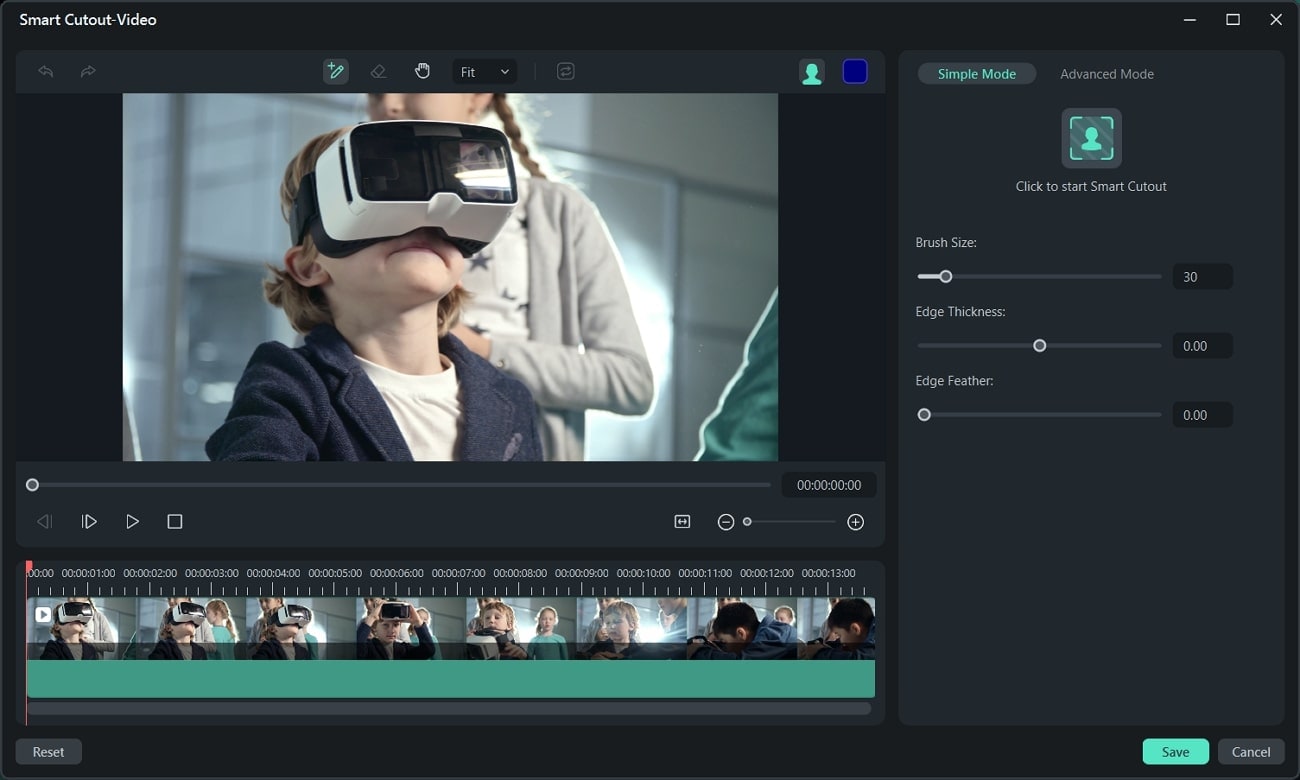
- AI Smart Cutout: Filmora’s AI Smart Cutout makes identifying and removing any undesired backdrop or item from your videos and photos simple. It marks and cuts the object precisely using AI services.
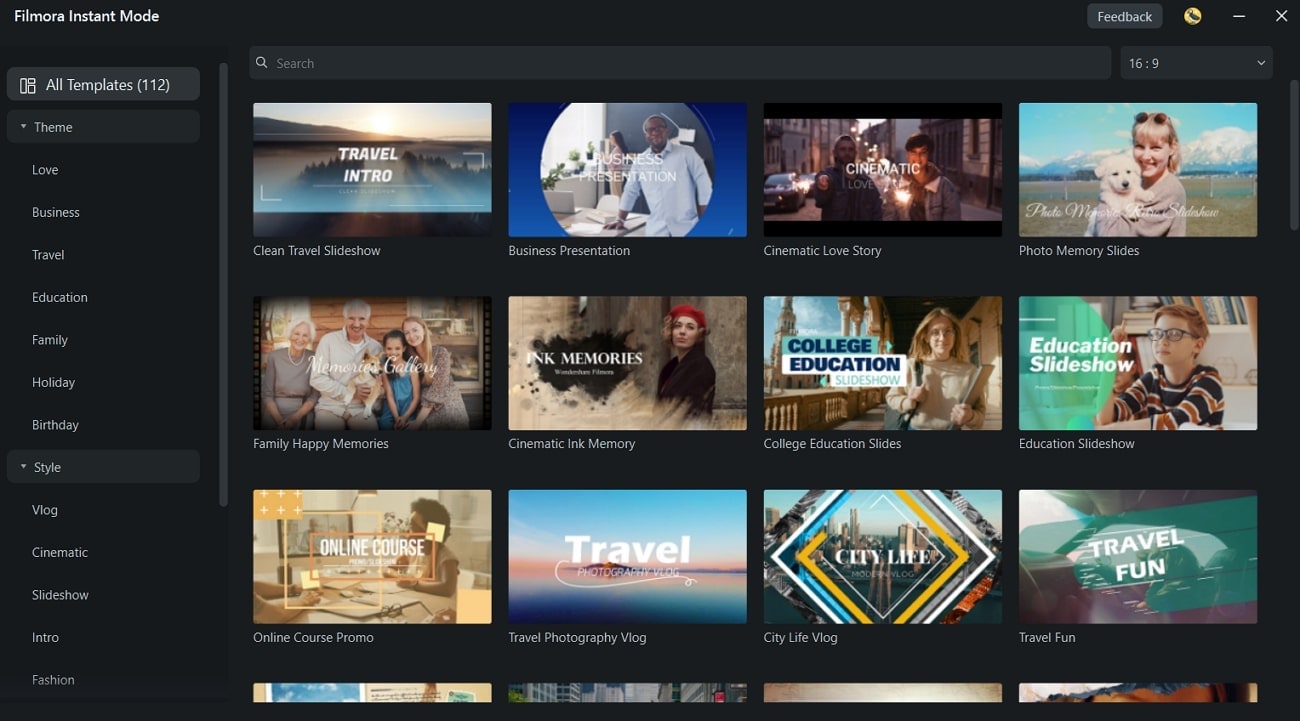
- Instant Mode: Making a video with an Instant Mode doesn’t require any editing experience. Filmora will instantly create a video by adding the media you wish to display.
- AI Vocal Remover: With sophisticated algorithms, Filmora’s AI Vocal Remover can effectively remove vocals from background music without sacrificing a noticeable amount of audio quality.

- Background Remover: You can extract your object or eliminate the background from films using Filmora’s cutting-edge AI technology. Just import a photograph or a movie, and the AI will take care of the rest.
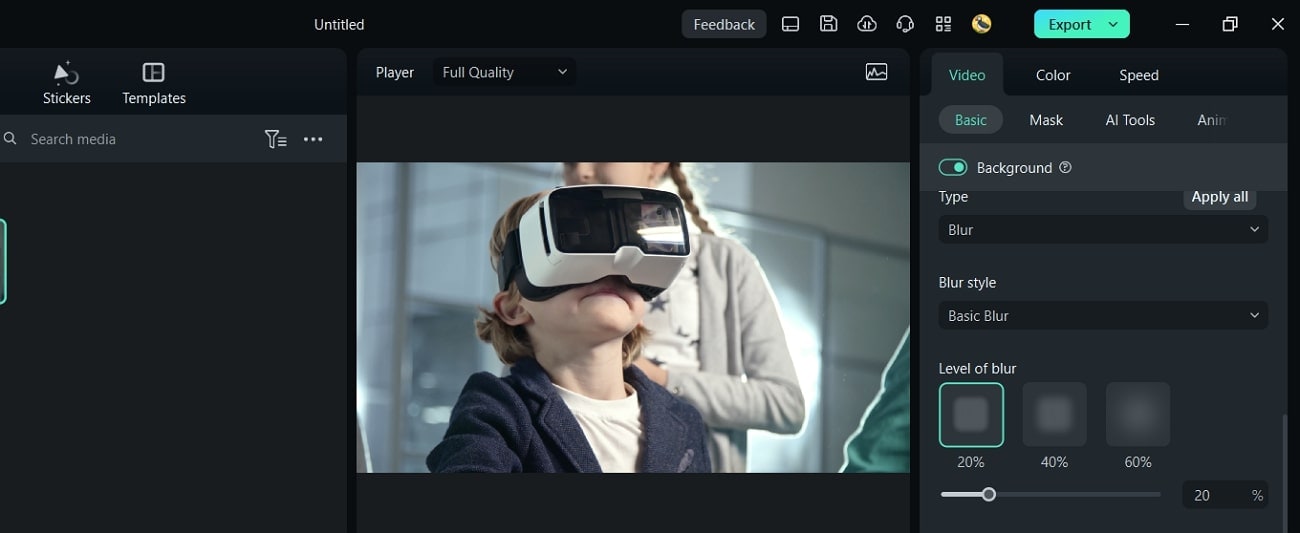
Steps To Change Background Using AI Portrait in Filmora
Wondershare Filmora provides a great replacement for the dark sky and keeps the quality of the media intact. Look at the easy guideline below to remove and replace the sky background.
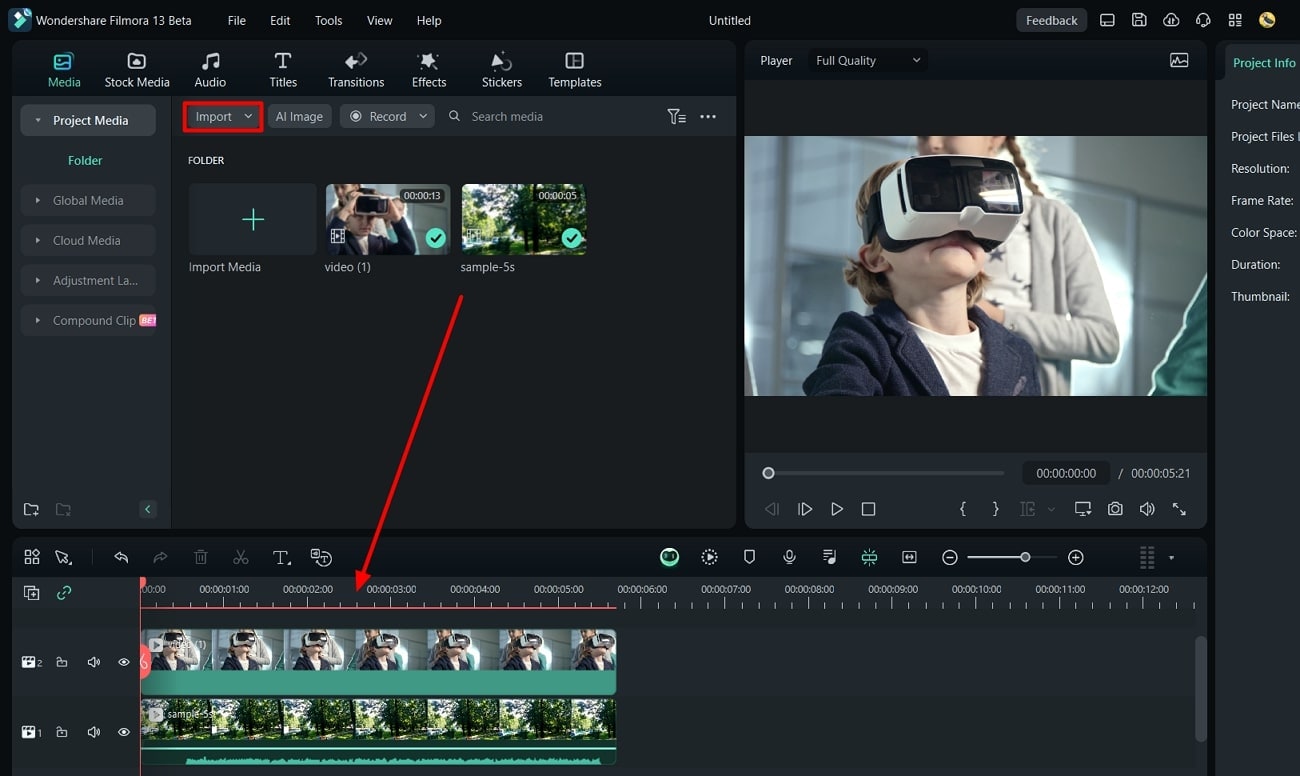
Step 1: Bring In Media to Filmora
Open Filmora on your computer and click “New Project.” Now import the media whose background you want to change. After that, bring in the new background. Now, drag and drop the media and background into the editing timeline.
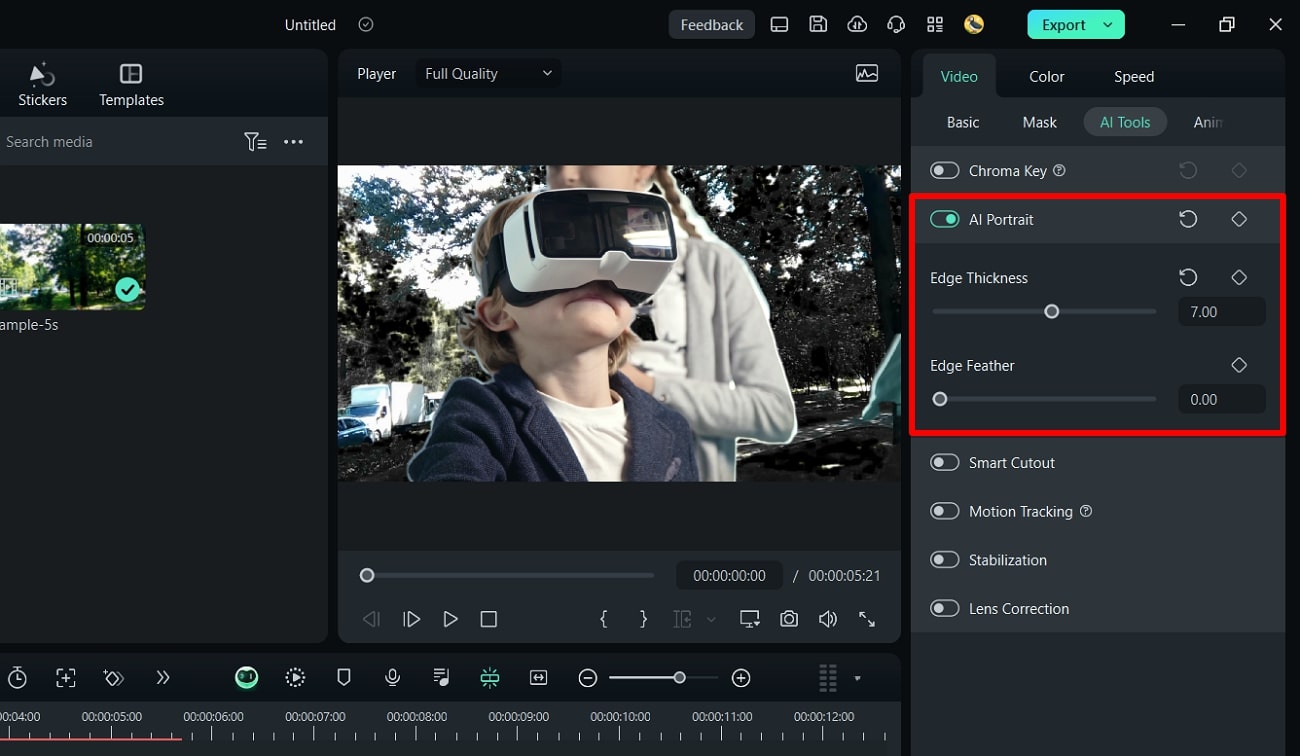
Step 2: Replace Background Using AI Portrait
Select the media that needs background changing. On the right side of the screen, you will see an editing option; click on “AI Tools” from the top right of the screen. Now go down and enable “AI Portrait.” Once you do it, the background of your media file will automatically change.
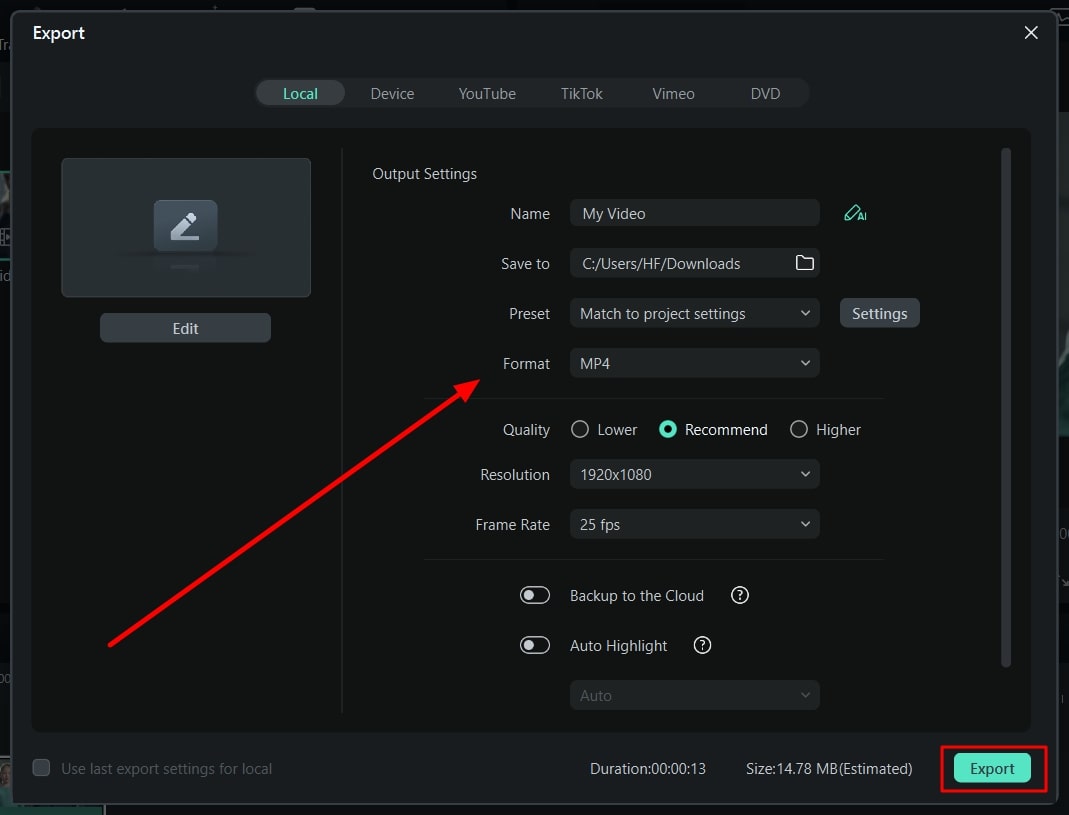
Step 3: Preview and Save
You can check to see if it is everything you were hoping for. After that, click “Export” from the top right of the screen and save the video on your computer.
Free Download For Win 7 or later(64-bit)
Free Download For macOS 10.14 or later
Conclusion
Changing the sky background can lift the tone of your image and video. Sky photos are the main element of the ‘soft girl aesthetic’ era. As a content creator, you must always search for a reliable editor to remove background and change your photos and videos.
This article introduces the best apps to replace dark sky in Android and iOS. You will also find a bonus part that can change your content editing journey.
Free Download Free Download Learn More

Part 1: Finding The Best iOS Apps to Change Sky Background in Media
Sky replacement apps are a fantastic way to give your pictures an entirely new viewpoint. Here are some of the top sky-changing applications for iOS:
- Background Changer & Eraser
- Bazaart: Design, Photo & Video
- Easy Photo Background Editor
- Superimpose+: Background Eraser
- Background Eraser: BG Remover
1. Background Changer & Eraser
Background Changer & Eraser is your go-to editor if you want to alter the backdrop, create incredible effects and overlays, apply filters, and modify the lighting in your pictures. Everyone who wishes to have gorgeous photos like those edited by a pro can do so with only one click using the one-click background changer and photo editing solution.

Pros
- Erases even the smallest part of a snapshot, easily trims out objects and fixes faults.
- With the extensive selection of overlays, including sparkles, lens flare, and glitter, you can add a little glitz to your photos.
Cons
- The app tends to become glitchy when you keep using it.
2. Bazaart: Design, Photo & Video
Bazaart is a one-stop app for all your design needs that combines the functions of a picture editor, video editor, and design studio. You can create stop motion films, GIFs, stickers, AI art, Reels, stories, logos, posters, flyers, memes, profile pictures, and product photography. Bazaart can assist with anything from digital marketing to social media posting to online sales.

Pros
- The app lets you personalize images and videos by changing exposure, color, highlights, and blur to enhance the media.
- You can add as many as 100 pictures and five video layers; each layer can be edited separately.
Cons
- The tool doesn’t cut out the edges so smoothly. The small leaves or messy hair are not fully cropped out.
3. Easy Photo Background Editor
With the Easy Photo Background Editor, you can share your photos with others by altering their backgrounds like a pro. This image and video sky change app can create beautiful and artistic photos and videos. Thanks to the app’s fantastic capabilities, users can quickly and effortlessly switch out their backgrounds with various high-quality, free HD backdrops available within the app.

Pros
- You can efficiently change the background of your media and adjust it with the foreground.
- The app has a collection of backgrounds you can choose and add if you don’t have one.
Cons
- The undo button can take a long time to react, which is risky, and you may need to edit your photos again.
4. Superimpose+: Background Eraser
Superimpose+: Background Eraser is an automatic sky replacement tool. People, animals, vehicles, and other objects can all be removed with a single tap. It doesn’t leave a watermark behind, so your photos and videos don’t get ruined. It lets you overlay numerous images and eliminate photo backgrounds within seconds. It also includes simple, automatic, and manual options for removing backgrounds.

Pros
- The app offers batch processing so that you can add multiple photos and videos and edit them.
- The app replaces or removes your background precisely with a single click.
Cons
- Too many advertisements are shown when editing the media files, which can be annoying.
5. Background Eraser: BG Remover
The background eraser app can quickly remove photos and let your imagination go wild. It is an AI-powered backdrop removal but can also do manual editing. You can add colorful background replacements and immediately share your photos with your viewers. It is one of the best weather apps to replace the dark sky when you are working on an iOS device.

Pros
- You can replace the sky background of your picture with a solid color or gradient shade.
- The auto background accurately recognizes the object and separates the background from it.
Cons
- The tool provides very limited editing options in the free version.
Part 2: Finding The Best Android Apps to Change Sky Background in Media
If you’re an Android user looking for a weather app to replace the dark sky, this is your lucky day. This part is dedicated to telling you about the apps you can use to replace the sky:
- Photo Background Change Editor
- Background Eraser Photo Editor
- PhotoRoom AI Photo Editor
- Photo Editor – Lumii
- Canva
1. Photo Background Change Editor
With the help of the Background Eraser and Changer, you can automatically crop images, eliminate backgrounds, and produce transparent PNG stamps that are precise to each pixel. With just one touch, the app can identify and eliminate your photo’s background, allowing you to swap out dull backdrops for an infinite number of 4K/HD backgrounds that will elevate your images.

Pros
- The tool offers 100+ background templates. You can choose solid colors, gradients, or images as backdrops.
- You can edit the sky in the background and enhance its look to match the picture.
Cons
- It removes the background with finger smearing, making it hard to remove the backdrop precisely.
2. Background Eraser Photo Editor
The app can cut out pictures automatically and is dedicated to becoming your only photo backdrop eraser and switcher. With over 10 million users, Background Eraser Photo Editor is an incredibly user-friendly tool for changing and editing photos’ backgrounds. Additionally, it has a library of more than 200 images, including sky pictures, which makes it a great dark sky app replacement tool.

Pros
- The app provides high-quality results by using AI-powered background remover.
- You can directly export and share your creation to popular social media platforms.
Cons
- The tool can only be used to remove the background of the images. You need a different tool for video background removal.
3. PhotoRoom AI Photo Editor
With PhotoRoom, you can manage your business from your phone by editing, designing, and optimizing high-quality visual content all in one app. You can apply presets, cut out or remove photo backgrounds, and produce content. You no longer need to be an expert photographer or designer because PhotoRoom lets you quickly convert your images into high-quality content.

Pros
- The app magically removes the unwanted objects from the background by brushing the magic re-toucher.
- It is a great app to change the sky You can replace it with another sky image from the app’s library.
Cons
- The quality of the images decreases, and the background looks glitchy and blurry due to that.
4. Photo Editor – Lumii
Lumii is a potent photo editor pro that offers trendy picture filters. It’s a great photo editing app that lets you alter photographs with over 100 gorgeous preset filters. Whether you are a beginner or an expert in photo editing and background removal, you can generate images that satisfy your aesthetic requirements using expert editing tools like BG Cutout, HSL, Curve, and Doodle.

Pros
- AI enhancement tools can automatically enhance the look of your picture and blend the object with the background.
- AI cutout isolates the object from the background with jaw-dropping accuracy.
Cons
- You must watch several advertisements if you want to access the pre-made filters in the app.
5. Canva
Canva is a free graphic design program that combines a photo editor, logo creator, and video editor all in one place. You can access the potent magic AI tools and use editable templates to create gorgeous pictures, videos, social network posts, and collages. The logo creator develops your brand or hones your graphic design talents. Moreover, you can use the Canva app to change the sky in photos and videos.

Pros
- The app offers efficient and professional editing and background removal for photos and videos.
- It has millions of photos, video templates, and fun elements to add to your media.
Cons
- It takes up huge space in your phone and provides limited features on the mobile app.
Bonus Part: A Perfect Background Changing Application For PC: Wondershare Filmora
Many professional users prefer editing their media through a PC as it is much easier, and computer editing software offers many more features. But most professional apps cost too much, and paying for them every month is hard. In this confusing situation, only one app comes to mind that can save us from all these troubles and give high-quality results: Wondershare Filmora .
The tool offers many royalty-free editing services that you can use to change the landscape of your video. It is the app that changes the sky and replaces the background of your media with perfection. You can enhance and upscale your video with this pro app and impress your viewers.
Free Download For Win 7 or later(64-bit)
Free Download For macOS 10.14 or later
Other Features of Wondershare Filmora to Look Out For
Wondershare Filmora has many amazing functions. Following are a few of its features that can assist you in creating wonderful content:
- AI Text-to-Video: This feature uses AI algorithms to examine data, including text, photographs, and videos. It then applies machine learning and computer vision techniques to produce a video.

- AI Smart Cutout: Filmora’s AI Smart Cutout makes identifying and removing any undesired backdrop or item from your videos and photos simple. It marks and cuts the object precisely using AI services.

- Instant Mode: Making a video with an Instant Mode doesn’t require any editing experience. Filmora will instantly create a video by adding the media you wish to display.

- AI Vocal Remover: With sophisticated algorithms, Filmora’s AI Vocal Remover can effectively remove vocals from background music without sacrificing a noticeable amount of audio quality.

- Background Remover: You can extract your object or eliminate the background from films using Filmora’s cutting-edge AI technology. Just import a photograph or a movie, and the AI will take care of the rest.

Steps To Change Background Using AI Portrait in Filmora
Wondershare Filmora provides a great replacement for the dark sky and keeps the quality of the media intact. Look at the easy guideline below to remove and replace the sky background.
Step 1: Bring In Media to Filmora
Open Filmora on your computer and click “New Project.” Now import the media whose background you want to change. After that, bring in the new background. Now, drag and drop the media and background into the editing timeline.

Step 2: Replace Background Using AI Portrait
Select the media that needs background changing. On the right side of the screen, you will see an editing option; click on “AI Tools” from the top right of the screen. Now go down and enable “AI Portrait.” Once you do it, the background of your media file will automatically change.

Step 3: Preview and Save
You can check to see if it is everything you were hoping for. After that, click “Export” from the top right of the screen and save the video on your computer.

Free Download For Win 7 or later(64-bit)
Free Download For macOS 10.14 or later
Conclusion
Changing the sky background can lift the tone of your image and video. Sky photos are the main element of the ‘soft girl aesthetic’ era. As a content creator, you must always search for a reliable editor to remove background and change your photos and videos.
This article introduces the best apps to replace dark sky in Android and iOS. You will also find a bonus part that can change your content editing journey.
Also read:
- To Closely Observe the Content on Screen, We Often Zoom in to Catch the Details. This Article Will Provide You with a Brief Note on How to Zoom in on YouTube Videos Quickly on Your Devices
- Updated How to Find Free Online Slideshow Maker with No Watermark for 2024
- New 2024 Approved M31 LUT (Teal and Orange LUT) Free Download
- New Making Slow Motion Videos in Final Cut Pro The Best Methods
- 2024 Approved How to Make a Transparent Background in Paint. How 3D Paint Transparent Background Can Be Made. How to Save an Image with Transparent Background?
- Updated Experience Time Differently with The Top Slow-Motion Applications for 2024
- The Best Wedding LUTs for Premiere Pro for 2024
- Updated One of the Latest Tools for Editing Video and Images Is AI Composite Video App Which Is Popular Among Users. Learn All About This Tool and Its Functioning
- In 2024, Motion Tracking Never Goes Out of Trend, so Do You Wish to Make Your Videos Trendy with This? No Issue because Here We Will Guide You on How to Do Motion Tracking
- An Ultimate Guide to Edit a Music Video Aspect Ratio and First Cut for 2024
- Updated In 2024, Detailed Steps to Rotate Videos in Blender
- New Which 10 Best Video Editing Online Makers Is Worth Your Attention, In 2024
- Updated In 2024, How to Add Effects in Premiere Pro
- New In 2024, How to Use LUTS to Color Grade on Your iPhone
- Ultimate Guide on How To Plan and Storyboard a Music Video for 2024
- New Wondering How to Stand Out with Your Adobe Slideshow Presentation? Follow the Given Discussion to Learn All About the Easiest Ways of Making a Slideshow at Adobe for 2024
- In 2024, 10 BEST TEXT TO SPEECH VIDEO MAKERS
- 8 Apps to Custom GIF Stickers
- 2024 Approved How to Create a Light Sweep (Shine) Effect with Filmora
- Updated 2024 Approved Learn to Splice Videos Together on iPhone
- Updated 2024 Approved How-To Tutorials of Kapwing Collage Maker
- New How to Speed Up Video on Instagram Reels?
- In 2024, What Slideshow Templates Teach You About Aesthetic
- Are You Finding It Difficult to Freeze-Frame in After Effects? Note that Freeze-Frame Takes only a Few Seconds, and, in This Tutorial, We Will Guide You on How to Create and Add Frame Hold in After Effects
- Updated Transforming a Slow-Motion Video to Normal Mastering the Skill for 2024
- In 2024, This Guide Will Help You to Understand Everything About the Zoho Show. Also, Know What the Zoho Show Slide Is, Why It Is Used and All Related Information
- New Best Voice Changers for WhatsApp Free Included for 2024
- New Ideas That Will Help You Out in Making Transparent Image for 2024
- New In 2024, Steps to Make a Neon Dance Effect With Filmora
- New In 2024, Do You Want to Print Designs Onto Your Garments or Other Fashion Accessories? Find Out How to Create a Screen Print Effect in Photoshop to Give Your Text or Graphics a Vintage or Retro Look
- Updated 2024 Approved Level Up Videos By Applying Keyframe with Filmora
- Updated 2024 Approved Find a Solution for Effortless Sky Replacement Photoshop in This Comprehensive Guide. Also, Use the Easiest Video Editing Tool to Make Your Media Stunning
- 3 Actionable Ways to Create Countdown Animation for Videos
- How to Denoise in Final Cut Pro – Reduce Video and Audio Noise for 2024
- New How to Add Text in Adobe Rush
- 10+ Royalty-Free 5 Second Countdown Footage HD & 4K Clips Included for 2024
- 2024 Approved If You Are a Free Video Editor Being a Windows User, VSDC Free Video Editor Is a Great Choice. But Is It the Best Video Editor You Should Use? Find Out From Our VSDC Free Video Editor Review
- Updated In 2024, Are You Searching the Internet for Top Wedding LUTs Premiere Pro? This Article Provides Suggestions on the Best LUT Color Presets
- New 2024 Approved Why Vimeo Slideshow Maker Become Popular
- New 2024 Approved How to Use iMovie Text Effects
- All About Apple iPhone 6 Plus Unlock Chip You Need to Know
- The Best 8 VPN Hardware Devices Reviewed On Infinix Note 30 | Dr.fone
- In 2024, How To Create an Apple Developer Account On iPhone 13
- How to Reset your Realme 11 Pro Lock Screen Password
- Unlock Your Vivo V27 Pro Phone with Ease The 3 Best Lock Screen Removal Tools
- Here are Some Pro Tips for Pokemon Go PvP Battles On Realme 10T 5G | Dr.fone
- Possible solutions to restore deleted messages from Vivo V29e
- In 2024, A Step-by-Step Guide on Using ADB and Fastboot to Remove FRP Lock from your Lava Yuva 2
- Does PokeGo++ still work on Apple iPhone XS/iPad? | Dr.fone
- In 2024, Reset iTunes Backup Password Of iPhone 11 Pro Prevention & Solution
- How To Reset the Security Questions of Your Apple ID From Your Apple iPhone 12
- How to Transfer Data from Motorola Defy 2 to BlackBerry | Dr.fone
- In 2024, How to Change GPS Location on OnePlus Ace 3 Easily & Safely | Dr.fone
- How to Spy on Text Messages from Computer & Vivo Y78 5G | Dr.fone
- In 2024, Latest Guide How To Bypass OnePlus Nord CE 3 Lite 5G FRP Without Computer
- Top 5 Samsung Galaxy A05 Bypass FRP Tools for PC That Actually Work
- Fix Vivo V29e Android System Webview Crash 2024 Issue | Dr.fone
- How to Screen Mirroring Samsung Galaxy A23 5G to PC? | Dr.fone
- In 2024, How Xiaomi Redmi 12 Mirror Screen to PC? | Dr.fone
- In 2024, Is Mega Mewtwo The Strongest Pokémon On Apple iPhone XS? | Dr.fone
- How To Free Up Apple iPhone 12 Space | Dr.fone
- How To Recover iPhone 14 Pro Max Data From iCloud? | Dr.fone
- Catch or Beat Sleeping Snorlax on Pokemon Go For Xiaomi Redmi Note 12 Pro+ 5G | Dr.fone
- How to remove Google FRP Lock on Oppo A18
- In 2024, How to Unlock ZTE Blade A73 5G Phone without PIN
- In 2024, How to Transfer Data After Switching From Samsung Galaxy F04 to Latest Samsung | Dr.fone
- In 2024, Resolve Your Apple iPhone 12 Pro Keeps Asking for Outlook Password | Dr.fone
- Best YouTube Video Into Text Converters
- Can I use iTools gpx file to catch the rare Pokemon On Google Pixel 7a | Dr.fone
- Here are Some Pro Tips for Pokemon Go PvP Battles On Oppo A78 5G | Dr.fone
- Updated In 2024, What Is an AI Voice Generator?
- In 2024, Overview of the Best Honor 70 Lite 5G Screen Mirroring App | Dr.fone
- Bricked Your Vivo X100? Heres A Full Solution | Dr.fone
- Can Life360 Track Or See Text Messages? What Can You Do with Life360 On Apple iPhone 15 Pro Max? | Dr.fone
- Hard Resetting an Realme GT Neo 5 Device Made Easy | Dr.fone
- In 2024, 5 Quick Methods to Bypass Lava Blaze 2 Pro FRP
- Full Tutorial to Bypass Your Vivo Face Lock?
- Title: New In 2024, Master Premiere Pro Custom Sequence Presets
- Author: Morgan
- Created at : 2024-04-24 01:06:58
- Updated at : 2024-04-25 01:06:58
- Link: https://ai-video-editing.techidaily.com/new-in-2024-master-premiere-pro-custom-sequence-presets/
- License: This work is licensed under CC BY-NC-SA 4.0.

