
:max_bytes(150000):strip_icc():format(webp)/watch-free-movies-online-1356647-32f79b8cc3ed484ca1f9f898f503e416.png)
New In 2024, Splice Video Editor Online - Get Your Videos Splice Easily
Splice Video Editor Online - Get Your Videos Splice Easily
Create High-Quality Video - Wondershare Filmora
An easy and powerful YouTube video editor
Numerous video and audio effects to choose from
Detailed tutorials are provided by the official channel
We are in the digital era, and any online activity gives us a high exposure level. Making digital content and posting it online is not enough. You have to be creative and adopt an advanced mode of communication. The best place to begin is with online platforms. This is because most people find it easy to source information online instead of any other place.
The availability of video editors makes it possible to splice videos online and post them instantly, reaching thousands of viewers through social media platforms in a short time.
Recent research has shown that online videos are more effective and can help brands connect with their audience compared to other data types like images, audio, GIFs, and text, among others. Check out how to merge videos online and the advantages of going online on your video editing journey.

In this article
01 The Meaning of Splice Video
02 Top 6 Online Video Splice Editors
The Meaning of Splice Video
To splice a video means combining two or more video clips to form one. You can use the available editing apps to merge several videos. You need to select each video to splice and put them together in the timeline. Several apps enable you to edit your footage by trimming, cropping, adding music, and transitions, among other adjustments.
Reasons to splice video
You could be wondering why it is necessary to splice your videos. Well, people love to be creative, and working on several videos may not bring out the creativity they need. Here are some reasons that come in handy as far as splicing video is concerned.
- It isn’t easy to share many videos at once. Splicing your videos is a quick way to get your videos to move as one piece and express your message as direct as possible.
- You can also splice videos for easy management. Remember, you can edit it as one, making you finish the editing process quickly and easily.
- Merged videos make it easy to share on other platforms. It would be very hectic to promote several videos separately on media sites.
- Another reason for splicing videos is to compress them. It will take up less space compared to dealing with several videos at once.
- Spliced video is organized, indicating the starting point and endpoint of the video.
The Benefits of Online Video Editing
Since its backbone reason is to share videos online, several pros come with it. The Splice video editor online enables anyone to create engaging videos without software installation. Let’s peruse the advantages of using online video editing compared to the conventional options.
• Automatic updates
Updates are important for the normal operation of an application. It may be hectic to keep remembering when you should update your drivers on your device. However, online apps need no manual configuration as they do this automatically. You’ll always get the latest version anytime you log in. Besides, new templates and features are instantly available to you after every update.
• Easy collaboration
This comes when several people work on a project. It could be difficult to share files manually, given the rise of computer crashes and data loss. Online mechanisms come to the rescue as all files are kept in the cloud. This lets anyone working on the project access it on any device, anywhere, thereby minimizing the risks of data loss. Furthermore, multiple collaborators can log in to the same project to input their views and other additions. Anyone can upload the file from their end and make the necessary adjustments.
• Convenient
You don’t require any tools while manage Splice video editor online. You can easily make edits from anywhere as long as you have an internet connection. It also promotes easy accessibility of your files from any device. More so, making edits and polishing your video is accomplished faster than ever.
• Time-saving
You’ll get improved productivity when you work online on your video. You won’t waste time running up and down the stairs to install your app or get updates. All you need are a few clicks of a button to make quick moves as far as video editing is concerned. Instead, you can easily polish and post your clip while you figure out what works best for your audience at each step.
• Multi-OS compatible
An online video editor runs in a web browser and, therefore, can run on several operating systems. It doesn’t matter which device you use to compose your video. You can easily share it and be accessible on other platforms by several people. Likewise, the speed will not be affected no matter which operating system you use.
Top 6 Online Video Splice Editors
Now that we have seen what online video editing is best at, we need to explore the suitable Splice video editor online that will quickly bring out the creativity in you and elevate your editing ability to the next level.
1) MiniTool MovieMaker
The app comes free with no ads and is watermark-free as well. It is rich in features that help you to maneuver as you edit your video to perfection. The MiniTool lets you create continuous videos based on your vision. It also encompasses video templates that make it easy to settle on a theme.

Pros
Customize videos with video transitions and animated text.
This app contains no advertisements.
It leaves no watermark on the finished video.
It has an intuitive and clean interface that enables easy editing of videos.
The app is highly compatible with popular video and audio formats.
Cons
It lacks some advanced features, like a green screen and motion speed control.
2) Filmora Video Editor
Filmora is another powerful tool with splice video templates. It has an intuitive interface that enables any level of user to easily edit videos. You can add filters and other video effects to create an engaging video. Also, make use of advanced features like keyframe animation, color matching, split screen, etc.
For Win 7 or later (64-bit)
For macOS 10.12 or later
Pros
It comes with advanced features to help you create compelling videos.
You can add music and other sound effects directly.
An intuitive interface that suits beginners.
Produce high-density videos.
Cons
It doesn’t support newer formats like HEIC photos..
3) Clipchamp
This online splice video editor offers you two modes of video creation online. You can either use the video templates or the blank project option. For templates, get customized ones right from the app’s gallery. However, you may also opt to start your video creation from scratch and make progress toward completion.

Pros
This app offers you two modes for video creation.
Preview your video clips before posting them.
Easily organize your music tracks in the timeline.
Splice your videos without quality loss.
Use styled text templates with animations.
Cons
It has no keyframe features for animation creation.
4) Kapwing
This is a video converter and splice video editor that freely edits your videos to any file format. You can use the screen-by-screen editing option for advanced editing ability. You can also bring on more creativity by using multiple scenes. Furthermore, you can’t run out of editing tools, which include rotating, splitting, and trimming, among others. Also, spice up your project by adding some background music and customizing text to the desired font and color.

Pros
It includes free music from the internet.
It comes with a large library of photos, stickers, etc.
It’s easy to use and allows editing of videos without signing in.
Cons
It lacks advanced features like speech ramping.
5) Video Editor by EaseUS
This is another reliable splice editor that comes with quality editing features. You can splice, merge, trim, and rotate your video, among other functionalities. Furthermore, the advanced features allow you to easily apply transitions and elements.

Pros
Splice your videos instantly using your mouse.
Easily detach the audio from the spliced video.
It supports various video formats.
Cons
It has limited templates.
6) WeVideo
This online editor lets you splice your videos anywhere. It supports several formats, and you can finally export your video in any format. Besides, it allows you access to free stock media like music tracks, videos, and images, among others.

Pros
WeVideo is free to use. However, you can upgrade to the premium version for advanced features.
Directly export videos to YouTube, Instagram, etc.
Cons
The free version leaves a watermark on your videos.
Conclusion
● Are you looking forward to promoting your brand online? Then splice the video online at the best resolution for your editing purposes. You’ll quickly edit your videos and reach your target audience with just a few clicks of a button. Likewise, it is effective to monitor your viewers’ reactions through various comments and feedback. This article has brought you several editing apps for online use. You can easily pinpoint what works best for you concerning their features.
We are in the digital era, and any online activity gives us a high exposure level. Making digital content and posting it online is not enough. You have to be creative and adopt an advanced mode of communication. The best place to begin is with online platforms. This is because most people find it easy to source information online instead of any other place.
The availability of video editors makes it possible to splice videos online and post them instantly, reaching thousands of viewers through social media platforms in a short time.
Recent research has shown that online videos are more effective and can help brands connect with their audience compared to other data types like images, audio, GIFs, and text, among others. Check out how to merge videos online and the advantages of going online on your video editing journey.
In this article
01 The Meaning of Splice Video
02 Top 6 Online Video Splice Editors
The Meaning of Splice Video
To splice a video means combining two or more video clips to form one. You can use the available editing apps to merge several videos. You need to select each video to splice and put them together in the timeline. Several apps enable you to edit your footage by trimming, cropping, adding music, and transitions, among other adjustments.
Reasons to splice video
You could be wondering why it is necessary to splice your videos. Well, people love to be creative, and working on several videos may not bring out the creativity they need. Here are some reasons that come in handy as far as splicing video is concerned.
- It isn’t easy to share many videos at once. Splicing your videos is a quick way to get your videos to move as one piece and express your message as direct as possible.
- You can also splice videos for easy management. Remember, you can edit it as one, making you finish the editing process quickly and easily.
- Merged videos make it easy to share on other platforms. It would be very hectic to promote several videos separately on media sites.
- Another reason for splicing videos is to compress them. It will take up less space compared to dealing with several videos at once.
- Spliced video is organized, indicating the starting point and endpoint of the video.
The Benefits of Online Video Editing
Since its backbone reason is to share videos online, several pros come with it. The Splice video editor online enables anyone to create engaging videos without software installation. Let’s peruse the advantages of using online video editing compared to the conventional options.
• Automatic updates
Updates are important for the normal operation of an application. It may be hectic to keep remembering when you should update your drivers on your device. However, online apps need no manual configuration as they do this automatically. You’ll always get the latest version anytime you log in. Besides, new templates and features are instantly available to you after every update.
• Easy collaboration
This comes when several people work on a project. It could be difficult to share files manually, given the rise of computer crashes and data loss. Online mechanisms come to the rescue as all files are kept in the cloud. This lets anyone working on the project access it on any device, anywhere, thereby minimizing the risks of data loss. Furthermore, multiple collaborators can log in to the same project to input their views and other additions. Anyone can upload the file from their end and make the necessary adjustments.
• Convenient
You don’t require any tools while manage Splice video editor online. You can easily make edits from anywhere as long as you have an internet connection. It also promotes easy accessibility of your files from any device. More so, making edits and polishing your video is accomplished faster than ever.
• Time-saving
You’ll get improved productivity when you work online on your video. You won’t waste time running up and down the stairs to install your app or get updates. All you need are a few clicks of a button to make quick moves as far as video editing is concerned. Instead, you can easily polish and post your clip while you figure out what works best for your audience at each step.
• Multi-OS compatible
An online video editor runs in a web browser and, therefore, can run on several operating systems. It doesn’t matter which device you use to compose your video. You can easily share it and be accessible on other platforms by several people. Likewise, the speed will not be affected no matter which operating system you use.
Top 6 Online Video Splice Editors
Now that we have seen what online video editing is best at, we need to explore the suitable Splice video editor online that will quickly bring out the creativity in you and elevate your editing ability to the next level.
1) MiniTool MovieMaker
The app comes free with no ads and is watermark-free as well. It is rich in features that help you to maneuver as you edit your video to perfection. The MiniTool lets you create continuous videos based on your vision. It also encompasses video templates that make it easy to settle on a theme.
Pros
Customize videos with video transitions and animated text.
This app contains no advertisements.
It leaves no watermark on the finished video.
It has an intuitive and clean interface that enables easy editing of videos.
The app is highly compatible with popular video and audio formats.
Cons
It lacks some advanced features, like a green screen and motion speed control.
2) Filmora Video Editor
Filmora is another powerful tool with splice video templates. It has an intuitive interface that enables any level of user to easily edit videos. You can add filters and other video effects to create an engaging video. Also, make use of advanced features like keyframe animation, color matching, split screen, etc.
For Win 7 or later (64-bit)
For macOS 10.12 or later
Pros
It comes with advanced features to help you create compelling videos.
You can add music and other sound effects directly.
An intuitive interface that suits beginners.
Produce high-density videos.
Cons
It doesn’t support newer formats like HEIC photos..
3) Clipchamp
This online splice video editor offers you two modes of video creation online. You can either use the video templates or the blank project option. For templates, get customized ones right from the app’s gallery. However, you may also opt to start your video creation from scratch and make progress toward completion.
Pros
This app offers you two modes for video creation.
Preview your video clips before posting them.
Easily organize your music tracks in the timeline.
Splice your videos without quality loss.
Use styled text templates with animations.
Cons
It has no keyframe features for animation creation.
4) Kapwing
This is a video converter and splice video editor that freely edits your videos to any file format. You can use the screen-by-screen editing option for advanced editing ability. You can also bring on more creativity by using multiple scenes. Furthermore, you can’t run out of editing tools, which include rotating, splitting, and trimming, among others. Also, spice up your project by adding some background music and customizing text to the desired font and color.
Pros
It includes free music from the internet.
It comes with a large library of photos, stickers, etc.
It’s easy to use and allows editing of videos without signing in.
Cons
It lacks advanced features like speech ramping.
5) Video Editor by EaseUS
This is another reliable splice editor that comes with quality editing features. You can splice, merge, trim, and rotate your video, among other functionalities. Furthermore, the advanced features allow you to easily apply transitions and elements.
Pros
Splice your videos instantly using your mouse.
Easily detach the audio from the spliced video.
It supports various video formats.
Cons
It has limited templates.
6) WeVideo
This online editor lets you splice your videos anywhere. It supports several formats, and you can finally export your video in any format. Besides, it allows you access to free stock media like music tracks, videos, and images, among others.
Pros
WeVideo is free to use. However, you can upgrade to the premium version for advanced features.
Directly export videos to YouTube, Instagram, etc.
Cons
The free version leaves a watermark on your videos.
Conclusion
● Are you looking forward to promoting your brand online? Then splice the video online at the best resolution for your editing purposes. You’ll quickly edit your videos and reach your target audience with just a few clicks of a button. Likewise, it is effective to monitor your viewers’ reactions through various comments and feedback. This article has brought you several editing apps for online use. You can easily pinpoint what works best for you concerning their features.
How to Zoom Webcam on PC
Making certain our digital presence is the best it can be pays dividends as more and more of what we do online; similar is the case with how to zoom out webcam windows 10. The majority of experts advise against using the built-in camera that comes with your laptop or computer and instead advocate getting a webcam or an HD camera. These, however, may be hard to come by and pricy if you locate a nice one. If the built-in camera on your laptop doesn’t perform effectively during Zoom meetings, you may want to consider about investing in a separate, better webcam. Webcams offer automatic settings that are intended to function with the largest variety of lighting situations possible. This suggests that they average out a great number of responses to the content of the frame. Because of this, we have incorporated basic PC webcam zooming settings. These answers may be found in the portions that follow.
It’s vital to know how to zoom in on a webcam before visiting there. The camera wasn’t always as vital as it is today, and only very large corporations could afford to employ it as a convenience. But today, nearly everyone, from huge organizations to little firms, acknowledges its value. Everybody needs a webcam that works properly. The camera control software you are using determines the zoom function. The resolution of your picture window and the capabilities of the application dictate how far you can zoom in on the webcam’s video image. You can zoom in and out on camera photos using tools like YouCam and Windows Live Messenger. The most critical camera capabilities for the ideal video conferencing experience are zoom in and zoom out, which at first look may appear trivial. Here, we’ll walk you through each step, in detail. Continue reading, and we’ll check your understanding of webcam zoom in and zoom out skills!
Way 1: Zoom with Windows Live Messenger
When utilizing a camera for video conferencing, you may zoom in on a user’s face to get rid of the background. Webcam settings are not accessible by default in Microsoft Windows. However, camera zoom settings may be changed in instant chat systems. Through an instant messaging tool, such as Windows Live Messenger, you may simply access these options. This application provides private offline chat, video messaging, image and video sharing, and video chatting.
Step1Start Windows Live Messenger on your PC or laptop first. Enter your login name and password by clicking the “Sign In” button.

Step2On the top menu bar, pick “Tools.” And then select the “Audio and Video Setup”. Drag the slider next to “Speaker” to modify the speaker volume. Drag the slider next to “Microphone” to modify the microphone sensitivity. Press “Next.”

Step3From the drop-down list, pick the webcam. The “Camera Control” option is situated on the top; pick “Webcam Settings” after that.
Step4Now, to alter the zoom settings, drag the “Zoom” slider. To zoom in or out, drag the slider to the left or right. Press “OK.”
Way 2: Use Windows 10 Camera App
Wondering how to zoom your camera in the Windows 10 Camera app? The Camera app enables you to zoom in or out on your webcam in both image and video modes. To accomplish so, click or push the Magnification button, and then use the slider to modify the webcam’s zoom level. To operate the zoom feature manually, pick “Manual Zoom.” In the preview window, a square appears when you pick this option. To zoom in on a specific region of the capture window, drag the square there. To expand the image that was acquired by the webcam, slide the slider bar. In simply, The Camera app enables you zoom in or out of photographs and movies shot with your webcam. To do this, click on the “Zoom” button and drag the slider to the left or right as appropriate on your Windows 10 camera. the following steps:
Step1To open the “Start Menu,” make a right-click on “Start.” Now, to access the Camera app, type “Camera App” into the start menu’s search box.

Step2Tap the Camera Control icon when you start or join a meeting. To zoom and pan the camera to the appropriate spot, utilize the icons on the Camera Control panel.
![]()
Step3To exit the Camera Control window and return to the Meeting Controls, touch outside of it.
Way 3: Zoom with YouCam
Unfortunately, the default cameras or webcams bundled with the majority of Windows laptops and desktops don’t have an automatic zoom option. In fact, the only method to adjust their crop is to switch from “Standard” to “Widescreen,” which does slightly zoom in on you but not in the manner we’d want. This makes it inescapable that the only method to manually alter a webcam’s magnification is to acquire one separately and apply its software settings. , like YouCam. YouCam provides video calling, streaming, and broadcasting. includes an integrated app. To employ Zoom with YouCam, refer to the methods given below:
Step1Launch the YouCam camera program and activate the webcam.

Step2In the camera preview window, pick Settings. Then, select “Enable Video Zoom” from the menu.
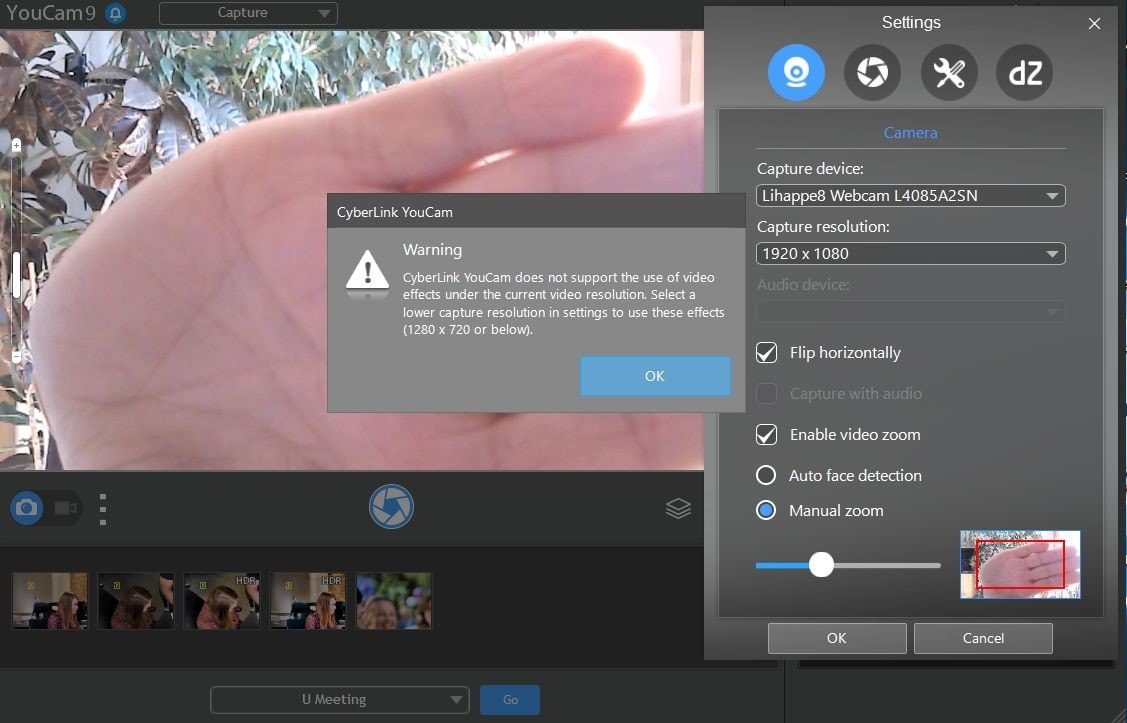
Step3Select “Automatic Face Detection” from the menu. As you wander about in the capture window, the camera watches your face and automatically zooms in on your photo as shown above.
Step4To handle the zoom feature manually, pick “Manual Zoom.” In the preview window, a square appears when you pick this option. To zoom in on a specific region of the capture window, drag the square there. To expand the image that was acquired by the webcam, slide the slider bar.

Way 4: Use iGlasses on Mac
For the perfect webcam look on a MAC, install the Chrome plugin iGlasses for video effects and style tweaks. Your videos will appear better on Zoom as a consequence. You may instantly enhance the appearance of your video interactions by utilizing the digital zoom on your iGlasses. Digital pan, tilt, and zoom are all possible with easy controls. For Macs that support it, an Apple Remote may be used to operate. iGlasses will become an option in Zoom’s video settings when it has been installed. You may improve your camera by altering the settings in iGlasses. You may experiment with a range of amusing effects, like 3-D distortions, using the virtual camera. Let’s learn how to utilize iGlasses on a Mac:
Step1Installing Ecamm’s iGlasses on a MacBook in the first step.
Step2To activate the camera, go to your video settings and pick iGlasses.
Step3Choose the Zoom window and execute the appropriate operations using the Zoom and Flip options. You may now zoom in and out using the camera on your MacBook as you like.

Conclusion
In conclusion, so many people currently take part in online conferences and virtual meetings. You want to create a lasting impression, don’t you? Not or whether you are the host of an online meeting or event, you must now maintain a professional image to prevent turning off attendees. You have discovered how to utilize the tools at your disposal to boost the zoom in and out quality of your camera in this post. However, as will be explained in the sections ahead, you may do it without the third-party plugins. With just one quick plugin, you can significantly transform how you look on a camera. Hence, try out the easy method from the above enlisted ones to get hold on your PC webcam to zoom in or out purposes.
Making certain our digital presence is the best it can be pays dividends as more and more of what we do online; similar is the case with how to zoom out webcam windows 10. The majority of experts advise against using the built-in camera that comes with your laptop or computer and instead advocate getting a webcam or an HD camera. These, however, may be hard to come by and pricy if you locate a nice one. If the built-in camera on your laptop doesn’t perform effectively during Zoom meetings, you may want to consider about investing in a separate, better webcam. Webcams offer automatic settings that are intended to function with the largest variety of lighting situations possible. This suggests that they average out a great number of responses to the content of the frame. Because of this, we have incorporated basic PC webcam zooming settings. These answers may be found in the portions that follow.
It’s vital to know how to zoom in on a webcam before visiting there. The camera wasn’t always as vital as it is today, and only very large corporations could afford to employ it as a convenience. But today, nearly everyone, from huge organizations to little firms, acknowledges its value. Everybody needs a webcam that works properly. The camera control software you are using determines the zoom function. The resolution of your picture window and the capabilities of the application dictate how far you can zoom in on the webcam’s video image. You can zoom in and out on camera photos using tools like YouCam and Windows Live Messenger. The most critical camera capabilities for the ideal video conferencing experience are zoom in and zoom out, which at first look may appear trivial. Here, we’ll walk you through each step, in detail. Continue reading, and we’ll check your understanding of webcam zoom in and zoom out skills!
Way 1: Zoom with Windows Live Messenger
When utilizing a camera for video conferencing, you may zoom in on a user’s face to get rid of the background. Webcam settings are not accessible by default in Microsoft Windows. However, camera zoom settings may be changed in instant chat systems. Through an instant messaging tool, such as Windows Live Messenger, you may simply access these options. This application provides private offline chat, video messaging, image and video sharing, and video chatting.
Step1Start Windows Live Messenger on your PC or laptop first. Enter your login name and password by clicking the “Sign In” button.
Step2On the top menu bar, pick “Tools.” And then select the “Audio and Video Setup”. Drag the slider next to “Speaker” to modify the speaker volume. Drag the slider next to “Microphone” to modify the microphone sensitivity. Press “Next.”
Step3From the drop-down list, pick the webcam. The “Camera Control” option is situated on the top; pick “Webcam Settings” after that.
Step4Now, to alter the zoom settings, drag the “Zoom” slider. To zoom in or out, drag the slider to the left or right. Press “OK.”
Way 2: Use Windows 10 Camera App
Wondering how to zoom your camera in the Windows 10 Camera app? The Camera app enables you to zoom in or out on your webcam in both image and video modes. To accomplish so, click or push the Magnification button, and then use the slider to modify the webcam’s zoom level. To operate the zoom feature manually, pick “Manual Zoom.” In the preview window, a square appears when you pick this option. To zoom in on a specific region of the capture window, drag the square there. To expand the image that was acquired by the webcam, slide the slider bar. In simply, The Camera app enables you zoom in or out of photographs and movies shot with your webcam. To do this, click on the “Zoom” button and drag the slider to the left or right as appropriate on your Windows 10 camera. the following steps:
Step1To open the “Start Menu,” make a right-click on “Start.” Now, to access the Camera app, type “Camera App” into the start menu’s search box.
Step2Tap the Camera Control icon when you start or join a meeting. To zoom and pan the camera to the appropriate spot, utilize the icons on the Camera Control panel.
![]()
Step3To exit the Camera Control window and return to the Meeting Controls, touch outside of it.
Way 3: Zoom with YouCam
Unfortunately, the default cameras or webcams bundled with the majority of Windows laptops and desktops don’t have an automatic zoom option. In fact, the only method to adjust their crop is to switch from “Standard” to “Widescreen,” which does slightly zoom in on you but not in the manner we’d want. This makes it inescapable that the only method to manually alter a webcam’s magnification is to acquire one separately and apply its software settings. , like YouCam. YouCam provides video calling, streaming, and broadcasting. includes an integrated app. To employ Zoom with YouCam, refer to the methods given below:
Step1Launch the YouCam camera program and activate the webcam.
Step2In the camera preview window, pick Settings. Then, select “Enable Video Zoom” from the menu.
Step3Select “Automatic Face Detection” from the menu. As you wander about in the capture window, the camera watches your face and automatically zooms in on your photo as shown above.
Step4To handle the zoom feature manually, pick “Manual Zoom.” In the preview window, a square appears when you pick this option. To zoom in on a specific region of the capture window, drag the square there. To expand the image that was acquired by the webcam, slide the slider bar.
Way 4: Use iGlasses on Mac
For the perfect webcam look on a MAC, install the Chrome plugin iGlasses for video effects and style tweaks. Your videos will appear better on Zoom as a consequence. You may instantly enhance the appearance of your video interactions by utilizing the digital zoom on your iGlasses. Digital pan, tilt, and zoom are all possible with easy controls. For Macs that support it, an Apple Remote may be used to operate. iGlasses will become an option in Zoom’s video settings when it has been installed. You may improve your camera by altering the settings in iGlasses. You may experiment with a range of amusing effects, like 3-D distortions, using the virtual camera. Let’s learn how to utilize iGlasses on a Mac:
Step1Installing Ecamm’s iGlasses on a MacBook in the first step.
Step2To activate the camera, go to your video settings and pick iGlasses.
Step3Choose the Zoom window and execute the appropriate operations using the Zoom and Flip options. You may now zoom in and out using the camera on your MacBook as you like.
Conclusion
In conclusion, so many people currently take part in online conferences and virtual meetings. You want to create a lasting impression, don’t you? Not or whether you are the host of an online meeting or event, you must now maintain a professional image to prevent turning off attendees. You have discovered how to utilize the tools at your disposal to boost the zoom in and out quality of your camera in this post. However, as will be explained in the sections ahead, you may do it without the third-party plugins. With just one quick plugin, you can significantly transform how you look on a camera. Hence, try out the easy method from the above enlisted ones to get hold on your PC webcam to zoom in or out purposes.
Easy Way to Add Transitions to Videos
Editing a video is equally important as recording a video. A raw video footage is never appealing to the eyes because of sudden cuts, unnecessary parts, and lack of eye-catching effects. That is why video editing is crucial for turning an unappealing raw video into an attention-grabbing video. As a matter of fact, the way you edit your video makes your video stand out when you are posting on social media platforms.
One of the most important aspects of video editing is adding transitions to video clips. When you jump from one scene to another and make sudden cuts, you need to apply some video transitions so that the move from one scene to another becomes soothing to the eyes. Different video editors have different transition effects and Wondershare Filmora has the best collection of transitions. We will illustrate how to add transition in Filmora and how to improve your video with video transitions.
Part 1. What is a Video transition effect?
A video transition effect is the most commonly used graphical effect in video editing. A video transition effect is essential whereby you connect one shot to another, especially when you are making sudden cuts in the video. Therefore, a video transition effect sits in between two shots and connects them together smoothly so that it does not look odd to the eyes. Video editing with transitions is a common practice for short videos on social media, presentation videos, and even movies.
A video transition effect is effective when you are jumping from two moods and emotions in the video. It is equally useful while jumping between storylines, points of view, and timelines. Besides, you can spice up your narrative and make your video eye-catching as well as eye-soothing. There are different types of video transition effects such as fade in and out, zoom in and out, dissolve, wipe and pan.
Part 2. How to add transitions in video?
To add transitions to your video, you will need a video editor. You should choose a video editor that has a wide collection of transition effects so that you can apply them to your video as per your preference. If you are someone who regularly makes videos and edits them, a variety of transitions will make the videos look different. There are Movie Maker transitions for Windows users and iMovie transitions for Mac users. But we recommend Wondershare Filmora as the best video editor for adding transitions.
<pFilmora is a professional video editor with so many different categories of transitions including the trending ones. Their team continuously adds new transitions to their collection, and you can download them and use on your videos. Starting from basic, slideshow, and social media to 3D, light and smoke, there is no dearth of transitions to fulfill your requirements. Here are the steps how to add transition in Filmora. Free Download For Win 7 or later(64-bit)
Free Download For macOS 10.14 or later
Step1 Download and install Filmora on your computer. Filmora is available for Windows and Mac users. Launch Filmora and click on New Project.

Step2 Drag and drop your video clips under Project Media folder. Thereafter, drag and drop them on Timeline.
If you have one raw video file, you can split it up into multiple video clips to add transitions in between them.
Step3 Go to Transitions tab located at the top bar. You will see all the categories of transitions on the left panel.

Step4 Once you select your desired transition effect, drag and drop it in between the video clips. You can add multiple transition effects for different video clips.

Play the video after you are done editing and adding transitions. Thereafter, click on Export button to save the video on your hard drive. You should follow the same steps on how to add transition effects in reels, status videos, and YouTube videos.
Part 3. Video transitions tips and tricks
If you want to make your video stand out by simply using video transition effects, you have to follow the following tips and tricks.
Consistency – Amateur video editors tend to use several extravagant transitions in one video that distract and even annoy the audience. You are using video transition effects not to distract but to smoothen the video content. Therefore, you need to be consistent with the video transition effect you use. You should use one or maximum of two transition effects throughout the video so that the audience does not get distracted.
Experiment – While it is true that you should not be using too many video transitions in one video, but you should definitely apply different video transition effects in different videos initially. This will help you to understand which transition is getting better traction, and thereafter, you can stick to it for the rest of your videos. This is particularly useful when you are making similar type of content for social media and video streaming sites.
Out of the Box – The reason you recommended Wondershare Filmora is that there is a huge collection of different types of transition effects. If you use the regular transitions such as fade, zoom, wipe, and dissolve, you cannot create an impression among your viewers. You have to use out of the box transitions so that your video can look and feel different even when you content is not. There are 3D effects, social media effects, and different genres of effects that can go well with your video content.
Judicious – There is a difference between transition effects and video effects. Transition effects should last only for a fraction of a second so that there is no aftereffect in mind. On the contrary, a video effect can last as long as required in the video. Therefore, do not stretch the duration of a transition effect and keep it as short as possible. Similarly, you should not use transition effects here and there unnecessarily. It should be used only when there is a proper scope such as scene cuts, mood changes, and subject changes.
Meaningful – Even transition effect has a meaning behind it and you should understand it and use wherever appropriate. For example, fade out effect signifies the fading of a scene or changing of mood. Similarly, a dissolve effect is appropriate when the subject is dissolved in certain thoughts or a scene is getting dissolved. That way the effect will look natural and more meaningful as well as impactful.
The Bottom Line
Video transition effects are essential in almost all types of videos. They enhance the video content and make the transition between scenes smoother. You should choose your video editor wisely so that you can avail different types of video transition effects. We recommend Wondershare Filmora for its better collection of video transition effects for all types of videos.
Step1 Download and install Filmora on your computer. Filmora is available for Windows and Mac users. Launch Filmora and click on New Project.
Step2 Drag and drop your video clips under Project Media folder. Thereafter, drag and drop them on Timeline.
If you have one raw video file, you can split it up into multiple video clips to add transitions in between them.
Step3 Go to Transitions tab located at the top bar. You will see all the categories of transitions on the left panel.
Step4 Once you select your desired transition effect, drag and drop it in between the video clips. You can add multiple transition effects for different video clips.
Play the video after you are done editing and adding transitions. Thereafter, click on Export button to save the video on your hard drive. You should follow the same steps on how to add transition effects in reels, status videos, and YouTube videos.
Part 3. Video transitions tips and tricks
If you want to make your video stand out by simply using video transition effects, you have to follow the following tips and tricks.
Consistency – Amateur video editors tend to use several extravagant transitions in one video that distract and even annoy the audience. You are using video transition effects not to distract but to smoothen the video content. Therefore, you need to be consistent with the video transition effect you use. You should use one or maximum of two transition effects throughout the video so that the audience does not get distracted.
Experiment – While it is true that you should not be using too many video transitions in one video, but you should definitely apply different video transition effects in different videos initially. This will help you to understand which transition is getting better traction, and thereafter, you can stick to it for the rest of your videos. This is particularly useful when you are making similar type of content for social media and video streaming sites.
Out of the Box – The reason you recommended Wondershare Filmora is that there is a huge collection of different types of transition effects. If you use the regular transitions such as fade, zoom, wipe, and dissolve, you cannot create an impression among your viewers. You have to use out of the box transitions so that your video can look and feel different even when you content is not. There are 3D effects, social media effects, and different genres of effects that can go well with your video content.
Judicious – There is a difference between transition effects and video effects. Transition effects should last only for a fraction of a second so that there is no aftereffect in mind. On the contrary, a video effect can last as long as required in the video. Therefore, do not stretch the duration of a transition effect and keep it as short as possible. Similarly, you should not use transition effects here and there unnecessarily. It should be used only when there is a proper scope such as scene cuts, mood changes, and subject changes.
Meaningful – Even transition effect has a meaning behind it and you should understand it and use wherever appropriate. For example, fade out effect signifies the fading of a scene or changing of mood. Similarly, a dissolve effect is appropriate when the subject is dissolved in certain thoughts or a scene is getting dissolved. That way the effect will look natural and more meaningful as well as impactful.
The Bottom Line
Video transition effects are essential in almost all types of videos. They enhance the video content and make the transition between scenes smoother. You should choose your video editor wisely so that you can avail different types of video transition effects. We recommend Wondershare Filmora for its better collection of video transition effects for all types of videos.
10 Best Music Video Templates to Make Your Video Popular
Music is essentially the food to the soul. A good song could pull you out of a bad mood or cheer you up when you feel low. You could also use music to motivate you to do tedious tasks, like tackling a mountain of dishes at the sink. In addition to having a catchy beat and rhythm, a good song should accompany a well-executed music video.
If you are a novice and new to the music industry, you might wonder how to make your video look stunning and polished to excite your fans. This article will discuss the ten best templates on Filmstock and how to incorporate them into your music video.

- Retro Music Visualization Background Video Template
- Audio Visualization Intro Template for Your Music Video
- Visualizer Overlays Pack Templates for Music Videos
- Audio Visualization Music Video Template
- Audio Spectrum Template for Music Video
- Music Playlist Video Title Pack Template Free for Download
- Lyrics for Music Video Templates
- Music Event Templates Pack for Your Video
- VJ Looping Backgrounds Templates for Music Videos
- EDM Logo Templates for Music Videos
- How To Edit Your Next Music Video With Templates Using Filmora for Desktop
- How To Use Music Video Templates With Filmora for Mobile
- Tips for Editing Your Music Videos
10 Best Music Video Templates
Without dilly-dallying too much, let’s look at some amazing templates from Filmstock you can use to edit your music videos.
1. Retro Music Visualization Background Video Template
The looping background in our first music video template removes the tedium from editing. Once you ensure your soundtrack is flawless, the template takes it to a whole new level, almost like giving it a facelift. The bright neon and pastel colors are sure to keep your audience glued to their screens, unable to look away from the masterpiece before their eyes.
2. Audio Visualization Intro Template for Your Music Video
This audio visualization intro template is beautifully designed and easy to use for even the least experienced editor. All you need to do is pair it with your favorite soundtrack; the template will match it to the audio animation. This intro template is compatible with Filmora 9.6 and above and comes with 12 titles and 12 effects. Sadly, there are no transitions here.
3. Visualizer Overlays Pack Templates for Music Videos
Perhaps your music videos are a bit bland, or your audience has grown used to a particular editing style. This music template video is a sure way to refresh your videos and introduce your audience to a whole new side of you. Even though it contains plenty of bright colors similar to other templates on our list, we guarantee it shines bright uniquely.
4. Audio Visualization Music Video Template
Podcasts are a new type of content where the viewers can plug in their headphones and listen to you rant while they complete their chores. You could take your podcast videos to the next level using this audio visualization template, which is easy to use and contains deep, rich colors that are easy on the eyes.
5. Audio Spectrum Template for Music Video
There is no shortage of templates with beautiful bold colors on our list. This audio spectrum template is definitely one of them. It also contains geometric shapes and futuristic designs to wow your audience.
6. Music Playlist Video Title Pack Template Free for Download
Some viewers prefer to watch one long video with their favorite artist’s songs bundled up in one place. This template for music video can provide the perfect background for your viewers as they enjoy their beloved songs.
7. Lyrics for Music Video Templates
This fun template takes the boredom out of any music video and allows your audience to enjoy both the auditory and visual experience simultaneously. The lyrics for music video templates are suitable for Filmora 9.6 and above and come with a whopping 16 titles, 17 elements, and four transitions.
8. Music Event Templates Pack for Your Video
The eighth music video template on our list is inspired by concerts and dance clubs, even though it is not as loud or chaotic. This template is compatible with Filmora 9.6 and above and comes with 14 titles, ten elements, four effects, and two transitions. Since you will be adding your own audio track, it’s not such a bummer that it doesn’t come with music.
9. VJ Looping Backgrounds Templates for Music Videos
The modern and futuristic look in the VJ looping background template makes it a great choice for concert-type videos or anything related to sci-fi. The bright colors are hard to miss and will wow your audience.
The VJ looping background template is easy to incorporate into any project, and within a few simple clicks, your video is ready for viewing. You can use this template with Filmora 9.6 and above. However, it only comes with 36 elements. There are no titles, transitions, or effects.
10. EDM Logo Templates for Music Videos
Last but not least, this EDM logo template is compatible with Filmora 9.6 or above and comes with six titles, eight elements, and two effects. Unfortunately, the package doesn’t include any transitions. This electronic video template is perfect for concerts and festival-related music videos that are anything but laid-back.
How To Edit Your Next Music Video With Templates Using Filmora for Desktop
Having seen the beautiful templates for your music video discussed above, you might wonder how you could use them in your next music video to increase traffic to your channel. Wondershare Filmora is an excellent editing tool that can help you achieve exactly that. The desktop version is free to download, not to mention its feature-rich interface and templates you can’t possibly exhaust.
Free Download For Win 7 or later(64-bit)
Free Download For macOS 10.14 or later
Below is a step-by-step guide on how to edit your video with a music video template**.**
Step1 Launch Filmora for desktop on your device and click on the logo to import media from your internal storage. Alternatively, you could drag and drop the files in the designated region as shown.

Step2 Navigate to the “Template” tab and wait for a drop-down menu to appear on the left side of the screen. Select the “Music” tab and wait a few seconds for the platform to download all the available music templates. Click the template that tickles your fancy and drag it to the timeline as shown below.

Step3 Select the “Media” tab at the top of the page. Drag your soundtrack and music video to the timeline and click “Replace” to remove the sample footage that comes with the template.

Step4 Customize your video by adding effects, transitions, and stickers as you see fit. View the changes you have made in the Player window of the platform. Once you are happy with the outcome, click “Export” to save a copy of the final video to your device.

If you want to add more custom designs to your music video, watch the video below to learn more:
How To Use Music Video Templates With Filmora for Mobile
Suppose you want to use your mobile phone to edit a short video clip. Filmora has a mobile app, which is no different from the desktop app, except that it is optimized for smartphones and tablets. The installation is pretty easy, and the interface is very user-friendly.
Stick around to learn how to use Filmora for mobile to edit your video with a free music video template.
Step1 Launch the app on your mobile phone and select the “Template” tab.

Step2 Navigate to the “Lyrics” or “Music Beats” tab to start perusing music video templates on the app.

Step3 Choose a template you like and tap on the “Make Video” button.

Step4 import your music video or photos from your internal storage. Select “Go >” to apply the changes.

Step5 Preview the resulting footage and click “Export” once you are happy with the outcome.

Step6 You can share the video directly on any of your social media platforms. Alternatively, if you want to download the edited video to your device, select “More.”

Tips for Editing Your Music Videos
Now that you have the ideal editing tool to take your videos from drab to fab, here are a few tips to help you along the way.
- Ensure you set the output file to the appropriate resolution to avoid lowering the quality of the video you edit.
- Resist the temptation to insert the artsy shots before you lay a basic framework. It would be wise to focus on the musician’s performance before you insert shots of the beautiful scenery.
- As you edit, it would help to create a storyline that matches the lyrics. You could create a simple story or a complex one.
- Since your computer might struggle to process numerous 4k videos, it would help to create proxy files as early as possible so you can save your progress along the way.
- During filming, create and collect your favorite b-roll shots. These clips provide extra information or context to anyone watching your music video.
- Ensure you match the video to the beat and look out for areas where the performer sings along. We guarantee your fans will notice the slightest delay between the song and the performer in the video.
- Once the music video looks polished and synchronized, you can adjust brightness, contrast, and exposure and change the white balance.
- Lastly, you could begin or end the video with the artists’ credits, such as their names or logo. Since it is a relevant piece of information, ensure this segment of the video grabs the viewers’ attention.
Conclusion
If you want your song to go viral, you ought to put in the work and make the video as good as the soundtrack. Nothing is as bad as a good song with a poorly executed video. Your fans will definitely criticize you for it, making the ratings go down.
Fortunately, the guidelines in this article will set you on the right path and help you make a polished-looking music video in no time.
10 Best Music Video Templates
Without dilly-dallying too much, let’s look at some amazing templates from Filmstock you can use to edit your music videos.
1. Retro Music Visualization Background Video Template
The looping background in our first music video template removes the tedium from editing. Once you ensure your soundtrack is flawless, the template takes it to a whole new level, almost like giving it a facelift. The bright neon and pastel colors are sure to keep your audience glued to their screens, unable to look away from the masterpiece before their eyes.
2. Audio Visualization Intro Template for Your Music Video
This audio visualization intro template is beautifully designed and easy to use for even the least experienced editor. All you need to do is pair it with your favorite soundtrack; the template will match it to the audio animation. This intro template is compatible with Filmora 9.6 and above and comes with 12 titles and 12 effects. Sadly, there are no transitions here.
3. Visualizer Overlays Pack Templates for Music Videos
Perhaps your music videos are a bit bland, or your audience has grown used to a particular editing style. This music template video is a sure way to refresh your videos and introduce your audience to a whole new side of you. Even though it contains plenty of bright colors similar to other templates on our list, we guarantee it shines bright uniquely.
4. Audio Visualization Music Video Template
Podcasts are a new type of content where the viewers can plug in their headphones and listen to you rant while they complete their chores. You could take your podcast videos to the next level using this audio visualization template, which is easy to use and contains deep, rich colors that are easy on the eyes.
5. Audio Spectrum Template for Music Video
There is no shortage of templates with beautiful bold colors on our list. This audio spectrum template is definitely one of them. It also contains geometric shapes and futuristic designs to wow your audience.
6. Music Playlist Video Title Pack Template Free for Download
Some viewers prefer to watch one long video with their favorite artist’s songs bundled up in one place. This template for music video can provide the perfect background for your viewers as they enjoy their beloved songs.
7. Lyrics for Music Video Templates
This fun template takes the boredom out of any music video and allows your audience to enjoy both the auditory and visual experience simultaneously. The lyrics for music video templates are suitable for Filmora 9.6 and above and come with a whopping 16 titles, 17 elements, and four transitions.
8. Music Event Templates Pack for Your Video
The eighth music video template on our list is inspired by concerts and dance clubs, even though it is not as loud or chaotic. This template is compatible with Filmora 9.6 and above and comes with 14 titles, ten elements, four effects, and two transitions. Since you will be adding your own audio track, it’s not such a bummer that it doesn’t come with music.
9. VJ Looping Backgrounds Templates for Music Videos
The modern and futuristic look in the VJ looping background template makes it a great choice for concert-type videos or anything related to sci-fi. The bright colors are hard to miss and will wow your audience.
The VJ looping background template is easy to incorporate into any project, and within a few simple clicks, your video is ready for viewing. You can use this template with Filmora 9.6 and above. However, it only comes with 36 elements. There are no titles, transitions, or effects.
10. EDM Logo Templates for Music Videos
Last but not least, this EDM logo template is compatible with Filmora 9.6 or above and comes with six titles, eight elements, and two effects. Unfortunately, the package doesn’t include any transitions. This electronic video template is perfect for concerts and festival-related music videos that are anything but laid-back.
How To Edit Your Next Music Video With Templates Using Filmora for Desktop
Having seen the beautiful templates for your music video discussed above, you might wonder how you could use them in your next music video to increase traffic to your channel. Wondershare Filmora is an excellent editing tool that can help you achieve exactly that. The desktop version is free to download, not to mention its feature-rich interface and templates you can’t possibly exhaust.
Free Download For Win 7 or later(64-bit)
Free Download For macOS 10.14 or later
Below is a step-by-step guide on how to edit your video with a music video template**.**
Step1 Launch Filmora for desktop on your device and click on the logo to import media from your internal storage. Alternatively, you could drag and drop the files in the designated region as shown.
Step2 Navigate to the “Template” tab and wait for a drop-down menu to appear on the left side of the screen. Select the “Music” tab and wait a few seconds for the platform to download all the available music templates. Click the template that tickles your fancy and drag it to the timeline as shown below.
Step3 Select the “Media” tab at the top of the page. Drag your soundtrack and music video to the timeline and click “Replace” to remove the sample footage that comes with the template.
Step4 Customize your video by adding effects, transitions, and stickers as you see fit. View the changes you have made in the Player window of the platform. Once you are happy with the outcome, click “Export” to save a copy of the final video to your device.
If you want to add more custom designs to your music video, watch the video below to learn more:
How To Use Music Video Templates With Filmora for Mobile
Suppose you want to use your mobile phone to edit a short video clip. Filmora has a mobile app, which is no different from the desktop app, except that it is optimized for smartphones and tablets. The installation is pretty easy, and the interface is very user-friendly.
Stick around to learn how to use Filmora for mobile to edit your video with a free music video template.
Step1 Launch the app on your mobile phone and select the “Template” tab.
Step2 Navigate to the “Lyrics” or “Music Beats” tab to start perusing music video templates on the app.
Step3 Choose a template you like and tap on the “Make Video” button.
Step4 import your music video or photos from your internal storage. Select “Go >” to apply the changes.
Step5 Preview the resulting footage and click “Export” once you are happy with the outcome.
Step6 You can share the video directly on any of your social media platforms. Alternatively, if you want to download the edited video to your device, select “More.”
Tips for Editing Your Music Videos
Now that you have the ideal editing tool to take your videos from drab to fab, here are a few tips to help you along the way.
- Ensure you set the output file to the appropriate resolution to avoid lowering the quality of the video you edit.
- Resist the temptation to insert the artsy shots before you lay a basic framework. It would be wise to focus on the musician’s performance before you insert shots of the beautiful scenery.
- As you edit, it would help to create a storyline that matches the lyrics. You could create a simple story or a complex one.
- Since your computer might struggle to process numerous 4k videos, it would help to create proxy files as early as possible so you can save your progress along the way.
- During filming, create and collect your favorite b-roll shots. These clips provide extra information or context to anyone watching your music video.
- Ensure you match the video to the beat and look out for areas where the performer sings along. We guarantee your fans will notice the slightest delay between the song and the performer in the video.
- Once the music video looks polished and synchronized, you can adjust brightness, contrast, and exposure and change the white balance.
- Lastly, you could begin or end the video with the artists’ credits, such as their names or logo. Since it is a relevant piece of information, ensure this segment of the video grabs the viewers’ attention.
Conclusion
If you want your song to go viral, you ought to put in the work and make the video as good as the soundtrack. Nothing is as bad as a good song with a poorly executed video. Your fans will definitely criticize you for it, making the ratings go down.
Fortunately, the guidelines in this article will set you on the right path and help you make a polished-looking music video in no time.
Also read:
- New How to Speed Up Video on Instagram Reels?
- New Why You Should Master Slideshows In Lightroom, Fresh Insight for 2024
- Updated 7 Tips to Create Teaching Videos for 2024
- Updated Top 5 Websites and Software to Convert Powerpoint to Mp4
- Want to Make Use of a Lovely Background for Your Image by Removing the Background or Making It Transparent? Here Is Something You Need to Cover
- Updated How to Edit Facebook eCommerce Video Ads for 2024
- Want to Feather Shapes in After Effects? Read This
- New Video Editors Use Transitions to Tie Their Shots and Clips Together Into a Cohesive, Polished Program. Learn the Best Method to Create a Smooth Cut Transition Effect
- Consider a LUT to Be a Color Preset that a Filmmaker Can Use to Start Working on a Project Quickly. Sony Engineers Have Developed LUTs to Help Filmmakers Perform Specific Tasks. All of These Are Available for Free for 2024
- 2024 Approved Freeze Frame Clone Effect Is a Creative Effect to Use for Many Video Creators. This Article Will Show You How to Use Filmora to Make a Frozen Frame Clone Video Effect
- Updated In 2024, How to Remove Motion Blur In Photoshop
- New In 2024, Top Free LUTs To Use in Shotcut An Overview
- New How To Synchronize Your Audio And Videos Properly?
- New Convert MP4 to 60 FPS GIF A Step-by-Step Guide for 2024
- Updated In This Article We Will Be Covering the Most Important Topics You Have to Remember when Becoming a Successful YouTube-Star for 2024
- Updated In 2024, How to Make Glitch Effect with Filmora
- New 2024 Approved Want to Take Your Editing Creativity to the Next Level by Designing Top-Class, Professional-Quality Slideshows in Aquasoft? Rest Assured, You Have Landed at the Right Place
- 5 Tips for Aquasoft Slideshow for 2024
- New How To Make Boring Videos Look Cool By B Rolls
- Updated 10+ Best Unlimited FCPX Slideshow Templates
- 2024 Approved The Most Efficient Ways to Manage Your Timeline
- Updated In 2024, How to Use Blender Green Screen
- Updated 2024 Approved Little Known Ways of Adding Emojis to Photos on iPhone & Android
- How to Add Filter to Video in Premiere Pro for 2024
- In 2024, A Guide to Find a High-Quality Video Marketing Agency
- Updated In 2024, MP3 Cutter Download for Computer and Mobile
- New 10 Best Free GIF Background Remover for PC and Online
- 2024 Approved Do You Have Any Idea About Changing the Video Speed Using the Editors? Had You Worked with the VLC Playback Speed? This Article Enlightens You with the Best Video Edits Using the Perfect Tool in the Digital Space
- Create Your Slow Zoom TikTok in Minutes for 2024
- New Tactics To Make Keynote Slideshow
- New In 2024, The Best Wedding LUTs for Premiere Pro
- New In 2024, Step by Step Guide of Make Gimp Transparent Background PNG
- 2024 Approved Learning How to Create LUTs with LUTs Generator
- 2024 Approved Being an After Effects Editor, You Often Find Yourself the Need to Add Motion Blur After Effects. This Guide Has Got You Covered. Follow to Find Out How to Add Motion Blur in After Effects
- The Ultimate Guide to Countdown Animation in Videos
- 2024 Approved Top 11 Best Video Editing Apps for iPhone
- New 2024 Approved Wondering How to Replace Sky in After Effects? Learn How
- 2024 Approved Ultimate Guidelines to Help You Use VLC Media Player Better
- In 2024, Are You Also a Fan of the Slow Mo Guys? Well! Who Isnt? Learn How You Can Create Compelling Slow-Mo Videos Like the Slow Mo Guys Here
- Have You Ever Wanted to Stop Your Video and Hold on to a Single Frame to Draw Attention to a Point or for Dramatic Flair? Good News! VEGAS Pro Makes It Easy to Do Just That. In This Tutorial, Well Look at How to Make Sony Vegas Freeze Frame for 2024
- New In 2024, How to Create Cinematic Style Videos?
- In 2024, Explore a Variety of Inexpensive Camera Models Suitable for Making Slow-Motion Footage without Compromising Quality
- New 2024 Approved Find Out How to Create Your Own Custom Motion Graphics in Filmora. Add Unique Objects, Manipulate Text, and Animate Anything You Want
- Looking For A Location Changer On OnePlus Nord N30 5G? Look No Further | Dr.fone
- Easy steps to recover deleted pictures from Itel S23.
- How to Unlock SIM Card on Vivo Y36i online without jailbreak
- Spoofing Life360 How to Do it on Vivo Y100t? | Dr.fone
- Resolve Compile Error in Hidden Module in Excel 2019 Causes & Solutions | Stellar
- Simple and Effective Ways to Change Your Country on YouTube App Of your Samsung Galaxy S24+ | Dr.fone
- Top 12 Best Meme Makers Online for FREE for 2024
- In 2024, Unlocking the Power of Smart Lock A Beginners Guide for Vivo Y100i Power 5G Users
- In 2024, 5 Ways to Track Apple iPhone 14 Pro Max without App | Dr.fone
- How to Upgrade iPhone 14 Pro to the Latest iOS/iPadOS Version? | Dr.fone
- In 2024, How Do You Unlock your iPhone 12 Pro? Learn All 4 Methods
- How to Factory Reset Honor Magic 6 If I Forgot Security Code or Password? | Dr.fone
- In 2024, Top 15 Augmented Reality Games Like Pokémon GO To Play On Motorola Moto E13 | Dr.fone
- How to Change Location On Facebook Dating for your Apple iPhone 12 | Dr.fone
- In 2024, 3 Things You Must Know about Fake Snapchat Location On Oppo K11x | Dr.fone
- In 2024, Effective Guide to Cast Apple iPhone 7 Plus to MacBook without Hindrance | Dr.fone
- How to restore wiped call history on Samsung Galaxy S24 Ultra?
- In 2024, How To Change Your Apple iPhone SE (2022) Apple ID on MacBook
- Restore Missing App Icon on Nubia Red Magic 8S Pro Step-by-Step Solutions | Dr.fone
- In 2024, How To Do Oppo A18 Screen Sharing | Dr.fone
- Recover your photos after Lava Blaze 2 Pro has been deleted.
- How To Recover Lost Data on Apple iPhone 14 Pro? | Dr.fone
- How to Reset your Vivo S17t Lock Screen Password
- Title: New In 2024, Splice Video Editor Online - Get Your Videos Splice Easily
- Author: Morgan
- Created at : 2024-04-24 01:03:35
- Updated at : 2024-04-25 01:03:35
- Link: https://ai-video-editing.techidaily.com/new-in-2024-splice-video-editor-online-get-your-videos-splice-easily/
- License: This work is licensed under CC BY-NC-SA 4.0.
