
New In 2024, Steps to Denoise in Final Cut Pro – Reduce Video and Audio Noise

Steps to Denoise in Final Cut Pro – Reduce Video and Audio Noise
Whenever it comes to the term denoise, we usually get kind of “lost in translation” – does it mean to remove or reduce just the background noise in terms of audio, or does it intend noise effect on the actual scene which we see visually? Anyway, using video editors, denoising is possible in both ways. And why should we denoise at all? – to find out, we will touch upon both issues, and learn how to do those two things in Final Cut Pro.
How to remove background noise in Final Cut Pro?
It doesn’t really matter if you are preparing a video for youtube, a podcast, or any other content with audio in it – for your listeners to be engaged, you need a clear audio, but sometimes that is not the case. You might even find unnecessary background noise after recording the video or audio, and it can be really annoying – that kind of recording gives your audio tracks an unprofessional touch, which can lead to disengaged listeners, the viewers who just don’t want to listen to it anymore. But it’s always possible to turn the tables – and for it, using video editors might really give us a hand. So, Final Cut Pro, which is developed only for Macs (so, you will not be able to use this software on the PC), can solve this problem for you.
So, if you are using Final Cut Pro 10.6, it’s possible to achieve your goal without using any plug-ins. In such a case, there are special effects to use. First of all, let us say that you have an audio file which you want to be corrected because it has some echo, hum, background noise; so you import that one into the programme, namely, timeline.
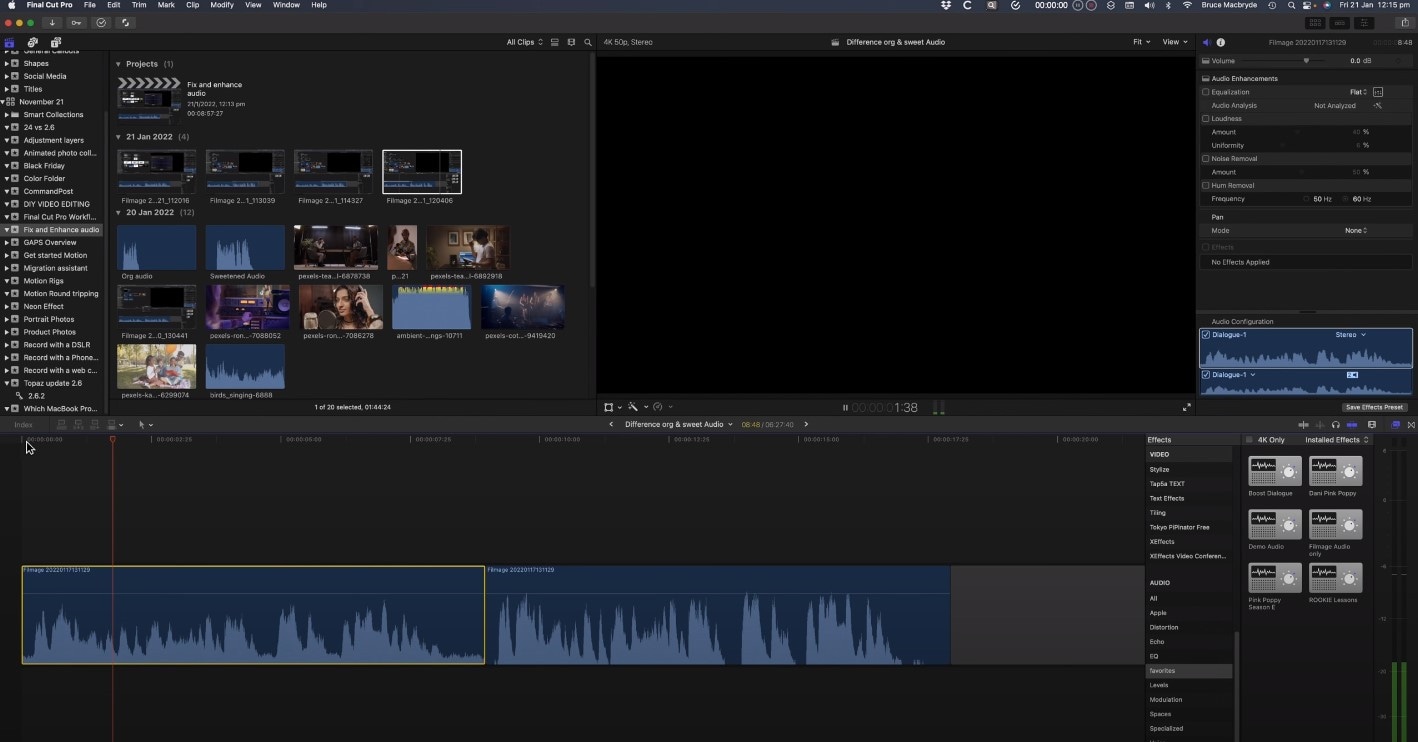
You will need to first use Equalatization, which is under the Audio Enhancements.
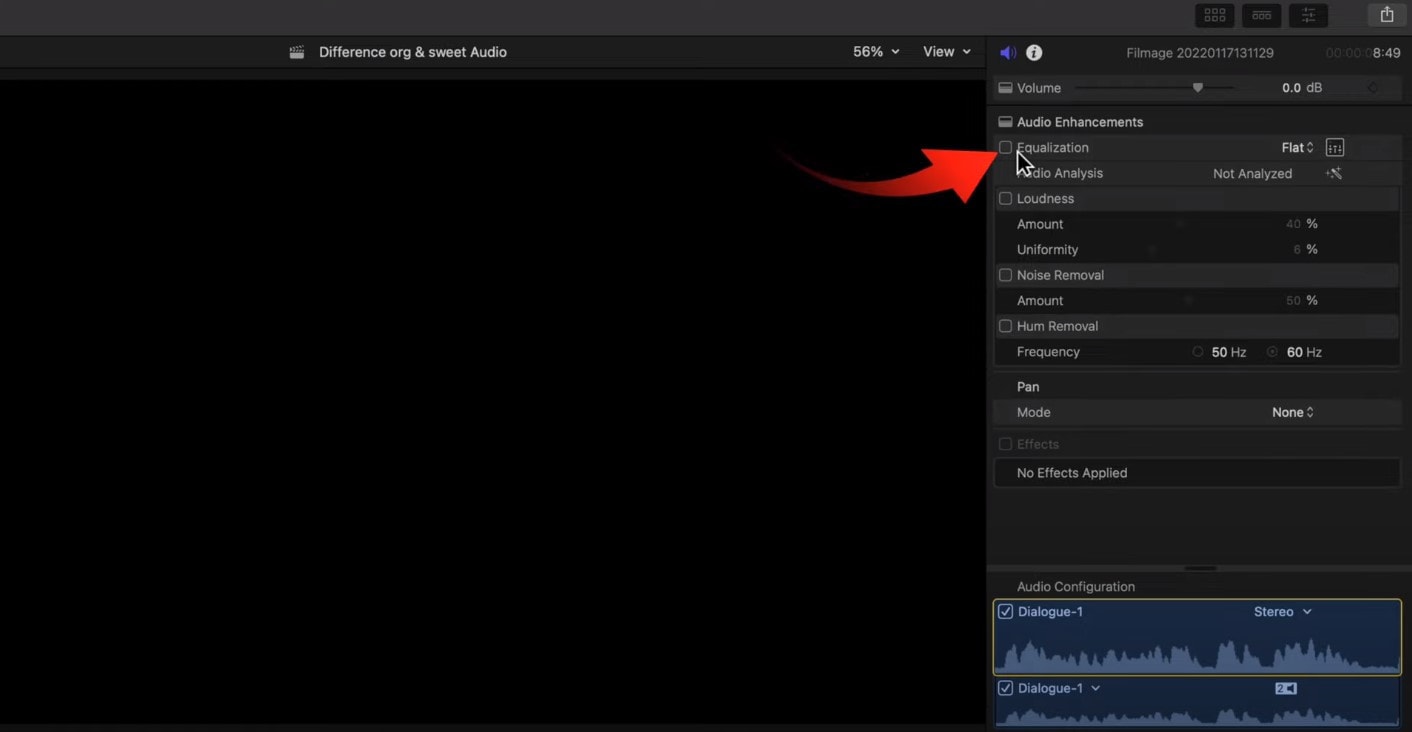
You will need to check the square that opens the equalizer and shows graphics for it. The high frequencies are on the right, and the low ones you will find on the left. Lower the highs and raise the points a little on the left side.
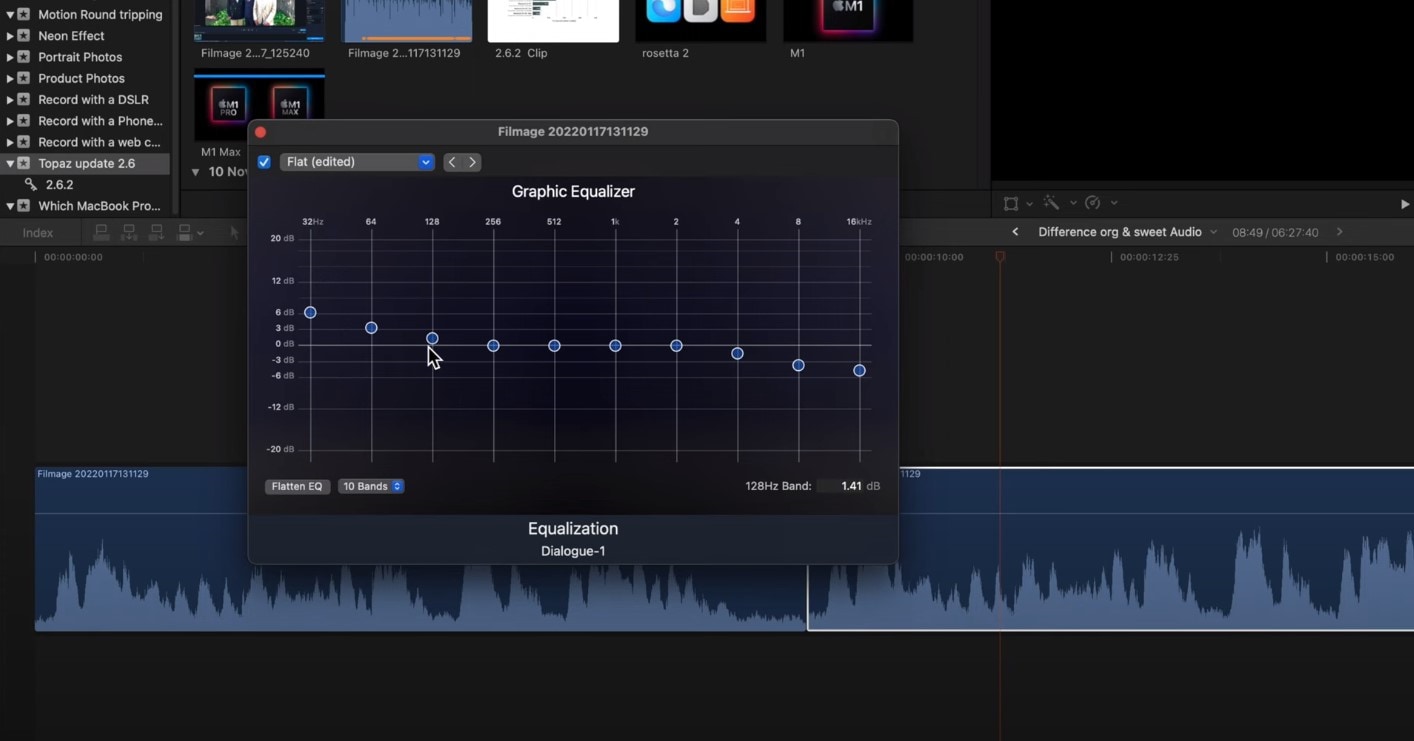
Next step would be to level out the lows and highs of the voice using a Compressor. You will find this effect in Installed Effects, which you need to drag and drop on the audio, and it will raise the whispers and lower the shouts in the audio.
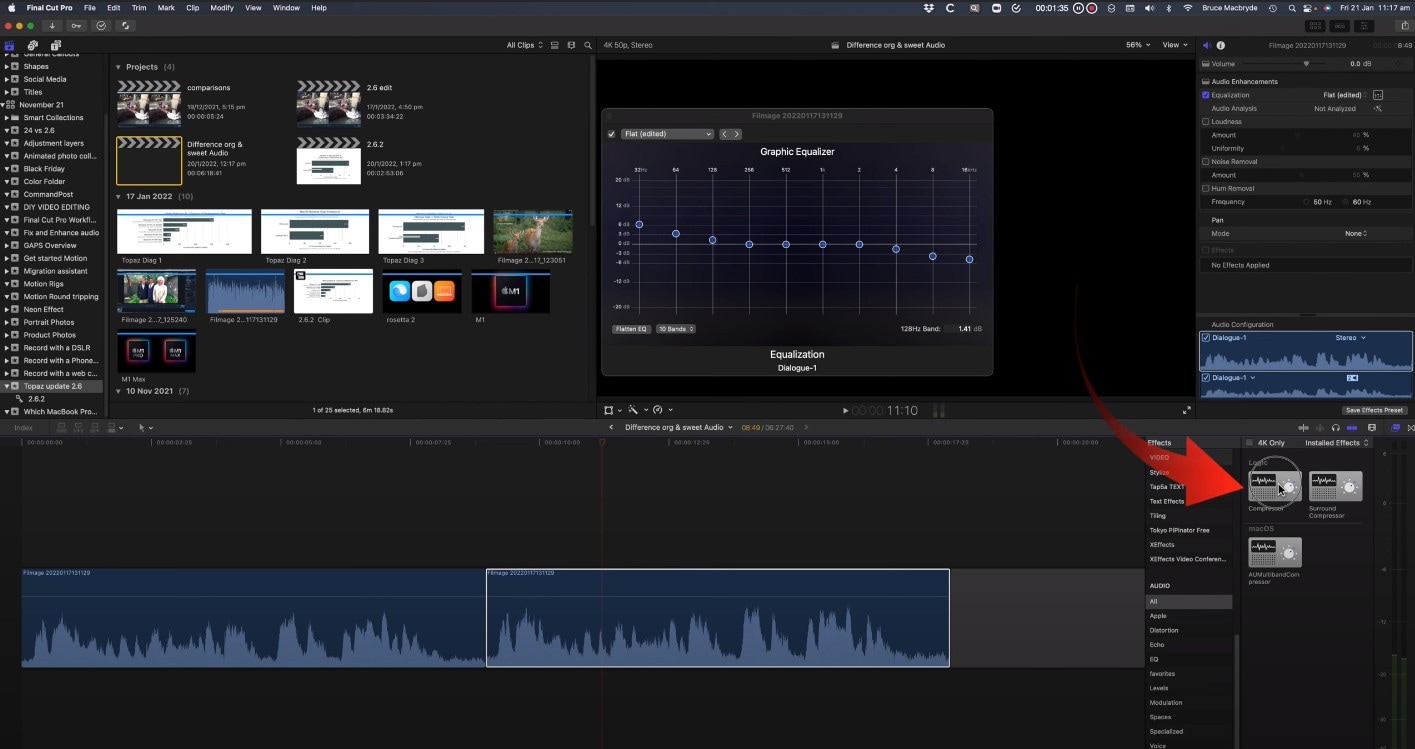
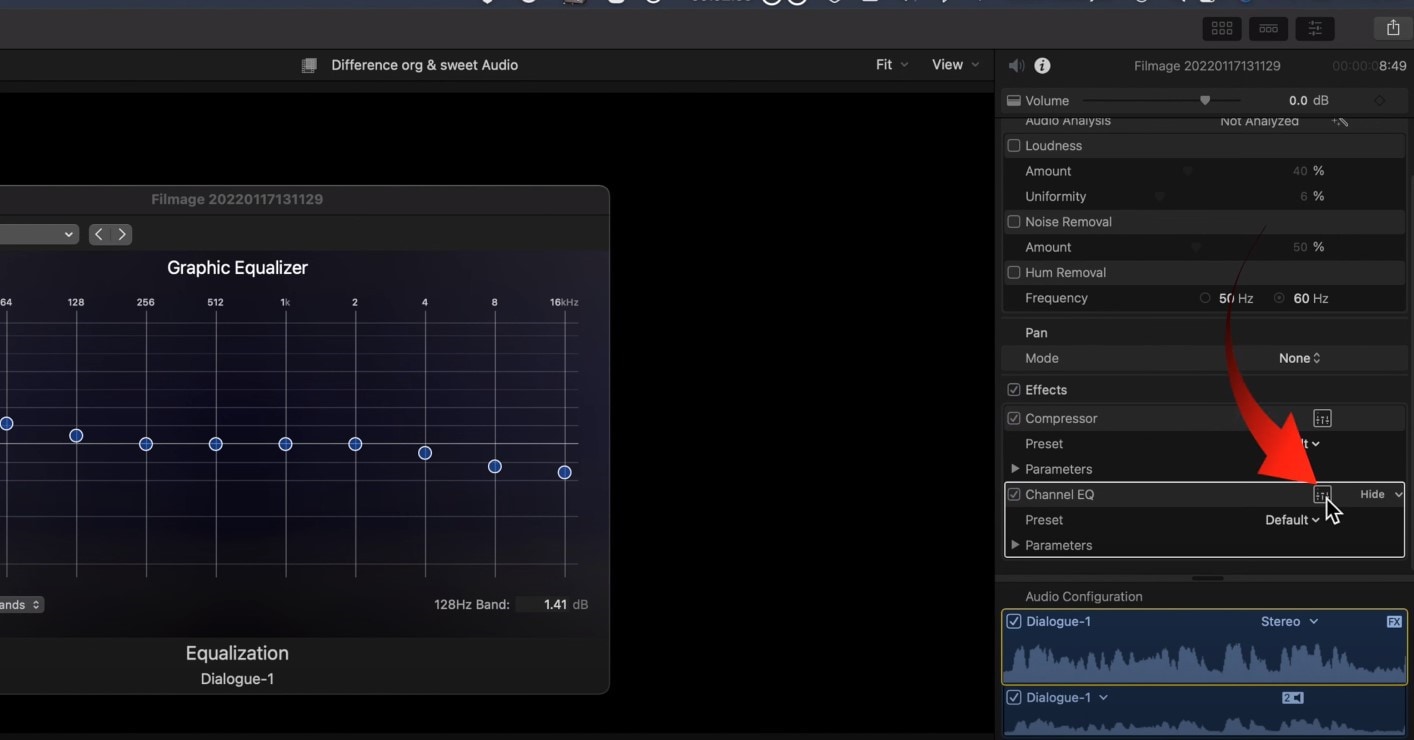
Some background noise will still be there, so you then can find Channel EQ effect you will find in the effects. You need to drag it on the clip, then click on the equalize button in the inspector, and this time, reduce the lower levels on the left, while you also lower the highs on the right.
Lastly, you will need to use the Noise Gate effect. This will cut out all of the sounds between words, so when someone in the audio is not speaking, there will be no background noise at all.
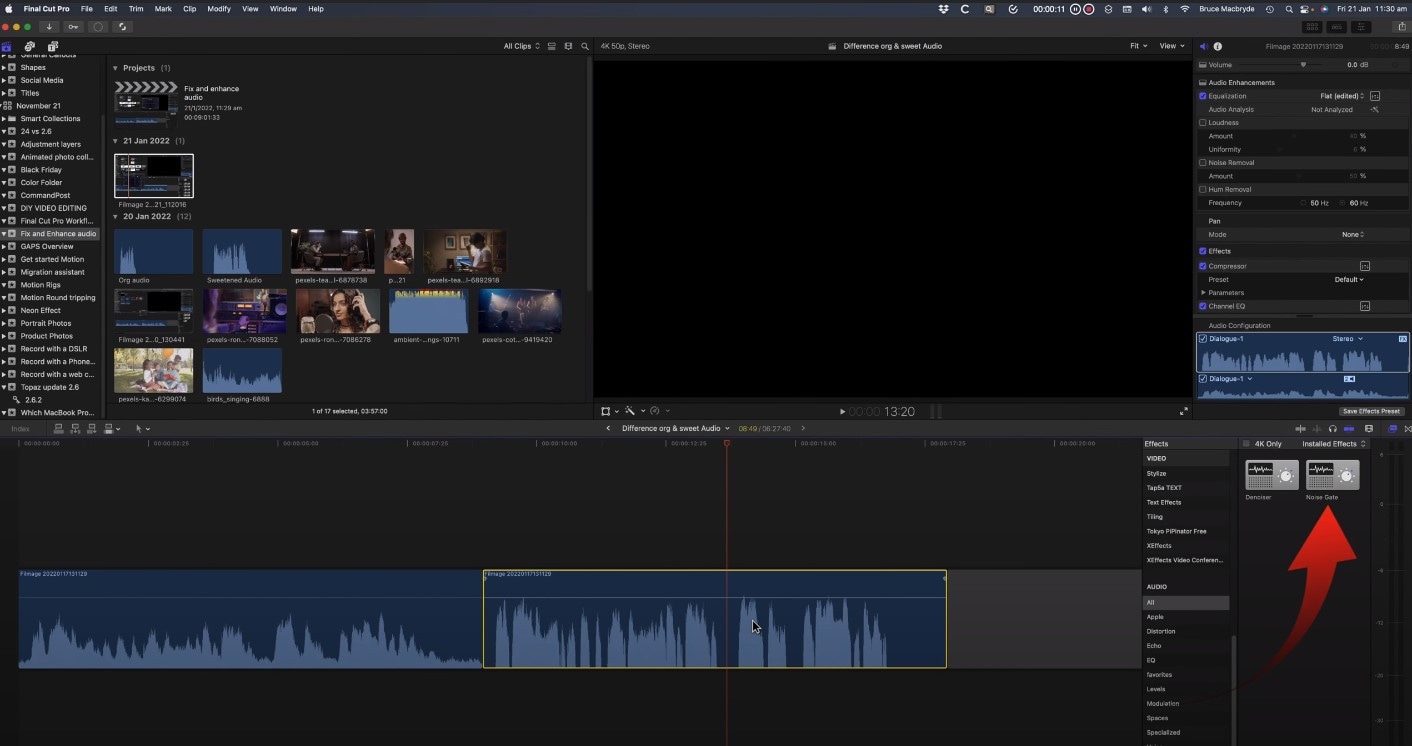
In case this kind of cutting noise out doesn’t sound natural, you can look into Noise Gate Parameters and concentrate on two of them – reduction and release. If you drag the latter right, the noise will raise, and reduction will also raise noise a little, in order to reduce the clipping.
How to denoise a video in Final Cut Pro?
But what is noise in terms of videos? It means that the video is not clear, but instead, the clip has grains on it, which is not so pleasant to see (unless you use noise/grain effect with some purpose!). the noise usually appear when the shot was taken in an environment with not enough white, or, in other cases, when the video was taken with small-sensory equipment, for example, smartphone or action camera.
And Final Cut Pro is one of the video editors where you can remove or reduce the noise and make your footage look clearer than it would have been originally, and it will guarantee that people who are interested and watch your clip will have a better experience. So, let’s learn step by step how to denoise the video in our beloved Final Cut Pro, which added this feature only starting from Final Cut Pro 10.4.4 – it means that before, the task was only done by using some expensive plug-ins, but starting from this version of the program, the software has video noise reduction effect itself.
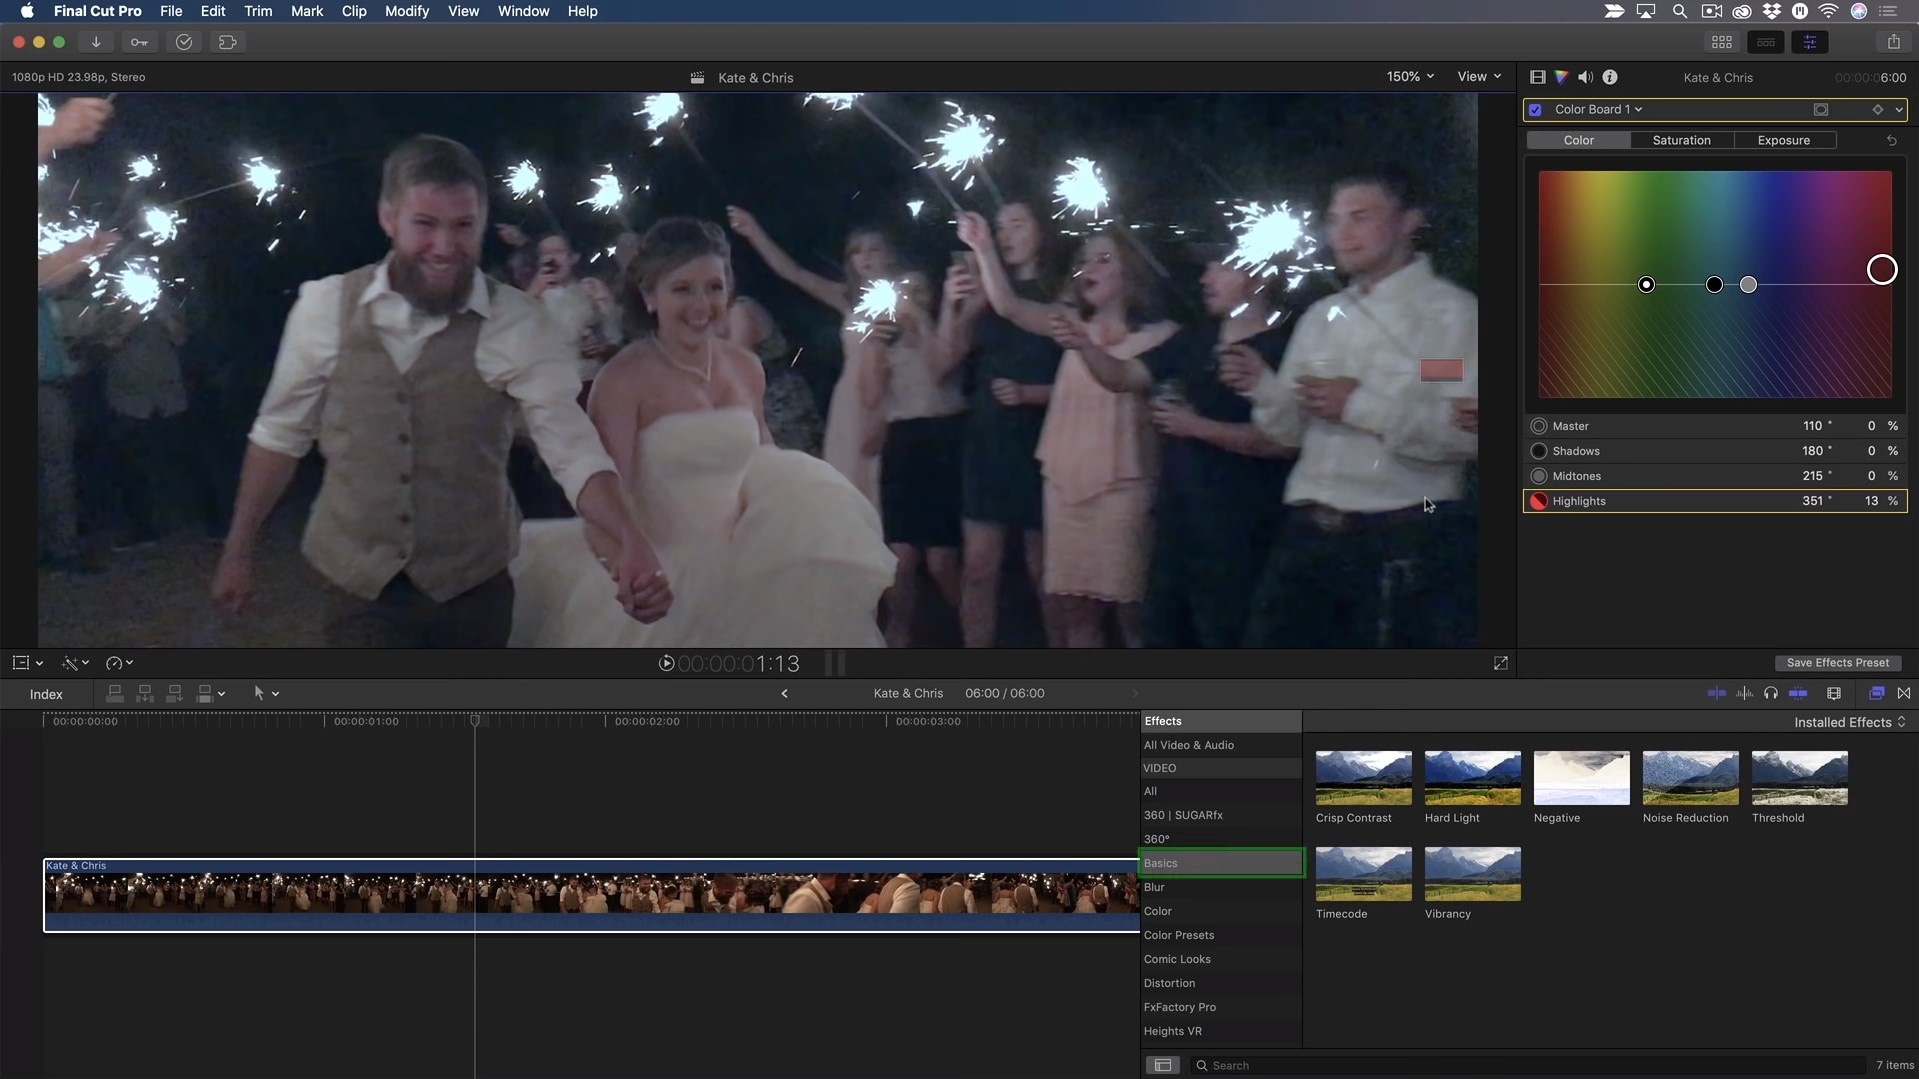
So, choose the video which has some noise and grain and you wish to edit. Bring it in the program, and click on it in the timeline, in order to select it. The video should appear in the viewer, and you will be able to see the noise right away or whenever you zoom in a little. Then, you will need to find the Effects – you can just use the shortcut and click on Command and 5, or find the panel in the top-right corner of the timeline. Whenever Effects appear, you will need to select the Basic category, and then double-click the icon to apply the noise reduction filter, and close the window. It might take a while to analyze the clip for noise.
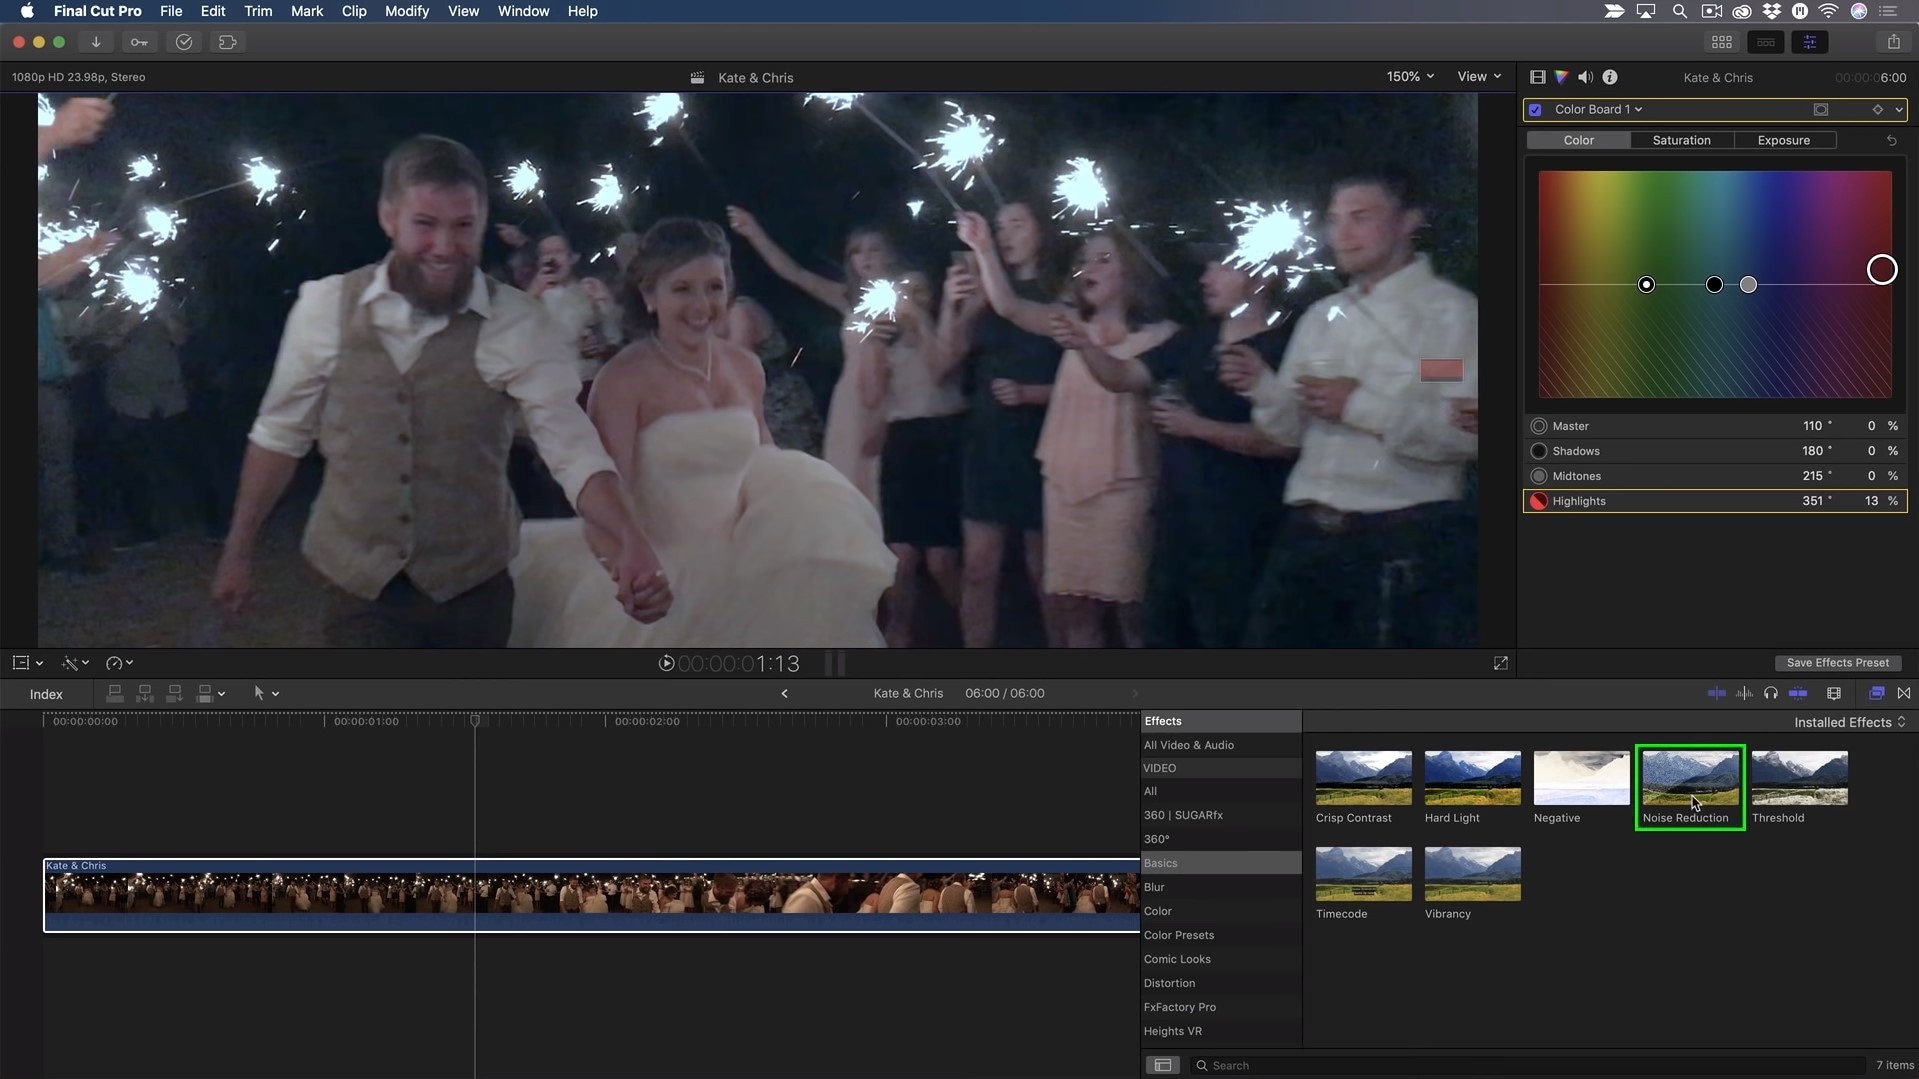
In the inspector, you will find the controls for noise reduction, which only include the Amount and Sharpness.
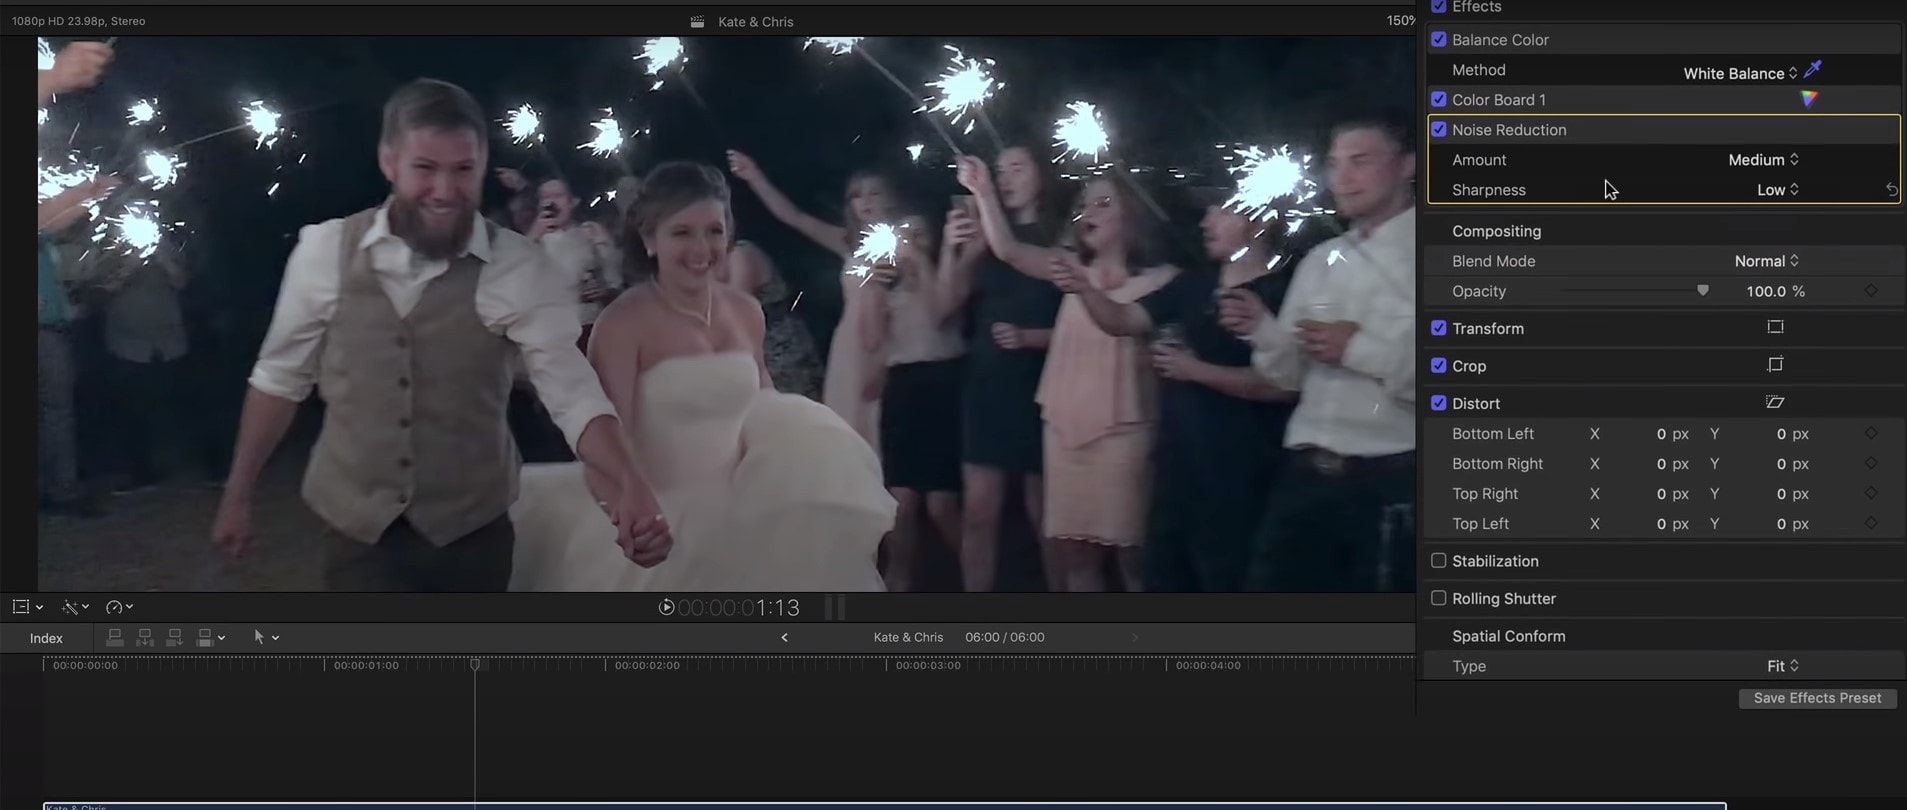
You might as well boost the amount to high, then you can take a look at the image to evaluate the result. One way to do the last step is to uncheck the box next to the Noise Reduction as well, which will disable the filter until you check the box again.
You can also change the Sharpness to Medium, which will compensate for the soft look the effect produces.
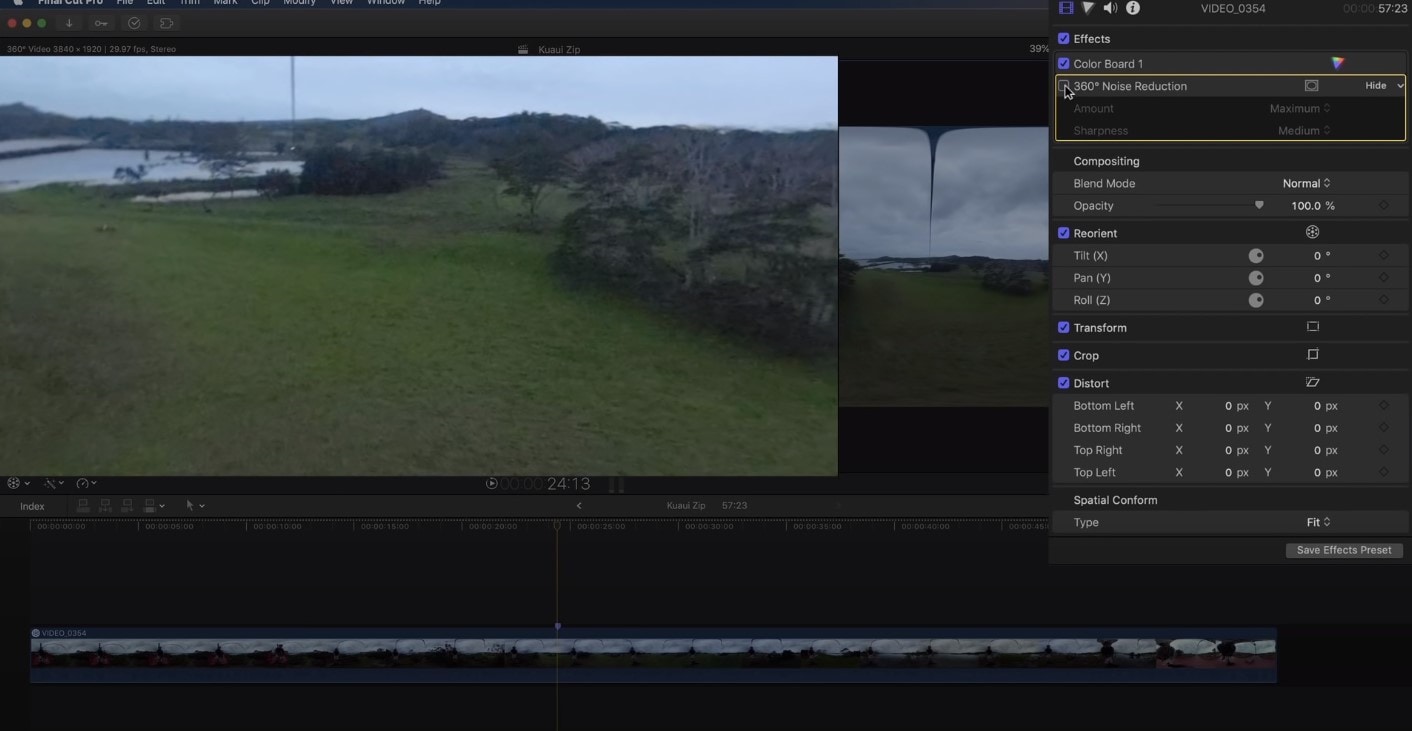
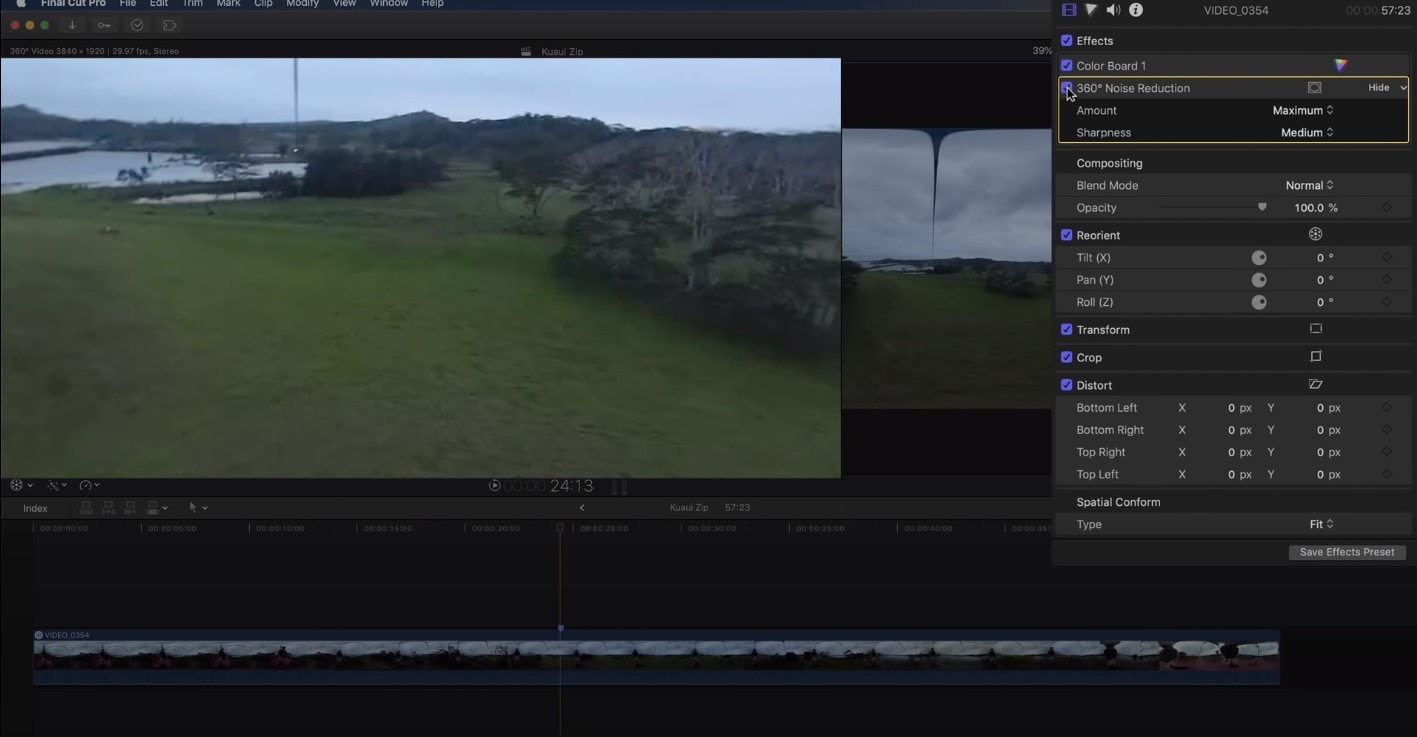
And, there is also a noise reduction effect dedicated to 360 viewers, which is called 360 Noise Reduction. As you can see, the effect removes a lot of noise and makes the grainy video look clearer and more enjoyable, besides, if you move around the sphere in the viewer, the effect seems quite seamless!
Bonus tip: how to remove audio noise in video with Filmora
In case you don’t own Mac or just want to operate in another computer program, then Wondershare Filmora would make a great alternative – it’s one of the software that can help you get rid of the background noise. How to do it there? Follow this guideline:
First off, of course, you need to drag and drop the video into the timeline. Then, in order to edit the audio of the video separately, you’ll need to right-click on the video and find Detach Audio.
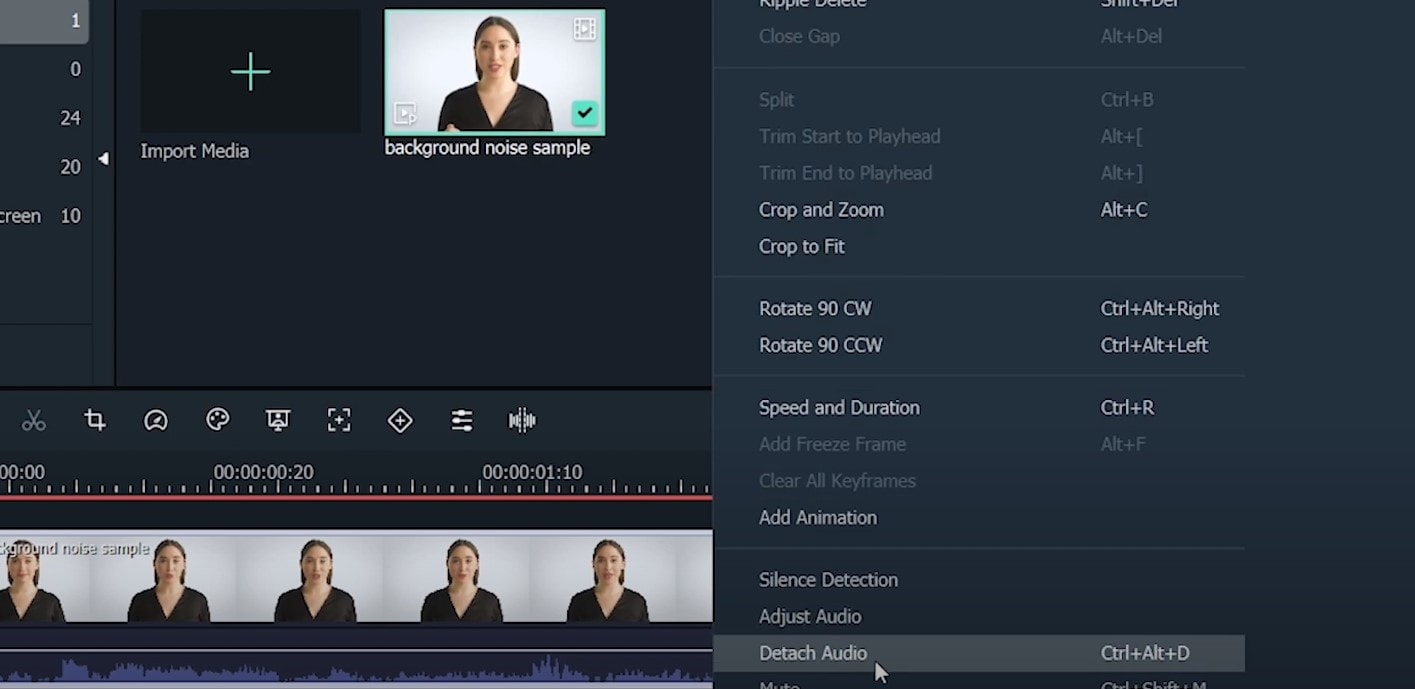
Double-clicking on the audio track in the sequence will show the editing panel, where you can find – Remove background noise, which, as it is obvious, will remove the noise directly.
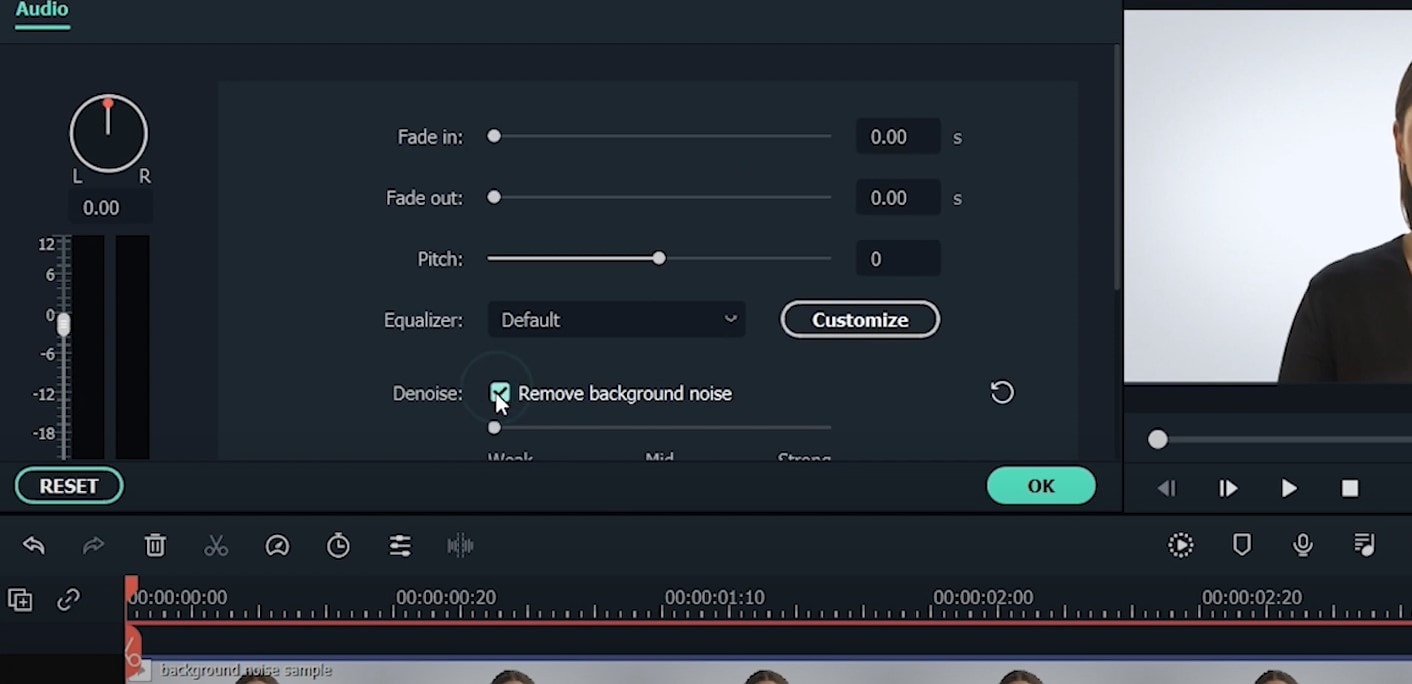
So, in this article, we learned how to denoise in Final Cut Pro – both in terms of audio background noise, and noise and grain on the video, and we learned how to get rid of audio noise in Wondershare Filmora in the easiest and fastest way!
You will need to first use Equalatization, which is under the Audio Enhancements.

You will need to check the square that opens the equalizer and shows graphics for it. The high frequencies are on the right, and the low ones you will find on the left. Lower the highs and raise the points a little on the left side.

Next step would be to level out the lows and highs of the voice using a Compressor. You will find this effect in Installed Effects, which you need to drag and drop on the audio, and it will raise the whispers and lower the shouts in the audio.

Some background noise will still be there, so you then can find Channel EQ effect you will find in the effects. You need to drag it on the clip, then click on the equalize button in the inspector, and this time, reduce the lower levels on the left, while you also lower the highs on the right.

Lastly, you will need to use the Noise Gate effect. This will cut out all of the sounds between words, so when someone in the audio is not speaking, there will be no background noise at all.

In case this kind of cutting noise out doesn’t sound natural, you can look into Noise Gate Parameters and concentrate on two of them – reduction and release. If you drag the latter right, the noise will raise, and reduction will also raise noise a little, in order to reduce the clipping.
How to denoise a video in Final Cut Pro?
But what is noise in terms of videos? It means that the video is not clear, but instead, the clip has grains on it, which is not so pleasant to see (unless you use noise/grain effect with some purpose!). the noise usually appear when the shot was taken in an environment with not enough white, or, in other cases, when the video was taken with small-sensory equipment, for example, smartphone or action camera.
And Final Cut Pro is one of the video editors where you can remove or reduce the noise and make your footage look clearer than it would have been originally, and it will guarantee that people who are interested and watch your clip will have a better experience. So, let’s learn step by step how to denoise the video in our beloved Final Cut Pro, which added this feature only starting from Final Cut Pro 10.4.4 – it means that before, the task was only done by using some expensive plug-ins, but starting from this version of the program, the software has video noise reduction effect itself.
So, choose the video which has some noise and grain and you wish to edit. Bring it in the program, and click on it in the timeline, in order to select it. The video should appear in the viewer, and you will be able to see the noise right away or whenever you zoom in a little. Then, you will need to find the Effects – you can just use the shortcut and click on Command and 5, or find the panel in the top-right corner of the timeline. Whenever Effects appear, you will need to select the Basic category, and then double-click the icon to apply the noise reduction filter, and close the window. It might take a while to analyze the clip for noise.


In the inspector, you will find the controls for noise reduction, which only include the Amount and Sharpness.

You might as well boost the amount to high, then you can take a look at the image to evaluate the result. One way to do the last step is to uncheck the box next to the Noise Reduction as well, which will disable the filter until you check the box again.
You can also change the Sharpness to Medium, which will compensate for the soft look the effect produces.
And, there is also a noise reduction effect dedicated to 360 viewers, which is called 360 Noise Reduction. As you can see, the effect removes a lot of noise and makes the grainy video look clearer and more enjoyable, besides, if you move around the sphere in the viewer, the effect seems quite seamless!


Bonus tip: how to remove audio noise in video with Filmora
In case you don’t own Mac or just want to operate in another computer program, then Wondershare Filmora would make a great alternative – it’s one of the software that can help you get rid of the background noise. How to do it there? Follow this guideline:
First off, of course, you need to drag and drop the video into the timeline. Then, in order to edit the audio of the video separately, you’ll need to right-click on the video and find Detach Audio.

Double-clicking on the audio track in the sequence will show the editing panel, where you can find – Remove background noise, which, as it is obvious, will remove the noise directly.

So, in this article, we learned how to denoise in Final Cut Pro – both in terms of audio background noise, and noise and grain on the video, and we learned how to get rid of audio noise in Wondershare Filmora in the easiest and fastest way!
You will need to first use Equalatization, which is under the Audio Enhancements.

You will need to check the square that opens the equalizer and shows graphics for it. The high frequencies are on the right, and the low ones you will find on the left. Lower the highs and raise the points a little on the left side.

Next step would be to level out the lows and highs of the voice using a Compressor. You will find this effect in Installed Effects, which you need to drag and drop on the audio, and it will raise the whispers and lower the shouts in the audio.

Some background noise will still be there, so you then can find Channel EQ effect you will find in the effects. You need to drag it on the clip, then click on the equalize button in the inspector, and this time, reduce the lower levels on the left, while you also lower the highs on the right.

Lastly, you will need to use the Noise Gate effect. This will cut out all of the sounds between words, so when someone in the audio is not speaking, there will be no background noise at all.

In case this kind of cutting noise out doesn’t sound natural, you can look into Noise Gate Parameters and concentrate on two of them – reduction and release. If you drag the latter right, the noise will raise, and reduction will also raise noise a little, in order to reduce the clipping.
How to denoise a video in Final Cut Pro?
But what is noise in terms of videos? It means that the video is not clear, but instead, the clip has grains on it, which is not so pleasant to see (unless you use noise/grain effect with some purpose!). the noise usually appear when the shot was taken in an environment with not enough white, or, in other cases, when the video was taken with small-sensory equipment, for example, smartphone or action camera.
And Final Cut Pro is one of the video editors where you can remove or reduce the noise and make your footage look clearer than it would have been originally, and it will guarantee that people who are interested and watch your clip will have a better experience. So, let’s learn step by step how to denoise the video in our beloved Final Cut Pro, which added this feature only starting from Final Cut Pro 10.4.4 – it means that before, the task was only done by using some expensive plug-ins, but starting from this version of the program, the software has video noise reduction effect itself.
So, choose the video which has some noise and grain and you wish to edit. Bring it in the program, and click on it in the timeline, in order to select it. The video should appear in the viewer, and you will be able to see the noise right away or whenever you zoom in a little. Then, you will need to find the Effects – you can just use the shortcut and click on Command and 5, or find the panel in the top-right corner of the timeline. Whenever Effects appear, you will need to select the Basic category, and then double-click the icon to apply the noise reduction filter, and close the window. It might take a while to analyze the clip for noise.


In the inspector, you will find the controls for noise reduction, which only include the Amount and Sharpness.

You might as well boost the amount to high, then you can take a look at the image to evaluate the result. One way to do the last step is to uncheck the box next to the Noise Reduction as well, which will disable the filter until you check the box again.
You can also change the Sharpness to Medium, which will compensate for the soft look the effect produces.
And, there is also a noise reduction effect dedicated to 360 viewers, which is called 360 Noise Reduction. As you can see, the effect removes a lot of noise and makes the grainy video look clearer and more enjoyable, besides, if you move around the sphere in the viewer, the effect seems quite seamless!


Bonus tip: how to remove audio noise in video with Filmora
In case you don’t own Mac or just want to operate in another computer program, then Wondershare Filmora would make a great alternative – it’s one of the software that can help you get rid of the background noise. How to do it there? Follow this guideline:
First off, of course, you need to drag and drop the video into the timeline. Then, in order to edit the audio of the video separately, you’ll need to right-click on the video and find Detach Audio.

Double-clicking on the audio track in the sequence will show the editing panel, where you can find – Remove background noise, which, as it is obvious, will remove the noise directly.

So, in this article, we learned how to denoise in Final Cut Pro – both in terms of audio background noise, and noise and grain on the video, and we learned how to get rid of audio noise in Wondershare Filmora in the easiest and fastest way!
You will need to first use Equalatization, which is under the Audio Enhancements.

You will need to check the square that opens the equalizer and shows graphics for it. The high frequencies are on the right, and the low ones you will find on the left. Lower the highs and raise the points a little on the left side.

Next step would be to level out the lows and highs of the voice using a Compressor. You will find this effect in Installed Effects, which you need to drag and drop on the audio, and it will raise the whispers and lower the shouts in the audio.

Some background noise will still be there, so you then can find Channel EQ effect you will find in the effects. You need to drag it on the clip, then click on the equalize button in the inspector, and this time, reduce the lower levels on the left, while you also lower the highs on the right.

Lastly, you will need to use the Noise Gate effect. This will cut out all of the sounds between words, so when someone in the audio is not speaking, there will be no background noise at all.

In case this kind of cutting noise out doesn’t sound natural, you can look into Noise Gate Parameters and concentrate on two of them – reduction and release. If you drag the latter right, the noise will raise, and reduction will also raise noise a little, in order to reduce the clipping.
How to denoise a video in Final Cut Pro?
But what is noise in terms of videos? It means that the video is not clear, but instead, the clip has grains on it, which is not so pleasant to see (unless you use noise/grain effect with some purpose!). the noise usually appear when the shot was taken in an environment with not enough white, or, in other cases, when the video was taken with small-sensory equipment, for example, smartphone or action camera.
And Final Cut Pro is one of the video editors where you can remove or reduce the noise and make your footage look clearer than it would have been originally, and it will guarantee that people who are interested and watch your clip will have a better experience. So, let’s learn step by step how to denoise the video in our beloved Final Cut Pro, which added this feature only starting from Final Cut Pro 10.4.4 – it means that before, the task was only done by using some expensive plug-ins, but starting from this version of the program, the software has video noise reduction effect itself.
So, choose the video which has some noise and grain and you wish to edit. Bring it in the program, and click on it in the timeline, in order to select it. The video should appear in the viewer, and you will be able to see the noise right away or whenever you zoom in a little. Then, you will need to find the Effects – you can just use the shortcut and click on Command and 5, or find the panel in the top-right corner of the timeline. Whenever Effects appear, you will need to select the Basic category, and then double-click the icon to apply the noise reduction filter, and close the window. It might take a while to analyze the clip for noise.


In the inspector, you will find the controls for noise reduction, which only include the Amount and Sharpness.

You might as well boost the amount to high, then you can take a look at the image to evaluate the result. One way to do the last step is to uncheck the box next to the Noise Reduction as well, which will disable the filter until you check the box again.
You can also change the Sharpness to Medium, which will compensate for the soft look the effect produces.
And, there is also a noise reduction effect dedicated to 360 viewers, which is called 360 Noise Reduction. As you can see, the effect removes a lot of noise and makes the grainy video look clearer and more enjoyable, besides, if you move around the sphere in the viewer, the effect seems quite seamless!


Bonus tip: how to remove audio noise in video with Filmora
In case you don’t own Mac or just want to operate in another computer program, then Wondershare Filmora would make a great alternative – it’s one of the software that can help you get rid of the background noise. How to do it there? Follow this guideline:
First off, of course, you need to drag and drop the video into the timeline. Then, in order to edit the audio of the video separately, you’ll need to right-click on the video and find Detach Audio.

Double-clicking on the audio track in the sequence will show the editing panel, where you can find – Remove background noise, which, as it is obvious, will remove the noise directly.

So, in this article, we learned how to denoise in Final Cut Pro – both in terms of audio background noise, and noise and grain on the video, and we learned how to get rid of audio noise in Wondershare Filmora in the easiest and fastest way!
Are You Looking for a Voice Changer to Make Your Gaming Experience More Fun? Here Is a List of the Top 6 Best Alternatives of Clownfish Voice Changers to Use
Do you remember using the Taking Tom or Talking Angela app? I do because I was giggling so hard at how hilarious it was. Well, it was the easy and fun application of voice-changing technology. Imagine performing this in real-time while using different voice tones because voice-changing software will enable you to accomplish that.
These voice-changing apps have a variety of pre-programmed voice types, including cartoon, robotic, and alien sounds. With these apps, you can manually modify your voice’s pitch, frequency, tone, and other elements. In this article, we will talk about the most popular clownfish voice changer and its best alternative, so keep reading:
Try AI Voice Changer For Win 7 or later(64-bit)
Try AI Voice Changer For macOS 10.14 or later
Part 1: What’s the best part of the clownfish voice changer app?
You can modify your voice with the simple-to-use Clownfish Voice Changer app. It has various functional applications and is used for enjoyment and amusement. For instance, you can use it to ensure the speaker’s anonymity when making phone conversations or recording podcasts.

With the help of Clownfish Voice Changer, you can instantly alter your voice. It is incredibly effective and doesn’t require technical knowledge or expensive equipment. You can use it while gaming, making prank calls to random people, having fun with your buddies, or even altering your voice for professional purposes.
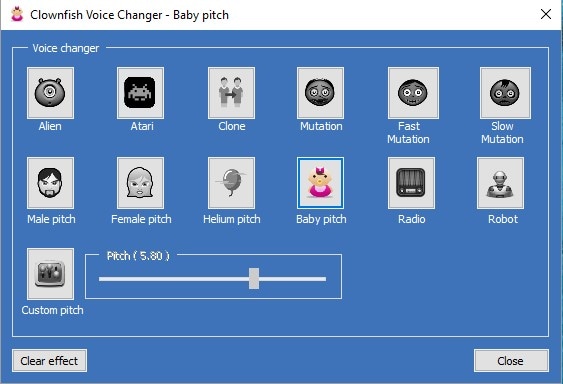
You can use a clownfish voice changer while gaming to change your voice. It can be fun, but it might help make your playing character more distinctive. You will need a robust and authoritative voice to sound like a Black Ops Unit Commander commander.
Features
- Clownfish Voice Changer can improve the quality and tone of your voice.
- You can modify your voice on various apps like Hangouts, Steam, Skype, ooVoo, Mumble, Ventrilo, Viber, Ekiga, TeamSpeak, Jitsi, Discord, etc.
- You can use different voice effects like Female pitch, Helium pitch, Radio, Robot, Custom pitch, Alien, Atari, Fast Mutation, Clone, Slow Mutation, Male pitch, Mutation, Silence, Baby pitch, etc.
- It supports various media formats and has better audio controls and playlist features for the music player.
- Clownfish Voice Changer has Virtual Studio Technology (VST) plugins.
Compatibility
Clownfish voice changer supports Windows Vista, 7, 8, 8.1, 10, and 11 operating systems.
Price
The clown voice changer is available for free.
Part 2: What’re the best alternatives for a clownfish voice changer?
If you are looking for the best alternatives to Clownfish voice changer, you can use the following apps:
Voxal
Voxal Voice Changer is a great and straightforward voice-changing application to record audio files and apply a variety of voice and sound effects in real time. Almost any software that uses a microphone, such as numerous games, Skype, TeamSpeak, etc., can use this to modify a user’s voice.
Voxal’s Voice Changer is the simplest method to alter your gender in speech chats, voice animations, fun team games with your pals, or make your unique voice modification effects.
All cutting-edge voice alteration tools, including basic audio editing, are accessible for a modest fee or a monthly membership.

Compatibility
Voxal is compatible with Windows 10, 8.1, 8, 7, XP, Vista (64-bit and 32-bit), and macOS 10.5 or above.
Price
During the 14-day trial period, a free version of Voxal is only accessible for non-commercial usage. You must pay $19.99 for a lifetime license if you want to keep using the program at home. The cost of the business license is $24.99. A quarterly subscription option is also available for $1.94 per month.
Voicemod
You should try Voicemod voice changer if you want a live voice changer app that can alter a user’s speech to sound like a robot, chipmunk, male, or female. With this app, you can prank friends and do real-time speech modification in live gaming and streaming. Voicemod has a vast library of pre-made voice filters that offers more than 90 voices. You can use it for PUBG, Fortnite, Discord, Grand Theft Auto, Zoom, Skye, ASMR, etc.

Compatibility
It supports Windows 10 and 11 (64-bit). Although the team is attempting to make this real-time voice changer more accessible, it is not intended for Xbox, macOS, or PS4.
Price
You download the Voicemod voice changer for free. Only pro users can access the full feature set and voice collection. Three subscription options are available: 3-month ($4.99), 1-year ($9.99), and lifetime ($19.99).
MorphVOX
MorphVOX voice changer is a practical real-time voice changer for PC. It alters the user’s original voice into many voices. Using the included sounds and effects, you can change your voice into that of a woman, man, child, and many more. It differs from other voice changers due to the extensive selection of preset voice libraries.

Compatibility
MorphVOX voice changer app supports Windows and Mac.
Price
You can test the features and functionality of this voice changer by downloading the free version. A $39.99 premium edition is advised if you want to unlock all valuable features.
UnicTool MagicVox
One of the most powerful real-time voice changers for PCs is UnicTool MagicVox. You can fake your voice to amuse friends and make gaming more enjoyable in real time, thanks to an extensive library of more than 200 voice effects. It has voice filters that use background noises to improve mood and atmosphere and make voice-changing results more dramatic.
It can work with many platforms, including Skype, Discord, Viber, and others that support live calls. The most fantastic feature is that it contains all the tools necessary to change voice in real-time, including voice customization, background sound, keybinding, etc.

Compatibility
MagicVox voice changer is compatible with Windows.
Price
You can download a free version of MagicVox or purchase a complete package at a reasonable cost of about $0.2 per day.
AV Voice Changer
An excellent substitute for Clownfish Voice Changer is AV Voice Changer. Using AV Voice Changer, you can adjust your voice’s pitch, speed, loudness, echo, etc. It can produce various effects, such as baby pitch, robot pitch, and helium pitch.
This voice changer has real-time pitch shifting that enables most effects, allowing you to alter your tone in the middle of a statement. There are more than a hundred built-in effects available. Using the built-in sound editor, you can also make your effect.

Compatibility
It is compatible with Windows Vista/7/8/8.1/10 (32-bit & 64-bit).
Price
You can purchase a full AV Voice Changer basic software license for $29.95.
MasqVox Voice Changer
MasqVox Voice Changer is one of the best real-time voice changers. It allows you to switch between voices when conversing on Skype. This app will enable you to change the pitch of someone else’s speech or audio.

Compatibility
It is compatible with Windows.
Price
You can use this voice changer for free.
Part 3: How to record and edit funny voice-changing videos?
If you are looking for the best app to record and edit funny voice-changing videos, then you should give Filmora 11 a try. Filmora is a powerful professional video and audio editing program for Windows and Mac computers. You can add a new audio track from the Audio Library, mute the audio, cut, copy, paste, or insert audio files using the built-in editing tools.

A variety of audio effects are available in the Filmora video editor. Choose a music track and audio effects from the audio library by clicking the Audio tab at the top of the screen. More than 50 free sound effects and soundtracks are available on Filmora. Choose where you want the audio to appear on the audio track by dragging and dropping the music from the audio library. After that, click the play button to see if the modifications were successful.
You can also add a voiceover anytime in the timeline by using the internal or external microphone on your computer to record one. With Filmora, you can adjust the audio speed by sliding the speed slider or typing a specific number.
Filmora screen recorder allows you to simultaneously record their screen and camera and the audio from their system and microphone. You can record games, tutorials, YouTube videos, etc., and export the videos to other devices, Vimeo and YouTube.
Free Download For Win 7 or later(64-bit)
Free Download For macOS 10.14 or later
Part 4: FAQs
Is Clownfish a good voice changer?
One of the most popular and well-known voice changers is Clownfish. It is excellent for people who want more from their voice changer than just altering sounds. Clownfish voice changer provides several features that are not offered by other apps.
Is Clownfish voice changer compatible with Chrome?
Yes, the clown fish voice changer is compatible with Chrome. Any Windows or Mac computer, as well as an Android or iOS device, can install a clown voice changer.
Is Clownfish voice changer free?
Clown fish voice changer is a 100% free tool. It doesn’t have any freemium constraints despite having a smaller selection of voice selections.
Try AI Voice Changer For Win 7 or later(64-bit)
Try AI Voice Changer For macOS 10.14 or later
Part 1: What’s the best part of the clownfish voice changer app?
You can modify your voice with the simple-to-use Clownfish Voice Changer app. It has various functional applications and is used for enjoyment and amusement. For instance, you can use it to ensure the speaker’s anonymity when making phone conversations or recording podcasts.

With the help of Clownfish Voice Changer, you can instantly alter your voice. It is incredibly effective and doesn’t require technical knowledge or expensive equipment. You can use it while gaming, making prank calls to random people, having fun with your buddies, or even altering your voice for professional purposes.

You can use a clownfish voice changer while gaming to change your voice. It can be fun, but it might help make your playing character more distinctive. You will need a robust and authoritative voice to sound like a Black Ops Unit Commander commander.
Features
- Clownfish Voice Changer can improve the quality and tone of your voice.
- You can modify your voice on various apps like Hangouts, Steam, Skype, ooVoo, Mumble, Ventrilo, Viber, Ekiga, TeamSpeak, Jitsi, Discord, etc.
- You can use different voice effects like Female pitch, Helium pitch, Radio, Robot, Custom pitch, Alien, Atari, Fast Mutation, Clone, Slow Mutation, Male pitch, Mutation, Silence, Baby pitch, etc.
- It supports various media formats and has better audio controls and playlist features for the music player.
- Clownfish Voice Changer has Virtual Studio Technology (VST) plugins.
Compatibility
Clownfish voice changer supports Windows Vista, 7, 8, 8.1, 10, and 11 operating systems.
Price
The clown voice changer is available for free.
Part 2: What’re the best alternatives for a clownfish voice changer?
If you are looking for the best alternatives to Clownfish voice changer, you can use the following apps:
Voxal
Voxal Voice Changer is a great and straightforward voice-changing application to record audio files and apply a variety of voice and sound effects in real time. Almost any software that uses a microphone, such as numerous games, Skype, TeamSpeak, etc., can use this to modify a user’s voice.
Voxal’s Voice Changer is the simplest method to alter your gender in speech chats, voice animations, fun team games with your pals, or make your unique voice modification effects.
All cutting-edge voice alteration tools, including basic audio editing, are accessible for a modest fee or a monthly membership.

Compatibility
Voxal is compatible with Windows 10, 8.1, 8, 7, XP, Vista (64-bit and 32-bit), and macOS 10.5 or above.
Price
During the 14-day trial period, a free version of Voxal is only accessible for non-commercial usage. You must pay $19.99 for a lifetime license if you want to keep using the program at home. The cost of the business license is $24.99. A quarterly subscription option is also available for $1.94 per month.
Voicemod
You should try Voicemod voice changer if you want a live voice changer app that can alter a user’s speech to sound like a robot, chipmunk, male, or female. With this app, you can prank friends and do real-time speech modification in live gaming and streaming. Voicemod has a vast library of pre-made voice filters that offers more than 90 voices. You can use it for PUBG, Fortnite, Discord, Grand Theft Auto, Zoom, Skye, ASMR, etc.

Compatibility
It supports Windows 10 and 11 (64-bit). Although the team is attempting to make this real-time voice changer more accessible, it is not intended for Xbox, macOS, or PS4.
Price
You download the Voicemod voice changer for free. Only pro users can access the full feature set and voice collection. Three subscription options are available: 3-month ($4.99), 1-year ($9.99), and lifetime ($19.99).
MorphVOX
MorphVOX voice changer is a practical real-time voice changer for PC. It alters the user’s original voice into many voices. Using the included sounds and effects, you can change your voice into that of a woman, man, child, and many more. It differs from other voice changers due to the extensive selection of preset voice libraries.

Compatibility
MorphVOX voice changer app supports Windows and Mac.
Price
You can test the features and functionality of this voice changer by downloading the free version. A $39.99 premium edition is advised if you want to unlock all valuable features.
UnicTool MagicVox
One of the most powerful real-time voice changers for PCs is UnicTool MagicVox. You can fake your voice to amuse friends and make gaming more enjoyable in real time, thanks to an extensive library of more than 200 voice effects. It has voice filters that use background noises to improve mood and atmosphere and make voice-changing results more dramatic.
It can work with many platforms, including Skype, Discord, Viber, and others that support live calls. The most fantastic feature is that it contains all the tools necessary to change voice in real-time, including voice customization, background sound, keybinding, etc.

Compatibility
MagicVox voice changer is compatible with Windows.
Price
You can download a free version of MagicVox or purchase a complete package at a reasonable cost of about $0.2 per day.
AV Voice Changer
An excellent substitute for Clownfish Voice Changer is AV Voice Changer. Using AV Voice Changer, you can adjust your voice’s pitch, speed, loudness, echo, etc. It can produce various effects, such as baby pitch, robot pitch, and helium pitch.
This voice changer has real-time pitch shifting that enables most effects, allowing you to alter your tone in the middle of a statement. There are more than a hundred built-in effects available. Using the built-in sound editor, you can also make your effect.

Compatibility
It is compatible with Windows Vista/7/8/8.1/10 (32-bit & 64-bit).
Price
You can purchase a full AV Voice Changer basic software license for $29.95.
MasqVox Voice Changer
MasqVox Voice Changer is one of the best real-time voice changers. It allows you to switch between voices when conversing on Skype. This app will enable you to change the pitch of someone else’s speech or audio.

Compatibility
It is compatible with Windows.
Price
You can use this voice changer for free.
Part 3: How to record and edit funny voice-changing videos?
If you are looking for the best app to record and edit funny voice-changing videos, then you should give Filmora 11 a try. Filmora is a powerful professional video and audio editing program for Windows and Mac computers. You can add a new audio track from the Audio Library, mute the audio, cut, copy, paste, or insert audio files using the built-in editing tools.

A variety of audio effects are available in the Filmora video editor. Choose a music track and audio effects from the audio library by clicking the Audio tab at the top of the screen. More than 50 free sound effects and soundtracks are available on Filmora. Choose where you want the audio to appear on the audio track by dragging and dropping the music from the audio library. After that, click the play button to see if the modifications were successful.
You can also add a voiceover anytime in the timeline by using the internal or external microphone on your computer to record one. With Filmora, you can adjust the audio speed by sliding the speed slider or typing a specific number.
Filmora screen recorder allows you to simultaneously record their screen and camera and the audio from their system and microphone. You can record games, tutorials, YouTube videos, etc., and export the videos to other devices, Vimeo and YouTube.
Free Download For Win 7 or later(64-bit)
Free Download For macOS 10.14 or later
Part 4: FAQs
Is Clownfish a good voice changer?
One of the most popular and well-known voice changers is Clownfish. It is excellent for people who want more from their voice changer than just altering sounds. Clownfish voice changer provides several features that are not offered by other apps.
Is Clownfish voice changer compatible with Chrome?
Yes, the clown fish voice changer is compatible with Chrome. Any Windows or Mac computer, as well as an Android or iOS device, can install a clown voice changer.
Is Clownfish voice changer free?
Clown fish voice changer is a 100% free tool. It doesn’t have any freemium constraints despite having a smaller selection of voice selections.
How To Make An Interactive Quiz Video? [Step-by-Step Guide]
Quiz videos are becoming popular on YouTube but creating good content takes work. You’ll have to spend time on it, find the right questions and spend resources on powerful video editing software. In this guide, we’ll show you what a quiz video is, its advantages, and how you can use Filmora to make interactive video quizzes.
So, what are you waiting for? Read on to learn how to create quiz videos for Youtube!
Part 1. What Is A Quiz Video?
A quiz video is a type of content that provides viewers with a series of questions that are typically about a particular topic or subject matter and may also provide additional information about the topic. You can use the video for various purposes, including educational, entertainment, and marketing.

To make an appealing video quiz, you have to look at it from various angles, such as its purpose, type, and relevancy.
Moreover, a well-made quiz video will demand the viewer’s attention and encourage them to take action without being intrusive or annoying. One of the best ways is to provide visual captions that can explain the point being made in an engaging, fast-paced, and entertaining way.
Part 2. What Are The Advantages Of A Quiz And How To Use It?
Quizzing is a great way to engage your audience and encourage them to interact with your content. They can be used to create thought-provoking content, impart knowledge, and improve learning outcomes.
When used correctly, a quiz can be a powerful learning tool. But how do you use it effectively? And what are some of the advantages?
To answer these questions, we’ve provided some advantages of creating video quizzes and some scenarios where you can use them.
Advantages
Here are some advantages of video quizzes:
Draw Attention
A quiz can draw the viewer’s attention to the topic under discussion. Specifically, if you are a teacher, you can use GK question videos in your classroom to emphasize the content you are teaching and can better assess your students’ knowledge.
Increase Interactivity
Quizzes are a great way to increase engagement and interaction with your audience. By incorporating video into your questions, you can add an element of excitement and increase the likelihood that people will want to participate.

A Good Way To Introduce A Topic
Quizzes are an excellent way to introduce a new topic or subject matter. They can help you provide context and background information to help people understand the concepts you’re trying to teach or introduce.
Increase One’s Impressions Of Your Content
By adding a quiz, you can increase the time that someone spends on your page or channel as they work to answer the questions. This is valuable because it allows you to introduce a new topic in a fun and interactive way, along with getting more impressions on your content.
Scene
Here are some scenes where you can use the quizzes:
Educational
You can use quizzes in any educational setting, such as a classroom, online course, or YouTube video, to provide knowledge to others and assess their understanding.
Speech
Quizzes can also be used in speeches to add interest and engagement. For instance, a motivational speaker can play a quiz during their talks to the audience to help them understand his point better and get their response.
Presentation
Adding a fun quiz to your presentation can help to break the monotony and keep your audience engaged throughout the session.
Social media
Quizzes can aid in generating engagement on your social media page. For example, you can use them to drive traffic to your website or blog or simply to get people talking about your brand.
Part 3. How To Make An Interactive Quiz Video In Filmora?
Suppose the above advantages have compelled you to create an interactive quiz video to engage your audience and get them involved in your content. In that case, you can use Filmora software which makes it easy to make quiz videos with its built-in interactive video editing tools.
Here’s how you can make an interactive quiz video using Filmora :
Free Download For Win 7 or later(64-bit)
Free Download For macOS 10.14 or later
Step1 Upload Your Materials
In the first step, it is essential that you complete in-depth research and find reliable information for your quiz video. Afterward, go to the Filmora website and download the software that is compatible with your system. Install the program on your PC/laptop and launch it.
On the homepage, select the “Create New Project” option, and choose “Click here to upload a media file” to upload your video. Alternatively, you can drag and drop the background video from your system to the Filmora interface.
Finally, drag and drop the background video into the timeline.

Step2 Make An Intro
Now, start by creating an introduction. You can do this by opening the “Media” tab, selecting a template, and dropping it in the timeline once it is downloaded.
Then, go to the “Titles” tab, choose a text style you like, and drop it in the timeline. Finally, align both the template and your video file.
To add text to your intro, click on the text track in the timeline. Enter the intro text, ideally the quiz topic, then customize the text color and style as desired. The Advanced option also lets you animate your text. Save the changes by clicking “OK.”
Step3 Add A Quiz To The Timeline
Next, add the GK questions and answers to your video using the “Titles” tab. You should adjust the display time and text on the timeline as needed.

Step4 Increase Interactivity In Your Quiz Video
To make your video more engaging, go to the “Transition” tab and add an interesting transition effect. You can also add effects or countdown elements between questions or reveal the answer.
Step5 Repeat The Process And Export Your Final Video
After completing the previous steps, you can now create the entire quiz video by repeating the above steps.
Once you are done, click the “Play” icon to preview your work, and select the “Export” icon to either save the clip to your device or upload it directly to your YouTube channel.
Conclusion
In this detailed guide, we’ve explored what a video quiz is, its advantages, and scenes where you can use them. We’ve also walked you through the step-by-step process of making an interactive video quiz using the Wondershare Filmora software.
Hopefully, you’ve enjoyed reading this article and can now create quiz videos for your presentation, classroom, or YouTube videos.
Free Download For macOS 10.14 or later
Step1 Upload Your Materials
In the first step, it is essential that you complete in-depth research and find reliable information for your quiz video. Afterward, go to the Filmora website and download the software that is compatible with your system. Install the program on your PC/laptop and launch it.
On the homepage, select the “Create New Project” option, and choose “Click here to upload a media file” to upload your video. Alternatively, you can drag and drop the background video from your system to the Filmora interface.
Finally, drag and drop the background video into the timeline.

Step2 Make An Intro
Now, start by creating an introduction. You can do this by opening the “Media” tab, selecting a template, and dropping it in the timeline once it is downloaded.
Then, go to the “Titles” tab, choose a text style you like, and drop it in the timeline. Finally, align both the template and your video file.
To add text to your intro, click on the text track in the timeline. Enter the intro text, ideally the quiz topic, then customize the text color and style as desired. The Advanced option also lets you animate your text. Save the changes by clicking “OK.”
Step3 Add A Quiz To The Timeline
Next, add the GK questions and answers to your video using the “Titles” tab. You should adjust the display time and text on the timeline as needed.

Step4 Increase Interactivity In Your Quiz Video
To make your video more engaging, go to the “Transition” tab and add an interesting transition effect. You can also add effects or countdown elements between questions or reveal the answer.
Step5 Repeat The Process And Export Your Final Video
After completing the previous steps, you can now create the entire quiz video by repeating the above steps.
Once you are done, click the “Play” icon to preview your work, and select the “Export” icon to either save the clip to your device or upload it directly to your YouTube channel.
Conclusion
In this detailed guide, we’ve explored what a video quiz is, its advantages, and scenes where you can use them. We’ve also walked you through the step-by-step process of making an interactive video quiz using the Wondershare Filmora software.
Hopefully, you’ve enjoyed reading this article and can now create quiz videos for your presentation, classroom, or YouTube videos.
TikTok Velocity Dance Tutorial| Filmora
Preparation
What you need to prepare:
- A computer (Windows or macOS)
- Your video materials.
- Filmora video editor
Step 1
First, download the Filmora Video Editor . Run it and click on “New Project”.
Step 2
Import the video and audio you want to use for your edit.

Step 3
Drag the Audio into the Timeline. Then, Drag your Video clip to Track 1 on the Timeline.

Step 4
Double-click on the Video clip, go to the Speed tab, and change the Speed value to “0.50”. Click on OK.

Step 5
Next, place the Playhead one frame before the first spike (beat) on the Audio clip. Here, split the Video clip. Click on the Video from the right, go to Speed and change it to “8”.

Step 6
Move the Playhead three frames forward → Split the video → click on the clip from the right → go to Speed → change it back to “0.50”. Do this same process as in Steps 5 and 6 to every Audio spike (beat) you see on the audio clip.
Step 7
That’s it! Render the video and you can watch the final preview. Congratulations on creating a TikTok velocity dance effect in Filmora.

Summary
What you’ve learned:
- How to create a unique velocity dance effect in Filmora
- How to edit video based on unique audio clips
- Edit the speed settings of a video clip in Filmora
What you need to prepare:
- A computer (Windows or macOS)
- Your video materials.
- Filmora video editor
Step 1
First, download the Filmora Video Editor . Run it and click on “New Project”.
Step 2
Import the video and audio you want to use for your edit.

Step 3
Drag the Audio into the Timeline. Then, Drag your Video clip to Track 1 on the Timeline.

Step 4
Double-click on the Video clip, go to the Speed tab, and change the Speed value to “0.50”. Click on OK.

Step 5
Next, place the Playhead one frame before the first spike (beat) on the Audio clip. Here, split the Video clip. Click on the Video from the right, go to Speed and change it to “8”.

Step 6
Move the Playhead three frames forward → Split the video → click on the clip from the right → go to Speed → change it back to “0.50”. Do this same process as in Steps 5 and 6 to every Audio spike (beat) you see on the audio clip.
Step 7
That’s it! Render the video and you can watch the final preview. Congratulations on creating a TikTok velocity dance effect in Filmora.

Summary
What you’ve learned:
- How to create a unique velocity dance effect in Filmora
- How to edit video based on unique audio clips
- Edit the speed settings of a video clip in Filmora
What you need to prepare:
- A computer (Windows or macOS)
- Your video materials.
- Filmora video editor
Step 1
First, download the Filmora Video Editor . Run it and click on “New Project”.
Step 2
Import the video and audio you want to use for your edit.

Step 3
Drag the Audio into the Timeline. Then, Drag your Video clip to Track 1 on the Timeline.

Step 4
Double-click on the Video clip, go to the Speed tab, and change the Speed value to “0.50”. Click on OK.

Step 5
Next, place the Playhead one frame before the first spike (beat) on the Audio clip. Here, split the Video clip. Click on the Video from the right, go to Speed and change it to “8”.

Step 6
Move the Playhead three frames forward → Split the video → click on the clip from the right → go to Speed → change it back to “0.50”. Do this same process as in Steps 5 and 6 to every Audio spike (beat) you see on the audio clip.
Step 7
That’s it! Render the video and you can watch the final preview. Congratulations on creating a TikTok velocity dance effect in Filmora.

Summary
What you’ve learned:
- How to create a unique velocity dance effect in Filmora
- How to edit video based on unique audio clips
- Edit the speed settings of a video clip in Filmora
What you need to prepare:
- A computer (Windows or macOS)
- Your video materials.
- Filmora video editor
Step 1
First, download the Filmora Video Editor . Run it and click on “New Project”.
Step 2
Import the video and audio you want to use for your edit.

Step 3
Drag the Audio into the Timeline. Then, Drag your Video clip to Track 1 on the Timeline.

Step 4
Double-click on the Video clip, go to the Speed tab, and change the Speed value to “0.50”. Click on OK.

Step 5
Next, place the Playhead one frame before the first spike (beat) on the Audio clip. Here, split the Video clip. Click on the Video from the right, go to Speed and change it to “8”.

Step 6
Move the Playhead three frames forward → Split the video → click on the clip from the right → go to Speed → change it back to “0.50”. Do this same process as in Steps 5 and 6 to every Audio spike (beat) you see on the audio clip.
Step 7
That’s it! Render the video and you can watch the final preview. Congratulations on creating a TikTok velocity dance effect in Filmora.

Summary
What you’ve learned:
- How to create a unique velocity dance effect in Filmora
- How to edit video based on unique audio clips
- Edit the speed settings of a video clip in Filmora
Also read:
- Updated How to Add Camera Shake to Video in Adobe After Effects for 2024
- Updated How to Create Text Animation for Videos for 2024
- New In 2024, The Actual Discussion Is Regarding the Splitting of the Video by Using the VSDC. Also, Recommendation of Using Wondershare Filmora as the Better Substitute in Place of VSDC
- How to Make Text Reveal Effect for Your Video
- 2024 Approved How to Polish Your Music Video Edits Using Filmora
- Updated Best 5 PDF to GIF Converters You Should Know for 2024
- Updated Are You Tired of Long Video Edits? Do You Speed up the Video in Canva without a Hassle? Well, Stick with Us as We Guide You Through the Process Step by Step
- New 2024 Approved How To Polish Your Music Video Edits Using Filmora
- New How to Make Discord GIF PFP
- Updated 2024 Approved Can You Enhance Your Drone Footage with Cinematic Drone LUTs? This Article Discusses Top Drone LUTs Recommendations to Simplify Video Editing
- Updated 2024 Approved The Most Complete Guide to Make Fortnite Montage
- New How to Create An Eye-Catching Intro Videos with InVideo
- Updated In 2024, Brighten a Video in Windows 10 Easily When Video Clips You Recorded on Your Windows 10 Computer or Those Downloaded From YouTube Are Too Dark or Too Bright, You Can Easily Adjust the Color Levels in a Few Clicks
- Updated 4 Ways to Loop a Video on Vimeo for 2024
- What Is the Best MP4 Cutter for YouTuber on Mac?
- Whatever the Reason You Want to Convert an Mp4 to GIF Online, There Are a Number of Ways to Do It. Use This Guide to Learn the Best Methods. Read More Here for 2024
- New 2024 Approved Top 10 Online And PC Cartoon Video Maker 2022 For Beginner
- Updated 2024 Approved This Article Will Help You Understand How to Create Flying Objects Using Editing Tools Such as Wondershare Filmora
- New Are You Looking for Ideas for Funny YouTube Videos? Your Search Is Over. Read the Article Below and Get the Most Information Regarding Funny Videos. You Will Also Get to Know About the Best Funny Video Background Music
- A Review of Efectum App Making Slow Motion Video
- New What Is an Eye Zoom Transition Effect? Its a Close-Up Video Effect Allowing Viewers to Transit to the Next Clip From the Eye
- In 2024, How Does the YouTube AI Algorithm Work
- New How to Select and Use The Best BRAW LUTs
- Updated How to Customize Your Loading Text Effect, In 2024
- New Best Text Animations In After Effects for 2024
- How To Change Font In Premiere Pro for 2024
- This Article Will Address Your Questions About the Easiest Way to Turn a Blog Into a Podcast. Lets Begin with the Reasons Why You Should Do a Podcast for 2024
- Updated Everything About Adding Effects In Kinemaster
- Updated How to Be a YouTube Vlogger
- Updated How to Make Audio Visualizer in Filmora Easy
- Updated Create Your Own Subscribe Channel Graphics
- Updated Explore Our Comprehensive Guide to the 10 Best Cameras . Unlock the World of Advanced Technology Perfect for Capturing Slow-Motion Footage in Various Scenarios for 2024
- New In 2024, Top 10 Audio Visualizers Windows, Mac, Android, iPhone & Online
- New 2024 Approved Keyframes Interval Everything You Need To Know
- 2024 Approved Looking for a Free Video Editor to Edit Videos on Mac? IMovie by Apple Is a Great Choice? But Is It the Best Video Editor or Is There a Better Alternative Available? Check Out Our iMovie Review
- New If You Are Experiencing a Color Distortion in Your Video, You Are in the Right Place. We Have Provided a Detailed Guide with Three Methods that Will Help You Correct This Issue for 2024
- In 2024, Guide Adopting Lumetri Color Presets in Effective Color Grading
- New If You Are a Free Video Editor Being a Windows User, VSDC Free Video Editor Is a Great Choice. But Is It the Best Video Editor You Should Use? Find Out From Our VSDC Free Video Editor Review for 2024
- Updated How to Merge Videos in HandBrake? Expectation Vs. Reality
- In 2024, How to Turn On/Off Motion Blur in Fortnite? Is It Good for Fortnite?
- Add Subtitles To Videos With Kapwing Step by Step
- Updated In 2024, Learn How Video Montages Were Used over Film History with Examples and the Types of Videos for Shorter Montages. Plus, Learn About the Best Software for It
- Every Compositor Should Know The Tips of Color Match in After Effects
- Updated How to Create Discord Logo GIF for 2024
- A Step-by-Step Guide on Using ADB and Fastboot to Remove FRP Lock from your Nokia G42 5G
- How to Detect and Stop mSpy from Spying on Your Nokia 105 Classic | Dr.fone
- Play Store Stuck on Downloading Of Realme C55? 7 Ways to Resolve | Dr.fone
- In 2024, The Best iSpoofer Alternative to Try On Tecno Spark 10C | Dr.fone
- In 2024, Top 11 Free Apps to Check IMEI on Apple iPhone 8
- 3uTools Virtual Location Not Working On Itel A05s? Fix Now | Dr.fone
- In 2024, How to Change/Add Location Filters on Snapchat For your Realme 11 5G | Dr.fone
- How to Update Apple iPhone 14 without iTunes? | Dr.fone
- In 2024, Tutorial to Change Asus ROG Phone 7 Ultimate IMEI without Root A Comprehensive Guide
- How to Fix Life360 Shows Wrong Location On Realme C67 4G? | Dr.fone
- In 2024, Here Are Some Reliable Ways to Get Pokemon Go Friend Codes For Vivo Y02T | Dr.fone
- How to Reset Apple iPhone 12 Pro to Factory Settings? | Dr.fone
- How To Bypass iCloud By Checkra1n Even On Apple iPhone 11 Pro If Youve Tried Everything
- How to fix videos not playing with my Huawei Enjoy 70?
- How Nokia C210 Mirror Screen to PC? | Dr.fone
- How To Get Out of Recovery or DFU Mode on iPhone XS? | Dr.fone
- In 2024, How To Remove iCloud On iPhone 14 Plus Smoothly
- Bypassing Google Account With vnROM Bypass For Tecno Spark 20 Pro
- Title: New In 2024, Steps to Denoise in Final Cut Pro – Reduce Video and Audio Noise
- Author: Morgan
- Created at : 2024-06-24 01:30:28
- Updated at : 2024-06-25 01:30:28
- Link: https://ai-video-editing.techidaily.com/new-in-2024-steps-to-denoise-in-final-cut-pro-reduce-video-and-audio-noise/
- License: This work is licensed under CC BY-NC-SA 4.0.

