
New In 2024, Use Path Blur In Photoshop To Create Motion Effect

Use Path Blur In Photoshop To Create Motion Effect
There are different kinds of blur effects that redefine the movement and intensity of an image. By applying a suitable blur effect, you can increase the visual appeal of your still photo by emphasizing a certain motion. Path blur is one of the trending motion blur effects that people use to enhance their photos instantly. Through this article, you can learn how to use path blur in Photoshop conveniently.
Part 1: What is Path Blur and How Does It Work?
Path blur is a kind of motion blur that highlights a motion and speed in a certain direction. It helps to create a sense of movement by adjusting the blur intensity and central point. If you want to display a stimulating motion in an image, path blur can assist you in this regard.
Path blur works by adjusting two variables: Speed and Taper. By adjusting the speed slider, you can specify the amount of path blur. In addition to speed, you can adjust the taper value accordingly to determine the blur trail.

This effect can instantly add new dimensions to your captured photo. For instance, if you have captured a photo of a racing car, you can add a path blur effect to give a sense of speed to it. You can easily find this special effect in Adobe Photoshop. By using the selection tools, you can effectively add a path blur effect to your image in the selected area. To know more about path blur in Photoshop, continue reading this article.
Part 2: How to Use Path Blur in Photoshop?
Photoshop is undoubtedly the most commonly used tool to edit pictures with great configuration options. After uploading the image, you can quickly transform it by adding new effects, filters, and layers. You can retouch your photography efficiently through this tool by increasing the quality of pictures. Moreover, the clean user interface of Photoshop allows you to utilize the advanced functions without any interruptions.
Are you ready to use Photoshop path blur? Read this part of the article to find out two interesting ways to create a path blur effect in the images.
Add Dynamic Effect to Your Static Images
Step1 Open Photoshop and import the desired picture. Once done, go to the “Layers” section and copy the background layer. For this, press “Ctrl + J” in Windows and “Command + J” for MacBook.

Step2 Now proceed to the “Filter” section and locate the option “Blur Gallery”. From there, choose the “Path Blur” option. Now you would be able to see an arrow on your screen. Using this arrow, you can specify the path blur motion. Drag and close the arrow where you want to show the speed. Also, set a higher value for the speed given on the right side. Once done, hit the “OK” button.

Create a Long Exposure Picture
Step1 Navigate to the Adobe Photoshop tool and begin by uploading a picture. Afterward, go to the “Filter” tab and select “Convert for Small Filters.”

Step2 Now go to the “Filter” tab again and choose the “Blur Gallery” option. From there, select the “Path Blur” option. Now adjust the displayed arrow in a particular direction to decide the starting and endpoint of the path blur. Moreover, modify the “Speed” slider according to your choice.

Step3 After dragging the arrow in a particular direction, a blue dot will appear at the center. Press the “Delete” button to eliminate that point. Now select the endpoint of the arrow and change its blur shape.

Step4 Utilize the noise section to add a grainy effect in the blurred area. Once done, click on the “OK” button. Now select the masking tool to select the area in your picture. Afterward, choose the “Smart Mask” filter and then navigate to the “Fill” option given in the “Edit” section.

Step5 In the fill menu, choose the color “Black.” Now go to the “Select” section and click “Deselect.” To soften the whole look, you can go to the “Properties” panel and adjust the “Feather” properties.

Step6 Now add the first layer and choose the option “Convert for Smart Filters.” Again, go to the “Filter” section, select “Blur Gallery,” and uncheck the option called “Edit Blur Screen.”

Step7 Now increase the length of the arrow and press “Ctrl + Click” for Windows or “Command + Click” for Mac to reposition the path. You can also add a curve to the arrow. Enhance the speed from the right panel and uncheck the option of “Center Blur.” You can increase the taper value to make the blur gradually trail off. Add a grainy filter for more enhancements.

Bonus Tips – The Alternative to Photoshop to Create Motion Blur Effect
Many users find the interface of Adobe Photoshop intimidating or challenging to operate. If you want an alternative to Photoshop, the best choice you can make is to use Wondershare Filmora . For beginners, this tool adds built-in presets that are professionally made.
Free Download For Win 7 or later(64-bit)
Free Download For macOS 10.14 or later
It offers more than 900 effects that you can use to add new dimensions to your photos and videos. Moreover, it provides fast processing speed for photo and video editing to help you achieve your goals conveniently.
Steps to Produce Motion Blur Effect in Filmora
If you are a beginner and want to create a motion blur effect, then use the steps mentioned below:
Step1 Add the Image to Timeline
After launching Filmora, select “Create New Project” and import the desired picture. After dragging it to the timeline, you have to split it to proceed.

Step2 Choose the Background Blur
To split, choose the starting and ending point in the clip where you want to add the motion blur effect. Once done, go to the “Effects” tab and search for the “Background Blur” effect section. Pick and apply the desired blur filter to the split section of the video.

Step3 Apply the Transition
Once you have added the motion blur effect, you can check the results from the preview window. You can also apply the “Dissolve” transition from the “Transitions” tab to generate a smooth result.

Conclusion
If you want to display a sense of speed and movement in the picture, you can add a path blur effect. It’s one of the types of motion blur effects that many people use in their pictures to add a dynamic element. By reading this article, you have learned how to add path blur in Photoshop through simple means. Moreover, you can also explore the tool Filmora to create a motion blur effect in the photos effortlessly.
Free Download For macOS 10.14 or later
It offers more than 900 effects that you can use to add new dimensions to your photos and videos. Moreover, it provides fast processing speed for photo and video editing to help you achieve your goals conveniently.
Steps to Produce Motion Blur Effect in Filmora
If you are a beginner and want to create a motion blur effect, then use the steps mentioned below:
Step1 Add the Image to Timeline
After launching Filmora, select “Create New Project” and import the desired picture. After dragging it to the timeline, you have to split it to proceed.

Step2 Choose the Background Blur
To split, choose the starting and ending point in the clip where you want to add the motion blur effect. Once done, go to the “Effects” tab and search for the “Background Blur” effect section. Pick and apply the desired blur filter to the split section of the video.

Step3 Apply the Transition
Once you have added the motion blur effect, you can check the results from the preview window. You can also apply the “Dissolve” transition from the “Transitions” tab to generate a smooth result.

Conclusion
If you want to display a sense of speed and movement in the picture, you can add a path blur effect. It’s one of the types of motion blur effects that many people use in their pictures to add a dynamic element. By reading this article, you have learned how to add path blur in Photoshop through simple means. Moreover, you can also explore the tool Filmora to create a motion blur effect in the photos effortlessly.
Learn How to Extract Sound From Video Using the Different Online and Software Tools. Details About Their Features, Pros/Cons, and More Are Given
It often happens that we get so engrossed in a movie or video and fall exceptionally hard for all elements. This can prompt us to extract sounds from videos, like the background music, a voiceover, or dialogue between characters.
Safe sound extraction from any type of video file will require the help of the best sound extractor software. Wondering about which you should try out? Go through this list, and then make up your mind.
- Adobe Premiere Pro
- Filmora
- iMovie
- VLC
- Online Audio Converter
- Audio Converter
- FFmpeg
- QuickTime
- Audio Extractor
- ASPOSE
- Practical Tips to Choose the Best One to Extract Sound from Videos
- Hot FAQs on Extract Sound from Videos
Top 10 Sound Extractors for Extracting Sound from video
We researched and found many software options for extracting Sound from video. After careful checking, we found 10 options with high-quality functions and performance levels. We recommend you consider them for pulling audio from video files- here’s why.
1. Adobe Premiere Pro
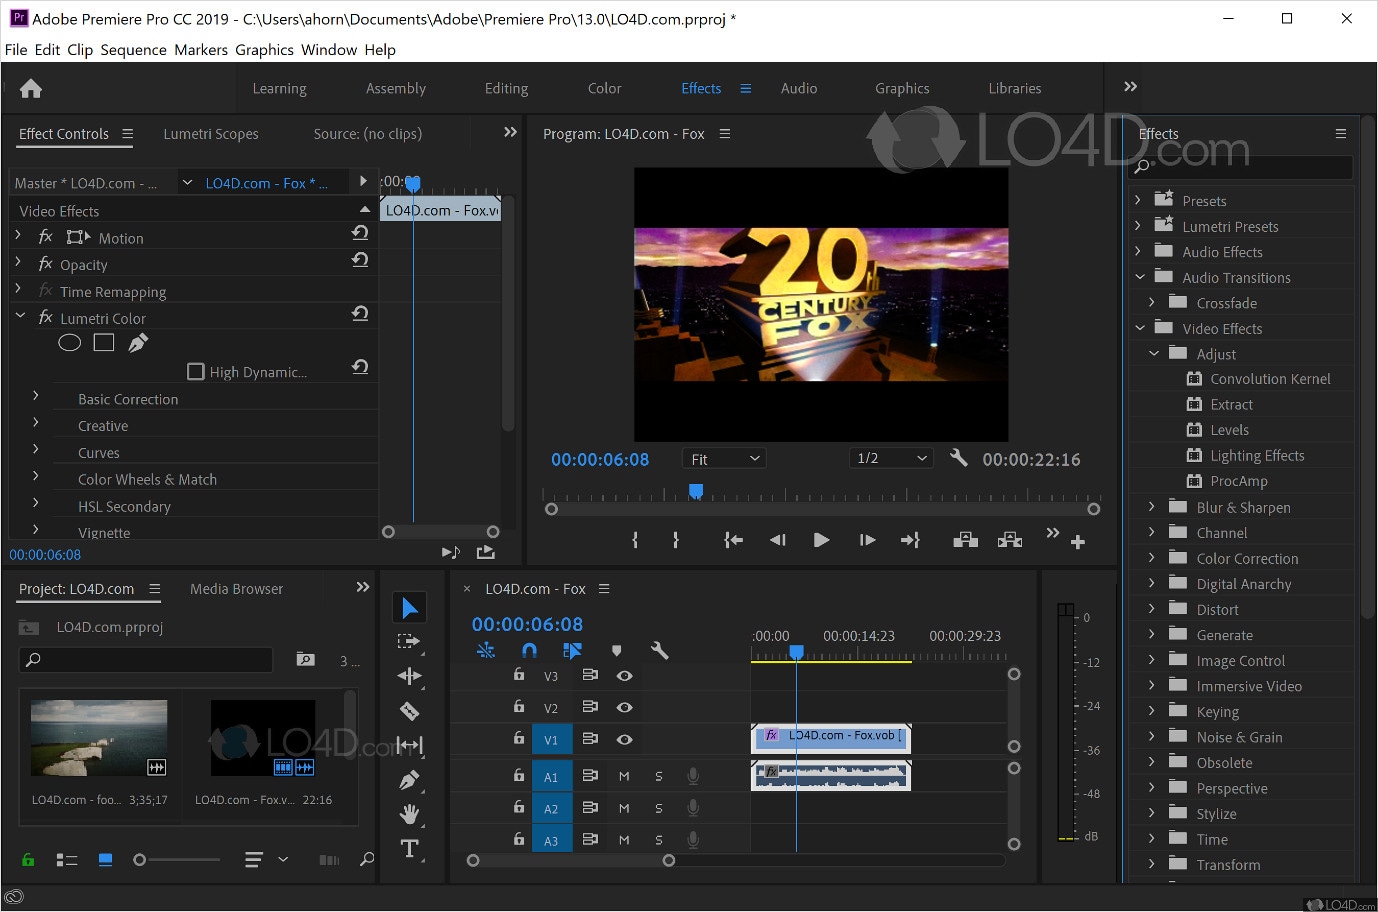
Adobe Premiere Pro is one of the top-level video editors available with various functions and pre-set filters/effects. So, one can customize the videos and audio as they require, like extracting Sound from video and saving them.
How to Download: Website
Compatible OS: Windows, Mac
Price: Individuals- USD 20.99/month. License for Teams- USD 35.99. All Apps-related plans.
Main Features:
- Pre-set templates are available in high-quality resolutions.
- Customize your titles and video edits.
- Automatically adjusts color matching in scenes.
- Robust text-to-speech function with multi-language support.
Pros
- Share easily across the platform with cloud support.
- Access to diverse stock media with Adobe membership.
- Supports many file formats like / (), MPEG-2, Apple ProRes, MPEG-4, native camera formats, etc.
Cons
- No perpetual license support.
- Strict eligibility rules to qualify for student-teacher plans.
Best for Users: Professionals and organization-based users, like teachers, can use this for personal and teaching-related video editing steps.
2. Filmora
If you want a software sound extractor that provides a wide range of audio editing functions, Filmora is one that we would recommend. While it is firstly a video editor, you can use audio-based editing functions like sound stabilization, extraction, visualization, audio ducking, silence detection, and more.

Free Download For Win 7 or later(64-bit)
Free Download For macOS 10.14 or later
Compatible OS: Windows, Mac
Price: Free, Annual- USD 49.99, Perpetual- USD 89.99
Main Features:
- The audio visualization feature analyzes and virtually shows beats.
- Detect silent sections in the video and remove them.
- Many audio stabilization settings like Denoise and Equalizer.
- Vital TTS/STT functions for voiceovers.
Pros
- Multiple video/audio formats are supported.
- Pre-set sound effects are present.
- Adjust the volume of videos during editing.
Cons
- Upgrade plan to remove ads.
- Audio output is mainly available in MP3.
How to use for extracting music from videos:
Step1 Download and install Filmora 11 .
Step2 Click on New Project.
Step3 Press “Click here to import Media” > choose file folder > Insert.
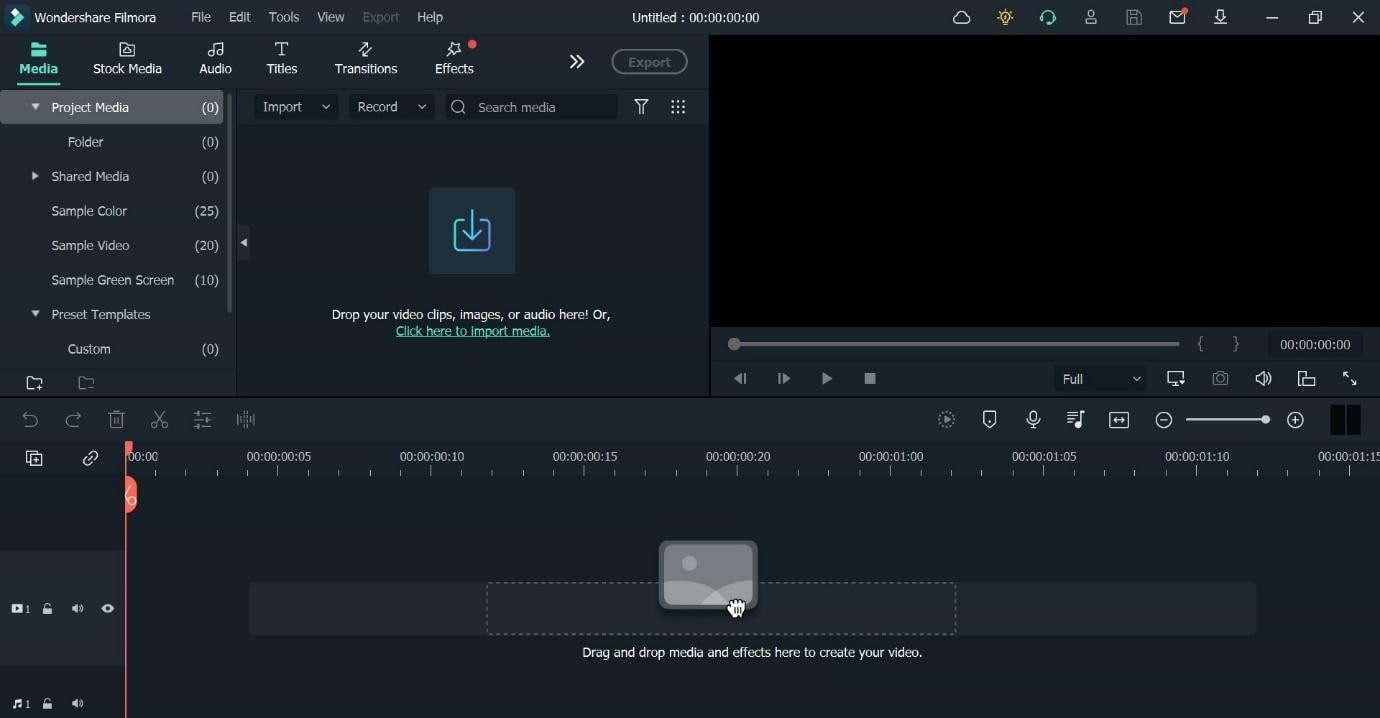
Step4 Drag file to editor timeline > Cut the file to a set suitable size for your audio extraction.
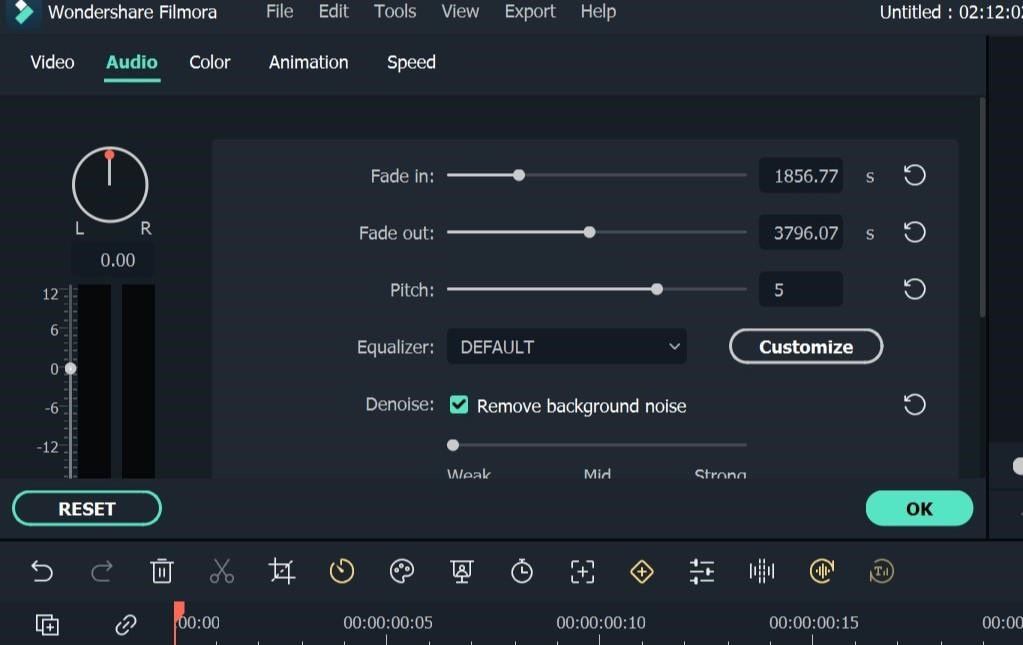
Step5 Click on the Edit icon from the list of icons above the timeline.
Step6 Press on Audio > Make adjustments for settings like Fade in/Face out, Equalizer, Pitch, etc.
Step7 Click Export > Local > MP3. Make changes as needed.
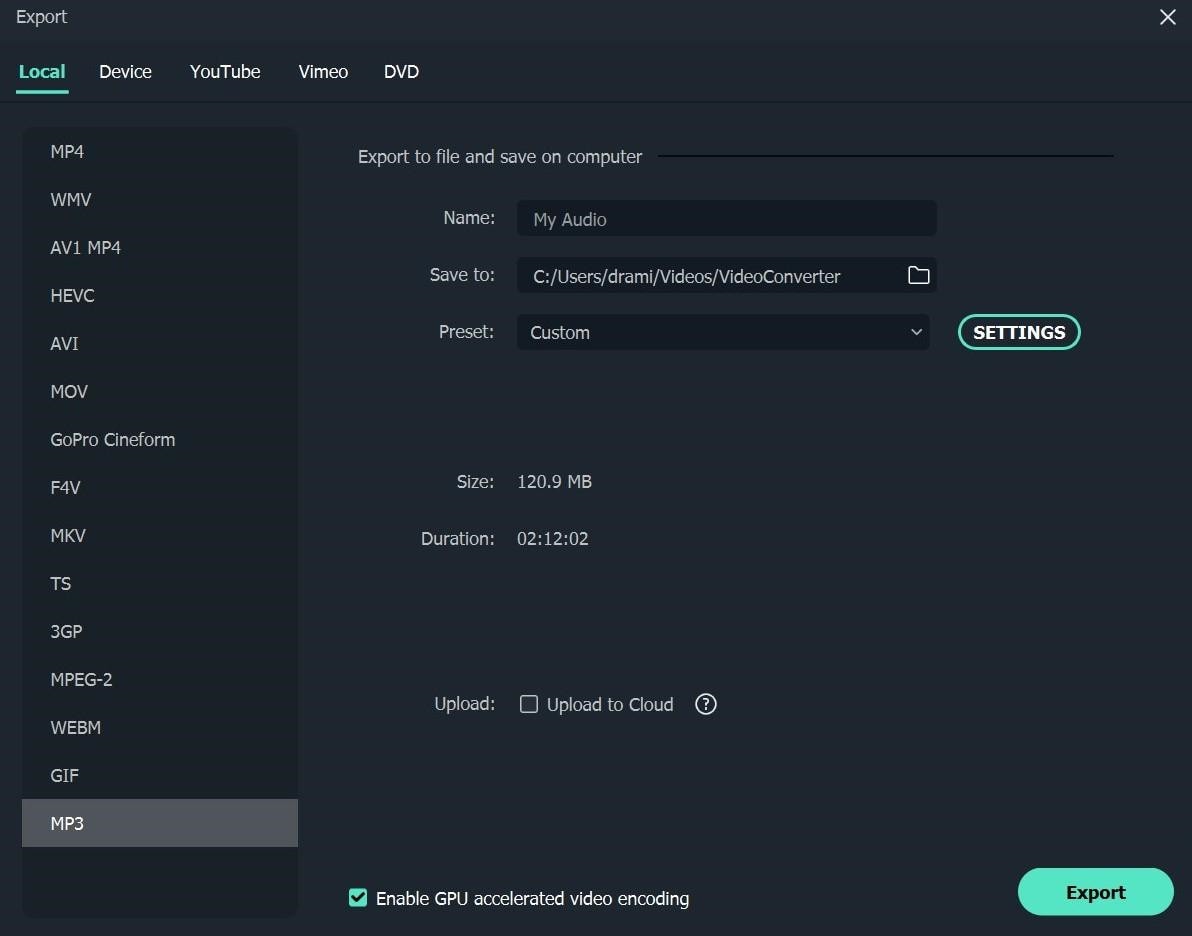
Step8 Hit the Export button.
Best for Users: Pro-level and beginner-level professionals and home-based users who want a comprehensive, feature-rich platform for video/audio editing can benefit from this.
3. iMovie
Mac and iOS users benefit significantly from this video editing software to create dynamic movie-quality videos. One major part of movies is the soundtrack, and you can use this software to add easily, control, and extract the sound clips.
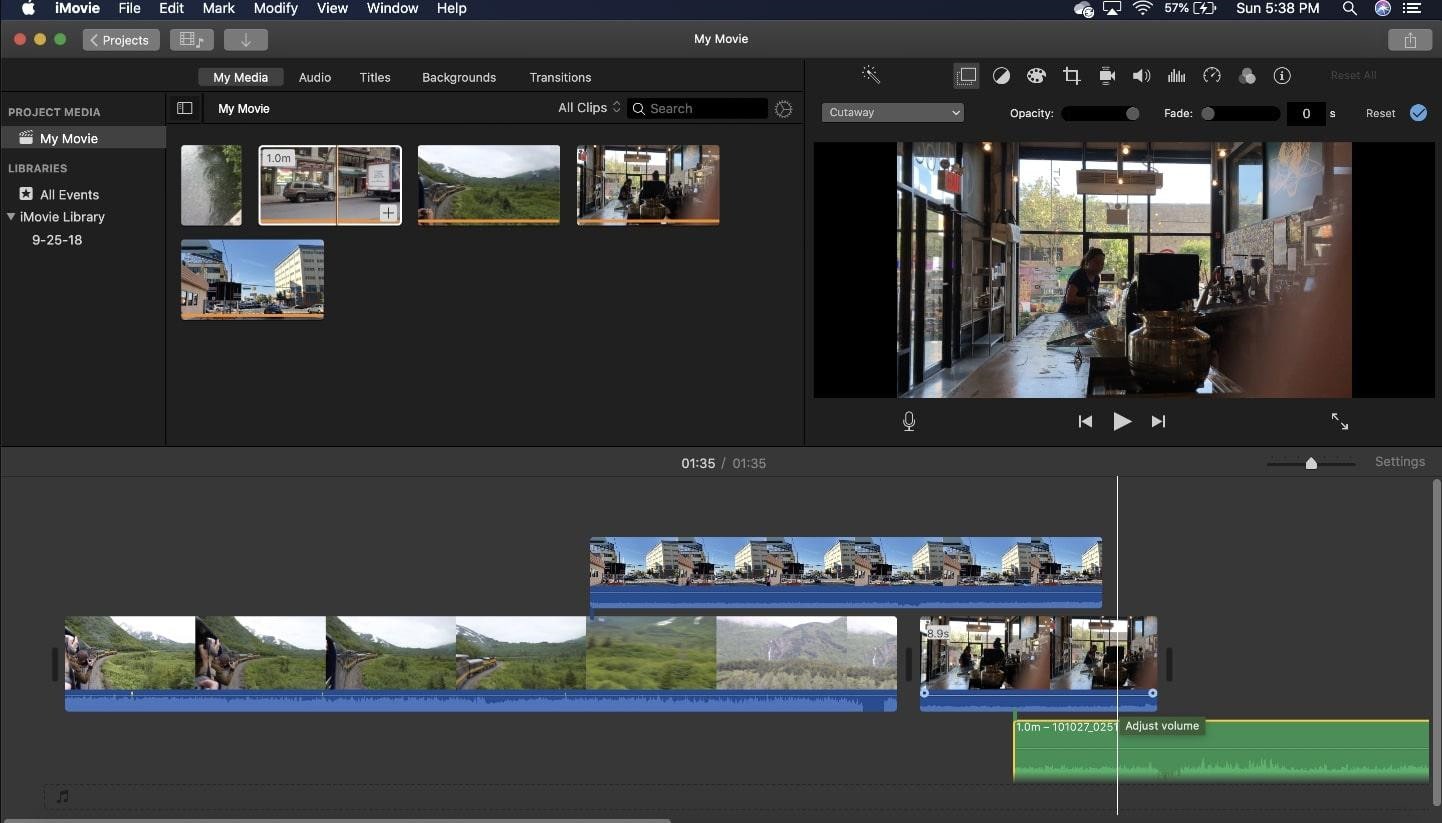
How to Download: Mac App Store , Apple App Store
Compatible OS: Mac, iOS
Price: Free
Main Features:
- Pre-set storyboard available for optimized and thematic video edits.
- Royalty-free audio files in the library.
- You can add voiceovers.
- Add pre-set sound effects or customize them, like removing/adding audio clips.
Pros
- Sound aligns precisely with video.
- Multiple effects, filters, and editing tools are available.
- Simple sharing via social media accounts.
Cons
- Only available for iOS 15.1+ and such newest versions of Apple devices.
- You cannot access it without an Apple ID.
Best for Users: Professional video editors with diverse movie-like presentation-making needs can use this.
4. VLC
VLC is a well-known Windows-based media player that is accessible as a Chrome extension and has mobile app versions. While you can use it mainly to view videos, the software can easily cut out sound clips from the video here.

How to Download: Microsoft Store , Apple App Store , Google Play Store , Chrome Web Store
Compatible OS: Windows, iOS, Chromebook, Android
Price: Free
Main Features:
- Script the command line VLC-based invocations.
- Play different types of files with multi-format support.
- Use the in-built equalizer to optimize sound quality/effects.
- Sync with or create a new video stream.
Pros
- The software assures quick functions with all features.
- No codec installation is necessary.
- Keyboard shortcuts for specific actions.
Cons
- Difficult to search and open files.
- Not very customizable.
Best for Users: People can use VLC Media Player to stream or play videos and even make some minor adjustments/extraction.
5. Online Audio Converter
This is one of the more straightforward tools to add video files and extract Sound from video with some quick steps. The Online Audio Converter supports a wide range of video formats. You just have to add one file by dragging and dropping it from your device memory, inserting its URL, or uploading it via the cloud. Then, press the Start Extracting command.
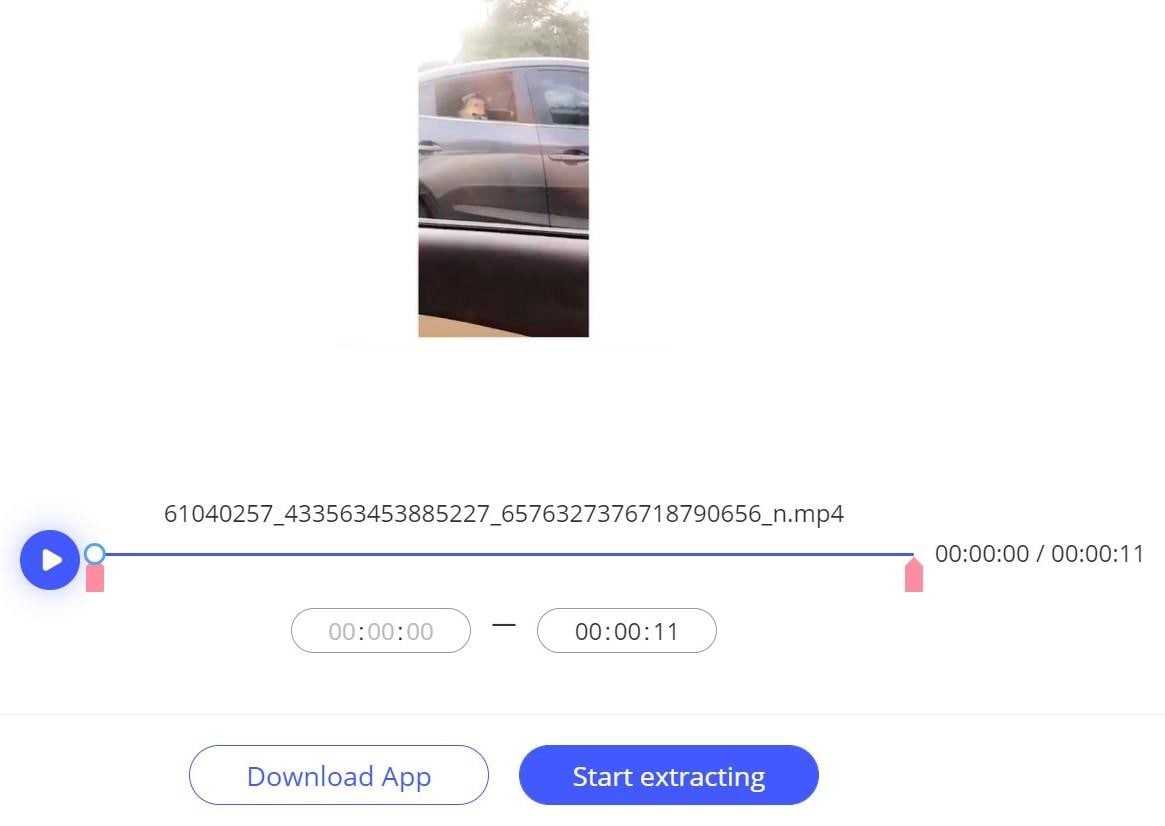
How to Download: Website
Compatible OS: Windows, Mac, Online
Price: Monthly- USD 29.95, Annual- USD 39.95, Lifetime- USD 59.95
Main Features:
- Add files either directly through the device or the cloud.
- Insert video URL for audio extraction from online video.
- Supports multiple video file formats like MPEG, MOV, AVI, and MP4.
- Scroll to select extraction end and start points.
Pros
- Only allows videos with 500MB or smaller size.
- Straightforward three steps for the whole extraction process.
- Zero quality loss after an extraction.
Cons
- Customization options are limited.
- The main audio format supported is MP3 for extraction.
Best for Users: Beginners and pro-level users who want to extract Sound from video files quickly.
6. Audio Converter
The Audio Converter app can efficiently pull out audio clips from video and is compatible with many such media formats. You can use this to cut and trim your file, mainly to decide how much of the audio will extract. Then, play it to see the quality of the output file.

How to Download: Apple App Store
Compatible OS: iOS
Price: Free, Pro- USD 2.99.
Main Features:
- Extract sound from video in formats like M4A, MP3, OGG, M4R, FLAC, etc.
- Insert videos in formats like MP4, 3G2, 3GP, MOV, MKV, WMV, and more.
- Trim the audio to smaller sections for extraction.
- The media player version supports all audio/video types.
Pros
- Supports a wide variety of audio/video formats.
- A simple media player function is also available.
- It is compatible with many languages.
Cons
- App size of 143.1 MB can feel high to some users.
- Basic-level functions only.
Best for Users: People who want to extract Sound from video files to create ringtones can use this best.
7. FFmpeg
FFmpeg is one of the most trustworthy platforms for converting and extracting Sound from video. It is an open-source solution and comes with complete multi-media management work. This is mainly used for easily streaming, converting, and recording video/audio projects.
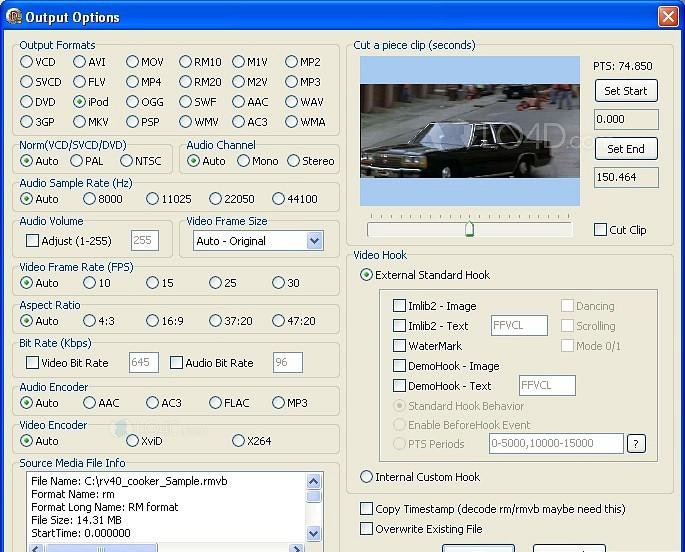
How to Download: Website
Compatible OS: Windows, Mac, etc.
Price: Free
Main Features:
- Audio filters are available, like virtualbass and tiltshelf.
- Video editing filters like colormap, blurdetect, and pixelize are available.
- Enhance dialog and extract sound clips.
- Constantly updating features.
Pros
- This has open-source benefits.
- No excessive installation steps are necessary.
- Supports a wide range of encoding benefits.
Cons
- One must have some sort of technical knowledge to use this.
- Finding the right features or solutions takes some time.
Best for Users: Developers with better technical knowledge can use this dynamic open-source platform for video/audio editing.
8. QuickTime
You can also use this Mac-based video player on Windows to watch different videos easily. Besides the streaming benefits, you can install plugins to optimize its available features, like adding the ability to record/edit video files.

How to Download: Website
Compatible OS: Mac, Windows
Price: Free
Main Features:
- Stream videos and even extract Sound from the files.
- Supports many video formats in the player.
- Record audio on this media player.
- Import files from other Mac products like Final Cut Pro and iMovie.
Pros
- Works on both Windows and Mac.
- Pre-set effects and filters are available that one can edit.
- Simple interface for beginners.
Cons
- Unnecessary bloatware installation is needed.
- Playback support is lacking.
Best for Users: New users can simply operate this media player to watch videos and learn the extraction process.
9. Audio Extractor
You can use this conversion and extraction software to do many editing functions, like changing, cutting, and extracting video/audio files. The supported format here is MP3 and WAV - choose which you find compatible with your final project. You can decide and extract from specific sections.
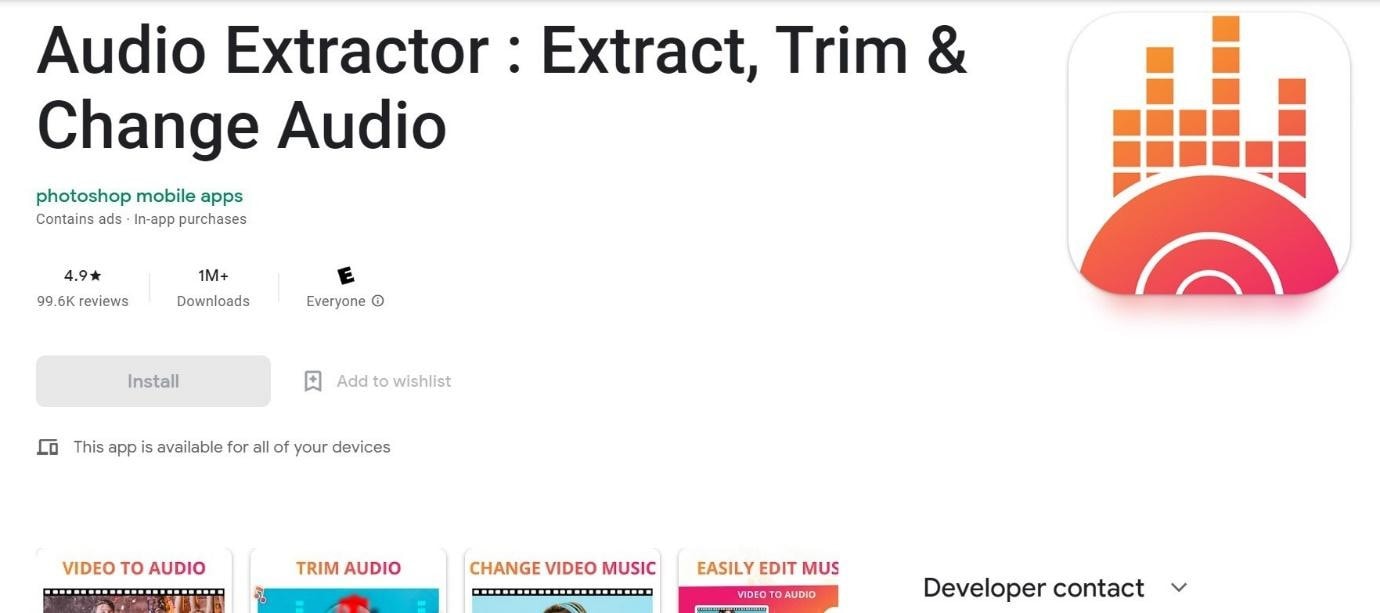
How to Download: Google Play Store
Compatible OS: Android
Price: Free with in-app purchases of USD 1.99- USD 6.99 for each item.
Main Features:
- Change audio file size and format.
- View/delete components through the app directly.
- Preview video/sound file.
- Trim/extract sounds from videos easily with the converter.
Pros <path d=”M7 22H4C3.46957 22 2.96086 21.7893 2.58579 21.4142C2.21071 21.0391 2 20.5304 2 20V13C2 12.4696 2.21071 11.9609 2.58579 11.5858C2.96086 11.2107 3.46957 11 4 11H7M14 9V5C14 4.20435
Top 10 Sound Extractors for Extracting Sound from video
We researched and found many software options for extracting Sound from video. After careful checking, we found 10 options with high-quality functions and performance levels. We recommend you consider them for pulling audio from video files- here’s why.
1. Adobe Premiere Pro
Adobe Premiere Pro is one of the top-level video editors available with various functions and pre-set filters/effects. So, one can customize the videos and audio as they require, like extracting Sound from video and saving them.

How to Download: Website
Compatible OS: Windows, Mac
Price: Individuals- USD 20.99/month. License for Teams- USD 35.99. All Apps-related plans.
Main Features:
- Pre-set templates are available in high-quality resolutions.
- Customize your titles and video edits.
- Automatically adjusts color matching in scenes.
- Robust text-to-speech function with multi-language support.
Pros
- Share easily across the platform with cloud support.
- Access to diverse stock media with Adobe membership.
- Supports many file formats like / (), MPEG-2, Apple ProRes, MPEG-4, native camera formats, etc.
Cons
- No perpetual license support.
- Strict eligibility rules to qualify for student-teacher plans.
Best for Users: Professionals and organization-based users, like teachers, can use this for personal and teaching-related video editing steps.
2. Filmora
If you want a software sound extractor that provides a wide range of audio editing functions, Filmora is one that we would recommend. While it is firstly a video editor, you can use audio-based editing functions like sound stabilization, extraction, visualization, audio ducking, silence detection, and more.

Free Download For Win 7 or later(64-bit)
Free Download For macOS 10.14 or later
Compatible OS: Windows, Mac
Price: Free, Annual- USD 49.99, Perpetual- USD 89.99
Main Features:
- The audio visualization feature analyzes and virtually shows beats.
- Detect silent sections in the video and remove them.
- Many audio stabilization settings like Denoise and Equalizer.
- Vital TTS/STT functions for voiceovers.
Pros
- Multiple video/audio formats are supported.
- Pre-set sound effects are present.
- Adjust the volume of videos during editing.
Cons
- Upgrade plan to remove ads.
- Audio output is mainly available in MP3.
How to use for extracting music from videos:
Step1 Download and install Filmora 11 .
Step2 Click on New Project.
Step3 Press “Click here to import Media” > choose file folder > Insert.

Step4 Drag file to editor timeline > Cut the file to a set suitable size for your audio extraction.
Step5 Click on the Edit icon from the list of icons above the timeline.
Step6 Press on Audio > Make adjustments for settings like Fade in/Face out, Equalizer, Pitch, etc.

Step7 Click Export > Local > MP3. Make changes as needed.

Step8 Hit the Export button.
Best for Users: Pro-level and beginner-level professionals and home-based users who want a comprehensive, feature-rich platform for video/audio editing can benefit from this.
3. iMovie
Mac and iOS users benefit significantly from this video editing software to create dynamic movie-quality videos. One major part of movies is the soundtrack, and you can use this software to add easily, control, and extract the sound clips.

How to Download: Mac App Store , Apple App Store
Compatible OS: Mac, iOS
Price: Free
Main Features:
- Pre-set storyboard available for optimized and thematic video edits.
- Royalty-free audio files in the library.
- You can add voiceovers.
- Add pre-set sound effects or customize them, like removing/adding audio clips.
Pros
- Sound aligns precisely with video.
- Multiple effects, filters, and editing tools are available.
- Simple sharing via social media accounts.
Cons
- Only available for iOS 15.1+ and such newest versions of Apple devices.
- You cannot access it without an Apple ID.
Best for Users: Professional video editors with diverse movie-like presentation-making needs can use this.
4. VLC
VLC is a well-known Windows-based media player that is accessible as a Chrome extension and has mobile app versions. While you can use it mainly to view videos, the software can easily cut out sound clips from the video here.

How to Download: Microsoft Store , Apple App Store , Google Play Store , Chrome Web Store
Compatible OS: Windows, iOS, Chromebook, Android
Price: Free
Main Features:
- Script the command line VLC-based invocations.
- Play different types of files with multi-format support.
- Use the in-built equalizer to optimize sound quality/effects.
- Sync with or create a new video stream.
Pros
- The software assures quick functions with all features.
- No codec installation is necessary.
- Keyboard shortcuts for specific actions.
Cons
- Difficult to search and open files.
- Not very customizable.
Best for Users: People can use VLC Media Player to stream or play videos and even make some minor adjustments/extraction.
5. Online Audio Converter
This is one of the more straightforward tools to add video files and extract Sound from video with some quick steps. The Online Audio Converter supports a wide range of video formats. You just have to add one file by dragging and dropping it from your device memory, inserting its URL, or uploading it via the cloud. Then, press the Start Extracting command.

How to Download: Website
Compatible OS: Windows, Mac, Online
Price: Monthly- USD 29.95, Annual- USD 39.95, Lifetime- USD 59.95
Main Features:
- Add files either directly through the device or the cloud.
- Insert video URL for audio extraction from online video.
- Supports multiple video file formats like MPEG, MOV, AVI, and MP4.
- Scroll to select extraction end and start points.
Pros
- Only allows videos with 500MB or smaller size.
- Straightforward three steps for the whole extraction process.
- Zero quality loss after an extraction.
Cons
- Customization options are limited.
- The main audio format supported is MP3 for extraction.
Best for Users: Beginners and pro-level users who want to extract Sound from video files quickly.
6. Audio Converter
The Audio Converter app can efficiently pull out audio clips from video and is compatible with many such media formats. You can use this to cut and trim your file, mainly to decide how much of the audio will extract. Then, play it to see the quality of the output file.

How to Download: Apple App Store
Compatible OS: iOS
Price: Free, Pro- USD 2.99.
Main Features:
- Extract sound from video in formats like M4A, MP3, OGG, M4R, FLAC, etc.
- Insert videos in formats like MP4, 3G2, 3GP, MOV, MKV, WMV, and more.
- Trim the audio to smaller sections for extraction.
- The media player version supports all audio/video types.
Pros
- Supports a wide variety of audio/video formats.
- A simple media player function is also available.
- It is compatible with many languages.
Cons
- App size of 143.1 MB can feel high to some users.
- Basic-level functions only.
Best for Users: People who want to extract Sound from video files to create ringtones can use this best.
7. FFmpeg
FFmpeg is one of the most trustworthy platforms for converting and extracting Sound from video. It is an open-source solution and comes with complete multi-media management work. This is mainly used for easily streaming, converting, and recording video/audio projects.

How to Download: Website
Compatible OS: Windows, Mac, etc.
Price: Free
Main Features:
- Audio filters are available, like virtualbass and tiltshelf.
- Video editing filters like colormap, blurdetect, and pixelize are available.
- Enhance dialog and extract sound clips.
- Constantly updating features.
Pros
- This has open-source benefits.
- No excessive installation steps are necessary.
- Supports a wide range of encoding benefits.
Cons
- One must have some sort of technical knowledge to use this.
- Finding the right features or solutions takes some time.
Best for Users: Developers with better technical knowledge can use this dynamic open-source platform for video/audio editing.
8. QuickTime
You can also use this Mac-based video player on Windows to watch different videos easily. Besides the streaming benefits, you can install plugins to optimize its available features, like adding the ability to record/edit video files.

How to Download: Website
Compatible OS: Mac, Windows
Price: Free
Main Features:
- Stream videos and even extract Sound from the files.
- Supports many video formats in the player.
- Record audio on this media player.
- Import files from other Mac products like Final Cut Pro and iMovie.
Pros
- Works on both Windows and Mac.
- Pre-set effects and filters are available that one can edit.
- Simple interface for beginners.
Cons
- Unnecessary bloatware installation is needed.
- Playback support is lacking.
Best for Users: New users can simply operate this media player to watch videos and learn the extraction process.
9. Audio Extractor
You can use this conversion and extraction software to do many editing functions, like changing, cutting, and extracting video/audio files. The supported format here is MP3 and WAV - choose which you find compatible with your final project. You can decide and extract from specific sections.

How to Download: Google Play Store
Compatible OS: Android
Price: Free with in-app purchases of USD 1.99- USD 6.99 for each item.
Main Features:
- Change audio file size and format.
- View/delete components through the app directly.
- Preview video/sound file.
- Trim/extract sounds from videos easily with the converter.
Pros <path d=”M7 22H4C3.46957 22 2.96086 21.7893 2.58579 21.4142C2.21071 21.0391 2 20.5304 2 20V13C2 12.4696 2.21071 11.9609 2.58579 11.5858C2.96086 11.2107 3.46957 11 4 11H7M14 9V5C14 4.20435
How to Create the Stranger Things Upside Down Effect
With stranger things season 4 ending, it seems like great timing to make a stranger things style transition to the Upside Down. In the Netflix series Stranger Things, there is an opposite version of our world called the Upside Down. The Upside Down is dark, creepy, and possibly filled with aliens, monsters, creatures, and other things.
Now, you can also apply the Stranger Things Upside Down Effect to your video! This effect combines camera tricks and video editing within Filmora to transition from the normal world into the Upside Down.
How-to Guide
1) Preparation
To make this effect, you will need two footage shots: one with the camera moving down and one with the camera coming back up.
When shooting for the footage, follow the steps below:
First shot
- Find any item close enough to the ground that we can block our frame with.

- Once you have your talent lined up, rotate your camera while lowering it below the foreground item at a constant speed and leaving the camera there. The key is making sure when you go behind the object, the frame is nothing but black.

For the next scene, have your actor change positions, or you can change the set around to look like the Upside Down. For instance, adding fake plants and flickering lights.
Second shot
Start bringing your camera back up at the same speed and rotate it again in the direction it was moving.

2) Steps
After you have all the footage, you can start editing it on Filmora. If you haven’t installed it yet, you can download Filmora at their official website at https://filmora.wondershare.com .
Free Download For Win 7 or later(64-bit)
Free Download For macOS 10.14 or later
Now, launch Filmora on your PC and follow the steps below:
Step1 Take your first clip in the “normal” world and drag it down to a video track on the timeline. Trim the edge of the clip, so it ends on pure black and in a downward motion.

Step2 Drag the second clip (in the Upside Down) onto the video track on the timeline after the first clip. Trim this video, so it begins in pure black and an upward motion.

Cut the clips to get the timing right since it should be a very fast transition. You can cut in the black frames so they won’t be too apparent.
If you don’t have a perfectly smooth transition, you can add a dissolve by going to Transitions > Basic > Dissolve.

Color Grading and Effects
After the transition, you can make the clip look a lot more like the Upside Down from the show with a color grade and Filmora effects. Follow the steps below:
Step1 Double-click on your second clip, then go to Color > Advanced. For a quick edit, you can try one of the presets available, such as “cool film.” It will give you the colder blue tones that Stranger Things used for the Upside Down.

Step2 You can further edit the color grading in the white balance menu. Drag the slider to the left to get a blue, cold vibe for the Upside Down.
The “cool” or “warm” color grading technically talks about color temperature. A “warmer” look will be more orange, and a “colder” look will be bluer. You can also use the tint slider to fine-tune the look.

Step3 Next, move down to the color, lower the brightness and increase contrast. It makes the scene darker and more sinister than the normal world.

Step4 Finally, go down to the vignette and drag the amount slider a tiny bit to give a Vinnette around your clip.

3) Pro Tips
You can still make your clip look even more like Upside Down with some Filmora elements.
Go to Elements > Smoke > Smokescreen 2. Drag this element on top of your Upside Down clip and trim it, so it starts at the same time the clip leaves the black frame.

You can adjust the opacity by double-clicking the smoke effect to open the setting.
Finally, go to the Transition > Basic > Dissolve to the start of the smoke and adjust it when the smoke gradually appears.

Resources from Filmostock
You can also use filmstock effects to bring our video to the next level. Go to Elements > Fire > Large Scale 12 and drag it down on top of your clip and the smoke.

Double-click the clip and change the scale of the effect to your needs. Then, go to compositing to change the blending mode to the screen to help the effect blend in more.

Now, go to color and open the white balance menu. Drag the two sliders to change the color of the particles to match your clip.

Summary
That is all you need to make a Stranger Things Upside Down effects to your video. Let us know if there are any other effects from tv shows you want to learn how to make.
Free Download For macOS 10.14 or later
Now, launch Filmora on your PC and follow the steps below:
Step1 Take your first clip in the “normal” world and drag it down to a video track on the timeline. Trim the edge of the clip, so it ends on pure black and in a downward motion.

Step2 Drag the second clip (in the Upside Down) onto the video track on the timeline after the first clip. Trim this video, so it begins in pure black and an upward motion.

Cut the clips to get the timing right since it should be a very fast transition. You can cut in the black frames so they won’t be too apparent.
If you don’t have a perfectly smooth transition, you can add a dissolve by going to Transitions > Basic > Dissolve.

Color Grading and Effects
After the transition, you can make the clip look a lot more like the Upside Down from the show with a color grade and Filmora effects. Follow the steps below:
Step1 Double-click on your second clip, then go to Color > Advanced. For a quick edit, you can try one of the presets available, such as “cool film.” It will give you the colder blue tones that Stranger Things used for the Upside Down.

Step2 You can further edit the color grading in the white balance menu. Drag the slider to the left to get a blue, cold vibe for the Upside Down.
The “cool” or “warm” color grading technically talks about color temperature. A “warmer” look will be more orange, and a “colder” look will be bluer. You can also use the tint slider to fine-tune the look.

Step3 Next, move down to the color, lower the brightness and increase contrast. It makes the scene darker and more sinister than the normal world.

Step4 Finally, go down to the vignette and drag the amount slider a tiny bit to give a Vinnette around your clip.

3) Pro Tips
You can still make your clip look even more like Upside Down with some Filmora elements.
Go to Elements > Smoke > Smokescreen 2. Drag this element on top of your Upside Down clip and trim it, so it starts at the same time the clip leaves the black frame.

You can adjust the opacity by double-clicking the smoke effect to open the setting.
Finally, go to the Transition > Basic > Dissolve to the start of the smoke and adjust it when the smoke gradually appears.

Resources from Filmostock
You can also use filmstock effects to bring our video to the next level. Go to Elements > Fire > Large Scale 12 and drag it down on top of your clip and the smoke.

Double-click the clip and change the scale of the effect to your needs. Then, go to compositing to change the blending mode to the screen to help the effect blend in more.

Now, go to color and open the white balance menu. Drag the two sliders to change the color of the particles to match your clip.

Summary
That is all you need to make a Stranger Things Upside Down effects to your video. Let us know if there are any other effects from tv shows you want to learn how to make.
A Guide to Speed up a Video on Splice
Create High-Quality Video - Wondershare Filmora
An easy and powerful YouTube video editor
Numerous video and audio effects to choose from
Detailed tutorials are provided by the official channel
The availability of video editing apps enables you to turn your device into a compelling tool to make video tweaks. Several editing abilities are available, ranging from adding overlays, text, music, and changing speed. The latter carries more weight, especially when dealing with a wide range of scenes. You can either slow down or speed up your video with a click of a button. In this article, we focus on how to speed up video on Splice and its alternative.

In this article
01 Can I speed up a video using Splice?
02 Alternative: Try out Filmora V11’s Speed Ramping
03Additional Video Splice Apps for Android
Can I speed up a video using Splice?
Yes, Splice is a state-of-the-art tool that comprises several editing features, including speed up and down controls. It works with iOS devices like iPhones and iPads and is a sure bet to edit your videos on the go. The Splice app is generally useful for social media influencers who want to market their products and hold online tutorials, among other functions.t
Splice’s video speed control features
Among the features of Splice, is the ability to speed up or slow down your video. A splice speed ramp is the rate of acceleration or deceleration of a clip. This technique smoothly adjusts the video speed to the desired pace.
Some other features of the Splice
- You can also add music to your videos. Music attracts attention, thereby keeping them glued during the video playback.
- The trim and crop features let you cut out unnecessary footage from your video for a polished finish. Likewise, you can use the app to remove some segments that you don’t want to feature in your video.
- It brings you exclusive effects that widely enhance your videos. Adding certain elements, like overlay text, and changing speed, among other aspects, is a great way to enrich your video.
- Utilizing the social media platform is Splice’s most influential feature. It facilitates the online sharing of videos once you have edited and completed the creation process. You can easily upload your video to Instagram, Facebook, and YouTube, among other platforms.
Alternative: Try out Filmora V11’s Speed Ramping
An alternative to Splice video in Filmora V11’s Speed Ramping. Filmora brings you ramping features to make breathtaking videos.
- Filmora brings you six preset speed effects to create professional speed changes such as flash in, bullet time, montage, etc.
- This tool helps you to maintain the original audio pitch when changing the video’s speed.
- Filmora also supports customized speed ramping templates for a unique speed ramping effect.
For Win 7 or later (64-bit)
For macOS 10.12 or later
How to use Filmora to speed up video
Filmora is a sophisticated tool that quickly solves any editing functions for you. It has an intuitive interface, accommodating both professionals and beginners. It is a quick solution to speed up your video for a fast-track action. Follow these steps to speed up the video with Filmora to produce high-end quality videos.
Step 1. Launch Filmora and open the video
First, open the Filmora app on your device, then search for the target video to speed up. Alternatively, you can drag and drop the videos onto the interface.
Step 2: The speed
Working Vary with the video from your timeline Right-click on the video, and a menu will pop up immediately. Then tap on “Speed and Duration” and select the number of times you want to speed up your speed. These range from X2, X3, X4, X5, or any other speed rate of your choice.

Step 3: Modify the Duration
Specify the duration of your video; it will take Remember that the duration should be less than the original one if you aim to speed up the video. Then click on the “OK” button to preview the video.
Step 4. Save and export your video
Finally, it’s time to save and share your video. Click on the “File” tab and go to the “Save Project” option. Give your project a name then, tap on the “Save” option. Then use the “Export” feature to export your video to other media sites.
Using Splice to Speed Up a Video
Before you speed up a video on Splice, it is better to know how to use the Splice app and make impressive videos.
1) Starting a video project
Ensure the Splice app is installed on your device. Then choose what needs to be the first part of your video. This could be a title screen, or you could add a video first. To create a title screen, click on the “Title” button. Then type in the text to use as a title. Likewise, you can select how long the title screen should show in your video by adjusting the “duration” slider. Next, continue to add content after your title or the video you used.
2) Add videos
Check for the video to add to your project and click on the “+” button. You should notice the “Albums” screen show up and your videos will be visible in the “Camera roll” section. Choose the video you want to edit and click on the “Done” tab. Next, your videos will upload into the project, and be brought back to the main screen where you can view the project.
3) Edit your videos
The Splice app is rich in various editing tools to change your video into any enticing piece of work.
To trim and cut video: To trim your video, just tap on your video and drag the edge clip to the portion you want to trim.
Meanwhile, to cut your video, tap on the video and locate where you want to cut the clip. Check on the “yellow” line as it is the guideline for your clip. Then tap on your clip once more and hit the “Split” tab to separate the video into two.
To add video overlays, first, insert your video into the timeline. Then press and hold on to the media that you want to add as an overlay. Next, drag the clip to the “Drop here to turn into an overlay” tab to add it.
To add text: Adding text to your video allows you to expand on it more easily. To do this, tap on the “Title” icon at the bottom of the timeline. Then double-tap on the media screen and type in the text you want to add.
To add music: For music, tap on the “Music” icon found at the bottom of the timeline. You can extract music from the “Splice” gallery or import your music from your device.
Add filters and other effects: You can also add filters to your clip. Just click on the “Filter” icon found at the bottom of the timeline. Then choose the filter of choice you wish to add and, finally, adjust the filter level.
4) Save and export your video
After a successful edit, it is time to save your project onto your device. Splice lets you choose an output format to save your file into. Once saved on your computer, you can now share it on social media sites.
• Remember, you can do more with Splice, such as speeding up your video. This section walks you through simple ways to speed up video for a professional look.
Here are the steps to speed up your video on Splice
Step 1: Choose a video
You first need to select the video that you need to speed up. Go to the timeline and select the video to add to the timeline. You can select the video from the Splice gallery by importing it or dragging and dropping the video onto the timeline.

Step 2: Select your speed
It is the speed rate that determines how fast or slow is your video. For this, you should select a fast speed. To do so, first, choose the “Speed” tab from the bottom toolbar. Then tap the “Speed Effects” option and specify your speed as X2, X4, etc.

Step 3: Begin the effect
Identify where you want to start the speeding effect and position the yellow line at that point.

Step 4. Add a speed point
Just tap the white “+” button to add a speed point to your video.
Step 5: Determine an endpoint
Now position the yellow line once more at the point where you intend to end the effect. Next, click on the white “+” button again and you will have specified the endpoint.
Step 6. Set the desired speed
Finally, choose the segment whose speed you wish to adjust. Use the “Slider” at the bottom to set the speed you want for your video. Then save and share your video.

Conclusion
● Video editing entails many aspects. Speed control is one of the major specifications of a successful video. Speeding up your video will fast forward to the selected portion and, thereby, eliminate repetitions or non-important sections of your video. This article covers how to splice and speed up video and also perform other video edits.
The availability of video editing apps enables you to turn your device into a compelling tool to make video tweaks. Several editing abilities are available, ranging from adding overlays, text, music, and changing speed. The latter carries more weight, especially when dealing with a wide range of scenes. You can either slow down or speed up your video with a click of a button. In this article, we focus on how to speed up video on Splice and its alternative.

In this article
01 Can I speed up a video using Splice?
02 Alternative: Try out Filmora V11’s Speed Ramping
03Additional Video Splice Apps for Android
Can I speed up a video using Splice?
Yes, Splice is a state-of-the-art tool that comprises several editing features, including speed up and down controls. It works with iOS devices like iPhones and iPads and is a sure bet to edit your videos on the go. The Splice app is generally useful for social media influencers who want to market their products and hold online tutorials, among other functions.t
Splice’s video speed control features
Among the features of Splice, is the ability to speed up or slow down your video. A splice speed ramp is the rate of acceleration or deceleration of a clip. This technique smoothly adjusts the video speed to the desired pace.
Some other features of the Splice
- You can also add music to your videos. Music attracts attention, thereby keeping them glued during the video playback.
- The trim and crop features let you cut out unnecessary footage from your video for a polished finish. Likewise, you can use the app to remove some segments that you don’t want to feature in your video.
- It brings you exclusive effects that widely enhance your videos. Adding certain elements, like overlay text, and changing speed, among other aspects, is a great way to enrich your video.
- Utilizing the social media platform is Splice’s most influential feature. It facilitates the online sharing of videos once you have edited and completed the creation process. You can easily upload your video to Instagram, Facebook, and YouTube, among other platforms.
Alternative: Try out Filmora V11’s Speed Ramping
An alternative to Splice video in Filmora V11’s Speed Ramping. Filmora brings you ramping features to make breathtaking videos.
- Filmora brings you six preset speed effects to create professional speed changes such as flash in, bullet time, montage, etc.
- This tool helps you to maintain the original audio pitch when changing the video’s speed.
- Filmora also supports customized speed ramping templates for a unique speed ramping effect.
For Win 7 or later (64-bit)
For macOS 10.12 or later
How to use Filmora to speed up video
Filmora is a sophisticated tool that quickly solves any editing functions for you. It has an intuitive interface, accommodating both professionals and beginners. It is a quick solution to speed up your video for a fast-track action. Follow these steps to speed up the video with Filmora to produce high-end quality videos.
Step 1. Launch Filmora and open the video
First, open the Filmora app on your device, then search for the target video to speed up. Alternatively, you can drag and drop the videos onto the interface.
Step 2: The speed
Working Vary with the video from your timeline Right-click on the video, and a menu will pop up immediately. Then tap on “Speed and Duration” and select the number of times you want to speed up your speed. These range from X2, X3, X4, X5, or any other speed rate of your choice.

Step 3: Modify the Duration
Specify the duration of your video; it will take Remember that the duration should be less than the original one if you aim to speed up the video. Then click on the “OK” button to preview the video.
Step 4. Save and export your video
Finally, it’s time to save and share your video. Click on the “File” tab and go to the “Save Project” option. Give your project a name then, tap on the “Save” option. Then use the “Export” feature to export your video to other media sites.
Using Splice to Speed Up a Video
Before you speed up a video on Splice, it is better to know how to use the Splice app and make impressive videos.
1) Starting a video project
Ensure the Splice app is installed on your device. Then choose what needs to be the first part of your video. This could be a title screen, or you could add a video first. To create a title screen, click on the “Title” button. Then type in the text to use as a title. Likewise, you can select how long the title screen should show in your video by adjusting the “duration” slider. Next, continue to add content after your title or the video you used.
2) Add videos
Check for the video to add to your project and click on the “+” button. You should notice the “Albums” screen show up and your videos will be visible in the “Camera roll” section. Choose the video you want to edit and click on the “Done” tab. Next, your videos will upload into the project, and be brought back to the main screen where you can view the project.
3) Edit your videos
The Splice app is rich in various editing tools to change your video into any enticing piece of work.
To trim and cut video: To trim your video, just tap on your video and drag the edge clip to the portion you want to trim.
Meanwhile, to cut your video, tap on the video and locate where you want to cut the clip. Check on the “yellow” line as it is the guideline for your clip. Then tap on your clip once more and hit the “Split” tab to separate the video into two.
To add video overlays, first, insert your video into the timeline. Then press and hold on to the media that you want to add as an overlay. Next, drag the clip to the “Drop here to turn into an overlay” tab to add it.
To add text: Adding text to your video allows you to expand on it more easily. To do this, tap on the “Title” icon at the bottom of the timeline. Then double-tap on the media screen and type in the text you want to add.
To add music: For music, tap on the “Music” icon found at the bottom of the timeline. You can extract music from the “Splice” gallery or import your music from your device.
Add filters and other effects: You can also add filters to your clip. Just click on the “Filter” icon found at the bottom of the timeline. Then choose the filter of choice you wish to add and, finally, adjust the filter level.
4) Save and export your video
After a successful edit, it is time to save your project onto your device. Splice lets you choose an output format to save your file into. Once saved on your computer, you can now share it on social media sites.
• Remember, you can do more with Splice, such as speeding up your video. This section walks you through simple ways to speed up video for a professional look.
Here are the steps to speed up your video on Splice
Step 1: Choose a video
You first need to select the video that you need to speed up. Go to the timeline and select the video to add to the timeline. You can select the video from the Splice gallery by importing it or dragging and dropping the video onto the timeline.

Step 2: Select your speed
It is the speed rate that determines how fast or slow is your video. For this, you should select a fast speed. To do so, first, choose the “Speed” tab from the bottom toolbar. Then tap the “Speed Effects” option and specify your speed as X2, X4, etc.

Step 3: Begin the effect
Identify where you want to start the speeding effect and position the yellow line at that point.

Step 4. Add a speed point
Just tap the white “+” button to add a speed point to your video.
Step 5: Determine an endpoint
Now position the yellow line once more at the point where you intend to end the effect. Next, click on the white “+” button again and you will have specified the endpoint.
Step 6. Set the desired speed
Finally, choose the segment whose speed you wish to adjust. Use the “Slider” at the bottom to set the speed you want for your video. Then save and share your video.

Conclusion
● Video editing entails many aspects. Speed control is one of the major specifications of a successful video. Speeding up your video will fast forward to the selected portion and, thereby, eliminate repetitions or non-important sections of your video. This article covers how to splice and speed up video and also perform other video edits.
The availability of video editing apps enables you to turn your device into a compelling tool to make video tweaks. Several editing abilities are available, ranging from adding overlays, text, music, and changing speed. The latter carries more weight, especially when dealing with a wide range of scenes. You can either slow down or speed up your video with a click of a button. In this article, we focus on how to speed up video on Splice and its alternative.

In this article
01 Can I speed up a video using Splice?
02 Alternative: Try out Filmora V11’s Speed Ramping
03Additional Video Splice Apps for Android
Can I speed up a video using Splice?
Yes, Splice is a state-of-the-art tool that comprises several editing features, including speed up and down controls. It works with iOS devices like iPhones and iPads and is a sure bet to edit your videos on the go. The Splice app is generally useful for social media influencers who want to market their products and hold online tutorials, among other functions.t
Splice’s video speed control features
Among the features of Splice, is the ability to speed up or slow down your video. A splice speed ramp is the rate of acceleration or deceleration of a clip. This technique smoothly adjusts the video speed to the desired pace.
Some other features of the Splice
- You can also add music to your videos. Music attracts attention, thereby keeping them glued during the video playback.
- The trim and crop features let you cut out unnecessary footage from your video for a polished finish. Likewise, you can use the app to remove some segments that you don’t want to feature in your video.
- It brings you exclusive effects that widely enhance your videos. Adding certain elements, like overlay text, and changing speed, among other aspects, is a great way to enrich your video.
- Utilizing the social media platform is Splice’s most influential feature. It facilitates the online sharing of videos once you have edited and completed the creation process. You can easily upload your video to Instagram, Facebook, and YouTube, among other platforms.
Alternative: Try out Filmora V11’s Speed Ramping
An alternative to Splice video in Filmora V11’s Speed Ramping. Filmora brings you ramping features to make breathtaking videos.
- Filmora brings you six preset speed effects to create professional speed changes such as flash in, bullet time, montage, etc.
- This tool helps you to maintain the original audio pitch when changing the video’s speed.
- Filmora also supports customized speed ramping templates for a unique speed ramping effect.
For Win 7 or later (64-bit)
For macOS 10.12 or later
How to use Filmora to speed up video
Filmora is a sophisticated tool that quickly solves any editing functions for you. It has an intuitive interface, accommodating both professionals and beginners. It is a quick solution to speed up your video for a fast-track action. Follow these steps to speed up the video with Filmora to produce high-end quality videos.
Step 1. Launch Filmora and open the video
First, open the Filmora app on your device, then search for the target video to speed up. Alternatively, you can drag and drop the videos onto the interface.
Step 2: The speed
Working Vary with the video from your timeline Right-click on the video, and a menu will pop up immediately. Then tap on “Speed and Duration” and select the number of times you want to speed up your speed. These range from X2, X3, X4, X5, or any other speed rate of your choice.

Step 3: Modify the Duration
Specify the duration of your video; it will take Remember that the duration should be less than the original one if you aim to speed up the video. Then click on the “OK” button to preview the video.
Step 4. Save and export your video
Finally, it’s time to save and share your video. Click on the “File” tab and go to the “Save Project” option. Give your project a name then, tap on the “Save” option. Then use the “Export” feature to export your video to other media sites.
Using Splice to Speed Up a Video
Before you speed up a video on Splice, it is better to know how to use the Splice app and make impressive videos.
1) Starting a video project
Ensure the Splice app is installed on your device. Then choose what needs to be the first part of your video. This could be a title screen, or you could add a video first. To create a title screen, click on the “Title” button. Then type in the text to use as a title. Likewise, you can select how long the title screen should show in your video by adjusting the “duration” slider. Next, continue to add content after your title or the video you used.
2) Add videos
Check for the video to add to your project and click on the “+” button. You should notice the “Albums” screen show up and your videos will be visible in the “Camera roll” section. Choose the video you want to edit and click on the “Done” tab. Next, your videos will upload into the project, and be brought back to the main screen where you can view the project.
3) Edit your videos
The Splice app is rich in various editing tools to change your video into any enticing piece of work.
To trim and cut video: To trim your video, just tap on your video and drag the edge clip to the portion you want to trim.
Meanwhile, to cut your video, tap on the video and locate where you want to cut the clip. Check on the “yellow” line as it is the guideline for your clip. Then tap on your clip once more and hit the “Split” tab to separate the video into two.
To add video overlays, first, insert your video into the timeline. Then press and hold on to the media that you want to add as an overlay. Next, drag the clip to the “Drop here to turn into an overlay” tab to add it.
To add text: Adding text to your video allows you to expand on it more easily. To do this, tap on the “Title” icon at the bottom of the timeline. Then double-tap on the media screen and type in the text you want to add.
To add music: For music, tap on the “Music” icon found at the bottom of the timeline. You can extract music from the “Splice” gallery or import your music from your device.
Add filters and other effects: You can also add filters to your clip. Just click on the “Filter” icon found at the bottom of the timeline. Then choose the filter of choice you wish to add and, finally, adjust the filter level.
4) Save and export your video
After a successful edit, it is time to save your project onto your device. Splice lets you choose an output format to save your file into. Once saved on your computer, you can now share it on social media sites.
• Remember, you can do more with Splice, such as speeding up your video. This section walks you through simple ways to speed up video for a professional look.
Here are the steps to speed up your video on Splice
Step 1: Choose a video
You first need to select the video that you need to speed up. Go to the timeline and select the video to add to the timeline. You can select the video from the Splice gallery by importing it or dragging and dropping the video onto the timeline.

Step 2: Select your speed
It is the speed rate that determines how fast or slow is your video. For this, you should select a fast speed. To do so, first, choose the “Speed” tab from the bottom toolbar. Then tap the “Speed Effects” option and specify your speed as X2, X4, etc.

Step 3: Begin the effect
Identify where you want to start the speeding effect and position the yellow line at that point.

Step 4. Add a speed point
Just tap the white “+” button to add a speed point to your video.
Step 5: Determine an endpoint
Now position the yellow line once more at the point where you intend to end the effect. Next, click on the white “+” button again and you will have specified the endpoint.
Step 6. Set the desired speed
Finally, choose the segment whose speed you wish to adjust. Use the “Slider” at the bottom to set the speed you want for your video. Then save and share your video.

Conclusion
● Video editing entails many aspects. Speed control is one of the major specifications of a successful video. Speeding up your video will fast forward to the selected portion and, thereby, eliminate repetitions or non-important sections of your video. This article covers how to splice and speed up video and also perform other video edits.
The availability of video editing apps enables you to turn your device into a compelling tool to make video tweaks. Several editing abilities are available, ranging from adding overlays, text, music, and changing speed. The latter carries more weight, especially when dealing with a wide range of scenes. You can either slow down or speed up your video with a click of a button. In this article, we focus on how to speed up video on Splice and its alternative.

In this article
01 Can I speed up a video using Splice?
02 Alternative: Try out Filmora V11’s Speed Ramping
03Additional Video Splice Apps for Android
Can I speed up a video using Splice?
Yes, Splice is a state-of-the-art tool that comprises several editing features, including speed up and down controls. It works with iOS devices like iPhones and iPads and is a sure bet to edit your videos on the go. The Splice app is generally useful for social media influencers who want to market their products and hold online tutorials, among other functions.t
Splice’s video speed control features
Among the features of Splice, is the ability to speed up or slow down your video. A splice speed ramp is the rate of acceleration or deceleration of a clip. This technique smoothly adjusts the video speed to the desired pace.
Some other features of the Splice
- You can also add music to your videos. Music attracts attention, thereby keeping them glued during the video playback.
- The trim and crop features let you cut out unnecessary footage from your video for a polished finish. Likewise, you can use the app to remove some segments that you don’t want to feature in your video.
- It brings you exclusive effects that widely enhance your videos. Adding certain elements, like overlay text, and changing speed, among other aspects, is a great way to enrich your video.
- Utilizing the social media platform is Splice’s most influential feature. It facilitates the online sharing of videos once you have edited and completed the creation process. You can easily upload your video to Instagram, Facebook, and YouTube, among other platforms.
Alternative: Try out Filmora V11’s Speed Ramping
An alternative to Splice video in Filmora V11’s Speed Ramping. Filmora brings you ramping features to make breathtaking videos.
- Filmora brings you six preset speed effects to create professional speed changes such as flash in, bullet time, montage, etc.
- This tool helps you to maintain the original audio pitch when changing the video’s speed.
- Filmora also supports customized speed ramping templates for a unique speed ramping effect.
For Win 7 or later (64-bit)
For macOS 10.12 or later
How to use Filmora to speed up video
Filmora is a sophisticated tool that quickly solves any editing functions for you. It has an intuitive interface, accommodating both professionals and beginners. It is a quick solution to speed up your video for a fast-track action. Follow these steps to speed up the video with Filmora to produce high-end quality videos.
Step 1. Launch Filmora and open the video
First, open the Filmora app on your device, then search for the target video to speed up. Alternatively, you can drag and drop the videos onto the interface.
Step 2: The speed
Working Vary with the video from your timeline Right-click on the video, and a menu will pop up immediately. Then tap on “Speed and Duration” and select the number of times you want to speed up your speed. These range from X2, X3, X4, X5, or any other speed rate of your choice.

Step 3: Modify the Duration
Specify the duration of your video; it will take Remember that the duration should be less than the original one if you aim to speed up the video. Then click on the “OK” button to preview the video.
Step 4. Save and export your video
Finally, it’s time to save and share your video. Click on the “File” tab and go to the “Save Project” option. Give your project a name then, tap on the “Save” option. Then use the “Export” feature to export your video to other media sites.
Using Splice to Speed Up a Video
Before you speed up a video on Splice, it is better to know how to use the Splice app and make impressive videos.
1) Starting a video project
Ensure the Splice app is installed on your device. Then choose what needs to be the first part of your video. This could be a title screen, or you could add a video first. To create a title screen, click on the “Title” button. Then type in the text to use as a title. Likewise, you can select how long the title screen should show in your video by adjusting the “duration” slider. Next, continue to add content after your title or the video you used.
2) Add videos
Check for the video to add to your project and click on the “+” button. You should notice the “Albums” screen show up and your videos will be visible in the “Camera roll” section. Choose the video you want to edit and click on the “Done” tab. Next, your videos will upload into the project, and be brought back to the main screen where you can view the project.
3) Edit your videos
The Splice app is rich in various editing tools to change your video into any enticing piece of work.
To trim and cut video: To trim your video, just tap on your video and drag the edge clip to the portion you want to trim.
Meanwhile, to cut your video, tap on the video and locate where you want to cut the clip. Check on the “yellow” line as it is the guideline for your clip. Then tap on your clip once more and hit the “Split” tab to separate the video into two.
To add video overlays, first, insert your video into the timeline. Then press and hold on to the media that you want to add as an overlay. Next, drag the clip to the “Drop here to turn into an overlay” tab to add it.
To add text: Adding text to your video allows you to expand on it more easily. To do this, tap on the “Title” icon at the bottom of the timeline. Then double-tap on the media screen and type in the text you want to add.
To add music: For music, tap on the “Music” icon found at the bottom of the timeline. You can extract music from the “Splice” gallery or import your music from your device.
Add filters and other effects: You can also add filters to your clip. Just click on the “Filter” icon found at the bottom of the timeline. Then choose the filter of choice you wish to add and, finally, adjust the filter level.
4) Save and export your video
After a successful edit, it is time to save your project onto your device. Splice lets you choose an output format to save your file into. Once saved on your computer, you can now share it on social media sites.
• Remember, you can do more with Splice, such as speeding up your video. This section walks you through simple ways to speed up video for a professional look.
Here are the steps to speed up your video on Splice
Step 1: Choose a video
You first need to select the video that you need to speed up. Go to the timeline and select the video to add to the timeline. You can select the video from the Splice gallery by importing it or dragging and dropping the video onto the timeline.

Step 2: Select your speed
It is the speed rate that determines how fast or slow is your video. For this, you should select a fast speed. To do so, first, choose the “Speed” tab from the bottom toolbar. Then tap the “Speed Effects” option and specify your speed as X2, X4, etc.

Step 3: Begin the effect
Identify where you want to start the speeding effect and position the yellow line at that point.

Step 4. Add a speed point
Just tap the white “+” button to add a speed point to your video.
Step 5: Determine an endpoint
Now position the yellow line once more at the point where you intend to end the effect. Next, click on the white “+” button again and you will have specified the endpoint.
Step 6. Set the desired speed
Finally, choose the segment whose speed you wish to adjust. Use the “Slider” at the bottom to set the speed you want for your video. Then save and share your video.

Conclusion
● Video editing entails many aspects. Speed control is one of the major specifications of a successful video. Speeding up your video will fast forward to the selected portion and, thereby, eliminate repetitions or non-important sections of your video. This article covers how to splice and speed up video and also perform other video edits.
Also read:
- Updated 2024 Approved Camtasia Vs Captivate - Which to Choose?
- Updated 2024 Approved Step by Step to Resize Video in Davinci Resolve
- In 2024, Need to Learn About Halftone Effects? Learn How to Quickly Create a Halftone Effect in Adobe Photoshop with Simple, Easy-to-Follow Instructions
- Step by Step to Add Border to Video Using Premiere Pro for 2024
- How to Stabilize Videos for Free with Google Photos App
- New In 2024, Best Ways to Blur Zoom Background for Free
- In 2024, 3 In-Camera Transitions Tricks To Make Videos
- Updated How Long Does It Take To Edit Videos for 2024
- Updated How to Resize FLV Video Efficiently Windows, Mac,Android, iPhone & O
- New 2024 Approved Finding The Best LUTs for Wondershare Filmora
- New Camtasia vs Final Cut Pro
- New In 2024, AVI Video Format How to Open, Play, Edit AVI File?
- Updated Do You Want to Make TikTok Videos More Elemental by Using Countdown but Dont Know How to Do This? Here We Will Thoroughly Guide You About This
- Updated 2024 Approved Mastering the Technique Playing Videos in Slow Motion on Your iPhone Like a Pro
- New In 2024, AI Features of Filmora - Silence Detection in Videos
- Do You Know You Can Trim and Cut Your Video Into the Desired Portions Using a Reliable Video Splitter? Get an Easy Video Splitter Now to Simplify Your Work. Here Are 33 Carefully Chosen Apps to Help You in This for 2024
- Updated In 2024, Video Inspiration for Birthday Slideshow
- Updated To Get Cinematographs of a Music Video, You Need to Understand the Basics of Camera Movement. As Well Framing and Lighting of the Setup Are Illustrated in This Article for 2024
- How to Concatenate Videos Using FFmpeg for 2024
- New Frame Rates, Speed, and Wondershare Filmora An Overview
- Updated 2024 Approved Do You Want to Remove the Video Background in Premier Pro Using the Ultra Key but Dont Know About the Whole Process? Please Read Our Complete Step-by-Step Tutorial and Learn From Scratch as a Beginner
- New Ultimate Guidelines to Help You Better Use VLC Media Player
- Updated Create Your Slow Zoom TikTok in Minutes
- Updated In 2024, How to Create an Alternate Reality Effect
- Step By Step Guide on Using Media Player Classic To Rotate A Video
- Updated 2024 Approved You Will Also Be Guided on How to Use This Software to Crop Your Videos. Dont Worry and Just Take It One Step at a Time
- In 2024, How to Blur Faces in Your Video on iPhone
- New In 2024, Find a Solution for Effortless Sky Replacement Photoshop in This Comprehensive Guide. Also, Use the Easiest Video Editing Tool to Make Your Media Stunning
- 5 Best Route Generator Apps You Should Try On Honor X7b | Dr.fone
- In 2024, A Step-by-Step Guide to Finding Your Apple ID From Your Apple iPhone 8 Plus
- 7 Solutions to Fix Chrome Crashes or Wont Open on Tecno Camon 20 Pro 5G | Dr.fone
- Fix Cant Take Screenshot Due to Security Policy on Infinix Hot 40 Pro | Dr.fone
- In 2024, A Step-by-Step Guide on Using ADB and Fastboot to Remove FRP Lock on your Tecno Camon 20 Pro 5G
- In 2024, 8 Best Apps for Screen Mirroring Realme Narzo 60 Pro 5G PC | Dr.fone
- Fix Cant Take Screenshot Due to Security Policy on Honor X9a | Dr.fone
- New 5 Ways You Never Heard of for Converting MP4 to GIF in Photoshop for 2024
- How to Change Xiaomi Redmi 13C Location on Skout | Dr.fone
- Easy steps to recover deleted call history from Lava Yuva 2
- In 2024, Full Guide to Unlock Your Vivo Y78t
- A Comprehensive Guide to Apple iPhone 8 Plus Blacklist Removal Tips and Tools
- How to Turn Off Google Location to Stop Tracking You on Xiaomi Redmi K70E | Dr.fone
- How to Mirror PC Screen to Vivo Y100i Power 5G Phones? | Dr.fone
- In 2024, How does the stardust trade cost In pokemon go On Motorola Razr 40 Ultra? | Dr.fone
- In 2024, 5 Ways to Transfer Music from Vivo S18 to Other Android Devices Easily | Dr.fone
- 8 Workable Fixes to the SIM not provisioned MM#2 Error on Vivo Y27 4G | Dr.fone
- In 2024, Hassle-Free Ways to Remove FRP Lock from Samsung Galaxy M34 5G Phones with/without a PC
- Title: New In 2024, Use Path Blur In Photoshop To Create Motion Effect
- Author: Morgan
- Created at : 2024-06-24 01:30:38
- Updated at : 2024-06-25 01:30:38
- Link: https://ai-video-editing.techidaily.com/new-in-2024-use-path-blur-in-photoshop-to-create-motion-effect/
- License: This work is licensed under CC BY-NC-SA 4.0.

