New In 2024, Want to Add a Motion Blur Effect to Your Photos? This Step-by-Step Tutorial Will Show You How to Use GIMP Software to Get the Effect You Want

Want to Add a Motion Blur Effect to Your Photos? This Step-by-Step Tutorial Will Show You How to Use GIMP Software to Get the Effect You Want
GIMP is a cross-platform image editing software that you can use to edit photos and create graphics. The software is available for Linux, Windows, and macOS and can add a motion blur effect (A sense of movement in the photo), making your pictures look more realistic and professional.
So to help you tone your skills, we’ve written a comprehensive guide on how to apply the GIMP motion blur effect to your photos!
Part I. What Is GIMP?
GIMP software, a GNU Image Manipulation Program, is an open-source raster graphics editor used for image editing and retouching, converting between different image formats, free-form drawing, and more.
GIMP is frequently used as a Photoshop alternative. The software boasts a wide range of features, including support for layers, masks, color management, and third-party plugins.
Key Features
Here are some key features of the GIMP software:
- Quickly hide panels and menus to let you switch to a full-screen mode to preview pictures
- Fixes distorted images
- Available for Windows, Linux, Mac OS, and other operating systems
- Automatic image enhancement tool
- Lets you remove all the panels and tools from the workflow except the one you are working with.
- Released under a license called GNU General Public License v3 and later, which makes it free to use and distribute
- Add overlays and crop or resize an image
- Wide range of file formats that it can read and write, making it a versatile tool for working with images
Part II. How To Add The Motion Blur Effect To Your Photos in GIMP?
Below we’ve provided the step-by-step tutorial to add a motion blur effect to your photos in GIMP:
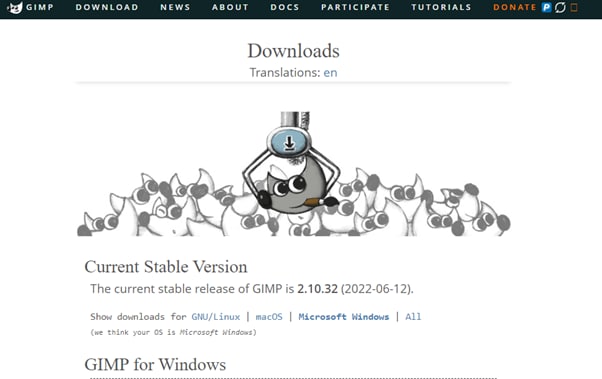
Step1 In the first step, launch a browser on your device, head to the GIMP website , and download the installation file according to your operating system. Now, click the downloaded installer, install the software on your system and launch it.
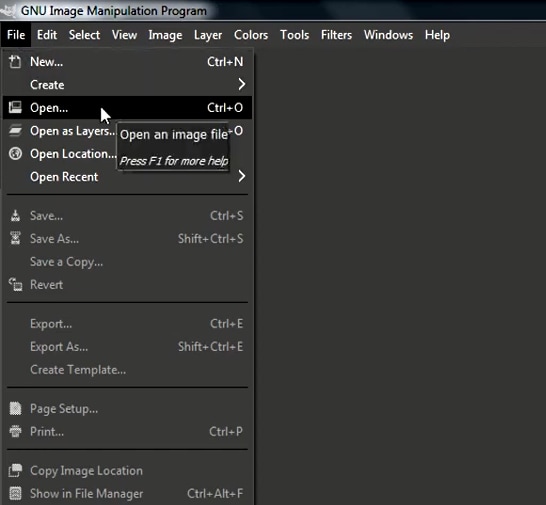
Step2 In the next step, click “File” on the GIMP dashboard, and select “Open” to access the Open Image window. Select your image file from your system and click “Open” to import the file.
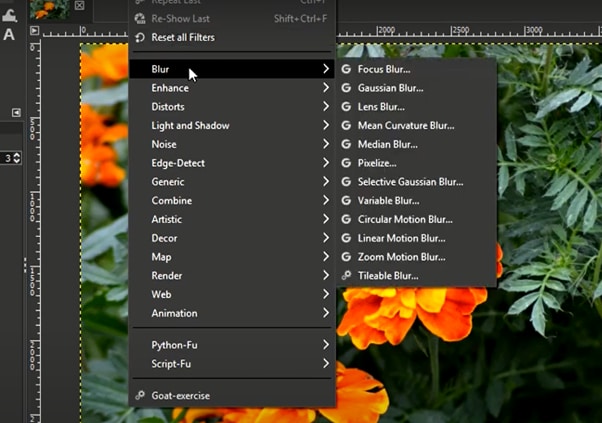
Step3 Next, click the “Filters” option from the top toolbar, select “Blur,” and choose “Motion Blur” from the drop-down menu. A dialogue box will now open where you can preview the effect and adjust the settings, including Blur Type, Blur Center, and Blur Parameters.
Step4 Once you are satisfied with your changes, click “OK” to apply the effect to the image, and make some other edits if needed. Finally, click “File” from the top toolbar, choose “Export As,” click “File Type” to select the format, and select the “Export” option to save your file.
Bonus Tips – The Alternative To GIMP To Create Motion Blur Effect
GIMP is a popular image editor that you can use to create motion blur effects. However, some users find it difficult to use the software for this purpose.
To simplify the process, we recommend using Wondershare Filmora an all-in-one editing software that offers multiple advanced features to help you quickly enhance your project.
Free Download For Win 7 or later(64-bit)
Free Download For macOS 10.14 or later
Here’s why Filmora is the best alternative to GIMP for creating motion blur effects:
- A user-friendly interface where you can quickly create the motion blur effect without spending hours learning the process
- Advanced video editing tools, such as keyframing, speed ramping, green screen, title editing, motion tracking, screen recorder, and preset templates
- Royalty-free music library where you can access millions of music and soundtracks
- Adds the motion blur effect to your videos as well as images
- Comes with multiple parameters to adjust the effect on your clip or image
To add the radial blur effect to images using Filmora, here are the quick and easy-to-follow steps:
Step1 Download the Filmora software on your PC, launch it, and click “Create New Project” on the main panel. Use the “Click Here to Import your Media File” option to import your photo and drag and drop it into the timeline.

Step2 Now, head to the “Effects” tab from the taskbar. Use the search option to find the Blur effect. Afterward, drag & drop it in the timeline and adjust it on your selected clip.
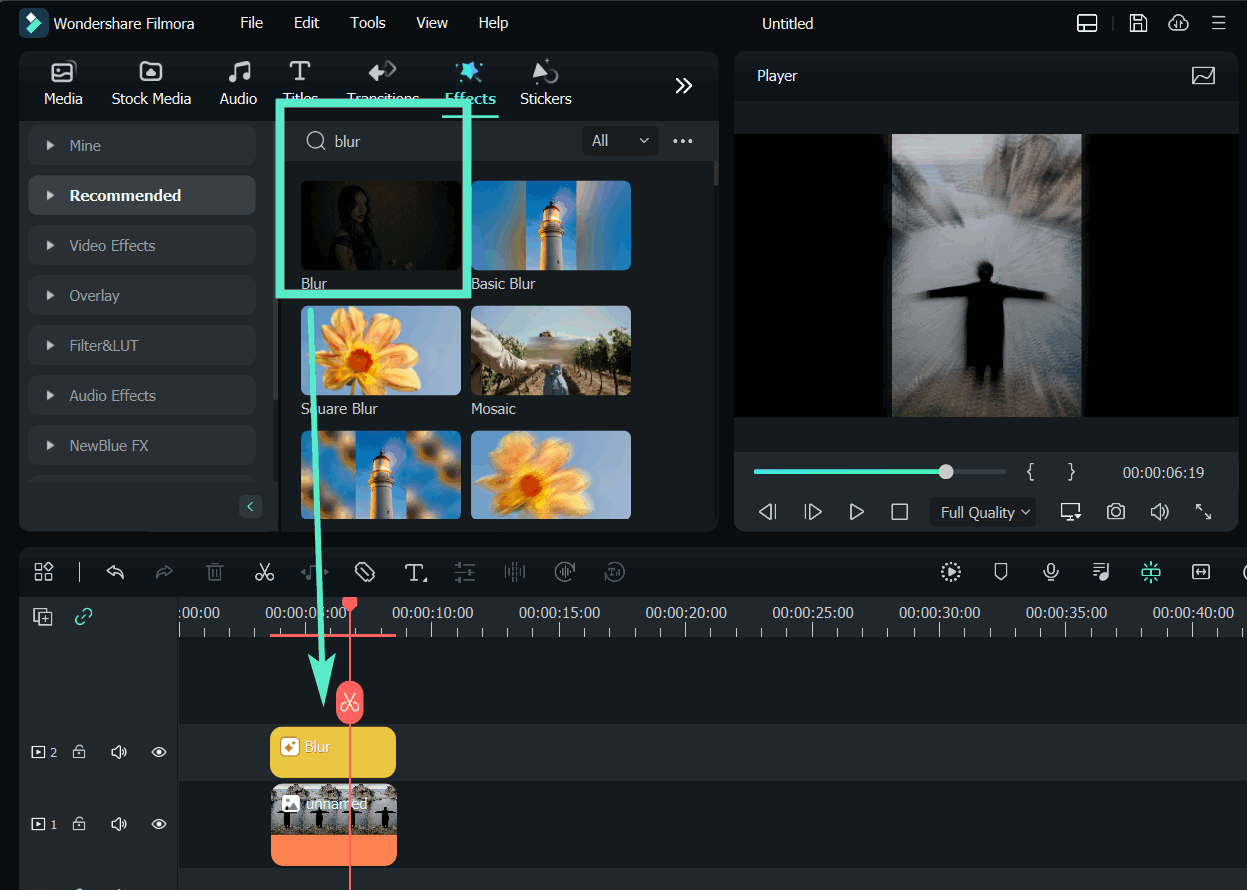
Step3 Please note that motion blur is now a dynamic effect on the image. That means you can add multiple photos and make them into a slideshow with a blur effect transition. Or, press the “Play” icon to preview your photo and pause the clip where you think motion blur works best.
Step4 Click the effect in the timeline to open its settings. Now, play your clip to preview and adjust the parameters as you want to smooth down the motion effect.
Step5 Once satisfied with the outcome, click the “Export” option, go to the “Local” tab, select a file format to save the images, and click “Export” again to save your project.
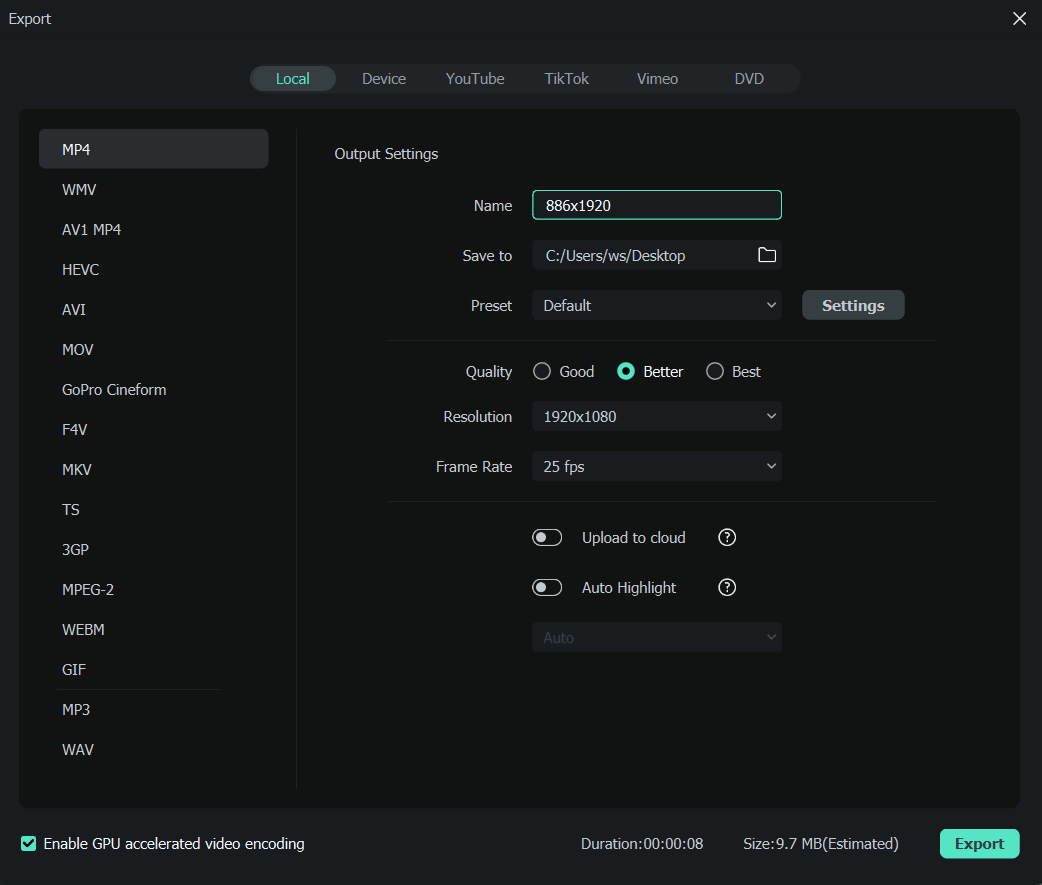
Filmora offers many export options, such as your device, YouTube, Vimeo, and DVD, with just a few clicks.
Last Words
In this detailed tutorial, we’ve discussed what GIMP is and its key features. We’ve provided a step-by-step guide to walk you through the process of creating the motion blur effect using the GIMP software.
In addition, we’ve provided a bonus tip to recommend Filmora as the best alternative to GIMP for creating the motion blur effect.
Hopefully, you found this article helpful in resolving your queries, and you can now add a smooth motion blur effect to your images.
Free Download For macOS 10.14 or later
Here’s why Filmora is the best alternative to GIMP for creating motion blur effects:
- A user-friendly interface where you can quickly create the motion blur effect without spending hours learning the process
- Advanced video editing tools, such as keyframing, speed ramping, green screen, title editing, motion tracking, screen recorder, and preset templates
- Royalty-free music library where you can access millions of music and soundtracks
- Adds the motion blur effect to your videos as well as images
- Comes with multiple parameters to adjust the effect on your clip or image
To add the radial blur effect to images using Filmora, here are the quick and easy-to-follow steps:
Step1 Download the Filmora software on your PC, launch it, and click “Create New Project” on the main panel. Use the “Click Here to Import your Media File” option to import your photo and drag and drop it into the timeline.

Step2 Now, head to the “Effects” tab from the taskbar. Use the search option to find the Blur effect. Afterward, drag & drop it in the timeline and adjust it on your selected clip.

Step3 Please note that motion blur is now a dynamic effect on the image. That means you can add multiple photos and make them into a slideshow with a blur effect transition. Or, press the “Play” icon to preview your photo and pause the clip where you think motion blur works best.
Step4 Click the effect in the timeline to open its settings. Now, play your clip to preview and adjust the parameters as you want to smooth down the motion effect.
Step5 Once satisfied with the outcome, click the “Export” option, go to the “Local” tab, select a file format to save the images, and click “Export” again to save your project.

Filmora offers many export options, such as your device, YouTube, Vimeo, and DVD, with just a few clicks.
Last Words
In this detailed tutorial, we’ve discussed what GIMP is and its key features. We’ve provided a step-by-step guide to walk you through the process of creating the motion blur effect using the GIMP software.
In addition, we’ve provided a bonus tip to recommend Filmora as the best alternative to GIMP for creating the motion blur effect.
Hopefully, you found this article helpful in resolving your queries, and you can now add a smooth motion blur effect to your images.
How to Add Echo Effect to Video
If you are alone in a large empty room and you speak something, your words get echoed across the room. It will seem as if you are speaking the same words multiple times but with less volume every single time. When you have a video where you are reading out poems or giving an important message, adding an echo effect to the video makes the audio impactful and engaging.
You will need a video editor where you can add echo effect to video in simple steps. Not many video editors are available where you can add the echo effect instantly from the available sound effects and presets. That is why we have handpicked the best video editors for Windows PC and Mac users. You can also add echo effect to video online from any device directly from your web browser.
Part 1. How to Add Echo Effect to Video Online
If you want to add echo effect to your video one time only, there is no need to download any video editor uselessly. You can use an online audio editor to add echo effect and combine the modified audio and video files together. TwistedWave is one of the few online video editors that allow you to add echo effect to your video. Here are the steps how to add echo effect in video online.
Step 1Open your web browser and visit “twistedwave.com/online”. Click on Upload a file button to upload your video file.
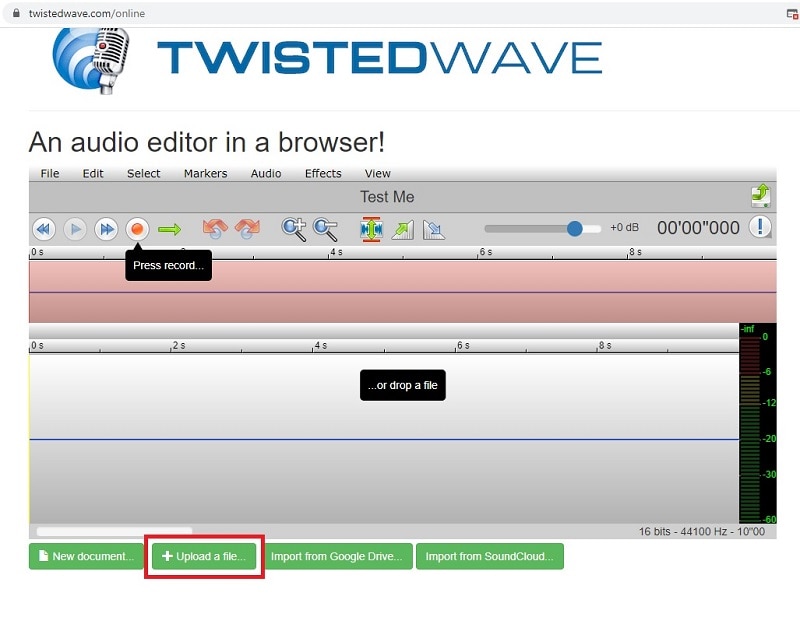
Step 2After successful uploading, TwistedWave will separate the audio portion from the uploaded video file and open it on its editor to add sound effects.
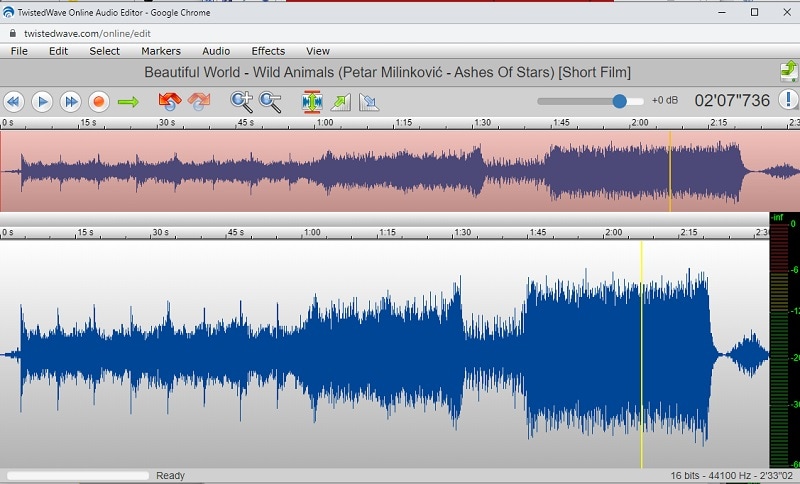
Step 3On the new editor window, go to Effects> VST Effects and click on mdaDelay.so.
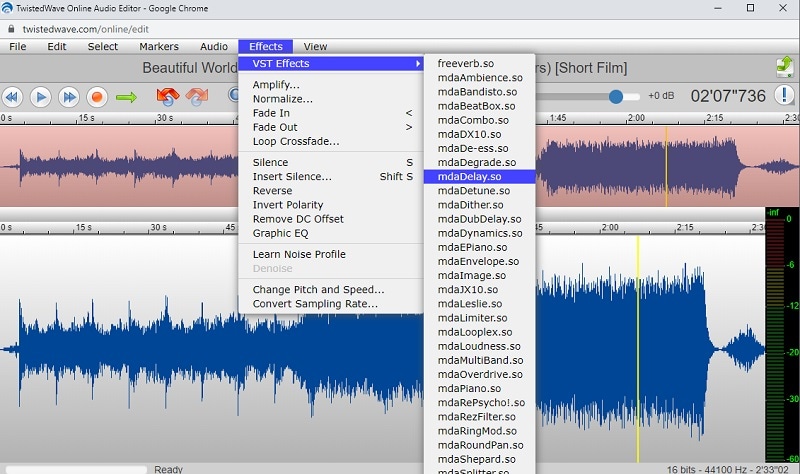
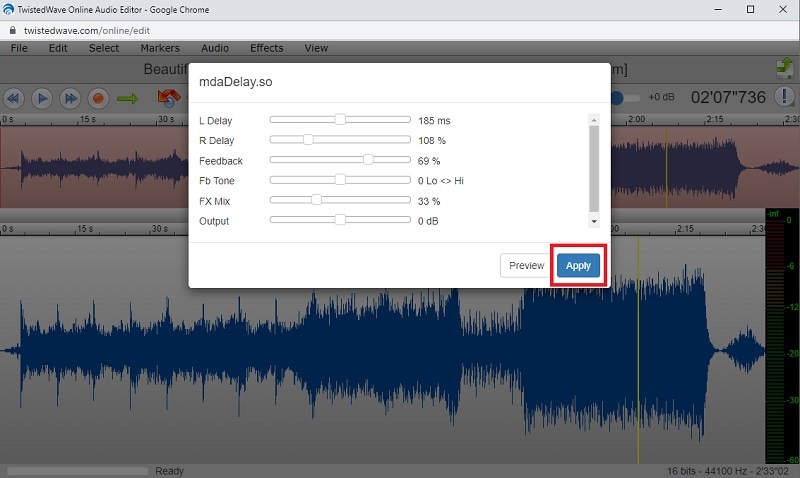
Step 4From the pop-up window, you can adjust different parameters as per your preference for the enhanced echo effect. Click on Apply button.
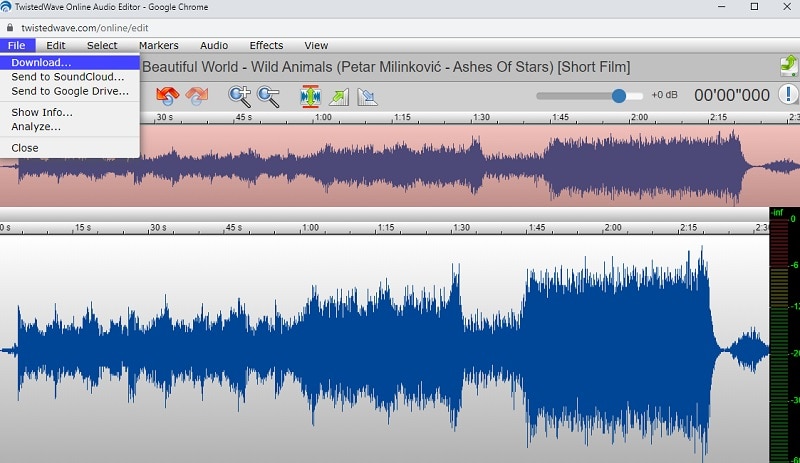
Step 5Play the audio to check the echo effect and go to File and click on Download option. You can save the modified audio file on your device.
Part 2. How to Add Echo to Video on Windows PC
If you are a Windows PC user, there are only a few video editors available where you can add echo effect instant from the built-in option. Even the most popular video editors do not have the echo effect preset in the audio effects. We recommend Wondershare Filmora where you can add echo effect in a few steps instantly from the built-in echo effect.
Filmora Video Editor is a powerful application that simplifies adding echo effects to your videos. It has a comprehensive range of features that make it easy for even beginners to create stunning results in no time at all. To start adding a echo effect with Filmora, follow these few simple steps:
Free Download For Win 7 or later(64-bit)
Free Download For macOS 10.14 or later
Step 1Download and install Filmora. Launch the application and click on New Project option. You can go to File menu and click on New Project option.

Step 2Go to File> Import Media and click on Import Media Files option. Select your video file from your storage device. Otherwise, you can drag and drop the video on Project Media and drop the video on Timeline.

Step 3Click on Effects option located at the top and search for “echo”. Drag and drop the Echo effect on your video located on Timeline.
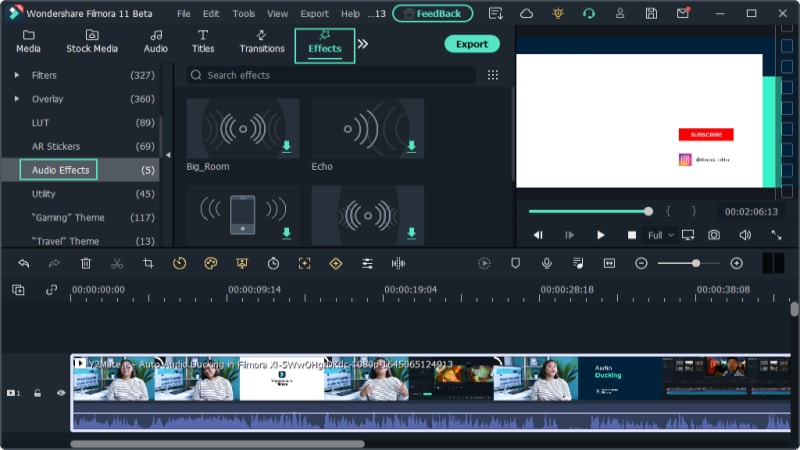
Step 4Double-click on the video file and click on Audio option at the top. Scroll down and go to Echo section. You can adjust the parameters to get the echo effect as per your preference. Click on Ok button.

Step 5Play the video and if you are satisfied, click on Export button to save the video in your desired file format.
Part 3. How to Add Echo to Video on Mac
If you are a Mac user and you are looking for a free video editor to add echo effect, you can use iMovie app. iMovie is a video editor by Apple and most Mac users know and might have used it. iMovie comes with a built-in echo delay effect that can get the job done for you. However, the effect is not customizable as it is in Filmora. Here are the steps on how to put echo on video using iMovie.
Step 1Launch iMovie from Applications folder as it comes pre-installed on Mac.
Step 2Go to File> Import Media to bring in your video file. Thereafter, drag and drop the file on the Timeline.

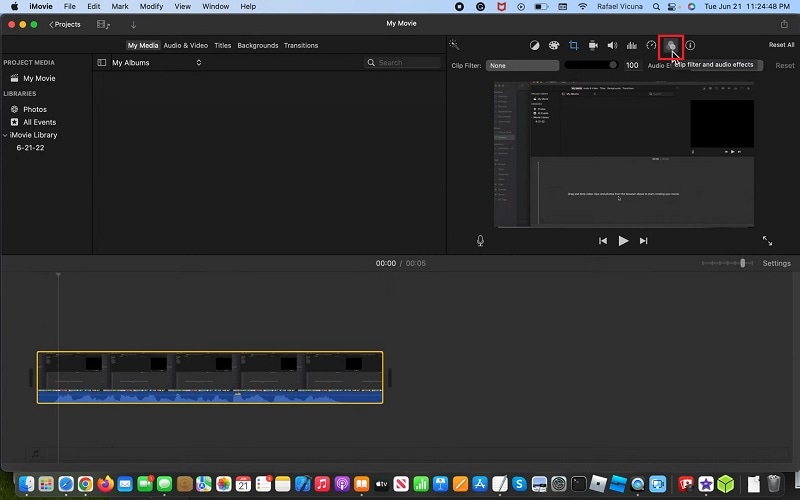
Step 3Click on the video clip on the Timeline and click on “Clip Filter and Audio Effects” icon in the top-right corner.
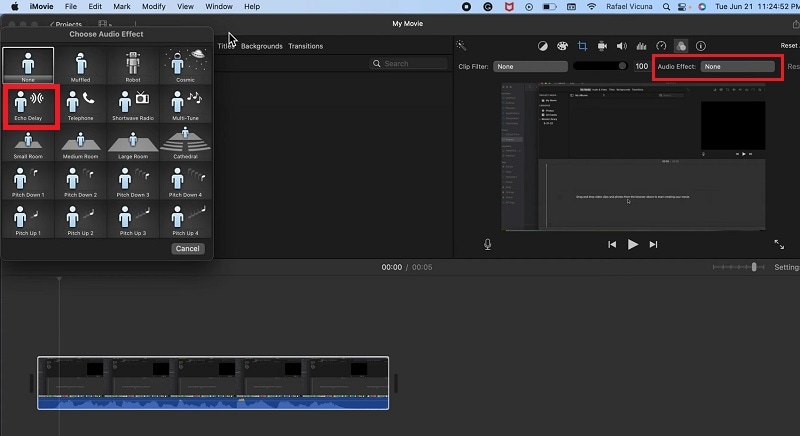
Step 4Click on Audio Effect – None option and “Choose Audio Effect” pop-up window will open. Click on Echo Delay option.
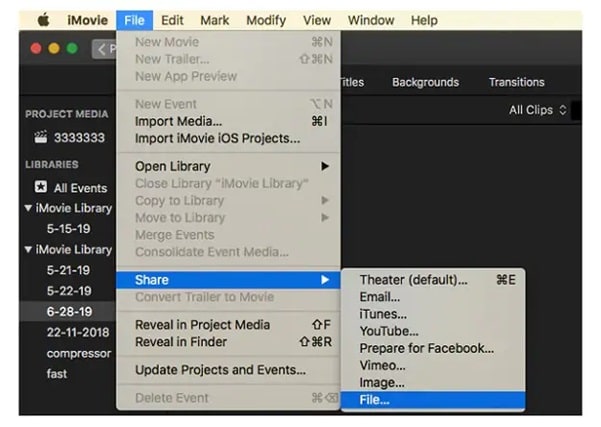
Step 5Play the video and go to File> Share> File option to export the edited video.
The Bottom Line
Adding echo effect to video is a common trend when you want to emphasize what you are speaking. The echo effect sounds different and hence, it grabs the attention of the audience instantly. We have illustrated how you can add echo effect to your video online as well as on your computer. We highly recommend Wondershare Filmora to instant put echo effect to your video on Windows PC and Mac.
Free Download For Win 7 or later(64-bit)
Free Download For macOS 10.14 or later
Free Download For macOS 10.14 or later
Step 1Download and install Filmora. Launch the application and click on New Project option. You can go to File menu and click on New Project option.

Step 2Go to File> Import Media and click on Import Media Files option. Select your video file from your storage device. Otherwise, you can drag and drop the video on Project Media and drop the video on Timeline.

Step 3Click on Effects option located at the top and search for “echo”. Drag and drop the Echo effect on your video located on Timeline.

Step 4Double-click on the video file and click on Audio option at the top. Scroll down and go to Echo section. You can adjust the parameters to get the echo effect as per your preference. Click on Ok button.

Step 5Play the video and if you are satisfied, click on Export button to save the video in your desired file format.
Part 3. How to Add Echo to Video on Mac
If you are a Mac user and you are looking for a free video editor to add echo effect, you can use iMovie app. iMovie is a video editor by Apple and most Mac users know and might have used it. iMovie comes with a built-in echo delay effect that can get the job done for you. However, the effect is not customizable as it is in Filmora. Here are the steps on how to put echo on video using iMovie.
Step 1Launch iMovie from Applications folder as it comes pre-installed on Mac.
Step 2Go to File> Import Media to bring in your video file. Thereafter, drag and drop the file on the Timeline.

Step 3Click on the video clip on the Timeline and click on “Clip Filter and Audio Effects” icon in the top-right corner.

Step 4Click on Audio Effect – None option and “Choose Audio Effect” pop-up window will open. Click on Echo Delay option.

Step 5Play the video and go to File> Share> File option to export the edited video.

The Bottom Line
Adding echo effect to video is a common trend when you want to emphasize what you are speaking. The echo effect sounds different and hence, it grabs the attention of the audience instantly. We have illustrated how you can add echo effect to your video online as well as on your computer. We highly recommend Wondershare Filmora to instant put echo effect to your video on Windows PC and Mac.
Free Download For Win 7 or later(64-bit)
Free Download For macOS 10.14 or later
Guide: Cropping and Combining Content in Wondershare Filmora [Latest]
Video editing is one of the most essential tasks in a video project. It plays a role in creating videos that leave a lasting impression on your audience. From the initial raw footage to the final product, a video goes through several processes. One vital aspect of video editing is trimming and merging, which holds great importance for any video project.
The editing process changes the whole narrative of a video by adding more depth and feel to it. Through editing, you can remove unwanted segments, rearrange clips, and much more. Capturing and recording video is one thing, but bringing the best out of the raw files is another. To make your raw footage somewhat stunning, you have to sit in the editing room.
Part 1: How Does Trimming or Merging Videos Help Users?
Merging and trimming videos is an editing technique that offers many benefits. Here’s how these actions can help you in so many ways. Find out how it helps the users when they merge or trim a video:
Trimming Videos
- Trimming allows users to remove unwanted portions of a video. You can eliminate mistakes, irrelevant footage, or unnecessary pauses in the video. It also helps streamline the content and improve its overall quality.
- It can help adjust the pacing of a video by removing or shortening sections that may be too slow or lengthy. This ensures a more engaging and dynamic viewing experience.
- By trimming, you can select the best moments from a longer video. You can also create highlight reels that showcase the most important or exciting parts.
- Many social media platforms have specific time limitations for videos. It allows you to meet these requirements and share their content without compromising its essence.
Merging Videos
- The merging of videos enables you to combine multiple clips or segments into a single video. This technique is useful when users want to compile footage from different sources. It also creates a uniform narrative from separate scenes.
- Merging allows you to create montages or collages that showcase various moments or perspectives. This is often used in music videos, compilations, or video presentations.
- Doing this can make seamless transitions between different shots or scenes. This further creates a visually fluid experience for the viewer.
- It also helps you create a coherent storyline by combining different clips. You can use this technique to communicate ideas, emotions, or messages effectively.
Part 2: Wondershare Filmora: An Introduction to A Great Video Editor
Wondershare Filmora is a video editing tool that is created for almost everyone. This tool has it all, from simple edit options to more complicated ones. You can apply various kinds of filters and effects to your video. Additionally, you can change the color tone of your video project by making a few adjustments. However, this is not it, as you can even do trimming and merging in your project.
Trimming or Merging Videos Editor A cross-platform for making videos anywhere for all creators, providing trimming and merging videos functions.
Free Download Free Download Learn More

Besides all this, the tool offers more than you’re expectations. It exists for professionals, enthusiasts, and even those who have started learning how to edit. Moreover, you can import and export videos up to 4K resolution using Wondershare Filmora. Choose a suitable template, import your media files, and start editing your videos with this tool.
Also read:
- [Updated] Explore Google Meet's Full Potential (Free Edition)
- [Updated] In 2024, Key Technique to Integrate GoPro Content Within Cohesive Spherical Videography
- Get Your Free Video Jockey Clips Now! Essential Download for Enhancing the 'Video Link' Functionality in Pioneer Deck Manager v3.6 (PDM)
- In 2024, How To Remove or Bypass Knox Enrollment Service On Itel A70
- In 2024, Top 10 Fingerprint Lock Apps to Lock Your Realme 11 5G Phone
- In 2024, VidGrabMaster Mobile/PC App Downloads
- New 2024 Approved Did You Know Cameras Have a Built-In Feature to Shoot Slow-Motion Clips? This Article Is About Using Sony S&Q to Capture Slow-Motion Scenes
- New 2024 Approved Let Us Talk About the Famous Photoshop and Most Commonly Used Glitch Effect. The Article Understudy Will Discuss in Detail About Photo Glitch Effect
- New The Ultimate Guide for the 10 Leading Slow-Motion Cameras for 2024
- Play Store Not Working On Honor 70 Lite 5G? 8 Solutions Inside | Dr.fone
- Updated 2024 Approved Reverse Video Online The Ultimate 2023 Guide
- Updated Green Screen Is a Widely Used Effect in After Effects. Many Professional Photographers Use It to Make Creative Video Effects. This Guide Will Show You How to Use Green Screen to Videos in After Effects for 2024
- Updated Looking for Efficient Ways to Create a Slow-Motion Video? Read the Article for Reliable Solutions that Provide Excellent Results for 2024
- Updated Top 10 Anime Movies of All Time for 2024
- Title: New In 2024, Want to Add a Motion Blur Effect to Your Photos? This Step-by-Step Tutorial Will Show You How to Use GIMP Software to Get the Effect You Want
- Author: Morgan
- Created at : 2025-02-03 14:20:37
- Updated at : 2025-02-09 14:55:42
- Link: https://ai-video-editing.techidaily.com/new-in-2024-want-to-add-a-motion-blur-effect-to-your-photos-this-step-by-step-tutorial-will-show-you-how-to-use-gimp-software-to-get-the-effect-you-want/
- License: This work is licensed under CC BY-NC-SA 4.0.