

New In 2024, Ways to Learn Discord Game Bots – Even if Youre Just Starting Out
Ways to Learn Discord Game Bots – Even if You’re Just Starting Out
Ways to Learn Discord Game Bots – Even if You’re Just Starting out
An easy yet powerful editor
Numerous effects to choose from
Detailed tutorials provided by the official channel
Discord is free social communication service used by tens of millions of individuals aged 13 and above to socialize with their communities and friends. People use discord regularly to discuss various topics, from art projects and family vacations to homework and mental health help. It serves as a home for communities of different sizes but has become quite popular as discord bot games due to the rise in the gaming community.
The great majority of servers are private, invite-only locations where friends and communities may communicate and spend time together. More significant, more open groups based on specific themes like popular video games like PUBG and Genshin Impact. Because all discussions are opt-in, users have complete choice over who they connect with and how they use discord.
In this article
01 [What Are Discord Game Bots?](#Part 1)
02 [How Do You Add Bot Games to Discord?](#Part 2)
03 [Top 10 Picks of Discord Gaming Bots](#Part 3)
04 [Discord Game Bots FAQs](#Part 4)
Part 1 What Are Discord Game Bots?
Discord game bots are artificial intelligence (AI)-powered applications that automate processes and add music, games, welcome messages, memes, and other fun stuff to your server. These bots make it simple to interact with your audience, grow your community, and manage your server.
There is a plethora of game bots for discord to pick from, each with its purpose. Some may automatically welcome new users, while others utilize webhooks to interface with other apps—and it may be tough for novice users to figure out which ones will provide the most remarkable results for their requirements.
Part 2 How Do You Add Bot Games to Discord?
Follow the steps below to add game bots for discord successfully:
Step 1: To add a bot to your Discord server, go to the bot’s source page. We’ll be using ProBot for this lesson.
Step 2: Depending on the bot you’re adding, click Add to Discord or Invite Now.
Step 3: To grant the bot access, a pop-up window will appear asking you to check in to your Discord account.
Step 4: After you log in, you’ll see a box asking for account authorization. Locate and choose the Add to Server drop-down menu.
Step 5: This will bring up a list of discord servers where you can add a bot game discord. Continue after selecting your server.
Step 6: Examine the server permissions that the bot asks for. Select and deselect according to your requirements. When you’re ready, click Authorize.
For those who like to share their discord game bots experience through screen recordings and whatnot, a potent and convenient video editing tool to make your sessions look even more incredible is Filmora.
Wondershare Filmora Video Editor is a famous video editing program for those who wish to focus on editing and producing high-quality videos. The program supports 4K video editing. It’s a reasonably priced tool featuring effects for both video and audio. When it comes to designing, adding effects, and modifying movies, it provides users with many possibilities. You can use the tool to add overlays, create animations and objects, add music, and input text. Imagine sharing your experience in 4k
For Win 7 or later (64-bit)
For macOS 10.12 or later
Part 3 Top 10 Picks of Discord Gaming Bots
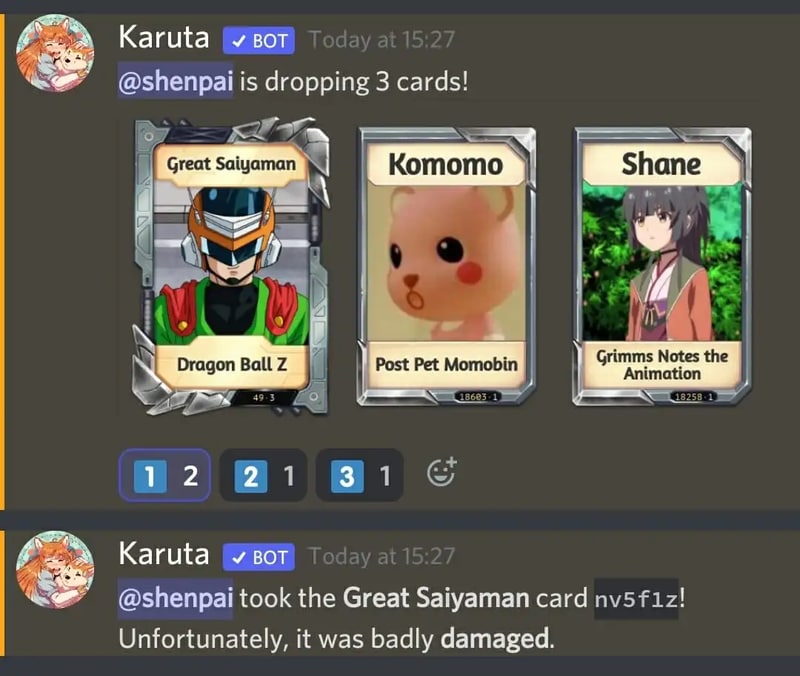
01Karuta
Karuta is a discord game bot where you gather anime characters. In Karuta, though, you collect characters using trading cards. Your cards and other objects may be customized, upgraded, and traded with other players. Better still, you maintain the same cards between servers, allowing you to play Karuta with the same deck on any server where the game discord bot is!
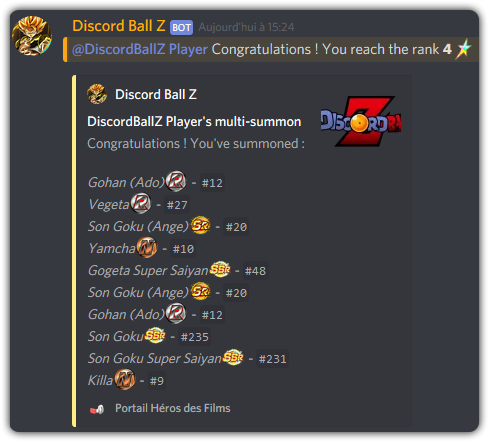
02Dragon Bot Z
Dragon Bot Z is the discord bot game that adds discord Ball Z, a multiplayer text-based RPG, to your server. Players in Discord Ball Z summon characters from the iconic Dragon Ball Z franchise, train them, fight foes, buy equipment, and trade with other players. This Discord game is ideal for Dragon Ball fans or anybody who likes text-based roleplaying games.
03Mudae
Mudae is a bot discord game with character-collecting. For example, you can claim popular anime and videogame characters as your “waifus” or “husbandos,” develop your harem, and compete for your favorite characters with other users. You can also trade the characters with other members.

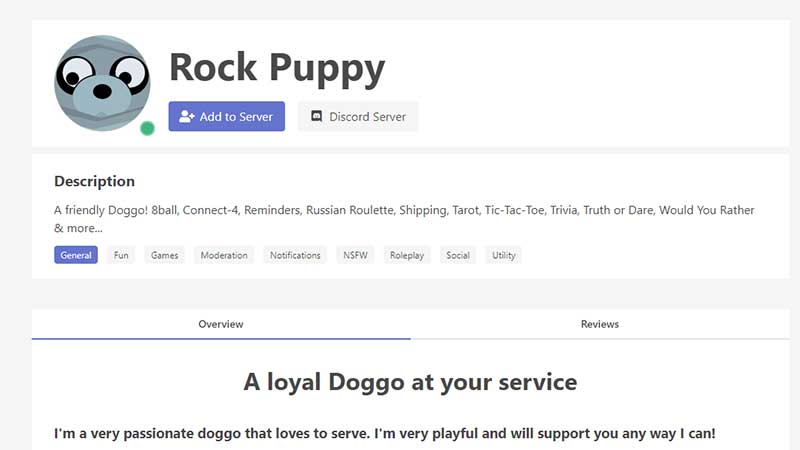
04Rock Puppy
Rock Puppy is a basic yet entertaining game bots discord bot that incorporates several classic games. You can enjoy Discord games like ConnectFour, Truth or Dare, Trivia, Tic-Tac-Toe, Russian Roulette, and Would You Rather with Rock Puppy. You may also use magic 8-ball, dice, or tarot cards, play classic board and party games on your server with Rock Puppy.
05GarticBOT
GarticBot is a bot game in discord that allows you to play the drawing game Gartic. GarticBot begins the Discord game by painting an image on your server. Members then compete against one another to predict the image the quickest. Others can guess your drawings if you submit them. Type the command g.draw, and Gartic will provide you with a URL to submit your artwork. GarticBot creates a fun Pictionary-style game for everyone on your server to play.

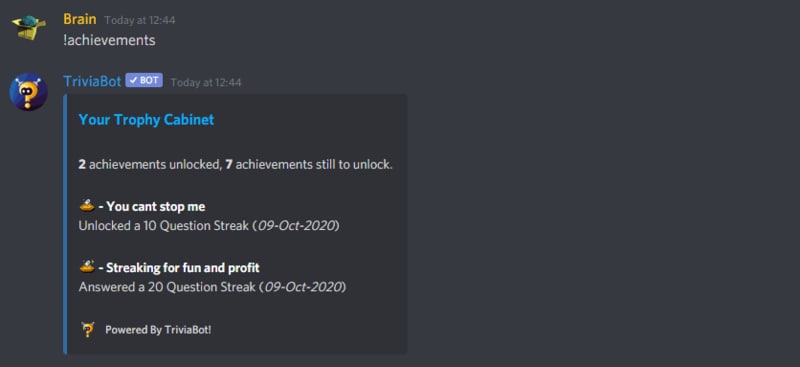
06TriviaBot
TriviaBot is the most popular trivia game discord bot. It has over 90,000 questions, and you can even submit your own for inclusion in the bot. Members can form and join teams to compete in competitions. You may also create a public leaderboard to display who performs the best on the server.
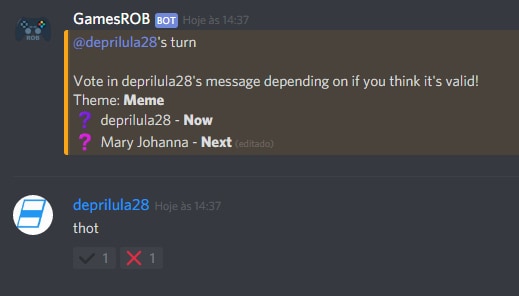
07GamesRob
The finest Uno discord game bot is GamesROB. ConnectFour, Trivia, Battleship, 2048, Tic-Tac-Toe, Minesweeper, and Hangman are the other traditional party games added to discord. You may also play “Detective,” a Discord game in which you try to figure out who is the “assassin” on your server, memory games, and Town, Country, River, a game in which you try to come up with as many phrases as possible within a theme.
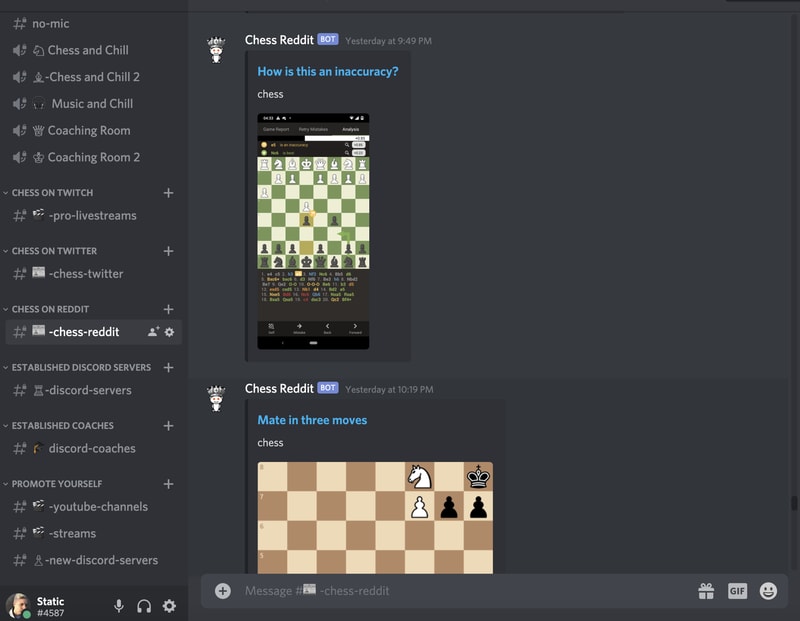
08Chess Reddit
Chess is a simple game that allows you to play chess on discord. You may play a chess game with other server members directly on the server. Instruct the bot on which pieces to move and where they should go. After each move, the Discord game bot creates a fresh graphic of the board so you can plot your next move. And, because the game hosts on your server, other users may watch and debate it!
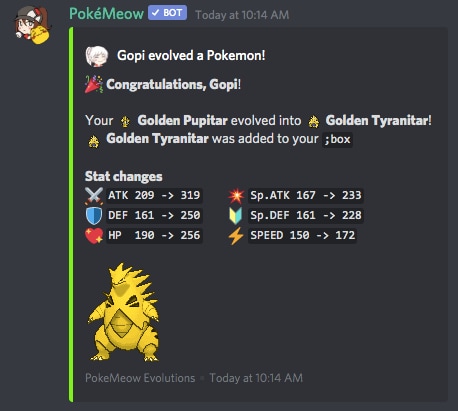
09PokeMeow
PokeMeow is by far the most popular Pokemon game discord bot. With this Pokemon bot, you may capture Pokemon on your server, trade, battle with other players, and accomplish tasks for in-game currency and stuff. As you keep building up your Pokedex, the Pokemon bot also allows to compete with other users on the worldwide leaderboard! PokeMeow is the ideal Pokemon Discord bot for fans of the Pokemon series.
10IdleRPG
IdleRPG is a discord game where you may play a text-based roleplaying game. You may make your character complete with ethnicity and social status. Then, you can go on quests and combat beasts, purchase, and exchange mythic objects, join guilds, engage with gods, and even marry other players. Play through your character’s adventure while engaging with and creating stories with other players. IdleRPG is likely to provide your server with hundreds of hours of roleplaying pleasure.
Part 4 Discord Game Bots FAQs
Now, let us go through some FAQs about discord game bots:
Q. Is it possible to play games with discord bots?
A. You could indeed play discord games in-server with bots, challenge other members, and win prizes! A game bot is a terrific method to keep players engaged on your server, especially if it’s a gaming Discord channel.
Q. Do game bots spy on you?
A. No, game discord bots do not have inbuilt spyware.
Q. How many bots should a server have?
A. It’s best not to have more than 20 bots game on discord on a server at any moment. More bots than this may cause users to become confused and the service to seem suspicious.
Q. Are discord bots free?
A. All these discord game bots are free to use. However, some have premium upgrades.
Q. Which bot is the most popular game bot in discord?
A. Worddle
Q. Which bot is the best bot for gaming on discord?
A. Gawesome is an excellent alternative for adding a multifunctional bot to your discord server.
● Ending Thoughts →
● Discord is accessible communication and socializing service for individuals aged 13 and above.
● The platform extends to various servers, each with its users, rules, themes, and channels, but one underutilized feature is the ability to develop and code custom AI-powered bots.
● Game bots for discord are artificial intelligence (AI)-powered applications that automate processes and add games to your discord server.
● These game discord bots make it simple to interact with your audience, grow your community, and manage your server.
● Lastly, to enhance the discord game bots experience and bring your gaming videos to life, use the Filmora software.
Discord is free social communication service used by tens of millions of individuals aged 13 and above to socialize with their communities and friends. People use discord regularly to discuss various topics, from art projects and family vacations to homework and mental health help. It serves as a home for communities of different sizes but has become quite popular as discord bot games due to the rise in the gaming community.
The great majority of servers are private, invite-only locations where friends and communities may communicate and spend time together. More significant, more open groups based on specific themes like popular video games like PUBG and Genshin Impact. Because all discussions are opt-in, users have complete choice over who they connect with and how they use discord.
In this article
01 [What Are Discord Game Bots?](#Part 1)
02 [How Do You Add Bot Games to Discord?](#Part 2)
03 [Top 10 Picks of Discord Gaming Bots](#Part 3)
04 [Discord Game Bots FAQs](#Part 4)
Part 1 What Are Discord Game Bots?
Discord game bots are artificial intelligence (AI)-powered applications that automate processes and add music, games, welcome messages, memes, and other fun stuff to your server. These bots make it simple to interact with your audience, grow your community, and manage your server.
There is a plethora of game bots for discord to pick from, each with its purpose. Some may automatically welcome new users, while others utilize webhooks to interface with other apps—and it may be tough for novice users to figure out which ones will provide the most remarkable results for their requirements.
Part 2 How Do You Add Bot Games to Discord?
Follow the steps below to add game bots for discord successfully:
Step 1: To add a bot to your Discord server, go to the bot’s source page. We’ll be using ProBot for this lesson.
Step 2: Depending on the bot you’re adding, click Add to Discord or Invite Now.
Step 3: To grant the bot access, a pop-up window will appear asking you to check in to your Discord account.
Step 4: After you log in, you’ll see a box asking for account authorization. Locate and choose the Add to Server drop-down menu.
Step 5: This will bring up a list of discord servers where you can add a bot game discord. Continue after selecting your server.
Step 6: Examine the server permissions that the bot asks for. Select and deselect according to your requirements. When you’re ready, click Authorize.
For those who like to share their discord game bots experience through screen recordings and whatnot, a potent and convenient video editing tool to make your sessions look even more incredible is Filmora.
Wondershare Filmora Video Editor is a famous video editing program for those who wish to focus on editing and producing high-quality videos. The program supports 4K video editing. It’s a reasonably priced tool featuring effects for both video and audio. When it comes to designing, adding effects, and modifying movies, it provides users with many possibilities. You can use the tool to add overlays, create animations and objects, add music, and input text. Imagine sharing your experience in 4k
For Win 7 or later (64-bit)
For macOS 10.12 or later
Part 3 Top 10 Picks of Discord Gaming Bots
01Karuta
Karuta is a discord game bot where you gather anime characters. In Karuta, though, you collect characters using trading cards. Your cards and other objects may be customized, upgraded, and traded with other players. Better still, you maintain the same cards between servers, allowing you to play Karuta with the same deck on any server where the game discord bot is!
02Dragon Bot Z
Dragon Bot Z is the discord bot game that adds discord Ball Z, a multiplayer text-based RPG, to your server. Players in Discord Ball Z summon characters from the iconic Dragon Ball Z franchise, train them, fight foes, buy equipment, and trade with other players. This Discord game is ideal for Dragon Ball fans or anybody who likes text-based roleplaying games.
03Mudae
Mudae is a bot discord game with character-collecting. For example, you can claim popular anime and videogame characters as your “waifus” or “husbandos,” develop your harem, and compete for your favorite characters with other users. You can also trade the characters with other members.
04Rock Puppy
Rock Puppy is a basic yet entertaining game bots discord bot that incorporates several classic games. You can enjoy Discord games like ConnectFour, Truth or Dare, Trivia, Tic-Tac-Toe, Russian Roulette, and Would You Rather with Rock Puppy. You may also use magic 8-ball, dice, or tarot cards, play classic board and party games on your server with Rock Puppy.
05GarticBOT
GarticBot is a bot game in discord that allows you to play the drawing game Gartic. GarticBot begins the Discord game by painting an image on your server. Members then compete against one another to predict the image the quickest. Others can guess your drawings if you submit them. Type the command g.draw, and Gartic will provide you with a URL to submit your artwork. GarticBot creates a fun Pictionary-style game for everyone on your server to play.
06TriviaBot
TriviaBot is the most popular trivia game discord bot. It has over 90,000 questions, and you can even submit your own for inclusion in the bot. Members can form and join teams to compete in competitions. You may also create a public leaderboard to display who performs the best on the server.
07GamesRob
The finest Uno discord game bot is GamesROB. ConnectFour, Trivia, Battleship, 2048, Tic-Tac-Toe, Minesweeper, and Hangman are the other traditional party games added to discord. You may also play “Detective,” a Discord game in which you try to figure out who is the “assassin” on your server, memory games, and Town, Country, River, a game in which you try to come up with as many phrases as possible within a theme.
08Chess Reddit
Chess is a simple game that allows you to play chess on discord. You may play a chess game with other server members directly on the server. Instruct the bot on which pieces to move and where they should go. After each move, the Discord game bot creates a fresh graphic of the board so you can plot your next move. And, because the game hosts on your server, other users may watch and debate it!
09PokeMeow
PokeMeow is by far the most popular Pokemon game discord bot. With this Pokemon bot, you may capture Pokemon on your server, trade, battle with other players, and accomplish tasks for in-game currency and stuff. As you keep building up your Pokedex, the Pokemon bot also allows to compete with other users on the worldwide leaderboard! PokeMeow is the ideal Pokemon Discord bot for fans of the Pokemon series.
10IdleRPG
IdleRPG is a discord game where you may play a text-based roleplaying game. You may make your character complete with ethnicity and social status. Then, you can go on quests and combat beasts, purchase, and exchange mythic objects, join guilds, engage with gods, and even marry other players. Play through your character’s adventure while engaging with and creating stories with other players. IdleRPG is likely to provide your server with hundreds of hours of roleplaying pleasure.
Part 4 Discord Game Bots FAQs
Now, let us go through some FAQs about discord game bots:
Q. Is it possible to play games with discord bots?
A. You could indeed play discord games in-server with bots, challenge other members, and win prizes! A game bot is a terrific method to keep players engaged on your server, especially if it’s a gaming Discord channel.
Q. Do game bots spy on you?
A. No, game discord bots do not have inbuilt spyware.
Q. How many bots should a server have?
A. It’s best not to have more than 20 bots game on discord on a server at any moment. More bots than this may cause users to become confused and the service to seem suspicious.
Q. Are discord bots free?
A. All these discord game bots are free to use. However, some have premium upgrades.
Q. Which bot is the most popular game bot in discord?
A. Worddle
Q. Which bot is the best bot for gaming on discord?
A. Gawesome is an excellent alternative for adding a multifunctional bot to your discord server.
● Ending Thoughts →
● Discord is accessible communication and socializing service for individuals aged 13 and above.
● The platform extends to various servers, each with its users, rules, themes, and channels, but one underutilized feature is the ability to develop and code custom AI-powered bots.
● Game bots for discord are artificial intelligence (AI)-powered applications that automate processes and add games to your discord server.
● These game discord bots make it simple to interact with your audience, grow your community, and manage your server.
● Lastly, to enhance the discord game bots experience and bring your gaming videos to life, use the Filmora software.
How to Create After Effects Gifs
How to Create After Effects Gifs
An easy yet powerful editor
Numerous effects to choose from
Detailed tutorials provided by the official channel
GIFs have been around for quite some time but as the flow of content continues to plummet on popular social media platforms like Facebook or Instagram, the demand for GIFs would continue to increase.
Unfortunately, you won’t be able to make a gif in after effects directly, unless with the help of a plug-in like GIFGun.
Before moving forward, keep in mind that using Adobe Media Encoder is an easier method for compressing your exports rather than any third-party compressor.
In this article, you will find easy to follow methods using which you can create after effects GIFs within a matter of minutes.
In this article
01 [General Knowledge on GIF Animation](#Part 1)
02 [What Is the Difference Between After Effects Gifs’ Making and Photoshop Gifs’ Making?](#Part 2)
03 [How to Create After Effects Gifs](#Part 3)
Part 1 General Knowledge on GIF Animation
01What is a GIF?
The acronym GIF stands for Graphics Interchange Format and the file is created in bitmap image format. This was developed back in 1987 by a working in CompuServe.
This format was incredibly successful on the WEB due to benefits like smaller file sizes, broader support, and its easy compatibility with Operating Systems.
However, GIFs are much more suitable as simple graphics and logos rather than Live Action Videos with its palette limitation of 256 per image.
Creating a GIF is like looping an animation or animated elements. You can use these animated GIFs in banners to engage your audience or even create fun sharable content for your Facebook pages.
You can start by creating basic easy animations in Photoshop and then elevate them by using After Effects.
02Why create a GIF?
Here are a handful of things you can keep your eye on if you are just starting on making GIFs;
● Simple Product Demonstrations. With simple 3 to 4 step GIFs, you can briefly introduce steps on how to use a product.
● You can provide instructions in a short span of time.
● UX designers use GIFs to show the functioning of certain digital experiences.
● You can introduce GIFs on your page to keep followers engaged.
● You can display some amazing things on your website.
Part 2 Difference between making GIFs in After Effects and Photoshop
Creating GIFs in After Effects and Photoshop are both one in the same thing but the results may vary depending on which choice of tools and features suits you better.
Now, for those who are learning Photoshop and After Effects for the first time, to understand the difference in results between both these software lets familiarize you with their features in brief.
01What’s Similar?
Since both are designed by Adobe, there are bound to be similarities in the tools and interface they use. Both these software enables you to use layers of editing from the layer panel where you separate the blending or transform multiple layers. You can apply masks to these layers in different ways on both software.
02Groups (PS) and Nested (AE) Composition
In Photoshop, you can group layers together and apply styles, blends, and transformations together. However, in After Effects, this is called Nesting.
Both are in a way similar to each other but Nesting Comps give users more functionality as it interprets probable compositions during the nesting process.
Smart objects used in PS are also comparable to Nested Comps as you can apply filters over one while applying effects to the other.
03Vector and Shapes
You can use the Pen tool or Shape tool in both PS and AE that creates shape layers without losing any integrity. Both the applications support Bezier which lets you control curves between anchor points in PS and vertices in AE.
04Destructive Effects
After Effects does not provide you with destructive effects while in Photoshop you can apply non-destructive filters. You can also combine several layers to apply changes or distort your images but these permanent changes cannot be made in After Effects.
You will also notice that although there are several similarities, there are tools and features which are not shared between both applications. The types of tool categories would also vary. Like with After Effects, you can create paragraph and character styles that you can apply to texts.
Part 3 How to Create After Effects Gifs
After Effects harbors greater video editing capabilities rather than the basic animating options you can try on Photoshop. In creating a GIF, you would want to leverage the combination of tools offered on both After Effects and Photoshop.
Let’s first get into how you can create an animated video on After Effects and then convert it into an animated GIF in Photoshop.
01Animating in After Effects
Step 1: Open After Effects, go to ‘Composition’ and create ‘New Composition’. You will need to fill out the dimensions and specs for your project on the window that pops up. For example, 300x250 px at 30 fps and 6 sec duration.

Step 2: You can import assets by dragging and dropping, or by going to the ‘Project Panel’ in the After Effects Workspace as shown in the image.

Step 3: Now, you can begin animating your Assets. Drag them and add them to the ‘Composition’ panel or ‘Timeline’ panel. Placing them in either one will make them appear on both. Adjust the layers according to the topmost layer on the panel.

Dial down the scale of every animation to 0% so that can be animated in a growing sequence. Select the layer you wish to adjust and click on ‘Transform’. Click on ‘Scale’ to give that layer an active marker on the timeline. Set the scale to 0%.

You can now begin animating the first item by moving the current time indicator to 06f (the 6th frame on the 30fps timeline). Scale the item back to 100% and the marker will reappear.

Repeat this for the other items. Keep in mind that each item has a 06f space between them for later adjustability.

Your equation is now complete and all that is left to do is animate your CTA button. Adjust the position of the top layer on your CTA and set the current time indicator to start time on the button animation. Click on ‘position’ to set up a marker on your Timeline. Forward the 04f then nudge the button and reverse back to the original position so that it looks like a button clicking animation.

Your animation is now complete. Now go to ‘Composition’ and shorten the time in the ‘Duration’ panel.
Step 4: Go to Composition. Click on Pre-Render and a new selection will pop up. Now click on ‘Render’. Your output will be a .mov file.

If you find exporting gifs from After Effects too complicated, you can also upload and loop videos using Wondershare Filmora Video Editor which has plenty of other amazing video editing features you can drag and drop to create.

Wondershare Filmora - Best Video Editor for Mac/Windows
5,481,435 people have downloaded it.
Build unique custom animations without breaking a sweat.
Focus on creating epic stories and leave the details to Filmora’s auto features.
Start a creative adventure with drag & drop effects and endless possibilities.
Filmora simplifies advanced features to save you time and effort.
Filmora cuts out repetition so you can move on to your next creative breakthrough.
02Converting Animation to GIF in Photoshop
Step 1: Create a new file in Photoshop with the same specs as you did in After Effects. Now go to ‘File’ > ‘Import’ > ‘Frames to Layers’ and import the saved .mov file.

Step 2: If you don’t automatically see the timeline, go to Windows > Timeline.

Step 3: Decide on how many loops you want in your animation. Once you are done with your GIF, go to ‘File’ > Export. Apply the Legacy Save for Web and choose the format for your GIF.

Step 4: In Export options, you can gain access to several presets to apply to your animated GIFs. The more color displayed in your GIF, the larger its size. You can use Dethering to smoothen gradients and shades. Looping is also turned off on Photoshop but you can apply looping from the ‘Options’ shown at the bottom of the menu.
Part 1 Ending Thoughts
● GIFs are a popular type of media that is quite trendy and easy to make using Adobe after effects gifs or Photoshop. They are called Graphics Interchange Format and are best used as simple graphic images.
● You require a combination of both Photoshop and After Effects, though both share similar interfaces, tools, and effects. You can group or nest compositions, apply filters or effects, and adjust vectors and shapes.
● After Effects is better than Photoshop in terms of creating videos, so you can first create a project in AE and then import the project onto PS after exporting after effects to gif. You can also use Filmora for the first step of this process.
GIFs have been around for quite some time but as the flow of content continues to plummet on popular social media platforms like Facebook or Instagram, the demand for GIFs would continue to increase.
Unfortunately, you won’t be able to make a gif in after effects directly, unless with the help of a plug-in like GIFGun.
Before moving forward, keep in mind that using Adobe Media Encoder is an easier method for compressing your exports rather than any third-party compressor.
In this article, you will find easy to follow methods using which you can create after effects GIFs within a matter of minutes.
In this article
01 [General Knowledge on GIF Animation](#Part 1)
02 [What Is the Difference Between After Effects Gifs’ Making and Photoshop Gifs’ Making?](#Part 2)
03 [How to Create After Effects Gifs](#Part 3)
Part 1 General Knowledge on GIF Animation
01What is a GIF?
The acronym GIF stands for Graphics Interchange Format and the file is created in bitmap image format. This was developed back in 1987 by a working in CompuServe.
This format was incredibly successful on the WEB due to benefits like smaller file sizes, broader support, and its easy compatibility with Operating Systems.
However, GIFs are much more suitable as simple graphics and logos rather than Live Action Videos with its palette limitation of 256 per image.
Creating a GIF is like looping an animation or animated elements. You can use these animated GIFs in banners to engage your audience or even create fun sharable content for your Facebook pages.
You can start by creating basic easy animations in Photoshop and then elevate them by using After Effects.
02Why create a GIF?
Here are a handful of things you can keep your eye on if you are just starting on making GIFs;
● Simple Product Demonstrations. With simple 3 to 4 step GIFs, you can briefly introduce steps on how to use a product.
● You can provide instructions in a short span of time.
● UX designers use GIFs to show the functioning of certain digital experiences.
● You can introduce GIFs on your page to keep followers engaged.
● You can display some amazing things on your website.
Part 2 Difference between making GIFs in After Effects and Photoshop
Creating GIFs in After Effects and Photoshop are both one in the same thing but the results may vary depending on which choice of tools and features suits you better.
Now, for those who are learning Photoshop and After Effects for the first time, to understand the difference in results between both these software lets familiarize you with their features in brief.
01What’s Similar?
Since both are designed by Adobe, there are bound to be similarities in the tools and interface they use. Both these software enables you to use layers of editing from the layer panel where you separate the blending or transform multiple layers. You can apply masks to these layers in different ways on both software.
02Groups (PS) and Nested (AE) Composition
In Photoshop, you can group layers together and apply styles, blends, and transformations together. However, in After Effects, this is called Nesting.
Both are in a way similar to each other but Nesting Comps give users more functionality as it interprets probable compositions during the nesting process.
Smart objects used in PS are also comparable to Nested Comps as you can apply filters over one while applying effects to the other.
03Vector and Shapes
You can use the Pen tool or Shape tool in both PS and AE that creates shape layers without losing any integrity. Both the applications support Bezier which lets you control curves between anchor points in PS and vertices in AE.
04Destructive Effects
After Effects does not provide you with destructive effects while in Photoshop you can apply non-destructive filters. You can also combine several layers to apply changes or distort your images but these permanent changes cannot be made in After Effects.
You will also notice that although there are several similarities, there are tools and features which are not shared between both applications. The types of tool categories would also vary. Like with After Effects, you can create paragraph and character styles that you can apply to texts.
Part 3 How to Create After Effects Gifs
After Effects harbors greater video editing capabilities rather than the basic animating options you can try on Photoshop. In creating a GIF, you would want to leverage the combination of tools offered on both After Effects and Photoshop.
Let’s first get into how you can create an animated video on After Effects and then convert it into an animated GIF in Photoshop.
01Animating in After Effects
Step 1: Open After Effects, go to ‘Composition’ and create ‘New Composition’. You will need to fill out the dimensions and specs for your project on the window that pops up. For example, 300x250 px at 30 fps and 6 sec duration.
Step 2: You can import assets by dragging and dropping, or by going to the ‘Project Panel’ in the After Effects Workspace as shown in the image.
Step 3: Now, you can begin animating your Assets. Drag them and add them to the ‘Composition’ panel or ‘Timeline’ panel. Placing them in either one will make them appear on both. Adjust the layers according to the topmost layer on the panel.
Dial down the scale of every animation to 0% so that can be animated in a growing sequence. Select the layer you wish to adjust and click on ‘Transform’. Click on ‘Scale’ to give that layer an active marker on the timeline. Set the scale to 0%.
You can now begin animating the first item by moving the current time indicator to 06f (the 6th frame on the 30fps timeline). Scale the item back to 100% and the marker will reappear.
Repeat this for the other items. Keep in mind that each item has a 06f space between them for later adjustability.
Your equation is now complete and all that is left to do is animate your CTA button. Adjust the position of the top layer on your CTA and set the current time indicator to start time on the button animation. Click on ‘position’ to set up a marker on your Timeline. Forward the 04f then nudge the button and reverse back to the original position so that it looks like a button clicking animation.
Your animation is now complete. Now go to ‘Composition’ and shorten the time in the ‘Duration’ panel.
Step 4: Go to Composition. Click on Pre-Render and a new selection will pop up. Now click on ‘Render’. Your output will be a .mov file.
If you find exporting gifs from After Effects too complicated, you can also upload and loop videos using Wondershare Filmora Video Editor which has plenty of other amazing video editing features you can drag and drop to create.
Wondershare Filmora - Best Video Editor for Mac/Windows
5,481,435 people have downloaded it.
Build unique custom animations without breaking a sweat.
Focus on creating epic stories and leave the details to Filmora’s auto features.
Start a creative adventure with drag & drop effects and endless possibilities.
Filmora simplifies advanced features to save you time and effort.
Filmora cuts out repetition so you can move on to your next creative breakthrough.
02Converting Animation to GIF in Photoshop
Step 1: Create a new file in Photoshop with the same specs as you did in After Effects. Now go to ‘File’ > ‘Import’ > ‘Frames to Layers’ and import the saved .mov file.
Step 2: If you don’t automatically see the timeline, go to Windows > Timeline.
Step 3: Decide on how many loops you want in your animation. Once you are done with your GIF, go to ‘File’ > Export. Apply the Legacy Save for Web and choose the format for your GIF.
Step 4: In Export options, you can gain access to several presets to apply to your animated GIFs. The more color displayed in your GIF, the larger its size. You can use Dethering to smoothen gradients and shades. Looping is also turned off on Photoshop but you can apply looping from the ‘Options’ shown at the bottom of the menu.
Part 1 Ending Thoughts
● GIFs are a popular type of media that is quite trendy and easy to make using Adobe after effects gifs or Photoshop. They are called Graphics Interchange Format and are best used as simple graphic images.
● You require a combination of both Photoshop and After Effects, though both share similar interfaces, tools, and effects. You can group or nest compositions, apply filters or effects, and adjust vectors and shapes.
● After Effects is better than Photoshop in terms of creating videos, so you can first create a project in AE and then import the project onto PS after exporting after effects to gif. You can also use Filmora for the first step of this process.
Top List of Best VHS Video Effect Makers
VHS effects are the trendiest and most highly usable effects for videos through which you can add retro qualities in simple videos. You must have noticed the classical yet smooth distortion in the famous music videos. This smoother distortion that gives a retro vibe in the video is possible with the VHS effects. You don’t have to spend millions on this as many VHS effect online tools are at your disposal.
This discussion aims to familiarize you with the most known and reliable VHS filter online tools. You will also discover much-needed and significant knowledge of VHS effects. The offline tool through which you can add VHS effects in videos like never before will also be discussed here.
Part 1: What Do You Know About VHS Effects?
The VHS effects are the visual and auditory artifacts, along with smoother playback video distortion. The term VHS indicates the technology “Video Home System tapes.” From the 1980s-1990s, these effects were well-known and readily used in digital content. Moreover, in recent years, the vintage appeal of the videos has been achieved with these VHS effects. You can learn more about this from the provided information:
- Lines of VHS: The lines in VHS are tracking lines, and it is used to implement distortion effects in the videos. You can notice that these lines often run vertically in the video effects.
- Vintage Frames: You may have seen the darkening and faded effects on the edges in the VHS-integrated videos. The playback equipment limitation initially caused it; however, many videographers apply these effects in videos to give them a vintage look.
- Glitching Effects: VHS effects are not completed without comprehension of glitching effects. This includes rolling bars and sudden statics. This also gives the look of tape damage and signal interface and is perfect for flashbacks.
- Nostalgic Provocation: With this effect, you can add nostalgic feelings. If you are going to make movies regarding history, it can also help you by adding retro effects. It also replicates imperfections to give a unique look to videos.
Add VHS Effect to Video
Simply add video effects on Video with Filmora Video Effect Editor ! Experience the magic of cool yet outstanding video effects, where your videos come to life in beautiful visuals.
Apply VHS Effect Apply VHS Effect Learn More >


Part 2: Top VHS Video Effect Online Tools to Use in 2024
A substantial inventory of tools can confuse you and make it harder to select the best tool. We wish to bring peace and harmony to your videography career and wish you to get familiar with the VHS effect online video tools without getting confused. You can find the industry-grade tool for making videos visually appealing here:
| 1. Veed.io | 2. Kapwing |
|---|---|
| 3. Clideo | 4. FlexClip |
| 5. Fastreel | 6. CreatorKit |
1. Veed.io
Veed.io lets you transform simple-looking videos into a masterpiece of aesthetics and retros with its VHS overlays. With this online VHS effect tool, you can also add perfect flashbacks along with VHS to engage users. Creating the loops of videos and adding VHS overlays is also possible with this. It also helps to add customized subtitles to the videos to make it more understandable.
Some Prominent Characteristics of Veed.io
- It is an all-in-one video editor through which you can add modern modifications to create stunning and powerful videos. This tool can help in creating marketing, training, TikTok, and demos.
- You can also optimize the videos by trimming, cropping, rotating, and splitting them. Other than this, you can add customized audio in simple videos.
- Removing unnecessary background noises and awkward pauses is also possible with Veed.io. You can also upgrade your productivity by using its pre-built templates.

2. Kapwing
To add VHS effects to video online for free, you can get assistance from this premium grade tool - Kapwing . It also supports timeline-based nondestructive editing, which gives you a free hand in customization. Other than this, you can also create the layers in the videos and add VHS effects where needed. If you have some unique idea in mind, don’t hesitate to choose a blank canvas.
Some Prominent Characteristics of Kapwing
- Kapwing lets you import videos from different sources. You can use Google Drive, Google Photos, or your device’s gallery to add a video.
- Using its preset templates, you can create high-quality videos without investing extra time. It also supports diversified plugins to boost your productivity.
- There are versatile shapes, emojis, and elements in it that you can use as per your need. This also lets you add customized text and subtitles to videos.

3. Clideo
This fast and secure VHS effect online video tool helps you add realistic VHS effects to videos. You can not only add the effects but can also change the format of videos without any issues. Other than this, you also apply several intuitive filters to make videos more studio friendly. Clideo can edit diversified metrics of the videos and work as a reputable video editor.
Some Prominent Characteristics of Clideo
- With this tool, you can add text to a video, change its fonts and colors, or make a picture in a picture split screen.
- It also assists you in merging lengthy videos into smaller ones. You can also compress the large-sized videos to make them more shareable.
- Creating memes, managing the speed of videos, resizing their dimensions, or cropping unrequired parts is also possible with this.

4. FlexClip
Distorted video quality is much adored in today’s world, and you can also add these effects to your videos. You can deploy this effect to represent something in the past, and it can boost your engagement in the entertainment industry. If you are worried that the quality of the video will be compromised with FlexClip , you can use its duplicating feature so the original video is preserved.
Some Prominent Characteristics of FlexClip
- It supports the text-to-speech feature through which you can not only add voiceover but can also customize the voice style.
- If you want to make videos more engaging, you can use the previously existing soundtracks of FlexClip. You can also search for the required soundtrack through specific genres.
- There are versatile effects, logos, shapes, cooperative, decorative, and title overlays, so you can make videos more illustrative.

5. Fastreel
This online-based platform can escalate your user experience by adding VHS effects to the videos. You can add high-quality VHS effects in videos and create perfect slideshows. Not only personally, but you can also use the capabilities of this tool to expand your professional life. Fastreel also lets you merge multiple videos and then apply the VHS effects.
Some Prominent Characteristics of Fastreel
- This tool works like an all-in-one video editor, as you can reverse, crop, resize, flip, and loop videos.
- If you are a slow-motion video lover, you can also make slow and stop-motion videos with built-in features.
- Fastreel can also convert images into videos or make video collages for you. Other than this, you are also free to add music to videos.

6. CreatorKit
Along with hundreds of promotional templates for high-quality VHS effects, this VHS filter online tool never fails to amaze users with its higher functionality. CreatorKit can create engaging product videos with intuitive text styles. You can use its background removal if you want to create transparent-grade videos.
Some Prominent Characteristics of CreatorKit
- To create optimized videos, you can use its Shopify integrations to access more elements and other things.
- It can add animated price tags along with showcasing product features. You can also create intros and outros with this.
- There are several colors generated and gradient-generating bases that can assist you in showcasing the brand colors without any issues.

Part 3: Software Alternative: Insert Best VHS Effects Using Wondershare Filmora
It will not be inappropriate to say that Wondershare Filmora is the top-ranked video editor in the market. With Filmora, you can add several types of VHS effects in videos, such as horror filters, distortion bad, static, lines, vintage, and more. You can also search for customized effects by adding keywords and their subscription status.
Add VHS Video Effect For Win 7 or later(64-bit)
Add VHS Video Effect For macOS 10.14 or later
Wondershare Filmora is also a better option than other VHS effect online tools because you can also access versatile stock media files in it. There are tons of pre-built templates in Filmora, and you can also access all your previous projects from Filmora Cloud. Adding high-quality audio to videos is also possible with this tool.
Instructions to Add VHS Effects in Videos with Filmora
The instructions through which you can add the VHS effects in videos with any complications are given here:
Step 1Launch Filmora and Add a Video
To get started, install and launch Wondershare Filmora on your device. Make sure you use the updated version of Filmora. Next, click the “New Project” button and select “Click here to import media.” Next, add the video of your choice on which you wish to apply the VHS effect.

Step 2Add Video to Timeline and Apply Effect
Following this, drag the video to the “Timeline,” click on “Effects” from the above panel and go to “Search Bar.” From there, search for “VHS Effects” and select the effect from the available options. After selecting it, drag it on the video present in the timeline.

Step 3Download the VHS Effect Integrated Video
To continue, you can also modify it to a further extent by clicking on the added effect. There are several features that can help you with modification, such as Transitions, Stickers, and more. Afterward, click the “Export” button, customize the “Name,” “Save To,” “Format,” Quality,” and other metrics of videos. Finally, hit the “Export” button and save the video on your device.

Conclusion
To summarize, it can be said that you can use the VHS effect online video tools to create cinematic-level videos. VHS effects are smooth distortion effects that are used in several videos. You can learn more about this from the above information. Besides this, several online tools such as Veed.io, Clideo, FlexClip, and more can help you add VHS effects to videos.
To learn more about these tools, look at the information provided above. In case you wish to add the VHS effects to videos without facing any complications, don’t refrain from using the top-class tool named Wondershare Filmora. The steps to accomplish this task in a flawless manner are also discussed above for you.
Apply VHS Effect Apply VHS Effect Learn More >
Part 2: Top VHS Video Effect Online Tools to Use in 2024
A substantial inventory of tools can confuse you and make it harder to select the best tool. We wish to bring peace and harmony to your videography career and wish you to get familiar with the VHS effect online video tools without getting confused. You can find the industry-grade tool for making videos visually appealing here:
| 1. Veed.io | 2. Kapwing |
|---|---|
| 3. Clideo | 4. FlexClip |
| 5. Fastreel | 6. CreatorKit |
1. Veed.io
Veed.io lets you transform simple-looking videos into a masterpiece of aesthetics and retros with its VHS overlays. With this online VHS effect tool, you can also add perfect flashbacks along with VHS to engage users. Creating the loops of videos and adding VHS overlays is also possible with this. It also helps to add customized subtitles to the videos to make it more understandable.
Some Prominent Characteristics of Veed.io
- It is an all-in-one video editor through which you can add modern modifications to create stunning and powerful videos. This tool can help in creating marketing, training, TikTok, and demos.
- You can also optimize the videos by trimming, cropping, rotating, and splitting them. Other than this, you can add customized audio in simple videos.
- Removing unnecessary background noises and awkward pauses is also possible with Veed.io. You can also upgrade your productivity by using its pre-built templates.
2. Kapwing
To add VHS effects to video online for free, you can get assistance from this premium grade tool - Kapwing . It also supports timeline-based nondestructive editing, which gives you a free hand in customization. Other than this, you can also create the layers in the videos and add VHS effects where needed. If you have some unique idea in mind, don’t hesitate to choose a blank canvas.
Some Prominent Characteristics of Kapwing
- Kapwing lets you import videos from different sources. You can use Google Drive, Google Photos, or your device’s gallery to add a video.
- Using its preset templates, you can create high-quality videos without investing extra time. It also supports diversified plugins to boost your productivity.
- There are versatile shapes, emojis, and elements in it that you can use as per your need. This also lets you add customized text and subtitles to videos.
3. Clideo
This fast and secure VHS effect online video tool helps you add realistic VHS effects to videos. You can not only add the effects but can also change the format of videos without any issues. Other than this, you also apply several intuitive filters to make videos more studio friendly. Clideo can edit diversified metrics of the videos and work as a reputable video editor.
Some Prominent Characteristics of Clideo
- With this tool, you can add text to a video, change its fonts and colors, or make a picture in a picture split screen.
- It also assists you in merging lengthy videos into smaller ones. You can also compress the large-sized videos to make them more shareable.
- Creating memes, managing the speed of videos, resizing their dimensions, or cropping unrequired parts is also possible with this.
4. FlexClip
Distorted video quality is much adored in today’s world, and you can also add these effects to your videos. You can deploy this effect to represent something in the past, and it can boost your engagement in the entertainment industry. If you are worried that the quality of the video will be compromised with FlexClip , you can use its duplicating feature so the original video is preserved.
Some Prominent Characteristics of FlexClip
- It supports the text-to-speech feature through which you can not only add voiceover but can also customize the voice style.
- If you want to make videos more engaging, you can use the previously existing soundtracks of FlexClip. You can also search for the required soundtrack through specific genres.
- There are versatile effects, logos, shapes, cooperative, decorative, and title overlays, so you can make videos more illustrative.
5. Fastreel
This online-based platform can escalate your user experience by adding VHS effects to the videos. You can add high-quality VHS effects in videos and create perfect slideshows. Not only personally, but you can also use the capabilities of this tool to expand your professional life. Fastreel also lets you merge multiple videos and then apply the VHS effects.
Some Prominent Characteristics of Fastreel
- This tool works like an all-in-one video editor, as you can reverse, crop, resize, flip, and loop videos.
- If you are a slow-motion video lover, you can also make slow and stop-motion videos with built-in features.
- Fastreel can also convert images into videos or make video collages for you. Other than this, you are also free to add music to videos.
6. CreatorKit
Along with hundreds of promotional templates for high-quality VHS effects, this VHS filter online tool never fails to amaze users with its higher functionality. CreatorKit can create engaging product videos with intuitive text styles. You can use its background removal if you want to create transparent-grade videos.
Some Prominent Characteristics of CreatorKit
- To create optimized videos, you can use its Shopify integrations to access more elements and other things.
- It can add animated price tags along with showcasing product features. You can also create intros and outros with this.
- There are several colors generated and gradient-generating bases that can assist you in showcasing the brand colors without any issues.
Part 3: Software Alternative: Insert Best VHS Effects Using Wondershare Filmora
It will not be inappropriate to say that Wondershare Filmora is the top-ranked video editor in the market. With Filmora, you can add several types of VHS effects in videos, such as horror filters, distortion bad, static, lines, vintage, and more. You can also search for customized effects by adding keywords and their subscription status.
Add VHS Video Effect For Win 7 or later(64-bit)
Add VHS Video Effect For macOS 10.14 or later
Wondershare Filmora is also a better option than other VHS effect online tools because you can also access versatile stock media files in it. There are tons of pre-built templates in Filmora, and you can also access all your previous projects from Filmora Cloud. Adding high-quality audio to videos is also possible with this tool.
Instructions to Add VHS Effects in Videos with Filmora
The instructions through which you can add the VHS effects in videos with any complications are given here:
Step 1Launch Filmora and Add a Video
To get started, install and launch Wondershare Filmora on your device. Make sure you use the updated version of Filmora. Next, click the “New Project” button and select “Click here to import media.” Next, add the video of your choice on which you wish to apply the VHS effect.
Step 2Add Video to Timeline and Apply Effect
Following this, drag the video to the “Timeline,” click on “Effects” from the above panel and go to “Search Bar.” From there, search for “VHS Effects” and select the effect from the available options. After selecting it, drag it on the video present in the timeline.
Step 3Download the VHS Effect Integrated Video
To continue, you can also modify it to a further extent by clicking on the added effect. There are several features that can help you with modification, such as Transitions, Stickers, and more. Afterward, click the “Export” button, customize the “Name,” “Save To,” “Format,” Quality,” and other metrics of videos. Finally, hit the “Export” button and save the video on your device.
Conclusion
To summarize, it can be said that you can use the VHS effect online video tools to create cinematic-level videos. VHS effects are smooth distortion effects that are used in several videos. You can learn more about this from the above information. Besides this, several online tools such as Veed.io, Clideo, FlexClip, and more can help you add VHS effects to videos.
To learn more about these tools, look at the information provided above. In case you wish to add the VHS effects to videos without facing any complications, don’t refrain from using the top-class tool named Wondershare Filmora. The steps to accomplish this task in a flawless manner are also discussed above for you.
Explore Your Skills in Dimensional Graphic Editing and Animation with Blender. The Software Lands Among the Best Platforms for Art Enthusiasts with Its Stunning Transparent Backgrounds
Blender Tips - How to Make Blender Render Transparent Background
An easy yet powerful editor
Numerous effects to choose from
Detailed tutorials provided by the official channel
Want to explore open source 2D/3D content creation through Blender? Stay here to embark your graphic creations with over the top dimensional detailing!
In this article
01 [What’s Blender and What’s Its Advantages?](#Part 1)
02 [How to Make a Material Transparent in Blender](#Part 2)
03 [How to Make a Background Transparent in Blender](#Part 3)
Part 1 What’s Blender and What’s Its Advantages?
When landing into the world of 3D graphic design, the Blender software suite is a one stop access to everything you would possibly think of exploring with. Right from modeling, animation, rendering and compositing to rigging, motion tracking and simulation; the software is a complete video editor and game developer kit.
Some high rated professional applications of the software include, API based Python and allied tool scripting to customize different applications, most of which are a part of the suite’s later releases. The software further supports a common graphic pipeline; compatible to studio based professional as well as individual usage and undergoes continuous upgrade to ascertain maximum graphic productivity.
Talking of the software’s platform compatibility, you are free to use Blender on any of your Windows, Mac and Linux supported devices with utmost ease. The suite works on the OpenGL platform for the most responsive user experience and quick output response.
You can further, conveniently regard the software as your personal 3D graphic designer, owing to the fact that the software’s General Public License grants the liberty of minor and major code alterations to its users, which often results in making the suite additively responsive, with the inclusion of improved features, receptive bug fixes and interactive usage.
Potential Advantages
Choosing the Blender 3D design suite for dimensional and motion graphic editing, you are entitled to benefit from the following advantages:
01A Free Graphic Suite
Almost every software user has the obvious habit of prioritizing financial equity before all other program credibility. However, you should be relieved to realize that the Blender 3D Suite is available to you without a price tag. Loyal users of the software claim the product to outshine its priced counterparts in terms of features and responsive flexibility.
If you are at the shore of graphic design and 3D modeling, there’s absolutely no better software to jump with, in the creation pool. Talking of the concerns of long term free usage and hidden feature blocking pay walls, there’s no cause to worry.
The software earns most of it financial credits through sales merchandise, donations and Cloud Service, which is a reasonably priced and optional graphic design assistant and application resource.
02Open Source Software
Essentially programmed and developed by an expert and skilled core team, the software is liberal enough to entertain open source modifications. Public users of the suite are permitted to make functionality alterations with Python coding. This flexibility of the Blender software is the underlying reason to a community driven increment to the existing top class suite functionalities.
While the public user creativity is responsible for adding a heap of free and paid software functionalities, the suite offers a sale of the specific feature scripts at marketplaces like, Blendermarket.com as a developer support initiative to promote the creation of highly productive graphic tools.
03Extensive Pipeline Support
As already stated, the software supports a plethora of creative utilities ranging from still and motion image graphics, movie developments, dimensional modeling, gaming, studio VFX and lots more. What’s best is, you are entitled to all this without having to spend a single penny from your pocket.
While most creators take up Blender graphic designing as a full time earning source, the bottom line is, if you are wondering, whether or not Blender supports a particular design task, most of the times it possibly can!
04Rendering Flexibility
You can work with two rendering options, viz., Eevee and Cycles within Blender. Using the Eevee render option, users can render their design models in physical, real time outputs in a quick time span. T5her biggest advantage of this rendering engine happens to be its working speed. While it does not require you wait for tedious rendering durations, you can additionally escape individual frame renders.
The Cycles is a physical, path tracing render engine, using light rays to interpret design looks. Compatible to GPU and CPU rendering, this one is a bit slow, but delivers a much precise image than Eevee.
Part 2 How to Make a Material Transparent in Blender
Blender is a top class graphic modulation tool; you can use to play with your editing creativity to your heart’s content, catering to a variety of design requirements, while adhering to a distinguished professional outlook. If you are pondering over the perfect task choice to start your editing journey with Blender, you can begin with making a material transparent in the software.
When beginning to create transparent artworks in Blender, you need to be familiar with the Transparent BSDF node. Here’s a quick explanation:
Transparent BSDF Node
When working with Blender, you get to access a variety of graphic nodes that cater to specific design purposes. Likewise, the transparent BSDF, as the name suggests, is an exclusive transparency creation graphic node that is essential to make materials transparent in Blender. Talking of the specific node function, it is there to facilitate the control of different transparency modes, in cohesion with specific user requirements.
Browse through the following section for a guided tutorial to make a material transparent using Blender:
Step 1:
Prepare a suitable BSDF material by selecting any image from your device and applying it to the object in the Blender’s viewport.
Step 2:
To start working with the Transparent BSDF node, you first need to insert the same into the node tree amongst the Principle BSDF and the Mix Shader nodes. To do this, you need to select ‘Add’ or press ‘Ctrl + A’, followed by locating the same in the ‘Shader’ submenu. Do not forget to add the ‘Mix Shader’ node, which is again, present in the ‘Shader’ submenu, to the node tree.
Step 3:
Plug in the Transparent BSDF output into the top Shader input of the Mix Shader, while dragging the latter into the connecting link between the Material Output and Principle BSDF nodes. This enables the Mix Shader node to pass through the two output generating nodes. The resultant ‘Transparency Effect’ can be seen on the viewpoint object within a few seconds.
Step 4:
Make an additional connection of two fresh nodes into the node tree as follows:
● Transparent BSDF output to the Mix Shader input
● Principal BSDF output to the Mix Shader input
● Mix Shader output to the Surface input
This will finally fetch a transparent material output for the selected image object.

Part 3 How to Make a Background Transparent in Blender
Having experimented with object material transparency in Blender, you can try hands at taking your creativity to the next level by creating Blender render transparent backgrounds in the software. Here’s what you need to do to take up the creation process:

Step 1:
Begin with choosing a suitable image to create a transparent background in either of the Eevee or Cycles render engines, followed by navigating to the ‘Render Properties’ tab in the software’s main interface. Click on the same to get a related drop down menu for activating selected image effects.

Step 2:
From the dropdown that appears, reach to the ‘Film’ option and click on the ‘Transparency’ checkbox to activate it.

You will now observe the image background in the Blender object viewport to disappear.

Step 3:
Press F12 to receive the render output. You can now save the transparent background image in your device. Take note use a transparency compatible image format, preferably PNG.
Blender is undoubtedly a viable graphic editing software to create transparent background images, but if you are in search of a different editor alternative, the Filmora Image Creator and Editor software to take up the aforesaid task with utmost ease.

Wondershare Filmora Video Editor
Essentially a Wondershare software utility, Filmora is conveniently regarded as one among the finest and top curated image editor software. Adhering to the particular interest of transparent background creation, Filmora’s exclusive ‘Green Screen’ attribute is a viable solution to create masterpieces of professional quality, transparent background images. The huge effects library of the software is there to infuse the additional tint of class to your creative excellence.
Making Transparent Background Images in Filmora
Follow the stepwise guided tutorial given below to create images with excellent quality transparent background in Filmora:
Step 1: Software Download and Installation
Log in to your favorite web browser in a Mac or Windows device to download Filmora from its official site and proceed with the software installation process.
For Win 7 or later (64-bit)
For macOS 10.12 or later
Step 2: Import Image File
When you are done with the installation, launch the software and navigate to the ’Import’ tab in its welcome interface. Click and tap ‘Import Media File’ from the dropdown that appears to import the desired image to Filmora’s media library.

Step 3: Drag to Timeline
The next step is to drag your image selection from the software’s media library to its editor timeline. Either right click the image and select ‘Insert’ option from the submenu that appears, or use the conventional ‘Drag and Drop’ method to accomplish this task.

Step 4: Transparency Adjustments
Once the image reaches the timeline, tap the same to see the ‘Settings’ tab get opened. Navigate through the tab options until you find ‘Chroma Key Settings’. Enable the ‘Chroma Key’ with a right side toggle to see your selected image get transparent with a ‘Green’ color in the background.
An alternative to the above method is to hit the ‘Color Picker’ option to the right of the ‘Select Color’ tab and navigate to a desired section of the image to make it transparent with a single click.

If you observe partial transparency in the resultant image background, consider making additional adjustments in ’Chroma Key’ setting parameters like, offset, edge thickness, tolerance, edge feather, etc., to ensure that the image background is totally transparent. When the final artwork makes you happy, tap ‘OK’.

**Step 4: Time to Export!**Your creation is now all set for a media export to your favorite social media handles. Just click on the ‘Export’ tab in the top right of the software timeline and that’s it!

● Ending Thoughts →
● Exploring your creative abilities with different graphic design tools and editing variations is an absolute fun. Among the various design alternatives, playing with dimensional graphic creativity is a remarkable craft that can be mastered with convenient market based software like Blender.
● However, if you are keen on trying other alternatives, you can prefer the Filmora Image Editor software for top class, professional quality image and video creation.
Want to explore open source 2D/3D content creation through Blender? Stay here to embark your graphic creations with over the top dimensional detailing!
In this article
01 [What’s Blender and What’s Its Advantages?](#Part 1)
02 [How to Make a Material Transparent in Blender](#Part 2)
03 [How to Make a Background Transparent in Blender](#Part 3)
Part 1 What’s Blender and What’s Its Advantages?
When landing into the world of 3D graphic design, the Blender software suite is a one stop access to everything you would possibly think of exploring with. Right from modeling, animation, rendering and compositing to rigging, motion tracking and simulation; the software is a complete video editor and game developer kit.
Some high rated professional applications of the software include, API based Python and allied tool scripting to customize different applications, most of which are a part of the suite’s later releases. The software further supports a common graphic pipeline; compatible to studio based professional as well as individual usage and undergoes continuous upgrade to ascertain maximum graphic productivity.
Talking of the software’s platform compatibility, you are free to use Blender on any of your Windows, Mac and Linux supported devices with utmost ease. The suite works on the OpenGL platform for the most responsive user experience and quick output response.
You can further, conveniently regard the software as your personal 3D graphic designer, owing to the fact that the software’s General Public License grants the liberty of minor and major code alterations to its users, which often results in making the suite additively responsive, with the inclusion of improved features, receptive bug fixes and interactive usage.
Potential Advantages
Choosing the Blender 3D design suite for dimensional and motion graphic editing, you are entitled to benefit from the following advantages:
01A Free Graphic Suite
Almost every software user has the obvious habit of prioritizing financial equity before all other program credibility. However, you should be relieved to realize that the Blender 3D Suite is available to you without a price tag. Loyal users of the software claim the product to outshine its priced counterparts in terms of features and responsive flexibility.
If you are at the shore of graphic design and 3D modeling, there’s absolutely no better software to jump with, in the creation pool. Talking of the concerns of long term free usage and hidden feature blocking pay walls, there’s no cause to worry.
The software earns most of it financial credits through sales merchandise, donations and Cloud Service, which is a reasonably priced and optional graphic design assistant and application resource.
02Open Source Software
Essentially programmed and developed by an expert and skilled core team, the software is liberal enough to entertain open source modifications. Public users of the suite are permitted to make functionality alterations with Python coding. This flexibility of the Blender software is the underlying reason to a community driven increment to the existing top class suite functionalities.
While the public user creativity is responsible for adding a heap of free and paid software functionalities, the suite offers a sale of the specific feature scripts at marketplaces like, Blendermarket.com as a developer support initiative to promote the creation of highly productive graphic tools.
03Extensive Pipeline Support
As already stated, the software supports a plethora of creative utilities ranging from still and motion image graphics, movie developments, dimensional modeling, gaming, studio VFX and lots more. What’s best is, you are entitled to all this without having to spend a single penny from your pocket.
While most creators take up Blender graphic designing as a full time earning source, the bottom line is, if you are wondering, whether or not Blender supports a particular design task, most of the times it possibly can!
04Rendering Flexibility
You can work with two rendering options, viz., Eevee and Cycles within Blender. Using the Eevee render option, users can render their design models in physical, real time outputs in a quick time span. T5her biggest advantage of this rendering engine happens to be its working speed. While it does not require you wait for tedious rendering durations, you can additionally escape individual frame renders.
The Cycles is a physical, path tracing render engine, using light rays to interpret design looks. Compatible to GPU and CPU rendering, this one is a bit slow, but delivers a much precise image than Eevee.
Part 2 How to Make a Material Transparent in Blender
Blender is a top class graphic modulation tool; you can use to play with your editing creativity to your heart’s content, catering to a variety of design requirements, while adhering to a distinguished professional outlook. If you are pondering over the perfect task choice to start your editing journey with Blender, you can begin with making a material transparent in the software.
When beginning to create transparent artworks in Blender, you need to be familiar with the Transparent BSDF node. Here’s a quick explanation:
Transparent BSDF Node
When working with Blender, you get to access a variety of graphic nodes that cater to specific design purposes. Likewise, the transparent BSDF, as the name suggests, is an exclusive transparency creation graphic node that is essential to make materials transparent in Blender. Talking of the specific node function, it is there to facilitate the control of different transparency modes, in cohesion with specific user requirements.
Browse through the following section for a guided tutorial to make a material transparent using Blender:
Step 1:
Prepare a suitable BSDF material by selecting any image from your device and applying it to the object in the Blender’s viewport.
Step 2:
To start working with the Transparent BSDF node, you first need to insert the same into the node tree amongst the Principle BSDF and the Mix Shader nodes. To do this, you need to select ‘Add’ or press ‘Ctrl + A’, followed by locating the same in the ‘Shader’ submenu. Do not forget to add the ‘Mix Shader’ node, which is again, present in the ‘Shader’ submenu, to the node tree.
Step 3:
Plug in the Transparent BSDF output into the top Shader input of the Mix Shader, while dragging the latter into the connecting link between the Material Output and Principle BSDF nodes. This enables the Mix Shader node to pass through the two output generating nodes. The resultant ‘Transparency Effect’ can be seen on the viewpoint object within a few seconds.
Step 4:
Make an additional connection of two fresh nodes into the node tree as follows:
● Transparent BSDF output to the Mix Shader input
● Principal BSDF output to the Mix Shader input
● Mix Shader output to the Surface input
This will finally fetch a transparent material output for the selected image object.
Part 3 How to Make a Background Transparent in Blender
Having experimented with object material transparency in Blender, you can try hands at taking your creativity to the next level by creating Blender render transparent backgrounds in the software. Here’s what you need to do to take up the creation process:
Step 1:
Begin with choosing a suitable image to create a transparent background in either of the Eevee or Cycles render engines, followed by navigating to the ‘Render Properties’ tab in the software’s main interface. Click on the same to get a related drop down menu for activating selected image effects.
Step 2:
From the dropdown that appears, reach to the ‘Film’ option and click on the ‘Transparency’ checkbox to activate it.
You will now observe the image background in the Blender object viewport to disappear.
Step 3:
Press F12 to receive the render output. You can now save the transparent background image in your device. Take note use a transparency compatible image format, preferably PNG.
Blender is undoubtedly a viable graphic editing software to create transparent background images, but if you are in search of a different editor alternative, the Filmora Image Creator and Editor software to take up the aforesaid task with utmost ease.
Wondershare Filmora Video Editor
Essentially a Wondershare software utility, Filmora is conveniently regarded as one among the finest and top curated image editor software. Adhering to the particular interest of transparent background creation, Filmora’s exclusive ‘Green Screen’ attribute is a viable solution to create masterpieces of professional quality, transparent background images. The huge effects library of the software is there to infuse the additional tint of class to your creative excellence.
Making Transparent Background Images in Filmora
Follow the stepwise guided tutorial given below to create images with excellent quality transparent background in Filmora:
Step 1: Software Download and Installation
Log in to your favorite web browser in a Mac or Windows device to download Filmora from its official site and proceed with the software installation process.
For Win 7 or later (64-bit)
For macOS 10.12 or later
Step 2: Import Image File
When you are done with the installation, launch the software and navigate to the ’Import’ tab in its welcome interface. Click and tap ‘Import Media File’ from the dropdown that appears to import the desired image to Filmora’s media library.
Step 3: Drag to Timeline
The next step is to drag your image selection from the software’s media library to its editor timeline. Either right click the image and select ‘Insert’ option from the submenu that appears, or use the conventional ‘Drag and Drop’ method to accomplish this task.
Step 4: Transparency Adjustments
Once the image reaches the timeline, tap the same to see the ‘Settings’ tab get opened. Navigate through the tab options until you find ‘Chroma Key Settings’. Enable the ‘Chroma Key’ with a right side toggle to see your selected image get transparent with a ‘Green’ color in the background.
An alternative to the above method is to hit the ‘Color Picker’ option to the right of the ‘Select Color’ tab and navigate to a desired section of the image to make it transparent with a single click.
If you observe partial transparency in the resultant image background, consider making additional adjustments in ’Chroma Key’ setting parameters like, offset, edge thickness, tolerance, edge feather, etc., to ensure that the image background is totally transparent. When the final artwork makes you happy, tap ‘OK’.
**Step 4: Time to Export!**Your creation is now all set for a media export to your favorite social media handles. Just click on the ‘Export’ tab in the top right of the software timeline and that’s it!
● Ending Thoughts →
● Exploring your creative abilities with different graphic design tools and editing variations is an absolute fun. Among the various design alternatives, playing with dimensional graphic creativity is a remarkable craft that can be mastered with convenient market based software like Blender.
● However, if you are keen on trying other alternatives, you can prefer the Filmora Image Editor software for top class, professional quality image and video creation.
Also read:
- Replacing Sky Background Using Adobe Photoshop A Comprehensive Guide
- You Have to Get It Right when It Comes to Cinematic Grading. We Highlight the Most Common Mistakes to Avoid While Focusing on Various Tips to Apply in the Process
- New In 2024, Movavi Slideshow Maker Is a Powerful Video Editing Tool that Can Be Used to Add Rich Effects to Videos Easily. This Guide Will Introduce the Features and Show You How to Apply Effects to Videos with This Tool
- New 2024 Approved 4 Methods to Resize a WebM File
- 2024 Approved Learn How to Use Face Tracking in After Effects to Quickly Mask Out Faces, Animate Objects on Faces, and More
- Updated Perfecting the Art of Slowing Down Video on Instagram
- Finding LUTs Made by Danny Gevirtz
- New Ultimate Guide to Countdown Animation in Videos for 2024
- New Unleash the Power of Video Slow Motion with Wondershare Filmora. Find Out How to Create Slow Motion Video with the Effective Speed Ramping Feature on Filmora
- Want to Make an Epic CSGO Montage? You Are in the Right Place. This In-Depth Guide Will Explain How You Can Make an Attention-Grabbing Gaming Montage
- New Tutorial | How to Make a Smooth Speed Ramping in Premiere Pro, In 2024
- New 2024 Approved Ever Wondered About the Similarity You Bear with an Anime Character? If You Have Not yet Looked Into This Exciting Aspect of Motion Graphic Design, You Can Very Well Break the Ice Here
- 2024 Approved How to Create a Custom Slide Show in PowerPoint
- New A Complete Guide to the Best Brand Story Videos |2023|
- New How Did AI Video Games Act More Human Than Human, In 2024
- Updated Top Shortcut Towards Timeline Template for 2024
- Steps to Rotate Videos in Lightworks for 2024
- Updated How to Comment on YouTube Live Chat for 2024
- 2024 Approved How to Turn Text Into a Podcast
- In 2024, Unlink Audio and Video in DaVinci Resolve Detailed Steps
- List of Supported Whatsapp Video Format You May Want to Know
- Updated 2024 Approved Do You Want Your Photo and Video Edits to Look Like Peter McKinnons? Color-Grade Your Media Files with Peter McKinnon LUTs to Make Your Content Stand Out
- New This Article Talks in Detail About How to Convert Time-Lapse to Normal Video Using Certain Methods on iPhone, Online Tools, and so On. It Further Discusses Converting Time-Lapse Video to Normal on the Computer. Check Out
- Updated 2024 Approved This Well-Written Article Will Share a Descriptive Method on How to Stream Zoom to YouTube Quickly. By Doing so, You Can Share Your Zoom Session Live with Your YouTube Audience Effortlessly
- New 2024 Approved You Might Have Difficulty Rotating a Video without an Efficient Media Player or Editing Tool. Below Is a Detailed Guide on Rotating a Video on Any Axes
- Updated 2024 Approved A Wedding Is One of the Exciting Parts that Will Happen in Your Life. Its Not that Easy to Plan a Wedding, Theres a Lot to Be Consider Like Wedding Dress, Food, Venue, Videographer Etc
- Deleting White Background in Photoshop Is Hard? No
- Updated In 2024, How to to Mimic Professional Filming Gears
- New A Full Guide to Funcall Voice Changer and Its Alternatives
- In 2024, How to Fade in Text in Adobe Premiere Pro
- New In 2024, How to Control the Speed of Video
- In 2024, Cropping Video in VLC Step by Step
- In 2024, Comprehensive Guide for Free Video Translator Downloading
- 3 Effective Methods to Fake GPS location on Android For your Samsung Galaxy A23 5G | Dr.fone
- 7 Ways to Unlock a Locked Nokia XR21 Phone
- About Samsung Galaxy A25 5G FRP Bypass
- In 2024, How to Change Google Play Location On Meizu 21 | Dr.fone
- Simple and Effective Ways to Change Your Country on YouTube App Of your Honor X9b | Dr.fone
- How to Stop Google Chrome from Tracking Your Location On ZTE Axon 40 Lite? | Dr.fone
- In 2024, How to Change Google Play Location On Huawei Nova Y91 | Dr.fone
- Hassle-Free Ways to Remove FRP Lock on Honor 90 Lite Phones with/without a PC
- Forgot your Oppo lock screen pattern, PIN or password? Here’s what to do
- In 2024, How To Check if Your Nokia 105 Classic Is Unlocked
- Full Guide on Mirroring Your Realme 12 Pro+ 5G to Your PC/Mac | Dr.fone
- Calls on Vivo Y77t Go Straight to Voicemail? 12 Fixes | Dr.fone
- How to Rescue Lost Music from Samsung Galaxy F34 5G
- 10 Best Fake GPS Location Spoofers for Realme Narzo 60 Pro 5G | Dr.fone
- Title: New In 2024, Ways to Learn Discord Game Bots – Even if Youre Just Starting Out
- Author: Morgan
- Created at : 2024-06-24 01:30:17
- Updated at : 2024-06-25 01:30:17
- Link: https://ai-video-editing.techidaily.com/new-in-2024-ways-to-learn-discord-game-bots-even-if-youre-just-starting-out/
- License: This work is licensed under CC BY-NC-SA 4.0.
