
:max_bytes(150000):strip_icc():format(webp)/coffeecup-free-html-editor-profile-3467555-8876645f89c444c8b94addcf4307b22d.png)
New In 2024, What Is MKV Format and How To Play MKV Video?
What Is MKV Format and How To Play MKV Video?
MKV file format is a popularly adopted format. The format is easily accessible digital, and self-documented. The only problem people face with different formats is their compatibility. If you are trying to play an MKV video but facing problems, read the article below.
We will discuss the MKV video format, how it works, the way to play it, and other things you need to know. Stay with us; we are about to begin.
In this article
03 How to Play MKV Video Files on VLC Media Player?
04 How Can You Edit Video Files with Filmora Video Editor?
05 Which One Is Better? MKV or MOV?
Part 1: What is MKV format?
The MKV format, known as Matroska, was developed in 2002. This is an open standard video format. Different media files have different encoding, yet MKV stores various multimedia files as it is a container. Do you know what the format is widely used for? Well, the MKV file format is popularly used for online video streaming and also HD videos.

Typically, the format is used to store video clips, movies, and also TV shows. Among the list of audio and video codecs that MKV support, a few are VobSub subtitles, .SRT, .SSA, and .USF. The MKV container file format is famous in the anime fansubbing world. Many users create subtitles with this as the MKV video format supports various audio and subtitle tracks in one same file.
Part 2. How Does A MKV Video Work?
What do you know about the working of the MKV file? If you don’t have much knowledge, let’s share everything you need to know. The MKV format supports 3D objects and also subtitles. The file format is capable of running on both Windows and Mac. Interestingly, the MKV format supports all video and audio coding formats.
Let us clarify something, MKV file format is not an audio-video compression codec; it is a container format used to store subtitles, audio, video in a single file. Surprisingly, the MKV video format is also great for storing complete movies or CDs.
Do you know one amazing thing about MKV? It’s error-resilient; this means if your file is corrupted, it can recover the playback. The open-source format is great for describing technical information and commercial groups.
Part 3. How to Play MKV Video Files on VLC Media Player?
Different platforms support different formats like this MKV file format supported by Microsoft Movies & TV, VLC Media Player, and MPlayer. We will share how you can play MKV video files on VLC Media Player for the current article. If you don’t know, VLC is a cross-platform media player that supports most of the file formats, streaming protocols, DVDs, VCDs, Audio CDs, etc.
Interestingly, the media players work on all platforms like Windows, Mac, Linux, iOS, Android, etc. Do you know that the media playing software is free? Well, it is. It has no spyware and no user tracking. If you are interested in learning about how to play MKV video format on VLC, follow the steps below:
Step 1: Start by installing VLC Media Player on your respective device. It is possible you might have already installed VLC; what to do now? If this is the case, then open VLC and head over to the ‘Help’ option. There select the ‘Check for Updates’ option to update your VLC to the latest version for better performance.

Step 2: After you have either installed or updated VLC Media Player, launch it and move to the ‘Media’ option from the top bar. Next, select the ‘Open File’ option from the menu list and look for the MKV format video in your device to add to the media player. You can also add files to VLC by directly dragging them to the media player.

Step 3: Have you successfully imported the MKV file? If yes, then your video will start playing, and you can enjoy watching your videos with VLC.

Part 4. How Can You Edit Video Files with Filmora Video Editor?
You must have heard about Wondershare Filmora , as a great video editor. The software is used everywhere, by professionals, beginners, everyone. Do you not know much about it? Let us tell you! Whenever you plan to edit your MKV video format files, make sure you try Filmora. The video editor comes with uncountable features and offers limitless editing capabilities.
For Win 7 or later (64-bit)
For macOS 10.12 or later
While editing with Filmora, you never have to worry about video effects, transitions, titles, or anything. Do you know why? This is because Filmora provides every editing element. Let’s talk more about its features:
Audio Section
From the top menu bar on Filmora, you get an Audio section. This section can do wonders for your MVK format video. If you are looking for suitable audio to add to your video, try the audio collection from the audio section. You get sound effects of various types like Jazz, Rock, Happy, etc. You also get a wide variety of musical sounds, human sounds, etc.

Audio Editing Capacity
We must have mentioned above that apart from video editing; you get options for Audio Editing. Do you know what you can do? Start by accessing the Audio Editor by double-clicking on the audio file now, and you can do whatever you like.
For instance, the software offers features like Detach Audio from video, Mute video. Or even the advanced features offer Silence Detection, which automatically detects silence and crops the part.

Add Transitions and Titles
Like we said earlier, you don’t have to worry about transitions and titles with Filmora; this is because an independent section has been given to both the categories that are loaded with wide crazy options. Like if you head to the Transitions tab, you will get options like Speed Blur, Basic, Ripple & Dissolve, and others.

Whereas, if you open the Titles section, you will get various templates. The software offers Lower Thirds, Subtitles, Openers, etc. With Filmora, you get Titles and Transitions according to recent events and occasions.

Cool Elements
For video editing, effects and transitions are not everything. Although they play a vital role in setting and making a good video but do, you know what else matters? Let’s guide you. To make creative and eye-catching content, you need to add elements.

With Filmora, you get tons of great elements that can sustain your viewer’s interest. You can select between the various options like Subscribe Chanel, Share, Count Down, Metaverse, and much more than this. You can also get your hands-on Background Elements, Social Media Elements, etc.
Part 5. Which One Is Better? MKV or MOV?
MKV file format is not as commonly used as MOV because of its poor compatibility when it comes to mobile devices. If we talk about the file size, MKV tends to have a larger file size as compared to other used formats. MOV is a container file format that can store multiple media files of different tracks. Whereas MKV is an envelope format, even supporting to store complete movies with subtitles.
MKV format was developed by Matroska, whereas Apple developed the MOV file format. MKV format is good for storing HD videos, and MOV format is great for saving movies.
Last Words
MKV format is a container format that can store different files with different encodings. The article above has discussed the file format in detail. We talked about how you can use the format, play MKV video format, and also how to edit MKV videos. We will conclude the article by suggesting a great video editor, Wondershare Filmora.
Features like Keyframing, Motion Tracking are offered by the software. Along with this, some advanced-level features are also provided, like Advanced Color Tuning, Green Screen, Video Snapshot, and many others. So, for creating a nice video with great editing elements, Wondershare Filmora is a must.
For Win 7 or later (64-bit)
For macOS 10.12 or later
03 How to Play MKV Video Files on VLC Media Player?
04 How Can You Edit Video Files with Filmora Video Editor?
05 Which One Is Better? MKV or MOV?
Part 1: What is MKV format?
The MKV format, known as Matroska, was developed in 2002. This is an open standard video format. Different media files have different encoding, yet MKV stores various multimedia files as it is a container. Do you know what the format is widely used for? Well, the MKV file format is popularly used for online video streaming and also HD videos.
Typically, the format is used to store video clips, movies, and also TV shows. Among the list of audio and video codecs that MKV support, a few are VobSub subtitles, .SRT, .SSA, and .USF. The MKV container file format is famous in the anime fansubbing world. Many users create subtitles with this as the MKV video format supports various audio and subtitle tracks in one same file.
Part 2. How Does A MKV Video Work?
What do you know about the working of the MKV file? If you don’t have much knowledge, let’s share everything you need to know. The MKV format supports 3D objects and also subtitles. The file format is capable of running on both Windows and Mac. Interestingly, the MKV format supports all video and audio coding formats.
Let us clarify something, MKV file format is not an audio-video compression codec; it is a container format used to store subtitles, audio, video in a single file. Surprisingly, the MKV video format is also great for storing complete movies or CDs.
Do you know one amazing thing about MKV? It’s error-resilient; this means if your file is corrupted, it can recover the playback. The open-source format is great for describing technical information and commercial groups.
Part 3. How to Play MKV Video Files on VLC Media Player?
Different platforms support different formats like this MKV file format supported by Microsoft Movies & TV, VLC Media Player, and MPlayer. We will share how you can play MKV video files on VLC Media Player for the current article. If you don’t know, VLC is a cross-platform media player that supports most of the file formats, streaming protocols, DVDs, VCDs, Audio CDs, etc.
Interestingly, the media players work on all platforms like Windows, Mac, Linux, iOS, Android, etc. Do you know that the media playing software is free? Well, it is. It has no spyware and no user tracking. If you are interested in learning about how to play MKV video format on VLC, follow the steps below:
Step 1: Start by installing VLC Media Player on your respective device. It is possible you might have already installed VLC; what to do now? If this is the case, then open VLC and head over to the ‘Help’ option. There select the ‘Check for Updates’ option to update your VLC to the latest version for better performance.
Step 2: After you have either installed or updated VLC Media Player, launch it and move to the ‘Media’ option from the top bar. Next, select the ‘Open File’ option from the menu list and look for the MKV format video in your device to add to the media player. You can also add files to VLC by directly dragging them to the media player.
Step 3: Have you successfully imported the MKV file? If yes, then your video will start playing, and you can enjoy watching your videos with VLC.
Part 4. How Can You Edit Video Files with Filmora Video Editor?
You must have heard about Wondershare Filmora , as a great video editor. The software is used everywhere, by professionals, beginners, everyone. Do you not know much about it? Let us tell you! Whenever you plan to edit your MKV video format files, make sure you try Filmora. The video editor comes with uncountable features and offers limitless editing capabilities.
For Win 7 or later (64-bit)
For macOS 10.12 or later
While editing with Filmora, you never have to worry about video effects, transitions, titles, or anything. Do you know why? This is because Filmora provides every editing element. Let’s talk more about its features:
Audio Section
From the top menu bar on Filmora, you get an Audio section. This section can do wonders for your MVK format video. If you are looking for suitable audio to add to your video, try the audio collection from the audio section. You get sound effects of various types like Jazz, Rock, Happy, etc. You also get a wide variety of musical sounds, human sounds, etc.
Audio Editing Capacity
We must have mentioned above that apart from video editing; you get options for Audio Editing. Do you know what you can do? Start by accessing the Audio Editor by double-clicking on the audio file now, and you can do whatever you like.
For instance, the software offers features like Detach Audio from video, Mute video. Or even the advanced features offer Silence Detection, which automatically detects silence and crops the part.
Add Transitions and Titles
Like we said earlier, you don’t have to worry about transitions and titles with Filmora; this is because an independent section has been given to both the categories that are loaded with wide crazy options. Like if you head to the Transitions tab, you will get options like Speed Blur, Basic, Ripple & Dissolve, and others.
Whereas, if you open the Titles section, you will get various templates. The software offers Lower Thirds, Subtitles, Openers, etc. With Filmora, you get Titles and Transitions according to recent events and occasions.
Cool Elements
For video editing, effects and transitions are not everything. Although they play a vital role in setting and making a good video but do, you know what else matters? Let’s guide you. To make creative and eye-catching content, you need to add elements.
With Filmora, you get tons of great elements that can sustain your viewer’s interest. You can select between the various options like Subscribe Chanel, Share, Count Down, Metaverse, and much more than this. You can also get your hands-on Background Elements, Social Media Elements, etc.
Part 5. Which One Is Better? MKV or MOV?
MKV file format is not as commonly used as MOV because of its poor compatibility when it comes to mobile devices. If we talk about the file size, MKV tends to have a larger file size as compared to other used formats. MOV is a container file format that can store multiple media files of different tracks. Whereas MKV is an envelope format, even supporting to store complete movies with subtitles.
MKV format was developed by Matroska, whereas Apple developed the MOV file format. MKV format is good for storing HD videos, and MOV format is great for saving movies.
Last Words
MKV format is a container format that can store different files with different encodings. The article above has discussed the file format in detail. We talked about how you can use the format, play MKV video format, and also how to edit MKV videos. We will conclude the article by suggesting a great video editor, Wondershare Filmora.
Features like Keyframing, Motion Tracking are offered by the software. Along with this, some advanced-level features are also provided, like Advanced Color Tuning, Green Screen, Video Snapshot, and many others. So, for creating a nice video with great editing elements, Wondershare Filmora is a must.
For Win 7 or later (64-bit)
For macOS 10.12 or later
3 Ways To Stream And Record At The Same Time
The popularity of live streaming has exploded recently. A live stream is simply a video broadcast in real-time over the internet. It’s a great way to connect with people directly, whether for a gaming session, a cooking show, or a Q&A.
Many reasons are there for which why you might want to live stream and record at the same time. For instance, keep a record of your gameplay or stream highlights for future editing or use your live stream to generate content for your YouTube channel.
Whatever your reasons, this article will show you how to do live streaming and recording at the same time using three different methods.
Way 1. Use OBS To Stream And Record Video At The Same Time
OBS, or Open Broadcaster Software, is a free and open-source tool that allows you to stream and record video at the same time, which can be useful if you want to live-stream your gameplay on Twitch or record a tutorial for YouTube.
Key Features of OBS
- Compatible with Mac OS X, Linux, and Windows operating systems.
- Requires at least 4 GB of storage space and an Intel i5 2000-series processor or higher DirectX 10 capable graphics card.
- High-performance video capturing and mixing in real-time.
- With Custom Transitions, you can set up an unlimited number of scenes you can switch between seamlessly.
- Intuitive audio mixer.
- Easy-to-use and simple configuration options.
Steps
Here’s an easy and quick guide on how to use OBS Studio to stream and record videos simultaneously:
Step1 Download OBS Studio from the official website and install it on your computer or laptop.
Step2 Launch OBS Studio and go to the Settings menu. Find the Recording section under the Output tab.
Step3 Click “Start Recording” to manually start the recording or head to the General Tab and checkmark the box before “Automatically Record When Streaming.”
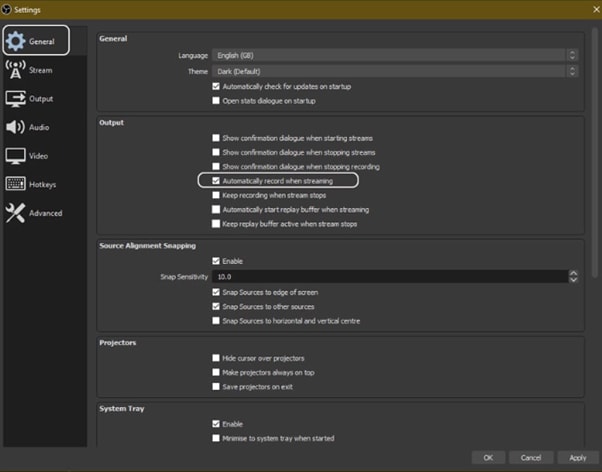
Step4 Finally, click “Apply” to save your settings. Now when you start your stream, the recording will also begin simultaneously.
Way 2. Use Twitch To Save Your Streams
Twitch is the most popular and best live streaming platform that allows gamers to broadcast their gameplay to a live audience and also gives them the ability to save their past broadcasts, or “streams.”
This feature can be useful to save your live stream for later viewing or share your stream with someone who missed it.
Features
Twitch offers a variety of features that make it a unique and powerful game streaming platform. Some of the most notable ones are:
- Live streaming: Twitch allows gamers to share their gameplay in real-time with other gamers around the world. This live aspect of the platform makes it unique and engaging.
- Social interaction: Twitch offers a variety of features that allow gamers to connect with each other, including chat rooms, forums, and user-generated content.
You can save your stream on Twitch in two ways:
- Use the “Highlights” feature, which allows you to save specific moments from your live stream.
- Download your stream’s entire VOD (video on demand) after it has ended.
Steps
Here are the quick steps to saving a stream on your PC from Twitch. But first, you need to enable Twitch VODs before starting your broadcast in the following way:
Step1 Visit Twitch and sign in to your account. Now, click the “Profile” icons and go to “Creator Dashboard.”
Step2 Head to Setting from the left-sidebar and click the “Stream” option. Scroll down and find the VOD Settings. Toggle the buttons next to “Store Past Broadcasts.”
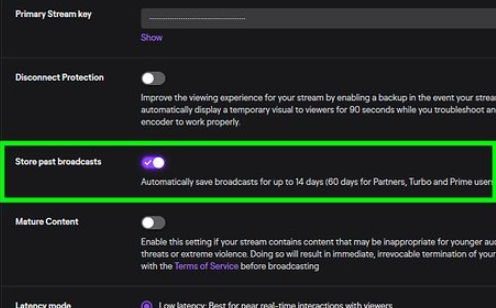
Step3 To publish your VODs instantly after broadcasting, toggle the button next to “Always Publish VODs.”
Now, to download the recordings of your broadcasts to your PC, do the following steps in sequence:
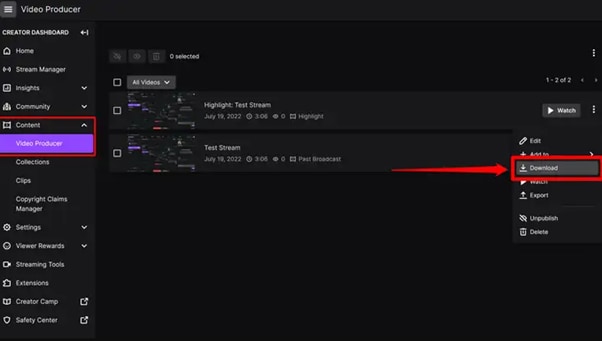
Step1 Head to the Creator Dashboard, find the “Content” section in the left sidebar, and click “Video Producer.”
Step2 Find the stream (VOD or Highlights) you want to download and on the right side, click the three dots.
Step3 Finally, click the “Download” option and let Twitch prepare your video. You will then get the stream’s recording in MP4 format.
Way 3. Use Screen Recorder To Record Your Streams
Using a screen recorder is a great way to record your live stream because it lets you capture the full screen of your PC. Although there are many different screen recorders to choose from, we recommend using Filmora.
Wondershare Filmora is a powerful editor with easy-to-use screen recording capabilities, giving you everything you need to record and stream your video at the same time. The software is free to use and has an intuitive interface.
Features of Filmora
- Support for both Mac OS X and Windows operating systems.
- Ability to record your PC screen, audio, and webcam all at once
- A variety of video editing features
- An easy-to-use interface
Steps
Here’s how to use Filmora for recording while streaming:
Step1 Head to the official Filmora website, download the software and install it on your PC.
Step2 Launch Filmora 11 and click “New project” in the main interface. Click “File” from the top toolbar and scroll down to “Record media.” From the drop-down menu, select “Record PC Screen.”
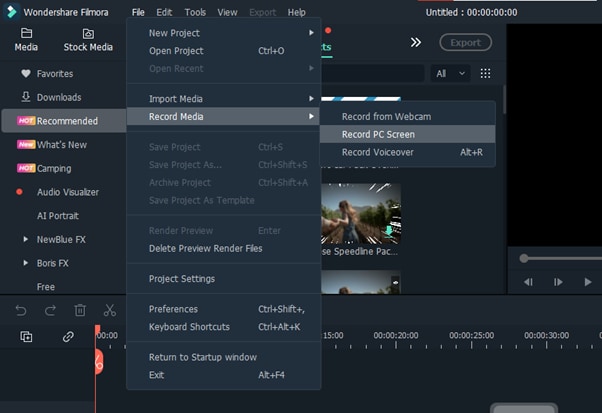
Step3 A new “Wondershare Screen Recorder” window will pop up. You can set up a full screen, custom or target screen recording, speaker, and microphone settings. If you want more Settings, click the drop-down icon.
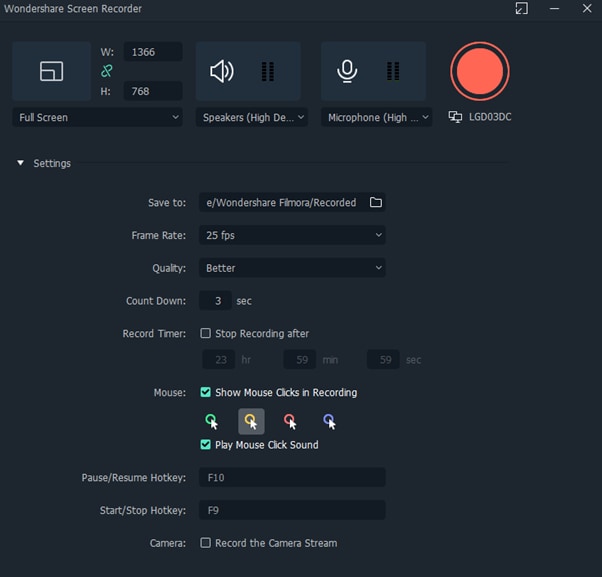
Step4 Click the Start icon to begin your recording. Afterward, click the Stop icon to stop the recording, and your stream will be saved in the selected destination.
Conclusion
In this article, we’ve discussed three step-by-step methods to help you do live streaming and recording at the same time. With these solutions at your disposal, you’ll be able to save your VODs with ease.
It is best to choose only one software to start with to avoid the time-consuming trial-and-error process. If you want to add another tool, do so later; otherwise, you will waste your precious time and resources.
Give these methods a shot, and eventually, you will find your groove—and become accustomed to just how easy it is to record and stream a video simultaneously.
Free Download For Win 7 or later(64-bit)
Free Download For macOS 10.14 or later
Free Download For macOS 10.14 or later
Here, You Will Learn How to Add a Realistic Fire Effect Using Wondershare Filmora. That Will Help to Boost Your Channel and Decorate Your YouTube Channel with Creative and Unique Effects
Do you know that many cinema films and big-budget companies use visual effects to create realistic fires? It saves them from potential danger in production and helps them manage the time required to create a project. In this article, you will get pro tips and easy ways to add Fire effects by Wondershare Filmora.
![]()
Note: let’s not count Michael Bay and Christopher Nolan productions because their movies have a higher budget, and creating fake fire is easy.
Part 1. What do you need to create fire effects?
Using simple tools such as Filmora and visual effects, you can create a realistic fire effect with an easy setup. For filming the effect, we will need
- A good camera
- A light source
- Video editing software - Wondershare Filmora
- Basic editing skills
However, the light source is key to the fire effects. It will be beneficial if you have a warmer color light or a light that can change its temperature. You can use tungsten light bulbs or small circular LEDs that are pretty famous with Vloggers and tick-tock users.
Part 2. How to make a realistic effect fire?
After getting prepared, it’s time to do the real things. Follow the steps below to create a realistic fire effect like a pro.
Step1 Record your footage
While recording the video, you can slightly shake your light source, which will give it the flickering effect of the flame. Here, you can do this in two ways.
Shaking the light manually
Just make sure when you are shaking the light, it is not shaken aggressively, or it will lose its realism to a real fire.

Shaking the light using a dimmer
You can also use some skills to create the flickering effect of the fire without literally shaking the LED light. Dimmers come to help. A dimmer is a device that enables you to change the temperature of the LED light. If you have a dimmer, your work will be more accessible.
A regulator on the dimmer will help you switch between low and high tones. It will flicker the light on the object like a flame and make it look like it was placed in front of a real fire.

Step2 Record the object
Our next step will be to record the object on which the effect is taking place. Ensure the camera is placed under a good light source so that the picture is not dim and the object is exposed. Make sure the camera is placed at the level of the eye so that it will help you record your video clearly and accurately.
Also, keep in mind to zoom out the camera lens, which will fix the frame of the video so that the object or the person is entirely on the screen. Another tip for creating a realistic fire effect would be the person acting as the object. The more natural the acting is, the more realistic would be the fire effect.
Step3 Edit the footage
We are being safe and saving time by not using actual fire. The goal of creating a fake fire would be the effect and reaction of the object or the actor.
1. Download a professional video editing software - Wondershare Filmora
Visit Wondershare Filmora official site if you haven’t already downloaded it.
![]()
Note: download the latest version of filmora. It will give you a pro version and help you to create more realistic fire effects.
2. Create a new project and import the recorded clips
Before adding the fire effects to your video, you must ensure that you are familiar with the editing software. Your first step would be to add your clips to the timeline. Drag the footage from the library and enter it into the timeline.

3. create the fire effect more realistic by adding smoke
The next step would be to add smoke to the fire. As it is only fair that the fire makes the smoke so. Adding the smoke will create the fire effect more realistic. Follow the below steps to get your cinematic video!
#Step1 Search for smoke effects
To add the smoke effect, click on the element’s icon on the bar above and search for smokescreen 2.
#Step2 Add a smoke effect
Once you have searched and found the smoke screen 2 effects, then import that effect onto your timeline so that you can begin editing.

Once you’ve added the fire effect, you will notice the change on the screen in the top right corner.
#Step3 Add duration
The next step would be to set the duration of the smokescreen effect so that it matches the length of the video. To do so,
- Click on the edge of the smoke screen effect.
- Drag it to the right if the effect appears smaller than the video clip.
- And drag it to the left if it is larger than the video clip.
- As soon as it matches the length of the video, leave the drag, and it will fit right into place.
#Step4 Make some changes to the smoke effect
Once you have matched the duration of the smoke screen effect to the video clip, our next step would be to make some changes. These changes will make the smokescreen appear more pleasing—double-click on the smokescreen effect, which will open the transform menu.
We would first focus on the transform panel. Here you would have many options, but our focus would be on rotation, scale, and position.
![]()
Note: make sure to rotate the smoke screen effect by simply sliding the slider or dragging the slider right or left to your desire.
- You would have created an angle of the smokescreen to make it more natural.
- Now, we would have to adjust the scale of the smokescreen effect.
- Drag the slider to the right to expand the smoke to spread on the screen. It will help the smoke screen do appear more natural.
- You can adjust how much the smoke screen is visible on the screen by decreasing the opacity.
Adjust the slider to the left so it blends in with the flickering of the light we created. Now playback the video from the big screen to get an idea of the effect you added. And here are our parameters for reference.

Cool, isn’t it? Now we have added smoke to our timeline. Combined with the flickering light effect, we are closer to our goal.
Step4 Add flames or sparks
To mimic a real fire, we also have one more element that is missing, And that will be the sparks and the flames. And if you want to bring the fire effect of your video to the pro level, we would have to use the film stock effects. Flames and sparks are also available in the Wondershare Filmora.
#Step1 Search for Fire Tab

- To do so, click on the bar above the element’s icon.
- Once you have opened the elements tab, look to your left window, where further options are available.
- From these options, click on the fire tab.
- A new window will pop up in the library panel.
#Step2 Add the flame to the timeline
Click on a large scale 14 and drag it into your timeline above the smoke effect and the clip. Doing so would have created two extra layers after the video tab.

#Step3 Adjust the flame effect
Now, we have to do steps similar to the ones above the first job. But first, you have to click on the edges of the effect. Then, match it to the length of your video.
Now, remember if the length of the effect is more than that of the video clip. You can adjust it by clicking on the edge and dragging it to the left. And if it appears to be smaller than the video clip, drag the edge to the right to match the length.
#Step4 Blend the video
When you look at the effect as you play the video from the start, you will notice that the effect is a little more intense than we want. To change it to your desires, you can follow the following steps.
- First of all, double-click and open the transform
- Experiment with the rotation and the scale and position; make your choice.
- Then move on to the compositing panel and focus on the blending mode.
- Here, you will notice a drop-down panel and select the screen option from all the other options.
- Doing so would help you blend the spark effect video much better.
If you focus on the spark effect that appears on the screen, you will notice that it seems to be much more intense than we require. If you want to blend it further, you can use the opacity adjuster and decrease the transparency. Then, adjust the slider till you feel it to be just right.
And the following are ideal parameters of our adjustment just for you to refer to.

Final results
Now can easily create a realistic-looking fire effect by Wondershare Filmora.

Best editing views
See how easy it was to create a fire effect without using real fire. A fire effect you can use:
- To make your car catch on fire.
- You are screaming at the top of your lungs in a yard where your garden is on fire.
- Act like your husband forgot to watch the stove on with the dish in the kitchen.
You can create all these scenarios by using camera tricks and lighting effects. And a few skills in video editing, easily! How cool is that?
If you are a beginner or a frequent user of Wondershare Filmora, following the steps explained above will help you quickly get the hang of how to add fire effects to your videos.
Also, if you have a YouTube channel or a content creator, adding these effects will add unique creativity to your videos and ultimately boost your approach.
Free Download For Win 7 or later(64-bit)
Free Download For macOS 10.14 or later
Part 1. What do you need to create fire effects?
Using simple tools such as Filmora and visual effects, you can create a realistic fire effect with an easy setup. For filming the effect, we will need
- A good camera
- A light source
- Video editing software - Wondershare Filmora
- Basic editing skills
However, the light source is key to the fire effects. It will be beneficial if you have a warmer color light or a light that can change its temperature. You can use tungsten light bulbs or small circular LEDs that are pretty famous with Vloggers and tick-tock users.
Part 2. How to make a realistic effect fire?
After getting prepared, it’s time to do the real things. Follow the steps below to create a realistic fire effect like a pro.
Step1 Record your footage
While recording the video, you can slightly shake your light source, which will give it the flickering effect of the flame. Here, you can do this in two ways.
Shaking the light manually
Just make sure when you are shaking the light, it is not shaken aggressively, or it will lose its realism to a real fire.
Shaking the light using a dimmer
You can also use some skills to create the flickering effect of the fire without literally shaking the LED light. Dimmers come to help. A dimmer is a device that enables you to change the temperature of the LED light. If you have a dimmer, your work will be more accessible.
A regulator on the dimmer will help you switch between low and high tones. It will flicker the light on the object like a flame and make it look like it was placed in front of a real fire.
Step2 Record the object
Our next step will be to record the object on which the effect is taking place. Ensure the camera is placed under a good light source so that the picture is not dim and the object is exposed. Make sure the camera is placed at the level of the eye so that it will help you record your video clearly and accurately.
Also, keep in mind to zoom out the camera lens, which will fix the frame of the video so that the object or the person is entirely on the screen. Another tip for creating a realistic fire effect would be the person acting as the object. The more natural the acting is, the more realistic would be the fire effect.
Step3 Edit the footage
We are being safe and saving time by not using actual fire. The goal of creating a fake fire would be the effect and reaction of the object or the actor.
1. Download a professional video editing software - Wondershare Filmora
Visit Wondershare Filmora official site if you haven’t already downloaded it.
![]()
Note: download the latest version of filmora. It will give you a pro version and help you to create more realistic fire effects.
2. Create a new project and import the recorded clips
Before adding the fire effects to your video, you must ensure that you are familiar with the editing software. Your first step would be to add your clips to the timeline. Drag the footage from the library and enter it into the timeline.
3. create the fire effect more realistic by adding smoke
The next step would be to add smoke to the fire. As it is only fair that the fire makes the smoke so. Adding the smoke will create the fire effect more realistic. Follow the below steps to get your cinematic video!
#Step1 Search for smoke effects
To add the smoke effect, click on the element’s icon on the bar above and search for smokescreen 2.
#Step2 Add a smoke effect
Once you have searched and found the smoke screen 2 effects, then import that effect onto your timeline so that you can begin editing.
Once you’ve added the fire effect, you will notice the change on the screen in the top right corner.
#Step3 Add duration
The next step would be to set the duration of the smokescreen effect so that it matches the length of the video. To do so,
- Click on the edge of the smoke screen effect.
- Drag it to the right if the effect appears smaller than the video clip.
- And drag it to the left if it is larger than the video clip.
- As soon as it matches the length of the video, leave the drag, and it will fit right into place.
#Step4 Make some changes to the smoke effect
Once you have matched the duration of the smoke screen effect to the video clip, our next step would be to make some changes. These changes will make the smokescreen appear more pleasing—double-click on the smokescreen effect, which will open the transform menu.
We would first focus on the transform panel. Here you would have many options, but our focus would be on rotation, scale, and position.
![]()
Note: make sure to rotate the smoke screen effect by simply sliding the slider or dragging the slider right or left to your desire.
- You would have created an angle of the smokescreen to make it more natural.
- Now, we would have to adjust the scale of the smokescreen effect.
- Drag the slider to the right to expand the smoke to spread on the screen. It will help the smoke screen do appear more natural.
- You can adjust how much the smoke screen is visible on the screen by decreasing the opacity.
Adjust the slider to the left so it blends in with the flickering of the light we created. Now playback the video from the big screen to get an idea of the effect you added. And here are our parameters for reference.
Cool, isn’t it? Now we have added smoke to our timeline. Combined with the flickering light effect, we are closer to our goal.
Step4 Add flames or sparks
To mimic a real fire, we also have one more element that is missing, And that will be the sparks and the flames. And if you want to bring the fire effect of your video to the pro level, we would have to use the film stock effects. Flames and sparks are also available in the Wondershare Filmora.
#Step1 Search for Fire Tab
- To do so, click on the bar above the element’s icon.
- Once you have opened the elements tab, look to your left window, where further options are available.
- From these options, click on the fire tab.
- A new window will pop up in the library panel.
#Step2 Add the flame to the timeline
Click on a large scale 14 and drag it into your timeline above the smoke effect and the clip. Doing so would have created two extra layers after the video tab.
#Step3 Adjust the flame effect
Now, we have to do steps similar to the ones above the first job. But first, you have to click on the edges of the effect. Then, match it to the length of your video.
Now, remember if the length of the effect is more than that of the video clip. You can adjust it by clicking on the edge and dragging it to the left. And if it appears to be smaller than the video clip, drag the edge to the right to match the length.
#Step4 Blend the video
When you look at the effect as you play the video from the start, you will notice that the effect is a little more intense than we want. To change it to your desires, you can follow the following steps.
- First of all, double-click and open the transform
- Experiment with the rotation and the scale and position; make your choice.
- Then move on to the compositing panel and focus on the blending mode.
- Here, you will notice a drop-down panel and select the screen option from all the other options.
- Doing so would help you blend the spark effect video much better.
If you focus on the spark effect that appears on the screen, you will notice that it seems to be much more intense than we require. If you want to blend it further, you can use the opacity adjuster and decrease the transparency. Then, adjust the slider till you feel it to be just right.
And the following are ideal parameters of our adjustment just for you to refer to.
Final results
Now can easily create a realistic-looking fire effect by Wondershare Filmora.
Best editing views
See how easy it was to create a fire effect without using real fire. A fire effect you can use:
- To make your car catch on fire.
- You are screaming at the top of your lungs in a yard where your garden is on fire.
- Act like your husband forgot to watch the stove on with the dish in the kitchen.
You can create all these scenarios by using camera tricks and lighting effects. And a few skills in video editing, easily! How cool is that?
If you are a beginner or a frequent user of Wondershare Filmora, following the steps explained above will help you quickly get the hang of how to add fire effects to your videos.
Also, if you have a YouTube channel or a content creator, adding these effects will add unique creativity to your videos and ultimately boost your approach.
Free Download For Win 7 or later(64-bit)
Free Download For macOS 10.14 or later
This Article Is Regarding the Guidance About the Split of the Audio From the Video in Premiere Pro. And Also, the Discussion of the Wondershare Fllmora as the Replacement and How to Perform a Similar Task in It
Adobe Premiere Pro is mainly designed and helpful for all video editors looking for options to enhance their tasks. It is beneficial for transforming any random video into an awesome video. There are different tools so you can experience your creative skills on Premiere Pro. It enables the fine-tuning of the audio, adjustments of the colourings, and supports various formats.
There is an integration of this software with other products of Adobe. So, it is pretty easy for you to transfer the task from one adobe software to another. This helps in editing and using the complete outcome according to the needs. This article is regarding the guidance about the split of the audio from the video in Premiere Pro. And also, the discussion of the Wondershare Fllmora as the replacement and how to perform a similar task in it.
How is it possible to split the audio from the video in Adobe Premiere Pro?
The Adobe Premiere Pro is quite popular for its tools and works smoothly. The whole interface also helps increase the entire work’s productivity, efficiency, and effectiveness. It is very easy to open several projects at the exact timings. It is very simple and easy to add the clips and even extract the audio from the video clips. Please take a step by step below to extract the audio from your video files, whether it is on Windows or Mac operating system.
Step 1: The first step is the creation of the project. Go to the File tab on the toolbar and select the New option.

Step 2: Import the video that you want to be mute. File à Import.

Step 3: From the project panel, drag and drop the project in the timeline panel.

Step 4: Now is the time to select the video clip from the timeline. Click on the video layer for the selection.

Step 5: Right-click on the video presentation on the timeline and select the option of “unlink” from the drop-down menu.

Step 6: Now delete the audio from the video you want to separate. For deleting the audio, either select the layer and press the “delete” key. Or you can choose the layer from audio from which you are unlinking from the video and choose the option of “Clear” from the menu.
You have received success in separating the audio from the video clip with the help of Adobe Premiere Pro. It is easy to edit the track as your own choice. Export options are also available, so you can share them wherever you want.

One easier way to separate the audio from the video clips
It is a fact that Premiere Pro is an extraordinary software, but unluckily, its features depend on the subscription monthly or yearly. It requires high storage memory from your system. While working on this software, it increases the complexity.
That’s the reason the graphic designers and video editor are always in search of feasible and straight forward editing software. Filmora Video Editor is the right solution of all the issues.
It is light to the systems and all the features are freely available without any subscription. No matter which operating system you are using Wondershare Filmora is easily available to run on it. Whether it is separating the audio or removing the background, each and everything is simple for handling.
For Win 7 or later (64-bit)
For macOS 10.14 or later
Features:
- Preview of using the tools before applying the changes
- Numerous tools are available for customizing the videos and images
- Splitting of the clips and screens as well
- Involving of the graphics and animation
- Simply drag and drop the videos in the timeline
- Mixing of the audio
- Removing the noise
Under this heading are the steps for guiding you regarding the extraction or separation of the audio from your videos.
Step :1
Simply launch the Wondershare Filmora after it installs your system. If it is already installed, then start creating the new project.
Step:2
Import the file in the timeline you want to remove or separate the audio. Go to the File menuàimport the media file or press the keys of CTRL+I on the keyboard.

Step :3
Drag and drop the video clip in the timeline to proceed with editing.

Step:4
Right-click on your video and choose the option of “Detach Audio”. Then the new track of the audio appears in the timeline.

Step:5
Select the audio you have just received above and select the option of “Delete”.

Step:6
Click on the button “Export” for exporting the video.

Step:7
Please choose the format of your choice, name the file and choose the folder where you want to save it. Even setting the resolution, decoding the video and frame rate is also possible. These options are under the settings button. Click on “Export” to begin the exporting of the video. Wondershare Filmora supports a number of video formats, as you can see in the picture below. So, it is also possible to save the video in the format of your choice. It supports 4K quality.

Every website, blog or social media page doesn’t look appealing without the videos. So, the video plays an essential role in showing your presence on the web, and for this purpose, you need the most straightforward editing software. Wondershare Filmora is the proper selection as it has all the tools no matter you are familiar with it or not.
It can completely transform your videos with amazing tools and features that bring a WOW factor to your images and videos. There is a whole library for effects; whether for transition or animation; everything is available. Start using Wondershare Filmora today and have fun.
Step 2: Import the video that you want to be mute. File à Import.
Step 3: From the project panel, drag and drop the project in the timeline panel.
Step 4: Now is the time to select the video clip from the timeline. Click on the video layer for the selection.
Step 5: Right-click on the video presentation on the timeline and select the option of “unlink” from the drop-down menu.
Step 6: Now delete the audio from the video you want to separate. For deleting the audio, either select the layer and press the “delete” key. Or you can choose the layer from audio from which you are unlinking from the video and choose the option of “Clear” from the menu.
You have received success in separating the audio from the video clip with the help of Adobe Premiere Pro. It is easy to edit the track as your own choice. Export options are also available, so you can share them wherever you want.
One easier way to separate the audio from the video clips
It is a fact that Premiere Pro is an extraordinary software, but unluckily, its features depend on the subscription monthly or yearly. It requires high storage memory from your system. While working on this software, it increases the complexity.
That’s the reason the graphic designers and video editor are always in search of feasible and straight forward editing software. Filmora Video Editor is the right solution of all the issues.
It is light to the systems and all the features are freely available without any subscription. No matter which operating system you are using Wondershare Filmora is easily available to run on it. Whether it is separating the audio or removing the background, each and everything is simple for handling.
For Win 7 or later (64-bit)
For macOS 10.14 or later
Features:
- Preview of using the tools before applying the changes
- Numerous tools are available for customizing the videos and images
- Splitting of the clips and screens as well
- Involving of the graphics and animation
- Simply drag and drop the videos in the timeline
- Mixing of the audio
- Removing the noise
Under this heading are the steps for guiding you regarding the extraction or separation of the audio from your videos.
Step :1
Simply launch the Wondershare Filmora after it installs your system. If it is already installed, then start creating the new project.
Step:2
Import the file in the timeline you want to remove or separate the audio. Go to the File menuàimport the media file or press the keys of CTRL+I on the keyboard.
Step :3
Drag and drop the video clip in the timeline to proceed with editing.
Step:4
Right-click on your video and choose the option of “Detach Audio”. Then the new track of the audio appears in the timeline.
Step:5
Select the audio you have just received above and select the option of “Delete”.
Step:6
Click on the button “Export” for exporting the video.
Step:7
Please choose the format of your choice, name the file and choose the folder where you want to save it. Even setting the resolution, decoding the video and frame rate is also possible. These options are under the settings button. Click on “Export” to begin the exporting of the video. Wondershare Filmora supports a number of video formats, as you can see in the picture below. So, it is also possible to save the video in the format of your choice. It supports 4K quality.
Every website, blog or social media page doesn’t look appealing without the videos. So, the video plays an essential role in showing your presence on the web, and for this purpose, you need the most straightforward editing software. Wondershare Filmora is the proper selection as it has all the tools no matter you are familiar with it or not.
It can completely transform your videos with amazing tools and features that bring a WOW factor to your images and videos. There is a whole library for effects; whether for transition or animation; everything is available. Start using Wondershare Filmora today and have fun.
Also read:
- 2024 Approved The Upcoming Generation of AR and VR Is Going to Define Augmented Reality Conferencing as the New Normal for All Business Purposes. With a Global Perspective to Build Better Communication, AR Can Be the Future of Collaborative Workspace
- Featuring The Use of Camera Shake in Creating the Best Videos
- New In 2024, In the Realm of Creating Graphic Presentation, People Also Ask About Designing Professionally Sound Slideshow Word Presentations. Heres How You Can Go About the Process
- Updated In 2024, How to Find a High-Quality Video Marketing Agency?
- Updated In 2024, Create Kinetice Typography Text Effect in Filmora
- New 2024 Approved The Availability of the Slow-Motion Feature on the iPhone Is Often Debated. This Article Will Guide You on How to Slow Down a Video on iPhone
- Updated In 2024, 10 Catchy Pixel Art Wallpapers and How to Custom Your Own with Ease
- In 2024, 12 Best Picks of Video Enhancer Software
- Updated 2024 Approved Time Lapse Video Is Very Interesting and Creative, Which Usually Attracts More Attention. This Article Will Show You How to Make a Time Lapse Video with Adobe After Effects
- Updated In 2024, How to Use the Logo Intro Templates for Your Next Video
- New Splice Video Editor Online - Get Your Videos Splice Easily for 2024
- Updated Guaranteed 10 Storyboard Creators To Make Animation Easier for 2024
- New 2024 Approved How to Use a Stabilization Tool in Filmora
- New If You Want to Know More About the Basics of Final Cut Pro, It Would Be Helpful to Watch a Beginner Tutorial, with the Length of only 20 Minutes, an Introduction of the Whole Program
- New 10 Best Movie Trailer Voice Generators Windows, Mac, Android, iPhone & Online
- In 2024, Best 5 AI Music Video Examples and Makers to Make Them
- New In 2024, How To Add Scrolling Text Effect
- Updated In This Article, You Will Learn About the Top 5 Editors for Windows, Top 5 Editors for iPhone/Android, and Top 5 Editors for Animated GIF Editing for 2024
- Updated Create Promotional Video
- New 2024 Approved Best Jump Cut Editing Tricks
- Updated How to Add a Lower Third to Your Video
- 2024 Approved Do You Want to Learn How to Film a TikTok with Multiple Clips? Worry No More because You Can Do This by Following the Methods Instructed in This Article
- 2024 Approved Using Montage In Movies | Learn to Use Montage With Movies
- Updated General Knowledge About MP4 Format and Best MP4 Video Editor
- 2024 Approved 12 Impressive AI Video Ideas for Creating Engaging Video Content
- Easy Ways to Change Aspect Ratio in iMovie, In 2024
- Updated In 2024, How To Speed Up Video With Lightworks Video Editor
- New Quick Answer What Is a Transparent Logo and Why Do You Need It
- 2 Ways to Transfer Text Messages from Infinix Note 30 Pro to iPhone 15/14/13/12/11/X/8/ | Dr.fone
- In 2024, Best Solutions for Lava Network Unlock
- In 2024, The Best iSpoofer Alternative to Try On Itel P55 | Dr.fone
- In 2024, How to Unlock iCloud lock from your iPhone 13 Pro Max and iPad?
- How To Transfer WhatsApp From iPhone 6s Plus to other iPhone 12 devices? | Dr.fone
- Recommended Best Applications for Mirroring Your Vivo Y36 Screen | Dr.fone
- New 5 Best Adobe Animate Courses & Classes for 2024
- Delete Gmail Account With/Without Password On Vivo T2x 5G
- 3 Things You Must Know about Fake Snapchat Location On Nokia C110 | Dr.fone
- Recover your photos after Nokia C110 has been deleted.
- Best Xiaomi Pattern Lock Removal Tools Remove Android Pattern Lock Without Losing Data
- New Whats the Best 10 Photo Animator Templates That Bring Your Images to Life?
- In 2024, 3 Ways to Erase Apple iPhone 6 When Its Locked Within Seconds | Dr.fone
- In 2024, How to Mirror Your Honor X50i+ Screen to PC with Chromecast | Dr.fone
- What Does Enter PUK Code Mean And Why Did The Sim Get PUK Blocked On Vivo Y78 5G Device
- iSpoofer is not working On Meizu 21? Fixed | Dr.fone
- Full Solutions to Fix Error Code 920 In Google Play on Vivo V30 | Dr.fone
- Easy steps to recover deleted videos from Smart 7
- 2024 Approved Translate Live Videos With The Best Video Translator
- Your Complete Guide To Reset Samsung Galaxy M54 5G | Dr.fone
- In 2024, Unlock Apple iPhone 8 With Forgotten Passcode Different Methods You Can Try | Dr.fone
- Life360 Learn How Everything Works On Xiaomi Civi 3 | Dr.fone
- Xiaomi Redmi 13C Screen Unresponsive? Heres How to Fix It | Dr.fone
- Remove Samsung Lock Screen without Password(Samsung Galaxy M14 4G)
- In 2024, Why Your WhatsApp Location is Not Updating and How to Fix On OnePlus Ace 3 | Dr.fone
- Title: New In 2024, What Is MKV Format and How To Play MKV Video?
- Author: Morgan
- Created at : 2024-04-24 01:08:03
- Updated at : 2024-04-25 01:08:03
- Link: https://ai-video-editing.techidaily.com/new-in-2024-what-is-mkv-format-and-how-to-play-mkv-video/
- License: This work is licensed under CC BY-NC-SA 4.0.
