
:max_bytes(150000):strip_icc():format(webp)/Instagram_Login-5c004ff2c9e77c000104174d.png)
New In 2024, What Is Motion Blur in the Game? Do You Really Need It?
What Is Motion Blur in the Game? Do You Really Need It?
Video games, as a whole, have developed exceptionally in the market over the past two decades. With new technology taking charge, different effects and enhancements have risen and introduced contemporary gaming designs. Amidst this transition, the development of games with the motion blur effect is also present. But does a gamer need a motion blur effect in their games?
Although motion blur is present in many game settings, it has not been acknowledged in the gaming community. However, there are still doubts about this effect. In this article, we will discuss motion blur gaming in detail. We will also decide whether gamers require a motion blur effect in their games. Read this article to know if motion blur is beneficial or problematic for gamers.

Part 1: What is Motion Blur?
The motion blur effect has been a part of many movies and videos. It has been used as a source to display objects moving at high speed. This effect is bridged in situations where the objects moving in speed are directed in a single direction. However, this effect is not adjusting the object in a frame but creates an apparent blur.
If you tend to pause that video or movie during the motion blur effect, you will find the picture blurred in a specific direction. This is because the camera records the blur as the motion information, providing a realistic effect. Many filmmakers and videographers utilize this feature and tend to develop a sense of fast-moving objects. This advancement has turned out to be quite successful.

With the help of the information recorded through motion blur, the high-speed objects moving within the frame are coherent within the 24 frames, which is the standard frame rate per second. However, motion blur has also been tested at 29.97 and 30fps, which does show diversity in its functionality.
An Overview of Stop-Motion Animation Effect
If you tend to display the cohesive effect of the object within the image, you will have to cut short the particular clip. It should be done in 24 frames to achieve a frame-by-frame display of the object with changing direction. This removes the dynamic blur within the video. However, it displays another effect generally referred to as stop-motion animation.
Talking about this principle, stop-motion animation is quite common in old animated films. The movement was displayed by taking snapshots of every frame with the object displaced within each frame. Combining these snapshots, a complete stop-motion effect was created, making footage. The animation is captured one frame at a time, with a sequenced display. However, no blurring is present within the animation, making both discussed effects different.

Part 2: What is Motion Blur in Games? Why Do Games Have It?
Once you understand the concept of motion blur, it is time to figure out what motion blur is in games. This particular effect has not only been used in films but is now taking place within games for a realistic effect. Unfortunately, the use of stop-motion animation within the games is not effective. Although it has a standard frame rate of 24fps, the screen always lags.
Since the recorded action is manually adjusted within the frames, the motion is inaccurate, indicating the need for a motion blur effect in games. Talking about motion blur in games, this particular effect was not observed for a long time. The use of motion blur increases the quality of the game, but it also enhances the size of the game, which requires better equipment.
The games did not include the effect for quite a long time. Every frame was clear since the stop-motion animation runs under this principle. The clarity in frames, if operated at 24fps, the standard rate for stop-motion animation, will show screen lags. This is why the games were operated at least 30fps to be almost smooth.
When these screens were to display high-speed movement, the game had 30fps displayed lag on screen. Rapid changes in cameras led to the need for games to include motion blur gaming. This was based on smoothening the fast-moving effect covered in 30fps or less. Motion blur has improved the overall video output effects of the game. Due to motion blur, you can observe better transitions with a smooth flow at a lower fps rate.

Part 3: Should Motion Blur in Game Be On or Off?
The question that arises, in this case, is whether you should keep the motion blur on or off. To answer this question, you will have to observe why gamers dislike motion blur in games. As this effect is most prominent in conditions where the screen’s frame rate is 30fps or lesser, it becomes redundant if the screen’s frame rate is less than it.
Although you have heard that motion blur makes a screen smooth, this goes the other way in such situations. The display gets sticky for screens with lower frame rates, making the user dizzy. A good gaming engine provides the function of automatically adjusting the motion blur effect against the screen’s frame rate. However, if the user is not playing such quality games, they will face this issue.
It is better to turn off the motion blur effect for games without this adjustment or conditions where the output video remains sticky. For smoother results, the motion blur effect is preferred. It clarifies that the problem generally ranges from player to player. This clearly explains that motion blur is not the culprit in this situation.

Part 4: Is Motion Blur Good for FPS? Does it Increase FPS?
Motion blur, as explained above, is pleasing if it makes your results smoother. Generally, this is the reason why motion blur gaming was considered. Thus, motion blur is good for FPS; however, it does not increase the frame rates of your computer’s screen. The explanation above shows that motion blur has nothing to do with increasing the frame rates. It blurs the object’s trail by sustaining the video within the same frame rates.
The brain corrects the pictures the eye observes since it is being observed in natural circumstances. The use of motion blur improves the experience. Along with that, the results are always considered realistic under dynamic blur. In conclusion, motion blur is considered much more effective in video games.
Bonus Tips – How to Add Motion Blur to Your Gaming Video
What if you have a game recording on your computer that does not contain motion blur? If you have been recording clips of your old favorite game and intend to put them on social media, you might consider adding motion blur. To enhance motion blur gaming, you can consider using Wondershare Filmora , one of the most influential cross-platform video creation platforms.
Free Download For Win 7 or later(64-bit)
Free Download For macOS 10.14 or later
Filmora enhances the quality and swiftness of a video with the aid of many functions. From control of the effects to transitions, using these features in video editing gives the option of perfecting the results. Furthermore, Filmora provides these all under a simple interface, which makes it intuitive for users to work on.
Other Prominent Features of Wondershare Filmora
To know more about Wondershare Filmora and its prominent features, let’s look into the details provided below:
- You can utilize the speed ramping option to control your video’s speed. To use better effects, this option gives you reasonable control over the keyframes.
- To make your videos look professional, you can consume the motion tracking feature offered by the video editor.
- Filmora gives a complete and comprehensive list of effects and transitions to enhance the quality of your video.
Steps to Add Motion Blur to Gaming Video with Filmora
With an overview of this perfect video editing platform, we will now observe the instructions for adding motion blur within a gaming video with the tool:
Step1 Launch Filmora and Open Project
Download and install the latest Wondershare Filmora on your computer and launch the tool. Select the “New Project” on the window to proceed to a new window.

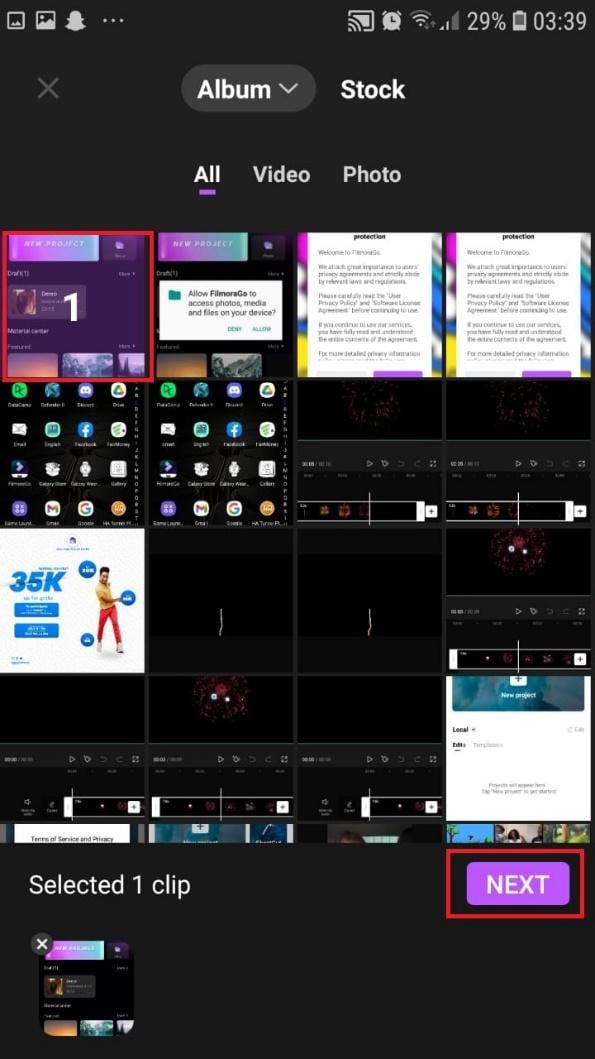
Step2 Import Gaming Video
As it opens, select the “Import” icon on the screen to add the gaming video that is to be edited. As you import it, drag the video to the timeline for editing.

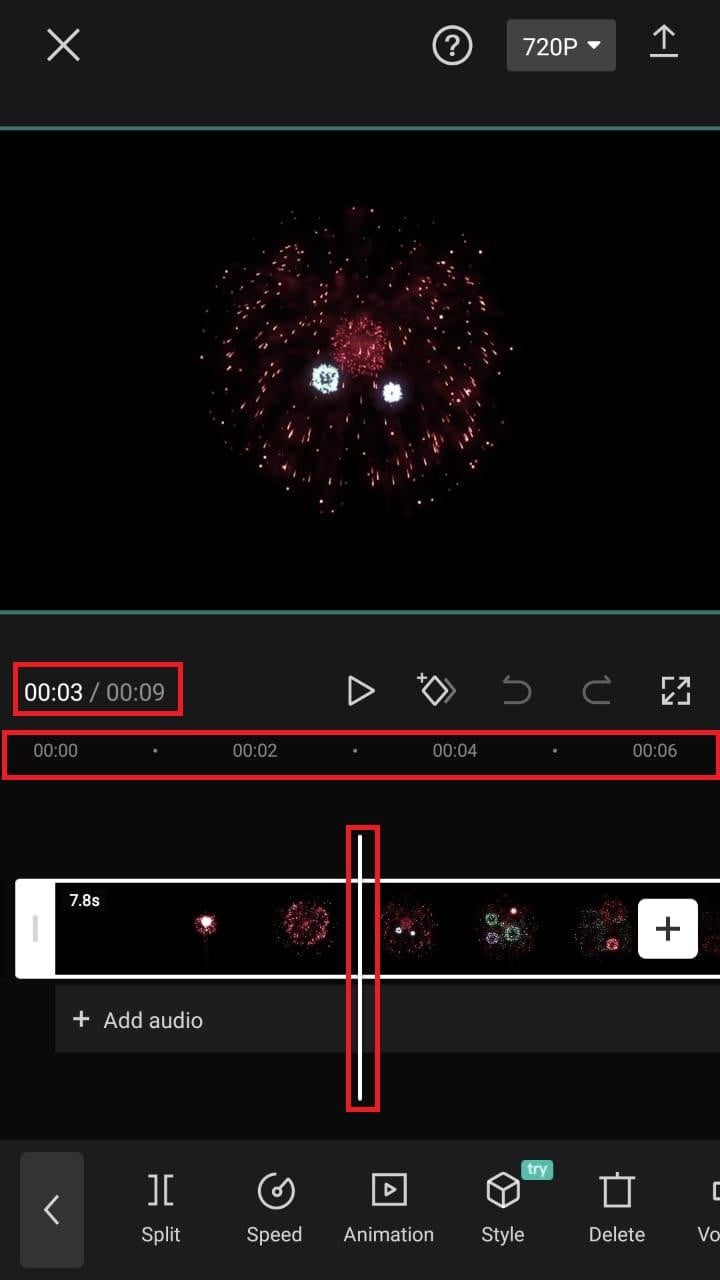
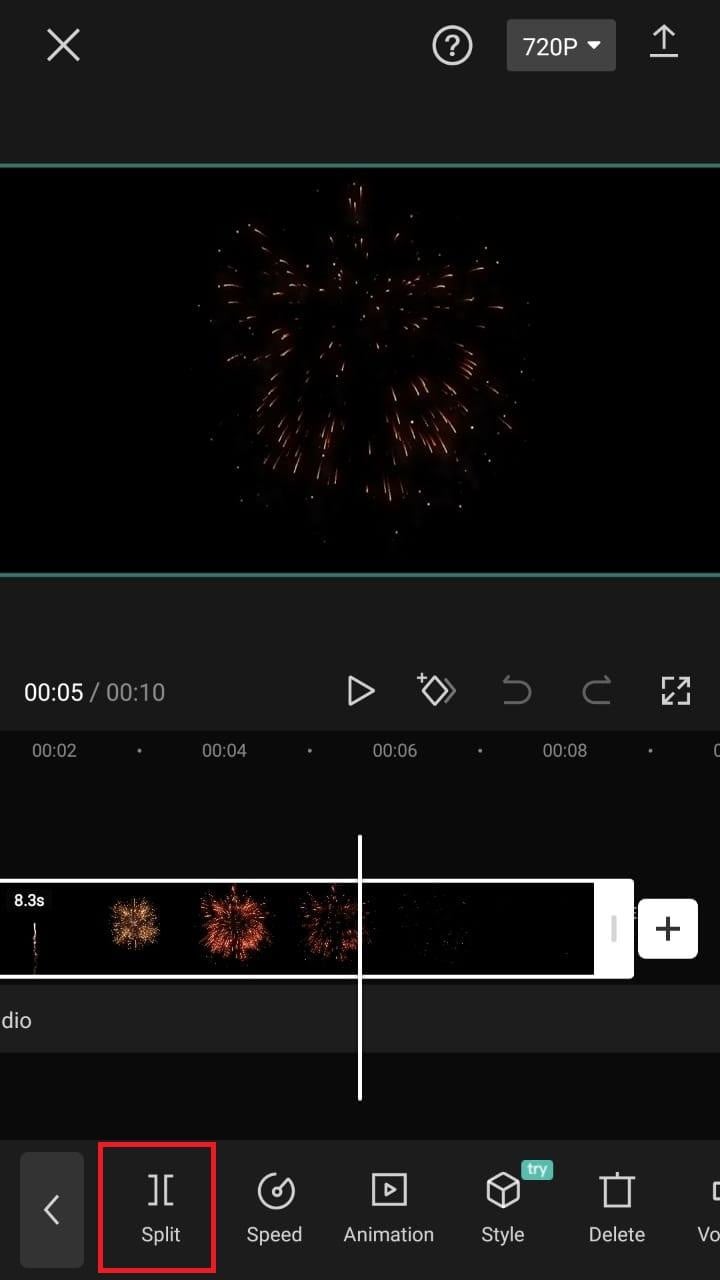
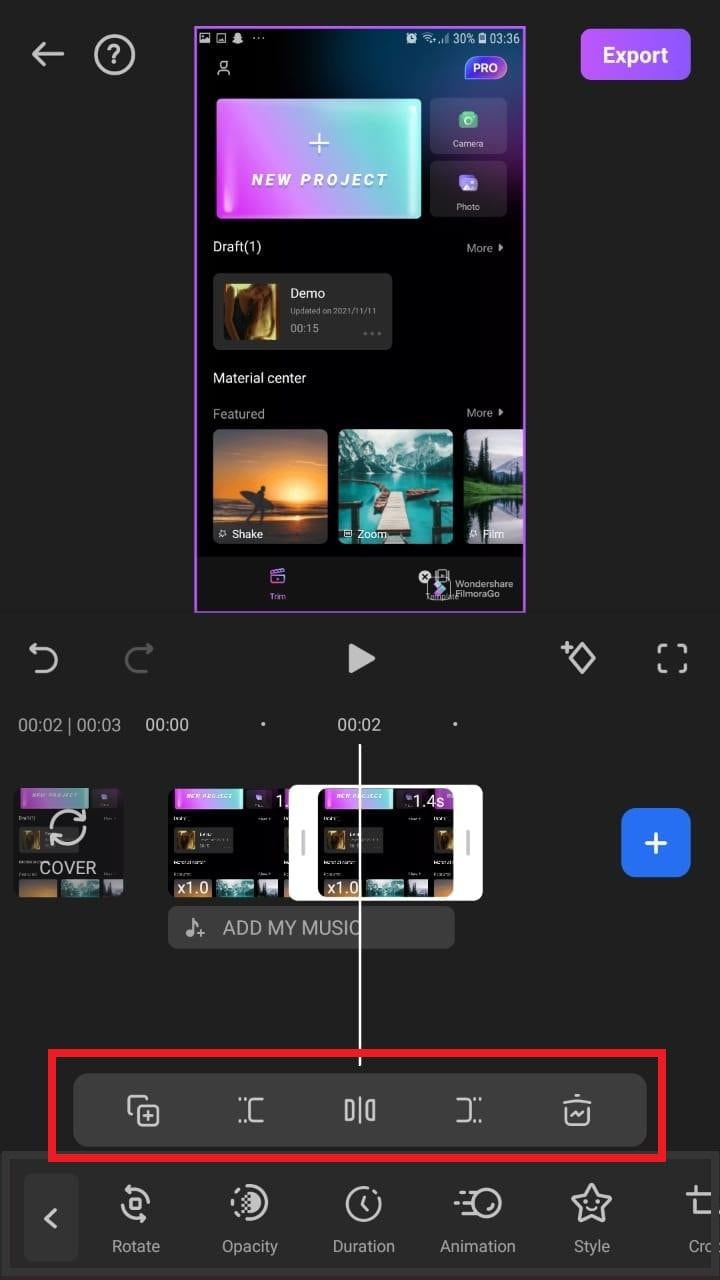
Step3 Add Motion Blur to Gaming Video
Next, you must drag the play head to the point where you wish to add the motion blur effect on the gaming video. As you reach the point, click the “Scissors” icon to split the video. Once it is done, navigate to the “Effects” tab and select “Video Effects” from the left panel. Then, tap on the search bar and continue to search for “Blur.” You must drag the first result of this search to the point where you wish to add the motion blur.

Step4 Smooth Video with Transition and Export
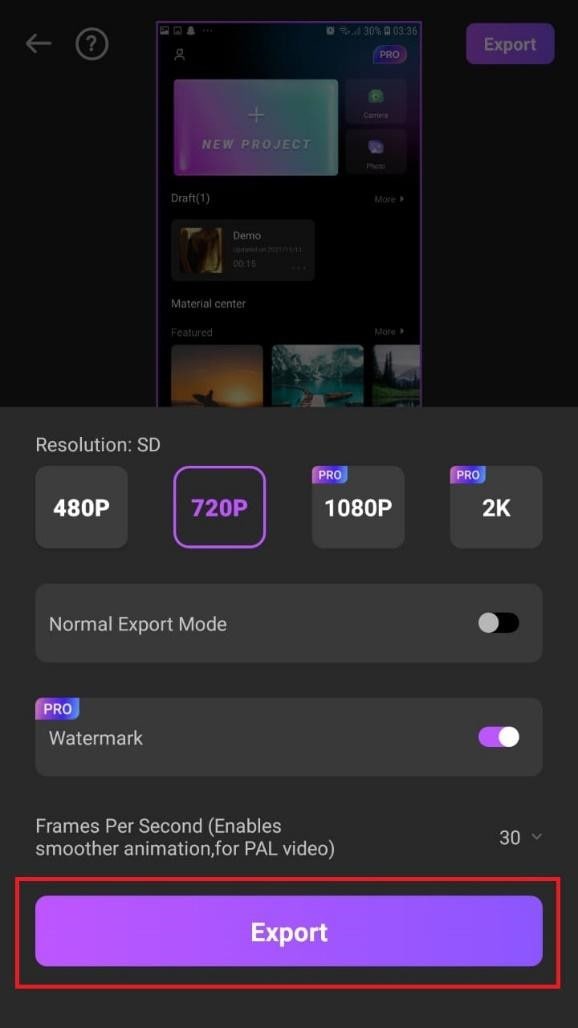
To smoothen the results, you must look for a transition. Proceed to the “Transitions” tab and look for “Dissolve” from the search bar. With the Dissolve transition in line, drag it onto the timeline in the same position where the motion blur is added. Once done, click the “Export” button and follow the on-screen instructions to export your edited gaming video.

Last Words
This article has presented a comprehensive overview of motion blur gaming and why it is necessary for games. While you figure out why motion blur is required, you must also observe whether it is needed. If you have a gaming video that needs to be added with motion blur, you can consider using Wondershare Filmora, a great video editor based on exceptional features.
Free Download For macOS 10.14 or later
Filmora enhances the quality and swiftness of a video with the aid of many functions. From control of the effects to transitions, using these features in video editing gives the option of perfecting the results. Furthermore, Filmora provides these all under a simple interface, which makes it intuitive for users to work on.
Other Prominent Features of Wondershare Filmora
To know more about Wondershare Filmora and its prominent features, let’s look into the details provided below:
- You can utilize the speed ramping option to control your video’s speed. To use better effects, this option gives you reasonable control over the keyframes.
- To make your videos look professional, you can consume the motion tracking feature offered by the video editor.
- Filmora gives a complete and comprehensive list of effects and transitions to enhance the quality of your video.
Steps to Add Motion Blur to Gaming Video with Filmora
With an overview of this perfect video editing platform, we will now observe the instructions for adding motion blur within a gaming video with the tool:
Step1 Launch Filmora and Open Project
Download and install the latest Wondershare Filmora on your computer and launch the tool. Select the “New Project” on the window to proceed to a new window.
Step2 Import Gaming Video
As it opens, select the “Import” icon on the screen to add the gaming video that is to be edited. As you import it, drag the video to the timeline for editing.
Step3 Add Motion Blur to Gaming Video
Next, you must drag the play head to the point where you wish to add the motion blur effect on the gaming video. As you reach the point, click the “Scissors” icon to split the video. Once it is done, navigate to the “Effects” tab and select “Video Effects” from the left panel. Then, tap on the search bar and continue to search for “Blur.” You must drag the first result of this search to the point where you wish to add the motion blur.
Step4 Smooth Video with Transition and Export
To smoothen the results, you must look for a transition. Proceed to the “Transitions” tab and look for “Dissolve” from the search bar. With the Dissolve transition in line, drag it onto the timeline in the same position where the motion blur is added. Once done, click the “Export” button and follow the on-screen instructions to export your edited gaming video.
Last Words
This article has presented a comprehensive overview of motion blur gaming and why it is necessary for games. While you figure out why motion blur is required, you must also observe whether it is needed. If you have a gaming video that needs to be added with motion blur, you can consider using Wondershare Filmora, a great video editor based on exceptional features.
How To Split Screen On Tiktok
TikTok is probably the most popular video-sharing app in the world right now. Many TikTokers have become famous for making videos that have a significant impact and encourage creativity and new ideas. One of the most popular TikTok trends is the split-screen effect. You’ve probably seen a lot of TikTok split-screen videos with cool effects that made you wonder how the user split their screen. Becoming skilled in using TikTok effects is not as difficult as it might look. It only requires a significant amount of practice. Read on as we show you how to make a TikTok split-screen video.
Using CapCut To Split Screen
CapCut is the official free TikTok Video Maker and Video Editor with Music for TikTok that is multifunctional. Its interface is quite similar and easy to use.
CapCut includes free advanced capabilities such as keyframe animation, stabilization, and Picture-in-Picture (PIP). These are in addition to its fundamental functions, such as video editing, adding stickers, text, and music.
Steps to Split Screen Video with CapCut On Android and IOS Devices
- To use the app, you need to install it first. iPhone and Android users can download CapCut. Navigate to the appropriate app store of your choice and download CapCut.
- After installation, launch the app.
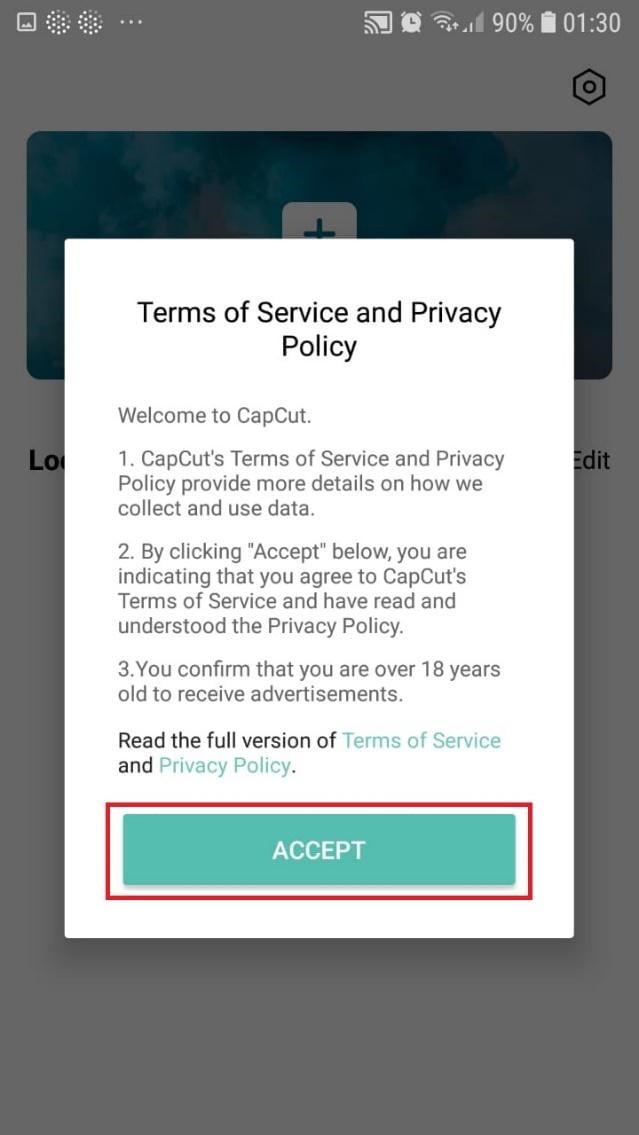
- Then go ahead and grant CapCut permission to view your camera roll. Incorporating video clips into your project has never been easier. Go to the app’s main screen and select “New Project“ from the drop-down menu.
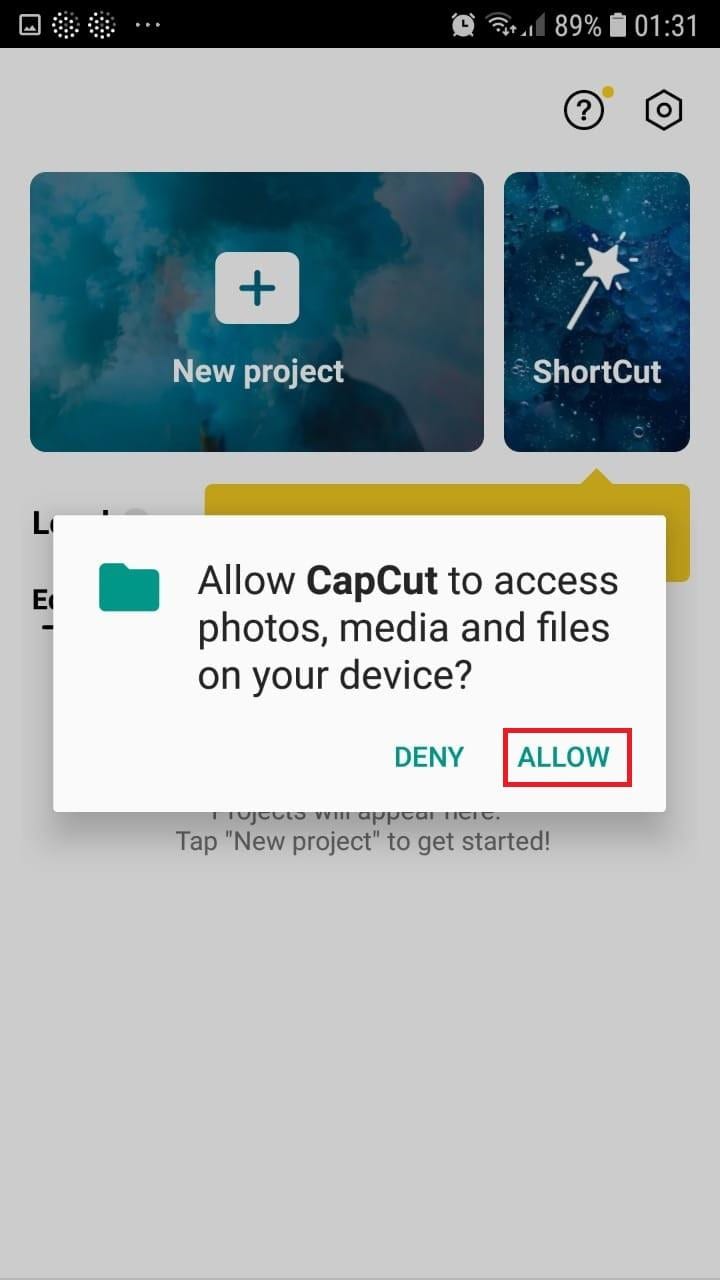
- To confirm your selection, click the green Accept This confirms that CapCut requires access to your photographs to function correctly. Tap on the button on the following pop-up window to gain access to all the photos. This is a one-time process that must be carried out the first time you launch the application.
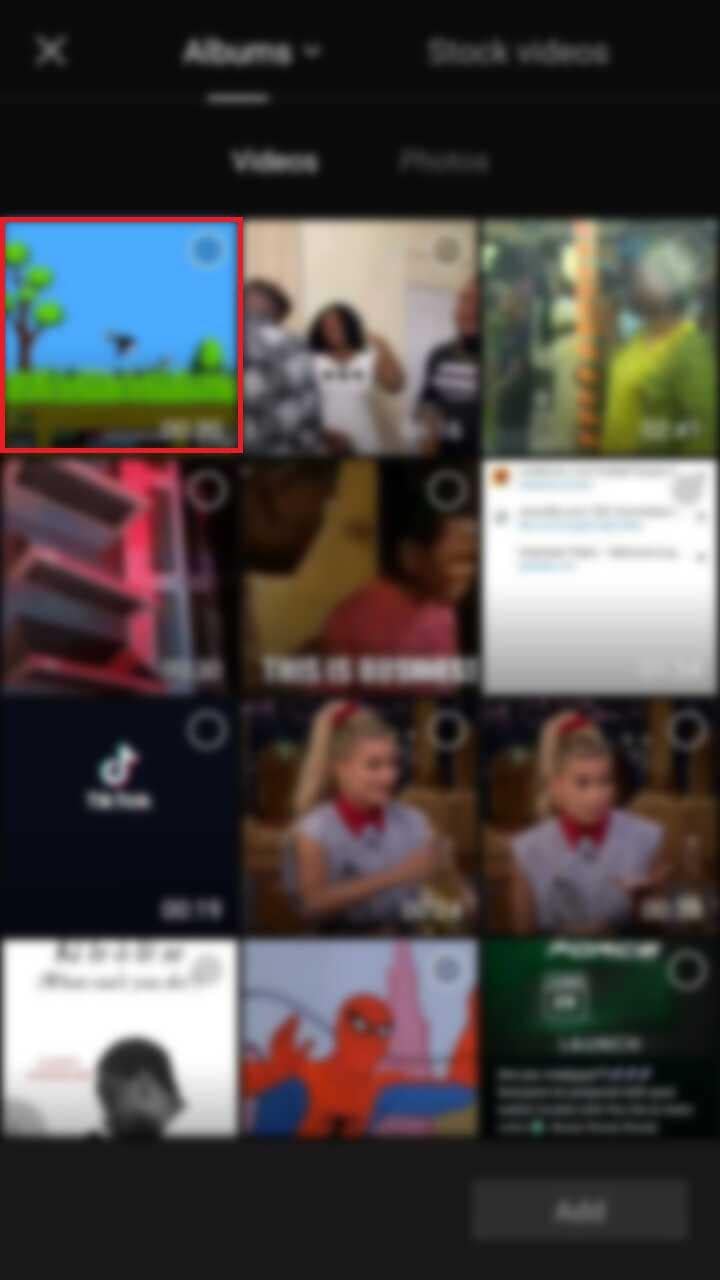
- Begin a New Project. After opening the app, press the “New Project“ icon to bring up a new screen showing your device’s videos.

- Choose a video clip. Locate the desired video clip for your project by scrolling through the pages displaying your camera roll. Tap the video’s thumbnail and then tap the “Add“ icon in the screen’s lower part.
- Get familiar with your workspace. Upon uploading your first clip, CapCut leads you to the primary workspace. This is where you will spend most of your time within the app. The preview panel, the timeline, and the toolbar are in order from top to bottom.
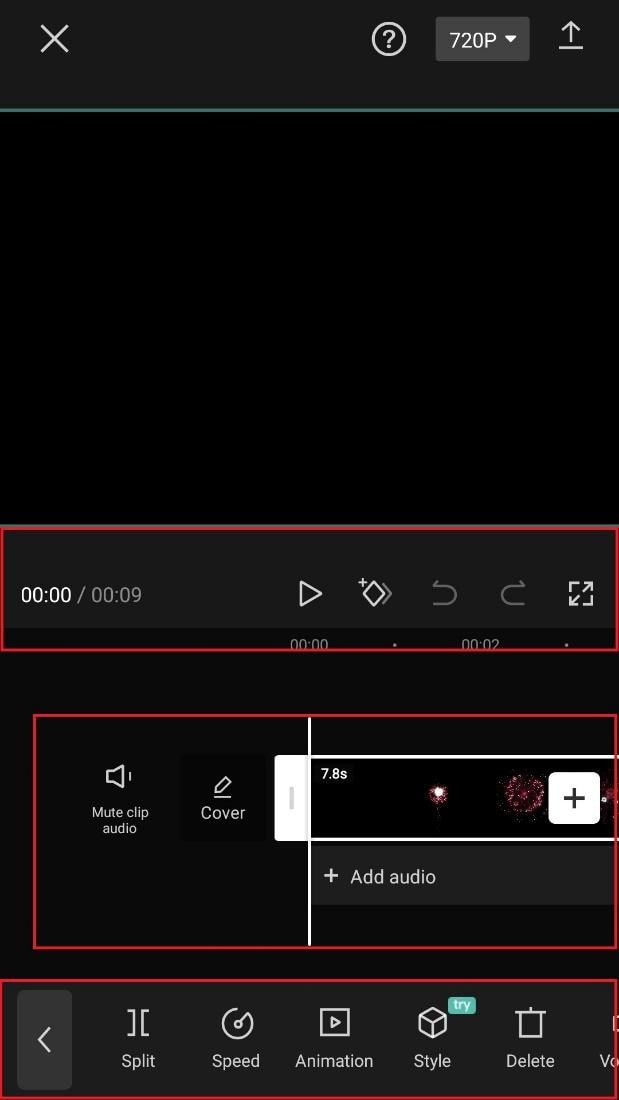
- View the toolbar and timeline. They represent your screen’s bottom half. The timeline, located below the preview panel, is where you’ll make all your adjustments. You can access all your video editing tools, including split, text, audio, effects, stickers, and more, on the toolbar at the bottom of your screen.
- Split video clips. To split a video clip in half, move the play head to the desired location on the timeline. Tap on your clip, then press the “Split“ toolbar icon. Your result now shows two different clips, not just one.
A Better Split-Screen Effect Video Editor
Filmora is one of the best free HD video makers and video editors with several functionalities, including text, backgrounds, filters, special effects, emoji, audio, and special effects.
Filmora is a feature-packed video editor which has a variety of tools to work with. With this video editor, producing memes, videos with images, pictures, music, stickers, and sound effects and editing videos for YouTube, Twitter, WhatsApp, Facebook, TikTok, and Instagram is simple and entertaining.
Free Download For Win 7 or later(64-bit)
Free Download For macOS 10.14 or later
Steps to Split Screen Video with Filmora
- Download Filmora from the App store
- After installation, launch it.
- Click on “Continue” to continue to use the app.

- Click on Allow to grant Filmora access to your photos and videos.
- You can now tap on “New Project” with the + Symbol.
- Select your desired video and tap on “Next” at the bottom right of your screen
- You can select various options from the bottom of your screen to edit the selected video the way you like.

- Click on trim, and then you will see the different split-screen and collage feature options. Pick any that appeals to you.
- When you are done with the editing, tap on “Export” at the top right of your screen.

- Go ahead and tap on “Export” on the next screen. Your video will be successfully exported and saved to your camera roll.
Using Filmora is very efficient in splitting your videos and making collage features for TikTok. It is a very simplified app available on both the Google Play Store and Apple Appstore.
Conclusion
TikTok is a platform that users use worldwide to create and share content. It could be pictures, videos, reels, or any other media type. Some people create videos for their audience on TikTok to educate them, while others do it to entertain them.
In any case, the goal is to build a more significant following on TikTok and garner greater attention from its users. You could even make money off the app.
One of the methods to impress your fans and explore multiple possibilities to build unique reels is to use the TikTok split-screen and collage feature effect available on TikTok. Although there are a few different ways to create a Split Screen on TikTok, the steps highlighted in this article are the most straightforward.
Free Download For macOS 10.14 or later
Steps to Split Screen Video with Filmora
- Download Filmora from the App store
- After installation, launch it.
- Click on “Continue” to continue to use the app.
- Click on Allow to grant Filmora access to your photos and videos.
- You can now tap on “New Project” with the + Symbol.
- Select your desired video and tap on “Next” at the bottom right of your screen
- You can select various options from the bottom of your screen to edit the selected video the way you like.
- Click on trim, and then you will see the different split-screen and collage feature options. Pick any that appeals to you.
- When you are done with the editing, tap on “Export” at the top right of your screen.
- Go ahead and tap on “Export” on the next screen. Your video will be successfully exported and saved to your camera roll.
Using Filmora is very efficient in splitting your videos and making collage features for TikTok. It is a very simplified app available on both the Google Play Store and Apple Appstore.
Conclusion
TikTok is a platform that users use worldwide to create and share content. It could be pictures, videos, reels, or any other media type. Some people create videos for their audience on TikTok to educate them, while others do it to entertain them.
In any case, the goal is to build a more significant following on TikTok and garner greater attention from its users. You could even make money off the app.
One of the methods to impress your fans and explore multiple possibilities to build unique reels is to use the TikTok split-screen and collage feature effect available on TikTok. Although there are a few different ways to create a Split Screen on TikTok, the steps highlighted in this article are the most straightforward.
Slowing Down GIF With The Best Available Methods
Graphic interchange format, mostly known as GIF, is extensively used to convey information. GIF is a communication tool in bitmap image format that clearly conveys your online content. When sharing GIF images, playback speed is the most important thing to count. If the playback speed of the GIF is faster than usual, viewers may skip their focus essential data.
As a solution, you must learn how to adjust slow motion GIF’s speed. This article will teach you the stepwise methods to achieve a slow-motion GIF. Before heading towards the methods, learn about some GIF video platforms. By the end, you will be able to make a matchless slow-mo GIF through a desktop solution.
Slow Motion Video Maker Slow your video’s speed with better control of your keyframes to create unique cinematic effects!
Make A Slow Motion Video Make A Slow Motion Video More Features

Part 1: Where Can I Get Impressive Slow-Motion GIFs for Myself?
Slowing down GIFs brings viewers’ attention to specific actions in video content. It exaggerates facial expressions or movements in the videos, leading to humorous results. Creators choose to slow down GIFs to convey particular moods and styles. Different contexts require different slow-mo GIF videos; below are some platforms to cater to all of them.
1. Giphy
One of the famous platforms for GIFs is Giphy, which offers an extensive collection of GIFs. If you want a GIF that can add humor to your content, pick the entertainment category from Giphy. It provides different domains of GIFs for your ease of selection. Some of its categories include sports, gaming, animals, and cartoons.

Key Features
- Using this platform, you can not only get a GIF but also upload one. Graphics designers or GIF creators can use this place to publish their work globally.
- After selecting one GIF, you can share it on any platform. It allows you to embed the GIF directly on websites or share it through links.
- Every GIF on Giphy provides in-depth details like size, frame, and source. This way, you can instantly choose one that matches your project’s requirements.
2. Tenor
Another popular platform to get high-quality GIFs is Tenor. It supports multiple languages in its interface so international users can better comprehend it. Apart from that, there are many categories in the trending searches of GIFs. It shows which domain of GIFs is ranking the most. Some trending tenors include cars, snow, happy holidays, good nights, and GIFs.

Key Features
- When you pick one GIF, you can change its format before downloading. In this regard, you can choose HD, MP4, and SD quality options.
- This platform detects your selection and suggests relevant GIFs afterward. For instance, if you pick a cat GIF, then you will find a cat GIF when scrolling down.
- Tenor provides GIF specification details under each. Besides, you can share the selected GIF image through the URL and embedded link.
Part 2: What to Do If You Want to Slow Down GIFs: The Best Tools
Knowing platforms, as mentioned above, makes it easier for you to avail the desired GIF. After grabbing one of your choices, you can make it a slow-motion GIF, if required. To do so, there are several tools in the market. Some of them are explained below, along with step-by-step instructions on how to use them.
List of Best Tools to Slow Down GIFs
1. Ezgif.com
This tool is primarily responsible for online GIF making and image editing. Besides, it can convert your video into GIF, resize, cut, crop, and optimize them. Moreover, you can add effects and text to your videos or GIFs to make them appealing. GIF animation speed changers are the real game changers among online solutions:
Step 1
Browse the official site of Ezgif.com and tap on the “Effects” section. Afterward, choose the “Adjust GIF Speed” section to proceed to further options. There, click the “Choose File” white button and look for the file you want to slow down. Optionally, paste the URL link in the given section and tap “Upload” to continue.

Step 2
Scroll down the window and insert the digits on which percentage you want to slow down the speed. Afterward, click the “Change Speed” button and find a slow-motion GIF in the output image.

2. VEED.io
VEED.io is a preferred choice by many creators for professional or high-quality videos. It offers screen recording, video editing, and subtitle translation services. Apart from that, it can fix GIF speed with the GIF speed changer feature. After changing speed, you can add transitions and animation effects in Veed.io. For now, let’s just stick to the slow-mo GIF in the following steps:
Step 1
Access the “GIF Speed Changer” in VEED.io, start by tapping “Choose GIF File” and enter the editing screen.

Step 2
From the next screen, you will get a pop-up menu first. You have to hit the “Upload a File” option and select a GIF file to import into VEED.io. Under the video preview, click on the “Speed” icon next to the “Sound” symbol. Then, choose “0.5x” and get a slow-down GIF preview in front of you.

3. Canva
Students must be aware of this platform as a presentation template provider. Canva is a tool that provides stunning templates to customize with its cloud storage system. Gradually, it’s turning more into a video editing platform. Regarding slow-motion GIFs, it can change the GIF speed online. After slowing down the GIF, you can convert it into MP4 or enhance it by adding graphics.
Step 1
Reach out to the GIF Speed Changer feature of Canva’s video editing. Then, tap the “Change GIF Speed” button to access the editing screen.

Step 2
Navigate towards the left-side panel and hit the “Upload Files.” Now, search and select your GIF to import in Canva’s editing window. Afterward, go to the “Playback” option at the top left and then direct to the left panel. Move the “Video Speed” slider to the left for a Slow-mo GIF. Click on the video for a preview, or look for any other playback adjustments.

Part 3: Make Impressive Slow Mo GIFs Using Desktop Solution
Are you getting customized speed adjustment options using any of the above tools? The answer is quite clear: no online tools do not offer personalization for slow-motion GIFs. That’s where you need Wondershare Filmora as a better alternative. It is currently the best video editor that transforms your videos into art pieces.
With more than 10 billion stock media, you don’t have to browse different sites. Filmora is an all-in-all platform that can not only edit your video but also aims to polish it to the next level. Besides, editors can use Filmora anywhere with just a password.
Free Download For Win 7 or later(64-bit)
Free Download For macOS 10.14 or later
How to Make Slow-motion GIF with Filmora
After discovering the top-notch features of Filmora, it’s time to use it. Although it’s very simple to operate, this step-by-step guide will help you process faster:
Step 1Launch Filmora and Import GIF to the Timeline
Download Wondershare Filmora from its official site. After a successful launch, you will enter its main screen. Look for the “New Project” option from the main interface. Tapping on the New Project, you will find the editing screen. Import your GIF in the media panel and drag it into the timeline section to begin the process.

Step 2Slow Down the GIF with Optical Flow
Right-click on the video and pick the “Uniform Speed” option from the list. This way, you will find an editing panel on the right side. Now, you can move the “Speed” slider towards the left. You can press the space bar and get the slow-motion GIF preview. Direct downward and choose the “Optical Flow” option from the extended menu of “AI Interpolation.”

Step 3Continue to Edit or Head to Export the Media
Finally, you will get a slow but high-quality GIF. Now, it’s up to you to continue exploring other features of Filmora or head to save the file. To save the file, go to the top right corner and press the “Export” button.

Key Features Marking Filmora’s Greatness
Filmora is proven to be the easiest software with the most powerful editing features. As proof, you can read the main features of Filmora to comprehend its functionalities better.
1. Speed Ramping
Create a unique cinematic effect in your video by adjusting keyframes. Filmora offers speed ramping features to bring a smooth transition in slow-motion or fast motions. In speed ramping, you get 6 templates, such as bullet time, montage, and jumper. Using those templates, you don’t need to manually adjust keyframes for speed ramping. Also, you can retain the original pitch of the audio after changing the speed.
2. AI Copilot Editing
To boost productivity, Filmora provides an AI Copilot editor option. It saves time that could be wasted searching for some feature or making the editing perfect. Users can ask anything to copilot in natural language. They can take help from an already existing question in the copilot editors. This feature will guide you toward practical actions through navigation buttons.
3. AI Music Generator
Who else is fed up with finding the perfect music for Vlog? Commonly, you didn’t find a video of exact length and mood. Thus, Filmora enables you to generate a soundtrack according to your mood and video length. Using it, you just have to prompt with the number of tracks, mood, and length. The AI-generated music will not require copyrights, so you can use it freely anywhere.
4. AI Image
Have you ever heard that any video editor can convert your text prompts into images? Filmora is offering this option, especially for people who are struggling to get their desired image. For this purpose, they need to describe images in simple language. Afterward, they are required to pick one style for accurate results.
5. AI Copywriting
Do you have a deadline for script submission, but it is not ready yet? Leave this headache to Filmora’s AI copywriting feature, which aims to produce engaging scripts. With ChatGPT integration, it can generate YouTube titles and descriptions. Furthermore, you can ask AI to convert your script into an appealing video.
Conclusion
To summarize, slowing down is the ultimate solution to retain the viewer’s attention. In this article, you have seen the top-notch platforms for slow-motion GIFs. They are not enough for remarkable videos because of the limited speed adjustment options. So, using Filmora remains the best option in providing easier ways to customize the speed of GIFs.
Make A Slow Motion Video Make A Slow Motion Video More Features
Part 1: Where Can I Get Impressive Slow-Motion GIFs for Myself?
Slowing down GIFs brings viewers’ attention to specific actions in video content. It exaggerates facial expressions or movements in the videos, leading to humorous results. Creators choose to slow down GIFs to convey particular moods and styles. Different contexts require different slow-mo GIF videos; below are some platforms to cater to all of them.
1. Giphy
One of the famous platforms for GIFs is Giphy, which offers an extensive collection of GIFs. If you want a GIF that can add humor to your content, pick the entertainment category from Giphy. It provides different domains of GIFs for your ease of selection. Some of its categories include sports, gaming, animals, and cartoons.
Key Features
- Using this platform, you can not only get a GIF but also upload one. Graphics designers or GIF creators can use this place to publish their work globally.
- After selecting one GIF, you can share it on any platform. It allows you to embed the GIF directly on websites or share it through links.
- Every GIF on Giphy provides in-depth details like size, frame, and source. This way, you can instantly choose one that matches your project’s requirements.
2. Tenor
Another popular platform to get high-quality GIFs is Tenor. It supports multiple languages in its interface so international users can better comprehend it. Apart from that, there are many categories in the trending searches of GIFs. It shows which domain of GIFs is ranking the most. Some trending tenors include cars, snow, happy holidays, good nights, and GIFs.
Key Features
- When you pick one GIF, you can change its format before downloading. In this regard, you can choose HD, MP4, and SD quality options.
- This platform detects your selection and suggests relevant GIFs afterward. For instance, if you pick a cat GIF, then you will find a cat GIF when scrolling down.
- Tenor provides GIF specification details under each. Besides, you can share the selected GIF image through the URL and embedded link.
Part 2: What to Do If You Want to Slow Down GIFs: The Best Tools
Knowing platforms, as mentioned above, makes it easier for you to avail the desired GIF. After grabbing one of your choices, you can make it a slow-motion GIF, if required. To do so, there are several tools in the market. Some of them are explained below, along with step-by-step instructions on how to use them.
List of Best Tools to Slow Down GIFs
1. Ezgif.com
This tool is primarily responsible for online GIF making and image editing. Besides, it can convert your video into GIF, resize, cut, crop, and optimize them. Moreover, you can add effects and text to your videos or GIFs to make them appealing. GIF animation speed changers are the real game changers among online solutions:
Step 1
Browse the official site of Ezgif.com and tap on the “Effects” section. Afterward, choose the “Adjust GIF Speed” section to proceed to further options. There, click the “Choose File” white button and look for the file you want to slow down. Optionally, paste the URL link in the given section and tap “Upload” to continue.
Step 2
Scroll down the window and insert the digits on which percentage you want to slow down the speed. Afterward, click the “Change Speed” button and find a slow-motion GIF in the output image.
2. VEED.io
VEED.io is a preferred choice by many creators for professional or high-quality videos. It offers screen recording, video editing, and subtitle translation services. Apart from that, it can fix GIF speed with the GIF speed changer feature. After changing speed, you can add transitions and animation effects in Veed.io. For now, let’s just stick to the slow-mo GIF in the following steps:
Step 1
Access the “GIF Speed Changer” in VEED.io, start by tapping “Choose GIF File” and enter the editing screen.
Step 2
From the next screen, you will get a pop-up menu first. You have to hit the “Upload a File” option and select a GIF file to import into VEED.io. Under the video preview, click on the “Speed” icon next to the “Sound” symbol. Then, choose “0.5x” and get a slow-down GIF preview in front of you.
3. Canva
Students must be aware of this platform as a presentation template provider. Canva is a tool that provides stunning templates to customize with its cloud storage system. Gradually, it’s turning more into a video editing platform. Regarding slow-motion GIFs, it can change the GIF speed online. After slowing down the GIF, you can convert it into MP4 or enhance it by adding graphics.
Step 1
Reach out to the GIF Speed Changer feature of Canva’s video editing. Then, tap the “Change GIF Speed” button to access the editing screen.
Step 2
Navigate towards the left-side panel and hit the “Upload Files.” Now, search and select your GIF to import in Canva’s editing window. Afterward, go to the “Playback” option at the top left and then direct to the left panel. Move the “Video Speed” slider to the left for a Slow-mo GIF. Click on the video for a preview, or look for any other playback adjustments.
Part 3: Make Impressive Slow Mo GIFs Using Desktop Solution
Are you getting customized speed adjustment options using any of the above tools? The answer is quite clear: no online tools do not offer personalization for slow-motion GIFs. That’s where you need Wondershare Filmora as a better alternative. It is currently the best video editor that transforms your videos into art pieces.
With more than 10 billion stock media, you don’t have to browse different sites. Filmora is an all-in-all platform that can not only edit your video but also aims to polish it to the next level. Besides, editors can use Filmora anywhere with just a password.
Free Download For Win 7 or later(64-bit)
Free Download For macOS 10.14 or later
How to Make Slow-motion GIF with Filmora
After discovering the top-notch features of Filmora, it’s time to use it. Although it’s very simple to operate, this step-by-step guide will help you process faster:
Step 1Launch Filmora and Import GIF to the Timeline
Download Wondershare Filmora from its official site. After a successful launch, you will enter its main screen. Look for the “New Project” option from the main interface. Tapping on the New Project, you will find the editing screen. Import your GIF in the media panel and drag it into the timeline section to begin the process.
Step 2Slow Down the GIF with Optical Flow
Right-click on the video and pick the “Uniform Speed” option from the list. This way, you will find an editing panel on the right side. Now, you can move the “Speed” slider towards the left. You can press the space bar and get the slow-motion GIF preview. Direct downward and choose the “Optical Flow” option from the extended menu of “AI Interpolation.”
Step 3Continue to Edit or Head to Export the Media
Finally, you will get a slow but high-quality GIF. Now, it’s up to you to continue exploring other features of Filmora or head to save the file. To save the file, go to the top right corner and press the “Export” button.
Key Features Marking Filmora’s Greatness
Filmora is proven to be the easiest software with the most powerful editing features. As proof, you can read the main features of Filmora to comprehend its functionalities better.
1. Speed Ramping
Create a unique cinematic effect in your video by adjusting keyframes. Filmora offers speed ramping features to bring a smooth transition in slow-motion or fast motions. In speed ramping, you get 6 templates, such as bullet time, montage, and jumper. Using those templates, you don’t need to manually adjust keyframes for speed ramping. Also, you can retain the original pitch of the audio after changing the speed.
2. AI Copilot Editing
To boost productivity, Filmora provides an AI Copilot editor option. It saves time that could be wasted searching for some feature or making the editing perfect. Users can ask anything to copilot in natural language. They can take help from an already existing question in the copilot editors. This feature will guide you toward practical actions through navigation buttons.
3. AI Music Generator
Who else is fed up with finding the perfect music for Vlog? Commonly, you didn’t find a video of exact length and mood. Thus, Filmora enables you to generate a soundtrack according to your mood and video length. Using it, you just have to prompt with the number of tracks, mood, and length. The AI-generated music will not require copyrights, so you can use it freely anywhere.
4. AI Image
Have you ever heard that any video editor can convert your text prompts into images? Filmora is offering this option, especially for people who are struggling to get their desired image. For this purpose, they need to describe images in simple language. Afterward, they are required to pick one style for accurate results.
5. AI Copywriting
Do you have a deadline for script submission, but it is not ready yet? Leave this headache to Filmora’s AI copywriting feature, which aims to produce engaging scripts. With ChatGPT integration, it can generate YouTube titles and descriptions. Furthermore, you can ask AI to convert your script into an appealing video.
Conclusion
To summarize, slowing down is the ultimate solution to retain the viewer’s attention. In this article, you have seen the top-notch platforms for slow-motion GIFs. They are not enough for remarkable videos because of the limited speed adjustment options. So, using Filmora remains the best option in providing easier ways to customize the speed of GIFs.
Best Free LUTs to Use
Photo and video editing has always been an important aspect of creative work. However, the availability of new tools and software has transformed how editing is done. Today, you can choose different editing software from personal to professional usage. These tools support multiple add-ons and plugins to make editing easier and more creative.
One of the most recent additions to the editing toolbox is LUTs (Lookup Tables). LUTs are pre-made color grading presets that allow you to adjust the colors and tones. The integration of LUTs has made editing easy and gives you so much to explore with different presets. This overview of the best free LUTs can help you to choose the best ones.
Part 1: What Are LUTs?
LUTs, or Lookup Tables, are a preset used in digital image and video editing software. These are used to adjust the color and tone of your images and videos. They work by using a pre-defined table of color values to map the colors in your content to new colors. It is like having a set of filters that you can apply to your content to achieve a specific look or feel.
Moreover, you can download free LUTs to get different effects in your content. There are various LUTs available, each with its own unique characteristics and effects. It provides you with consistent results with different styles.
Empower your videos with a new mood using different LUTs. Filmora now offers 100+ top-quality 3D LUTs cover a broad range of scenarios. Transform your videos with Filmora’s powerful 3D LUTs.
Apply LUT on Videos Apply LUT on Videos Learn More


Part 2: Best Cinematic LUTs to Use in 2024
If you want to give your media content a cinematic look, use cinematic LUTs. There are many cinematic-looking paid and free LUTs that you can choose from, out of which some are discussed below:
1. Teal and Orange
The Teal and Orange LUT is a popular choice among content creators. It can enhance the colors in your images and videos to give them a cinematic look. This LUT works by highlighting teal and orange colors, often found in cinematic productions. Moreover, this LUT can also help to enhance skin tones and make them look more vibrant and natural.

2. Cinematic LUTs Pack 2023
If you want to add a cinematic look to photos, consider using the Cinematic LUTs Pack 2023. This pack contains many different LUTs, each designed to create a unique cinematic look. It offers different options like Dark Noir, Light Cinematic, Red Pop, and more. Cinematic LUTs highlight certain colors to give your content a cinematic feel.

3. Custom Stylized LUTs
In addition to the standard LUTs, there are also custom-stylized LUTs for cinematic-looking media. These custom LUTs come in packs with many different options. For instance, the OrangeAndBlue LUT highlights the orange and blue color, making it look more professional. These photo and video LUTs allow you to achieve a specific cinematic mood or tone in your content.

4. Vintage Vibe
Vintage Vibe is a popular LUT that can give your digital content a cinematic look with a vintage twist. This LUT adds a colorful film look to your photos and videos to make them look great. Using Vintage Vibe can help you achieve a professional-looking final product. The Vintage Vibe of this LUT can make digital files feel like they were taken with an older camera.

5. Sandstorm
If you want to add a cinematic look to your photos and videos, consider using the Sandstorm LUT. This preset is designed to enhance the gold or sand colors in your content. It creates a warm and inviting atmosphere by highlighting specific details in your content. By adding this LUT to your digital media files, you can give them a professional cinematic look.

6. Cinematic
Cinematic LUT is perfect for digital media files to have a cinematic look. It gives your content a bit of a rusty look by fading and highlighting certain colors. This LUT is known for providing one of the best cinematic-looking color grading options. It is also available in both CUBE and 3DL versions, making it easy to integrate into editing software.

7. Free Cinematic LUTs Pack
The Free Cinematic LUTs Pack can add a cinematic look to your digital media files. You can transform the color and shading of your images and videos to give them a movie-like feel. Moreover, this free LUT pack gives your content a dramatic effect. With this LUT pack, you can take your digital media files to the next level and create professional-looking content.

8. 15 Cinematic LUTs for free
This pack is a great option if you want to download free LUTs. This pack contains a range of LUTs that can give your content a dramatic, professional-looking color grading. With 15 different options, this pack offers a variety of cinematic looks. This pack will enhance the colors and tones in your photos and videos, giving them a more cinematic feel.

9. Cinematic LUTs PRO LEVEL
Cinematic LUTs PRO LEVEL is a pack of LUTs designed to add a cinematic look to your edits. You can choose the desired look from the pack and apply it to your media files. This pack provides one of the best cinematic and professional looks with its shading and color effects. By using this pack, you can add a professional-looking cinematic feel to your digital content.

10. 20 FREE Travel LUTs for Cinematic Looks
Add a cinematic touch to your travel videos and photos by using this 20 FREE Travel LUTs pack. This pack includes 20 different LUTs, and each LUT in the pack is designed to add a different type of cinematic look. The LUTs in the pack darken the shadows and add golden warmth to your content. Similarly, this pack will enhance your travel footage and create a more cinematic look.

Part 3: Best Vintage LUTs to Use in 2024
With so many options to make your photos and videos more unique, vintage LUTs are a good option too. One of the best LUTs packs is discussed here for an informed selection.
1. Color Grading Central
With this pack, you can add a vintage look to your photos and videos. The Color Grading Central LUT pack contains 7 free LUTs that you can use to give your content a unique look. These LUTs are designed to add a grainy and faded effect, giving your files a vintage vibe. Additionally, they can add a muddy or burned effect to your media files, giving them an artistic look.

2. SmallHD
SmallHD is a LUT pack that provides a set of seven free LUTs to give your images and videos a vintage look. These LUTs can add grains, faded colors, and warm tones to your content, giving them an old and retro feel. The pack also adds an intense contrast and desaturated effect to your media files. With the SmallHD LUT pack, you can effortlessly add a vintage touch to your files.

3. KODACHROME – K-Tone LUT
Check out the Free Vintage LUT pack by Frank Glencairn to give your media files a vintage feel. It highlights red, blue, and yellow tones to give a vintage look. Moreover, it even adds warmth and contrast to your digital files making it a classic version of Hollywood movies. Additionally, this LUT pack will give your content a nostalgic feel by highlighting the greens of the summer.

4. Cineplus Perfekta LUT
Cineplus Perfekta LUT is a LUT pack that is designed to give your images and videos a vintage look. It uses an infrared foliage effect to create a look that resembles classic Hollywood movies. By enhancing green and brown colors, this LUTs video and photo pack gives your content a retro feel to your files. Besides this, you can give your files a unique vintage look that will make them look different.

5. Vintage LUTs
Vintage LUTs is a pack of 86 retro-looking LUTs that can give your files a classic look. These LUTs highlight the brown color and sharpen the contrast to produce a vintage look. You can create a unique and distinctive style by applying these LUTs to your photos and videos. In addition to the classic vintage look, the faded color and warm LUTs can also add a nostalgic touch to your files.

6. Vintage
Vintage is a popular LUT that can be used to give your digital media a classic and nostalgic feel. It highlights your content’s orange and green colors, giving it an old film look. With Vintage LUT, you can give your photos and videos a timeless look that is perfect for a variety of projects. This LUT is a great choice for those who want to create a vintage aesthetic in their content.

7. Dark Brown
Dark Brown is a popular LUT that can give your digital media a classic Hollywood movie feel. This LUT highlights the dark brown color and fades into the other colors. This color grading creates a burned and faded effect that looks more vintage and classic. This free LUT pack can transform your digital files into something that looks like it was shot on film decades ago.

8. B&W
B&W, which is a classic LUT, has the ability to transform your photos and videos into a black-and-white version. This effect creates a timeless, vintage look that can add a touch of nostalgia to your content. The LUT works by changing every color in your image or video into an old, classic black-and-white shade. Overall, B&W is a good classic LUT that can add an old touch to your content.

9. Vintage LUTs by Shmelevideo
Vintage LUTs by Shmelevideo is a popular classic LUT that creates a faded and burned effect in your photos and videos. This LUT is perfect for those looking to achieve a vintage look in their content. The color correction LUTs highlight the muddiness and increase the contrast to your files. Furthermore, this pack also adds warmth to your photos and videos to give a retro look.

10. Vintage LUTs by Creators Studio
Vintage LUTs by Creators Studio is a pack of over 20 LUTs that can help you achieve a vintage look to your content. These LUTs offer different color correction options that give your content the feel of being taken with an old Kodak camera. Besides this, they add grains to your photos and videos, giving them a more classical look. Vintage LUTs are a great option for retro-style color correction.

Empower your videos with a new mood using different LUTs. Filmora now offers 100+ top-quality 3D LUTs cover a broad range of scenarios. Transform your videos with Filmora’s powerful 3D LUTs.
Apply LUT on Videos Apply LUT on Videos Learn More
Part 4: Best Moody LUTs to Use in 2024
Do you want LUTs that go with your mood? Here are some of the most popular moody LUTs color grading packs you can download and use.
1. 20 Dark Moody LUTs Pack
The 20 Dark Moody LUTs Pack is a collection of over 20 Moody LUTs that improve the colors of your files. These LUTs offer a variety of color corrections that can sync with your mood. With these LUTs, you can create a dark and moody atmosphere for your photos and videos. This pack can help you achieve the perfect look for your content, from soft dark shades to sharper dark colors.

2. Dark Moody Elite LUTs Pack
You can add a dramatic and moody look to your photos and videos with the Dark Moody Elite LUTs Pack. This pack includes over 16 LUTs, each with a different dark and moody style. When applied to your content, these LUTs can help highlight dark colors. Additionally, it adds a professional-looking touch and cinematic feel to your photos and videos.

3. 15 Dark Moody LUTs
Dark Moody LUTs is a pack of over 15 LUTs designed for color correction in photo and video editing. This pack includes a variety of dark and moody LUTs that can give your media a dramatic look. It highlights the orange and blue tones to create a moody look. Moreover, these LUTs can also darken the highlights and shadows to add depth and emotion to your files.

4. Dark and Moody LUT
Dark and Moody LUT is a pack of 3 professional LUTs that can give your photos and videos a moodier and more dramatic feel. These LUTs work by underexposing and fading the colors, which can create a sense of nostalgia for your content. By using these LUTs, you can give your content the look and feel of expired and old film stocks. Moreover, it highlights teal and orange to add depth to your content.

5. Dark and Moody Cinematic 3D LUTs
Dark and Moody Cinematic 3D LUTs is a pack of over 8 LUTs that add a dark and dramatic feel to your media files. This LUT pack fades the dark colors, underexposes the shadows, and darkens the highlights. Using this LUTs pack can help you achieve an intense and cinematic look for your content. You can add emotion and mood to your videos and photos using this pack.

Part 5: Try Wondershare Filmora for Accessing the Best Free LUTs
If you want to access high-quality LUTs for your photo and video editing projects, you might want to try Wondershare Filmora . This software offers over 200 free LUTs that you can use for your digital content. Additionally, you’ll have access to the best free LUTs you can use to achieve different effects and styles. Whether you’re going for a vintage look or a cinematic feel, you’re sure to find the right LUT to suit your needs.
Furthermore, with more updates, you can look forward to even more professional-looking free LUTs to download. Furthermore, another amazing feature offered by Filmora is silence detection. This feature analyzes your video and automatically removes awkward silences and pauses in the video. It is evident that Wondershare Filmora makes your video editing experience worth a while.

Conclusion
In conclusion, LUTs are a powerful tool for adding a creative touch to your photo and video editing projects. When it comes to finding the best LUT packs, Wondershare Filmora is a great option. With its growing library of free LUTs and presets, you can create amazing digital content. With these professional LUTs for color correction, you can make unique and fantastic media files.
Add LUTs on Video For Win 7 or later(64-bit)
Add LUTs on Video For macOS 10.14 or later
Apply LUT on Videos Apply LUT on Videos Learn More
Part 2: Best Cinematic LUTs to Use in 2024
If you want to give your media content a cinematic look, use cinematic LUTs. There are many cinematic-looking paid and free LUTs that you can choose from, out of which some are discussed below:
1. Teal and Orange
The Teal and Orange LUT is a popular choice among content creators. It can enhance the colors in your images and videos to give them a cinematic look. This LUT works by highlighting teal and orange colors, often found in cinematic productions. Moreover, this LUT can also help to enhance skin tones and make them look more vibrant and natural.
2. Cinematic LUTs Pack 2023
If you want to add a cinematic look to photos, consider using the Cinematic LUTs Pack 2023. This pack contains many different LUTs, each designed to create a unique cinematic look. It offers different options like Dark Noir, Light Cinematic, Red Pop, and more. Cinematic LUTs highlight certain colors to give your content a cinematic feel.
3. Custom Stylized LUTs
In addition to the standard LUTs, there are also custom-stylized LUTs for cinematic-looking media. These custom LUTs come in packs with many different options. For instance, the OrangeAndBlue LUT highlights the orange and blue color, making it look more professional. These photo and video LUTs allow you to achieve a specific cinematic mood or tone in your content.
4. Vintage Vibe
Vintage Vibe is a popular LUT that can give your digital content a cinematic look with a vintage twist. This LUT adds a colorful film look to your photos and videos to make them look great. Using Vintage Vibe can help you achieve a professional-looking final product. The Vintage Vibe of this LUT can make digital files feel like they were taken with an older camera.
5. Sandstorm
If you want to add a cinematic look to your photos and videos, consider using the Sandstorm LUT. This preset is designed to enhance the gold or sand colors in your content. It creates a warm and inviting atmosphere by highlighting specific details in your content. By adding this LUT to your digital media files, you can give them a professional cinematic look.
6. Cinematic
Cinematic LUT is perfect for digital media files to have a cinematic look. It gives your content a bit of a rusty look by fading and highlighting certain colors. This LUT is known for providing one of the best cinematic-looking color grading options. It is also available in both CUBE and 3DL versions, making it easy to integrate into editing software.
7. Free Cinematic LUTs Pack
The Free Cinematic LUTs Pack can add a cinematic look to your digital media files. You can transform the color and shading of your images and videos to give them a movie-like feel. Moreover, this free LUT pack gives your content a dramatic effect. With this LUT pack, you can take your digital media files to the next level and create professional-looking content.
8. 15 Cinematic LUTs for free
This pack is a great option if you want to download free LUTs. This pack contains a range of LUTs that can give your content a dramatic, professional-looking color grading. With 15 different options, this pack offers a variety of cinematic looks. This pack will enhance the colors and tones in your photos and videos, giving them a more cinematic feel.
9. Cinematic LUTs PRO LEVEL
Cinematic LUTs PRO LEVEL is a pack of LUTs designed to add a cinematic look to your edits. You can choose the desired look from the pack and apply it to your media files. This pack provides one of the best cinematic and professional looks with its shading and color effects. By using this pack, you can add a professional-looking cinematic feel to your digital content.
10. 20 FREE Travel LUTs for Cinematic Looks
Add a cinematic touch to your travel videos and photos by using this 20 FREE Travel LUTs pack. This pack includes 20 different LUTs, and each LUT in the pack is designed to add a different type of cinematic look. The LUTs in the pack darken the shadows and add golden warmth to your content. Similarly, this pack will enhance your travel footage and create a more cinematic look.
Part 3: Best Vintage LUTs to Use in 2024
With so many options to make your photos and videos more unique, vintage LUTs are a good option too. One of the best LUTs packs is discussed here for an informed selection.
1. Color Grading Central
With this pack, you can add a vintage look to your photos and videos. The Color Grading Central LUT pack contains 7 free LUTs that you can use to give your content a unique look. These LUTs are designed to add a grainy and faded effect, giving your files a vintage vibe. Additionally, they can add a muddy or burned effect to your media files, giving them an artistic look.
2. SmallHD
SmallHD is a LUT pack that provides a set of seven free LUTs to give your images and videos a vintage look. These LUTs can add grains, faded colors, and warm tones to your content, giving them an old and retro feel. The pack also adds an intense contrast and desaturated effect to your media files. With the SmallHD LUT pack, you can effortlessly add a vintage touch to your files.
3. KODACHROME – K-Tone LUT
Check out the Free Vintage LUT pack by Frank Glencairn to give your media files a vintage feel. It highlights red, blue, and yellow tones to give a vintage look. Moreover, it even adds warmth and contrast to your digital files making it a classic version of Hollywood movies. Additionally, this LUT pack will give your content a nostalgic feel by highlighting the greens of the summer.
4. Cineplus Perfekta LUT
Cineplus Perfekta LUT is a LUT pack that is designed to give your images and videos a vintage look. It uses an infrared foliage effect to create a look that resembles classic Hollywood movies. By enhancing green and brown colors, this LUTs video and photo pack gives your content a retro feel to your files. Besides this, you can give your files a unique vintage look that will make them look different.
5. Vintage LUTs
Vintage LUTs is a pack of 86 retro-looking LUTs that can give your files a classic look. These LUTs highlight the brown color and sharpen the contrast to produce a vintage look. You can create a unique and distinctive style by applying these LUTs to your photos and videos. In addition to the classic vintage look, the faded color and warm LUTs can also add a nostalgic touch to your files.
6. Vintage
Vintage is a popular LUT that can be used to give your digital media a classic and nostalgic feel. It highlights your content’s orange and green colors, giving it an old film look. With Vintage LUT, you can give your photos and videos a timeless look that is perfect for a variety of projects. This LUT is a great choice for those who want to create a vintage aesthetic in their content.
7. Dark Brown
Dark Brown is a popular LUT that can give your digital media a classic Hollywood movie feel. This LUT highlights the dark brown color and fades into the other colors. This color grading creates a burned and faded effect that looks more vintage and classic. This free LUT pack can transform your digital files into something that looks like it was shot on film decades ago.
8. B&W
B&W, which is a classic LUT, has the ability to transform your photos and videos into a black-and-white version. This effect creates a timeless, vintage look that can add a touch of nostalgia to your content. The LUT works by changing every color in your image or video into an old, classic black-and-white shade. Overall, B&W is a good classic LUT that can add an old touch to your content.
9. Vintage LUTs by Shmelevideo
Vintage LUTs by Shmelevideo is a popular classic LUT that creates a faded and burned effect in your photos and videos. This LUT is perfect for those looking to achieve a vintage look in their content. The color correction LUTs highlight the muddiness and increase the contrast to your files. Furthermore, this pack also adds warmth to your photos and videos to give a retro look.
10. Vintage LUTs by Creators Studio
Vintage LUTs by Creators Studio is a pack of over 20 LUTs that can help you achieve a vintage look to your content. These LUTs offer different color correction options that give your content the feel of being taken with an old Kodak camera. Besides this, they add grains to your photos and videos, giving them a more classical look. Vintage LUTs are a great option for retro-style color correction.
Empower your videos with a new mood using different LUTs. Filmora now offers 100+ top-quality 3D LUTs cover a broad range of scenarios. Transform your videos with Filmora’s powerful 3D LUTs.
Apply LUT on Videos Apply LUT on Videos Learn More
Part 4: Best Moody LUTs to Use in 2024
Do you want LUTs that go with your mood? Here are some of the most popular moody LUTs color grading packs you can download and use.
1. 20 Dark Moody LUTs Pack
The 20 Dark Moody LUTs Pack is a collection of over 20 Moody LUTs that improve the colors of your files. These LUTs offer a variety of color corrections that can sync with your mood. With these LUTs, you can create a dark and moody atmosphere for your photos and videos. This pack can help you achieve the perfect look for your content, from soft dark shades to sharper dark colors.
2. Dark Moody Elite LUTs Pack
You can add a dramatic and moody look to your photos and videos with the Dark Moody Elite LUTs Pack. This pack includes over 16 LUTs, each with a different dark and moody style. When applied to your content, these LUTs can help highlight dark colors. Additionally, it adds a professional-looking touch and cinematic feel to your photos and videos.
3. 15 Dark Moody LUTs
Dark Moody LUTs is a pack of over 15 LUTs designed for color correction in photo and video editing. This pack includes a variety of dark and moody LUTs that can give your media a dramatic look. It highlights the orange and blue tones to create a moody look. Moreover, these LUTs can also darken the highlights and shadows to add depth and emotion to your files.
4. Dark and Moody LUT
Dark and Moody LUT is a pack of 3 professional LUTs that can give your photos and videos a moodier and more dramatic feel. These LUTs work by underexposing and fading the colors, which can create a sense of nostalgia for your content. By using these LUTs, you can give your content the look and feel of expired and old film stocks. Moreover, it highlights teal and orange to add depth to your content.
5. Dark and Moody Cinematic 3D LUTs
Dark and Moody Cinematic 3D LUTs is a pack of over 8 LUTs that add a dark and dramatic feel to your media files. This LUT pack fades the dark colors, underexposes the shadows, and darkens the highlights. Using this LUTs pack can help you achieve an intense and cinematic look for your content. You can add emotion and mood to your videos and photos using this pack.
Part 5: Try Wondershare Filmora for Accessing the Best Free LUTs
If you want to access high-quality LUTs for your photo and video editing projects, you might want to try Wondershare Filmora . This software offers over 200 free LUTs that you can use for your digital content. Additionally, you’ll have access to the best free LUTs you can use to achieve different effects and styles. Whether you’re going for a vintage look or a cinematic feel, you’re sure to find the right LUT to suit your needs.
Furthermore, with more updates, you can look forward to even more professional-looking free LUTs to download. Furthermore, another amazing feature offered by Filmora is silence detection. This feature analyzes your video and automatically removes awkward silences and pauses in the video. It is evident that Wondershare Filmora makes your video editing experience worth a while.
Conclusion
In conclusion, LUTs are a powerful tool for adding a creative touch to your photo and video editing projects. When it comes to finding the best LUT packs, Wondershare Filmora is a great option. With its growing library of free LUTs and presets, you can create amazing digital content. With these professional LUTs for color correction, you can make unique and fantastic media files.
Add LUTs on Video For Win 7 or later(64-bit)
Add LUTs on Video For macOS 10.14 or later
Also read:
- Updated In 2024, Understanding the Dynamics Underlying in AI Slow Motion Editing
- 2024 Approved Go Through This Guide on All Steps in Freezing Frame Sequences in Videos Using Filmora. Details Include Splitting the Clip, Reversing Speed, and More
- Updated In 2024, Understanding More About CapCut Lenta Template and Slow-Motion Videos
- Updated 2024 Approved Guaranteed 10 Storyboard Creators To Make Animation Easier
- New Best 8 Animated Video Makers
- New Find The Best Free Canon LUTs for 2024
- New How to Vlog? A Ultimate Guide for Beginners for 2024
- Updated 2024 Approved Do You Also Use Android to Create and Edit Videos? Read About the Efectum Video Effects Editor, Which Is Available in Your App Stores for Seamless Editing
- New How to Use Motion Tracking in Video Editing for 2024
- New In 2024, How to Create Loop Videos with Filmora
- Updated Before & After Editing Trick | Wondershare Filmora Tutorial
- Updated 2024 Approved How to Vlog? A Beginners Guide to Start Vlogging
- New Find Out How to Add Subtitles in the VLC Media Player on Your Windows and Mac System with Quick and Simple Instructions for 2024
- Want to Add Life to Your Customary Business Presentations and Videos on a MacOs Device with Expressive Emojis? Dive in to Have an Insight Into the Credibility of Using Emojis on a Mac
- Updated 2024 Approved How to Create Intro Video with KineMaster
- Updated In 2024, Want to Add Motion Effects to Your Texts in Your Video? Learn the Simple Steps to Create Motion Text Effects in Popular Video Editors
- Updated 2024 Approved Are You Looking to Find Out How to Loop YouTube Videos on iPhone? Learn How to Loop Your Favorite YouTube Video on Your iPhone, so You Can Play that Part over and Over
- New Ideas to Make A Perfect Café Vlog
- Updated 2024 Approved Are You Looking for Funny Discord Emojis to Massively Improve Your Discord Experience? Using some Fun Bots for Discord Is an Excellent Way of Doing That! Thus, We Compiled a List of 10 Fun Discord Bots You Need
- Updated An Ultimate Guide To Edit a Music Video Aspect Ratio and First Cut
- Start Making Procreate GIFs and Take Your Editing Creativity to the Next Level for 2024
- Updated 2024 Approved How to Create Photoshop GIF The Easy Way
- New 3 Best Effects to Appear on Camera
- New How to Add Freeze Frame to Your Video From Any Device, In 2024
- Updated 20 Best Text To Speech Software Windows, Mac, Android, iPhone & O for 2024
- Updated So, in This Short Tutorial, Well Learn How to Create a Vintage 1980-Style Video with a Retro Effect that Will Leave Your Audience Yearning for More
- New How to Turn On/Off Motion Blur in Dying Light 2, In 2024
- Are You Seeking Free Lumetri Presets to Enhance Your Videos? Find Out All About Lumetri Color Presets and How to Use Them in Presenting Proper Color Grading
- Updated 2024 Approved How Does the YouTube AI Algorithm Work - AI EXPLAINED
- Updated In 2024, Zoom In and Zoom Out on YouTube
- New This Article Will Show You How to Make a Tattoo Disappear on Your Body Magically for 2024
- Updated Do You Seek to Blur Out Your Video and Photo to Display some Motion Blur? This Article Provides a List of the Best Motion Blur Apps for Videos and Photos for 2024
- In 2024, Video Inspiration for Birthday Slideshow
- Updated In 2024, Looking for Efficient Ways to Create a Slow-Motion Video? Read the Article for Reliable Solutions that Provide Excellent Results
- Tactics to Make Transparent Image in Minimal Steps
- New Are You Looking for Dark LUTs Premiere Pro Free? This Article Discusses the Dark Moody LUTs with Top Recommendations for Beginning Visual Editing
- 5 Tried-And-True Ways to GIF Making
- Creating Motivational Videos with AI Comprehensive Guide 2024
- Good Slideshow Makers Sometimes Cost High and Free Slideshow Makers Provide Slideshows with the Watermark. How to Cope with This Problem? This Article Gives Solutions
- In 2024, The Ultimate Guide to Using Shotcut To Rotate Videos
- New 2024 Approved Leading Applications to Create Fast Motion in iPhone
- Repair Video Tool - Repair all your damaged video files of Tecno Phantom V Flip on Windows
- 5 Quick Methods to Bypass Itel A05s FRP
- How to Hard Reset Honor X8b Without Password | Dr.fone
- In 2024, Complete Tutorial to Use VPNa to Fake GPS Location On Poco X5 | Dr.fone
- In 2024, Android Unlock Code Sim Unlock Your Xiaomi 13 Ultra Phone and Remove Locked Screen
- In 2024, How to Bypass Google FRP Lock from Nokia C02 Devices
- In 2024, How To Change Vivo T2 5G Lock Screen Password?
- In 2024, Is GSM Flasher ADB Legit? Full Review To Bypass Your Gionee Phone FRP Lock
- In 2024, How to Change Your Poco M6 5G Location on life360 Without Anyone Knowing? | Dr.fone
- How to Use Life360 on Windows PC For Nubia Red Magic 8S Pro+? | Dr.fone
- In 2024, Full Guide to Catch 100 IV Pokémon Using a Map On Vivo Y27s | Dr.fone
- Top 15 Augmented Reality Games Like Pokémon GO To Play On Vivo V30 | Dr.fone
- In 2024, How to Track Xiaomi Civi 3 Location without Installing Software? | Dr.fone
- In 2024, How To Track IMEI Number Of Infinix Smart 8 HD Through Google Earth?
- In 2024, Pokémon Go Cooldown Chart On Vivo Y36 | Dr.fone
- 5 Easy Ways to Change Location on YouTube TV On Oppo Find N3 | Dr.fone
- Updated 2024 Approved 10 Most Memorable Japanese Cat Cartoons
- Title: New In 2024, What Is Motion Blur in the Game? Do You Really Need It?
- Author: Morgan
- Created at : 2024-04-24 01:08:04
- Updated at : 2024-04-25 01:08:04
- Link: https://ai-video-editing.techidaily.com/new-in-2024-what-is-motion-blur-in-the-game-do-you-really-need-it/
- License: This work is licensed under CC BY-NC-SA 4.0.
