
:max_bytes(150000):strip_icc():format(webp)/GettyImages-454939687-56cac7b03df78cfb37988474.jpg)
New In This Article, Youll Find Four Solutions for Rotating Your Go-Pro Videos. The Following Tools Will Be Used for This Purpose
In This Article, You’ll Find Four Solutions for Rotating Your Go-Pro Videos. The Following Tools Will Be Used for This Purpose
Video editing has secured a prominent position among other post-production works with innovation in cameras. Now, you do not need to hold the reins of your imagination tight.
With its advanced technology, Go-Pro has grabbed the attention of technology lovers. It offers video stabilization, making it the best gadget for capturing sports activities and other outdoor events.
If you have recorded your video in an odd direction? Also, you don’t want to lose that precious memory? There is no need to worry.
Rotating your video horizontally or vertically can change the entire perspective of your project.
The process of changing the orientation of the video is convenient. There are different tools for rotating your Go-Pro videos simply and easily.
In this article, you’ll find four solutions for rotating your Go-Pro Videos. The following tools will be used for this purpose.
- Wondershare Filmora
- GoPro Quik
- VLC Media Player
- Online Converter (Ezgif)
Filmora Wondershare-A companion to rotate your GoPro Videos
If you want to experience new dimensions of video editing by changing the orientation of your videos, then Filmora Video Editor is there for you. If you have made a video with your Go-pro at the wrong angle, video rotation can solve your problem.
Filmora is there to keep you out of trouble. It comes with the option of changing the direction of your videos. Apart from that, you can crop the unwanted parts or even zoom in on videos.
For Win 7 or later (64-bit)
For macOS 10.14 or later
Here is the step-by-step guide for rotating your go-pro video.
Step 1: Drag and Drop
The interface of Filmora is user-friendly and convenient. The video rotation process starts with importing the video file and then adding the drag and drop feature to the timeline.


Step 2: Video Rotation
- In the timeline, double-click on the video clip.
- The video tab will appear with several options like transformation and lens correction.

Step 3: Exploring the Transform Tab
- Expand the Transform tab.
- You will see the options like rotation, flip, scale, and position.
- You can now rotate your Go-pro video by either rotating the slider or entering a specific value for the degree of rotation.

- You can also use the scale slider to adjust the image size.

Step 4:Exporting the rotated Go-pro Video
- After changing the orientation of your video, now is the time to export your project.
- Click on the Export tab.

The Export tab shows a list of options whether you want to export the rotated video directly to your computer or share it with your friends via social media.

Exploring the Rotation of Video through GoPro Quik
GoPro Quik provides an alternative for changing the direction of videos. It comes with built-in tools specifically meant to deal with GoPro videos. Irrespective of the quality of your videos or format, it can rotate GoPro videos with ease.
You can rotate GoPro Video with GoPro Quik by following these steps
- Download and install the software and launch it afterward.
- You can connect your GoPro device to your computer or choose a folder to add media.

- Upload the media folder into the GoPro Quik program.

- Go to the video you want to rotate and double click on it.

- A new window will open. Select the circle-shaped icon.

- The video is rotated at 90 degrees with each click.

- Apart from that, on the far right side is a three-dotted button. Click on it to enter Create Mode.

- Afterward, select Open.
- Click on the Save button to save all the editing.
Pros:
- User-friendly and convenient
- It connects to the GoPro camera easily.
- Background tracks can be imported to audio libraries.
- Supports importing of background tracks to music libraries.
Cons:
- It is slow when dealing with 4K and files.
Changing the orientation of a Go-pro video using a VLC player
The majority consider VLC as only a media player. But, it also performs the functions of a video editor. The software is user-friendly and supports every existing operating system, including Windows and Linux. The cherry on top is that it supports all audio and video formats. Unlike other tools, there is no need to download add-ons.
- After downloading the VLC media player, launch the software.

- Now, you need to import the video file you want to rotate. This is done by dragging the media file to the timeline or selecting a media source from the left.

- In the VLC menu, go to Tools and then select Effects and Filters.

Tip: You can use the shortcut CTRL+E for the same purpose.
- The effects and filter tab will open a dialogue box with different options. Select the Video Effects tab.

- The video effect tab has many sub-tabs. You need to select the Geometry tab.

- Select the Transform option. A drop-down menu will appear with different options for rotating your video at different angles.

- Tick the checkbox that says Rotate to flip your video at a certain angle. Then, move the angle dialer. This will rotate your video to the angle you have specified.

- Click on the save option to complete the rotation process.

Note: The rotation settings are saved. Thus, you need to uncheck the option if you don’t want to rotate your next video.
Permanent Rotation of Video
The above steps rotated the video for only playing once. If you want to make the orientation of the video permanently to be flipped, then follow these instructions after the above steps.
Go to Media and select Convert/Save on the menu bar or use the shortcut CTRL+R.

A pop-up window will appear. Click on the Add button. Your video will be added.
Afterward, select the option Convert/Save.

A pop-up window will appear in which you have to select the settings logo, located next to Profile

- A pop-up window will appear; click on the Video codec tab.
- Select the Filters tab and click on the Video transformation filter

In the Audio Codec tab, under the encoding parameters, select MP3 in the codec option.
Select the save option.

Note: Make sure to add the destination file in the convert dialogue box.

Click on the start button to begin the transformation.
Using the Online Converter
The Online Converter is a tool that assists you in rotating the direction of your GoPro. It is an online resource and does not require downloading and installing the cumbersome trouble. It is user-friendly and compatible with different video formats like MP4, MKV,3GP, and more.
Pros:
It is free for users. Therefore, there is no need for installation.
Cons:
- If it takes longer to upload a file, you may have to re-submit it. Hence, it can be time-consuming.
- It does not support encrypted files.
Fixing the Orientation of Go-pro video by Ezgif
If you have no time to download different tools for rotating your Go-Pro videos, then the Internet has got a solution to your problem. There are various resources available on the web that facilitate the online rotation of your videos.
The Ezgif online video rotation is a handy tool. With it, you can flip your Go-pro video both horizontally and vertically. Not only that, but it also gives you the option of rotating your video at different angles. It supports various video formats like MP4, MOV, and many others.
You need to follow these simple steps to fix the orientation of your Go-Pro video.
- Upload your desired video file.
- You can also paste an URL.

- Select the rotation options and then click the Rotate video button.

Viola! Your new rotated video is there in no time.
- You will also see several options ranging from cropping the video to changing the speed of the video.

Pros:
- There would be no watermarks in the rotated version.
- The output of the created file is mostly similar to the pre-rotated video.
Cons:
- If you have poor internet connectivity, the conversion process may take a little longer than usual.
Conclusion
With the rising trend in the development of video editing tools, Go-pro Quik is not the only app for editing its videos. Whether you are a beginner or an intermediate, editing multimedia files has added spark to the creativity of the artists. You can add the desired rotation effects to yours.
Changing the rotation of your Go-Pro videos has been made easier due to the availability of user-friendly tools. These are available for all types of operating systems. Their interface is not complicated. Hence, it makes it easy for beginners to polish their video-editing skills.
By changing the orientation of your video, you can turn an ordinary video into a mesmerizing and cherishable lifelong memory. So be it an indoor or outdoor activity, enhance your video editing skills by playing with different orientations of your videos.
For macOS 10.14 or later
Here is the step-by-step guide for rotating your go-pro video.
Step 1: Drag and Drop
The interface of Filmora is user-friendly and convenient. The video rotation process starts with importing the video file and then adding the drag and drop feature to the timeline.
Step 2: Video Rotation
- In the timeline, double-click on the video clip.
- The video tab will appear with several options like transformation and lens correction.
Step 3: Exploring the Transform Tab
- Expand the Transform tab.
- You will see the options like rotation, flip, scale, and position.
- You can now rotate your Go-pro video by either rotating the slider or entering a specific value for the degree of rotation.
- You can also use the scale slider to adjust the image size.
Step 4:Exporting the rotated Go-pro Video
- After changing the orientation of your video, now is the time to export your project.
- Click on the Export tab.
The Export tab shows a list of options whether you want to export the rotated video directly to your computer or share it with your friends via social media.
Exploring the Rotation of Video through GoPro Quik
GoPro Quik provides an alternative for changing the direction of videos. It comes with built-in tools specifically meant to deal with GoPro videos. Irrespective of the quality of your videos or format, it can rotate GoPro videos with ease.
You can rotate GoPro Video with GoPro Quik by following these steps
- Download and install the software and launch it afterward.
- You can connect your GoPro device to your computer or choose a folder to add media.
- Upload the media folder into the GoPro Quik program.
- Go to the video you want to rotate and double click on it.
- A new window will open. Select the circle-shaped icon.
- The video is rotated at 90 degrees with each click.
- Apart from that, on the far right side is a three-dotted button. Click on it to enter Create Mode.
- Afterward, select Open.
- Click on the Save button to save all the editing.
Pros:
- User-friendly and convenient
- It connects to the GoPro camera easily.
- Background tracks can be imported to audio libraries.
- Supports importing of background tracks to music libraries.
Cons:
- It is slow when dealing with 4K and files.
Changing the orientation of a Go-pro video using a VLC player
The majority consider VLC as only a media player. But, it also performs the functions of a video editor. The software is user-friendly and supports every existing operating system, including Windows and Linux. The cherry on top is that it supports all audio and video formats. Unlike other tools, there is no need to download add-ons.
- After downloading the VLC media player, launch the software.
- Now, you need to import the video file you want to rotate. This is done by dragging the media file to the timeline or selecting a media source from the left.
- In the VLC menu, go to Tools and then select Effects and Filters.
Tip: You can use the shortcut CTRL+E for the same purpose.
- The effects and filter tab will open a dialogue box with different options. Select the Video Effects tab.
- The video effect tab has many sub-tabs. You need to select the Geometry tab.
- Select the Transform option. A drop-down menu will appear with different options for rotating your video at different angles.
- Tick the checkbox that says Rotate to flip your video at a certain angle. Then, move the angle dialer. This will rotate your video to the angle you have specified.
- Click on the save option to complete the rotation process.
Note: The rotation settings are saved. Thus, you need to uncheck the option if you don’t want to rotate your next video.
Permanent Rotation of Video
The above steps rotated the video for only playing once. If you want to make the orientation of the video permanently to be flipped, then follow these instructions after the above steps.
Go to Media and select Convert/Save on the menu bar or use the shortcut CTRL+R.
A pop-up window will appear. Click on the Add button. Your video will be added.
Afterward, select the option Convert/Save.
A pop-up window will appear in which you have to select the settings logo, located next to Profile
- A pop-up window will appear; click on the Video codec tab.
- Select the Filters tab and click on the Video transformation filter
In the Audio Codec tab, under the encoding parameters, select MP3 in the codec option.
Select the save option.
Note: Make sure to add the destination file in the convert dialogue box.
Click on the start button to begin the transformation.
Using the Online Converter
The Online Converter is a tool that assists you in rotating the direction of your GoPro. It is an online resource and does not require downloading and installing the cumbersome trouble. It is user-friendly and compatible with different video formats like MP4, MKV,3GP, and more.
Pros:
It is free for users. Therefore, there is no need for installation.
Cons:
- If it takes longer to upload a file, you may have to re-submit it. Hence, it can be time-consuming.
- It does not support encrypted files.
Fixing the Orientation of Go-pro video by Ezgif
If you have no time to download different tools for rotating your Go-Pro videos, then the Internet has got a solution to your problem. There are various resources available on the web that facilitate the online rotation of your videos.
The Ezgif online video rotation is a handy tool. With it, you can flip your Go-pro video both horizontally and vertically. Not only that, but it also gives you the option of rotating your video at different angles. It supports various video formats like MP4, MOV, and many others.
You need to follow these simple steps to fix the orientation of your Go-Pro video.
- Upload your desired video file.
- You can also paste an URL.
- Select the rotation options and then click the Rotate video button.
Viola! Your new rotated video is there in no time.
- You will also see several options ranging from cropping the video to changing the speed of the video.
Pros:
- There would be no watermarks in the rotated version.
- The output of the created file is mostly similar to the pre-rotated video.
Cons:
- If you have poor internet connectivity, the conversion process may take a little longer than usual.
Conclusion
With the rising trend in the development of video editing tools, Go-pro Quik is not the only app for editing its videos. Whether you are a beginner or an intermediate, editing multimedia files has added spark to the creativity of the artists. You can add the desired rotation effects to yours.
Changing the rotation of your Go-Pro videos has been made easier due to the availability of user-friendly tools. These are available for all types of operating systems. Their interface is not complicated. Hence, it makes it easy for beginners to polish their video-editing skills.
By changing the orientation of your video, you can turn an ordinary video into a mesmerizing and cherishable lifelong memory. So be it an indoor or outdoor activity, enhance your video editing skills by playing with different orientations of your videos.
Best Movie Title Maker
In order to find an effective title movie maker. Of course, there are several possibilities available, and selecting the best movie title maker online free will be your toughest task. Titles are regarded as independent videos intended to introduce films. Why not utilize one of the top movie titles software tools instead of settling for less? They may be used for entertaining home videos, professional presentations, or gripping motion pictures. Titles have a role in this. Let’s find out.
Select a movie title creator that gives you unrestricted power and freedom over how you modify your movie projects. Given the vast number of movies that have previously been produced, coming up with a distinctive title might be challenging. This movie title maker guide should assist you in coming up with the ideal title for your next masterwork, whether you are working on a huge budget movie or a student film studies project. Not less crucially, start your movies with distinctive, personalized titles.
Part 1. Create Movie Title with Filmora
Filmora must be your finest option if you’re seeking for a tool to add a title or text to your film. This movie title creator can meet demands with only a few easy clicks. You may select from a variety of titles and materials about IT, ranging from simple to sophisticated. You can alter it yourself if they don’t work for your requirements. The list will be updated often to include new unique templates. Additionally, you have the option to change the text’s size, color, and location.
With the aid of the many video editing tools and title effects offered by this simple but effective video title builder, you can add more interest to your film. The Wondershare collection offers a wide variety of over hundreds of templates that are broken down into several categories. You may use background music, filters, and other things in addition to text. Additionally, Filmora supports a variety of file formats, guaranteeing that it is fully compatible and equipped with several helpful effects.
Free Download For Win 7 or later(64-bit)
Free Download For macOS 10.14 or later
Step1 Add video files to the program
Drag and drop your video into the software to load it. You may do this in the meantime by selecting “Import” and then “Open” as shown below:

Step2 Add title to the video
The next step is to first upload your video to the timeline. There are several text templates available in this title creation tool when you click the “Title” symbol on the toolbar. You may now choose the appropriate one and include it in the timeline.

Step3 Edit title in video
Please right-click on the text file in this stage; a drop-down menu will appear. To proceed, please choose “Title Group Controller”. You may freely change important aspects of your text’s appearance on the video after receiving a pop-up window, including its font, color, size, and position.

Step4 Export the video
It’s time to double-check everything to make sure everything is perfect. To begin with, proofread your article for grammatical and spelling mistakes. Make sure that all of the information is in the correct font and size to maintain the visual hierarchy and the brand’s integrity. It’s time to play your video for the intended audience. After selecting the Export button, choose the MP4 file option or customize it according to your preferences.
Part 2. Use Premiere Pro to Make video Title
Use Premiere Pro to Create Video Titles are an essential component of every video, whether they are required for the credits, introduction, or other information. A common editing tool that works with the majority of PCs is Adobe Premiere Pro. When compared to other products on the market, it is quite well-liked. You may add titles to any film in Adobe Premiere Pro in a variety of ways, animate them, and customize their appearance.
Step1 Creating your title
From the toolbar on the left, choose the Type tool. Write the title that you wish to appear in it. Once a title has been produced, you should also see the Effects Controls window appear. You may alter the text’s font, size, color, and many other features using the Effects Controls panel.

Step2 Customizing your title
Using the Properties bar on the right, you can change the title (Size, Font, Color). If you wish to make modifications, make sure the text box is selected.

Step3 Saving Your Title Text Style
Additionally, you may wish to save a text style you have made for later usage. This is possible using the Styles feature. Additionally, you may configure other effects, including opacity, so that the title begins and ends with a varied opacity.

Part 3. Edit Movie Title Online
You may modify videos in a variety of ways, including by adding text, using the web tool FlexClip. It can compete with many other applications since its interface is well-streamlined to enhance processing power. It makes it simpler for users to choose a title template in accordance with their video’s requirements. Additionally, it is a tool that is extremely easy for everyone to use.
Step1 Upload Your Video
To submit your video straight to FlexClip’s video editor, choose the Media option. You may also utilize the video and picture content from FlexClip’s huge media collection to adorn your film or include it into a brand-new project.

Step2 Add the Title
Click the “+” button on the Timeline to add backdrop for your title card. By only altering the default hue, you may utilize a simple colored backdrop here. You may also choose the desired text style by going to the Text option.
image name: add-title-to-video-flexclip.jpg
Step3 Customize the Title
Customize the Title by double-clicking the text box and enter whatever text you like. After that, change the font, location, size, color, etc. of the text.

Step4 Save the Video
Lastly, save the Video You may see a final preview of the project, save it to your computer with a title screen, or upload it to the internet and share it with the world.

Editor’s Pick
When people see anything, they often discuss it with their friends and coworkers. This is why your film requires a catchy title that accurately describes what it is about! A video is the most efficient technique to increase the number of attendees at your online concert. Making a film with attractive titles is simple and fast using Filmora movie title maker. You may either create your own or use pre-made title video templates for movies or music videos as a starting point.
You may go through the media library to find excellent footage, photos, and background music to add to your title video’s creativity. Filmora is at the top of our list of suggestions for the best video title creator because of this. In order to increase the interest in your video, try on your own. This movie editor offers a variety of text and title options. You can quickly make your own video tale with awesome video intros in just a few easy steps as mentioned above.
Free Download For macOS 10.14 or later
Step1 Add video files to the program
Drag and drop your video into the software to load it. You may do this in the meantime by selecting “Import” and then “Open” as shown below:
Step2 Add title to the video
The next step is to first upload your video to the timeline. There are several text templates available in this title creation tool when you click the “Title” symbol on the toolbar. You may now choose the appropriate one and include it in the timeline.
Step3 Edit title in video
Please right-click on the text file in this stage; a drop-down menu will appear. To proceed, please choose “Title Group Controller”. You may freely change important aspects of your text’s appearance on the video after receiving a pop-up window, including its font, color, size, and position.
Step4 Export the video
It’s time to double-check everything to make sure everything is perfect. To begin with, proofread your article for grammatical and spelling mistakes. Make sure that all of the information is in the correct font and size to maintain the visual hierarchy and the brand’s integrity. It’s time to play your video for the intended audience. After selecting the Export button, choose the MP4 file option or customize it according to your preferences.
Part 2. Use Premiere Pro to Make video Title
Use Premiere Pro to Create Video Titles are an essential component of every video, whether they are required for the credits, introduction, or other information. A common editing tool that works with the majority of PCs is Adobe Premiere Pro. When compared to other products on the market, it is quite well-liked. You may add titles to any film in Adobe Premiere Pro in a variety of ways, animate them, and customize their appearance.
Step1 Creating your title
From the toolbar on the left, choose the Type tool. Write the title that you wish to appear in it. Once a title has been produced, you should also see the Effects Controls window appear. You may alter the text’s font, size, color, and many other features using the Effects Controls panel.
Step2 Customizing your title
Using the Properties bar on the right, you can change the title (Size, Font, Color). If you wish to make modifications, make sure the text box is selected.
Step3 Saving Your Title Text Style
Additionally, you may wish to save a text style you have made for later usage. This is possible using the Styles feature. Additionally, you may configure other effects, including opacity, so that the title begins and ends with a varied opacity.
Part 3. Edit Movie Title Online
You may modify videos in a variety of ways, including by adding text, using the web tool FlexClip. It can compete with many other applications since its interface is well-streamlined to enhance processing power. It makes it simpler for users to choose a title template in accordance with their video’s requirements. Additionally, it is a tool that is extremely easy for everyone to use.
Step1 Upload Your Video
To submit your video straight to FlexClip’s video editor, choose the Media option. You may also utilize the video and picture content from FlexClip’s huge media collection to adorn your film or include it into a brand-new project.
Step2 Add the Title
Click the “+” button on the Timeline to add backdrop for your title card. By only altering the default hue, you may utilize a simple colored backdrop here. You may also choose the desired text style by going to the Text option.
image name: add-title-to-video-flexclip.jpg
Step3 Customize the Title
Customize the Title by double-clicking the text box and enter whatever text you like. After that, change the font, location, size, color, etc. of the text.
Step4 Save the Video
Lastly, save the Video You may see a final preview of the project, save it to your computer with a title screen, or upload it to the internet and share it with the world.
Editor’s Pick
When people see anything, they often discuss it with their friends and coworkers. This is why your film requires a catchy title that accurately describes what it is about! A video is the most efficient technique to increase the number of attendees at your online concert. Making a film with attractive titles is simple and fast using Filmora movie title maker. You may either create your own or use pre-made title video templates for movies or music videos as a starting point.
You may go through the media library to find excellent footage, photos, and background music to add to your title video’s creativity. Filmora is at the top of our list of suggestions for the best video title creator because of this. In order to increase the interest in your video, try on your own. This movie editor offers a variety of text and title options. You can quickly make your own video tale with awesome video intros in just a few easy steps as mentioned above.
Trailer Guide for Creators and Developers
Trailers are a popular means to showcase a product you are about to release to the market. Teasers and trailers are traditionally created for movies, but have eventually evolved to include book trailers, game trailers, and app trailers. In this article, we will explain the key details of a trailer, highlight some examples, and show you how to create an effective trailer.
Part 1. What is a Trailer?
A trailer is a type of video commercial advertisement made to advertise and inform audiences about a specific program or item. To persuade customers to view or use the product, it includes a brief series of previews of the entire material. It also serves as a means of creating anticipation for a show or product that is about to hit the market.

Trailers were originally made for cinema movies. Nowadays, trailers are created for different forms of media like shows, apps, programs, video games, and book videos. A typical traditional trailer lasts between 1 to 3 minutes.
Part 2. What Are the Similarities and Differences Between a Teaser and Trailer?
Teasers and trailers can often be confused with each other. After all, they pretty much have the same objective.
Both are created for the purpose of advertising an upcoming show, product, or service. Teasers and trailers are similarly shown to audiences prior to the release of the thing they are advertising. They are meant to show a small portion of the full experience to create curiosity and excitement towards a targeted market. Both videos are typically short in length - taking up only a maximum of 3 minutes in duration.
The differences between them lie in their content, timeline, and duration. A teaser is much shorter than a trailer - the former runs for only 20-30 seconds while the latter can go between 1-3 minutes in length. This is because teasers are typically made before or during the production process of a movie or feature, whilst trailers are commonly made at the end.
For films, movies, and shows, teasers generally capture only a single part of that media. It focuses on the most intense or impactful scene. Trailers are formed from a series of clips depicting striking scenes derived from the beginning, middle, and end of the show. These scenes are normally arranged in a nonlinear structure, allowing viewers to have a general understanding of the story without revealing the entirety of the plot.
Part 3. Examples of good trailers
An excellent trailer is one who can effectively attract and maintain the audience’s attention. It satisfies its objective of showcasing striking and captivating pieces of the main product and entices viewers to experience its entirety. Here are some examples of trailers who have well fulfilled the criteria of a good trailer.
1. The Suicide Squad
The Suicide Squad is a fresh take featuring DC’s anti-heroes assemble in a single chaotic and unconventional team. James Gunn’s iteration on these characters is brought to life in the trailer with a majestic cast including John Cena, Idris Elba, Margot Robbie, and David Dastmalchian. Several key scenes are shown, highlighting its standout characters in the process while portraying the movie’s setting.
2. Raya and the Last Dragon
The trailer starts out innocently and comes with an adorable and surprising twist. The brief 2-minute trailer is packed with relevant scenes that depict the character’s quest without revealing too much. Many action-packed scenes and emotional interactions are satisfactorily squeezed into the trailer. Excitement builds further with Tamara Bubble’s “I’m That Good” playing in the background on the last minute of the video.
3. Men (2022)
Ingenious combination of sound effects and background music play a distinct role in this 2022 trailer. The female lead’s voice echoing from a tunnel, the haunting piano keys gradually building up the suspense, and the common but cleverly used horror audio effects create a chilling ensemble of haunting scenes in the movie. The sounds gradually rise up as more aggressive and energized scenes flash on the screen, and eventually end back into the sombre intro that leaves the audience with questions.
4. The Farewell
Lulu Wang’s dramatic comedy The Farewell is all about a family hiding the truth of a family member’s terminal illness from the person herself. What makes the trailer special is that it steers away from the sad, melancholic direction and veers toward a feel-good movie vibe. The conflict, struggle, and the beliefs featured in the movie are depicted in the trailer. However, the clever placement of interactions and the uplifting music tug at the audience’s heartstrings and urge them to want to see more.
5. Pokémon Go
Pokémon has become a culture to several generations. Becoming a Pokémon trainer is a secret dream that almost all of us have, even as adults. Niantic’s collaboration with the Pokémon franchise brings people closer to that reality by introducing its AR and location-powered app Pokémon Go. The trailer shows people of all ages living out their trainer dreams in the real world and interacting with Pokémon. The different features of the game are dramatized in a real-life setting, inciting more excitement, and pulling out the nostalgia from its market. The trailer keeps the actual app showcase to a minimum, instead focusing on once again selling that dream to audiences and bringing out the inner child in everyone.
Part 4. How to bring your trailer to the next level?
While it may seem intimidating to create a trailer for your upcoming product, there is no need to worry. It is now easier than ever to create a well-crafted trailer by taking advantage of a program’s tools and templates.
- Stock media
Filmora makes it easy to craft a trailer with only a few clicks. Make use of the program’s media library to gain access to a wealth of resources like stock photos, videos, music, and audio files.
- Keyframing
Keyframing lets you smoothly transition from one scene to another, making it an effective tool for trailers. It is particularly appealing for shows that highlight motion like sports, dancing, and action. Experiment with more than 80 preset templates and create smooth scene transitions with ease.
- Speed Ramping
Speed Ramping is a feature that works perfectly with keyframing. Increase the energy and dynamics in your trailer with 6 preset speed types. You can also customize these templates. There is also no need for concern about the audio - Filmora lets you maintain the audio pitch even when using these features.
- FX Effects
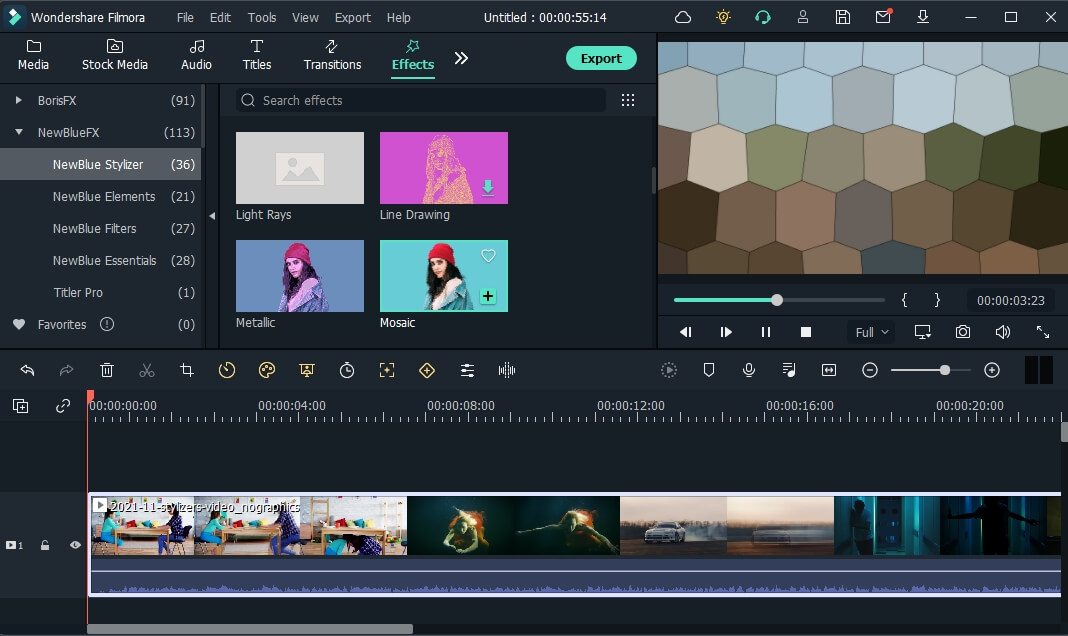
The program also offers many effects and filters for an extra element in your trailer. The Borix FX is an example of that. Designed in collaboration with the award-winning developer of the same name, Boris FX and its extension Continuum features a wide array of tasteful effects for your convenience. There are over 91 customizable and adjustable presets including types like blurs, stylization, and lights. NewBlue is another option that carries choices of filters, titlers, and stylizers.
Filmora offers different features, tools, and effects to explore that can help make your trailer editing objectives easier and more convenient. Save time and resources by taking advantage of its powerful yet easy-to-use tools.
Free Download For Win 7 or later(64-bit)
Free Download For macOS 10.14 or later
2. Raya and the Last Dragon
The trailer starts out innocently and comes with an adorable and surprising twist. The brief 2-minute trailer is packed with relevant scenes that depict the character’s quest without revealing too much. Many action-packed scenes and emotional interactions are satisfactorily squeezed into the trailer. Excitement builds further with Tamara Bubble’s “I’m That Good” playing in the background on the last minute of the video.
3. Men (2022)
Ingenious combination of sound effects and background music play a distinct role in this 2022 trailer. The female lead’s voice echoing from a tunnel, the haunting piano keys gradually building up the suspense, and the common but cleverly used horror audio effects create a chilling ensemble of haunting scenes in the movie. The sounds gradually rise up as more aggressive and energized scenes flash on the screen, and eventually end back into the sombre intro that leaves the audience with questions.
4. The Farewell
Lulu Wang’s dramatic comedy The Farewell is all about a family hiding the truth of a family member’s terminal illness from the person herself. What makes the trailer special is that it steers away from the sad, melancholic direction and veers toward a feel-good movie vibe. The conflict, struggle, and the beliefs featured in the movie are depicted in the trailer. However, the clever placement of interactions and the uplifting music tug at the audience’s heartstrings and urge them to want to see more.
5. Pokémon Go
Pokémon has become a culture to several generations. Becoming a Pokémon trainer is a secret dream that almost all of us have, even as adults. Niantic’s collaboration with the Pokémon franchise brings people closer to that reality by introducing its AR and location-powered app Pokémon Go. The trailer shows people of all ages living out their trainer dreams in the real world and interacting with Pokémon. The different features of the game are dramatized in a real-life setting, inciting more excitement, and pulling out the nostalgia from its market. The trailer keeps the actual app showcase to a minimum, instead focusing on once again selling that dream to audiences and bringing out the inner child in everyone.
Part 4. How to bring your trailer to the next level?
While it may seem intimidating to create a trailer for your upcoming product, there is no need to worry. It is now easier than ever to create a well-crafted trailer by taking advantage of a program’s tools and templates.
- Stock media
Filmora makes it easy to craft a trailer with only a few clicks. Make use of the program’s media library to gain access to a wealth of resources like stock photos, videos, music, and audio files.
- Keyframing
Keyframing lets you smoothly transition from one scene to another, making it an effective tool for trailers. It is particularly appealing for shows that highlight motion like sports, dancing, and action. Experiment with more than 80 preset templates and create smooth scene transitions with ease.
- Speed Ramping
Speed Ramping is a feature that works perfectly with keyframing. Increase the energy and dynamics in your trailer with 6 preset speed types. You can also customize these templates. There is also no need for concern about the audio - Filmora lets you maintain the audio pitch even when using these features.
- FX Effects
The program also offers many effects and filters for an extra element in your trailer. The Borix FX is an example of that. Designed in collaboration with the award-winning developer of the same name, Boris FX and its extension Continuum features a wide array of tasteful effects for your convenience. There are over 91 customizable and adjustable presets including types like blurs, stylization, and lights. NewBlue is another option that carries choices of filters, titlers, and stylizers.
Filmora offers different features, tools, and effects to explore that can help make your trailer editing objectives easier and more convenient. Save time and resources by taking advantage of its powerful yet easy-to-use tools.
Free Download For Win 7 or later(64-bit)
Free Download For macOS 10.14 or later
Learn About some of the Best Photo Collage with Music Tools
8 Free Photo Collage with Music Video Maker
An easy yet powerful editor
Numerous effects to choose from
Detailed tutorials provided by the official channel
It is definitely possible Usually, people use video collage makers for this reason. But you can also create an actual photo collage with music as well (no need to use actual video clips if you don’t want to.)
In the end, it all depends on the collage maker you’re using to be completely honest. In this case, the collage maker in question would have to have video editing functionalities advanced enough to allow you to create a video consisting of a picture collage with music Learn more about the different tools that you can check out below as we break down some of the best of the best available
01 Wondershare Filmora Video Editor
The first of the video makers that we’re going to be introducing is called Filmora. This is a professional editor that’s equipped with just about everything you need for creating high-quality video content. That includes the things that you will need in order to create a music photo collage
For your reference, that means that you can use it to create a video showing off a picture collage with music. Usually by making use of the templates provided by the software and uploading your own images (although, in the newest version of Filmora, Filmora V11, there is a ‘Stock Media’ option that includes an endless supply of photographs, videos, music, etc. for adding to your content.)

For Win 7 or later (64-bit)
For macOS 10.12 or later
02 Canva
Canva is really more of a photo editor than anything else. But it has a timeline function that you can use for more advanced things. Which, in this case, would be creating a picture collage with music
Note, just like with Filmora, Canva is not an entirely FREE program. But it is free to try. And, just like Filmora, it comes with a stock media library that you can use as a resource for your projects (i.e., images, clip arts, etc.) Canva also comes with a Pro version that you can unlock if you want some of its more advanced features (highly recommended if you’re looking to create content for work or entrepreneurial reasons and not just for posting on social media. Especially since it will allow you to collaborate with others.)

03 Express It
You can say that “Express It” is Adobe’s version of Canva. It is available as an online tool and as a photo collage with music app that you can use for your smartphone or tablet.
Much like with Canva, this program has a built-in stock media library that you can use for your projects. It’s also primarily FREE to use, although you’ll need to pay in order to unlock some of its more advanced resources. It comes with the usual layouts for creating quick templates, but it’s most prized for its ‘free-style’ mode, which will allow you to create a collage that looks exactly how you want it to look.

04 Smilebox
Smilebox is an automatic video collage maker that is capable of turning photographs into a video collage without much input from you It’s the tool to use if all you’re looking for is a quick solution. By that, we of course mean the solution of the ‘upload-and-then-download’ variety
It is also an online tool, so Sign-Up is required. But once you’re signed up, the only thing you really have to do is provide the images that you want to use for your music photo collage

05 Fotojet
Next is ‘Fotojet’, which is an online collage maker that is incredibly popular for those that are looking for an easy solution. It works pretty much how you expect a collage maker to work. You choose from a list of ‘collage layouts’, choose the images that you want to place in the layout that you’ve chosen, pick out your music, maybe decorate the pic collage a bit (for example, you can add text, clipart stickers, etc.) and then you’re done
Much like some of the programs on this list, Fotojet isn’t an entirely free music photo collage tool. However, a FREE trial is available if you want to try it out for a quick project or two.

06 Vimeo
Video is a professional online photo editing tool that’s incredibly popular with entrepreneurs. It actually works very similarly with all the other tools that we’ve introduced so far. That means that it comes with templates that you can use in order to create projects, it also comes with a ‘resources’ library that you can take advantage of in order to fill up said projects
As for creating a photo collage with music by using this tool. You will need to sign up to start creating, but it’s FREE to try — with some elements locked under the premium version.

07 Kapwing
KapWing is exactly what it looks like, it’s an online photo editor The best part about it is that it comes with quick collage layouts that you can use and the usual resources library. The layouts in question are customizable, allowing you to control what your music photo collages look like in the end. You also have the choice of creating said collage with photos, videos, GIFs, and music

08 VEED.IO
Similar to KapWing, VEED.IO offers a video collage maker that comes with customizable layouts that you can use to easily create a pic collage with music. The program is of course also free to try (though certain elements are locked in the FREE version).

● Key Takeaways from This Episode →
● Collages are a fun way to preserve memories of a fun event with friends and families Traditionally, of course, photo collages were created with printed still images.
● Now, however, not only can you create a moving collage (with images, videos, GIFs, etc.) but you can even add music to it
● These types of music photo collages are really fun to share with friends and family online. And, these days, there are even digital picture frames that will allow you to display them in your home (and yes, some of these picture frames do come with speakers for playing music)
It is definitely possible Usually, people use video collage makers for this reason. But you can also create an actual photo collage with music as well (no need to use actual video clips if you don’t want to.)
In the end, it all depends on the collage maker you’re using to be completely honest. In this case, the collage maker in question would have to have video editing functionalities advanced enough to allow you to create a video consisting of a picture collage with music Learn more about the different tools that you can check out below as we break down some of the best of the best available
01 Wondershare Filmora Video Editor
The first of the video makers that we’re going to be introducing is called Filmora. This is a professional editor that’s equipped with just about everything you need for creating high-quality video content. That includes the things that you will need in order to create a music photo collage
For your reference, that means that you can use it to create a video showing off a picture collage with music. Usually by making use of the templates provided by the software and uploading your own images (although, in the newest version of Filmora, Filmora V11, there is a ‘Stock Media’ option that includes an endless supply of photographs, videos, music, etc. for adding to your content.)
For Win 7 or later (64-bit)
For macOS 10.12 or later
02 Canva
Canva is really more of a photo editor than anything else. But it has a timeline function that you can use for more advanced things. Which, in this case, would be creating a picture collage with music
Note, just like with Filmora, Canva is not an entirely FREE program. But it is free to try. And, just like Filmora, it comes with a stock media library that you can use as a resource for your projects (i.e., images, clip arts, etc.) Canva also comes with a Pro version that you can unlock if you want some of its more advanced features (highly recommended if you’re looking to create content for work or entrepreneurial reasons and not just for posting on social media. Especially since it will allow you to collaborate with others.)
03 Express It
You can say that “Express It” is Adobe’s version of Canva. It is available as an online tool and as a photo collage with music app that you can use for your smartphone or tablet.
Much like with Canva, this program has a built-in stock media library that you can use for your projects. It’s also primarily FREE to use, although you’ll need to pay in order to unlock some of its more advanced resources. It comes with the usual layouts for creating quick templates, but it’s most prized for its ‘free-style’ mode, which will allow you to create a collage that looks exactly how you want it to look.
04 Smilebox
Smilebox is an automatic video collage maker that is capable of turning photographs into a video collage without much input from you It’s the tool to use if all you’re looking for is a quick solution. By that, we of course mean the solution of the ‘upload-and-then-download’ variety
It is also an online tool, so Sign-Up is required. But once you’re signed up, the only thing you really have to do is provide the images that you want to use for your music photo collage
05 Fotojet
Next is ‘Fotojet’, which is an online collage maker that is incredibly popular for those that are looking for an easy solution. It works pretty much how you expect a collage maker to work. You choose from a list of ‘collage layouts’, choose the images that you want to place in the layout that you’ve chosen, pick out your music, maybe decorate the pic collage a bit (for example, you can add text, clipart stickers, etc.) and then you’re done
Much like some of the programs on this list, Fotojet isn’t an entirely free music photo collage tool. However, a FREE trial is available if you want to try it out for a quick project or two.
06 Vimeo
Video is a professional online photo editing tool that’s incredibly popular with entrepreneurs. It actually works very similarly with all the other tools that we’ve introduced so far. That means that it comes with templates that you can use in order to create projects, it also comes with a ‘resources’ library that you can take advantage of in order to fill up said projects
As for creating a photo collage with music by using this tool. You will need to sign up to start creating, but it’s FREE to try — with some elements locked under the premium version.
07 Kapwing
KapWing is exactly what it looks like, it’s an online photo editor The best part about it is that it comes with quick collage layouts that you can use and the usual resources library. The layouts in question are customizable, allowing you to control what your music photo collages look like in the end. You also have the choice of creating said collage with photos, videos, GIFs, and music
08 VEED.IO
Similar to KapWing, VEED.IO offers a video collage maker that comes with customizable layouts that you can use to easily create a pic collage with music. The program is of course also free to try (though certain elements are locked in the FREE version).
● Key Takeaways from This Episode →
● Collages are a fun way to preserve memories of a fun event with friends and families Traditionally, of course, photo collages were created with printed still images.
● Now, however, not only can you create a moving collage (with images, videos, GIFs, etc.) but you can even add music to it
● These types of music photo collages are really fun to share with friends and family online. And, these days, there are even digital picture frames that will allow you to display them in your home (and yes, some of these picture frames do come with speakers for playing music)
Also read:
- New Whatre the Best Alternatives to Pexels, In 2024
- New In 2024, How to Create a Clideo Slideshow Simply
- Updated Deleting White Background in Photoshop Is Hard? No
- 2024 Approved 12 Impressive AI Video Ideas for Creating Engaging Video Content
- Updated In 2024, Applying the Effect of Camera Shake in Video Creation
- In 2024, You Can Create a Photo Video Slideshow on YouTube. In Slideshow on YouTube You Can Add Photos and Videos, Effects and Transitions and Make a Quality Slideshow
- In 2024, Adding a Spooky Shadow Effect with Filmora
- Updated In 2024, How to Add Text to Video
- New In 2024, It Is Crucial to Introduce Your Kids to the Different Colors and Practice the Color Matching Game. So, Here Are the Various Factors Related to Color Matching for Your Child with a Tool to Help You in It Ideally
- New How to Add a Lower Third to Your Video
- New Ultimate Guide to Countdown Animation in Videos for 2024
- Top 10 3D Slideshow Software Review
- New Minecraft Pixel Art Is a Trending Subject, and They Simply Consist of In-Game Pixel Artworks, Besides the Minecraft Houses, Farms, or Cities. Lets Explore the Fantastic World of Minecraft Pixel Art for 2024
- In 2024, Learn How to Effectively Use Masking in After Effects with This Comprehensive Guide. Includes Step-by-Step Instructions and an Alternative Masking Technique
- New 2024 Approved How to Add a Lower Third to Your Video
- 2024 Approved 10 Crazy-Cool Examples of AR Video
- Updated Learn Color Correction in After Effects with These Videos
- In This Article You Will Learn How to Crop a Video Through Windows Media Player and with Filmora Wondershare. Here Are Ways to Crop Your Video Clip
- Updated Gifs Can Convey Your Emotions in a Way that Words Cannot, so They Are Becoming a Popular Way to Express Yourself, and You Must Know How to Make a Gif and You Wont Believe that Its Not Difficult to Do for 2024
- New How to Use GIMP GREEN SCREEN for 2024
- New In 2024, The Availability of the Slow-Motion Feature on the iPhone Is Often Debated. This Article Will Guide You on How to Slow Down a Video on iPhone
- Updated 2024 Approved 3 Actionable Ways to Create Countdown Animation for Videos
- New In 2024, The Complete Guide to Converting GIF to SVG With Ease
- New In 2024, Recording Videos with Your Smartphones Is Fun and Fantastic. But Did You Know that Recording in Slo-Mo Has Become a Trend Nowadays? Read More to Learn About How to Convert Videos to Slow Motion Here
- New In 2024, How to Color Correct in OBS
- New How To Import and Adjust the Video Clips on Wondershare Filmora?
- 2024 Approved Looking for a Free Video Editor to Edit Videos on Mac? IMovie by Apple Is a Great Choice? But Is It the Best Video Editor or Is There a Better Alternative Available? Check Out Our iMovie Review
- In 2024, Are You Looking to Make a Thumbnail for Your Fortnite Video? This Article Features a Guide Explaining Creating a Fortnite Motion Blur Thumbnail
- Updated 2024 Approved Guiding Principles of Track Matte and Tracking in Adobe After Effects
- Updated How to Loop a Video in Canva Editor for 2024
- In 2024, An Ultimate Guide to Flexclip Online Trimmer
- New 2024 Approved Best GIF to Video Converters
- 2024 Approved We Will Give You the Best-Suggested List of Color Match Generators to Help You Choose From an Efficient Collection Rather than Finding It Aimlessly
- New What Is the Best FPS for YouTube Videos for 2024
- Updated 2024 Approved Adding a Spooky Shadow Effect with Filmora
- New 2024 Approved 2 Solutions to Cut Video in VLC on Windows
- Updated 2024 Approved How to Easily Add VHS Green Screen to Your Video
- 3 Effective Methods to Fake GPS location on Android For your Tecno Camon 20 Premier 5G | Dr.fone
- How To Easily Unlock Vivo Screen?
- Stuck at Android System Recovery Of Tecno Pova 5 Pro ? Fix It Easily | Dr.fone
- In 2024, How To Do Poco X5 Pro Screen Sharing | Dr.fone
- In 2024, Full Guide to Fix iToolab AnyGO Not Working On Honor X50 | Dr.fone
- How Can I Use a Fake GPS Without Mock Location On OnePlus Nord CE 3 5G? | Dr.fone
- How can I get more stardust in pokemon go On Apple iPhone SE? | Dr.fone
- In 2024, Top 11 Free Apps to Check IMEI on Asus Phones
- In 2024, How I Transferred Messages from Realme 12 Pro+ 5G to iPhone 12/XS (Max) in Seconds | Dr.fone
- How to Quickly Fix Bluetooth Not Working on Poco C51 | Dr.fone
- In 2024, A How-To Guide on Bypassing the iPhone 14 iCloud Lock
- What is Geo-Blocking and How to Bypass it On Oppo A56s 5G? | Dr.fone
- How To Deal With the Nokia C110 Screen Black But Still Works? | Dr.fone
- How to Sign Excel 2013 document with Electronic Digital Signature - (Tutorial)
- In 2024, AddROM Bypass An Android Tool to Unlock FRP Lock Screen For your Infinix Hot 30i
- How To Remove iCloud On iPhone 11 Pro Max Smoothly
- In 2024, Recommended Best Applications for Mirroring Your Nokia G42 5G Screen | Dr.fone
- In 2024, 5 Ways to Track Apple iPhone 6s Plus without App | Dr.fone
- In 2024, Top 11 Free Apps to Check IMEI on OnePlus Ace 2 Pro Phones
- In 2024, How To Get the Apple ID Verification Code From iPhone 12 Pro in the Best Ways
- In 2024, Here are Some of the Best Pokemon Discord Servers to Join On Vivo Y36 | Dr.fone
- Tips and Tricks for Apple ID Locked Issue From iPhone 13 mini
- In 2024, Full Guide to Unlock iPhone SE (2022) with iTunes
- Title: New In This Article, Youll Find Four Solutions for Rotating Your Go-Pro Videos. The Following Tools Will Be Used for This Purpose
- Author: Morgan
- Created at : 2024-05-19 05:12:38
- Updated at : 2024-05-20 05:12:38
- Link: https://ai-video-editing.techidaily.com/new-in-this-article-youll-find-four-solutions-for-rotating-your-go-pro-videos-the-following-tools-will-be-used-for-this-purpose/
- License: This work is licensed under CC BY-NC-SA 4.0.
