:max_bytes(150000):strip_icc():format(webp)/apple-logo-steering-wheel-25522ee2c5664139948ebfd1cb1df653.jpg)
New Learn How to Create a Unique Repeated Text Animation in the Filmora Video Editor. Follow the Simple Step-by-Step Instructions for 2024

Learn How to Create a Unique Repeated Text Animation in the Filmora Video Editor. Follow the Simple Step-by-Step Instructions
Preparation
What you need to prepare:
- A computer (Windows or macOS)
- Your video materials.
- Filmora video editor
Step 1
Download Filmora . Let it install and wait for it to run. Then, click on “New Project”. Now, you’re ready to edit!
Step 2
First, go to Titles and drag the Default Title to the Timeline.

Step 3
Now, double-click on the Default Title clip. Here, change its font to any bold font. Increase the text size to 120. Type in your text in the box. Scroll a bit down and change the Text Spacing to 8. Click OK.

Step 4
Take a Snapshot of this Default Title.

Step 5
Double-click on the Default Title clip once again. This time, click on its Advanced settings. Here, turn OFF Text Fill → turn ON Outline → change the Outline color to White → reduce Thickness to 1. Click OK. Now, take another Snapshot.

Step 6
Delete the Default Title clip from the Timeline. Now, drag the Outline snapshot that we just created to the Timeline. Open the Crop tool → change the Ratio to Custom → replace “1080” with “540”. Lastly, move the highlighted crop section to the top. Click OK.

Step 7
Double-click on the Snapshot to open its settings panel. Go to the Animation tab. Here, change the value of the Y-axis to “275”**.** Click OK. Now, take a Snapshot.

Step 8
Next, click on the Crop tool again and simply move the highlighted crop section to the bottom part of the screen. Click OK. Then, double-click on the snapshot clip in the Timeline and change the value of the Y-axis from “275” to “-275”**.** Click OK. Take a Snapshot again.
Step 9
Import a background image to My Media. Drag the background image to the Timeline. Double-click on it and drag the Scale bar until the background image covers the whole screen. Click OK. You should cut the background clip to make it 3 seconds long as well.

Step 10
Lock this track in the Timeline by pressing the highlighted button on the left. Then, go to “Track Manager” and add 6 new Tracks to the Timeline. Click OK.

Step 11
Drag the first Snapshot we made before to Track 6. Cut it so it’s 3 seconds long. Then, Lock the Track.

Step 12
Set the Playhead at the 15th frame on the Timeline. Then, drag the Upward Outline snapshot to this point. Double-click on it and change the Y-axis value to “**-4%**”. Then, reduce the Opacity to 0%. Now, move the Playhead 5 frames further. Next, increase the Opacity to 100% and increase the Y-axis value to around “105”. Don’t click OK yet.
Step 13
Move the Playhead to 1 minute and 5 seconds on the Timeline. Add a keyframe by clicking on the “+Add” button. Then, move the Playhead 5 frames forward. Here, change the Zoom Level to 25%.

Step 14
Double-click on the clip in Track 5. Drag the text like in the image below. Then, delete the part of the clip on the right side after 1 minute and 15 seconds.

Step 15
Hide the clips on Track 6 and Track 1 by clicking the “eye” icons next to them. Then, take a Snapshot. Now, drag this Snapshot right next to the clip on Track 5.

Step 16
Move the Playhead 3 frames forward from the starting point of the clip you just added. Unhide Track 6. Double-click on the clip on the right side of Track 5 and click on “+Add”. Move the Playhead 5 seconds forward and adjust the Upward Outline to fit the text.

Step 17
Move the Playhead 5 frames forward again. Drag the Y-axis value to the left until the outline clip overlaps the main text. Then, reduce the Opacity to 0%. Move the Playhead to 2 minutes and 10 seconds. Cut the Track and delete the clip on the right side. Lastly, Lock Track 5.

Step 18
Drag the Downward Outline snapshot to Track 4. Then, repeat the same process as in Step 16 and Step 17.
Step 19
Drag the Upward Outline snapshot to Track 3 at the 17th frame. Double-click on it and change the Opacity to 0%.

Step 20
Now, move 5 frames forward and increase the Opacity back to 100%. Then, drag the Y-axis value to the right until the screen looks like this.

Step 21
Move the Playhead to 1 minute and 5 seconds. Click on “+Add” to add a keyframe. Then, move the Playhead 5 frames forward. Double-click on the clip and stretch it from side to side to match something like this.

Step 22
Move the Playhead to 1 minute and 16 seconds. Split the clip and delete the part on the right side. Hide Track 4, 5, and 6. Then, take a Snapshot. Drag this Snapshot next to the clip on Track 3. Place the Playhead on 1 minute and 18 seconds. Then, unhide Track 4, 5, and 6.
Step 23
Double-click on the clip on the right side of Track 3. Add a keyframe by pressing “+Add”. Move the Playhead to 1 minute and 23 seconds. Now, resize the clip back to its original size by moving the rectangle left and right. Right now, it should look like this.

Step 24
Move the Playhead 5 frames forward. Drag the Y-axis value to the left until the screen looks like this.

Step 25
Move the Playhead 5 frames forward again. Drag the value of the Y-axis to the left until the screen looks like this. Then, change the Opacity to 0%. Finally, split the clip at 2 minutes and 10 seconds. Delete the part on the right side. Lock Track 3.

Step 26
Next, drag the Downward Snapshot on Track 2 and follow the same process as in Steps 19 through 25.
Step 27
Unhide the Background clip at the bottom of the Timeline. Then, Unlock Track 6. Split the clip on Track 6 at the 15th frame.

Step 28
Move the Playhead at the beginning of the Timeline. Click on the first part of the clip on Track 6. Add a keyframe. Drag the X-axis value to the right until the word disappears out of the screen. Like this. 👇Then, move the Playhead to the 6th frame and Reset the X-axis value to 0.0.

Step 29
Take the Playhead to 2 minutes and 10 seconds. Split it. Now, move the Playhead to 2 minutes and 19 seconds and add a keyframe. Lastly, take the Playhead to the very end of the clip and drag the text to the right side until it’s out of the screen once again.

Step 30
Go to the Effects tab. Select Glitch from the panel on the left. Then, apply “Glitch Dispersion” and “Glitch Stripe 2” to the clips at the start and at the end.

Step 31
Finally, Render the video to watch the final preview. And, you’re done! Congratulations on creating a repeated text animation in Filmora.

Summary
What you’ve learned:
- How to create text animations in Filmora
- Applying animation effects
- Make advanced edits on Titles in Filmora
- Hide and lock Tracks and Clips in Filmora
What you need to prepare:
- A computer (Windows or macOS)
- Your video materials.
- Filmora video editor
Step 1
Download Filmora . Let it install and wait for it to run. Then, click on “New Project”. Now, you’re ready to edit!
Step 2
First, go to Titles and drag the Default Title to the Timeline.

Step 3
Now, double-click on the Default Title clip. Here, change its font to any bold font. Increase the text size to 120. Type in your text in the box. Scroll a bit down and change the Text Spacing to 8. Click OK.

Step 4
Take a Snapshot of this Default Title.

Step 5
Double-click on the Default Title clip once again. This time, click on its Advanced settings. Here, turn OFF Text Fill → turn ON Outline → change the Outline color to White → reduce Thickness to 1. Click OK. Now, take another Snapshot.

Step 6
Delete the Default Title clip from the Timeline. Now, drag the Outline snapshot that we just created to the Timeline. Open the Crop tool → change the Ratio to Custom → replace “1080” with “540”. Lastly, move the highlighted crop section to the top. Click OK.

Step 7
Double-click on the Snapshot to open its settings panel. Go to the Animation tab. Here, change the value of the Y-axis to “275”**.** Click OK. Now, take a Snapshot.

Step 8
Next, click on the Crop tool again and simply move the highlighted crop section to the bottom part of the screen. Click OK. Then, double-click on the snapshot clip in the Timeline and change the value of the Y-axis from “275” to “-275”**.** Click OK. Take a Snapshot again.
Step 9
Import a background image to My Media. Drag the background image to the Timeline. Double-click on it and drag the Scale bar until the background image covers the whole screen. Click OK. You should cut the background clip to make it 3 seconds long as well.

Step 10
Lock this track in the Timeline by pressing the highlighted button on the left. Then, go to “Track Manager” and add 6 new Tracks to the Timeline. Click OK.

Step 11
Drag the first Snapshot we made before to Track 6. Cut it so it’s 3 seconds long. Then, Lock the Track.

Step 12
Set the Playhead at the 15th frame on the Timeline. Then, drag the Upward Outline snapshot to this point. Double-click on it and change the Y-axis value to “**-4%**”. Then, reduce the Opacity to 0%. Now, move the Playhead 5 frames further. Next, increase the Opacity to 100% and increase the Y-axis value to around “105”. Don’t click OK yet.
Step 13
Move the Playhead to 1 minute and 5 seconds on the Timeline. Add a keyframe by clicking on the “+Add” button. Then, move the Playhead 5 frames forward. Here, change the Zoom Level to 25%.

Step 14
Double-click on the clip in Track 5. Drag the text like in the image below. Then, delete the part of the clip on the right side after 1 minute and 15 seconds.

Step 15
Hide the clips on Track 6 and Track 1 by clicking the “eye” icons next to them. Then, take a Snapshot. Now, drag this Snapshot right next to the clip on Track 5.

Step 16
Move the Playhead 3 frames forward from the starting point of the clip you just added. Unhide Track 6. Double-click on the clip on the right side of Track 5 and click on “+Add”. Move the Playhead 5 seconds forward and adjust the Upward Outline to fit the text.

Step 17
Move the Playhead 5 frames forward again. Drag the Y-axis value to the left until the outline clip overlaps the main text. Then, reduce the Opacity to 0%. Move the Playhead to 2 minutes and 10 seconds. Cut the Track and delete the clip on the right side. Lastly, Lock Track 5.

Step 18
Drag the Downward Outline snapshot to Track 4. Then, repeat the same process as in Step 16 and Step 17.
Step 19
Drag the Upward Outline snapshot to Track 3 at the 17th frame. Double-click on it and change the Opacity to 0%.

Step 20
Now, move 5 frames forward and increase the Opacity back to 100%. Then, drag the Y-axis value to the right until the screen looks like this.

Step 21
Move the Playhead to 1 minute and 5 seconds. Click on “+Add” to add a keyframe. Then, move the Playhead 5 frames forward. Double-click on the clip and stretch it from side to side to match something like this.

Step 22
Move the Playhead to 1 minute and 16 seconds. Split the clip and delete the part on the right side. Hide Track 4, 5, and 6. Then, take a Snapshot. Drag this Snapshot next to the clip on Track 3. Place the Playhead on 1 minute and 18 seconds. Then, unhide Track 4, 5, and 6.
Step 23
Double-click on the clip on the right side of Track 3. Add a keyframe by pressing “+Add”. Move the Playhead to 1 minute and 23 seconds. Now, resize the clip back to its original size by moving the rectangle left and right. Right now, it should look like this.

Step 24
Move the Playhead 5 frames forward. Drag the Y-axis value to the left until the screen looks like this.

Step 25
Move the Playhead 5 frames forward again. Drag the value of the Y-axis to the left until the screen looks like this. Then, change the Opacity to 0%. Finally, split the clip at 2 minutes and 10 seconds. Delete the part on the right side. Lock Track 3.

Step 26
Next, drag the Downward Snapshot on Track 2 and follow the same process as in Steps 19 through 25.
Step 27
Unhide the Background clip at the bottom of the Timeline. Then, Unlock Track 6. Split the clip on Track 6 at the 15th frame.

Step 28
Move the Playhead at the beginning of the Timeline. Click on the first part of the clip on Track 6. Add a keyframe. Drag the X-axis value to the right until the word disappears out of the screen. Like this. 👇Then, move the Playhead to the 6th frame and Reset the X-axis value to 0.0.

Step 29
Take the Playhead to 2 minutes and 10 seconds. Split it. Now, move the Playhead to 2 minutes and 19 seconds and add a keyframe. Lastly, take the Playhead to the very end of the clip and drag the text to the right side until it’s out of the screen once again.

Step 30
Go to the Effects tab. Select Glitch from the panel on the left. Then, apply “Glitch Dispersion” and “Glitch Stripe 2” to the clips at the start and at the end.

Step 31
Finally, Render the video to watch the final preview. And, you’re done! Congratulations on creating a repeated text animation in Filmora.

Summary
What you’ve learned:
- How to create text animations in Filmora
- Applying animation effects
- Make advanced edits on Titles in Filmora
- Hide and lock Tracks and Clips in Filmora
What you need to prepare:
- A computer (Windows or macOS)
- Your video materials.
- Filmora video editor
Step 1
Download Filmora . Let it install and wait for it to run. Then, click on “New Project”. Now, you’re ready to edit!
Step 2
First, go to Titles and drag the Default Title to the Timeline.

Step 3
Now, double-click on the Default Title clip. Here, change its font to any bold font. Increase the text size to 120. Type in your text in the box. Scroll a bit down and change the Text Spacing to 8. Click OK.

Step 4
Take a Snapshot of this Default Title.

Step 5
Double-click on the Default Title clip once again. This time, click on its Advanced settings. Here, turn OFF Text Fill → turn ON Outline → change the Outline color to White → reduce Thickness to 1. Click OK. Now, take another Snapshot.

Step 6
Delete the Default Title clip from the Timeline. Now, drag the Outline snapshot that we just created to the Timeline. Open the Crop tool → change the Ratio to Custom → replace “1080” with “540”. Lastly, move the highlighted crop section to the top. Click OK.

Step 7
Double-click on the Snapshot to open its settings panel. Go to the Animation tab. Here, change the value of the Y-axis to “275”**.** Click OK. Now, take a Snapshot.

Step 8
Next, click on the Crop tool again and simply move the highlighted crop section to the bottom part of the screen. Click OK. Then, double-click on the snapshot clip in the Timeline and change the value of the Y-axis from “275” to “-275”**.** Click OK. Take a Snapshot again.
Step 9
Import a background image to My Media. Drag the background image to the Timeline. Double-click on it and drag the Scale bar until the background image covers the whole screen. Click OK. You should cut the background clip to make it 3 seconds long as well.

Step 10
Lock this track in the Timeline by pressing the highlighted button on the left. Then, go to “Track Manager” and add 6 new Tracks to the Timeline. Click OK.

Step 11
Drag the first Snapshot we made before to Track 6. Cut it so it’s 3 seconds long. Then, Lock the Track.

Step 12
Set the Playhead at the 15th frame on the Timeline. Then, drag the Upward Outline snapshot to this point. Double-click on it and change the Y-axis value to “**-4%**”. Then, reduce the Opacity to 0%. Now, move the Playhead 5 frames further. Next, increase the Opacity to 100% and increase the Y-axis value to around “105”. Don’t click OK yet.
Step 13
Move the Playhead to 1 minute and 5 seconds on the Timeline. Add a keyframe by clicking on the “+Add” button. Then, move the Playhead 5 frames forward. Here, change the Zoom Level to 25%.

Step 14
Double-click on the clip in Track 5. Drag the text like in the image below. Then, delete the part of the clip on the right side after 1 minute and 15 seconds.

Step 15
Hide the clips on Track 6 and Track 1 by clicking the “eye” icons next to them. Then, take a Snapshot. Now, drag this Snapshot right next to the clip on Track 5.

Step 16
Move the Playhead 3 frames forward from the starting point of the clip you just added. Unhide Track 6. Double-click on the clip on the right side of Track 5 and click on “+Add”. Move the Playhead 5 seconds forward and adjust the Upward Outline to fit the text.

Step 17
Move the Playhead 5 frames forward again. Drag the Y-axis value to the left until the outline clip overlaps the main text. Then, reduce the Opacity to 0%. Move the Playhead to 2 minutes and 10 seconds. Cut the Track and delete the clip on the right side. Lastly, Lock Track 5.

Step 18
Drag the Downward Outline snapshot to Track 4. Then, repeat the same process as in Step 16 and Step 17.
Step 19
Drag the Upward Outline snapshot to Track 3 at the 17th frame. Double-click on it and change the Opacity to 0%.

Step 20
Now, move 5 frames forward and increase the Opacity back to 100%. Then, drag the Y-axis value to the right until the screen looks like this.

Step 21
Move the Playhead to 1 minute and 5 seconds. Click on “+Add” to add a keyframe. Then, move the Playhead 5 frames forward. Double-click on the clip and stretch it from side to side to match something like this.

Step 22
Move the Playhead to 1 minute and 16 seconds. Split the clip and delete the part on the right side. Hide Track 4, 5, and 6. Then, take a Snapshot. Drag this Snapshot next to the clip on Track 3. Place the Playhead on 1 minute and 18 seconds. Then, unhide Track 4, 5, and 6.
Step 23
Double-click on the clip on the right side of Track 3. Add a keyframe by pressing “+Add”. Move the Playhead to 1 minute and 23 seconds. Now, resize the clip back to its original size by moving the rectangle left and right. Right now, it should look like this.

Step 24
Move the Playhead 5 frames forward. Drag the Y-axis value to the left until the screen looks like this.

Step 25
Move the Playhead 5 frames forward again. Drag the value of the Y-axis to the left until the screen looks like this. Then, change the Opacity to 0%. Finally, split the clip at 2 minutes and 10 seconds. Delete the part on the right side. Lock Track 3.

Step 26
Next, drag the Downward Snapshot on Track 2 and follow the same process as in Steps 19 through 25.
Step 27
Unhide the Background clip at the bottom of the Timeline. Then, Unlock Track 6. Split the clip on Track 6 at the 15th frame.

Step 28
Move the Playhead at the beginning of the Timeline. Click on the first part of the clip on Track 6. Add a keyframe. Drag the X-axis value to the right until the word disappears out of the screen. Like this. 👇Then, move the Playhead to the 6th frame and Reset the X-axis value to 0.0.

Step 29
Take the Playhead to 2 minutes and 10 seconds. Split it. Now, move the Playhead to 2 minutes and 19 seconds and add a keyframe. Lastly, take the Playhead to the very end of the clip and drag the text to the right side until it’s out of the screen once again.

Step 30
Go to the Effects tab. Select Glitch from the panel on the left. Then, apply “Glitch Dispersion” and “Glitch Stripe 2” to the clips at the start and at the end.

Step 31
Finally, Render the video to watch the final preview. And, you’re done! Congratulations on creating a repeated text animation in Filmora.

Summary
What you’ve learned:
- How to create text animations in Filmora
- Applying animation effects
- Make advanced edits on Titles in Filmora
- Hide and lock Tracks and Clips in Filmora
What you need to prepare:
- A computer (Windows or macOS)
- Your video materials.
- Filmora video editor
Step 1
Download Filmora . Let it install and wait for it to run. Then, click on “New Project”. Now, you’re ready to edit!
Step 2
First, go to Titles and drag the Default Title to the Timeline.

Step 3
Now, double-click on the Default Title clip. Here, change its font to any bold font. Increase the text size to 120. Type in your text in the box. Scroll a bit down and change the Text Spacing to 8. Click OK.

Step 4
Take a Snapshot of this Default Title.

Step 5
Double-click on the Default Title clip once again. This time, click on its Advanced settings. Here, turn OFF Text Fill → turn ON Outline → change the Outline color to White → reduce Thickness to 1. Click OK. Now, take another Snapshot.

Step 6
Delete the Default Title clip from the Timeline. Now, drag the Outline snapshot that we just created to the Timeline. Open the Crop tool → change the Ratio to Custom → replace “1080” with “540”. Lastly, move the highlighted crop section to the top. Click OK.

Step 7
Double-click on the Snapshot to open its settings panel. Go to the Animation tab. Here, change the value of the Y-axis to “275”**.** Click OK. Now, take a Snapshot.

Step 8
Next, click on the Crop tool again and simply move the highlighted crop section to the bottom part of the screen. Click OK. Then, double-click on the snapshot clip in the Timeline and change the value of the Y-axis from “275” to “-275”**.** Click OK. Take a Snapshot again.
Step 9
Import a background image to My Media. Drag the background image to the Timeline. Double-click on it and drag the Scale bar until the background image covers the whole screen. Click OK. You should cut the background clip to make it 3 seconds long as well.

Step 10
Lock this track in the Timeline by pressing the highlighted button on the left. Then, go to “Track Manager” and add 6 new Tracks to the Timeline. Click OK.

Step 11
Drag the first Snapshot we made before to Track 6. Cut it so it’s 3 seconds long. Then, Lock the Track.

Step 12
Set the Playhead at the 15th frame on the Timeline. Then, drag the Upward Outline snapshot to this point. Double-click on it and change the Y-axis value to “**-4%**”. Then, reduce the Opacity to 0%. Now, move the Playhead 5 frames further. Next, increase the Opacity to 100% and increase the Y-axis value to around “105”. Don’t click OK yet.
Step 13
Move the Playhead to 1 minute and 5 seconds on the Timeline. Add a keyframe by clicking on the “+Add” button. Then, move the Playhead 5 frames forward. Here, change the Zoom Level to 25%.

Step 14
Double-click on the clip in Track 5. Drag the text like in the image below. Then, delete the part of the clip on the right side after 1 minute and 15 seconds.

Step 15
Hide the clips on Track 6 and Track 1 by clicking the “eye” icons next to them. Then, take a Snapshot. Now, drag this Snapshot right next to the clip on Track 5.

Step 16
Move the Playhead 3 frames forward from the starting point of the clip you just added. Unhide Track 6. Double-click on the clip on the right side of Track 5 and click on “+Add”. Move the Playhead 5 seconds forward and adjust the Upward Outline to fit the text.

Step 17
Move the Playhead 5 frames forward again. Drag the Y-axis value to the left until the outline clip overlaps the main text. Then, reduce the Opacity to 0%. Move the Playhead to 2 minutes and 10 seconds. Cut the Track and delete the clip on the right side. Lastly, Lock Track 5.

Step 18
Drag the Downward Outline snapshot to Track 4. Then, repeat the same process as in Step 16 and Step 17.
Step 19
Drag the Upward Outline snapshot to Track 3 at the 17th frame. Double-click on it and change the Opacity to 0%.

Step 20
Now, move 5 frames forward and increase the Opacity back to 100%. Then, drag the Y-axis value to the right until the screen looks like this.

Step 21
Move the Playhead to 1 minute and 5 seconds. Click on “+Add” to add a keyframe. Then, move the Playhead 5 frames forward. Double-click on the clip and stretch it from side to side to match something like this.

Step 22
Move the Playhead to 1 minute and 16 seconds. Split the clip and delete the part on the right side. Hide Track 4, 5, and 6. Then, take a Snapshot. Drag this Snapshot next to the clip on Track 3. Place the Playhead on 1 minute and 18 seconds. Then, unhide Track 4, 5, and 6.
Step 23
Double-click on the clip on the right side of Track 3. Add a keyframe by pressing “+Add”. Move the Playhead to 1 minute and 23 seconds. Now, resize the clip back to its original size by moving the rectangle left and right. Right now, it should look like this.

Step 24
Move the Playhead 5 frames forward. Drag the Y-axis value to the left until the screen looks like this.

Step 25
Move the Playhead 5 frames forward again. Drag the value of the Y-axis to the left until the screen looks like this. Then, change the Opacity to 0%. Finally, split the clip at 2 minutes and 10 seconds. Delete the part on the right side. Lock Track 3.

Step 26
Next, drag the Downward Snapshot on Track 2 and follow the same process as in Steps 19 through 25.
Step 27
Unhide the Background clip at the bottom of the Timeline. Then, Unlock Track 6. Split the clip on Track 6 at the 15th frame.

Step 28
Move the Playhead at the beginning of the Timeline. Click on the first part of the clip on Track 6. Add a keyframe. Drag the X-axis value to the right until the word disappears out of the screen. Like this. 👇Then, move the Playhead to the 6th frame and Reset the X-axis value to 0.0.

Step 29
Take the Playhead to 2 minutes and 10 seconds. Split it. Now, move the Playhead to 2 minutes and 19 seconds and add a keyframe. Lastly, take the Playhead to the very end of the clip and drag the text to the right side until it’s out of the screen once again.

Step 30
Go to the Effects tab. Select Glitch from the panel on the left. Then, apply “Glitch Dispersion” and “Glitch Stripe 2” to the clips at the start and at the end.

Step 31
Finally, Render the video to watch the final preview. And, you’re done! Congratulations on creating a repeated text animation in Filmora.

Summary
What you’ve learned:
- How to create text animations in Filmora
- Applying animation effects
- Make advanced edits on Titles in Filmora
- Hide and lock Tracks and Clips in Filmora
If You Are Trying to Create a Countdown Effect, but You’re Not Sure Where to Start, Then This Post Is Going to Show You some Ways to Create a Countdown Animation for Your Videos
Many online marketers find that the animated countdown timer is the perfect way to bring a visual element to their videos while maintaining the quality and effectiveness of the video itself.
There are many ways to show a countdown timer on videos using animated GIFs. But they can be hard to implement or could cost a lot of money. You can use some free services, but they are limited in terms of features.
But not to worry, this post will go through a detailed process of creating an animated timer with 3 different methods. Before that, let’s discuss the benefits of using a timer for videos.
- Method 1: Make a Countdown Animation with a Professional Video Editing Software
- Method 2: Generate the timer with Free Online Countdown Timer Video Generators
- Method 3: Make a Countdown Timer with a Graphic Design Platform
- Cool Countdown
- Fitness Countdown
- Cinematic Countdown
- Neon Countdown
- Cyber Countdown
- Digital Countdown Pack
- Big Metal Countdown
- Glitch Countdown Transition
- Countdown To New Year
- Flashing Light Countdown
What are the benefits of using a countdown timer for videos/live streams?
Countdowns are a great way to get your message across and get your viewers excited about your product or service. A countdown timer provides a very simple visual cue to help motivate yourself and your audience to start watching the video.
It also works well with vlogs and YouTube, seamlessly transitioning from one part of your video to the next. This works best when your video isn’t about the product itself (but rather a review, a demo, or something else that lends itself well to a countdown).
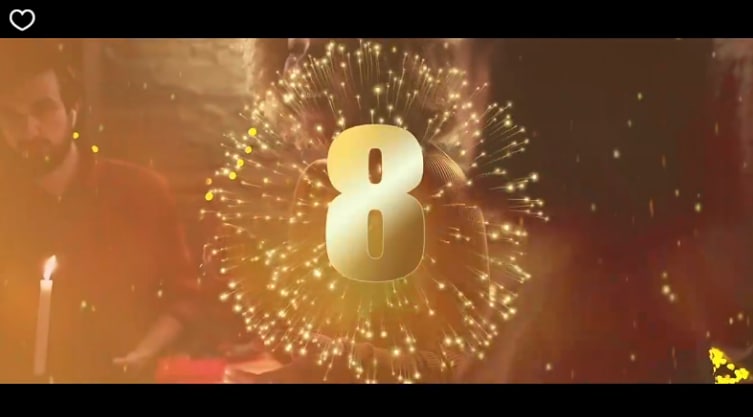
As you can see, the Vlogger uses a countdown timer at the beginning of his video. Vlogger uses a countdown timer to make it appear as if the time is running out because it adds urgency and suspense. As a viewer, you’ll want to hurry up and watch this video, so you don’t miss out on anything.
Let’s now dive deep into methods of creating countdown animation for videos.
Method 1: Make a Countdown Animation with a Professional Video Editing Software
The most common trend today is video content creation, and it’s everywhere. Videos are not only entertaining, but they have a significant impact on audience retention.
With a video editor, you can create compelling content that will entice your viewers to watch the whole thing. Moreover, it can also help you get started by adding captions, transitions, effects, etc.
If you’re ready to make your next project more engaging and interactive, you can try the best video editing software, Wondershare Filmora !

Wondershare Filmora is the industry standard when it comes to editing video. The video editing software industry is filled with features that promise to be faster, smarter, and easier to use than others.
Moreover, Wondershare has Filmstock effects that have revolutionized the world of video creators.
Filmstock is a collection of videos ready to be used with Filmora that contains more than 1,000 free stock footage clips of various scenes and locations, plus video effects, transitions, and titles, to make creating professional-quality videos faster and easier.
Let’s see some of its features that help us make animation countdown timers easily.
- Rich effects for you to choose customizing countdown animation at ease.
- You’re not stuck with traditional slow motion in your videos; you can add dynamism and energy to your videos with smooth animations.
- It has various countdown animation templates simplify the whole process, just drag-and-drop, everything gets done.
How to make a countdown animation with Filmora
You’re looking for an animated countdown timer for your website or your very first YouTube video, but you want one that stands out. You don’t want your visitors to think it’s generic or boring, so you’re thinking about how to make your countdown timer more interesting.
That’s where Filmora comes in. It’s an amazing tool that makes it easy to create countdown animations on websites or videos for almost any purpose. Let’s look at how to create your own cool, creative countdown timers using Filmora.
Free Download For Win 7 or later(64-bit)
Free Download For macOS 10.14 or later
Step1 Open Filmora and import the background video file from the media section.
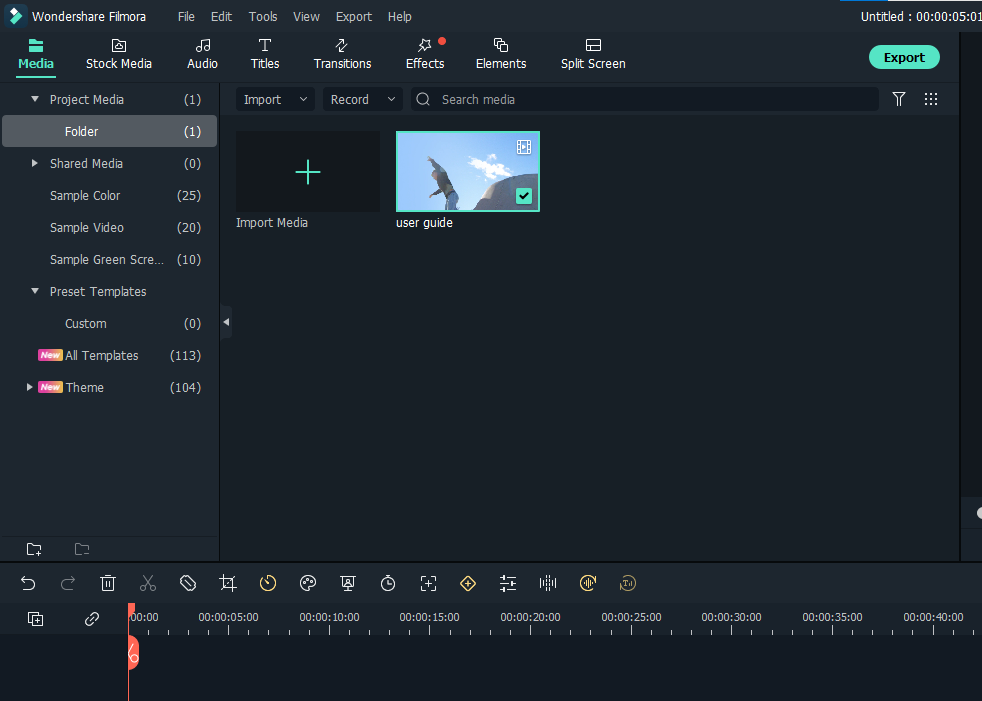
Step2 After importing the video, go to elements options from the top tab.
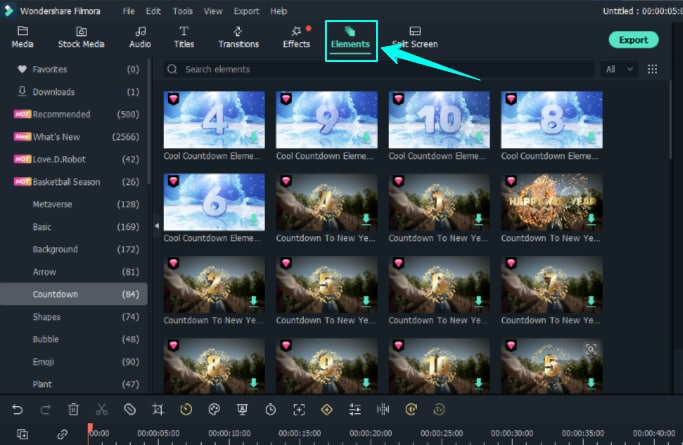
Step3 After choosing elements, you’ll see the countdown tab on your left. Click on the countdown and choose any animation. You can adjust the animation duration, size, and audio.

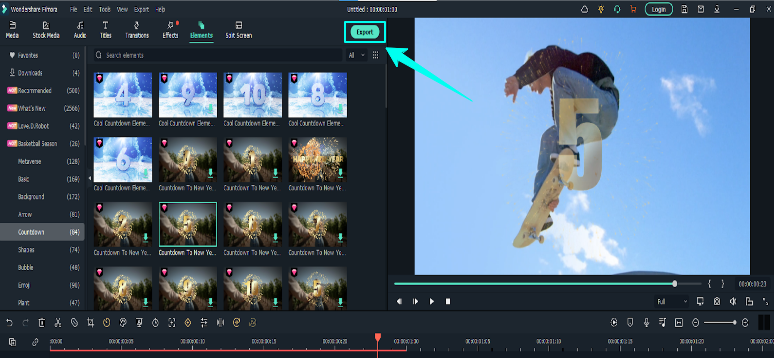
Step4 Adjust the animation duration according to the background video, and finally, export your animated countdown timer.
Pros and Cons of using Video Editing Software to make a countdown animation
Pros
- You can save any countdown effects project as a project to be used in future videos
- You can create a vision of your brand concept in your way
- Free templates are available according to your brand and target audience
- More stable
Cons
- Standard out-of-the-box video editing software isn’t enough to create a professional-quality video
Method 2: Generate the timer with Free Online Countdown Timer Video Generators
If you’re trying to catch your audience’s attention by giving them a reason to ‘countdown’ to something, then you’ll want to use a countdown timer with some great free online countdown videos.
There are many countdown timer websites like;Biteable ,Kapwing ,Movavi ,and MakeWebVideo . But we’ve rounded up the best countdown video generator site you’ll ever see:
FlexClip

FlexClip is a powerful yet easy-to-use online video editor. Its music library is versatile and high-quality. It lets you pick and add favorite tracks without infringing worries. Apply interesting editing to make your videos look better by adding transitions, filters, text, and more.
FlexClip’s biggest advantage is its extensive amount of free media assets. Whether you’re a master or rookie with FlexClip, you’re capable of producing excellent videos with music. You can be a video guru or a video beginner. You’re capable of producing awesome videos with great sound using FlexClip.
Key Features:
- Provides a complete set of video-making processes.
- A diverse range of royalty-free music selection
- Loads of handy editing tools
- Thousands of ready-made templates
- Multiple advanced features like adding text, emoji, effects, and more
How to make a countdown animation with FlexClip
The FlexClip countdown creator is a leading video editor with many powerful features. To make your countdown video, click the Create a Video button below.
Step1 Set Your Countdown Video Background
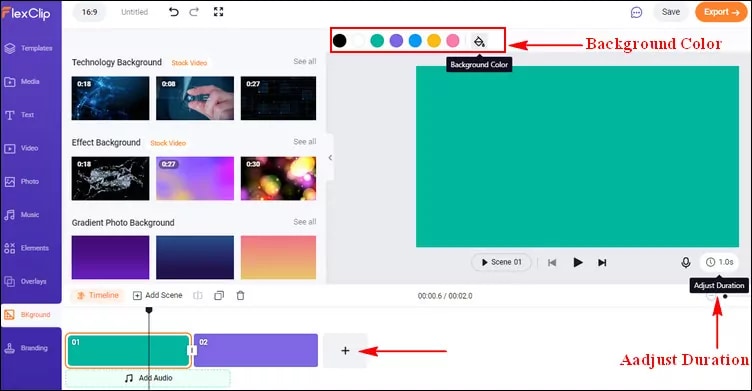
Set your timer to how long you want your message to start your countdown. Usually, it’s 10 seconds.
Then add scenes and adjust the duration of scenes to make them all length. You can use the background color to make it more appealing to your audience.
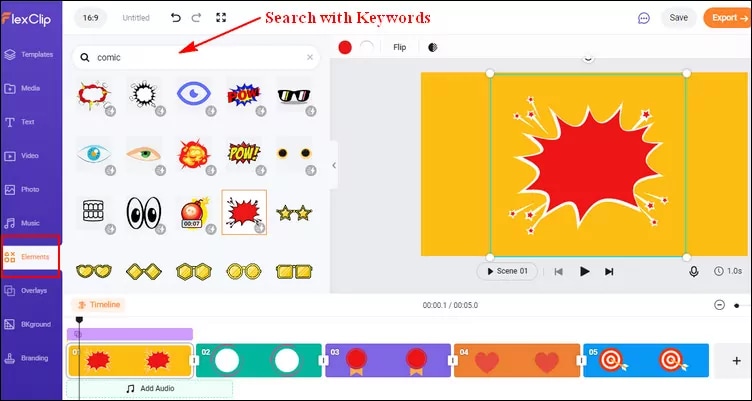
Step2 Highlight Your Countdown with Animated Elements
Using the amazing elements, you can make your countdown interactive and much more fun. Just go to the sidebar and switch to the Elements options. Apply the elements you want, then customize them on size, position, and color.
Step3 Add the Number to Your Countdown
Now, add the numbers for the countdown, e.g., if you want a 10-second countdown, type in the number “10”. You can pick a basic text effect and manually enter the number.
After you’ve created the number, go to the timeline and control how long the number will appear and when it will disappear.

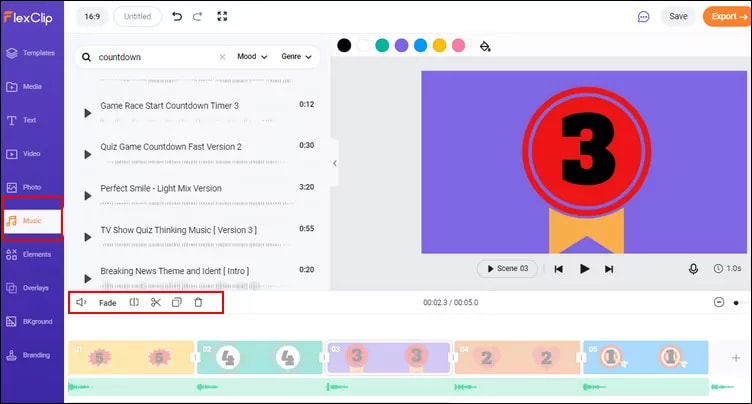
Step4 Add Music or Sound Effects to Your Countdown Video
FlexClip lets you upload your audio files from a local folder, or you can select one from FlexClip’s library. Once you’re done adding the countdown music, you can trim the duration, set it to start and end at any time, and use the fade-in/out effect to make the music match your countdown. Plus, you can also adjust the volume to make the music softer.
Step5 Preview and Export Your Countdown Video
You can preview it to see how the countdown video will look in the end, finally, hit export, and you’re done!
Method 3: Make a Countdown Timer with a Graphic Design Platform
Today’s graphic design platforms give designers more options than ever before, but many designers struggle to make the most of these resources. Let us share some tips and tricks on designing a countdown timer using the tools available through Canva, a graphic design platform.
Canva
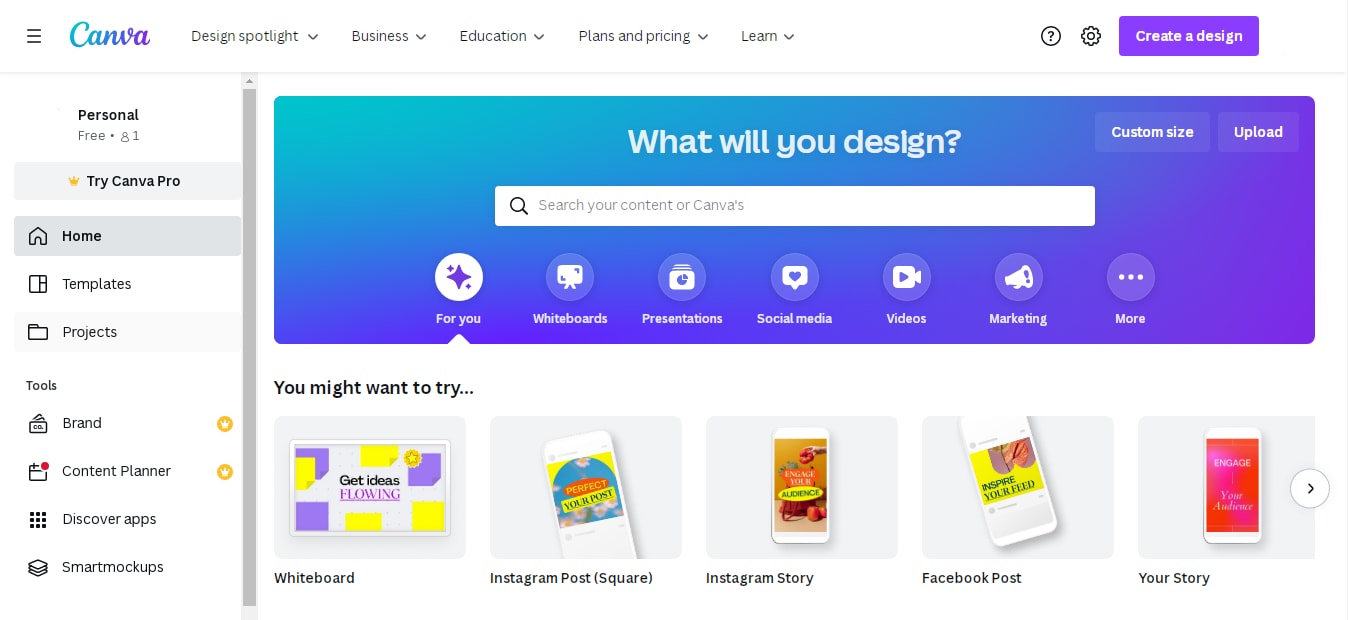
Many types of graphic design software are available, and Canva is one of the best. While its critics may disagree, Canva is an undeniable tool to help millions of business owners and marketers improve their social media graphics and redesign their brand image without needing to learn graphic design.
Key Features:
- Drag and drop feature
- Free templates
- Background Removal Tool
- Canva Brand Kit
- Magic Resizing
How to make a countdown animation with Canva
Canva offers a range of great-looking countdown templates that’ll help you create one in just a few minutes. And if you need a simple countdown animation, you can download one of their free templates. Let’s make it from scratch:
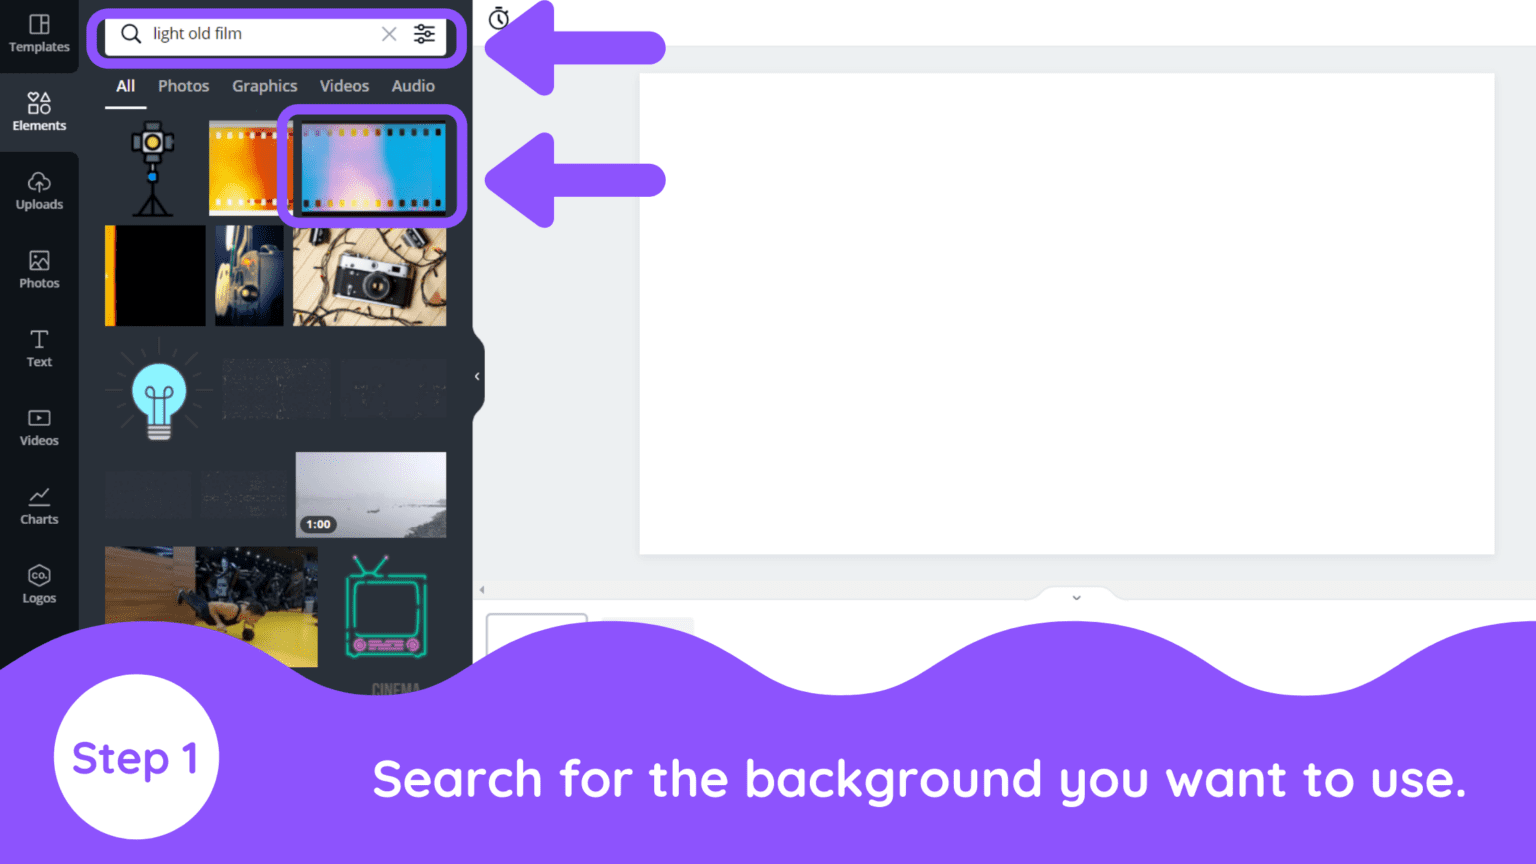
Step1 Select The Background
With Canva, you get a wide range of free backgrounds. Click on the button labeled “Search.” Now choose the “light old film” background element and click Add.
Step2 Enter Your Text (Number)
Then select the text tab and choose any font style, color, and size.

Step3 Animate Text
Next, select the font again, and then, at the top, there’s an option for Text Animation.
Adding text animation to your countdown timer will make it more realistic and match your background better than a straight-up countdown timer.

Step4 Edit The Page Timing
Next, click on the “Edit Timing” option. You can set the timer for each page as per your choice

Step5 Duplicate The Page
Now, select the duplicate page option and change the number of duplicate pages from 3 to 2,1, with the same design and formatting.

Step6 Export / Download Video
You’re finally done! Click the Download button to export your design.
The background of this photo is not a static image, so you cannot select the JPG, PNG, or SVG. You must choose an MP4 video or a GIF when creating an animation.

Top 10 animated countdown effects to make your video like a Pro
Animated countdown effects are a great way to add some “pizzazz” to a simple video. They look awesome and are extremely effective in creating a memorable video. When used well, they can add some excitement to a boring video. We’ll go over the top 10 animated countdown effects from Filmstock
1. Cool Countdown

2. Fitness Countdown

3. Cinematic Countdown

4. Neon Countdown

5. Cyber Countdown

6. Digital Countdown Pack

7. Big Metal Countdown

8. Glitch Countdown Transition

9. Countdown To New Year
10. Flashing Light Countdown

How to use these effects in Wondershare Filmora
You can access Filmstock directly from the Filmora application or by visiting the website:
- Create a new project by clicking Filmora Video Editor in the menu.
- Select the audio effects tab, or go to the Audio tab, title tab. You will see the film stock option.
- Click the Visit Filmstock button, and you will be taken to the Filmstock website.
Free Download For Win 7 or later(64-bit)
Free Download For macOS 10.14 or later

- Log in to Filmstock using your Wondershare account.

- After the download, the new effects will be added to your project in the appropriate section (Audio, Title, Transitions, and Elements). You’ll also be able to preview each effect from this window.

![]()
Note: it is highly recommended to log in to Filmstock and Filmora with the same Wondershare ID.
Final Words
A countdown is a powerful tool to add suspense to your videos. It gives your audience more incentive to watch your video all the way through. Get this article, as it is the ultimate guide to making your countdown animations, plus the best video editing software, Wondershare Filmora.
Wondershare Filmora is an excellent place to be creative and make some terrific countdown timers that can improve your viewers’ overall experience. Use their templates to create a strong and engaging online presence. Your audience won’t be able to resist the mesmerizing, hypnotizing, and enthralling effects of Wondershare Filmora.
Free Download For Win 7 or later(64-bit)
Free Download For macOS 10.14 or later
- Cool Countdown
- Fitness Countdown
- Cinematic Countdown
- Neon Countdown
- Cyber Countdown
- Digital Countdown Pack
- Big Metal Countdown
- Glitch Countdown Transition
- Countdown To New Year
- Flashing Light Countdown
What are the benefits of using a countdown timer for videos/live streams?
Countdowns are a great way to get your message across and get your viewers excited about your product or service. A countdown timer provides a very simple visual cue to help motivate yourself and your audience to start watching the video.
It also works well with vlogs and YouTube, seamlessly transitioning from one part of your video to the next. This works best when your video isn’t about the product itself (but rather a review, a demo, or something else that lends itself well to a countdown).
As you can see, the Vlogger uses a countdown timer at the beginning of his video. Vlogger uses a countdown timer to make it appear as if the time is running out because it adds urgency and suspense. As a viewer, you’ll want to hurry up and watch this video, so you don’t miss out on anything.
Let’s now dive deep into methods of creating countdown animation for videos.
Method 1: Make a Countdown Animation with a Professional Video Editing Software
The most common trend today is video content creation, and it’s everywhere. Videos are not only entertaining, but they have a significant impact on audience retention.
With a video editor, you can create compelling content that will entice your viewers to watch the whole thing. Moreover, it can also help you get started by adding captions, transitions, effects, etc.
If you’re ready to make your next project more engaging and interactive, you can try the best video editing software, Wondershare Filmora !

Wondershare Filmora is the industry standard when it comes to editing video. The video editing software industry is filled with features that promise to be faster, smarter, and easier to use than others.
Moreover, Wondershare has Filmstock effects that have revolutionized the world of video creators.
Filmstock is a collection of videos ready to be used with Filmora that contains more than 1,000 free stock footage clips of various scenes and locations, plus video effects, transitions, and titles, to make creating professional-quality videos faster and easier.
Let’s see some of its features that help us make animation countdown timers easily.
- Rich effects for you to choose customizing countdown animation at ease.
- You’re not stuck with traditional slow motion in your videos; you can add dynamism and energy to your videos with smooth animations.
- It has various countdown animation templates simplify the whole process, just drag-and-drop, everything gets done.
How to make a countdown animation with Filmora
You’re looking for an animated countdown timer for your website or your very first YouTube video, but you want one that stands out. You don’t want your visitors to think it’s generic or boring, so you’re thinking about how to make your countdown timer more interesting.
That’s where Filmora comes in. It’s an amazing tool that makes it easy to create countdown animations on websites or videos for almost any purpose. Let’s look at how to create your own cool, creative countdown timers using Filmora.
Free Download For Win 7 or later(64-bit)
Free Download For macOS 10.14 or later
Step1 Open Filmora and import the background video file from the media section.

Step2 After importing the video, go to elements options from the top tab.

Step3 After choosing elements, you’ll see the countdown tab on your left. Click on the countdown and choose any animation. You can adjust the animation duration, size, and audio.

Step4 Adjust the animation duration according to the background video, and finally, export your animated countdown timer.

Pros and Cons of using Video Editing Software to make a countdown animation
Pros
- You can save any countdown effects project as a project to be used in future videos
- You can create a vision of your brand concept in your way
- Free templates are available according to your brand and target audience
- More stable
Cons
- Standard out-of-the-box video editing software isn’t enough to create a professional-quality video
Method 2: Generate the timer with Free Online Countdown Timer Video Generators
If you’re trying to catch your audience’s attention by giving them a reason to ‘countdown’ to something, then you’ll want to use a countdown timer with some great free online countdown videos.
There are many countdown timer websites like;Biteable ,Kapwing ,Movavi ,and MakeWebVideo . But we’ve rounded up the best countdown video generator site you’ll ever see:
FlexClip

FlexClip is a powerful yet easy-to-use online video editor. Its music library is versatile and high-quality. It lets you pick and add favorite tracks without infringing worries. Apply interesting editing to make your videos look better by adding transitions, filters, text, and more.
FlexClip’s biggest advantage is its extensive amount of free media assets. Whether you’re a master or rookie with FlexClip, you’re capable of producing excellent videos with music. You can be a video guru or a video beginner. You’re capable of producing awesome videos with great sound using FlexClip.
Key Features:
- Provides a complete set of video-making processes.
- A diverse range of royalty-free music selection
- Loads of handy editing tools
- Thousands of ready-made templates
- Multiple advanced features like adding text, emoji, effects, and more
How to make a countdown animation with FlexClip
The FlexClip countdown creator is a leading video editor with many powerful features. To make your countdown video, click the Create a Video button below.
Step1 Set Your Countdown Video Background
Set your timer to how long you want your message to start your countdown. Usually, it’s 10 seconds.
Then add scenes and adjust the duration of scenes to make them all length. You can use the background color to make it more appealing to your audience.

Step2 Highlight Your Countdown with Animated Elements
Using the amazing elements, you can make your countdown interactive and much more fun. Just go to the sidebar and switch to the Elements options. Apply the elements you want, then customize them on size, position, and color.

Step3 Add the Number to Your Countdown
Now, add the numbers for the countdown, e.g., if you want a 10-second countdown, type in the number “10”. You can pick a basic text effect and manually enter the number.
After you’ve created the number, go to the timeline and control how long the number will appear and when it will disappear.

Step4 Add Music or Sound Effects to Your Countdown Video
FlexClip lets you upload your audio files from a local folder, or you can select one from FlexClip’s library. Once you’re done adding the countdown music, you can trim the duration, set it to start and end at any time, and use the fade-in/out effect to make the music match your countdown. Plus, you can also adjust the volume to make the music softer.

Step5 Preview and Export Your Countdown Video
You can preview it to see how the countdown video will look in the end, finally, hit export, and you’re done!
Method 3: Make a Countdown Timer with a Graphic Design Platform
Today’s graphic design platforms give designers more options than ever before, but many designers struggle to make the most of these resources. Let us share some tips and tricks on designing a countdown timer using the tools available through Canva, a graphic design platform.
Canva

Many types of graphic design software are available, and Canva is one of the best. While its critics may disagree, Canva is an undeniable tool to help millions of business owners and marketers improve their social media graphics and redesign their brand image without needing to learn graphic design.
Key Features:
- Drag and drop feature
- Free templates
- Background Removal Tool
- Canva Brand Kit
- Magic Resizing
How to make a countdown animation with Canva
Canva offers a range of great-looking countdown templates that’ll help you create one in just a few minutes. And if you need a simple countdown animation, you can download one of their free templates. Let’s make it from scratch:
Step1 Select The Background
With Canva, you get a wide range of free backgrounds. Click on the button labeled “Search.” Now choose the “light old film” background element and click Add.

Step2 Enter Your Text (Number)
Then select the text tab and choose any font style, color, and size.

Step3 Animate Text
Next, select the font again, and then, at the top, there’s an option for Text Animation.
Adding text animation to your countdown timer will make it more realistic and match your background better than a straight-up countdown timer.

Step4 Edit The Page Timing
Next, click on the “Edit Timing” option. You can set the timer for each page as per your choice

Step5 Duplicate The Page
Now, select the duplicate page option and change the number of duplicate pages from 3 to 2,1, with the same design and formatting.

Step6 Export / Download Video
You’re finally done! Click the Download button to export your design.
The background of this photo is not a static image, so you cannot select the JPG, PNG, or SVG. You must choose an MP4 video or a GIF when creating an animation.

Top 10 animated countdown effects to make your video like a Pro
Animated countdown effects are a great way to add some “pizzazz” to a simple video. They look awesome and are extremely effective in creating a memorable video. When used well, they can add some excitement to a boring video. We’ll go over the top 10 animated countdown effects from Filmstock
1. Cool Countdown

2. Fitness Countdown

3. Cinematic Countdown

4. Neon Countdown

5. Cyber Countdown

6. Digital Countdown Pack

7. Big Metal Countdown

8. Glitch Countdown Transition

9. Countdown To New Year

10. Flashing Light Countdown

How to use these effects in Wondershare Filmora
You can access Filmstock directly from the Filmora application or by visiting the website:
- Create a new project by clicking Filmora Video Editor in the menu.
- Select the audio effects tab, or go to the Audio tab, title tab. You will see the film stock option.
- Click the Visit Filmstock button, and you will be taken to the Filmstock website.
Free Download For Win 7 or later(64-bit)
Free Download For macOS 10.14 or later

- Log in to Filmstock using your Wondershare account.

- After the download, the new effects will be added to your project in the appropriate section (Audio, Title, Transitions, and Elements). You’ll also be able to preview each effect from this window.

![]()
Note: it is highly recommended to log in to Filmstock and Filmora with the same Wondershare ID.
Final Words
A countdown is a powerful tool to add suspense to your videos. It gives your audience more incentive to watch your video all the way through. Get this article, as it is the ultimate guide to making your countdown animations, plus the best video editing software, Wondershare Filmora.
Wondershare Filmora is an excellent place to be creative and make some terrific countdown timers that can improve your viewers’ overall experience. Use their templates to create a strong and engaging online presence. Your audience won’t be able to resist the mesmerizing, hypnotizing, and enthralling effects of Wondershare Filmora.
Free Download For Win 7 or later(64-bit)
Free Download For macOS 10.14 or later
Do You Know You Don’t Need a PC or Mac to Apply LUTs on Your Media? You Can Use Many Smartphone Apps to Apply LUTs, Such as 3DLUT Mobile App
Have you ever wondered how movies, TV shows, and social media posts look so good? It’s not the video editing that makes them look good but also the color grading. The correct color grading adds a perspective to your storytelling and a feel to your media. As a matter of fact, there are many different tools for this purpose, and LUT is the most popular one.
Many people think that LUTs can only be applied using a PC or Mac. However, it’s not true because there are different mobile apps that you can use to apply LUTs. One such excellent tool is 3DLUT mobile app which is available for multiple mobile platforms.
- Part 2: How to Use LUTs on 3DLUT Mobile App for Video Editing?
- Part 3: 6 Best LUTs That Can Be Used on 3DLUT Mobile App
Part 1: Overviewing The Features of the 3DLUT Mobile App
If you’re looking for a simple and basic mobile application for color grading, 3DLUT mobile app is a good choice. It is an easy-to-use application that does not overcomplicate your color grading process. You can adjust the brightness and contrast of your media files with its basic tools option. Moreover, you can add white balance and saturation, brighten shadows, and sharpen your photos and videos.
Additionally, this app offers over 70 LUT presets that you can use. These LUTs can be applied directly to your media files by changing their tone and mood. In addition to this, it gives you access to the 3DLUT Creator’s library, where you can download and purchase different LUTs packs. You can download this color grading application on your iOS and Android devices.
Free Download For Win 7 or later(64-bit)
Free Download For macOS 10.14 or later
Part 2: How to Use LUTs on 3DLUT Mobile App for Video Editing?
Color grading and color correction are not only for professional pictures and portraits. You can color-correct your videos as well with your smartphones. This section will give you step-by-step guidance on how to use LUTs using the 3D LUT mobile app for your videos.
Step1Install the Application and Import Media
To install the application, go to the App Store/Play Store and search for the 3DLUT app. Install the application to apply LUTs to your videos. After installing the app, open the application and tap on the “Open Gallery” button to import your media files. You can choose any photo or media from your gallery.

Step2Apply LUTs On Your File
Once you’ve imported your video file, it’s time to apply the LUT to your video. To do so, choose the “LUT” tab from the bottom tray and select the desired LUT.

Step3 Apply the Changes and Save Your File
When you have selected the desired LUT, tap on the “Tick” sign in the right corner of the screen. You can save your file in the gallery by tapping the same sign. Moreover, you can further adjust your file by selecting the Basic option from the bottom tray.

Part 3: 6 Best LUTs That Can Be Used on 3DLUT Mobile App
With the 3DLUT app, you can even access the LUT’s library of 3DLUT Creator. You can choose from different LUTs available according to your choice. You can always select the option for 3DLUT mobile app free download on your app’s store.
1. Speedy Grade Pack
It is a great LUT pack that you can use for your photos and videos. Speedy Grade Pack is a LUT pack that includes 10 LUTs. This color grading pack has different LUTs, each with a new style and color composition. Moreover, it is a pack that enhances color to make your videos more vibrant and livelier. It creates a more refreshing and colorful atmosphere for your viewers.

2. GoPro LUTs Color Grading Pack
Yet another fantastic LUT pack, especially for outdoor vlogging and videography, is GoPro LUTs Color Grading Pack. This pack comes with over 50 different LUTs, each suitable for GoPro videos. You can use these LUTs to give your vlogs and videos a more cinematic and professional touch. It enhances the brown and muddiness in your videos and balances the exposure to provide the perfect outdoor look.

3. Skin Tones Pack
This pack is the right choice if you want to color-grade your portraits. Skin Tones Pack has over 5 LUTs, and each one is used to fine-tune your skin complexation. With this LUT pack, you can add tan and more brightness to your photos and videos. This pack enhances your skin tone by highlighting your skin color composition. It increases brownness and saturation in your media files to give them a more natural look.

4. Zoan Cinematic Pack
Zoan Cinematic Pack is the perfect color-grading preset that gives your videos a professional-looking cinematic look. This pack has eight cinematic-rich presets you can apply to your videos and vlogs. These LUTs give the modern Hollywood-style impression. It adds richness to your videos, and it underexposes bright colors in your videos to create a modern cinematic ambiance.

5. Winter Pack
It is an exceptional and diversely influencing pack of 3DLUT Mobile. It changes your color composition to bluish to give a colder look. This pack has one LUT that comes with rich colors and deep blue color grading. These colors create an atmosphere that resembles winter and coldness. The blue tone and damping of other colors make your videos look more profound and meaningful.

6. RakhmonovFilmsLUT Pack
The last one on this list is RakhmonovFilmsLUT Pack which has over 100 LUTs. Each LUT is different from the others in style and tone. This pack gives your videos a more meaningful natural-looking color tone. These LUTs create a movie-like feel to your content by correcting colors that look more professional. It adds depth and dramatic touch to your media files with the correct exposure and white balance.

Conclusion
With new tools and applications, video editing becomes more accessible with a professional touch. Social media influencers create videos that give the feel of an expensive movie. This is how much these tools have made creating an excellent cinematic video easier. You can apply LUTs and other color grading options with your smartphone applications, such as 3DLUT mobile app.
Empower your videos with a new mood using different LUTs. Filmora now offers 100+ top-quality 3D LUTs cover a broad range of scenarios. Transform your videos with Filmora’s powerful 3D LUTs.
Apply LUT on Videos Apply LUT on Videos Learn More

Part 1: Overviewing The Features of the 3DLUT Mobile App
If you’re looking for a simple and basic mobile application for color grading, 3DLUT mobile app is a good choice. It is an easy-to-use application that does not overcomplicate your color grading process. You can adjust the brightness and contrast of your media files with its basic tools option. Moreover, you can add white balance and saturation, brighten shadows, and sharpen your photos and videos.
Additionally, this app offers over 70 LUT presets that you can use. These LUTs can be applied directly to your media files by changing their tone and mood. In addition to this, it gives you access to the 3DLUT Creator’s library, where you can download and purchase different LUTs packs. You can download this color grading application on your iOS and Android devices.
Free Download For Win 7 or later(64-bit)
Free Download For macOS 10.14 or later
Part 2: How to Use LUTs on 3DLUT Mobile App for Video Editing?
Color grading and color correction are not only for professional pictures and portraits. You can color-correct your videos as well with your smartphones. This section will give you step-by-step guidance on how to use LUTs using the 3D LUT mobile app for your videos.
Step1Install the Application and Import Media
To install the application, go to the App Store/Play Store and search for the 3DLUT app. Install the application to apply LUTs to your videos. After installing the app, open the application and tap on the “Open Gallery” button to import your media files. You can choose any photo or media from your gallery.

Step2Apply LUTs On Your File
Once you’ve imported your video file, it’s time to apply the LUT to your video. To do so, choose the “LUT” tab from the bottom tray and select the desired LUT.

Step3 Apply the Changes and Save Your File
When you have selected the desired LUT, tap on the “Tick” sign in the right corner of the screen. You can save your file in the gallery by tapping the same sign. Moreover, you can further adjust your file by selecting the Basic option from the bottom tray.

Part 3: 6 Best LUTs That Can Be Used on 3DLUT Mobile App
With the 3DLUT app, you can even access the LUT’s library of 3DLUT Creator. You can choose from different LUTs available according to your choice. You can always select the option for 3DLUT mobile app free download on your app’s store.
1. Speedy Grade Pack
It is a great LUT pack that you can use for your photos and videos. Speedy Grade Pack is a LUT pack that includes 10 LUTs. This color grading pack has different LUTs, each with a new style and color composition. Moreover, it is a pack that enhances color to make your videos more vibrant and livelier. It creates a more refreshing and colorful atmosphere for your viewers.

2. GoPro LUTs Color Grading Pack
Yet another fantastic LUT pack, especially for outdoor vlogging and videography, is GoPro LUTs Color Grading Pack. This pack comes with over 50 different LUTs, each suitable for GoPro videos. You can use these LUTs to give your vlogs and videos a more cinematic and professional touch. It enhances the brown and muddiness in your videos and balances the exposure to provide the perfect outdoor look.

3. Skin Tones Pack
This pack is the right choice if you want to color-grade your portraits. Skin Tones Pack has over 5 LUTs, and each one is used to fine-tune your skin complexation. With this LUT pack, you can add tan and more brightness to your photos and videos. This pack enhances your skin tone by highlighting your skin color composition. It increases brownness and saturation in your media files to give them a more natural look.

4. Zoan Cinematic Pack
Zoan Cinematic Pack is the perfect color-grading preset that gives your videos a professional-looking cinematic look. This pack has eight cinematic-rich presets you can apply to your videos and vlogs. These LUTs give the modern Hollywood-style impression. It adds richness to your videos, and it underexposes bright colors in your videos to create a modern cinematic ambiance.

5. Winter Pack
It is an exceptional and diversely influencing pack of 3DLUT Mobile. It changes your color composition to bluish to give a colder look. This pack has one LUT that comes with rich colors and deep blue color grading. These colors create an atmosphere that resembles winter and coldness. The blue tone and damping of other colors make your videos look more profound and meaningful.

6. RakhmonovFilmsLUT Pack
The last one on this list is RakhmonovFilmsLUT Pack which has over 100 LUTs. Each LUT is different from the others in style and tone. This pack gives your videos a more meaningful natural-looking color tone. These LUTs create a movie-like feel to your content by correcting colors that look more professional. It adds depth and dramatic touch to your media files with the correct exposure and white balance.

Conclusion
With new tools and applications, video editing becomes more accessible with a professional touch. Social media influencers create videos that give the feel of an expensive movie. This is how much these tools have made creating an excellent cinematic video easier. You can apply LUTs and other color grading options with your smartphone applications, such as 3DLUT mobile app.
Empower your videos with a new mood using different LUTs. Filmora now offers 100+ top-quality 3D LUTs cover a broad range of scenarios. Transform your videos with Filmora’s powerful 3D LUTs.
Apply LUT on Videos Apply LUT on Videos Learn More

How to Create Discord Logo GIF
How to Make Discord Logo GIF
An easy yet powerful editor
Numerous effects to choose from
Detailed tutorials provided by the official channel
The craze to get a personalized Discord animated icon is increasing with time. As it can deliver your favorite vibe to you and your friends, it’s exciting. Moreover, there are so many options in logos to choose from.
But what if you want a Discord GIF icon for your account? Maybe you’ve seen your friends using it and it’s stunning, isn’t it? That’s why this article is containing all the latest and easiest tricks to make the desired GIF icons Discord. Get the three best ways to make your own Discord logo. And let your friends ask you for the secret.
In this article
01 [Why Discord GIF Become Popular Recently?](#Part 1)
02 [How to Make an Animated Discord Logo Icon (Free Template)](#Part 2)
03 [How to Get Animated Discord PFP](#Part 3)
04 [How to Make Your Discord PFP a GIF on Wondershare Filmora](#Part 4)
Part 1 Why Discord GIF Become Popular Recently?
Think of one online entertainment that Discord is not serving right now. It’s hard to get one in mind. From chatting with friends to watching a movie together, from listening to music to playing together, all the entertainment is under a roof. And who doesn’t want the best appearance on such an engaging platform?
On the other hand, animated icons Discord is immensely popular as they can replicate your expression and mood as you want. Normal profile pictures are back-dated now as these GIFs can make the profile more interesting. You can pick any character or Discord animated icon as per your wish. Moreover, many of these are for free. While using these GIFs on multiple online chatting platforms, users can express their exact thoughts behind a message or reaction. Similarly, by using Discord icons GIFs, people can make their profile more lively and personalized.
Not sure of using GIFs? Imagine your Discord profile with your favorite anime character or a suitable clip. On some social media platforms, we need to be formal out of the profession. But on Discord, you can chill, so your profile. So, why not give it a try?
If you’re here to know the quick guide to set your Discord logo GIF or if you’re facing any error while setting the logo, this article will help you in no time.
Part 2 How to Make an Animated Discord Logo Icon (Free Template)
If you have already decided what will be the type of GIF icon Discord you want, that’s great. Otherwise, decide whether you need something funny or relaxed or it depends on a brand. This decision would help you to pick the template. Similarly, you can make the best Discord GIF icon with the following steps.
● To make a GIF with your choice, use this tool and click on “Edit this template”. This will let you make a customized GIF from any video from your personal collection or download from the Internet.
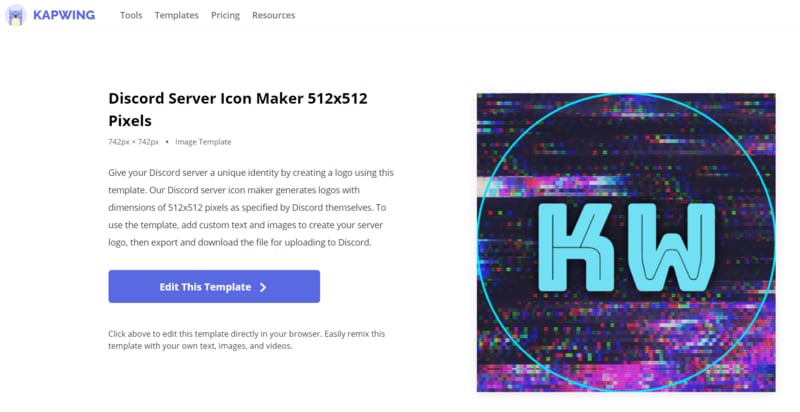
● In the next step, you have to choose the template size from the right-hand side of the window. You can keep to the custom 512x512 size as well.
● Now, on the topmost bar in the window, you can find an option named “Upload”. Click on this option to upload the video from where you want to make your Discord icon GIF.
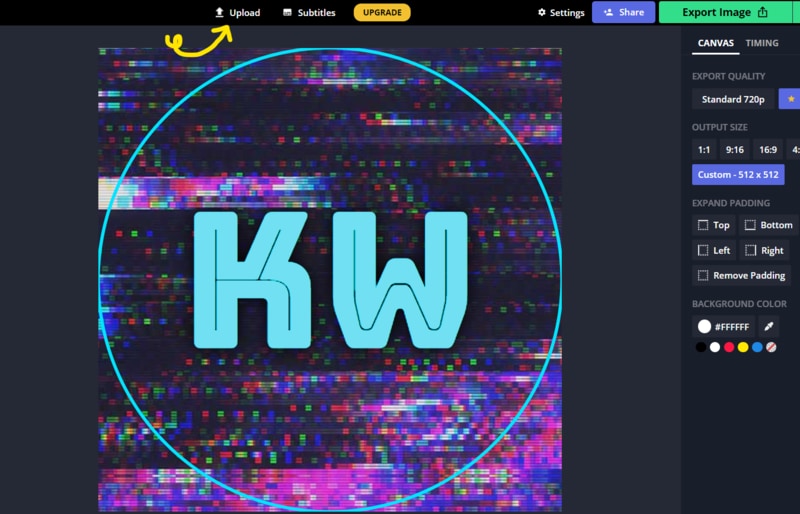
● You can upload the video from the gallery or drag-and-drop to the uploader window. You can also get videos from Google Drive.
● Now, as the video gets uploaded, you need to edit within the edit window. You can set the frame, time, and size from the tools highlighted in the image.
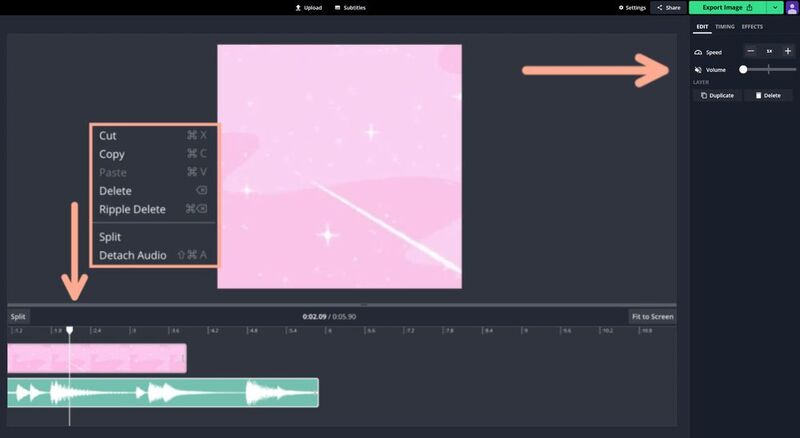
● Now, from the top-right side of the window, get the “Export Video” button. Click on the green arrow beside the button to get a drop-down list. From there click on the “Export as GIF” button to save your Discord icon GIF.
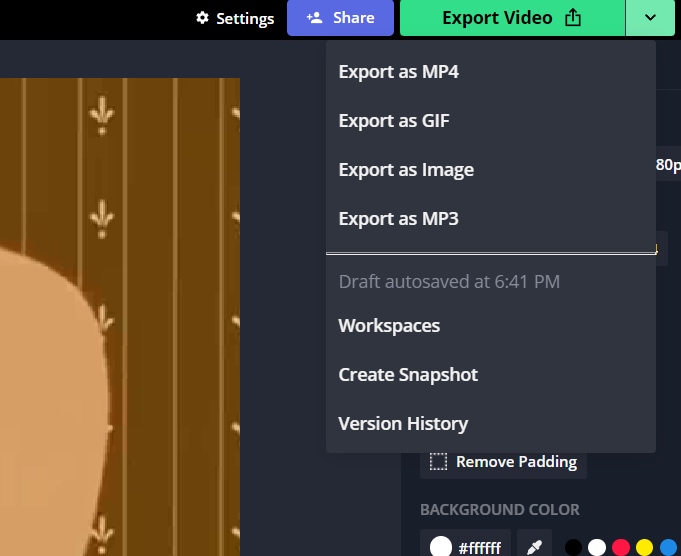
● You can check the download status from the next window.
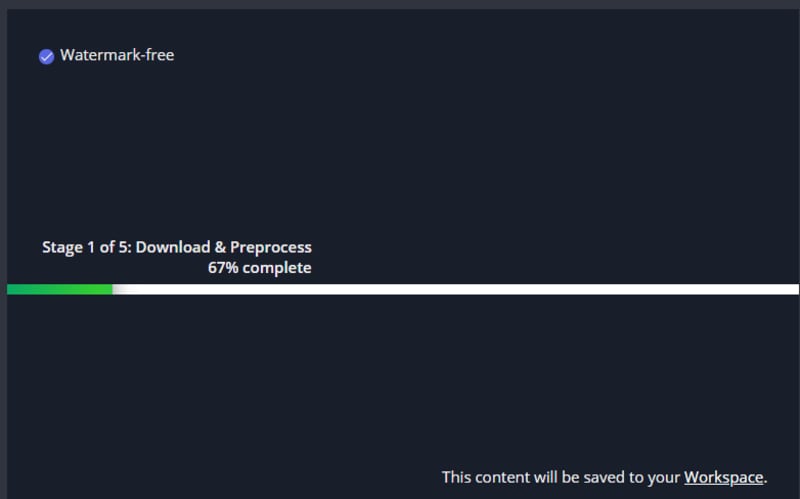
● To save the recent GIF, click on “Download”. It will take some seconds to get saved to your system.

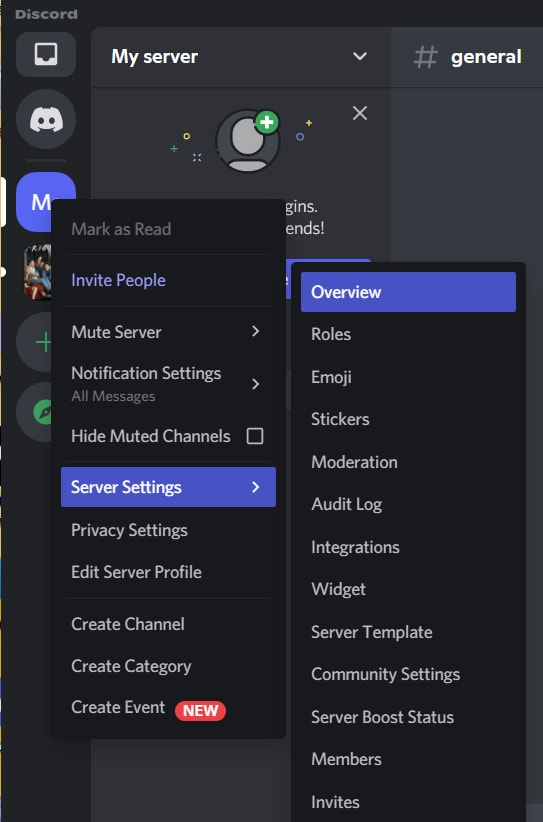
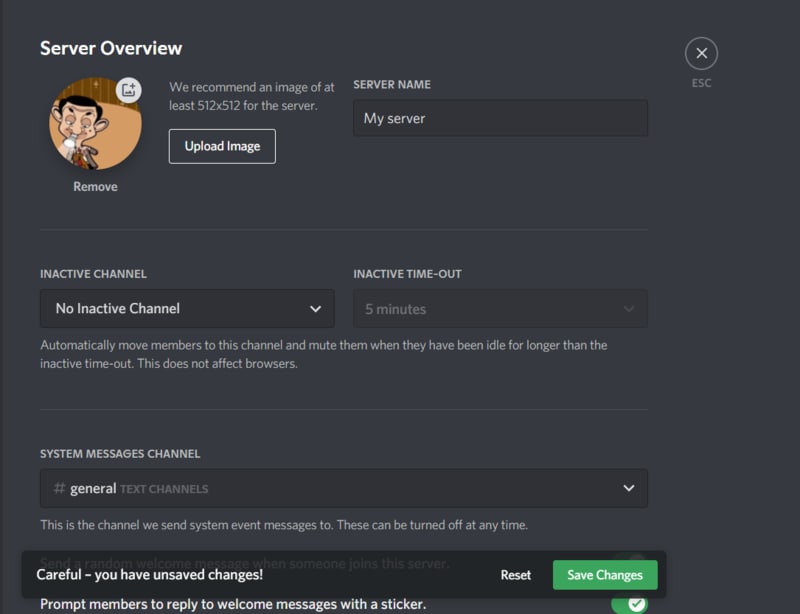
● Now, open Discord in your system and right-click on your “Server” icon from the left-hand side of the window. As a drop-down menu appears, select “Server Settings” followed by “Overview”.
● A new window will be opened with the existing profile picture of the server. To add the GIF icon Discord, click on “Upload Image”.
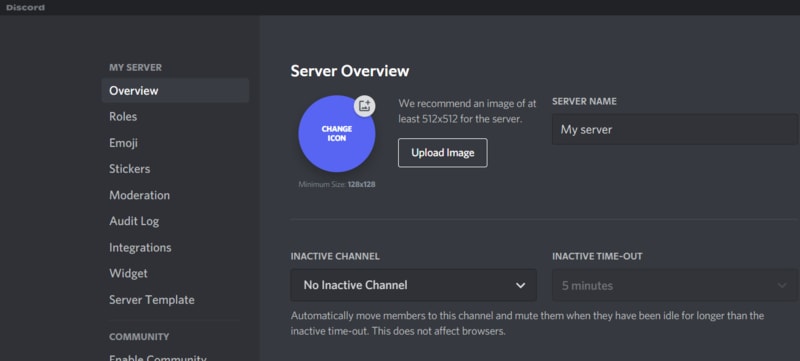
● From the location where you’ve saved the GIF, select it. Then, click on “Apply” to upload the GIF icon to the server profile.
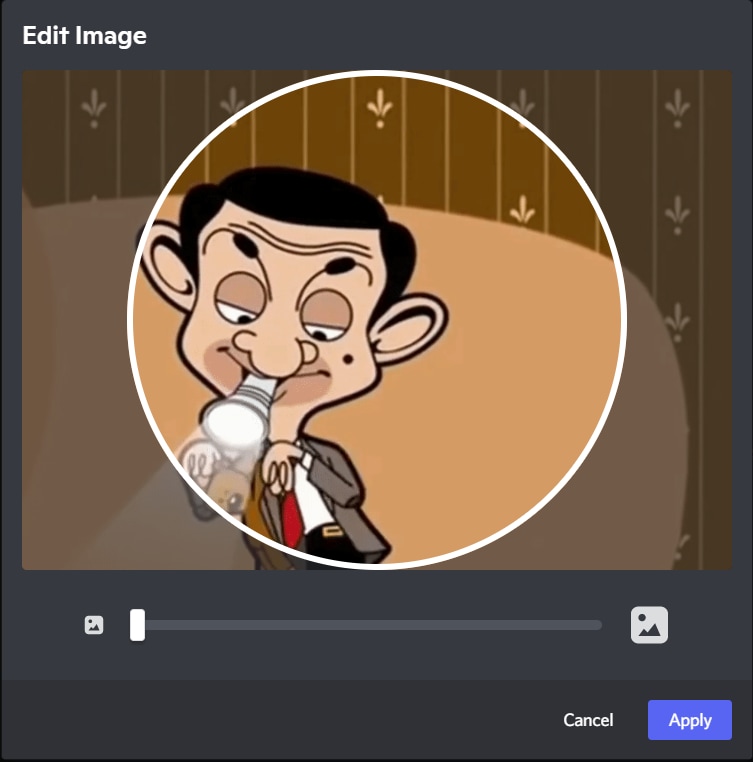
● When uploading is completed, click on the green button named “Save Changes” to save the GIF icons Discord. Make sure that your GIF file size is less than 10.24 MB. Otherwise, you cannot save the GIF and have to resize it again.
Part 3 How to Get Animated Discord PFP
To set an exciting avatar in your Discord profile, you need to go through the following quick steps. Firstly, note that you need to have Discord Nitro to set a Discord logo GIF in your user profile. Without Nitro, GIF cannot be used as a PFP. Get all the answers for how to use Discord Nitro or how to get animated Discord PFP here.
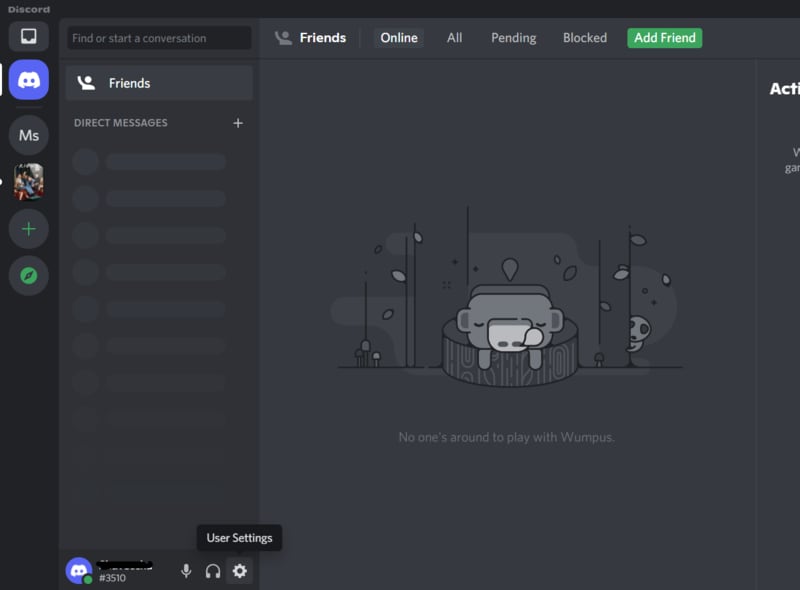
● Open Discord and from the bottom-left side panel, click on the “Gear” icon that is the “User Settings”. It will present beside your user name on the “Home” window itself.
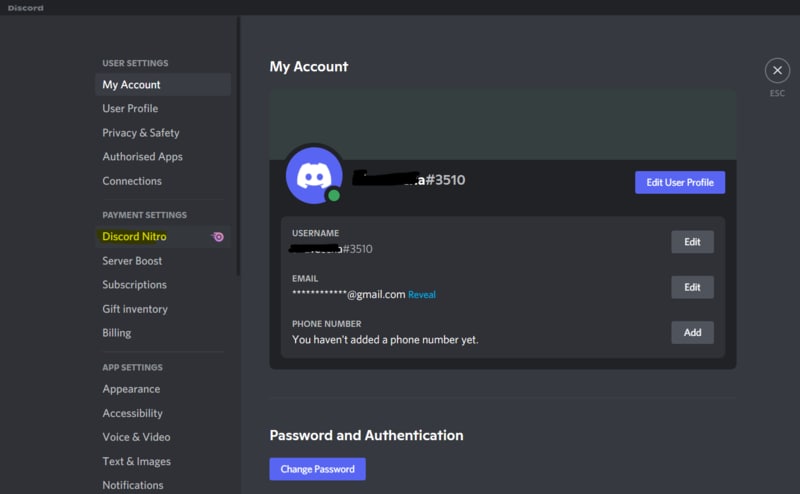
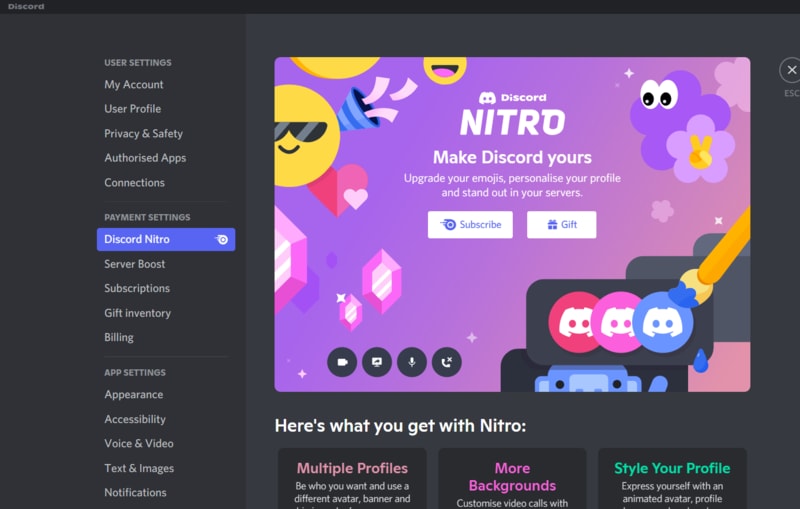
● As the new window gets opened, go to “Discord Nitro” under “Payment Settings”.
● If you don’t have activated Nitro, then click on “Subscribe” to get a suitable subscription to initiate animated icons Discord for your profile.
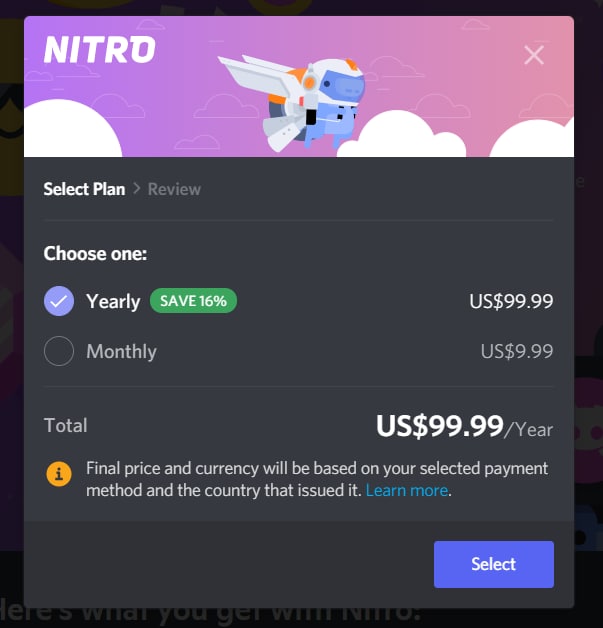
● Then, you’ll be redirected to the subscription options. Choose “Monthly” or “Yearly” subscription and to confirm it, click “Select”. If you choose the yearly plan, you’ll get an additional 16% off.
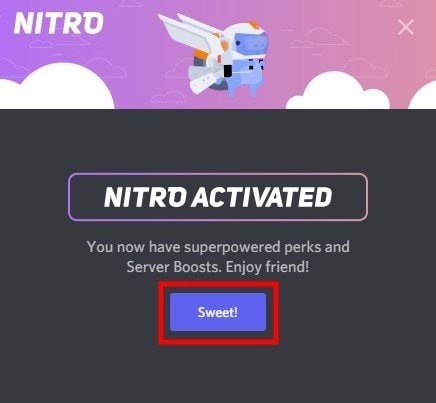
● As Discord Nitro is activated after payment and agreeing to the terms and conditions, you can see a pop-up window. Click on “Sweet” to get started.
● To set your profile avatar with GIF icon Discord, you need some GIFs downloaded to your system. So, make your GIF according to the last technique we mentioned. Or you can search for GIFs on the Internet like Giphy”, “Tenor”, or “Gfycat”. Save the GIFs as images to the system.
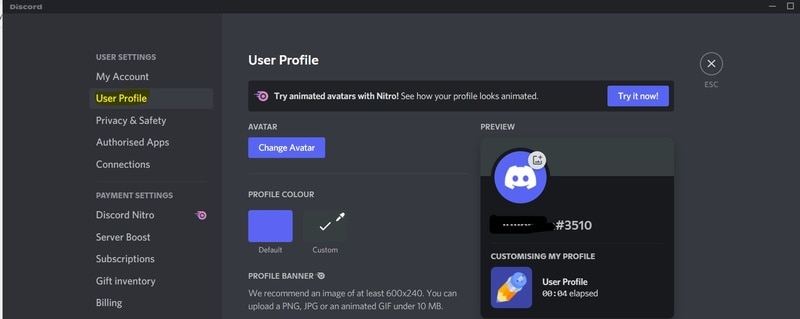
● Go the the “Gear” icon like the 1st step and open “User Settings”. Then, Go to the second option under user settings, “User Profile”. In this window, you can find a blue button named “Change Avatar”. Click on this button to set the Discord icon GIF.
● Now, you need to find the desired GIF from the “File Explorer” opened. Go to the folder where you saved the GIF file. Then, select it and click on “Open”.
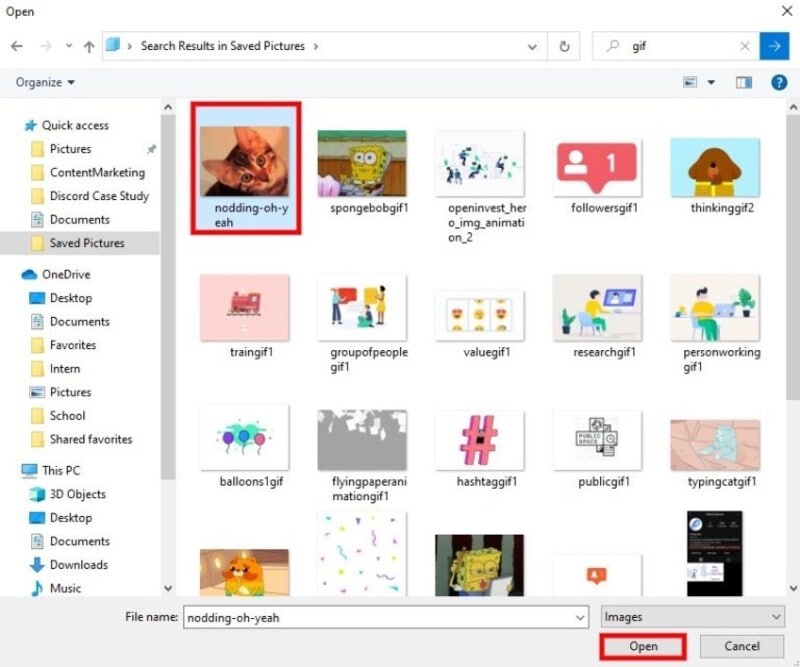
● You can edit the frame of your Discord animated icons in the “edit image’ pop-up window. Then, click on “Apply” to set it finally. If you don’t want to edit the size, click on “Skip” to save the GIF as your profile picture on Discord.
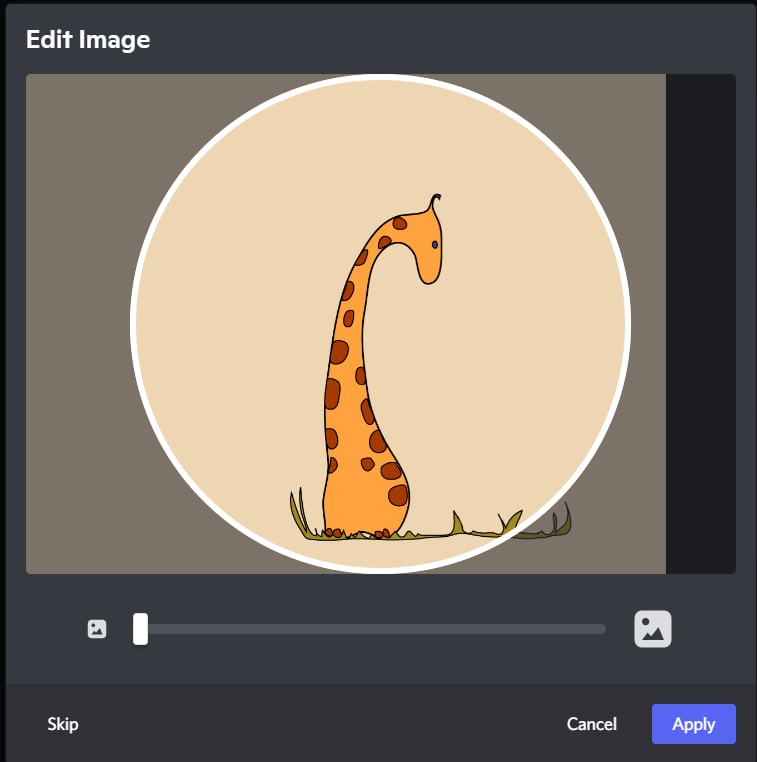
● Check your profile picture now and match it with your expectations. Then click on “Save Changes” to save the icon. If you want some changes, click on “Change Avatar” and select any GIF from the saved discord icons GIF from the file explorer.

Part 4 How to Make Your Discord PFP a GIF on Wondershare Filmora
Wondershare Filmora Video Editor is the latest software where you can create a GIF easily to set as a discord GIF icon. Instead of using the same, existing GIFs, you can make your own now. It will help you to make a unique impression and be satisfied with your personalized account. Moreover, this software is just 4 KB in storage size. So, instan5 download and installation is not a problem at all.

Wondershare Filmora - Best Video Editor for Mac/Windows
5,481,435 people have downloaded it.
Build unique custom animations without breaking a sweat.
Focus on creating epic stories and leave the details to Filmora’s auto features.
Start a creative adventure with drag & drop effects and endless possibilities.
Filmora simplifies advanced features to save you time and effort.
Filmora cuts out repetition so you can move on to your next creative breakthrough.
Let’s go through the steps to understand the procedure to make GIF icons discord on Wondershare Filmora.
● Download and Install Wondershare Filmora in your system. It won’t take more than 10 minutes for the complete installation process. This software is available for both Windows and Mac OS.
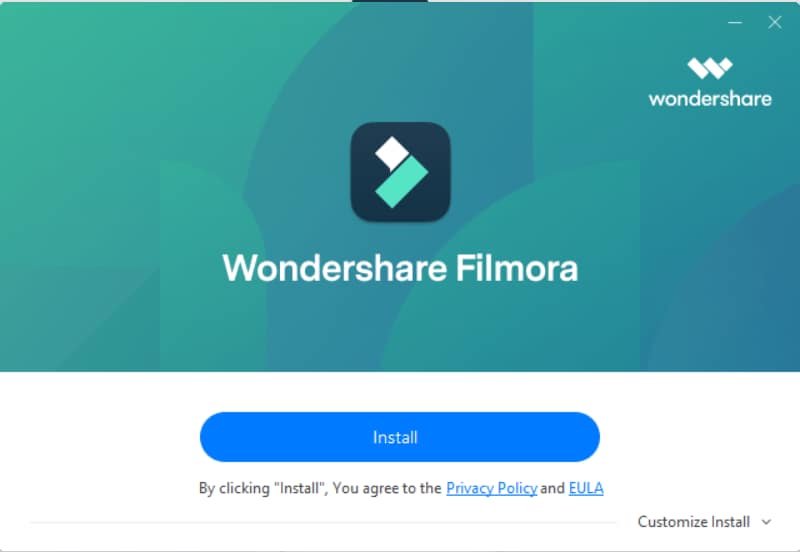
● You can observe the installation status on your screen.
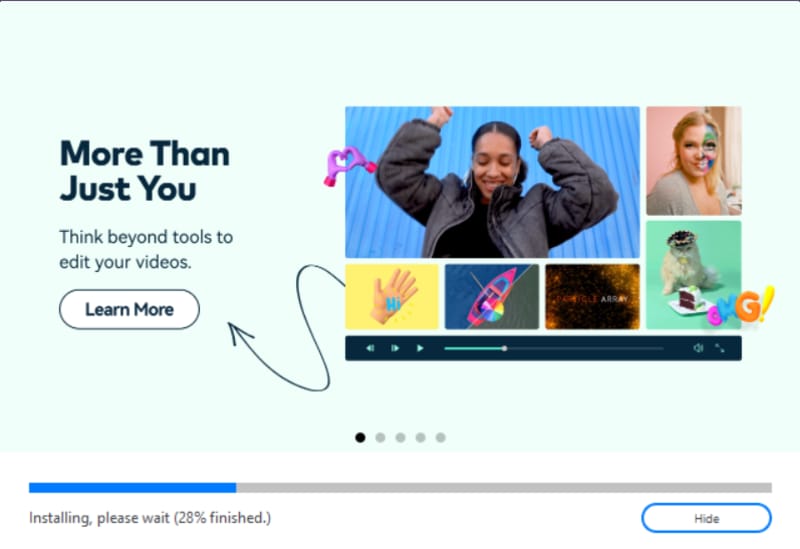
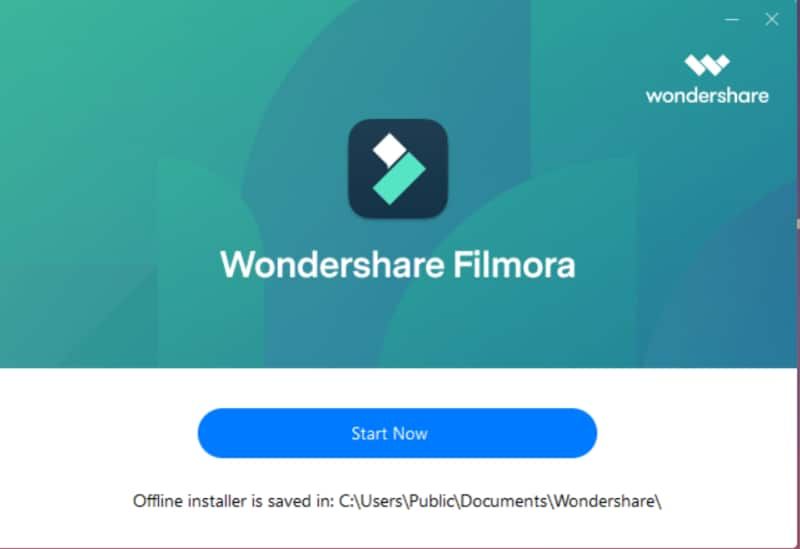
● As the installation is done, click on “Start Now” to open the software on the computer. A new black window will be opened on the screen.
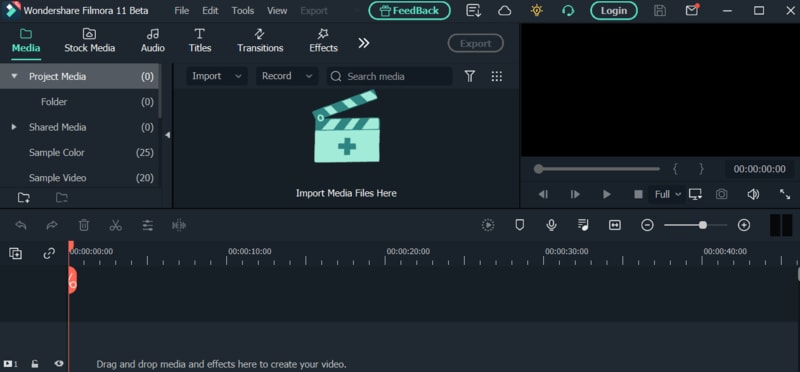
● Click on the “Import Media Files Here” section to select an editable video file or a collection of photos to make the GIF.
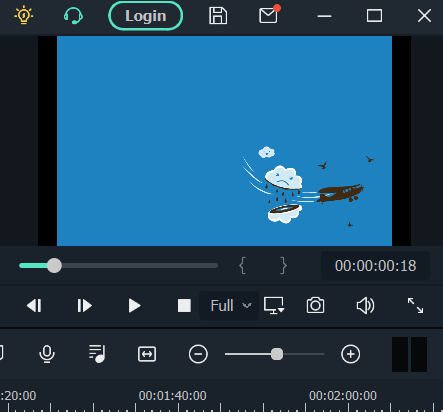
● As you select the desired video or images to make a discord animated icon from, you can find plenty of editing tools in the bottom section of the window. You can “crop”, “edit”, change the “duration” or apply “chroma-key” to the selected file. You can observe the respective changes on the right-hand side of the window.

● When you complete the editing process, move to the right-hand section to play the GIF with the triangular-shaped button. It will give you a preview of your edited GIF for discord.
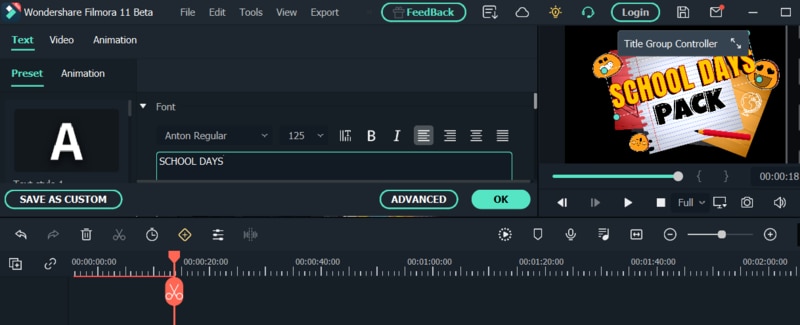
● If you want to add text to your GIF to make it more interactive, it’s possible with Wondershare Filmora. Firstly, select the “T” button or “Title” option from the menubar in the window. There’ll be multiple title templates available. Choose any one of them and click on the green “Down arrow” on the template.
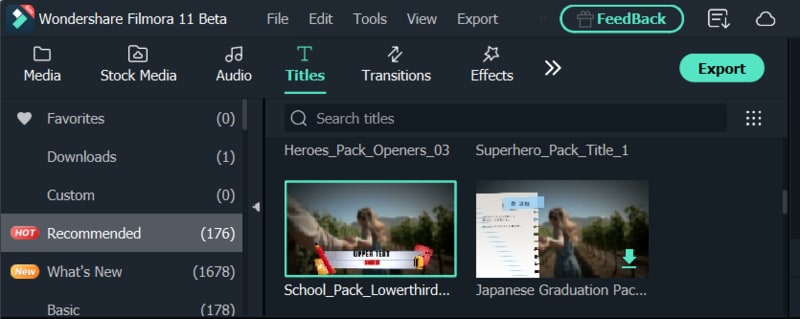
● The template will be loaded and then you can click on the small, green “+” button on the selected template to add it to your GIF. Now, click on the GIF frame to edit the text. Then click on “OK”.
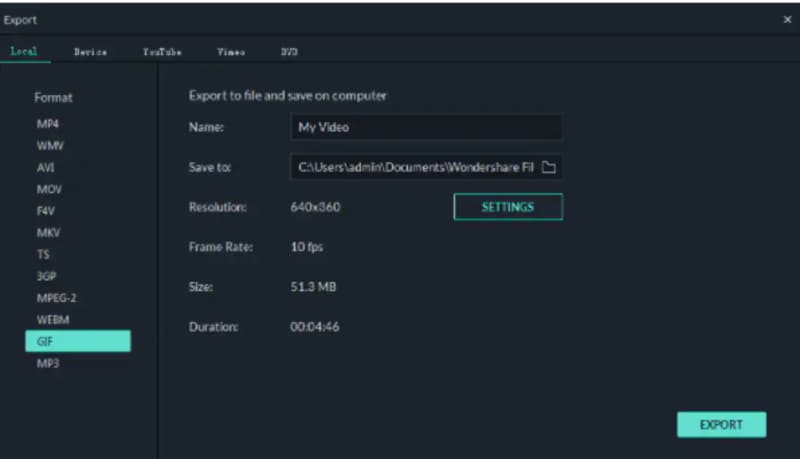
● Now, save the discord icon GIF with a proper gif extension and then upload it as your profile picture.
● Ending Thoughts →
● This article includes three different ways to make discord icons GIF easily to make a customized avatar.
● There’s no need to stick to the old profile picture in your discord account.
● With these quick and easy steps, creating and setting a GIF as a profile icon would be very easy.
The craze to get a personalized Discord animated icon is increasing with time. As it can deliver your favorite vibe to you and your friends, it’s exciting. Moreover, there are so many options in logos to choose from.
But what if you want a Discord GIF icon for your account? Maybe you’ve seen your friends using it and it’s stunning, isn’t it? That’s why this article is containing all the latest and easiest tricks to make the desired GIF icons Discord. Get the three best ways to make your own Discord logo. And let your friends ask you for the secret.
In this article
01 [Why Discord GIF Become Popular Recently?](#Part 1)
02 [How to Make an Animated Discord Logo Icon (Free Template)](#Part 2)
03 [How to Get Animated Discord PFP](#Part 3)
04 [How to Make Your Discord PFP a GIF on Wondershare Filmora](#Part 4)
Part 1 Why Discord GIF Become Popular Recently?
Think of one online entertainment that Discord is not serving right now. It’s hard to get one in mind. From chatting with friends to watching a movie together, from listening to music to playing together, all the entertainment is under a roof. And who doesn’t want the best appearance on such an engaging platform?
On the other hand, animated icons Discord is immensely popular as they can replicate your expression and mood as you want. Normal profile pictures are back-dated now as these GIFs can make the profile more interesting. You can pick any character or Discord animated icon as per your wish. Moreover, many of these are for free. While using these GIFs on multiple online chatting platforms, users can express their exact thoughts behind a message or reaction. Similarly, by using Discord icons GIFs, people can make their profile more lively and personalized.
Not sure of using GIFs? Imagine your Discord profile with your favorite anime character or a suitable clip. On some social media platforms, we need to be formal out of the profession. But on Discord, you can chill, so your profile. So, why not give it a try?
If you’re here to know the quick guide to set your Discord logo GIF or if you’re facing any error while setting the logo, this article will help you in no time.
Part 2 How to Make an Animated Discord Logo Icon (Free Template)
If you have already decided what will be the type of GIF icon Discord you want, that’s great. Otherwise, decide whether you need something funny or relaxed or it depends on a brand. This decision would help you to pick the template. Similarly, you can make the best Discord GIF icon with the following steps.
● To make a GIF with your choice, use this tool and click on “Edit this template”. This will let you make a customized GIF from any video from your personal collection or download from the Internet.

● In the next step, you have to choose the template size from the right-hand side of the window. You can keep to the custom 512x512 size as well.
● Now, on the topmost bar in the window, you can find an option named “Upload”. Click on this option to upload the video from where you want to make your Discord icon GIF.

● You can upload the video from the gallery or drag-and-drop to the uploader window. You can also get videos from Google Drive.
● Now, as the video gets uploaded, you need to edit within the edit window. You can set the frame, time, and size from the tools highlighted in the image.

● Now, from the top-right side of the window, get the “Export Video” button. Click on the green arrow beside the button to get a drop-down list. From there click on the “Export as GIF” button to save your Discord icon GIF.

● You can check the download status from the next window.

● To save the recent GIF, click on “Download”. It will take some seconds to get saved to your system.

● Now, open Discord in your system and right-click on your “Server” icon from the left-hand side of the window. As a drop-down menu appears, select “Server Settings” followed by “Overview”.

● A new window will be opened with the existing profile picture of the server. To add the GIF icon Discord, click on “Upload Image”.

● From the location where you’ve saved the GIF, select it. Then, click on “Apply” to upload the GIF icon to the server profile.

● When uploading is completed, click on the green button named “Save Changes” to save the GIF icons Discord. Make sure that your GIF file size is less than 10.24 MB. Otherwise, you cannot save the GIF and have to resize it again.

Part 3 How to Get Animated Discord PFP
To set an exciting avatar in your Discord profile, you need to go through the following quick steps. Firstly, note that you need to have Discord Nitro to set a Discord logo GIF in your user profile. Without Nitro, GIF cannot be used as a PFP. Get all the answers for how to use Discord Nitro or how to get animated Discord PFP here.
● Open Discord and from the bottom-left side panel, click on the “Gear” icon that is the “User Settings”. It will present beside your user name on the “Home” window itself.

● As the new window gets opened, go to “Discord Nitro” under “Payment Settings”.

● If you don’t have activated Nitro, then click on “Subscribe” to get a suitable subscription to initiate animated icons Discord for your profile.

● Then, you’ll be redirected to the subscription options. Choose “Monthly” or “Yearly” subscription and to confirm it, click “Select”. If you choose the yearly plan, you’ll get an additional 16% off.

● As Discord Nitro is activated after payment and agreeing to the terms and conditions, you can see a pop-up window. Click on “Sweet” to get started.

● To set your profile avatar with GIF icon Discord, you need some GIFs downloaded to your system. So, make your GIF according to the last technique we mentioned. Or you can search for GIFs on the Internet like Giphy”, “Tenor”, or “Gfycat”. Save the GIFs as images to the system.
● Go the the “Gear” icon like the 1st step and open “User Settings”. Then, Go to the second option under user settings, “User Profile”. In this window, you can find a blue button named “Change Avatar”. Click on this button to set the Discord icon GIF.

● Now, you need to find the desired GIF from the “File Explorer” opened. Go to the folder where you saved the GIF file. Then, select it and click on “Open”.

● You can edit the frame of your Discord animated icons in the “edit image’ pop-up window. Then, click on “Apply” to set it finally. If you don’t want to edit the size, click on “Skip” to save the GIF as your profile picture on Discord.

● Check your profile picture now and match it with your expectations. Then click on “Save Changes” to save the icon. If you want some changes, click on “Change Avatar” and select any GIF from the saved discord icons GIF from the file explorer.

Part 4 How to Make Your Discord PFP a GIF on Wondershare Filmora
Wondershare Filmora Video Editor is the latest software where you can create a GIF easily to set as a discord GIF icon. Instead of using the same, existing GIFs, you can make your own now. It will help you to make a unique impression and be satisfied with your personalized account. Moreover, this software is just 4 KB in storage size. So, instan5 download and installation is not a problem at all.

Wondershare Filmora - Best Video Editor for Mac/Windows
5,481,435 people have downloaded it.
Build unique custom animations without breaking a sweat.
Focus on creating epic stories and leave the details to Filmora’s auto features.
Start a creative adventure with drag & drop effects and endless possibilities.
Filmora simplifies advanced features to save you time and effort.
Filmora cuts out repetition so you can move on to your next creative breakthrough.
Let’s go through the steps to understand the procedure to make GIF icons discord on Wondershare Filmora.
● Download and Install Wondershare Filmora in your system. It won’t take more than 10 minutes for the complete installation process. This software is available for both Windows and Mac OS.

● You can observe the installation status on your screen.

● As the installation is done, click on “Start Now” to open the software on the computer. A new black window will be opened on the screen.

● Click on the “Import Media Files Here” section to select an editable video file or a collection of photos to make the GIF.

● As you select the desired video or images to make a discord animated icon from, you can find plenty of editing tools in the bottom section of the window. You can “crop”, “edit”, change the “duration” or apply “chroma-key” to the selected file. You can observe the respective changes on the right-hand side of the window.

● When you complete the editing process, move to the right-hand section to play the GIF with the triangular-shaped button. It will give you a preview of your edited GIF for discord.

● If you want to add text to your GIF to make it more interactive, it’s possible with Wondershare Filmora. Firstly, select the “T” button or “Title” option from the menubar in the window. There’ll be multiple title templates available. Choose any one of them and click on the green “Down arrow” on the template.

● The template will be loaded and then you can click on the small, green “+” button on the selected template to add it to your GIF. Now, click on the GIF frame to edit the text. Then click on “OK”.

● Now, save the discord icon GIF with a proper gif extension and then upload it as your profile picture.

● Ending Thoughts →
● This article includes three different ways to make discord icons GIF easily to make a customized avatar.
● There’s no need to stick to the old profile picture in your discord account.
● With these quick and easy steps, creating and setting a GIF as a profile icon would be very easy.
The craze to get a personalized Discord animated icon is increasing with time. As it can deliver your favorite vibe to you and your friends, it’s exciting. Moreover, there are so many options in logos to choose from.
But what if you want a Discord GIF icon for your account? Maybe you’ve seen your friends using it and it’s stunning, isn’t it? That’s why this article is containing all the latest and easiest tricks to make the desired GIF icons Discord. Get the three best ways to make your own Discord logo. And let your friends ask you for the secret.
In this article
01 [Why Discord GIF Become Popular Recently?](#Part 1)
02 [How to Make an Animated Discord Logo Icon (Free Template)](#Part 2)
03 [How to Get Animated Discord PFP](#Part 3)
04 [How to Make Your Discord PFP a GIF on Wondershare Filmora](#Part 4)
Part 1 Why Discord GIF Become Popular Recently?
Think of one online entertainment that Discord is not serving right now. It’s hard to get one in mind. From chatting with friends to watching a movie together, from listening to music to playing together, all the entertainment is under a roof. And who doesn’t want the best appearance on such an engaging platform?
On the other hand, animated icons Discord is immensely popular as they can replicate your expression and mood as you want. Normal profile pictures are back-dated now as these GIFs can make the profile more interesting. You can pick any character or Discord animated icon as per your wish. Moreover, many of these are for free. While using these GIFs on multiple online chatting platforms, users can express their exact thoughts behind a message or reaction. Similarly, by using Discord icons GIFs, people can make their profile more lively and personalized.
Not sure of using GIFs? Imagine your Discord profile with your favorite anime character or a suitable clip. On some social media platforms, we need to be formal out of the profession. But on Discord, you can chill, so your profile. So, why not give it a try?
If you’re here to know the quick guide to set your Discord logo GIF or if you’re facing any error while setting the logo, this article will help you in no time.
Part 2 How to Make an Animated Discord Logo Icon (Free Template)
If you have already decided what will be the type of GIF icon Discord you want, that’s great. Otherwise, decide whether you need something funny or relaxed or it depends on a brand. This decision would help you to pick the template. Similarly, you can make the best Discord GIF icon with the following steps.
● To make a GIF with your choice, use this tool and click on “Edit this template”. This will let you make a customized GIF from any video from your personal collection or download from the Internet.

● In the next step, you have to choose the template size from the right-hand side of the window. You can keep to the custom 512x512 size as well.
● Now, on the topmost bar in the window, you can find an option named “Upload”. Click on this option to upload the video from where you want to make your Discord icon GIF.

● You can upload the video from the gallery or drag-and-drop to the uploader window. You can also get videos from Google Drive.
● Now, as the video gets uploaded, you need to edit within the edit window. You can set the frame, time, and size from the tools highlighted in the image.

● Now, from the top-right side of the window, get the “Export Video” button. Click on the green arrow beside the button to get a drop-down list. From there click on the “Export as GIF” button to save your Discord icon GIF.

● You can check the download status from the next window.

● To save the recent GIF, click on “Download”. It will take some seconds to get saved to your system.

● Now, open Discord in your system and right-click on your “Server” icon from the left-hand side of the window. As a drop-down menu appears, select “Server Settings” followed by “Overview”.

● A new window will be opened with the existing profile picture of the server. To add the GIF icon Discord, click on “Upload Image”.

● From the location where you’ve saved the GIF, select it. Then, click on “Apply” to upload the GIF icon to the server profile.

● When uploading is completed, click on the green button named “Save Changes” to save the GIF icons Discord. Make sure that your GIF file size is less than 10.24 MB. Otherwise, you cannot save the GIF and have to resize it again.

Part 3 How to Get Animated Discord PFP
To set an exciting avatar in your Discord profile, you need to go through the following quick steps. Firstly, note that you need to have Discord Nitro to set a Discord logo GIF in your user profile. Without Nitro, GIF cannot be used as a PFP. Get all the answers for how to use Discord Nitro or how to get animated Discord PFP here.
● Open Discord and from the bottom-left side panel, click on the “Gear” icon that is the “User Settings”. It will present beside your user name on the “Home” window itself.

● As the new window gets opened, go to “Discord Nitro” under “Payment Settings”.

● If you don’t have activated Nitro, then click on “Subscribe” to get a suitable subscription to initiate animated icons Discord for your profile.

● Then, you’ll be redirected to the subscription options. Choose “Monthly” or “Yearly” subscription and to confirm it, click “Select”. If you choose the yearly plan, you’ll get an additional 16% off.

● As Discord Nitro is activated after payment and agreeing to the terms and conditions, you can see a pop-up window. Click on “Sweet” to get started.

● To set your profile avatar with GIF icon Discord, you need some GIFs downloaded to your system. So, make your GIF according to the last technique we mentioned. Or you can search for GIFs on the Internet like Giphy”, “Tenor”, or “Gfycat”. Save the GIFs as images to the system.
● Go the the “Gear” icon like the 1st step and open “User Settings”. Then, Go to the second option under user settings, “User Profile”. In this window, you can find a blue button named “Change Avatar”. Click on this button to set the Discord icon GIF.

● Now, you need to find the desired GIF from the “File Explorer” opened. Go to the folder where you saved the GIF file. Then, select it and click on “Open”.

● You can edit the frame of your Discord animated icons in the “edit image’ pop-up window. Then, click on “Apply” to set it finally. If you don’t want to edit the size, click on “Skip” to save the GIF as your profile picture on Discord.

● Check your profile picture now and match it with your expectations. Then click on “Save Changes” to save the icon. If you want some changes, click on “Change Avatar” and select any GIF from the saved discord icons GIF from the file explorer.

Part 4 How to Make Your Discord PFP a GIF on Wondershare Filmora
Wondershare Filmora Video Editor is the latest software where you can create a GIF easily to set as a discord GIF icon. Instead of using the same, existing GIFs, you can make your own now. It will help you to make a unique impression and be satisfied with your personalized account. Moreover, this software is just 4 KB in storage size. So, instan5 download and installation is not a problem at all.

Wondershare Filmora - Best Video Editor for Mac/Windows
5,481,435 people have downloaded it.
Build unique custom animations without breaking a sweat.
Focus on creating epic stories and leave the details to Filmora’s auto features.
Start a creative adventure with drag & drop effects and endless possibilities.
Filmora simplifies advanced features to save you time and effort.
Filmora cuts out repetition so you can move on to your next creative breakthrough.
Let’s go through the steps to understand the procedure to make GIF icons discord on Wondershare Filmora.
● Download and Install Wondershare Filmora in your system. It won’t take more than 10 minutes for the complete installation process. This software is available for both Windows and Mac OS.

● You can observe the installation status on your screen.

● As the installation is done, click on “Start Now” to open the software on the computer. A new black window will be opened on the screen.

● Click on the “Import Media Files Here” section to select an editable video file or a collection of photos to make the GIF.

● As you select the desired video or images to make a discord animated icon from, you can find plenty of editing tools in the bottom section of the window. You can “crop”, “edit”, change the “duration” or apply “chroma-key” to the selected file. You can observe the respective changes on the right-hand side of the window.

● When you complete the editing process, move to the right-hand section to play the GIF with the triangular-shaped button. It will give you a preview of your edited GIF for discord.

● If you want to add text to your GIF to make it more interactive, it’s possible with Wondershare Filmora. Firstly, select the “T” button or “Title” option from the menubar in the window. There’ll be multiple title templates available. Choose any one of them and click on the green “Down arrow” on the template.

● The template will be loaded and then you can click on the small, green “+” button on the selected template to add it to your GIF. Now, click on the GIF frame to edit the text. Then click on “OK”.

● Now, save the discord icon GIF with a proper gif extension and then upload it as your profile picture.

● Ending Thoughts →
● This article includes three different ways to make discord icons GIF easily to make a customized avatar.
● There’s no need to stick to the old profile picture in your discord account.
● With these quick and easy steps, creating and setting a GIF as a profile icon would be very easy.
The craze to get a personalized Discord animated icon is increasing with time. As it can deliver your favorite vibe to you and your friends, it’s exciting. Moreover, there are so many options in logos to choose from.
But what if you want a Discord GIF icon for your account? Maybe you’ve seen your friends using it and it’s stunning, isn’t it? That’s why this article is containing all the latest and easiest tricks to make the desired GIF icons Discord. Get the three best ways to make your own Discord logo. And let your friends ask you for the secret.
In this article
01 [Why Discord GIF Become Popular Recently?](#Part 1)
02 [How to Make an Animated Discord Logo Icon (Free Template)](#Part 2)
03 [How to Get Animated Discord PFP](#Part 3)
04 [How to Make Your Discord PFP a GIF on Wondershare Filmora](#Part 4)
Part 1 Why Discord GIF Become Popular Recently?
Think of one online entertainment that Discord is not serving right now. It’s hard to get one in mind. From chatting with friends to watching a movie together, from listening to music to playing together, all the entertainment is under a roof. And who doesn’t want the best appearance on such an engaging platform?
On the other hand, animated icons Discord is immensely popular as they can replicate your expression and mood as you want. Normal profile pictures are back-dated now as these GIFs can make the profile more interesting. You can pick any character or Discord animated icon as per your wish. Moreover, many of these are for free. While using these GIFs on multiple online chatting platforms, users can express their exact thoughts behind a message or reaction. Similarly, by using Discord icons GIFs, people can make their profile more lively and personalized.
Not sure of using GIFs? Imagine your Discord profile with your favorite anime character or a suitable clip. On some social media platforms, we need to be formal out of the profession. But on Discord, you can chill, so your profile. So, why not give it a try?
If you’re here to know the quick guide to set your Discord logo GIF or if you’re facing any error while setting the logo, this article will help you in no time.
Part 2 How to Make an Animated Discord Logo Icon (Free Template)
If you have already decided what will be the type of GIF icon Discord you want, that’s great. Otherwise, decide whether you need something funny or relaxed or it depends on a brand. This decision would help you to pick the template. Similarly, you can make the best Discord GIF icon with the following steps.
● To make a GIF with your choice, use this tool and click on “Edit this template”. This will let you make a customized GIF from any video from your personal collection or download from the Internet.

● In the next step, you have to choose the template size from the right-hand side of the window. You can keep to the custom 512x512 size as well.
● Now, on the topmost bar in the window, you can find an option named “Upload”. Click on this option to upload the video from where you want to make your Discord icon GIF.

● You can upload the video from the gallery or drag-and-drop to the uploader window. You can also get videos from Google Drive.
● Now, as the video gets uploaded, you need to edit within the edit window. You can set the frame, time, and size from the tools highlighted in the image.

● Now, from the top-right side of the window, get the “Export Video” button. Click on the green arrow beside the button to get a drop-down list. From there click on the “Export as GIF” button to save your Discord icon GIF.

● You can check the download status from the next window.

● To save the recent GIF, click on “Download”. It will take some seconds to get saved to your system.

● Now, open Discord in your system and right-click on your “Server” icon from the left-hand side of the window. As a drop-down menu appears, select “Server Settings” followed by “Overview”.

● A new window will be opened with the existing profile picture of the server. To add the GIF icon Discord, click on “Upload Image”.

● From the location where you’ve saved the GIF, select it. Then, click on “Apply” to upload the GIF icon to the server profile.

● When uploading is completed, click on the green button named “Save Changes” to save the GIF icons Discord. Make sure that your GIF file size is less than 10.24 MB. Otherwise, you cannot save the GIF and have to resize it again.

Part 3 How to Get Animated Discord PFP
To set an exciting avatar in your Discord profile, you need to go through the following quick steps. Firstly, note that you need to have Discord Nitro to set a Discord logo GIF in your user profile. Without Nitro, GIF cannot be used as a PFP. Get all the answers for how to use Discord Nitro or how to get animated Discord PFP here.
● Open Discord and from the bottom-left side panel, click on the “Gear” icon that is the “User Settings”. It will present beside your user name on the “Home” window itself.

● As the new window gets opened, go to “Discord Nitro” under “Payment Settings”.

● If you don’t have activated Nitro, then click on “Subscribe” to get a suitable subscription to initiate animated icons Discord for your profile.

● Then, you’ll be redirected to the subscription options. Choose “Monthly” or “Yearly” subscription and to confirm it, click “Select”. If you choose the yearly plan, you’ll get an additional 16% off.

● As Discord Nitro is activated after payment and agreeing to the terms and conditions, you can see a pop-up window. Click on “Sweet” to get started.

● To set your profile avatar with GIF icon Discord, you need some GIFs downloaded to your system. So, make your GIF according to the last technique we mentioned. Or you can search for GIFs on the Internet like Giphy”, “Tenor”, or “Gfycat”. Save the GIFs as images to the system.
● Go the the “Gear” icon like the 1st step and open “User Settings”. Then, Go to the second option under user settings, “User Profile”. In this window, you can find a blue button named “Change Avatar”. Click on this button to set the Discord icon GIF.

● Now, you need to find the desired GIF from the “File Explorer” opened. Go to the folder where you saved the GIF file. Then, select it and click on “Open”.

● You can edit the frame of your Discord animated icons in the “edit image’ pop-up window. Then, click on “Apply” to set it finally. If you don’t want to edit the size, click on “Skip” to save the GIF as your profile picture on Discord.

● Check your profile picture now and match it with your expectations. Then click on “Save Changes” to save the icon. If you want some changes, click on “Change Avatar” and select any GIF from the saved discord icons GIF from the file explorer.

Part 4 How to Make Your Discord PFP a GIF on Wondershare Filmora
Wondershare Filmora Video Editor is the latest software where you can create a GIF easily to set as a discord GIF icon. Instead of using the same, existing GIFs, you can make your own now. It will help you to make a unique impression and be satisfied with your personalized account. Moreover, this software is just 4 KB in storage size. So, instan5 download and installation is not a problem at all.

Wondershare Filmora - Best Video Editor for Mac/Windows
5,481,435 people have downloaded it.
Build unique custom animations without breaking a sweat.
Focus on creating epic stories and leave the details to Filmora’s auto features.
Start a creative adventure with drag & drop effects and endless possibilities.
Filmora simplifies advanced features to save you time and effort.
Filmora cuts out repetition so you can move on to your next creative breakthrough.
Let’s go through the steps to understand the procedure to make GIF icons discord on Wondershare Filmora.
● Download and Install Wondershare Filmora in your system. It won’t take more than 10 minutes for the complete installation process. This software is available for both Windows and Mac OS.

● You can observe the installation status on your screen.

● As the installation is done, click on “Start Now” to open the software on the computer. A new black window will be opened on the screen.

● Click on the “Import Media Files Here” section to select an editable video file or a collection of photos to make the GIF.

● As you select the desired video or images to make a discord animated icon from, you can find plenty of editing tools in the bottom section of the window. You can “crop”, “edit”, change the “duration” or apply “chroma-key” to the selected file. You can observe the respective changes on the right-hand side of the window.

● When you complete the editing process, move to the right-hand section to play the GIF with the triangular-shaped button. It will give you a preview of your edited GIF for discord.

● If you want to add text to your GIF to make it more interactive, it’s possible with Wondershare Filmora. Firstly, select the “T” button or “Title” option from the menubar in the window. There’ll be multiple title templates available. Choose any one of them and click on the green “Down arrow” on the template.

● The template will be loaded and then you can click on the small, green “+” button on the selected template to add it to your GIF. Now, click on the GIF frame to edit the text. Then click on “OK”.

● Now, save the discord icon GIF with a proper gif extension and then upload it as your profile picture.

● Ending Thoughts →
● This article includes three different ways to make discord icons GIF easily to make a customized avatar.
● There’s no need to stick to the old profile picture in your discord account.
● With these quick and easy steps, creating and setting a GIF as a profile icon would be very easy.
Also read:
- How to Create an Adobe Slideshow the Easy Way
- Updated 3GP Video Format What Is 3GP Format And How To Open It, In 2024
- Are You Looking to Vlog Across Your Next Stop at the Café? Get Aware of the Significant Elements that Make up the Café Vlog
- Updated 2024 Approved Guide Create The Perfect VHS Effect Look in Premiere Pro
- In 2024, Learn Color Correction in After Effects with These Videos
- New 2024 Approved Steps to Rotate Videos in Lightworks
- Updated Ever Wondered About the Similarity You Bear with an Anime Character? If You Have Not yet Looked Into This Exciting Aspect of Motion Graphic Design, You Can Very Well Break the Ice Here
- New In 2024, 8 Free Photo Collage with Music Video Maker
- How to Use Rule of Thirds in Video
- New 2024 Approved Gif to Svg, Svg to Gif, Convert Gif to Svg, Animated Svg to Gif, Convert Svg to Gif, Svg to Gif Converter, Svg to Gif Animation, Svg Animation to Gif, Gif to Svg Converter
- Updated 2024 Approved Top 10 Old Film Overlays to Make Your Videos Look Vintage
- Detailed Guide to the Best Convertors for Turning GIF Into PDF Files. Know Their Features, Pros, Cons, and More for 2024
- 4 Ways to Add White Borders on Mobile and Desktop for 2024
- 2024 Approved Creative Ways to Add Green Screen Effects In Photoshop
- 10+ Top Unlimited FCPX Slideshow Templates
- Updated In 2024, In This Guidepost, Youll Learn What an HDRI Photo Is and How to Use the Best Free HDRI Program to Edit Photos. Youll Also Know the Difference Between HDR and HDRI
- New How Can I Control Speed of a Video for 2024
- New Add Background to Video With/Without a Green Screen
- Updated 2024 Approved 9 Best Sparkle Effects Photo and Video Editors You Should Know
- Pokemon Go Error 12 Failed to Detect Location On Vivo S17 Pro? | Dr.fone
- Which Pokémon can Evolve with a Moon Stone For Honor Magic 5 Lite? | Dr.fone
- In 2024, How to Unlock Disabled iPhone 15 Pro Max/iPad Without Computer | Dr.fone
- In 2024, How to Send and Fake Live Location on Facebook Messenger Of your Motorola Razr 40 Ultra | Dr.fone
- How to Change your Motorola Razr 40 Location on Twitter | Dr.fone
- In 2024, Ultimate Guide to Catch the Regional-Located Pokemon For Apple iPhone XS | Dr.fone
- In 2024, Ways to trade pokemon go from far away On Oppo Reno 9A? | Dr.fone
- How to Mirror Your Nokia C210 Screen to PC with Chromecast | Dr.fone
- In 2024, A Step-by-Step Guide on Using ADB and Fastboot to Remove FRP Lock from your HTC U23 Pro
- Video Fixer Software for all Corrupt Videos of Huawei Mate X5
- Complete Tutorial for Tecno Phantom V Fold Hard Reset | Dr.fone
- 9 Mind-Blowing Tricks to Hatch Eggs in Pokemon Go Without Walking On Xiaomi Redmi 13C 5G | Dr.fone
- How to Restore Deleted Samsung Galaxy S24+ Photos An Easy Method Explained.
- In 2024, 5 Easy Ways to Copy Contacts from Vivo X100 to iPhone 14 and 15 | Dr.fone
- All About Factory Reset, What Is It and What It Does to Your Poco F5 Pro 5G? | Dr.fone
- Title: New Learn How to Create a Unique Repeated Text Animation in the Filmora Video Editor. Follow the Simple Step-by-Step Instructions for 2024
- Author: Morgan
- Created at : 2024-04-24 01:10:30
- Updated at : 2024-04-25 01:10:30
- Link: https://ai-video-editing.techidaily.com/new-learn-how-to-create-a-unique-repeated-text-animation-in-the-filmora-video-editor-follow-the-simple-step-by-step-instructions-for-2024/
- License: This work is licensed under CC BY-NC-SA 4.0.


