
New Master Premiere Pro Custom Sequence Presets

Master Premiere Pro: Custom Sequence Presets
You’ve probably heard of Adobe Premiere Pro – it’s a top-tier video editing software that’s widely recognized in the market. But have you delved into the nitty-gritty of sequence presets? A custom sequence preset is your best friend for maintaining consistency across projects.
It allows users to save specific settings for sequence attributes like frame rate, resolution, and audio settings. Instead of reconfiguring these settings for each new project, a custom sequence preset lets you jump right into editing. Now, how do you create one? Keep reading!
Part 1: How to Create a Custom Sequence in Premiere Pro
Creating a custom sequence is like tailoring a shirt to fit you perfectly. Here’s a step-by-step guide to help you do just that:
Step 1: Displays the New Sequence Window
Begin by launching Adobe Premiere Pro. Once opened, navigate to the top menu and select File > New > Sequence. This will open up the New Sequence window, where all the magic happens!
Step 2: Change the Editing Mode to Custom in the Settings Panel
You’ll see several tabs in the New Sequence window, but we will focus on the “Settings” tab for our purposes. Click on it.
Here, you’ll find the ‘Editing Mode’ dropdown menu. By default, it’s set to a specific format like ‘DSLR’ or ‘AVCHD.’ Change this to ‘Custom.’ This will unlock a plethora of options for you to play with.
Deep Dive into Settings:
- Frame Size: Define your video’s width and height. Remember, 1920x1080 is Full HD, and 3840x2160 is 4K. Choose based on your project needs.
- Frame Rate: 24fps is the cinematic standard, but if you’re creating content for TV or web, 30fps or 60fps might be more suitable.
- Pixel Aspect Ratio: Stick with ‘Square Pixels’ unless you have a specific reason to do otherwise.
- Fields: Choose ‘No Fields’ for progressive footage. If you’re unsure, this is a safe bet.
- Audio Settings: Here, you can configure the sample rate, among other things. 48000Hz is standard for video.
Step 3: Give the New Preset a Name and Save It
Once you’ve customized the settings to your satisfaction, it’s time to save this configuration for future use. At the bottom of the New Sequence window, you’ll see a ‘Save Preset’ button. Click on it.
A pop-up window will show up, requesting you to provide a name for your new preset. Choose something descriptive so you can easily recognize it later. Once named, click ‘OK’.
Your custom sequence preset is now saved and will appear under the ‘Custom’ folder in the ‘Sequence Presets’ tab.
Part 2: Why Custom Sequence Presets are Essential for Efficient Editing
As you delve deeper into video editing, you’ll begin to appreciate the little things that shave off minutes from your workflow, allowing you to dedicate more time to the creative process. This is precisely where the utility of custom sequence presets in Premiere Pro comes into play. But why are these presets so crucial?
- Consistency Across Projects: If you’re managing multiple projects or a series of videos, having a standard format ensures that all your content has a uniform look and feel. Consistency is a hallmark of professional-grade content. It’s not just about the visuals – maintaining a uniform audio quality and format is equally significant. With a preset, you no longer need to remember the minutiae of each setting, ensuring consistency effortlessly.
- Speed Up Your Workflow: Every minute you spend adjusting the sequence settings is a minute less you have for cutting, color correcting, audio mixing, or adding those special effects that make your videos pop. Over time, those minutes can add up to hours. By using a custom sequence preset, you can jump straight into the creative part of editing without the preliminary setup.
- Avoid Common Mistakes: Have you ever rendered an entire project only to find that the frame rate was off or the audio was set to the wrong sample rate? These kinds of errors can occur when setting up a new sequence from scratch each time. By relying on a preset, you mitigate the risks of such oversights.
- Personalized Templates for Different Platforms: Different platforms may have varying preferred settings. For instance, the ideal video format for YouTube might differ from that of Instagram or TikTok. Instead of Googling these settings each time, you can have a custom sequence preset ready for each platform, ensuring your content is optimized wherever it’s destined.
- Ease of Collaboration: If you’re working as part of a team, having standard sequence presets ensures everyone is on the same page. This is particularly handy when multiple editors are working on different segments of the same project. With custom presets, you’re not just aligning sequences but also visions.
Incorporating this practice into your editing routine might initially seem trivial, but its benefits compound with time.
Part 3: Summary
Creating a custom sequence preset in Adobe Premiere Pro isn’t just about streamlining your workflow – it’s about ensuring consistency across your projects.
By saving your most-used settings, you’re creating a base template that can be pulled up any time, granting you more time for the creative process.
Adobe Premiere Pro’s interface is designed to make tasks like these intuitive, so even if you’re a beginner, with a bit of practice, you’ll be creating custom sequence presets like a pro.
Are You Trying to Make Slow-Mo Videos on Instagram? In This Article, We Will Discuss Top-Rated Ways to Produce Perfect Slow-Motion Videos for Instagram
Do you wish to see your followers on Instagram growing? As an influencer, you can make your content engaging through slow-motion Instagram reels. Slow-motion videos are visually pleasing as they highlight the details. People can easily observe the little movements in slow-motion Instagram videos. Moreover, such videos can showcase your creative skills to the audience.
This guide will explore how to generate professional slow-motion Instagram videos. By following the instructions, you can produce captivating results. Also, it will increase the chances of getting more followers on your Instagram feed.
Slow Motion Video Maker Slow your video’s speed with better control of your keyframes to create unique cinematic effects!
Make A Slow Motion Video Make A Slow Motion Video More Features

Part 1: How Can Slow Motion Videos Be Used in Social Media Content?
Slow-motion videos can be a great addition to your social media platforms. It will insert a cinematic impression into your content. To learn more details, jump to the below part explaining the use of slow motion videos in social media:
1. Displaying Products
Do you want to promote your product? Slow-motion videos can highlight the details of your product in a professional manner. You can display the main features of the product at a slow speed. Moreover, viewers would absorb the information with great ease.
2. Demos and Tutorials
Slow-motion videos can assist you in providing clear demonstrations. Slow-motion tutorials on your social media platform can make your audience understand better. Hence, while producing cooking or DIY videos, slow-motion effects would be valuable.
3. Adds Dramatic Effect
Slow-motion Instagram videos evoke emotions in people. In an action sequence, you can add dramatic effect through slow motion. Furthermore, it can help with the storytelling of your video. This will also help in generating an immersive experience for the audience.
Part 2: Composite Ways To Perform Slow Mo on Instagram
On Instagram, there are different approaches to creating slow-mo videos. Within a few taps, you can reduce the speed of the video on Instagram. This section will highlight the two ways to generate slow-motion Instagram reels.
Way 1: Before Recording the Reel
To create a slow-motion video, you can reduce the speed before recording. To do so, you will need to check the following steps in detail:
Step 1
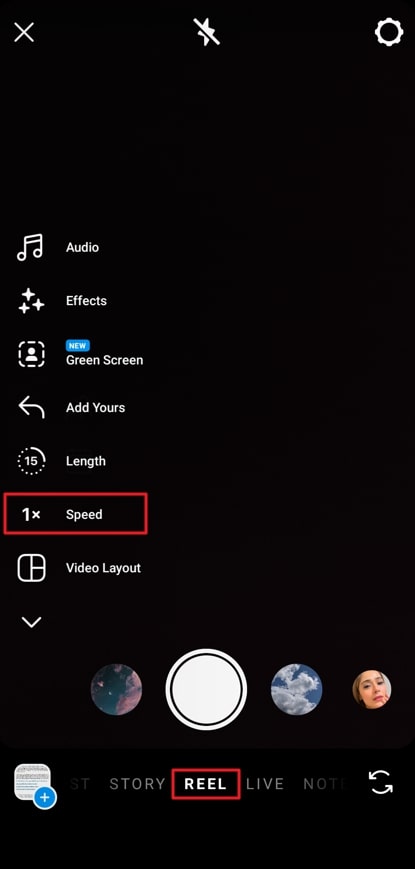
Open your Instagram and swipe from left to right. Select “Reel” from the below options for recording. On the left panel, you can see the options for settings. From there, tap “Speed” to display the further options.
Step 2
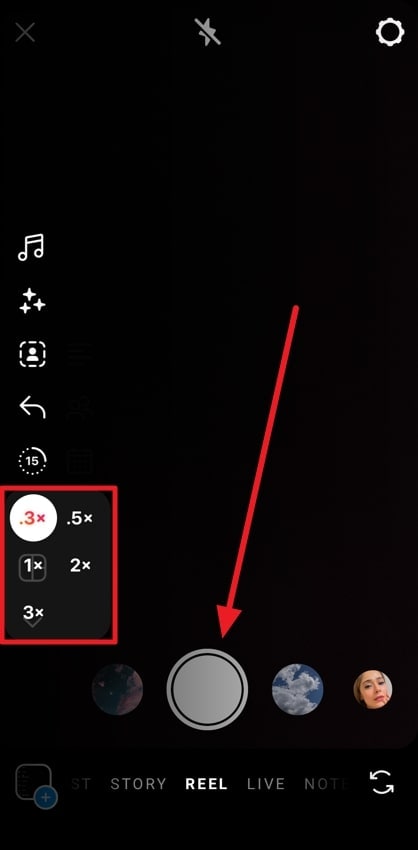
Here, you can choose the lowest speed for slow-mo, which is “0.3x.” Then, tap on the desired speed from the given option. Afterward, press and hold the recording button to capture the video.
Way 2: During Editing Video
Instagram lets you modify the speed of a pre-recorded video. Thus, after recording the video, users can still reduce the speed. Mentioned below are the steps to help you with this process:
Step 1
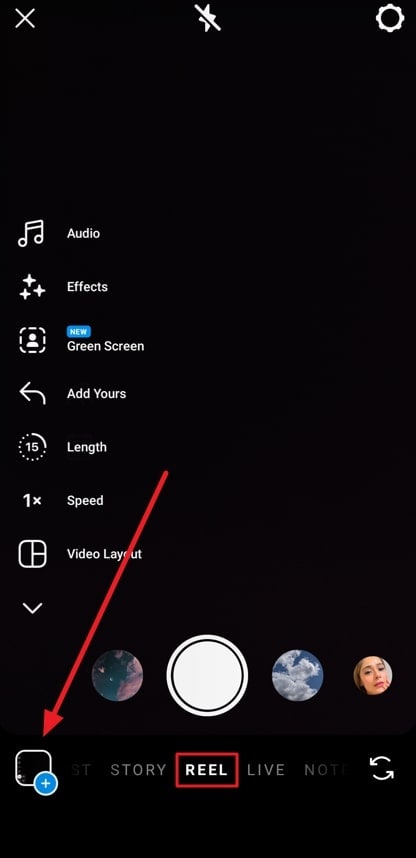
Open your Instagram profile and swipe from left to right. Choose “Reel” from the bottom and select the “Plus” icon given in the bottom-left corner.
Step 2
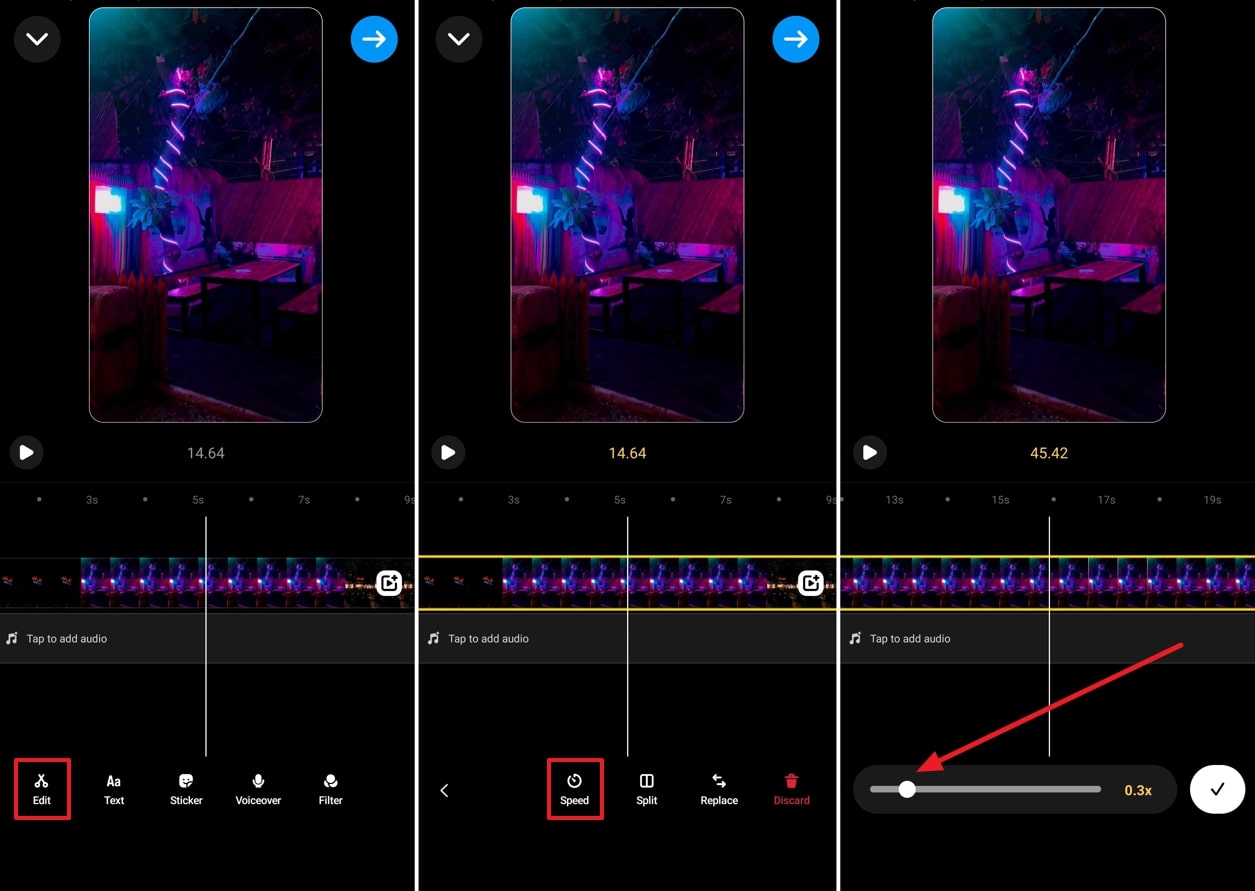
Now, you can select and upload the desired video from your phone to Instagram. Afterward, click the “Edit” option at bottom left side to access further options. Here, select the “Speed” option and then move the slider to reduce the speed and make the video slow mo.
Part 3: Make Video Editing in Slow Mo Easy With Wondershare Filmora
Creating slow-mo reels on Instagram won’t add uniformity to the results. Thus, you should use a third-party tool like Filmora to produce convincing results. With the latest release of Volume 13, this tool has upgraded itself to a massive scale. It includes many AI features that can transform your editing experience. The AI features can finish tasks with great accuracy within a few minutes.
This desktop tool can also generate slow-motion videos with natural results. It does not degrade the frame rate of the video after slow-mo. In fact, it increases the video quality through rendering. Along with slow motion, this tool can add many visual effects. Hence, it’s an all-rounder tool to confront all the requirements for video editing.
Free Download For Win 7 or later(64-bit)
Free Download For macOS 10.14 or later
Methods to Create Slow Motion Instagram Reels with Filmora
On Filmora, there are many ways to create slow-motion Instagram reels. To discover them, jump to the below section:
Method 1: Using Optical Flow in Speed Ramping
Heading to our first method, we will use optical flow to smoothen the video’s slow motion. Let’s get started with the below-mentioned steps:
Step 1Sign in to Create a New Project
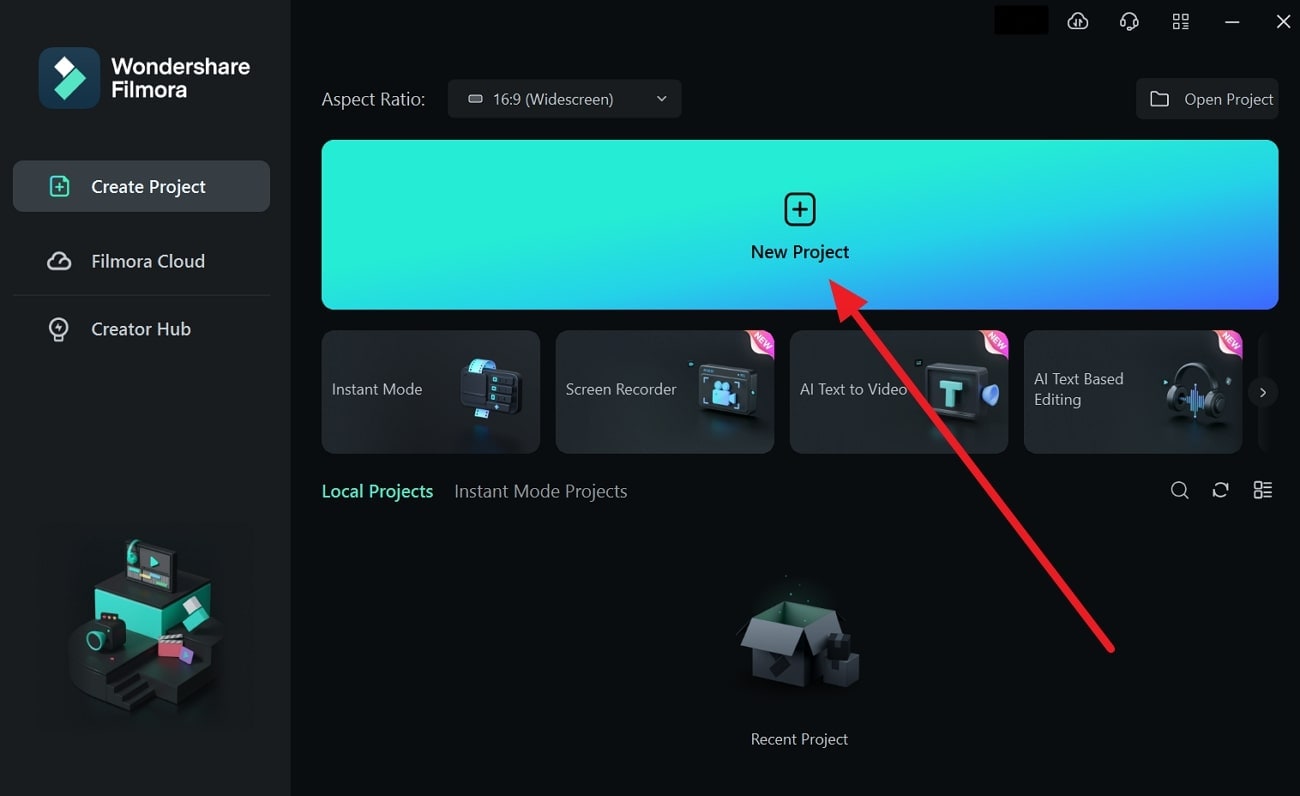
Start by following the on-screen instructions to sign into Filmora. Once logged into this tool, hit the “New Project” option. It will open the main interface of this tool on your screen.
Step 2Import Video to the Timeline
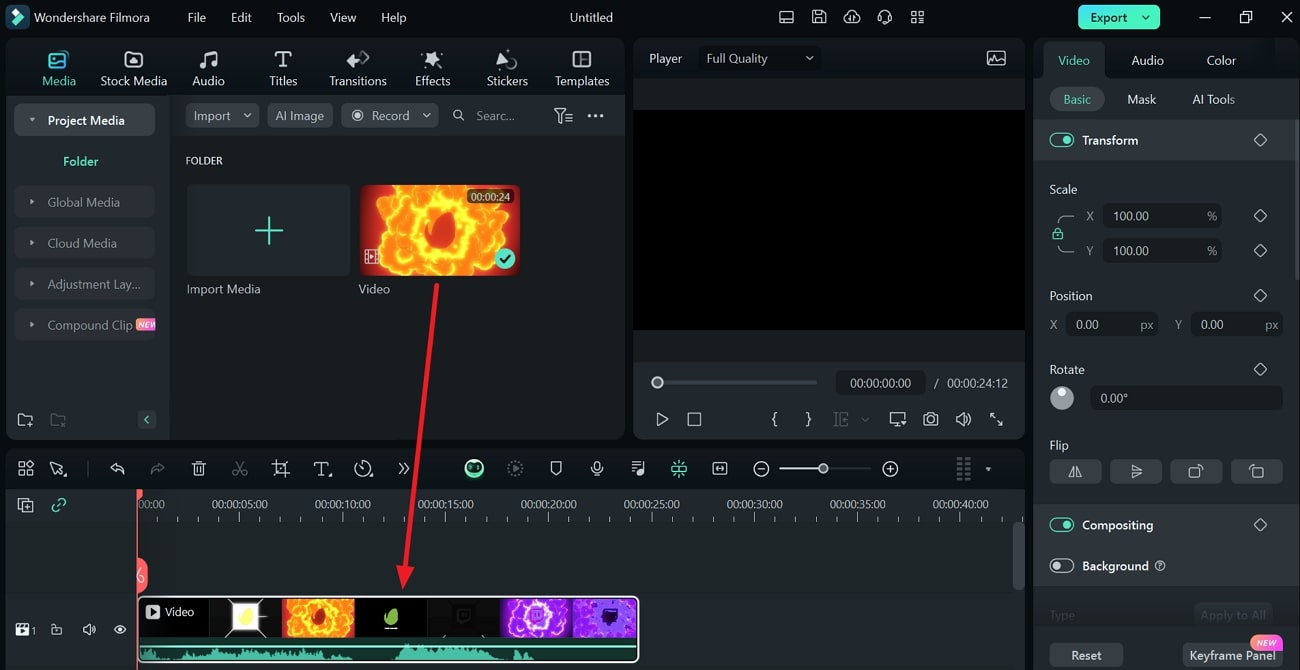
To import the preferred video, press “Ctrl+I”. With this, your video will be uploaded within a time of few minutes. Afterward, drag and drop it to the timeline below.
Step 3Select Uniform Speed
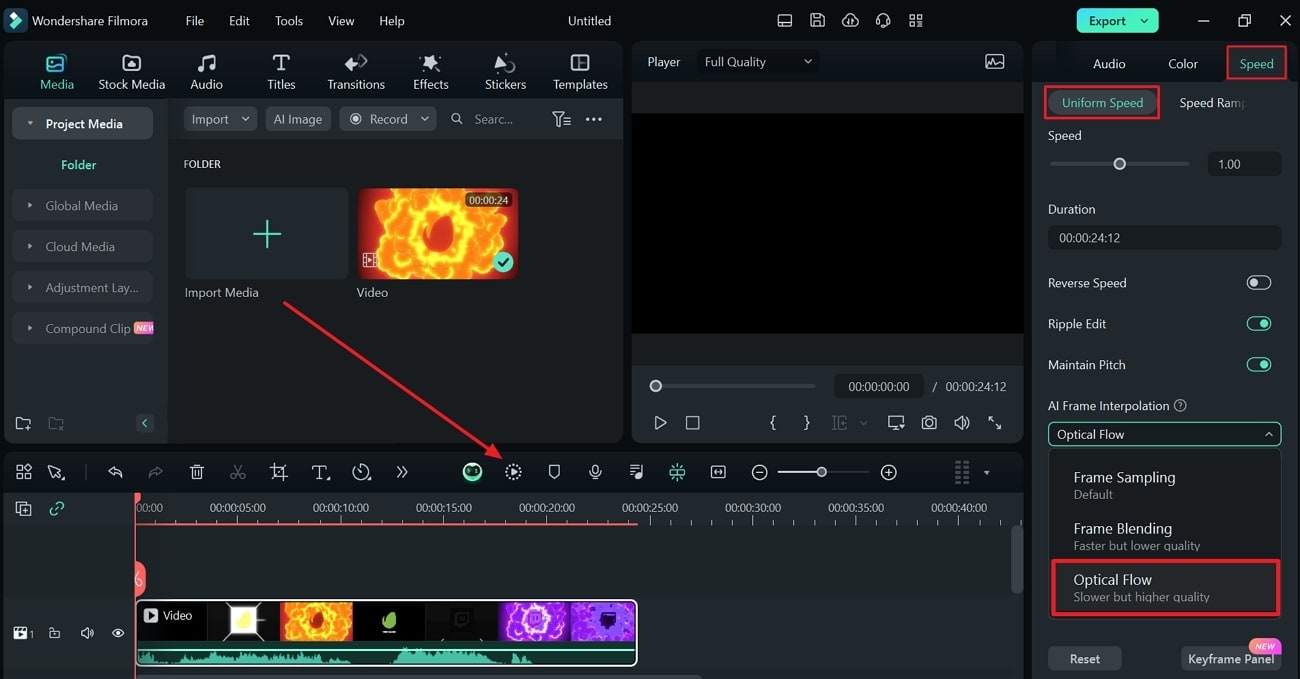
After dropping the video into the timeline, select it with your cursor. Go to the settings given on the right side and choose “Speed”. Select “Uniform Speed” and proceed to extend the settings for “AI Frame Interpolation.” Once done, select the “Optical Flow” option. To generate the final results, choose “Render Preview” from the toolbar of the timeline.
Method 2: Using Uniform Speed
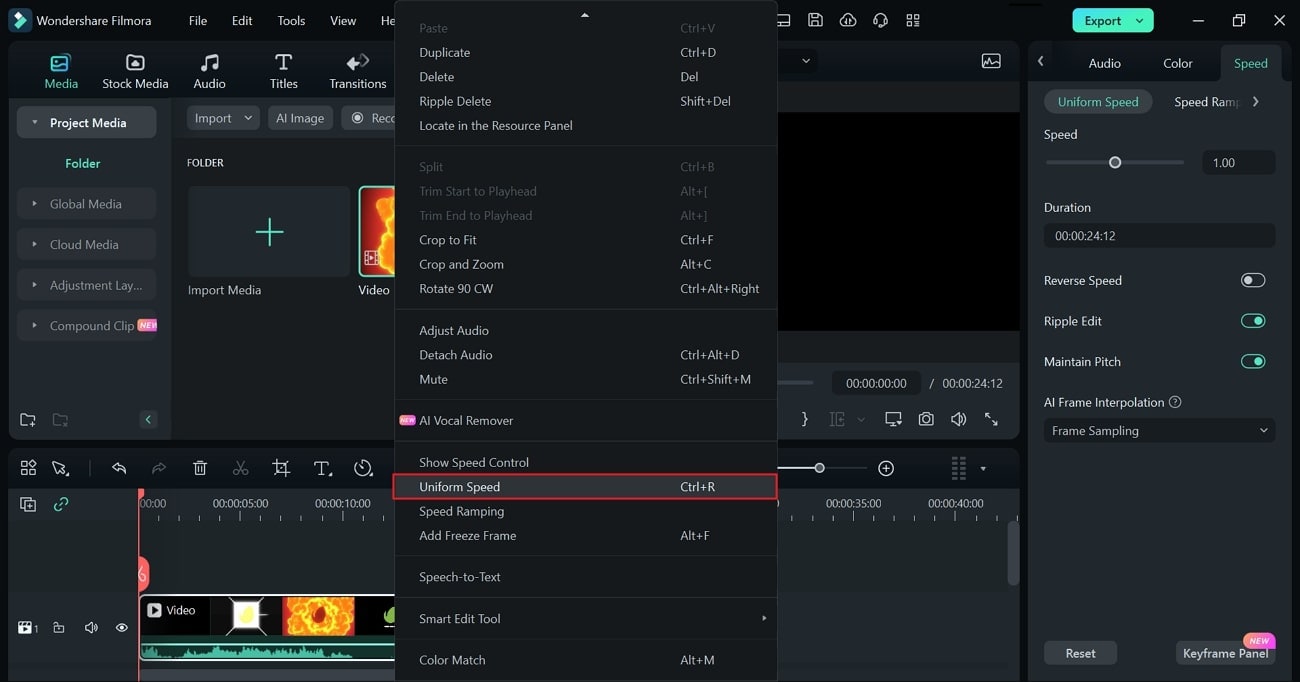
After dragging the video on the timeline, right-click on it. From the pop-up options, select the option called “Uniform Speed”. Once done, follow the instructions given above to conclude the process.
Method 3: Using Toolbar
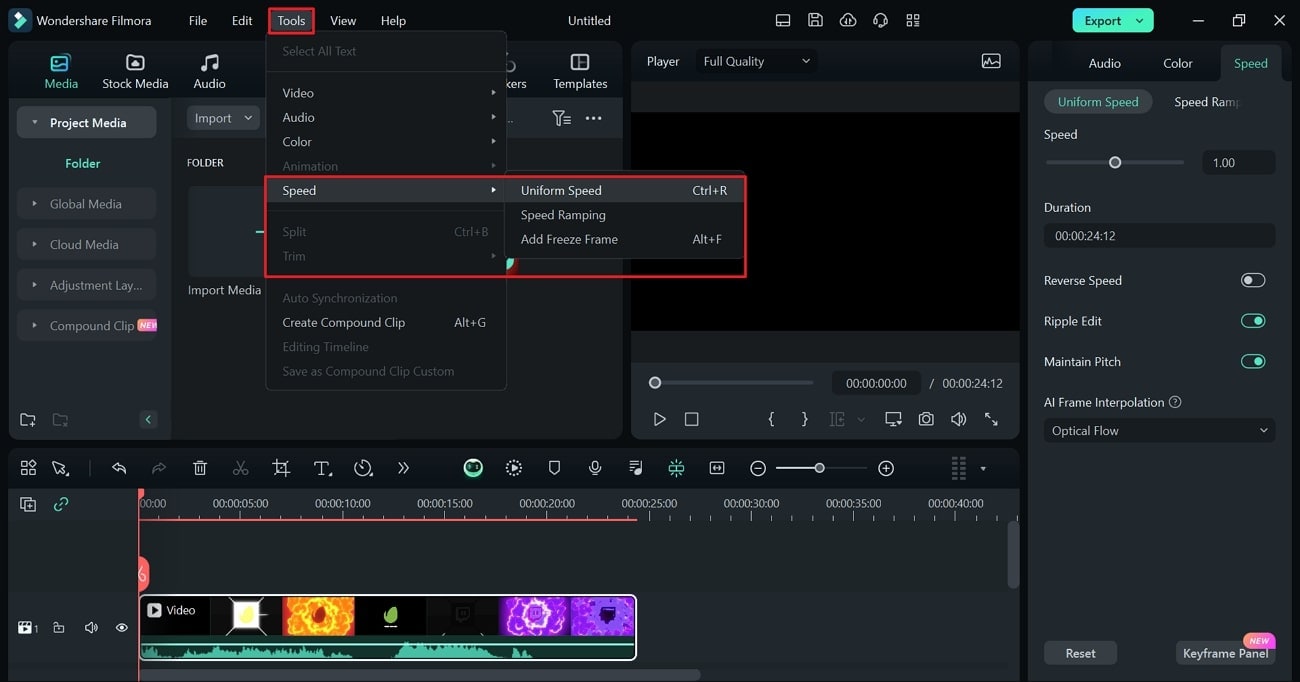
Start by selecting the video clip on the timeline. Once done, head to the “Toolbar” given above and click “Tools”. Now, expand “Speed” and then select “Uniform Speed”. Now, you can follow the steps given above to continue with the process.
Key Features of Wondershare Filmora
AI Thumbnail Creator: This tool observes the three best shots in your video for a thumbnail. Moreover, it contains 58 templates to produce engaging thumbnails for the videos. It also lets you customize the results with text and image editing.
Auto Reframe: Every social media platform has requirements for aspect ratio. With the auto-reframe feature, you can adjust the aspect ratios in an automated way. With this feature, you can convert videos for YouTube shorts, TikTok, and Instagram.
Background Remover: You can replace backgrounds from your video without needing a green screen. By doing so, the tool can make transparent or virtual backgrounds for you. Also, it cuts out images and objects from the background with accuracy.
Color Correction: Do you need to enhance the colors of your video? This tool provides many color correction techniques for videos. It contains over 40 color presets that you can apply to your videos. Also, it allows you to adjust the color gradings and properties with ease.
Conclusion
Slow-motion Instagram videos have higher chances of getting maximum views. Viewers can catch the unique details in such videos efficiently. Moreover, it will help you promote your brand by emphasizing its features. However, Filmora gives the best results in producing slow-motion videos. It uses advanced algorithms to create slow-mo videos without distorting the original quality.
Make A Slow Motion Video Make A Slow Motion Video More Features

Part 1: How Can Slow Motion Videos Be Used in Social Media Content?
Slow-motion videos can be a great addition to your social media platforms. It will insert a cinematic impression into your content. To learn more details, jump to the below part explaining the use of slow motion videos in social media:
1. Displaying Products
Do you want to promote your product? Slow-motion videos can highlight the details of your product in a professional manner. You can display the main features of the product at a slow speed. Moreover, viewers would absorb the information with great ease.
2. Demos and Tutorials
Slow-motion videos can assist you in providing clear demonstrations. Slow-motion tutorials on your social media platform can make your audience understand better. Hence, while producing cooking or DIY videos, slow-motion effects would be valuable.
3. Adds Dramatic Effect
Slow-motion Instagram videos evoke emotions in people. In an action sequence, you can add dramatic effect through slow motion. Furthermore, it can help with the storytelling of your video. This will also help in generating an immersive experience for the audience.
Part 2: Composite Ways To Perform Slow Mo on Instagram
On Instagram, there are different approaches to creating slow-mo videos. Within a few taps, you can reduce the speed of the video on Instagram. This section will highlight the two ways to generate slow-motion Instagram reels.
Way 1: Before Recording the Reel
To create a slow-motion video, you can reduce the speed before recording. To do so, you will need to check the following steps in detail:
Step 1
Open your Instagram and swipe from left to right. Select “Reel” from the below options for recording. On the left panel, you can see the options for settings. From there, tap “Speed” to display the further options.

Step 2
Here, you can choose the lowest speed for slow-mo, which is “0.3x.” Then, tap on the desired speed from the given option. Afterward, press and hold the recording button to capture the video.

Way 2: During Editing Video
Instagram lets you modify the speed of a pre-recorded video. Thus, after recording the video, users can still reduce the speed. Mentioned below are the steps to help you with this process:
Step 1
Open your Instagram profile and swipe from left to right. Choose “Reel” from the bottom and select the “Plus” icon given in the bottom-left corner.

Step 2
Now, you can select and upload the desired video from your phone to Instagram. Afterward, click the “Edit” option at bottom left side to access further options. Here, select the “Speed” option and then move the slider to reduce the speed and make the video slow mo.

Part 3: Make Video Editing in Slow Mo Easy With Wondershare Filmora
Creating slow-mo reels on Instagram won’t add uniformity to the results. Thus, you should use a third-party tool like Filmora to produce convincing results. With the latest release of Volume 13, this tool has upgraded itself to a massive scale. It includes many AI features that can transform your editing experience. The AI features can finish tasks with great accuracy within a few minutes.
This desktop tool can also generate slow-motion videos with natural results. It does not degrade the frame rate of the video after slow-mo. In fact, it increases the video quality through rendering. Along with slow motion, this tool can add many visual effects. Hence, it’s an all-rounder tool to confront all the requirements for video editing.
Free Download For Win 7 or later(64-bit)
Free Download For macOS 10.14 or later
Methods to Create Slow Motion Instagram Reels with Filmora
On Filmora, there are many ways to create slow-motion Instagram reels. To discover them, jump to the below section:
Method 1: Using Optical Flow in Speed Ramping
Heading to our first method, we will use optical flow to smoothen the video’s slow motion. Let’s get started with the below-mentioned steps:
Step 1Sign in to Create a New Project
Start by following the on-screen instructions to sign into Filmora. Once logged into this tool, hit the “New Project” option. It will open the main interface of this tool on your screen.

Step 2Import Video to the Timeline
To import the preferred video, press “Ctrl+I”. With this, your video will be uploaded within a time of few minutes. Afterward, drag and drop it to the timeline below.

Step 3Select Uniform Speed
After dropping the video into the timeline, select it with your cursor. Go to the settings given on the right side and choose “Speed”. Select “Uniform Speed” and proceed to extend the settings for “AI Frame Interpolation.” Once done, select the “Optical Flow” option. To generate the final results, choose “Render Preview” from the toolbar of the timeline.

Method 2: Using Uniform Speed
After dragging the video on the timeline, right-click on it. From the pop-up options, select the option called “Uniform Speed”. Once done, follow the instructions given above to conclude the process.

Method 3: Using Toolbar
Start by selecting the video clip on the timeline. Once done, head to the “Toolbar” given above and click “Tools”. Now, expand “Speed” and then select “Uniform Speed”. Now, you can follow the steps given above to continue with the process.

Key Features of Wondershare Filmora
AI Thumbnail Creator: This tool observes the three best shots in your video for a thumbnail. Moreover, it contains 58 templates to produce engaging thumbnails for the videos. It also lets you customize the results with text and image editing.
Auto Reframe: Every social media platform has requirements for aspect ratio. With the auto-reframe feature, you can adjust the aspect ratios in an automated way. With this feature, you can convert videos for YouTube shorts, TikTok, and Instagram.
Background Remover: You can replace backgrounds from your video without needing a green screen. By doing so, the tool can make transparent or virtual backgrounds for you. Also, it cuts out images and objects from the background with accuracy.
Color Correction: Do you need to enhance the colors of your video? This tool provides many color correction techniques for videos. It contains over 40 color presets that you can apply to your videos. Also, it allows you to adjust the color gradings and properties with ease.
Conclusion
Slow-motion Instagram videos have higher chances of getting maximum views. Viewers can catch the unique details in such videos efficiently. Moreover, it will help you promote your brand by emphasizing its features. However, Filmora gives the best results in producing slow-motion videos. It uses advanced algorithms to create slow-mo videos without distorting the original quality.
HDR Photography: How to Use HDR Mode on Your Android Devices
The present-day high-end smartphones, like iPhone, Samsung, and Huawei, come packed in with advanced camera features that can let you capture interesting and bright images having depth. To get this done, you first need to check if your smartphone has an HDR mode and if it does, how to use the same.
So, we are here to help you to learn in detail about HDR Android photography and how to use the HDR mode on your smartphone. Keep reading till the read and we assure you that you will be able to capture some breath-taking images with your phone.

Part 1: What is HDR photography?
First things first. Before using the HDR feature on your smartphone, let’s learn what actually is the function of HDR.
Standing for High Dynamic Range, HDR is an image capturing method where the dynamic range of an image is high. When we talk about dynamic range, it refers to the difference between the lightest and the darkest elements of a picture. Thus, in HDR images the range dynamic range of the image is greater than the actual capture and thus making the image look more real with higher contrast, colors, and saturation.
While using the HDR image capturing method, the subject is captured in multiple shots having different exposures. These multiple captured shots are then combined into a single picture thus making it look detailed and saturated.
Though HDR enhances the overall looks of an image it is not suitable only in certain situations and subjects like landscape, subjects captured in sunlight or bright background, low or dim light conditions, and more.

Part 2: How to tell if I can shoot HDR images on my Android devices or not?
HDR images can be captured using DSLR cameras, but you need to have a thorough knowledge of the camera and the process of capturing the HDR images. A simpler alternative to this is using an Android device. The principle of capturing HDR images using an Android phone is simpler in comparison to a professional DSLR camera and also quick. Using an Android device, the imbalance in the exposure is corrected and the details of the image background, as well as the foreground, are enhanced.
How-to steps to check the HDR camera Android feature
So now that you know that HDR images can be easily captured using your Android device, the next important thing is to check if your phone supports the HDR feature or not as not all Android devices have the HDR mode. Below listed are some of the options where you can the HDR option in the camera app of your Android device.
- Check for the HDR option under the Shooting Mode menu (this can be found on high-end Samsung phones.)
- In the devices like HTC One X, Desire X, and others with custom Camera apps, the feature can be found under the Camera Scenes section.
- In case you cannot locate the HDR option in both the above methods then try looking for it under the Settings menu of Camera. Devices like Sony Xperia T and Xperia V have the option here.
- For the Nexus 4 device that runs on Android 4.2 OS, the option of HDR mode can be turned on by simply long-tapping the viewfinder and then tapping on the HDR icon.
- You may also find the option of HDR mode under the labels like Backlight HDR or Backlight Correction HDR. On the Samsung Galaxy devices, HDR is labeled as Rich Tone and can be located under the Smart Modes menu.
Part 3: How to Take an HDR Shot with Your Android devices?
Once you have found the HDR mode on your Android device, using the feature is simple.
Below listed are the steps to take HDR shots on your Android phone.
Step1 First of all, open the camera app on your phone and find the option of HDR.
Step2 Enable the HDR option on your device.
Step3 Once the feature is enabled, you simply need to capture images like you would normally do- point and focus on the image subject and click the image.
The rest will be taken care and your HDR shot image will be captured.
![]()
Note: ensure to hold your phone with stable hands while capturing the image or you can even use a tripod. In Samsung devices, two images will be captured- one with normal exposure and the other one with HDR (image name having HDR word). You can choose the one as required.
Part 4: How to Use HDR Apps android to take HDR photography
As we have mentioned above not all Android phones come with HDR function. So, if your device does not have this function, no need to worry as there are Android apps available for the same. You can search and download one such HDR-capable camera app on your device from Google Play Store and enjoy capturing HDR images.
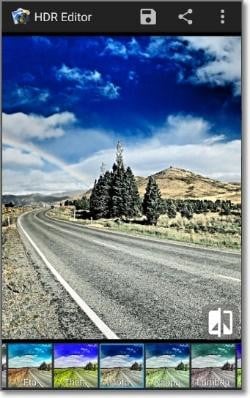
One such widely used app is HDR Camera that simple to use and allows for capturing high-quality HDR pictures. Using the upgraded version of the app you can even edit your captured images.
Steps to using HDR Camera Apps
Step1 First of all, download, install, and launch the HDR Camera app on your Android smartphone.
Step2 The interface of the app looks like the interface of the Android camera and the majority of the screen is taken up by the viewfinder.
Step3 Next, simply start taking the picture as you would do normally by pointing towards the subject and clicking on the shutter button.
Step4 If you have opted for the advanced version of the app, you can even add a pre-set filter or edit your images as needed.
Step5 Finally, save the HDR-captured image on your phone.
Part 5: Video Guide HDR on your Android device
If you are still not clear about using the HDR feature on your Android smartphone, the YouTube video tutorial will help you to learn the entire process.
https://www.youtube.com/watch?v=myMGalkNiP8
Part 6: Pro tip: How to Edit HDR Video without Washed Out Color
In several situations, you would want to edit the HDR videos recorded using your phone or other device but the major problem lies when the editing makes your video washed out. So, to ensure that this does not happen with your recordings, we suggest using a professional tool and one of the best that we recommend here is Wondershare Filmora .
This is a versatile Windows and Mac-based software that can let you edit and customize videos simply and quickly. The software is known for its multi-video editing facilities, it comes packed in with all basic as well as advanced features that may be needed for enhancing your overall videos.
The software supports all key video formats and to further make the files look interesting, you can add multiple effects supported by the tool.
Free Download For Win 7 or later(64-bit)
Free Download For macOS 10.14 or later
Steps to edit HDR videos using Wondershare Filmora
Step1 Download, install, and launch the software on your system. Click on the Create New Project on the main interface.
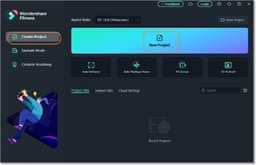
Step2 On the next screen that appears, tap on the Import Media Files Here button to browse and add the HDR video that has to be edited. Multiple files can be added here for batch processing.
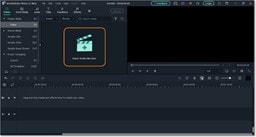
Step3 Next, drag and move the added videos to the timeline at the bottom of the software interface. After the videos are added to the timeline, you can edit using the editing tool as needed.
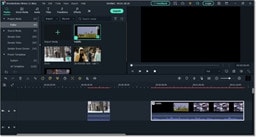
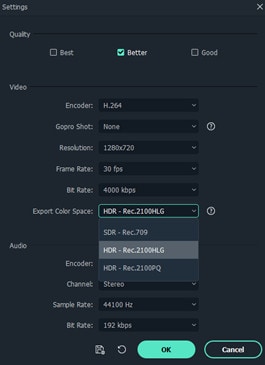
Step4 When done with editing, click on the Export button, choose the target format, also, click the ‘Export Color Space’ drop/down icon from the ‘settings’ to change HDR video output quality (default quality is SDR - Rec.709). Then click on the ‘OK’ button once you’re done to finalize the operation.
Final Words
To take your mobile photography to another level and capture interesting and bright images, HDR mode is one of the great options to use. So, even if your smartphone does not support the HDR feature, install an app from the Google Store. When it comes to HDR videos and their editing, Wondershare Filmora works as the best tool as it helps to add those little tweaks and customize your files without worrying about the quality or washed-out color.
Part 4: How to Use HDR Apps android to take HDR photography
As we have mentioned above not all Android phones come with HDR function. So, if your device does not have this function, no need to worry as there are Android apps available for the same. You can search and download one such HDR-capable camera app on your device from Google Play Store and enjoy capturing HDR images.
One such widely used app is HDR Camera that simple to use and allows for capturing high-quality HDR pictures. Using the upgraded version of the app you can even edit your captured images.
Steps to using HDR Camera Apps
Step1 First of all, download, install, and launch the HDR Camera app on your Android smartphone.
Step2 The interface of the app looks like the interface of the Android camera and the majority of the screen is taken up by the viewfinder.
Step3 Next, simply start taking the picture as you would do normally by pointing towards the subject and clicking on the shutter button.
Step4 If you have opted for the advanced version of the app, you can even add a pre-set filter or edit your images as needed.
Step5 Finally, save the HDR-captured image on your phone.

Part 5: Video Guide HDR on your Android device
If you are still not clear about using the HDR feature on your Android smartphone, the YouTube video tutorial will help you to learn the entire process.
https://www.youtube.com/watch?v=myMGalkNiP8
Part 6: Pro tip: How to Edit HDR Video without Washed Out Color
In several situations, you would want to edit the HDR videos recorded using your phone or other device but the major problem lies when the editing makes your video washed out. So, to ensure that this does not happen with your recordings, we suggest using a professional tool and one of the best that we recommend here is Wondershare Filmora .
This is a versatile Windows and Mac-based software that can let you edit and customize videos simply and quickly. The software is known for its multi-video editing facilities, it comes packed in with all basic as well as advanced features that may be needed for enhancing your overall videos.
The software supports all key video formats and to further make the files look interesting, you can add multiple effects supported by the tool.
Free Download For Win 7 or later(64-bit)
Free Download For macOS 10.14 or later
Steps to edit HDR videos using Wondershare Filmora
Step1 Download, install, and launch the software on your system. Click on the Create New Project on the main interface.

Step2 On the next screen that appears, tap on the Import Media Files Here button to browse and add the HDR video that has to be edited. Multiple files can be added here for batch processing.

Step3 Next, drag and move the added videos to the timeline at the bottom of the software interface. After the videos are added to the timeline, you can edit using the editing tool as needed.

Step4 When done with editing, click on the Export button, choose the target format, also, click the ‘Export Color Space’ drop/down icon from the ‘settings’ to change HDR video output quality (default quality is SDR - Rec.709). Then click on the ‘OK’ button once you’re done to finalize the operation.

Final Words
To take your mobile photography to another level and capture interesting and bright images, HDR mode is one of the great options to use. So, even if your smartphone does not support the HDR feature, install an app from the Google Store. When it comes to HDR videos and their editing, Wondershare Filmora works as the best tool as it helps to add those little tweaks and customize your files without worrying about the quality or washed-out color.
Easy Steps to Create Intro Video with After Effects
It’s difficult to make an intro in After Effects. To start, you must have a natural beginning that will catch the
viewer’s attention in the film you’ve made right away. Then, you can improve the caliber of your intros by using built-in filters, transition effects, overlays, animation, and more! Therefore, we’re confident that this article will be helpful to you if you’ve been trying to learn how to create After Effects intros of the highest level. Continue reading to learn more.
Let’s start off!
1. Create a new composition for your intro
You must build up your video’s composition based on the output. You can upload the previously recorded video after choosing the composition and the runtime. Right-click again and select “Pre-compose” from the menu that appears. To make it simpler to find later, you can also rename your movie here.
The composition can then include a solid layer. Follow *Layer > New > Solid* to get to this option. Additionally,
you can choose a hue based on the type of video you want to make. Additionally, you may use the Text option to build text layers, which will allow you to split the words at different points in the document. You can edit each word separately when you break it into layers. Finally, you can move the text around and change the color of the reader to make it more appropriate for your films.
After Effects makes it incredibly simple to edit the text composition and import it into the timeline of the film.
A panel appears on the right after importing a text composition. Here, you can alter the text’s color, position,
and size.
2. Add the first transition layer
By include the transition layer, you may use After Effects’ effects templates to apply a variety of effects to your
videos. You can experiment with a variety of transition layers in After Effects before selecting the ideal one (CC Light Wipe is a popular choice).
You can modify the transition after applying it to the layer. For instance, you may decide to apply the second
key transition at a later period in the timeline and configure the first key transition to occur immediately at the start of the timeline. Setting the completion value is crucial since it will influence how long the word will remain displayed in the video.
3. Add the second transition layer
The transition effect you introduced in the first stage can either be maintained here, or you can select an
entirely different one. According to how long you want the text to be displayed, add the layer and adjust
completion. The reader is invisible when the completion value is set to 100%, or the word is said when it is set
to 0%.
A memory sketch
If you want to make a black-and-white video that is more interesting, the memory sketch is a great template to use. You can make a visually beautiful video with its outstanding text captions, fluid transitions, and excellent animations.
Toolkit for Instagram
These days, Instagram is a very popular social media site. Instagram is a platform where reels and videos
flourish, therefore you must make every effort to differentiate your video from the millions of others available.
The Instagram Toolkit template meets the standards of the social media network by being brief, clear, and
appealing.
Lighting sweep
A final transition effect, which can be found in the *Effects > Generate *section, must be added to the video in order to complete the effect. The final flourish can be added in the same way as the other keyframes. In this step, you can use the edge intensity, sweep intensity, and direction. This allows you to seamlessly combine the transition of words with lighting effects.
These are some quick and easy techniques to adding some intros to your videos that look professional. Let’s
also take a look at some well-known templates you may utilize to make perfect video intros. Because the initial few seconds of any video are so important, After Effects has put together some incredible templates that have a variety of video clips, images, text, sound effects, and music tracks. To produce the video you want, you must obtain the ideal template.
The Bottom Line
Utilizing templates will hasten your workflow even though it takes some time to become familiar with After
Effects’ various tools. To gain a feel for how After Effects functions, we advise playing around by adding some
clips and titles. When you do that, you will be well on your way to creating a fantastic intro for your upcoming
video project.
Free Download For Win 7 or later(64-bit)
Free Download For macOS 10.14 or later
Free Download For macOS 10.14 or later
Also read:
- [New] In 2024, Creating Funny Text Memes A Step-by-Step Guide
- [Updated] 2024 Approved Live Dance Performances on Xigua Video
- How To Remove or Bypass Knox Enrollment Service On Vivo Y02T
- In 2024, Streaming Content Artist
- New 2024 Approved Wondering How to Edit a Video to Slow Motion on iPhone and Android Devices? Find Out How to Use Wondershare Filmora to Create and Edit Slo Mo Videos in a Few Clicks
- New What Should Be Considered to Choose A Nice GoPro for Vlogging for 2024
- Step-by-Step Guide: Transferring Data From Your Samsung Smartphone to a Computer
- Updated 2024 Approved Do You Often Feel Fascinated to Try Hands at Anime Character Design to Spark up Your Editing Skills, or Just for a Fun-Filled Activity? Stay Here for the Best Inspirations You Can Ever Get
- Updated 2024 Approved Learn How to Change Aspect Ratio in iMovie on Mac, iPad, and iPhone in This Guide. And You Can Also Use iMovie Alternatives Like Wondershare Filmora to Edit Your Videos
- Title: New Master Premiere Pro Custom Sequence Presets
- Author: Morgan
- Created at : 2024-09-29 20:05:22
- Updated at : 2024-10-06 04:18:53
- Link: https://ai-video-editing.techidaily.com/new-master-premiere-pro-custom-sequence-presets/
- License: This work is licensed under CC BY-NC-SA 4.0.